
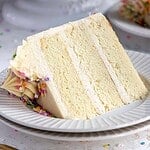
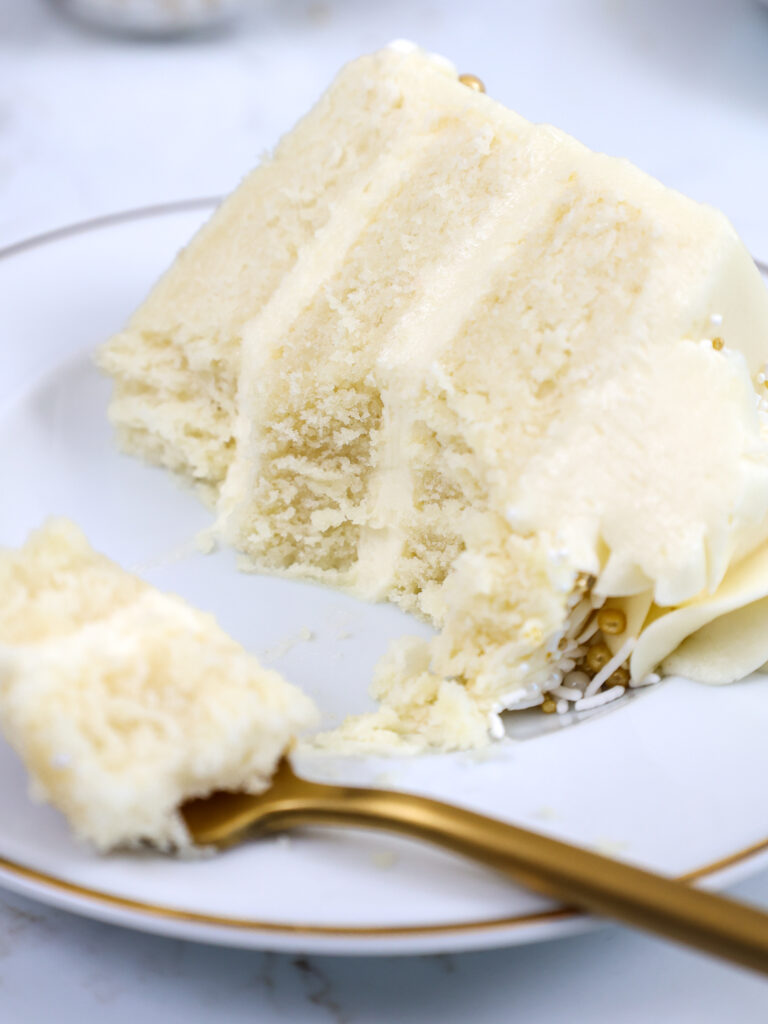
Vanilla Layer Cake
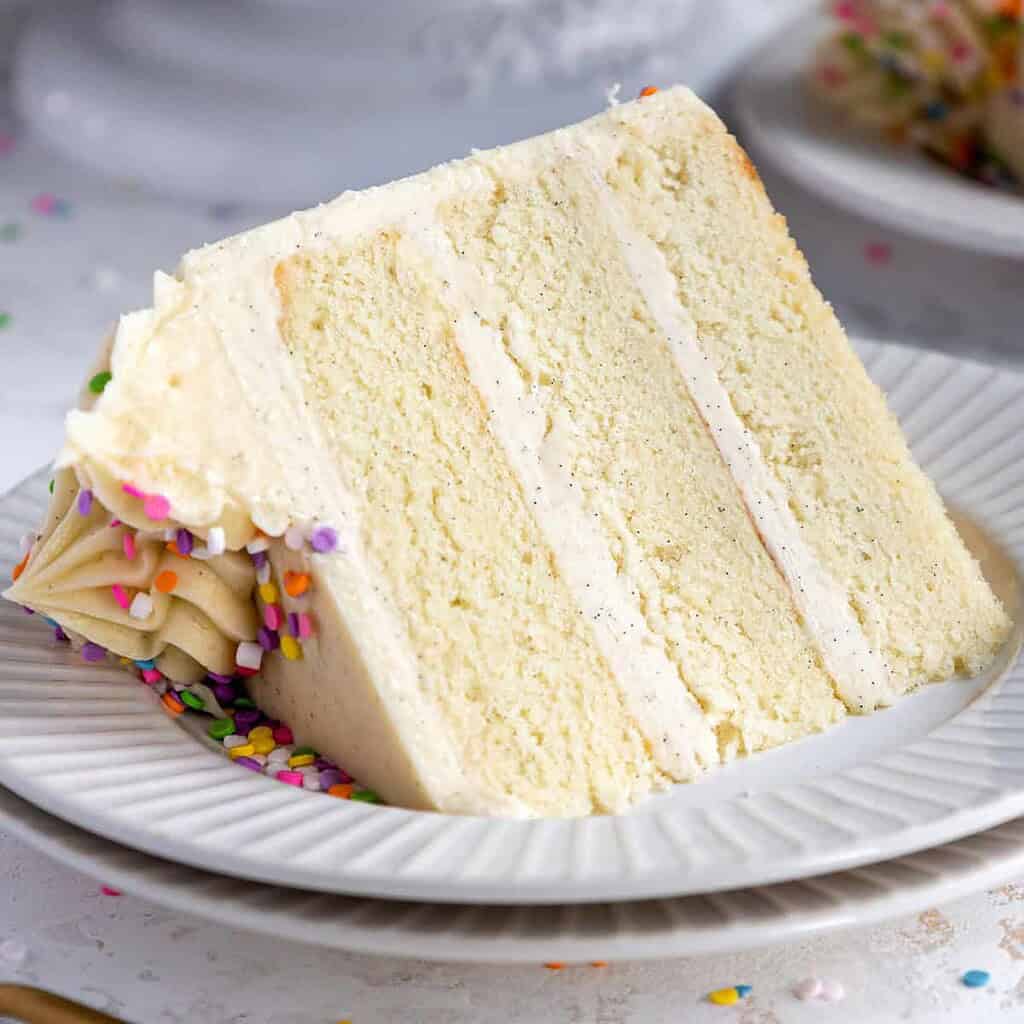
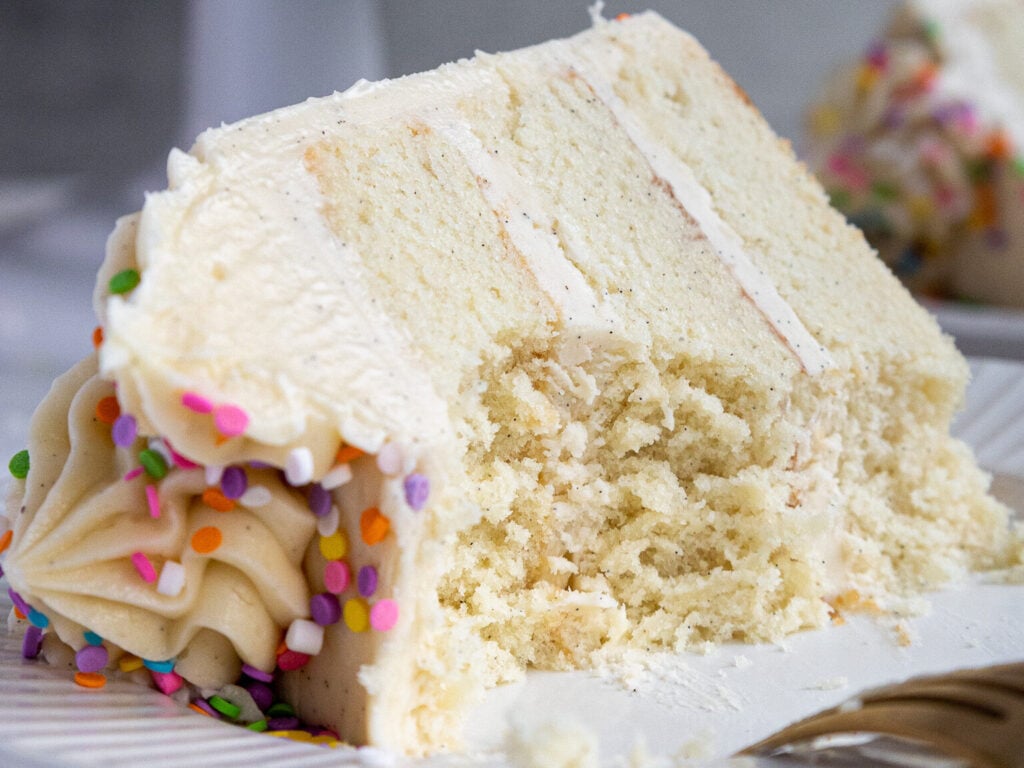
This is my favorite vanilla layer cake! It’s delicious, moist, and best of all, it keeps its shape! It has over a thousand 5-star reviews, and I totally get why.
This is a butter cake recipe, which means it has a denser texture than a sponge cake, but is also more tender.
This Recipe At a Glance
- Flavor: classic vanilla with a slight tang (thanks, buttermilk)
- Texture: moist, tender but sturdy for stacking (butter cake-style)
- Skill level: intermediate (reverse-creaming + layer assembly, but I walk you through it)
- Best for: birthdays, celebrations, tiered cakes, and bright colored layers
- Makes: 3×8-inch or 4×7-inch layers + frosting
- Batter amount: about 10 cups / ~1800g (useful for scaling)
- Bake time: about 33–36 minutes (layers)
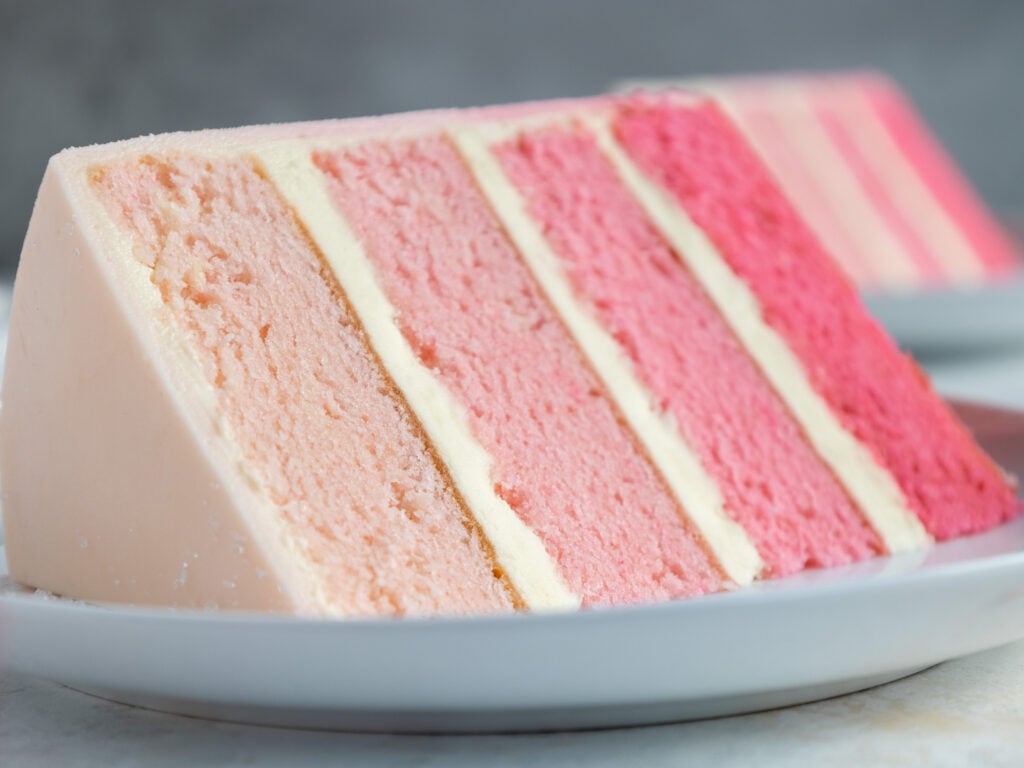
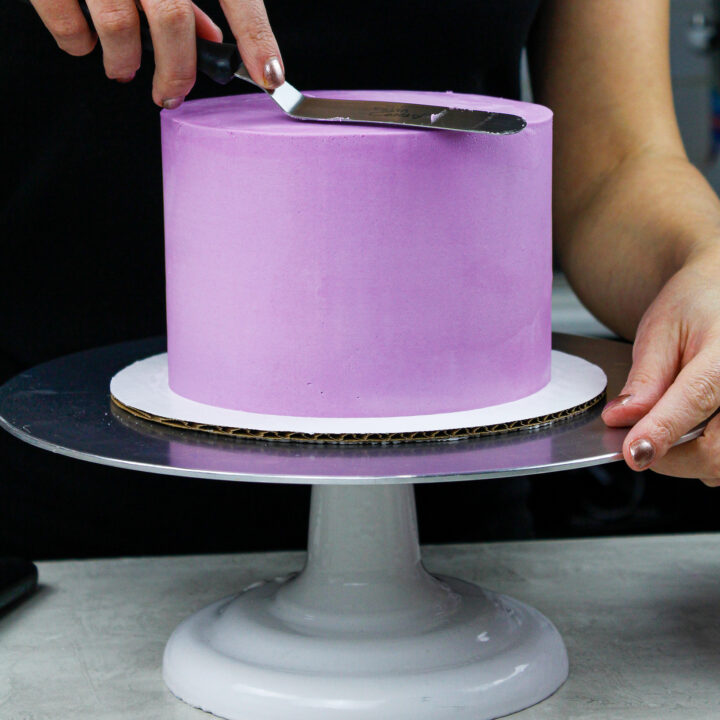
Coloring These Vanilla Cake Layers
For bright cake layers, use gel food coloring (my favorite brands are Americolor and Chef Master). Liquid coloring works in a pinch, but you’ll need more of it (which can thin the batter and mute the color).
Gel food coloring is incredibly concentrated, so it allows you to use less. A small amount will create beautiful, bright colors like the ones in my Peeps cake or my pink ombre cake shown below.
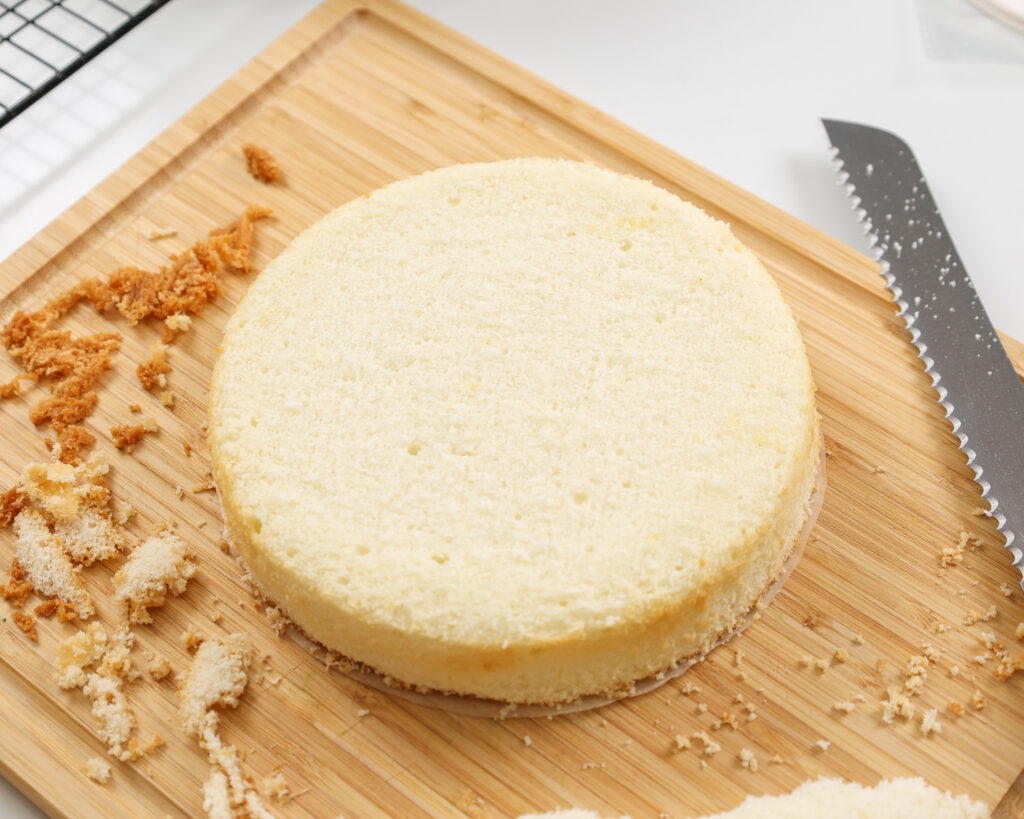
Trimming Your Cake Layers
If your layers caramelize on the edges, you can trim them with a serrated knife for super clean slices (especially helpful for stacked/tiered cakes).
Chill the layers first, so they’re firm and easy to cut. I’ve shared a video showing exactly how I trim and level my cake layers here.
Troubleshooting
Why did my cake sink in the middle?
Most often it’s underbaking (center isn’t set), old baking powder, or an oven that runs cool.
Why is my cake dry?
Dryness usually comes from too much flour or overbaking. Make sure you’re measuring the flour correctly (use a scale, or fluff, then spoon into the measuring cup, then level with a knife), and remove the layers from the oven when a toothpick comes out with a few moist crumbs (not totally clean).
Why are my layers falling apart when I frost them?
These cake layers are soft and tender, and they can be fragile if they’re still warm. Cool the layers completely, then chill the layers (20 minutes in the freezer) before stacking.
Why are my cake layers browned on the edges?
That’s normal caramelization from a high-sugar butter cake. If you want super clean edges, trim the edges once the layers are fully cooled.
Why is my buttercream gritty/not smooth?
Grittiness usually means powdered sugar isn’t fully incorporated. Mix longer on low/medium, scrape the bowl well, and add additional cream slowly until smooth.
Tips for Making the Best Vanilla Cake
- Properly measure the flour!! Spoon into the cup measure, then level or use a kitchen scale to measure your dry ingredients.
- Chill your cake layers in the freezer for about 20 minutes before assembling the cake. It makes it so much easier to stack and frost.
- Use my small batch vanilla cake recipe to make a 6-inch layer cake.
- If your cake layers turn out less than perfect, please check out my cake troubleshooting guide.
- If you need to make a gluten-free cake, you can swap GF baking flour for the AP flour in this recipe, or use my gluten-free vanilla cake recipe.
Frequently Asked Questions
Can I use whole eggs instead of egg whites?
Yes. The cake will be a little more yellow and slightly richer. I recommend using 4 large, room-temperature eggs + 1 large egg white in place of the egg whites.
Can I make this in 2 (9-inch) pans?
Yes. One batch works for two 9-inch layers (they’ll be a bit thicker than the 8-inch version), so they will likely need to bake longer, depending on your pans and oven.
Can I make this recipe into cupcakes?
Yes, but expect flatter tops than a cupcake-specific recipe (this cake batter is designed to bake level). Fill the liners 3/4 full and bake at 350°F for 19–21 minutes (about 3 dozen). If you only want a dozen, you can use my vanilla cupcake recipe.
What can I use instead of buttermilk?
DIY buttermilk works great! 1 Tbsp vinegar or lemon juice + milk to the 1-cup line (per cup needed). Plain yogurt or sour cream also works 1:1.
Let Me Know What You Think!
If you try my vanilla layer cake, I’d love to hear what you think! Please leave a rating and comment below.
Tag me @chelsweets and use the #chelsweets on social media so that I can see your amazing creations!
Vanilla Layer Cake
Ingredients
Vanilla Cake Recipe
- 3 cups all-purpose flour 375g
- 3 cups granulated sugar 600g
- 2 1/2 tsp baking powder 10g
- 1 tsp fine salt 6g
- 1 cup (2 sticks) unsalted butter, room temperature 226g
- 1 cup carton egg whites or 7 large egg whites, room temperature 240g
- 1 1/2 cups buttermilk, room temperature 360g
- 2 Tbsp vegetable or canola oil 30g
- 2 tsp vanilla extract or vanilla bean paste 8g
- gel food coloring – if desired
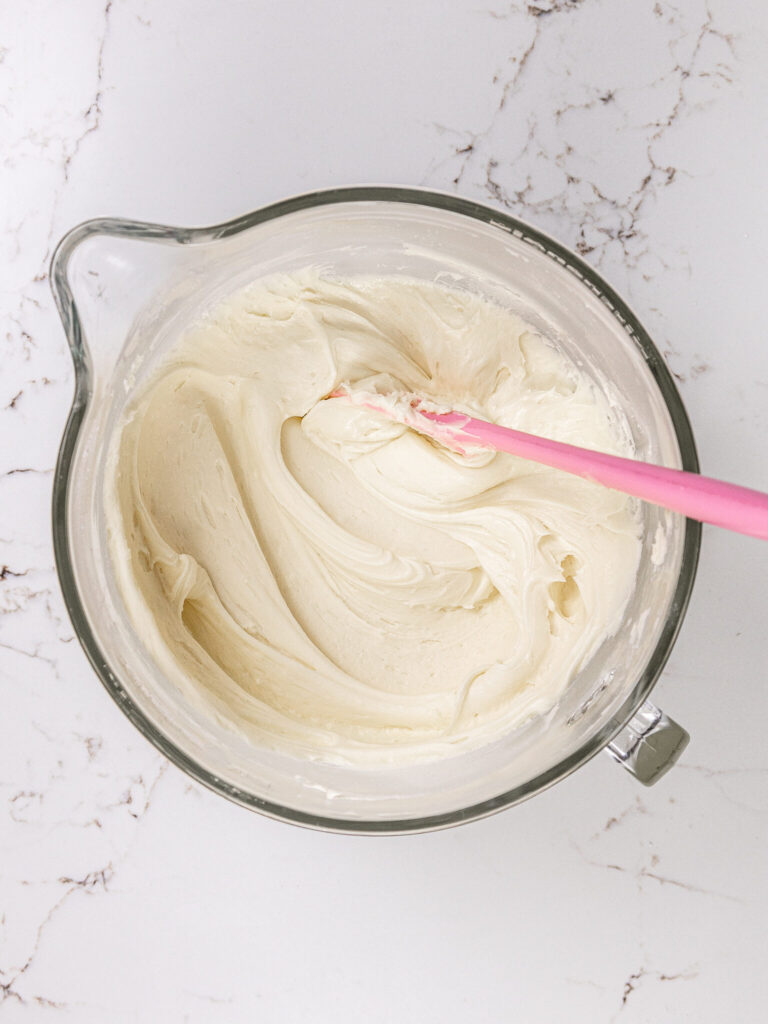
Vanilla Buttercream Frosting
- 2 cups (4 sticks) unsalted butter, room temperature 452g
- 1 Tbsp vanilla extract or vanilla bean paste 12g
- 1/2 tsp fine salt 3g
- 7 cups powdered sugar 907g or a 2 lb. bag
- 1/4 cup heavy whipping cream, room temperature 60g
Instructions
Vanilla Cake Layers:
- Preheat the oven to 350°F / 175°C. Grease then line four 7-inch or three 8-inch cake pans with nonstick spray and parchment paper rounds. Set aside.
- Mix 3 cups all-purpose flour, 3 cups sugar, 2 1/2 tsp baking powder, and 1 tsp salt together in a stand mixer with a paddle attachment or hand mixer until fully combined.
- Mix in 1 cup of room temperature, unsalted butter slowly into the dry ingredients on a low speed. Continue to mix until no large chunks of butter remain and the mixture looks like moist sand.
- Pour in 1 cup of egg whites and mix on low until just incorporated. Mix in 1 1/2 cups of buttermilk in two installments at a low speed.
- Add in 2 Tbsp of vegetable oil and 2 tsp of vanilla extract and mix at a low speed until fully incorporated. If you plan to color your cake layers, add the gel food coloring with the oil and vanilla.
- Scrape down the sides of the bowl with a rubber spatula, then beat on a medium speed for about a minute to make sure everything is properly mixed together. This also helps lighten the texture of the cake layers a bit.
- Divide the batter evenly between your prepared pans. I like to use a scale to make sure each pan has the same amount of batter and will bake up to the same height.
- Bake for 33-35 minutes or until a toothpick inserted in the center of one of the layers comes out with a few moist crumbs.
- Let the pans cool for 10 minutes, then run a small offset spatula around the perimeter of the pan to separate the cake from the pan.
- Place the cake layers into the freezer for 30 minutes to accelerate the cooling process. Once the layers are fully cooled, carefully flip the pans and remove the layers.
- Use a serrated knife to level the tops of the layers right before you plan to assemble your cake, or you can wrap and freeze the layers if you're making them in advance.
- If you make these cake layers in advance and freeze them, let them thaw for about 20 minutes before making your cake. The cake layers should still be slightly cold to the touch, which will make it easier to assemble your cake.
Vanilla Buttercream Frosting:
- While the cake layers bake and cool, make the vanilla buttercream frosting.
- Beat 2 cups of unsalted butter on a medium speed for 30 seconds with a paddle attachment until smooth.
- Mix in 1 Tbsp of vanilla extract and 1/2 tsp salt on a low speed.
- Slowly mix in 7 cups of powdered sugar on a low speed. Add 1/4 cup of heavy cream halfway through to make the frosting easier to mix. Scrape the sides and bottom of the bowl with a rubber spatula to make sure everything is properly mixed together.
- Continue to mix on a low speed for a few minutes until the desired consistency is reached.
- If the frosting is too thick, add additional cream (1 Tbsp at a time). If the frosting is too thin, add more powdered sugar (a quarter of a cup at a time).
- If you plan to color the buttercream, add in the gel food coloring once the frosting is fully made and beat on low until it reaches the desired color.
Assembling This Vanilla Layer Cake:
- Stack and frost cake layers on a greaseproof cakeboard using a dab of frosting to help stick the first cake layer to the board.
- Add an even layer of buttercream between each cake layer with a large offset spatula.
- Once the cake layers are stacked, add a thin coat of frosting around the cake that fully covers the layers. Smooth using a bench scraper, then chill the cake in the fridge (30 minutes) or freezer (10 minutes) until the frosting is firm to the touch.
- Next, add a second, thicker layer of frosting to the cake and smooth it using a bench scraper. If you're struggling to get smooth sides on your cake, I share all my tips and tricks in this smooth cake tutorial. Then, decorate as desired and enjoy!
Video
Notes
How Many People Does This Cake Feed?
If you make this cake with 4, 7-inch cake layers or 3, 8-inch cake layers, it will feed about 24 people. For more information on cake sizes and servings, check out my cake portion guide.Recipe Variations – Making This Cake in Different Sizes
One batch of this recipe makes about 10 cups of batter or about 1800 grams. If you plan to use four circular cake pans, add 450 grams of batter to each pan. If you want to make a tiered cake or a different-sized cake with this recipe, check out my cake batter calculator to see how many batches of batter you’ll need. This recipe can also be used to make a sheet cake! One batch will make a 1, 9 x 13-inch cake layer that’s about 1.5 inches tall once leveled. Bake for 45-55 minutes at 350°F / 175 °C, or until a toothpick inserted in the center comes out with a few moist crumbs. Bake time can vary a lot based on the type of pan you use, if you use heating cores, and your oven. I recommend using heating cores if you have them; they help sheet cake layers bake more evenly and quickly. For more details on how to convert this cake recipe and others into sheet cakes, check out my sheet cake guide. Last but not least, you can also make cupcakes using this recipe. Fill the liners 3/4 full and bake them at 350°F / 175 °C for 19-21 minutes, or until a toothpick inserted in the center comes out with a few moist crumbs. You should end up with about 3 dozen. Or, if you want to make just one batch of cupcakes, I highly recommend trying my vanilla cupcake recipe.Tips for Making the Best Vanilla Layer Cake
- Ingredients at room temperature mix together better! Set out any cold ingredients ahead of time.
- Properly measure the flour (spoon it into the cup measure, then level). Or better yet, use a kitchen scale to measure your dry ingredients.
- Use a scale to weigh your cake pans as you fill them. It will make your cake layers bake to the same height and bake more evenly.
- Make sure the buttercream is the right consistency. This will help give the cake proper structure and make it easier to decorate.
- Chill your cake layers in the freezer for about 20 minutes before assembling the cake. It makes it so much easier to stack and frost them!
- If your cake layers turn out less than perfect, read my cake troubleshooting guide to see where things might’ve gone awry.
Making This Vanilla Layer Cake in Advance & Storage Tips
I highly recommend making the cake layers in advance and freezing them. It breaks the process up and makes it more approachable and enjoyable, and I promise they taste just as delicious! You can also make the frosting ahead of time or save any leftover frosting! It can be stored in an airtight container in the fridge for up to a month or in the freezer for up to 3 months. Be sure to give it a good stir once it thaws to get the consistency nice and smooth again. A frosted cake can last in the fridge for up to a week (as long as it doesn’t have a perishable fruit filling) or in the freezer for up to a month. The buttercream locks in all the moisture, keeping the cake fresh and delicious! If you cut into the cake and have leftovers, use any remaining frosting to cover the cut section to keep it moist and store it in the fridge for up to a week.Nutrition
Other Recipes You Might Like:
hi! just curious if you’ve used this for a 9″ cake before? If so, did you scale the recipe up at all? I’m making a 3-layer 9″ cake and would love to try this recipe. Thanks!
I have not! How thick do you want your layers? My four layers were pretty tall, I think you could definitely get by making 3 9 inch layers with this amount of batter!
So, I ended up making 1.5x the recipe but it was too much. It didn’t even come close to fitting in the mixing bowl so i had to split it into 2 batches at the last minute, which was a pain but luckily worked out fine. And then the cake was way too tall so I had to trim the layers anyway lol. Next time I’ll definitely stick to the recipe without increasing it at all! The biggest problem was that it was so good and my boyfriend and I couldn’t stop eating all of the cake i had to trim off….
Sounds messy!! But happy that you had enough batter and that it sounds like it passed your taste-test 🙂
@Melissa Perlzweig,
I’m going to try the same! 3 9″ layers. Did you adjust the oven temp or cook time at all?
@Melissa Perlzweig, I made a different cake recipe tonight and did NOT have enough batter for my three 9” pans. Super happy to hear that this recipe will work for me as is and that this was the first comment I saw lol! Thanks!
@Melissa Perlzweig, Doing that will work fine because that is what I do.
I’m trying to make a 4 tier cake with 7″ rounds. Would that work with this recipe?
Yes! I’ve done it before and it works fine! Just be sure to keep an eye on the cakes and take them out when they’re golden brown.
Is 2 sticks of butter correct? Or should it be 1 stick/ 1 cup/ 227 grams
Yes 2 sticks but how many grams. I thought 1 cup of butter is 227grams of butter
ah so sorry! brain fart!!! Yes, 227 grams! just updated the recipe!!! for some reason I was calculating the entire box of butter!
@Val, so how much butter was in the recipe? 2 sticks?
Hi Chels! First off I absolutely LOVE all your videos on YouTube and Instagram, I literally check it daily lol. I love to bake cakes for friends and family and I get so many cool ideas! But I was wondering how did you color the cakes, I mean I know to add the food coloring to it. But I was told to pour the batter immediately and start baking or else it will turn clumpy and not bake correctly. So did you mix the coloring while it was in the baking pan, or you put it aside? Just curious….thank you!
You’re too sweet 🙂 I color my cake batter by dividing it into individual bowls, then coloring with gel food coloring (I use americolor). I have never had any problems with clumping or it incorrectly baking! I have even refrigerated colored batter, then baked the following day and had no issues. However, I usually bake the batter right after coloring. Hope that helps 🙂
Oh wow! Okay great! I’m baking one on Friday for my niece’s birthday and I’ll be trying your recipe, I can’t wait!! Thank you so much for the tips!!
So fun! Happy baking!!
I just found you on youtube, and I love your stuff! I want to make this cake and was wondering something…I’ve always heard to use cake flour for best results. Does it matter in this recipe? Would plain all-purpose flour be ok? Thanks!
Cake flour does result in a tender cake with a very light texture, but all-purpose flour cakes can also turn out great if you use the right recipes! They also stand up better to thick, american buttercream, which is my frosting of choice. I always use all-purpose flour 🙂
@Chelsweets, I made it with cake flour the first time and it came out amazing. But after my 3rd or 4th time making it I’ve used cake flour and it just never comes out the same. It keeps getting too brown 🙁 I’m not sure why.
Hi Sarah,
This recipe should work just fine with cake flour too! Is there anything different you’re doing making the recipe now, like using a different oven or different pans? Hopefully we’ll be able to figure it out together!
Hi ! Question about how many can this size cake feed ?
really depends on what you consider a serving size! I say that it comfortably feeds 12-16!
@Chelsweets, 12-16 party servings and about 24 wedding servings right?
Do you frost your cakes the same day you bake, or do you do it the next day? My same day cakes seem to fall apart when I frost (too fresh?)
I do both! Depends on the situation, number of cakes I’m making, tiers, etc. Either way, I always free my layers before frosting them! It makes it so much easier to frost 🙂 Hope that helps!
So u frost your cakes while they are frozen?
yes! they are dense, and thaw as i frost and decorate!
Do you wrap them before you throw them in the freezer? Saran wrap?
yah you can wrap them in saran wrap or store them in a large air tight container!
@Jeanne Bird, you have to wait 4 the cake 2 cool or the frosting won’t stay on.
Hi. How many layers is this recipe for? How do you adjust it for larger layers?
Thanks much. Enjoyed your winter wonderland cake video.
depends on the size of cake pans you use! I usually do 4 layers, with either 7 inch or 8 inch pans! Glad you enjoyed the livestream 🙂
Can you substitute the buttermilk for any other type of milk? I’m lactose intolerant!
You can! It will change the taste and texture of the cake slightly, but it is an option!
@Chelsweets, sorry I just saw this comment. Do you have any recommendations for substitutions that you prefer or think would work the best?
Hi Angie,
No worries at all, and great question! If you don’t have buttermilk on hand, the easiest (and most effective) substitute is to use 1 cup whole milk + 1 tablespoon lemon juice or white vinegar. Stir it together and let it sit for 5–10 minutes—it’ll curdle slightly and mimic that tangy buttermilk effect.
This works beautifully in this recipe and still gives you that tender, moist crumb. You can also use full fat sour cream or yogurt, or even just whole milk. But the flavor and moisture won’t be quite the same.
Let me know how it goes if you try it!
Hi, would you be able to make this recipe into cupcakes? If so how many would it yield? Thank you for your time
I would not recommend that! Because it’s a cake base, it doesn’t rise much, and makes cupcakes that are very flat/kind of concave in!! I’ve learned the hard way. I recommend this vanilla cupcake base: https://chelsweets.com/2016/12/13/baby-panda-vanilla-cupcakes/
@Chelsweets, I’m late to the Chelsweets train but I’m on board now! Thank you for asking this question Lauren and thank you for attaching the vanilla cupcake recipe, Chelsey!
can this recipe be used for cupcakes how many would you say if it does?
I would not recommend that! Because it’s a cake base, it doesn’t rise much, and makes cupcakes that are very flat/kind of concave in!! I’ve learned the hard way. I recommend this vanilla cupcake base: https://chelsweets.com/2016/12/13/baby-panda-vanilla-cupcakes/ it tastes great!!
Hi! i believe i only have 9″ cake pans- would it be okay to maybe make 3 layers using the 9″ pans?
Yes! That would be just fine! Just keep a close eye on them while they bake, as this will affect the baking time!
Can you use whole eggs for this recipe instead of just egg whites?
Yes! The color of the batter will be more yellow, and the cake will be slightly more dense, but it still tastes great! Use 6 whole eggs.
@Chelsweets, I’m excited to try this recipe for my daughter’s baby shower cake soon. I have a question regarding the quantity of whole eggs if desired instead of all egg whites. I would think possibly 3 whole eggs (& 1 egg white) would be much closer to replacing 7 egg whites. Please advise! [I was actually considering using 2 whole eggs plus 3 egg whites instead of the 7 egg whites in the recipe.]
@Chelsweets, hi there I want to make 3 10″ layers. Do you advise I double the recipe?
@Victoria, what did you end up doing?
I have done 3 10″ layers and 1.5x the recipe and increased baking time a little
@Chelsweets, Hi, I am going to try this recipe for mini cakes (about 12cms, 4.7 inches), plan to half the recipe, will see. I was thinking of using whole eggs but you mentioned to use 4 Large (tips ) but say 6 whole eggs (just above) Could you please confirm which one is right? thank you so much for so many good explanations.
First off, let me say that I never, ever leave reviews. But after trying this cake I just HAD to. I’ve been looking for a go-to vanilla cake recipe for years and I was hesitant to try this because of the 7″ pans and all the egg whites. Silly, right? Well I made this recipe last night and had the cake today…10/10 recommend!!! Hands down the BEST vanilla cake I’ve ever had. I made a three layer 8″ and also a three layer 10″ cake (I did 1.5 recipes for the 10″) and it came out perfectly for both! I made the cake for two different wedding showers and everyone RAVED about them! I love how moist and smooth (weird adjective for a cake) the texture is. And the flavor is perfect. I was and am still blown away! Thank you for this recipe!!!
Aww so happy to hear that!! I also used to always avoid recipes with egg whites, but this recipe is worth it! Happy that you love this recipe as much as I do 🙂
Cassidy, may I ask how long you baked your three layer 8″ cakes? thanks.
Hi again! Just a quick question- I’m making a neapolitan cake and wanted to use this cake recipe but I’m looking for a strawberry taste for just one of the layers; could I divide the batter and substitute in a few teaspoons of strawberry extract in for vanilla to get that flavor? Or do you recommend finding a completely different cake recipe for a strawberry layer? Thanks!!
Hi! Love your videos! I’m from Kyrgyzstan and I don’t understand what “a cup” means. How much gr is in one cup. Can you please write in grams how much flour, sugar and butter do I need for this recipe. Thank you.
Thanks! Sadly I haven’t been able to convert all my recipes to grams, as in the US we bake by volume! So sorry!
http://www.fauziaskitchenfun.com/my-measurements
http://www.fauziaskitchenfun.com/my-measurements Check this link for conversions
Hey Chelsea, does your quantity for your recipe for American buttercream recipe is enough to frost a layered cake and then do rosettes to cover it? Or should I double the recipe? Thanks!
It’s just enough to cover a 4 layer cake with 8 inch cake layers. I’d make a double batch if you want to add some rosettes 🙂
Hey Chelsea, have you had success with halving this recipe for only 2x 8inch cake layers? Making a four layer cake this weekend, but they want two flavors (vanilla and strawberry), so I am plan on separating each of the two layers with a cake board for two different choices of cake flavor in one cake.
Yes, I’ve halved this recipe several times! Usually to make four thin 6″ cake layers, but it works for two 8″ layers as well!!
@Chelsweets, when you use this to make 6 inch cake, how much batter are you placing in each pan? Do you measure at all?
Hi Chelsea! I’m looking for a strawberry flavored layer cake. Are there variations I can make to this cake for that? Thanks!
Unfortunately the only cake batter itself that I’ve flavored strawberry involved strawberry jello! I wasn’t a huge fan, so I didn’t share it. A good strawberry cake is on my to-do list this summer one berries are back in season!
I was going to ask the same question. I’ve made strawberry cake quite a few times and I blend down strawberries into puree and one recipe said to add a packet of strawberry jello which I didn’t care for either, so I used strawberry pudding mix and liked that much better. If I use your vanilla cake recipe (which I LOVED), where should I substitute the purée in?
Awesome
Thanks!!
Do you think I could get 4 layers with 8′ pans? Or would it better to do 3 layers with 9′ pans? Thank you. I love your cakes.
I’ve done it with four 8″ layer before and it works great! I’ve never tried 9 inch pans!
@Chelsweets, HOw thick are the layers if you do 4 layers 8″ with this recipe? 1 inch or less than 1 inch?
Will carton egg whites work and tadte just as good as using fresh egg whites?
Yes! That’s actually what I normally use! I hate wasting yolks, and it’s so much easier to just pour out a cup of egg whites than separating all the eggs 🙂
Have you tried a recipe for a lemon cake? I haven’t tried your Vanilla yet but plan to this weekend! From all the rave reviews I’m sure it will be amazing!
I did ages ago! It was really tasty, but the photos look terrible!! haha here’s the link: https://chelsweets.com/2013/05/06/lemon-blueberry-swirl-cake/
I just made this cake in three 9 inch rounds and it was perfection??btw I have never made a 3 layer cake I usually do cupcakes. Wish I could post a pic of it
So happy to hear that!! 🙂
Hi!
I was wondering how long you let your frozen cake layers thaw before frosting them? And if they are still cold, once they are frosted, do water droplets “sweat” ever form on the frosting or crumb coat?
I usually let them sit for about 20 minutes. The frosting is at room temperature, so once I”m done frosting the cake is slightly chilled, but not cold enough to sweat. hope that helps!
I found this cake slightly heavy and dense. Is that normal or is there a way to make it lighter while keeping it level. Everyone loved this recipe!!
It is more dense than a sponge cake! You can try to mix the batter on high at the end, to incorporate more air into it! This can help make it slightly less dense. Hope that helps!
@Chelsweets, won’t continuing to beat the batter create tougher gluten strands and actually make it more dense? Maybe using half cake flour/half AP may make it lighter? Just wondering.
@Ann Austin, Exactly my thought. Please what was the outcome if anyone tried this?
@Ann Austin, I know this is alittle late. Yes, if you mixed it too long the gluten strands will probably become longer resulting in a tougher cake. but not necessarily because the flour is mixed with the butter, encapsulating the flour and acting as a barrier which prevents the gluten strands from getting too long even with extensive mixing.
I have three 6×3 inch round cake pans. Will this recipe make too much to fit in those?
My pans are usually 2 inches tall, and usually 7 or 8 inches in daimeter. I think they would probably fit in your pans but i’m not 100% sure! I’d just be sure not to fill them too full! and I’d make at least 4 layers, if not 6!
What do you line the pans with?
parchment paper rounds!
Hi Chelsea
I was wondering is this recipe would be good for a 12×15 sheet cake?
I used it to make two rectangular sheet cakes that were about 10×14 inches. So I think it would work for 12×15, but it would make a super thick layer! Maybe don’t use all the batter if it looks like it’ll be too thick! I usually fill my pans about 1 inch high. Hope that helps!
Great!. Thank you!.
Also what brand of butter do you use in your buttercream to get it white?
Hi Chelsea, I was wondering if I can replace egg with milk in this recipe? If not, then what would you suggest to be a good substitute for eggs?
I’m honestly not sure! you need the protein from the eggs to get the texture right!
Hi Chelsea, My cake puffed up in the middle! Any guesses as to what I may have done wrong?
strange! my only guess would be that you put in too much baking powder! I have a full tutorial showing how I make it here, maybe that will help show what went wrong: https://www.youtube.com/watch?v=bYybj5VEvPM
Hi Chelsey, I’m actually making my wedding cake and would LOVE to try this recipe. I was just a little nervous about doing the different layers since they are bigger than the 7 or 8 inch rounds. I think we are going to do 12 10 and 8 inch rounds. Would I need to increase the batter by just half or how would you suggest doing this??
You will need a LOT of batter for that! I’d recommend making 4-5 batches, but it also depends how tall you want the layers to be!
It looks like double works for 1 12″ pan so that was perfect. LOVE the cake though! Thanks so much (:
awesome! so happy to hear that!!
@Tyler Baker, did your 12 inch round cakes bake flat? Did they sink in the middle or dome?
I’m considering this cake recipe for 3 layer /12 inch round cake.
Thanks in advance ?
Hi Michele,
I’ve made this recipe for wedding cakes before that were 12 inches! I used two heating cores (like these: https://amzn.to/407ifro) to help them bake more evenly and quickly. These don’t dome up much, but I did still level them just because you need layers to be super precise for tiered cake. Hope that helps, happy baking!
Was this enough to bake 4 cakes or did you double the recipe?
This recipe makes four, 8 inch cake layers!
Can I sub in whole eggs instead?
Yes five whole eggs!
@Chelsweets,
Hi, someone asked the same question right above about subbing whole eggs and you said 6 whole eggs, now you say 5 whole eggs. Just curious, why the different answer. I’m making this cake today and I want to make sure I have the right answer. Thanks so much.
Hi Betty,
When I first shared this recipe years ago, I used to sub in 6 whole eggs if needed. However, overtime I’ve found I much prefer using 5 whole eggs in place of the egg whites when I opt to use whole eggs. Hope that helps, happy baking!
Stupid question — should I bake each layer one at a time or should all 4 go in the oven together?
I put all pans in the oven at the same time!
I am looking to make a birthday cake for my friend this weekend. She is wanting a lemon cake with a chiffon/berry filling. Have you made this as a lemon cake before? Also are you familiar with Ermine frosting?
Yes, by adding some lemon zest and lemon extract! But it’s a pretty dense cake layer that is nothing like chiffon! I always just use American buttercream!
Seriously the easiest and best tasting cake recipe! I was in awe when I saw that you didn’t have level the tops of your cakes!! I am currently in the process of making the 4th of July cake you made! So far, so good! Can’t wait to see how it turns out!
So happy to hear that!!! 🙂
I love this cake recipe! I added a box of banana cream pudding for my banana pudding cake and it came out great! It’s dense and delicious especially with bavarian filling. Thank you!
HI!! did you use self raising or plain flour!??
plain flour!
can the sugar be reduced or does that change the texture? also you mentioned mixing on high at the end for less dense. Will that make the cake tough?
Hi Crystal,
Reducing the sugar does sadly make the layers more dense! You can reduce it by about 1/2 cup, but any more than that and it will have a significantly negative impact on the texture. Hope that helps, happy baking!
I’m looking in to purchasing cake pans but can’t afford a lot, do you prefer 4 8″ pans for most of your cakes using this recipe or 4 7″? Also, how many 6″ pans would you recommend someone having? And if you were to do a 3 teir wedding cake what dimension of pans would you recommend? Also do you have a favorite place to purchase them? Thank you!
i responded to this via email 🙂
Could u send the answers to her question in a email bmmcaskin@gmail.com
@Chelsweets, hi. Love this recipe. I also would like to ask how much batter for a 6 inch, 4 layer cake. Can I bake it in 2 pans and just torte it to make 4 layers? I am making my first wedding cake for a friend. I am not a professional baker, just like to bake for friends.thanks.
Hi Chelsea! I’m planning on making this recipe next week, as well as your American Buttercream. I want to make them cinnamon flavoured. Should I replace the vanilla with cinnamon, or add both cinnamon AND vanilla?
Thanks!
P.S. Love you live streams and vids! Can’t wait to try this recipe out.
Thanks 🙂 I would add in cinnamon in addition to the vanilla!!
Hello!
Mine didn’t come out flat. The middle rose and the sides were in the same place it started. Suggestions?
Very strange! I’ve never had that happen! Here is a link showing exactly how I make my batter, maybe if you watch you can see if you did anything different? Hope that helps!! https://youtu.be/bYybj5VEvPM
Hello!
I used the balloon attachment, not the one in the video. I don’t think my food processor came with that attachment.
I also cooked at 180 degrees not 190 which 375 degrees Fahrenheit converts too. I really don’t think 10 degrees difference should matter though?
Thank you though for your response. I will try again and maybe see if it’s my oven as every cake I make always rises like that.
Hi, I’ve just started following you and your cakes are brilliant. I’ve followed your recipe for this vanilla cake and I’ve used four colours to make an ombré effect however the sides baked quite crusty and the colour didn’t quite reach the sides. I’ve improvised and cut the crusts off the cake but wondered if you know what I might have done wrong. I’ve followed your you tube video and double checked my measurements into uk grams… the bits I cut off taste good!
I usually trim the caramelization from the sides of my cakes when I bake them! you can also use wilton baking strips to prevent the caramelization <3
Do you use regular flour or cake flour with your recipe?
regular, all-purpose flour 🙂
Hi chels! Just wanted to ask if you thought this would work ok with 3 – 8″ pans?
It would, but the layers would be super thick, and would take longer to bake! I also think you might need your pans to be taller than 2 inches!
Do you think this would be a good recipe for making a semi naked cake? Thanks. 🙂
I actually used it to make this semi-naked cake! I think it worked well! https://www.youtube.com/watch?v=Cn6suIFQkeU
Hi chlesea!
Could you use this recipe to make chocolate cake, and instead take out some flour and replace with cocao
I actually have a chocolate layer cake recipe up that does exactly that 🙂 you can find it here:
https://chelsweets.com/2017/03/02/the-best-chocolate-layer-cake-recipe/
Im wanting to make your taco cake you made but dont want to waist so much cake since i know I need one vanilla and one chocolate. Any suggestion on how I could convert this to just a one 8inch layer cake? Or is there a different recipe you suggest for that cake?
Hi Chelsey!
Will this recipe work if I just cut everything in half? I think I just want to make a shorter two layer cake instead of the four layers because I know a lot of it would go to waste.
Thanks in advance!
it will!
Hi Chelsea! I never leave reviews but I just wanted to comment and say this is the first time I’ve made vanilla cake and frosting from scratch that I actually thought was better than boxed cake mix. I’ve been so discouraged because every recipe I’ve tried has resulted in a dense, dry and crumbly cake and I didn’t see the point of making cakes from scratch. Your recipe came out amazing, thanks!! I love your website and Facebook page!
i am so happy to hear that Renae!!!! Thank you for the kind feedback 🙂
Hi Chelsea
I have made Kara’s cake recipe and it was great except it came out a little more dense than I would like for a regular cake(not sculpted). What does adding buttermilk do to the recipe that’s different?
It makes the cake slightly more dense, and gives it a bit more flavor! I actually do us this for all my cakes, including sculpted cakes, which is why I like it 🙂
Can this be used to make 4 9″ cakes?
Hi Chels! Would this recipe work well for a 4- tier cake? Just want to make sure it holds up with stacking multiple tiers! Thank you!
It is a crusting buttercream, so it should work just fine for that!
Hi Chels…
As I’ve told you before, I loveeee your work! I am looking for a cake recipe that I can use under fondant. Can I use this one?
Thanks… Sheila
Hi Sheila! You can definitely use this recipe under fondant 🙂 It’s a pretty stiff buttercream, and keeps it’s shape well!
First, I love your site, recipes, and videos! Thank you for the inspiration! Second, I understand freezing the layers before and during frosting/decorating. My question is how do you store your decorated cake before serving? I’d like to bake my layers 2 days before serving and decorate 1 day before serving. Thanks again!!
I usually just place the box in my fridge, uncovered! I have a cake fridge, so I don’t really worry about covering it! The buttercream locks in all the moisture!
Hi Chelsea! Just wondering if baking this recipe in 2 tins and for longer, would it still turn out? And then slicing them in half to get the four layers? Thanks! 🙂
I think the edges would get pretty dark, but as long as you plan to trim them it should be fine!
Made this for a semi-naked cake and got rave reviews! I was so excited to see how even/flat all the layers were when it was cut into. I’ve never had a cake look so uniform on the inside! Thanks 🙂 This will be my go-to vanilla cake recipe now.
Also, I know you love your American buttercream but if you’re looking for something with less sugar this is amazing! It’s light and fluffy and I would never have guessed it until I tried it.
http://tastykitchen.com/recipes/desserts/thate28099s-the-best-frosting-ie28099ve-ever-had/
so happy to hear that!!! I just looked at the recipe, and it does sound interesting!!! I’ll have to try it one of these days 🙂
Gracias por esta receta! La hice para el bautizo de mi hija y todos la amaron 🙂 Saludos desde Venezuela.
Would this recipe work for a sheet cake? I’m needing to make a 12 x 18 sheet cake and just wondering if I could use this but double or triple the original recipe.
yes, one batch should work great for one layer of that sized sheet cake!
@Chelsweets,
How thick would the layer be with one batch in a 12×18 pan? Im needing my layers to be 2 inches tall. Would I need to make a batch and a half for 2 inch tall layers.
Do you a serving size guide for your cakes? How many would this 4 layered cake serve? Thanks!
this serves 20-25 people!
Do you place your cakes in the freezer or fridge once cooled on the backing rack before decorating. Watching your videos your cakes look like they barley have crumbs and recently the ones i have baked are almost falling apart and pure crumbs on the side with no “crust” and VERY hard to decorate. Also what kind of pans do you use?
I do freeze my cake layers fully, and let them thaw for about 20 minutes before frosting. It
makes it WAY easier to frost! Mine form a pretty solid crust on the sides, I use wilton and fat daddio’s pans!
Hi Chelsweets! Greeting from Malaysia ?? ?
I have a few questions regarding this cake;
1) would it be okay if at the end of the mixing process, the granulated sugar hasn’t been dissolved at all?
2) i only have two 8″ pans at the moment. But i want to make a 4 coloured rainbow cake. Is it okay if i bake the first two colours and just let the remaining uncook batter aside during the baking?
yes! The sugar doesn’t dissolve, but the batter should me smooth / fully mixed. Yes, you can bake the two layers first, and leave the batter out until you are able to bake it in the next batch!
It’s the best vanilla cake recipe I have ever made – and I’ve done a lot. Can’t thank you enough! Used it for my daughter’s unicorn birthday cake and she loved it! Wish I could send you a picture. Thanks again for sharing!
so happy to hear that!!! 🙂
Hi! So I just made this cake tonight, and it tastes absolutely delicious. My only question is the thinkness of the cake layers. I used four 8 in pans that are 2in deep. The layers cake out a lot thinner than what I expected based off of your videos…. is this something I could prevent, is it the size pan, or is that how they come out when using one patch of the recipe above??
I usually use one batch to make 3 8-inch cake layers, or 4 7-inch cake layers <3
Hi, I made this cake the other day and absolutely loved it, best recipe I have used by far. Would it be possible to use this recipe for cupcakes or am I best to use your vanilla cupcake recipe??
So happy to hear that! sadly what makes it a great cake recipe (baking flat) makes it a terrible cake recipe! I highly recommend using my classic vanilla cupcake recipe instead 🙂
Hi, Chelsweets! I have a quick question, I can never get my batter even in my baking pans. I only bake using 6 x 3 size pans. Do you have any suggestions on how much batter i should use in a 6×3 pan OR 8 inch cake pans as I would like my cakes to be even .
I usually just scoop that batter in the pans one spatula at a time! I add one scoop to each pan, then repeat until I have used all the batter! Doing that I usually end up with equal amounts of batter in my pans!
Hi Chelsea
I plan on making this tomorrow with 2 9 in rounds and a few cupcakes with the rest of the batter. I just bought a new box of cake flour I’d like to use. Do I need to adjust the amount or anything to do so? Also I maybe have a 1/3 cup of buttermilk left can I use soured milk for the rest the recipe calls for? hank you in advance so much!
I’m not sure what soured milk is, but I’d recommend just using a bit of regular milk if you don’t have enough buttermilk! I’ve never made this recipe with cake flour. It will definitely change the texture of the cake though, and I’m not sure if it will turn out! I highly recommend just using regular flour!
Thank you it’s currently in the oven. Soured milk is a version of homemade buttermilk. I use 1 TBSP vinegar/lemon to 1 cup of milk.
Thank for the info.
Hi Chelsea!! Greetings from México!!!
I tried these recipe today, and it was delicious. I have tried almost 6 different recipes, and this one is really delicious, the best of all the recipes a have tried. I have been looking for my go to vanilla recipe for cupcakes and cakes for a long time, and it has been quite difficult!!!
I made cupcakes with the left batter, only to see how they turn out, but cupcakes didn´t make a big dome and some cupcakes sink in the middle , the flavor was delicious but not the appearence. I saw that you have a go to vanilla cupcake recipe (only using oil), so I would like to know if you recomend this recipe only for layer cakes and the other one for cupcakes??? I hope you can help me.
Definitely only use this recipe for cakes! it’s great because it bakes flat, and that’s also why it makes TERRIBLE cupcakes! I highly recommend my classic vanilla cupcake recipe instead if you want to make cupcakes 🙂
hi what can i use to replace buttermilk?
you can use regular milk!
Hi Chelsea , can you sprinkles to this recipe to make it a funfetti cake?
Definitely!! I do all the time 🙂
What type of flour does this recipe use?
just regular, all purpose flour!
Hi Chealsea, just wondering if this makes a moist but sturdy cake when cut into coffee/dessert servings or if it is a soft cake that may fall apart easy when sliced. Loving your chocolate cupcakes btw, they’re so good! & thank you for being a baker that will answer questions when you can.
it’s definitely not as sturdy as a sponge cake, but it should be easy enough to slice through! My cakes are usually slightly chilled when I cut into them, which makes it easier to slice!
I want to make two layers with 8 inch pans and two additional layers that are in 6 inch pans. Will this recipe work in the 6 in pan as well?
Hi Chelsea! I love your cakes and wanted to try your receipt. I’ve made it a couple times now and the middle always falls. Do you have any tips that might work to prevent it? The cake tastes great I just can layer them. Thank you
I would recommend baking it for a few more minutes!!
I’m going to try to make your vanilla cake today, any tips for 9″ pans instead of 7″ or 8″.
Only make three layers! and watch closely to adjust the baking time as needed!
thanks! Your cakes really inspired me to start baking cakes and not just cookies.
Chelsie!!! You are heaven sent!!!
So made this recipe today and I think I failed. I halfed the recipe to make it in two 8 inch pans….. the cakes came out pretty flat. I sifted the flour….could that have been it? I’m going to try again
On the other hand I made the buttercream and it’s amazing!!! My son was watching the video and telling me the steps. He’s 4 and loves your videos!!
Haha so happy to hear that 🙂
The whole point of this recipe is that it bakes flat!? That way you don’t have to waste tons of cake by trimming off huge domes. This isn’t a sponge cake recipe, its a denser, buttermilk based cake!
Hi chels! Im dying to do this cake but I have a question: the flour is All Purpose?
I live in Panamá, very humid climate and I dont know if I should use a special type of flour.
Thank u!
yup! just regular all purpose flour 🙂
Hi Chelsea! If I want to add color to the mix, should I use liquid food coloring or gel? Thanks!
Also, is buttermilk necessary or can I also use regular milk?
buttermilk gives the cake a really great flavor, but if you don’t have any you can use regular milk.
always gel!! It works wayyy better, and doesn’t throw off the consistency of the batter!
Hey Chelsey,
Just wondering if you freeze your layers before decorating??
Thanks! Love your work
yes!! it makes it so much easier to frost them! I freeze them overnight, then let them sit out for about 20 minutes before I start decorating.
amazing thank you!!
could you link me to your Wine Glass Spill cake? I want to make it for my mom’s birthday and can’t find your instructions
https://chelsweets.com/2016/10/06/the-one-glass-too-many-cake/
Do you happen to have a high-altitude version of this recipe? I live in Denver and cake recipes usually turn out pretty dry!! 🙁 thank you!
Shelby
I don’t, but I’ve been told by other people who live in high altitude areas that it turns out great! It’s a super moist cake, which is why I think it works!
Hi Chelsey! Love your Instagram and all your videos!
I’m planning on making your vanilla cake for the first time this week and I’m really excited after seeing all these good reviews on it, especially since it’s important to me that the cake is moist and stays moist. Just wondering if you ever tried using egg whites from eggs instead of from the carton and if you ever felt that there was a difference?
Part of me is afraid that using egg whites from the carton might prevent the cake from rising enough (since for meringues and smbc, I’ve been advised to not use carton egg whites) so I’ve never tried it for a cake!
Would love to hear your response~
-From a fellow New Yorker!
I have done both, with identical results! That’s why i use carton egg white now, because it’s less messy and yields the same results!
Hey there! Just a quick question. I like to bake using weight as well and I see that you have 3.25 cups of flour as weighing 416g… which breaks down to 128g per cup, but when I look up flour weight per cup, I find it to be 120g a cup… which would mean using 390g of flour. Help me solve this discrepancy?!?!? Thanks in advance
Honestly, I just used to be heavy handed with my flour measurements!!
Hi Chelsea , love your recipes , I’m wanting to do this recipe for an engagement cake that would be two tiers , would this work for a 9 or 10 inch for the bottom tier ? Or would there not be enough ingredients ; any advice would be much appreciated ! Thank you
I have been using this recipe for a very long time. I love it but I ran into a problem is there any way I can make the cake less dense? I have some clients who don’t like the texture.
Instead of mixing the butter with the flour Can I cream the butter and sugar first
Yes, you can try that!
Ok thanks so much..
Do I have to whipped the egg whites or Can I just pour them in?
i just pour them in, but you can also attempt to whip them if you think it’ll help with the texture!
I haven’t made this cake yet but I would very much like to. I was wondering if you use planning flour or self-raising flour. Also, what would happen if I used ordinary milk instead of buttermilk.
Thankyou in advance!
plain flour! regular milk can be substituted, but it changes the taste of the cake, and the texture slightly.
Also, I have made many vanilla cake recipes before and they have never rised that well, how do you get it to rise so much or is it just the recipe?
Thankyou!
it’s all about the chemistry of the recipe!
Hey Chelsea. Great videos. Going to be trying your vanilla cake for the first time. I’ve been measuring out the ingredients and then confirming their weight ( scooping the flower into the measuring cup so it doesn’t compact ), but it doesn’t seem accurate to the gram weight that you have listed next to your ingredients. Can you confirm the weights in your measurements are accurate?
If you’re in the US, I would focus on the cup measurements provided. I added in the grams for international bakers who don’t have US cup measures. However, the weight should be accurate, as a lot of people have made this recipe using them and the cake turned out great! Hope that helps. Thanks!
Could I use caster sugar instead of granulated sugar.
Thanks!
Great recipe! If I wanted to make this recipe in a 3-layer 12″ cake, how much should I multiply the recipe by? Thanks in advance!
I approach this considering the area/ volume of a pan. if the area of a circle is ?r2, and the recipe makes 4 8 inch layers which are about 1 inch thick, that’s about 201 cubic inches. For 3 12 inch pans, that’s 339 cubic inches. I’d recommend doubling the recipe. and either making the layers slightly thicker, or using the extra batter for a different project. hope that helps!
Thanks so much! I didn’t even think of it that way.. that was definitely super helpful!
What brand of cake pans do you use?
I use fat daddios, which I get on amazon!
Hey Chelsea! I’m looking to make a 2 tier cake with either 7″, 8″, or 9″ pans for the bottom layer. What size would you recommend using for the top layer so the tiers look proportional? Thanks!! I’ll be using your cake recipe!
I like to make tiers that vary by 2 inches! so if you make an 8 inch base tier, make a 6 inch upper tier! hope that helps 🙂
@Chelsweets,
I want to make either 3 8 inch cakes and 2 6 inch cakes
or 2 8 inch cakes and 2 6 inch cakes
Any thoughts? How much of yourrecipe would i need 1 and a half
Hi Lynda,
One batch of this cake makes about 10 cups of batter, and I share how much you need for each different sized pan here: https://chelsweets.com/how-much-cake-batter-per-pan/
Hope that helps, happy baking!
Hi Chelsea, I have been looking for a new vanilla layer cake recipe and can’t wait to try this one! If I am using 10 inch round pans, I am guessing this recipe will make two 10” layers but I may want to make a double batch as they’d be a bit thin, would you agree?
Hi Chelsea,
Do you always make your own buttermilk? Or do you buy it? If you make the buttermilk, what is your recipe?
I usually buy it from my grocery store 🙂
Hi Chelsea! With this recipe dose it make 3 or 4 layers if I were using 8 inch pans?
I love your videos! You are so creative!!
I’m wanting to make this for Thanksgiving.
And will one recipe of the buttercream cover the cakes or would I have to make more than 1 recipe?
Thanks!!
Hey chels ! Can I freeze these cakes ?
for sure!! here’s a link explaining how I like to freeze my layers: https://chelsweets.com/2018/10/28/how-to-make-cake-layers-in-advance/
Could I use this recipe for cupcakes? I know you have a cupcake recipe, but the flavor of this cake is perfect!
sadly you can’t! what makes this such a great layer cake recipe makes it a terrible cupcake recipe!!! The cupcakes bake super flat and stick to the liners. My cupcake recipe also uses buttermilk, and i think it also tastes great, so i recommend trying that <3
Do your vanilla and chocolate cake recipies work well together for a marbled cake?
yah, I swirl together colors of my layer cake batter all the time!
Would you add your choc recipe to your vanilla? Or the other way around? Youre choc recipe is more liquid than the vanilla-Im just concerned it wont look right- thank you for your help! Love your site and ig!!
Hello, can i replace the buttermilk with either sour cream or yoghurt?
I’ve never tried it, but it should work! might make the batter a bit thick though!!
Does the buttermilk add a sour taste? Can I swap the buttermilk for heavy cream or milk?
it adds a tang! You can definitely use whole milk instead though!
Hi Chels,
I’m gonna make 8 in 4 cakes will you help me figure out how much extra ingredients I need to add?
Hi! If we can’t use buttermilk what would you suggest? I saw another comment about whole milk? Same quantity?
yup! you can use whole milk in its place! The same amount 🙂
Hello!
I want to make your geode cake for my brother’s birthday, but we have a few lactose intolerant people in the family. I usually just use almond milk with vinegar in it to replace buttermilk in other recipes with good results. Have you ever tried making this dairy free? Butter doesn’t bother them, so I would only need to find a good substitute for the buttermilk.
Thank you!
I am looking for a good yellow cake to use for decorating and I LOVE tall cakes. However, I struggle with the outside rim baking before the middle, resulting in a dry cake. I usally put simple syrup on my cakes but I really want to figure out how to fix this issue. Do you have any tips on how to bake thick cake layers without them drying out? Thanks!
it really comes down to the cake recipe you’re using! No matter what, the sides of a cake layer will always bake first! but if the cake is dry and it’s a sponge cake base, simple syrup is a great way to add moisture! I don’t add simple syrup to mine, as it’s a butter cake base that’s pretty moist and is denser than a sponge cake!
I love your cakes!!! I’ve learned most of what I know from you :). I’m baking a cake for 40 people to be served at a restaurant . Advice on how big and how many layers?
Oh geeze! really depends on your expected serving sizes! I’d make two batches of this cake batter, and that should feed 40! You can either make 10 inch cake layers, or do a 2 tiered cake! Best of luck, and happy baking <3
Thanks Chelsey 🙂 I just pulled out my 10 in baking pans before i read your response. About to start. I’m thinking of doing 4 layers of 10in cake using 2 batches of this recipe?
Can I only make a two layer cake with this recipe? Just starting with the whole learning how to decorate cakes and would like to possibly start small.
Definitely! Just half the recipe and make two layers ? happy baking!!
Thank you! Chelsey! I will be testing it out in the morning, it’s my husband’s birthday tomorrow!
I need to freeze this cake for about a week. Think it would be okay as long as I wrap it well?
yup, as long as it’s wrapped well it should be fine!!
Can I use this recipe for cupcakes? Love the taste of this cake but don’t know how long to bake for cupcakes.
I wouldn’t recommend it! they don’t rise at all, and they stick horribly to the liners. I have a great cupcake recipe I’d recommend instead: https://chelsweets.com/2017/07/03/classic-vanilla-cupcake-recipe/
I’m looking for a recipe for a coconut cake and wondered if I could adapt your vanilla cake recipe as I use this all the time and love it – it also stands decorating with fondant… what would you recommend?
I’d recommend adding 1 Tbsp coconut extract to both the cake and the frosting 🙂 I’ve done it before, and also added some toasted coconut between the layers.
I love the flavor so much, and the recipe was so easy, but I found my first attempt to be too dense(almost snapped my cake leveler). Is there any way you’d recommend to make it less dense?
try beating the recipe at a slightly higher speed to incorporate more air into the batter!
Hi,
I’m making a giant cupcake and regular size ones as well. Any recommendations for chocolate cake and cupcakes?
here’s my favorite chocolate cupcake recipe: https://chelsweets.com/2017/07/08/the-best-one-bowl-chocolate-cupcake-recipe/
Could you use splenda in this recipe instead of sugar?
Sadly you can’t! recipes have to be specially altered for splenda!!
Is there any way to make it less dense? I love the flavor, but I found mine too difficult to cut into
I’d recommend beating it on a higher speed to incorporate a bit more air into the batter!
I have made this cake several times and like it but was wondering about the amount of sugar. I’ve never made a recipe that had almost equal amounts of flour and sugar. 3 cups of sugar sounds high..have you ever tried it with less?
I haven’t, but other people have tried it with a bit less sugar and said it still turned out! Let me know if you do modify it, i’d love to hear how it turns out!
Is there a way I can turn this into a strawberry champagne cake? Sub in gelatin or puree somewhere for the strawberry and champagne for liquid?
exactly! i’d swap mayb 3/4 of a cup of buttermilk for champagne, add in a packet of strawberry jello in place of about 1/2 cup of sugar, and add in a tiny bit of strawberry puree! The champagne can make the batter curdle initially, but it will come back together as you stir 🙂
Love this recipe! Nice even layers ! I’ve made it before in 8 inch pans. If I bake this recipe in 4 x 6inch pans do you think it’ll be okay?? I’ll bake them for longer at 320degrees.
They’d end up being really tall!! I usually use half a batch of batter to make 4 6 inch layers.
Hey Chel,
I love this recipe however do you know how I can make mini tall 4″ cakes? Can I use this recipe? Thanks!
Hi Chelsweets! 🙂
I quartered this recipe so I could test it out as I am doing a wedding cake for my brother-in-law and his wife. They requested a semi-naked style cake and you have wonderful recipes and tutorials for this! When I baked it, the sides failed to get brown. Maybe it’s because I quartered it and it’s not as accurate? I used an 8″ Nordic ware cake pan. Do you think I should try using a 7″ like you do and possibly just halfing the recipe?
That’s crazy, I’ve never had that happen before! Did you bake then for the full 35 minutes?? I’ve never quartered the recipe, but I have halved it and it worked fine! So maybe try that next, hopefully it’ll work! Happy baking 🙂
Will this recipe work well for a sheet cake?
it will! I use it to make 2 half sheet layers. you have to increase the bake time though, so i recommend lowering the temperature about 25 degrees to help with the browning!
Thank you!! It carved so well for the mermaid tail and I have an order for a snook shaped cake ?
I am using 10″ x 2″ pans. Do I need to increase the batter that I make for this size pan? In other words, do I need more than 1 recipe for 2 of these pans?
Thanks
Angel did this work for you? I’m doing a BB8 cake, using 13 & 10 inch pans.
I tried doing 2 recipes with the first 2 cakes I baked and ended up making a dozen cupcakes – which is not necessarily a bad thing! The next 2 layers, I did 1 1/2 recipe and it worked fine.
Hi! I was wondering how many batches of your cake recipe you typically use. Your cakes seem to always be 4 layers and a decent height. 8” pans I’m assuming?
yup! i usually use 1.5 – 2 batches, depending on the type of decoration and how many colors of frosting I have to make!
Hi Can you please share half of this recipe Thanks
It’s the exact same process, you just need to use 1/2 of the ingredients. I’m working on making a post on smaller cakes, but it won’t be up for a while
Hi,
This recipe sounds delicious, thanks for sharing it. Any idea on how it’ll hold up as a 3-tier semi naked cake? I’ll make a 6″, 8″, and 10″ x 4″ height tiers, but want to make sure that the weight will hold up using the standard wooden dowels and cakeboards for support.
Thanks!
it will hold up just fine as long as the dowels are placed properly 🙂 I’ve made a few 3 tiered cakes with it and it’s worked great!
I did a test run on this cake today and I can’t express how impressed I am. The cake looks perfect, crusts beautifully, and it’s the best I’ve ever tasted! I’m over the moon. My husband also loved it. THANK YOU so much Chelsweets!
Hi! I am planning to use your recipe, but instead of 8″ pans I’m going to be using 9″. Will it still make 4 layers and will the temp and cook time need to be adjusted? Thanks!
I’d recommend making 3 layers, so that they’re a decent height and not too think! You will need to bake them slightly longer, but keep an eye on them!
Have you ever tried replacing the flour with gluten free flour?
Not with this recipe!! but if you do try it, please let me know how it turns out 🙂
I made this cake with Bobs Redmill 1 to 1 gluten free flour and it worked great.
ah that’s great to know, I’m so happy to hear that!
Hi !
first i want to thank you for all your recipes and your teaching methods..
i want to ask can i use regular milk instead of the buttermilk in the (BEST VANILLA LAYER CAKE RECIPE)
Yes you can! It will taste slightly different, but will still taste great!
Can almond extract be substituted for the vanilla extract? Would I still just do 2tsp?
definitely! it’s to taste, so you can add however much or little as you like! I usually use 1 TBSP of almond extract!
Hi!! I was wondering what the adjustments would be for high altitude? I’m at about 4500 and newly here from the ocean so I’m finding all my recipes need various tweeking…
I’ve actually heard that this recipe works well at high elevations! I would try it as is! it’s a buttermilk cake recipe so it’s on the denser side of the cake spectrum.
I made a version of the recipe with all ingredients halved:
• 1.5 cups + 2tbsp all-purpose flour
• 1.5 cups granulated sugar
• 1 1/4 tsp baking powder
• 1/2 tsp salt?
• 1/2 cup unsalted butter or 1 sticks, room temperature?
• 1/2 cup egg whites?
• 3/4 cup buttermilk, room temperature
• 1 tsp. vanilla extract
• 2 tbsp cup vegetable oil
CORRECTION: 1 tbsp cup vegetable oil
CORRECTION: 1 tbsp vegetable oil
Hi just found your site, I love, love the site!!!!!, I only have 2 7-inch pans, would it be better for me to invest in buying 2 more 7-inch pans and bake all 4 layers at one time? can i reserve the cake batter for the other 2 layers while the first 2 layers are baking?
You can do either! The batter is best when baked immediately, but if it sits for a half hour while the first two layers bake, it still bakes up fine! 🙂
Thanks!!!!, i made the cake for my daughters birthday, i made the batter according to the recipe. I divided it in two 9-inch pans and baked for about 5-8 minutes longer, came out perfect. Then I half the second batter i made and it was just enough for a single layer, baked the same way. This cake was a HUGE HIT!!!!, THANK YOU!!!!!!!!!!!!!!!
ONE MORE THING, HOW MANY CUPS OF BATTER DO YOU PUT IN EACH PAN? THANK YOU AGAIN
can i use this for cupcakes?
no! It bakes very flat, which is great for making layer cake, but terrible for cupcakes. It also sticks to the liners. I have a vanilla cupcake recipe up that’s great, and I recommend using that instead 🙂
I’m going to be making BB8 cake. I have a 13 inch round and 10 inch round. Will 2 batches of your white cake work? They will be 1 layer cakes. I think I will need 16 cups of batter. Thank you!
1 batch of my cake batter makes 4, 8 inch layers that are about 1 inch tall, so based on the area of a circle (pie x radius squared), I think you’d need closer to 4 batches!! 13 inch layers are huge!
Me again!
Do you think this cake would serve well as a base for a key lime pie flavored cake?
Adding key lime juice and zest?
Can you substitute almond milk for the buttermilk in this cake for a dairy free version?
I’ve never tried before, so I’m not sure! I think the texture and taste would be different though, as the buttermilk adds moisture!
Hi! I love your YouTube videos and I ended up here! I want to make a two tiered cake (for around 50 people) with this recipe, I have an 8″ and 6″ tins, how many layers? Three/four each?
Enough with two batches?
Thinking about your buttercream for a seminaked cake, should be enough with your recipe for everything or I need to change something?
Thank you so much!
Btw! I don’t have any machine, so I’ll do it just by hand and blender… any tips? Thank you!
ah that’s crazy! you can still make it all, but it’s quite a bit more work!! Your arm is going to get a great work out!!
I usually make my tiered cake with 3 layers, but if you want to feed 50 people I’d recommend making 4 layers of each size! two batches of cake will def be enough to make the layers! since you’re making two tiers, you’ll probably need about 2 batches of frosting if you’re making it semi- naked! Hope that helps, happy baking!!
Does the baking and pan sizes work the same with the chocolate version of this? How many 10 x 2 inch cakes ( the cake actually being 2 inches tall) could you make with one batch? How long and how high temperature would you have to bake it at? Thank you.
Yes, same baking instructions! one batch can make 2 10 inch layers, but they’ll only be about 1 inch tall!
If baking this in smaller round cake pans like 6in and 4in what would you recommend the baking time and oven temp to be?
I’d bake them at the same temp, but for 25-30 minutes!
Thank you so much!
Do you have a sponge cake recipe as well? I am looking for a cake that is less dense
Hi! If I want to make this recipe one day early, how do you recommend storing the cake layers overnight? Thanks!
I would wrap them in saran wrap or place them in an airtight container, and freeze them! I let them thaw for about 20 minutes the following day before frosting. they’re easier to frost when they’re chilled!
Thanks! I made a semi-naked cake with this cake recipe and your buttercream frosting recipe and everyone loved it!! Turned out perfect!
Ah I’m so happy to hear that!! Yay ?
Hi! I also found you through you tube. I definitely want to make your cake for my daughters birthday coming up. I live in South Africa however and we do not seem to have all purpose flour. Could I use cake flour instead?
I think it would definitely change the texture of the cake, but I’ve never tried it so I’m not sure if it would work :/
Made your recipe using cake flour, and it worked out beautifully! Will definitely be using it again!
ah so happy to hear that 🙂
Hi! Would this recipe work for 3 6” inch round pans?? Thanks!
Definitely, but I would recommend halving it, as you wont need a full batch of batter!
Hello! I made the chocolate cake recipe this weekend and had the mixture in two cakepans rather than four. The cakes looked good at first when it baked, but at the end it kind of fell together and was more like a brownie rather than a normal cake. Have you experienced this before? I don’t have room for 4 cake pans in the oven at the same time, so i thought i could cut them in half when baked. But that didn’t turn out well. How do you bake yours?
I always bake mine in four separate pans! If it fell into itself, it sounds like it may have been underbaked! you would have to bake them for super long if you put all the batter in 2 pans!
Hi! I’d like to know what’s buttermilk or what do you refer to?
Thanks
I buy it in the store, it’s usually 1.5% milk fat and has a tang to it! Here’s how wikipedia defines it: https://en.wikipedia.org/wiki/Buttermilk
I’ve made this recipe using round cake pans! I’m making sheet cakes for a wedding! Do you think this recipe would yield a half sheet cake or full?
When I make sheet cakes with this recipe, I use it to make two 9×13 inch layers!
I did this and while it did fill the half sheet pan it was nowhere high enough. I do believe it would take 2 batches to produce a half sheet cake and 4 batches for a full sheet one layer cake. If you want to make a two layer full sheet cake it would take 8 batches. Using a single batch in the half sheet pan the cake was barely an inch tall.
I guess that’s where we had the disconnect! I actually wanted me layers to be about an inch tall!! I like them that height, in terms of the cake to frosting ratio! That way I can stack two layers on top of each other.
I just made a half sheet tonight using one batch of this. I plan to make a full sheet double layer so three more batches of this should do it!
Hi Chelsey, I am a huge fan of your cakes! Is there any way I can turn this cake into a marble cake?If so, what do you recommend for the cocoa powder measurements?
Or do you recommend something completely different? Thank you so much!
I make a half batch of this, and a half batch of my chocolate layer cake recipe, then swirl them together!
Hi chels !
Love love love your videos !
Everything I’ve learnt so far is from your tutorials !
I just did this in 3 9 inch cake tins however they really didn’t rise much at all, did I need to double the batch or have I done something wrong in the mixing process ? It’s going to be the bottom tier of a two tier cake and I’m worried it won’t hold the weight of the top tier ?
Thank you
How much butter cream icing did u use to frost this cake
It depends on the type of decoration! I usually use 1.5 – 2 batches of my buttercream recipe!
Why do u use egg Whites instead of the whole egg
It helps lighten the texture a bit, and makes the batter a nice white color!
Why do u use egg whites instead of the whole eggs
helps keep the base a bright white color, and makes the batter slightly less dense!
Hello Chelsweets, I would like to know how many whole eggs I can use and will it change the texture of the cake? Thanks for sharing your recipes!
If you don’t want to use egg whites, you can use 5 whole eggs. It overall will change the texture if you use yolks, but it will still taste great!
I love watching your videos! Will this recipe work for four 6″ x 2″ cake pans? I’m thinking I will have too much batter. I want to try this recipe, but these are the only pans I have.
it does! It makes 6-8, 6-inch layers, depending on how tall you want them to be! I make them all the time 🙂 They only take about 30 minutes to bake!
Thank you!
Hi! How do I upscale this recipe for a 12 inch tin? Also when doing a layer cake (naked one) do you recommend baking each layer individually or just slicing a whole cake up? Thanks! x
I always bake my layers individually, which i think is best with this recipe! The area of a circle is pi x radius squared. If this recipe makes four 7 inch layers that are 1 inch thick, it’s volume is about 153.86 cubic inches. The volume of a 12 inch pan is 113 cubic inches. So based on how many layers you want to make, you can calculate how many batches you’ll need.
Hi! Do you know how many cups of batter this recipe yields? Thank you!!
if makes about 10 cups!
2 questions.
Do i need to change anything for this for the cake since I’m at high altitude (4600 ft)?
Also if i only have 2 cake pans and I’m doing 4 layers will the batter be ok sitting out while the first 2 bake and cool then do the next set? Or do i just need to go buy more cake pans?
I’ve actually heard that this recipe works great at high altitude! Since this is a denser, buttermilk cake base, it is fine to sit out for a little bit. But I’d recommend baking the second batch as soon as possible!
Hi, Can I make this recipe with 5 layers? Also, just to clarify, the pans are 8 x 1 inch? Not a higher pan? I need to serve about 35-40 people.
Thanks!
That should work, your layers should just barely fit!!
Hi Chelsey! I love this recipe!! It works perfect every time!! I have to make a couple batches of cupcakes and I’d like to use this recipe. Will it work ok?
Thank you!!
D.D.
That’s so great to hear! As great of a cake recipe as this is, it makes terrible cupcakes! They stick to the liners and bake so flat! I’d recommend trying my classic vanilla cupcake recipe instead, it makes great cupcakes!
Thank you!! I was doing a little more research and found that recipe!! Perfect!! You are a joy to watch and learn from!! Because of you I had a very successful experience making my daughter’s birthday unicorn cake!!?
Yay! And so happy to hear that 🙂 Happy belated birthday to your daughter!
I want to make 4 layered cake with 9×2 inch pans. Would i need to do 1.5 of this recipe?
I love this cake recipe for vanilla layers! If I wanted to make an almond cake, could I just replace some of the vanilla extract with almond extract?
exactly! I like to add about 2 tsp of almond extract, but you can add more or less to suite your taste 🙂
Hi! Can I prepared this recipe in advance and refrigerate it until time to devide into pans and bake ?
It can definitely be baked in advance, but I wouldn’t recommend letting the batter sit for long! You can bake and freeze the layers, up to a week in advance! Just be sure to wrap them really well with saran wrap, or place them in an airtight container.
I haven’t tried out your cake recipe yet, but I’m going to this weekend. I used another recipe for a layered sheet cake I did a month ago. I froze the layers overnight and in between frosting steps. I was actually invited to the party I made the cake for and it was super dry and I was really dissapointed! Some of my cupcakes I made that weekend were also dry. I used a different recipe for them. I thought it was because I froze them. Have you had this problem before? Ever since then I have been very careful and usually made the cupcakes the night before delivering, without freezing in fear of them drying out. Any suggestions? (I did switch my cupcake recipe btw)
Freezing cake layers shouldn’t change anything, as long as they’re wrapped properly in plastic wrap! It sounds like it might be an issue with the recipe. I haven’t really run into problems like that from freezing!
Hi Chelsey!
I am making a two tiered naked cake with this recipe- i saw on your naked cake YouTube video that this was the best because of the carmelized sides!
If i plan to make 8” and 6” tiers how much of this recipe should i make?
Thank you!
I would recommend making 1.5 or 2 batches, depending on how thick of layers you’re after! 1.5 batches will make thinner layers, with 2 batches you’d have layers that are 1 inch tall after being leveled 🙂
I’m wanting to use this for my son’s birthday cake next week. There are a lot of people so i want to do 4 layers but use 9 inch pans. How much more batter will i need?
I would make 1.5 batches of batter!
Hi Chelsey.
I’ve made this recipe several times now. Your right the taste is amazing but each time I make it I have problems. Mostly that the cakes sink in the middle before their time is up.
The oven door never opens so I don’t know what makes them do this. All I can think is that due to the tins being 3” deep (plus I line them a bit higher) is that there is too much batter in the tin? I fill to around an inch from the top rim.
I always bake 2 tins whatever the diameter. So for instance today I made this recipe x 4. This was heck of a lot of eggs and other ingredients.
I filled 2 x 10inch pans and 3 x 6inch pans…it’s to be part of a 4 tier wedding cake.
Even if there is a 2” deep pan, I line it and fill it the same as I would a 3” pan.
It doesn’t matter if I make the batter for 7” or 8” pans either. They all sink in the middle. Creating a heck of a lot of waste when I torte them.
I’ve tried knocking down the temp to 160c fan assisted and extended the bake time. (For example today’s bake took over two hours). Is this recipe only good for shallow baked?
they definitely need to be baked longer if they’re sinking in the middle! I only ever bake single layers, no thicker than an inch once baked! I don’t torte my layers, I’m not sure this is the best recipe for torting!
Sorry that meant to say shallow bakes.
no worries, I understood! Yah, I don’t think recipe does well when baked in tall pans!
Hi Chelsey!
I love all your videos and tutorial!! Super helpful and they gives me great inspiration for my decorating!
I’m planning on trying this recipe for my birthday cake this weekend! Will it still work well if I use regular milk instead of buttermilk? And before icing your cakes, do you soak them in a simple syrup first?
Thank you!
Yes, it will! it will be a bit drier than if you use buttermilk though! I don’t use simple syrup with this recipe normally, since it’s already pretty moist! however, if you do plan to use milk, adding a bit of simple syrup might be a good idea since it will be a bit drier. Happy baking!
Hello,
Could this be used for cupcakes?
Thank you for your response Chelsey. I love that even after all this time you still take the time to answer everyone’s questions and comments. So thank you very for that. It’s reallg appreciated.
And yes I think you’re right about this recipe being not so good for deep pans. I’m going to try doing shallower bakes and see where that gets me because I can’t go on with the problems a deep bake gives me. Sinking in the middle before they’ve even reached the extended time limit Plus the time it takes to bake deep pans is sooo long (over two hours for 2×10” pans).
The only problem is now I need two more sets of every span size in both square and round if it’s no good for torting ! (I like to have deep 6” tiers with at least 4 layers Gah ?)
Hey! Is there anyway I can use this recipe and turn it into a yellow cake ? If not do you have any good yellow cake recipes ?
sadly I don’t! I’m not really a big yellow cake recipe fan , so I haven’t made many!! I’ve never tried to alter this recipe for that, so I’m not sure how it would turn out with egg yolks…but I think it would be rather dense, since it’s already pretty heavy with just egg whites!
Thanks so much ! I’m not a fan either but it’s for a customer. I just used box yellow cake added milk butter vanilla and an extra egg instead of the box directions.
How many cupcakes does this recipe make?
This recipe should not be used to make cupcakes! It bakes very flat, which makes great cake layers but not the best cupcakes. they also stick to the liners. I’d recommend using my vanilla cupcake recipe!! It makes amazing cupcakes 🙂
Hi! Can I make 3-8″ layers your vanilla cake? Also, embarrassed to ask but you do take the layers out of the pan before freezing them in the cooling process? Thank you!
Yes you can!! That’s actually a great question. Most people do remove the layers from the pans, then wrap and freeze them. Some times I do just throw the whole pan in the freezer (after running an offset spatula around the sides to loosen the layer from the pan)! I let the layers cool completed, then bang the pans lightly (upside-down) on my counter, until the layers pop out! but you can do either, whatever you prefer!
How can I turn this into a coconut cake for a semi naked cake for a wedding? I’d like to use real coconut if possible, not just flavoring
You can add toasted coconut between the layers as you assemble the cake! You could also add it to the batter, but I’m not sure how this would affect the texture of the cake since I’ve never tried it! I usually just add extract to the layers, and then sprinkle actual coconut between the layers!
I made the cake using 5 whole eggs like you mentioned in a Previous comment. It was probably the best vanilla cake I’ve ever made other than the fact it was dense like a pound cake. I still loved it! Then I made it by the recipe using only egg whites and it came out a completely different cake. I felt like the oil gave it an odd aftertaste and in your vanilla cupcake recipe as well. What is the purpose of the oil?
Just wanted to see if it was normal to give the cake an oily aftertaste and/or if possibly I could leave it out or substitute something for it (:
You can definitely leave it out if you prefer it that way 🙂
The oil just helps lighten it a bit! But you can omit it if you don’t like the taste. It’s not an absolute must for my cake recipe, I just like it better with a bit of oil!
Hi!
I’ve got two questions:
1. Can I use fresh egg whites (saperate the eggs on my own) insted of using the carton?
2. Where did you get the cake pans? I’d like to buy them too.
Yes, you can use fresh egg whites! I like to use the fat daddio’s brand, which I order on amazon!
Hi Chelsea!
How many servings does this recipe yield?
Also, I’m using Americolor too, should I keep adding drops until it reaches the color I want or does the color get stronger when it bakes?
Thanks in advanced for your time 🙂
If you bake this recipe in 7 or 8 inch pans, It feeds about 20 people. The color does get a bit deeper when that batter is baked, but you want to get the batter pretty close to the final color you want!
Do you use the egg whites carton because it’s pasteurized and safer?
Can you please give me the URL to your cake pans at amazon? I can’t find it
hello Chelsea!! So we have to fill the pans only an inch deep? how tall will the batter rise then? Thank you 🙂
the batter doesn’t rise much, i’d say it rises about 1/3 of an inch! the height you fill them depends on how many layers you’re making and what size of pans you’re using! the most important thing is to make sure that each pan has the same amount of batter (I like to use a scale)
hi again!! I’m wondering if we can replace buttermilk with whole milk ?
yes, you can! it will make the cake slightly less moist though!
Hi Chelsea!
Will this recipe work for a funfetti cake if I just fold sprinkles into the batter? I know you have a funfetti recipe on the site, but this one seems like your go-to, so wondered if you thought it would work.
Thanks in advance!
that’s exactly what I do for funfetti! I add about 3/4 of a cup of rainbow jimmies!
Hi Chelsea!
Do you recommend using this recipe for a funfetti cake by folding sprinkles into this batter? I know you have a funfetti recipe posted on the site, but this one seems like your go-to, so thought I’d ask!
Thanks in advance,
Scott
Hi Chelsea. Will this recipe work in a 10 in pan? All of you recipes says 7 or 8 inch pans.
it makes 2 10 inch layers!
Hi Chelsea. Will this recipe work in a 10 in pan? All of your recipes says 7 or 8 inch pans.
yes, it makes 2, 10 inch layers!
Hi Chelsweets! Love your videos!
I have made the vanilla cake a couple of times and the edges get brown and well done- crunchy.
Is it the oven temp? the pans? the fact that I live in AZ and there is no humidity?
Thanks in advance!
the edges do caramelize! I usually trim it using a serrated knife!
Love your posts so helpful. Going to try your reciepe but a question could the mixture be divided in 2 x 8” pans and once cooked split to make 4 layers ?
Yes, but the edges will caramelize a TON, since it will take quite a bit longer to bake! I recommend making 4 separate layers instead!
Hi everyone. I used the Wilton Cake strips around my pans – you know – the ones that you soak im water before applying them. This prevented a lot of the caramelization.
Angel
________________________________
Hiya.
I really would like to make this but only need 2 layers. Can I just exactly half the recipe?
Thank you.
yes you can! 🙂
Thank you ?
Hi Chelsa
This is my new go to recipe. I love it. I am baking a 10” shower cake. I want to make it at least 4 layers. How much batter would I need to put in each pan to have them come out 1” thick like yours?
I”d recommend making 2 batches of batter, and dividing it evenly between your four pans!
Hi! I’m a huge fan!
My cakes didn’t rise to 1 inch! They are probably only half an inch, I followed the recipe so I’m not sure where it went wrong. So I’m just wondering if this have happened to you before? and what method do you use to even distribute the batter between the 4 pans? Do you weigh them? ??
My 1 inch layers are when I use 7 inch pans! If I use 8 inch pans, the layers are thinner. What size of pans did you use? I do use a kitchen scale to make sure my layers turn out the same height!
Made this cake with your cookie dough filling and it was a huge success.
aw so happy to hear that! It really is a winning combo 🙂
Hi Chelsea, this looks like the perfect recipe I was after to make a tall layer cake for my daughter’s christening with ombre colouring!
I would normally bake cakes ahead and freeze, but my husband filled our freezer with meals this week so now I’m out of space. If I were to bake and frost them on a Thursday try and keep moisture in, will it still be good to eat on Saturday? I need to deliver the cake to the venue on Friday, would have preferred to frost the frozen layers on Friday. So annoyed
Hi there
This looks like the perfect recipe I was after to make a tall layer cake for my daughter’s christening with ombre colouring!
I would normally bake cakes ahead and freeze, but my husband filled our freezer with meals this week so now I’m out of space. If I were to bake and frost them on a Thursday try and keep moisture in, will it still be good to eat on Saturday? I need to deliver the cake to the venue on Friday, would have preferred to frost the frozen layers on Friday. Thanks
definitely! As long as the cake is fully covered in buttercream, it’ll stay moist if stored in the fridge for several days! The buttercream keeps everything nice and fresh 🙂
Hello,
Can you please let me know how much batter i need to add to a 8” round pan to get a 1” high cake?
Thank you.
I’m not sure, but it you split one batch of this batter between 3 pans, the layers should be about 1 inch tall!
Hi!! So love your cakes! I made this vanilla recipe this Saturday and it was sooooo good but I was only able to make four 6 inch rounds. I’m I doing something wrong?? And it was not crazy dense but it was kind of thick. Is that normal? Please let me know
Usually the layers are somewhat dense, but I use this recipe to make 4 7 inch or 8 inch layers all the time! if you used one back to make 4 6 inch layers, they must have been super tall layers!
Hello! I LOVE how responsive you are. Thanks for all you do!
I am going to try to use this recipe to make a 3 tiered wedding cake for my cousin.
We are planning for 130 people about.
I am super bad at figuring out the math for this and don’t want to get it wrong! I will be doing two practice rounds of course. Could you recommend how much batter, the sizes of the pans, and how many layers for each size?
I really really appreciate it. Thanks SO much!
Hey lovely. Wondering if i can turn this recipe into pistachio one. Cs i saw the pistachio recipe you got but i vsmt find pistachio pudding . Thanks heaps x
Hi! I know you explained some cubic squares method to figure out how much you need for a 12 inch cake but I suck at math lol – I need two layers, 12 inch round cakes height 4 inches total. How many batches of this recipe would I need?? Thanks!!
Sorry for the insanely delayed response! I’m actually going to share a guide this week on how much batter you need for different sized pans!! Stay tuned <3
Hi
Can’t wait to try your recipe!
Small question- their is no bettermilk in my country, is there enything I can put instead that would bring the same result?
you can either use whole milk, or make your own! here is a great tutorial showing how: https://www.thekitchn.com/how-to-make-a-quick-easy-buttermilk-substitute-cooking-lessons-from-the-kitchn-185757
I made your recipe and it was a huge success. One thing that I could not figure out was after taking the cakes out of the freezer (just overnight), did I let them reach room temp first or frost right away. I let them reach room temp but they were very sticky. I had a hard time frosting them without pieces of cake mixing into the frosting. Fortunately it was a pink flamingo cake, so the bits of pink cake looked nice with the white frosting, but wanted to know your trick to avoid cake pieces in the frosting. Thanks!
I only let them thaw for about 20 minutes before I decorate them! they’re easier to frost when they’re chilled!!
Hi, I’m doing a wedding cake soon and they want a 1/2 sheet cake also. Do you happen to have measurements for a 1/2 sheet cake for your vanilla cake batter?
I use this recipe to make two 9in x 17in layers!
If I need two 9X13 cakes, will one batch of this work? One inch thick.
yes! That exactly how i make my sheet cakes!
I make this cake often and everyone loves it! Love how even it bakes! I’ve been asked to do a sheet cake, do you know if this will work or how many batches I’d need? Thanks!
it does! I use one batch to make 2 quarter sheet pans (9×13 inch). Hope that helps!
Hi! Love the recipe, thank you for sharing! I do have two questions though 😉 I have two 10″ pans, how long would you recomend baking them? And the second question; is it also possible to freeze the entire cake after layering and frosting it? (so you can make it in advance, a few days before your event)
Thank you so much for your help!
I’d put a flower nail in the center to help it bake more evenly, and would bake them for about 40ish minutes!
yes, you can freeze a frosted cake. I’d recommend refrigerating it instead though, to minimize the temp shock!
i recommend adding a flower nail into the pans to help the layers bake more evenly and quickly! with them, it shouldn’t take more than 35-40 minutes to bake! without them it can take a lot longer. you can def freeze an assembled / frosted cake, but be sure to transfer it the fridge a day before you plan to cut into it, to help reduce the temperature shock <3
Hi.. with 10 inch pan, how many layers can it make it? how much batter (g) should I use?
one batch makes 2 10 inch cake layers!
Hi.. Can the batter be stored for later use? if so how long can I store for and how? thanks
def! it can be stored in an airtight container in the fridge for a month, or the freezer for several months! just give it a good stir once it’s back at room temp <3
Thank you for your replies!
Just one more question, with 10 inch pan how long should I bake for?
I think I usually bake them for 40-45 mins, with a flower nail inserted in the center to help them bake more evenly!
Please Help Me!!!, This cake is awesome!!!, i have a request to make a cake using a 11×15 inch pan, they would like it two layers. I would like to make two flat layers instead of making a large cake and then torte it in half. How may cups of batter should i use or do you suggest making batter x 1-1/2 or x 2 for each layer. please help me
I don’t really look at it as cups of batter, I more so consider how many batches of batter I need to fill the pan to the right height! One batch makes 2 layers that are 1 inch tall in 9×13 inch pans, so I think you’d need at least 1.5 batches of my cake batter for your size of pans.
I want to decorate my cake like this with the pink do you have a video to that ? Also for the icing, how to make it
you can just add pink gel food coloring! I do have a pink cake tutorial, here’s the link: https://www.youtube.com/watch?v=1BqvjJ07gTk
I so want to make your recipe! But I live in a high altitude area (6000 ft) and I have never had luck with anything but boxed mixes 🙁 and I would like to make a cake from scratch! Any advice on how to keep it from sinking in the middle when it bakes? I usually use 8 inch rounds. Thanks!!
I’ve actually heard my recipe works great at high altitude! So this should be good to use as is, without modification!
Ni Chelsea; Is 3 1/2 of flour to 3 cups or sugar right ? More sugar in weight Tham flour; is this ratio correct?
Thank you un advanced
I believe the recipe states 3 1/4 cup of flour, and 3 cups of sugar, which is the correct ratio.
Hi, I’m attempting to make this cake next week for my son’s 1st birthday. I had a question about the baking time. Is the 35-37mins for baking all 4 layers at the same time? Or should the time be reduced if I’m baking 2 at a time or individually (I only have 1 cake pan!).
Thanks!
Yes, I bake all 4 layers at the same time! I’ve honestly never baked only 2 at a time or individually, so i’m not sure! I’d just keep an eye on the first layer, and test is a few minutes before you pull it out to ensure it’s not overbaked. Happy baking <3
Hi there, I made this cake and the taste is awesome!! But they fell in the middle. What happened? I am at 6500 ft. What changes should I make ?
You may need to bake them slightly longer, or your oven might run a little cool!
Hello, is the baking time of 35-37mins for baking all the layers at the same time? What would it be if I was baking 2 x 8″ cakes at a time as I only have 2 tins.
Also, what temperature should I use in a fan oven?
Thanks
Yes, that’s for all 4! I’m not sure, I’ve never baked only 2 layers at a time, so sorry!
Hello would this recipe work well if I used mini Bundt pans? Or should I use your cupcake recipe?
I’d recommend my cupcake recipe instead 🙂
Hello, how much batter would be needed for four 9inch round 2.5 inch deep cake pans, and how many cups per pan to have them come out even. Thank you 🙂
I don’t really look at things by cups of batter! but one batch of my vanilla cake batter makes 2 nine inch layers that are about 1 inch tall once baked! I make sure I have the same amount of batter in my pans by weighing them. It’s much easier than dealing with cups! 🙂
Can I make half the recipe? Will it work if I just cut everything by half?
it sure will!! 🙂
hi, I’m wanting to make 3×7 inch cakes to layer, will 1 batch be enough?
also how how many inches in depth is 1 cake?
yes, I use this recipe to make 4, 7-inch cake layers, that are about 1 inch tall!
Hello Chelsweets ,
Love your cakes , I decided to give your vanilla cake recipe a try i made 2 batches and both batches the batter curdled im not sure what im doing wrong i still put in the oven and they came out good but when i seen that i thought they would not bake correctly. Im not happy with how the batter looked so i know im doing something wrong just not sure what it is do the eggwhites need to be room temp as well , im thinking it was buttermilk because it happend after adding the buttermilk each time ?
my batter sometimes will separate a bit if it sits out for a while, but normally is pretty smooth when I make it! Yes, all the ingredients should be at room temp, to help them mix together better.
I LOVE watching your vids and have learned so much from you… so thank you!! A question on this… if I only have two pans should I leave the remaining batter to be used out at room temp or put it into the fridge? Also, do you freeze after baking and then again after a crumb coat? Thank you in advance for your help 🙂
You can leave the remaining batter out at room temp, as long as you plan to use it right after the first wave of layers bake. I do freeze the layers once they’re baked, and freeze the crumb coated cake for a bout 5 minutes, to help it firm up. Hope that helps, happy baking!
Hi,
What is the weight on your scale for each cake?
Thanks!
I’ve never actually weighed a finished cake! Do you mean how much does one batch of batter make in grams?
Hi Chels, sometimes i have orders for two or three cakes for the week, I would like to know if i make my cakes say on a monday for the order on say saturday and sunday will it be ok to bake them a week ahead, wrap will good and freeze until the next week for decorating? How far in advance can i make my cakes and freeze if using your recipe, it is sooo!!!!!Awesome. Thank YOu
Definitely! if they layers are wrapped properly, they can def be made 1 week in advance!
What is the longest you can freeze this after baked?
I’ve never really tested that before! I usually don’t make them more than a week in advance!
Hey Chelsea, love your cakes! Just wondered if there was a dairy-free substitute for buttermilk? Do you think water would be ok?
I would recommend trying soy or almond milk!
Hi I’m making a wedding cake, and my usual batter recipe is too moist, I’ve come across lots of recipes but yours looks fab and I’m going to try it this weekend. I’m making 12” 10” 8” and 6” layers and I’m super confused as to how much batter I should use in each. I’m only working with one of each size tin also so going to make different sizes at the same time, hope this makes sense. Thanks in advance 🙂
i’d use the area of a circle to calculate it (pie x radius squared)! if you know that one batch of batter makes 4 7 inch cake layers that are 1 inch (once leveled), you know one batch of batter makes about 154 square inches. You can then calculate the total area of each tier, and then determine how many batches of batter you will need 🙂 hope that helps, happy baking!
Hi Chelsey! I need to make a cake that needs 6 inch layers. Have you used this recipe for 6 inch pans? If so how long do you think I should bake them for and how many pans did one batch fill? Thank you for this recipe, can’t wait to try it!
I make a half batch of batter, to make 3, 6 inch cake layers! they bake for about 30-32 minutes!
Have you ever used the Wilton cake strips to avoid the cake carmelization along the edges? Did you have to extend the bake time?
I have, and I didn’t really find they helped that much! I didn’t need to extend the bake time when I did though!
Hi ther! Just wondering if you could do this cake gluten free? What would you use as your substitute?
Thanks!
gluten free baking is always such a challenge! I actually have one gluten free cake recipe up which i recommend using instead!
Hi! If i want to make just one 9 x 13 in sheet cake, do I just half the recipe? How about the baking time? Thanks!
exactly! I’d bake it for 35- 40 minutes, and add a flower nail or two to the center to help it bake more evenly and quickly.
I love your stuff; I am doing a semi naked cake for a wedding Saturday, baking them off today… can you give me advice on how to plan out and freeze, I was thinking to frost and stuff tomorrow and let it freeze, the venue is outdoor and I’m afraid it will melt. With that said, I don’t know if naked cakes sweat like traditional buttercream cakes do? Help, lol.
They will sweat too. I do NOT recommend freezing it! It will increase the temperature shock once the cake is outside, and cause tons of condensation. I’d say just chill the cake in the fridge once it’s made! You can def make it in advance. Hope that helps!!
Hi – I’m making 4 layers of 12inch x 2inch round cakes – how many batches of your cakes would I need? I also suck at math so I’m sure I’d miscalculate what I need lol
How long do you bake your 9 inch layers? Love your videos! You really inspire me to experiment with my baking!
I place a baking nail in the center of the pans, and bake them for about 38 minutes!
Hi, my grocery store only carries 1% buttermilk,can I use that?
yup!!
Can the buttermilk sit out all night to get to room temp or is that too long?
I wouldn’t recommend it!! If you pour out the amount you need and let it sit for about 30 minutes, it’ll warm up pretty quickly! I’d recommend doing it closer to when you plan to bake the cake <3
I made his tonight and it was super good but tastes like corn bread? What did I do wrong, any ideas? Thanks! Love you and you’ve taught me so flipping much!
interesting!! maybe it’s the brand of flour you’re using?? It will have a bit of a tang from the buttermilk, but def shouldn’t taste like cornbread 😛
Hello! I am from the UK and we typically use caster sugar for baking as it is a finer sugar. UK granulated is normally used to sweeten tea or coffee. My understanding is that American granulated sugar is typically finer than UK granulated sugar…which brings me to my question. As I am in the UK, should I be using caster sugar instead of granulated sugar for this recipe? I’m concerned that it will influence the texture of the sponge. Thank you!
I didn’t even consuder this, I’m in Australia and made this last week using caster sugar. The cake had a lovely, fluffy texture
Brilliant! Thank you 🙂 I will use caster sugar
I didn’t know that!! I honestly have no idea which would be better to use, but I think as long as you weight it out and are using the right amount, it should turn out fine with either! 🙂
Hi, I love all your videos and recipes, does it matter if a used low fat buttermilk I couldn’t find any other in the supermarket.
Low fat buttermilk should work just fine with this recipe! that’s what I normally use!
I am looking to make a 4 layer 8″ drip cake decorated with flowers on top for a bridal shower so I would like to get as much height as possible. I don’t know if I should just use 1 batch of batter and spread evenly in 4 pans or prepare 1 1/2 batches and spread in 4 pans for a slightly thicker layer. How high do you typically fill your pans-1/2 way or 3/4 of the way? How high are your layers after they are baked?
I usually fill them about 1 inch high with batter! They don’t rise a ton, and they end up being about one inch after I trim and level them. I like the thickness one batch makes in 7 inch pans, so if you want nice thick layers, I’d recommend 1.5 batches to ensure you get lots of height (especially if you plan to trim/level them). Hope that helps, happy baking!!
Hi! I hope I’m not repeating any question I’ve looked through and didn’t find it.
I love this recipe for stacked cakes, but was wondering if you had a lighter recipe for just single tiered cakes?
I have a small batch recipe, but it’s just a half version! I usually use to make small, 6 inch cakes with three layers. When you say single tiered cake, do you mean single layer cake?
Thank you for replying. I just mean I like to use a lighter, less dense cake for non-stacked cakes. I was wondering if you had a recipe for a lighter cake?
Can I use cake flour instead of regular flour? and if so is the measurement still the same?
I don’t recommend it! This recipe is super moist from the buttermilk, and it needs regular flour to have the right texture!
I can’t wait to try this recipe. One quick question after I assemble and ice the cake can it sit over night in a cake box in the fridge. I usually let the cakes sit out 4-5 hours next day before serving.
That should be fine! I always make my cakes in advance, but usually let them sit out for about 2 hours before cutting! I find it’s easier to get clean slices when the cake is still a tiny bit chilled 🙂
Just quietly, thank you so much for including the gram conversions. I’m in Australia and our cup measurements are different to US one and this makes it SO much easier! Love your work 🙂
haha happy to help!! and thank you!! 🙂
Hi Chelsea, can I you baking soda inspite of baking powder?? And how much for small 6″cake.
I really recommend baking powder, to ensure the recipe turns out the way it’s supposed to <3 if you want to make a 6 inch cake, I recommend making a half batch of this recipe!
On the small batch vanilla cake recipe – using three 6″ pans – do you cook for less time than the full batch recipe? Thanks, Cindy
They usually are done baking after about 30 minutes!
do you have a chocolate cake recipe that will not rise like your vanilla cake recipe?
i do! here’s the link to it: https://chelsweets.com/2017/03/02/the-best-chocolate-layer-cake-recipe/
Hi, from your home state! I’m in Seattle. 🙂
I’m really excited to try this recipe for our Halloween party. I’m nervous about leaving things out. Just so I’m sure I understand, if I want nice, strong color for dyed layers, I leave the batter sitting out overnight? In the fridge or on the counter? After baking, it’s: cool ten minutes, freeze 45, and then thaw 20 before trimming the layers? Then if I want, I can refreeze them for a few days, thaw them 20 minutes, crumb coat, freeze 5 minutes, and then frost. Then, I put the cake in the fridge until about two hours before serving. Does all that sound like the right plan? If I have to have the cake out longer than two hours, will that be ok? I’m making it for a work party and our fridge at work isn’t big enough, so it will be out from about 9 am-1:30 before I serve it. PS- just discovered your blog and love it!
The color deepens with frosting if you let it sit, but I def don’t recommend letting your batter sit out! It should be baked right away. If you use gel food coloring, your layers should turn out very vibrant.
Correct on the layer prep, and cake assembly! You can def leave the frosted cake out for more than 2 hours, 2 hours is just the minimum for it to warm back up to room temp 🙂
Chelsea, im in Australia. If using self raising flour for this recepie (it already contained rasing agent), do I omit the baking powder? Or, should I really be using what we call plain flour and still use the baking powder as the raising agent?
I guess so! I’ve never tried a self rising flour before, so I’m not quite sure how it’ll turn out! I’d recommend plain flour + baking powder for best results 🙂
Chelsea, in regards to using self raising four, I did it and it turned out perfectly. Just to confirm if others have the same question – I used the same quantity of flour requested by the recepie, but used self raising flour and left out the baking powder. Thank you.
Hey. Thanks Sarah for finding this out. I’m in UK. We have self raising flour here too. I’ve always used plain flour and baking powder as recipe states – but now I know you can use SR I’m never going to panick and run out to buy Plainfield’s I’ve only got SR in.
I use this recipe for Lemon cake, Victoria sponge cake and Coconut cake. Basically any
White cake I need to make and then I just modify with flavours and extras.
The cake came out great! People wanted to know where I bought it. 🙂 I used this cake recipe and your recipe for black frosting. The electric purple gel coloring from americolor wasn’t as vibrant as I would have liked for my purple layers, but the orange and green layers were cool. This is my very first tiered cake, first time stacking layers and trying to smooth frosting like you do. I could not have done it without your tutorials. Thank you!
I’m so happy to hear that 🙂
If I can’t bake all three layers at the same time, should I have the batter out st room temp or in the refrigerator in between baking layers!?
Thanks
I’d recommend letting it sit at room temp!
Hello. I would like to use your recipe but I am making a 4 layered 8inch and a 4 layered 6 inch. Should I double the recipe or would that mess with the consistency? Appreciate any help! Thank you
You can double it, as long as you have a large enough mixer! my kitchen aid can only do a 1.5 batch, and even that is pushing it to it’s absolute max capacity!
Hi Chelsea! I love your blog and your videos. I’ve been watching for a while. This past weekend was my first attempt at a layer cake where I really focused on the technique. I used your vanilla layer cake recipe and your buttercream recipe. Love the flavor of both!! For the layer cake, mine came out very dense. The sponge wasn’t crumbly or airy. Do you think I over-beat the batter? Is it supposed to be very dense? I also had some trouble smoothing out the buttercream so it was all even. Any extra tips for that? Should I try adding a thicker layer possibly?
Thanks for any advice!!
Kate
My cake recipe isn’t a sponge cake recipe, it’s a buttermilk cake recipe! So it’s definitely going to be less airy than a sponge cake. But if it was super dense, i would recommend trying to beat the batter less next time. In terms of getting smooth buttercream, here’s a full tutorial where I walk through each step I take to make my frosting super smooth: https://www.youtube.com/watch?v=yg7CRfLRWEg
Hope that helps, happy baking!
Hi Chelsea! If I wanted to turn this into lemon cake, how much zest would I add? I’m worried adding lemon juice will mess with the consistency. Thank you!!
I’d add in the zest of 2 medium lemons if you don’t plan to add any lemon juice! you can add some, and just reduce the amount of buttermilk you add by the amount of lemon juice 🙂 That way the consistency should be just fine!
Hi! I tried this and the recipe was a bit sweet for me but I loved everything else about it. If I reduced the sugar would that mess up the recipe? Have you ever tried that?
Sadly i’ve never tried that!! I’m not sure how it would turn out, but i’d love to hear how yours goes if you decide to try it!!
@Jordan, I found the same. Did you try baking it again with less sugar? I’d like to give it another go but don’t want to risk ruining it by removing too much. Thanks!
Can you use cake flour instead of all purpose flour?
i haven’t tested it, so sadly I’m not sure!
Hi! Would this recipe work for a 10in cake…3 layers?
you would need to make 2.5 batches to make 3 10 inch cake layers that are the same thickness as the layers shown here!
Hello Chelsea! I am a great fan of your baking. I am just wondering why you use only egg whites in this vanilla cake? I am used to use the whole egg in my cakes. Is there a reason for this? Thank you so much for your response!
Thanks for advice!
Gabriela
it just helps make the cake a bit lighter! it’s a rather dense cake, and i like the texture best when i make it with egg whites 🙂
Hi Chelsea, do you know how many cups of batter your vanilla cake recipe makes for the 7 inch layer cake? I am going to make a Fortnite battle bus cake and the pan I’m using calls for 11 cups of cake batter. Thank you, Polly
Sadly I don’t know, so sorry polly!!
Hi! I made this exact recipe and put it in two 8 inch pans – I’d say it’s about 9-10 cups
thank you for sharing Ana!! <3
I am making my daughter’s birthday cake and the theme is frozen. I am going blank on creativity and how I could decorate it cute! Any tips or pictures for inspiration of a frozen cake you have done?
i made a winter wonderland cake last year that’s kind of frozen-esque! here’s what it looked like: https://www.youtube.com/watch?v=A3S9w3i0yX8
Hi Chelsea! I have made this layer cake recipe many times and I absolutely love it! I just baked the first layer of my current cake and it sunk in the centre of the cake when i took it out of the oven, do you know why this happened? and how can i prevent this from happening with my next layer? Thank you 🙂
Sounds like you may need to bake it slightly longer next time! Or maybe add a bit less batter to each pan!
Do make a 3 layer 9 inch cake, do I double the recipe?
to make 3, 9 inch layers, I’d recommend making 1.5 batches of batter!
Hi Chelsea, thank you so much for your posts, I’m learning a lot. I’m wondering what is the height of your individual cooked cake layers and also the overall height of your 4 layer cake once assembled?
I’d say if I bake the recipe in 7 inch pans, it makes 4 layers that are about 1.25 inches tall once leveled! The height will vary based on how much frosting / filling you add between the layers, but i’d say about 6 inches tall – just as high as my bench scrapper 🙂
Thanks so much Chelsea. I just bought some Fat Daddio cake tins and saw that you use these also, yah! Do you line with parchment paper? Fat Daddios suggest the traditional method of butter and flour…
Hi Chelsea, Do you use 1 inch or 2 inch deep cake pans?
Thanks!!
my pans are 2 inches deep 🙂
Hi Chelsea! I love this cake and was just wondering if you have ever just used this as the base for funfetti. I noticed your funfetti cake recipe is a little different. Do you think adding the sprinkles will screw up the rise or texture?
yes, and I highly recommend it! I love to add abotu 3/4 of a cup of rainbow jimmies, and I also add in an extra tsp of almond extract to make it a bit more exciting 🙂 It changes the texture a tiny but, but it still tastes great!
When you said 8 inch pans is that 2 or 3? I’m used to doing 2 layer cakes.
I use on batch of batter to make either three 8-inch cake layers, or 4 7-inch cake layers <3
Hi Chelsea! Can you tell me how many people this 4 layer 7 inch or 4 layer 8 inch cake will serve? Thank you so much!
I like to say it feeds 20-25 people, depending on how big of slices you cut!
Hi Chelsea! Love all your work! Does this cake come out moist and stay that way after being in the fridge/freezer? Can you use a simple syrup to keep them moist?
Thanks!! It definitely freezes well! I don’t normally use simple syrup (the buttermilk makes the cake pretty moist), but if you want to add some simple syrup you could!
Hi Chels your amazing and I love your vanilla cake recipe. I get asked a lot for 2vanilla layers one chocolate. Is there anyway I can add the cocoa and coffee to the vanilla recipe instead of making so much extra batter for the chocolate…
Thanks Carolyn, and so happy to hear you’re enjoying my vanilla layer cake recipe!! I’m actually in the process of sharing my marbled cake recipe, which shows how to make half of the batter vanilla, and then turn the other half into chocolate 🙂 It’ll be up within the next week! stay tuned!!
Hi! I may have missed it, but how long do you bake 3 6-inch pans for using the half recipe? Also, your half recipe does make 3 pans right? It’s throwing me off that it says it makes “1 serving” of a 6 in. layer cake? Thank you so much for sharing, I can’t wait to bake this! 🙂
Haha yes, sorry for not making that more clear! A half batch will make 3 cake layers, and I like to bake them for 25-28 minutes!
How would I adjust the recipe to make 3 9-inch layer cakes?
Hi Sarah! I would make 1.5 batches of batter to make three, nine-inch cake layers with this recipe 🙂
Hi Chelsea I plan on making this cake but I wanted to make 3 layers using a 9 inch pan.. would I double the recipe or do 1.5 of the recipe?
I would recommend making 1.5 batches of batter to make three, nine inch cake layers 🙂
Hi! I had a question I am making a 3 tier cake using your vanilla layer cake recipe. Baked in 6 inch cake pans. I need to transport it in the car to the party. I was wondering what size cake box can I use??
do you mean 3 tier, or 3 layer cake?? if it’s three tier, it’s going to be super tall! Either way, I normally cut the tops off my cake boxes, and just leave the top exposed, to ensure it doesn’t get smushed! it’s so hard to find boxes that are tall enough for layer cakes <3
Hello, I want to make ur vanilla cake recipe. But notice that u didn’t add egg yolk. Just want to know why it’s left out? Secondly is it okay to freeze the cakes? If yes then how long can we freeze it ?
using just egg whites makes the cake a bit lighter in texture, which I like! You can also use 5 whole eggs in place of the egg whites though! You can definitely freeze these cake layers! I go through all the details on that here: https://chelsweets.com/2018/10/28/how-to-make-cake-layers-in-advance/
hope that helps!! <3
What cake round pan do you recommend using?
I like to use 7 inch pans and make 4 layers, but you can also use 8 inch pans, and make 3 or 4 layers <3
OH my goodness! YUM
Just made this recipe for my husband’s birthday cake and I just tried the cake trimmings while the crumb coated cake is chilling. Sooo good! I’ve made a blueberry yogurt frosting to go with because he loves blueberries so much. I follow you on Facebook and your cakes are life goals. Thanks so much for a wonderful recipe.
aw you are too sweet! I’m so happy to hear that Sarah, thank you for sharing!! that frosting sounds delicious!! ?
Is a stand mixer necessary? Can i use a hand mixer instead?
You can definitely use a hand mixer 🙂
Hi just wondering how long to cook 6inch layers for pls. Thanks.
I usually bake them for about 30 minutes, or until a toothpick comes out clean! But this can vary based on the amount of batter in each pan!!
I just made this cake and it’s cooling. I baked it at 350 and their done but they look pale on top instead of golden, is that normal?
yah! mine don’t always brown a ton on the top! It also can vary based on your oven and how high your rack is! That sound be fine as long as a toothpick comes on out pretty clean 🙂
Wow ! I just recently discovered your work through Instagram, I LOVE the detailed blog post with all the tips and vidéo ! Im so excited to try. Especially love the explanation on how to replace buttermilk and translation into grams … since I am from France 🙂 Keep up the great job !!
Aw I’m so happy to hear that Angelina!! You’re too sweet, thanks!! Happy baking <3
Hi! I was wondering how many does this make for 6inch cake? Also how long to cook the 6in. Thank you!
Hi Dayla! one batch makes about six six-inch cake layers! I usually make a half batch to make a six inch cake with three layers. I bake the layers for 28-30 minutes <3
Thank you so much. I made this recipe and it was the best cake I ever made lol thank you so much!
so happy to hear that!!! 🙂
I can’t wait to try this cake recipe. Quick question….my daughter wants a chocolate chip cake. Could I simply add them to this recipe as it is? If so, what type would you recommend? Thanks!
of course! I like to add mini chocolate chips!! just be sure to toss them lightly in flour before carefully folding them into the batter! this will help them from sinking to the bottom of each layer <3
Is there a way I can make this lactose free? What can I use in place of buttermilk?
You could try almond milk! I’ve done this with a vegan cake recipe and it turned out, so I’d think it should work for this recipe too <3
Hey. Love watching your tutorials but saw where you said you use this as a base recipe for all of your other flavors and was curious if you would use this to make strawberry flavored cake? If yes could you consider doing a video or blog about a strawberry flavored cake? Pretty please and thank you. I have seen lots of flavors and even strawberry flavored buttercream but have still yet to find cakes that fit my taste of strawberry flavored cake since strawberries are so fussy to bake with and most people use strawberry flavored jello. Thanks!
haha ugh what a question Lorie!! I only say that because I’ve been meaning to share a fresh strawberry cake recipe for a while, but have struggled getting it just right! I hate the recipes that use jello, but that’s the only kind I’ve successfully made thus far. I plan to revisit it this summer, so stay tuned!!! <3
Hi,
I just made one substituting strawberry emulsion ( it’s like an extract) for the vanilla extract. It was soooo good.
really?! wait where did you get it from?!? exciting news!!! 🙂
Unbelievable. I have tried dozens and dozens of vanilla cake recipes trying to find the holy grail and THIS IS IT GIRL! Its the perfect marriage of density and fluffiness, with a perfect crumb and incredible flavor. Bravo you wonderful woman, I will never make another vanilla cake recipe in my life, and will forever sing your praises and pass this recipe (with due credit) on.
This makes me all the more eager to try the chocolate cake!
Oh Anne that is SO wonderful to hear!!! I read the beginning of that and was like, oh no! But I’m so happy that you love this recipe as much as I do 🙂 Yes, you should definitely try my go to chocolate layer cake recipe next, it’s delicious!! <3
hi! i just wanted to know where your small batch recipe for this vanilla cake is!? thanks !!
ugh in the midst of switching recipe cards on my blog it was lost!!! I’m working to reshare it soon!! stay tuned <3
Hi, do you bake in 2” pans or 3”? Thanks
my pans are 2 inches deep! <3
Hi! I am planning to make a single layer of white cake in an 8 x 8 pan. If I half this recipe, do you think that would be enough batter for that? Thank you in advance!
Yup, it will be enough!
Hi
Would this cake be too soft to cover with fondant icing?? I’m making a unicorn Harry Potter cake so I’ll be covering with icing and putting in a unicorn horn. Do you think it’ll be to soft too hold it all??
I love your chocolate cake recipe and this seems liked it would be the same
Thanks
It actually has great structure, and keeps its shape very well 🙂 It will be just fine under fondant!
Great thank you so much for your reply
I tried the buttercream and thought it was too salty. What’s the purpose of the salt? Next time I think I’ll omit.
Since the recipe calls for unsalted butter, it needs a little salt to help balance the sweetness of the buttercream! Did you use unsalted butter? You can definitely add less salt next time, to suit your palette <3 it’s all about adjusting to make it taste exactly how you like it!
Hi there, I was wondering if you can use regular beaters as I don’t have a paddle attachment?
Thanks
You definitely can! just be sure to mix it on a low speed, and to not overmix the batter 🙂
I really struggled with this recipe. Followed to a T. I did three 9-inch pans and checked them pretty early and rotated in my oven. By the time I hit 25 minutes, they were torched on the sides and bottom. So I start over and lowered my oven by 25 degrees. This time, at 25 minutes the sides and bottom were verrrrry dark brown and the middle almost raw. I cook a ton in this oven, so I don’t know if it was the high sugar content, my dark cake tins or what.
I’m so sorry to hear that Allison! This recipe recommends making either four seven inch cake layers, or three eight inch layers.
If you tried to make three nine inch cake layers with one batch of batter, they’re going to turn out too thin. you would need to make 1.5 batches of batter.
what brand of cake pans do you use? I use aluminum cake pans, that are the fat daddio brand! Dark metal pans do absorb/distribute heat more quickly and thoroughly than lighter-colored pans. That might be the problem!!
One batch makes two 10 inch layers. Half makes two 8 inch layers. One and a half makes two 12 inch layers.
Hi!! I have a couple of questions as I am making my wedding cake also! How much of this batter would I need to make a three tiered wedding cake that is 10, 8, and 6 inches? Also how much of the ABC frosting would I need to frost this three tiered cake? Thanks so much and your cakes are beautiful!
I’m actually working on a post right now sharing how to know how much batter you need for different sized cakes! I’m hoping to share it later this week, stay tuned!!
Can I add some lemon zest and a little lemon juice to the cake? I was thinking of putting lemon curd between the layers
You can, but it might make the cake batter separate a bit (not a problem, just a heads up)! I would swap out maybe 1/4 cup of buttermilk for lemon juice, and then add in a good amount of zest! It should bake up great 🙂
Hi, thanks so much for your helpful videos! I’m currently making this and I’m really confused about the conversion from cups to grams. Flour says 3.25 cups is 410 grams yet 3 cups sugar is 600 grams? I’m doing the buttercream now and have used 675 grams of butter but I’m worried that is too much now as Google says 3 cups would only be 400 grams. Please help! 🙂
Sugar and flour weigh different amounts, so granulated sugar is 200 grams per cup, and flour is generally about 125 grams per cup! I’m a bit heavy handed when I scoop my flour, which is why I list 410 grams of flour for 3 1/4 cups 🙂 hope that helps, happy baking!
Good Morning Chelsey, Would you please help me, this cake is loved by everyone that I make a cake for, i have a request for a large sheet cake, I have a wilton sweet cake pan that is 12×18, very scary for me to make, please tell me how many recipes would I have to make in order to fill this pan, the request is for a single layered cake, I don’t want it to be too flat and I don’t want it to be to big, say two inches high. I think I read one of the comments that said you would be working on cake pan batter chart, have you done it, if so, where can I find it, Thanks Again For All the Wonder Recipes and Technique’s You Share With Use Home Bakers, God Bless And Please Keep Them Coming, I Have Learned Sooo!!!! Much From You, Beautiful Cakes, Easy And Clear Instructions.
Hey Chelsea, I really love your vanilla cake recipe, they bake and taste so we’ll and come out nice and flat. Please what if I wanted just one layer of the 7 inch pan for this recipe. Thanks
Thanks Tomi!! You can use 1/4 of the ingredients to make a single 7-inch cake layer!
Hey Chelsea
Your recipe is so amazing
Lovely and flat layers
Please how can I make just one layer of a 7 inch pan.
Thanks Tomi!! You can use 1/4 of the ingredients to make a single 7-inch cake layer!
Hi Chelsea! Just wondering why you make the cake in this specific order? Is there are difference in the way the cake bakes if I were to cream the butter and sugar together first? Delicious cake btw, just wondering if there was a way I can make it just a little bit less dense!
Good morning Chelsea thank you for sharing with us your knowledge. Must the cream or whipping cream be whipped before adding to the frosting?
nope! i just pour it straight in from the container, in its liquid state 🙂
Hey! When trying to colour my layers purple they always go blue. The butter I use is quite yellow, so what colour would you use to counter this? Thanks ?
I’ve been watching your videos for a week so I could attempt to make my boyfriend a birthday cake, I used your vanilla layer cake recipe and buttercream and put strawberries in between the layers and it was amazing. The best vanilla cake i’ve ever tried. Thank you!!!
I’m so happy to hear that! Thank you for putting my recipe to good use Jordan 🙂
I tried this recipe for the first time this weekend. I made a say “Yes to the dress’ cake for my daughter. Everyone loved the recipe THANKS I would love to post a picture but can’t find the upload button
aw I’m so happy to hear that!!!! I know, it stinks that you can share photos in the comments on here :/ If you shared it on instagram or facebook, you can always tag me 🙂
Thats a great recipe the only thing i want to knw that y did u use only egg whites?? Do u hv any rmgreat recipe like this with whole eggs as here where i live it is difficult to find carton egg whites:-(
you can use 5 whole eggs in place of the egg whites in this recipe! I just like using egg whites because they make the batter a tiny bit lighter, and easier to color!
That looks yummy!
Can I add pink champagne? My boyfriend and I want to have a tiny intimate wedding, and I think that the perfect wedding cake would be a single tier semi naked pink champagne cake with white rose buttercream. You recommended this recipe on our video on YouTube about how to make the perfect semi naked cake, and I’m assuming that I should add only a small amount of pink champagne so the liquid won’t ruin the consistency of the cake.
What do you think?
You can definitely swap out half a cup of buttermilk for pink champagne! I’ve done that before and it works great. If you really want to impart a champagne taste into the cake, you can also add a pink champagne simple syrup to the layers. Hope that helps, happy baking!!
Hi Chelsea! Will the cake still turn out great if i half all the ingredients to make a smaller cake? Thanks!
I actually just shared a small batch version of this recipe, which makes 3, 6-inch cake layers! I’d recommend using it instead: https://chelsweets.com/2019/05/02/6-inch-cake-recipe/
I made this recipe and your cupcake recipe loved both. I just had a quick question for my daughters birthday I was going to do a large Wilton 3D cupcake and was wondering which recipe would you recommend using for that? Thank you!
I just tried a vanilla cake recipe and was so excited to finally make a cake from scratch but it just tasted like flour 🙁 I’m now really scared to try making cakes from scratch since this attempt was a fail and a waste of ingredients and time. However, you have recieved many amazing reviews and I would love to try your recipe out. I’d like to make 3, 6 x 2” cakes, with layers that are as tall (and flat) as possible as I need a tall cake and I find that trimming the dome part of a cake always removes so much cake. Will using this exact recipe and putting more in each pan, bake taller layers or should I split the recipe, and if so by how much?
That’s so strange, it shouldn’t taste anything like flour! The dominant flavors should be the vanilla extract and a slight tang from the buttermilk.
I have a small batch recipe that makes 3, 6 inch cake layers that are about 1 inch tall. here’s the link: https://chelsweets.com/2019/05/02/6-inch-cake-recipe/
This recipe should bake with a dome, most people don’t even level them because they’re so flat!
Are you properly measuring your flour? some people really pack it into the cup measure, which can cause them to add a lot more flour than is recommended! I bake by weight (grams) which I’ve found helps ensure you use the right amount of flour. Hopefully that helps!!
This is AMAZING!! I’ve been trying to find a vanilla cake recipe that really gets that WOW factor and I finally found it! Thanks so much Chelsea!!
aw I’m so happy to hear that! Thank you for sharing Barbara 🙂
I have never left a comment on a blog or a how to page BUT I HAD TOO…I went back through my history on my computer to find you..BECAUSE this was THE BEST CAKE RECIPE EVER! I’ve made tons of cakes ..always with a yellow or choco cake recipe and they have tasted great…YOUR CAKE was amazing. It baked great (I followed your video of how to cool it trim/level it and wow! What an easy easy cake! I am sold..just had to tell you and encourage you that it was a fun video to watch and a wonderful recipe
I am so happy to hear that Martha! Thank you for taking the time to share, comments like this really do make my day!!! 🙂
I used this recipe for a three tier, naked, berry cake for a wedding that I did last weekend and I’m still getting rave reviews on how delicious it was! Thank you so much for sharing, this will be my go to vanilla cake recipe from now on!!! I’ve attached a pic I hope you don’t mind. https://www.facebook.com/SweetKBakes/photos/pcb.2257036987750533/2257036901083875/?type=3&theater
I am so happy to hear that, and it looks gorgeous!! I’m so happy you shared a photo, and that’s a great way to do it! people have a hard time sharing pics on here, but sharing a link is a great way around that 🙂
Thank you for sharing Kathy, I love seeing people put my recipes to good use!!! <3
So I just made this cake but subbed the 1/2 cup of buttermilk with baileys because I couldn’t find a vanilla baileys cake just chocolate and it was AMAZING!! Your recipes are the absolute best! Thank you for sharing them!
I’m so happy to hear that Christina!! Love to hear that type of creativity 🙂 Now I want to try that!!! haha happy baking <3
Hello Chels
If I wanted to make this recipe with 6 inch tins. Would you recommend I make two, 2 tiered cakes?
Hi Suzana,
One batch of this recipe makes about 5 6 inch cake layers! I actually have a great small batch version of this recipe which makes 3 perfect 6 inch cake layers 🙂 here’s the link to the recipe: https://chelsweets.com/2019/05/02/6-inch-cake-recipe/
Hello.
I just prepared the dough but I do not understand, it looks like she has grained …
I do not know what it will give at the exit of the oven …
I do not know what happened … do you have any clues?
Have a good day
Julie from France
Sometimes that can happen if the ingredients aren’t all at the same temperature! I’ve had that happen before (I didn’t let my wet ingredients come to room temp before adding them), and my cake layers still baked up just fine! <3 Hope that helps Julie!
I am curious to know if you’ve ever tried sour cream in your cakes. Why do you prefer buttermilk over sour cream or milk?
PS. I love that you respond to every single post!
Hi! I have a question about tiered cakes- I’ve been practicing to make my sister’s wedding cake and I never know how many layers you can have before you need to add a cake board and dowels. I’m scared it will be too heavy and the frosting will start to leak out the sides, but also don’t want to add them unnecessarily. Thank you!
Your tiers should be the same height, so each one should have the same number of cake layers. I usually use 3 cake layers per tier, but sometimes do four. If the cake is properly supported, none of the frosting should bulge out from the sides <3 hope that helps Sandy!!
Hi Chelsea! My 5 year old daughter and I both love your videos on youtube! 🙂 anyway, Im planning to use this recipe for a tall rainbow cake. Im thinking of making twice the recipe for 6 layers of 8 inch cakes. Have you tried doing that already? Ive noticed you do mostly 4 layers so I was thinking its because it might be too heavy? Do you think it will hold up? Thank you!!!
Can I use whole eggs in this recipe? My friend requested a yellow cake recipe but I still wanted to try out this recipe. If so how many will I need to use? Thank you so much in advance!
So sorry for the delayed response Joshua! You definitely can. You can use 5 whole eggs in place of the egg whites 🙂 Hope that helps!!
Thank you so much, Chelsea, for sharing this great recipe!
I’ve adapted the buttercream because we Germans don’t have a sweet tooth. I mixed butter and powered sugar 1:1. I always have the problem that the buttercream has many air bubbles and the cake frosting doesn’t look smooth.
Is this a problem of how I prepare the buttercream or is it more difficult using German buttercream?
Thank you for any advice!
Hi Tessa! I totally understand 😛 I sometimes get air bubbles in my buttercream, and I just give it a really good stir with a rubber spatula to smooth it out. I’m not sure if that will work the same way for german buttercream, but it’s my best suggestion!! Hope that helps, happy baking!
Hi Chelsea!! I love your blog & videos!! I really want to make this cake for my son’s birthday on Monday, but we’re going out of town Saturday until Monday so I don’t want to rush to make it when we get back. Do you think it will be good to make Friday & keep it in the fridge until Monday afternoon? Should I frost it Friday or wait until Monday?! I seen that it freezes well but I don’t think there will be enough time to thaw once I get back home Monday! Any advice or yours would be so great!!
Thanks Candiss! So sorry for the delayed response!! Cakes that are fully frosted stay good in the fridge for several days. I made/frosted my wedding cake 5 days before my wedding, and it tastes amazing when we ate it. If you do put it in the freezer, transfer it to the fridge the day before you plan to eat it, so that it can slowly warm up. This will help minimize temperature shock / condensation. Hope that helps!! <3
Hi! Does this cake stand up well under fondant?!
Hi Samantha! This cake recipe has great structure, and holds up just fine under fondant! <3
Hey, I’m looking to turn this into a funfetti cake, how much sprinkles do you recommend? 1.5 cups? Also do you coat your sprinkles in flour first to make them stay put in the batter?
Apologies if you have answered this previously, I did try and scroll through the same 100 cupcake and and pan queries.
Ta
I’d recommend just using my funfetti cake recipe!! It’s based on this recipe, and will make your life easier 😛 Here’s the link: https://chelsweets.com/2019/05/09/funfetti-cake-recipe/
I usually don’t coat my sprinkles in flour, I just gently fold them in to the batter once it’s made. Hope that helps! <3
Hi! Does this cake stand up well under fondant?! I’m excited to try this recipe!
It does! it has a great structure, and works great under fondant <3
Hi, I was just wondering if I could sub cake flour into this recipe instead? I prefer fluffiness especially because I’ll be making a funfetti cake
Hi June! You can sub cake flour, but it will definitely change the texture! I prefer this recipe with AP, but if you like recipes with cake flour you can sub it! <3
I don’t have a stand mixer. Will this cake turn out the same using a hand mixer?
This recipe will turn out just fine with a hand mixer 🙂 They can totally be used in place of a stand mixer!
I made my own buttermilk and added it to the velvety looking batter, and it appears to have curdled. I’m baking it in 2 10 inch pans and it is taking longer than 35 mins. I’m staying the course, but is the curdling normal?
Sometimes the cake batter can separate a bit, so if that’s what happened then it should still be ok! I usually use a couple flower nails / heating cores in any cake pans larger than 8 inches, to help them bake more evenly and quickly. When I use flower nails, I find that my 10 inch cake layers bake for 37-38 minutes! Hope that helps Catherine!
Hi Chelsea! I’m new to cake baking. I know that this batch of batter can make more or less cakes depending on the size of your pan, but is there a height that you recommend the batter be in the pan? For example, should the wet batter be about 1 inch tall in the pan after pouring it in?
I usually like to fill my pans about 1 inch high with batter! my pans are usually 2 inches tall, so I have about 1 inch left in the pan once I’ve poured the batter. The better way to do it though is to weight your pans, to make sure they all have the same amount of batter! that way you’re guaranteed to have your cake layers bake to be the same height 🙂
Hi! I am planning on making a 3 layer 10″ and was wondering If I should double the recipe for this or If I should just make 1 full batch of batter and then another half?
Hi Taylor! You can definitely make a double batch, as long as your mixing bowl / stand mixer is big enough! I do it all the time when I’m making big cakes! 🙂
I love your recipes and this cake is one of my favorite! I’m making my first tiered cake next week and am wondering how many recipes I need to make a 6”, 9”, and 12” cake, all three layers. Any advice for me?
I actually share exactly how I figure that out here! It will help you calculate the amount you need for this cake, and any cake in the future 🙂 Hope that helps Ronya!
https://chelsweets.com/2019/04/22/how-much-cake-batter-per-pan/
Hello I Love your YouTube channel and recipes?? Thank you for sharing?I want to make the peeps cake, but I only have 8 inch cake pans how much batter can I put in to have 4 layers? I don’t m9nd if the layers aren’t supper thick I just need to know how much until I can order some pans. Thank you in advanced
OMG! This cake recipe is amazing. Made a 3 layer x 3 tier cake and it was perfect. So so delicious. I needed to use a heating rod for all sized pans (6″, 9″ and 12″) otherwise they seemed to rise a bit too much in the middle. This will now be my go-to cake recipe. Though I can’t wait to try some of your other variations on your site. Thank you so much for your other tips – freezing the layers, how far in advance to buttercream, etc. Everything was really useful. You are a wonder Chelsea! THANK YOU!
I am so happy to hear that Sarah!!! And that you’ve found my other posts helpful 🙂 Happy baking!!
Hi there, I’ve tried making this cake a couple of times now, but each time it has come out a bit dry. I’m in Australia, so I’ve had to convert oven heat etc. I”m using an 8 inch cake pan and making three layers. Doyou have any suggestions?
So sorry to hear that Miranda! A lot of the moisture comes from the buttermilk, is buttermilk maybe different in Australia?! I know it can vary in different countries! Or maybe try baking it less long? It should come out pretty moist!!
Hi, I need to make 2- 10x10x2, cakes and I’m not sure about the amount of batter needed. Can you please help me with this?
I actually have an in-depth post that explains exactly how you can figure out how much batter you need 🙂 here’s the link: https://chelsweets.com/2019/04/22/how-much-cake-batter-per-pan/
Quick question, my cake batter very grainy and when I took it out the oven there was caramelization in the shape of a circle and the outside of the circle was normal color. But the whole thing looked as if it were liquid but the cake was fully cooked?? Is this normal?
Caremelization around the sides o the cake is totally normal, but usually the cake layers look fulled baked when they come out of the oven. Did you use a different size of cake pan than a 7 or 8 inch?
Hello! Just wanted to say that this is now my fav vanilla cake recipe! I doubled the recipe for 3 10-inch cakes. Thank you very much!
I am so happy to hear that Jake 🙂 Thank you for sharing!!! This put the biggest smile on my face!
I am so excited to have found you! and your amazing cakes and recipes! I was hoping to flavor the cake with some coffee, so its a coffee / vanilla cake base. Do you think it would be okay to put in a couple tsp of espresso powder? Also was planning to make a 4 layer 10″ cake. I’m guess from all the comments, I will probably need 1.5x the recipe? I don’t need the layers to be too big.
You can definitely add some espresso powder to the cake mix! I’d say dissolve it in a tiny bit of water before adding it though, to help it incorporate better into the batter. If you want to make 4, 10 inch cake layers you should double the cake recipe <3 The layers will each be about 1 inch tall!
My edges and top becomes very hard , can I cut out some of the sugar?
Hi Kymberlee! What types of pans are you using? Sometimes darker pans can cause cake layers to caramelize more than normal. You can reduce the sugar a bit, but it will change the taste and texture of the cake layers. A bit of caramelization is normal, and actually tastes amazing!! That’s my favorite part of this cake recipe.
Hi Chelsea,
I tried your vanilla cake recipe and it tastes great. The only problem I have is that it crumbles. To I take it out of the pain but it seems to crumble whenever i try to lift en move it. Hope you have an idea as to what the problem could be.
Thank you for your help!
Best regards,
Gabriela
Welcome ^^. I’ve already use that recipe for a few different flavors and they all turn out amazing! I’m wondering, if I subs some of the flour with almond flour, will it be just as good? Thanks in advance!
I’m about to try this recipe for the first time and need to know how many cups of the batter equates to 450 grams.
This recipe makes about 7 cups of batter, and is about 1800 grams when it’s made. Seems like 1.75 cups of batter should get you about 450 grams.
Hi Chelsea, I just saw this response about the flour weights and in the recipe you list flour as 390g; should it be 410g? Just baked a cake and it looks fine so I hope 390g was correct! ?
Hi Dana,
I’ve made the cake both ways, and it turns out great with 390g or 410g! I like the texture slightly better when I use 390g, which is why that’s the amount included in the recipe! I believe a cup of properly measured flour is 120g, so my weight measurement in the recipe reflects that <3
Do you use one recipe of batter for 2, 8 inch layer and 2, 6 inch layers or do you need more batter?
You can use one batch for 2 8-inch cake layers and 2 6-inch layers, but they’ll be thinner/shorter than my normal cake layers!! <3
Hey Chels! Excited to try this cake, however I’m needing four 6″layer, do you think this would be okay? I read where you said halving it would give four thin layers, but I don’t want thin. Would I just use my digression? Thank you!!!
This recipe actually makes 4, thick 6-inch cake layers! It makes thin cake layers if you make 4, 8-inch layers, or if you use a half batch to make the 6 inch layers.
One batch will be fine to make 4, 6-inch cake layers, but they will need to bake a bit longer. I’d suggest baking them for 36-39 minutes. Hope that helps, happy baking!
Hey, I’m about to try this cake for the first time and I have a few questions.
1. Can I substitute the butter in the batter with vegetable oil?
2. How to make a smaller batch of this cake since the recipe calls for almost 7 eggs?
Hi Sahr! If you want to make a smaller version of this recipe, I recommend using my small batch version! here’s the link: https://chelsweets.com/2019/05/02/6-inch-cake-recipe/
I highly recommend using butter, as the recipe is made to turn out best that way <3
Can you cook this is 2 pans rather than 3? Just tried the 6 inch half recipe in 3 pans which is looking nice and currently cooling put I normally make 2 deeper ones? Thanks
This layer cake recipe caramelizes quite a bit on the sides as is, so it bakes best when the layers are baked in more pans / with not as much batter! You could use 2 deeper pans, but i’d recommend using a flower nail too, to help the thicker layers bake more evenly and quickly. They also will need to bake slightly longer! Hope that helps, happy baking Hayley!
WOW!! This cake is Dangerous!! I Can’t Stop eating the scraps! This cake recipe has to be the BEST Vanilla Cake recipe I’ve made and I’ve tried many! Now, I’m mad ? I didn’t try this earlier. I tried another recipe today and added sprinkles to make it funfetti like.
This recipe will most Definitely be my go to recipe! I hope your cupcake recipe is just as delicious as this one.
Thanks!
#newfollower
You are too sweet Jackie! The cake scraps are what always get me too 😛
Thank you so much for the kind words, I’m so happy you’re putting my recipes to good use! Happy baking!!
I’ve made several 8 inch, 10 inch and 12 inch cakes but a few are crumbling at the outer edges. I’ve followed your recipe exactly and not all cakes are crumbling. What could be causing this?
Actually, Chelsea, all of us professional bakers in the U.S., and a huge number of home bakers, as well, use the metric system, as it’s a bit more accurate when multiplying or dividing recipes and formulas. Sites such as King Arthur Flour now only use metric measurements, not imperial weights. It’s fairly easy to find automatic conversion sites; you’d be doing yourself and your readers a real favor by using weight measurements in grams instead of ounces.
Hi Rachel! I do use the metric system, which is why I include grams for all my recipes 🙂 With that being said, a lot of home bakers or new bakers are still hesitant to break out the kitchen scale (or even buy a scale), so I provide both measurements in each recipe!
Can I just say thank you! I’m from England, so we use Grams not cups, and you have no idea how hard it is to find recipes that covert cups into g for you! Whenever it comes to converting myself from cup to g conversions online, it still doesn’t always work, as you know baking is a science and being slightly out on weight can still make all the difference! So thank you so much for giving the g measurements too! I cant wait to try your recipe!! 🙂 Have always followed you on Instagram, love what you do!
Emily
I’m so happy to hear that Emily! It definitely takes a bit of extra work to share all my recipes in grams, but it’s totally worth it when I get comments like this! Thank you for sharing, I really appreciate it 🙂
Hi, Chels!!
I’ve made this recipe more times than I can count because it such a nice, dense, vanilla cake!
Although, every time, the edges of the cake get really hard after cooling… I have to trim it heavily. Do you think it’s my cake tins or the recipe?
I’d love to be able to not have to trim the layers this much. Just wondering what your advice would be!
You’re amazing! Thanks for any tips!
-Hailey
Hi Hailey! I’ve found the caramelization can vary a ton based on your oven. I’ve seen some people have hardly any, and others have a ton.
I also get some caramelization on my edges, but if I trim the edges while the cake layers are chilled, I find I don’t have to trim off too much from the layers.
My tip would be to try cake strips. They’re a bit of a pain to use, but they do help with caramelization! Hope that helps <3
I just made this layer cake for my daughters first birthday. It was miraculous! I had never made a layer cake before and choose to do 5 tiers! 3-9in and 2-6in. Your pi (3.14 X etc.) equation was awesome and easy to follow. Since I calculated I only needed 1 and 2/3 batches I was able to make an extra 8in round and frosted it to test taste and have dessert the night before the party for all my family visiting town! I did use cake flour and coconut oil instead of veggie oil. Everyone was thoroughly impressed. I used your vanilla buttercream frosting recipe as well and it made plenty extra for how much cake I was making! I decorated with real sunflowers and a homemade paper cake topper 🙂 thanks for such an amazing recipe!!
Hi Hannah,
So happy to hear that, and I love that you found my batter calculator helpful 🙂 Sounds like it was an epic cake, you have one lucky daughter!!
After talking with other bakers ended up re-making and they turned out great!
What would the difference in texture be between buttermilk and whole milk. I thought buttermilk would “fluff” the texture up. And, is a butter cake a pound cake? I definitely don’t want a pound cake.
Hi Gloria!
The buttermilk really just adds a ton of moisture, and a bit more flavor! Whenever I use whole milk in this recipe, the cake tastes a bit less moist and less flavorful to me.
This definitely isn’t a pound cake, but it isn’t a sponge cake either! It has a wonderful texture, and isn’t dense like a pound cake. Hope that helps!
I love to make and decorate cakes but could never find a recipe that was out of this world delicious. Always sweet and always “oh yum…standard vanilla that tastes like Betty Crocker boxed cake” (and same goes with frosting). I needed a new game plan.
I found your recipe and I AM AMAZED! The buttermilk and egg whites definitely made me a little skeptical…not gonna lie…but your videos are fantastic so I said “I’m going for it”. I made my gender reveal cake (also followed your “painting buttercream” video for tips, thanks for that!) and it was a huge hit! Compliments left and right, it held its shape and it tasted like a cake should! Thank you. Thank you. Thank you for this recipe!
Hi Annie,
hahaha I totally get it, when I first started baking I used to avoid recipes that called for egg whites like the plague!! But then I realized you can buy cartons of egg whites, and I got a bit adventurous 🙂
I’m so happy to hear you tried this recipe and loved it!! Thank you for putting it to good use <3
Hi Chelsea, I’m so glad I found your blog! I made your vanilla layer cake with raspberry jam for my daughters christening this weekend. I wanted to create a semi-naked cake and your recipie was perfect. I baked a test cake but my pans were a little big and the layers too thin, so I searched high and low to find a 7” pan (seemed to be less common here in Australia) and the 4 layers together were just the right height. I always have trouble creaming butter & sugar so using the butter to create the crumbly base then adding the wet ingredients was so much easier! And I like that it creates a slightly denser texture for the cake.
I used a Swiss meringue buttercream as I find American buttercream quite sweet, but it still worked well, I just had to add some Wilton white food colouring.
This cake is so versatile – great that you can use it as a base for many different versions!
Thanks again!
Hi Lisa!
I’m so glad you found it too 🙂 7 inch pans can be hard to find, but they really are the perfect size!! I totally respect your choice to use SMBC, American buttercream can definitely be on the sweet side. You have one lucky daughter, I hope her Christening was wonderful 🙂
Hi Chels!
I need to make one 9×13 sheet cake and two 6″ round cakes. Do you recommend I double the recipe?
Hi Mandi,
You should have just enough batter to make all that if you double this recipe. Happy baking!
Hi! I absolutely love your vanilla cake recipe!! Been a hit every time I make it…. I’m making it in advance and freezing it, and adding chocolate chips to the batter. Does it matter that it will have chocolate chips in it, will it make a difference in freezing it?
Thank you
Hi Chelsey! I tried this recipe with a 12 inch at 325 degrees for 50 minutes and it came out awesome! I need to make a 16 inch also, what would you suggest for the temperature and time? I’m making a 3 tier wedding cake. I need to make sure the middle cooks ?
So happy to hear that Kathy! I would say bake the 16 inch at 325 degree, and just be sure to use a few flower nails in the center to help the cake layers bake evenly and more quickly 🙂
Would this work for sheet cakes? 1/4, 1/2 sheets
Hi Starla! I use one batch of batter to make 2, 9 x 13 inch sheet cakes that are about 1 inch tall. Hope that helps!
I am so nervous! I have been baking for 40 years. A young friend asked me to make her wedding cake. Her only request is semi-naked to serve 125. I am not charging for the cake. I am likely doctoring a white box mix and using your recipe for American buttercream. I have spent hours watching your videos. Thank you for sharing your expertise and encouragement. The wedding is in six days.
Hi Elisa! I’m sure you will do an amazing job, and you are such a good friend!! I’m so happy you found my videos helpful 🙂 Best of luck, I’d love to hear how it goes!!
Love this recipe and back again! Would I need to double the batter for 3 10″ cake layers? Thanks! My favorite recipe by far!
Does using carton egg whites versus using egg whites separated from egg yolks change the consistency of the cake? I purchased carton egg whites and it seemed to be a very thin liquid consistency. Making your cake for a baby shower this week.
Thank you
Hi I wanted to make this cake for my sons birthday as a naked cake but we are dairy free. Do you know what I can sub the buttermilk for instead?
You can try using almond or soy milk, but it will change the texture of the cake a lot! I’d recommend trying my vegan cake recipe instead, which is dairy free <3
Here’s the link: https://chelsweets.com/2015/05/29/vegan-almond-birthday-cake/
Hi Cindy!
I appreciate your feedback, and sadly I have no idea what could have gone wrong! The main reason cakes end up dry is because of overmixing, but it sounds like you didn’t do that. did you use a paddle attachment? Were the ingredient all at room temp?
What type of buttermilk did you use? My cakes are usually quite moist, so hearing that it’s dry makes me think something must have gone awry :/ Hopefully we can figure it out!
Good Morning! Yes, I used a paddle attachment for it. I’m certain that it wasn’t over mixed because I am always very careful just to barely mix each ingredient until it is just incorporated, which is usually only a few seconds. My buttermilk was full fat buttermilk. I have no idea why it was so dense and tough, almost spongy. I looked on google about using egg whites from a carton and read somewhere that they can cause cakes to end up dry, dense and spongy but I read that you had tried both carton egg whites as well as fresh egg whites with the same result so I really don’t know. It was a beautiful cake but I had to throw it out. I was looking forward to having it for breakfast this morning, my favorite kind of breakfast! Lol
I’m sorry, I forgot to mention that the ingredients were at room temperature also. Well, the egg whites weren’t though, I poured them right out of the carton into my measuring cup and used them. Could that have made a difference?
Can you make 2x 8″ an 2 x 6″ cakes with this recipe?
I need this to serve 30 people. I like the look of the 6” size. Would you do this and then half the original recipe?
If I use a convection oven at what temperature it needs to be?
Hi Zuniga! I recommend actually not turning on the convection setting on your oven when you bake cakes. A lot of times even if you turn the temperature down, it can cause them to bake too quickly and overbake. Hope that helps, happy baking!
The blog recipe says 3 cups of flour but the YouTube recipe says 3 1/4. Which is correct? I went by the blog instructions
Hi TL! I just updated the recipe, so I’m glad you followed this version!
In general, if there ever is a discrepancy between my videos and my blog post, I recommend following the recipe on my blog. Sometimes I make small tweaks down the road after I film, and update the recipe.
I’m hoping to refilm my vanilla cake recipe soon, to avoid any future confusion <3
I made 2/3 of this to make two 8” rounds. I used whole eggs and because I had seen two different suggestions for how many in the comments, I decided to go by measurement (2/3 cup). But that was between 3 and 4 eggs. So I used 4. I loved the cake but it was kind of eggy so next time I’ll use 3 and see if it’ll be even better. Mine didn’t come out very flat and my oven made one of the pans bake uneven. The tops I cut off tasted amazing. Next time I’ll try homemade baking strips and one less egg.
Hi Catherine! I recently tried the full recipe with 4 whole eggs, and I liked it better than when I used to make it with 5 whole eggs! with that in mind, I’d definitely recommend trying 3 whole eggs for a smaller batch next time.
My oven actually bakes pretty unevenly too, so I rotate my pans halfway through the baking process. You can also try baking strips to help them bake more evenly! I don’t usually use them, but a lot of people swear by them. Let me know how it turns out next time!! Happy baking 🙂
Hi Chelsea. Can I cook the cake in one pan and cut my layers? I only have two pans
Hi! I hardly ever leave reviews, but I had to come here and thank you for this amazing recipe! I’ve followed you for a while and love all your videos and tutorials and have been wanting to try your vanilla cake recipe for a long time. I finally did over the weekend, along with your chocolate buttercream recipe, and holy wow are they delicious! I’ve been looking for an amazing vanilla cake recipe for a long time and I’ve finally found it! I made it in 3 9″ pans because it’s what I had, and it came out really well for me and made a pretty sizable cake. Thanks again for all your hard work in creating these recipes for us. Now on to try the chocolate cake! 🙂
Hi Jessica! I am so happy to hear that!! 🙂 That would be one big, delicious cake! Thanks for your support, and for putting my recipes to good use <3 Your comment put a big smile on my face!!!
Hello! I’ve been following you now for years and I credit my love of baking to your videos :). This is my go to Cake recipe and everyone always raves about it. Recently, I’ve been asked to make my first wedding cake. I’m excited but nervous, because anyone who has been a bride knows that this cake is a big deal! I want to use this recipe, but I’m concerned cuz every time I’ve made this (which is dozens) i get a little rim of caramelization around the top that sticks up above the cake like a little crown. I need to cut it off, and sometimes it leads to the corners of the cakes breaking. Because this is a wedding cake and there is so much stacking, I’m nervous about this! 2 questions.. 1, has this ever happened to you and am I doing something wrong to make this happen? 2, will cake strips stop this from happening ?
Thanks so much!
Hi Jamie! That is the sweetest thing I’ve ever heard!!!! 🙂
Making a wedding cake is a nerve-wracking, yet incredibly rewarding process! Leveling your cake layers is definitely a good idea, and I know exactly what you’re talking about!
The amount of caramelization on the sides of the layers can vary based on the type of pans you use, and your oven, but cake strips should help with that!! You’re not doing anything wrong, and sometimes I get a bit of that too! I find I get more of it when I use gel food coloring to color my cake layers.
Hope that helps, let me know if you have any other questions along the way let me know!! <3
Hi chelsea , I love your recipes. However i find it a bit dence. Do you have an alternative to a more softer type. Can I replace the egg whites with whole eggs?
Hi Kymberlee! I totally get that, this is definitely a denser cake recipe.
If you swap the egg whites for whole eggs, the cake actually is slightly more dense! You can do it, but it will change the texture a bit.
If you want to fluff this recipe up, you can cream together the sugar and butter with a whisk attachment in the beginning of the process, then add in the egg whites, buttermilk, and oil and vanilla, then fold in the flour. This should incorporate more air into the batter, to make fluffier cake layers. Hope that helps, happy baking!! <3
Just made this recipe for my sons baptism and it was a huge hit!! This is my new favorite butter cream!! I was having a hard time with other recipes to stabilize it for decorating, but this one was perfect!
Hi Jordan,
I am so happy to hear that 🙂 Thank you for sharing, congratulations on your Son’s baptism!!
I just made this recipe this weekend for my son’s baptism cake and it was a huge hit! I’ve always had trouble finding a good recipe for buttercream stabilized enough to decorate with, but this one is perfect! I can’t wait to try another!
This was a really great recipe. So simple. Practically foolproof. I made three batches for a tiered cake (3 – 8in and 3 -10in layers). Tasted amazing. I always worry that vanilla cakes will be dry, but this cake was moist and flavorful. And, perfectly dense, just the way I like it.
So happy to hear you love it Tammy! The dense-ness of this cake can definitely be polarizing, but it’s just how I like my cake too 🙂 Thank you for sharing!!
This was the best cake/frosting that I’ve made in my thirty years of baking. The cake was moist and had great flavor. The frosting was fabulous. Thank you for sharing your recipes.
Aw I am so happy to hear that Angela!! Your comment put the biggest smile on my face 🙂 Thank you!!!
Hi, may I add fruits (cherries) to cake mix? would it work?
Hi Antonella,
I’ve never tried adding fruit into this cake batter before! but as long as they’re small and you flour them (to help prevent them from sinking to the bottom of the pan), I think it should work! If you try it, please let me know how it turns out!!
Hello, I love your cake as it my go to for baking but everyone has said the cake is too sweet. Is there a way to cut down some of the sugar? 600 grams of sugar is a lot!
Hey! I’m going to be making this in Colorado, up in the mountains. Any tips with the altitude? Thank you!
I just LOVE following you, and I was finally able to try your vanilla cake recipe for my mom’s 60th bday and it was a HIT! I made my very first tiered cake and the layers held together nicely and tasted so great! Dense but also moist! Thanks for a wonderful recipe I plan to use many more times to come!
I’m so happy to hear that Michelle!! Congrats on your first tiered cake, that’s amazing! You have one lucky mother! And yes exactly, dense but in a good way ?
Hi!! I absolutely love this cake recipe! It’s my favorite! However when I bake my cakes following the recipe exactly, the middle of my cakes always fall. Is there a reason for that? O4 an adjustment I need to make for high altitude baking?? Thanks!!!!
Hi Kyla,
So happy to hear you love this recipe, but sad that the centers keep falling! Usually the centers fall, the cake layers need to be baked a bit longer. What altitude are you at? Air pressure is lower at high altitude, so foods usually take longer to bake. Temperatures and/or bake times may need to be increased, I’d play around with baking a few minutes longer next time. I hope that helps, happy baking!
Hi Chelsea! This is my absolute favorite vanilla cake recipe and I’ve tried many. Thank you for all of your amazing work and recipes – love the videos and your creativity.
I have a bunch of cake flour not being used – have you tested this cake using cake flour or 1/2 cake flour with AP? Just curious! It’s already so fluffy but I was thinking about testing it.
Thank you!
Aw thanks Elyse! I am so happy to hear that! I actually have tried it with cake flour (I did this in my matcha cake, but I also swapped out the buttermilk for whole milk). It definitely changes the texture, but not in a bad way! I prefer it with regular flour, but cake flour totally works too!
Just be sure to use 1 cup plus 2 tablespoons cake flour for every cup of all-purpose flour 🙂 I’d love to hear what you think of it if you try it 🙂 Please let me know!!
Hi, just tried it and it seems my cake is sunk in. the edges are higher and the middle. Do you know why?
Hi Vernita,
So sorry to hear that! A lot of times if the center of cake layers sink it, they needed to bake a touch longer! Or it may be that the batter was over mixed :/ here’s a great resource for that issue, how ways to troubleshoot it: https://delishably.com/desserts/Baking-Tips-Why-a-Cake-Sinks-in-the-Middle-and-How-to-Stop-It
hope that helps, happy baking!
Hello Chelsea 🙂 do you know if I could use cake flour instead of ap ?
Hi Mina,
You definitely can! It will change the texture a bit, but it’s still delicious! Just be sure to use 1 cup plus 2 tablespoons cake flour for every cup of all-purpose flour. hope that helps, happy baking!
Hi Chelsea!! Huge fan you’re amazing! This is my first time baking a 6 inch, silly question- cake board ? 12 inches? I am recent home baker and I’m learning everyday, you have taught me so much so thank you!!!
Aw thanks Lauren, you’re too sweet! Not a silly question at all. The size of cake board you use for a 6 inch layer cake totally comes down to preference. You can use any size 🙂 I like to use 8 inch boards for 6 inch cakes, so there’s a bit of an overhanging edge that makes it easier to transfer in and out of the fridge/freezer.
Also, if you want to make a 6 inch cake, I highly recommend trying my small batch version of this recipe. It makes 3, perfect little 6 inch cake layers. Here’s the link: https://chelsweets.com/2019/05/02/6-inch-cake-recipe/
Hope that helps, happy baking!!
Hi Chelsea! I was just wondering if I could use this recipe for 3 12’ and 3 10’ cakes. I’m making a wedding cake this weekend and want to know if I can use this recipe! The reviews are great and I wanna give it a try!
Hi Esther,
You can definitely use this recipe to make larger cake layers! I recommend using a heating core / flower nail as well, to help the layers bake through evenly and more quickly though 🙂
It works great for wedding cakes, because it has wonderful structure!! I hope you like it, please let me know how it goes!!
How many cupcakes would this recipe make?
Hi Ashley,
My cake recipes are designed to bake pretty flat, so it isn’t ideal for cupcakes! It still works, but they’ll make super flat cupcakes! I suggest just using my vanilla cupcake recipe instead! It’s also delicious, and I highly recommend it! 🙂 Here’ the link: https://chelsweets.com/2017/07/03/classic-vanilla-cupcake-recipe/
Hi Chelsie you are amazing and your cakes toooo, can I add eggs instead of eggs white? Thanks in advance
Hi Roxana,
Thanks 🙂 You totally can! I recommend using 4 large eggs in place of the egg whites in this recipe. Hope that helps, happy baking!
Hi Chelsea
I’d love to test your recipe for a wedding cake I’m doing.
What you recommend my measurement and cooking time would be for baking it in a 10” cake tin.
Love your works it’s amazing!
Thank you
Lisa
Hi Lisa! I actually have a great post that helps you calculate how much batter you need for different sized cake layers, here’s the link: https://chelsweets.com/2019/04/22/how-much-cake-batter-per-pan/
For large cake layers, I suggest adding a couple heating cores to the center (these are the ones I use: https://amzn.to/2NQ0lVZ), to help the layers bake more evenly and quickly! The bake time can vary based on how tall of cake layers you are making, but I find it usually takes mine 50-55 minutes. Hope that helps, happy baking!
made this recipe (just the cake not the frosting) and it was too sweet. would cutting the sugar significantly require altering the rest of the recipe?
Hi Hazel! So sorry to hear that, it definitely is on the sweet side! You can reduce the amount of sugar from 3 cups to 2, and it will still turn out! The texture will be slightly different, but it still is great. Hope that helps! <3
As an add on to Lisa’s question of 1/16/2020, would you lower the oven temp for more even baking? I am planning on using a 12″ square.
Hi Paula,
You can lower the temp to reduce caramelization, but I usually just bake them at 350 F.
For large cake layers, I like to add a couple heating cores to the center (these are the ones I use: https://amzn.to/2NQ0lVZ), to help the layers bake more evenly and quickly! The bake time can vary based on how tall of cake layers you are making, but I find it usually takes mine 45-55 minutes. Hope that helps, happy baking!
Oh my goodness! I wish I could post a pic of the wedding cake a made with this recipe! I have NEVER had good results freezing cakes until now! The cake was a semi naked cake and the edges turned out beautiful!!! It froze for two weeks and tasted amazing! This will be my go to recipe from now on! Thanks so much for all the tips and the wonderful recipe!
I am so happy to hear that, that’s awesome 🙂 Thank you for sharing!! Comments like this make my day Robyn!
I only have 2 7 inch pans, will the batter keep while I cook the first two? Or should I make the batter in two parts?
Hi Veronica,
That should be fine! Just be sure to bake the next two layers as soon as possible after the first two cake layers are baked 🙂
Can’t wait to try this recipe. I am attempting to make a baby carriage cake and I need a 2 layer 10 inch and 2 – 4 inch. How would you suggest I alter cooking time or temp.
Hi Diane,
That’s wonderful to hear Diane!! For large cake layers, I suggest adding a couple heating cores to the center (these are the ones I use: https://amzn.to/2NQ0lVZ), to help the layers bake more evenly and quickly! The bake time can vary based on how tall of cake layers you are making, but I find it usually takes mine 50-55 minutes.
For the smaller cake layers, I find they take a little more than 20 minutes in my oven, but it can vary based on how full you fill the pans. Hope that helps, happy baking!
Hi Chelsey! Firstly, thank you so much for posting the helpful batter per layer calculator. I’m making my first wedding cake two weeks from now, and that will allow me accurately and adequately prepare. My question concerns almond flavoring. How would you suggest integrating almond extract into this recipe to achieve that classic wedding cake flavor? Thank you so much!
Hi Kayla,
So happy to hear you’ve been putting my batter calculator to good use!!
The amount of almond you add can vary based on your preference. I like to add 2 tsp to each batch of cake batter (in addition to the vanilla), and then 1 or 2 tsp of extract into each batch of frosting (in addition to the vanilla). I like a relatively strong almond flavor though. I figure, if i’m adding it to a cake I want to be able to taste it! I like the way that tastes, but I’d definitely recommend doing a test batch with the amount you think you’ll use, to make sure the flavor is right for you 🙂
Hope that helps, and best of luck with your wedding cake! I’m sure you’ll do a wonderful job!
Hey Chelsea
I attempted this recipe but the cake to me seemed dense and not very light airy and fluffy. Are the cakes in this recipe a more dense cake ?
Hi Patrice,
They definitely are! This is a butter cake recipe, so it’s a lot different than a fluffy sponge cake! Because it uses the reverse creaming method, it has a much different structure. I really like it because it makes them super easy to stack and frost, and I also love the way they taste 🙂
Hi, I’m trying to bake a cake could you please comment the link to your video on making the vanilla cake and frosting. I had seen it on Facebook and then I lost the link
Hi Itzel,
I’m so sorry for the delayed response! Here’s the link to me making my vanilla layer cake recipe: https://www.youtube.com/watch?v=bYybj5VEvPM
Hope that helps, happy baking!
Thank you for listing the ingredients in grams. I just made the recipe for my sons birthday cake and everybody loved it! I made it with raspberry buttercream and it was delicious!! Greetings from Czech rep.!
I am so happy to hear that Jana! That sounds delicious!!!
We visited the Czech Republic on our honeymoon, and I loved it so much! It was my favorite place we went 🙂 Greetings from NYC!!!
Can I use buttermilk powder or does it change the recipe?
Hi Loraine,
I haven’t tried it myself, but I’ve heard buttermilk powder mixed with water works great in place of the buttermilk in this recipe. Hope that halps, happy baking!
I love this but your pic has 4 layers but the recipe is for 3 :(. I like to do my 4 layers on all my cakes but can rarely find recipes for them. Also hope you can help with something – is there an easy way to adapt a cake recipe for different size pans? So this recipe is fantastic, how do I alter for 6inch or a 10inch cake? Thank you so much for your help :).
Hi Louise,
The recipe says you can use one batch of batter to make 4, 7-inch cake layers, or 3, 8-inch cake layers. I use 7 inch pans, and make 4 cake layers with this recipe.
I have a great post about how much batter you need for different sized cake pans, and how many batches of batter you need here: https://chelsweets.com/2019/04/22/how-much-cake-batter-per-pan/
Or if you want to make 6 inch cake layers, I have a small batch version of this vanilla cake recipe here: https://chelsweets.com/2019/05/02/6-inch-cake-recipe/
Hope that helps, happy baking!
Thank you so much! ??
No problem 🙂
Hi Chelsea! First of all, I love this recipe and so does everyone else that’s tried the cakes I’ve made!
I was wondering how thick each of your layers are before and after leveling them? I don’t seem to need to do any leveling if any and I just trim the caramelization on the sides BUT my layers seem thin, maybe 1” each. It seems like they aren’t thick enough which makes for a shorter finished cake. My pans are 7 x 3 in Fat Daddio’s and i bake for 30 min, the toothpick comes out clean by then. I also let them cool in the pan for 10 min on my stove before throwing them in the freezer for 45 min. Do you have an idea why this is?
Hi Mercedes,
Most of my cake layers are a little over 1 inch, and I trim off maybe a 1/4 of an inch! I trim off hardly anything from the top of that cake. My layers are usually about 1 inch tall. I use 7×2 inch cake pans, but I don’t think that should make much difference. I bake mine for about 35 minutes. Do you use a convection setting? I do not.
I think yours sound like they’re similar to mine! Sometimes if you overmix the batter it can make the cake layers more dense / rise less, but this cake recipe is pretty forgiving and that shouldn’t change the height of them much. Sorry I can’t be of more help!
Adorable melted snowman cake! So, in watching the video, I see that you covered your spinning cake stand, which I did buy recently and LOVE! What did you cover it with? I understand why you did. Do you change up the top of this cake stand often? I’ve only used the non slip mat that it came with. Thank you!
Hi Paula,
So happy to hear you got an ateco cake stand too! It’s the best, I swear!
Mine came with the same non-slip mat, which I trimmed down a little bit to fit better under my boards. I decorate all my cakes on it 🙂
Hi, my daughter has asked me to do her wedding cake coming up in October… I found your recipe and decided to make a test cake and get my co-workers (about 11 ppl) at the salon to be my taste testers 🙂 I made a raspberry mousse filling and basic buttercream and got thumbs up from everyone! The flavor and texture turned out lovely and I plan to use your recipe! Thank you! It’s been a long search to find a really good white cake recipe! ????
Hi Noreva,
That is such a great idea, and I’m so happy to hear that your taste test went well!! That sounds amazing, I bet this cake paired with a raspberry mousse filling is divine 🙂
Best of luck with your daughter’s wedding cake, I’m sure it will turn out wonderfully <3
Hi. I just found your website. Someone on another site mentioned your Russian Buttercream–I plan to try it. Thanks. I just watched your video on trimming the best vanilla cake layer and wondered why the sides baked so dark. I’ve baked cakes for a long time and find setting the oven temp to 325 degrees rather than 350 the cake bakes perfectly level almost every time and the edges and top do not over-brown. If there is a little “dome” on the cake when it is completely baked, just out of the oven, and still in the pan, you can take a tea towel folded, so you don’t burn yourself, and gently press the top. If you test doneness with a toothpick, those little holes become steam vents as you press, so be careful. Mine will then require no trimming off the top. It does take longer at the lower temp but I use that time to prep other stuff because I save time not having to trim so timewise, it usually balances out. I might add, if you are preparing a wedding cake you would definitely not want to see a dark crumb next to the pristine white icing when the cake is served–wishing you all good things in your decorating endeavors.
Hi MaryLouise,
I have a mini oven that’s gas powered, so i can barely fit my cake pans in my oven. I’ve tried baking strips, but it’s just a struggle in general with my old oven. I’ve seen this recipe baked by other people in newer ovens, and they don’t have as much caramlization as I do. I actually press down on my layers sometimes too! But instead of a towel, I use a slightly smaller cake pan, to ensure it turns out super flat 🙂
Thank you for sharing! I’ll try baking this recipe at a lower temp and see if it helps with my oven <3
Hi, how can I turn this into gluten free cake?
Hi Kirsten,
I’m actually working on a gluten free vanilla cake recipe right now!! Stay tuned <3 I’m hoping to share it soon!!
Hi!
I want to make a cake with a slight coconut flavor and then I will add coconut flakes to the side. Could I add coconut extract rather than vanilla (or 1/2 vanilla 1/2 coconut) to this recipe or would that alter it?
Thanks!
Hi Karli,
You sure can!! I actually do that in my easter basket cake recipe, and it taste great! Here’s the link: https://chelsweets.com/2018/03/19/easter-basket-cake/
The amount of coconut extract you add can vary based on taste, especially in the frosting. Hope that helps, happy baking!
Hello, I am from the Netherlands and have been looking for the perfect basic cake for a while, I have 8 x 4 inch cake board and it fails every time because it collapses during baking. is it because my cake board is too high? I would love it
if I heard from you!
Hi Floortje,
Are you using 4 separate cake pans to bake each layer, or are you adding most of the batter into your tall pan? Each cake layer in this recipe needs to be baked separately. Usually when a cake layer collapses, it means it needs to be baked longer. But if you bake each cake layer in it’s own pan, the bake time in this recipe should be perfect and they should not collapse. I hope that helps, happy baking!
Do you have a website where I can find your recipes of cakes like red velvet, chocolate, fun fettie, lemon
Also could you by chance make a video on how to make a coconut flavored cake?
Hi Vivian,
There is a search icon in the center of the screen underneath my site heading, and you can search for all of my cake recipes there! You can also see a list of all the cakes I’ve made here: https://chelsweets.com/category/cakes/
Sadly I haven’t shared a video of a coconut flavored cake before, but I do share a recipe for one here: https://chelsweets.com/2018/03/19/easter-basket-cake/
Hope that helps, happy baking!
So excited to try this recipe. Actually my three 8 by 2 inch pans are now in my oven! and the smell is delicious! I am using bake even strips to ensure they are super flat and that they have as much caramelization. Anyway I guess I am doing this as an extra step to ensure moistness as I end up trimming my cake layer like you do in your amazing tutorial. I will keep you posted on the outcome, BTW do you teach online decorating cake classes? I would be super interested.
Regards!
Yay, I hope you love it Claudia! Some people swear by bake strips, and I always encourage using what works best for you and your oven 🙂 I’d love to hear how they turn out!
I don’t teach online classes right now, but I am working on an e-book with some detailed videos!! It’s about as close as I think I’ll get to teaching online. Haha more on that to come later this year!
Hi! I made the cake and used 4 eggs as recommended instead of 7 egg whites and it turned out good. It is possibly a tiny bit too dense but is there I could do to make it a tiny bit softer? I’m going to try and make 3 12″ layers for the base of this wedding cake I’m baking. Also when I took it out of the fridge my buttercream cake started sweating? Do you know how I can stop that Chelsey?
Hi Serena,
Using whole eggs instead of egg whites makes the cake a bit denser. I’d recommend trying egg whites next time like the recipe calls for <3 You can also use cake flour instead of whole flour (cup for cup) to make softer cake layers.
Sweating happens for a variety of reasons, but can be caused by warm or humid weather. I’d recommend trying to turn the AC up higher in your kitchen, or making your fridge a tiny bit warmer. The condensation forms from the change in temperature, so if you can reduce that temperature change it might help.
Best of luck with the wedding cake you making!!
Hello, I am using this recipe to make a 4-layer, 7-inch cake for my daughter’s sweet 16. I already made the smaller version (3-layer, 6-inch) as a test and it turned out great! My question: do I have to dowel the 4-layer, 7-inch cake or use supports in any way? Would I need to put a cake board in the middle? I see your picture that is posted with the recipe and it doesn’t look like you used supports, but I just wanted to check. Also: Do you think I could get 26 servings out of this? – I know it says 24. Thank you!
Hi Laura,
I am so happy to hear that!! I don’t usually add supports into a single tier cake, and I make 7 inch cakes with 4 layers all the time! As long as your frosting isn’t too thin, it should be just fine. My american buttercream is quite stiff, and works great supporting layer cakes. The cake layers in this recipe also have great structure, so I find supports aren’t necessary at that size.
I think you can definitely get 26 servings out of this cake! The slices will be small, but this cake is pretty rich so I don’t think people will mind 🙂 Hope that helps, happy baking!
Thanks so much I used your recipe for my daughters wedding cake it was perfect!!
Aw I’m so happy to hear that!! Thank you for sharing Diane 🙂
Hi Chelsey…I am loving your vanilla cake. Just made your small batch funfetti. Very good!!! I imagine that your vanilla can be easily converted into lemon cake, with juice, lemon extract and zest. For a great zingy lemon taste, what quantities of each would you recommend? Have you ever used Elderflower cordial in lemon cake? I discovered it while watching a video about the making of Prince Harry’s wedding cake, by baker Claire Ptak. I have used it and it does add a slight flowery essence to your cake. Thanks very much for your thoughts!
Hi Paula,
That is wonderful!! I am so happy to hear that. I would recommend using this recipe, and just not adding the ice cream: https://chelsweets.com/2019/08/16/pink-lemonade-ice-cream-cake/
I have played around with elderflower liqueur in a simple syrup, and I used about 2/3 cup water, 1/3 cup liqueur, and 1 cup of granulated sugar. I add it to my cake layers once I leveled them, which adds a great flavor. Hope that helps, happy baking Paula!!<3
Thank you for your comment. I appreciate it and will immediately try it in 4 separate cake pans! Xx
No problem! I really hope that helps your cake layers turn out 🙂
Hello! Just wondering if you typically put simple syrup on your cakes (especially before or after freezing?). Thank you!!
Hi Melissa,
I only add simple syrup to cakes if it’s a wedding cake and I know the layers will be sitting out for a while when I make it. My cake recipes are all pretty moist and they don’t really need it. If you do want to add some, I definitely recommend adding it after you freeze the cake layers when making them in advance. I’d suggest adding it right before you start to assemble your cake. Hope that helps, happy baking!
I am making a 7-inch round 4-layer cake. Do I have to dowel it or use supports? Should I put a cake board in the middle? Can it serve 26 people instead of the 24? Thank you!
Hello! I’m a fellow self-taught baker/cake decorator who is currently working in corporate finance 🙂 I am going to try this recipe today. I love watching your videos. I’m just wondering if you typically use simple syrup on your cakes, especially before or after freezing/making in advance? Thank you!
Hi Melissa,
That is awesome!!! I hope you love this recipe, and that it turned out great 🙂 I usually don’t use simple syrup just because my cake recipes are already moist from all the buttermilk in them. However, I do use simple syrup on wedding cakes, because the layers sit out for a while when you assemble cake and once it’s served.
I don’t really think this recipe needs it, but if you wanted to I would recommend adding it after freezing your cake cake layers / once they’ve thawed and you’re about to assemble the cake. Hope that helps (and sorry this response is so delayed), happy baking!!
Hello, I have an issue with grams versus cups for this recipe. On my scale (I tested it and it’s accurate) , 3 cups of flour = 518g, not 390. the sugar is also off by 50g…Advice? Thank you!
Hi Andree,
That’s wild! Are you properly spooning your flour into your cup measure and leveling it? It sounds like you might be scooping and packing the flour into the cup measure, which is causing it to have a lot more flour in it than it should. As you using a US cup measure?
Are you accounting for the weight of the cup measure or bowl? If your sugar is off too, I’d recommend getting new cup measures. If you google the weight of granulated sugar and AP flour, the standard is definitely 200 grams of sugar per US cup, and between 125 and 130g of AP flour per US cup. I’m not sure what is happening with your scale, but hopefully it’s one of those things!! Sorry I can’t be of more help!
How much is 28 grams of oil?
Hi Naz,
It’s about 30ml!
I want to make this cake but would love to make it Into a few mini cakes. Do you know know how many mini cakes I could get out of this batter ?
Hi Bianca,
It really depends what size of cake layer you plan to make for the mini cakes, and how many cake layers they’ll have. You can probably use my cake batter calculator to back into the number of smaller cakes you can make with one batch of batter. Here’s the link: https://chelsweets.com/2019/04/22/how-much-cake-batter-per-pan/
Hope that helps, happy baking!
To store cake once it’s decorated so I place in an airtight container in the fridge or just put it straight in the fridge uncovered? Thank you in advance!!
Hi Tanya,
I let cakes sit in the fridge overnight, or for a few days all the time! I usually leave my cakes just open in the fridge without a covering. It should be fine as long as you don’t have anything fragrant in your fridge (like fish or onions).
I find adding a covering doesn’t really help much, but if you have one that fits you can add it over the cake. Hope that helps, happy baking!
Hi Chelsea– I have made your vanilla cake several times- yum! Is there a way to reduce the hard edges? And I can never find 7″ cake pan— where and who makes them?
Thanks for your posts- I love to watch them!
Hi Elisa,
So happy to hear that! I have two tips for reducing the caramelization on the sides. One is to try baking strips (like these: https://amzn.to/2HMUFbz if you haven’t already). They don’t really work for me because my oven is so tiny, but some people swear by them. You also can turn the temp down to 325 degree F, and bake the layers for 38-40 minutes.
I order my 7 inch pans on amazon too, and love this brand: https://amzn.to/32l9Pyu
Hope that helps, happy baking!!
Hi, Im a new baker and I have learnt so much from your website, thank you. Im going to try your vanilla cake this week. I havent had much success with vanilla cakes, they seem to be harder to keep moist than chocolate cakes, they were dry by the next day. But I think now it was because I was using a sponge cake recipe. With your recipe do we need to put sugar syrup on the layers before assembling?
So happy to hear that Maria!!
Sponge cakes are definitely more dry than butter cakes, and that’s why most people use simple syrup on them! It helps keep them moist 🙂 This recipe is a butter cake, so it’s quite moist on its own and it doesn’t need simple syrup. Hopefully this recipe was a success for you, I’d love to hear what you thought of it!
Hi Chelle, I made a 2 tier birthday cake using the vanilla layer cake recipe and it was fabulous!. However, I’m making my Son’s 3 tier wedding cake in May and they want a 12 inch chocolate, 9 inch lemon and 6 inch vanilla. Can this layer cake recipe be converted to make the chocolate and lemon cakes? Thank you 🙂
Hi Joanne,
I am so happy to hear that!! You totally can. I actually have a chocolate version of this cake recipe here: https://chelsweets.com/2017/03/02/the-best-chocolate-layer-cake-recipe/
You can make this recipe into a lemon version by adding in some lemon extract, and a bunch of lemon zest 🙂 Hope that helps, happy baking!
Plese, could you give me the ingredients of your lovely vanilla layer cake, I can’t find them.
Many thanks. Naima
Hi Naima,
The ingredients and instructions for my vanilla layer cake recipe are included in the recipe card at the bottom of this post <3
Hi, I normally use Wilton’s cake recipe, but am looking for a better recipe. How many 6″ round pans would this make? Thank you!
Hi Rebecca,
This recipe makes 4, 6-inch cake layers. Hope you give it a try, I’d love to hear what you think of it!!
I am trying to convert the recipe with your cup chart for 3 10” but am I using the sponge or butter conversion?
Can you use your vanilla xake recipe in a 9×11 pan?
Hi Kerry,
This cake recipe makes two sheet cakes that are 9×13 inches (or whatever variation of quarter sheet cake pan you have!). They’ll be slightly less than 1 inch tall once you level them.
When I bake layer cakes, I place two flower nails spaced evenly apart in the center of each pan (and spray them), to help the layers bake more evenly and quickly. With flower nails, the cake layers bake in 37-40 minutes in my oven. I hope that helps, happy baking!!
Is the frosting in the recipe just for inbetween the layers or is this also enough to cover all the outside? I’m planning on colouring the outside frosting to make a galaxy effect so will need quite a lot. Thanks!
Hi Laura,
This recipe makes enough frosting to fill and cover the cake, and I usually have extra leftover! So I think it should be great to make a galaxy themed cake 🙂 Hope that helps, happy baking!
Hi! I am really excited to be making my granddaughter’s 1st birthday cake with your recipe.Crossing my fingers and hoping it all comes out well.
Aw that’s so wonderful Judith!! I’m sure you’ll do an amazing job 🙂 Please let me know how it turns out!
Thank you so much for that info Chel, that has helped me a lot 🙂
You’re welcome! I’m so happy to hear that Joanne!! 🙂
is the temperature for fan forced oven?
Hi Vanessa,
The temperature is for a standard oven, not set on the convection setting (which I think is what you mean by forced fan). Hope that helps, happy baking!
I think it should read ~2.5 lbs of powdered sugar, not 1.5 😉 Planning to try this out for a wedding cake, thanks!
Hello! How would you suggest converting this recipe to 3 – 10″ rounds? Also, is this the same vanilla cake recipe you used for your Caramel Drip Cake?
Hi Jen,
I have a great conversion chart that works great for figuring out something like that! Here’s the link: https://chelsweets.com/2019/04/22/how-much-cake-batter-per-pan/
It is the same vanilla cake base that I use in my caramel cake. Hope that helps, happy baking!
Hi can this recipe be made into a 10 inch layer cake as well please, my step daughter wants me to make her wedding cake 6 ” 8 ” & 10 ” your recipe looks perfect. Thanks Emma
Hi Emma,
It totally can! I share a conversion chart for making different sized cake layers here, which I think would be helpful for figuring out how much batter you’ll need for different sized tiers. Hope that helps, happy baking!!
https://chelsweets.com/2019/04/22/how-much-cake-batter-per-pan/
I’m trying to make a cake about the height of the 4 layer Vanilla one in your recipe card. Would I need to double the recipe if I’m using 8-inch pans?
How did this work out for you, Veronica? Would love to use 7 inch pans but do not have 4!
hi can the egg whites be replaced with just whole eggs?
Hi Wenny,
You can use 4 whole eggs in their place. It will change the texture of the cake a bit, but it will still be delicious!!
Thankyou so much chels for your help xx
Np Emma!! 🙂
I love your recipes!! In most of your recipes you use all purpose flour, can I substitute cake flour in this recipe (and others) pretty easily with a 1:1 conversion?
Hi Maria,
You can swap it 1:1! I find when using cake flour, I like to also swap the buttermilk for sour cream (also 1:1). Hope that helps, happy baking!!
Hi Chelsweets,
I’m looking to make a tall-ish cake with vanilla sponge. At least 5-6 inches in height. Do you think this recipe would work for 3 8inch tins that are 3inches deep?
Thanks.
Ayesha
Hi Ayesha,
Sadly no! This cake makes 3, 8-inch cake layers that are about 1 inch tall once they’re leveled. Even with a generous layer of frosting, I think that it might be a bit shorter than what you’re hoping for! I use 7 inch cake pans to make my cakes taller, and make 4 layers. They usually end up being about 6 inches tall. Hope that helps, happy baking!
It worked beautifully thank you..Is this vanilla cake recipe good to use for a 3 tier wedding cake? Also what icing do you use to frost a wedding cake? Thanks so much
Kerry
Hi there. Is your vanilla cake recipe good to use to make a 3 tier wedding cake? Also, what icing would you use with it?
Thank you
Kerry
Hi Kerry,
It sure is! I made my wedding cake and several of my friend’s wedding cakes with this cake recipe 🙂 It has great structure for making tiered cakes. I like to use my american buttercream, which is included in the recipe card below. Hope that helps, happy baking!
Hello! Can I make this non dairy by using margarine and almond milk?
You totally can! I’ve found that shortening works better for creating a good texture, but you might want to add a bit more extract to make up for the loss of flavor the butter usually adds. Almond milk is my favorite dairy free milk to bake with, and I like adding in a couple tsp of almond extract with it to amp up the flavor. Hope that helps, happy baking!
Hi I have two quick questions, would you double the recipe for 9″ cakes or 8″ cakes and can you explain how you use the flower nails?
Hi Nichola,
ONe batch of this recipe makes 3 8-inch cake layers, or 2 9-inch cake layers. I place the flower nails upside down in the center of the pan, so the flat part is against the pan. Spray them generously with non stick spray, then pour your batter into your pan. This helps them conduct heat into the center of the cake pan to help the layers bake more evenly. Hope that helps, happy baking!
Hi! I’m a new baker and I want to try this recipe today. I have 3 9 inch pans. Would that work for this recipe?
Hi Tosin,
There isn’t quite enough batter to make that many layers, they’d be super thin! I recommend using one batch of batter to make 2, 9-inch cake layers. Hope that helps, happy baking!
Just finished with the cake which I baked in 1 8×3 pan. I baked over an hour. The middle was bubbling out and the top is very caramelized. Waiting for it to cool to see if it’s salvageable.
Hi Tanya,
I definitely don’t recommend baking that much batter in one pan!! This recipe is designed to be baked in separate pans, using at least 3 or 4 pans. I would recommend trying that next time, the layers will bake much more quickly and evenly. Hope that helps, happy baking!
Hello Chelsweets. Thanks for sharing. I have some questions. Can fresh egg whites be used only? As I don’t understand the pasteurized eggs thing.
How many egg white should be used and how many inch tall will it be if I made it in a size 9 pan?
Thank you
With love from Nigeria
Hi Ayomi,
In the US we have cartons of egg whites at the grocery store, and usually they’ve been heat treated so they’re pasteurized! I use these carton egg whites, which work great. You can also use fresh egg whites if you can’t find the kind that come in a carton.
Like I mention in the recipe card, 1 cup of egg whites is the equivalent of 7 egg whites. This amount of batter works for making 2, 9-inch cake layers that are about 1 inch tall once they’re leveled. I hope that helps, happy baking <3
I am going to make your Easter egg basket. But that calls for 4 8 inch layers of cake. Should I follow a different recipe?
Hi Destiny,
I’m not quite sure what you mean! Do you not have 8-inch pans? Are you looking for a recipe with small cake layers? You can also make 4 7 inch cake layers if that’s the size of pan you have. Hope that helps, happy baking!
I’ve made this the regular way and with a substitution for the eggs. The regular way can taste kinda eggy (in a good way) and gets crispy delicious sugary edges which I like. Unfortunately my gut doesn’t like eggs so this time I used 1 cup of 5% fat Plain Greek yogurt (although regular whole milk yogurt should also work) instead. And it tasted way better than the other eggless vanilla cake recipe I tried. I think the high sugar content helped lol. I still think it’s better with eggs but maybe next time I’ll try doing half eggs, half yogurt.
Hi Catherine,
That’s great to know! I’ve wanted to play around with adding greek yogurt into some of my cake recipes, so it’s super helpful to hear your results 🙂 Hope that the half and half version turns out great, happy baking!
Hello,
I want to bake this recipe but i would like to make it 9”. Do you think I will still be able to bake 3 cakes?
Thank you!
Hi Ann Sophie,
Sadly your layers would be super thin if you tried to make 3, 9-inch cake layers with this recipe! I recommend using one batch to make 2, 9-inch cake layers. Hope that helps, happy baking!
Hello! Love your recipes!
Some questions: Do you use 2 inch or 3 inch deep pans? Do you know how much weight of batter goes into each 8 inch pan? Also, about how tall are our tiers before and after torting? When considering servings and say, a 7 inch extra tall tier, are you accounting for the entire tier with filling, in inches? Thanks so much for your help!
Aw thank you Danielle!
I like to use 2 inch deep pans. I place about 450 grams of batter in each pan when I’m making 4, 7-inch cake layers. The cake layers bake up to be about 1 1/4-1 1/2 inches, and they end up being just a bit over an inch once they’re leveled. The cake layers don’t dome up too much, so there isn’t a ton of height removed when it is leveled. The overall cake is about 6 inches tall once it’s filled and frosted.
Hope that helps, happy baking!
For this recipe can the buttermilk be substituted for almond or coconut milk?
Hi Nayab,
You can use coconut milk or almond milk in place of the buttermilk! It will change the texture and taste a bit, but it will still taste great! Hope that helps, happy baking!
I absolutely love this cake recipe. I use it for all my cake orders and everyone loves it. Thank you Chelsea!!????
Aw thank you Shay! I’m so happy to hear that 🙂
Can I substitute buttermilk for almond milk. For someone that’s lactose intolerant
Hi Kymberlee,
You can totally substitute the almond milk for the buttermilk! It will change the texture and taste of the cake a bit, but it will still taste great. Hope that helps, happy baking!!
Hey! Thanks for the instructions! Using this recipe how many grams would you weigh in for 2 ten inch pans or 2 8 inch pans?
No problem Catherine! one batch of batter makes about 1900 grams, so I’d add 800 grams to each pan if you plan to only make 2 cake layers. Hope that helps, happy baking!
For the buttercream, could I possibly use a hand mixer? I dont own a stand one…?
Hi Cami,
You can definitely make this with a hand mixer 🙂 It might take a little bit longer to make, but it’s totally doable. Happy baking!
Hi! Does the batter rise a lot in the oven? it looked a little thin in my two 9-inch pans so just wondering if i should make some extra layers
Hi Allie,
It usually rise about 1/4-1/2 inch depending on the pan size. You might want to make a double batch of batter if you want to make a taller layer cake (and make 4 layers). Hope that helps, happy baking!
Can I use this recipe to make 5 6″ cake layers as well? I am wanting to make a checkered pig cake for my daughters birthday, so I need 4 layers for sure, as well as enough cake to make ears. Any tips or suggestions? TIA!
Hi Lynnsey,
I think this cake recipe would be perfect to make 5 6″ cake layers! They probably only need to bake for 30-33 mins, so keep an eye on them. Hope that helps, happy baking!
Hi! I want to use this recipe! Love your content btw:) but can I use swiss meringue buttercream and how much would you suggest for a 3layer 8-inch cake? Also how do you decorate with flowers on the cake? Do you just buy them and snip them and plop them on the cake? Too good to be true? Lol
Hi Snizhana,
Thanks so much!! You can totally use swiss meringue buttercream with this cake recipe. I’d make 1.5 batches. If you want to add fresh flowers to a cake, I go through how I like to prep them here: https://chelsweets.com/2019/06/10/how-to-put-fresh-flowers-on-a-buttercream-cake/
Hope that helps, happy baking!
I would like to make (4) 6″ x 2″ round cakes using your recipe so that each of my grandchildren can decorate their own cake. How much batter should I put in each 6″ round pan? Thanks for your help.
Hi Pam,
This cake recipe caramelizes a decent amount, so I don’t recommend making cake layers taller than 1 inch with it! If you want 2 inch tall cake layers, you might want to try a sponge cake recipe instead, which bakes up higher. Sorry I can’t be of more help!!
Hands down the best vanilla cake I’ve tried….and I’ve tried a lot of them. I even made birthday cake ice cream with the leftover cake and your buttercream icing… so good!!
Aw that’s so wonderful to hear Redd!! Happy birthday 🙂 Thank you for sharing!!
It was my first time baking a cake and frosting from scratch! It came out soooo good! I could use practice on frosting but the flavors were amazing. Thanks so much for sharing your advice and recipes.
Hi Sinead,
I am so happy to hear that, that’s awesome!! The frosting does take a little time to get just right, but it gets easier the more you make it! Thank you so much for sharing, happy baking!
I added the juice of one lemon, hopefully it goes right!! I’ll comment the results on my comment ?
hey! i was wondering what you use to keep your cakes from sticking to the bottom of the pan?
Hi Lindsey,
I like to place parchment rounds at the bottom of my pans and then I spray the sides with non-stick spray. You can either cut out circles or order them! I get mine on amazon, and use this type: https://amzn.to/2Osp1Uw
I used to hand cut mine, but I recently started ordering the precut type and I don’t think I’ll ever go back. They’re so much easier and quicker to use!
Hope that helps, happy baking!
Edit: it was great!! The only thing was that the top had a very thin golden layer, and it looked somewhat caramelized, idk how to explain it. But I had no problems and it was delicious!! ?
AW that’s great Ana! I’m so happy to hear that 🙂 Thank you for sharing!!!
I made my nieces birthday cake this year for her second birthday. I had NEVER made a cake in my life aside from boxed cake that never left the throw away pan.. I used this recipe and omg I’m never using anything else for a cake!! It was so easy and everyone raved about the icing! Ive been asked to make more cakes in the future now and I’m super excited. Thank you for the wonderful recipes! I’ll sure be sharing with everyone I know who wants to make a cake.
Aw I am so happy to hear that Christina!! That is wonderful 🙂 Thank you so much for sharing, happy baking!! <3
Hi dear. Love your videos! Do you use simple syrup if the cake has to be refrigerated and used for 2 or 3 days. Tanx
Hi Blessy,
Thanks! I don’t really use simple syrup on any cakes except wedding cakes! I find as long as the cake layers are fully frosted, the buttercream keeps all the moisture locked in. This recipe is already pretty moist from all the buttercream in it. You can add some if you want to though, it doesn’t hurt! Hope that helps, happy baking!
I just wanted to say how much I love your recipes! (I am on cake #3) I just started out in hopes of being the mom that is “good at baking something” and I will gladly give my credit to you! My family has fell in love with your carrot cake, chocolate layered, and now the vanilla recipe! Haven’t quite got the buttercream down as it seems to be a little sweet or I don’t make enough to cover the cake and do decorations. Any tips?
That’s awesome, I’m so happy to hear that Abby!
Frosting can be hard to master! If you find my American buttercream too sweet you can try adding in more heavy cream and whipping it up a bit more, or you try my russian or swiss meringue buttercream! They’re a lot less sweet. Here are the links:
SMBC: https://chelsweets.com/2020/04/02/swiss-meringue-buttercream-frosting/
Russian buttercream: https://chelsweets.com/2020/01/06/russian-buttercream/
hope that helps, happy baking!
Hi Chelsea, great recipes and tips for baking cakes. Im baking my daughters 5th birthday cake and aiming for a 10 inch diameter, 4 inch height cake (2 layers)
You said use 3 x 7inch or 4 x 8inch tins for the tin preparation and your mixture makes 154 cubic inches of batter how much batter would I need for 10inch?
I have done your calculations and come up with 314 cubic inches as my optimum quantity to be split into two 10inch tins, therefore by your calculation that would be 2 batches of your cake batter recipe, correct? Please advise if I have made an error.
My sum was this: 3.14 x 5 x 5 = 78.5 x 2 (inch layer) = 157 x 2 layers = 314…?
Much appreciated!
Shell
Hi Shell,
I think I answered this question via email 🙂 Hope your cake turns out great!!
Just looking again at the recipe and your photo and to be honest I think I’ll only need 1 batch of your batter as surely 4 x 7inch cake tins is roughly the same cake why as 2 x 10″? My tins would allow a 2.5 rise so guess that’s where the extra mixture is needed? As your 7inch layers look about 1″ in height, am I right? Purchasing ingredients tomorrow so need to know really…btw did a small test (1/4 of your mix in 1 x 6″ tin) and tasted wonderful freshly baked and the next day! I got confused though and still mixed the sugar and butter (I’m a Victoria sponge traditionalist baker!) But otherwise followed your recipe 100% – does it make a difference if sugar added to flour first or not? Sorry for the essay…shell
Hi Shell,
I think I also answered this question via email 🙂 Hope your cake turns out great!!
How would you adjust this recipe to include bourbon? I’m going to start practicing for my wedding in June since everything is shut down! Thank you!!
Hi Monique,
You can add in 1/2 cup of bourbon in place of some of the buttermilk, or make a whiskey simple syrup! Or both 🙂
Can your full size cakes be made into a sheet cake? Like a 9×13. Or even a square layer cake? Any suggestions you might have so they turn out?
Hi Jennifer,
This cake recipe can be used to make one or two sheet cakes that are 9×13 inches. If you make 2 layers, they’ll be slightly less than 1 inch tall once you level them.
When I bake layer cakes, I place two or three flower nails (like these: https://amzn.to/39oJK3I) spaced evenly apart in the center of each pan (and spray them), to help the layers bake more evenly and quickly. With flower nails, the cake layers bake in 37-40 minutes in my oven. I hope that helps, happy baking!!
Hi there! Wondering if you’ve tried this with your strawberry buttercream? Do you think it would be okay together?
Hi Ashley,
I have, and they’re great together! I like to also add some strawberry jam or fresh strawberries (patted dry) between the layers to give it an extra pop of flavor 🙂
l loved it the frosting was great and the cake was so light and airy there was no problem with this cake from my point of view.
That’s great to hear, thanks for sharing!! 🙂
Hi i was just wondering how much do I need ro scake down if I want to make it a sheet cake and also do you think making into a caramel poke cake would be a good idea like the one you made with chocolate cake
Hi I was just wondering how much to scale it down if I want to use a very small square cake pan and also do you think it will be good to turn it into a caramel poke cake like the one you did with chocolate cake
Hi Guiliana,
It depends on the dimensions of your pan! I just shared a great mini cake recipe that is 1/3 of this, and that’s probably your best bet! Here’s the link to it: https://chelsweets.com/2020/04/16/mini-vanilla-cake-recipe/
I bet it would be great with some caramel drizzled into it like a poke cake!!
What would I need to do to make this a chocolate cake!? But still god for stacking and decorating? Thank you!
Hi Skye,
I actually share the chocolate version of it here: https://chelsweets.com/2017/03/02/the-best-chocolate-layer-cake-recipe/
Hope that helps, happy baking!
Hi! The recipe is super simple, loved it!
Although, I forgot to have room temp for my buttermilk.. is this the reason my final batch came out a little gritty?
Also, I’m worried I mixed too long, and the batch was pretty thick and had a whipped feel to it. Is this normal for this recipe?
Amateur baker in training so all the insight helps!!
Hi Allie,
Having all your ingredients at room temp definitely helps them incorporate better, and helps give the cake a smooth texture. You should be mixing it just until the ingredients are incorporated and on a low speed, so you it shouldn’t have any air incorporated into it. The batter should be pretty dense and not fluffy. Be sure you’re also using a paddle attachment when making it if possible. Hope that helps, happy baking!
Hello! Can we use raw sugar instead of granulated sugar? Will that work?
Hi Komal,
I haven’t tested that, but I think that should work just fine!! It might cause the layers to caramelize a bit more, but it’ll still taste great!
Hi ! I have to make a lemon cake tomorrow and i absolutely love this recipe ! Do you think i can replace vanilla extract for lemon extract and it will turn out well ?
Hi Armanie,
It tastes great with lemon! I’d recommend adding two tsps of lemon extract in addition to the vanilla, and adding in the zest of a couple lemons. That’s what I do, and it’s delicious 🙂
Could you tell the persise mesurements for frosting if using vinegar and milk instead of buttermilk? I’ll be going to europe to finally have my reception and am thinking of baking my wedding cake (it’ll be 4×9’/4×7’/4×4′ layers). How much frosting should i make for that big of a cake (double the recipe or even triple?), same with the cake batter, should i double the recipe?
Hey Chelsey! I was wondering if you recommend using cake flour for this cake and if so, can I just replace the amount of all purpose flour for cake flour? thank you!
Hi Jesus,
You can replace the AP flour with cake flour, but I think the texture is best with AP flour <3
This cake looks so good!! I’m going to bake it for my moms birthday coming up! I love seeing all of your new recipes- they are all so cool! Is there a way to use less sugar in the frosting? 11 cups just sounds like a lot. Thank you!!
Aw thank you Kenna! I hope your Mom loved it!!
You can use less powdered sugar to the frosting to make it less sweet, but it will change the consistency of the frosting! Hope that helps, happy baking!
Have you tried freeze dried berries? The flavor is intense! Strawberry and raspberry are my favorites, very fresh tasting. Just process the freeze dried berries into a powder in a blender, spice mill, or food processor. I usually sift it as well, just to remove any larger particles. This method doesn’t add any moisture so it doesn’t effect the texture, and it doesn’t take much to get big flavor. When I was testing for flavor intensity, I mixed up a batch of cake batter, removed about 1/2 cup and put it in a small bowl, and carefully measured in the powdered berries, starting with 1/4 tsp. Then I heated a small nonstick frying pan over medium heat and made a pancake with about 1 tablespoon of the batter. (Texture of the pancake is different than baking, but this was to test flavor quickly and with less potential waste) I continued to carefully measure and add the powdered berries to the same cup of batter and made more small pancakes until I got a flavor intensity I liked. Remember that your 1 cup of batter is depleted each time you remove a tablespoon for testing, so you’ll need to adjust for that in your final recipe. When I reached a great flavor, I multiplied the number of 1/4 teaspoons by the number of TOTAL cups of batter I was flavoring.
Hi Chelsea!
Thanks for sharing your recipes!!! I cant wait to try this one out. I was wondering if it could be made with less sugar, maybe 2.5 cups instead of 3? I know it will be less sweet, but i’m hoping the texture is not affected too much.
Thoughts?!
Hi Gaby,
You can use 2.5 or 2 cups of sugar in this recipe instead of the 3 it calls for. The texture will be a tiny but less fluffy, but it will taste great!! I’ve done it before, and I don’t think you’ll notice the difference <3 Happy baking!!
Hi Chelsea!
Just had a big fail at a different cake I tried to ice but it fell apart so much.
Is this cake firm enough that I can frost it and cut layers and it won’t crumble like my last one?
Can homo milk (3.25%) be used instead of buttercream?
Thank you ?
Hi Kristin,
Whole milk can be used in place of the buttermilk in this recipe, and this recipe does make pretty sturdy layers.
I also recommend chilling the cake layers in the freezer for about 20 minutes before frosting them, so that they’re cold to the touch. this will also help reduce crumbing.I do that with all my cakes, and it makes it SO much easier to frost them.
Hope that helps, happy abkign!
Hi there
If I want to add chocolate chips to this recipe would it work do you think? I’m
Making this cake today but I wanted to add some white chocolate chips.
Thank you
Hina
Hi Hina,
It works great, just be sure to either chop up regular chocolate chips a bit or use mini chocolate chips! Regular sized chocolate chips can be a bit much, and I like when they’re smalls bis so that they more evenly distribute throughout the cake layers.
Also toss them in flour to help prevent them from sinking to the bottom of the cake layers as they bake. Hope that helps, happy baking!
Hi Chelsea.. I have tried applying sugar syrups to cakes and somehow it clogs on the surface. Must the layers be trimmed on top to apply the syrup? And must the syrup be thin? Tanx.
Hi Blessy,
You definitely need to level your cake layers before adding simple syrup, and the syrup should be quite thin (1 cup of sugar heated to a boil with 1 cup of water). It should only be a tiny bit thicker than water. Hope that helps, happy baking!
Hi Chelsea!
Just had a quick question, would I be able to use this recipe if I’m using 3 cake pans that 7.5 inches each?
Thank-you
Shrangi
Hi Shrangi,
That should work great! They might take slightly longer to bake (a minute or two) because they’ll be a bit thicker. Hope that helps, happy baking!
Tanx a lot! Stay safe!
Hi Chelsea ~ I need a 10” cake; would I increase this recipe by half? I, too, love baking with buttermilk; this sounds delicious! BTW, the recipe says it makes 3, 8” layers, but photo shows 4? Thanks, Chelsea!!
Hi Lauri,
How many layers do you want the cake to be? I’d actually suggest doubling the recipe! The recipe card says to line either 3, 8″ cake pans or 4, 7″ cake pans. The photos are of cakes made with 7″ inch cake pans 🙂
Hey,
I was wondering if I can substitute the flour for cake flour
Hi Judah,
To substitute cake flour for all-purpose flour use 1 cup plus 2 tablespoons cake flour for every cup of all-purpose flour. Happy baking!
Hi Chelsea ~
I’m making a 6”, 8” and 10” wedding cake; If I want a 10” cake, would I add 1/2 a recipe to the 8” recipe? This cake sounds delicious!
Hi Lauri,
The best way to calculate how much batter you need for a tiered cake is to use my cake batter calculator 🙂 Here’s the link: https://chelsweets.com/2019/04/22/how-much-cake-batter-per-pan/
Hi there! I love your recipes they sound amazing! It’s so nice to see a page which has so clear steps and so much info. I’ve got my daughters birthday coming up and I wanted to make the cake 3 days in advance as I don’t have time! Do you think the cake would taste the same after 3 days, would it change the taste or make it dry?
Hi Ammarah,
For sure! A frosted cake can stay good in the fridge for up to a week! As long as the frosting is completely covering the cake layers, it should lock in all the moisture, and the cake should stay nice and moist 🙂 I let cakes sit in the fridge overnight, or for a few days all the time! I usually leave my cakes just open in the fridge without a covering. It should be fine as long as you don’t have anything fragrant in your fridge (like fish or onions).
Hope your daughter’s bday cake turns out great!! 🙂
Yessss!!! I made this cake following your recipe exactly for a birthday cake. Added layers of salted caramel AND salted caramel buttercream. Drizzled the top with caramel.
Honestly the best white cake I’ve ever tried!
That absolutely delicious Tabatha!!! So happy to hear you loved this recipe 🙂
Could I add almond extract to the cake? If so, how much would you recommend?
You totally can Melissa! I like to add 2 tsp to the cake batter and 1 tsp to the frosting in addition to the vanilla. You can adjust though if you want a more or less intense almond flavor. Hope that helps, happy baking!
Hi! What non dairy sub can I use for the heavy cream in the frosting?
Hi Rachel,
You can use any alternative milk. Soy, oat or almond work great! Hope that helps, happy baking!
Hey! Love this cake, I was wanting to switch the vanilla extract out for almond extract and was wondering if i would also be able to add brandy to this? If so, how much would you recommend putting? Thanks!
Hi Tanya,
You can definitely swap out the vanilla for almond extract! The amount of brandy you add really depends on how strong of a taste you want. I’d suggest using maybe 1/3 cup of brandy in place of 1/3 cup of the buttermilk. You can also make a simple syrup with brandy and add it over the leveled cake layers to really give them a kick. Hope that helps, happy baking!
I want to make just two layer of size seven but I don’t know how to minimize the ingredients, pls help me
Hi Joy,
I’d suggest halving the recipe to make 2, 7″ cake layers!
Can I refrigerate the leftover batter ?
Hi Kim,
Sadly I wouldn’t recommend it! This batter bakes up best when it’s freshly made at room temperature <3 You can use extra batter to make cupcakes, or you can use my small batch version of this recipe to avoid having leftover batter next time. Here’s the link: https://chelsweets.com/2019/05/02/6-inch-cake-recipe/
Hope that helps!
Hi! Can I use this recipe to make 4 – 6inch cakes ?? Instead of 3 – 7inch cakes
Hi Hannah,
You can, but it’ll make a pretty tall cake!! The layers might also take a couple more minutes to bake. Hope that helps, happy baking 🙂
Hi! Am I going to beat the egg whites before adding it into the ingredients? The recipe doesn’t require egg yolks right?
Hi Khai,
You can just add the liquid egg whites right into the batter! I use the kind that come out of a carton so I don’t waste any egg yolk, but you can also use freshly separated egg whites. No need to beat or whip them before. Happy baking!
If I use a 9″ pan should I use 2 or 3? Thanks!
Hi can I use 9″ pans?
Hi Jamie,
You sure can! This recipe can be used to make 2, 9″ cake layers 🙂
Hi!
I made this cake for my daughters 1st birthday, it was a huge success! So delicious Everyone loved it!
I’m wondering if it could be made into a sheet cake?
Thanks!
So happy to hear that Jenny! You totally can, you can either use one batch of this recipe to make 2, 9″x13″ cake layers (which are about 1 inch tall, and bake for about 37-40 minutes), or you can use my small batch version of this recipe to make a thicker 9×13″ sheet cake (bakes for 45-50 mins)!
When I bake sheet cakes, I like to place two flower nails (like these: https://amzn.to/39oJK3I) spaced evenly apart in the center of each pan (and spray them), to help the layers bake more evenly and quickly.
Hope that helps, happy baking! <3
My friend had the most incredible wedding cake, made for her by her cousin. I asked her cousin what her secret was and she gave me this link. I can’t wait to make it myself!
Aw that is so sweet 🙂 This comment totally made my day, thank you for sharing LJ!!
Someone asked me to make them a Vanilla Bean cake. Can I use this recipe and just substitute Vanilla Bean for vanilla extract?
Hi! I tried this recipe, and it was a huge hit! I was wondering if I could sub the egg whites for whole eggs to make a yellow cake?
That’s great to hear Sydney! You totally can, use 4 whole large eggs in place of the egg whites 🙂
Hi!
Do you know if you can use a 25cm cake tin?? I really need to impress my family, after my last cake incident!
Hi Jamela,
You can use a cake pan that size, but this amount of batter will only make about two 25cm (or about 9 inch) cake layers. Hope that helps happy baking!
Also, is there something else you can use instead of egg whites??
Hi Jamela,
You can use 4 whole eggs in place of the egg whites in this recipe!
Can I add poppy seeds to this cake and lemon juice?
I’m making a naked chocolate raspberry cake for a wedding. How would you alter this to make it chocolate?! Thank you!!
Can I use self raising flour on this recipe?
Hi Chelsey! I have been obsessed with your website and videos lately. I am intimidated, but want to try making stacked cakes. I have been watching all your basics videos (trimming, frosting, freezing, etc). First of all, thank you for sharing all this information with us!
I am going to buy some new cake pans and others tools before I start…..can you offer any advice on the size cake pan you use most often? What if I wanted to torte the layers, which size pan would you recommend then? Thanks so much!!
Hi! I came across your website and really enjoyed your videos and how you explain everything. It really encouraged me to make my own cake since I want to make one for my nieces birthday this weekend. I have a question in regards to the cooling. Once I let it cool out for 10 minutes, when I put it in the freezer, am I putting it in there with the pan? Also, am I wrapping it with plastic wrap prior to putting it in the freezer, or am I just putting it in there with the pan just as is?
Oh, also, I did 3-8 inch cakes. I baked them for 40 minutes. I did the tooth pick thing and nothing was on it once i pulled it out of the cake. However, when i was cutting around the edges or the pan with the serrated knife, i noticed the knife had a little gooey-ness to it. Is that normal?
Thank you very much in advanced!
Anjel
Hey Chelsea, I think the second step of the frosting on this recipe is in the wrong spot (vanilla/salt). Just FYI!!
Thank you!!! I used the small batch version and it turned out perfectly! You are such an inspiration, thanks for sharing with us!
I love this cake recipe! Thank you for posting. I’ve used it a few times now and it’s my go to vanilla cake!!
Do you think it would work in a 13×18 half sheet pan?
Can I use this recipe for 4 6 inch cake pans? I’ve read over your small batch recipe but I’d like to have four 6 inch layers instead of the 3. What do you recommend? Thanks!!
My sister and I love your recipes!! However we watched one of your tiktoks and noticed that our frosting always comes out super thick even though we follow to recipe to a T! Yours looks so smooth and much thinner and that’s not how ours turns out. Any insight or tips??
Hi I can’t wait to try this recipe! What ingredient proportions should I use for three 6 inch tins (2 inches deep each), should I half the recipe?
Hi Chelsea, can one use both vanilla extract and almond?
How many cups of buttercream does this make?
Oh la la the best vanilla cake ever, I baked this cake using ur recipe, and twas awesome?
I’m in the middle of making this cake. In the ingredients it says 2.5 tsp baking powder BUT in the directions it says 1.5 tsp of BP. Which is it????
Can I use salted butter in the recipe ?
The ingredient list for your Vanilla Cake Recipe states to use 2 1/2 tsp of baking powder, however the written instructions say 1 1/2 tsp of baking power… I am just wondering which is the correct measurement. Thanks!
hey! I love your videos and recipes but I was just wondering about creaming the butter and sugar? I have always done this and I was wondering if this recipie is different or if it will affect the texture. thanks!
I have never baked a cake from scratch so here goes. It’s my granddaughter’s 1st birthday on Saturday. Just 2 questions. Can I double the batter or make 2 separate batches? I want to make 3 layers x 9” . Also can I add blueberries to the batter? Her favourite fruit.
Hi, I’m looking to purchase good cake pans. What size (diameter and height) and company would you recommend? Thanks!
Hi so the list if ingredients says 2 1/2 tsp baking powder but the instructions say 11/2 tsp baking powder which is it?
Hi…
I am planning on making a pregnant belly cake for a baby shower. Can I use this batter and bake in a half sphere mixing bowl .? I need a round belly so my research says I can use an oven mixing bowl which I plan to do but worried that this cake batter will either not be enough or will not cook properly if all is placed in one bowl rather then multiple bowls?
Thank you…
Hi, in tiktok video you used sour cream instead of buttermilk, which is the best and what is the difference in the cake
I absolutely love your recipes and videos especially the peanut butter buttercream but I tried this cake recipe substituting the 4 whole eggs , 1/2 cup oil,1/2 cup butter and I used creaming method but the cake totally fell, it was sunken and crispy any tips
Hi
Can I try this recipe for 10 inch pans? Would I just double the recipe?
Hi Chelsea! I want to bake this as a sheet cake for a birthday party. What size sheet pan do you recommend for this recipe? Thanks so much for your help! This will be the sixth or seventh recipe of yours that I’ve tried, and I absolutely love all of them (especially your moist chocolate cake recipe!)
Could coconut oil be substituted for vegetable oil? 🙂
Hey Chelsea, did you update this recipe? I remember it being 3 1/4 cups of flour.
Wonderful recipe, loved the video, easy to follow with measurements in the same paragraph as the instructions…no scrolling around! So, because I’m a crazy perfectionist I just had to measure the batter. What I found is that one cake pan is around 2 cups of batter…BAM!!!
I am also not patient and didn’t wait for the butter to completely become room temp so I just started whipping it up with my handheld mixer. I did have to stop and break up the bigger pieces, but once I did that it became a crumbly mess!
However….I’m making a four layer from this recipe not a three ?
Hello, is there a reason you use granulated sugar instead of caster sugar in this? Thank you 🙂
Hi… I’m hoping to make this along with your chocolate layer cake to make alternating layers for a tall cake. In this recipe can I add chopped nuts like hazelnuts and if so how much would you recommend. TIA
Hey Chelsea ! I would love to try and make this cake so I want to verify that the sugar amount is correct ? 21 oz ? Thank you ! Laura, all the way in Sweden 🙂
Can you please tell me the measurement for 1 cup flour…I wanted to make this for my birthday
Awesome recipe! I made this cake for a friends 50th Birthday and everyone loved how moist it was! I used both a thin layer of strawberry jam and fresh strawberries in the layers. It was just devine.
I made this cake for my son’s wedding cake….absolutely amazing! There were so many compliments on how moist and delicious it was. I used a raspberry jam between the layers with the icing and it was the perfect compliment to this tender cake. Easy to follow directions made this easy to make, having to make a lot of batter. Try it, you will love it!
Would you recommend making this cake as someone that has never made one before??
Where do you get 7 inch cake pans from? I can find 6 and 8 but cannot find 7 anywhere!
how many cups of buttercream does this cake need to be frosted and stacked
Hi. What measurements would you use for 2 6 inch tins 2 inch deep? Xx
Hi! I’ve commented a million times and I love all your recipes. I have sort of a general question and I was hoping you might have some insight to share! Whenever I make vanilla cakes from scratch – not just this recipe, but many recipes from other sites that I trust – I always seem to end up with a very dense, bread-y sort of flavor. I never have this issue with chocolate cakes, but I have been struggling so much with vanilla! I know it’s me, and not the recipes, because it’s a gotten struggle for me with vanilla. This recipe is definitely the closest I’ve gotten to a really good vanilla cake, so either I’m getting better or it’s a really fantastic recipe or both ? I wonder if you struggled at all with vanilla cakes when you were first starting out, and if you have any tips that could help me? I have a feeling I’m going to have to start using a kitchen scale to measure my flour, because surely something is off. Anyway, thanks for al the great recipes and tips!
Hi Chelsea, I wanted to ask…if I want to get a slightly taller layer can I use self-raising flour instead of plain but also keep the added baking powder? I use 7in tins but my layers don’t rise that much when baking.
Delicious! Thank you for this recipe. I was able to make it Gluten Free by subbing the flour with Bobs Red Mill Baking flour (blue bag) and it was incredible. No other adjustments needed aside from the flour and letting the batter rest for 20 minutes prior to baking. And I love that I can use pasteurized eggs, no more guilty feelings for not turning those reserved egg yolks into something. Thank you again, this is my new ‘GO To’ for vanilla cake. One question though, can I use this base for other flavors? Like strawberry or funfetti?
I only have three 8 inch pans and I would like to make 4 layers. Can I refrigerate some batter to be baked later? Thanks!
Hi! I am making a 3 tier cake and I want this to be my bottom tier. How do I make this recipe to fit a 10 inch cake?
Hi! I’m making a 3 tier cake and I want this recipe to be my bottom tier. How do I change this recipe to fit a 10 inch cake?
Hi! Does this cake have the same texture as your vanilla cupcake recipe? Is it similar to that recipe?
Thank you so much for your recipes. You were a life saver. I made my first wedding cake/nude cake using your vanilla cake recipe, vanilla buttercream and milk chocolate Ganache filling. It turned out amazing and everyone said the cake was delicious in taste and texture. Mother of the bride had it for breakfast, lunch and supper and saved a piece for metro enjoy. I did 4×11 inch round bottom tier and 4×11 inch 9 inch round top tier. Layers were thinner as I only used 4-5 batches of batter I think. If I did it again I might make 5-6 batches. I liked the thinner layers though. I would add a picture but it seems I can’t.
Hi there thanks for sharing your great recipes. I really want to have one go to recipe that i can change the flavour anytime. If i want to use passionfruit, pistacho, strawberry, cherry, banana paste, how much do i need to put in it and do i leave the vanilla out?
Hello!! I like my layers thick! At least 3inches, can I use this recipe and add more batter in the cake pans?!
anyone that has made this, does this recipe make 5-6 cups of batter? my class is doing a Halloween cake challenge the next two weeks and the seniors need a good recipe. thank you in advance.
can I use whole eggs instead or do I have to use egg whites?
Hi Chelsea.. I love your videos! This cake sounds and looks amazing! I’m excited to try it for my sisters birthday next week. I typically bake in (2) 8” round cake pans that are 3” tall and then tort my cake layers. You mentioned this recipe doesn’t rise very tall.. do you think it would work well if baked in two 3” tall pans?
Hello Chelsea,
I made this cake recipe yesterday and wrapped and placed in freezer once cooked.
They are golden brown and have a crust on all the outside edge. When I thaw these, will a serrated knife trim off ok?the cake won’t be ruined? I have been stressing about it. Learning to adjust to my new stove.
Hi, Chelsea! My niece made your vanilla cake for her 16th birthday (with raspberry Italian buttercream and some lemon curd) and introduced me to your website. I am planning to make a lemoncello cake for a friend’s birthday and want to use your vanilla cake as the base. I want to add lemon zest to the cake. I will make homemade lemon curd for between the layers and lemoncello in the frosting. I also plan to make a lemoncello syrup and brush over the cake before icing. Any other recommendations to enhance the lemon? Thanks so much!
Hello Chelsea.
Love your cakes.
I want to make this vanilla cake as a 3 layer, 11 inch cake. If I only have 1 tin and can only bake 1 tin at a time…do I adjust the baking time or does each separate layer get the full baking time as on the recipe?
Thanks in advance.
Chants
Hi chels. How do I divide evenly?? How much grams should each cake weigh? Cos I’m not sure how much filling to put in each tin
Hi Chelsea! I am wanting to make a tall 12 inch cake how much batter will I need?
Also, if I whip the egg whites first separately will that make the cake more fluffy?
Thanks!
Hello Chelsea! I always used your vanilla cake recipe and everyone loves it especially my son!! I have a question: I am making a two tiered cake and I wanted to make the bottom 8” chocolate flavour following your chocolate cake recipe and for the top tier I wanted to use a 6×3” or 4×3 cake pan. What do you think would look better? How long do you think I should keep it in the oven for and should I use same temperature? I never use deep pans so i have no idea! I always bake the way you do since I learned from you!! ???? Thank you!!
Hi Chelsea! I made this cake as one of the layers for my daughter’s wedding cake (12 inch). I put a thin layer of lemon curd between two of the layers. I used your buttercream frosting, also. I did the “naked” frosting technique and decorated it with fake flowers. It turned out so beautiful. The other two layers were your 9″ confetti cake and a 6″ red velvet. The wedding coordinator, the venue owners and everyone said it was the best wedding cake they have ever had. It is the first wedding cake I made. It was definitely a labor of love and a big learning curve. Thank you for all of your helpful tips and delicious recipes, especially the part about doing much of it in advance and freezing it since it was an out of town wedding. I used the bubble tea straws and wooden dowel for support. I have bought wedding cakes for my other daughters and they have collapsed in on themselves. Not this one.
Hi Chelsea, I found you on youtube, going to try to make my own wedding cake, and i have been trying different recipes. I love all of your recipes but they are a little too sweet for me. Would the consistency be any different if i did half of the sugar?? Thank you
Hi corrie, how much batter did you use for the 12”? I am making it this weekend!
I always weigh my bowl before mixing the batter, then I weigh it after the batter is in the bowl and minus the weight of the bowl and divide whats left by however many pans I am using.
The recipe calls for 3-6″ pans so did you just split between 4 then?
Hello! Is this cake overly sweet? 3 cups of sugar seems like a lot. Am I able to cut back on the amount of sugar or will that affect the cakes consistency?
How do I adjust the ingredients for 13 feet above sea level, which is Florida. I tried this cake twice. It came out flat and like a sense moist goofy middle.
Hi, I’ve made this cake several times and its ALWAYS perfect. My question is – is this enough frosting for the crumb coat plus the “perfect” coat ?
Hi Chelsea! Would these recipes (cake and frosting) work with your mirror glaze recipe? I’m an old baker but new to using mirror glazes, so any tips you could provide would be most appreciated!
Hello Chelsea I’ve made this recipe many many times and I love it, however I’ve had a few people want me to make it with less sugar. Would I be able to do that and how much sugar do you recommend? I also make your vanilla buttercream frosting for most of my cakes. Thank you!!
I love the cake receipeeeee
Hi I’ve e just found your site and am excited to make a start but, your granulated sugar scares me…. Is that the same as british granulated sugar?!! Or would it be british caster sugar??? Thanks xx
I love Mayo in a cake! What ingredients would I substitute? Just oil? Just curious of your thoughts here. I know it sounds crazy to use Mayo, but I have found it makes it really moist.
Do you have a guide line on how many cups to use per size of the pan. I’m making my daughter wedding cake. 3 tiers 12 inch , 10 inch 8 inch. And want all layers to be the same thickest.
Hi Chels!!!! Can I substitute cake flour for APF??? I made your Chantilly Cake and it’s Amazing!!!!! Thanks so much!
It’s been in for 40 mins and it’s still raw on the inside what do I do
Hi! Just made your cake today and the texture and ease of the cake were great, but it was sickeningly sweet. I couldn’t eat it – all I could taste was sugar. I tried to salvage it by making a Swiss meringue buttercream versus your American buttercream recipe included with the cake recipe and even that didn’t save it. My kids (who would probably eat sugar right out of the bag if they could) loved it.
Hi, can I used vegetable shortening instead of oil?
*use
Hello! Does this recipe call for one stick of butter or 2? I was confused by the list of ingredients as I don’t believe the error has been updated as mentioned in the comments. I just wanted to be sure as I was going to use this recipe for an order for a customer. Thank you!
I need to make a 9×13 2 layer would this single recipe work or do I need to double it?
Hi! I was wondering if i could add some almond extract to this recipe to make it more of a vanilla almond cake, and was wondering how much i should add? Thank you!
Could I use fondant with this cake? I would like to give it a try.
I was just wondering why you use egg whites instead of whole eggs? I was wondering if there’s a texture preference, etc thank in advance!
Hi! What kind of buttermilk do you use for this recipe? Is like the buttermilk dressing?
Can I do a three layer 10×3” with this recipe?
Thanks for the recipe. Could I bake this in two 7” round tins instead of four?
If that’s possible, how long do I bake them for?
This cake turned out wonderful for my daughters 20th birthday party. You are my first go to when looking for baking recipes. I love measuring by weights, I am much more successful that way. Thank you
Hello! I am in need of a good vanilla cake to for a semi naked cake I’m making. Will this be a good recipe for it? The vanilla recipe I normally use is a Madeira cake and for some reason just doesn’t caramelize on the sides for me. The sides are real crumbly so when I tried to do a semi naked, it just ended up looking like a crumb coating.
Thank you for the help!
Is the batter runny or thicker, I only have spring form pans so I don’t want to ruin it by baking of its too thin x
Hi Chelsea,
First of all you are amazing!
I’m spending my last two days reading your blogs and watching your videos. They were very helpful since I’m going to bake a 3 tier wedding cake for the first time and so thrilled about it. Could you suggest me choosing the moulds to get a 5-6 kg cake. I hope it requires 2.5 batches of your recipe if I’m not wrong.
Thanks
Considering 3 layers of one inch cake in each tier.
Hi how many cups of batter does this recipe make? Would this recipe work for 3 pans of 9in? Thanks
Hi there! Have you ever substituted for the egg in this recipe, and if so what did you use? How did it come out?
Your substitutions guide advises Aquafaba for egg whites. Just making sure that is a better choice here than applesauce or yogurt. Thank you!
Hi Chelsea!
Do you put the cakes into the freezer in their tins when you flash freeze them for 30 mins? Or do you tip them on to something, ?
Hi! My bday is coming up and I was wondering if I can use this recipe to bake the cake on just one 8” baking pan and then cut it in 3 or 4 layers, as I only own one. I guess I’ll have to leave in the oven for a longer time than it says here but maybe it doesn’t fully cook. Hope you answer! Thanks 🙂
@Lola,
Hi! Can I use this recipe for a 10 inch cake?
Can this be used to fill one 12in by 3in round pan?
Hi Chelsea would this cake work on a letter cake with exposed edges or would it dry out quickly? Thank you
Can I use cake flour?
Hi! My bday is coming up and I was wondering if I can use this recipe to bake the cake on just one 8” baking pan and then cut it in 3 or 4 layers, as I only own one. I guess I’ll have to leave in the oven for a longer time than it says here but maybe it doesn’t fully cook. Hope you answer! Thanks ?
Hello! Is there anything I could replace the vegetable oil with?
Hi. Chels! Such a big fan of your recipes! I would love to make this recipe for a 3 layer 10inch cake. Would you make the recipe by 1.5? Or do you have a yellow cake recipe I could make the same way? I’m making a two tier with an 10inch bottom and 8inch top. Would love some advice you are such a pro!!!
Hi I am wanting to add watermelon flavor how would I do that?
How can I change this vanilla cake recipe for 3 10inch round pans? Or do you have a recipe for that already?
Hey Chels! Would i be able to use this cake in a 13×9 pan? I know you have the yellow sheet recipe but the birthday girl likes white cake and i also rly enjoy this recipe!
Hi Chelsea! Just want to say your content and recipes are incredible. I’ve made this layer cake twice now but second time round the batter didn’t quite make enough 4 7inch pans and they didn’t rise as well as i’d hope! Any tips or ways I can increase the ingredients to make perfectly levelled layers?
Hi, Just made your recipe and it tastes great BUT the sides didn’t caramelize like yours. I followed your recipe – even weighing the ingredients. Would greasing the pan with butter help?
Also, your recipe says 3 cups flour, when I weighed it, it was way more grams. Then I read a post about 3-1/4 cups flour. Can you please clarify?
Hi Chelsea! I wanted to ask if you had any advice for making this recipe with a 2 layer square 9″ cake?
Would I be able to add frozen raspberries to the cake batter and then white chocolate to the icing to make it a raspberry and white chocolate cake? Would you suggest keeping the vanilla extract in or not? Thanks so much, your recipes are fab!
Hello, I just finished making this recipe, all good, but it is very sweet, won’t it be too much 600 grams of sugar?
Hi Tanisha here….I’m am from India.I wanna request you that please tell me what we can add on the place of egg?
How long in advance of an event in warmish temperatures can you put the decorated cake out?
Hi! Could I use cake flour instead of all-purpose flour for this recipe? Also could whipping and folding the eggs whites make it fluffy as well?
Hello!
I was wondering how long this cake may sit out prior to serving?
Chelsea,
I’d like to make a strawberry cake and was wondering if this recipe would work but omit some of the buttermilk and swap for a strawberry purée?
Thank you!
If I need 4 eight inch layers how can I adjust this recipe or cooking time?
can i use two deep 7inch cake tins? if so how high should i have the oven on for and for how long?
Hey Chelsea
I just baked your vanilla cake for tge 1st time and just received a call from the customer with rave reviews. Thewse are quite possibly my now go to cakes. Thank you
I was hoping to send a picture to show you.
Thank you
Jenny
Can you please link me to your recipe for 10″ vanilla cake with 3 layers? I am lost on how to recreate a recipe for 3 10″ rounds….
Hi! I just found you on YouTube and will be trying your cake/cupcake recipes soon (your cakes look amazing!) but I see that most of your recipes call for more sugar than other recipes. I do not like my cakes/cupcakes so sweet so I typically reduce the amount of sugar from the all recipes I find by 25-50% without much issues. My question is are your cakes very sweet and has anyone has been successful is reducing the amount of sugar in your recipes? Also, I like more of a light, moist cake – which of your recipes would you recommend?
I love this vanilla cake recipe! Im preparing to make this cake in a very large, rectangle pan, 12x18x4. I’ve never make a cake in this large of a baking pan before and was wondering if you have any suggestions in order that the cake bakes properly. I do have heating cores that I plan on using.
Thank you,
Sandy
Where can I find the small batch version of this recipe? Looking for a 3 layers With a 6inch cake pan. Thank you!!
Also, have you every tried making this with a dairy free butter?
This cake was AMAZING! It was delicious, moist, and a double of this recipe stacked up to a 5 tier cake that everyone wanted more of! I used the chelsweets American buttercream and then poured the galaxy mirror glaze on top. It was awesome and the best vanilla cake I ever made!! Thank you so much!!! I will always use this recipe forever!
I would like to make this into a lemon cake. I know that you have a recipe for lemon cake which is a little smaller. I have already measured out the ingredients for your large vanilla cake. How would I modify for a lemon cake?
Do we use pasteurized or non-pasteurized egg whites (from a carton)?
Thanks for the recipe, stoked to try it out!
Hi. I was thinking of doing a 2 layer 8 inch cake, would it work best If I use the quantities from the 6 inch recipe? Many thanks x
This has to be the best vanilla cake recipe ever
Have made this for family and friends and the feedback has been amazing
5 plus stars
Would I be able to double this recipe for a half sheet pan?
I’m making a rainbow layer cake. If I want 6 layers (one for each color) will I need to double this? What if I use 6inch pans instead? Will this be enough? Do you know how many cups of batter this makes? Thank you.
I’m in a pickle and I’m hoping you can help me out. I’m making a 3 tier wedding cake. The bride wants vanilla, chocolate layered cake. And the sizes are 10″ 8″ and 6″. How do I go about this? I am so lost and I have no idea what I’m doing!! Please help!
Hey Chelsea. Quick question do you use whole buttermilk (3.8%) or the fat-free / 1% kind?
Can i reduce the amount of sugar to 400g?
Hi there! Clarify for me, please? is this recipe for 3 or 4 8″ layers? Your description at top says 3, but picture is 4.
and are the layers 1″ thick generally?
Do you have a gram weight for dividing into each pan?
I’m really interested in trying this recipe, but it’s a lot of sugar. I’m used to cakes that have the same weight of flour and sugar and I don’t like my cakes too sweet. Would this recipe still work if I reduced the sugar?
This is my favorite vanilla cake recipe of all time!!! I use it for all my customers and they love it. I’ve never had 1 complaint. Thank you so much chelsea!!!
Hi I have made this cake many times and it has always been a hit. I need to make a cake for 30 people . Maybe a 2 tier or just one large round ? Any suggestions on how much to increase the ingredients?
Thank you!
I’m going to make a naked cake for me and my sisters 30th birthday. I’m going to use this recipe! I have a question, what size cake pans should I use if I have a 10 inch cake stand? Also, how many layers do you think? 3 or 4?
How can I make this into a lemon cake? Do you have measurements for lemon and zest? Beautiful recipes thank
You for all your hard work.
Hi! Any changes for high altitude?
I love love your cake recipe and YouTube channel! Any tips on doubling the vanilla cake layer recipe?
Hi.. Thank you so much for sharing. I need to bake 2 layers 14×3″ and (2) 12×3″ using the wilton cake pan and will love to try your recipe. How do I adjust the recipe. I wouldnt mind if I have make and bake them seperately. Thank you
Hi! I’m making my daughter’s wedding cake and have begun experimenting and playing around with it! My vanilla cake tastes DELICIOUS, but it keeps falling in the center. Any ideas why?
Hi! I am trying to find a good vanilla cake and not to sweet, your recipe has 3 cups flour and 3 cups sugar, isn’t it too much? Usually sugar is less than flour? Thx for your help 🙂
Any suggestions for this recipe for high altitude? 7220ft to be exact? Struggling with the batter right now.
@Andreea R, *Correction: put my batter (not “but”)
Have you flavored your cakes before?
Hi! I was looking to see if this recipe can be done with just 2 8″ pans? if so, is there a temperature change to bake it better? And how long would you bake it for? Thank you 🙂
Thank you for this! Successfully made a double layer cake for the 11-year-old’s birthday and true to the recipe, no shaping needed! Also delicious.
Would this recipe work for larger cakes? I want to use this for a wedding cake with a 14” bottom tier! Thanks in advance!
Is this the cake recipe that you recommended in your naked cake video?? Thank you!
I was wondering if you have to use buttermilk or can I use whole milk instead?
Any chance I could get away with using whole eggs? We don’t get carton whites in my city and I don’t want extra yolks on hand.
Is this cake suitable as a semi naked cake?
Can you make this mix and cook two tins at a time , will the mixture be ok standing while the tins are cooking as can only do two tins at a time
Hi,
I love your vanilla cake. I was planning to make a giant cupcake cake using the silicon giant cupcake mold.
Would you be able to tell me how much time I should bake it for?
I’m making a two layer 16 in cake. I’d like to one inch layers. Do you have an approximate baking time? Also, how many cups of batter does this recipe yield?
Thank you.
Thank you so much for this recipe. Please I would like to know if I can cover this cake with fondant and if I can use it for a 3 tiered cake. Thank you
I don’t have enough pans, I have 2 8” pans. How long can the cake batter stay out until the other two pans are baking?
Thank you
Will this give me full 2-inch tall layers as written? I need three 8×2 inch FULL layers so I wonder if I should add 1/3 recipe to make sure?
Would this need adjusting to get three full 2-inch layers in 8×2 pans? TY
I need to make a 9 by 13 single layer cake(1/4slab) can I use this recipe? I used this cake recipe before to make a rainbow layered cake and It turned out great!
I make this cake all of the time and everyone RAVES about it. It’s officially become my “go to” cake recipe! Thank you!
Hello, I want to try this recipe and IDK if you’ll answer but I want to make a roll cake and use a 8 by 11 sheet pan. Will there be much of a difference other than reduce time to bake? Will this recipe make a lot of sheet trays or shall I use the mini recipe?
Hi, so just wondering if the flour used for this recipe is 3cups (as given here) or is it 3 1/4 cups as shown in your YouTube tutorial(How to make the best vanilla cake).Thanks!
Absolutely the best vanilla cake recipe I have found! Aupwr moist and delicious! I was short 1 egg, and added a splash more vegetable oil, and the cake still was perfect!! It also colored soo well without jeopardizing the texture of the batter! This will def be my go to recipe!
I tried this recipe for a baby shower today… my standard white cake was what you described above… super finicky because of the whipped egg whites… never cared for it… and I had tried your carrot cake recipe for my dad’s birthday in September and everyone enjoyed it, so I figured I’d give this one a try…. HOLY COW! This cake is SUPURB. This is my new go-to white cake. It was so easy and extremely moist!
Hi, can I use whole eggs instead of just the whites? If yes, how many whole eggs?
Thank you.
For the 6 inch recipe, how do I divide the recipe in half to use if I want to bake a small cake
can you use this recipe for a half sheet cake
Hi! Can you use coconut oil instead of vegetable oil in this recipe?
Hey Chelsweets can I half this recipe??
I love the flavor and texture of this cake and I’ve tweeked it to make it more my style but what I can’t figure out is why the outsides get crystalized! it’s not that the outside is burnt, and I’m not using dark pans. the rack in my oven and its temp is always where is should be, but I still get crystalized edges! It’s this way with almost all your recipes. what is it that makes the edges do this? any suggestions?
I’m having trouble finding the actual recipe on this page. Am I missing something? I want to try it!
HI
I know this recipe is a older one – but it looks like the actual recipe has disappeared.. is there anyway you would consider publishing it again 🙂 was hoping to use it for my sisters wedding
How do I get this recipe. It will not pull up for me.
Hi! I love this recipe and am planning on using it for my wedding cake! It doesn’t look like the recipe itself, ingredients, or instructions are on the page anymore though? I didn’t write it down before so now I’m lost, help! Thank you!
Hi, I live at a high altitude of 7000 feet, I have made this recipe a couple of times and it seems to fall a little in the middle. What would you suggest I need to change in this recipe to make it high altitude friendly?
Hi Chelsea! I love your recipes and I’ve used this one many times (always perfect, thank you!!) but I think there might be something wrong with the page right now. For some reason its showing me the intro but not the recipe itself. Could just be my internet, but it happened on my phone and my computer so wanted to let you know in case there’s an issue on the website’s end. Thank you so much again!
Hi there,
Looking to make a 1/2 sheet cake with this recipe. How many batches do you recommend? 1? 2? I plan to cut it in half to fill it so I need it a bit taller. Thank you!
Hi!, If am planning to make this is Australia would I go by the grams? and would 2 batches be enough for 4x 10 inch layers?
Hi there!
I am wanting to make this cake for my sons birthday, but I only have two 8” pans… would this recipe work if I just split the quantity between the two pans? Or will it be too much? And then not cook properly?
Thanks!
Hi chels,
Will this mix be enough for 2: 8×3 inch high cake pans.
Hi Chelsea, do you know how tall this cake ends up when using 4 7inch layers? Planning on making a Frozen themed cake for my daughter but want it to be around 10inches high. Also what king of support would you use for a tall cake? Just straws or a centre dowel also? Thank you so much ?
Hi Chels, I’m really excited to make this recipe, it’s for a 1st birthday. I live in Australia and my cake pans are 9.5”. I’d like to make a two-layer cake with nice thick layers. Do you think this recipe as-is will give enough batter? Or should I do 1.5x ?
Thank you!
Hi. I used your cake recipe for my daughter’s birthday this weekend and it turned out great! It was so moist and tasted so good! I used my own recipe for the icing though. I finally found one that works every time for the perfect icing. Thank you!!
I made this cake this weekend. I used 3 – 9″ pans and it worked great. The icing recipe is wonderful. This is a delicious recipe, and I will be making it again. I used a layer of strawberry filling and a layer of lemon curd.
This cake is amazing!
I’ve been looking for a good Vanilla recipe for layered cakes forever. The fact that its easy to make and it works every time is amazing. Also the texture is flawless, airy and soft. It tastes great too.
Thank you! <3
Hi, I made this cake in the 6″ version, when I baked the cake, it came out so hard and crusty on the top, what did I do wrong?
Will this work at 4000’ elevation?
Hi! How are you? I plan to use this recipe to make a 3-layer 12 inch cake. I saw someone posted that they made a 3-layer 10 inch cake by using 1 and a 1/2 of your recipe. Do you think two recipes would be enough for a 3-layer 12 inch cake?
Thank you so much!
Can cake flour be used instead of regular flour? If so, would it be the same measurements ?
If I start with frozen layers and decorate the cake a day before the party will it eventually thaw in the fridge when it’s stored? I’m nervous the cake will still be frozen by the time it’s ready to eat day of birthday the next day
Hi can you tell me the ingredients for a 10 inch vanilla cake? I am doing 4 layers. Not sure how to scale them, thank you
Love this recipe!!! I’ll be making it for my Dad’s 100th birthday next monty.
2 questions – you say you freeze your cakes before frosting taking them out 20 minutes before. Can you freeze again after iced? I need to travel 50 minutes and need to assemble at the venue and I want minimal chance of icing damage.
Do you use simple syrup? I’m afraid to because I had a cake from a famous baker and the cake was soggy from so much syrup!
Is it normally for this cake to have a more dense feel to it… My husband said that it was dense and reminded him of like an Angel food cake… I thought that it cooked beautifully and handled wonderfully.
How many 1/4 sheet cake will this make?
I’m making a layered cake for the first time for my daughter’s birthday, and your details here are so amazing – thank you! I’ve got 2 6″ cake pans and the cake will have 4 layers, so I was going to make and bake two layers, then make and bake the other 2 later that day or the next day. Will this recipe work for 4 6″ cakes? And can I just milk up half the batter at a time so it doesn’t go wonky while waiting to bake the second 2 layers?
Love your videos and recipes! They are so helpful ? I am making a 10×15 sheet cake. About how many cups of batter does this recipe make? Thank you!
I just made a 1.5 batches for a 12″ and a 10″. The 12″ caramelized but the 10″ did not. (I want it caramelized because I’m doing a semi naked cake). I even baked them separately.
Why did that happen?
Is there a way for me to make it look brown???
Please answer ASAP as I need to continue baking.
Thanks!!!
How tall are each layer?
Made this today and it’s beautiful! The only thing is I find it a bit too sweet. Would I be able to reduce the sugar at all? And if so, by how much? Thanks so much!!
Made this today and loved it! The only thing is I find it a little too sweet. Is it possible to reduce the sugar and if so, by how much?
Thanks so much!
Hi Chelsea!
I wanted to know if this cake recipe can be used for half sheet cakes?
Thank you in advance!
What is the bake time for a 6 inch pan vs a 9 inch pan?
The best cake on the planet!!!!
new to baking…I’m making personal 4in cakes but don’t want to make multiple batches how many 4in can I get with this recipe
How much ingredients would you use for a three layer 10 inch round
I’ve tried several popular white cake recipes and this one has beat every one of them by far! It is now my go to and I love it!! Just curious, have you ever used this recipe as a base to make a strawberry cake? Like adding strawberry puree to the mixture? I’m interested in trying but wasn’t sure if you’ve tried before and had any tips.
I was glad to read the comment that other bakers ate not competition but fellow artists. I’m doing my first Farmer Market and was frightened at the number of i other bakers, but we all have different focuses. I don’t do fondant but one of them may and I will refer others. Thank you.
Have you ever put M&Ms in this vanilla cake?
Hi Chels, I have a question… I love this recipe so much but how would I make this into 3, 10in rounds?
T.I.A
Sure! I actually have a fun batter calculator that helps you figure that out for any recipe! Here’s the link: https://chelsweets.com/how-much-cake-batter-per-pan/
Hope that helps 🙂
Can I just say this is my go-to recipe of all time, its delicious. Thank you so much for 1)sharing with us and 2) your unearthly patience answering all our questions for so many years after you first posted this. Bravo.
I myself have used this recipe for all my “white” cakes, adapting and adding different flavours to make it lemon cake, victoria sponge cake, coconut cake you name it. Ive even multiplied the original recipe by 6 to make large tiered wedding cakes. I’ve used it in up to 12″ pans.
Ill be honest I do like my layers deep so I use x1.75 of your original recipe for the 7″ pans (four pans) but I know the limits too and you cant really put the whole batch (whatever you size up to) into two pans and hope to trim the layers in half (although I have for small sized cakes, id say 6 and 7″ is fine, 8″ and above and you’re on shaky ground trying to achieve a height that you can trim in half). Ive done it a few times because it saves a lot of time but best results are always when split into four pans.
So..moving on to my actual question. Id love to make a white chocolate and raspberry version of this buttermilk cake but im struggling with the raspberries and I know its because this is a wet batter..the frozen raspberries sink to the bottom and dont disperse evenly, ive tried coating in flour first and ive even tried fresh raspberries. I’ve yet to try freeze dried raspberries but I cant see how they’d have much flavour. Any tips on converting this to a white choc & raspberry cake? Can you add melted white chocolate to the batter? What would I have to omit if I did? Im thinking maybe some of the butter or buttermilk since chocolate (melted) is kinda liquid. Ive tried adding white chocolate chips – they also since and go a bit caramelised.
Currently im only adding the white chocolate to the Swiss meringue buttercream but it would be lovely to get a taste of the white chocolate in the sponge too…as well as having raspberries throughout the cake.
Thank you
I tried 2 other highly rated vanilla cake recipes before I found yours. They were ok but not what I wanted. Yours was perfect! I made 9 layers for a 3 tiered graduation cake. The cake was light, moist, flavorful and had the wonderful velvety texture that I wa looking for. Best of all, it held its structure under all the weight of 9 layers plus butterercream , fondant, and decorations! This recipe will be my go to white cake recipe. Thank you for sharing it. The guests raved about how delicious it was. It gets a 5 star rating from me!
This cake was delicious and so easy to make! I came across your blog by mistake and decided to try this recipe out. I was debating between two others, but I saw yours I thought why not. I’ve been hoping to find a good vanilla cake recipe and this will be my go to! Flavor and texture were both great, and the cakes did bake flat
I need to learn more about cake making
Can I substitute the all purpose with cake flour?
Hi Jackie,
You can! I prefer the texture with regular AP flour, but you can use cake flour too.
Hello, Just wondering how the recipe would change if I need to make a 4 layer 10 inch cake?
Thanks!
Kristina
Hi Kristina,
You would need to double this recipe! In the future if you are curious about how much batter you need for different sized cakes, I have a great cake batter calculator here: https://chelsweets.com/how-much-cake-batter-per-pan/
Happy baking!
It was way too thick.
Hi Charity,
I’m sorry to hear that! This batter shouldn’t be super thick if the ingredients are at room temperature. Is there a chance that some of the ingredients were cold? Or did you make any substitutions to the recipe?
Hi, can i put strawberry’s (or other red fruits) through the batter before baking? (Sorry for my english)
Hi Jasmijn,
You can bake these cake layers with bits of cut up fruit (like diced strawberries) by adding them on top of the batter before baking the layers. I don’t recommend folding the fruit into the batter though, it can cause those areas of the cake not to bake properly because of the moisture in the fruit. Hope that helps, happy baking!
Hey Chelsey! I really want to try this recipe. But can I just use whole eggs instead of only the white?? Same weight in grams as the whites. Apart from giving the cake a yellow tinge, will it change the texture in any way?
Just seeing this now! I’m pretty sure I answered you in a DM but I’ll share the response here too for anyone who has this question about this recipe in the future.
You can use 5 large eggs in place of the egg whites in this recipe if needed. It will slightly change the texture but it will still be delicious 🙂
Hi ?? I was wondering if I can make this cake batter then cook one layer at a time? Because I only have one 8” cake tin. So this means the rest of the batter will be sitting in the bowl for a couple hours until I can cook the other layers. Will this affect the cake at all?
If this is fine do you know how long I can wait to cook the cake batter?
Thanks ?
Hi Emma,
You totally can do that! The cake layers should bake up just fine. I had to do this when I made my wedding cake and had to bake a ton of layers, and it worked great. The batter can sit at room temp for a few hours, but I would try not to let it sit longer than that. Happy baking!
I made this cake for my mother and father in law’s 50th anniversary party. It was amazing!! I did 2 tiers…10″ and 8″. I also made your vanilla cupcakes. Wish I could upload pictures for you to see how they turned out. Thank you for sharing such great videos and steps to follow. I received dozens of compliments. Next I’m going to attempt your white chocolate with raspberry filling cake. Can’t wait!!
Hi Christy,
I am so happy to hear that 🙂 It sounds like a perfect cake for such a special occasion!! You can always email me pictures at hello@chelsweets.com, I’d love to see them!!
I hope my white chocolate and raspberry cake is just as big of a hit!! Happy baking!
Can I make this receipe in a 12 inch cake pan is it enough batter Thankyou
Hi Marian,
You can use this recipe to make one 12 inch cake layer. It will be a bit thicker than the layers that are made in 7 or 8 inch pans, and it will take a bit longer to bake. Hope that helps, happy baking!
Hi,
I made the cake and it was really good. Although I was wondering if I can use less sugar? Maybe 300gr or n stead of 600gr? And using cake flour instead of all purpose flour?
Thanks
Hi Alessandra,
You can use less sugar, but it will change the texture of the cake layers and they will bake up less tall. You can also use cake flour instead of AP flour if you want. If you make both of the adjustments I’d love to hear how it turns out! Let me know 🙂 Happy baking!
Hi.! I absolutely love this recipe but for some reason when I use it for cupcakes my cupcakes pull away from the wrapper. Can I not use it for cupcakes or is there something I’m doing wrong.?
Hi Miranda,
While this is an amazing cake, I do NOT recommend using this recipe to make cupcakes! Instead, I highly recommend using my favorite vanilla cupcake recipe, here’s the link: https://chelsweets.com/classic-vanilla-cupcake-recipe/
I like the texture better for cupcakes, and this recipe also uses buttermilk! Hope that helps, happy baking!
Hi can we substitute butter with oil in this recipe.
Thanks
Hi Richa,
You can! However, it will change the texture and flavor of the cake a bit. Happy baking!
I made this cake for my daughters first birthday! I used raspberry preserves between the layers. Everyone loved it! Thanks for sharing. I can’t wait to try more recipes!
That sounds delicious Danielle!! So happy to hear that 🙂 Happy baking!!
Why are my cake layers pulling away from the pan and falling when I take them out
Hi Jessica,
Cake layers naturally contract as they cool once they’re baked, so that’s normal! But the type of baking spray or non-stick spray you use and the amount can also have an impact on this. If you want them to pull away less, I’d recommend using slightly less spray, or using homemade pan release like this: https://chelsweets.com/homemade-cake-release/
Hope that helps, happy baking!
This is my go to vanilla cake recipe. I have tried many many different recipes. I always use this one for family and friends, everyone loves it! Thank you chels sooo much!!!
Thank you Shaylee!! Comments like this make my day 🙂 Thank you for sharing!!
Can this be used as a sheet cake? TIA!
Hi Tolu,
This recipe can be used to make a sheet cake! One batch will make 2, 9 x 13-inch cake layers that are about 1-inch tall. Bake for 35-40 mins at 350 F. I recommend using heating cores if you have them to help the cake bake more evenly and quickly (like these: https://amzn.to/3ShscwX)
Or you can make one 9 x 13-inch cake layer that’s about 2 inches tall, but bake time will be 45-55 minutes! Hope that helps, happy baking!
Hi! I like making 3 8×3 cake layers. Yeahhhhh pretty thick huh? Lol would doubling this recipie be enough?
Hi Toni,
Haha that is pretty thick!! Doubling the recipe should make cake layers that size that are just shy of 3 inches tall. They’re going to take a long time to bake though!! This batter is somewhat dense!
Made the cake today it’s super moist, but I wonder why it needs so much sugar. What would happen if I took away some of the sugar? What would the knock on effect be? Let’s say I did just 300g instead of 600g?
Hi Charlotte,
So happy to hear you loved the way this recipe turned out! Because this recipe uses the reverse creaming method, it needs a decent amount of sugar to have the right texture. If you use less sugar, the layers will be denser and less tender. I’ve tried it before and I really don’t like how this recipe turns out with less sugar. Hope that helps, happy baking!
Hi Chelsea,
I love your recipes, can I make this cake into a lemon cake by adding lemon juice and lemon zest?
So happy to hear that Miriam!
Lemon juice can actually cause cake layers to bake up dense and tough, so I wouldn’t recommend making that swap! To make these cake layers lemon flavored, I’d suggest adding the zest of one large lemon into the batter and adding a 1-2 teaspoons of lemon extract.
Both of these can also be added to the frosting to make lemon buttercream, and you can swap the heavy cream for lemon juice in the buttercream recipe. Hope that helps, happy baking!
This cake was SUPER easy to make and delicious! I paired it with Chelsweets strawberry buttercream and it was great! The only thing I couldn’t seem to bypass was the middle of my cakes kept sinking it no matter what I tried?
Hi Brooklynn,
That sounds like such a delicious combination!! So sad that the middles keep sinking though :/ I actually wrote a whole post about what cause the middle of cake to sink, here’s the link: https://chelsweets.com/why-do-cakes-sink-in-the-middle/
Hopefully that helps, happy baking!
I would like to make this into a 2 layer rectangle cake. How do I do that?
Hi Melissa,
This recipe can also be used to make a sheet cake! One batch will make 2, 9 x 13-inch cake layers that are about 1-inch tall. Bake for 35-40 mins at 350 F / 175 C.
I recommend using heating cores (like these: https://amzn.to/3CeVIwT) if you have them to help large cake layers like this bake more evenly and quickly. Happy baking!
Hi, I LOVE all of your recipes and videos! They are so informative and very easy to follow. I am hooked on your vanilla layer cake with the reverse creaming method. It is out of this world! I’m making a 4-tier wedding cake for this weekend and have a question about refiguring the measurements at 50%. I converted the flour to 562 grams but when I convert the sugar I come up with 900 grams which seems awfully high. Is this correct? I really don’t want to mess up the recipe so I’m afraid to try it without knowing for sure. I trust your thoughts and input. Thanks so much!
Hi Ashley,
So happy you love this recipe as much as I do 🙂 Are you trying to make a 1.5 batch of batter? Then yes, 900g of sugar! This recipe does use a lot of sugar, but you need a lot to give it the right texture because it uses the reverse creaming method.
Hope that helps and that your wedding cake turns out amazing (I’m sure it will!)!!
Is whipping cream a good substitute for heavy cream ?
Hi Michelle,
It is! Whipping cream can be used in place of heavy cream in the frosting included in this cake recipe. Happy baking!
Hi, I would love to try making this cake will this work if I used whole eggs? I hate wasting egg yolks, I mean I know I can use it for other thing but always forget and end up throwing them away after a few days
Hi Liv,
Great question! You can totally use whole eggs, I recommend using 4, large eggs in place of the egg whites in this recipe. Hope that helps, happy baking!
Will this cake be able to handle being stacked and put into three tiers?
Thank you.
Hi Mad,
Absolutely! This cake has a great structure for stacking and making tiered cakes 🙂 I’ve used it to make 3 wedding cakes. Happy baking!!
I realize this is an old thread, but I was wondering if 9″ x 2″ round cake pans would work. I’m making a 2 layer 9″ cake and I didn’t know if this would be too much batter for the cake pans or if it would be too thick? Thanks! Love your videos! 🙂
Hi Paige,
One batch of batter should actually be the perfect amount to make 2, 9-inch cake layers. Hope that helps, happy baking!
Hi. Can you tell me if this cake holds up well with a ganache crumb coat and a layer of fondant for tiered cakes
Hi Jeri,
This cake recipe is super sturdy and would work great in tiered cakes and under fondant. Happy baking!
Hi Chels, I’m looking to make a number cake with this recipe and will be baking it on a sheet cake pan. How many batches do you think I will need to make on 2 sheet pans.
Hi Jenn,
Depends on the size of your sheet pan and how many layers / how tall you want it to be.
One batch will make 2, 9 x 13-inch cake layers that are about 1-inch tall. Bake for 35-40 mins at 350 F / 175 C. I recommend using heating cores if you have them to help large cake layers like this bake more evenly and quickly.
Or you can make one 9 x 13-inch cake layer that’s about 2 inches tall, but bake time will be 45-55 minutes at 350 F/ 175 C. Hope that helps, happy baking!
What type of frosting do you have in the photo? Is that just jam or a jam slurry?
Hi Stacey,
The cake in that photo is frosted with my strawberry buttercream and homemade strawberry jam! Here’s the link to the frosting: https://chelsweets.com/strawberry-buttercream/
Hope that helps, happy baking!
can you make a full sheet cake with this recipe? Do I need to double it? It’s for a birthday serving 50 people. I love this recipe and have used it multiple times!!
Hi Kiersten,
I would definitely recommend doubling the recipe to make a full sheet cake (18” x 26”)! If you double the recipe, the layer should end up being a little less than 1-inch tall. Hope that helps, happy baking!
Hi Chels,
I’m using your recipe this week to make a number cake , I will be making a sheet cake and cutting to size. The thing is I’m doing vanilla and chocolate layers. Can I add 80g ocoa powder to the vanilla mix recipe to make the chocolate layers. Please let me know.
Hi Kay,
You could do that, but you’d need to reduce the amount of flour by the amount of cocoa powder you add in, otherwise the cake cake will end up being a bit dense and dry.
I think the easier way to transform this recipe into vanilla and chocolate cake batter would be to use my marble cake recipe! It’s does exactly that, and makes half chocolate and half vanilla cake batter from one batch of batter. You can just not marble the batter together and bake separate layers.
Here’s the recipe: https://chelsweets.com/easy-marble-layer-cake-recipe/
Hope that helps, happy baking!
Hi Amy update on the chocolate cake.
I ALWAYS use your recipes, this cake is amazing. Have you ever run into the cake tasting to “flour-y” though? I feel like I can taste the flour quite a bit, I wonder if it could be the brand of all purpose I am using? Thank you!
Hi! I really want to try this recipe, it seems like what I was looking for! I only have two 7″ cake pans though, and I was wondering if the batter woild be okay to sit on the counter while 2 layers are baking?
Hi Miruna,
Great question! That should work just fine, I’d recommend baking 2 layers at a time. The batter can sit at room temperature for a few hours. Hope that helps, happy baking!
Does this cake have to be refrigerated after it’s frosted or can I make the cake the night before and keep it on the counter?
Hi Jenna,
I usually store frosted cakes in the fridge to help them keep their shape and prevent any bulging or bubbles from forming as the cake settles, but it can be left out overnight at room temperature! Hope that helps, happy baking 🙂
Hello chelsweets! I followed your recipe for the cake as well as mini cupcakes. This cake seems a bit dense ( not as fluffy as I thought). Is that supposed to be like that? I was terrified as vanilla cake is easily get dried when it’s over baked, so I watched the time very closely. When I took the 8 inch cake pan out, the edge was golden brown and the middle was bit jiggly. I made sure the toothpick came out fine before I took out the pans. Also, did you cut the edges? Because mine was nothing like yours. Appreciate if you could get back to me!
Hi Felicia,
While I love this recipe for cake layers, I prefer using my vanilla cupcake recipe for all cupcakes/mini cupcakes! It’s made with oil and has a lighter texture that works great for cupcakes.
This cake recipe is a butter cake, so it has a dense yet tender crumb that makes it super easier to stack and frost a layer cake.
I do usually level the top of the cake layers and trim away any caramelization from the sides. I’ve used a few different types of pans to make these layers over the years and have found that can have a big impact on how they bake up / brown too. Right now I use Fat Daddio Pan’s that are made with aluminum. What type of pans are you using?
Hopefully that helps, happy baking!
Also, I tasted the cake, it’s bit too sweet for me. If I want to cut down the sugar, how much do you recommend to cut down so it won’t affect the texture?
Thank you!!
Hi Felicia,
Great question! It is a delicate balance to avoid throwing off the texture of the layers, but you can reduce the sugar but 1/2 cup, and use 2 1/2 cups instead of 3 and it should still bake up nicely. Hope that helps, happy baking!
So glad to chance on this channel Chelsea. Happy New Year to you! Am in love with this recipe already. I have a question though. I need to bake a sheet cake for an 8year old. I guess it’s the 9×13 inch size. Do you recommend doubling the recipe & can I reduce the sugar, if so how muchless per recipe? I would appreciate a prompt response. Thank you
Hi Mary,
Happy New Year to you too!! You can totally make a sheet cake with this recipe.
One batch will make 2, 9 x 13-inch cake layers that are about 1-inch tall. Bake it for 35-40 mins at 350 F / 175 C. I recommend using heating cores if you have them to help large cake layers like this bake more evenly and quickly.
You can also make one 9 x 13-inch cake layer that’s about 2 inches tall, but bake time will be 45-55 minutes at 350 F/ 175 C.
In terms of reducing the sugar, you can reduce it by 1/2 cup and the texture should still be pretty tender. Hope that helps, happy baking!
Hi just wondering should I divide this recipe into a 3 or 4 layer 8inch cake???
Hi Katarina,
You can do either! I usually do 3, 8-inch cake layers, but you can make 4, 8-inch layers and just bake them a few minutes less than the recipe calls for. Hope that helps, happy baking!
Hi Chelsey,
First off, I’ve made this cake and quite a few of your other cakes before and they’ve all been absolutely delicious. I use your recipes every single time I bake. Thank you so much for sharing them with us, I love you!
That being said, I have a friend who has requested I make this cake for her son’s first birthday, but she’s asked that I use coconut sugar opposed to regular granulated sugar because it’s healthier or something? and so I’m wondering if you would recommend using a 1:1 ratio or if I should use more or less? Idk I’ve never baked with anything other than normal sugar before.
Please help <3
Hi Jessica,
You’re too sweet, thank you! And great question. I haven’t tested this particular recipe with coconut sugar, but you should be able to swap it 1:1 for the granulated sugar in this recipe. If you try it, I’d love to hear how it goes!
@Chelsweets, Hey Chelsey, just an update
So, I tried to make the cakes with coconut sugar and 100% it was not worth it.
The coconut sugar had a very strong burnt smell just opening the bag, which probably should have been a huge red flag, but I ignored it and hoped for the best.
The cakes themselves didn’t smell much better after baking. They really didn’t have any scent or flavor at all for that matter. If anything it just had a burnt sugar aftertaste. The vanilla, which I doubled, was nowhere to be found, that burnt sugar smell completely overpowered and canceled it out. It was also no where near as sweet as I thought it would be, and that was probably the worst part.
The buttercream didn’t help either, I tried it with and without, but it just made everything slightly salty.
Honestly, it was not good.
Technically, it did work though, the cake layers were probably the best ones I’ve ever made, they were cooked through evenly, none of them needed an extra minute or two, nothing sank or rose in weird places. They were moist and spongy in the best way. They just tasted sad.
Glad I tested it before trying to serve it to people lol
Hi Jessica,
I’m so sorry to hear that! I really appreciate you testing this out and sharing the results <3 Thank you!!
Hi! When I measure out 600g of granulated sugar I only get 2 1/4 cups instead of 3. Which measurement is correct?
Hi Brooke,
There are 200g in 1 US cup of granulated sugar, so this recipe uses 3 cups, or 600g of sugar.
Is there a chance you aren’t zeroing out / taring the scale to account for the weight of your measuring cup? That’s the only thing I can think of that would cause your measurements to be off. Hopefully that’s it, let me know if it’s not and we’ll try to figure out what’s up with your measuring cups / scale!
I am going to make a 4 layer 7” cake. I bought the fat diddios 7 x 2 cake pans. I am not sure all 4 pans will bake at the same time. So I was thinking of doing two at a time. Can I bake 2 at a time and while they bake, can I place the other two covered in the fridge until they are ready to bake?
Hi Kelisha,
I love those pans, those are exactly what I use too 🙂 That should work totally fine, the batter can sit out at room temperature while the first two cake layers bake. I don’t recommend putting the batter / pans in the fridge, or else it’ll take a lot longer to bake them. Hope that helps, happy baking!
Could I use cake flour instead of all purpose flour? Is it a 1:1 ratio?
Hi Kelisha,
Great question! I prefer this recipe with AP flour, but you can use cake flour in place of the AP in a 1:1 ratio. Happy baking!
Hi Chelsea,
I found you in YouTube and am trialling your recipes for my sons christening cake! We baked them today and have made the buttercream too. When I pulled out the baked cakes though, the edges had caved in a little and it’s almost like the cake shrunk a little. The bottom of the cake goes all the way to the edge of the tin, but for some reason the sides came away from the tin. Do you know what might have caused this to happen? Thanks!
I made this recipe as the 8in cakes but I need to make a 10in cake now. I don’t have 3 10in pans so would have to make them separately, is that ok ? How much should I increase the recipe for the 10 in cakes and what is the cook time ? Also would the recipe be for 1 10in cake ?
Hi Terry,
Great question! This cake batter is fine to sit at room temperature for a few hours, so it’s ok to bake one layer at a time and let the rest of the batter sit. One batch of this batter will make 2, 10-inch cake layers, so i’d recommend making 1.5 batches to make 3, 10-inch cake layers.
Bake time will vary and be shorter if you use a heating core, but I’d say they’ll need to bake for 40-50 minutes. Check the center with a toothpick after 40 minutes and keep baking until a toothpick inserted in the center comes out with a few moist crumbs. Hope that helps, happy baking!
Hi, I’m exited to try this recipe 🙂 Could I also use this exact recipe for a 7-inch & 9-inch cake? I will be making a wedding cake that serves about 40 people, so I thought I could use this recipe x2 and use 7 & 9-inch pans. Will that work out?
Hi Monica,
Great question! You totally can. A double batch of batter should be just the right amount of bater to make 3, 7-inch layers and 3, 9-inch cake layers. Hope that helps and that your wedding cake turns out great!!
Can I ask please…
a. What size eggs do you use?
b. what temperature/time for a fan assisted oven?
c. If I wanted to do 4 x 8″ layers would this mixture be enough or would I need to increase it ?
Many thanks
Charmaine.
Hi Charmaine,
Great questions! I use egg whites from a carton, but if you want to separate your own eggs use large eggs.
I haven’t tested this recipe with a fan assisted oven, but the general rule of thumb is to use a setting of 20° Celsius (36° Fahrenheit) less than the recipe calls for. Cook time can be reduced by 10 minutes for every hour of cooking time.
This recipe can be used to make 4, 8″ layers! They will be a bit shorter than if you make 3, 8-inch layers, but they will still taste great! Bake time should be a few minutes shorter if you make 4 layers. Hope that helps, happy baking!
Can you add sprinkles to this to make a confetti cake? If so how much
Hi Mona,
Great question! You totally can. I’d recommend adding 3/4 of a cup of rainbow sprinkles. Happy baking!
Will a cream cheese frosting work to lock in moisture?
Hi Cynthia,
Great question! Cream cheese frosting should definitely still lock in the moisture 🙂 Happy baking!
Hi!!
Could I add some lemon juice into this recipe, maybe sub 1/3 cup lemon juice for 1/3 cup of the buttermilk to make this lemon flavored? I noticed your lemon cake was a different recipe completely, but I really love this recipe and just want to add some lemon flavor to it. Do you think that would work? And maybe doing almond extract instead of vanilla?
I have made this vanilla recipe many times and am OBSESSED. So good and so moist and everyone raves about it.
THANK YOU!?
Hi Elise,
Lemon juice can end up making baked goods a bit dense, but you can totally make adjustments to this recipe to make it a lemon cake!
I’d suggest adding the zest of a large lemon into the cake batter along with 1-2 tsp of lemon extract, and then adding a lemon simple syrup to the baked and leveled layers and use a lemon buttercream. That should give the cake a wonderful lemon flavor!
Hope that helps, happy baking!!
I had to make a multi tiered vanilla cake for a graduation party. I needed a delicious, velvety, and sturdy cake that would hold up under fondant and all sorts of fondant designs. My go to vanilla cake wouldn’t hold up under all the weight. I tried 4 other recipes, but they all failed in one or more areas. I tried yours and hit the Mother Load! One bite and I knew I had found the perfect recipe!
The finished cake turned out beautifully and the twin boys were estatic. Guests started oohing and ahhing on how delicious and velvety the cake was. The parents were thrilled and so was I!
Here it is almost a year later and I’m using the recipe for a large wedding cake. I know it will be a hit! Thank you for an amazing recipe. I appreciate all the tips and notes. I used them all and they really helped.
Hi Nilha,
Your comment put the biggest smile on my face 🙂 I’m so happy to hear that!! In all my years of sharing this recipe, I don’t think I’ve ever heard it described as velvety, but that is the perfect word for it!!! I love that. Thank you so much for sharing!
Hi how much do i need to double the recipe to make a 12×12 inch sheet cake?
Hi Ivanda,
One batch of batter should make a 12 x 12 sheet cake that is about 2-inches tall. If you want to make a sheet cake with two layers, you can make 2 batches of the batter. Hope that helps, happy baking!
I love your vanilla cake recipe it’s so soft! I noticed when I increase the recipe for bigger sized tiers I run into problems with the top cracking, is there a way to prevent this or should a different recipe be used for the bigger sized cakes. Thanks!
Hi Emily,
Great question! This recipe should scale up to make bigger layers just fine, I’ve used it to make sheet cakes and wedding cakes and it worked well. However, I do find I can’t make more than one batch at a time in my 5 qt KitchenAid. Technically it could fit a double batch, but I find the ingredients don’t get mixed together as well and the layers turn out kinda funky.
I also use a couple flower nails / heating cores per pan (like these: https://amzn.to/3JAuwfF) when baking layers larger than 8-inches. This helps the layers bake more evenly and quickly.
Hopefully that helps for next time, happy baking!
Hi, what a recipe for 6×1 inch pans? It’s just my husband and I. We don’t need a big cake. I would love to make a cake that we don’t throw part of it away. Do you ever do any recipes that small? If so, I would love to try them.
Thank you,
Tami
Hi Tami,
Great question! I actually have a mini vanilla cake recipe that I think would work for that! It makes 3, 4-inch cake layers, but it can also be used to make 2, 6 inch cake layers. You can half this recipe (use an egg white instead of a whole egg) and that should work! Here’s the link: https://chelsweets.com/mini-vanilla-cake-recipe/
Hope that helps, happy baking!
Hi! My name is Chloee and I’m a ten year old baker! I like to use pudding in my recipes, can this recipe have pudding in it or would it ruin it??? Thank you ?
Hi Chloee,
Great question! This recipe bakes up really nice and moist without pudding, so I wouldn’t recommend making it with pudding! Pudding would throw off the balance of ingredients in this recipe. Hope that helps, happy baking!
What will happen if I use cake flour instead of all purpose. I need to use it for a tiered cake. Vanilla cake at the bottom and chocolate cake at the top.
Hi Nicole,
You can use cake flour instead of all purpose flour in this recipe. I prefer it will AP flour, but cake flour will work. The batter will be thinner and the cake texture will be a bit softer. That should work just fine in a tiered cake. Hope that helps, happy baking!
Can I add sprinkles to make this into a confetti cake? I’m just wondering if the colours would just meld together.
Hi Rashida,
You totally can! I’d recommend folding 2/3 cup of rainbow sprinkles into the batter once it’s made and then immediately pouring the batter into the cake pans. As long as you don’t let the cake batter sit in the bowl before adding it to your pans and you use rainbow jimmy sprinkles (the long, thin ones) it should work great. Hope that helps, happy baking!
HELP, I am now completely confused. Your recipe says 3 8in cakes, but in the comments, when someone asked about 3 8in cakes you said they would be dense and maybe too high for the pans. What’s the story? I would like to make a 3 layer 8in cake
Hi Susan,
I think that comment was in reference to using pans that were 3-inches tall and maybe baking all the batter in one pan?
I use 8 inch pans that are 2 inches tall, and I bake them in three different pans. This recipe turns out great baking 3 layers that are 8-inches 🙂 Hope that helps, happy baking!
Could this be made using whole eggs instead of just whites?
Hi Melissa,
Great question! You can use 4 large, whole eggs in place of the egg whites in the recipe. It will change the texture of layers a bit, but it will still be delicious. Hope that helps, happy baking!
Big hit at the party I took this cake too. I layered it with blueberry and strawberry filling. Absolutely delicious
Yay!! So happy to hear that Stacey, it sounds delicious!!
Hi! I’m wondering how much flavored extract to use for a single batch of cake batter and buttercream frosting. Thanks in advance!!
Hi Erika,
Great question! It can vary based on what type of extract you’re using and how strong of a flavor you’re after.
I usually recommend adding 1-2 teaspoons of extract to the batter and frosting. After adding that amount, you can taste test the frosting and then add more if you want a stronger flavor. Hope that helps, happy baking!
How many batters would I need to make for half sheet cake? And how long ?
Hi Maily,
This recipe makes about 10 cups of batter, which can be used to make a sheet cake that is about 1-inch tall! Bake time can vary a lot, but I’d recommend baking it for 25-33 minutes, or until a toothpick inserted in the center comes out with a few moist crumbs. Hope that helps, happy baking!
Hi! I need a rich chocolate cake recipe for a 1/2 sheet cake size pan. I’m going to sculpt it into a bottle shape which is fairly rectangular except for the neck of the bottle. Will 1/2 sheet cake with two layers serve 50? Can you please direct me to a 1/2 sheet cake chocolate cake Recipe?
Thanks so much!
Hi Mary,
My chocolate buttermilk cake recipe would be great for that! Here’s the link: https://chelsweets.com/the-best-chocolate-layer-cake-recipe/
One batch makes 10 cups of batter, which is enough to make one, 1/2 sheet cake (13″ x 18″) that is about 1 inch tall once it’s baked. Hope that helps, happy baking!
I made the cake and it a little soggy does supposed to be fluffy
Hi Patricia,
So sorry to hear that! When you say soggy do you mean the top is a little sticky? Or is like the center not fully baked? Hopefully we’ll be able to figure out what happened! It sounds like it might have needed a little bit more time in oven.
8/6/23
Hi: I made this recipe (Vanilla Layer Cake Recipe) on (3) 7-inch x 2-inch cake pan because I want more actual cake than frosting. It took more baking time than the 33-35 minutes suggestion.
1. Can you tell the the best baking time for (3) 7-inch x 2-inch cake pan?
2. If I want to mix the layers with different flavors to be vanilla layer cake, chocolate cake, red velvet cake or lemon cake, what would (1) layer recipe be for each of these flavor layers for (3) 7-inch x 2-inch cake pan?
3. I enjoy watching your videos. So simple to understand and love the special suggestions.
Hi Lisa,
It definitely makes sense that 3, 7-inch cake layers would take longer since there would be more batter in the cake pan. Baking time can vary based on the type of pan you’re using and your oven, but I’d say it could take 37-42 minutes.
It’s pretty challenging to make each layer a different flavor, but you can make 1/3 of this recipe to make 1 vanilla cake layer. Hope that helps, happy baking!
This recipe is absolutely perfect!! So soft and so delicious, this is my go to vanilla cake recipe. I used this as the bottom tier for an engagement cake and it was such a hit 🙂
Can you make cupcakes with this recipe?
I made this cake for my wedding renewal ceremony and it was so moist and delicious. I also follow the recipe for your American buttercream it was creamy
and delicious. Thank you for such a great recipe.
I’m a little terrified by the quantity of sugar in this cake (almost double the weight of flour!) I did make it last year as per the recipe and it came out with an almost chewy, caramelised sugar texture around the edges which I trimmed off (and scoffed) – delicious but very sweet!
I’d like to make it again this year for a children’s birthday so wondering if it’s possible to reduce the quantity of sugar? If so, how much could I get away with reducing it by? Thanks!
Hi Pippa,
Great question! Sadly the texture of the cake layers is a lot less tender if you decrease the amount of sugar. I don’t recommend it! If you really want to use less sugar, you could use 500g, but even with that it won’t be quite as soft. Hope that helps, happy baking!
Sorry, I made a mistake when I did my previous comment. What I want to know how many cups of batter there is in this recipe. Thank hou
Hi Maggie,
No worries! One batch of this recipe makes about 10 cups of batter. Hope that helps, happy baking!
Thank you for this awesome recipe!!
Is there anyway I can use less sugar or will it change the texture ?? Thank you !
Hi Christin,
Thank you!! Sadly if you decrease the sugar in the cake recipe it will make the cake layers denser :/ You can reduce the amount of sugar by 1/2 cup, but it turns out best with the amount the recipe card calls for. Another suggestion would be to use a less sweet frosting like swiss meringue buttercream or my hybrid buttercream. Both of those contain less sugar. Hope that helps, happy baking!
Hi has anyone left their cake uncovered in the freezer overnight? Does anyone know if it’s salvageable or if I should just make another ? Will it be dry?
Thank you
Hi Michelle,
I have done that before and the layers are just fine the next day. If I bake layers in the evening and know I’m going to be frosting a cake the next morning, I sometimes leave them unwrapped and they taste exactly the same as if I wrapped them. The freezer locks in the moisture and they taste moist once they thaw. Hope that helps, happy baking!
HI – I see in the picture there are 4 layers but the recipe says makes 3 – which is correct – THANKS
Hi Annie,
This recipe can be used to make 4, 7-inch cake layers or 3,8-inch cake layers. I usually make 7-inch cake layers because I like the look of a slightly taller cake, but you can make either size. Hope that helps, happy baking!
I love this recipe! I need to make the layers 2 inches tall instead of 1 inch. Have you done this before? If so, how many cups of batter in each 8-inch pan and how much longer would it need to bake?
Hi Heidi,
So happy to hear you love this recipe! I haven’t tried making round cake layers that are 2-inches tall before, but I’d guess you’d need to use roughly twice the amount of batter the recipe normally calls for (I add about 2.5 cups of batter per pan when making 4, 1-inch cake layers). One batch of batter makes about 10 cups.
I’d guess bake time would be like 45-55 minutes? I highly recommend using a heating core (like this: https://amzn.to/3S24yYw) when making thicker layer like that to help the cake layers bake more evenly and quickly. I hope that helps, happy baking!
I’ve used this cake recipe twice for wedding cakes and they turned out great! Would it also work for a doll cake pan? Doll Dress Cake Pan Dome, 6 Inch Round Aluminum for Baking, Princess Birthday Party https://a.co/d/aTYTH8I
Hi Lori,
So happy to hear that!! And great question. This recipe can be used in a pan like that, but it will take quite a while to baking and will have a decent amount of caramelization! Be sure not to overfill the pan, and I’d recommend placing it on a small flat baking sheet to make it easier to get in and out of the oven, and to catch any overflow if the batter does rise up past the top of the pan. I learned the hard way on that with a domed pan last year. Hope that helps, happy baking!
Hi! I’ve used this recipe for a wedding cake and it was absolutely delicious!
I’m trying to make a caramel flavoured cake (not the icing cause that will be peppermint flavoured).
I know you’ve used cocoa instead of some flour to make a chocolate cake. If I used your caramel sauce recipe, is there a way to replace some of the sugar and buttermilk with caramel sauce to make this a caramel cake?
Thanks in advance!
Hi Mareli,
That is a great question! I’ve never added caramel into the cake batter before, so sadly I’m not sure what the best way to do that would be. An alternative that might work / be an easy way to incorporate caramel into the cake could be to add a layer of my thick caramel filling, or you could also add some dulce de leche! That’d probably be my best suggestion.
Here’s the link to the caramel recipe: https://chelsweets.com/caramel-filling/
Hope that helps, happy baking!
How much frosting do you usually put in between the layers?
Hi Julie,
I like a pretty thick layer of frosting between my layers, and it usually ends up being about 1/3 inch thick. But you can add as much or as little as you like!
Thank you so much for the recipe and the help with calculation of how much batter I need. I just bake fir my family and friends and I have been asked too make a wedding cake for someone very dear to me. Let’s just say I am a nervous wreck but your videos are helping me thru my anxiety. I used this recipe this week to make a trial 3 layer 8″ cake to bring to work for them to try and there was just a sliver left. I think that piece got left because no one wanted to clean up. I will be making a 10, 8, 6 and 4″ tiers with 3 layers to each. I hope I get all the measurements right. Thank you again for sharing all your knowledge with this little home baker.?
Hi Shannon,
I am so happy to hear you found my content helpful 🙂 Thank you for sharing, and I hope the wedding cake turns out amazing!!
Hello! Just a couple of questions.. can I use olive oil instead of vegetable oil? And can I add liquid food colouring to the frosting?
Hi Carlie,
Great question! You can use olive oil instead of vegetable oil, that should be fine since it’s such a small amount. You can also add liquid food coloring to the frosting! I usually use gel food coloring because it’s easier to get bright colors with it, but liquid food coloring can be used too. Hope that helps, happy baking!
This is truly the best vanilla cake!! I’m generally a very good baker but the one time, long ago, that I made a reverse cream method cake it was a disaster so I’ve been avoiding them ever since. No longer! The flavor of this cake is delicious and the texture was perfect! I didn’t use the frosting in the recipe, I made your Not Too Sweet Buttercream, switched out some of the vanilla extract for peppermint extract and added white chocolate. The perfect frosting for a perfect cake! Thanks Chelsea!!!
Aw thank you Glenna!! That sounds like an absolutely delicious combination 🙂 Thank you for sharing!!
Question. How many people does this serve?
This recipe feeds about 24 people! Hope that helps, happy baking!
Could I use this same amount of batter to make a two tier cake? On 10″ round and one 8″ round? 8″ high each.
Hi Kevin,
The best way to know how much batter you need for tiered cakes is to use my cake batter calculator. Here’s the link: https://chelsweets.com/how-much-cake-batter-per-pan/
For reference, this cake recipe makes 10 cups of batter. Hope that helps, happy baking!
Hello! I’ve made this cake many times and loved it. I want to try making it for a tres leches, and was wondering if it is too dense of a cake to absorb all the milk. Can I make the cake lighter by beating certain ingredients longer or making any changes?
Thanks!
Hi Aasma,
So happy to hear you love this recipe! I’m not quite sure how this cake recipe would work for tres leches, but I do think it might be a bit dense for that! Sadly I don’t have a recipe for that, but I’ve heard great things about this recipe for it: https://sugarspunrun.com/tres-leches-cake/
Hope that helps, happy baking!
@chelsweets can I use 9” pans and do 4 layers?
Hi Kevin,
If you want to use this recipe to make 4, 9-inch cake layers, I would recommend making 1.5 batches of batter. Hope that helps, happy baking!
Hi! I plan on halving this recipe to use two 6-inch pans and two four-inch. Based on your cake batter calculator, 5 cups of batter is the perfect amount for this.
What temperature do you suggest I adjust my oven to and what baking time?
Hi Lindsey,
Love that you checked out my cake batter calculator!!! yes, a half batch of batter should be perfect for cake layers that size. I would still bake them at 350 F / 175 C, and I’d bake the 4 inch layers for 28-32 mins, and and 6 inch layers for 34-36 minutes. Bake time can vary based on your oven and pans, so also be sure to test the center of the layers with a toothpick to make sure they’re done! They should come out with a few moist crumbs once the layers are done. Hope that helps, happy baking!
Can I use this recipe to make 2 cakes in 8 inch pans instead of 3?
Hi Brittany,
Sadly these layers would take a REALLY long time to bake if you used one batch of batter to make 2, 8-inch cake layers instead of 3! However, the batter can sit at room temp if you only have two pans! I would recommend baking 3 layers total still, but baking 2 layers at a time, and then baking the 3rd layer once the first two layers have cooled fully and you can use the pan again. Hope that helps, happy baking!
I despise making vanilla cake until I found this recipe! It is now my go to and everyone loves it! It’s moist and delicious yet stable enough for my tiered cakes. Thank you so much!
Aw I’m so happy to hear that Gayle 🙂 Thank you for sharing!
I tried this recipe for a test cake for my granddaughter’s wedding. We all agreed that it was perfect. My problem is, how many times do I make this recipe for a 12 layer, 10 layer, and a 8? I seen the graph of how many cups per layer but that doesn’t tell me how many cups one recipe makes. As you can tell this will only be the second wedding cake I have ever made. The first was for my niece. If you have time, please email me back. I really want this to be perfect for her. Thank you
Joannie Sheese
Joannie.Sheese@homefinder.org
Hi Joannie,
So happy to hear that! One batch of this recipe makes about 10 cups of batter. The total amount you’ll need will depend on how many layers you add per tier, but I hope that helps, happy baking!! 🙂
Have you ever used this to make a 12×18 cake? If you have, how much batter did you use and what temperature and bake time did you use?
Hi Brianna,
I have! A 12×18 sheet cake uses 7-8 cups of batter per layer. I made a 2 layered 12x 18-inch sheet cake for a big baby shower, so I used 1.5 batches of this recipe (one batch makes 10 cups, so I made 15 cups total, 7.5 cups per layer). I used 3 heating cores (like these: https://amzn.to/47RLaBM) per pan to help the layers bake more evenly and quickly, and I think they baked them at 350F for 45-55 minutes?! My pregnancy brain is the worst and I did it a couple months ago, so sadly I don’t completely remember that bake time. I’m sorry! Hope that helps though, happy baking!
Hello,
LOVE your recipe! I wondered, have you ever used buttermilk powder? If so, does it chance the flavour and texture of the cake?
Many thanks ?
Hi Suzie,
Great question! I haven’t ever used buttermilk powder (or even heard of it!!) but I would think that as long as you hydrate it with water it should work?? You can also use sour cream or full-fat yogurt in place of the buttermilk in this recipe!
I’m in the market for a new vanilla cake recipe for an upcoming cake order. And this one comes highly recommended. I have a weird question. I am making an “open book” cake and will be baking this recipe in a 9″ x 13″ pan. I need the center of the cake to “dome” for the design of the cake. Does that make sense? In other words, I’m wondering if this cake will bake flat (I won’t be using cake wraps) or will it dome in the center? Thanks.
Hi Shelley,
That is a great question! This cake recipe does bake up relatively flat, and only domes the tiniest bit. While I absolutely love this recipe and it works great for sheet cakes, I’m not sure it’s exactly what you’re after to make an open book cake. I’m so sorry!
My freezer was turned off on a Wednesday and I need the cake for Sunday. Will it still be ok? It’s stored wrapped in cling wrap and an air tight container.
Hi Lauren,
It depends on how long the freezer was off for, and if it was closed the entire time the power was off! Those types of situations can be tricky with food safety, but technically a frosted cake like this can be at room temperature for up to 2 days before the buttercream spoils, so it probably is still ok as long the powder wasn’t off for a long period of time. Sorry I can’t be of more help!
Rarely ever am I happy with how a recipe turns out on the first try. Holy guacamole, THIS CAKE IS INCREDIBLE. I followed the instructions to a T, until it came time to bake. I made two 9″ rounds, and torted them once frozen. Brushed with a vanilla simple syrup too. Cake tasted just like wedding cake. My family amd I were blown away.
Hi Jacqueline,
I am so happy to hear that!!! Thank you so much for sharing 🙂 Happy baking!
Can this recipe be doubled
Hi Sandra,
This recipe can be doubled, but I’d recommend using either a huge mixing bowl or a commercial sized stand mixer (8 qt) or else it’s really hard to get all the ingredients properly mixed together! I’ve tried doing it in a 5qt kitchen aid and my mixer really struggled to mix the batter and almost overflowed. Hope that helps, happy baking!
Hi Chelsey,
Thank you so much for your wonderful website! I recently made an 80th two-tiered layer cake for my mother-in-law’s friend and I used both your vanilla and chocolate layer cake recipes. It was a great success and all 40 guests loved them! It was my first time making a tiered cake so your website and videos were super helpful. Thank you so much x
Hi Clare,
You are too sweet, and I am so happy to hear that!!! Thank you so much for sharing 🙂
I weighed out the flour and sugar. Out of curiosity I measured the sugar with a measuring cup as I weighed it and I had to add a good amount of affliction Al sugar to get to 600 grams. I thought the cake was very sweet. I’m going to try again just scooping the sugar
@Janet, well I should have proofread my comment! It was “additional sugar”! Not “affliction AI”
hahaha omg how silly!! no worries!!
Hi Janet,
You can reduce the amount of sugar by 1/2 cup (100g), but if you reduce it by more than that it will negatively impact the texture of the cake layers. A standard US cup measure of granulated sugar is 200 grams, are you using US cup measures?
Hi Chelsea! Will this dough work to make cake pops?
Hi Jessica,
It totally does! This recipe is delicious when made into cake pops. Happy baking!
Every time I make a white/vanilla cake that calls for buttermilk it separates as soon as I add the buttermilk then the cake comes out dense and shrinks together. All of my ingredients are room temperature…like I get them out first thing in the morning and bake after lunch….what am I doing wrong ?!??
Hi L,
Usually my batter only splits if the ingredients aren’t all at room temperature, but it sounds like that isn’t your problem! What type of buttermilk are you using? Do you live in the US? Buttermilk should bake up similar to how milk or sour cream would in cake batter, but sometimes ingredients can vary in different places in the world. Hopefully we’ll be able to figure out what’s happening together!
Have you ever made your recipe as a red velvet cake and how do you adjust your recipe to a 14 x 3 in round pan also for an 11 x 15 x 3 in rectangle pan
Hi Terry,
I have different recipes to make red velvet cake, here’s the link to my red velvet layer cake: https://chelsweets.com/red-velvet-layer-cake/
One batch of batter is about 1300g or 6 cups, so I add about 440g to each of my cake pans when using 3, 6-inch cake pans.
If you want to make a tiered cake with this recipe or larger cake layers (like 14″), check out my cake batter calculator to see how many batches of batter you’ll need: https://chelsweets.com/how-much-cake-batter-per-pan/
Hope that helps, happy baking!
Was wondering if you ever made this recipe as a red velvet gluten free cake? Also if I was making an 11 x 15 x 3 rectangular cake or a 14 x 3 round cake how much batter would I need
Hi Chelsey! Have you used sour cream in place of buttermilk? Needing to make a cake today and I have sour cream but no buttermilk. Trying out this recipe for a wedding cake in July so I will need to make it again with buttermilk.
Thanks,
Paula
Hi Paula,
Great question, and apologies for the delayed response! You can totally use sour cream in place of the buttermilk in this recipe. I do that all the time! The layers will taste slightly different but will still bake up great. Hope that helps for the future, happy baking!
I have struggled in the past to find a good recipe for vanilla cake, but when my husband requested it for his birthday I decided to try this one. I used two 9” round pans and there was a perfect amount of batter for them. The cake turned out beautifully! Even though vanilla cake is not my favorite, this one was very good. I think I have finally found a recipe to hold on to!
Yay!! I am so happy to hear that Emily 🙂 Thank you so much for sharing!!!
Could I make this in 2 tall cake tins and then slice them in half to get 4 layers?
Hi Daisy,
You totally can! I torte my cake layers like that all the time, and I usually bake them in 2-inch tall pans. Hope that helps, happy baking!
Hi Chelsey,
You have a beautiful website!
What about crumb coating? Do you do this with your cakes? Maybe not since I don’t see the mention of it. Please share why or why not?
I’m baking a cake several days before transporting & serving it so I think I would wrap & freeze. If crumb coating, at what point would I need to do this?
Sure hoping to hear from you soon. I will be baking on Friday and frosting on Sunday and transporting on Monday.
Thank you.
Jill
Hi Jill,
Thank you!! And apologies for the delayed response!
I do always crumb coat my cakes 🙂 It’s included in the directions for assembling the cake, where I say to coat the cake in a thin layer of frosting. It’s always a good idea when you want to get a nice, smooth coat of frosting!
I would recommend freezing them once they’re fully frosted, then wrapping them once the frosting is firm to the touch. Hope that helps for the future, and that the cakes turned out amazing!!
One hundred percent the best cake I have ever made.
Aw I’m so happy to hear you love this recipe just as much as I do Laurie!! Thank you for sharing 🙂
I’ve been using this recipe as my go-to vanilla birthday cake for years now. I could not fault it. Bakes evenly, the cake stacks so well and feels sturdy but the texture is so light and tastes delicious! Thank you ?
Yessssss!! It really is so good!! Thank you for sharing Bec 🙂
This is my go-to cake recipe. It’s consistent (thank you for the measurements by weight!) and a crowd pleaser. It’s a solid cake with no fear of deflating/smooshing when stacked. I’ve used it for cupcakes too. So good!
I am so happy to hear that Meg 🙂 Thank you for sharing!!
This is my go-to cake recipe. I use it for birthday cakes, wedding cakes, every day cakes. So yummy and easy! Perfect for stacking too.
This is my go-to cake recipe. Always a success!
Aw thank you GD!!! 🙂 You’re too sweet!
Do I need to use simple syrup on this cake? I’m making a tiered wedding cake
I just made this recipe but the cake layers pulled away from the pans quite a bit. So now they’re tapered on the edges which will still work but isn’t ideal. Any idea why? Do I need to lower the baking temperature maybe?
Hi Joeclyn,
Layers do naturally contract as they cool, but it shouldn’t be super noticeable or at a sharp angle! What type of pans are you using, and what are you using to grease the pans? Hopefully we’ll be able to figure it out together!
You can try lowering the temp to 325 F and baking the layers for 38-40 minutes if you think that’s the issue! Hope that helps, happy baking!
I made this for a work event and did a checkerboard with it, and it was a big hit! Thank you for the easy-to-follow recipe.
Love that!! So happy to hear it, thank you for sharing Virginia!!
I want to use this recipe for a wedding 2-tier cake I’m making. It will be a 6 and 8 inch four layers for each tier and 2inch thick. How do I figure this recipe for that? I used your calculations and came up with 4.1 batches not sure how to do that?
Hi Deberlena,
That’s so exciting that you’re planning to use this recipe to make a wedding cake 🙂
Are you sure you want the layers to be 2 inches thick if you’re making 4 layers in each tier? That means each tier will be like 9 inches tall!! I don’t usually make layers that thick with this recipe, it bakes up best as 1 inch layers. I love making wedding cakes with this recipe, but I usually do 4, 1-inch tall layers per tier.
I think you calculation is right, I’m just not sure if this recipe is going to bake up properly that thick!!
Hi do the egg whites, butter and buttermilk need to be at room temperature ?
Thank you
Hi Zahra,
They do! I share that info in the ingredients section of the recipe card 🙂 Hope that helps, happy baking!
Hi! I was wondering if you were able to add strawberries into the batter to make a strawberry cake?
Hi Kaydance,
You can, but they end up baking into kind of soggy little pockets! I’d recommend just using a strawberry filling in the cake. If you really want to though, I’d recommend dicing the strawberries, patting them dry with a paper towel, then sprinkling them on top of the batter. Hope that helps, happy baking!
I need to make a 10 inch gender reveal cake. I love the recipe for vanilla cake. Could I sub almond for vanilla? I want to make it 3 layers. I would need 1.5 times the recipe. Does the recipe work if I reduce it by half? I appreciate all your advice and recipes. Thank you.
Hi Donna,
I’d actually recommend adding 2 tsp of almond extract (per batch) to the recipe in addition to the vanilla! So if you need to make a 1.5x batch, add 3tsp/1Tbsp of almond extract. The recipe will still turn out if you make one batch and then a half batch, or if you make one, 1.5x batch. Hope that helps, happy baking!
I recently made this cake for my mother’s 90th birthday party. I made the frosting pink and decorated with pink roses – it was so pretty and delicious! I was very proud to serve it and the leftovers were divided and enjoyed!
Love your recipes… like so much
Wonder if you would recommend this vanilla cake recipe foe a two tiered cake (8in 3 layer base and 6in 3 layer second tier).
Thank you!
Thanks for sharing your recipes. They’re so delicious. How can i make this vanilla cake strawberry flavored ?
I need to make this as a 10 inch cake, ideally 2 inches per tin across 3 tins. Do you think 1.5 x the recipe amount would work? How long would I cook for? Need to test bake it tomorrow. Thank you
Hello!
I made this recipe on the weekend and the sponge is absolutely DELICIOUS.
One question – I wanted my sponge layers to be slightly thicker than they came out. If I were to split the third tin across the first 2 (so each tin has 1.5x the amount of batter) and then just double the entire recipe so I end up with 4 more sizeable layers, would that work?
Or should I use self raising flour so it rises more instead?
Also, can I add lemon extract to make it into a lemon sponge?
Many thanks!!
Help please. How can I make the buttercream less sweet but maintain the consistency?
LOVE the cake. Made trial run for parents 60th wedding anniversary. My kids think buttercream too sweet so they can’t taste the cake … they love sweet!
Any help appreciated as making it mid September! Wish me luck!
X
Hi, I love your recipes!
I am making a 2-tier vanilla wedding cake and I have 2 questions:
1) Is this a better recipe to use than your small batch vanilla cake recipe?
2) The cake does not need to be white, is there a reason you use egg whites instead of whole eggs? Could I use whole eggs instead and how would I adjust the recipe if I could?
Thank you, you are great!
Wendy
Hi Wendy,
This recipe is the same as my small batch vanilla cake, my small batch version just makes 2/3 the amount of batter that this recipe does. If you want to use whole eggs to make the cake batter instead of egg whites, you can use 4, room-temperature large eggs. Hope that helps, happy baking!
As delicious and fluffy as this cake is I found it formed a crust on the edges , top and bottom?? Please advise
If I can’t fit 2 or 3 pans at the same time in my oven, can the rest of the batch wait their turn while one pan is baking? How should I store it?
Super easy recipe, but I had a problem… my cakes were in the oven for an hour and more, and the middle was still raw. The outside was getting a little hard and overcooked, but the middle never fully cooked.
Any clues of what happened?
So sorry to hear that Magalie! Could be a few different things – were all your ingredients at room temp? Have you used an oven thermometer to make sure your oven bakes accurately (my last oven baked 60 DEGREES COOL!!!)? What type of pans are you using? And lastly – did you make any substitutions? Hopefully we’ll be able to figure out what happened together.
Great cake recipe for using plain/AP flour! Great reverse creaming method, I want to try it with two other recipes. But this recipe is just incredibly sweet. Maybe its my British pallet. I had to cut the sugar by a third (to 400g) which was more than enough, especially when you’re using frosting. If you’re using full sugar, you’d definitely need a less sweet type of frosting.
The only effect is less cake batter and the cakes don’t rise as much. To counter I want to try adding baking soda and a pinch more baking powder. It makes a respectable 3-layer 6-inch cake. I also make tester-taste cupcakes that sink in the middle. But the large cakes did not sink at all.
I followed every direction to a T, but my cakes caved in the center. I have no idea why! Any suggestions?
So sorry to hear that Skye!! I so wish you could share pictures on here so I could see. A few initial question that come to mind – Did the center sink when it was in the oven, or after they came out? Did the center seem underbaked? Did you make any substitutions? Have you tested your oven with a thermometer? What type of pan did you use? What size of pan did you use? How long did you let your oven preheat? Hopefully we’ll be able to figure it out together!
I’ve been using this recipe for years but I was wondering have you tried it with cake flour?
I made this cake and your vanilla buttercream for my daughter’s bday and it was one of the best cakes I’ve EVER eaten! Thank you for sharing.. this is a keeper!
Hi there,
I have to say, this cake is the best vanilla cake i have ever tasted. But, the sugar seems a bit too much for me. So, i would like to ask if it is possible for one to use less sugar? And how much less sugar would be possible?
Is it possible to make one layer chocolate? I would like to use 3 nine inch pans. Thank you so much! The recipe sounds wonderful.
Thank you for this wonderful flop proof recipe – I decorate wedding cakes and always used to cringe when needing to bake the cake, since I have been using your wonderful recipes I have not had one flop! Complement s just keep rolling in! Thanks again. I am now busy with a Christening cake and Baby Shower cake for the weekend but thought to just take the time to compliment you on your great recipes.
Hi! Is the buttercream American?
It is!
I’ve been using your vanilla cake recipe as my main vanilla recipe since the beginning. But I have a friend who is gluten free and asked if I could make her a cake. Have you tried your recipe using gluten free flour and just substituting gluten free flour for the regular flour or do you think I should try to find a new recipe designated as gluten free?
Hi Emily,
Great question! I have used gluten free baking flour in this recipe and it does work! But I’d suggest doing half butter half oil, I think oil helps the gluten free flour incorporate better into the batter. also it sounds weird, but let the batter sit in the pans for like 30 minutes before baking, and mix it a bit extra once all the ingredients are combined (helps give the layers better structure). Hope that helps and that the layers turn out great, happy baking!
I don’t write a lot of reviews unless something was amazingly fantastic or horribly horrible. I decided to try this recipe for my son’s birthday cake, after many tried recipes that just seemed to never taste right. First off, after baking, they were really round, they didn’t sink, they didn’t have a giant dome I had to cut off, they were great. I was so happy pulling them out of the oven. Then I saw, they were such a wonderful golden color when I got them out to frost. Then it was time to eat the cake for the birthday party, I get a lot of compliments on my cakes because of various designs and character cakes but not only was I complimented on the design but specifically the sponge, my husband is used to trying all my baked goods and he said this was the BEST vanilla cake I have ever made, both in texture and taste. It truly was amazing, I couldn’t stop eating it! It would’ve been just as amazing without frosting, that’s how good it was! Light, airy, but also moist with the exact right amount of density. I have finally found my holy grail vanilla cake recipe and I’m soooooo happy!
The first sentence in your comment had me scared, but I am so happy to hear that you loved this recipe!!!! Thank you for sharing Kayla 🙂
This was the most non-fussy layer cake recipe I have tried and it turned out perfectly. Perfectly as in no trimming necessary, ready to stack, perfect texture for layering and icing. And it was so easy. This will go on repeat at my house.
I subbed orange extract for vanilla in the icing and it’s a delight.
That sounds AMAZING! And I’m so happy to hear that Annie 🙂 Thank you for sharing!
Any tips on making the buttercream less sweet. ?
Hi Michelle,
I totally hear you! This buttercream recipe is quite sweet and I actually have two other butter cream recipes that I think you might like if you want one that is less sweet! I’ll link them below:
My hybrid buttercream: https://chelsweets.com/not-too-sweet-buttercream-frosting/
My Swiss Meringue buttercream: https://chelsweets.com/swiss-meringue-buttercream-frosting/
I think both would taste great with this cake! Hope that helps, happy baking!
I’ve made this cake a few times now and making it again this weekend. IT’S FABULOUS!. The texture and taste are perfection! It’s now my go to cake. I love it. Thanks so much for the recipe and all your hints and suggestions.
So happy to hear that Judy!! Thank you so much for sharing 🙂
Hi, your video shows 4 8” pans, the recipe shows 3 8” pans, i baked this today, i filled 3 pans, how can i make 4 layers
Hi Liz,
You can make 4, 8 inch cake layers with this recipe but they’ll bake up pretty thin, which is why I recommend only making three, 8-inch cake layers with one batch of batter. The picture/video with 4 cake layers was actually made using 4,7-inch cake pans.
You can scale the recipe up to make 1.33 batches of batter and make 4, 8-inch cake layers, or you can use 4, 7-inch cake pans. Hope that helps, happy baking!
I need to make an 11×15” x2 sheet cake. Would I double this particular recipe to achieve this cake ?
I actually Have a great post that helps you calculate how much cake batter you need for different sized sheet cakes. Here’s the link: https://chelsweets.com/sheet-cake-guide-batter-amounts-servings/
That isn’t a super common size of sheet pan (sadly I’ve never made a layer that size and don’t own pans that size!), but it’s right between a quarter and half sheet pan, so I’d split the baby between the two to get the amount you need. Hope that helps, happy baking!
For reference this recipe makes 10 cups of batter. Hope that helps happy baking!
Hi there! I love your site and recipes! I’m using this recipe to make a friend’s wedding cake and am supplementing the display cake with sheet cakes for remaining guests. Your Yellow Sheet Cake recipe says to double the recipe for a half-sheet cake — do you recommend the same with this recipe? I did read your Sheet Cake Guide which recommends 16 cups batter for a 1-inch half-sheet butter cake, and if this recipe makes about 10 cups, do you recommend doubling it for a half-sheet pan or using 1.5x this recipe?
Thank you!
Hi Maura,
It sounds like you’ve done your homework, which I love and appreciate!! Yes, I’d recommend making 1.5x this recipe for a half sheet cake! It’ll make a nice, thick layer!! I’ve done this before when I made a big sheet cake for a baby shower and it worked great. Hope that helps, and that your cakes turn out amazing!! Happy baking 🙂
Hello!
1st I’ve made this cake twice and I love it! Making it for my parents today to have with chocolate icing ?
But, I’m noticing that when I make my batter, I never get the 10.5 cups. So each time I just divide it evenly between the pans (8 inch one attempt and 10 inches another attempt). I use cups vs grams for my measurements, is that why it could be less batter? Or am I missing something?
I am planning on making several cakes coming up and out want to make the correct along of batter ?
Thank you so much!
Hi Sarah,
Do you end up with more or less batter? It could definitely be because you’re using cup measures instead of grams but in general it should still be pretty close.
If you have a kitchen scale, I would recommend attempting to make this cake with gram measurements and then seeing how much batter you end up with. Either way, as long as the cake is turning out properly and you can figure out how many cups of batter you get when you make the recipe, you can then use that information to make sure that you are properly calculating how many batches you need to make different sized cakes. Hope that helps for the future, happy baking!!
Will this cake stand with just the buttercream between if I make 6 layers? Or do I need to stabilise it?
I will make two batches, three cakes per batch.
I’ve made one batch, with 3 cakes and I don’t think it will be big enough for 25 children.
I’m also terrible at baking and this is the first recipe that I have found to be a success for me! Hopefully I can stack and frost successfully too!
So happy to hear you love this recipe Deborah! 6 layers is pretty tall, but if they’re 8-inch cake layers and you level them and really chill the crumb coat before frosting the cake, I think you could get away with just stacking them as long as you don’t have to transport the cake. But if your layers are sliding as you stack them or if you do need to transport it somewhere, I would definitely recommend inserting a wooden cake dowel or thick plastic bubble tea straw in the center of the cake to help the layers stay in place. Hope that helps, and that your cake turns out wonderfully 🙂 Happy baking!
Please help, everytime i bake this cake it is only 1 1/2 ” tall and no caramelized sides, why ??? I love this recipe, thanks
Hi Lisett,
That is actually exactly how tall it’s supposed to bake! This recipe uses the reverse creaming method, which gives it a super tender, somewhat dense, but ultra moist and plush crumb!! With that in mind, it doesn’t rise a ton as it bakes. That heigh is totally normal! Hope that helps, happy baking 🙂
Thank you ?
Can I sub 1/4 of flour with cocoa power to make a chocolate version?
Even better, I have a chocolate version of the recipe here: https://chelsweets.com/the-best-chocolate-layer-cake-recipe/
It uses a bit more cocoa powder! Hope that helps, happy baking!
I use this cake recipe for all of my cakes, and I have gotten countless compliments that it’s the best cake people have ever had! I’m known for it now!!! Do you have any tips for making this cake gluten free?
Hi Lauren,
Ahh that makes me so happy to hear!! I love that this recipe has become your signature cake—what a compliment! 🙂
To make it gluten free, here’s what I recommend:
Use a good 1:1 gluten free flour blend (like Bob’s Red Mill or King Arthur). Look for one that contains xanthan gum, which helps with structure and texture.
Sift the flour before adding it—it helps lighten the blend, since GF flours can be a bit denser.
Let the batter rest for 20–30 minutes before baking. This helps hydrate the flour and gives a better texture (less gritty!).
I usually say don’t overmix, but this time do! It helps give the cake better structure/texture, and there’s no gluten so it won’t make the cake dense-I promise!
If you try it out, let me know how it goes! I’d love to hear how the GF version turns out for you
Hi, this cake was delicious and I’d love to use it as a base for a Neapolitan cake. I’m planning on doubling the recipe and baking it as three flavors on one half sheet pan. Do have any recommendations on the ratio of cocoa powder and strawberry jello powder I should use for their 1/3 of the batter?
Any suggestions would be greatly appreciated.
Hi Rosemary,
You’re so welcome—and I love the idea of turning this into a Neapolitan cake! That sounds like such a fun (and delicious!) project. Since you’re making a double batch, here are the amounts I’d recommend:
For the chocolate portion, 1/4 cup of unsweetened cocoa powder and 1/4 cup of additional buttermilk to 1/3 of the batter.
For the strawberry portion, 1/4 cup of strawberry Jell-O powder (either 2, 3oz boxes or 1, 6 oz box) should give it a nice flavor and color boost. If you want a more natural strawberry flavor too, you could add a couple tablespoons of strawberry purée or jam along with the Jell-O powder, just to deepen the taste.
I’d suggest baking at 325°F so everything bakes evenly across the pan. Can’t wait to hear how it turns out—it’s going to be such a showstopper!
@Chelsweets, thank you for the tips. Really hoping I can successfully pull it off as it’s for my niece’s 5th Birthday party per her request. I’ll keep you posted
You totally can, I believe in you!! Let me know how it goes 🙂
Is there an easy way to make this a 12 or 10 inch, 4 layer cake please? I want to do this as the base for my nephews wedding cake.
Thank you ? ?
Hi Cathy! Totally! One batch of this recipe makes 10 cups of batter, and I actually have a great chart that helps you calculate how many cups of batter you need for different sized layers. Here’s the link: https://chelsweets.com/how-much-cake-batter-per-pan/
Hope that helps, happy baking!
Is it possible to sub the buttermilk?
Sharing here too just in case other people see this comment when looking for info about substituting the buttermilk: If you don’t have buttermilk on hand, the easiest (and most effective) substitute is to use 1 cup whole milk + 1 tablespoon lemon juice or white vinegar. Stir it together and let it sit for 5–10 minutes—it’ll curdle slightly and mimic that tangy buttermilk effect.
This works great in this recipe and still gives you that tender, moist crumb. You can also use full fat sour cream or yogurt, or even just whole milk. But the flavor and moisture won’t be quite the same. Hope that helps, happy baking!
Hi what if I’m unable to put them in the freezer to cool before turning out of the tin?
Hi Cathy,
Great question! If you’re not able to pop the cakes in the freezer, no worries—you can let them cool in the pans at room temp for about 15–20 minutes, then gently run a knife around the edges and turn them out onto a wire rack to finish cooling completely.
The freezer step just helps lock in moisture and makes them easier to handle, but your cakes will still turn out lovely without it! Just be sure they’re fully cooled before frosting
Incredible cake!! Soooo yummy, and I love this buttercream recipe too. I’ve tried many different buttercream recipes over the years and this one definitely takes the cake 😉
Saving this for my always cake!!
Hi Stacey,
Ahhh this makes me so happy to hear!! I’m honored it’s earned a spot as your “always cake”—and I totally get you on the buttercream, this one’s a keeper! Thank you so much for the sweet words!
How many cupcakes will this recipe make?
Hi Trina,
Great question! You should end up with around 3 dozen. Hope that helps, happy baking!!
How sweet is this cake? 3 cups seems like a lot of sugar. Can you use less or will that change the texture of the cake?
Hi Russell,
Great question! Three cups of sugar does sound like a lot, but it’s balanced out by the volume of the batter and the other ingredients—it helps create that soft, fluffy texture and adds moisture too. That said, you can slightly reduce the sugar (by about 1/4 to 1/2 cup) without drastically changing the texture. Just know that going much lower might affect the cake’s structure and how well it rises. If you give it a try, I’d love to hear how it turns out!
You can also use a less sweet frosting, like my swiss meringue buttercream or hybrid buttercream. The American buttercream in this recipe is quite sweet. Hope that helps, happy baking!
This is it, the recipe I’ve been waiting for. I have tried many white cake recipes on other popular sites, but this one is top. So many scratch cakes can be dense or not have good flavor, but this one is so fluffy and delicious. Thank you!
Hi Melanie,
Ahh this makes my day!! White cake can be so tricky to get just right, so I’m beyond happy to hear this one hit the mark for you. Fluffy and flavorful is the ultimate combo, thank you so much for trying it and for the sweet feedback!
Love your content!!
Would this cake benefit from using a simple syrup on it after baking or would it be too much?
Hi Robyn,
Thank you so much!! This cake is already super moist on its own, so it usually doesn’t need simple syrup, but it definitely won’t hurt if you’re baking ahead of time or want to add a little extra insurance for longer storage. Just brush on a light layer so it doesn’t get soggy, and you’ll be golden! Hope that helps, happy baking!
Is 3 cups granulated sugar correct? Seems like a lot. 3 cups flour to 3 cups sugar. Or is this just a sugary cake? By the way, I love your detailed instructions.
Hi Gina,
Great observation, and I’m so glad you’re enjoying the detailed instructions! Yes, 3 cups of granulated sugar is correct for this recipe. It uses the reverse creaming method, which changes the way the ingredients come together and how the cake bakes.
Coating the flour in fat first helps prevent too much gluten from forming, which gives the cake its super tender, plush texture. But because of that method, the sugar ratio looks high, it helps create structure, moisture, and that soft, velvety crumb. So while it is a sweeter cake, the sugar plays a bigger role than just flavor here! Hope that helps, happy baking!!
Hello!
I LOVE this cake recipe!! And my daughter does too and she wants me to use this for her wedding cake!!
I have a question. When I mix the batter it looks curdled. It bakes ok but am I doing something wrong???
Thanks,
Ruth Morton
Hi Ruth,
Ahh I love that your daughter wants this cake for her wedding, what an honor!! And great question! If your batter looks curdled, it’s usually just the butter and liquid ingredients not fully emulsifying (especially if the eggs or milk are colder than the butter). It’s totally normal and happens to the best of us! To help, try bringing all your ingredients to room temperature before mixing. The curdled look won’t affect the final cake though, it’ll still bake up beautifully, just like yours has been!
Hope that helps, and that the wedding cake turns out amazing!!
Im thinking of baking this on Thursday, icing on friday for a party on Saturday. This should be OK shouldn’t it?
I was going to do a more adventurous flavour but im worried im being over ambitious so I think ill calm it down a bit.
Is there any way to make this recipe a bit more jazzy? With a curd or jam or soemthing? I dont want to experiment without someone’s advice haha.
Thanks in advance.
Hi Jb,
That timeline sounds perfect! Baking Thursday and icing Friday gives the cake time to settle and makes party day way less stressful. And I totally get wanting to simplify the flavor, sometimes classic is the way to go, especially when there’s a lot on your plate!
If you want to jazz it up just a little, adding a curd or jam layer is a great (and safe!) way to do it without reinventing the whole recipe. Here are a few easy ideas:
-Lemon or raspberry curd between the layers for a bright pop of flavor.
-Strawberry or berry jam swirled into the frosting or spread as a filling layer.
-A light fruit compote (just simmer fruit + a bit of sugar) can also work if you don’t want anything too sweet.
You could also try some of my other cake recipes that use the same cake base, like my white chocolate raspberry cake or my lemon curd cake!!
Just make sure the filling isn’t too runny! Chilling it first and adding a buttercream dam around the edges will help keep everything in place. Hope that helps, happy baking!!
I have to say I was a little wary about how much sugar went in this cake but it actually tastes pretty well-balanced! Thank you for this recipe!!!
Hi Karmela,
I’m so glad to hear that!! It definitely looks like a lot of sugar, but the reverse creaming method really helps balance everything out so the sweetness doesn’t overwhelm. Thanks for giving it a try and trusting the process 🙂 Happy baking!!
Hello, can this recipe be used as to make an Almond, 3 layer 9″ cake? Thanks a bunch!
@Kim, to make an Almond cake?
Hi Kim,
Yes, you can definitely make this as a 3-layer, 9-inch almond cake. For the almond part, just swap some or all of the vanilla extract for almond extract (I’d start with 1 ½–2 teaspoons since it’s strong).
To make three 9-inch layers you’ll want to scale the recipe up by about 1.25×. That’ll give you enough batter so each layer bakes to a similar height. Keep an eye on the layers toward the end and test with a toothpick inserted in the center of the layers. Once it comes out with a few moist crumbs, it’s ready! Hope that helps, happy baking!
Hi!I used this recipe recently with two 9 inch pans, cut the cakes in half and made layer cake with four thinner layers that turned out really nicely. I am wondering if I could make this recipe twice and make an 8 layer cake? It would be on the taller side, wondering if it is not tiered would it still need support? Could I just use the boba straws or would I need a dowel and divider? Thanks so much.
Hi Deborah,
That sounds beautiful, I love the idea of turning it into an 8-layer cake! Since it’s all one tier, you don’t need a full tiered-cake setup with boards between every few layers, but with that much height it’s a good idea to add a little internal support. A central wooden dowel or boba straws work perfectly for this kind of cake, they’ll keep it nice and stable. Just cut or trim them to the cake’s height and you’ll be golden. Hope that helps, happy baking!!
I tried looking at your conversion chart but it only seems to list round and square. Do you know how much I would need for a half sheet pan?
Hi Sarah,
Great question! I actually have a separate post for sheet cakes which covers that, here’s the link: https://chelsweets.com/sheet-cake-guide-batter-amounts-servings/
Hope that helps, happy baking!
This is my go to vanilla cake! I’ve used this to make the 7 layer rainbow cake for my daughter several years ago and use this as my base vanilla cake and today I’m using it to make a peach trifle. SO GOOD!! Thank you!
Hi Ginger,
That makes me so happy to hear! I love that this recipe has been such a staple for you 🙂 It sounds like it’s been part of so many special bakes!! Thank you for sharing, it truly means a lot! 🙂
Delicious fail-proof recipe. Our go to recipe . Thank you
Hi Fiona,
That makes me so happy to hear! I love that it’s become your go-to and that it’s been consistently delicious for you. Thanks so much for sharing your sweet feedback 🙂
I used this recipe along with your white chocolate buttercream (minus the white chocolate as it seized and burnt) and your lemon curd recipe for a filling and as a swirl on the top of the cake I followed all 3 recipes exactly and it was amazing. Made 2 9x13s and all 18 people loved the cake, I’m talking RAVE reviews, thank you so much for sharing your recipes. I’ve also made the White chocolate raspberry cake and got excellent reviews.
Hi Janet,
Wow, that sounds absolutely incredible! I love how you combined the recipes, it must’ve been such a bright, delicious cake. Two full 9x13s and rave reviews from 18 people is no small feat, so I’m thrilled it was such a hit. And I’m so happy to hear the White Chocolate Raspberry Cake was a winner too! Thank you for trusting my recipes for such special event and for sharing your experience 🙂
The taste is amazing but my cakes are only about 1” thick. Is that normal?
Hi Michelle,
Yes, that’s totally normal! This recipe uses the reverse creaming method, which gives the cake a tender crumb but doesn’t rise as much as a traditional creamed cake. The layers are usually around 1” thick, so you’re right on track. Hope that helps, happy baking!!
Hi can this be made with gluten free flour? Have been asked to make a cake and have used this recipe many times, it’s so good! But this person has requested gluten free flour
Hi Ev,
I’m so glad you love this recipe!! Yes, you can swap in a good quality 1:1 gluten-free flour blend (like King Arthur Measure for Measure or Bob’s Red Mill 1:1). Those blends already have xanthan gum mixed in, which helps mimic the structure of regular flour. The texture may be slightly different, but it should still turn out delicious. Let the batter sit for about 30 minutes before baking them to let the flour absorb some moisture (can reduce grittiness). Hope that helps, happy baking!!
Can I substitute cake flour for all purpose flour
Hi Tacara,
You totally can! The batter will be a little bit thinner, but they should bake up great! Hope that helps, happy baking!
Love this recipe! Just made this cake for my twin grandsons’ 2nd birthday. It was a big hit! Everyone loved it, especially my grandsons. Best vanilla cake I’ve ever had. I used your vanilla American buttercream as the recipe calls for, your red buttercream recipe for decoration and your chocolate drip recipe too. Finished it off with some Mickey Mouse themed sprinkles since it was a Mickey themed party. Wish I could post a picture. I got my inspiration from many of your cake decorations. Thank you so much. Love your site and recipes.
Hi Janet,
So happy to hear that 🙂 It sounds like the cutest cake, your grandsons are so lucky to have a grandma like you!!! I wish we could upload pictures on here too, I’d love to see it, I just know it was adorable!! Thank you so much for sharing!!
Hi! I am going to make this cake and was reading everything through to prepare. In the recipe notes it says you can use whole eggs and to use 4. In the comments you tell someone to use 6. Which should I do? You also say in the notes it can be used to make cupcakes and then in the comments you tell someone not to. What do I follow ?. Thank you!
Hi Olivia,
Apologies for any confusion! This recipe has been around for almost a decade, and it’s been modified along the way!! I always recommend referencing the recipe card first, since it’s always the most up to date 🙂 My current recommendation is swapping the egg whites for 4 large eggs, and you can make cupcakes with it, but they can sometimes stick to the liners a bit! Hope that helps, happy baking!
I also have to say I love how thoroughly you’re preparing for this, not many people take the time to reference the comments when they have a question!! But it’s awesome that you did, such a green flag! Hope your cake turns out amazing!!!!!!
Hello,
I’m looking to make a half sheet cake (13×18) using this recipe. Do you think a double batch would work?
Hi Laura,
Do you want it to just be a single layer? If so, you’d need about 11 cups of batter. One batch of this recipe makes 10 cups of batter, so you’d probably be ok with just one batch!
The cake would bake up to be about 1 inch tall. If you wanted it to be taller you could make 1.5 batches, or 2 batches but bake time will be longer. Hope that helps and that your cake turns out great!
Hello, I had a couple questions!
1. Does this cake go well with your other icing recipe as I am not a fan of buttercream: https://chelsweets.com/whipped-cream-frosting-with-cream-cheese/#recipe
2. What do you think about adding raspberries in between the layers or just on the top?
Hi Indira,
Great questions! I think this cake would taste great with my whipped cream frosting, and I think raspberries nestled between the cake layers in the frosting or to decorate the top of the would be lovely!! I’d just say if you do plan to add fresh raspberries between the layers, make sure you don’t make the cake more than a day or two in advance, or else they can get a little watery. Hope that helps, and that you cake turns out amazing!
Hi, I want to make a raspberry cake but I want to do it with this recipe do you think I can add jam in the batter?
Great questions Clara! You can, I did something similar in the recipe linked below and it worked great! I’d suggest doing something similar with this recipe:
https://chelsweets.com/blackberry-mousse-cake/
Hope that helps, happy baking!
Hi! I am currently looking to create a two tiered cake with 3 layers for a gender reveal party. What would you suggest I multiply the recipe by to do an 8inch 3 layer base and a 6in top, 3 layer tier? Thank you!
Hi Emmy,
Great question! I would recommend making 1.66 batches, which is an awkward amount to calculate! I’d recommend making one batch of this recipe, and then making my small batch vanilla cake recipe, which is exactly 2/3 of the full recipe. Or you can make a double batch and use the extra batter to make cupcakes. Hope that helps and that your cake turns out great 🙂 Happy baking!
Hi Chelsey, I am planning on making this cake in a quarter sheet cake size with 2 layers meaning I need 16 cups of batter (according to your sheet cake guide). I was just wondering how long I need to cook it in the oven? 🙂 I am also planning on using heating cores.
Thank you!
@Hiba, to add to this, If I were to do 16 cups of batter but divide it between two pans to get 1 layer each, what would the cooking time be? 🙂
Hi Hiba,
LOVE that you’re planning to use heating cores, it makes such a difference!!!!! My quarter sheet cakes using this recipe usually bake for 45-55 minutes at 350F. I’d start checking it after 45 minutes, and also remember to rotate the pan halfway through to make sure it bakes up evenly. Hope that helps, and that your cake turns out great!! Happy baking!
I am so confused. I’m a seasoned baker and I can’t get this recipe to work out like everyone else seems to. My batter curdles no matter what I do. I temperature check all my ingredients, all 70 degrees exact. I follow the instructions to the letter concerning slowly and carefully adding liquids to the emulsion. And the batter curdles every time. It results in shrunk cakes and slanted sides. Any advice from anyone? I love the taste and texture, even when it hasn’t baked up correctly but I’m about ready to give up on this recipe.
Hi Hannah,
That is so strange! My first thought would be that it’s the temperature of the ingredients, but it sounds like you’re being very careful about that. This is a pretty forgiving recipe, and in the past when I’ve been impatient and used ingredients that weren’t fully at room temp and the batter curdled a bit, the layers still baked up fine!
What type of cake pans are you using? And what are you using the grease the pans? Both of those things can also have a big impact on how the cake layers bake! I use light colorer, aluminum pans made by fat daddio (weird name, but great brand/pans). Or are you by chance baking with the convection setting on? Let me know, if it’s not that, we can keep troubleshooting!
Are you at a high altitude? Recipes with a lot of sugar tend to behave funky at altitudes above 3000’
I was wondering if you have ever replaced the vanilla extract with almond extract and would I use 2 tsp of almond extract?
Hi Denise,
I have and I love it! I am a big fan of almond extract, and I do think 2 tsp is a nice amount! You can always add a little bit more or less to suit your taste though, and/or frost it with almond buttercream! Hope that helps, happy baking!
Hi!!
I love this recipe !!!
So I recently got into weddings and am inquiring about using this recipe as a sheet cake. I use a more dense vanilla cake for stacking tiers, but for a sheet cake I attempted that and it was way too dense. This recipe is much lighter so wondering your thoughts on making it a two layer. If so, would I double it for a quarter sheet cake? Also, if so, to make this recipe more versatile, do add ins that aren’t liquid change the ratios? Or, easy way to make it chocolate? I’ll look through your pins more and probably find the answer! But wanted to ask about using for sheet cake for sure!
Hi Kailey,
I’m so happy you love this recipe!! This recipe works well as a two-layer sheet cake.
For a quarter sheet cake, it depends a bit on the exact pan size you’re using. If you mean a 9×13-inch pan, 1.5 batches should be the right amount to make two layers.
Dry add-ins like sprinkles, mini chocolate chips, chopped nuts, or crushed cookies usually won’t change the ratios much. I’d just keep the amount moderate so they don’t weigh down the batter, and toss anything like chocolate chips in a tiny bit of flour before folding them in.
I also have a chocolate version of this recipe here: https://chelsweets.com/the-best-chocolate-layer-cake-recipe/
Hope that helps, happy baking!!
So good! I used this recipe for my sons birthday cake and it was so yummy. The perfect vanilla cake. I actually reduced the recipe to 2/3 and it came out perfect. This is 100% my new go to vanilla cake. Great job!
Hi Jodie,
That is so wonderful to hear!! Thank you for sharing 🙂