
Snowflake Cake
I used to think making a snowflake cake had to be complicated. You either were making individual snowflakes out of fondant (like my Winter Wonderland Cake), or using white chocolate to pipe snowflakes one by one (like this beautiful cake by The Preppy Kitchen).
But after experimenting with a few different techniques, I found a super easy way to make a snowflake cake that is just as beautiful, using buttercream!
For this snowflake cake recipe, I used two techniques. To color the sides of the cake, I used a simple (sterile) makeup sponge to create a marbled blue look.
It creates the perfect winter wonderland background for the snowflakes.
As I experimented with the snowflakes, I was elated when I found a way to make them with buttercream! Even better? You can use the exact same frosting used to fill the cake!!
To create the snowflakes, I used my American buttercream (plus an extra splash of heavy cream) and a plastic snowflake stencil. Sadly my snowflake stencil isn’t sold on amazon anymore, but here is the link to one that’s very similar.
I’ve seen people use cake stencils before, but most cake stencil tutorials use either royal frosting or an airbrush. Who knew you could use buttercream with cake stencils?!
Tips For Making This Snowflake Cake
After playing around with buttercream and a cake stencil, I learned a few things! To successfully use buttercream with a cake stencil, I highly recommend:
- Using a chilled cake; the frosting should be firm to the touch
- Thinning your buttercream with extra heavy cream to make it more spreadable; this will help the stencil easily lift up once you’ve covered it in frosting
- Fully covering each cutout on the stencil to ensure the design comes out correctly
- Slowly removing the template, by starting on one side, and slowly peeling it off toward the other.
I also suggest making the components of this cake over a few days! For most of my cakes, I make my layers a couple days in advance. I also make my frosting up to a week in advance.
This helps me enjoy the decoration of the cake a lot more, and makes baking from scratch so much more manageable.
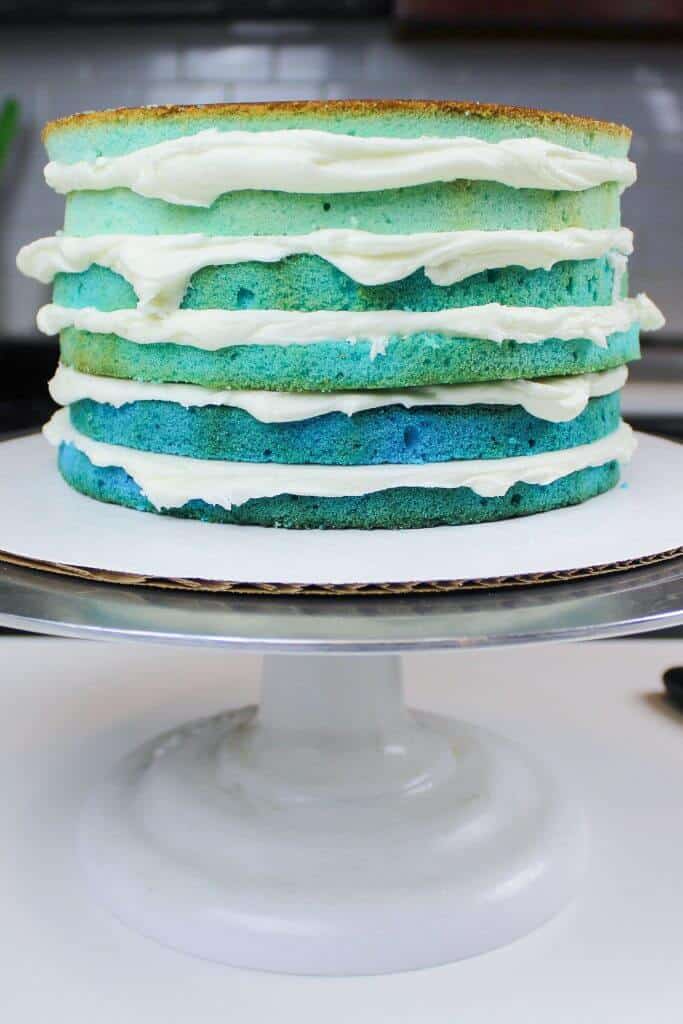
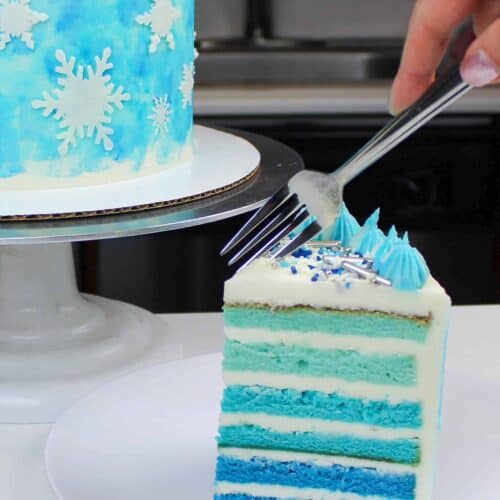
Speaking of the cake layers, I want to talk about what’s on the inside of this cake!! To give the cake layers the same wintery theme as the rest of the cake, I chose to make ombre blue cake layers.
This cake uses my white velvet cake recipe, plus varying amounts of sky blue gel food coloring to create three different colored layers.
Doubling The Layers, Double The Fun – Torting
To give this cake a bit more surface area on the sides, I chose to make three, eight-inch cake layers. Once the cake layers had baked and cooled, I torted (horizontally cut) each cake layer.
Torting the layers magically turns three, thick cake layers into six, wonderfully thin cake layers.
It’s a bit of extra work to do this, but it makes the cake have the most incredible frosting to cake ratio!! And I think all of you know by now how much a love buttercream frosting.
I usually use a serrated knife to trim and torte my cake layers. This is the knife I use – I ordered on amazon and have had it for a couple years!
Trimming the cake layers isn’t mandatory, but I find it helps those vibrant colors shine through when the cake is cut into. It also makes it way easier to build a level, straight cake!
Snowflake Cake Technique #1: Painting On Buttercream
Once the cake is assembled and frosted, place the cake in the freezer for 10 minutes to allow the frosting to firm up.
This allows you to paint on the chilled buttercream with a gel food coloring mixture! If you want to learn more about painting on buttercream cakes, you can watch my in-depth tutorial here.
As the cake chills, make your edible “paint” by mixing together 2 tsp of vodka (or any clear extract like lemon or almond extract) with a drop of sky blue gel food coloring.
Using vodka or an extract helps the mixture dry more quickly, due to the high alcohol content. It also helps thin out the gel food coloring, which is too concentrated to be painted directly onto a cake by itself.
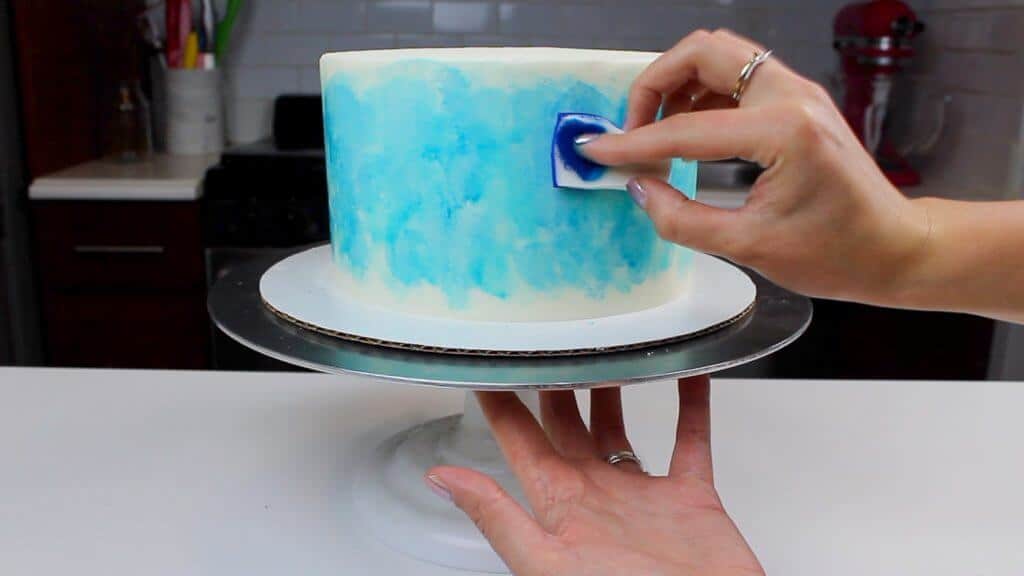
Use a fresh sponge to dab the mixture on the side of the cake. Gradually work around the cake, letting the “paint” dry.
Layer additional coloring onto the cake, to create shading. If the frosting begins to soften during this process, place it back into the freezer for a couple minutes.
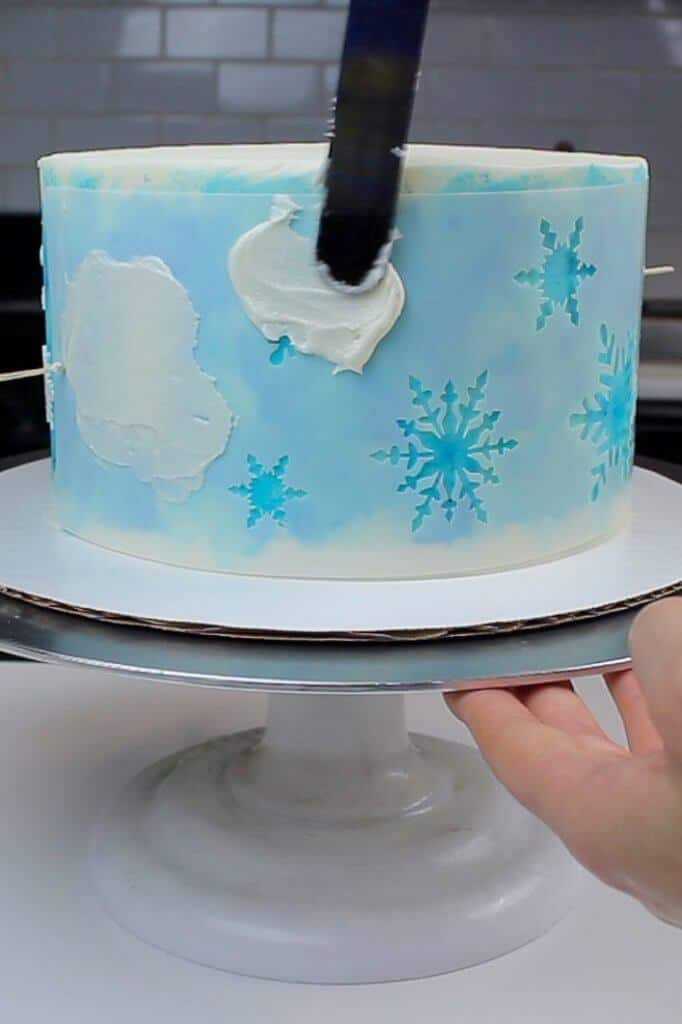
Snowflake Cake Technique #2: Using Buttercream With A Cake Stencil
After the sides of the cake are painted, pop the cake into the fridge or freezer for another 5 minutes.
Thin 1/2 cup of leftover buttercream with one additional Tbsp of heavy cream. Carefully secure the snowflake template around the cake using either toothpicks or pins.
If your template doesn’t have holes in it, you can use an x-acto blade to cut tiny holes on each side of the template.
Spread the thinned buttercream over the snowflake stencil, fully covering each cutout with a thin layer of frosting.
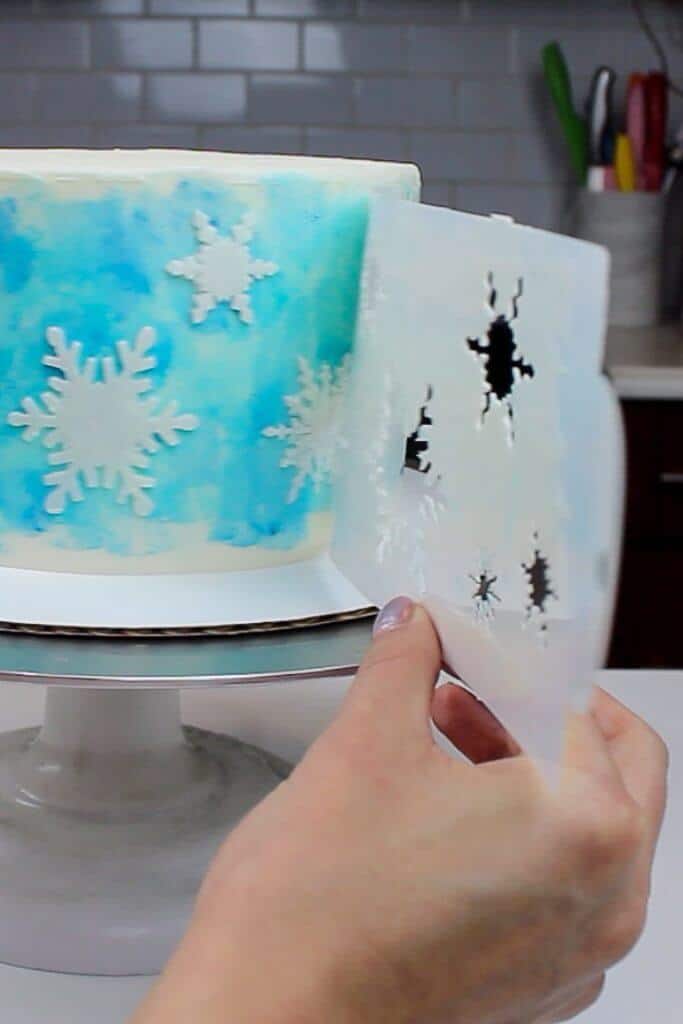
Holding the template in place, remove the toothpicks, and slowly peel away the template.
Color any remaining frosting blue, and pipe swirls (using a Wilton 1M frosting tip) on top of the cake. If desired, add a ring of sprinkles inside the frosting swirls on top of the cake.
To get super clean slices of cake, I run my knife under hot water before cut it! I also cut the cake when it’s still slightly chilled, so that each slice keeps its shape.
Making This Snowflake Cake in Advance and Storage Tips
- Make your cake layers in advance and freeze them. It breaks the process up and makes it more approachable.
- Make your frosting ahead of time, too, or save any leftover frosting! It can be stored in an airtight container in the fridge for up to 2 weeks or in the freezer for up to a month. Be sure to give it a good stir once it thaws to get the consistency nice and smooth again.
- A frosted cake can last in the fridge for up to a week or in the freezer for up to a month. The frosting locks in all the moisture, keeping the cake fresh and delicious!
- If you cut into the cake and have leftovers, use any remaining frosting to cover the cut section to keep it moist and store in the fridge for up to a week.
Let Me Know What You Think!
If you try this snowflake cake recipe, please tag me @chelsweets and use the #chelsweets so I can see your beautiful creations!!
Also leave a comment below and/or a rating to let me know your thoughts.
Other Recipes You Might Like:
Snowflake Cake Recipe
Ingredients
Blue Velvet Cake Layers
- 3 cups all-purpose flour 375g
- 3 cups granulated sugar 600g
- 2 tsp baking powder 8g
- 1 tsp baking soda 6g
- 1 tsp fine salt 6g
- 1 cup unsalted butter, room temperature 226g
- 1 cup carton egg whites or 7 large egg whites, room temperature 235g
- 1 1/2 cups buttermilk, room temperature 360g
- 1/8 cup vegetable or canola oil 28g
- 2 tsp vanilla extract or vanilla bean paste 8g
- 1 tsp vinegar 4g
- Sky blue gel food coloring
Vanilla Buttercream Frosting
- 3 cups unsalted butter, room temperature 678g
- 11 cups powdered sugar 1375g – or about 2.5 lb.
- 1/2 cup heavy whipping cream, room temperature 120g
- 1 Tbsp vanilla extract or vanilla bean paste 12g
- 1 tsp fine salt 6g
Additional Tools
- snowflake template
- 2 toothpicks
Instructions
Blue Velvet Cake Layers
- Preheat oven to 350°F/175°C. Line three eight-inch pans or three eight-inch round pans with parchment rounds, and lightly spray with non-stick cooking spray.
- Mix together all dry ingredients (flour, baking powder, sugar, and salt) in a stand mixer with a paddle attachment until fully combined.
- Mix chunks of room-temperature butter slowly into the dry mix on a low speed. Continue to mix until no large chunks of butter remain, and the mixture looks crumbly.
- On a low speed, mix in eggs one at a time. Beat on low until just incorporated. Mix in the buttermilk in two installments on a low speed. Then mix in the oil, vanilla extract, and vinegar on a low speed until fully incorporated. Scrape down the sides of the bowl with a spatula, then beat on medium speed for about 30 seconds.
- Divide the batter evenly between three bowls and use increasing amounts of blue gel food coloring to create ombre blue cake layers.
- Evenly divide the batter between the prepared cake pans. Bake for 35-37 minutes or until a skewer comes out clean.
- Let the cake layers cool in the pans for 10 minutes, then run an offset spatula around the pan to separate the cake from the pan. Then place the cake layers into the freezer for 45 minutes to accelerate the cooling process.
- Once the layers have fully cooled, I like to trim the caramelized bits from the sides of the layers using a serrated knife. While these layers bake pretty flat, sometimes I’ll also trim the top of the layers too, to get my layers perfectly level.
- Next, torte the layers but cutting each layer in half horizontally. Set aside.
Vanilla Frosting
- Beat the butter on a medium speed for 30 seconds with a paddle attachment, until smooth. Slowly add in the powdered sugar, 1 cup at a time. Alternate with small splashes of cream.
- Once fully mixed, add in the vanilla and salt, and beat on low until the ingredients are fully incorporated, and the desired consistency is reached.
- If the frosting is too thick, add in additional cream (1 teaspoon at a time). If the frosting is too thin, add in more powdered sugar (quarter of a cup at a time).
Cake Assembly
- Next we frost and assemble the cake. Spread a thin layer of frosting between each cake layer.
- Crumb coat the cake by covering it in thin layer of frosting, then chill the cake in the freezer for 5 minutes or fridge for 30 minutes.
- Once the crumb coat is firm to the touch, add a second, thicker layer of frosting and smooth with a large offset spatula and bench scraper.
- Chill the cake in the freezer for another 20 minutes, then lightly dab a mixture of vodka (or lemon extract) and sky blue gel food coloring onto the side of the cake using a small sterile sponge.
- Place the cake back in the fridge for 10 minutes. In a small bowl, mix together 1/2 cup of leftover frosting with and one extra Tbsp of heavy cream. Carefully secure the template to the side of the cake using toothpicks.
- Spread a thin layer of frosting over the template using an offset spatula. Remove one toothpick, and slowly peel the template off the cake. Repeat pattern on the other half of the cake.
- Color any remaining frosting blue, and pipe swirls onto the top of the cake with a French piping tip, then enjoy!
Video
Notes
Tips for Making the Best Snowflake Cake
- Ingredients at room temp mix together better! Set out any cold ingredients ahead of time.
- Properly measure your flour (spoon into the cup measure, then level). Or better yet, use a kitchen scale to measure your dry ingredients.
- Use a scale to weigh your cake pans as you fill them. It will make your cake layers bake to the same height and bake more evenly.
- Level your room temperature or thawed cake layers with a serrated knife to make them easier to stack.
- Chill your cake layers in the freezer for about 20 minutes before assembling the cake. It makes it so much easier to stack and frost them!
Hi Chelsea!!
Thank you so much for sharing!! Were you able to fit the entire batch of buttercream in your standard kitchen aid mixer?? I normally make your standard recipe with only 2 cups of butter and 8 cups powdered sugar- I am nervous it won’t all fit!! I’m sure I just have to mix if carefully 🙂
haha I almost always most a double batch in my kitchen aid! I have a 5 qt mixing bowl, and it barely fits. I usually put a kitchen towel over the kitchen aid to reduce the powdered sugar clouds!
I am making a 6 layer rainbow cake for my daughters birthday. I’m wondering if I can use this recipe to bake 6 separate cakes in 9” pans? Should I do one and a half of the recipe? I want the layers thin, just don’t know how thin that will be? Bake time? I love watching your videos! Excellent!
that’s tough! If you want six thin, nine-inch cake layers, I’d say def do 1.5-2 batches of batter! They will probably bake a lot quicker since they’ll be thin, so I’d say check on them after 25 minutes. Hope that helps, happy baking!
Hi Chelsea,
On this Snowflake recipe, I believe you have a typo on the Vanilla Buttercream frosting. Shouldn’t that say 11 Cups 2.5 lbs? Not 1.5 lbs?
Also just curious as I am a novice. Your ingredients order is oil, extract, vinegar. In the instructions you state ” now add vinegar, extract, oil. Just wondering what is the best way to add the ingredients, or all together at once. I only was concerned about the acidity of vinegar whether it was better to add oil first. Thanks
Hi John,
You are absolutely right, that was a typo!! My apologies, this is an older post that definitely needed a bit of an update! I’ve fixed the recipe card and it should be good to go now. Thank you for letting me know 🙂
Hey Chel,
Thanks for the tutorial I tried to look for the stencil but I guess that one is no longer offered either. Do you have another recommendation for the stencil?
Hi Ashley,
So sorry about that! Here’s a similar template that I think should work: https://amzn.to/3J0BPON
Hope that helps, happy baking!
I love this cake, so can I use the same thing for another color? novice baker 🙂