
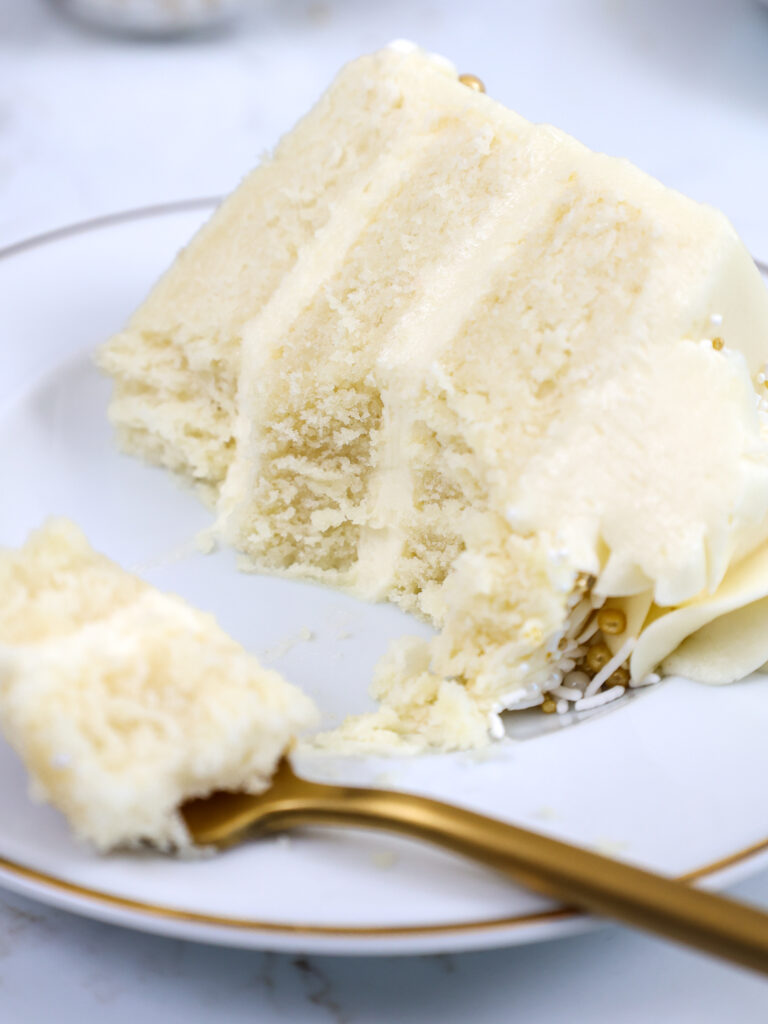
Small Batch Vanilla Cake Recipe: 6 Inch Cake
I’ve shared my very favorite vanilla cake recipe, which has received rave reviews. It’s an amazing recipe, but it makes a pretty big cake and feeds 24 people. What if you wanted to make a 6-inch cake??
Maybe you don’t need to feed a ton of people. Or maybe you want to make a smaller cake to create a certain look.
More often, people don’t have bigger pans. A lot of people start with 6-inch cake pans, which may be the only size they have on hand. If that’s you, then today is your lucky day.
How Many Cake Layers Does This Recipe Make?
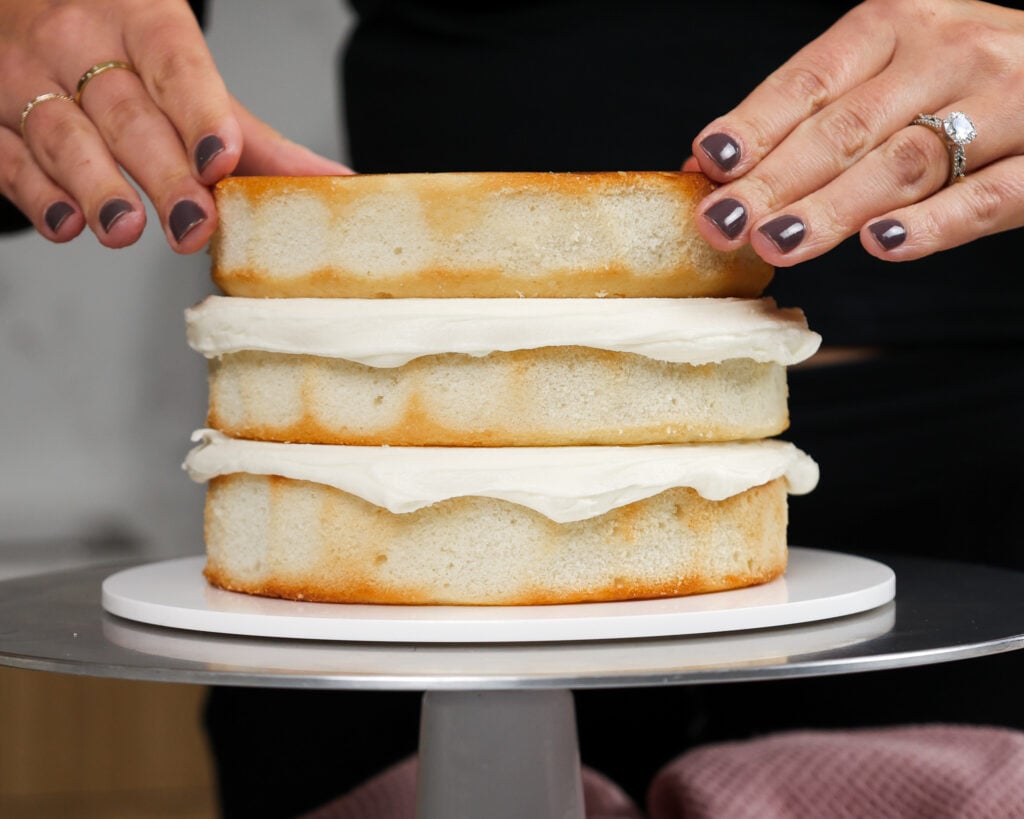
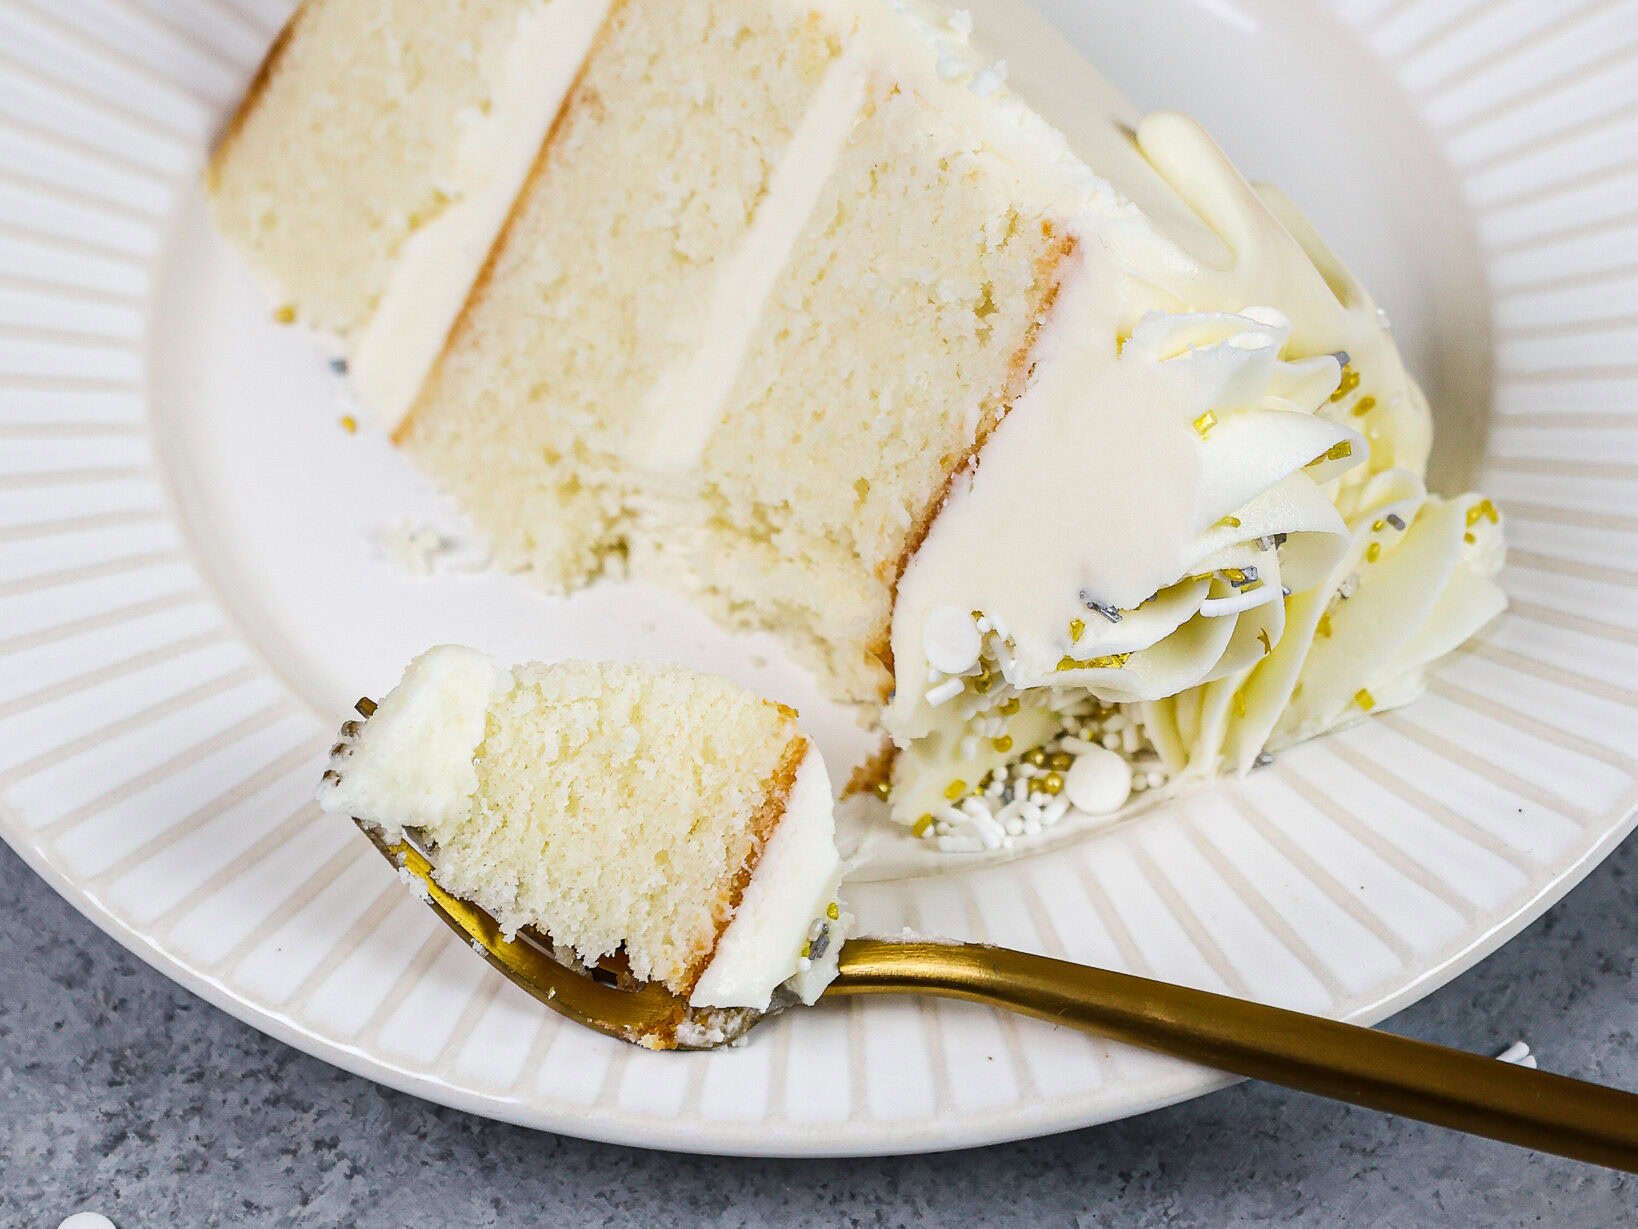
This small batch of my vanilla layer cake recipe bakes three, perfect little 6-inch cake layers. It may seem like you’re filling your pans pretty full, but this batter doesn’t rise much as it bakes.
That’s part of what makes my vanilla cake recipe so great, though. It bakes flat, so leveling your cake layers is optional. With that in mind, you should end up with cake layers that are just a bit taller than 1 inch.
What Does Small Batch Mean?
In this case, “small batch vanilla cake recipe” just means I’ve updated the amount of ingredients you use to make this batter to make a smaller cake.
Initially, I thought I could just cut the recipe in half and make three cake layers. You can do this, but the cake layers turn out quite a bit thinner than I’m used to.
I wanted each cake layer to be at least an inch tall, so I knew I’d have to play around with the ratios.
In the end, it turned out that making 2/3 of a batch is the ideal amount of batter for 6-inch cake layers.
Substitutions and Swaps – Vanilla Cake Layers
This 6-inch vanilla cake recipe uses quite a few ingredients, and I know you might not have all of them on hand. Or if you have food allergies or restrictions, I’ve got you covered.
Below are some swaps and substitutions that can be made in this cake recipe.
- All-Purpose Flour – This recipe turns out best with AP flour, but you can use a gluten-free flour blend or cake flour if that’s all you have on hand.
- Granulated Sugar – I do not recommend reducing the amount of sugar or changing the type of sugar, as it will change the texture of the cake layers.
- Unsalted Butter – If you only have salted butter on hand, you can use it in place of the unsalted butter in this recipe. Just be sure to omit the salt that this cake recipe calls for. You can also use vegan butter in its place (and also omit the salt)!
- Egg whites – I use egg whites out of a carton to avoid wasting any yolks! You can also use 5 egg whites or 3 whole eggs if needed. Or if you have an egg allergy, you can use flaxseed eggs or an egg replacer.
- Buttermilk – You can also use full-fat yogurt, sour cream, whole milk, or an alternative yogurt or milk (almond, soy, oat) if you’re dairy-free.
- Vegetable Oil – You can use any flavorless oil in this recipe. Canola or even sunflower oil would work great!
- Vanilla Extract – Other extracts can also be used in place of the vanilla extract. Feel free to use almond, lemon, or even coconut extract.
Substitutions and Swaps – Vanilla Buttercream Frosting
- Unsalted Butter – If you only have salted butter on hand, you can use it in place of the unsalted butter. Just be sure to omit the salt that this frosting recipe calls for. You can also use vegan butter in its place (and omit the salt)!
- Heavy Cream – Whole milk or alternative milk (soy, almond, oat) will work fine in this frosting recipe if that’s what you have on hand.
- Vanilla Extract – Other extracts can also be used in place of the vanilla extract. Feel free to use coconut extract, hazelnut extract, or even pistachio extract.
- Gel food coloring – If you want to color this frosting, I recommend using gel food coloring! It creates vibrant colors without throwing off the consistency of the buttercream.
Tips for Making this Small-Batch Vanilla Cake Recipe
- Chill your cake layers in the freezer for about 20 minutes before assembling the cake. It makes it easier to stack and frost.
- Properly measure your flour (spoon into the cup measure, then level) or use a kitchen scale to measure your dry ingredients.
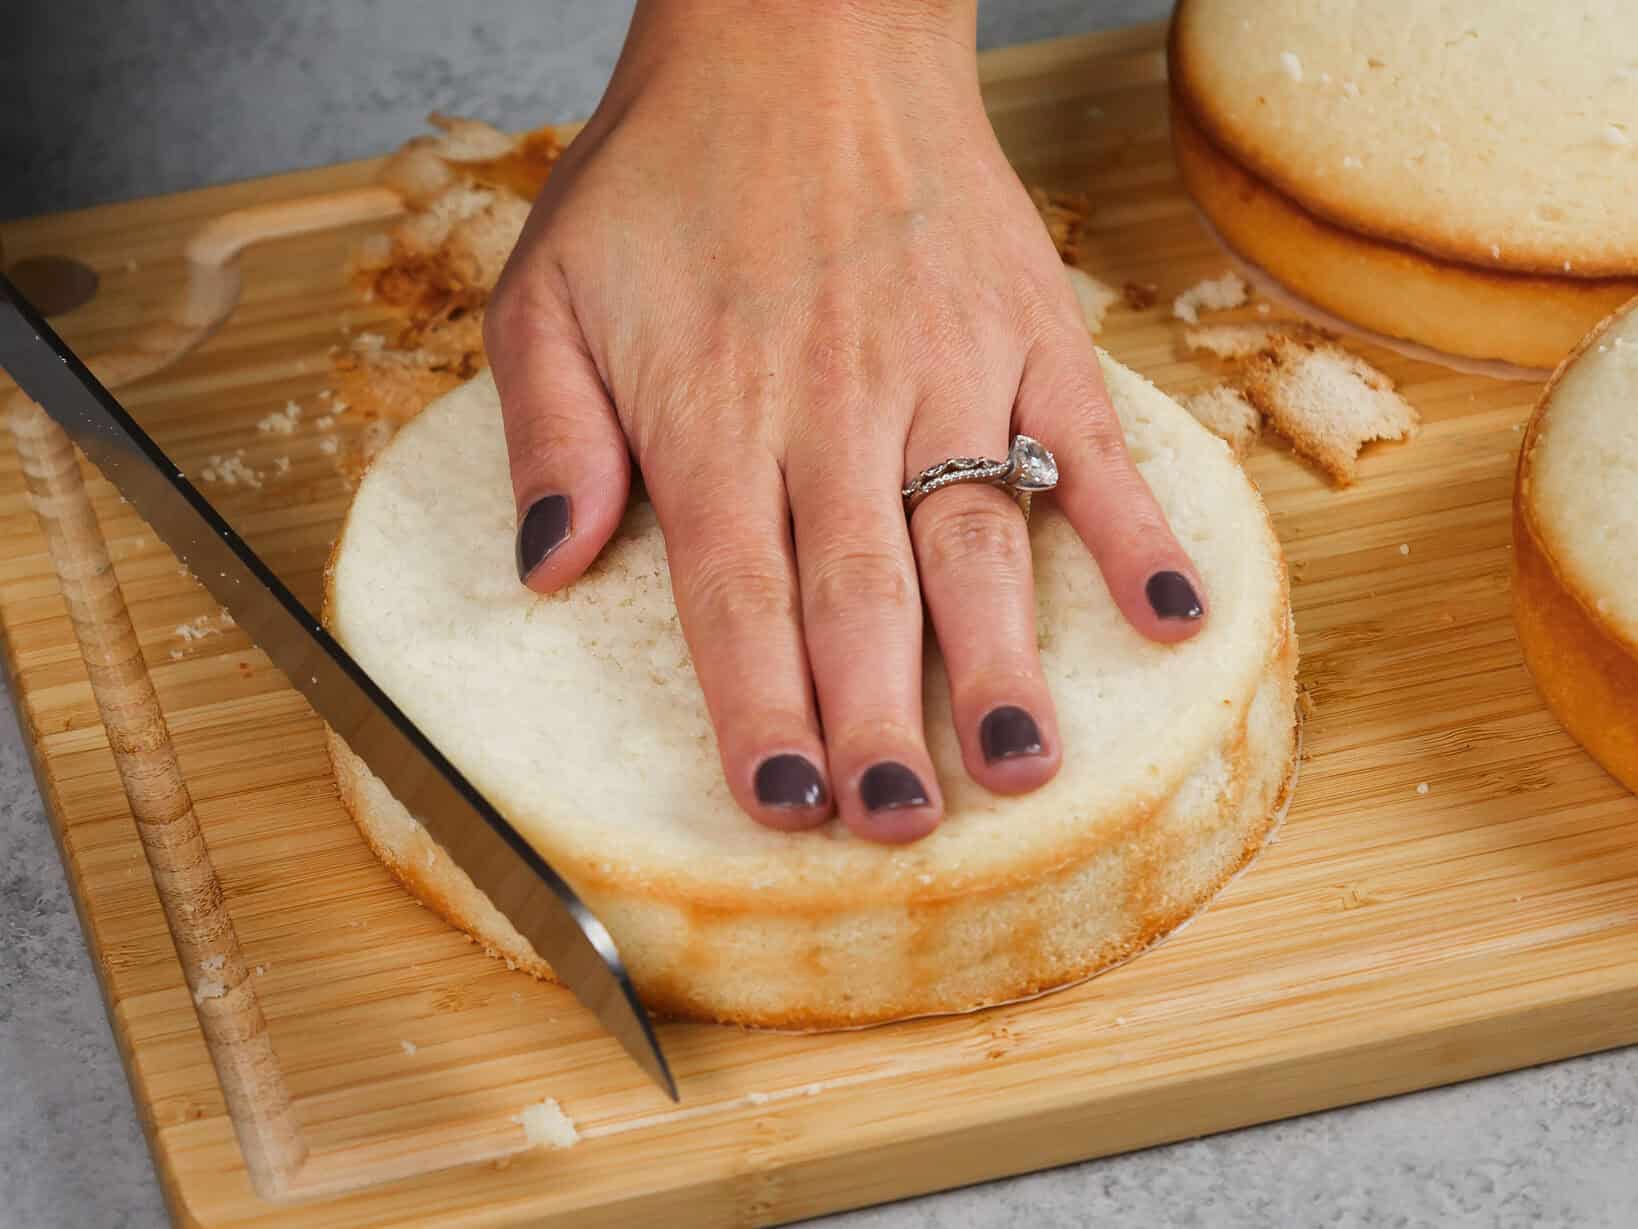
- Use a serrated knife to level your cake layers once they’re fully cooled to make it easier to assemble and frost the cake.
- I do NOT recommend using this recipe to make cupcakes! Instead, I highly recommend trying my vanilla cupcake recipe (I like the texture better for cupcakes).
- Use my regular vanilla cake recipe to make a 7-inch or 8-inch layer cake.
Making These 6-inch Cake Layers in Advance and Storage Tips
I recommend making these cake layers in advance and freezing them. It breaks the process up and makes it more approachable.
You can also make the frosting ahead of time, or save any leftover frosting! It can be stored in an airtight container in the fridge for up to a month or in the freezer for up to 3 months. Be sure to give it a good stir once it thaws to get the consistency nice and smooth again.
A frosted cake can last in the fridge for up to a week or in the freezer for up to a month. The buttercream locks in all the moisture, keeping the cake fresh and delicious!
If you cut into the cake and have leftovers, use any remaining frosting to cover the cut section to keep it moist and store in the fridge for up to a week.
Let Me Know What You Think!
I’d love to hear your thoughts on this small batch vanilla cake recipe! Do you like to make smaller cakes like this?
If you try this small batch vanilla cake recipe, please tag me @chelsweets and #chelsweets so that I can see your amazing creations!
Small Batch Vanilla Layer Cake Recipe
Equipment
Ingredients
Vanilla Cake
- 2 cups + 2 Tbsp all-purpose flour 270g
- 2 cups granulated sugar 400g
- 1 1/2 tsp baking powder 6g
- 1/2 tsp fine salt 3g
- 2/3 cup (1 1/3 sticks) unsalted butter, room temperature 150g
- 2/3 cup carton egg whites or 5 large egg whites, room temperature 155g
- 1 cup buttermilk, room temperature 240g
- 1 Tbsp vegetable or canola oil 14g
- 1 tsp vanilla extract or vanilla bean paste 4g
- gel food coloring if desired
Vanilla Buttercream Frosting
- 2 cups unsalted butter, room temperature 452g
- 7 cups powdered sugar 907g or a 2 lb bag
- 2 Tbsp heavy whipping cream, room temperature 30g
- 1 Tbsp vanilla extract or vanilla bean paste 12g
- 1/2 tsp fine salt 3g
Instructions
Vanilla Cake Layers
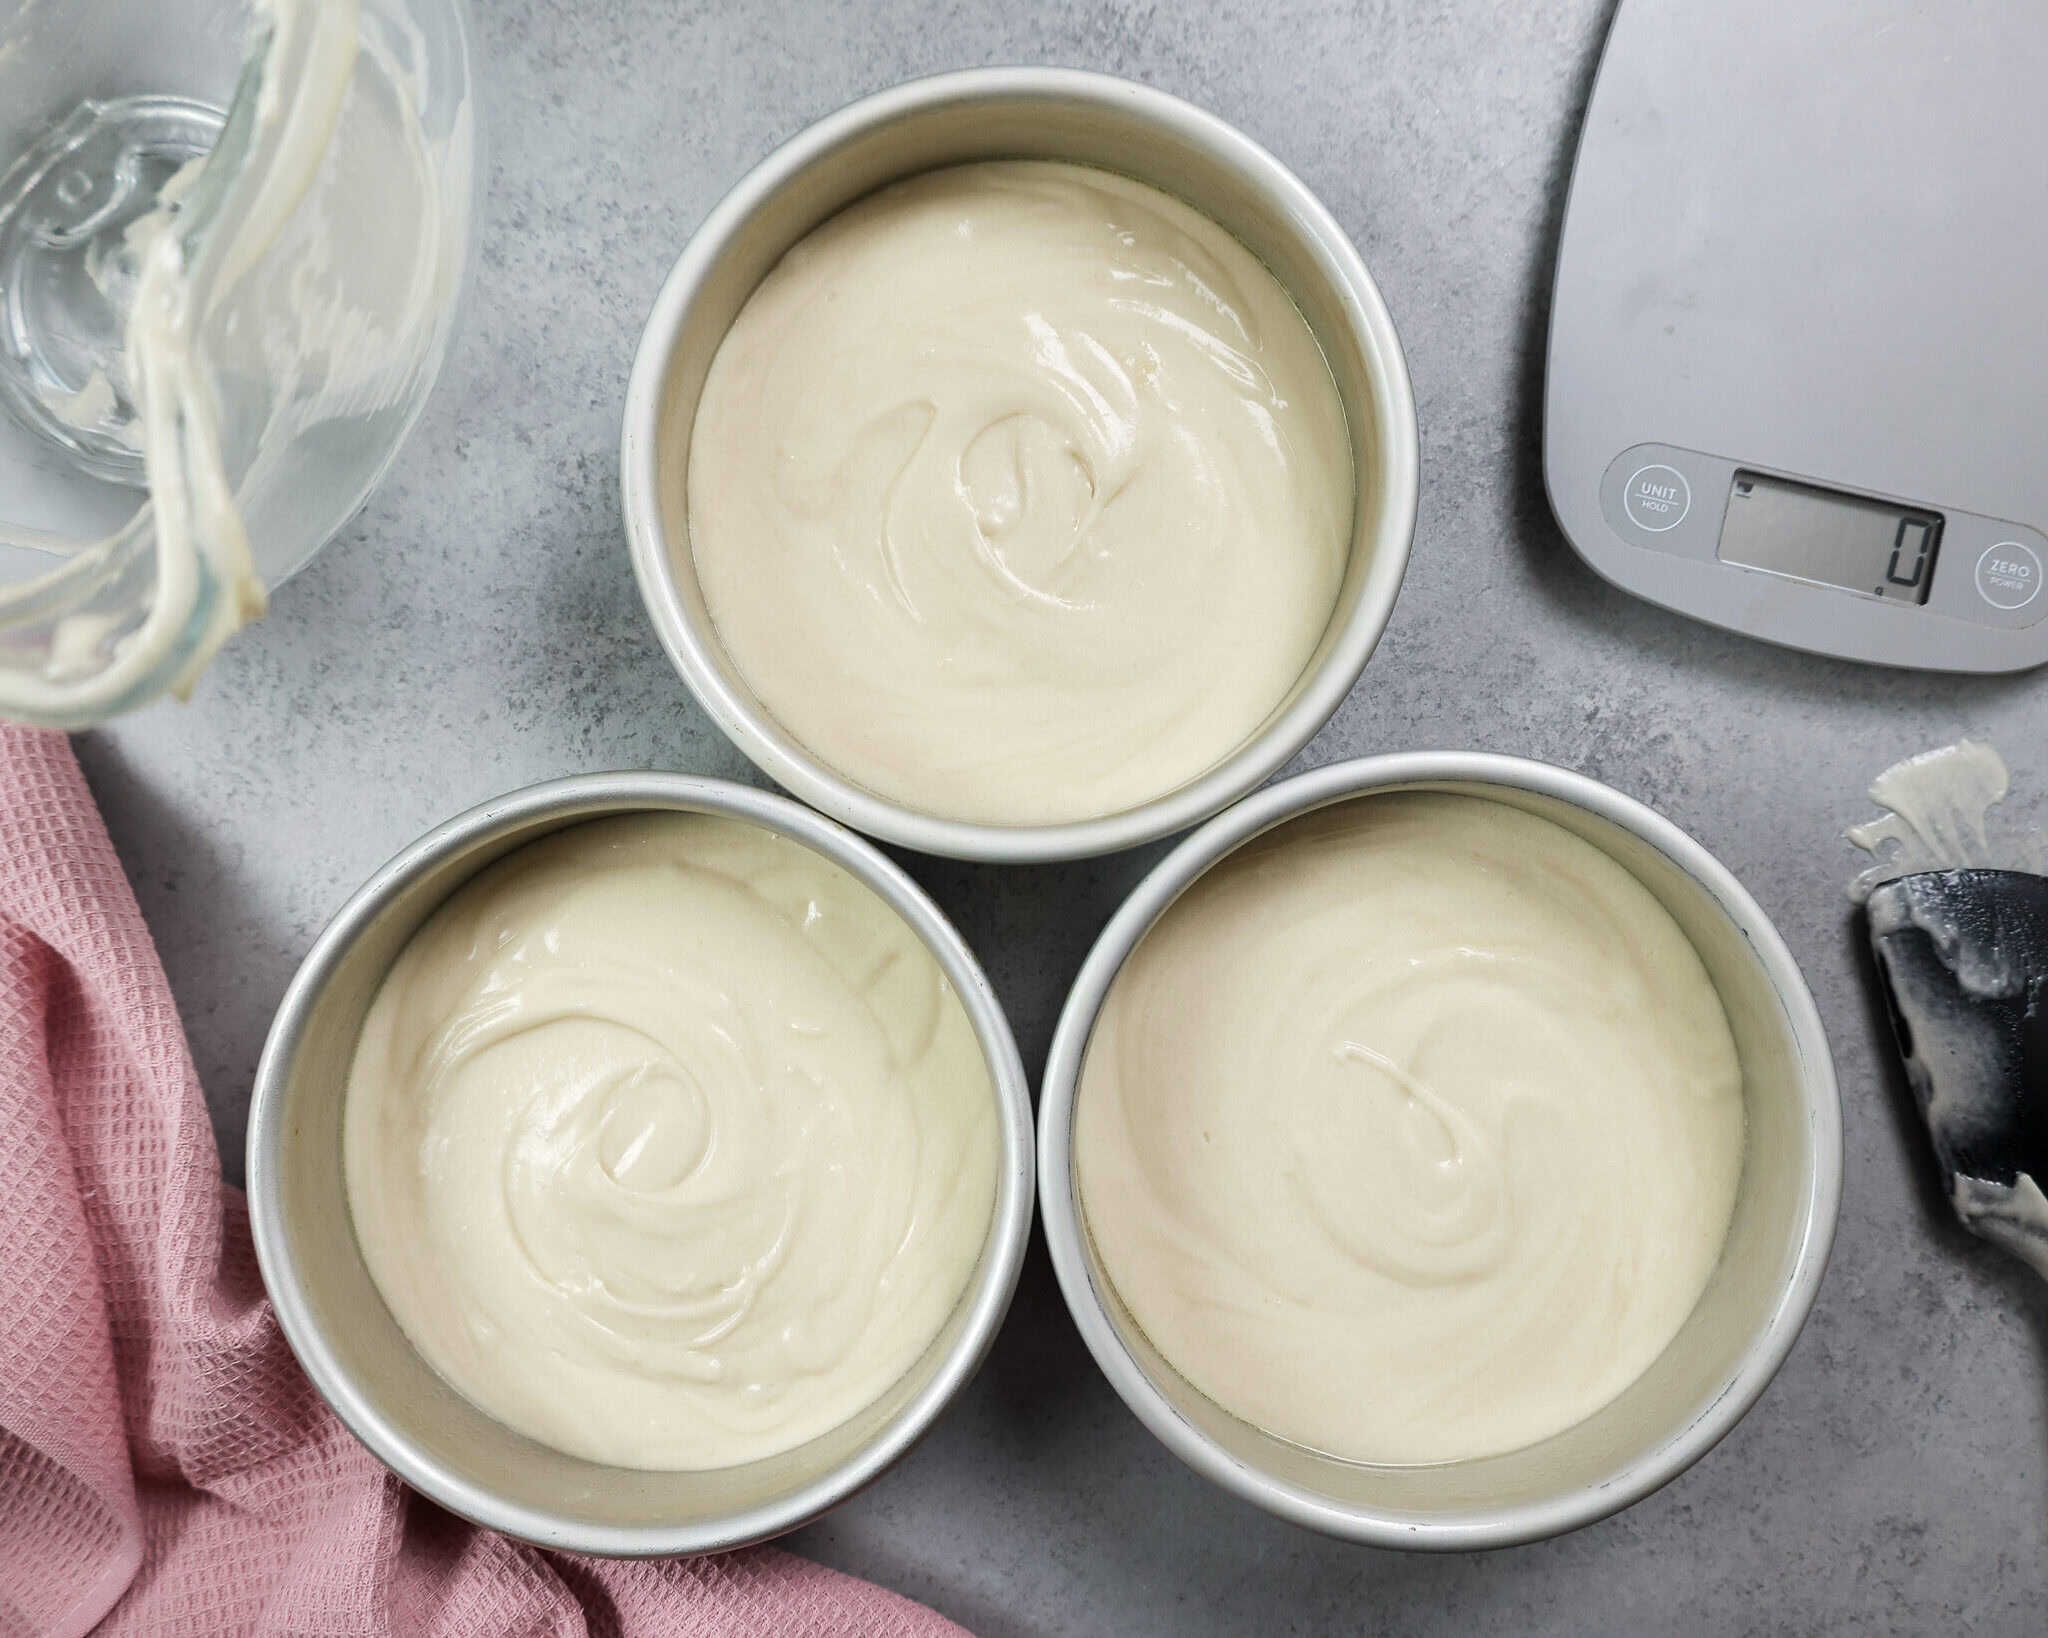
- Preheat oven to 350°F. Line three 6-inch or two 8-inch cake pans with parchment paper then grease them with nonstick spray. Set aside.
- Mix 2 cups + 2 Tbsp all-purpose flour, 2 cups granulated sugar, 1 1/2 tsp baking powder, and 1/2 tsp salt in a large bowl. Use a stand mixer and paddle attachment or a hand mixer to mix on a low speed until combined.
- Mix 2/3 cup (1 & 1/3 sticks) unsalted butter slowly into the dry mix, on a medium-low speed. Continue to mix until no large chunks of butter remain, and the mixture becomes crumbly.
- Pour in 2/3 cup or about 5 egg whites and mix on low until just incorporated and the batter looks wet.
- Then mix in 1 cup of buttermilk, 1 Tbsp of vegetable oil, and 1 tsp vanilla extract on a low speed. Scrape the sides and bottom of the bowl as needed with a rubber spatula, then beat on a medium speed for about a minute to make sure everything is properly mixed together. This also helps lighten the texture of the cake layers a bit.
- If desired, add in gel food coloring and stir by hand with a rubber spatula until the batter is evenly colored.
- Divide batter evenly between the prepared cake pans. I like to use a kitchen scale to weigh my pans and ensure they all have the same amount of batter. This guarantees your layers will bake to the same height.
- Bake for 30-33 minutes, or until a toothpick comes out with a few moist crumbs. Allow the pans to cool for 10 minutes, then run a small offset spatula around the perimeter of the pan to separate the cake from the pan.
- Place cake layers into the freezer for 30 minutes to accelerate the cooling process. Once the layers are fully cooled, carefully flip the pans and remove the layers.
- Use a serrated knife to level the tops of the layers right before you plan to assemble your cake.
Vanilla Buttercream Frosting
- While the cake layers bake and cool, make the vanilla buttercream frosting.
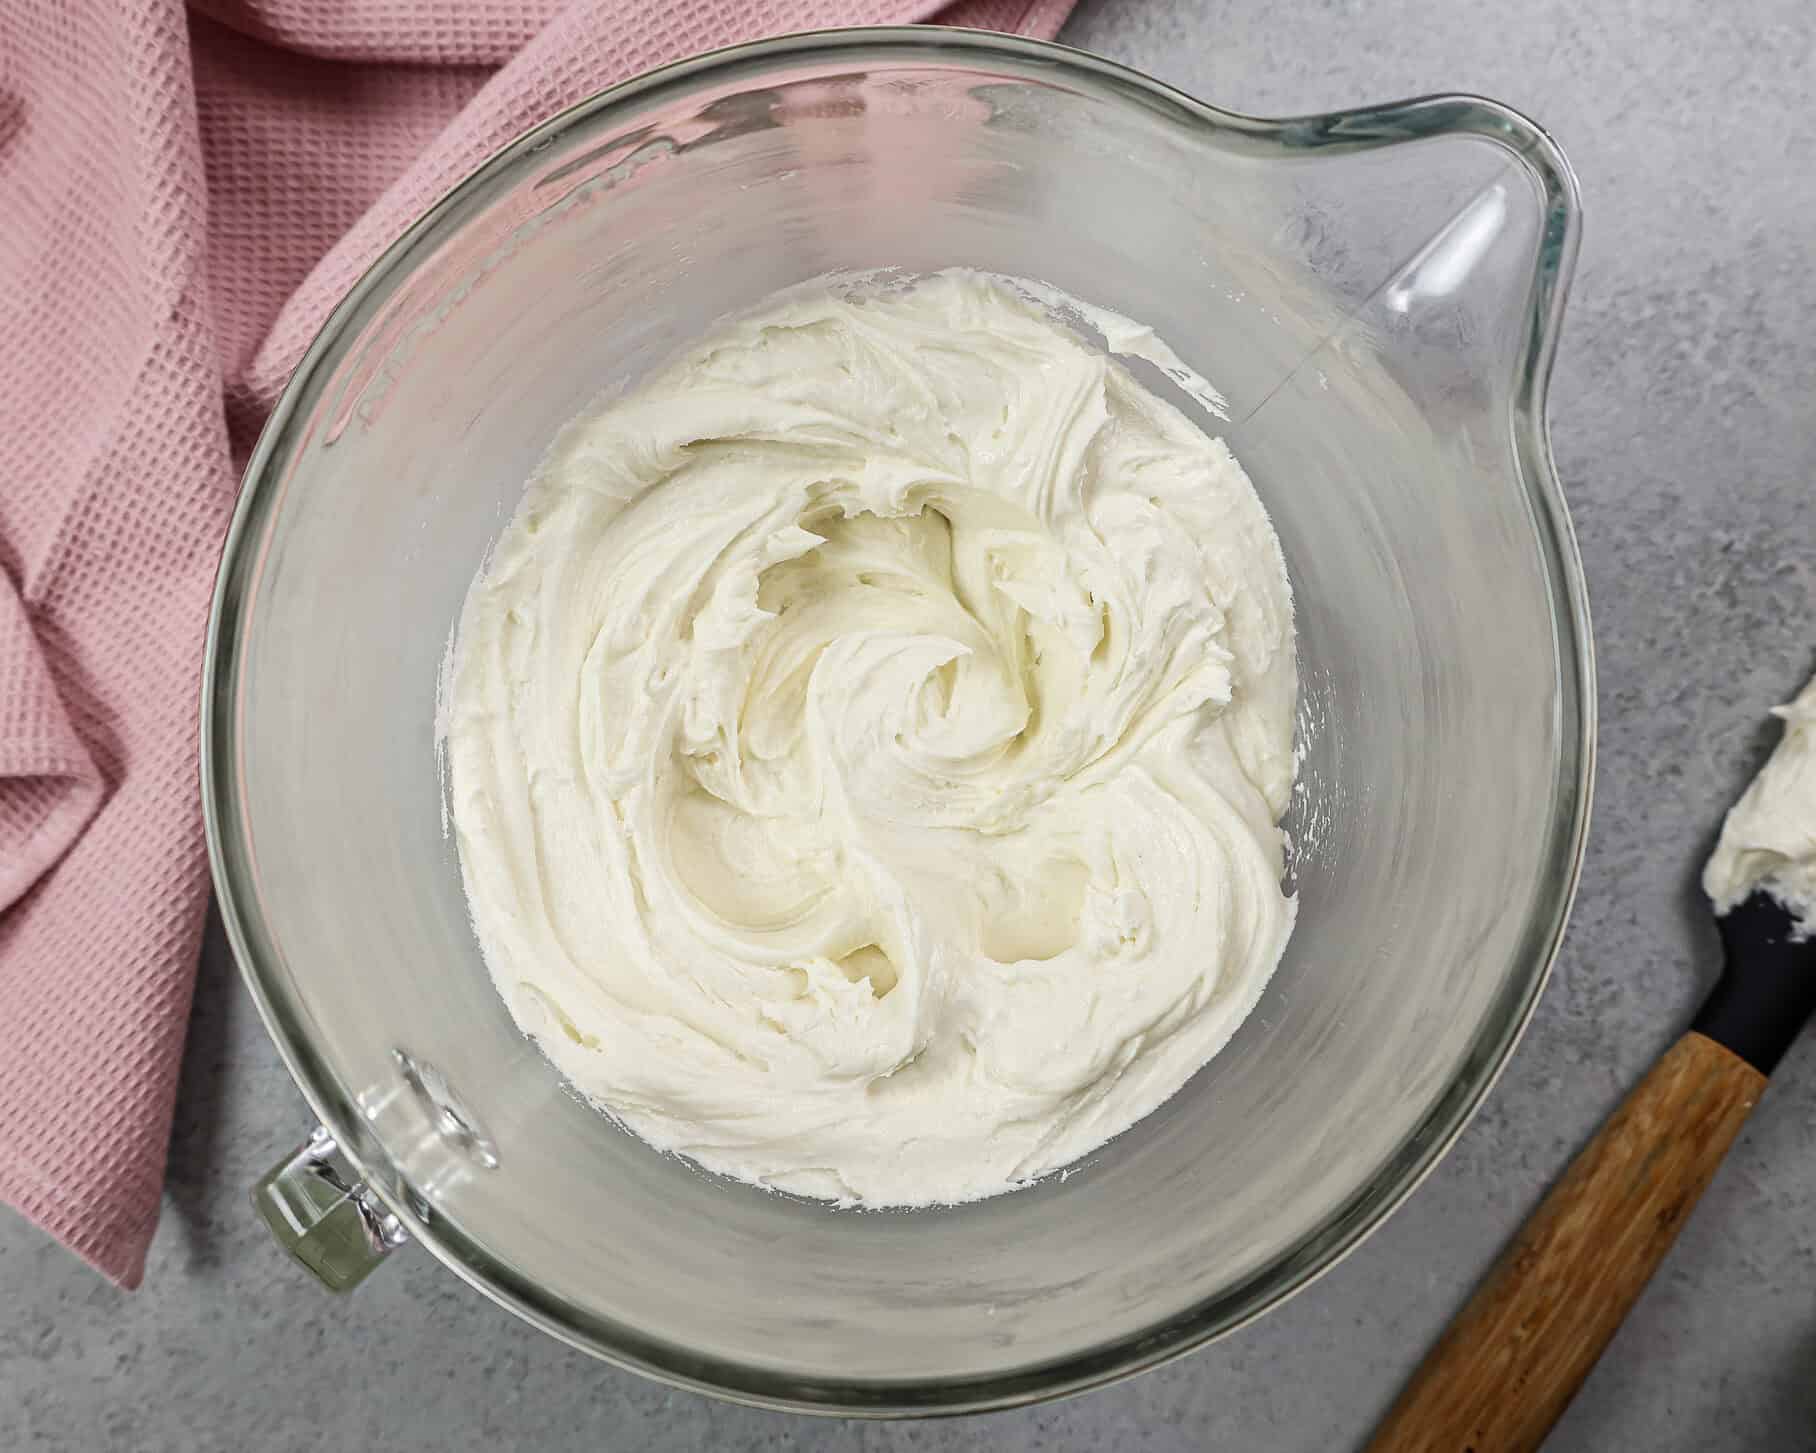
- Beat 2 cups of unsalted butter on medium speed for 30 seconds with a paddle attachment or hand mixer until smooth.
- Slowly mix in 7 cups of powdered sugar on a low speed, 1 cup at a time. Halfway through, add 2 Tbsp of heavy cream or milk to make it easier to mix.
- Scrape the sides and bottom of the bowl as needed with a rubber spatula.
- Once the frosting is fully mixed and smooth, add in 1 Tbsp of vanilla extract and 1/2 tsp salt. Mix on the lowest speed for a couple of minutes to help make the frosting silky smooth. If the frosting seems too thick, add in additional cream (1 teaspoon at a time). If the frosting is too thin, add in more powdered sugar (a quarter of a cup at a time). If you're unsure how thick your frosting should be, check out my frosting consistency post.
- If you plan to color the buttercream, add in the gel food coloring once the frosting is fully made, and beat on low until it reaches the desired color.
To Assemble The Cake
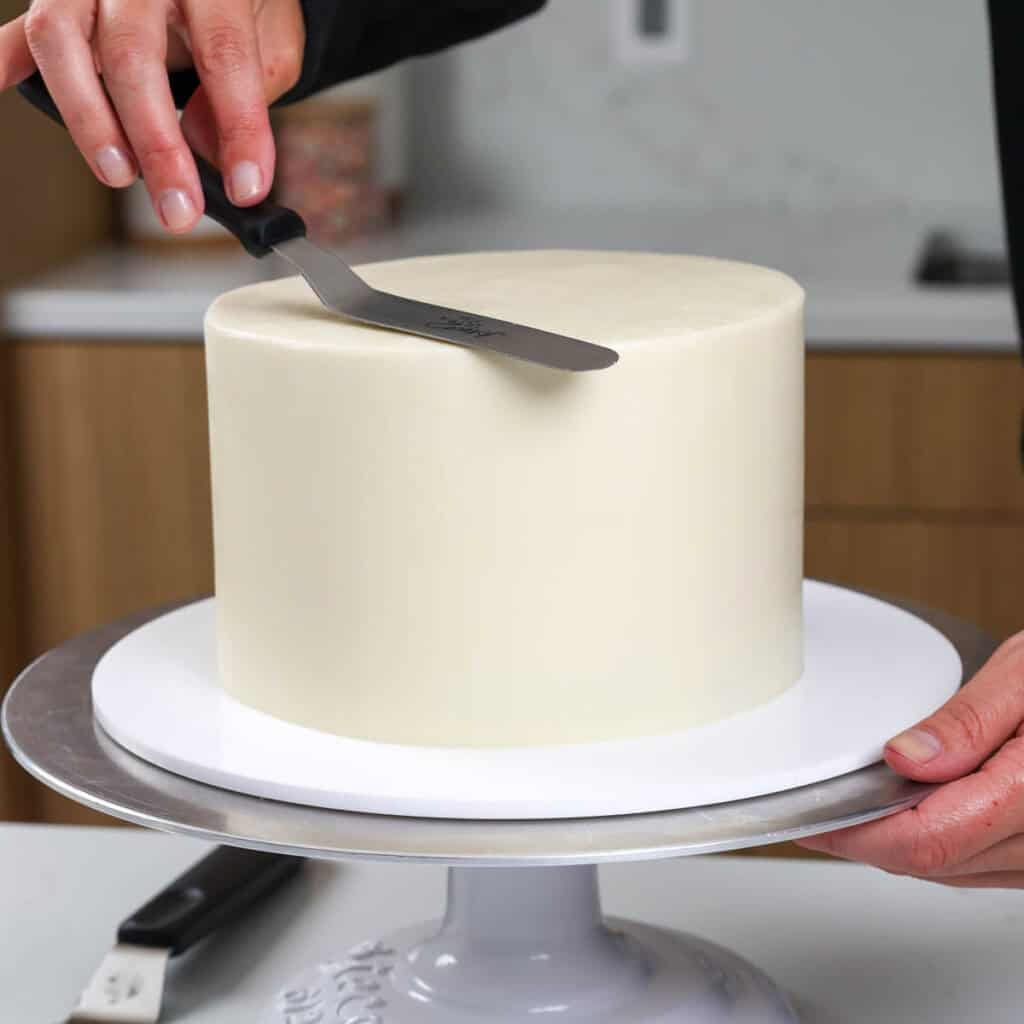
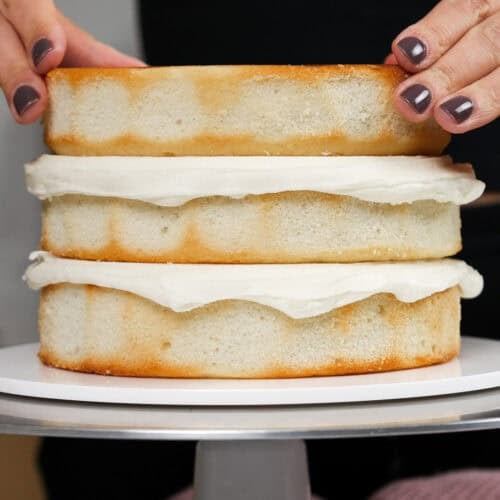
- Stack and frost cake layers on a greaseproof cake board or flat plate, using a dab of frosting to help stick the first cake layer to the board.
- Spread an even layer of buttercream between each cake layer with a layer offset spatula. Add a thin coat of frosting around the cake to fully cover the cake layers.
- Smooth using a bench scraper, then chill the cake in the fridge (20 minutes) or freezer (10 minutes) until the frosting is firm to the touch.
- Add a second, thicker layer of frosting to the cake, and smooth using a bench scraper. Then decorate as desired!
Video
Notes
Tips for Making the Best 6-inch Layer Cake
- Properly measure your flour (spoon into the cup measure, then level) or use a kitchen scale.
- Make sure your ingredients are at room temperature to help them mix together better.
- Don’t level and torte your cake layers until they are completely cooled.
- Make sure your buttercream is the right consistency. This will help give your cake proper structure and make it easier to decorate.
- If your cake layers turn out less than perfect, read my cake troubleshooting guide to see where things might’ve gone awry.
Nutrition
Other Recipes You Might Like:
Maybe a silly question, but do you think it would be possible to make this recipe (and also buttercream to decorate!) with just a hand mixer?
Not a silly question at all Catherine! You can make both recipes with the hand mixer 🙂 The buttercream will take a little longer to make, but it will turn out just as well as if you’d made it with a stand mixer!
Thank you thank you thank you!!! I’ve tried to make 2/3 of your original recipe… but oh my gosh it’s so hard to do that! Math and I are not friends. This cake is the BEST vanilla cake ever!
Haha I know!!! Calculating and testing it was not fun 😛 but it really is the right amount of batter!!! So happy it sounds like you’ll enjoy this recipe Kim 🙂
This is my go to vanilla recipe. Is it possible that I can replace the vanilla with lemon to make it a lemon cake?
so happy to hear that! And yes you can! I like to add in the zest of 1 large lemon, and 2 tsp of lemon extract!
Just a quick question! Your recipe forward says the recipe is for 3 6 inch layers, but in the instructions it says grease 4 pans? Is it for 4 layers, or 3?
Thanks so much!! Your recipes are always amazing:)
haha that’s just brain fritzing out while blogging late at night!! Just updated it to say three layers. You can make 4 layers, but they will be thinner! Making three layers makes them the same thickness as my normal vanilla cake recipe, which I think is ideal 🙂
Hey Chelsea! I was wondering if you could clarify, the recipe says this cake batter will do three, six inch layers, but I see the options for three eight inch as well? I just wanted to make sure that was an option for this recipe. I have three, eight inch pans available! Thank you so much for all you do and share!
Hi Ashley! If you want to make three, 8 inch cake layers, you can use my normal vanilla layer cake recipe! it makes the perfect amount of batter for pans that size 🙂
Here’s the link: https://chelsweets.com/2016/09/05/best-vanilla-layer-cake-recipe/
Can I please confirm that this cake will feed 16 people? Thanks!
Yup! I cut it into four sections, then cut four sliced from each. They will be thin slices, but the buttercream is pretty rich, so it should be a satisfying slice! However, if you like to cut larger slices, it may feed less <3
Is this recipe good for a 2 tier cake?
It stacks really well, and keeps it’s shape! but you’ll need multiple batches, I’d recommend using the full batch version of this cake recipe, which you can find here: https://chelsweets.com/2016/09/05/best-vanilla-layer-cake-recipe/
I’m so happy to have this smaller recipe! Any chance you will do the same for your chocolate cake?
Working on it as we speak! It’ll be up soon, stay tuned 🙂
hi Chelsea! i have followed you on IG for a while and as i’m making a cake today i came here searching for recipe. your decoration is always amazing but what really appeals to me is your layers!! they always look so uniform, flat, and not crumb-y!! i wondered if you ever work with yellow cakes using whole eggs? if not, why do you personally prefer a white cake? i hate wasting yolks but i guess i could save them for a nice fruit curd. 🙂
great question!! I like baking with egg whites, because it makes lighter cake batter, which is easier to color! It also helps the flavor of the buttermilk shine through. I use egg whites from a carton, so I don’t have to worry about the yolks 😛 However, this cake can be made with 3 whole eggs instead of egg whites, and still tastes great!
I’ve been playing around with a yellow cake recipe for a while, but I still haven’t perfected it! I’ll be sure to share it once I do 🙂
Thank you so much for this you are amazing
aw thanks Jenn! Anytime 🙂
Hi Chelsea, your cakes are amazing! I sometimes don’t have enough pans to make all the layers I need in one shot. How do I store the batter while the first layers are baking? Thank you
Hi Megan! I recommend leaving it out at room temp if it has to sit for a while! <3
Hi Chelsea
I am also a self taugh baker starting out and have my 1st stacked cake. The bottom tier is chocolate but my chocolate recipe is a little moist and I’m scared it might collapse. Do you maybe have a recipe to share for chocolate cake to stack ?
definitely! I use this chocolate cake recipe for tiered cakes, which has great structure! Here’s the link: https://chelsweets.com/2018/05/08/my-go-to-chocolate-layer-cake-recipe/
Also be sure you’re using dowels to properly support your cake 🙂 It makes a world of a difference!!
I wanted to make an 8inch cake with a 6inch tier for a friends birthday, would you recommend this recipe for that?
This would work great for the 6 inch tiered cake! My full sized vanilla cake recipe would be perfect to make the 8 inch tier! Here’s the link: https://chelsweets.com/2016/09/05/best-vanilla-layer-cake-recipe/
Hello, I’ve been on the lookout for a go-to recipe and am so glad to have found this! Just a note though, I tried this recipe a couple of times using the metric measurement (I live in London) and the result came out off (batter was too little, tastes too sweet). But when I switched to measuring everything by cups it all works out. Perhaps you want to look at the cup to metric conversion, in case someone outside of north america decides to try this?
So happy to hear this is now your go-to recipe, Erika!!
That’s so strange, I usually bake by metric measurement! I reviewed the metric amount vs the original recipe (since this is exactly 2/3 of the original), and I did have about 20 grams of extra egg whites. I’ve updated that, but I don’t think that would change the sweetness or volume of the cake much! I’m not sure what else I could look into / change about the metric amounts :/ So sorry!
Hi! I am gluten free, and I substituted the flour for King Arthur Gluten-Free flour. I used an exact cup-for-cup substitution, and it worked perfectly! This is the best cake I have ever had! My husband is coming back for seconds, and he doesn’t like cake! Thank you for sharing your recipes!!!
I am so happy to hear that Lauren! And that’s great to know 🙂 I get asked all the time about gluten-free recipes, so this is fantastic 🙂
I love love you, you are pretty detailed and connect well with your audience. Thank you so much for this.
Aw thanks Grace!! I try 🙂
Can I use whipped ganache instead of buttercream? I was asked to do a semi naked cake without buttercream.
you definitely can for the filling, but I’m not sure how well whipped ganache would smooth on the sides of the cake! regular ganache might actually be easier to work with on the sides to get that semi-naked look!
Hope that helps, happy baking Sharony!
Hello there! Random question – but what state are you baking these in? I live in Colorado so I am always looking for a good high-altitude recipe! I live in Colorado Springs, which is at a little over 6,000 above sea level! Just wondering! Thanks!
Hi Hannah! I’m in NYC. I’ve heard my cake recipes turn out ok at elevation, but I’m not sure how high up the people were who said that 😛
Hey Chelsea! What would you suggest I do to make this recipe into an almond cake? I want this same denseness and texture, but almond instead of plain vanilla. Should I just add almond extract and leave everything else the same, or should I sub almond for vanilla?
Hi Katie! I’d recommend adding about 2 tsp of almond extract in addition to the other ingredients 🙂
Hi there! Can this recipe be used to make cupcakes or mini cupcakes?
It can but sometimes this recipe sticks to the cupcake liners! I recommend using my vanilla cupcake instead, which is amazing and bakes up much better in that size 🙂 Here’s the link: https://chelsweets.com/2017/07/03/classic-vanilla-cupcake-recipe/
Hi!! I am going to use three 8” pans for my Fourth of July cake using this recipe! I was wondering if the recipe you gave makes just one cake and not more! Please let me know thanks!!
If you want to make three,8-inch cake layers, I highly recommend using my normal vanilla cake recipe! it makes the perfect amount of batter for that 🙂 here’s the link: https://chelsweets.com/2016/09/05/best-vanilla-layer-cake-recipe/
@Chelsweets, I have tried to figure this out but math is not my strong point. I was curious to see if I was right how I should go about making a tiered cake with a 6-in four layers for the top and an 8 in four layers for the bottom each being 2 in thick pans versus the 1 in using your Vanilla cake recipe.
Hi Deberlena,
My vanilla cake recipe is a dense cake recipe, so it doesn’t bake up great as thicker layers! This is why I usually bake 1 inch tall layers with it. I wouldn’t recommend making 2 inch thick layers with it.
I am so inspired to make this! I am a beginning and just getting started learning to bake multi-layer cakes. I was wondering why you chose all-purpose flour for this recipe as opposed to cake flour? What would happen if I substituted the all-purpose flour for cake flour here? Thanks!
Hi Jennifer,
The cake texture is just better with AP! if you want to use cake flour instead, you can substitute 1 cup plus 2 tablespoons cake flour for every cup of all-purpose flour.
Most of my cake recipes use AP, I prefer baking with it in general 🙂
Hi Chelsea,
I made your vanilla cake a couple days ago and it was delicious! Do you think cake flour can be substituted instead of ap flour? I have a couple boxes of cake flour that I need to use up.
It will change the texture a bit, but you can sub cake flour for AP in this recipe! Just be sure to use 1 cup plus 2 tablespoons cake flour for every cup of all-purpose flour. Hope that helps Cat! <3
Hi there, I’m encouraged by all the positive reviews of your vanilla cake and am going to try it for an upcoming order. I’ve haven’t liked any vanilla cake recipe yet so I’m excited to try this! What I would like to know is how many cups of batter does the Best Vanilla Cake recipe make? And when you say it makes 3, 8″ cake layers are they 1″ layers or 2″? I’m looking to make an 8×8 square.
Thanks!
Hopefully you like this one!! The layers end up being about 1 inch tall, they don’t rise much and bake pretty flat (one of my favorite things about this recipe). But just to clarify, this recipe is my small batch version, which makes 3, 6-inch cake layers! In the post where I mention 3, 8-inch cake layers, I’m referring to my normal layer cake recipe, which can be found here: https://chelsweets.com/2016/09/05/best-vanilla-layer-cake-recipe/
Hi! Do you prefer to use canola or vegetable oil for your cakes? I think I saw in one of your other posts that you used canola oil.
Hi Marlene!
I usually use canola oil, but vegetable oil works just as well in this recipe! Or any flavorless oil, for that matter! 🙂
Since your cakes bake fairly flat, I was wondering how deep your pans are. Do you use a 2 inch or 3 inch depth?
Thanks for all the wonderful information and links. I am a cottage baker delving into the realm of cake!
My pans are 2 inches deep! I like that height because it makes them easier to store.
And of course, thanks for visiting my blog and putting my recipes to good use Brigid 🙂
I didnt find the paper you put on the bottom can i only use the spray ?
Hi Vianney! You can also butter and flour the cake pans, to help the cake layers pop out more easily!! If you just use spray, you might be ok, but there is a chance you’ll have trouble getting the cake layers out of the pans!
Hi!! I’d like to ask what could you substitute the buttermilk with? L, Naomi.
Hi Naomi! You can use either sour cream, or whole milk! 🙂
I made the cake and frosting as a trial run for my niece’s wedding cake!! It was delicious!! Moist, flavorful, and required very little trimming.
Quick question regarding the frosting. Can half the butter amount be substituted for shortening to give it more of a pure white look? The original recipe was more of a beige color.
I’m so happy to hear that BettySue! You definitely can! It will make it taste slightly different though! You can also try using a paler butter (I love the whole foods generic brand) or you can add a TINY bit of purple gel food coloring to offset the yellow! It sounds strange, but purple and yellow are opposites on the color wheel. Hope that helps!!
Can I double this recipe for 3 9 inch layers? The other full recipe seems a bit short. I’m bad at math so I figure just doubling this recipe might be the right amount.
Haha you can definitely make a double batch. If you feel like some fun, I have a pretty great post on how to figure out how much batter you need for different sides cake pans here 🙂 https://chelsweets.com/2019/04/22/how-much-cake-batter-per-pan/
Chelsea I wonder if you’ve found an equivalent substitute for oil? Do you think applesauce would also work?
Hi Lisa! If you don’t want to use the oil, I’d recommend simply omitting it from the recipe. I like adding it because I think it lightens up the texture a tiny bit, but it still turns out fine without it!
I purchased some Land O Lake European style butter today and I was wondering would it be okay to use it? I definitely don’t want to alter the end result because it looks like it will taste amazing!!!
Yup, that should be fine to use!! I’m sure it will make the cake taste great 🙂 You may need to add a tiny bit of extra cream to the frosting though. I’ve found high quality butters are sometimes a bit stiffer than the regular store brand <3
Hi Chelsey, I would like to fold oreo cookie into this batter, would I need to make any changes to the recipe? Thanks!
That sounds like an awesome idea Stacy! You can totally fold chopped Oreos into this cake batter! No changes need to be made 🙂
Hey,
This looks like a great recipe but I have a question regarding the buttermilk?
I’m in the uk and generally prefer the American idea of putting buttermilk in cake and has become my go to for baking but my little girl is allergic to dairy and soya and I’ve been looking for a smaller batch cake for her 1st birthday next week, can the butter milk be substituted in any way?
I’m hoping so as this looks like the perfect recipe otherwise!
Thank you so much
Usually I recommend substituting with whole milk or almond milk :/ Maybe you could try coconut milk?? That’s the only thing I Can thing of at the moment!!
Can i make a 2 layer cake on this? I only have 2 6 inch pans.
Hi Mary Ann! You definitely can make this recipe in 2 6-inch pans. The layers will be a bit thicker, but it should bake up just fine! They may need to bake slightly longer though!!
Tried this recipe today and it was really good. The taste reminds me of a sugar cookie. Defiantly will make again and try your other recipes,,,
so happy to hear that Elizabeth!!! 🙂 Thank you for sharing!!
My son and I also have issues with the lactose in milk. We are able to drink the lactaid brand of milk (we drink the whole milk) I just used a cup of the lactaid milk and put a little bit of lemon juice in it to make it “sour” like buttermilk and it turned out the same. Very delicious
that’s great! I’ve never tested this recipe with lactaid before, but I’m really happy to hear it works well!!
Hi Chelsea,
I’m making this recipe for a gender reveal cake for my friend in a few days – I was so excited to see you had a recipe for 3 6 inch cake layers!
I want to get the same amount of batter in each pan so each layer is exactly the same height, and I see you recommend using a digital scale to measure 400 grams worth into each pan. The problem is, I don’t have a digital scale yet, and I only have 1 6 inch cake pan. Could you tell me approximately how many cups of batter i’d need per pan (rather than grams)? I know it’s not as accurate a measurement, but it’s what i’ve got for now. Thanks!!
Is this also a good recipe to use for cupcakes? If so, approximately how many does it make?
My cake recipes are designed to bake pretty flat, so it isn’t ideal for cupcakes! It still works, but they’ll make super flat cupcakes! I recommend using my vanilla cupcake recipe instead! It’s also delicious, and I highly recommend it! 🙂 Here’ the link: https://chelsweets.com/2017/07/03/classic-vanilla-cupcake-recipe/
Love this recipe! Can you upload a 6inch chocolate cake/frosting recipe as well please!! Thank you!
Hi Alana! I’m so sorry for the delay on this. I finally photographed this cake recipe, believe it or not! I promise it’s coming!!! <3
What a lovely site and tutorials. You have am amazing voice and fab recipes. Because I am making this cake next week for children, is there any way I can reduce the sugar or will it affect the bake. ? Many thanks . Maggie
Thanks Maggie!! I’m so sorry for the delayed response.
You can reduce the amount of sugar, but it will make the cake texture a bit more dense! Sometimes I use 2/3 the amount of sugar, and it bakes fine / for the same amount of time. I prefer the way the cake tastes and the texture of the cake when I use the full amount of sugar though <3 Hope that helps, happy baking!
I love your vanilla cake recipe! I would like to use this to make a smash cake. Only doing 4” round and the inch tall, 3 layers. Can I make this in a half sheet pan? and then cut circles out to the 4 inch round, you think? Kind of like you done with your banana cake recipe for your smash cakes.
Thanks for your help.
Hi Chelsea I love your vanilla cake, it’s the best. My daughter wants a vanilla cake for her 21st but wants a nine inch cake. What would the measurements be for a cake that size? ?
You would want to triple the ingredients in this cake recipe for a 9 inch layer cake! <3 Hope that helps!!
Heyyy.. I loved the texture of the cake and look delicious. Can you please tell me the substitute for eggs??
And also i have never tried macarons, can you tell me the easiest macaron recepie without eggs.
A good substitute for eggs is 1/4 cup of applesauce for each egg. Sadly macarons really need egg whites to turn out properly, so I don’t have a macaron recipe that doesn’t use eggs. So sorry!!
Hi, I want to make the vanilla 3 layer 6 inch cake for my grand niece’s first birthday, Can I use cake flour instead of all purpose flour? Do you have to make any adjustments in the quantity. Thanks so much.
Hi Karen,
You sure can! for each cup of all purpose flour that this recipe calls for, use 1 cup + 2 Tbsp of cake flour. Hope that helps, happy baking!
Hi ! I need to make a lactose free cake and was wondering if you know how I can do that with this recipe? Thank you very much!
Hi Teresa! I actually have a great vegan recipe that is lactose free 🙂 here’s the link:
https://chelsweets.com/2015/05/29/vegan-almond-birthday-cake/
Happy baking!
I did this exact same thing today! Used 2 6″ pans on purpose, because I like taller cakes and a bit thicker layers. Each of my layers were almost 1 1/2″ tall each. And they did bake a few minutes longer. I am not a fan of torting, so if I want a tall cake,, or a 3-4 layer cake, I would double this recipe and use all layers or use 3 and freeze 1.
Hi there, I am wanting to make a tiered cake. A 7” 3 layer cake and a 5” 3 layer cake. Would I just make two batches of this recipe or what would be the best way? Thanks!
Hi Ashley! It depends how thick you want your cake layers to be. You probably don’t need 2 full batches, 1 1/2 or 1 2/3 should be enough for a cake that size <3
THANK YOU THANK YOU THANK YOU!!!! You have saved me. My friend asked me to make a little cake for her daughter’s 7th birthday and she didn’t want anything too large as the cake is just for the family party. I couldn’t find any recipes specific to my 6 inch pans so I was so nervous that I would totally botch the job. AHHHHH!!! That was until I found your website. I can’t wait to make it this weekend. Thank you, Chelsey!!! 🙂
Hi Emily,
You are too sweet 🙂 So happy you found this recipe, I hope the cake turned out well, and that it was a big hit at the party!
Is this the recipe you recommend for a semi naked cake?
Would this recipe be a good one for a semi naked cake?
Hi Kirsten! This recipe works great for a semi-naked cake!! 🙂 Happy baking!
Hi!
I am a self taught baker and i am going to try making a 2 tier cake for the first time. I would like to know if i am baking this 6 inch 3 layer cake and a 4 layer 8 inch chocolate cake for the bottom (both your recipes) , will it feed 40 ppl? I am planning to frost with swiss meringue buttercream. Do you think its the ideal frosting for tier cakes?
By the way i tried your small chocolate cake recipe with ganache frosting and it turned out amazing. everyone loved it! Thank you!
Hi Afshan,
I think that making a tiered cake with 8 inch and 6 inch tiers should def feed 40 people (based on standard party sized cake slices!). The frosting type you use really comes down to taste. I prefer American buttercream, so that’s what I use on all my cakes (including tiered cakes), but others work great too! I’d recommend using the frosting you and your guest like best 🙂
So happy to hear you loved how my ganache frosting turned out! I hope your cake turns out wonderfully! Happy baking!
Hi, can you use whole eggs instead of just whites, if so , how many whole eggs?
Hi Adrienne! You can, I’d recommend using 3 whole eggs!
Hello,
Thank you for your reply. Can I bake a 4 layer 6 inch cake with your 8 inch vanilla cake recipe? I will be making your vanilla cake (top tier) and chocolate cake(bottom tier) with the strawberry buttercream and chocolate buttercream filling respectively. I would love to share a picture with you once its finished. !?
On another one of your blogs, in answer to a comment, you mentioned that the recipe for 3 – 6″ layers needs to bake for 25-30 minutes, but on this post you say its 32-35 minutes. In either case, is the temperature going to stay at 350 degrees?
Hi Bonnie,
I think the 25-30 minutes you’re referring to was about baking a half batch of my original vanilla cake batter, which makes thinner cake layers than this small batch recipe. This small batch cake recipe is 2/3 of a batch of my vanilla recipe, so it makes thicker cake layers that need to be baked a bit longer. Both of those are with a temp of 350 degrees F. I hope that helps, happy baking!
I made this for my friend’s birthday and it turned out beautifully. I even added 1/2 tsp. of cardamom to the cake batter and they loved it ! Thanks for the recipe !
I am so happy to hear that Meg!! That sounds delicious 🙂 Thank you for sharing!!
Hi Chelsy I love all your recipes. I want to make this cake but replace the vanilla with almond extract. Do you think it should work?
Hi Vivian,
I think that would work great! I usually like to add 1-2 tsp of almond extract to a cake this size, so that I can really taste it. Hope that helps, happy baking!
I love this recipe! Turned out very well, both cakes and icing. Icing is a bit hard on a hand-held mixer, but still got the job done well. I used gel color, 10 drops per 1/3 batch. How do you store them? The cakes get tall and I don’t want them getting the “fridge air” taste. Any recommendations? Thanks!
So happy to hear that Jessica! It’s def a bit harder with a hand mixer, but I’m proud of you for persevering through!
I usually just leave my frosted cakes uncovered in the fridge..but my fridge doesn’t have much in it other than cakes, frosting, and yogurt. I’d say just pop a box of baking soda in your fridge to help make your fridge air more neutral <3 You can try to cover it with plastic wrap once the cake is chilled and the frosting has firmed up, but I’ve found it doesn’t make much of a difference.
Hope that helps, happy baking!
Hi! Would I be able to sub cake flour in for regular flour for this cake?
Hi Melina,
You can totally sub in cake flour for the regular AP flour the recipe calls for. I find that the texture is best when I also swap the buttermilk with sour cream. The buttermilk is a bit much for the cake flour to handle, but this recipe taste amazing with cake flour and sour cream. Hope that helps, happy baking!! <3
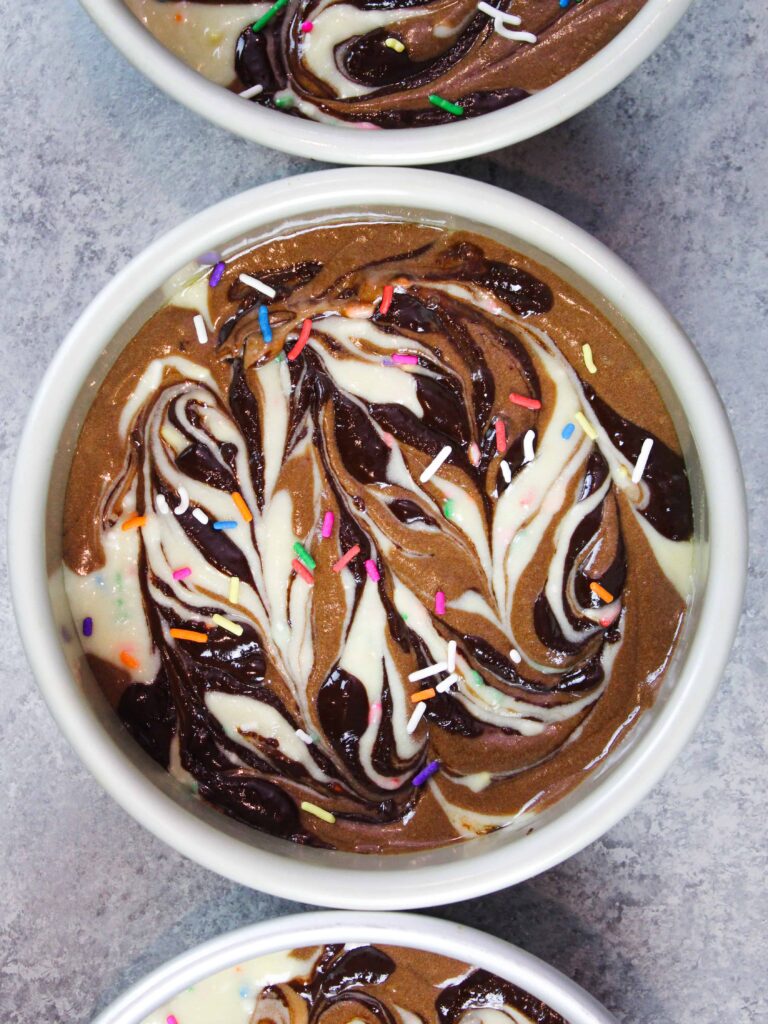
Hi love. I would like to make your marble cake using thus small batch. How can i change the measurements to het good results. Thanks in advance. That marble cake looks so decadent….that fudge swirl…omg.
Hi Keisha,
I would make a batch of batter using this small batch version, then use 2/3 of the additional ingredients my marble cake recipe calls for to make the chocolate batter of the cake. You can also use 2/3 of the ingredients for the chocolate swirl Added on top of each cake layer. Hope that helps, happy baking!!
My cakes are falling in the middle when I take them out of the oven. Maybe I’m not baking long enough? I baked them for over 30 minutes. They are still really good though!
Hi Angela,
If they’re falling in the center you probably do need to bake them a bit longer. Also be sure your oven is properly preheated before putting them in, that can sometimes throw off the baking time too. Hope that helps, happy baking!
Hi chels! I’m loving your recipes. I’m looking to make a 4 layer 6 inch vanilla cake and was wondering how I would do so? I still want the layers to be roughly an inch tall. Tyia xx
Hi Tyia,
I’d actually just my full batch / regular version of this recipe, and bake 4 layers that are 6 inches. They might take a couple minutes longer to bake because there will be more batter in each pan, but they should turn out great!
You can level them to make them the exact height you’re after, but that way they’ll definitely be tall enough. Hope that helps, happy baking
Hi there ! How many would this 6in 3 layer cake feed ?
Hi Mariah,
This size of cake feeds about 16 people. Hope that helps, happy baking!!
Hello Chels, can I use whole eggs instead of egg whites.
You can! I’d recommend using about 3 whole eggs in place of the egg whites (or two whole eggs and an egg white). Hope that helps, happy baking!
Hi, I really am amazed with all of your baking talents. Your videos make me very confident about making my own wedding cake. I just wanted to know how the math should be done if I wanted to make a 3 tier: 6 inch, 8 inch,10 inch cake. Also, for wedding cakes what is a better option? Dense cakes or sponge cakes?
Thank you so much Kawthar! I have a great post sharing exactly how to calculate that, here’s the link: https://chelsweets.com/2019/04/22/how-much-cake-batter-per-pan/
The type of cake you use totally comes down to your preference. Both will work just fine for a wedding cake, as long as it’s properly supported. Hope that helps, happy baking!
Hi!
Thanks for sharing the small batch version of this amazing recipe.
I love,love,love (and so does my family) your vanilla cake recipe.
It’s my go to vanilla recipe.
Can’t wait to try the small cake version.
Grisel
Aw thank you! So happy to hear you’re putting it to good use 🙂 Happy baking Grisel!!
Could I use two 6×3 round pans instead of 3 6×2 pans? If so, should I adjust time and temperature? Thank you!
Hi Mia,
This cake recipe caramelizes a lot, so if you make taller / thicker cake layers I worry they’d caramelize a TON because of the longer bake time! I’d recommend using a flower nail, to help the cake layers bake more evenly and quickly. I’d suggest baking them at 325 degrees F, and bake them for 40-45 minutes. Hope that helps, happy baking!
Hi,
Can i use the pasteurized egg white cartoon box?!
Thank you!
Hi Fatimah,
You totally can! That’s what I use 🙂 happy baking!
Hi!
I made this recipe yesterday and it came out great! I have a decorating question. When I was frosting the cake for the second layer (after the crumb coat and chill) I kept getting the same issue where you could see the cake through the buttercream. I added more to make it thicker but it kept going back to the original form when I smoothed it with my bench scraper. Do you have any tips for this issue or getting smooth frosting?
-Jillian
Hi Jillian,
You can either trim the sides of your cakes so that the caramelization isn’t as dark / easily seen through the frosting, or you can add on a thicker layer of frosting! It might seem like a lot, but a lot of times when people smooth they remove a lot of the frosting they add. So always err on the side of adding to much frosting around your cake, knowing that <3 hope that helps, happy baking!
Hello there! I love love love your work! I was wondering if I could use whole milk instead of the buttermilk for this recipe? Don’t want to go out to the store during these crazy times!
Thanks Lori, you’re too sweet! You can use whole milk in place of the buttermilk, but it will slightly change the taste and texture of the cake. You can add in a Tbsp of vinegar or lemon juice to make your own mock buttermilk if you have either of those on hand. Otherwise regular whole milk will work. Hope that helps, happy baking!
Hi, I was wondering if I wanted to make 12 inch cake how would I modify the recipie?
Hi Brianna,
I have a great post that helps you calculate how much batter you need for different sized pans here: https://chelsweets.com/2019/04/22/how-much-cake-batter-per-pan/
Hope that helps, happy baking!
Hi, I recently came across the site and am so excited to try this (and other) recipes!! My ultimate goal is a three layered 6in cake. However, I only have two 6in pans and unfortunately won’t be able to acquire any more before my daughter’s 3rd birthday in 4 days (dad baker here).
Would you suggest either A) making the small batch recipe, baking 2 pans while the batter sits to then bake a 3rd layer…or B) reducing the batter (perhaps 1/2) of the original recipe to bake 2 layers at a time. I know B is more time consuming, but I was leaning that way to have a better shot at uniform layers?
Is it advisable to store batter while other layers bake, then cool?
Thanks for any input and/or advice!
Hi Sam,
So sorry for the delayed response! I’d suggest option A! The batter can sit for a bit at room temperature as the first two layers bake, then just be sure to bake the last layer as soon as possible once the first batch of layers is baked and had a few minutes too cool. Hope that helps for the future, happy baking (and happy belated bday to your daughter!!)!
Hey! I am planning on making a key lime cake with this recipe! How would you recommend adding in the lime juice? Should I take out some of the buttermilk and replace it with the juice?
Thanks!
Elizabeth
That sounds delicious Elizabeth! I would do exactly that, replace some of the buttermilk with lime juice! Maybe use 1/4 or a 1/3 of a cup? You can also make a key lime simple syrup to add even more lime flavor to the cake, or add some fresh lime zest into the frosting! Hope that helps, happy baking!
Hey! I was wondering if this cake is dense or fluffy? If its very dense I was wondering if you have a fluffier cake recipes ( any flavour!) Thanks!
Hi Esther,
This is a butter cake recipe, so it’s definitely denser! Some of my fluffier cake recipes include by chocolate blackout cake and my berry chantilly cake (sharing the recipe this Friday)! Here’s the link to my fluffy chocolate cake: https://chelsweets.com/2020/01/24/chocolate-blackout-cake-2/
Hope that helps, happy baking!
Hi, I have 2 8-inch (8x2in) pans. Would this recipe work for those?
I also have 2 9x 2.5 inches pans – I quite like tall layers so how many batches of this would I need to make 2 layers of the 9 inch pans? Thank you so much!!
Hi Esther,
This recipe would work great to make 2 8-inch cake layers! I’d recommend using my regular sized vanilla cake recipe to make 2 9 inch cake layers. Here’s the link: https://chelsweets.com/2016/09/05/best-vanilla-layer-cake-recipe/
Hi can you use normal milk instead of buttermilk for this recipe?
Hi Esther,
You can use whole milk in place of the buttermilk in this recipe. happy baking!
Hi! I’m trying to save ingredients and I want to make this cake but in 4in pans. Do you know how to convert the measurements to fit 3 4in pans? Thanks!
– Jillian
Omg I’m actually sharing a recipe that does exactly that this coming Thursday!! I basically made 1/3 of my original vanilla cake recipe, but I share all the details in that blog post! Hope you can wait until then <3
Hi Chelsea!!
I’m going to make this recipe for my baby’s smash cake. What would you recommend I put the oven at and for how long for 4′ pan? Hope you respond! 🙂
sorry i meant 4″. its a fat daddio’s 4×2 pan
Hi Iveth,
You can half this recipe to make 3, 4″ cake layers! They bake for about 30-35 minutes. I’m actually sharing this exact variation of this recipe this coming thursday 🙂 Stay tuned!
HI, I’m just wondering – how tall and how wide is the cake? I’m confused whether it is 18 inches or 6 inches?
Hi Ella,
Each cake layer is 6 inches across, and a little over 1 inch tall. So the three cake layers plus the frosting between them makes the cake about 5 inches tall.
also is it ok to use full cream milk instead of buttermilk?
Hi Ella,
If that’s what you have on hand, you can use it in place of the buttermilk <3
Can I add full batter In one 6 inch cake mould?
Hi Poornima,
Sadly I wouldn’t recommend doing that! This is a butter cake recipe not a sponge cake, so it’s not really designed to be baked and torted like that. It also caramelizes quite a bit already, and you’d get a ton since you’d have to bake it for a long time :/
Hi if I were to add crushed Oreos to this to make it cookies and cream, would about 1/2 cup be ok? And could I reduce the sugar slightly to make it as sweet? Thanks, stay safe and luv your site.
Hi Maria,
For sure! Adding in crushed oreos would taste great. 1/2 cup is what i’d recommend, and what i normally add to this size of a cake. You can reduce the amount of sugar, but it will make the cake less tender / a bit more dense. Hope that helps, happy baking!
Do you have any recepie for sponge cake
Sadly I don’t have one up yet! I’m working on one this month though, and am hoping to share it soon <3
Hi, luv your site. If I was to add crushed Oreos to this would 1/4 cup be ok? And could I reduce the sugar slightly to make it not so sweet or not? Thanks
Thanks Chelsey for all your work on these great recipes!
I just made rainbow cake with this recipe (two batches to make 6 layers). I had to divide the batter before coloring it, so I mixed the color in by hand, which took a while and quite a bit of mixing to get right. The cooked sponge was quite gummy.
I guess I overworked the batter. Should I have omitted the 30second beating on medium speed (step 6)? The cake still looked amazing, so thank you!
Hi Grace,
You’re too sweet! That can be the hard part about making rainbow cakes, especially rainbow layer cakes. It takes forever and does require a lot of mixing!! Did you use gel food coloring? Sometimes when I add a lot of gel food coloring to cake batter, it can change the consistency a bit too! That could have been a part of problem too :/ You can try skipping step 6 next time, and hopefully the layers will turn out with a better consistency <3
Omg!! I made this cake TODAY and it turned out amazing! It was super moist and delicious! All of my family absolutely loved it! Thank you for sharing this recipe.
So happy to hear that Aimee!! 🙂
Hey Chelsea! I too am making an almond layered cake this weekend. Would you use the 2 tsp almond extract in addition to the vanilla?
Hi Brittany,
Yes, I’d add in addition to the vanila but I’d probably add 1 1/2 tsp!! If you like a strong almond flavor though, add 2 tsp! I just usually add almond extract to my frosting too, so I try to not have too intense of an almond flavor in my cake. Happy baking!
Thanks Chelsey for all your work on these great recipes!
I just made rainbow cake with this recipe (6 layers, made in two batches). I had to divide the batter before coloring it, so I mixed the color in by hand, which took a while and quite a bit of mixing to get right. The cooked sponge was a bit gummy.
Is it possible to overwork the batter in this cake? Should I have omitted the 30second beating on medium speed (step 6)? The cake still looked amazing, so thank you!
Thanks so much! Yes it was Sugarflair gel food coloring. I did notice the batter went a bit grainy after the color was added.
Np! I’ve never heard of that brand before, but if it’s gel food coloring it should work fine. Hopefully it turns out with a fluffier texture next time 🙂
Hey Chelsea! I was looking at your “moist vanilla cupcakes” recipe but wanted to make it in 6in cake instead. I noticed the “moist vanilla cupcakes” only calls for oil and no butter, where this recipe has both. What difference does it make? Does butter make it less moist?
Hi Kelsey,
The butter adds flavor! And the buttermilk in this cake recipe ensure the cake is still super moist <3
Ok first of all all your recipes are amazing. However, I made this recipe and the cakes came out a bit gummy and super dense. I followed all the instructions and I have absolutely no idea what I did wrong. Do you have any ideas? Thank you! <3
Hi sophia,
Did you make any ingredient swaps? Did you bake the batter in 3, 6-inch cake pans? Was your oven fully preheated? Those are my first guesses about what might have cause that.
If your cake layers bake up dense, you might be using too much flour (sometimes when you scoop out of a bag you end up packing a lot more flour into the cup than the recipe calls for (by weight), or you may be over-mixing! Those are usually the two main culprits for dense cake layers <3
If the cake layers were also gummy they might night have been fully baked! I’d recommend baking them a bit longer next time. Hope that helps, happy baking!
This has become my go to recipe! I love it. I always made your standard vanilla cake recipe but as get togetherS have changed and gotten smaller lately, this small batch is perfect! I have a request for a strawberry cake in this size. Wondering how (if) I can convert this to strawberry?? Or if you have a strawberry recipe I can try? Thank you!
So happy to hear that Jessica 🙂 I’m working on a fresh strawberry cake next week, but the only other cake recipe i have with strawberries is my dark chocolate strawberry cake.
You could swap in some freeze dried strawberry powder for some of the sugar in the cake and frosting, or you could add a strawberry reduction between the cake layers and to the frosting. Hope that helps, happy baking!
YES! I have finally found my go to and stay with vanilla recipe! I made this small batch version to make a cake for my nieces 10th birthday cake. I love the flavor and the tight crumb, but yet it was so moist. I do bake and freeze my layers to help with that. I also love (and kinda hate) that they bake so level! I “hate” because there isn’t as much scraps to eat!!!! HAHA Super delicious and I am so excited to try more of your recipes. I made a 3 later vanilla cake with cherry preserve filling. I should have added a touch of almond flavor to the cake. Do you think that would have paired well with the cherry filling?
So happy to hear that Kristi! I think almond and cherry would be a delicious pairing 🙂 Happy baking!
I had to do this and it came out just fine. I just used a bowl so that as I was dividing up the batter I had a place to put the 3rd pans batter. They all baked nice and even and saw no difference in the 3rd pan layer once it was baked.
Hi! Your entire page and business is amazing. Thank you so much for being amazing. If I wanted to make this into a strawberry cake by adding a strawberry Reduction ( I did strawberries and sugar ) would I need to reduce the liquids in this recipe ? Also would I need to reduce the sugar ?
Thank you for your time !
I would recommend doing exactly that! Maybe try adding 1/2 cup of reduction, and reducing the sugar but 1/4 cup and the buttermilk but 1/4 cup!? Hope that helps, let me know how it turns out 🙂 I’d love to know!
Hi Dinika,
I want to add a strawberry reduction to this cake recipe too. How did it work out for you?
Hi Chelsey! I only have 9in pans, do you think I could do this recipe in those and get 2 layers?
Hi Valeria,
This recipe def doesn’t make enough batter for that size of cake pan! But my full batch version of it will!! Here’s the link: https://chelsweets.com/2016/09/05/best-vanilla-layer-cake-recipe/
Do you think this small batch recipe will be ok with 8 inch rounds. I only need 1 8 inch round, but wanted a backup in case of decorating nightmares!
Hi Christina,
It would make a really thick 8 inch cake layer, but you could do it as long as you have a tall cake pan! I’d suggest using a cake pan that’s at least 3″ tall to be safe.
Or if you cut this recipe in half, it’d make an 8 inch cake layer that’s the thickness of my regular cake layers. Hope that helps!
Hey! I’ve been watching your videos and I got hooked. You had me thinking I could do this. You make it look so easy ?. I bought stuff to make the small batch vanilla cake today. I followed the recipe, preheated my oven, even had to add a few minutes to the baking time because a tooth pick didn’t come out clean when I first checked it. Fast forward to cutting and tasting the cake. When I cut into the cake I could tell at the bottom the cake wasn’t finished cooking and the cake was very dense. My husband said it was hard to swallow. If I adjust the cooking time again do you think it will help with the dense ness or is this a dense cake in general? I’m sorry, this is my first attempt at making any cake that isn’t from a box. All comments are much appreciated ?
Hi Allison,
So sorry to hear your cake didn’t turn out Allison! If your cake was dense it means you might be using too much flour (sometimes when you scoop out of a bag you end up packing a lot more flour into the cup than the recipe calls for (by weight), or you may be over-mixing! Those are usually the two main culprits for dense cake layers <3
In terms of cook time, was your oven fully preheated before adding the pans? What type of pans are you using? Light colored metal pans work best (like these: https://amzn.to/384LS0q), and dark metal or glass pans can impact the bake time. Hope that helps for next time <3
I weighed out all my ingredients bc I wanted to be like you ? I thought I was real fancy with my kitchen scale weighing everything out. I turned the over on way before I baked my cake. I used light colored pans also. I must have over mixed the cake ????? I’m going to try again and see. You also recommend using a paddle attachment with the scrapper, I will be ordering one and hopefully it helps. I love watching your videos!!
Sounds like you did things the right way Allison!! Measuring with a scale is def the way to go 🙂 Hopefully it was just a bit of overmixing and the next batch will turn out great. Let me know how it goes!! <3
hi, whenever i make cakes i always use this recipe, but i always decorate them in really elaborate ways. this usually takes me at least like 2 hours cause i am really slow. however as time goes my frosting gets like harder and its not as easy to work with or as soft it was while it was fresh. do have any tips for that?
Hi Faith,
I totally get what you mean! Cake decorating takes time, especially when you’re making an elaborate design.
I recommend covering your frosting directly with plastic wrap to prevent it from crusting, like literally pressing plastic wrap directly on top of it. That usually helps mine stay soft. I also stir it every 30 minutes or so to keep it super smooth and prevent it from developing air bubbles. Hope that helps 🙂
Hi Chelsea,
I made your small batch vanilla cake recipe for my nephews elmo cake. I also used your recipe for the Vanilla American Buttercream as well. The whole cake came out perfect. Took me a few times to figure out the frosting color. I only use the Americolor Gels. The only pink I had was the soft pink and that didn’t work with the super red. So, I switched it up and used the soft pink with the tulip rose and that worked much better.
Thank you for your delicious recipes.
So happy to hear that Laurie! Coloring frosting can be a bit of a pain, but that’s awesome that you were able to get the colors just right 🙂 You have one lucky Nephew!
Have you ever made this cake as a sheet cake? I know you have a yellow cake sheet cake but wasn’t sure if this could be made into a sheet cake.
Hi Lacey,
I have and it works great! I suggest adding a couple heating cores to the center (these are the ones I use: https://amzn.to/2NQ0lVZ), to help the sheet cake bake more evenly and quickly! The bake time can vary based on the type of pan you use, but I find it usually takes mine about 45 minutes. Hope that helps, happy baking!
Love this cake! I’m making it now for my birthday cake due to sheltering in place. ?. This, paired with the buttercream means I’ll finally get the exact cake I want!
Hi Christine,
That’s awesome!! Such a positive what to look at things 🙂 Hope your bday cake turns wonderfully!!
Hi Chelsey. I make your small batch vanilla cake recipe all the time. I love the texture, taste..everything. My question: can I add some of the strawberry powder (I bought the one that you use) to the sm batch vanilla cake to make it into a strawberry cake? Maybe I would add a drop or 2 of pink, or maybe the powder will give me some color along with flavor? I really don’t want to use strawberry jello, and I have made strawberry cake before, but I don’t really like the color. What are your thoughts on turning your sm batch vanilla into strawberry? Thank you.
Hi Paula,
You totally can! I’d swap out some of the sugar and use strawberry powder in its place. I’d suggest trying 1/4 or 1/3 cup! A couple drops of gel food coloring can def be added if the color of the batter isn’t pink enough with that amount. Hope that helps, and that your strawberry cake turns out wonderfully 🙂
Thanks very much! When I try it, I’ll let you know how it turned out!
Np, and yes please do 🙂
I seem to be really struggling to get my cakes to fully cook and I don’t know whether my oven is playing up, or whether oil based cakes just are slightly denser and I should expect it to be like that, and maybe it isn’t wrong at all.
So… I gave it a bit longer than the recipe said, it was golden on top and coming away from the sides a little, and a skewer came out clean. BUT when I turned it out onto the cooling rack, the bottom centre looked still quite moist. So I panicked and put it back in the oven upside down for 5 minutes and I think that did the trick.
This might sound daft, but when you preheat your oven, so you heat it up to higher than you need? Because I find my thermometer will say the oven is 175 but I put the cake in, walk away, and when I come back ten minutes later, it’s down at like 150C. So that won’t be helping matters that the oven wasn’t hot enough!
Hi. Love love love this recipe. Do you think it would bake well a a cupcake? If so, how long should I leave it in the oven for?
Could I use whole eggs instead of egg whites? Im looking to make a more yellow cake. How many whole eggs would I use in place of the egg whites? Im assuming 3 due to the fact that 1 egg is usually around 50g.
Hi Chelsea! So I made this cake today and I think it turned out okay, but whenever I use cakestrips it takes forever for the cake to bake, around 45 min, and they come out really white. The top is a light brown, the rest always turns out white. I know they’re done because they are spongy when I press on it and when I stick a toothpick in the middle nothing is on it. Is that normal? Thanks!!
Hello! I am a regular baker but I’ve avoided attempting making layer cakes as I’ve always failed at frosting, but I’ve decided to work on it. I wanted to make a rainbow cake but I only have 5, 6in pans. I was wondering if should double this recipe to make 6 layers or should I do two separate batches of this recipe? Also, instead of regular American buttercream, can I make your Russian buttercream instead for this recipe? Also, are food coloring gels better to use than the liquids?
Thank you so much for sharing your recipes. I’ve been following your blog and now Tiktok for a while now and I’m excited to try out your recipe!
Hi Chelsey. I made the small batch vanilla cake today and used 1/3 cup strawberry powder and decreased the sugar. It was very dense, pretty good color, and super slight strawberry flavor. I used your strawberry buttercream with it, which is really good. My husband said that if the cake had too much flavor it could be overwhelming, so he was ok with it. I think I would like the strawberry buttercream butter on your vanilla cake or chocolate cake. No harm in trying!!
Have you ever tried substituting the sugar in the recipe with maple syrup or another refined sugar alternative?
Hi, I want to try your small batch vanilla layer cake (for 6 inch pans) the recipe says granulated sugar, is that granulated sugar as we know it in the UK or should I use castor sugar?
Many tanks Julie
Hi! All of your recipes I have tried became my go to! They’re all delicious.
I have a question about the serving size. This makes 3 layers of 2” cakes so with buttercream, final height with usually comes out to be about 7” for me. Your serving chart says tall cake serving size is 24 but this is 16. So is this cake somewhere in between? I think I’ll follow serving size from the recipe cuz that’s the easiest way for me but I was curious. ?
Hi I have a question about the egg whites I am vegetarian so is there anything that could be subusited for that???
Hi!! I love all your recipes!!! None of failed me and everyone raves about how yummy my cakes are !! Thank you!! One question, I had everything but the butter and got me wondering if I could replace the butter with oil? I’ve gone to the store now cuz I didn’t want to mess with the recipe and needed the cake ASAP but was thinning in future if that were to happen in a pinch. Let me know your thoughts . Thanks !!
hey i am making a neapolitan cake , one 6 in layer is vanilla, another is chocolate, and the last one is strawberry. If i wanted to make just enough chocolate cake batter for one pan but i want to use some of the vanilla cake batter how would i do that bc i know u have a marble cake recipe but i only want one cake layer chocolate. And what would I do to make just one layer of strawberry cake, I was thinking of just adding some freeze dried strawberry powder bc i don’t want to have to make a strawberry reduction. and i don’t have an artificial extract. i’m making this cake layer today so i hope u can help!
Hi!
I love all ur recipes.. can I use whole egg instead if only white?
Thanq
Hi! I’m very excited to try this cake recipe for my nephew’s 6th birthday cake. I may have missed a response to this in the messages above but does this quantity leave enough to pipe a border around the top of the cake? Thank you!
hi Chelsea! can i use this recipe with only one pan and cut my layers? i have only one pan 🙁
I was going to ask if you can reduce the sugar without affecting the texture etc of the cake please, as I found it quite sweet? Although I’m also in the UK so used the metric measurements, so don’t know if that makes a difference?
Hello!can the cakes be baked one after the other?
Hey I really would love to try this cake but
the only cake pan I have is a 9 in. Is there a way to convert the recipe?
Hey Chelsea! I made a vanilla cake using this recipe but my cake turned out dense. What did i do wrong?
Can I use Cake Flour instead of AP Flour??
Hii Chelsea! I want to make this cake but my question is how tall is this cake in cm? Much love from the Netherlands (also I follow you on tiktok)??
Is it up yet? I can’t seem to find it
Is the chocolate one up yet? I can’t seem to find it.
hey Mia! I’m wanting to do exactly this. What was the end result for you?
Hi Mia! I’m wanting to do exactly this. What was the end result for you?
This is hands down the best vanilla cake I have ever made or tasted!! Definitely going in the recipe book! I used it with Chelsea’s stabilized whipped cream frosting and filled the layers with fresh cut strawberries and it was amazing.
This is a simple easy tasteful vanilla cake! I only upped my vanilla extract to 1Tablespoon to enhance the vanilla flavor. Super moist and delicious!
Thank you for sharing
Hi, I’m wanting to make your vanilla cake in my 6inch x 3inch deep cake tins, could you tell me the amount of ingredients i would need please? I’m making this in the next few days. Thank you
Hi Chelsea! Can I use salted butter instead and leave out the salt?
So sorry Chelsey for misspelling your name.
Is this a good cake recipe for making a strawberry shortcake?
I am just trying the recipe. The only problem that i have with it are eggs . What to do with rest of that eggs. I dont like when i have something left.
Hi , love the video can I use this recipe for 3 6inch cake pans ? Cause I have a problem with my cakes coming out thick because the cone out thin most of the time ?
Hi Chelsea. Thanks for all the amazing recipes. I only have 5inch pans. Do you think I can make that recipe and cook 4 layers so that they re the same height as for 6 inch pans ? Thanks a lot!
Hi Chelsea!! When I tried to make this cake the first time, it completely sunk in the middle in the oven for all three pans. Any idea why that would happen???
Love your recipes and tutorials am going to try your vanilla recipe on the weekend will post the results
I have made this recipe 3 times in 6” pans and it seems to take forever to bake in the middle. I have a oven thermometer and i rotate my cakes and i used strips, should i try a heating core on such small cake sizes ?
Hi just confused with the butter, sonits 150 gr right? I was so confused rea 2/3 cup and 1 1/3 stick. Thankyou
Hi Chelsea
I’ve just completed your 6” vanilla cake. I just wanted to tell you it turned out AM-AZ-ING. I’ve tried white cakes before and they turned out sooo wet. I baked it for my mum-in-law for Mother’s Day. The cake was so moist. I decorated it with a mix of fondant and buttercream flowers on top and white chocolate brushstrokes on the sides.
I also wanted to thank you for converting to grams for us British folk. The American version of cups and sticks can sure be confusing at times.
Anyway, thanks once again
Suzanne
I have tried so many vanilla cake recipes over the years and have not found a good one….. until today. Why? Why didn’t I just try yours? It would’ve saved so many disasters. I’ve followed you for a long time but haven’t tried this recipe. I’ve only tasted the parts I trimmed off to even out my layers but man it was soooo good, moist and delicious vanilla flavor! Thank you so much for always inspiring me!
This recipe has been my go to, ever since I found it. I’ve always been a chocolate only girl until I found your recipe. This is absolutely delicious!
That being said, I’m planning on making a two tier cake. 10” and 8”. I’ll use your regular vanilla cake recipe for 8” but do you think doubling this 16 serving recipe will work for 10” tier?
can I make the cake in one pan instead of three??
Hi .. your post is extremely helpful for me.. but I was wondering if Yu have a vanilla cake recipe without eggs ? Thanks a tonne in advance 🙂
Hi, How many cups of frosting do I need to frost a cake of this size?
Thanks!
Hi! I wonder if you have this recipe for 1 8 inch cake?
Does the frosting waste lots for three 6 inch cakes?
Hi there,
I am looking to have thick cake layer in order to use less when stacking. How many inches in height would 8 inch pans give me. Would it be anywhere between 3-5 inches high each layer in an 8 I pan. I would like them to be the thickness of you caramel cale layers
Please let me know
Hello! I am a beginner in baking and i am learning a lot from you. Thanks a lot for your amazingly explained recipes. I do have a doubt though. I have been experimenting a lot of cake recipes and majority of them has baking soda in it. So for this recipe, how come the cake is so perfect without adding baking soda?
Love your recipes!!
Just wondering how I’d go about it if I wanted to flavour the cake? When I make lychee cupcakes, I use 1/4 cup lychee juice in your vanilla cupcake recipe, however can’t figure out how I would tweak it here.
Thank you!
i only have 2 cake pans and i don’t have the math skills to do 2/3 the recipe so would you recommend me to bake the extra batter into cupcakes or to wait until after the first 2 have finished baking and then baking the last cake. (also how long should i bake the cupcakes if that’s the better option)
Hi! I was wondering if you’ve ever used this to bake the whole cake at once and then cut the layers later? I don’t have enough pans to do all the layers separate for this cake. Would the outside get overbaked at all?
Hi Chelsweets, I’m making this cake today and wanted to knownif the liquid egg whites have to be at room temperature or not. 🙂
I love 6” cake pans and have three as they are my go to size. Thanks for this recipe. Could I add rainbow sprinkles to this batter to make these “Funfetti” layers?
Hi – I made your vanilla cake (3 – 8” pans) & the small batch ( 2 x 6” pans) I had leftover batter, but only 2 pans. I wanted to make a 2 tier cake. It baked up beautifully & the caramelization is perfect! I plan on using your buttercream & doing a semi – naked cake.
With only 2 small cakes on the top, do I still need to use the dowel supports?
Thank you!
Can I make this with two 9 inch rounds? Figure yes since 6*3 is 18 and 9*2 is but want to confirm!
Do you have this recipe for a chocolate cake?
Made this cake for my daughter’s birthday and it was a hit. We’re sad that it is all gone. Maybe need to make it again 🙂
I used the 6 inch and 8 inch recipe and made my wedding cake. It was the best vanilla cake we have ever had, and was so easy! Thank you!
Hi Chelsey! Just wondering, should I use simple syrup in my layers or is it not necessary in this recipe?
How can i make this into a coffee cake?
I made you vanilla cake and used 7 inch pans but the layers look way smaller …a little less than an inch thick. I am practising to make my daughter’s wedding cake but it seems like I would need so many layers! Am I doing something wrong? I followed your instructions to a T.
Have you ever tried making this with gluten free flour? If so what brand did you use? Thanks for this amazing recipe, I have been looking for a good cake recipe that isn’t so spongey!
Hi
How deep are your pans? And how much should we fill the pans up to?
Hi, if I want it less sugary can I add only 5 cups of suger? If so, is it will be good for fondant cake.
Thanks?
Hi! How can I turn the frosting into chocolate frosting? How would I do that? Thanks!!!
Hi Kacie,
I share my favorite chocolate buttercream recipe here: https://chelsweets.com/chocolate-buttercream-frosting/
One batch should be perfect to frost this cake and add some big swirls to the top. Happy baking!
I made this cake for my son’s birthday and it came out great. I needed a smaller size cake and this fit the bill perfectly, thanks so much for creating! The tips and recipe were easy to follow and the cake tastes great!
Hi Danielle,
That is so wonderful to hear!! Thank you for sharing 🙂
Hello ? how can I double the recipe please? I have no idea.
Hi Maggie,
Do you want to make six, 6-inch cake layers? If so, I’d recommend doubling the ingredients to make a double batch and then divide the batter evenly between 6 pans. This can either be done in a very large bowl or in a 5 qt or larger stand mixer. Hope that helps, happy baking!
Hi, is there a reason that this smaller recipe has the same amount of buttercream as the 8 inch one? I’m trying to triple and quadruple this 6 in. recipe to make 10 and 12 in. cakes, but in my calculations it seems like a lot of buttercream!
Hi Sierra,
I left the amount of buttercream the same because I think it’s easier to make it that way (1 box of butter, 1 bag of powdered sugar) and if you want to add big swirls or any other decorations it’s good to have a little extra.
I have an amazing buttercream calculator that helps you figure out how much frosting you need for different sized cakes, here’s the link: https://chelsweets.com/how-much-buttercream-do-i-need/
Hope that helps, happy baking!
If I have two 9 inch round cake pans should I make this recipe or the regular one?
Hi Lauren,
I would recommend using my regular / not small batch vanilla cake recipe to make 2, 9-inch cake layers. Hope that helps, happy baking!
Regular vanilla cake recipe: https://chelsweets.com/best-vanilla-layer-cake-recipe/
I love this recipe, I always struggled with a vanilla cake until I found this one, I’ve used it several times with success ? do you think it would still work ok if I swapped unsalted butter for brown butter. I love the flavor that brown butter adds but I don’t want to mess with the recipe too much. Thanks!
So happy to hear that Victoria!! I think using brown butter in this recipe would be amazing! I’d recommend browning it, letting it come to room temperature, then making the recipe like usual. You also might want to add in an extra TBSP of butter when you brown it, because some of the moisture evaporates as it cooks and you end up with slightly less butter once it’s browned. Hope that helps, happy baking!
Thank you so much for this recipe, it BRILLIANT.
I was wondering what recipe you would use if you did a 6 inch 4 layer cake rather than 3? Thank youuu!
Hi Chinaenye,
Great question! I would use the regular / full batch version of my vanilla cake recipe to make 4, 6-inch cake layers. The cake will end up being pretty tall, but if you use the small batch version the layers will be quite thin. Hope that helps, happy baking!
Hi, I am going to make this cake in the next few days as it looks gorgeous. Could you please tell me what sort of frosting is dripping down the side of the cake as I would like to add that too.
Many thanks
Margaret
Hi Margaret,
Apologies for the delayed response! The drips down the sides are made with my white chocolate ganache, here’s the link to the recipe: https://chelsweets.com/colored-drips-recipe-white-chocolate-ganache/
Hope that helps for the future <3
Why did the tops of my cakes come out with a crusty layer.
Hi Brenda,
Most cake layers bake up with caramelization on the top / edges! I usually level my cake layers with a serrated knife to remove the top to make the layers easier to stack and frost. Hope that helps, happy baking!
Can i make this using no butter, only oil? I prefer to use oil in my cakes. Thanks in advance!
Hi Susan,
Great question! This recipe uses the reverse creaming method which gives it an amazing texture and flavor. Unfortunately, this means that the texture and flavor of the cake will be drastically different if you use oil instead of butter. You could do half butter half oil, but I wouldn’t recommend swapping out all of the butter for oil. Hope that helps, happy baking!
I have made this cake twice now. When I say, I’ve searched for years for a perfect vanilla cake, I mean years. This one is it. Top notch, easy and perfection. Thank you so very much! I cannot tell you how much I appreciate that you have a recipe for 6″ cakes and it is exact, and then cupcakes and bigger cakes.
Aw I am so happy to hear that Ashleigh!! Thank you for sharing 🙂
I made the 6 inch vanilla cake today. I ended up with three layers and 4 semi naked cake. cupcakes. I. Did a semi naked cake. Just now I had a cupcake and shared it with my husband. It was delicious. Delicate crumb…I put vanilla custard as one filling and a raspberry filling in the other… I can’t wait to try a lemon cake , chocolate cake yellow cake… I have a hard time smoothing the icing for the semi naked cake….I will keep practicing. Thank you Linda kraner
I made this six inch round cake the other day. I put a layer of cream filling and one layer raspberry filling. This cake was fit to serve a king and queen. Question, can I put in how much strawberry powder to become a all strawberry cake?thank you I will be make your chocolate gluten free cupcakes tomorrow!!
Can this batch be enough for a single 8 inch layer or a single 10 inch cake layer? Thank u linda kraner
Hi Linda,
This recipe makes enough batter to make 2 8-inch cake layers, or 1, 10-inch cake layer. Hope that helps, happy baking!
Hi! I’m such a big fan of your recipes. I’m using 5 6” cake tins to make a taller cake. Would you suggest using your other recipe for the larger batch and just filling up the tins equally? Or what would you suggest? Kind regards and hope you respond soon!
Ria xx
Hi Ria,
Great question! I would recommend using my full batch vanilla cake recipe and just equally distributing the batter between the pans. Here’s the recipe: https://chelsweets.com/best-vanilla-layer-cake-recipe/
Bake time will probably be a little bit shorter since the pans will have slightly less batter than normal. Hope that helps, happy baking!
Would this work for two 8 inch rounds?
Hi Tanesha,
Great question! Yes, this recipe would work great to make 2, 8-inch cake layers. Happy baking!
can I use this recipe for 2 6” cakes ? to make them a bit taller instead of 3 6” pans ?
Hi Nataly,
This recipe is a butter cake recipe, so that batter is pretty dense! If you make 2, 6-inch cake layers with one batch of batter, they will take quite a bit longer to bake through and you will have increased caramelization/browning around the cake layers. It’s possible, but I think the layers bake up much better when you use one batch to make 3, 6-inch layers. Hope that helps, happy baking!
Hi Chelsea,
I’m searching for a vanilla cake recipe for my son’s 3rd birthday. And he loves Bumble bees. Can I use this vanilla cake recipe to do the Bumble Bee cake you have? How would I scale up this recipe to make 4 x 6-inch layers of cake instead of 3 to make the bumble bee cake?
Thank you,
Hi Dulmini,
Great question, you totally can! I’d actually recommend using my standard vanilla cake recipe, which can be used to make 4, 6″ cake layers (bake time will be a few minutes longer than the recipe calls for). Here’s the link: https://chelsweets.com/best-vanilla-layer-cake-recipe/
Hope that helps, happy baking!
Question, probably something I’m doing but after I baked my layers for about 30 minutes they look nice and tall and golden brown on top. I took them out and let them cool. Then when I removed the layer it looked not quite cooked enough on the bottom. Could it be my pans or that I used cake insulated wraps around my pans? I wrapped them with foil and put them back in for a bit longer. Any suggestions?
Hi Angie,
It’s hard to be able to tell without being able to see the layers, and sadly we aren’t able to upload pictures in the comments section on here :/ It’s rare that the bottom of a cake layer doesn’t get fully baked if the top does unless your oven runs warm or has a lot of hot spots, but it possible. It could be the pans you’re using, are they aluminum / light in color?
This recipe bakes pretty flat so you shouldn’t really need to wrap the pans in foil. I don’t think that would have cause any issues, but maybe try it without the foil and see if that helps too! Hopefully it will, but if it doesn’t let me know and we’ll try to keep trouble shooting together <3
Hi Chelsea, what if I was to use this recipe to make an eggless cake? Any recommendations?
Hi Ree,
Great question! I’d suggest swapping out the egg whites in this recipe for 2/3 cup of unsweetened applesauce plus an extra 1/2 tsp of baking powder. I prefer using applesauce, but you can also use 3 flaxseed eggs or a vegan egg replacer. Hope that helps, happy baking!
Hi, when I made this cake batch earlier in three 21cm springform pans for 35min, it turned out perfect. When I made the same batch in three 15cm different pans for 35min, they look great on the outside, but on the inside, they were not done, or I dont really know, the toothpicks were not sticky at all, but they look “wet” in the middle, and when you “squeeze” them, it is like they are “wet”? I don’t know what I’ve done wrong? should they have been longer in the oven and lower temperature?
Johanna
Sorry, I meant in two 21cm springform pans..
Hi Johanna,
Is it just that the top of layers are kind of sticky? When you cut into the layers, what is the texture like? Also – what type of pans (light vs. dark metal, aluminum, etc.)? Hopefully we’ll be able to figure out what happened!
Hiii can you tell me how many cups of batter does small batch vanilla cake yield? Thanks!
Absolutely! This recipe makes about 6.5 cups of batter 🙂 Hope that helps, happy baking!
I only have two 6″ cake pans that are 2″ tall. If your three cakes only bake 1″ high, then two 2″ pans should work, right?
Hi great recipe! If I’m opting to use whole milk & sour cream in replacement of buttermilk- how much do you recommend I use?
Hi Al,
So happy to hear you love this recipe 🙂 I’d recommend using 1/2 cup whole milk and 1/2 cup sour cream if you want to use both in place of the buttermilk. Hope that helps, happy baking!
Hi! Is it possible to switch the vanilla extract to vanilla bean paste in the cake batter?
Hi!! I love all of your recipes but I always run into an issue with the vanilla cake recipes of yours and I’m not sure why, I use a digital scale but they always come out more gummy, chewy and super crumbly on the sides, and slightly sunken in the middle. I take care not to over mix and also use room temp ingredients! My 6”pans are a darker aluminum pan and I’m at a higher elevation (Albuquerque, New Mexico) I would love any advice you may have! Thank you!!
I def think it’s the cake pans and elevation! You may need adjust the amount of leavening agents you use and the temp. King Arthur has a great guide one that, here’s the link: https://www.kingarthurbaking.com/learn/resources/high-altitude-baking
Hope that helps, happy baking!
How much sour cream should I use for a 6 inch cake if I’m subbing for buttermilk?
Hi Alice,
It’s a 1:1 swap, so you can use the same amount of sour cream as the buttermilk called for in the recipe. Hope that helps, happy baking!
Hi I want to bake this in an 8 inch heart shaped pan, would this be enough for 1 pan? And can this batter be left at room temperature while the other cake bakes ?( I want to make a two layered cake)
Hi Mindy,
Hi! Yes — this recipe should work great for an 8-inch heart-shaped pan as long as it has a similar volume to a 6-inch round (it might bake a touch faster, so just keep an eye on it!). And yes, it’s totally fine to leave the remaining batter at room temp while the first layer bakes. Just cover the bowl with a towel or plastic wrap to keep it from drying out. Can’t wait to hear how your heart-shaped cake turns out!
I need a regular receipe for vanilla cake 10 inch and 8 inch for a wedding cake
Hi Maria,
So exciting that you’re making a wedding cake! For both 10-inch and 8-inch layers, I recommend starting with my go-to vanilla layer cake recipe—it’s super versatile, sturdy enough for stacking, and tastes amazing: https://chelsweets.com/vanilla-layer-cake-recipe/
To figure out exactly how much batter you’ll need for each tier, you can use my Cake Batter Calculator here (one batch makes 10 cups of batter): https://chelsweets.com/how-many-cups-of-batter-per-cake-pan/
It’ll help you scale the recipe based on pan size and number of layers so you get the perfect amount. Let me know how it goes or if you have any questions along the way!
The cake had amazing flavour but I am not sure why it did not cook through in the time suggested. By the time the middle cooked through it was over cooked on the outside 🙁
Hi Annik,
I’m so glad you loved the flavor! It sounds like your oven might be running a bit hot on the outside while not fully baking the center. This can happen with certain pans or oven types. You could try lowering the oven temperature by 25°F and baking a bit longer next time, or using bake-even strips to help the cake cook more evenly. Also, make sure to check your oven temp with an oven thermometer, they can be surprisingly off! Hope that helps for the future, happy baking!!
Hi ??
I know you don’t recommend turning this recipe into cupcakes. However, if I have batter left and would like to it into cupcakes do you have any suggestions on what to do with the remaining batter?
Hi Dorothea,
You can make cupcakes with this recipe (they actually are delicious!!), it’s just sometimes they stick to the liners a bit! If you have leftover batter, I’d say just make cupcakes with it. That’s the easier way to use it up! Hope that helps, happy baking!