
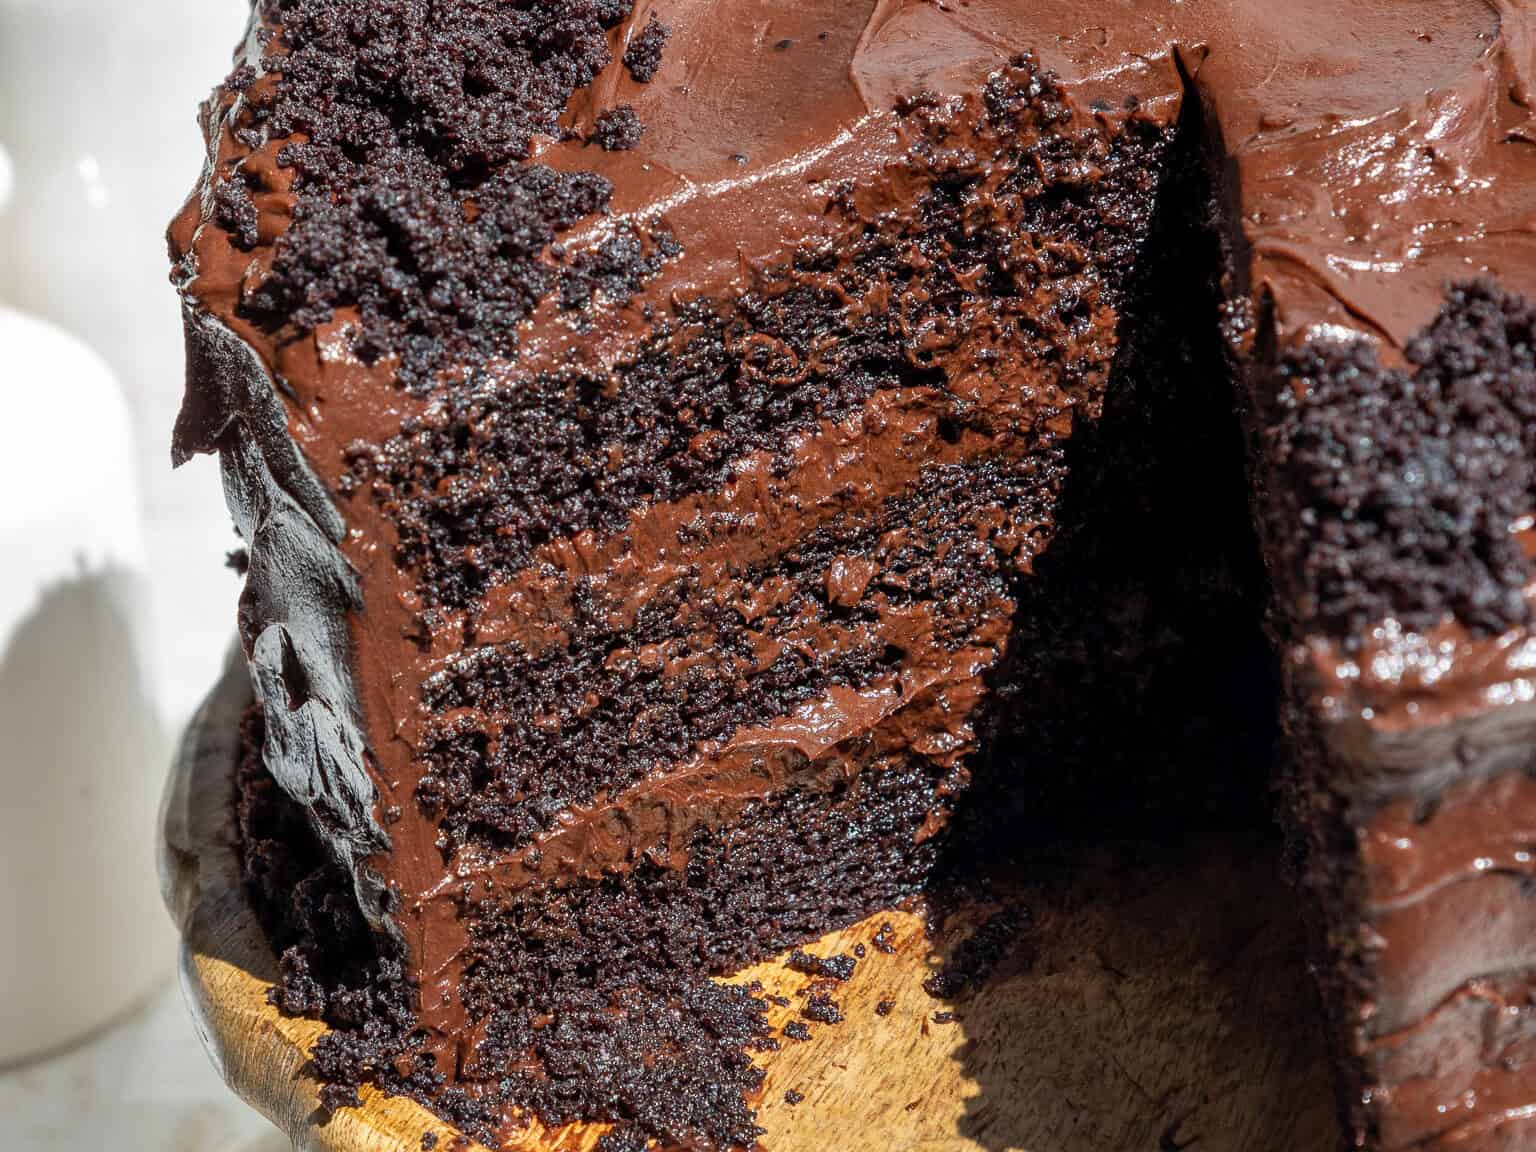
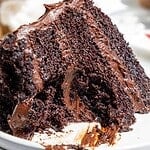
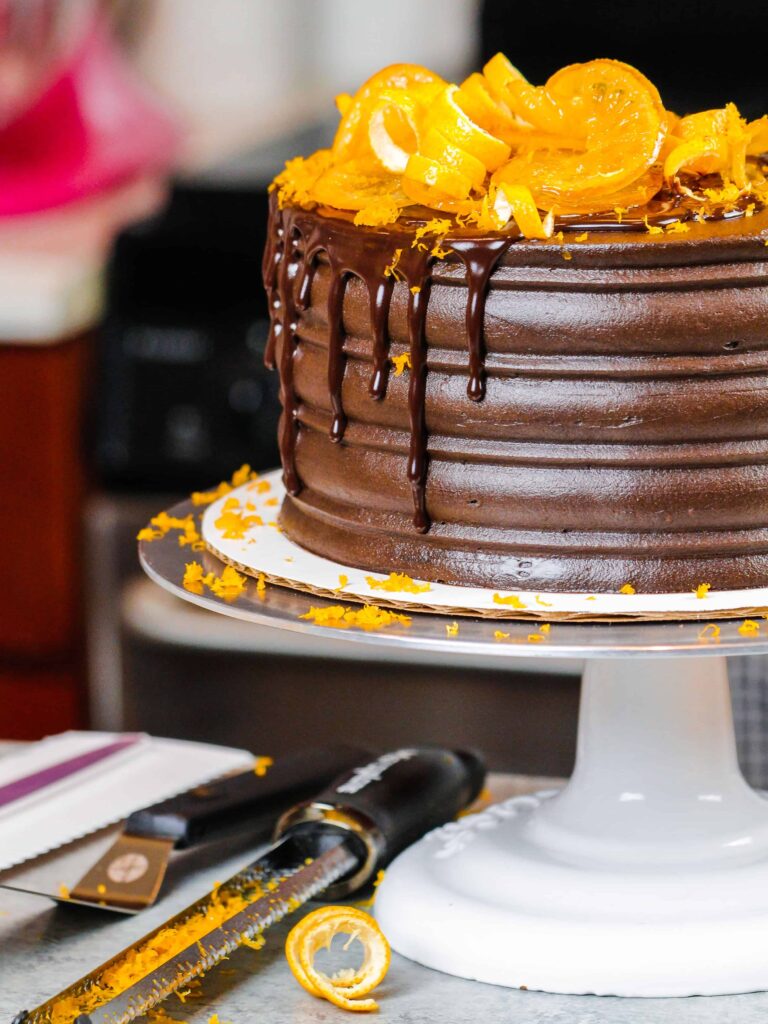
Death by Chocolate Cake
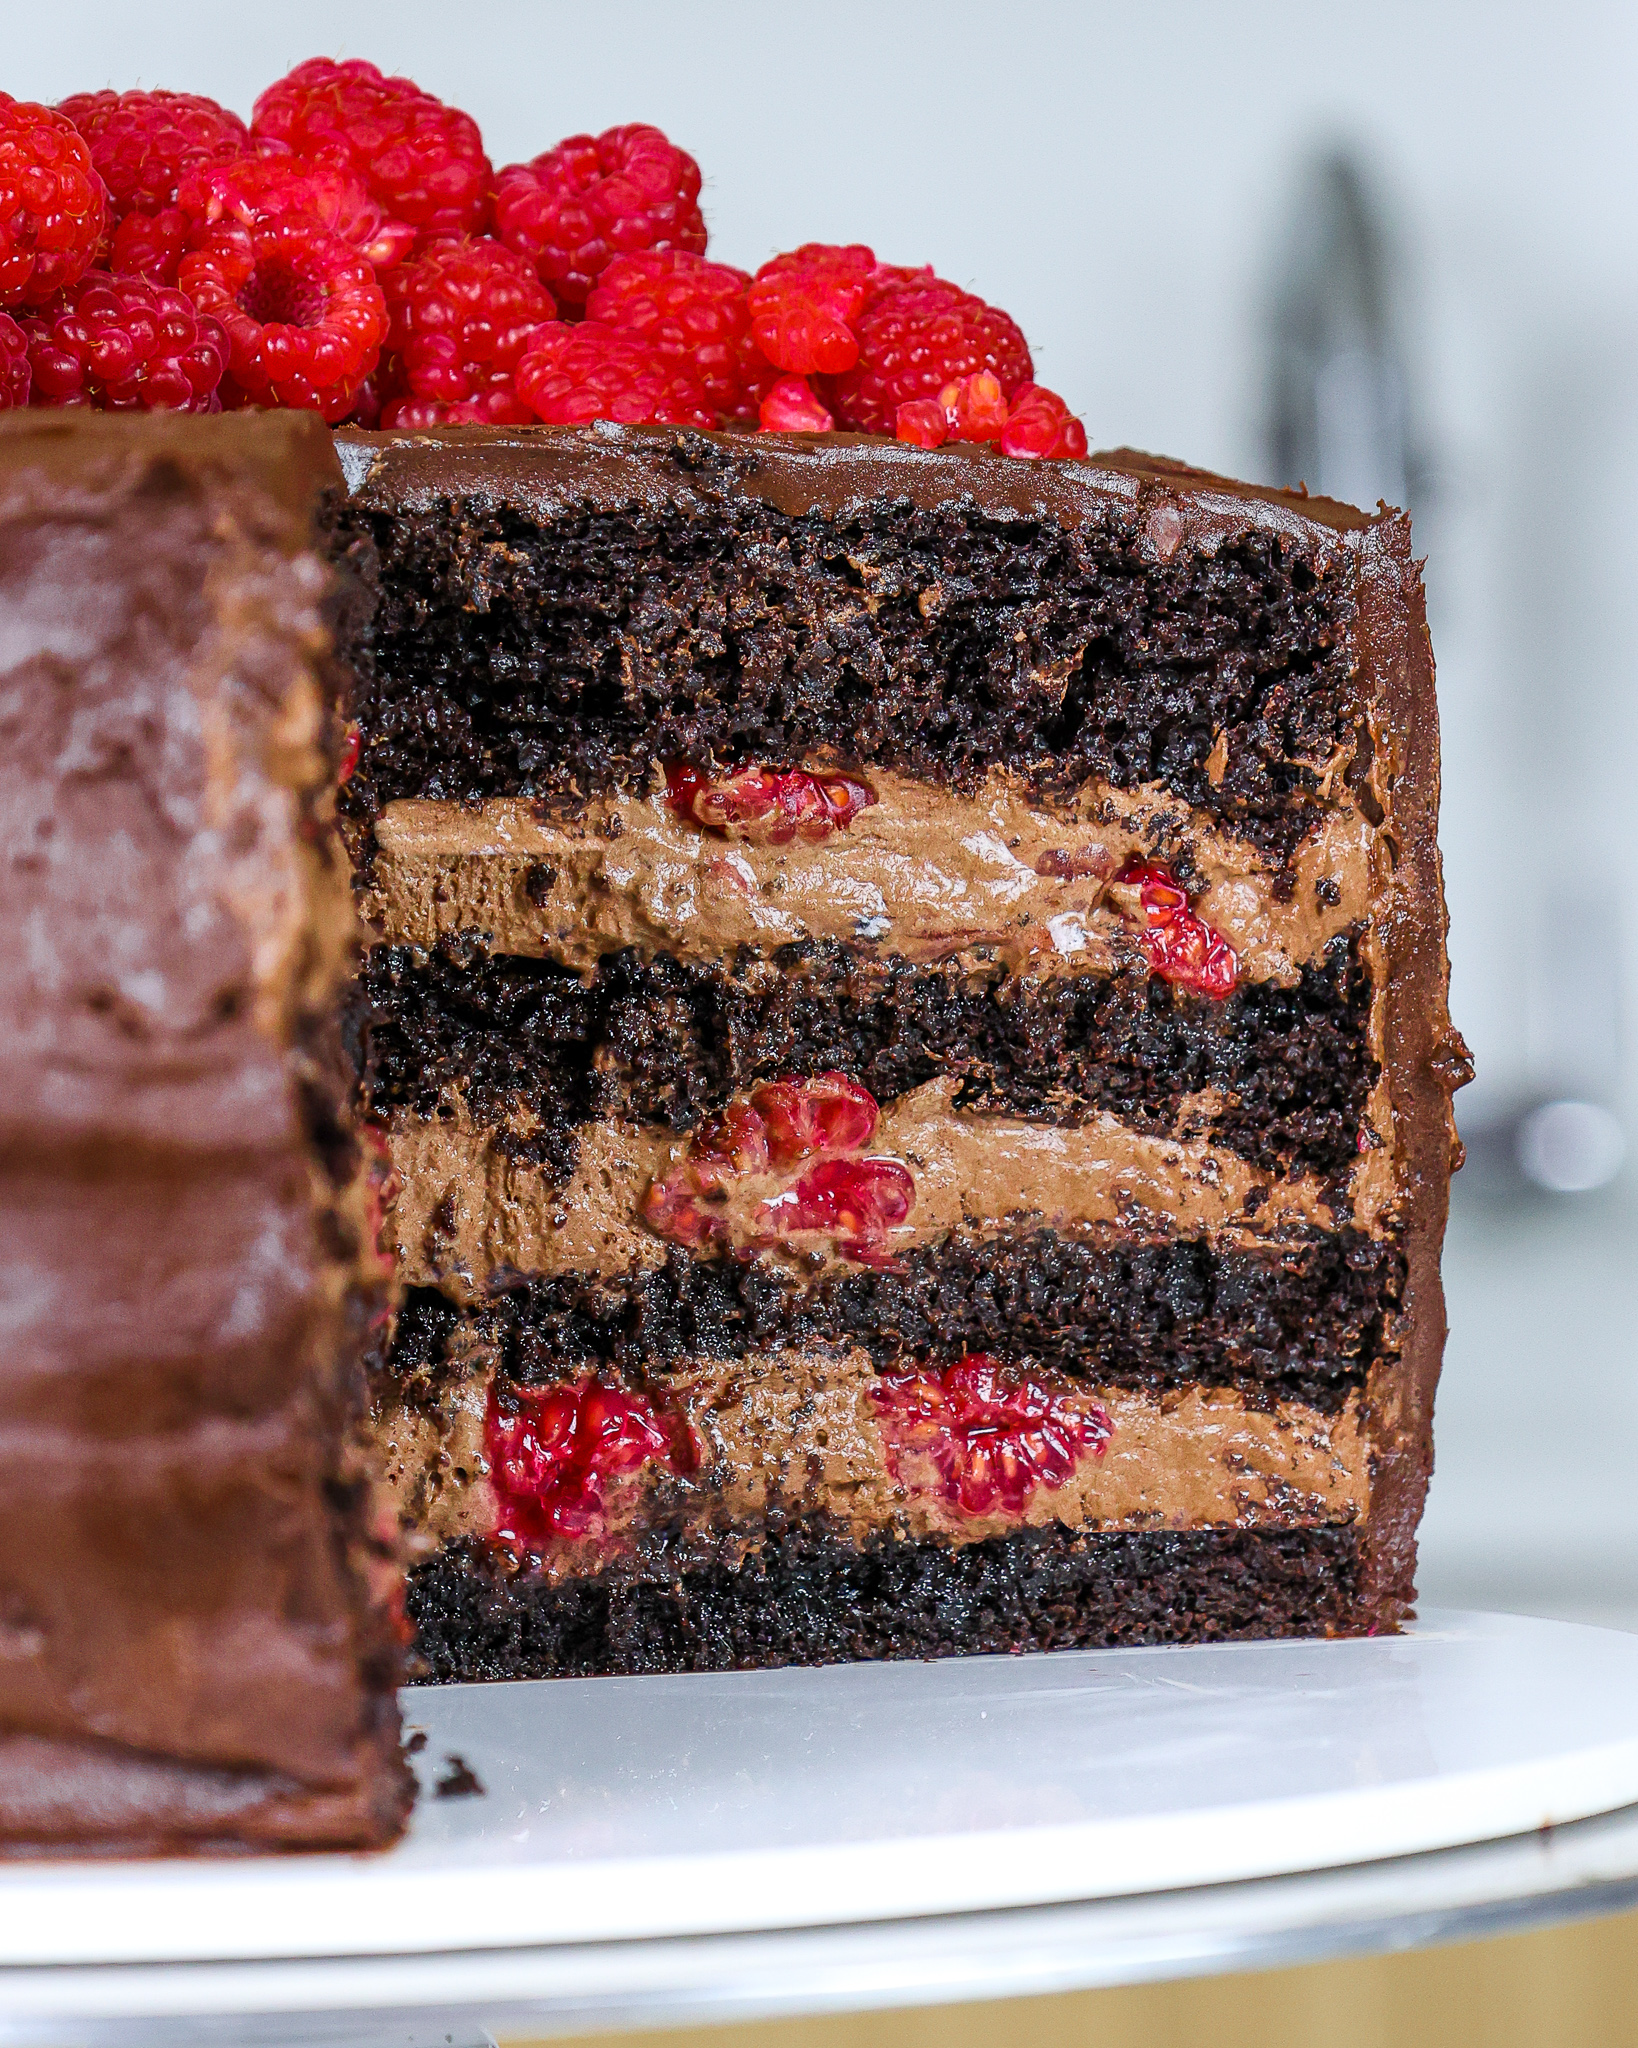
This ultra-moist death by chocolate cake is filled with thick layers of rich dark chocolate buttercream and finished with a coat of mini chocolate chips.
It’s over-the-top in the best way, but still totally doable at home with simple steps and everyday ingredients.

This Recipe At a Glance
- Flavor: Deep, dark chocolate
- Texture: Super moist with a tender crumb
- Skill level: Intermediate (but I walk you through every step!)
- Perfect for: Birthdays, celebrations, and serious chocoholics
- Makes: 3 (8-inch) layers or 4 (7-inch) layers + a full batch of dark chocolate buttercream
- Batter volume: About 1500g per batch
- Finish: Mini chocolate chips pressed into the frosting (optional, but iconic)
Why this recipe works
- Uses dark cocoa for a deeper dark chocolate flavor
- Sour cream keeps the cake layers super moist and tender
- Optional simple syrup for extra moisture (especially if baking cake layers ahead of time)
- Espresso powder is optional, but it boosts the chocolate flavor
- Melted chocolate in buttercream = richer + sturdier frosting
How to Make This Death by Chocolate Cake
To make sure your death by chocolate cake turns out as amazing as possible, let’s walk through each step together! I’ve also included a video tutorial of the process in the recipe card at the bottom of this post.
Step 1: Make the Chocolate Simple Syrup
Make the chocolate simple syrup first, because it needs time to cool down.
The chocolate simple syrup is optional, but it makes the layers extra moist. I highly recommend it if you’re baking ahead or want maximum chocolate flavor.
Step 2: Bake and Level the Chocolate Cake Layers
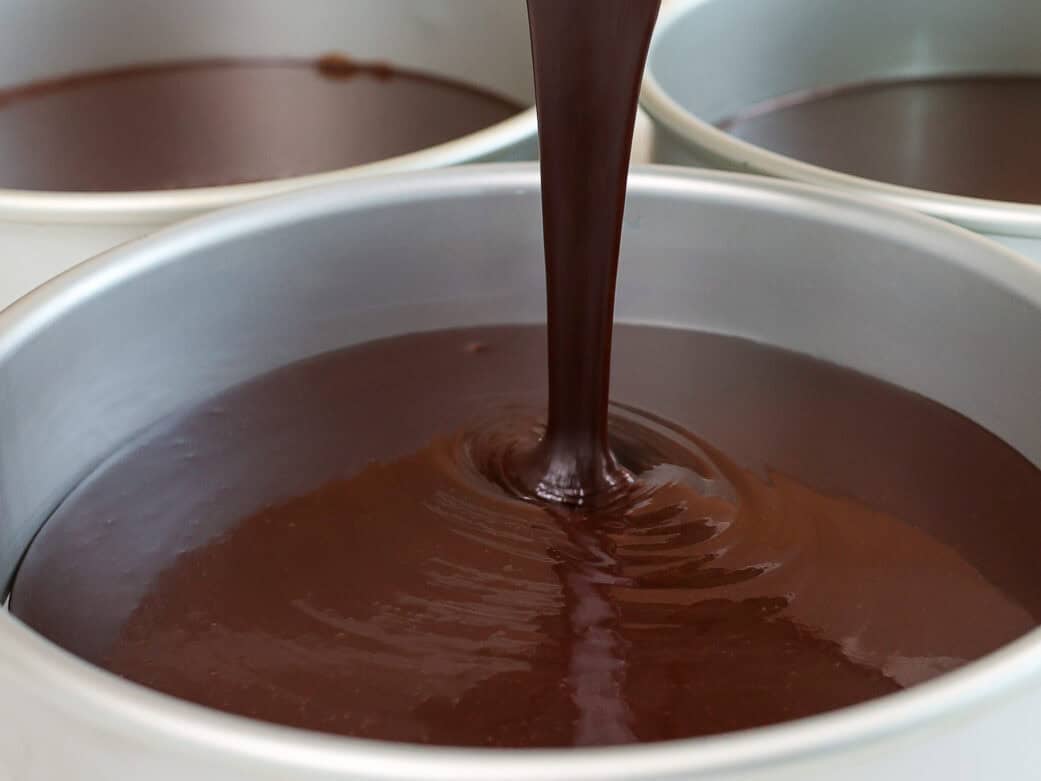
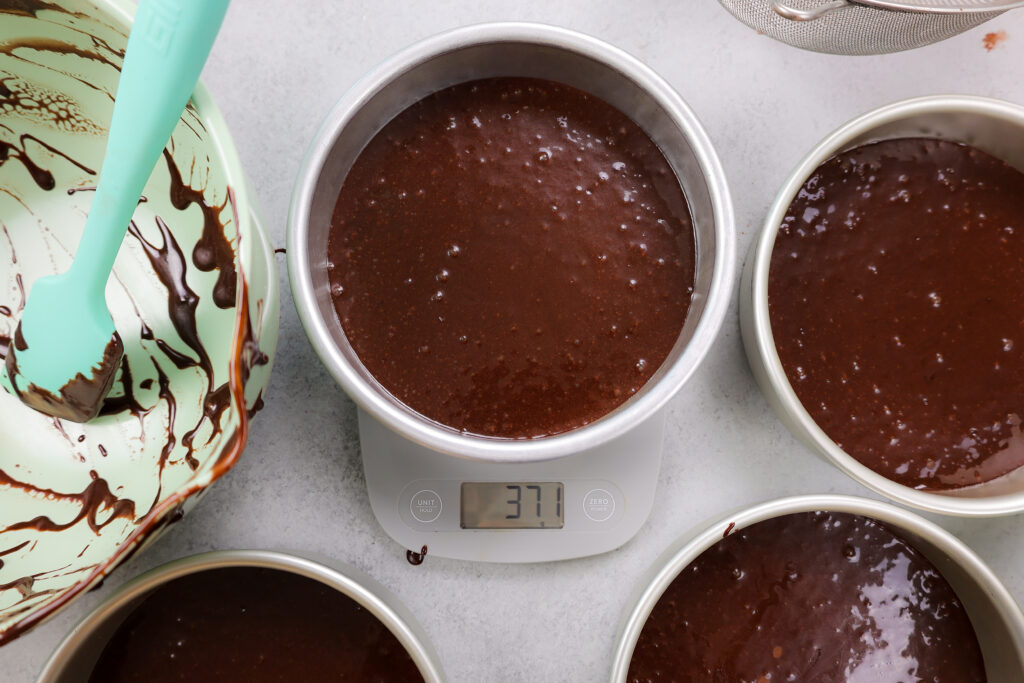
Next, make the chocolate cake batter. Divide the batter evenly between the prepared cake pans, and bake for 23-26 minutes or until a toothpick comes out with a few moist crumbs.
Remove the cake layers from the oven and let them cool in the pans for about 15 minutes.
Gently run an offset spatula around the rim of the cake pans to loosen them, then flip them into wire racks to finish cooling.
If you’re in a rush, you can pop the cake layers (pans and all!) into the freezer for 30 minutes. I love doing this because it actually traps some of the steam inside the layers and makes them extra moist.
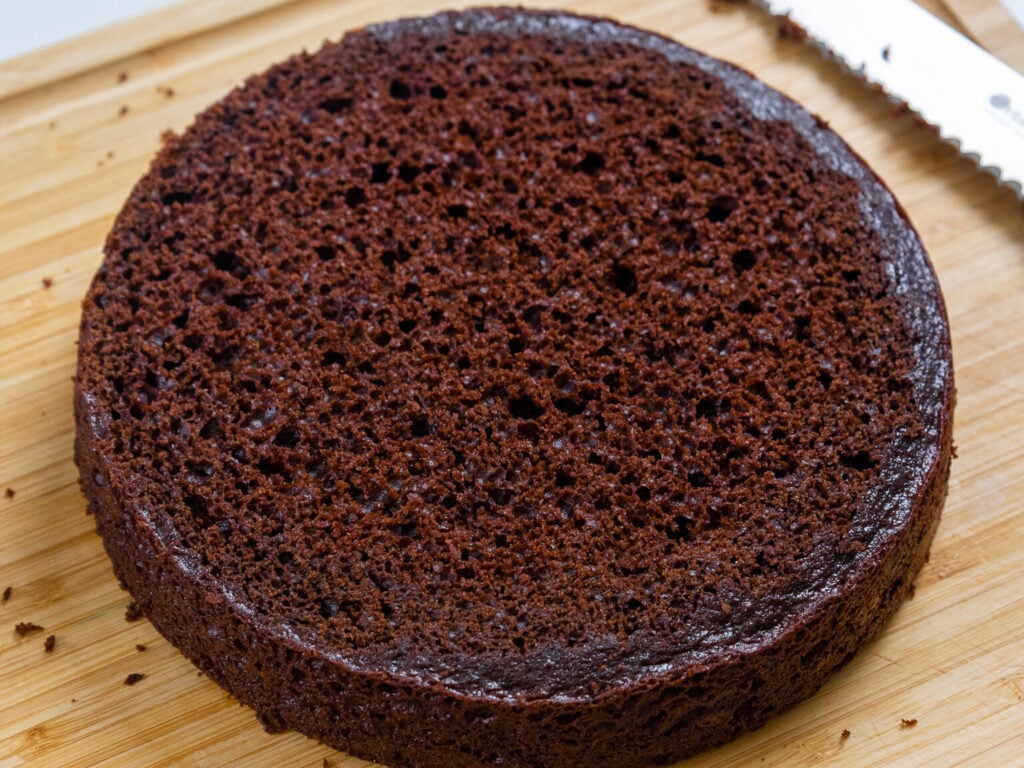
Once the cake layers have cooled to room temperature, use a serrated knife to level the top of each cake layer.
If you’re making these in advance, you can wrap and freeze them at this point.
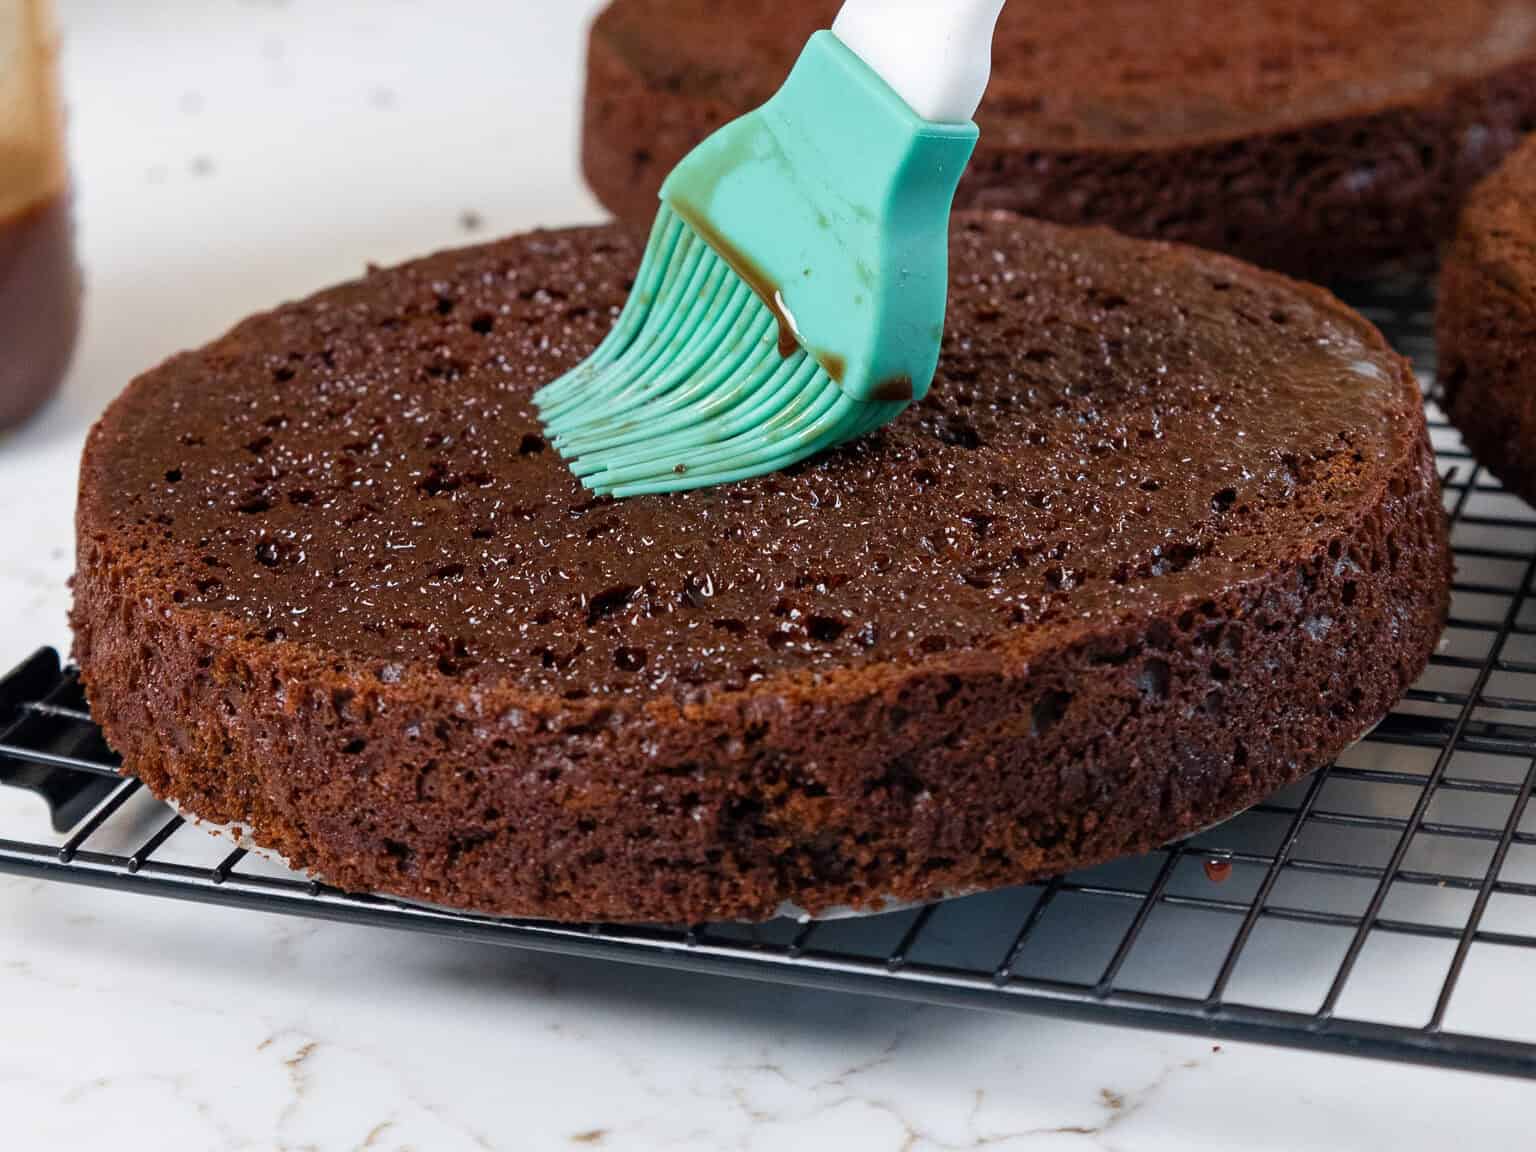
Wait to soak the cake layers with chocolate simple syrup until right before you plan to assemble the cake.
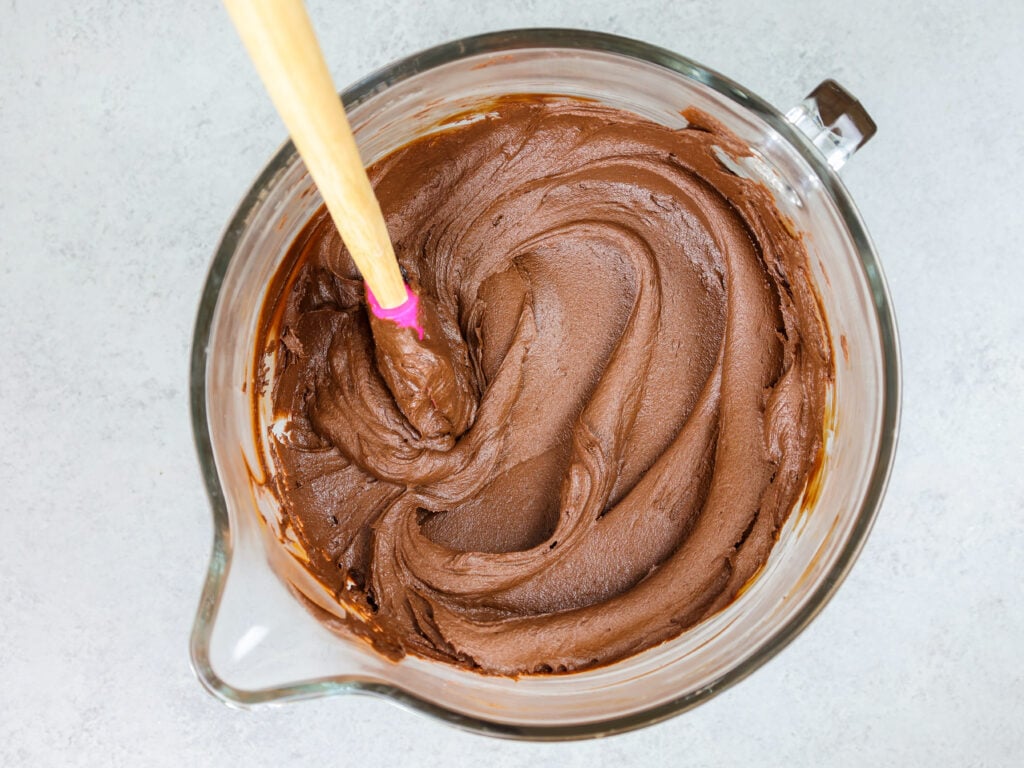
Step 3: Make the Chocolate Buttercream
While the cake layers bake and cool, make the chocolate buttercream. This frosting can also be made in advance if needed and kept in the fridge for up to a month!
Step 4: Soak and Stack the Cake Layers
Stack and frost cake layers on a greaseproof cake board or flat plate, using a dab of chocolate buttercream to help stick the first cake layer to the board.
Before you add each cake layer, use a silicone brush to soak the top of the cake layer with chocolate simple syrup.
Spread an even layer of chocolate buttercream on top of each cake layer with a large offset spatula.
I also like to top each layer of frosting with some mini chocolate chips to add a little texture to each bite of this cake. However, this is optional!
Repeat with the remaining cake layers, then freeze the cake for about 10 minutes in the freezer.
This will help the buttercream between the cake layers firm up and make the cake way easier to frost.
Step 5: Smooth on a Thick Layer of Frosting
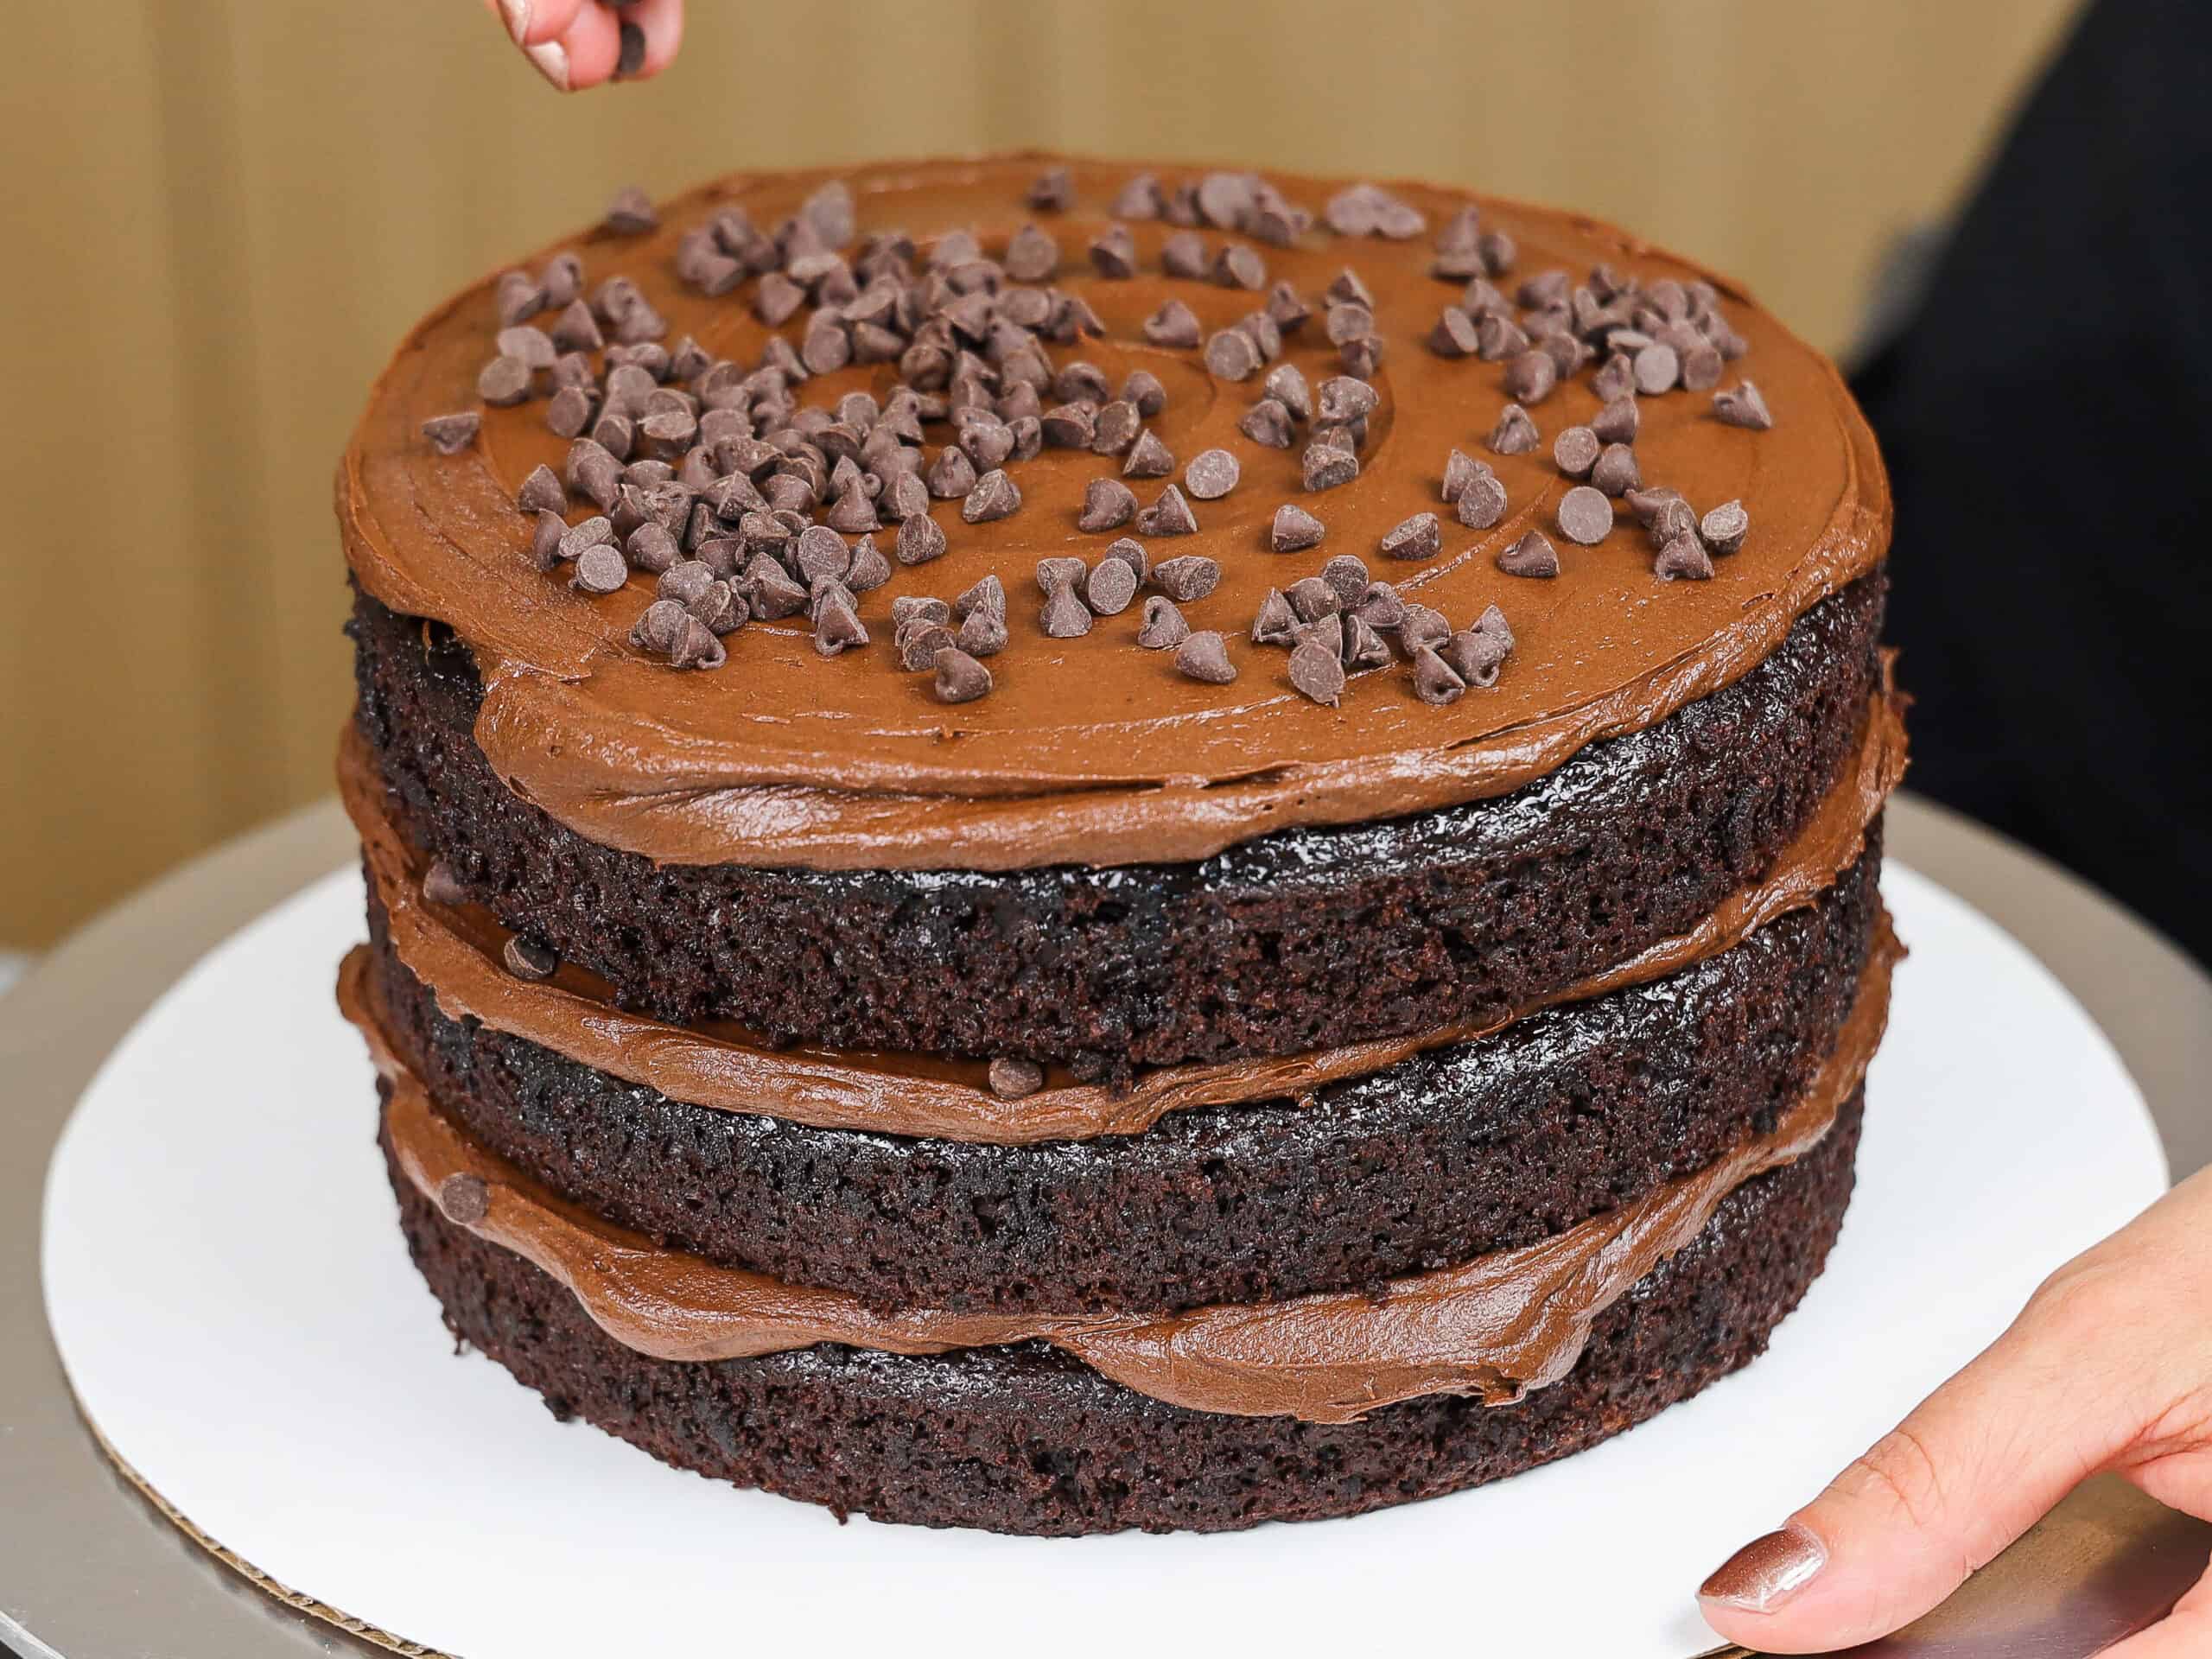
Add a thick layer of chocolate buttercream around the cake and smooth it using a large offset spatula. This is a very forgiving cake design, so don’t worry if the frosting isn’t perfectly smooth!
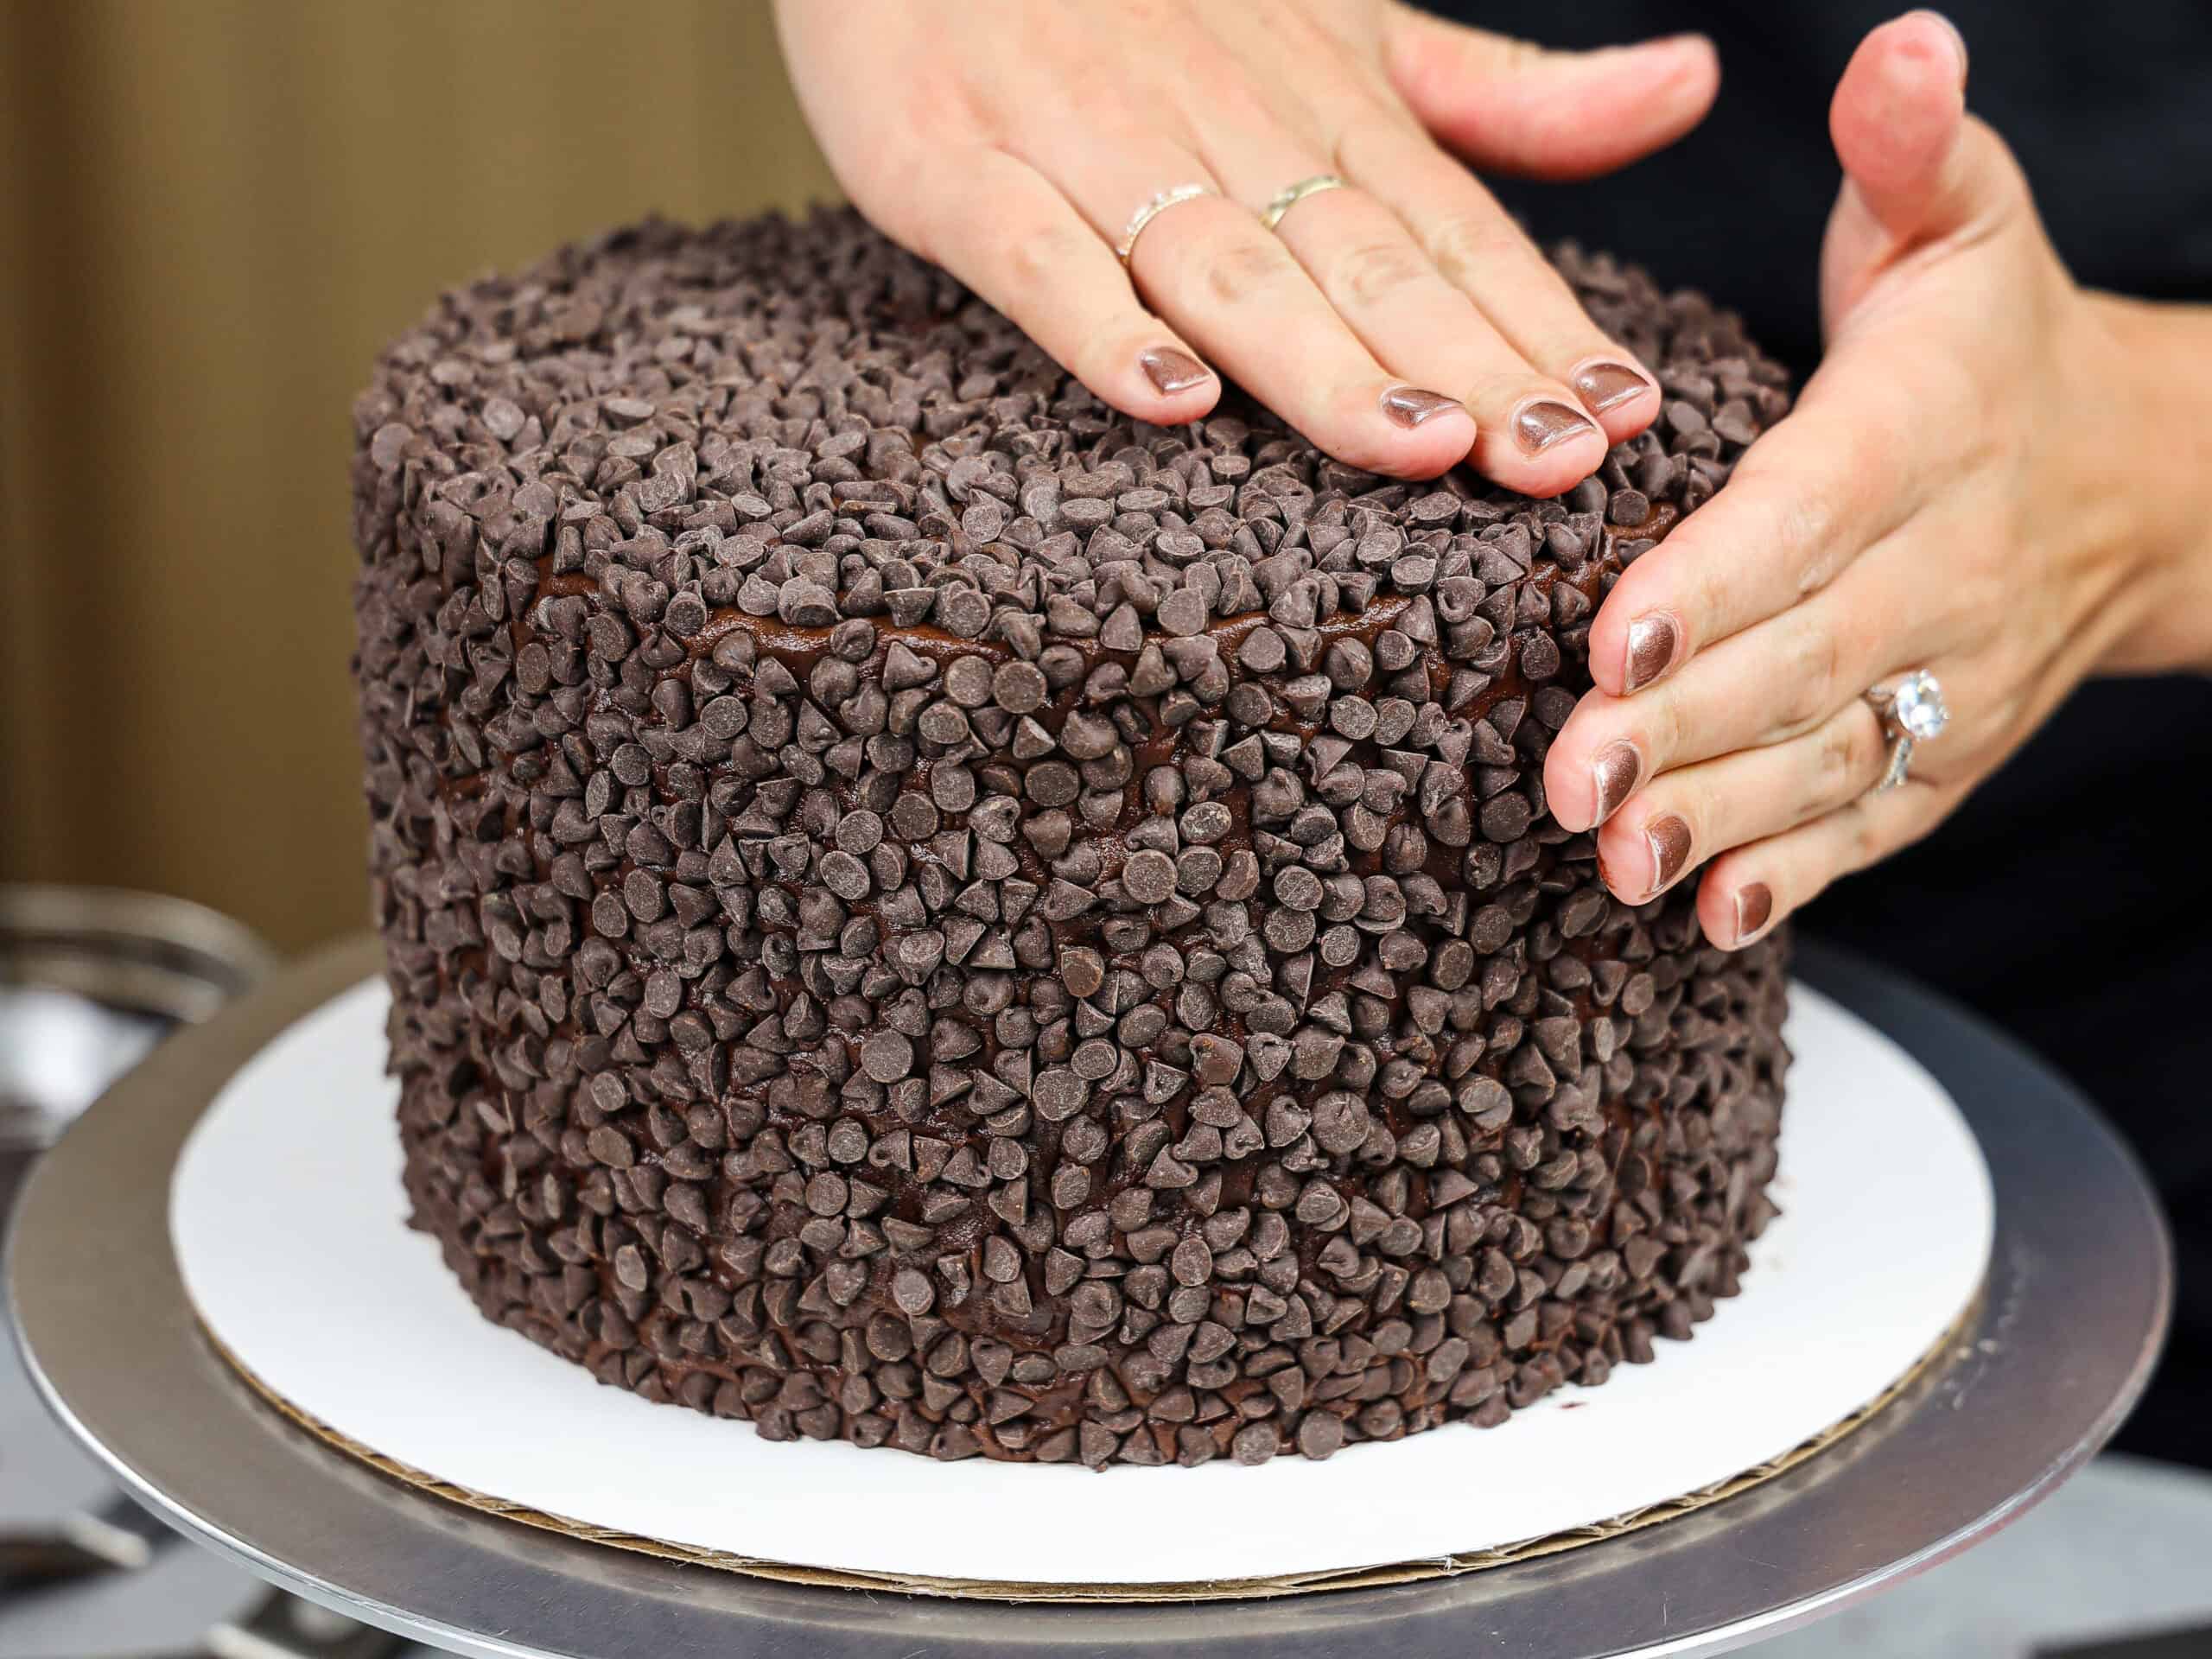
We’re going to cover it completely with mini chocolate chips, so no one will know what it looked like before.
Carefully press mini chocolate chips into the frosting on the sides and top of the cake until it’s completely covered.
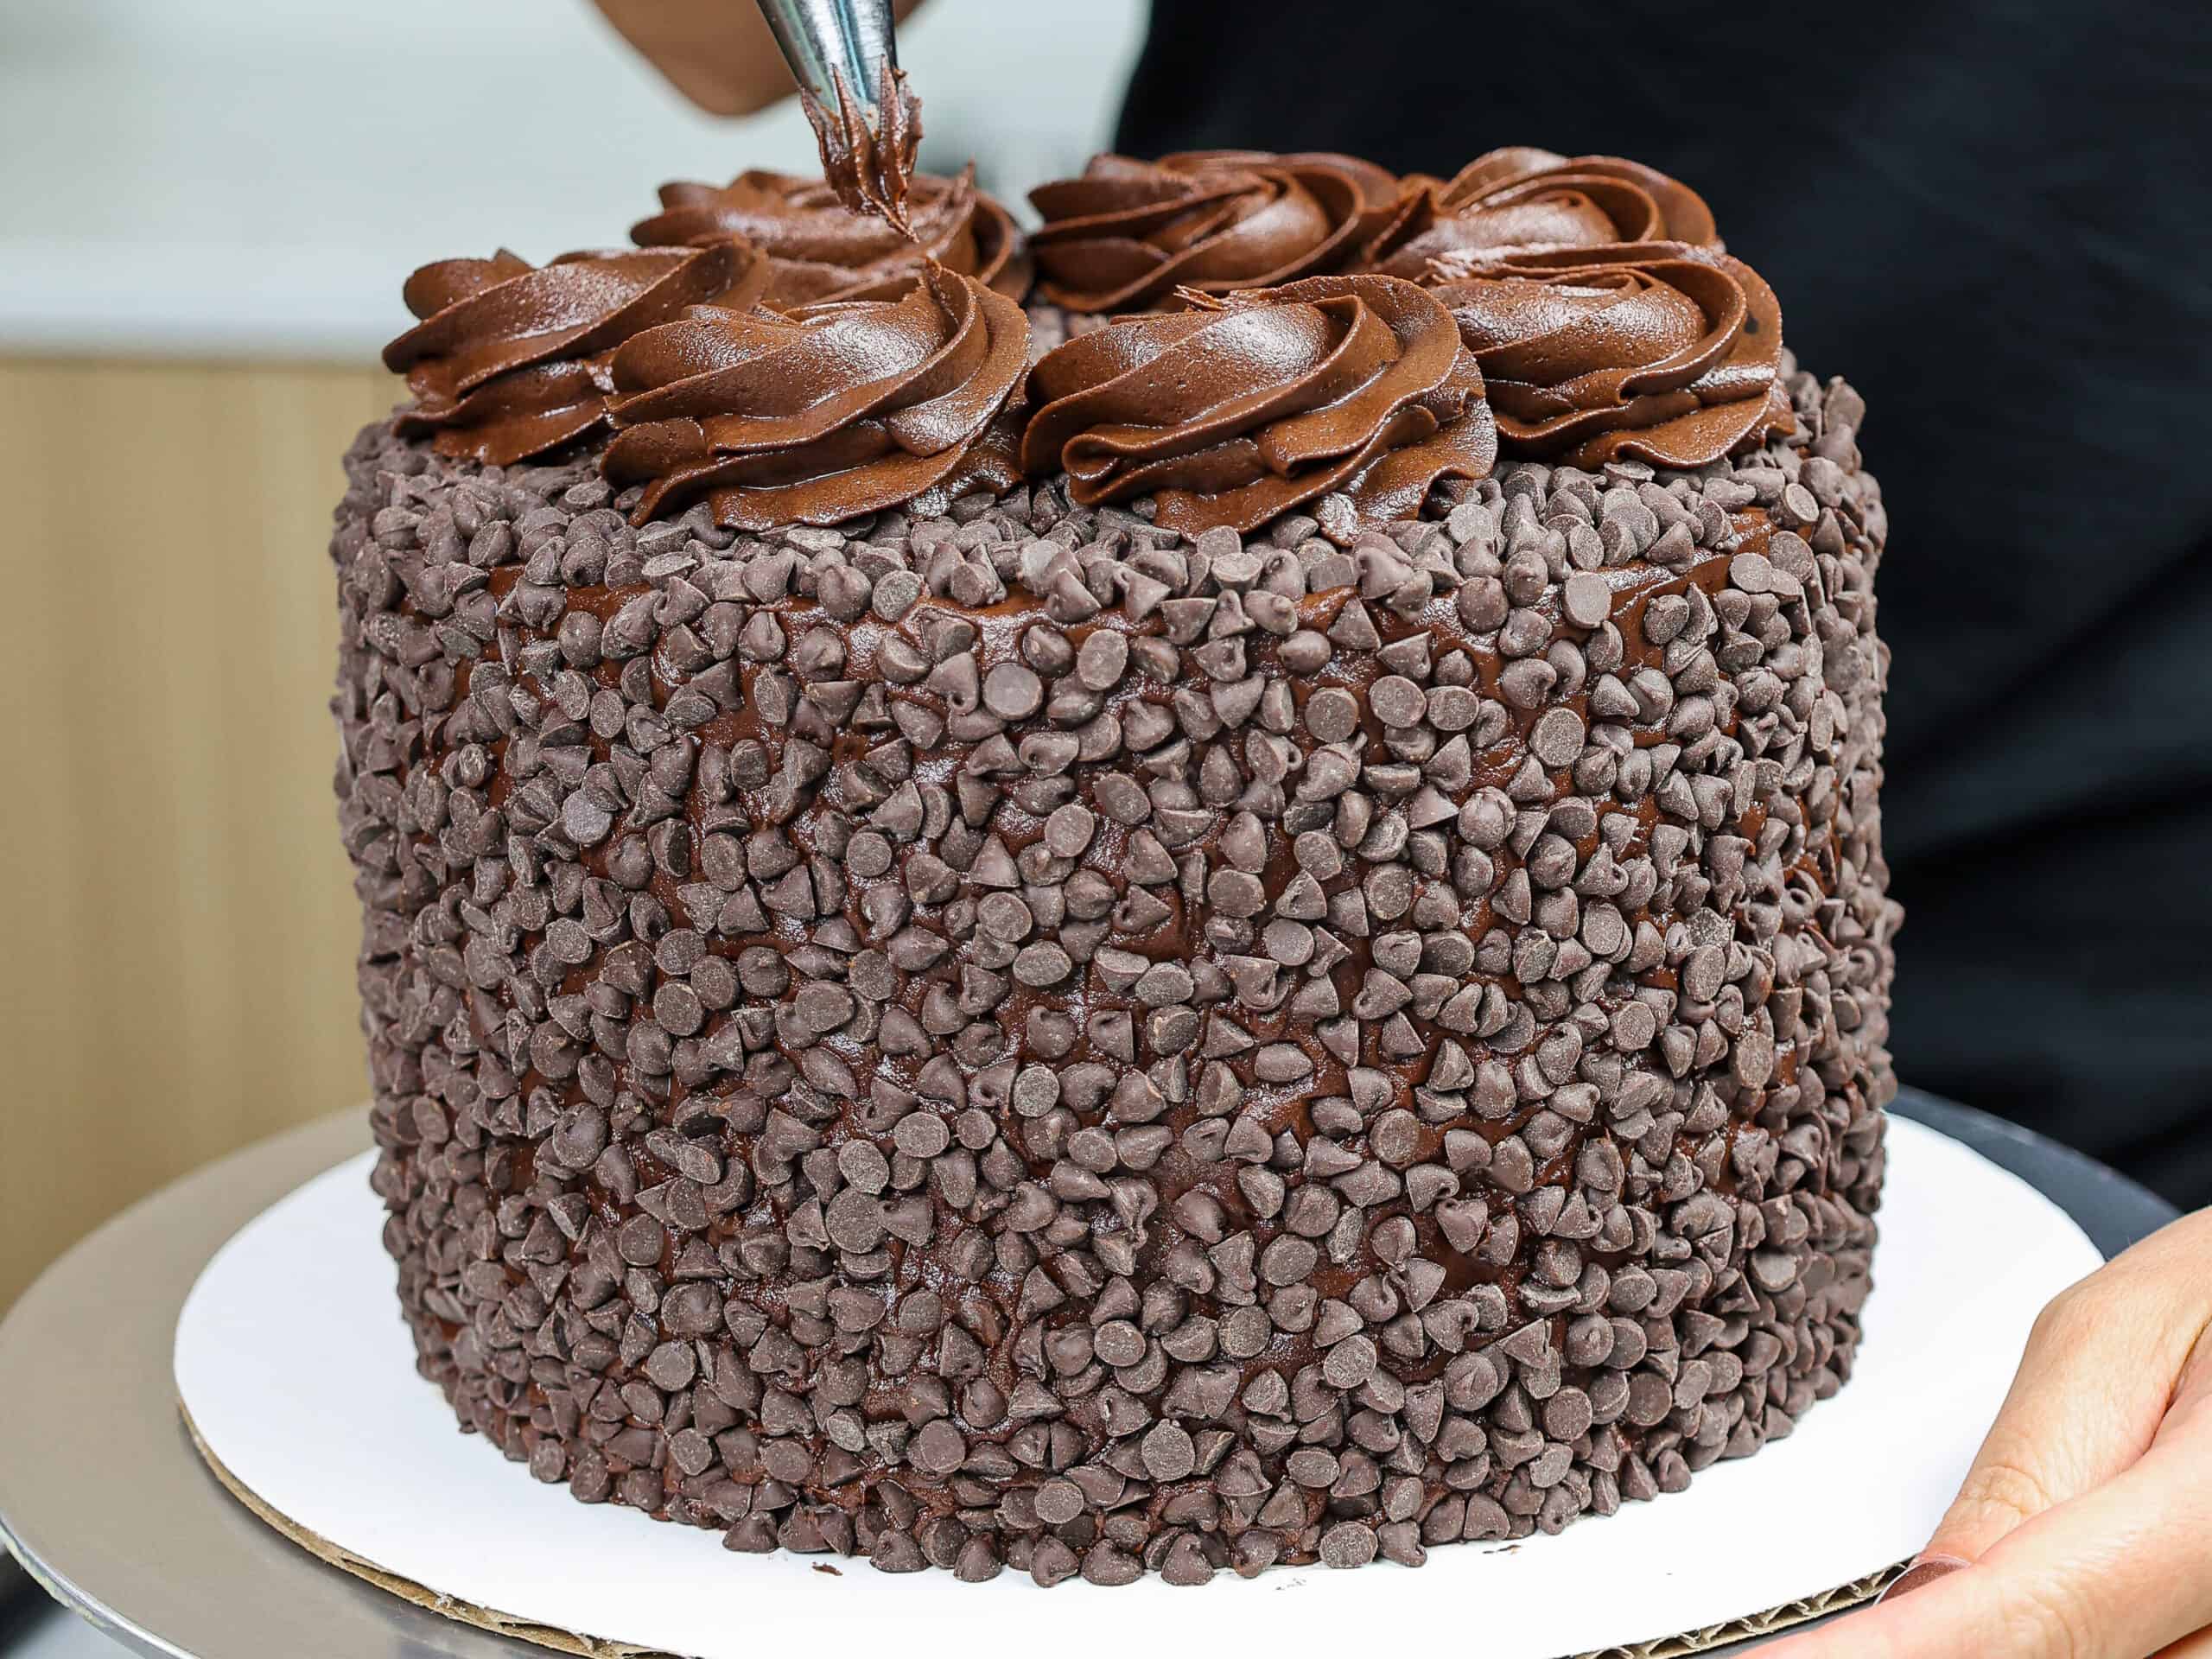
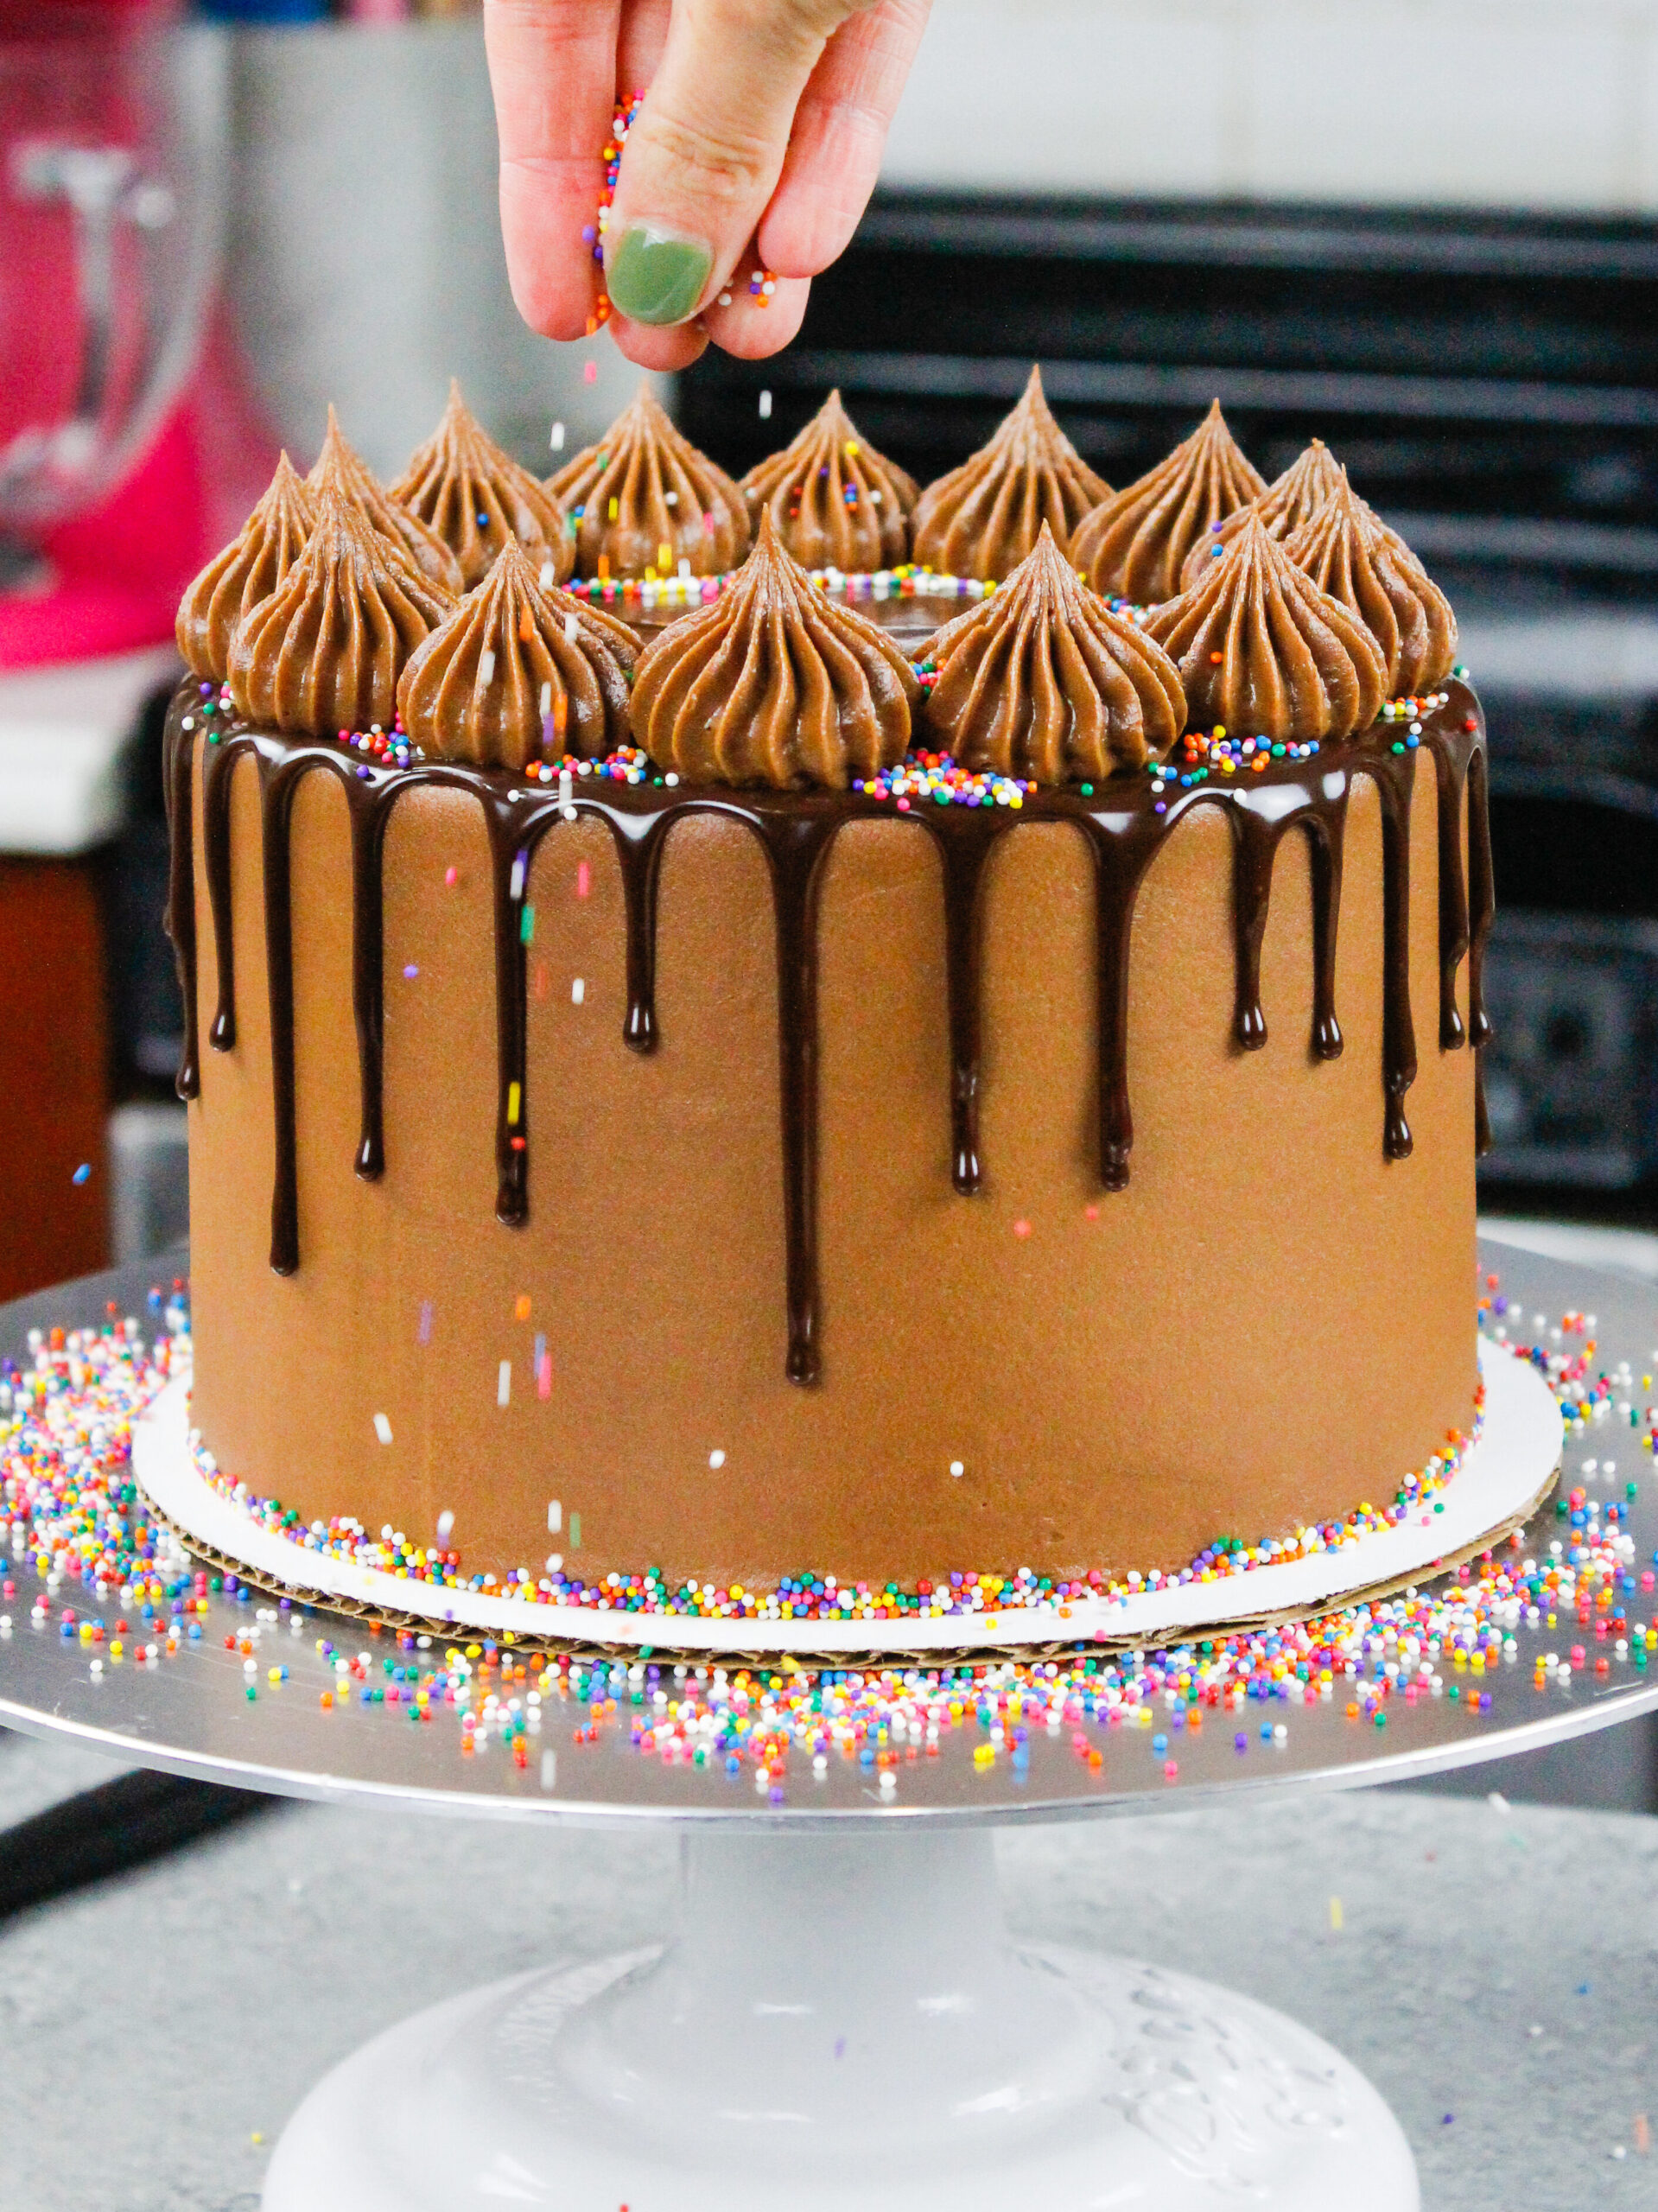
Step 6: Decorate the Top of the Cake
Decorate the top of the cake with buttercream dollops using any leftover frosting and your favorite frosting tip. I used a Wilton 1M to make my swirls.
Then cut yourself a big slice and enjoy! This cake can sit at room temperature for up to 2 days, or be stored in the fridge for a week.
Substitutions & Swaps: Chocolate Cake Layers
While I love this death by chocolate cake just the way it is, I know some of you might not have all of these ingredients on hand.
Below are some swaps and substitutions that can be made in this recipe:
- All-Purpose Flour – This recipe turns out best with all-purpose flour. However, you can swap in a good gluten-free flour blend (like this) if needed. Just be sure to stir the batter longer than normal to help give the cake proper structure, and let the batter sit for about 20 minutes before baking it if you opt to make a gluten-free version.
- Granulated Sugar – I do not recommend reducing the amount of sugar or changing the type of sugar, as it will change the texture of the cake layers.
- Dark Baking Cocoa – I like to use Hershey’s dark baking cocoa, but you can also use black cocoa or Dutch-processed cocoa powder. If you can’t find dark cocoa powder or don’t have any on hand, you can use regular unsweetened baking cocoa in its place.
- Sour cream – You can also use full-fat yogurt, buttermilk, whole milk, or an alternative yogurt or milk (almond, soy, oat).
- Vegetable Oil – Any flavorless oil can be used in this recipe. Canola, vegetable, or even sunflower oil would all work great. I don’t recommend olive oil, though, as it has a strong flavor and will change the taste of the cake.
- Eggs – This recipe uses 2 large eggs. You can try using a vegan egg replacer or 2 flaxseed eggs if you have an egg allergy.
Substitutions & Swaps: Chocolate Buttercream
Below are some great swaps and substitutions that can be made in this recipe.
- Unsalted Butter – If you only have salted butter on hand, you can use it instead of unsalted butter. Just be sure to omit the salt that this frosting recipe calls for. You can also use vegan butter in its place!
- Dark Cocoa Powder – If you can’t find dark cocoa powder or don’t have any on hand, you can use regular unsweetened baking cocoa or Dutch-processed cocoa powder, or add additional powdered sugar in its place.
- Heavy Cream – Whole milk or alternative milk (soy, almond, oat) can also be used to make the frosting.
- Dark Chocolate – You can use dark chocolate chips, baking chocolate, or good-quality chocolate bars to melt and add to the frosting. Alternatively, you can also use milk or semi-sweet chocolate if you have a strong preference.
Tips for Making the Best Death by Chocolate Cake
- Ingredients at room temperature mix together better! Be sure you set out any cold ingredients ahead of time.
- Properly measure the flour (spoon into the cup measure, then level). Or better yet, use a kitchen scale to measure your dry ingredients.
- Mix your cake batter just until the ingredients are incorporated. This will ensure your cake layers are tender and fluffy.
- Use a scale to weigh your cake pans as you fill them. It ensures that each pan has the same amount of batter, which will help the cake layers bake to the same height and bake more evenly.
- Level the room temperature or thawed cake layers with a serrated knife to make them easier to stack.
- Chill the cake layers in the freezer for about 20 minutes before assembling the cake and before adding the simple syrup. It makes it so much easier to stack and frost them!
Making this Death By Chocolate Cake in Different Sizes
One batch of batter is about 1500g, so I add roughly 500g to each of my cake pans when using 3, 8-inch cake pans, or 375g to my cake pans when using 4, 7-inch cake pans.
You can also use one batch of batter to make 2, 9-inch cake layers or 4, 6-inch cake layers. Bake time will be a few minutes longer at 350°F / 175°C.
This recipe can also be used to make a death-by-chocolate sheet cake! One batch will make 1, 9 x 13-inch cake layer that is about 1 inch tall once it’s baked.
Bake the sheet cake for 25-35 minutes at 350°F / 175°C, or until a toothpick inserted in the center comes out with a few moist crumbs. Bake time can vary a lot based on the type of pan you use, if you use heating cores, and your oven. I recommend using heating cores if you have them to help large cake layers like this bake more evenly and quickly.
If you want to make a tiered cake with this recipe, check out my cake batter calculator to see how many batches of batter you’ll need.
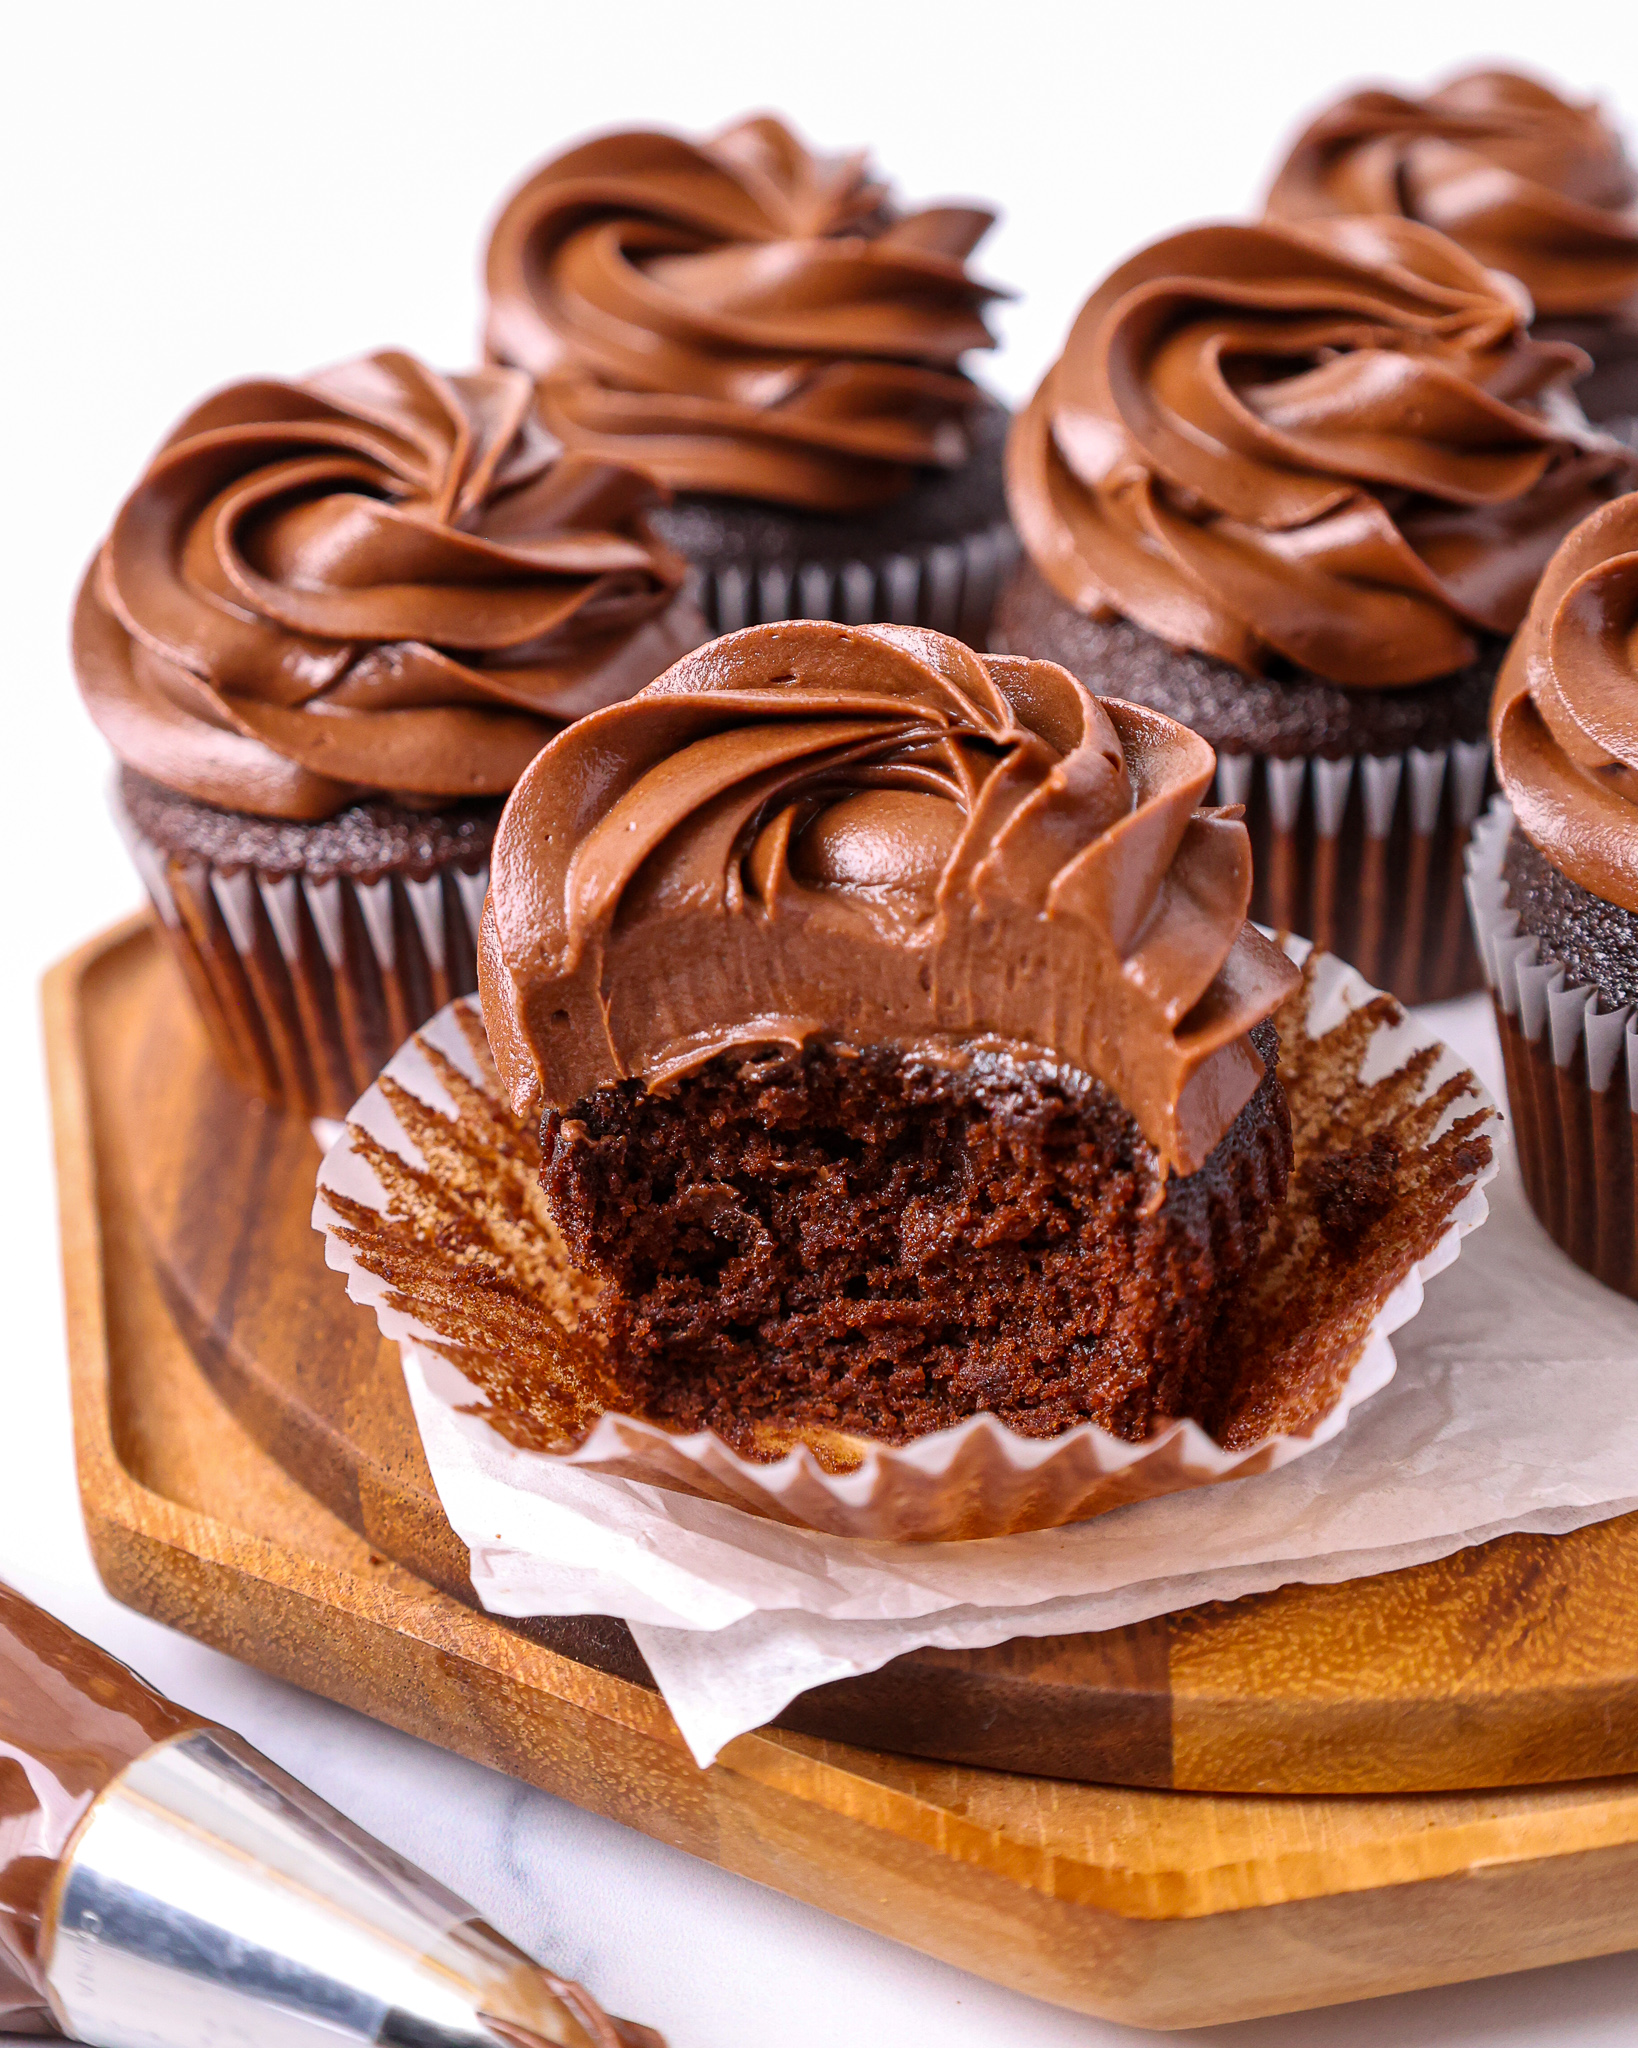
If you want to make death by chocolate cupcakes, use this recipe! One batch makes 2 dozen cupcakes.
Making this Death by Chocolate Cake in Advance & Storage Tips
I highly recommend making the components of this cake in stages. It breaks the process up and makes it so much more approachable!
The cake layers can be made in advance and frozen. They taste just as great when they’re frozen as when they’re fresh, I promise!
You can make the frosting ahead of time or save any leftover frosting! It can be stored in an airtight container in the fridge for up to a month or in the freezer for 3 months.
Be sure to give it a good stir once it thaws to get the consistency nice and smooth again.
This cake can last at room temperature for up to 2 days, in the fridge for a week, or in the freezer for a month. The buttercream locks in the moisture and keeps the cake fresh and delicious!
If you cut into the cake and have leftovers, use any remaining frosting to cover the cut section to keep it moist and store it in the fridge for up to a week.
Troubleshooting
Why did my cake sink in the middle?
A slightly sunken center usually comes down to one of these culprits:
- Expired leaveners: Baking powder/soda loses strength over time. If yours have been open forever, swap them out.
- Underbaked center: This cake is very moist, so it can look done before it actually is. Bake until the center springs back, and a toothpick comes out with a few moist crumbs (not wet batter).
- Oven temperature running off: Many ovens run hot/cool. If you’re seeing consistent sinking, an inexpensive oven thermometer is a game-changer.
- Overmixing the batter: Once the dry ingredients go in, mix just until combined. Overmixing can add too much air, and the cake may collapse as it cools.
- Opening the oven door too early: Try not to open the door in the first 23 minutes. Sudden temperature drops can cause sinking.
Why is my cake so crumbly or falling apart when frosting?
This recipe bakes up super soft and tender, which is amazing to eat, but it can be a bit difficult to handle.
- Chill or freeze the layers before assembling: Pop layers in the freezer for 20-30 minutes (or fridge for an hour) to firm them up.
- Level carefully + use a cake board/lifter: Sliding a thin board under the layer helps prevent cracking.
- Chill between steps: After frosting and stacking the cake layers, chill the cake 15–30 minutes so the frosting can set up before your final coat.
- If you want to make a more structured/tiered cake, I’d recommend using my go-to chocolate cake recipe, which is easier to stack when making big cakes.
Why are my cake layers sticky?
Sticky layers are common with really moist cake layers like this (and especially in humid kitchens).
- Let layers cool completely: If they’re even a little warm, steam gets trapped and creates stickiness.
- Use parchment + a light spray: Line pans with parchment rounds and spray the sides so the layers release cleanly.
- Cool on a rack (not a plate): A rack helps air circulate so moisture doesn’t collect underneath.
- Wrap only after cooling: If you wrap warm layers, you’re basically sealing in steam. Cool first, then wrap tightly.
Why is my chocolate buttercream gritty?
Gritty frosting is usually powdered sugar that hasn’t fully incorporated.
- Sift the powdered sugar (and cocoa) if it looks lumpy: This makes a huge difference for smoothness.
- Beat longer than you think: Once everything’s added, beat for a couple extra minutes on medium to help it come together.
- Add cream slowly: Add a little at a time until it’s smooth. Too much, too fast, can throw off the texture.
Why did my melted chocolate turn into lumps in the frosting?
That lumpy/chunky situation usually happens when the chocolate cools too much (or the butter is too cool), and it seizes as soon as it hits the bowl.
- Add chocolate while it’s still fluid: Let it cool slightly so it’s not piping hot, but it should still pour easily.
- Make sure the buttercream is at room temperature: If the mixture is cold, the chocolate can harden on contact and form little bits.
- Stream it in slowly while mixing: Pour in a thin stream with the mixer running on low, then increase speed once it’s incorporated.
- If it already happened: Warm the outside of the bowl slightly (hair dryer on low or set the bowl over warm water for a few seconds) and keep mixing until it smooths out.
Why is my chocolate buttercream too runny or too stiff?
- Runny = chocolate too hot / room too warm / too much cream
- Stiff = not enough cream / too much powdered sugar / cold kitchen
Frequently Asked Questions
Can I make this recipe into cupcakes?
Yes! This batter works great for cupcakes. Line a cupcake pan, fill each liner about 2/3 full, and bake at the same temperature until the tops spring back and a toothpick comes out with a few moist crumbs. Bake time will be shorter than the cake layers (start checking around 18-21 minutes).
Can I make it in 2 (9-inch) pans?
You can. Divide the batter evenly between two 9-inch round pans and bake until the centers are set and a toothpick comes out with a few moist crumbs. The layers will be a bit thicker, so expect a longer bake time than the 8-inch layers. Start checking around the mid-30-minute mark and go from there.
Can I use regular cocoa instead of dark cocoa?
Absolutely. Regular unsweetened cocoa will still make a delicious cake. Your layers will just be lighter in color and a little less intense in “dark chocolate” flavor. If you want to bump up the richness, add an extra pinch of salt and don’t skip the simple syrup.
Do I have to use espresso powder?
Nope. Espresso powder is optional. It doesn’t make the cake taste like coffee, it just deepens the chocolate flavor. If you don’t have it, you can leave it out or swap in a little strong-brewed coffee in place of some of the water in this recipe.
How far ahead can I make it?
This cake is a great make-ahead dessert. You can bake the layers 1-2 days in advance (wrap tightly and store at room temp or in the fridge), or freeze them for up to a month. The fully assembled cake is best enjoyed within 2-3 days, stored covered in the fridge. Then let slices come to room temp before serving for the softest texture.
Let Me Know What You Think
If you try this death by chocolate cake recipe, I’d love to hear what you think! Please leave a rating and comment below.
And don’t forget to tag me @chelsweets and #chelsweets so that I can see your amazing creations!
Death by Chocolate Cake
Equipment
Ingredients
Chocolate Simple Syrup
- 1/2 cup water 120g
- 1/2 cup granulated sugar 100g
- 1 Tbsp dark or Dutch-processed cocoa powder 6g
Dark Chocolate Cake Recipe
- 2 cups all-purpose flour 260g
- 2 cups granulated sugar 400g
- 3/4 cup dark or Dutch-processed cocoa powder 75g
- 2 tsp baking powder 8g
- 1 1/2 tsp baking soda 9g
- 1 tsp fine salt 6g
- 1 cup water, warm 240g
- 1 cup full-fat sour cream, room temperature 255g
- 1/2 cup vegetable or canola oil 110g
- 2 large eggs, room temperature 112g
- 2 tsp vanilla extract or vanilla bean paste 8g
- 1 tsp instant espresso or coffee – optional 1g
Chocolate Buttercream Frosting
- 2 cups (4 sticks) unsalted butter, room temperature 454g
- 1 cup dark baking cocoa, sifted 100g
- 1 tsp vanilla extract or vanilla bean paste 4g
- 1/2 tsp fine salt 3g
- 5 cups powdered sugar 625g
- 3/4 cup heavy whipping cream, room temperature 180g
- 1 1/3 cups dark chocolate chips, melted and cooled 230g
Additional filling and decoration – optional
- 2 cups mini chocolate chips 360g
Instructions
Chocolate Simple Syrup
- Pour 1/2 cup water and 1/2 cup granulated sugar into a small saucepan. Cook over medium heat, whisking continuously until the mixture starts to boil.
- Remove from heat and whisk in 1 Tbsp dark cocoa powder. Pour into a medium-sized bowl to cool to room temperature, then cover and set aside. This will be brushed onto the cake layers right before we assemble the cake. If you're making this in advance, it can be stored in an airtight container in the fridge for up to 3 weeks.
Dark Chocolate Cake Layers
- Preheat oven to 350°F/175C°. Grease and line four 7-inch or three 8-inch cake pans with parchment paper rounds. Set aside.
- Sift or whisk together 2 cups flour, 2 cups sugar, 3/4 cup dark cocoa powder, 2 tsp baking powder, 1 1/2 tsp baking soda, and 1 tsp salt into a large bowl.
- Then add 1 cup warm water, 1 cup sour cream, 1/2 cup oil, 2 eggs, 2 tsp vanilla, and 1 tsp instant espresso into the dry ingredients and whisk together until just incorporated.
- Divide the batter evenly between the prepared cake pans, and bake for 23-26 minutes or until a toothpick comes out with a few moist crumbs.
- Remove the cake layers from the oven and let them cool in the pans for about 15 minutes. Gently run an offset spatula around the rim of the cake pans to loosen them, then flip them onto wire racks to finish cooling. If you're in a rush, you can pop the cake layers (pans and all!) into the freezer for 30 minutes. I love doing this because it actually traps some of the steam inside the layers and makes them extra moist.
- Once fully cooled, use a serrated knife to level the top of each cake layer. If you are making these in advance, wrap and freeze them at this point.
Chocolate Buttercream Frosting
- Beat 2 cups or 4 sticks of butter on a medium speed for 30 seconds with a paddle attachment until smooth.
- Add in 1 cup dark cocoa powder, 1 tsp vanilla extract, and 1/2 tsp salt. Mix on low until the ingredients are fully incorporated. Scrape the sides and bottom of the bowl as needed with a rubber spatula.
- Gradually mix in 5 cups of powdered sugar and 3/4 of a cup of heavy cream on a low speed.
- Then, mix in 1 1/3 cups of melted and cooled dark chocolate at a low speed until the ingredients are fully incorporated and the desired consistency is reached. The chocolate should still be fluid, but no longer hot to the touch. I let mine sit for about 10 minutes before adding it to the frosting. Scrape the sides and bottom of the bowl as needed with a rubber spatula. You want to make sure all the melted chocolate is mixed in, or else you can end up with lumps of hardened chocolate in your buttercream. Cover with plastic wrap to prevent crusting and set aside.
Assembling this Death by Chocolate Cake
- Stack and frost the cake layers on a greaseproof cake board or flat plate using a dab of chocolate buttercream to help stick the first cake layer to the board.
- Before you stack each cake layer, use a silicone brush to soak the top of the cake layer with chocolate simple syrup.
- Spread an even layer of chocolate buttercream on top of each cake layer as you stack them with a large offset spatula. If desired, sprinkle 2-3 Tbsp of mini chocolate chips on top of each layer of frosting for a bit of texture.
- Repeat with the remaining cake layers, then freeze the cake for about 10 minutes. This will help the buttercream between the cake layers firm up, reduce crumbing, and make the cake way easier to frost.
- Then cover the cake with a thick, even layer of chocolate buttercream and smooth using a large offset spatula. Don't worry if the frosting isn't perfectly smooth!
- Carefully press mini chocolate chips into the frosting around the cake until it's completely covered.
- Then decorate as desired! I like to use the leftover buttercream to pipe swirls on top of the cake with an open star tip (like a Wilton 1M). Then cut yourself a big slice and enjoy! This cake can sit at room temperature for up to 2 days, or be stored in the fridge for up to a week.
Video
Notes
Tips for Making the Best Death by Chocolate Cake
- Ingredients at room temperature mix together better! Set out any cold ingredients ahead of time.
- Properly measure the flour (spoon into the cup measure, then level). Or better yet, use a kitchen scale to measure your dry ingredients.
- Mix the cake batter just until the ingredients are incorporated. This will ensure your cake layers are tender and fluffy.
- Use a scale to weigh your cake pans as you fill them. It ensures each pan has the same amount of batter, which helps the cake layers bake to the same height and bake more evenly.
- Level the room temperature or thawed cake layers with a serrated knife to make them easier to stack.
- Chill the cake layers in the freezer for about 20 minutes before assembling the cake and before adding the simple syrup. It makes it so much easier to stack and frost them!
Making this Death By Chocolate Cake in Different Sizes
One batch of batter is about 1500g or 8 cups, so I add roughly 500g to each of my cake pans when using 3, 8-inch cake pans, or 375g to my cake pans when using 4, 7-inch cake pans. You can also use one batch of batter to make 2, 9-inch cake layers or 4, 6-inch cake layers. Bake time will be a few minutes longer at 350°F / 175°C. This recipe can also be used to make a death-by-chocolate sheet cake! One batch will make 1, 9 x 13-inch cake layer that is about 1 inch tall once it’s baked. Bake for 25-35 minutes at 350°F / 175 °C, or until a toothpick inserted in the center comes out with a few moist crumbs. Bake time can vary a lot based on the type of pan you use, if you use heating cores, and your oven. I recommend using heating cores if you have them to help large cake layers like this bake more evenly and quickly. If you want to make a tiered cake with this recipe, check out my cake batter calculator to see how many batches of batter you’ll need. If you want to make death by chocolate cupcakes, use my death by chocolate cupcake recipe! One batch makes 2 dozen cupcakes.Making this Death by Chocolate Cake in Advance & Storage Tips
I highly recommend making the components of this cake in stages. It breaks the process up and makes it so much more approachable! The cake layers can be made in advance and frozen. They taste just as great when they’re frozen as when they’re fresh, I promise! You can make the frosting ahead of time or save any leftover frosting! It can be stored in an airtight container in the fridge for up to a month or in the freezer for 3 months. Be sure to give it a good stir once it thaws to get the consistency nice and smooth again. This cake can last at room temperature for up to 2 days, in the fridge for a week, or in the freezer for a month. The buttercream locks in the moisture and keeps the cake fresh and delicious! If you cut into the cake and have leftovers, use any remaining frosting to cover the cut section to keep it moist and store it in the fridge for up to a week.Nutrition
Other Recipes You Might Like:
Is it possible to make this into cupcakes? Would you still use the syrup and just brush it on before frosting? Thanks!!
@Marilyn Tiburski, I just wanted to respond to you because I just made cupcakes with this recipe!
It made exactly 2 dozen and 20 minutes was perfect!
They do rise a bit and I had filled mine 3/4 of the way full, and a lot of them did slightly go over the edges! So I would suggest only 1/2 way or just slightly less than 3/4 full! They are SO good and I didn’t use the simple syrup for these either!
Is it possible to make this with 9 inch pans? Thanks!
@Sabrina,
I haven’t tried it yet but most recipes that call for 8inch cake pans can usually be evenly swapped for 9inch pans (so, 3 9inch pans for this recipe).
Just monitor the oven more since the thickness of the cake would likely be different.
@Sabrina, I recently made these with 9″ pans
Came out perfect
Yay!! So happy to hear that Mariska! Thank you for sharing 🙂
@Sabrina, I used 2 9 inch pans, came out perfect
Yay, that’s awesome to hear!! Thanks for sharing—it’s super helpful for others to know it works perfectly in two 9-inch pans too!
Can you make this into a sheet cake?
@Jennifer, If you scroll down to almost end of the post, she talks about instructions on how to make this into a sheet cake. She says 1 batch makes a 9× 13 sheet cake and it comes out 1 inch. You’re welcome
Thank you for sharing Maahi!!
Me ha encantado , siempre había querido hacer esta receta , me recuerda el pastel de chocolate de Bruce en la película de Matilda, pero siempre veía recetas demasiado simples y sin tanto sabor, me has animado a preparar tu receta ,porque se ve realmente genial, y espero que me salga todo bien , te sigo en instagram ?? gracias por compartir
Dónde veo la receta completa?
Best chocolate cake recipe ever!!! Definitely recommend making it
There’s so many different ‘mini chocolate chips’. Semi-sweet here? Just good ol’ choco chip cookie chips (but mini)?
@Keith,
Pick one that matches your preference. I chose semi-sweet to balance out all of the dark chocolate in this recipe. It was delicious! Perfect amount of sweetness for me. However, I didn’t cover the whole cake with them. Just the bottom half. But if you prefer a cake that isn’t too sweet, I would go with dark chocolate.
I made this cake and it was SO DELICIOUS!!!! Perfectly moist cake and the icing was so good!!!
Just made this cake today. I used 2 x 9in pans.
Tastes amazing but the cake top was so sticky. It stuck to my hands and fingers while I was flipping it over, and it got stuck to the wire rack, then started to crumble as I flipped it again. I baked it for 20 minutes and toothpick came out clean. Now I have 2 layers with craters in them because of chunks that stuck to my hand / fell apart during the flipping process. What should I do next time?
@Rosy, spray your wire rack prior to flipping cakes if the happens
@Rosy,
Not uncommon with moist cakes. Parchment or waxed paper over top of cake before flipping. Voila
Delicious! I used dark chocolate (72%) for the buttercream and I did not add the mini chocolate chips as decoration. It was amazing! Thanks for the great recipe!
Made this for my sister’s birthday with the Hershey’s dark cocoa powder as suggested! Used 3, 8″ cake pans and worked out great. Made the simple syrup soak – and forgot to add it! But the cakes are so moist (day 2) that it wasn’t missed or needed at all. I omitted all the chocolate chips mentioned in the recipes and instead decorated the top with strawberries to cut into the chocolate a bit. Everyone loved it! This was my first time making American buttercream, followed the recipe to a T, and it worked out. Thanks Chelsey!!
Hi I tried this delicious cake and my family loves it. Thank you for this recipe.
Hi!
Love your Instagram page!
Can the heavy cream be replaced by whip topping?!
I can not find the video tutorial mentioned. I plan to make this cake today and tomorrow. The recipe looks excellent.
Hello,
I made this cake and it sunk in the middle for all three pans very badly. Do you know why this may have happened? It also over flood even though I only filled them half way full.
Just made these as cupcakes- halved the recipe and skipped the chocolate chips but used the chocolate syrup on top- they are absolutely delicious the recipe is excellent!
Made two of these for Thanksgiving.. one for home and one I sold.. Everyone raved about how delicate and moist it was.. only change I made was adding a little expresso coffee. I didn’t use simple syrup absolutely not needed
Can this recipe be turned into cupcakes ?
Hi!!
What about to substitute the cup of warm water for a cup of hot strong coffee?? It is told that coffee intensifies even more the chocolate flavor in cakes.
Thanks.
Loved this cake! I accidentally used black cocoa powder instead of dark but it still tasted great and stayed moist for a week. The icing was the best part I think! Was intimidated to try it but it wasn’t too difficult. Thank you!
@Kaleigh, I made this for a dear friend’s birthday and the cake was divine. Steps were easy to follow. I made two 9 inch rounds and cut them in half to make a four tier cake.
@Sara Cruz, how long did you bake them?
I’m so disappointed I’m making this cake foe a client. It’s my 1st time trying this recipe. I bake cakes all the time, and have never had a problem putting a crumb coat on a cake. The whole cake has literally falling apart and won’t allow me to put the crumb coat on. I just had to throw all 3 tiers away.
How did you obtain your volume to weight conversions? Several of them are very off, i.e. baking soda and salt to name two important ones. I used the volume measurements you provided and converted them to weight myself. Needless to say, my cake fell in the center. Is there a possibility you could update this to reflect the correct volume and/or weight measurements?
The frosting recipe sounds like it makes a ton. Do you recommend cutting the frosting recipe in half for a 13×9 cake?
Hi Chelsey,
i will make this cake for my daughter’s birthday but she wants a white outside frosting (i will use ur vanilla buttercream one) and a green drip…
i m a bit worried of the outside white frosting becoming a bit brown due to the cake and the chocolate filling. Im worried that when i will start frositng the cake with the spatula, some pieces of cake or filling will tint is brown. Does that make sense? Any tips for me
Thank you
Hello!
I was wondering why you have to wait for 20 minutes before baking the gluten free version of the cake?
Thank you
Can this cake be used as a base for a tiered cake? Would it be strong enough to hold up?
Fabulous cake!! Easy to follow recipe. I have made it twice now.
I love this recipe, it looks delicious and super moist. Is it structured enough to build a 3-tier wedding cake? Thank you!
Hi Suzana,
While I absolutely love this recipe, the layers are very soft and it would make it difficult to use in a large wedding cake. It could be done with proper supports, but getting sharp edges on this would be more challenging than some of my other chocolate cake recipes. I would recommend using this chocolate layer cake recipe: https://chelsweets.com/my-go-to-chocolate-layer-cake-recipe/
It has great structure and works amazing in tiered cakes likes wedding cakes!! It’s essentially the chocolate version of my go-to vanilla layer cake 🙂 Happy baking!
I wanted to come here and write a review as I made the cake for my husband and everyone absolutely loved it. I was not able to find dark cocoa so I sub with unsweetened. I double the recipe and filled three 10in cake pans with about 3 1/2 cups of batter each. I baked at 350f for 30 minutes. I also doubled the buttercream frosting and had
leftover that I currently have saved for something else.
Thank you for sharing!! i
I’ll definitely will be coming for more ?
Hi Loretta,
That is so wonderful to hear!!!! I love that 🙂 Thank you so much for sharing!
I loved making this cake! Turned out so moist and the frosting was just perfect! I had never made chocolate frosting and this was just the perfect recipe! Thanks for sharing your recipes!!
Hi Sarah,
Yay!!! This is my favorite cake recipe and I’m so happy to hear you love it as much as I do 🙂
I’ve made this as 3 layer 8inch cake before. It’s so good!!? but if I wanted to make a cake that’s two 9×13, how many batches will I need? I want to make number cakes but I’m unsure how much cake to make.
Btw, Thank you for creating this recipe. It’s honestly changed my life ??
Great question Noemi! It depends on how thick you want the layers to be, but I’d recommend making 1.5 batches! Divide the batter between the 2 quarter sheet pans and bake them at 325 F for 35-45 minutes (bake time can vary if you use flower nails and on the type of pan you use). Hope that helps, happy baking 🙂
@Chelsweets,
Super helpful!! Thanks for the reply. I’ll be trying it out this weekend 🙂
Yay! I hope it turned out amazing!! Happy baking!! 🙂
Can water in the chocolate syrup be substituted with milk? For a creamier syrup.
Hi Julie,
It totally can, that sounds delicious! Just make sure you keep the cake refrigerated if you make in advance so the milk doesn’t go bad 🙂
I’ve made this cake before and it’s sooo good!
If I did 1.5x of every ingredient for the cake it would work to add a layer or two for an 8 inch cake? I need it to be a bit bigger for a larger crowd.
TIA!
So happy to hear that Rachel, this is one of my all time favorite cake recipes!! You can totally make a 1.5x batch and make 2 additional 8-inch cake layers. The cake will end up being pretty tall but you can cut the slices in half and it should work great 🙂 Happy baking!
Hi Wondering if you can substitute Rum or Whiskey for the water in the simple syrup?
Was a tad intimidated that this would be hard, but it wasn’t. I made it for friends and they said it was handsdown the best chocolate cake they ever had.
1st try I used 8″ round oand and tried for 4 layers. It worked, but I don’t recommend it. On my 2nd try, I used 3 8′ rounds and it worked out much better. The cake is delicate and the extra thickness helps stabilize itself.
Great job!
Hi Melissa,
I live for comments like this!! Making an entire cake from scratch can be a lot of work, but it’s totally worth it 🙂 So glad all your friends loved this recipe too! Thank you for sharing!!
This recipe is amazing! Thank you so much for sharing. First time I tried it, I used home brand cocoa powder. Second time I baked this cake I used Hersheys cocoa powder and it’s a world of difference! I’ve doubled this recipe, and used 5 inch cake pans to make a tall cake! Came out so beautifully! Thank you once again.
Hi Aline,
I’m so happy to hear that!! And I totally agree, the dark cocoa powder totally makes it 🙂 Thank you for sharing!!
Hi made this for my daughters 19th birthday beat cake ever the buttercream best ever too .what am wanting to ask if I leave out the cocoa and chocolate in the frosting can I use it as a vanilla buttercream ?
Hi Samantha,
I am so happy to hear that!! I am obsessed with this recipe too 🙂
If you want to make vanilla frosting I’d recommend just using my vanilla buttercream recipe: https://chelsweets.com/the-best-american-buttercream-recipe/
It’s basically the same as leaving out the chocolate and cocoa powder in the frosting, but it also uses a bit of powdered sugar to replace the cocoa powder and uses less heavy cream. The melted chocolate really thickens the chocolate frosting, but you don’t need as much heavy cream when you’re just making vanilla frosting. Hope that helps, happy baking!
Can I use decaf coffee (instead of water) and can I use unsweetened cocoa instead of dark?
Hi Kemi,
You can totally make both of those swaps! Happy baking 🙂
Can I use this chocolate cake for wedding cake where I’ll be covering with fondant.
Hi Mavis,
Great question! This cake recipe is pretty soft, but as long as the cake is properly supported and chilled, it should work great in a wedding cake that’s covered in fondant. Hope that helps, happy baking!
how can i scale down the recipe for two six inch pans?
Hi Tiffany,
Great question! The easiest way to do that would be to cut the recipe in half. The layers will be taller than mine and they’ll take a bit longer to bake but they should turn out great. Hope that helps, happy baking!
Hello!! I’ve tried ur recipe !! The taste is good but the cake kept crumbling and breaking from the bottom. ( note : temperature at my city : 32c to 19c) . Will that affect anything ?!
Hi Rupika,
So sorry to hear that! When you say crumbled at the bottom, do you mean when you were frosting it, or when you were trying to remove it from the pan?
These cake layers are super soft and do crumble easily. I find that popping the cake layers in the freezer before assembling the cake makes them a lot easier to handle and frost. Hope that helps for next time, happy baking!
Can I use gluten free flour for this? Would that work? Thank you! It looks amazing ?
Hi Esther,
You totally can! You can swap in a good gluten free flour blend if needed. Just be sure to stir the batter longer than normal to help give the cake proper structure, and let the batter sit for about 20 minutes before baking it if you opt to make a gluten free version. Hope that helps, happy baking!
Hello! This sounds delicious. I would love to make this for a catering event. I would like to have it pre-sliced and frozen. Do you have any idea if it would slice better already Frozen or slice it first and then freeze. I will be putting wax paper between the slices also.
Hi Deanna,
I haven’t tested cutting it frozen, but I feel like the buttercream would be hard to cut through if it was and would crack?! Maybe it would be easier to cut it when it’s chilled in the fridge?! I usually cut my cakes when they’re chilled in the fridge but have sat at room temperature for about an hour. But I also am usually just cutting them casually, and don’t need to get perfect slices. Sorry I can’t be of more help!
Hi Chelsea,
I want to make this cake into three 4-inch pans. How much of the cake recipe should I make (1/2, 1/3, etc) and how long should I bake it? Thanks!
Hi Monica,
I’d recommend making a 1/4 batch to make 3, 4-inch cake layers. I’m not 100% sure on the bake time because I haven’t used this recipe to make layers that size, but I’d suggest baking them for 15-20 minutes. Hope that helps, happy baking!
I haven’t had the cake in it’s entirety (yet), but just tasting the scraps this is hands down the best chocolate cake recipe ever!!! I’m here to write, it works perfect in 3 9in cake pans baked for 18 minutes. Thanks for the recipe!
Hi Miranda,
I am so happy to hear that!! Thank you so much for sharing 🙂
Thank you for this not only fantastically delicious cake-made it and family loved it, but really appreciated how you put the measurements within the directions of the recipe-made baking so easy. Great notes at the end. I’ve been asked to make this for the birthdays now!
Hi Gena,
I’m so happy to hear that!! And I love that you appreciate how I write my recipe cards 🙂 Thank you for sharing!!
What oil can I replace the vegetable oil with? (But not coconut oil either)
Thanks
Hi Diane,
You can use canola oil in place of the vegetable oil! That should work great. Hope that helps, happy baking!
Hi! I’m really excited to try this recipe, but I’m a little confused about the amount of 8 inch cake pans needed, the recipe seems to say 3, but the photos and video show 4 layers of cake.
Thanks 🙂
Hi Valerie,
This recipe can be used to make 4, 7-inch cake layers, or 3, 8-inch cake layers. The cake in the picture are made with 7-inch cake layers. Hope that helps, happy baking!
Turned out fabulous the chocolate lover I made it for said the frosting was the best he ever tasted
Yay! So happy to hear that Susan 🙂 Thank you for sharing!!
Hi I love this recipe, how long would I bake for 3x 6inch pans?
Hi Kat,
So happy to hear that and great question! If you want to make 6-inch cake layers, I’d recommend making 4, 6-inch cake layers with one batch of batter. Otherwise the layers will be super thick and will take forever to bake through. The bake time for layers that size would be a few minutes longer than the recipe calls for. Hope that helps, happy baking!
hi, i’m very much looking forward to baking this cake! i just have one question: can i replace the all purpose flour with self raising flour and leave out the baking powder and baking soda? would this change the texture of the cake?
Hi Jas,
Great question! You can replace the AP flour, leavener and salt with self-rising flour (I believe most of them also have salt, but double check the bag!).The layers will rise up slightly taller, but it should be super similar in texture. Hope that helps, happy baking!
Amazing chocolate cake! Made it twice in 1 week because we love it so much! Thank you for sharing.
So happy to hear that Rubi!! Thank you for sharing!! 🙂
WOW i haven’t tried it yet but I will it looks sooo delicious ?
and THANK YOU SO MUCH for taking the time to put the Gramms in the back of every Ingredient! I’m a German so it saves me a lot off time ????
Hi Delia,
Thank you!! And of course!! I love using a scale to bake, and prefer it over using a cup measure 🙂
Best chocolate cake recipe ever
Aw thank you Abdulaziz!! 🙂
Oh my goodness, this cake turned out wonderful!!! So rich, decadent, and moist!!! This was my first time making a chocolate cake and it did not disappoint, the only substitution I did was using yogurt instead of sour cream. Will definitely keep this recipe in the books haha.
I tried it today!!
BEST CAKE I have ever tried! Definitely will be making this again!!
x
Yay!! So happy to hear that 🙂 Thank you for sharing!!
I hope you can help ! I’m making a 3 layer 9” cakes for a friends BD Will this be enough frosting??
Hi Susie,
It depends on how you plan to decorate it, but I’d definitely recommend making at least 1.5 batches of the frosting, if not 2 batches for a cake that size. Hope that helps, happy baking!
This recipe is incredible! The best chocolate cake ever!!
Aw you are too sweet Kiera!! Thank you for sharing!!!! 🙂
Can I make this cake into a 9×13. Cake?
Hi Waltina,
You totally can! The bake time should be 20-25 minutes. Hope that helps, happy baking!
Hi Chelsey,
If I had to yield 20-25 slices using this recipe, do you recommend I bake 3 6”layers or 4 6” layers?
Thank you!
Hi Ree,
I’d recommend making 4, 6-inch cake layers, so that you can cut 12 tall slices in half and have each slice have 2 layers/slice. Hope that makes sense/helps, happy baking!
Hi, can I use butter in place of cooking oil? thanks
Hi Gwen,
Great question! You can use melted butter in place of the cooking oil. The texture will be a tiny bit less moist and the cake will taste a little it richer (butter adds more flavor than oil), but it will still be absolutely delicious!
I LOVE this cake!!! I’ve done it several
Times, once I covered with fondant, another with candy melt decorations, other just chocolate… it’s specially good the day after when it’s really cold!!
I am so happy to hear that Britt 🙂 And yes totally agree!!! Thank you for sharing!!
Absolutely love love loved it!!! Person I made this for said that it was the best chocolate cake they’ve ever had!
YAY! So happy to hear that Rachel 🙂 That makes my day!!
My go to chocolate cake recipe! Made this one countless times and always a huge hit with family/friends/coworkers. It’s delicious and moist
This is one of my faves too!! Thank you so much for sharing 🙂
BEST.CAKE.EVER.
Made it a couple of times now. Don’t always add the syrup in, as the cake is already so moist.
So happy to hear that!! And agreed, the simple syrup is totally optional!! 🙂
I’m making this cake for a wedding next month and did a practice run yesterday. They only want a crumb coat on the cake as the “decoration” but the cake was very crumbly which made a crumb coat very difficult. Is there something I did wrong to make it so crumbly? Would the issue be resolved by leaving the cake in the freezer for 20 mins before frosting? Is there a different recipe that would work better for a crumb coat cake? Thank you so much!!
Hi Amee,
#1 – so happy you’re doing a practice run! SO SMART when it comes to wedding cakes!!
#2 – totally hear you on the crumbing. I love this recipe, but it can be difficult to stack, especially if you only can do a crumb coat! I’d recommend using my chocolate layer cake recipe instead. It has great flavor but a bit more structure and is WAY easier to stack! Here’s the link: https://chelsweets.com/my-go-to-chocolate-layer-cake-recipe/
Hope that helps and that the wedding cake turns out great!
Made this delicious rich chocolate cake for my grandson’s birthday in February. Making it again today for my granddaughter’s birthday because it was such a hit. Thank you, this one is a winner. Tanya- Cape Town South Africa
So happy to hear that Tanya!! You have some very lucky grandkids! Thank you for sharing 🙂
This is an AMAZING recipe!!!! I cannot recommend it enough. I’ve made it for a birthday party and a wedding, and both times it had RAVE reviews. So many people told me it was the best chocolate cake they’ve ever had—even people who didn’t like chocolate loved it. The icing is sinfully decadent. The chocolate simple syrup keeps it perfectly moist. I’ve made it with and without chocolate chips, and it’s amazing either way.
I’ve also made this into cupcakes, and it works really well! Just reduce the baking time. I think it took about 18-20min in my oven.
Aw this comment put the biggest smile on my face Sydney! Thank you so much for sharing!!! I made it for my birthday this year because it’s one of my all time favorite recipes too 🙂
Hi! I was wondering if you have tried making this with gluten free flour? Thank you ?
I have and it turned out great!!! I love using Bob’s Red Mill or King Arthur Flours GF baking flour. A few tips for gluten free baking:
1) Don’t be afraid to over-mix your batter! Vigorously whisk your batter for a few minutes once it’s made, to help give it structure. Goes against everything we say in normal baking (you usually NEVER want to over-mix), but with GF flour it’s a good idea.
2) Let your batter sit for about 30 minutes before baking to help the gluten free flour absorb more moisture from the batter. Hope that helps, happy baking!
This was so simple to make and so incredibly delicious! I’ve never made something that tastes just like it looks, this truly did not disappoint. Will 100% be making this for the rest of my life.
So happy to hear that Kay 🙂 You are too sweet! Thank you for sharing!!
can i use 2x 8″ cake pan instead of 3? how long should i bake it?
This cake is divine! It’s so moist that the syrup isn’t needed unless you’re planning on storing it for ages.
I used the volume measurement rather than weight as something didn’t quite look right about them (I’m yet to do my own conversions). I’ve made this 3 times now and it’s had rave reviews from 3 different groups of people.
Looks fabulous, I live at 7300 feet above sea level, do you recommend high altitude adjustments to your cake recipe?
Pues no entendí porque el centro de la torta se sumió, aunque como no tenía azúcar blanca, use morena, tal vez la hizo más húmeda y bueno cambio características de la torta, el molde usado no era de 8 o 9 pulgadas, estaba como en el medio según medida tomada. Se ve deliciosa sin embargo se me rompió en el desmolde por qué me quedo muy húmeda.
You bake and decorate beautifully! I love to see your videos. It took me a while to find your recipes but I managed to find it. Thank you for sharing with all of us. Have a wonderful day baking ?, Livia
Hii! So excited to try your recipe, it looks divine! Do you use the the same Hershey dark cocoa powder for both the batter and the frosting? Thank you!!!
Hii! So excited to try your recipe, it looks divine! Do you use the the same Hershey dark cocoa powder for both the batter and the frosting? Thank you!!!
Could greek yogurt be substituted for the sour cream. I happen to have greek yogurt in the fridge but no sour cream.
What do you think?
Recetas fabulosas.
Was not shure if i could trust the comments but iam so glad i tried it out. The cake batter alone is so useful bc its so moist but workable. After i baked the cake i instantly made Cupcakes wich turned out amazing as well. Very very simple but super great iam happy that i can use this for everything now ???? i will also try some diffrent variations like Vanilla or vegan substitute. Iam very hiped as u might notice.
I made this last week and it was AMAZING! However, both of my cakes fell in the middle. I am baking at elevation, but other than falling, they came out PERFECT. Do you know why the middle would fall like that? Thank you!!
I saw that you said this can be made as a sheet cake in a 9×13 pan. I’m thinking of doing that but cutting it in half, so it’s 9×6.5, and making it into 2 layers. Is there any reason you think that wouldn’t work? I’m trying to avoid buying round pans but still want layers if possible. Thanks!
I saw that you said this can be made as a sheet cake in a 9×13 pan. I’m thinking of doing that but cutting it in half, so it’s 9×6.5, and making it into 2 layers. Is there any reason you think that wouldn’t work? I’m trying to avoid buying round pans but still want layers if possible. Thanks!
Can I sub the water in the cake for milk? So excited to make for my birthday next week!
You totally can, that should work just fine. Happy baking Crystal!
Hey girl. Love all your recipes. This is actually my go to chocolate cake recipe, I love it. But was wondering, have you ever tried black cocoa in this recipe? I need to make a black cake this week but don’t want to waste the black cocoa powder as it was very expensive, and I love this recipe so figured I’d ask. Thank you ??
You totally can, it tastes amazing with black cocoa 🙂
In the time when the cake is in the freezer for 10 min after spreading frosting in between the layers what should I do with the rest of the frosting? Take it to the fridge or leave it out? I’m scared getting it too hard for the remaining frosting step or getting to melty ??? please help.
Can I freeze the bases before icing ?
How many people will one cake feed for a dessert?
The cake came out perfect, I’ve made it twice. However, the buttercream frosting has a grainy taste like eating sugar, how can i mitigate this?
I tried this cake today, but was a little confused by the measurements, for the cake it has 2 cups of flour at 260g and then 2 cups of sugar at 400g. I want with the grams and it didn’t rise at all. Should I be using cups? Are the gram measurements incorrect?
Hi Andrew! A cup of flour is 130g, and a cup of sugar is 200g! Sugar is denser than flour, so it weighs more. If the cake didn’t rise, it could be because your leavening agents are old and have lots some of their potency, or the batter may have been overmixed. But also – the cake doesn’t rise a ton and should have a some what flat top once its baked. However, the texture should still be nice and fluffy. Hope that helps for the future, happy baking!
Made this for my dad’s birthday. My most complimented cake so far, everyone LOOOOVEEESS it. Thanks for the recipe!!
Amazing recipe!! The buttercream is soooo good!!! Thank you! I’m going to make this for my daughter’s birthday.
Hi there,
Awesome Recipe!
One question though. When I melted the chocolate and let it cool. By the time we have to use it in the buttercream, it had big lumps in it. I thought putting it in and the mixer will break it down but it did not. This was the issue when using the buttercream as I had to take out the lumps.
Do you have a suggestion on this?
Hi Ashika,
How long did you let the melted chocolate cool for? It should take about 10 minutes from when you melt the chocolate to when you add it into the frosting. Like I mention in the recipe card, the chocolate should still be fluid, but no longer hot to the touch. When I say cooled, we just want it not to be so hot that it will melt the butter in the buttercream, but it’s ok if it’s still a bit warm. It is super important the chocolate has not started to harden before you add it into the frosting. Hope the helps, happy baking!
@Chelsweets,
Hi, I followed the recipe correctly this time and this Chocolate cake is a hit. Everyone loves this Death by Chocolate cake to “death”. ? Thank you for such great recipe.
Hi, how do i defrost the buttercream. What r the steps plz? Thnx
Hi Naulee,
You can either move it the fridge the night before, then set it out on the counter for a few hours to come to room temp, or take it straight from the freezer and set it on the counter overnight to come to room temp. Either way, once it’s thawed, be sure to give it a good stir with a rubber spatula or use the paddle attachment on a low speed to make it smooth again. A bunch of air bubbles will form as the the frosting thaws, but it’ll become smooth again after it’s mixed again. Hope that helps, happy baking!
Hi! – I am considering making two 12in cakes with this recipe. I see that this makes 8cups of batter so I will have to double the recipe in order to make the two 12in layers. Do you think this recipe will be able to support two 12in layers stacked on top of each other? I plan to use a few dowels but I have never made a cake this large but LOVE this recipe.
Hi Casey,
I would do exactly that! Double the recipe and add 8 cups to each 12-inch pan. Bake time will be longer, and if you have them use a couple heating cores (like these: https://amzn.to/4e7vRYt) you can use them to help the layers bake more evenly and quickly. The layers will be a bit harder to handle because they’re so soft, but you can freeze them before stacking them to make them easier to handle, and you can also place a 10-inch cake board underneath the layers to gently slide them into place! That helps a ton, I do that when I make big sheet cakes too. Hope that your cake turns out amazing!! Happy baking 🙂
Your recipe was a absolute smash.
Loved it very much, and will be using this recipe more often. All thanks to you. <3
Hi Manahil,
So happy to hear that!! Thank you for sharing 🙂
This was by far the BEST chocolate cake I have ever eaten!! I skipped the chocolate chips and added raspberry filling and fresh raspberries on top. Absolute perfection!!!
My husband is in love with this cake. I thought the frosting was going to be a little too intense, but it wasn’t. I did substitute 1 cup strong coffee for the water since I didn’t have expresso powder. Cake came out fabulous! Thank you??
Hi, well I made 2 batches – round pans… they ALL fell in the center and they look like gooey brownies 🙁 not sure what happened but I followed the recipe to the T. Both batches turned out exactly the same. Caved. Have not decorated & tasted yet. So we will see how it goes but it’s not going to look too great and this is for a huge party…..NEVER TRY A NEW RECIPE FOR AN EVENT LOL PRACTICE FIRST!!!!
THE BEST.
I don’t think I’ve ever left a review on a food blog before. Made this for friendsgiving and this was the best cake I’ve ever made. Followed the recipe to a T expect for the melted chocolate in the frosting for lack of time. I wrapped the cakes after 15 mins cooling in cling wrap and froze them overnight, then assembled the next day with the simple syrup. I also used a vieranamese instant coffee drink mix pouch in lieu of espresso and it added such a rich flavor. Seriously the moistest cake ever. I forgot to put frosting in between each layer and it was so moist that i couldn’t even lift it back up! Seriously the best. Will be the recipe I write on a card and pass down generations. Seriously so good.
This a is a fabulous recipe. The cake is moist and the frosting is Delish!
“This cake is pure chocolate heaven! ?? Moist layers, dark chocolate buttercream, and a coating of mini chocolate chips—every bite sounds like a dream come true for chocolate lovers. Can’t wait to try this indulgent masterpiece! ??”
I never comment on recipes — like ever. But this is the best cake I’ve ever made. Started at about 11 am finished just before 1 pm. The recipe is extremely easy to follow and I really appriciate that you included gram measurements, came together perfectly. The cake tastes like a fudgey brownie but with a beautiful light crumby texture. However, the chocolate butter cream is by far the star, it literally melts in your mouth. I was looking for a recipe that tastes like how I imagine the chocolate cake in the Great British Baking Show intro tastes and this has to be it. 10/10, thank you!
Slight modifications: I did not have dark coco powder on hand and subbed a 1:2 ratio of Hershey’s coco powder to black coco powder. I also added fresh raspberries to the top and it turned out lovely.
This recipe is sooo good, i have been made it for so long and always turn out very good, now i am living a high altitude and can’t figure out what to do. Could you please help me. Thank you.
It’s great i try it but sugar to much i wanna aske you if reduce sugar it’s more better
Hi!
Wondering if this could be turned into a single layer cake? If so, what would be the measurements? Thank you in advance!
Ok I love your train of thought Analisa, and I actually had the exact same one, and that’s what I did to make my chocolate snack cake recipe!! Here’s the link: https://chelsweets.com/chocolate-snack-cake/
It’s basically a scaled down version of this recipe that makes 1, 8×8-inch square cake layer 🙂
Instead of brushing the layers with the chocolate simple syrup, I purchased a small spray bottle and filled with the syrup. It sprays a nice fine mist and gives better control and a more even covering.
That is a fantastic way to do it!! Thank you for sharing Tammy 🙂
Our DIL made this cake for my birthday. Absolutely the best GF cake ever !
(Believe me, we’ve tried MANY before)
Delicious, moist, chocolatey goodness from top to bottom.
Her labor of love for this decadent cake will be remembered always.
Highly recommended by all that had a slice. ??
Hi Christy,
This just made my day!! I’m so honored that the cake was part of such a special celebration — and huge props to your DIL for baking it with so much love! I’m thrilled to hear it stood out among the many GF cakes you’ve tried! Thank you for the kind words and for sharing this — truly means so much!
How many cups of cake mix does the death by chocolate cake mix make?
Hi Donna,
This recipe makes about 8 cups of batter. For the future, I usually include this type of info in the notes section of my recipe cards 🙂 Hope that helps, happy baking!
Looooovvvveeeeee this. Made this and added almond extract and cake flour instead. I also did semi sweet chocolate chips in the frosting. My entire family and then some was in love with this!!!!!
Sounds delish!! So glad to hear you and your family loved it Rain 🙂
I am new to making chocolate cakes. I have only made pound cakes that my mom taught me. If I want to make a smaller version of it to try it out first, could you share the measurements please?
Hi NGM,
Happy to help! What size of layers or layer are you trying to make? Once I know that I can help recommend how to scale this recipe. Thanks!
Omg! My new favorite. I didn’t use the mini chocolate chips. For the cocoa, I used 1/2 black cocoa and 1/2 hersheys special dark cocoa. This cake is so moist and delicious. The frosting recipe makes plenty, most other recipes don’t make enough.
Ahh I love hearing this!! Your cocoa combo sounds amazing—I bet it gave the cake such a rich, deep flavor. And I totally get you on the frosting—there’s nothing worse than running out mid-decorating! So glad this one delivered all around!
I made this in a 9×13 pan and it turned out amazing and was super easy! (Didn’t use the recipe for the icing)
I’d say next time I’d make it a couple days ahead as I feel the chocolate flavour and the texture of the cake gets even better after a few days in the fridge!
Hi Aamena,
Love this! I’m so glad it worked well in a 9×13—such a great option when you want something easy to slice and serve. And yes, totally agree! Something magical happens when chocolate cake gets a little time to rest. The flavor deepens and the texture gets even more tender. Thank you for sharing your tips and tweaks!
How can I save this to Pinterest so I don’t loose it??
Hi Susanna,
I’m not sure why my pinterest buttons aren’t working on that post, I’m sorry! You can also try emailing yourself the recipe or bookmarking the page in the mean time. Hopefully I get it fixed ASAP!!
How can I replace sour cream?
Hi Maria,
Yes, definitely! You can substitute the sour cream with plain Greek yogurt (full-fat works best) for a very similar texture and tang. If you don’t have that on hand, regular plain yogurt or even buttermilk can work in a pinch, just keep in mind that buttermilk is a bit thinner, so the batter might be slightly looser. Hope that helps!
Anyway I could use a substitute for the sour cream?:) thanks!
Hi Ellie,
Yes, definitely! You can substitute the sour cream with plain Greek yogurt (full-fat works best) for a very similar texture and tang. If you don’t have that on hand, regular plain yogurt or even buttermilk can work in a pinch, just keep in mind that buttermilk is a bit thinner, so the batter might be slightly looser. Hope that helps! Let me know how it goes 🙂
I’ve tried to make it and this is the best chocolate cake recipe ever. It is so moist, rich and just yummm. But I used less sugar in both buttercream and cake and turned out just right. Thank you
Hi Octie,
Ahh I love hearing that!! I’m so glad it turned out perfectly for you, and great call on adjusting the sugar to your taste. That’s the beauty of baking once you find a solid base recipe, it’s so easy to make it your own. Thanks for giving it a try and for taking the time to share your results!
When it’s my time, I would like to face-plant into a pool of this cake and be instantly transported to heaven.
hahahahaha I mean same!!!! totally agree!!
How many servings is in this cake for nutrition purposes. Meaning how many calories in one serving?
Hi Leslie,
There are 24 servings in this cake. Usually both the calorie count and number of servings are included at the top of my recipe cards 🙂 Hope that helps for the future, happy baking!
how can I use regular cocoa powder instead of the dark one? do I need to replace or add something? thanks!
Hi Lily,
Yes, you can absolutely use regular (natural or Dutch-processed) cocoa powder instead of dark cocoa! The main difference is the flavor and color. Dark cocoa has a deeper, more bittersweet taste and gives a richer color, while regular cocoa will make the cake a little lighter in both flavor and appearance.
You don’t need to change the amount or add anything extra in this recipe, just swap it 1:1. The texture will stay the same, so you’re good to go! Let me know how it turns out if you give it a try!
All I can say is WOW. I made this for my birthday and it is by for the best chocolate cake and the BEST frosting. I will be making this every year.
Hi Laurah,
Ahh yay!! That’s the ultimate birthday win! I’m so happy you loved it, and what an honor that it’s now your go-to celebration cake!! Hope you had the best day 🙂
Oh yes, this is a great chocolate cake. It is the perfect texture and flavor. Thank you for the recipe.
Hi Carl,
Aw, thank you so much! I’m so glad you loved it, there’s nothing better than nailing that rich chocolate flavor with the perfect texture. Thank you for sharing!!
Ask ChatGPT
My daughter asked for a dark chocolate, raspberry and coconut cake for her 18th birthday. Couldn’t find a recipe we liked the look of so decided to combine different recipes. I’ve only made the cake layers from this recipe, but they were amazing – so moist and chocolatey (we didn’t even use the syrup). I’ve made a lot of cakes in my time and several people said this was their favourite yet – will definitely be making this with the chocolate syrup and icing soon ?
Hi Emma,
That sounds like such a dreamy flavor combo! I’m so glad the cake layers from the recipe worked so well for you, even without the syrup. They’re super rich and moist on their own, so I can totally see why people were raving!
If you do end up making it again with the chocolate syrup and frosting, it’ll take it to the next level for sure. And honestly, I love that you combined different recipes to get exactly what your daughter wanted. That’s such a thoughtful (and delicious) way to celebrate her 18th. Thank you so much for sharing 🙂
Was pretty disappointed with how it turned out. I followed everything EXACTLY and the cake was super dense, crumbly, and didn’t taste great. I’ll give 3 stars since the frosting was good though.
Hi Alex,
I’m so sorry to hear the cake didn’t turn out the way you hoped! That’s always super frustrating, especially when you followed everything to a T.
One thing that can sometimes cause a dense or crumbly texture is how the flour is measured. Just to check, were you using a kitchen scale or using measuring cups? If you’re using cups, I always recommend spooning the flour into the measuring cup and leveling it off (rather than scooping it straight from the bag), since that can pack in way more flour than intended and really affect the texture. It also could be your oven, have you tested it with an oven thermometer to make sure it’s baking accurately? As crazy as it sounds, most ovens are off by at least 25 F.
Would love to help troubleshoot more if you’re open to it, hopefully we can figure out what happened!
Omg.. This was the best. Made this cake for my daughters birthday. everyone loved it. I did use a fudge frosting in between the layers and decorated with fudge frosting instead of choco chips. The instructions are perfect, love that you included options for sizes and also weight based measurements which I find works best. I also did make of the frostings/syrup a couple days before, which made it easier on assembly day 🙂
Well worth the effort, thanks for the recipe.
Hi Barb,
This makes me so happy to hear! I’m so glad the cake was a hit for your daughter’s birthday!! Love that you made it your own with the fudge frosting, it sounds amazing! And I’m thrilled the size options and weight measurements were helpful. Thanks so much for sharing how it went 🙂
Made this cake for my family and it came out amazing, it’s so moist and crumbly, these best cake I ever made
Thank you for the recipe
Used warm coffee instead of water, everything else was the same
Thank you for this amazing recipe!
Hi Dee
I’m so glad to hear that! Using warm coffee instead of water is such a smart swap, it really enhances the flavor. I love that it turned out to be the best cake you’ve ever made, that makes me so happy 🙂 Thank you for sharing!!
Hi! I would like to make this with 3, 6inch cake layers. How can I scale this recipe down, and how long would I bake for? Thank you!
Hi Jessica,
Great question, and I actually have a scaled down version of this cake recipe that makes 3, 6-inch cake layers! Here’s the link: https://chelsweets.com/small-batch-chocolate-cake-recipe-6-inch-cake/
It doesn’t include the simple syrup, but it’s the same base recipe for the cake layers. Hope that helps, happy baking!!
I made the cake. They came out well. I tried the frosting but that didn’t come out well. I don’t have a microwave so I used the stove to melt the chocolate. I didn’t have the 1/3 cup extra chocolate chips so just used one cup. Do you think that’s the reason? Sigh, the mixture was too runny and unpipeable. Could you please tell me where I went wrong?
Hi Asha,
I’m glad to hear the cake part came out well!! For the frosting, one thing I’m wondering is did you let the melted chocolate cool a bit before mixing it in? If it’s still hot when you add it, it can melt the butter and make the frosting runny and hard to pipe. Using a little less chocolate than called for could also make it a bit thinner, but the main culprit usually is the temperature of the chocolate. Do you think that might’ve been the case here? Hopefully we’ll be able to figure it out together!
This is by far one of the best cakes I’ve made!! Question, do you have any recommendations on making the espresso stand out more? Do you think adding it to the cake batter and or the icing would help?
Hi Megan,
So happy to hear you loved this recipe! Great question, you can use a cup of warm coffee in place of the water in the cake batter, and/or you can add more instant espresso! You could try using 1 Tbsp instead of 1 tsp and see if that adds enough coffee flavor! You can also dissolve some instant coffee into the heavy cream that you add into the frosting. Hope that helps, and that your next cake turns out amazing!
TENS across the board!! Enough said.
The best comment to read!!!! Thank you!!!! 🙂
5/5 !! Honestly the best chocolate cake recipe ever! I didn’t even need to use the syrup because the cake was that moist !!
Ok RIGHT??? Like it’s good with the syrup but it doesn’t have to have it, it’s amazing on it’s own too!!!! Thanks so much for sharing Gab 🙂
This was amazing! I made a 4 layer 8in cake for a birthday yesterday. I made the cake a couple days in advance and froze them. I made the buttercream the same day, it was amazing and everyone loved it! I’ll definitely be making this again!
Hi Liz,
So happy to hear that!!! This cake does freeze great, and it makes the process so much less stressful 🙂 Thanks for sharing!!
Insanely easy and amazing recipe. My family and I were always obsessed with the chocolate cake Costco used to sell and this tastes just like it! It’s definitely my go to chocolate cake recipe now. Everyone loves it. Super rich!
Only note is I made it twice , once as a 6 layer cake where I doubled the recipe and another regular as a 3 layer cake.
For me, when I made the 6 layer cake the frosting recipe was exactly enough for 6 layers and all of the outside so when I made the 3 layer one I cut the frosting recipe exactly in 1/2 and it was the perfect amount of frosting . But totally up to you ! I just always find myself throwing away unused frosting .
Hi Soraya,
I am so happy to hear you loved this recipe! And I appreciate your feedback. I’m a very frosting heavy baker when I decorated cakes, but I know that not everyone likes to use as much frosting as I do 🙂 Thank you so much for sharing, and happy baking!
Hi chels!
I’m going to use the cake layer recipe to make some 6” cakes instead of the standard 8/9” cakes and wanted to ask about the baking time and temp.
Recipe says
You can also use one batch of batter to make 2, 9-inch cake layers or 4, 6-inch cake layers. Bake time will be a few minutes longer at 350°F / 175°C.
Shouldn’t the bake time be shorter when it’s 6” vs when it’s 7/8/9”?
If you could let me know what approximate baking time you recommend that would be amazing!
Thank you
Hi Jenn,
Great question, and you’re absolutely right to pause on that wording because pan size can be deceptive. Even though 6-inch layers have a smaller diameter, they’re usually thicker because the same amount of batter sits in a narrower pan. That extra depth is why they often take a little longer to bake than 8- or 9-inch layers.
I’d start checking the 6-inch layers around the 25 minute mark, but most ovens land closer to 26-29 minutes for four, 6-inch layers. They’re ready when the centers look set, spring back when gently pressed, and/or a toothpick comes out with just a few moist crumbs. Hope that helps, happy baking!!
Could I reduce the sugar in the frosting to one cup?
Five cups is WAY to much for my tastes.
Hi Dian,
Totally hear you! You can, but the consistency of the frosting will be a lot softer. It might be a little bit more difficult to spread on the cake and decorate with, but it should still be delicious! I always recommend adjusting to your palette 🙂 Let me know how it turns out if you do end up making it with 1 cup! Happy baking!
So rich, but so good! I loved how easy it was to make. I am not a great decorator so mine is definitely on the rustic side, but who cares! I only had two 8-in pans and was going to just do all the batter in those but got scared it would overflow so I put about 615g in each and used a couple slots from a big muffin tin for the rest. I think I might have actually been fine because mine didn’t rise too much but now I have a mini cake too!
That is such a fun work around Kim!! Appreciate you sharing, and love that it turned out so great 🙂
Made this for our Christmas family gathering. First time ever baking a cake from scratch, and I’m genuinely impressed with how well it turned out! Several people (including myself!) said it’s the best chocolate cake they’ve had in their entire life!!
Hi Emily,
That’s so wonderful to hear 🙂 I love it!!! Thank you for sharing, and happy holidays!!
Sorry – Death By Chocolate is both the copyrighted title and recipe of the cookbook by Chef/owner of the Trellis Restaurant (c. 1992 Rizzoli International Publications, Inc. and Kenan Books, Inc).
Hi Randy,
Thanks for sharing! Just to clarify, while Death by Chocolate is the title of a cookbook and a specific recipe from that publication, short phrases and recipe names themselves aren’t protected by copyright. The name has been used widely for chocolate desserts for many years, and this recipe is my own original version, not reproduced from that book. I always create and share original recipes 🙂
I had to leave this comment because I think it’s really funny. I made this and when I got to the frosting it was incredibly stiff. I thought it was because it was soooo cold in my kitchen. As I frosted the cake it didn’t stick to the cake without a lot of effort. It was almost like Playdoh. It tasted really good though. So I was reading the comments to see if anyone one else had this and…nothing. This is when I compared my handwritten recipe to the one online. I didn’t add the heavy cream!! So the good news is, if you don’t have heavy cream, you can still make it, but it’s a little weird looking. Still delicious. Next time I’ll do better – haha.
Hi Kitty,
Omg that is hilarious!! Yes, that would make it so stiff!!! Glad it still tasted good though, that is too funny!!!!
MAKE THIS!!!! Literally the best, most delicious, moist, chocolate-y cake ever. If I could rate this 100 stars, I would. It was absolutely divine!! Super easy to make, the cakes baked up perfectly and flat, ready to be frosted. But the taste, that’s the best part. This has definitely become my favorite cake now!
yessssss!!!! Isn’t it so good!?!?! Thanks for sharing Kim 🙂
This is the best chocolate cake recipe I’ve ever made and ever tasted. It’s so moist, the frosting is divine, absolutely amazing. I’m not the biggest traditional buttercream fan (it’s kind of sickly sweet to me) and this is my dream frosting. Very rich and decadent but not in an overpowering way. No notes. Everyone raves over this cake. I wish I had found this recipe sooner!
Ok this is the best comment!!!! Thank you Peyton!!! 🙂
Genuinely one of the best things I have ever made. Thank you Chelsey!
Hi Natasha,
The best comment!!!!!!! Thank you so much for sharing 🙂
Can I change the all-purpose flour and use instead flour cake?
Hi Xhady,
You can! The texture will be a little bit softer, so you might not want to or need to add the simple syrup, but bake time should be the same!!! The batter will be a bit thinner, but it will still bake up well. Hope that helps, happy baking!
Amazing recipe! My father-in-law asked for death by chocolate for his birthday cake and this really delivered!
Yay!!! So happy to hear you all loved this recipe 🙂 Thanks for sharing Samantha!!
Best chocolate cake ever! Made this with a raspberry filling for my niece’s wedding cake, and it was spectacular. The cake was so moist I’m not even sure the chocolate simple syrup was needed, but I used it anyway. Thanks for sharing what will now be my go-to chocolate cake recipe.
Hi Heather,
That sounds like such a delicious combination!! I need to try that next time I make this recipe!! Thank you so much for sharing 🙂
Hello I wanted to ask you about the death by chocolate cake
I want to make this for my friend but the cake pan I want to use is an 4.5 inch
So my question is how much batter do I use and how much do I put in the pan if I want it to be a 2 layer
Hi Alexandra,
I would recommend filling the pans about 1 inch high with batter, and you would probably only need about 1/4 of the recipe, if not less. That is going to be a tiny cake! Hope that helps, happy baking!
The first time I made this cake, it was good, but the frosting was lumpy and not as richly chocolatey as I’d want for a death by chocolate cake. The second time, I tried to follow the instructions for preventing the melted chocolate from clumping up in the frosting, but it happened anyway. Since the cake was for my daughter’s birthday party, I was ready to go the extra mile to make it perfect. It took a good 15 minutes in a double boiler – much longer than described in the recipe tips – but finally all the chocolate melted and I was left with a luscious, silky, fudge-flavored frosting. It was worth the effort! The cake was beautiful and delicious and I can’t wait to eat the leftovers. My go-to chocolate cake recipe from now on!
Honestly phenomenal cake! I made it to take to a weekend away and it travelled without any issues. It felt like more planning and work than I normally put into cakes before, but I can see why it was worth it. Everyone loved it!! 5/5
Hi Sophie,
So so happy to hear that!! Thank you for sharing 🙂
Hello
This looks absolutely fabulous and I have been on the hunt for a perfect crumbly chocolate cake. The only catch is, I am a vegetarian and can not use eggs at all. Could you give an alternative recipe? Or any other ingredient to add in place of eggs? Thanks.
Hi Anshika,
I haven’t tested this recipe without eggs, so I can’t say for sure how it would turn out with a swap. The eggs help give this cake structure, moisture, and richness, so replacing them can change the texture quite a bit.
If you want to experiment, you could try using 1 flax egg for each egg in the recipe, which is 1 Tbsp ground flaxseed mixed with 3 Tbsp water, rested for 5-10 minutes until thickened. Just know the cake may bake up a bit more dense and delicate. I’d definitely recommend testing it before making it for a special occasion! Hope that helps, happy baking!!
Can I use regular cocoa powder instead of Dutch process? A lot of times it’s either more expensive or not available at my local store also, what is dark baking cocoa?
Hi Jonathan,
You totally can! That should work just fine 🙂 Hope that helps, happy baking!
I like everything you did
For the flour, can you tell me which measurement to go by—cups or grams? My King Arthur flour says 1 cup is 120 grams. But above you say 2 cups is 260 grams. I always weigh my dry ingredients so do I use 240 grams of my flour or the 260 you mention above? Thanks! This comes up in so many recipes but I just can’t find an answer. Anyone, anyone?
Hi Karla,
It all comes down to how much you aerate the flour before you scoop it. Everyone has a slightly different process so there just is some natural variance.
The range is usually 120g-130g per cup of flour. You could always try weighing out a cup of flour to figure out which weight you feel most comfortable with and use that going forward if it would help you feel more comfortable!
In some recipes that 10g difference makes a difference, but luckily this is not one of them 🙂 I use 260g of flour. It will turn out well whether you use 240g or 260g of flour. Hope that helps, happy baking!
amo bolo de chocolate
Made this cake for my 2 year oldest birthday and it was absolutely amazing. So simple to make, so moist and so flavorful. My first time doing a soak and I’m glad I did! I put raspberry jam between the layers with the buttercream and it added a great fruity note to it. Thanks Chels for this amazing recipe, will definitely be coming back to it!
Omg that sounds AMAZING! I need to try that next time I make this cake 🙂 So happy to hear you loved this recipe, thanks for sharing Betty!
my sister made this cake for her sons bday and it was so delicious. best chocolate cake ever. i want to make this for a theme cake along with another cake.
I would like to know how tall each layer of cake is approx? 2 inches tall? thanks!
That’s so great to hear Amritha!! These cake layers are actually about 1 inch tall when baked in an 8-inch cake pan. Hope that helps, and that your themed cake turns out great!
I made this for my grandma’s 80th birthday- it was a HIT!! Will be making again!
Hi Brittney,
That is so wonderful to hear!! Thanks for sharing!!!?
This is a 5 star recipe, it just wouldn’t let me hit the fifth star! Super moist even without the simple syrup. I made 2 9″ cakes, cut them in half and layered them with whipped ganache and mousse. The frosting went on the outside and it was the fudgiest I’ve ever had. Nothing but compliments, this is the only recipe I’ll use now. Give the pans a spin before baking for level cakes. So good!
Hi Robyn,
I’m so happy it turned out great!!! Thanks for sharing ?
made this cake about 2 weeks ago and it was the best chocolate cake ever. currently trying to make it again and in 2 9 inch pans and it’s just not working. the edges are baking super fast and the middle is barely baked and the edges are puffed up and the middle is flat. made the recipe the exact same way, just different size pans. would that be causing this?
Hi Hope,
I’m so happy to hear you loved the cake the first time! Yes, switching to two 9-inch pans can definitely affect the way the layers bake.
This recipe can be baked in two 9-inch pans, but the layers will be thicker than they are when the batter is divided between three 8-inch pans. That means the centers need more time to bake through. If the edges are baking much faster than the middle, your oven may also be running a little hot, or the pans may be dark-colored and absorbing more heat.
I’d try baking them at 325°F next time to help the layers bake more evenly, and start checking around the mid-30-minute mark. You can also use heating cores/flower nails if you have them to help the layers bake more evenly and quickly (like these: https://amzn.to/4wgFqxS). They’re done when the center springs back when gently pressed and a toothpick comes out with a few moist crumbs, not wet batter. Cake strips can also help a lot with larger/thicker layers if you have them! Hope that helps for next time, happy baking!
Wanted something simple and easy to cut into small pieces for a work luch so I made this as a single layer cake in a 9″x13″ pan. Cut the chocolate simple syrup and butter cream frosting recipes in half, which turned out to be just right. Had a little simple syrup left over. Went over very well with vanilla ice cream on the side.
Aw I’m so happy to hear that!! Sounds like it turned out perfectly 🙂 Thanks for sharing!
i want to use one of these layers for a 25×25 cm cake, what do you recommend to do? maybe half this recipe?
This is the best chocolate cake recipe ever. I used regular cocoa because I did not have dark cocoa but still super good. Super easy to make in one bowl, no mixer needed, SUPER moist and I had to use light sour cream because I did not have full fat sour cream and the crumb was still super moist, the layers are mostly flat so did not have to deal with trimming the excess and what to do with it. Although I did trim a bit of the excess for the simple syrup to absorb otherwise it would not. Speaking of simple syrup, it’s not even necessary since the cake alone is that moist. The frosting was so good, the addition of the melted chocolate (I only had milk chocolate) made the frosting so silky. I hardly ever have time to make cake from scratch (have made the Hershey one before but too much work) and normally resort to box cake, but with the way this cake came out and how super easy it was, I don’t think I will do box cake again. LOVE LOVE LOVE!
Hi Annette,
Thank you so much for the incredibly thoughtful review! I’m glad the cake turned out so moist and easy to make, even with regular cocoa, light sour cream, and milk chocolate in the frosting. And I love that this recipe may have converted you from boxed cake to homemade 🙂 Thanks so much for sharing!
It’s tastes great but the frosting was really thick and difficult to spread. The cakes were completely cooked including the freezer and the frosting was made fresh with a good whip. Just too thick to spread pretty
Hi Colleen,
I’m so glad you enjoyed the cake, but I’m sorry the frosting was difficult to spread! Because it contains melted dark chocolate, it can become quite firm as it cools, and the frozen cake layers may have made it set even faster. The firmness can also vary based on the type of chocolate you used. What cocoa % was the chocolate?
I’d recommend letting the layers thaw slightly before frosting and mix in room-temperature heavy cream, 1 tablespoon at a time, until the buttercream reaches a softer, more spreadable consistency. Some types of chocolate require a bit more cream. Hope that helps for next time, happy baking!!
Question, I am making this cake to be put together this weekend for a birthday surprise. So I am going to freeze the cake layers after they are made tomorrow and then assemble the cake this weekend. What step do I freeze and now I usually wrap the cakes a bit after they come out but do I add the simple syrup the day of or before wrapping freeze? Thanks
Hi Courtney,
You can add the simple syrup to the layers before you freeze them or after you take them out to thaw a bit before you assemble the cake! Either way works, I usually add it to the layers right before I assemble the cake. Hope that helps, happy baking!
Thx!!!??