
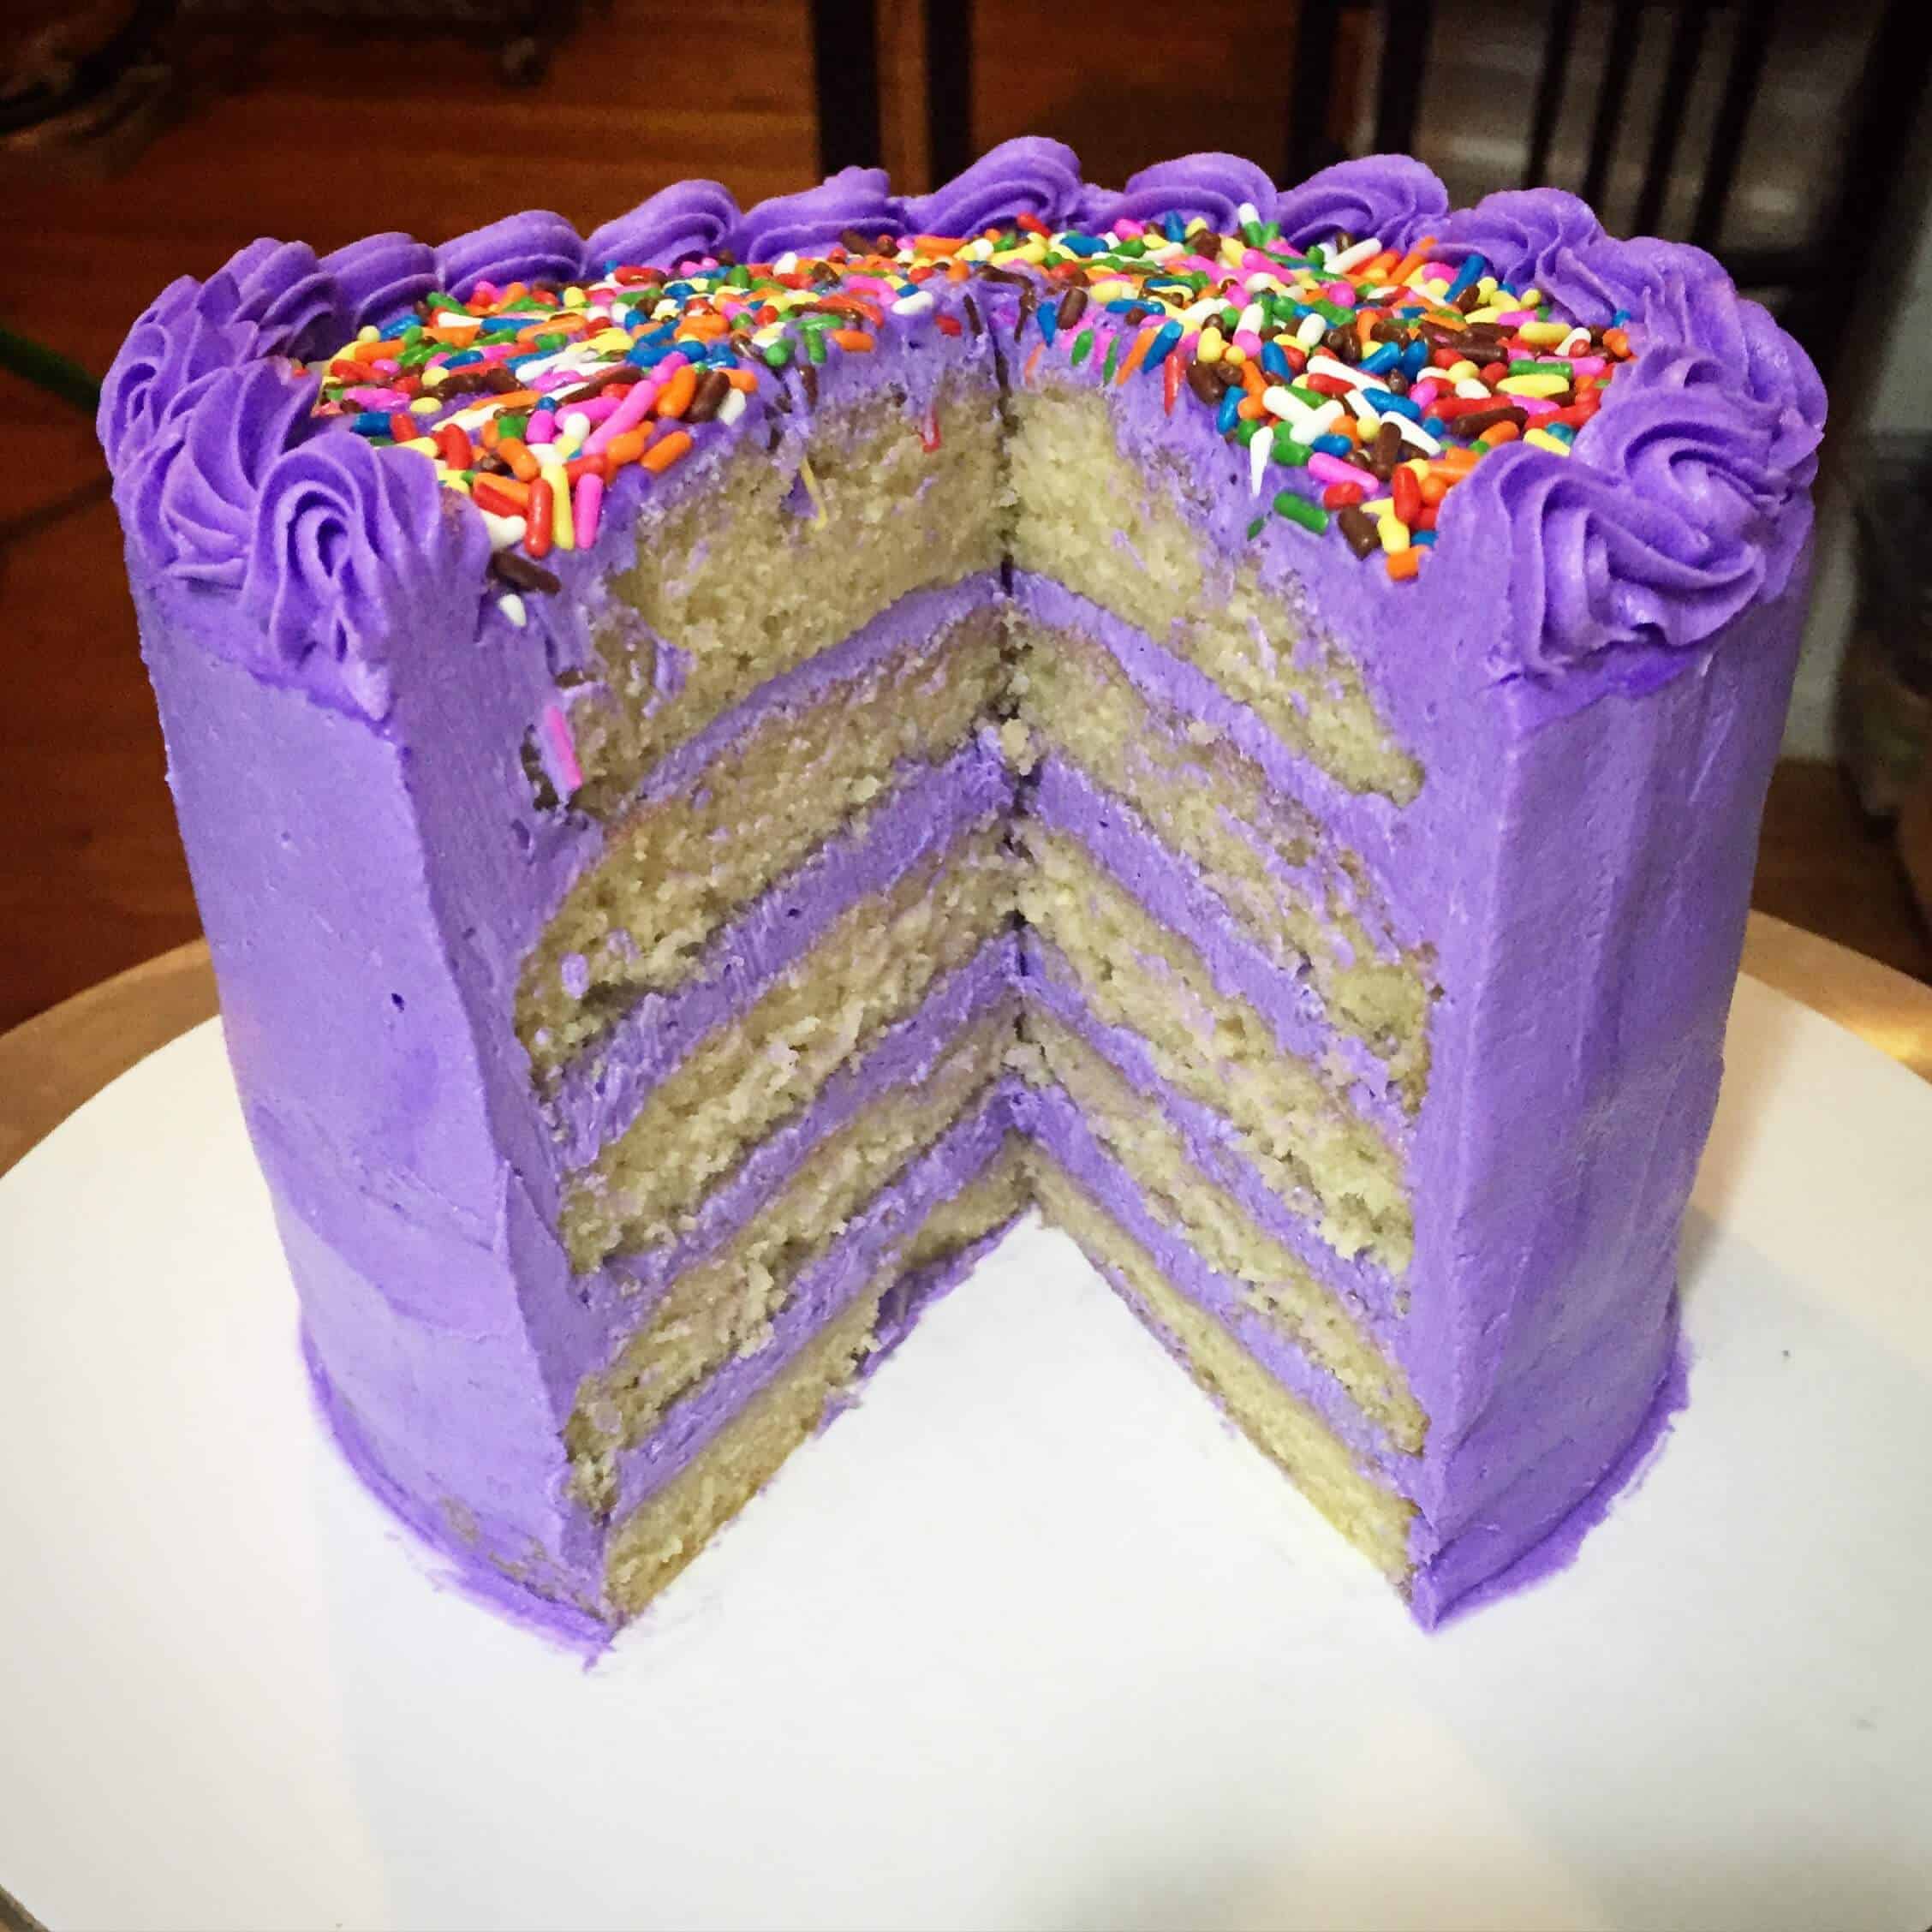
Small Batch Funfetti Cake
I’m in the midst of sharing small-batch recipes of my most popular cake recipes. So far, I’ve shared my small batch marble cake recipe, my small batch vanilla cake recipe, and my small batch WASC cake recipe. It was only a matter of time until I got around to making a small batch version of my funfetti cake recipe.
One batch of my full-sized funfetti layer cake recipe makes a cake large enough to feed about 24 people.
It makes three, 8-inch cake layers or four, 7-inch cake layers (my usual MO).
This is all great and dandy if you’re making a cake for a party or a big group of people.
But sometimes you don’t need to make that big of a cake. You might just want to make a cute little six-inch layer cake.
Maybe you simply don’t need to feed that many people. Or maybe you want to make a smaller cake to create a certain look.
More often, people don’t have bigger pans. A lot of people start off with 6-inch cake pans, which may be the only size they have on hand.
If that’s you, then this is the recipe for you!
How Many Cake Layers Does This Small Batch Funfetti Cake Recipe Make?
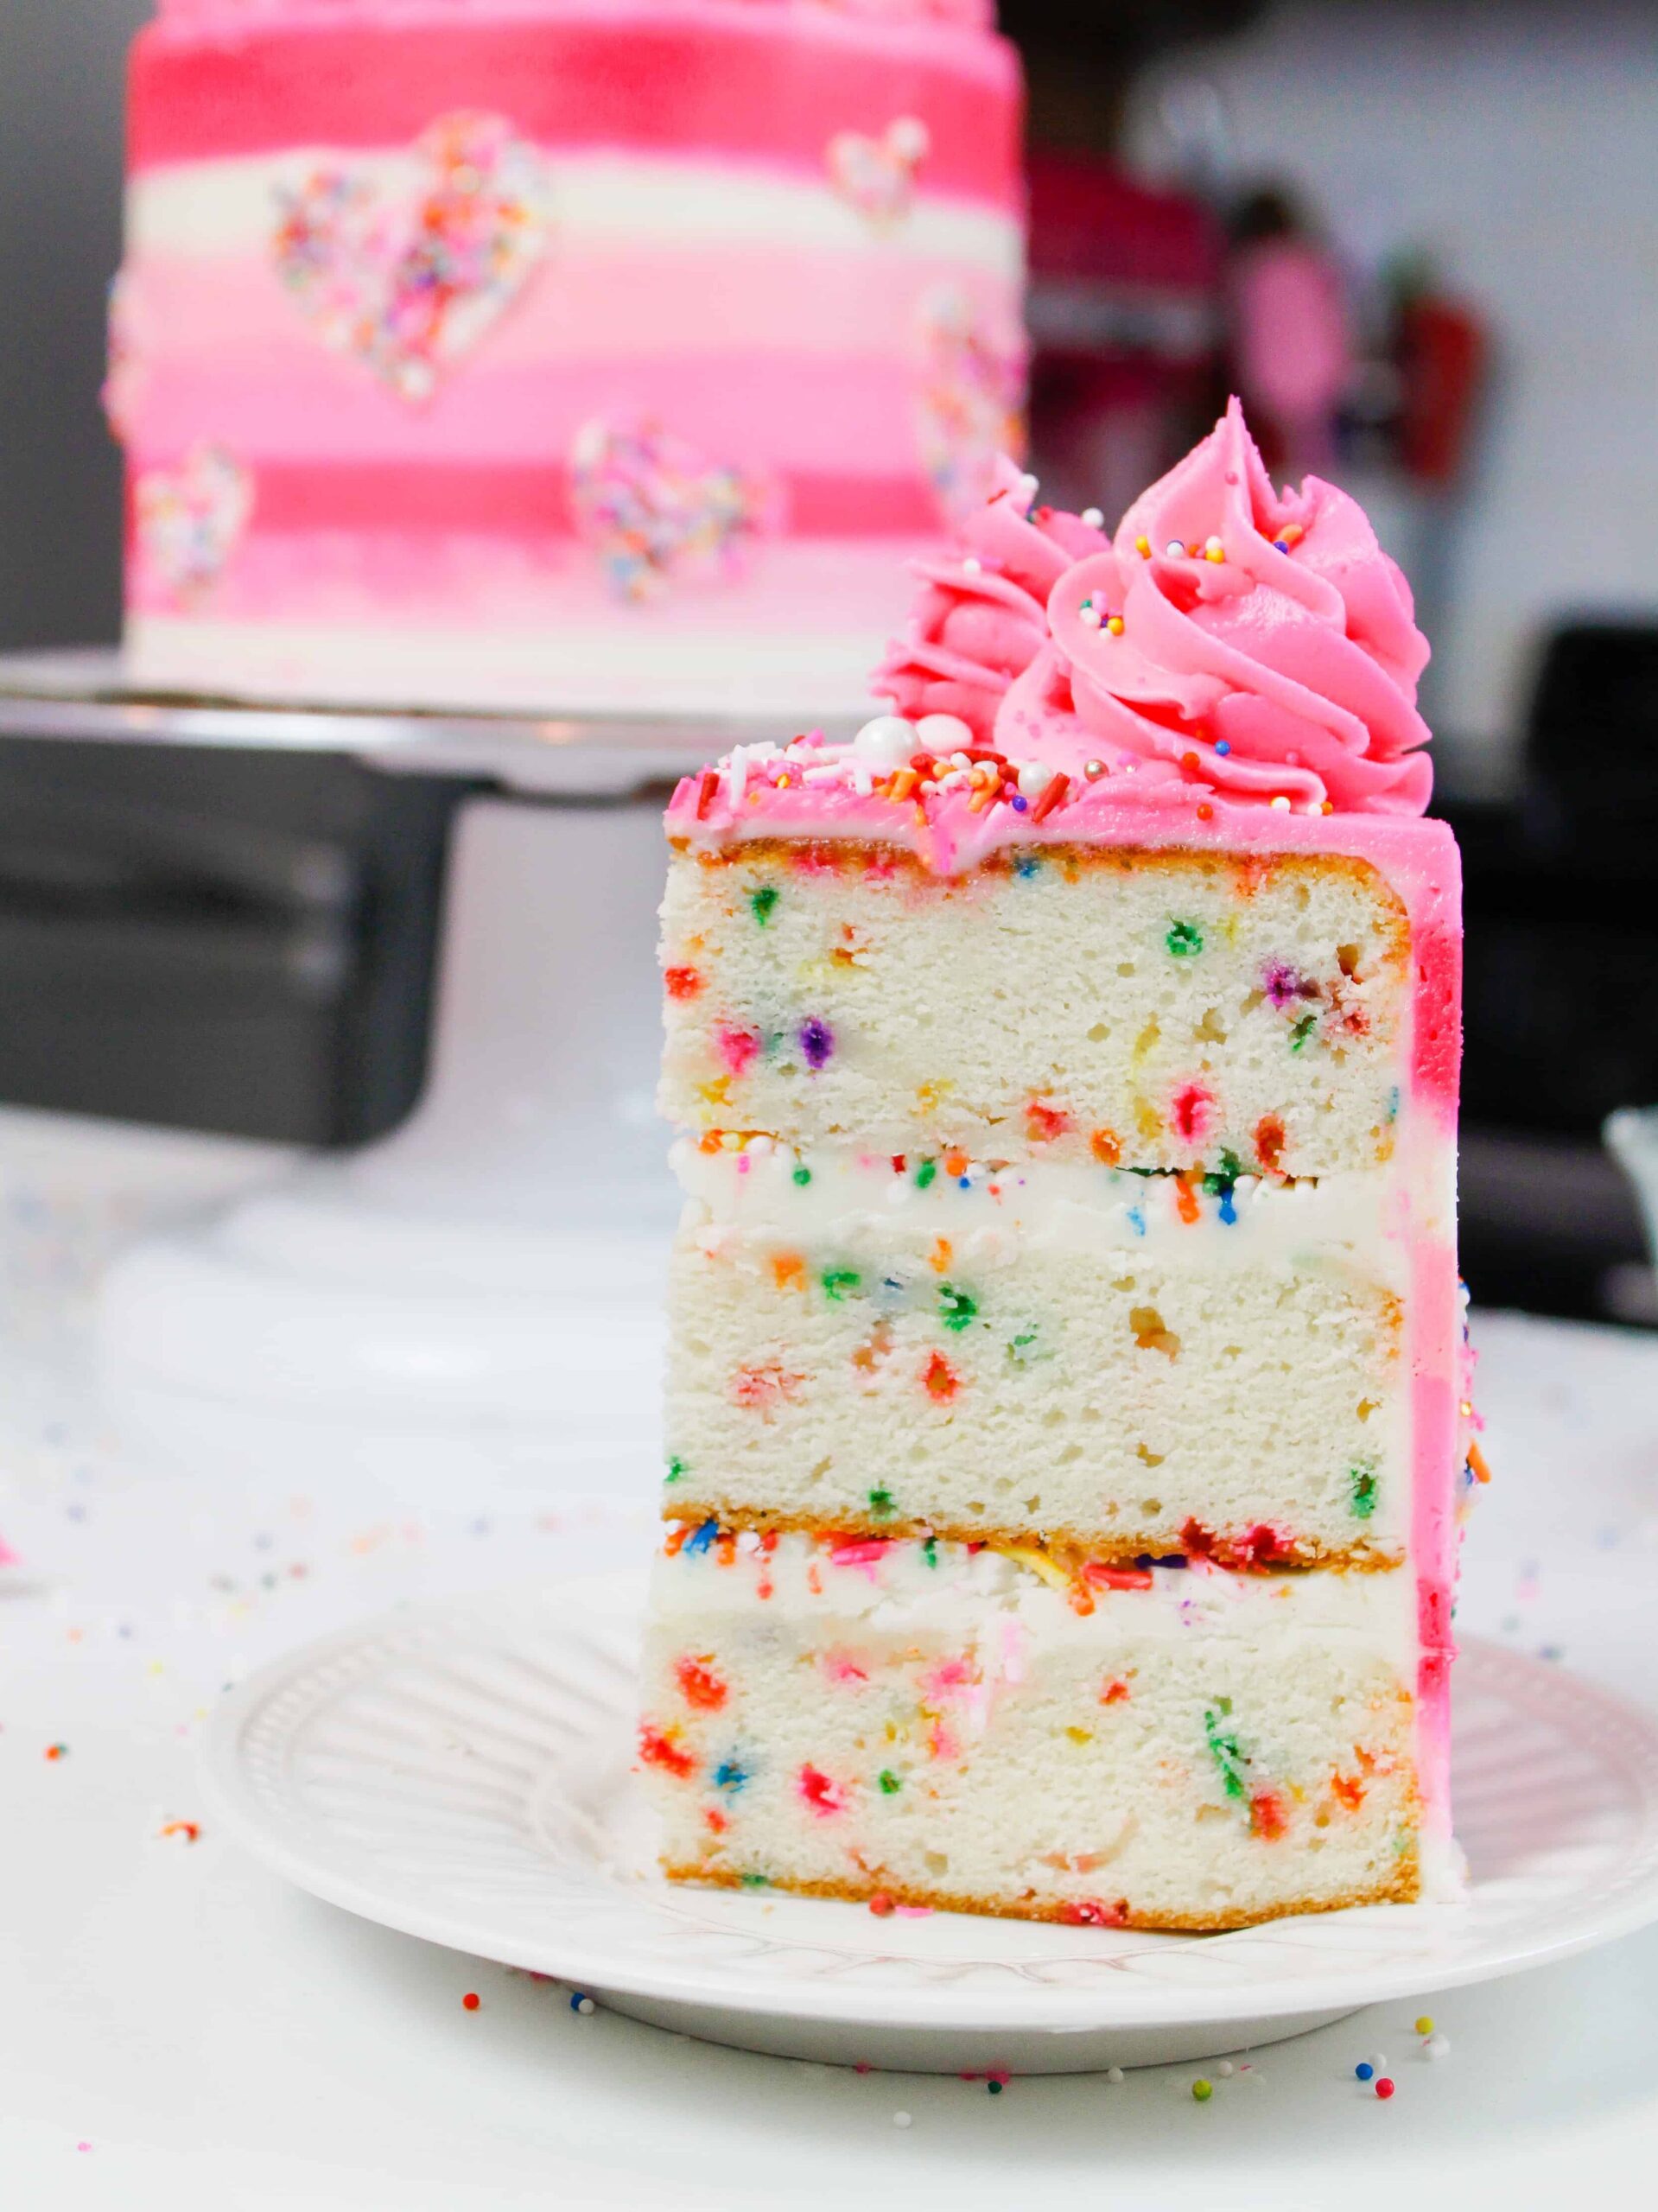
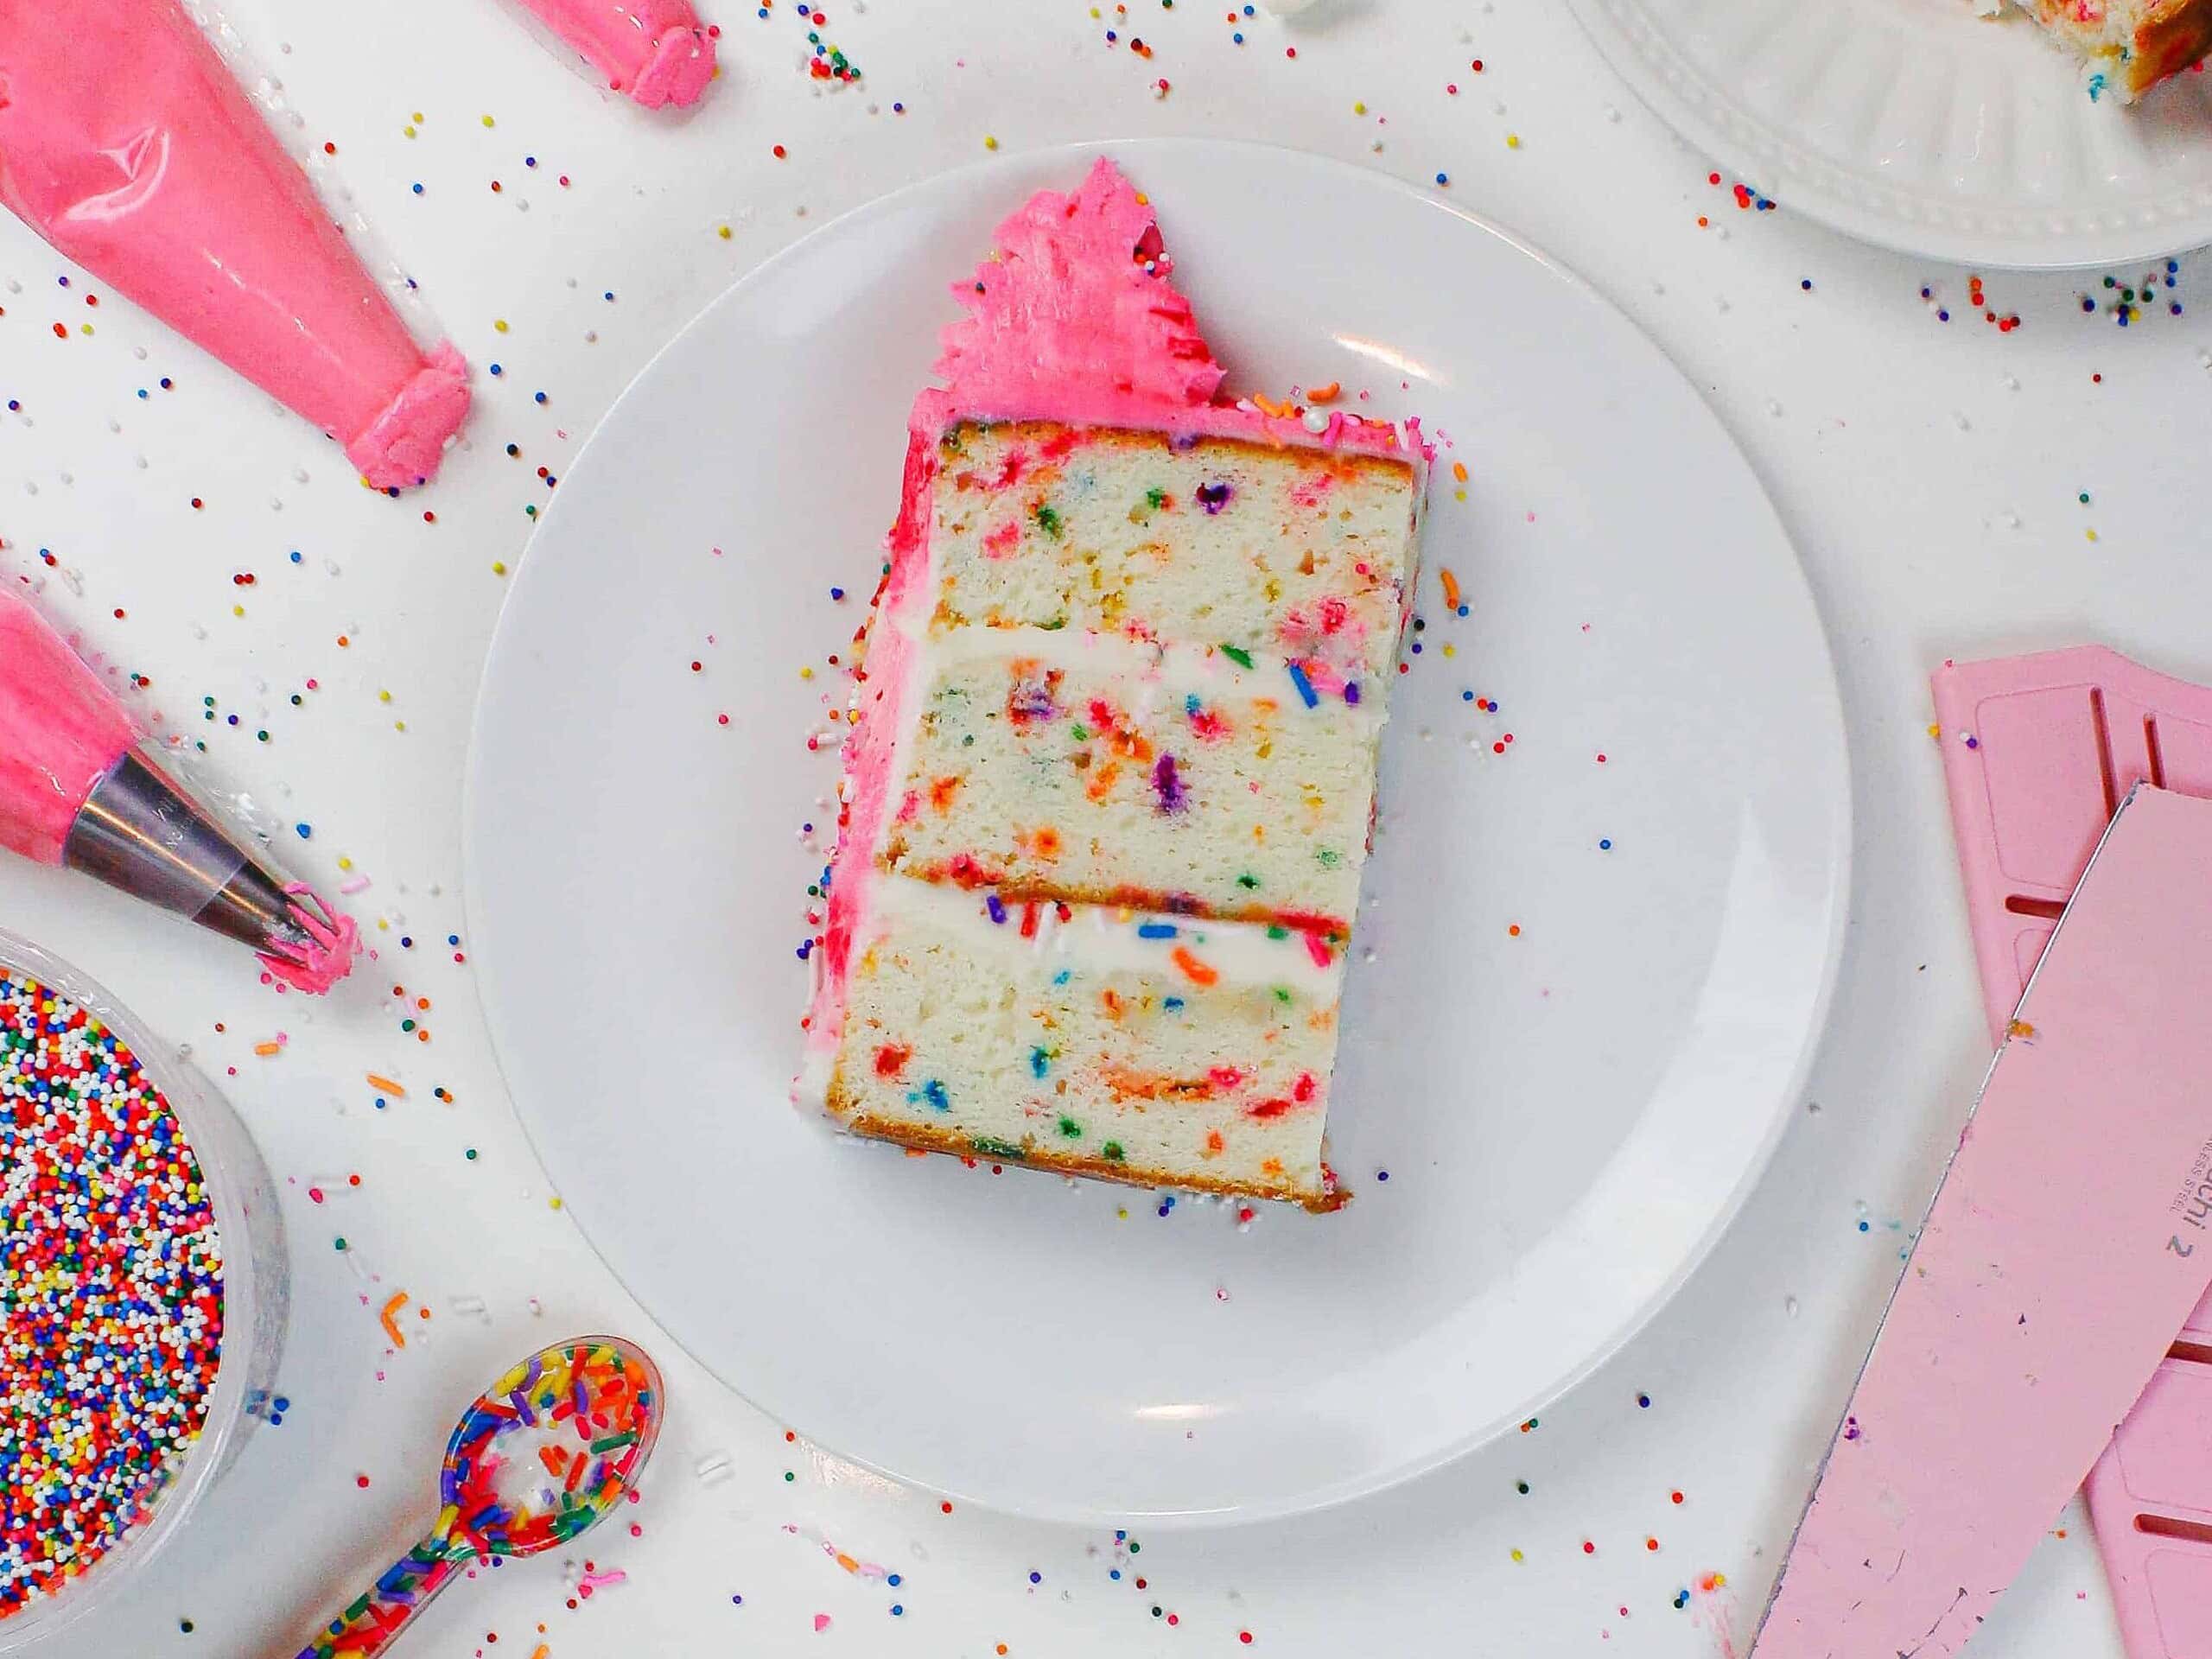
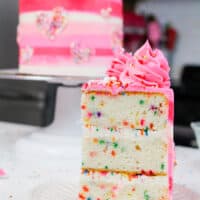
This small batch version of my funfetti layer cake recipe bakes three perfect little 6-inch cake layers.
It may seem like you’re filling your pans pretty full, but this batter doesn’t rise a ton as it bakes.
That’s part of what makes my funfetti cake recipe so great, though.
The layers bake flat, so leveling your cake layers is optional. With that in mind, you should end up with cake layers that are just a bit taller than 1 inch.
What Does Small Batch Mean?
In this case, it just means I’ve updated the amount of ingredients you use to make this batter to make a smaller cake.
Initially, I thought I could just cut the recipe in half and make three cake layers. You can do this, but the cake layers turn out a bit thinner than I prefer.
I wanted each cake layer to be at least an inch tall, so I knew I’d have to play around with the ratios.
In the end, I found that 2/3 of a batch is the ideal amount of batter for 6-inch cake layers.
What Types of Sprinkles Should I Use to Make This Funfetti Cake?
While you might think all sprinkles are created equal, they’re not.
When making a funfetti cake, it’s important that you use the right type of rainbow sprinkles.
The best sprinkles for making a funfetti cake are rainbow jimmies.
They are the longer sprinkles that you probably used to (and may still) put on your ice cream.
These sprinkles keep their color and won’t immediately bleed into the cake batter.
This is important because it will help your batter say white while you add it to your pans.
This will allow the color of the sprinkles to really shine through once the layers are baked.
The type of sprinkles you should NOT use are the tiny, round, rainbow sprinkles. They’re called nonpareil,s and they are the true enemy of funfetti cake layers.
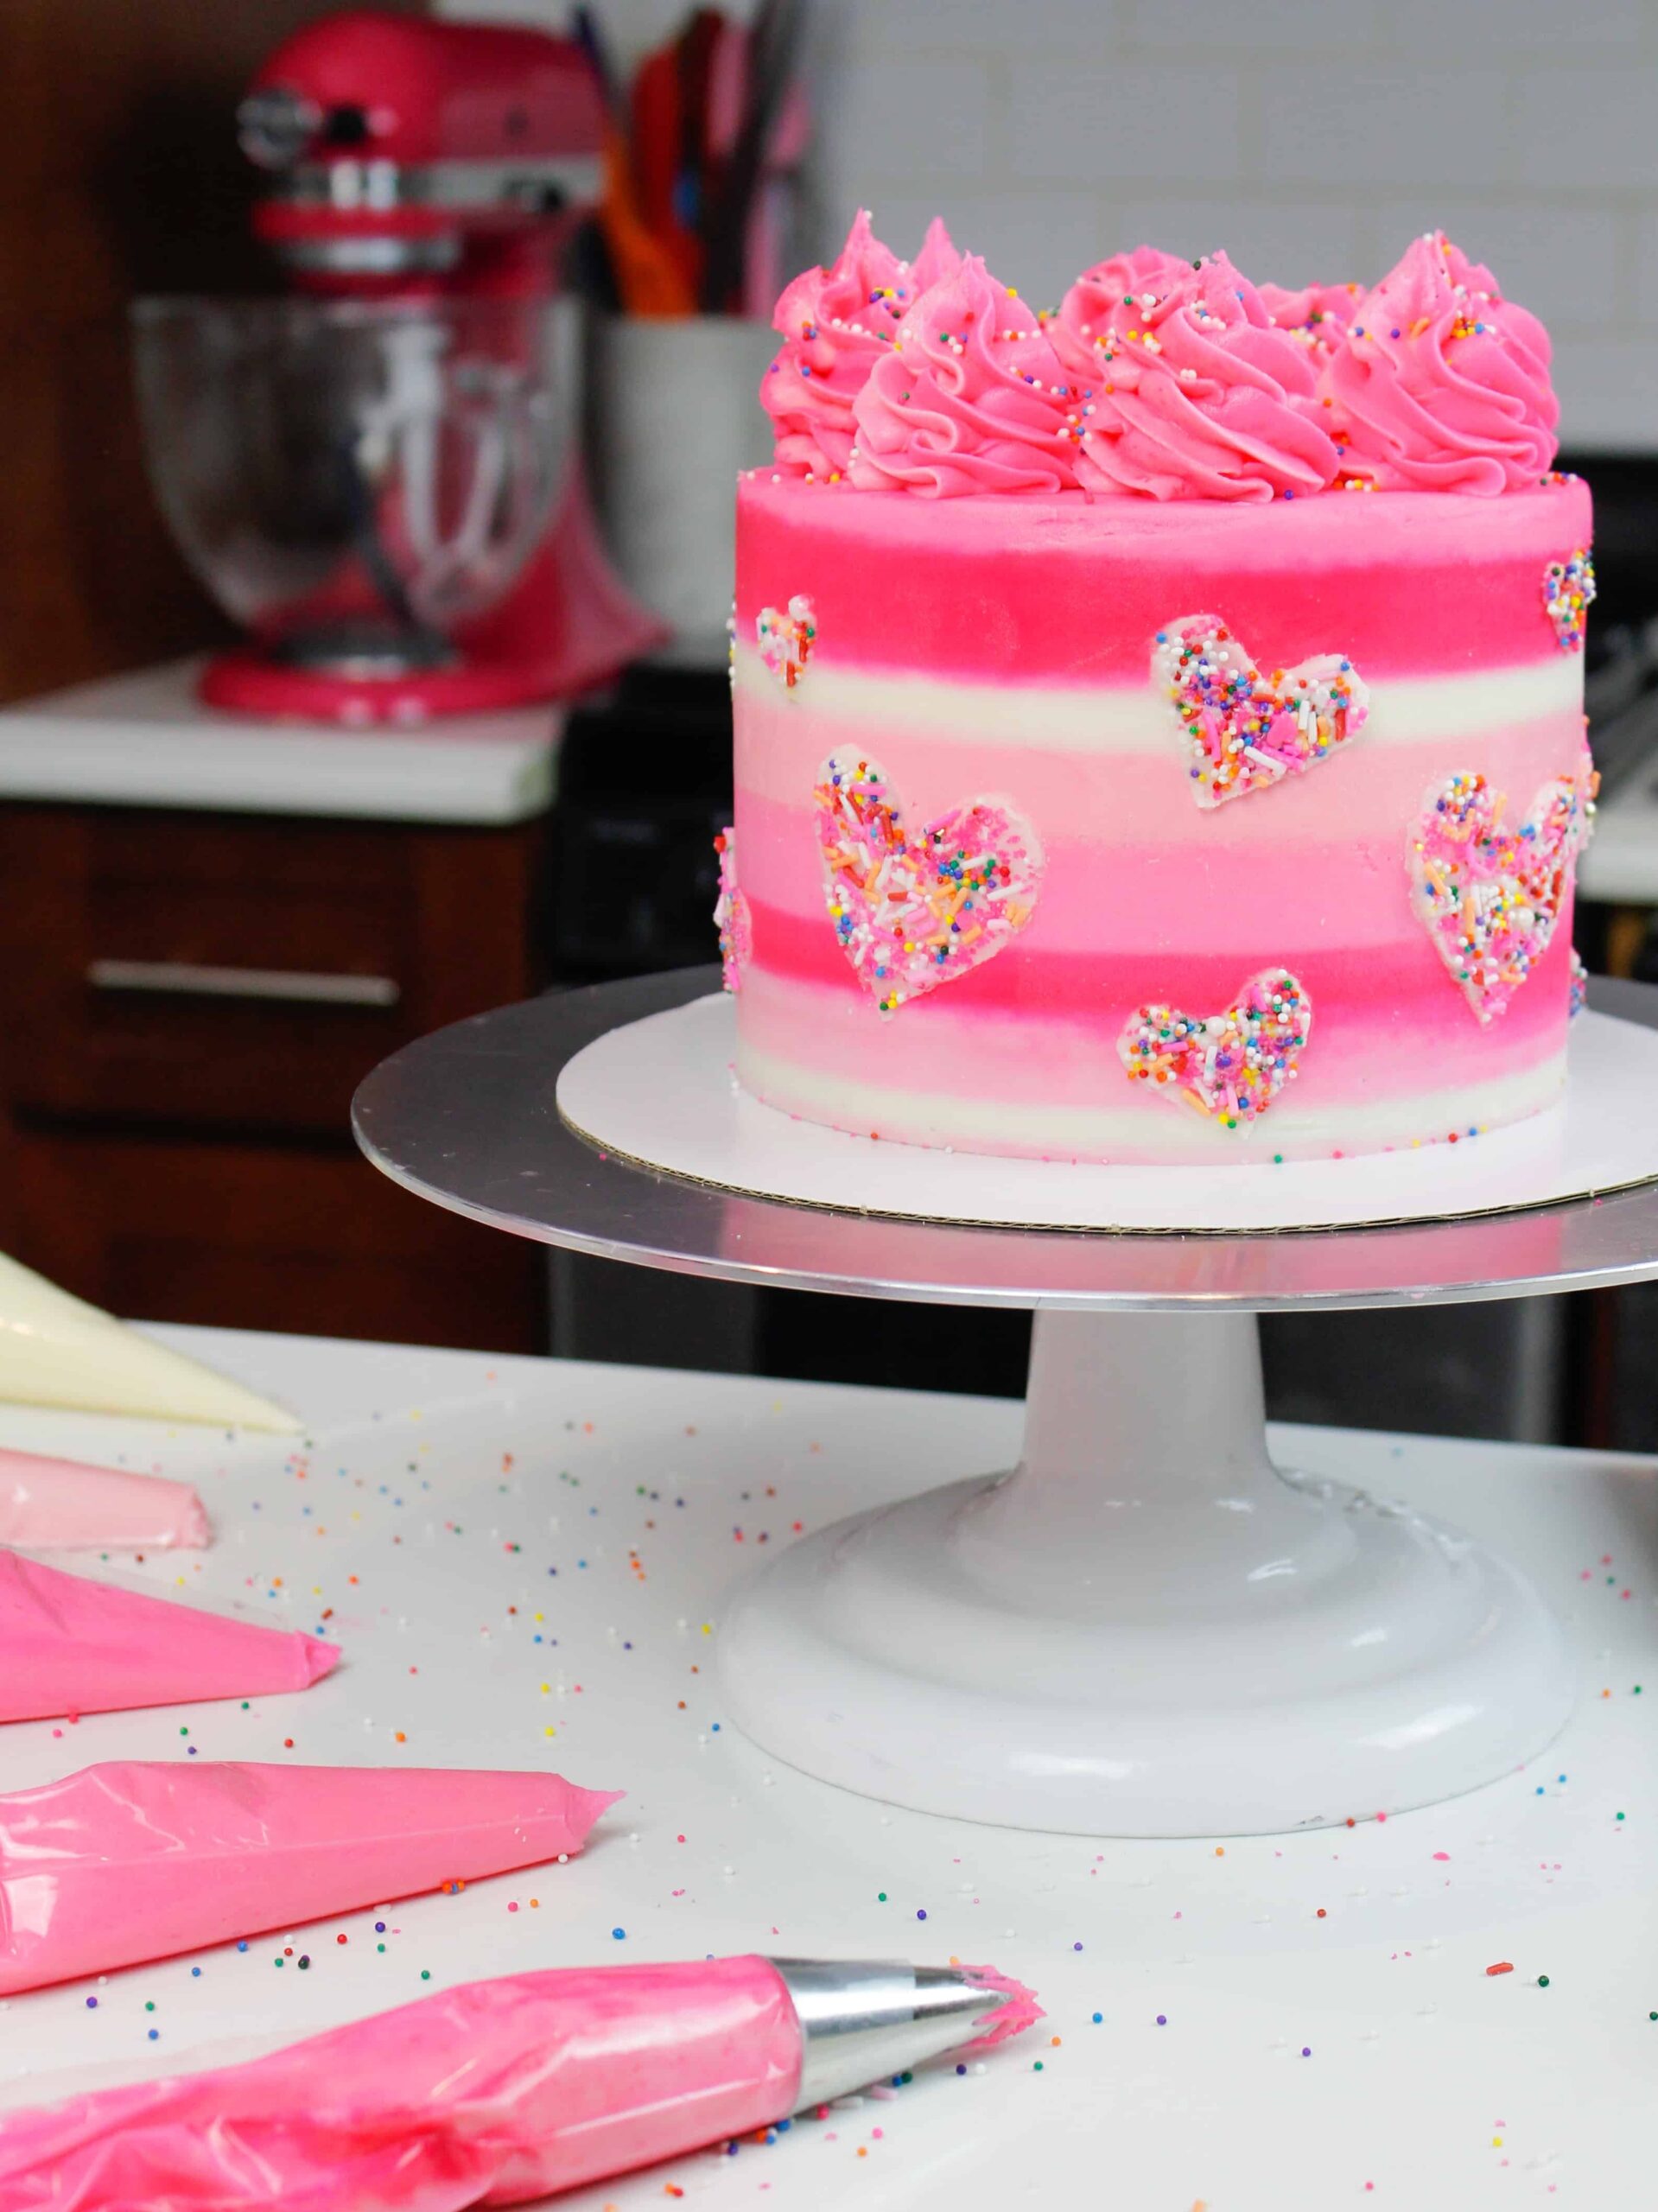
Nonpareils are awesome for decorating cakes, and I used them to create some sprinkle hearts on the outside of this Valentine’s Day cake.
But that’s the only place they should go- on the outside of a cake!!
Nonpareils will start to bleed their colors the second they’re stirred into the cake batter, resulting in a creepy, pink/grayish batter.
This can also happen if you let your rainbow jimmies sit in the batter for an extended period of time and then try to stir them.
The key takeaways? Only use rainbow jimmies in this funfetti cake recipe, gently fold them into the batter, and immediately pour the batter into your 6-inch cake pans.
Tips for Making the Best Small-Batch Funfetti Cake:
- USE RAINBOW JIMMIE (Jimmy?? IDK) SPRINKLES!! I repeat RAINBOW JIMMIES!!
- Go wild with the cake decoration and use some pretty sprinkles to take your cake design to the next level (like my pink sprinkle heart cake below!!)
- Chill the cake layers in the freezer for about 20 minutes before assembling the cake. It makes the cake much easier to stack and frost!
- Use a serrated knife to level your cake layers once they’re fully cooled to make it easier to assemble and frost your cake.
- I do NOT recommend using this recipe to make cupcakes! Instead, I highly recommend trying my funfetti cupcake recipe (I like the texture better for cupcakes).
- Use my full-size funfetti cake recipe to make a 7 or 8-inch layer cake.
Making These Cake Layers in Advance and Storage Tips:
Make your cake layers in advance and freeze them. It breaks the process up and makes it more approachable.
You can also make the frosting ahead of time or save any leftover frosting! It can be stored in an airtight container in the fridge for up to a month or in the freezer for up to 3 months. Be sure to give it a good stir once it thaws to get the consistency nice and smooth again.
A frosted cake can last in the fridge for up to a week or in the freezer for up to a month. The buttercream locks in all the moisture, keeping the cake fresh and delicious!
If you cut into the cake and have leftovers, use any remaining frosting to cover the cut section to keep it moist and store it in the fridge for up to a week.

Let Me Know What You Think!
If you try this small batch funfetti cake recipe, I’d love to hear what you think! Please leave a comment and rating below.
And don’t forget to tag me @chelsweets and use #chelsweets so I can see your delicious creations.
Small Batch Funfetti Layer Cake
Ingredients
Funfetti Cake
- 2 cups + 2 Tbsp all-purpose flour 276g
- 2 cups granulated sugar 400g
- 1 1/2 tsp baking powder 6g
- 1/2 tsp fine salt 3g
- 2/3 cup unsalted butter, room temperature 150g or 1 1/3 sticks
- 2/3 cup carton egg whites or 5 large egg whites, room temperature 155g
- 1 cup buttermilk, room temperature 240g
- 1 Tbsp vegetable or canola oil 15g
- 1 tsp vanilla extract or vanilla bean paste 4g
- 1 tsp almond extract – optional 4g
- 1/2 cup rainbow jimmie sprinkles 90g
Vanilla Buttercream Frosting
- 1 1/2 cups unsalted butter, room temperature 339g or 3 sticks
- 2 tsp vanilla extract or vanilla bean paste 8g
- 1/2 tsp fine salt 3g
- 5 cups powdered sugar 625g
- 2 Tbsp heavy whipping cream, room temperature 30g
Instructions
6-Inch Funfetti Cake Layers:
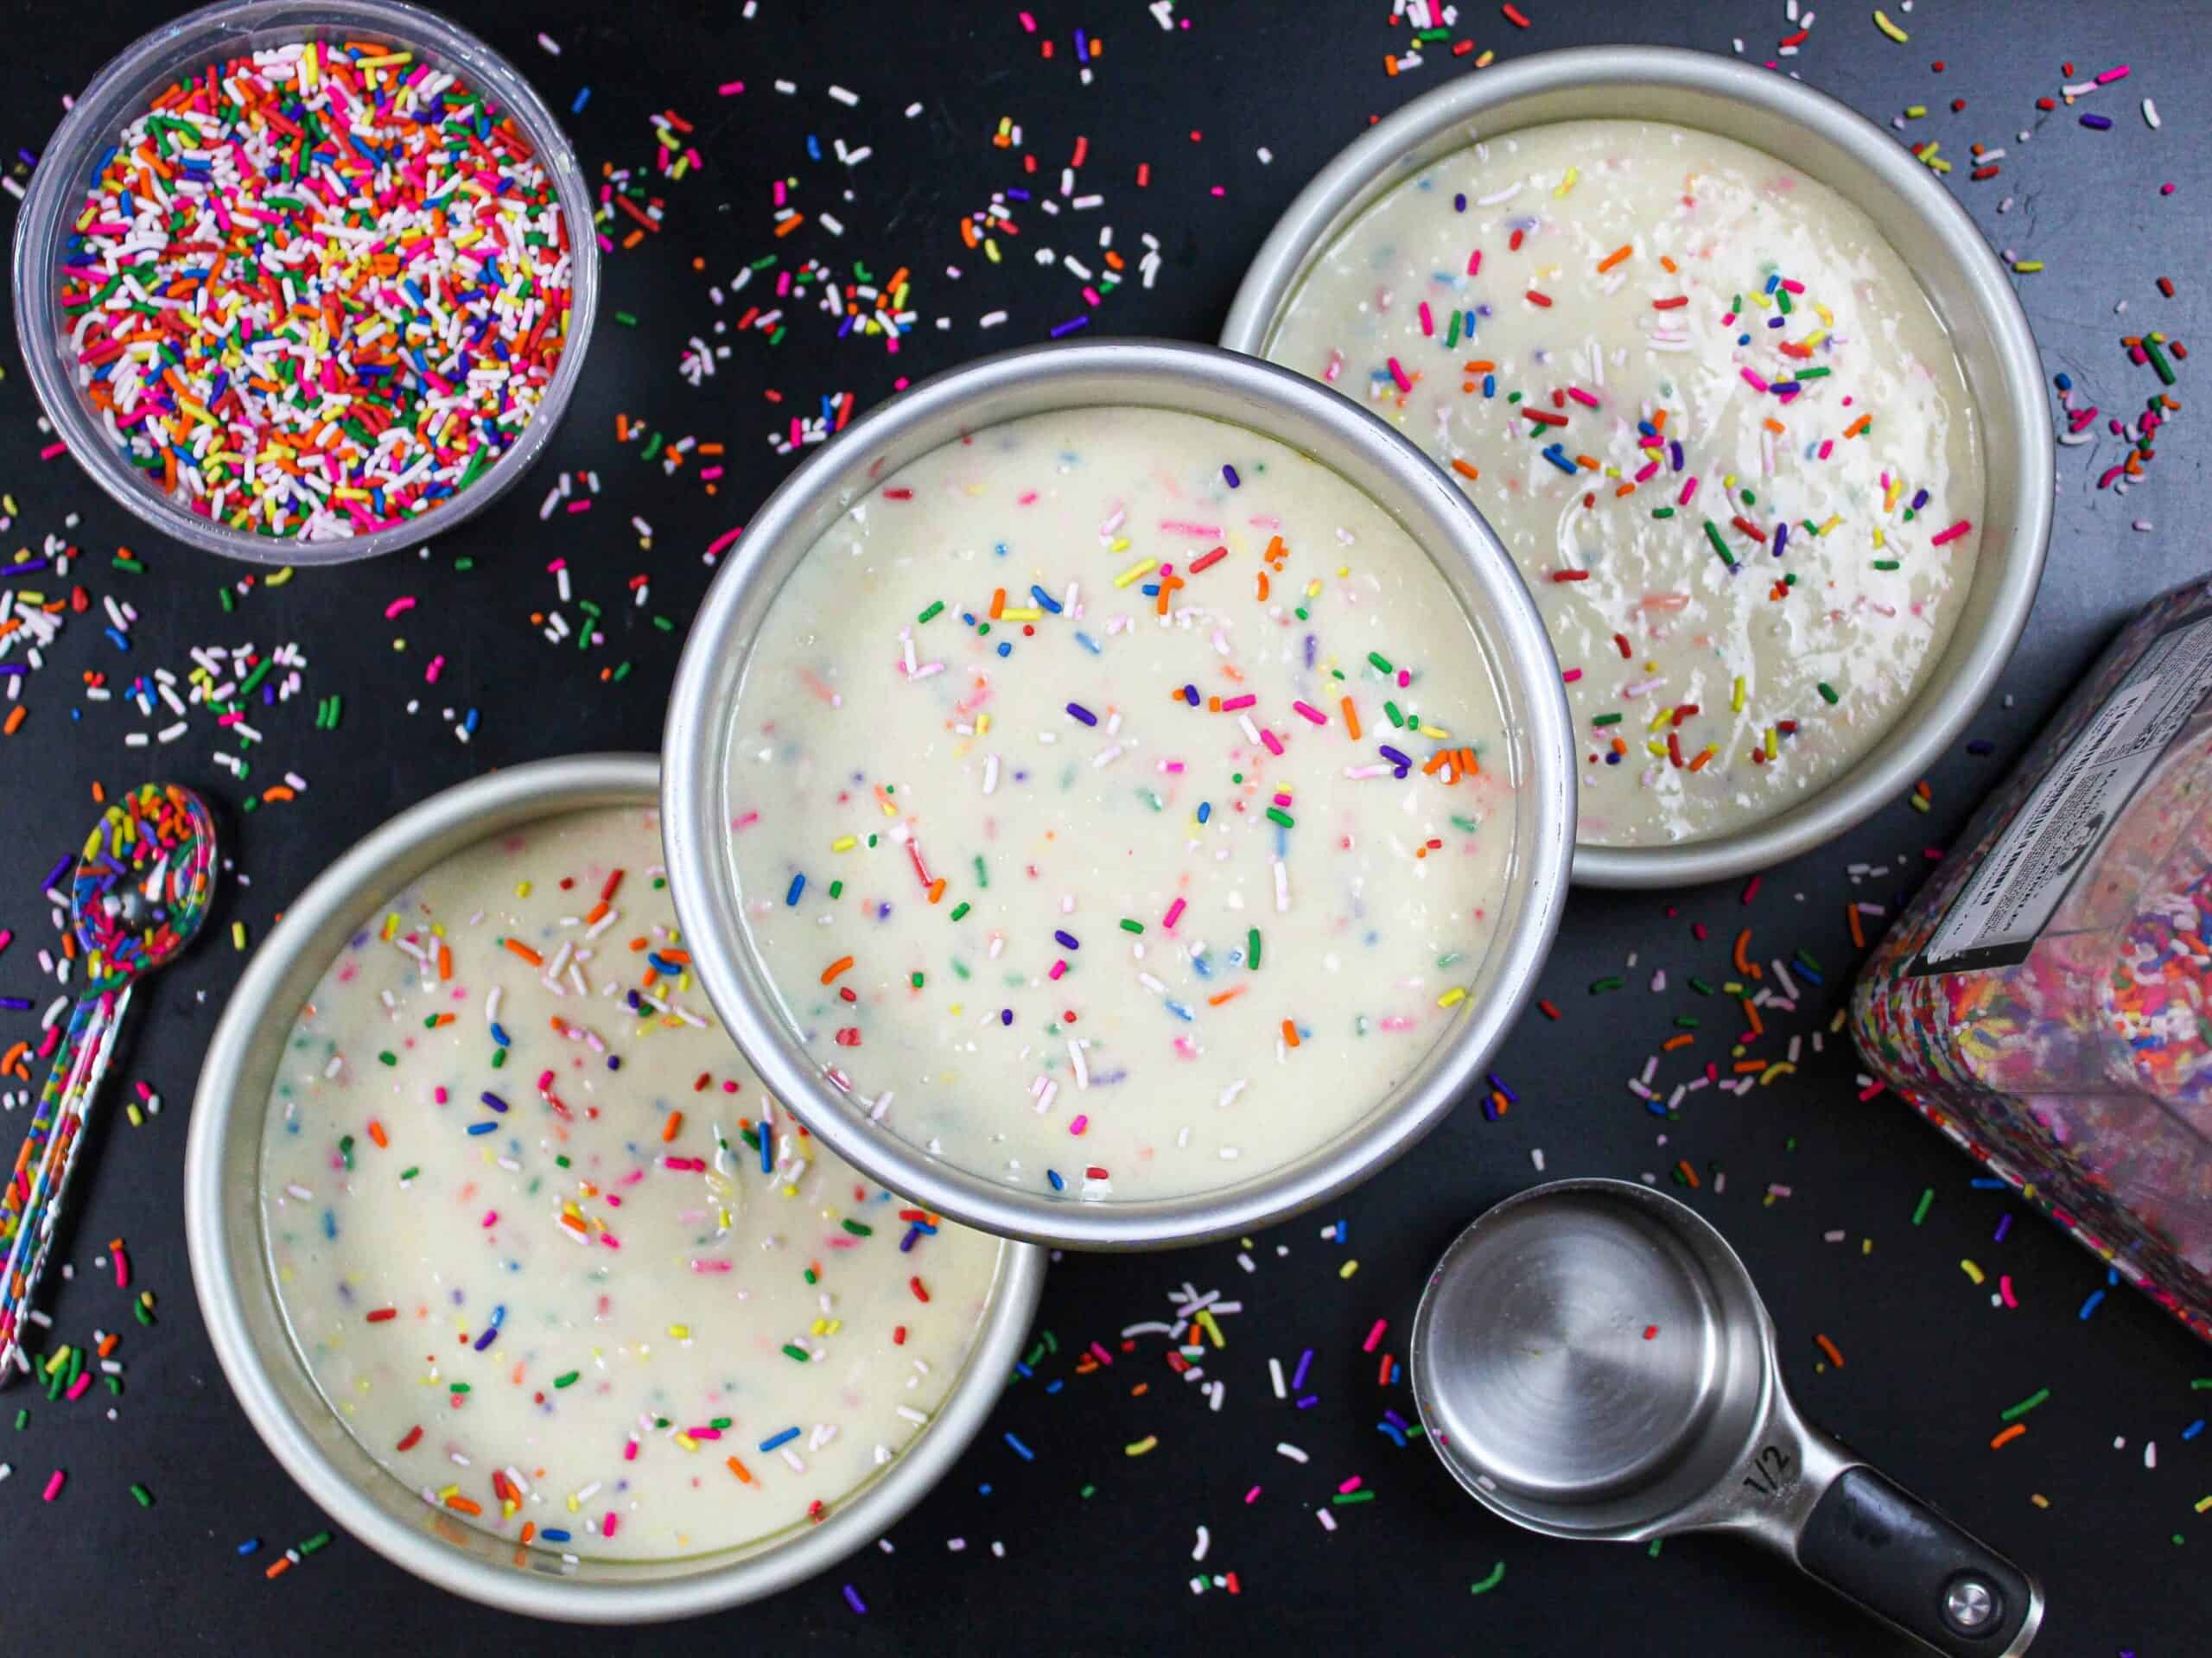
- Preheat oven to 350°F/175°C. Line three 6-inch pans with parchment rounds and grease with non-stick baking spray or homemade pan release.
- Mix 2 cups + 2 Tbsp all-purpose flour, 2 cups sugar, 1 1/2 tsp baking powder, and 1/2 tsp salt together in a stand mixer with a paddle attachment or hand mixer until fully combined.
- Mix in 2/3 cup of room temperature, unsalted butter slowly into the dry ingredients on a low speed. Continue to mix until no large chunks of butter remain, and the mixture looks like moist sand.
- Pour in 2/3 cup of egg whites and mix on low until just incorporated.
- Next, mix in 1 cup of buttermilk on a low speed.
- Add in 1 Tbsp of vegetable oil, 1 tsp of vanilla extract, and 1 tsp almond extract and mix at a low speed until fully incorporated. If you want to color these cake layers, add in the gel food coloring with the oil and extracts.
- Scrape down the sides of the bowl with a rubber spatula, then beat on a medium speed for about a minute to make sure everything is properly mixed together. This also helps lighten the texture of the cake layers a bit.
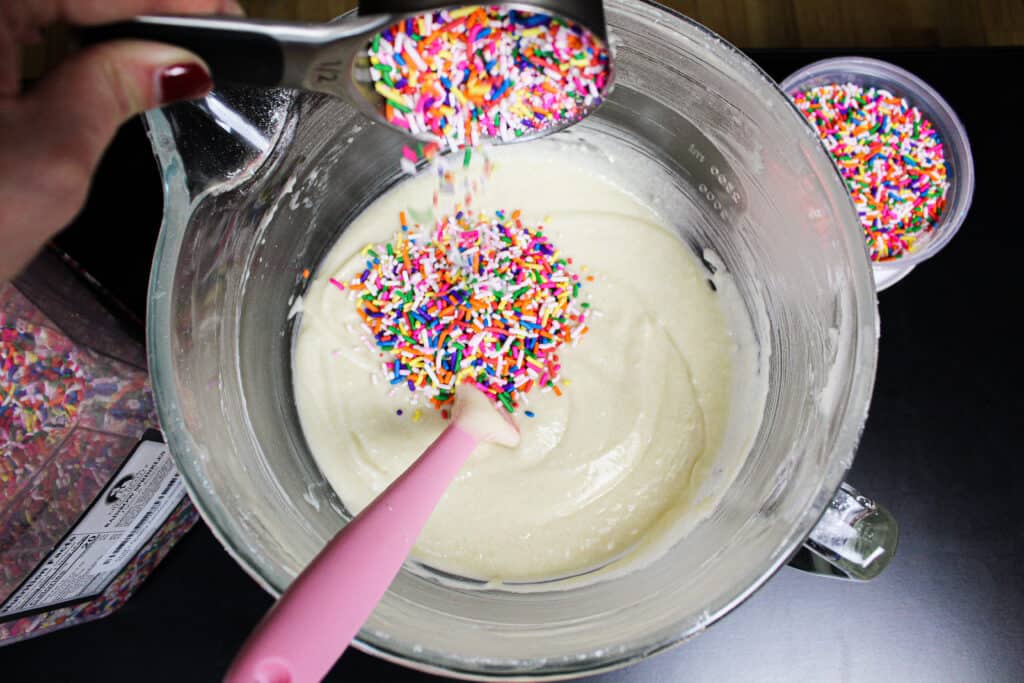
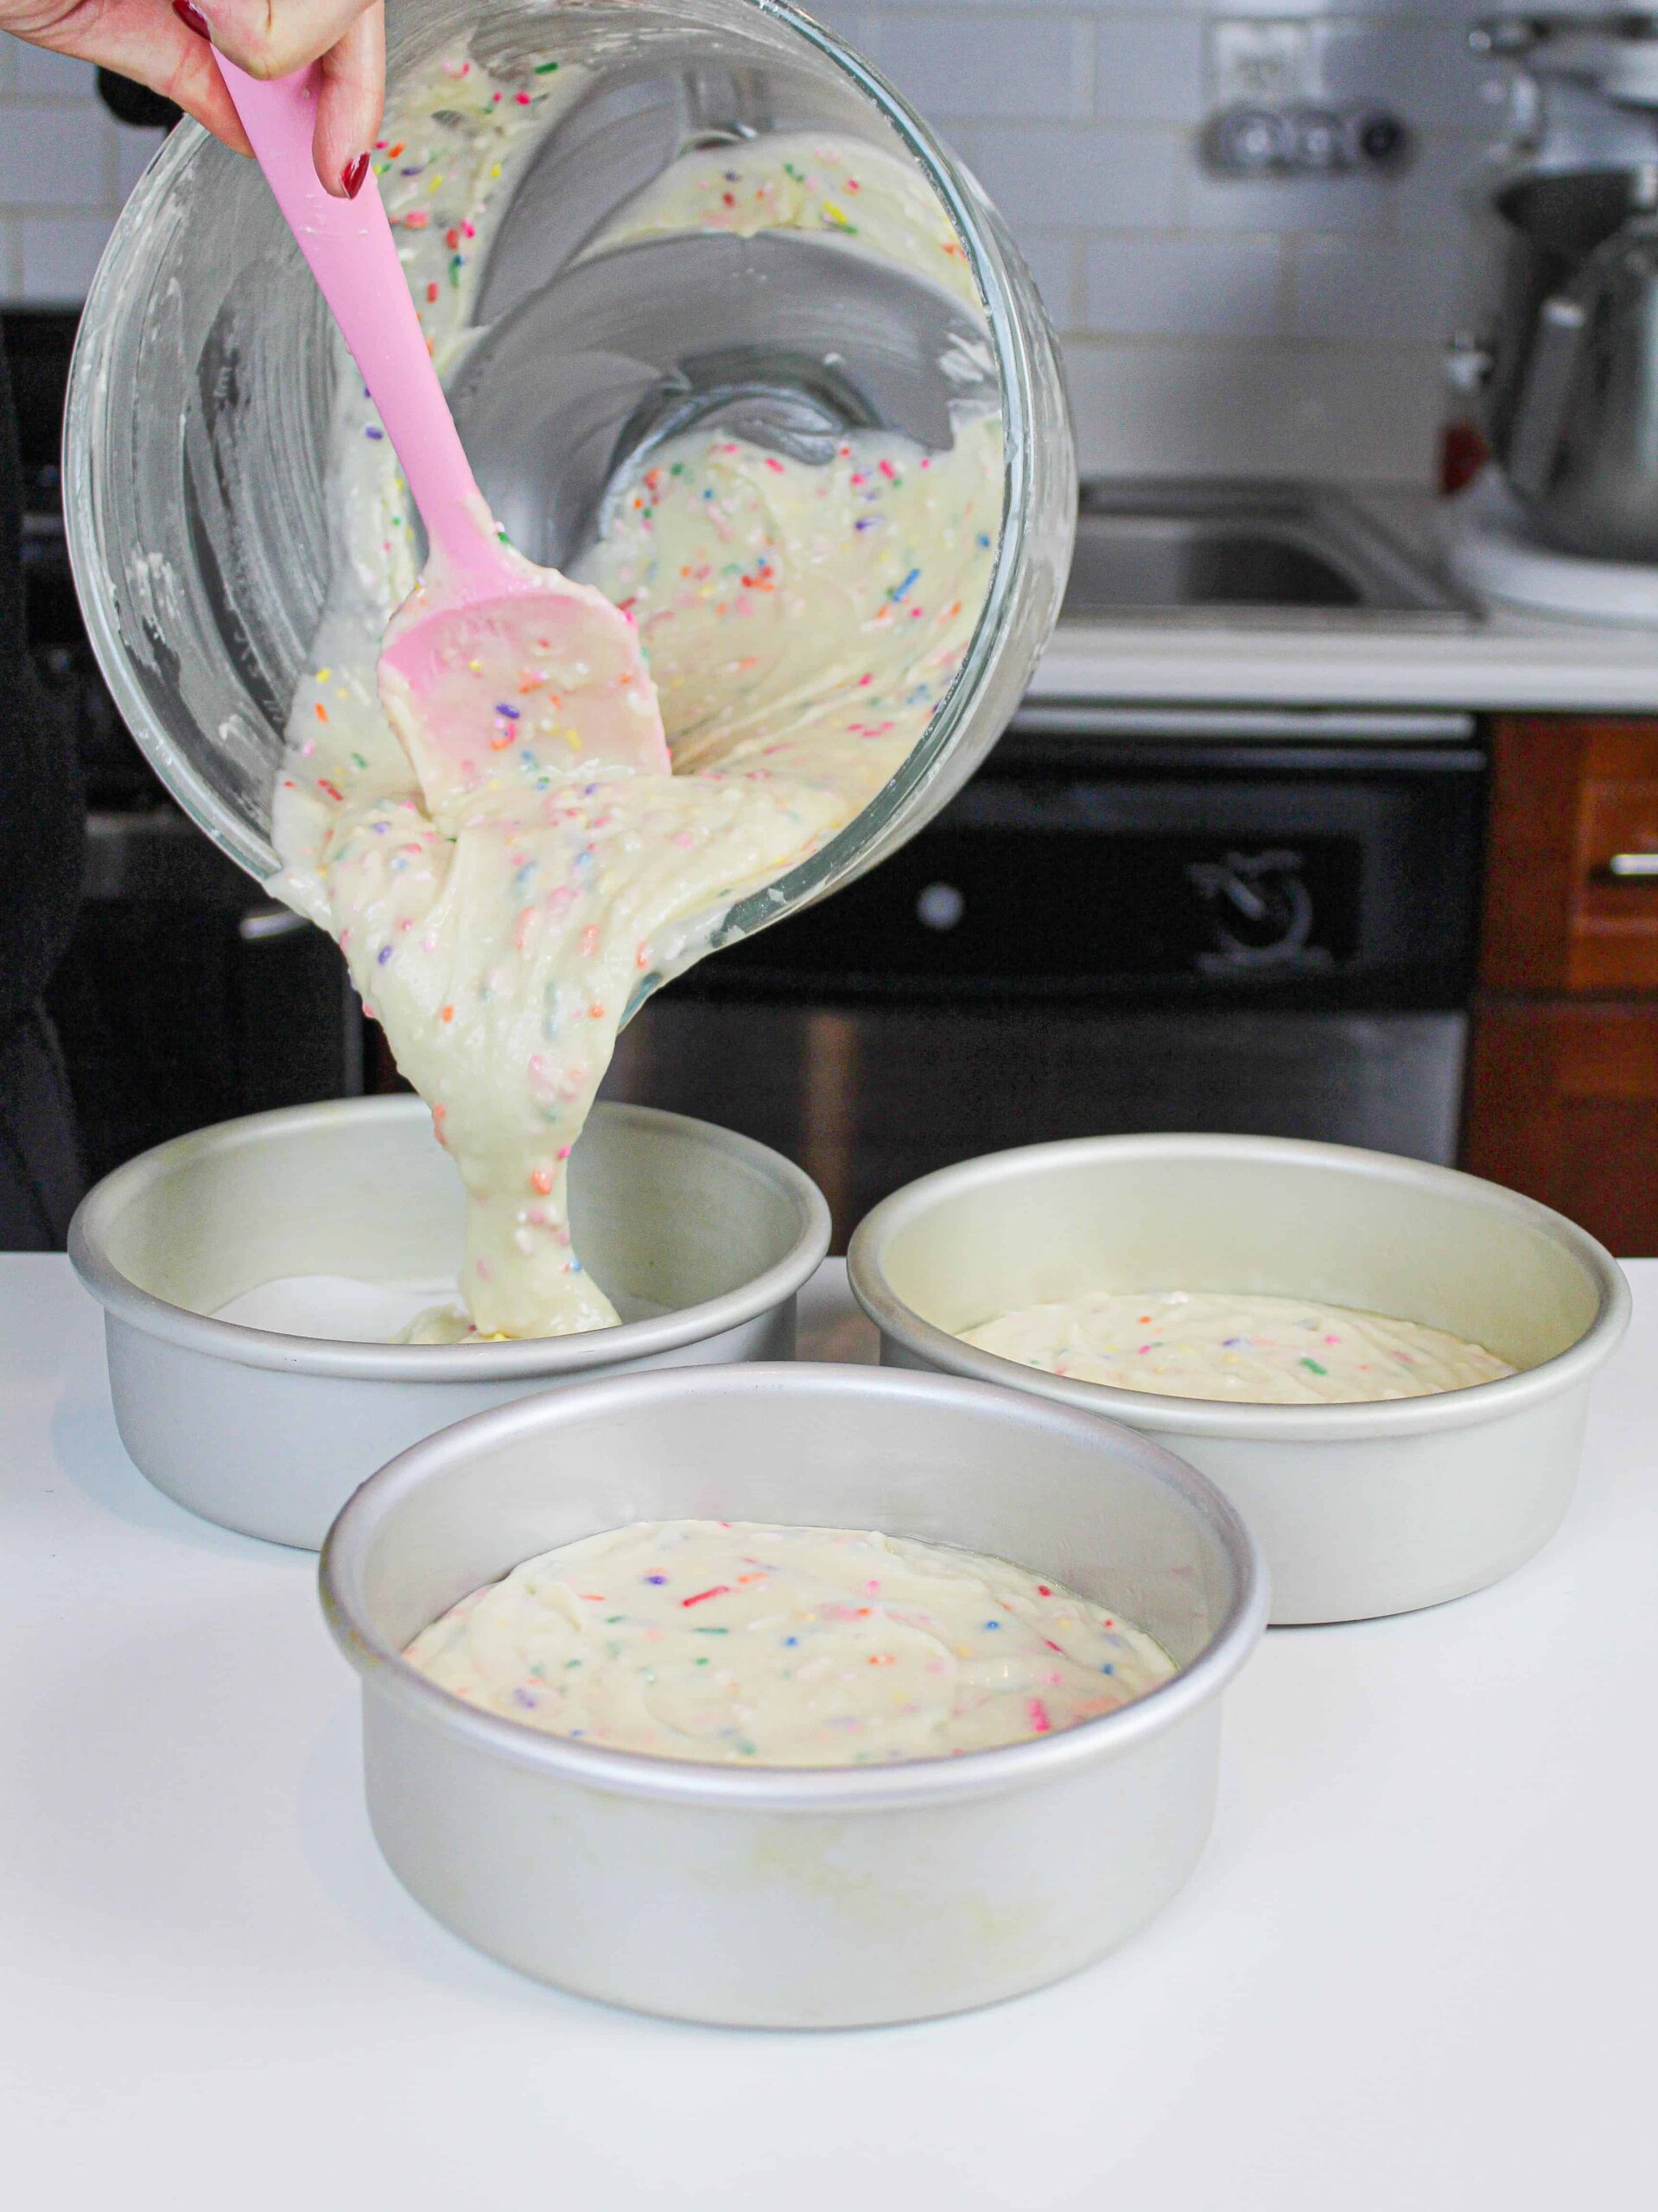
- Fold 1/2 cup of sprinkles into the cake batter using a rubber spatula and mix until they're evenly distributed.
- Divide batter evenly between the prepared cake pans. I like to use a digital kitchen scale to weigh my pans and ensure they all have the same amount of batter. This guarantees the layers will bake to be the same height.
- Bake for 30-33 minutes, or until a toothpick comes out with a few moist crumbs. Allow the pans to cool for 10 minutes, then run an offset spatula around the perimeter of the pan to separate the cake from the pan.
- Place cake layers into the freezer for 30 minutes, to accelerate the cooling process. Once the layers are fully cooled, carefully flip the pans and remove the layers.
- Use a serrated knife to level the tops of the layers, and then frost as desired.
Vanilla Buttercream Frosting:
- While the cake layers bake and cool, make the vanilla buttercream frosting.
- Beat 1 1/2 cups of unsalted butter at medium speed for 30 seconds with a paddle attachment until smooth.
- Mix in 2 tsp of vanilla extract and 1/2 tsp salt on a low speed.
- Slowly mix in 5 cups of powdered sugar on a low speed. Add in 2 Tbsp of heavy cream halfway through to make the frosting easier to mix.
- Continue to mix on a low speed for a few minutes until the desired consistency is reached.
- If the frosting seems too thick, add in additional cream (1 Tbsp at a time). If the frosting is too thin, add in more powdered sugar (a quarter of a cup at a time).
- If you plan to color the buttercream, add in the gel food coloring once the frosting is fully made and beat on low until it reaches the desired color.
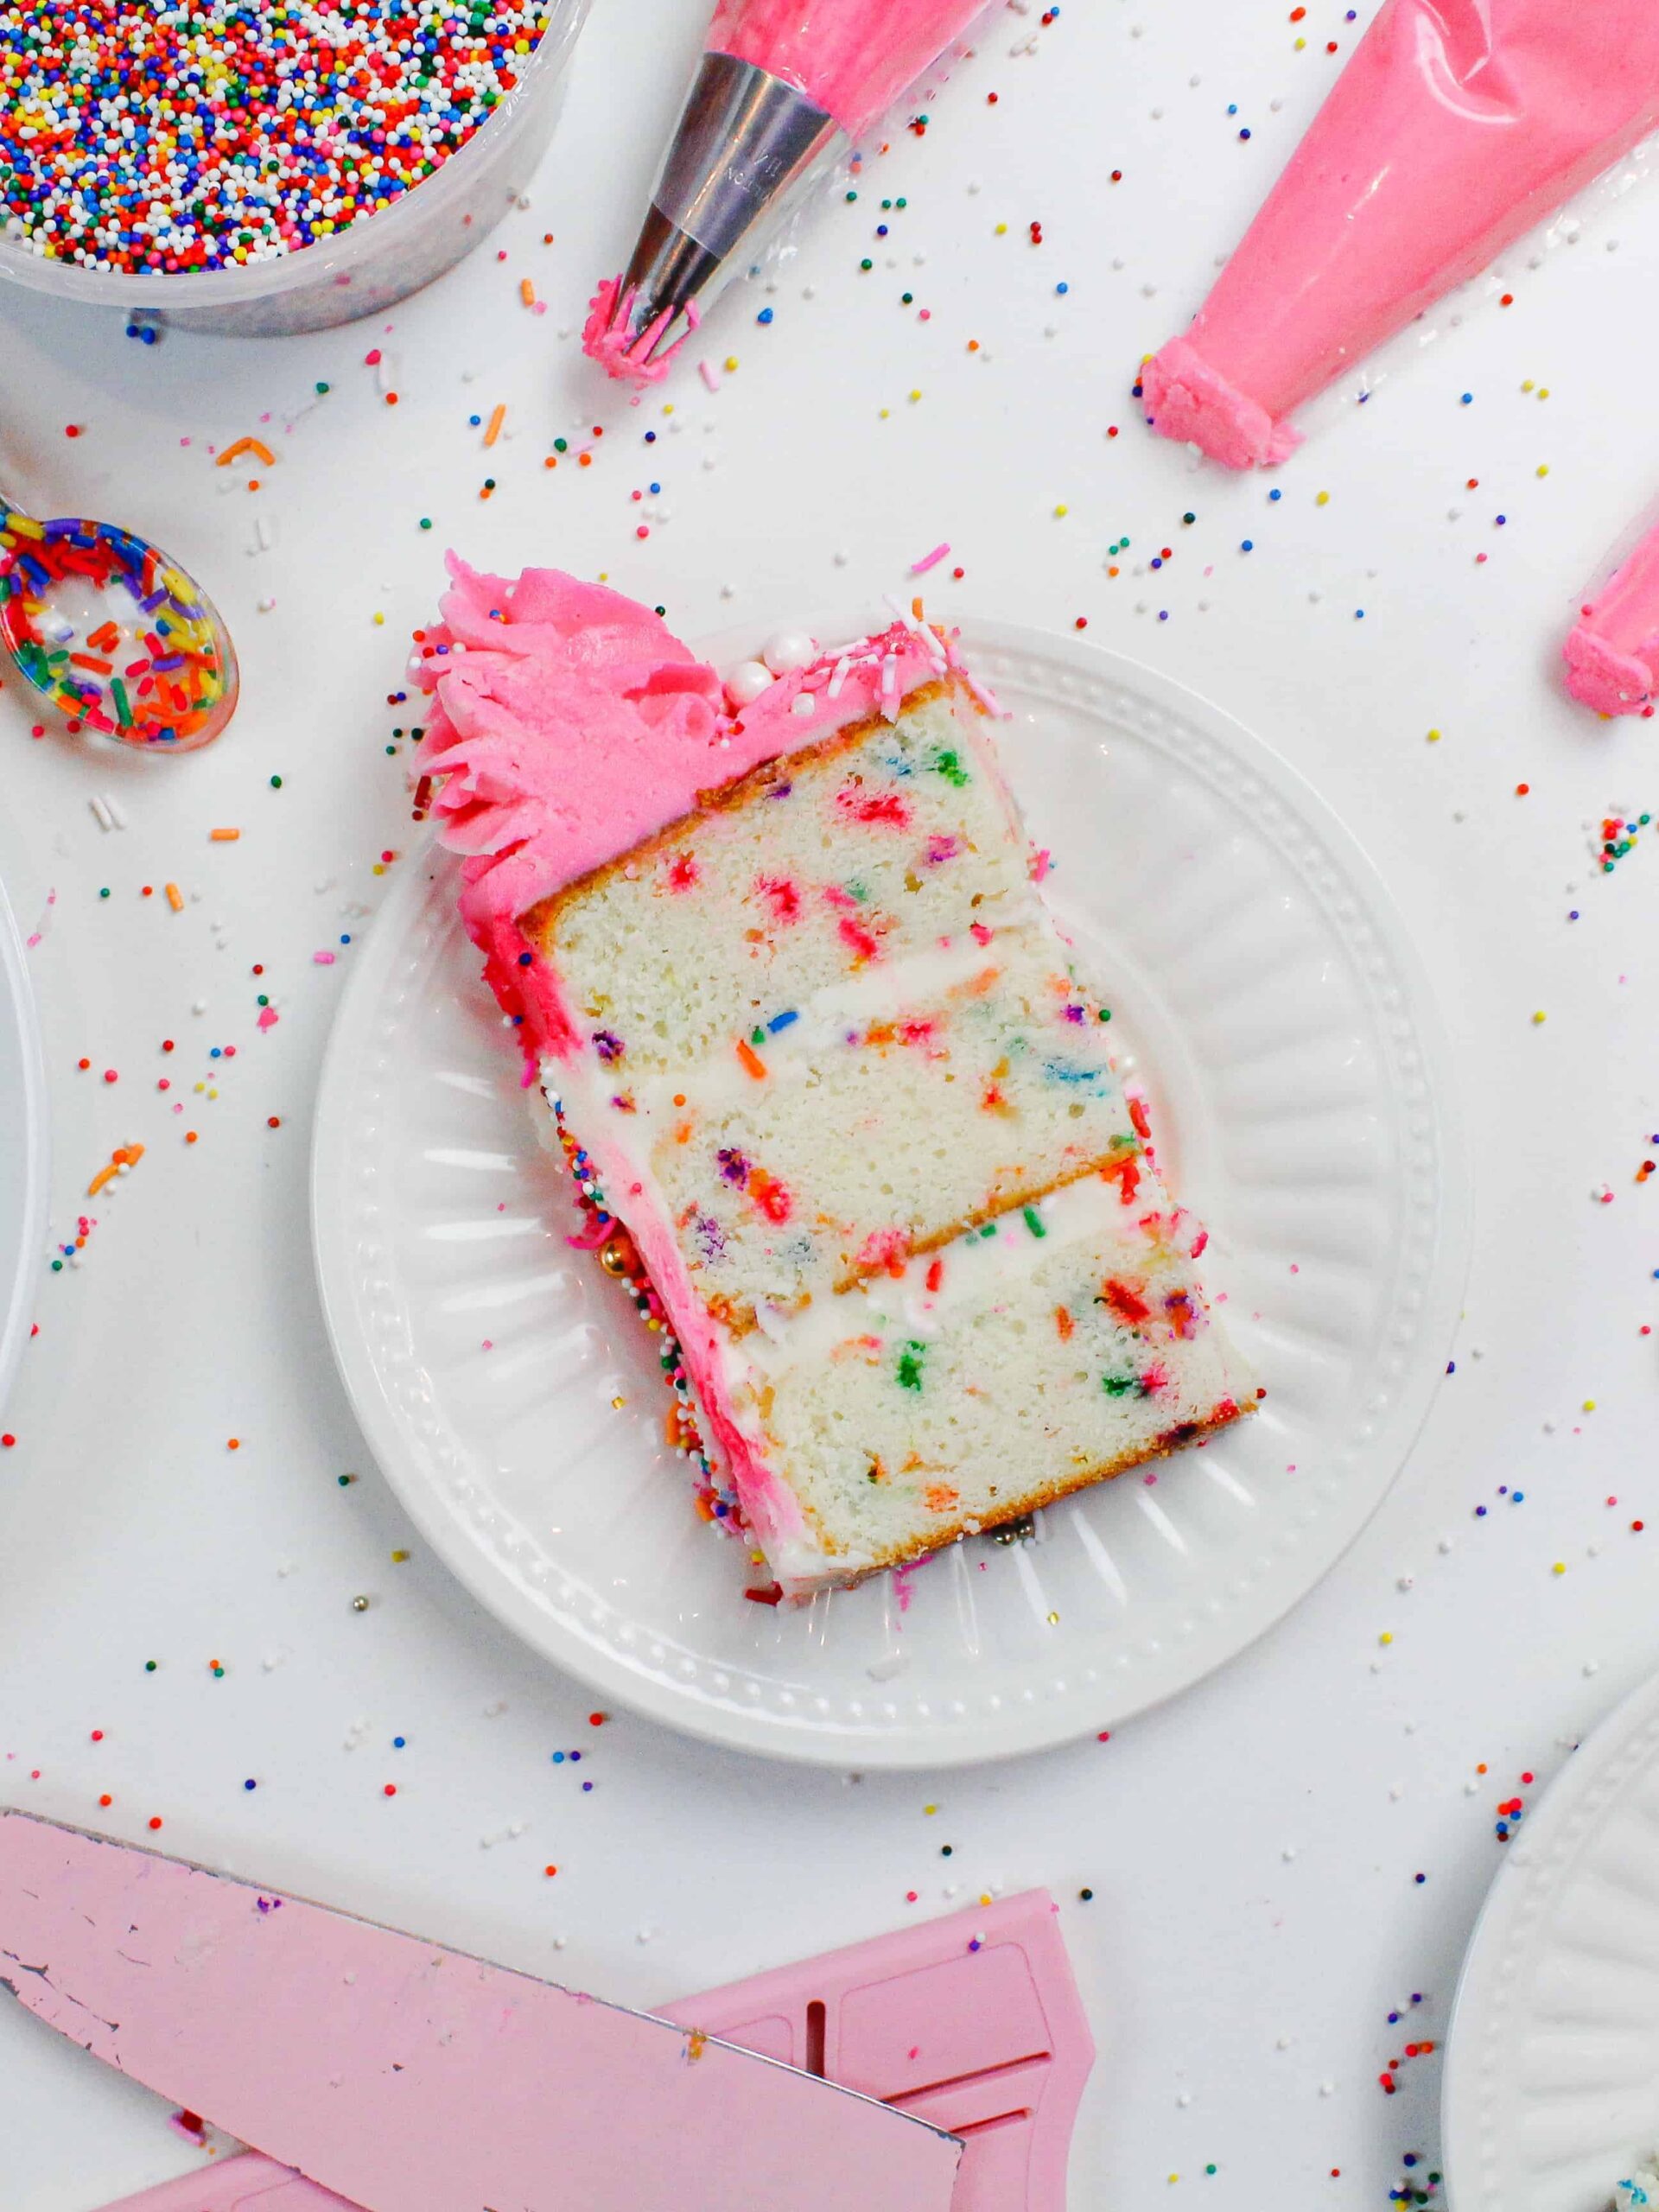
To Assemble this Small Batch Funfetti Cake:
- Stack and frost cake layers on a greaseproof cake board using a dab of frosting to help stick the first cake layer to the board.
- Add an even layer of buttercream between each cake layer.
- Spread a thin coat of frosting around the cake to fully cover the cake layers.
- Smooth using a bench scraper, then chill the cake in the fridge (10 minutes) or freezer (5 minutes) until the frosting is firm to the touch.
- Add a second, thicker layer of frosting to the cake and smooth using a bench scraper. Then decorate as desired! I used a Wilton 1M piping to pipe large swirls on top of the cake.
Video
Notes
Small Batch Funfetti Cake Recipe Variations
This recipe can also be used to make a sheet cake! One batch can be used to make a 9-inch x 13-inch cake that is about 1 inch tall.Tips for Making the Best Funfetti Cake
- Properly measure your flour. Either spoon it into the cup measure, then level with a knife or use a kitchen scale.
- Make sure your ingredients are at room temperature to help them mix together better.
- Chill your cake layers in the freezer for about 20 minutes before assembling the cake. This makes them easier to stack and frost.
- Level your room temperature or thawed cake layers with a serrated knife to make them easier to stack.
- Make sure your buttercream is the right consistency. It allows you to easily pipe your rosettes and have them keep their shape.
- Crumb coat and chill your cake, then smooth on a second layer of frosting. This will help make sure your final coat of frosting is crumb-free and beautiful.
- Make sure your buttercream is the right consistency before frosting your cake. It will help give your cake proper structure and make it easier to decorate.
Making this Funfetti Cake in Advance and Storage Tips
- Make your cake layers in advance and freeze them. It breaks the process up and makes it more approachable.
- Make your frosting ahead of time too or save any leftover frosting! It can be stored in an airtight container in the fridge for up to a month, or in the freezer for up to 3 months. Be sure to give it a good stir once it thaws to get the consistency nice and smooth again.
- A frosted cake can last in the fridge for up to a week or in the freezer for up to a month. The buttercream locks in all the moisture, keeping the cake fresh and delicious!
- If you cut into the cake and have leftovers, use any remaining frosting to cover the cut section to keep it moist and store in the fridge for up to a week.
Nutrition
Other Recipes You Might Like:
Yay! Have been looking forward to this one, cannot wait to try!
Yay!! So excited to hear that Nicole, I hope you love it! Let me know what you think of it 🙂
YOUR THE BEST!!!!, THANK yOU
Aw thanks Carol 🙂 You’re too sweet!!
How would I need to adjust this recipe if I was to make a layer cake from two 9″ cakes? Thank you.
Hi Tammie,
I would triple the recipe, to make 2 9-inch cake layers that are about 1 inch tall 🙂 Hope that helps, happy baking!
What icing colors did you use? This is so beautiful!
Hi Katie,
Thanks! I just used different amounts of the deep pink shade of americolor 🙂
Do you know Size pan you would use if you wanted to make a single sheet cake? I’m dying to try this bc I love your vanilla cake recipe. But I don’t want to invest in three 6″ pans until I know I will repeat it. Thank you so much!
You can use a quarter sized sheet cake pan that is 9 x 13 inches. For larger cakes like that, I suggest adding a couple heating cores to the center (these are the ones I use: https://amzn.to/2NQ0lVZ), to help the layers bake more evenly and quickly! The bake time can vary based on your oven and pan, but I find it usually takes mine 40-45 minutes. Hope that helps, happy baking!
This looks fabulous! How many people would you say this feeds?
Please don’t mind me, I just found your post on cake sizes and servings. Loving all of this info, thank you!!
haha no worries at all Amanda!! Happy you found what you were looking for <3 happy baking!!
Would the buttercream recipe you’ve provided in combination with this small-batch recipe cover in between the three layers, sides, and top comfortably of the 6″ cake? Then any extra piping or decoration would need extra buttercream? IF so, about how many cups of frosting does this recipe make?
Thanks!! I am so excited to try this!
Hi Courtney,
The amount of frosting included with this recipe should definitely be enough to fill, frost, and add some buttercream swirls to the top of this 6-inch cake 🙂 This frosting recipe makes 6-7 cups, depending on how much air you beat into it. Hope that helps, happy baking!! <3
Please keep the small batch cake recipes coming! 🙂
haha thanks Marlene 🙂 I sure will!!
Hi Chel! I tried this recipe, I love your six inch cakes! the vanilla choc and now this one! I just have a question , I have made your full size fun fetti, how come in the 6 inch no almond extract? I’m obEssed with the flavor of almond, could I use it next time in the six inch???
Hi Lauren,
You’re too sweet! I got a lot of feedback and questions from people who were allergic to tree nuts, so I decided to skip it in this version. You are more than welcome to add it though, I love it too!! Just use about 2/3 the amount the full batch version calls for. Happy baking!
Quick question, I put 1 and 1/3 sticks of butter on my kitchen scale and it was 190g, recipe states, 150g…..which one do you go by? weight or volume. Im taking a chance and going with 1 and 1/3 sticks. excited to try your small batch recipes 🙂
Hi Amy,
A standard stick of butter is about 113 grams, and that’s what my butter weighs too (I use the whole foods brand)! Is there a chance the way you cut the butter might have included more? What brand of butter are you using?
When in doubt, always go by weight / grams. It’s the most accurate 🙂 Hope that helps, happy baking!!
@AMY Champagne,
Hey make sure you don’t cut the second stick of butter at the 1/3 CUP line, that would give you 190g. 1/3 of the second stick. I almost made that mistake too
Thoughts on using this recipe for cupcakes? Need to make funfettie cupcakes soon!
Hi Carsyn,
I actually have a wonderful funfetti cupcake recipe that I suggest instead! They bake up better in cupcake liners. Here’s the link: https://chelsweets.com/2019/06/18/funfetti-cupcakes/
Hope that helps, happy baking!!
Loved this recipe! Do you have any cost-effective tips for transporting your cakes? I bought bulk bundles of 8x8x5″ and 10x10x5′ boxes for bringing 6″ and 8″ layer cakes around town (also a NYC-er!), which is great for cakes under 5″ tall. What are the best (and most economical) means you’ve found for transporting your taller creations? Thanks!
Sadly I haven’t been able to find any affordable cake boxes that are tall. I usually just prop the cake box tops open, or cut them off. So sorry I can’t be of more help!!
Would this recipe be sturdy enough to be a carved cake? I know some cakes are too delicate for shaping. If not, which of your recipes would you recommend?
Hi Carrie,
I carve this recipe and my vanilla cake recipe (both very similar) all the time! Just be sure to use a serrated knife! I also like to carve them when they’re slightly chilled, and trim them before I stack and frost the cake layers. Hope that helps, happy baking!
Hi! I’m wondering if this recipe would work well for a carved cake. I know some cakes are too delicate for shaping. If not, which of your recipes would you recommend? Thank you so much!
Hello! I am making 3, 4in little cakes. Should I half the recipe or just use the full thing and fill the cakes up 2/3 and discard the extra? Thanks!
Hi Grace,
I think a half batch of this recipe would work great for a tiny cake that size! You only need to fill the pans up about 1 inch high, and you will probably have a bit of extra batter left over. Hope that helps, happy baking!
I love your funfetti recipe! I was wondering how I can change it to make just a one layer 9 x 13” cake. My daughter’s birthday is this week and I would like to make a cake but don’t have time to do the multiple layers with work this week.
Hi Brittanie,
You totally can! When I bake sheet cakes, I place two flower nails (like these: https://amzn.to/39oJK3I) spaced evenly apart in the center of each pan (and spray them), to help the layers bake more evenly and quickly. With flower nails, the cake layers bake in about 45 minutes in my oven.
I also suggest reducing the bake temp to 325 degrees F to minimize browning. I hope that helps, happy baking!!
Hey! I’m planning on making my own birthday cake – I have looked at pretty much all of your cake and buttercream recipes! ? I was wondering if I could make a white chocolate funfetti cake by using you white chocolate cake recipe and adding sprinkles? Would this work?
Thanks!
Hi Esther,
You totally can do that!! Almost all of my cakes / frostings / fillings can be mixed and matched together! I’d recommend adding 2/3 of a cup of sprinkles to that cake recipe. Hope that helps!
What’s your process when letting them cool in the freezer? How do you wrap them? Also, I don’t have a stand mixer :/ don’t have the funds… will the cake come out different using a hand mixer?
Hi Jamie,
If I plan to use them within a few hours I just pop the pans straight into my freezer, otherwise I wrap the cake layers in plastic wrap after removing them from the pans! This recipe will turn out just as well with a hand mixer as a stand mixer <3 hope that helps, happy baking!
First of all I just want to say this is my FAVORITE recipe I have ever tried!!! I love it!!! second, do you have a diagram of how to cut this to yield the suggested 16 serving sizes? I can’t for the life of me figure it out
That’s awesome, I’m so happy to hear that Sierra! I just cut the cake into four equal sections, then cut 4 slices from each section! Hope that helps, happy baking!
First of all, I love your recipes and cake designs! I’m baking this one as we speak but I’m going on 50 minutes bake time. The outsides are browning but the center is still giggly. I know all ovens are different but I’m afraid the cakes will turn out dry since the bake time is exceeding the original 30-33 minutes posted. I also used cake strips if that makes a difference. Is it normal to have to cook cakes that much longer? Thanks!
Thank you Katie!! And I’m so sorry for the delayed response!!
That’s wild!! Did you bake the batter in a different sized pan than the recipe calls for? Or make a different number of cake layers? If it’s neither of those, it probably is your oven or you pans! What type of pans are you using?
I’ve found that other than ovens that are off in temperature, the type of pan you use can have a huge impact on bake time. Is it a dark metal? I use fat daddio pans (I order them on amazon: https://amzn.to/2ttArQF) which are made with aluminum and they work great. I’d suggest either testing your oven to see if it’s baking to the correct temperature, or getting new pans. Hopefully one of those will help fix it <3
I wanted to try to bake an decorate a cake for the first time. I have only salted butter, so should I reduce the amount of salt and how much should I reduce it to? Also, how much almond extract should I use in this recipe? I found your account on tick toc and I love your cakes!
Hi Alexis,
You can omit the salt in the cake and frosting recipe if you plan to use salted butter! I’d add in 1 tsp of almond extract, and you can add it to either the cake or the frosting, or 1 tsp to both! Hope that helps, happy baking!!
Can i use bread flour or does it have to be all purpose?
Hi Camaira,
bread flour has a super high protein %, so i wouldn’t recommend it! These would turn out way better with AP flour.
Question if you cant get pastuerised egg whites can i use whole egg? where I am living its hard to get
For sure! I’d suggest using 2 whole eggs and one egg white (or 3 whole eggs if you don’t want to waste a yolk) in place of the egg whites in this recipe 🙂 Hope that helps, happy baking!
Hi, I’m really excited to try this. I’m wondering if this recipe is ok, or how would I modify the it if I wanted to make this in two 8 inch Square pans?
Hi Elz,
I’d suggest using my regular batch funfetti cake recipe to make those cake layers! Square pans need more batter. Here’s the link: https://chelsweets.com/2019/05/09/funfetti-cake-recipe/
Hope that helps, happy baking!
Hello! Every time I bake my cakes the sides always end up way to brown and I have to cut them off! Is there a reason or am I just going crazy!?
Hi Sailor,
The browning happens because of the amount of sugar in this recipe, but can be exacerbated by your oven and the type of pans you use. Light aluminum pans work best (like these ones: https://amzn.to/384LS0q), or you can also try using cake strips. My oven causes a lot of caramelization because it’s a small, 24″ gas oven. But when I bake them in newer ovens, I don’t have the same issues. Hope that helps, happy baking!
How deep does the pan have to be?
Hi Villinez,
My pans are 2 inches deep <3
Thank you for responding, Does it matter if the pans are 4 inch deep?
Hi Vilinez,
They should still bake up just fine in 4 inch pans! 🙂
Hi, I was just wondering how long would it take for this to bake in 4 inch pans.
Hi Grace,
It depends on how thick your cake layers are! When I made my mini cake recipe, my layers took 30-33 minutes! Here’s the recipe, you can just add about 1/3 cup of sprinkles to it: https://chelsweets.com/2020/04/16/mini-vanilla-cake-recipe/
Hope that helps, happy baking!
Hi, is there anything I can use to substitute the buttermilk?
OMG i cant wait to try this!! i was wondering if by any chance if using cake flour would be ideal? or would it be a no go?
Hi Irma,
I prefer this recipe with AP flour, but you can use cake flour in its place if you want <3
The only cake tins I have are 8 inch wide and 1 inch deep would u recommend me using this recipe or the recipe for the larger cake ? Thank you 🙂
If I only want to make two six inch layers, could I just make 2/3 of the recipe?
Hi! Could I use this recipe to make 2 9-inch layers? Would there be enough frosting and batter? Thank you!
Hello! I just made your cake & it was delicious but I did feel as if it was too sweet. If I decrease the amount of sugar will it throw off the texture? Thank you!!
I would like to add almond extract to the small batch funfetti cake. Would 3/4 tsp be the correct amount?
I made this recipe today and it took a full hour to bake. I used three 6-inch stainless steel pans, which I love because they always release and clean up so easily.
My cake layers came out perfectly fluffy and moist, even though it took a whole hour to bake through. And I liked that they come out flat, but I found the flavor too sweet, specially when combining with American buttercream. I leveled the layers because all that sugar baked into a crunchy crust. How much sugar can I safely cut from this recipe? I thought about using SMBC but I’m afraid it would bring too much moisture into this cake.
How tall is this cake with the 3 layers?
Hi there. I love all your recipes and I’ve tried making the 4inch vanilla cake it was so good. I know most of the other recipes are for 3 x 6 inch layer cakes, is there tip of how can I make it into 3 x 4 inch cakes?
Hi this is my second time making this and both times they came out very greasy…and I mean leaves oil marks on everything it touches greasy. I weighed out all of my ingredients so I know the measurements aren’t the problem. And I have an oven thermometer and I baked it for 35 min so I can’t imagine that being the problem either. Any ideas?
Can you recommend an alternative to buttercream frosting for this cake?
Hi Chels!
I want to make a cake jar with your vanilla funfetti cake recipe, what do you recommend? to use this recipe or to use the cupcake funfetti recipe? it is for sale from my bakery in the Netherlands.
and one last question .. Should I leave the cake whole in the cake jar or crumble it?
I really hope you can help me with this! after all, you have the best vanilla cake recipes yet!
Love Floortje
I’ve baked a lot of cakes over the years and most recipes are pretty similar. When I first read the instructions I thought “there’s no way this is right”, but I followed the mixing instructions exactly and I found this to be a perfect recipe! I’ve never seen a recipe that calls for egg whites to be added but not whipped, so I thought it would come out dense. Boy was I wrong! The cake was light and fluffy with a crisp exterior and not too sweet.
I only had two extra-tall 6 inch pans, so I baked them at 325 degrees around 45-50 minutes instead since mine were so full and I didn’t want them to burn. I used a toothpick to check the center until it was barely coming out clean, and then let the pans sit and cool on the stove for about 10 minutes before turning out. I made sure to let them cool fully before leveling (they barely needed it) and used a plain buttercream frosting which was delicious.
Thank you so much for this recipe, it’s really delicious and great for small celebrations!
Thank you so much for sharing this recipe! I’m doing a funfetti kitten cake for a customer this week, and this recipe looks awesome!
Quick question: where do you find the best tall cake boxes!? I have a few orders this month that are 6 inch round 3 layer cakes, with decorative icing on top.
Kristi
Such a cute cake! What tip did you use to frost the swirls on top?
I made this for a baby naming and it was INCREDIBLE! Such a light, moist and delicious cake. People were flipping out over how good it was. Thank you for this recipe!
Hi! If you were doing roses on this 6″ 3-layer cake, would you do the same amount of icing you have in the recipe or more?
Hi! Can I reduce the sugar in this recipe? Worried it will be too sweet. Thx!
This recipe has become my children’s favorite. It is perfect for a 6 inch cake, the layers bake to perfection and the cake is moist and delicious. Truly, i have not found a better recipe. I do reduce the amount of sugar a little. Otherwise, it is perfection!
Thank you for sharing!
Hi Chel,
I would like to use oil instead of butter. If you recommend, then how much. Would this alter the taste.
Look forward to hearing from you.
How deep are your pans? I love all of your stuff!!
Hi Tina,
Aw thanks!! You’re too sweet. My cake pans are almost all 2″ deep! 3″ pans would work fine with my recipes too, I just like using 2″ pans more because they’re easier to store. Happy baking!
I made this cake today! Im a very new baker/decorator. It came out good! Liked it a lot! I need more practice with the frosting! It looked good but not as nice as yours! Thanks for the recipe!
So happy to hear that Stephanie!!! I’m sure it looked wonderful 🙂 Thank you for sharing!!
Yes, those are jimmies. Sprinkles are colored sugar. Looks delicious. Will have to try it.
Can this recipe be used to make a small batch vanilla cake if I leave out the sprinkles?
Hi Nikki,
Great question! This totally can be made without the sprinkles to make a classic vanilla cake. Happy baking!
I made this the past weekend and it was a hit! Question though.
How long can this sit out on a table for?
Should it constantly be in the fridge up to 30 minutes before serving?
Thank you for the amazing recipe!
For your recipes can I bake them at 325? I know it will take longer but I know sometimes I like to bake low and slow others I follow the recipe .
You totally can do that! Just adjust the bake time to be longer, or until a toothpick inserted in the center comes out with a few moist crumbs. Hope that helps, happy baking!
My cakes sunk in the middle, what did I do wrong?
Hi Molly,
Ah, I know how frustrating that can be! A cake sinking in the middle can happen for a few reasons — the most common are underbaking (a lot of ovens don’t bake accurately, yours might run a little cool!), opening the oven door too early, or too much leavening (which can cause it to rise quickly and then collapse). With small batch cakes, it’s extra important to measure carefully and make sure your oven is fully preheated. I’m happy to help troubleshoot more if you want to walk through what you did — we’ll get it perfect next time!
Can you use this recipe to make a 2 layer 8in heart cake?
Hi Joi Joi,
You can! It should be just the right amount of batter for that. Hope that helps, happy baking!