
Lunch Box Cakes
Lunch box cakes or bento cakes have taken social media by storm! These adorable little cakes are a wonderful treat for any occasion.
The best part is that they’re customizable, so you can really decorate them however your heart desires. Have an anniversary, birthday, or maybe a promotion?! These cakes are perfect for pretty much any kind of celebration.
Or if you just need a little pick me up, these cute little cakes are sure to put a smile on anyone’s face.
What Are Lunchbox Cakes?
Some people call this style of cake lunch box cakes, others call them Bento cakes.
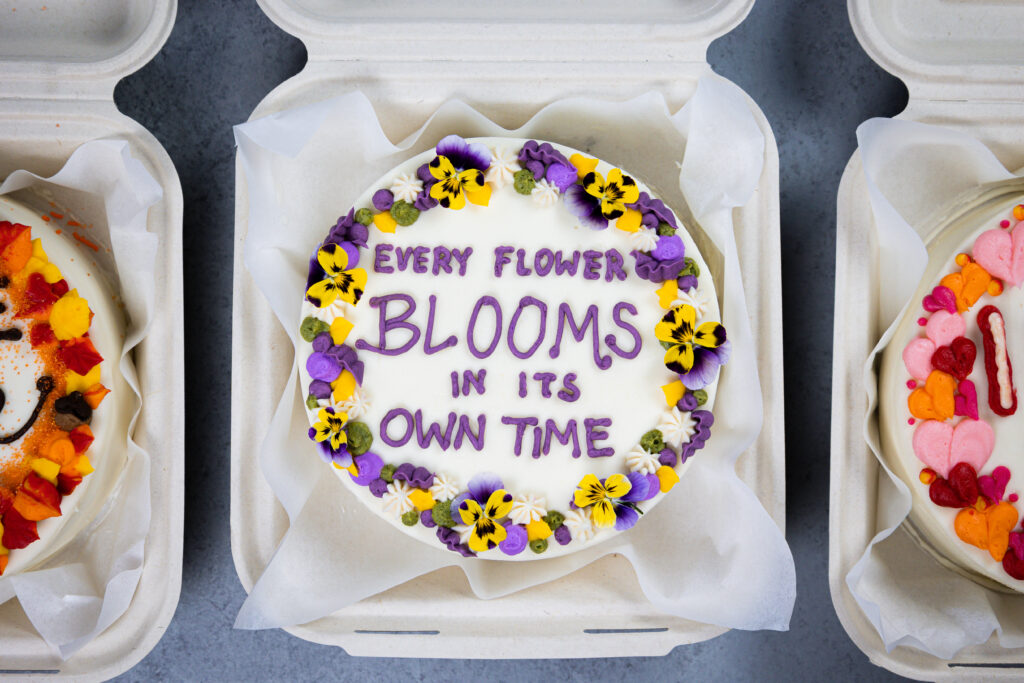
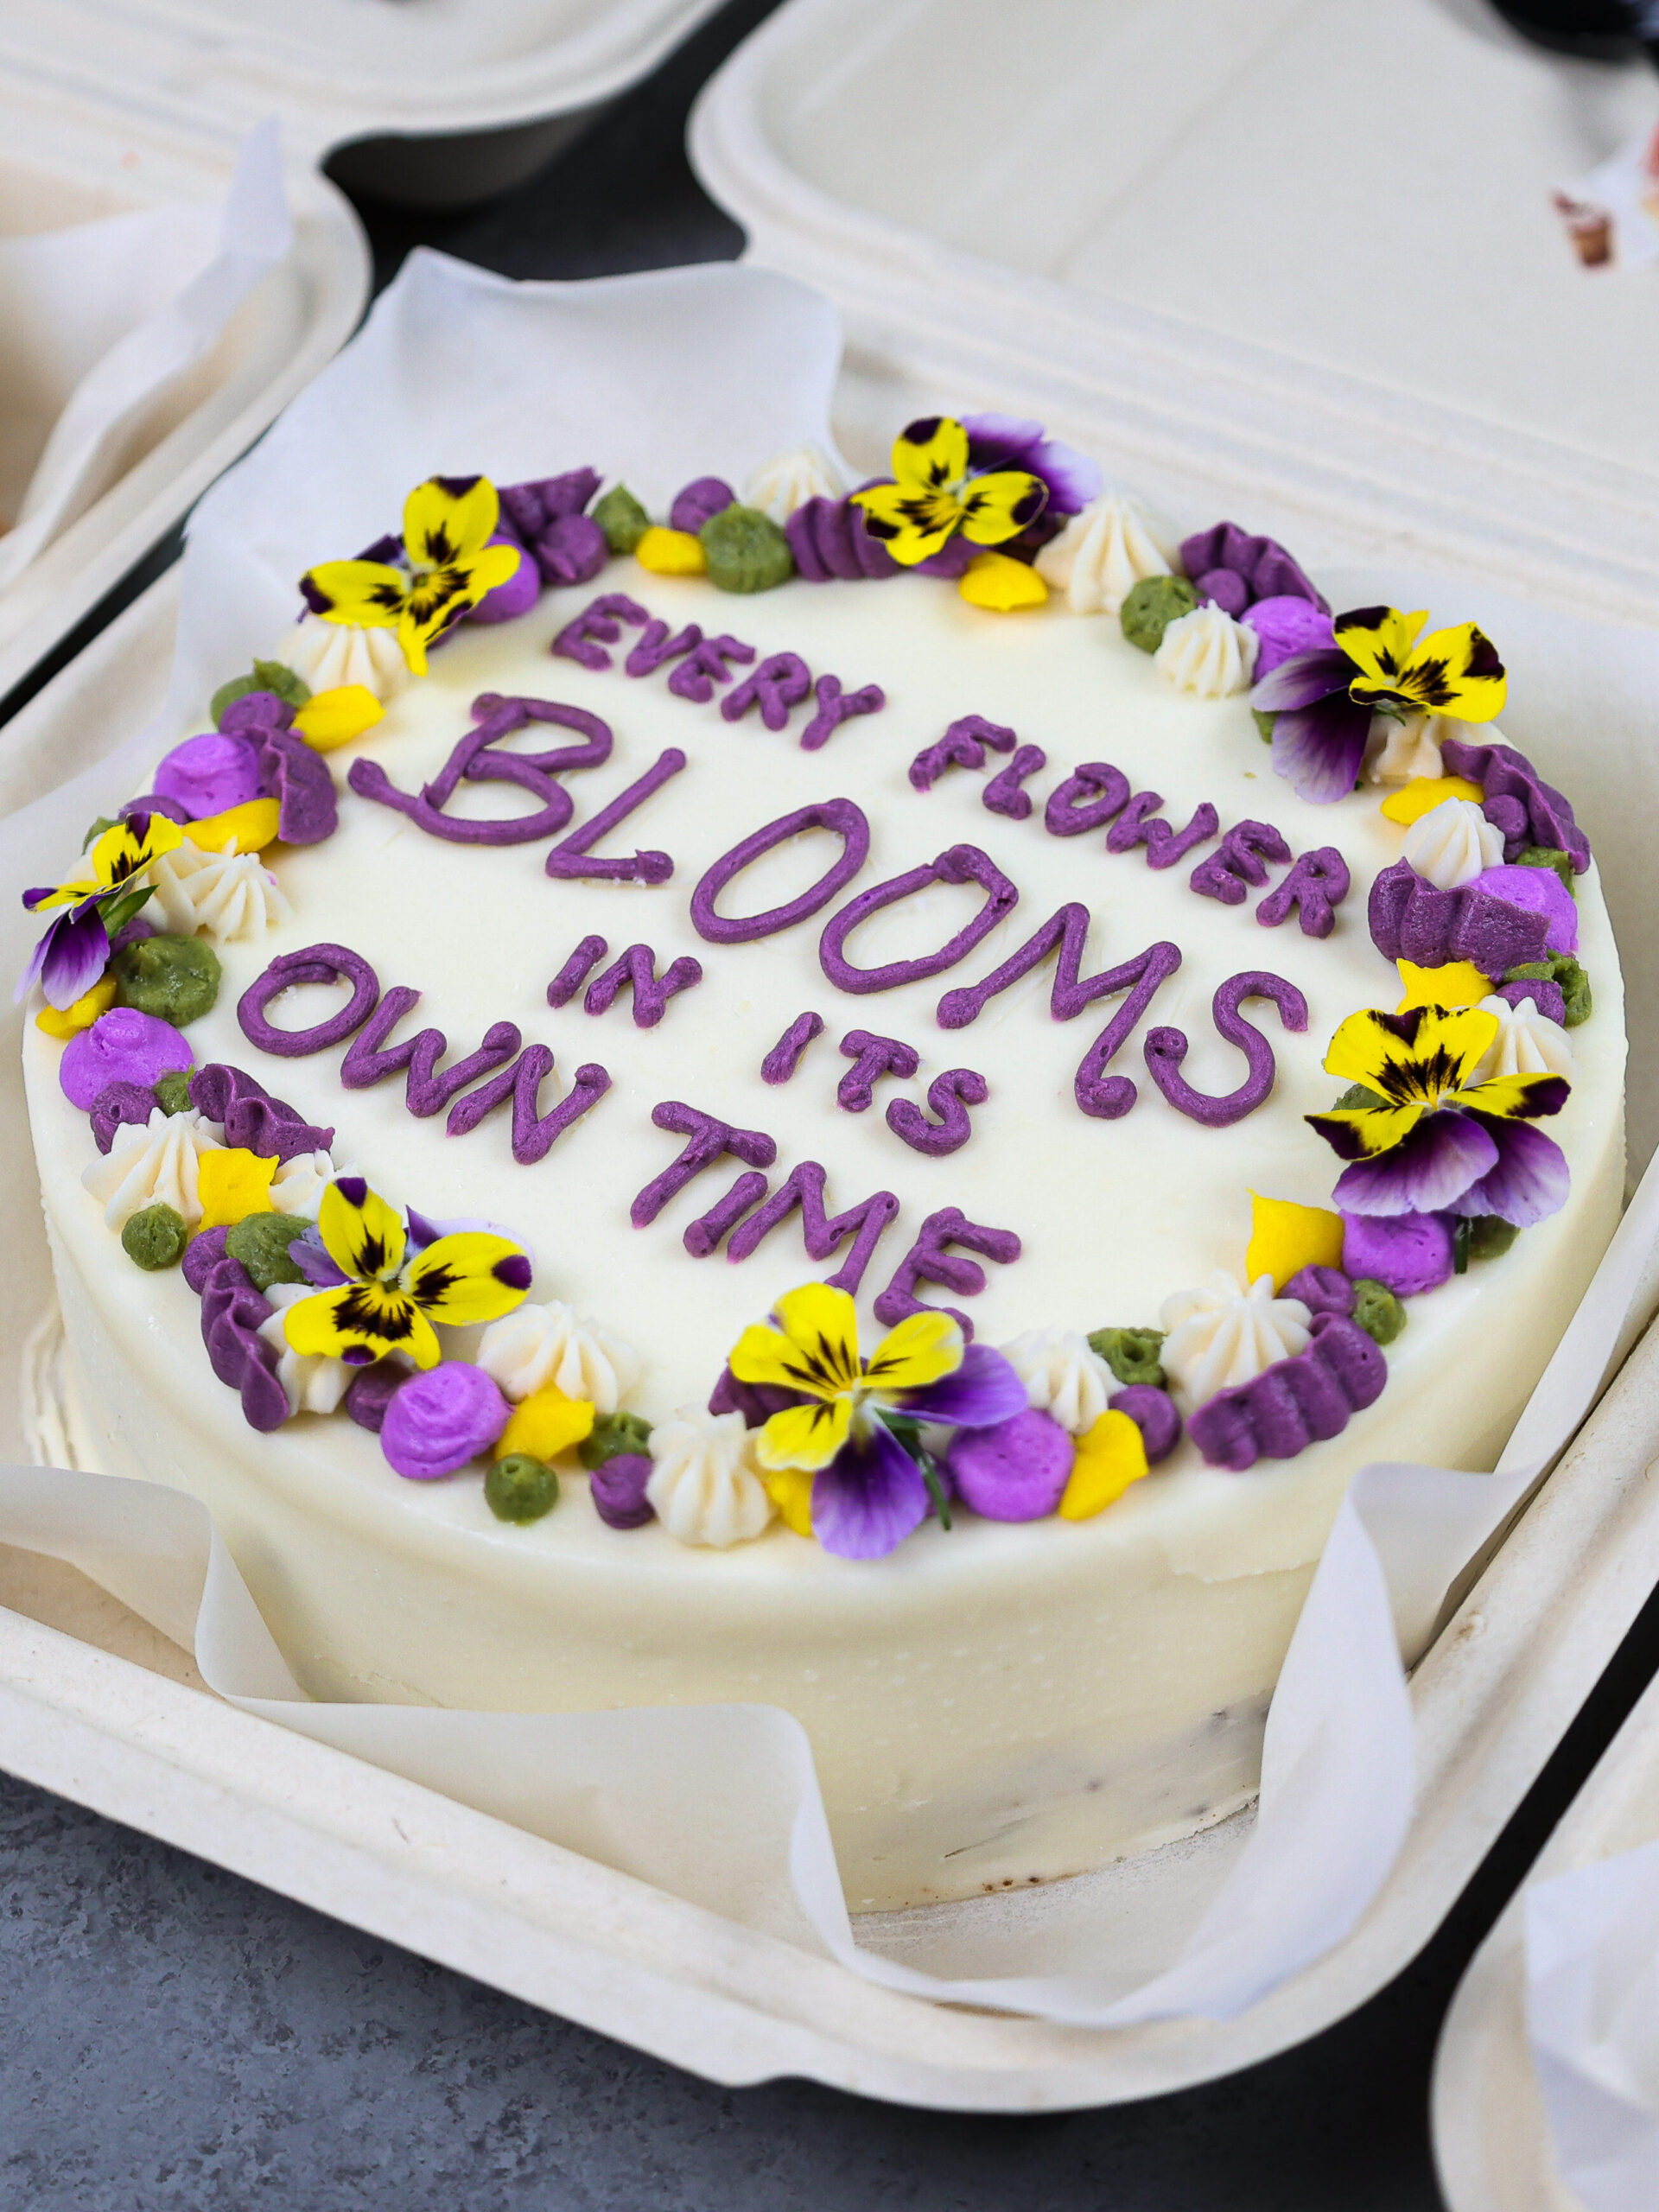
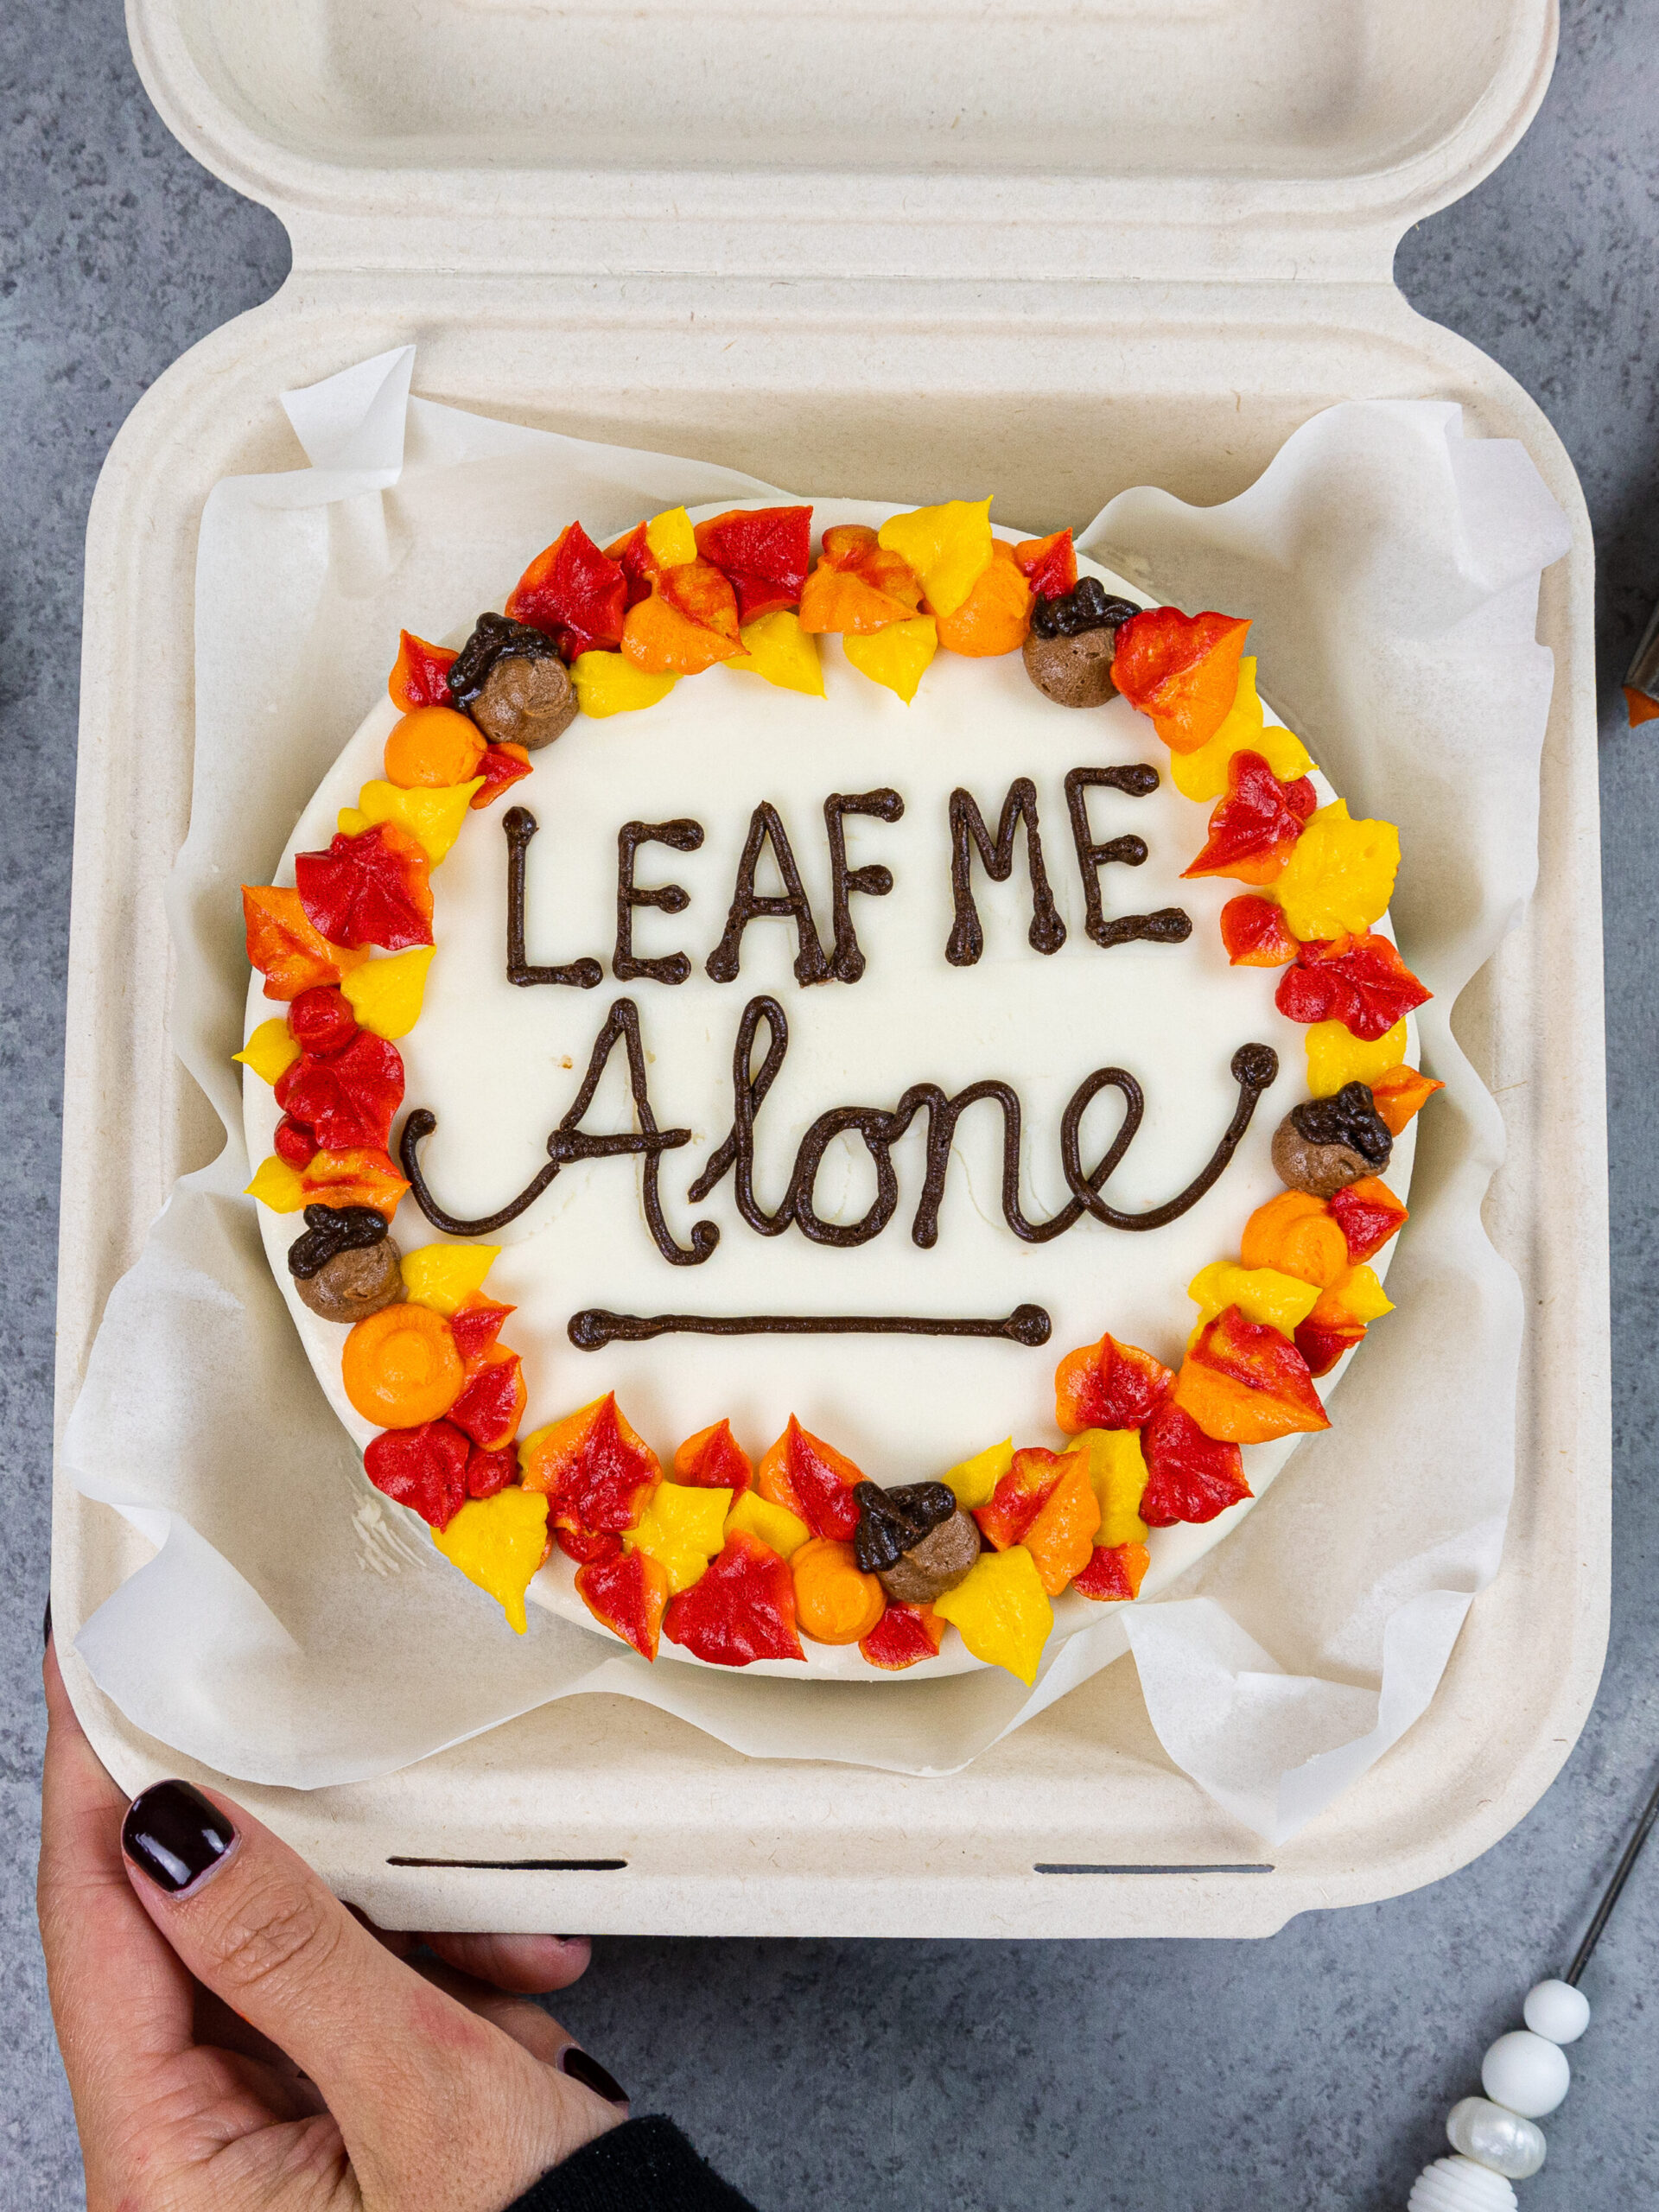
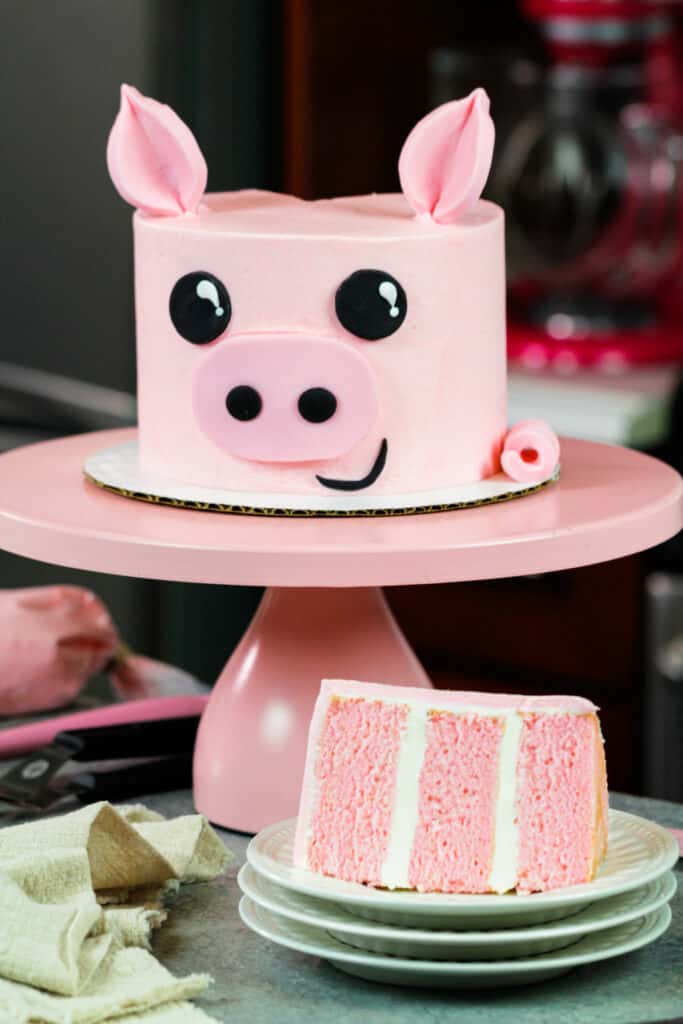
Bento cakes or lunch box cakes are cute, minimalist cakes that are usually made with four to six-inch cake layers. These became popular in Korea, and they’re so cute this style has gained popularity around the world.
Unlike the tall layer cakes that are common right now, these cakes are short and usually about 2 inches high.
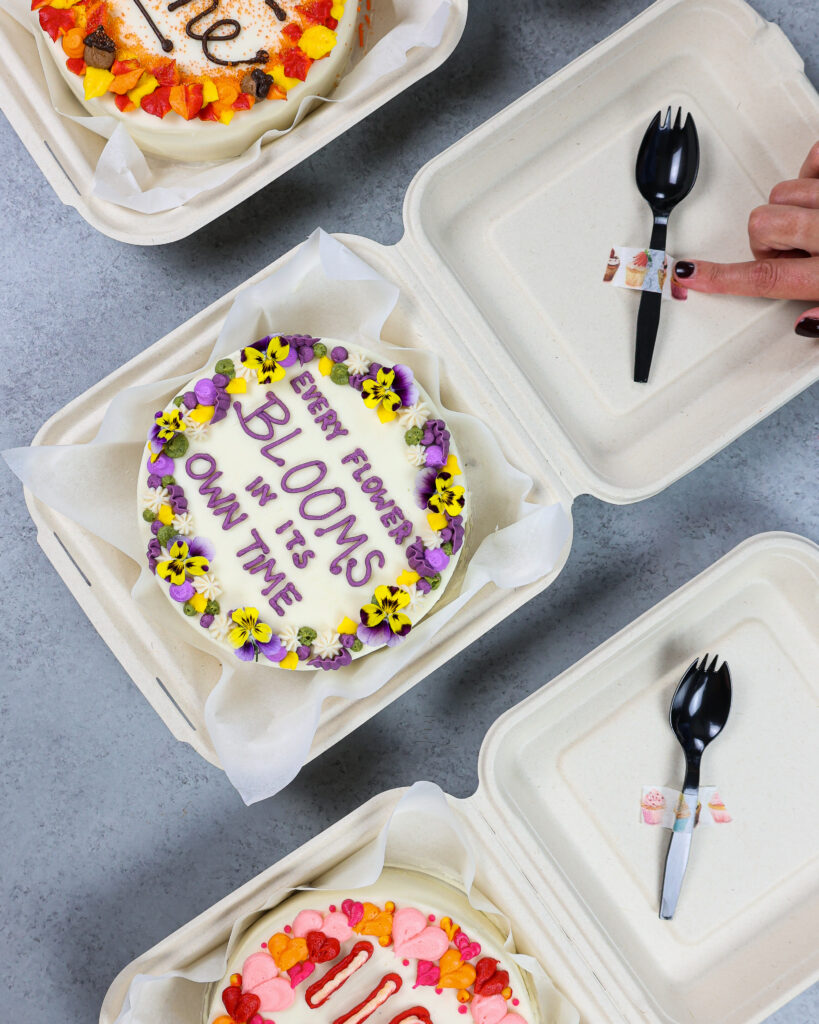
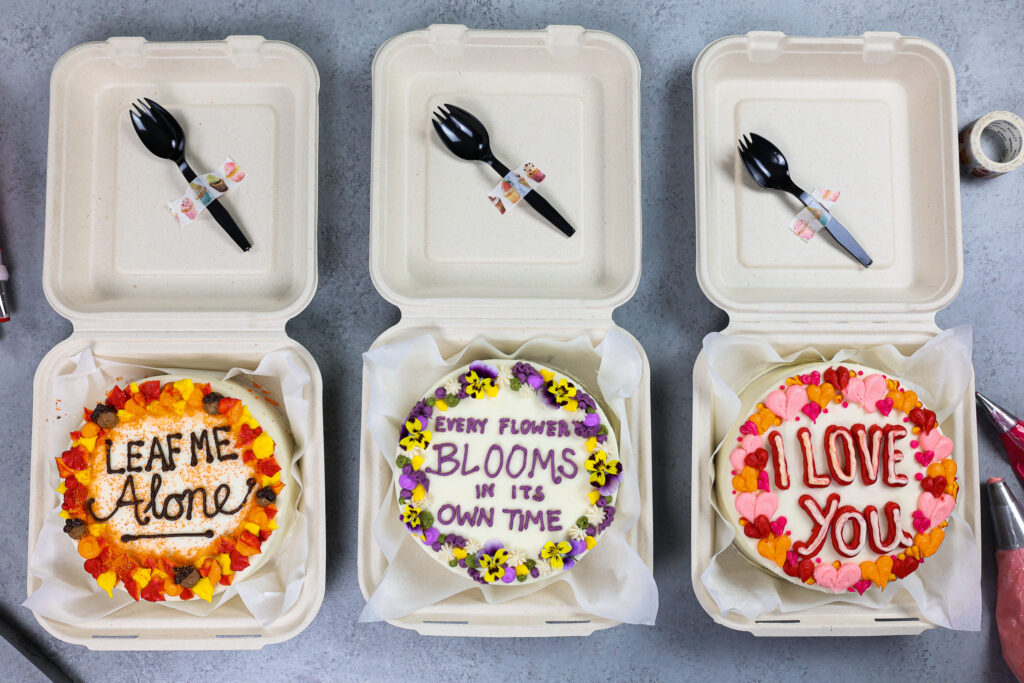
This is a signature feature of these cakes because it allows them to fit perfectly inside square to-go containers. The box that these cakes typically come in is a quintessential part of this style of cake.
They also are usually placed in their boxes using parchment paper, like in the photo below.
This makes them easy to decorate and transfer into the box, and also hides any imperfections that might exist on the sides of the cake. I love this because it makes this cake design super forgiving 🙂
The word Bento comes from the Japanese language and means lunch box.
Most people are familiar with bento box lunches, which date back all the way to the fifth century when Japanese men used to carry their meals in compact and easy to carry containers when going fishing and hunting.
Outside of Japan, this style of cuisine is also common in China, Taiwan and Korea.
How Big Are Lunch Box Cakes?
Lunch box cakes can vary in size, but they are typically quite small.
I like to make six-inch lunch box cakes so that I have lots of room to write on top of them. I also find that size of cake easier to frost. However, some bento cakes are made with three or four-inch cake layers.
The most important thing to keep in mind is that the size of the cake layer is the same as the bottom of the container that you plan to put the cake in. It should sit flush in the bottom of the box.
While the boxes I use are 8 x 8-inches, the bottom is tapered and actually has a 6 x 6-inch cavity. This is why I use 6-inch cake layers, they fit perfectly in these boxes.
How to Make Lunch Box Cakes: Step-by-Step Tutorial
Let’s walk through how to make these lunch box cakes together to make sure it turns out as amazing as possible!
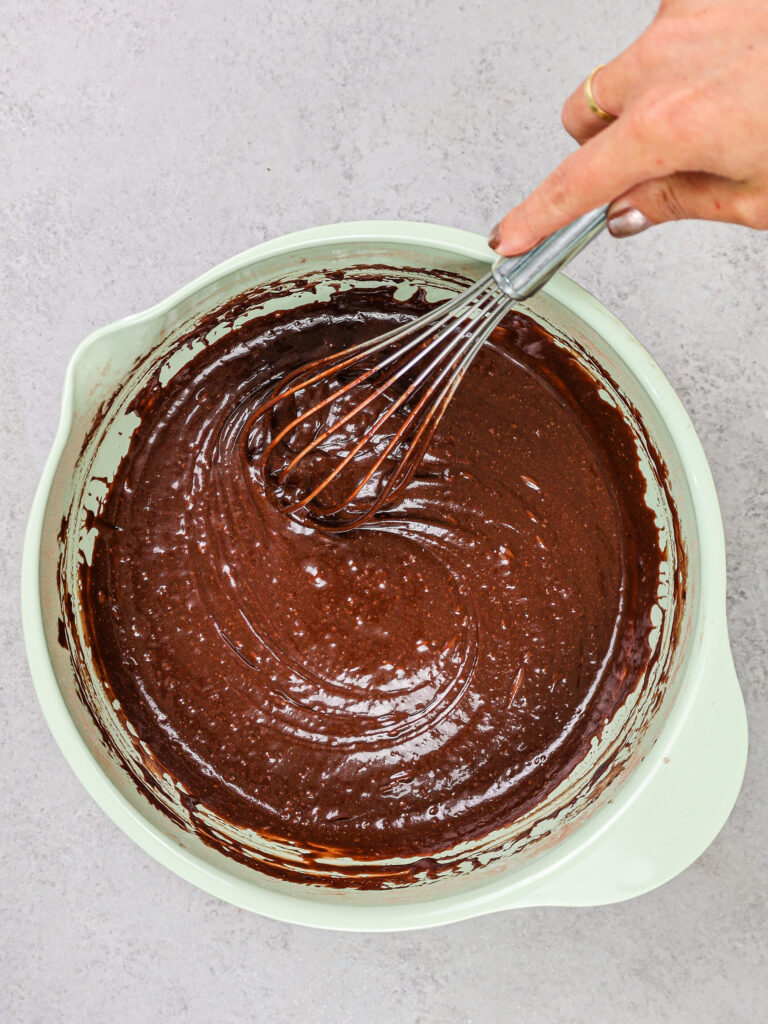
Step 1: Bake the Chocolate Cake Layers
Preheat oven to 350 F / 175 C. Grease and line two, six-inch round cake pans with non-stick spray or homemade cake release. If you want to use an 8-inch round cake pan, make one cake layer.
Divide the batter evenly between the prepared cake pans. Bake for about 25-28 minutes or until a toothpick comes out with a few moist crumbs. Bake time can vary quite a bit based on your oven, so keep an eye on the cake once it’s been in the oven for 25 minutes.
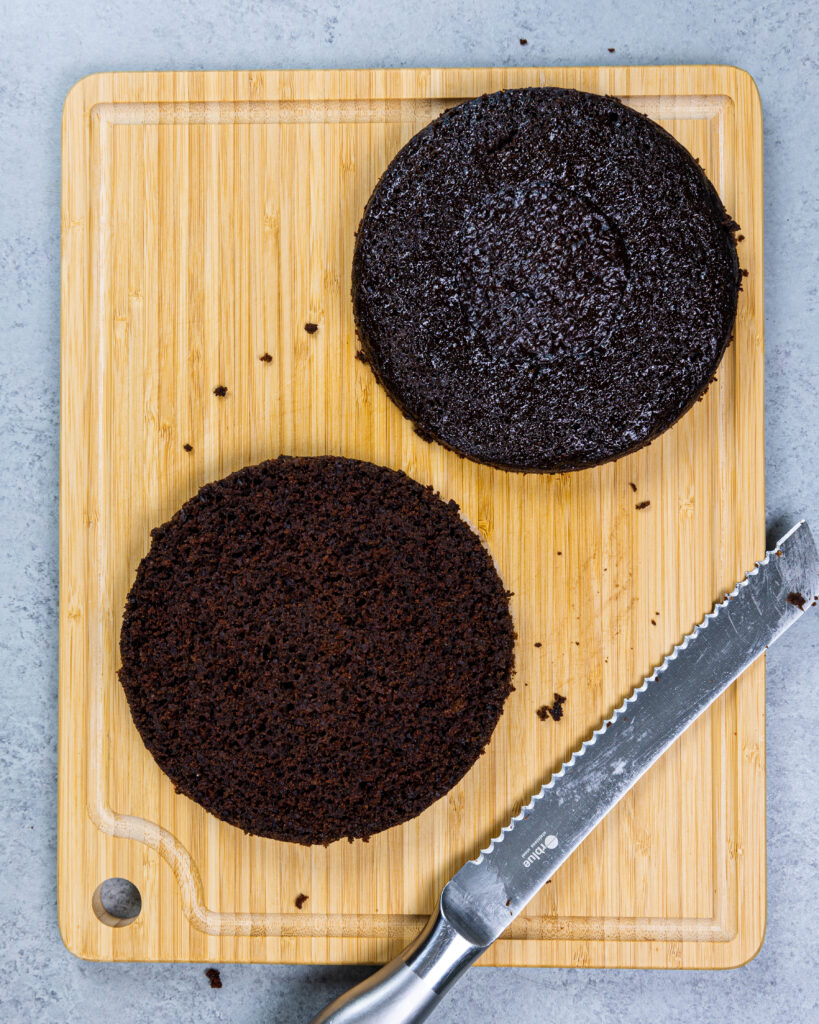
Remove the cake layers from the oven and let them cool in the pans for about 10 minutes. Then carefully flip them onto wire racks to finish cooling.
Once cooled, use a serrated knife to cut the cake layers horizontally, creating a total of four thin cake layers.
If you’re making these in advance, wrap and freeze them at this point.
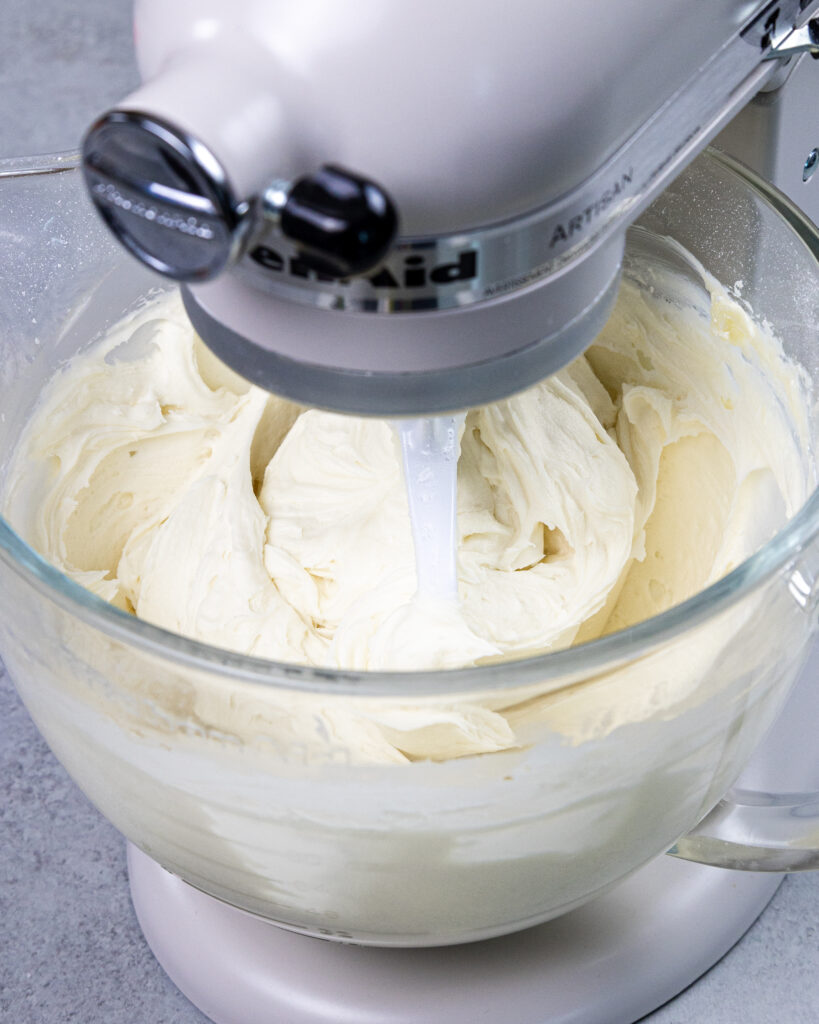
Step 2: Make the Buttercream Frosting
While the cake layers bake and cool, make the buttercream frosting with either an electric hand mixer or a stand mixer.
If your frosting seems too thick after mixing together all your ingredients, add in additional cream (1 tablespoon at a time). Or if the frosting is too thin, add in more powdered sugar (quarter of a cup at a time).
If you’re unsure how thick your frosting should be, you can learn what consistency you’re looking for in my frosting consistency post.
This recipe makes a sweet American buttercream frosting. If you don’t like sweet frosting, I recommend making a half batch of my Swiss meringue buttercream or using a half batch of my Russian buttercream.
Cover the frosting with plastic wrap to prevent crusting and set it aside.
Step 3: Stack and Crumb Coat the Cake Layers
Stack and frost the cake layers on a square sheet of parchment paper that is 1 inch larger than your box (i.e. 9 inch parchment square for an 8-inch box).

I also like to tape the parchment paper to a cake board to make the cake easier to move in and out of the freezer and keep the sheet in place.
Spread an even layer of vanilla buttercream on top of the cake layer with an offset spatula.
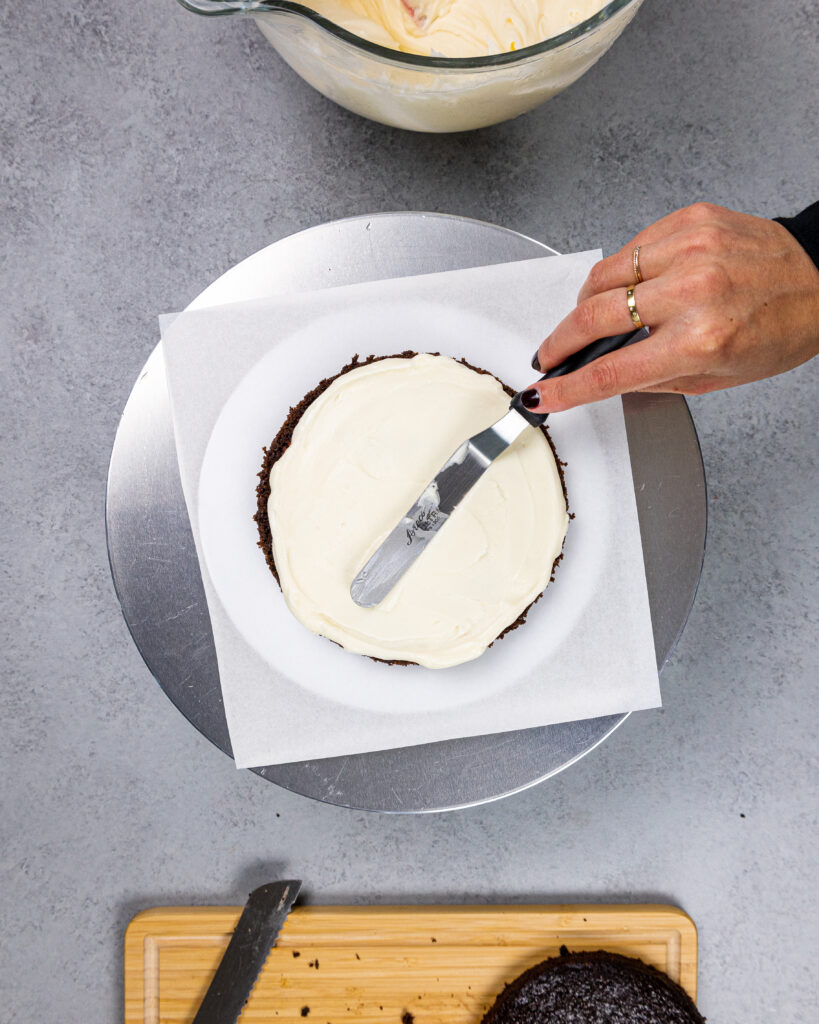
Stack the next cake layer on top and cover over the cake with a thin layer of buttercream. Smooth the frosting using a bench scraper and/or small offset spatula.
Chill the cake again in the fridge (20 minutes) or the freezer (10 minutes) until the frosting is firm to the touch.
Step 4: Add a Second Layer of Frosting
Cover the cake with a thicker layer of vanilla buttercream and smooth using a bench scraper and/or small offset spatula.
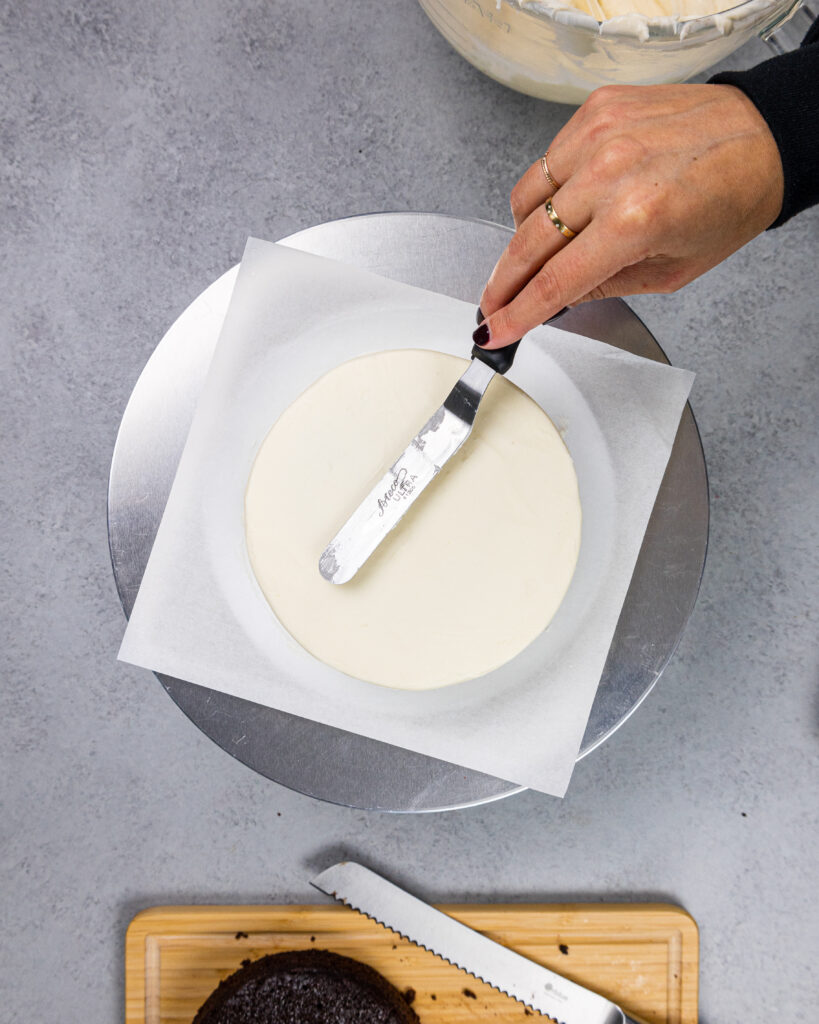
Chill the cake again in the fridge (20 minutes) or the freezer (10 minutes) until the frosting is firm to the touch. This will make it much easier to place in its box.
Repeat steps 1-5 with the second set of cake layers.
Step 5: Decorate as Desired!
Carefully lift both cakes off the cake boards using the parchment paper and place them inside the containers.
Color the remaining buttercream using gel food coloring in whatever color scheme you’d like and place in small piping bags.
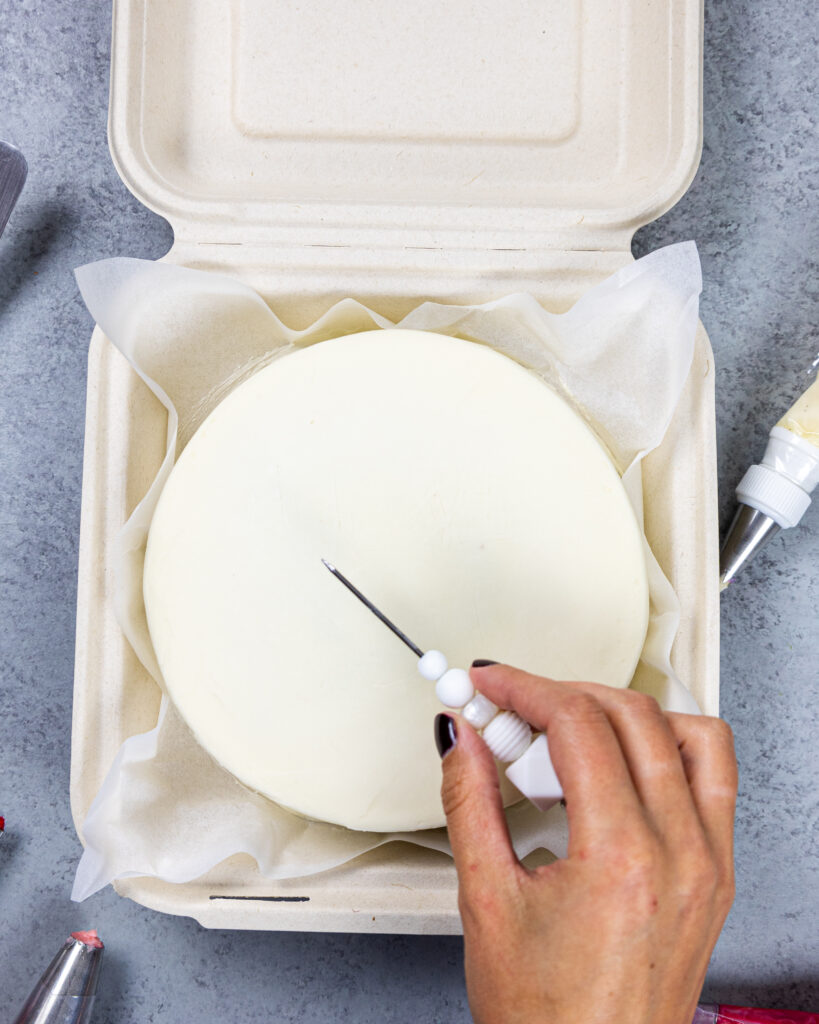
Use a toothpick or scribe to sketch out your message on top of the cake. This helps ensure your letters are centered and evenly spaced.
Then use buttercream to pipe the cute message on top of the cake and decorate the border with the remaining buttercream.
Substitutions and Swaps – Chocolate Cake Layers
This lunch box cake recipe uses quite a few ingredients and I know you might not have all of them on hand. Or if you have food allergies or restrictions, I’ve got you covered.
Below are some swaps and substitutions that can be made in this cake recipe.
- All Purpose Flour – This recipe turns out best with all purpose flour. However, you can swap in a good gluten free flour blend (like this) if needed. Just be sure to stir the batter longer than normal to help give the cake proper structure, and let the batter sit for about 20 minutes before baking it if you opt to make a gluten free version.
- Granulated Sugar – I do not recommend reducing the amount of sugar or changing the type of sugar, as it will change the texture of the cake layers.
- Unsweetened Baking Cocoa – I like to use the Hershey’s brand of dark baking cocoa, but you can also use black cocoa or regular unsweetened baking cocoa in its place.
- Buttermilk – You can also use full fat yogurt, sour cream, whole milk, or an alternative yogurt or milk (almond, soy, oat).
- Vegetable Oil – Any flavorless oil can be used in this recipe. Canola, vegetable, or even sunflower oil would all work great. I don’t recommend olive oil though, as it has a strong flavor and will change the taste of the cake.
- Egg – This recipe uses 1 large egg. If you have an egg allergy you can try using a vegan egg replacer.
Substitutions and Swaps – Vanilla Buttercream Frosting
- Unsalted Butter – If you only have salted butter on hand you can use it in place of the unsalted butter. Just be sure to omit the salt that this frosting recipe calls for. You can also use vegan butter in its place (and omit the salt)!
- Heavy Cream – Whole milk or alternative milk (soy, almond, oat) will work fine in this frosting recipe if that’s what you have on hand.
- Gel food coloring – Natural food coloring or liquid food coloring can be used if needed to color the frosting used to decorate the top of the cake.
- If you don’t like sweet American buttercream frosting, I recommend making a half batch of my Swiss meringue buttercream or using a half batch of my Russian buttercream.
Tips for Making the Best Lunch Box Cake:
- Be sure to properly measure your flour (spoon into the cup measure, then level) or use a kitchen scale to measure your dry ingredients.
- Use gel food coloring to create brightly colored frosting without throwing off the consistency of the frosting or giving it a bitter taste.
- Ingredients at room temp mix together better, so be sure you set out any cold ingredients ahead of time.
- Mix your cake batter just until the ingredients are incorporated. This will ensure your cake layers are tender and soft.
- Chill your cake layers in the freezer for about 20 minutes before assembling the cake. This makes it easier to stack and frost.
- Make these lunch box cakes vegan or dairy free if needed! Use your favorite type of dairy free milk to replace the buttermilk and heavy cream, and use vegan butter sticks in place of the butter. For the eggs I recommend using an egg replacer like this.
- If you don’t want to make two cakes, make one tall, 6-inch layer cake (but the box won’t close!). Or you can make one 8-inch cake layer to make a larger cake.
- Use a toothpick or scribe to sketch out your message on top of the cake. This helps ensure your letters are centered and evenly spaced.
- Make sure the size of the cake layer is the same as the bottom of the container that you plan to put the cake in. It should sit flush in the bottom of the box. While the boxes I use are 8 x 8-inches, the bottom is tapered and actually has a 6 x 6-inch cavity. This is why I use 6-inch cake layers, they fit perfectly in these boxes.
Making this Lunch Box Cake in Advance & Storage Tips:
- Make your cake layers in advance and freeze them. It breaks the process up and makes it more approachable.
- Make your frosting ahead of time too or save any leftover frosting. It can be stored in an airtight container in the fridge for up to a month. Or store it in the freezer for up to 3 months! Be sure to give it a good stir once it thaws to get the consistency smooth again.
- A frosted cake can last in the fridge for up to a week. The buttercream locks in all the moisture, keeping the cake fresh and delicious.
- If you cut into the cake and have leftovers, use any remaining frosting to cover the cut section to keep it moist. It can be stored in the fridge like this for up to a week.
- If you freeze the cake, transfer it to the fridge overnight then bring to room temperature the following day. This helps prevent condensation by minimizing the temperature shock.
Let Me Know What You Think!
If you try this lunch box cake recipe, I’d love to hear what you think of it! Let me know by leaving a rating below.
If you plan to share on social media, tag me @chelsweets and use #chelsweets so I can see your amazing creations!
Other Recipes You Might Like:

Lunch Box Cakes
Ingredients
Moist Chocolate Cake Recipe
- 1 cup all-purpose flour 130
- 1 cup granulated sugar 200g
- 1/3 cup dark or Dutch-processed cocoa powder 30g
- 1 tsp baking powder 4g
- 3/4 tsp baking soda 5g
- 1/2 tsp fine salt 3g
- 1/2 cup hot water 120g
- 1/2 cup buttermilk, room temperature 120g
- 1/4 cup vegetable or canola oil 55g
- 1 large egg, room temperature 56g
- 1 tsp vanilla extract or vanilla bean paste 4g
Vanilla Buttercream Frosting
- 1 cup (2 sticks) unsalted butter, room temperature 226g
- 1 tsp vanilla extract or vanilla bean paste 4g
- 1/4 tsp fine salt 2g
- 3 cups powdered sugar 375g
- 1/2 cup heavy whipping cream, room temperature 120g
- gel food coloring
Recommended Tools
- 2, 6- inch cake pans
- Electric hand mixer or stand mixer
- Spinning cake stand
- small offset spatula
- 8- inch square to-go container
- Small Piping Bags
- Small Round Piping Tip like a Wilton 4
Instructions
Chocolate Cake Layers
- Preheat oven to 350°F/175°C. Grease and line two 6-inch pans with non-stick spray or homemade cake release. If you want to use an 8-inch round cake pan, make one cake layer.
- Sift or whisk together the dry ingredients (flour, sugar, dark cocoa powder, baking powder, baking soda and salt) into a large bowl.
- Pour in the hot water, buttermilk, oil, eggs, and vanilla into a separate bowl and whisk together until fully incorporated.
- Mix the wet ingredients into the dry ingredients just until they're incorporated into the batter.
- Divide the batter evenly between the prepared cake pans. Bake for about 25-28 minutes or until a toothpick comes out with a few moist crumbs. Bake time can vary quite a bit based on your oven, so keep an eye on the cake once it's been in the oven for 25 minutes.
- Remove the cake layers from the oven and let them cool in the pans for about 10 minutes, then flip them onto wire racks to finish cooling.
- Once cooled, use a serrated knife to cut the cake layers horizontally, creating a total of four thin cake layers. This recipe makes 2, 6-inch cakes. If you want to make one taller 6-inch cake, you don't need to torte your cake layers. If you're making these in advance, wrap and freeze them at this point.
Vanilla Buttercream Frosting
- This recipe makes a sweet American buttercream frosting. If you don't like sweet frosting, I recommend making a half batch of my hybrid buttercream or my Swiss meringue buttercream.
- Beat the butter on a medium speed for 30 seconds with a paddle attachment until smooth.
- Add in the vanilla extract and salt. Mix on low until the ingredients are fully incorporated.
- Slowly mix in the powdered sugar. Half way through, add in the heavy cream to make the frosting easier to mix.
- Mix on a low speed until the ingredients are fully incorporated and the desired consistency is reached.
- Cover the frosting with plastic wrap to prevent crusting and set aside.
Assembling these Lunch Box Cakes
- Spread an even layer of vanilla buttercream on top of the cake layer with an offset spatula.
- Stack the next cake layer on top and cover the cake with a thin layer of buttercream. Smooth the frosting using a bench scraper and/or small offset spatula.
- Chill the cake again in the fridge (20 minutes) or in the freezer (10 minutes) until the frosting is firm to the touch.
- Cover the cake with a thicker layer of vanilla buttercream and smooth using a bench scraper and/or small offset spatula. Chill the cake again in the fridge (20 minutes) or in the freezer (10 minutes) until the frosting is firm to the touch. This will make it much easier to place in its box.
- Repeat steps 1-5 with the second set of cake layers.
- Carefully lift both cakes off the cake boards using the parchment paper and place them inside the containers. Color the remaining buttercream using gel food coloring in whatever color scheme you'd like and place in small piping bags.
- Use a toothpick or scribe to sketch out your message on top of the cake. This helps ensure your letters are centered and evenly spaced. Then use buttercream to pipe the cute message on top of the cake and decorate the border with the remaining buttercream and enjoy!
Video
Notes
My Tips for Making the Best Lunch Box Cake
- Ingredients at room temp mix together better! Be sure you set out any cold ingredients ahead of time.
- Be sure to properly measure your cake flour (spoon into the cup measure, then level). Or better yet, use a kitchen scale to measure your dry ingredients.
- Mix your cake batter just until the ingredients are incorporated. This will ensure your cake layers are tender and fluffy.
- Use a scale to weigh your cake pans as you fill them. Make sure each pan has the same amount of batter will make your cake layers bake to the same heigh and bake more evenly.
- Bang your cake pans on the counter before putting it in the oven. This brings any air bubbles that are trapped in the batter to the surface.
- Level your room temperature or thawed cake layers with a serrated knife to make them easier to stack.
- Chill your cake layers in the freezer for about 20 minutes before assembling the cake and before adding the simple syrup. It makes it so much easier to stack and frost them!
- If you don’t want to make two cakes, you can make one tall, 6-inch layer cake (but the box won’t close!), or you can make one 8-inch cake layer to make a larger cake.
- Use a toothpick or scribe to sketch out your message on top of the cake. This helps ensure your letters are centered and evenly spaced.
- If you don’t like sweet American buttercream frosting, I recommend making a half batch of my Swiss meringue buttercream or using a half batch of my Russian buttercream.
- The size of the cake layer is the same as the bottom of the container that you plan to put the cake in. It should sit flush in the bottom of the box. While the boxes I use are 8 x 8-inches, the bottom is tapered and actually has a 6 x 6-inch cavity. This is why I use 6-inch cake layers, they fit perfectly in these boxes.
Making these Lunch Box Cakes in Advance & Storage Tips
- Make your cake layers in advance and freeze them. It breaks the process up and make it more approachable.
- Make your frosting ahead of time or save any leftover frosting! It can be stored in an airtight container in the fridge for up to a month.
- This frosting can also be stored in the freezer for up to 3 months! Just be sure to give it a good stir once it thaws to make it nice and smooth again.
- A frosted cake can last in the fridge for a week, or in the freezer for a month. The buttercream locks in the moisture and keeps the cake fresh and delicious!
- If you freeze the cake, transfer it the fridge overnight then bring to room temperature the following day to prevent condensation.
The one thing that always put me off making these little cakes was not knowing how tall and wide to make them but you’ve covered everything! The freezer tip is handy too, I just imagined crumbs going everywhere. Can’t wait to make some for my friends ??
Hey Chelsea!!
Thanks for another great recipe! I’m making this for my son’s first birthday “smash cake”…perfect size!
I just wanted you to note that you mentioned sour cream in the instructions for the cake. Looked back at the recipe (I usually always miss something when writing it down) and it wasn’t listed. Also checked the “moist chocolate cake” regular recipe and it wasn’t listed there either. I’m just going to omit it and in this instance no one will be eating it except for the baby, so no biggie. Just for future as I am a repeat offender with your recipes!
Thanks so much!
@Nora, it says in the substitute section above the recipe that sour cream is a substitute for buttermilk if that helps at all. I think that it was just an accident.
I made 1/2 of this recipe, baked it in a sheet pan, then used a cookie cutter to cut out my layers. Made 2 two-layered mini cakes. Delicious! The cake is so moist.
I’ve also read your frosting consistency post, and that made me realize why my buttercream is always so difficult to work with. Mind you, this is the 4th or 5th time I’ve tried to make a layered cake!
I see sour cream in the directions but not the ingedients
Apologies about that Kimberly, that was a typo! I’ve updated the recipe card to fix this. This recipe uses buttermilk, but you can substitute sour cream for buttermilk if you want. Hope that helps, happy baking!