
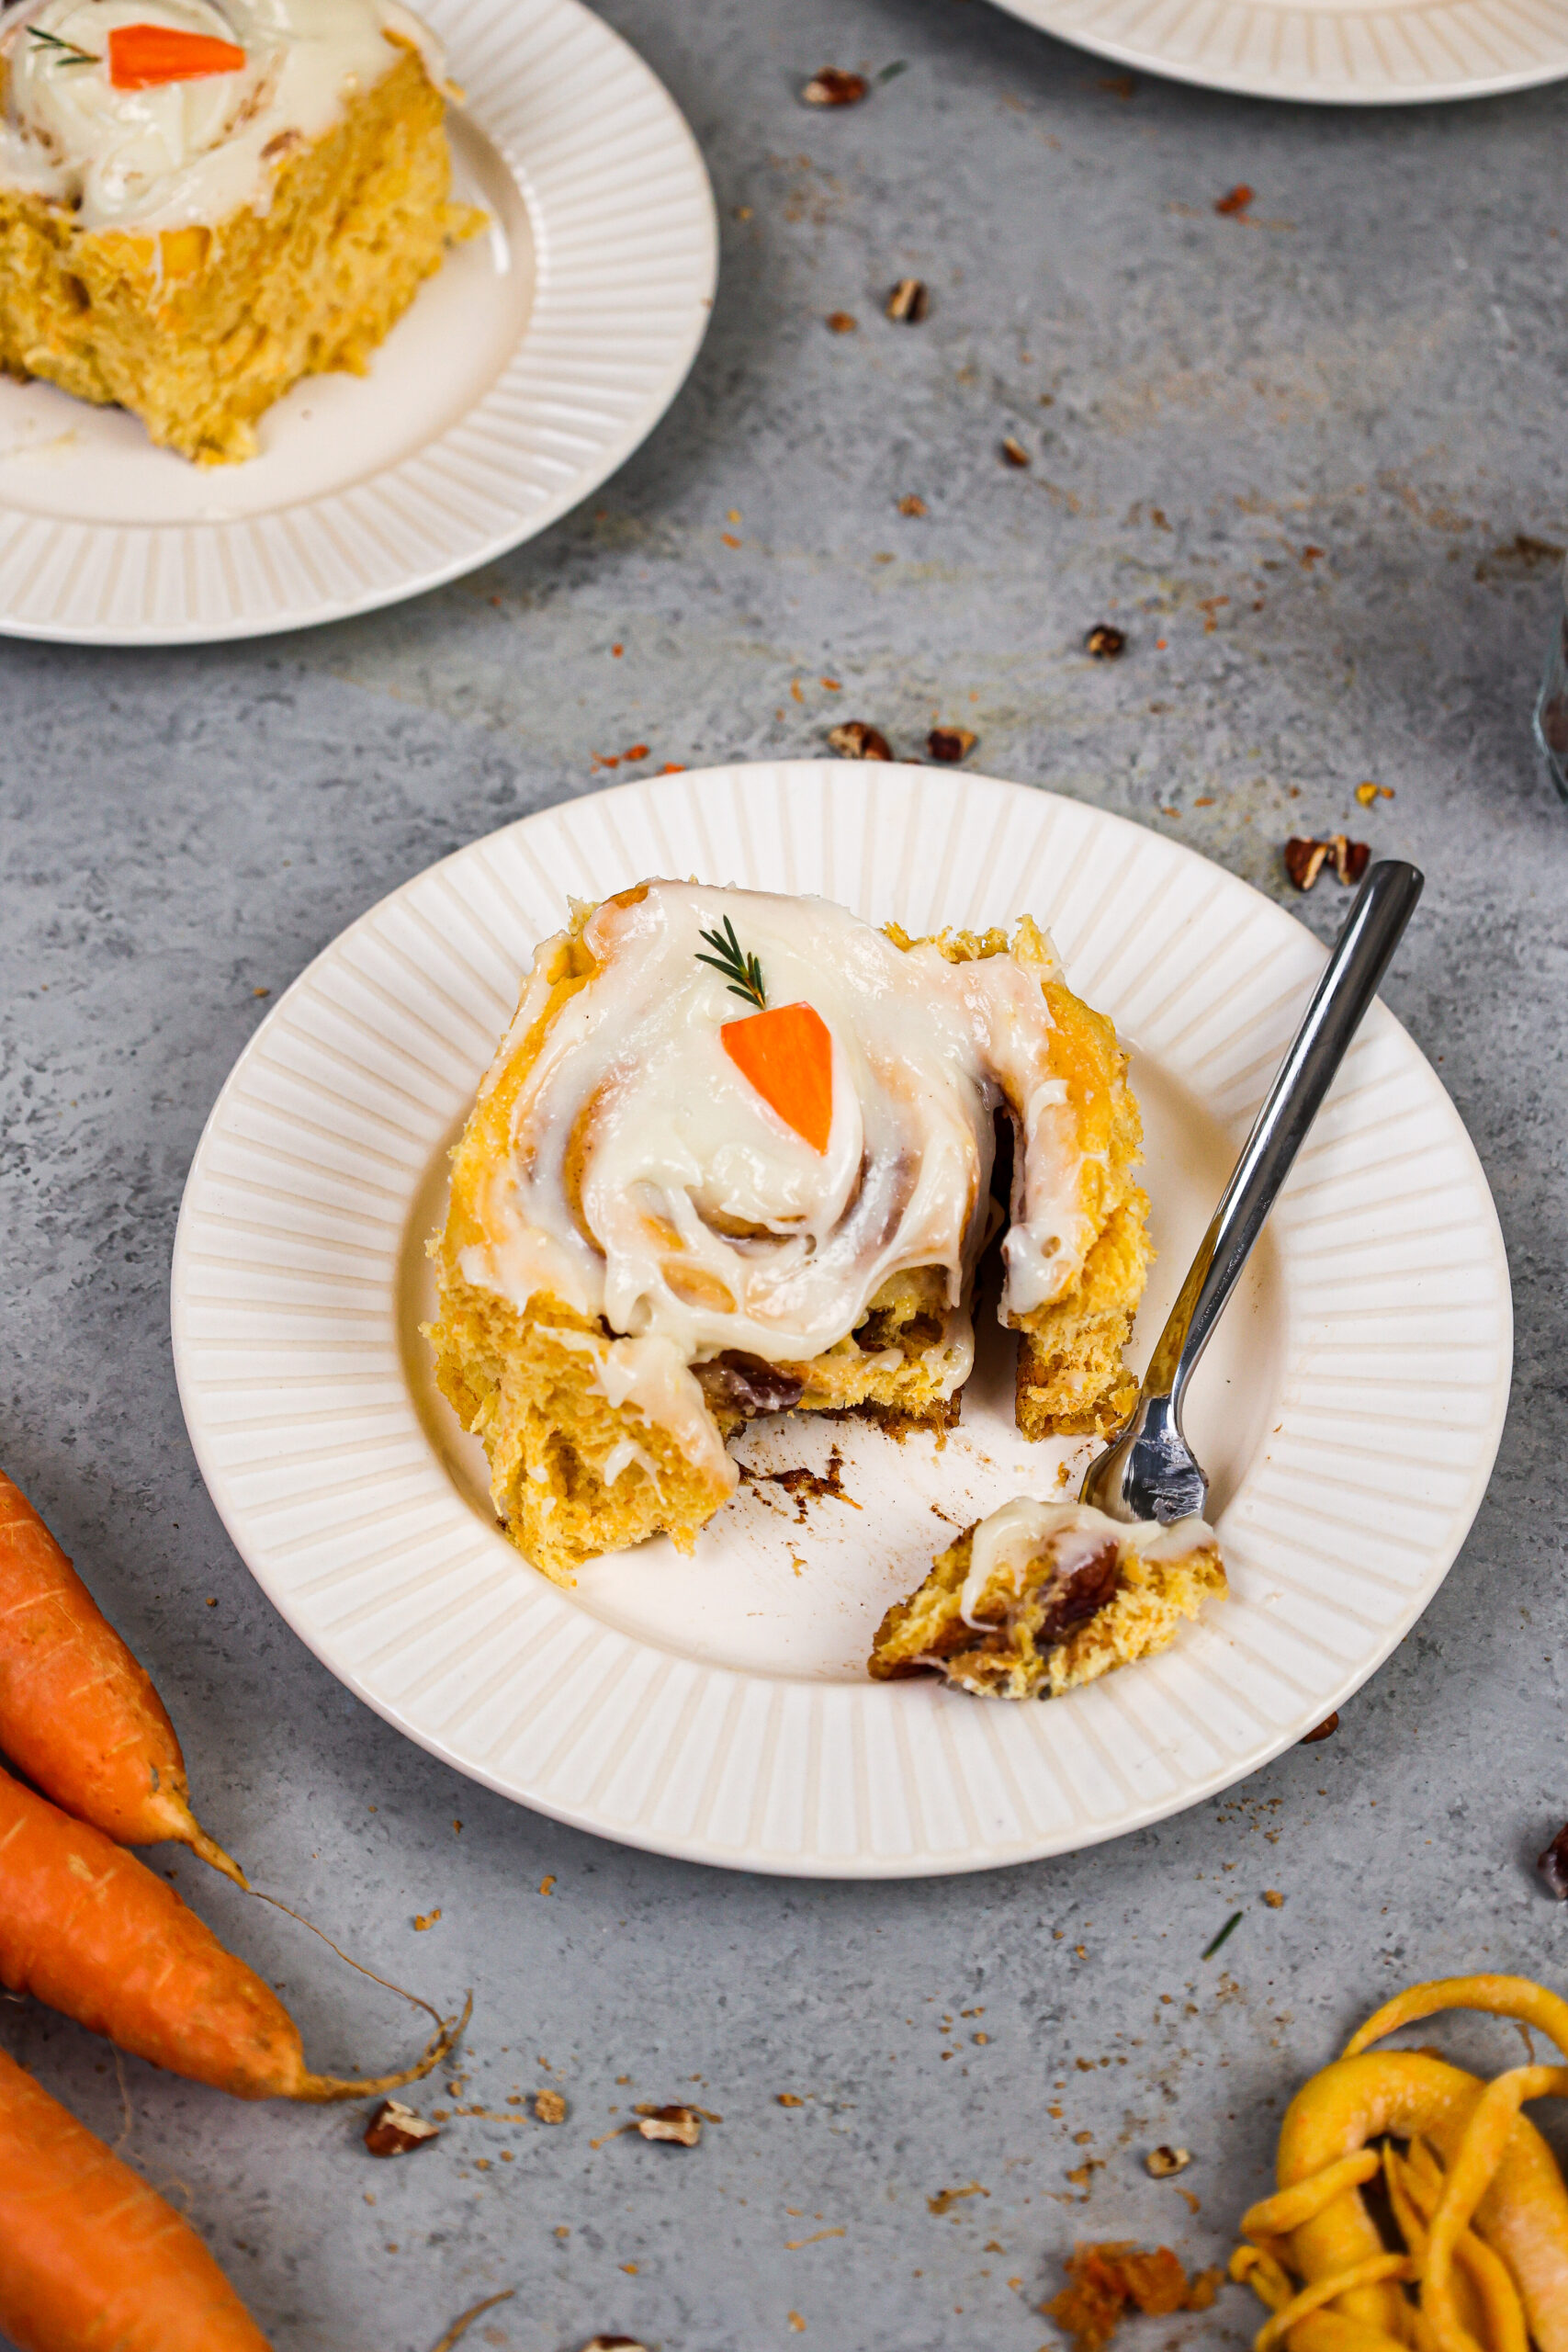
Moist Carrot Cake
This moist carrot cake recipe has been a long time coming. In the past, whenever I was asked to make a carrot cake, I used a very traditional carrot cake recipe.
Most classic or Southern carrot cake recipes include shredded coconut, chopped walnuts or pecans, and crushed pineapple.
But you know what?! I don’t really love all those ingredients in my carrot cake. I just want a simple, nut-free carrot cake that’s perfectly spiced and tender. And that’s exactly what this recipe is!
What Does Carrot Cake Taste Like?
Most of the delicious flavor we associate with carrot cake comes from the spices that are added to the batter.
Ground nutmeg, ground cloves, and cinnamon are the dominant flavors in most carrot cake recipes.
It’s essentially a spice cake that’s super moist from the water content in the shredded carrots.
Some recipes also call for molasses or brown sugar, which pairs so well with these warm spices.
How to Make This Moist Carrot Cake
To make sure this cake turns out as amazing as possible, let’s walk through each step together! I’ve also included a video tutorial of the process below.
I figured it might be helpful to know what tools I use too, so I’ve shared a list below too.
Not all of these are mandatory, but they make the process a lot easier.
If you don’t have all these things on hand, feel free to improvise and work with what you have.
- 4, 7-inch Cake Pans or 3, 8-inch Cake Pans
- Spinning Cake Stand
- Whisk
- Serrated Knife
- 10-inch Greaseproof Cake Board or Flat Plate
- Large Offset Spatula
- Bench Scraper
- 2 Large Piping Bags
- 1 Open Star Piping Tip (like a Wilton 1M)
- Orange and Green Gel Food Coloring
Step 1: Bake the Moist Carrot Cake Layers
Make the carrot cake batter first following the recipe card at the bottom of this post.
Divide it evenly between the prepared cake pans and bake for 25-28 minutes or until a toothpick comes out with a few moist crumbs.
Remove the cake layers from the oven and let them cool in the pans for about 30 minutes. Or if you’re in a rush, place the pans directly in the freezer to accelerate the cooling process.
Then gently run an offset spatula around the rim of the cake pans to loosen them and flip them onto wire racks to finish cooling.
These layers bake up pretty flat, so leveling them is optional! If you want to level them, use a serrated knife to level the top of each cake layer once they’re fully cooled.
If you’re making these in advance, you can wrap and freeze them at this point.
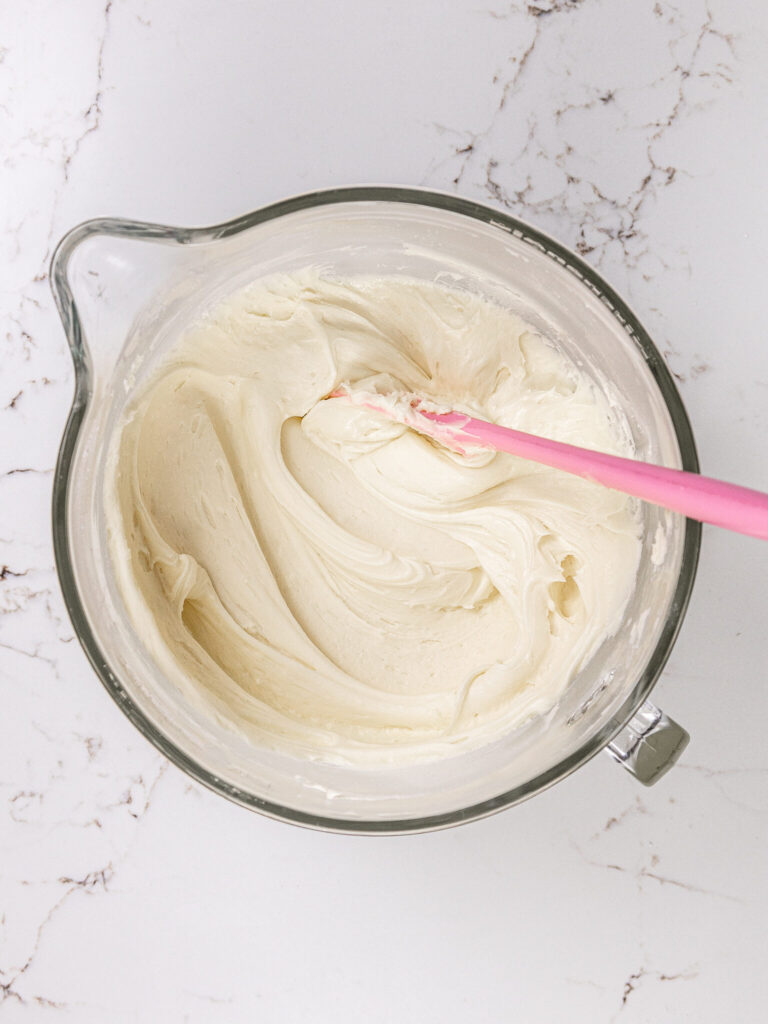
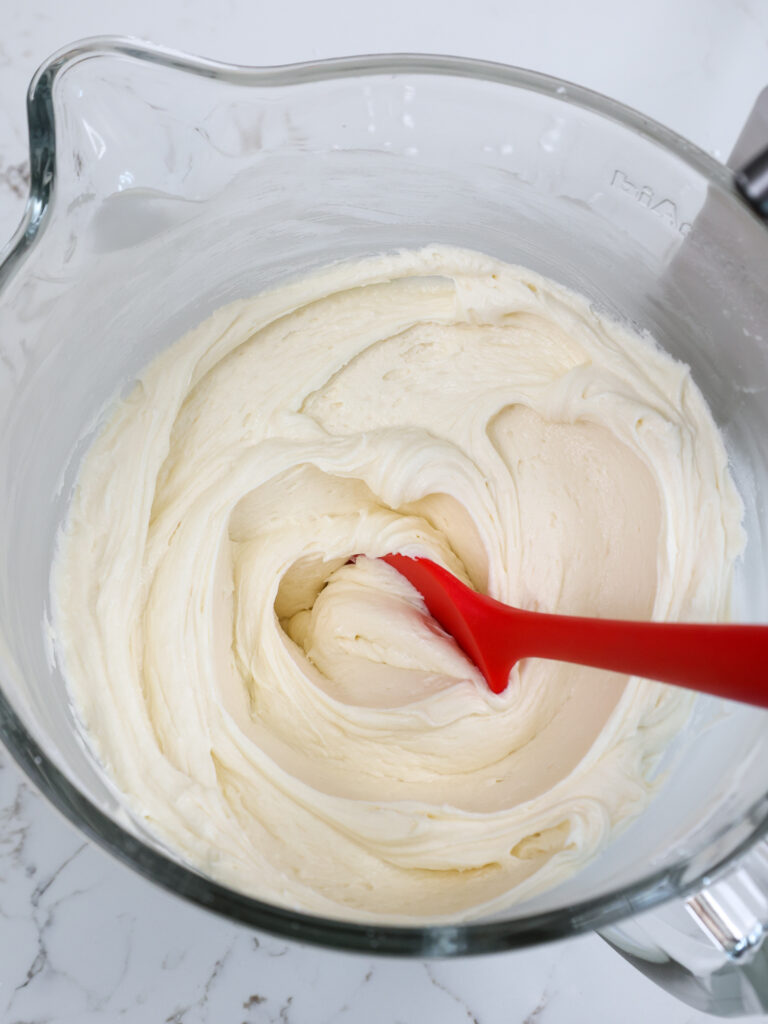
Step 2: Make the Cream Cheese Frosting
While the cake layers bake and cool, make the Cream Cheese frosting.
I love cream cheese frosting, but I know that some people find it quite sweet!
If you want to use a less sweet frosting base, I’d recommend making a batch of my Swiss meringue buttercream or 1.5 batches of my hybrid buttercream.
This frosting can also be made in advance if needed and kept in the fridge for up to 2 weeks or in the freezer for a month.
Wait to color the frosting until you’ve filled and crumb coated the cake.
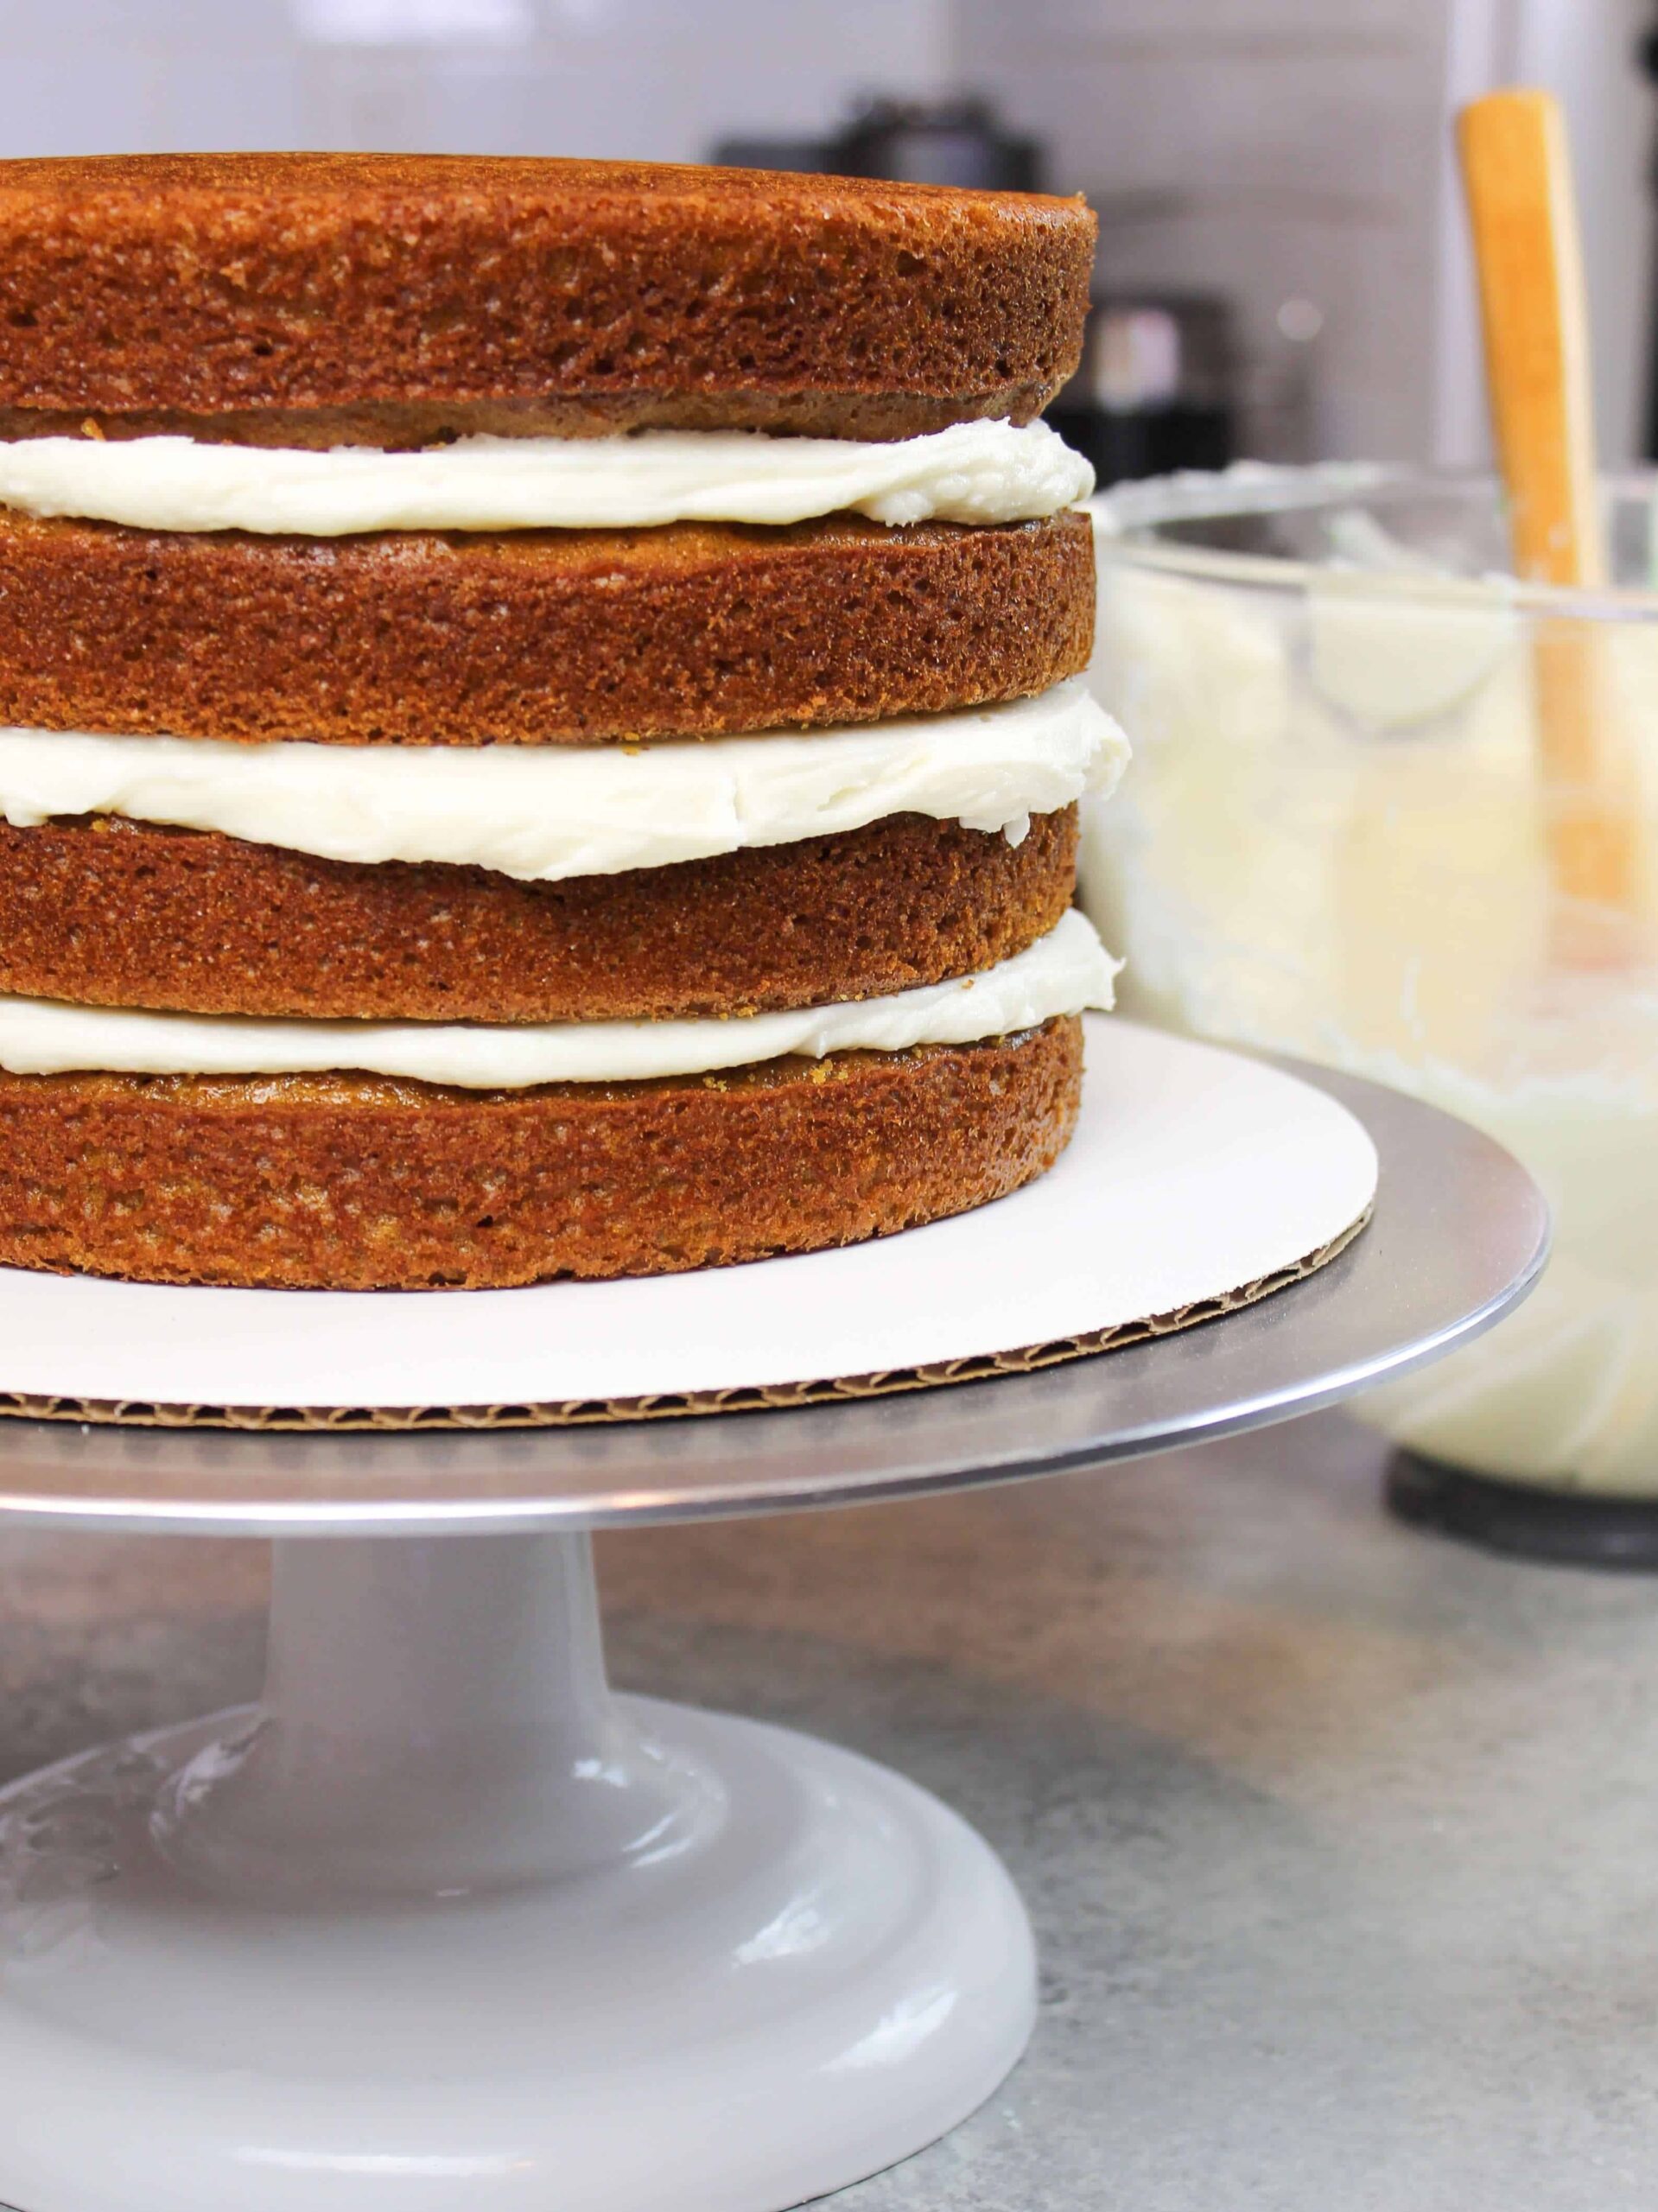
Step 3: Stack and Frost the Cake Layers
Then it’s time to assemble this cake! Stack and frost cake layers on a greaseproof cake board or flat plate. Use a dab of buttercream to help stick the first cake layer to the board.
Spread an even layer of buttercream on top of each cake layer with a large offset spatula.
Repeat with the remaining cake layers and place the top cake layer upside down to make the cake easier to frost.
Step 4: Crumb Coat the Cake
Spread a thin coat of frosting around the cake to fully cover the cake layers.
Smooth the frosting using a large offset spatula or bench scraper, then chill the cake in the fridge (30 minutes) or freezer (10 minutes) until the frosting is firm to the touch.
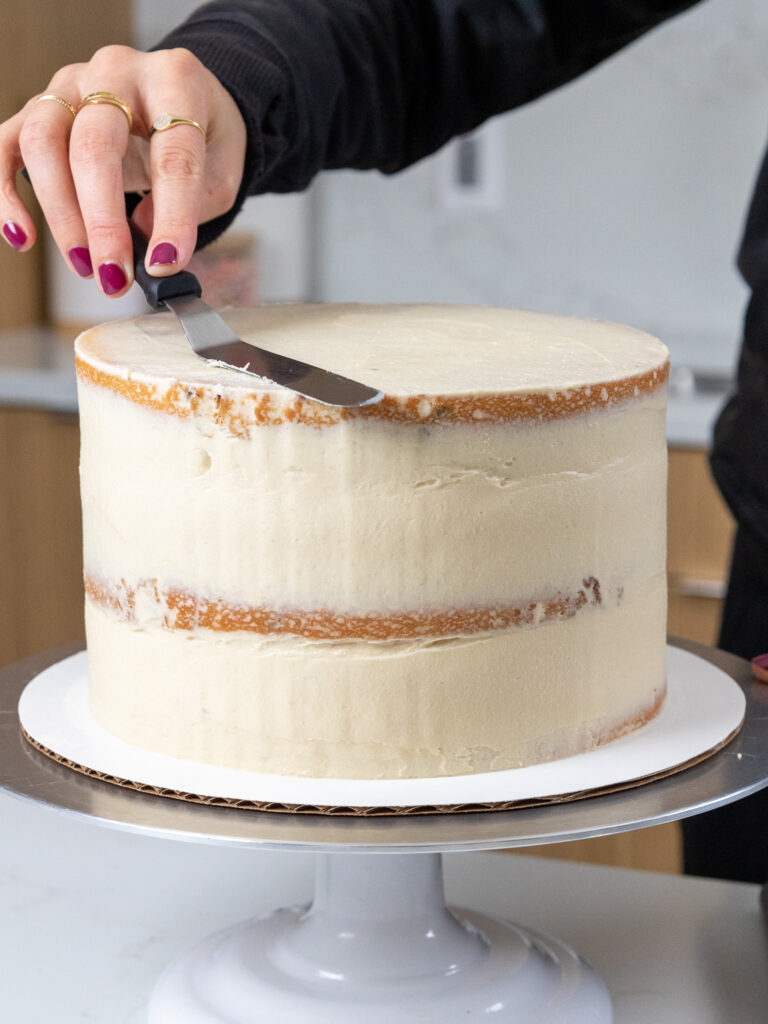
Step 5: Smooth on the Second Layer of Frosting
Next, smooth the frosting using a large offset spatula or bench scraper.
If you’re struggling to get smooth sides on the cake, check out my video tutorial on how to frost a cake smoothly.
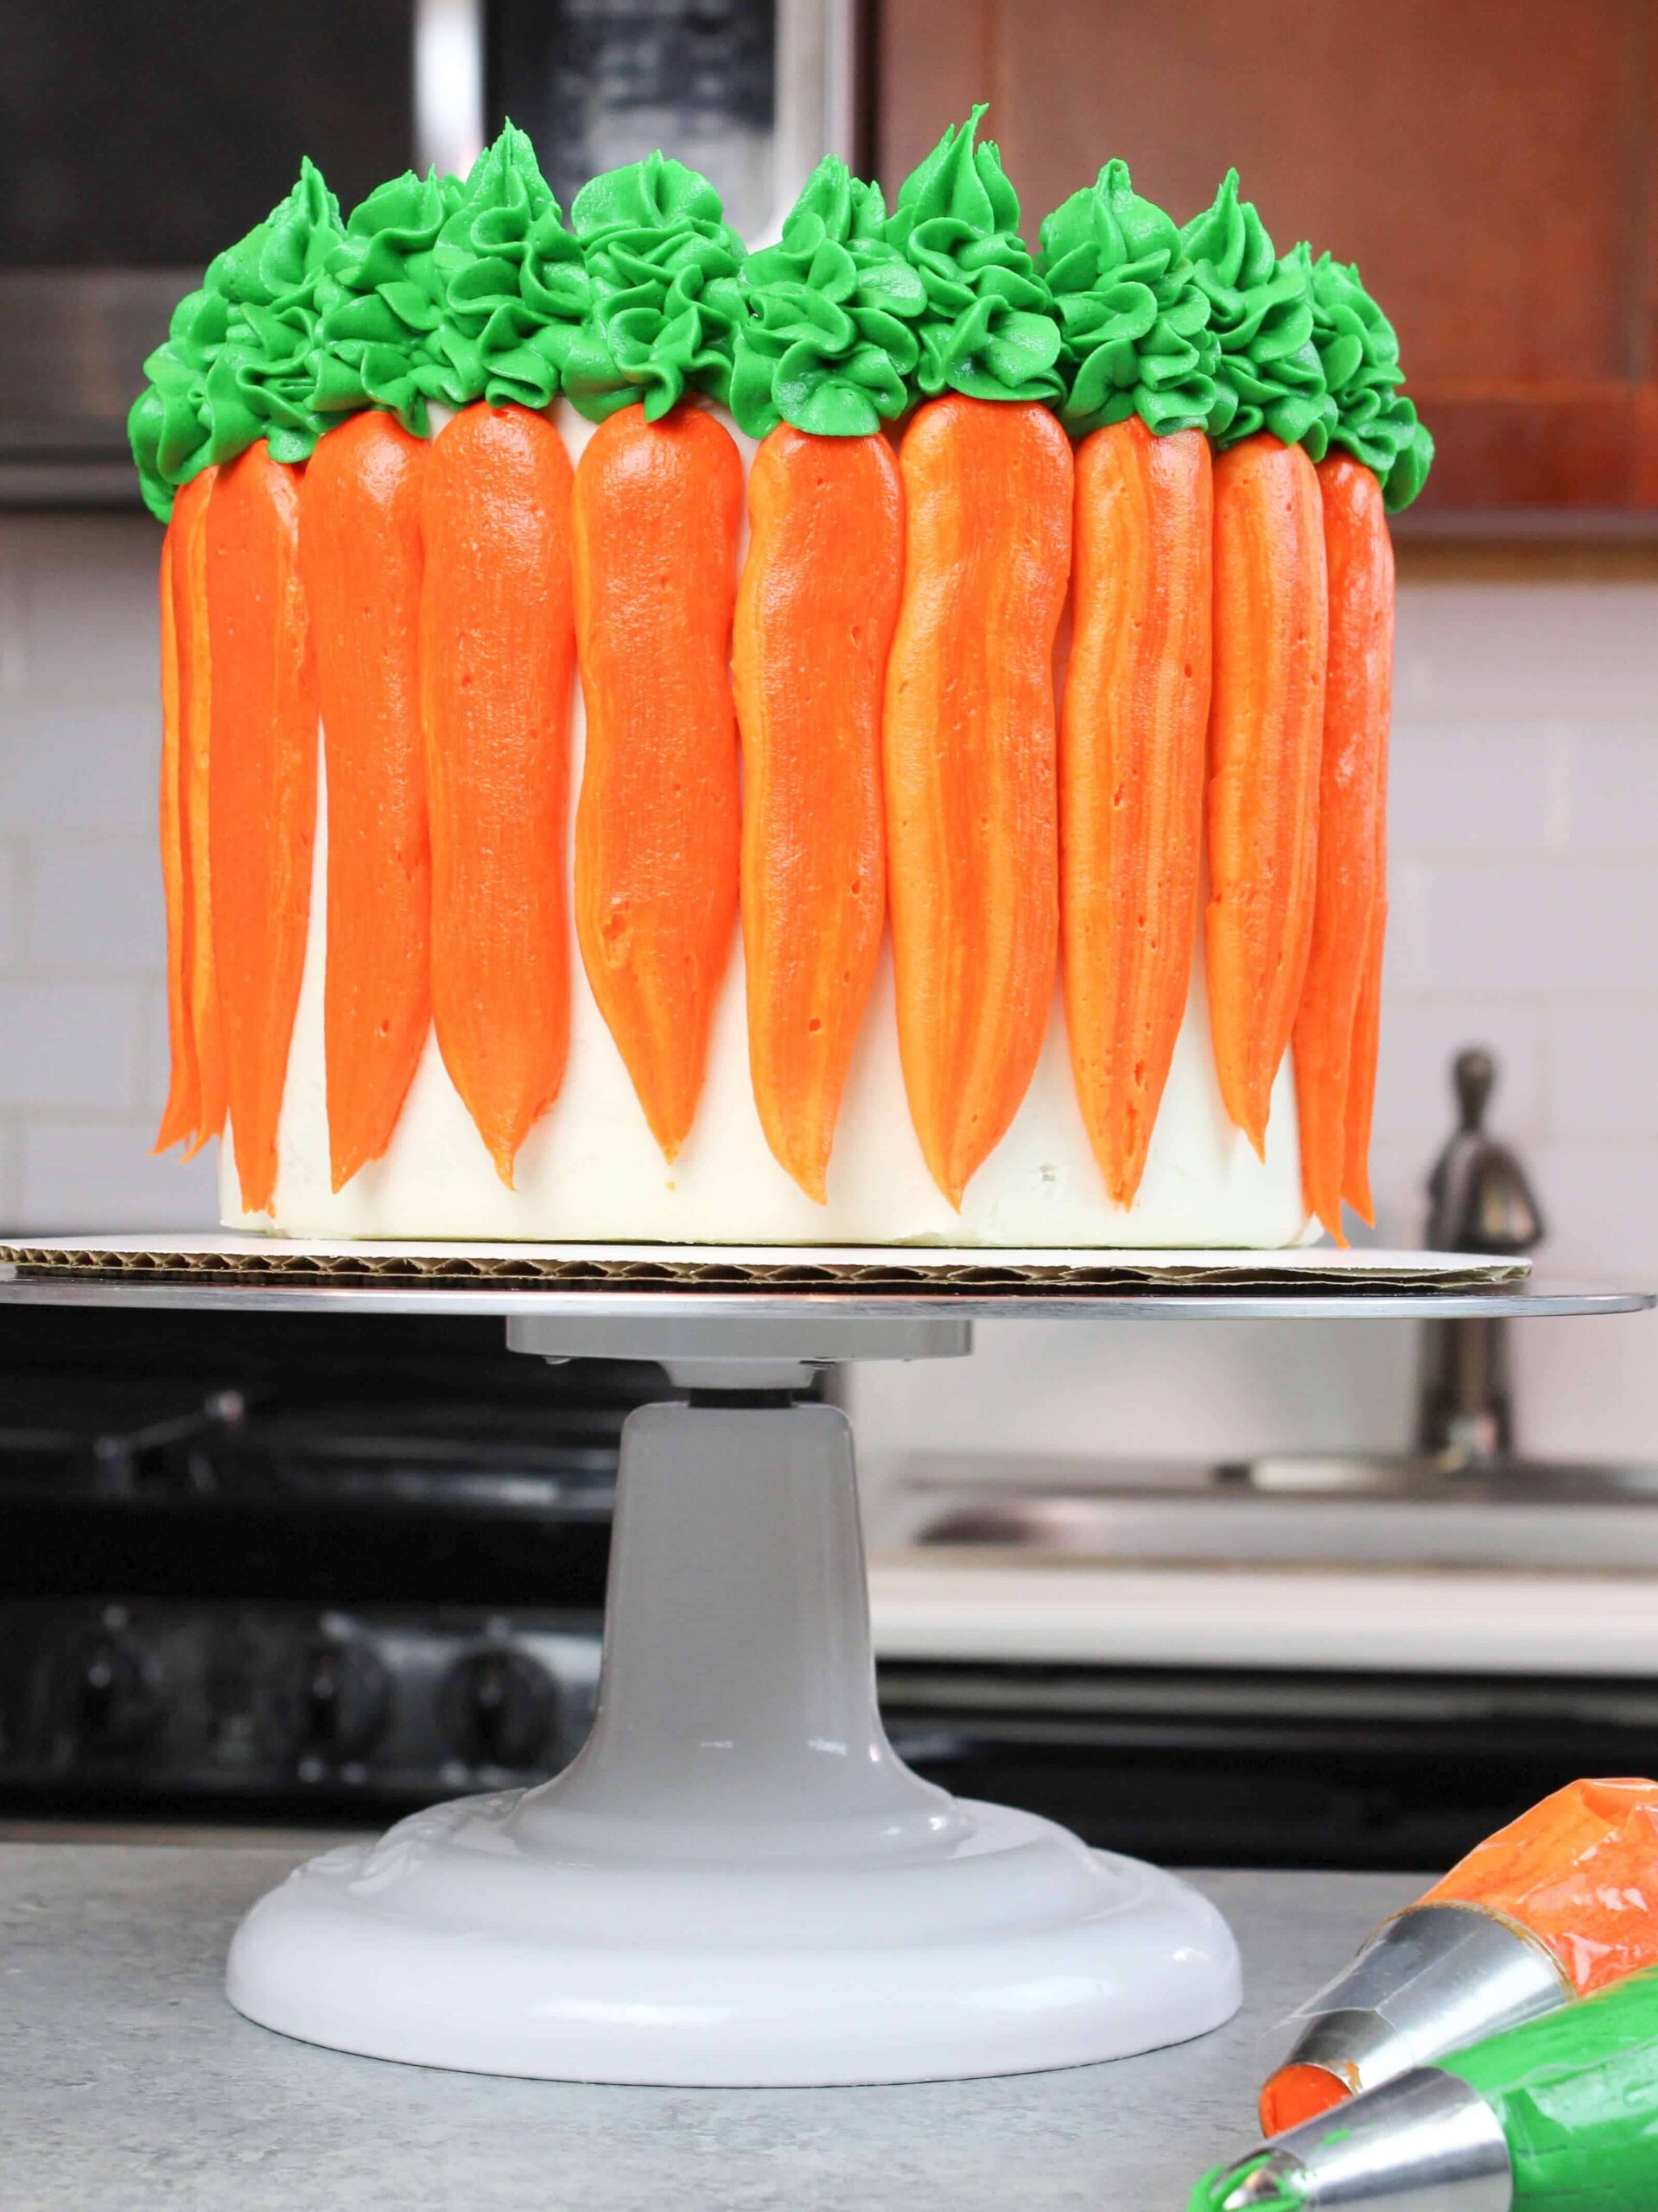
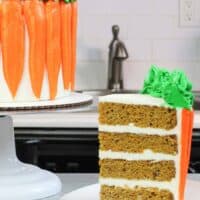
Step 6: Color the Remaining Frosting and Decorate the Cake
Place 1/4 of the remaining frosting in a separate bowl and color it green with gel food coloring. Place in a piping bag fitted with a Wilton 1M or 2D frosting tip. Seal the top of the bag with a rubber band or clip.
Color the remaining frosting orange with gel food coloring. Place in a piping bag fitted with a large round piping tip, or an opening cut about 1 inch wide. Seal the top of the bag with a rubber band or clip.
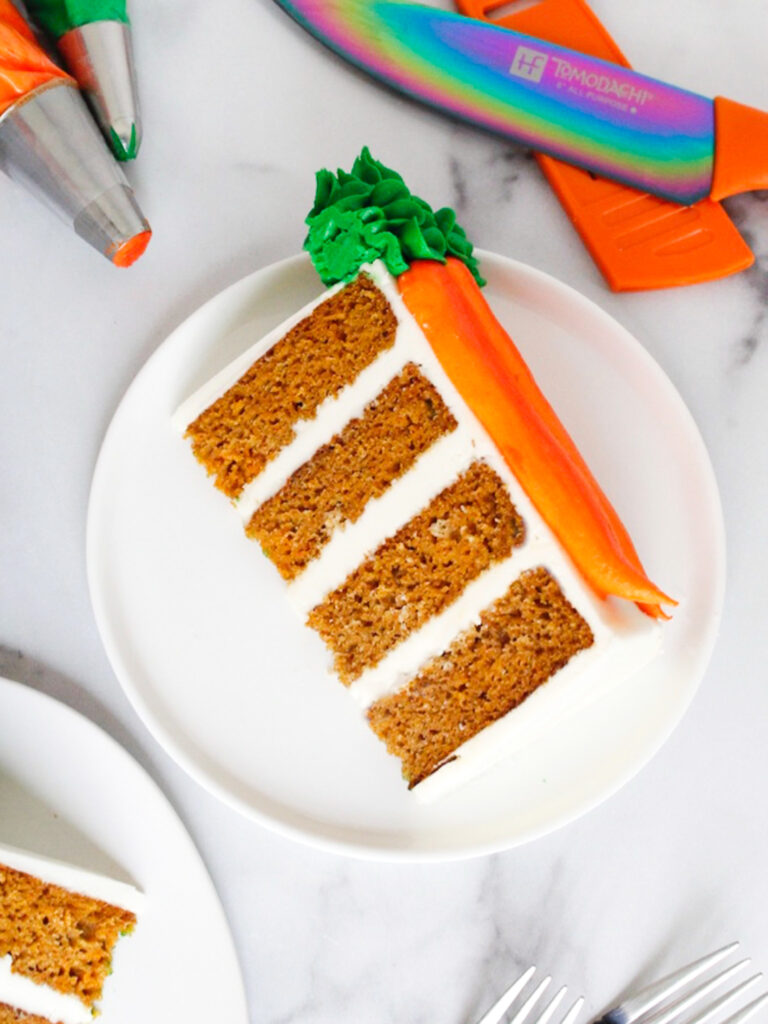
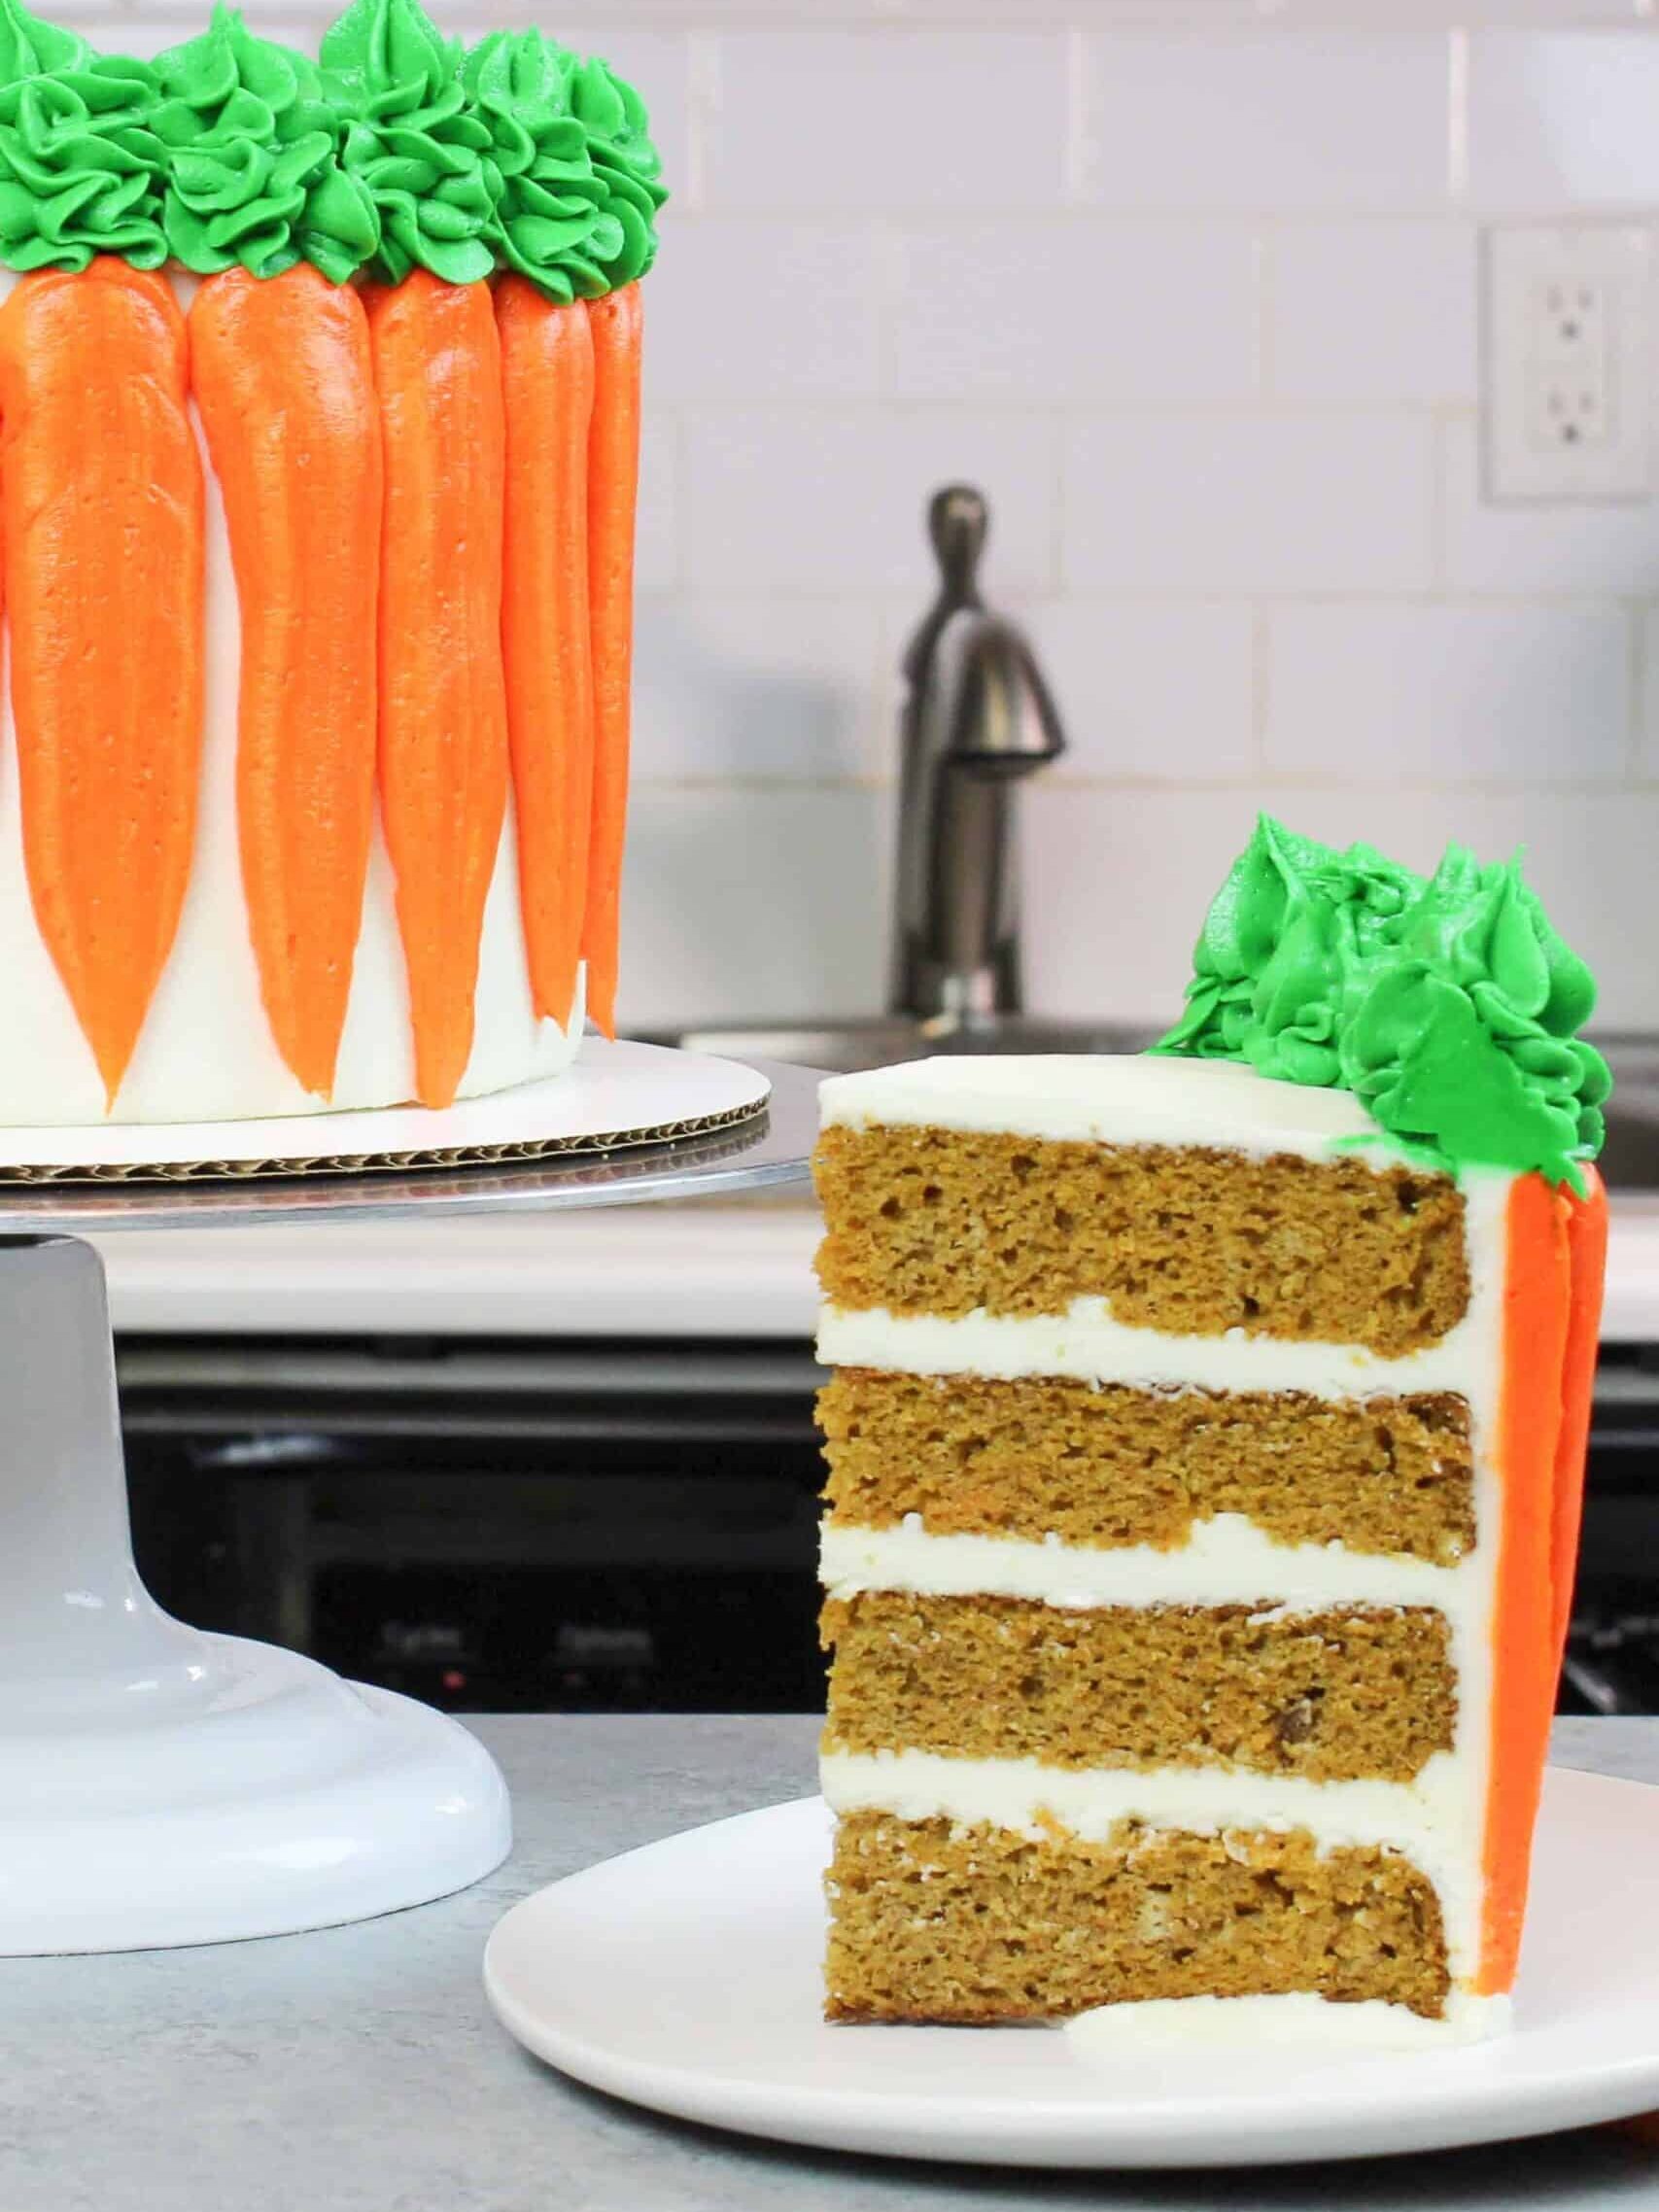
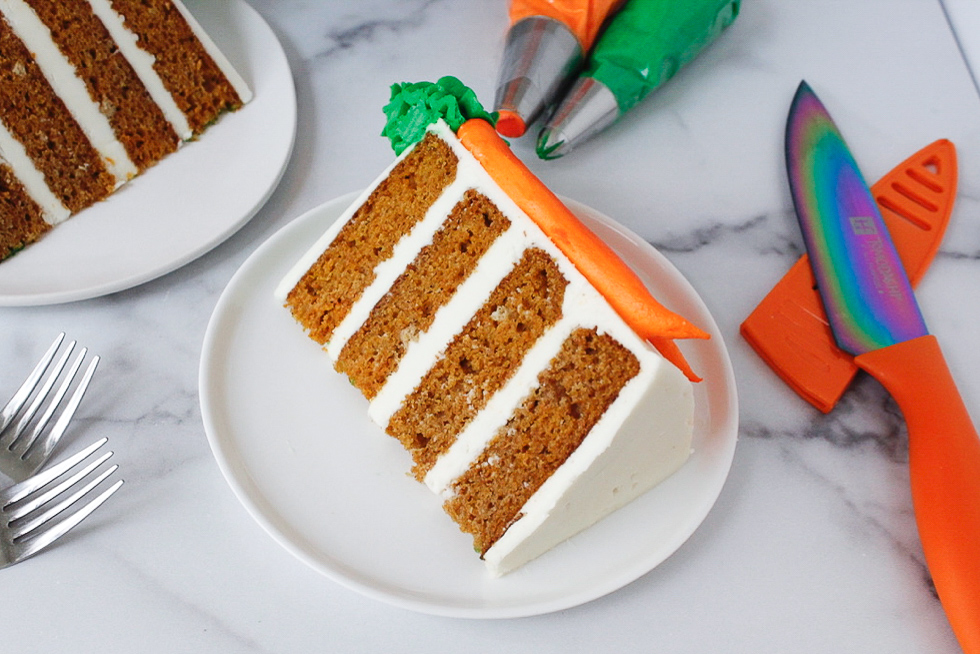
Pipe vertical lines of orange frosting on the sides of the cake to look like carrots.
Then pipe green frosting swirls around the top edge of the cake to look like carrot tops and enjoy!
If you’re making this cake in advance, it can sit at room temperature for a few hours or be stored in the fridge for up to a week.
Substitutions and Swaps – Carrot Cake Layers
This recipe uses quite a few ingredients and I know you might not have them all on hand. Or if you have food allergies or restrictions, I’ve got you covered.
Below are some swaps and substitutions that can be made in this cake recipe.
- Granulated Sugar – I do not recommend changing the type or reducing the amount of sugar because it will change the texture of the cake layers.
- Brown Sugar – I prefer using light brown sugar, but you can also use dark brown sugar if needed.
- Vegetable Oil – Any flavorless oil will work in this recipe. Canola or even sunflower oil would work great!
- Large Eggs – If you have an egg allergy you can use flaxseed eggs or a vegan egg replacer.
- All Purpose Flour – This recipe turns out best with AP flour, but you can use a gluten-free flour blend or cake flour if that’s what you have on hand.
- Ground Spices – These are the star of the show in this cake, so I don’t recommend skimping on them! Make sure your spices are fresh and fragrant.
- Buttermilk – You can also use full fat yogurt, whole milk, sour cream, or an alternative yogurt or milk (almond, soy, oat) if you’re dairy free.
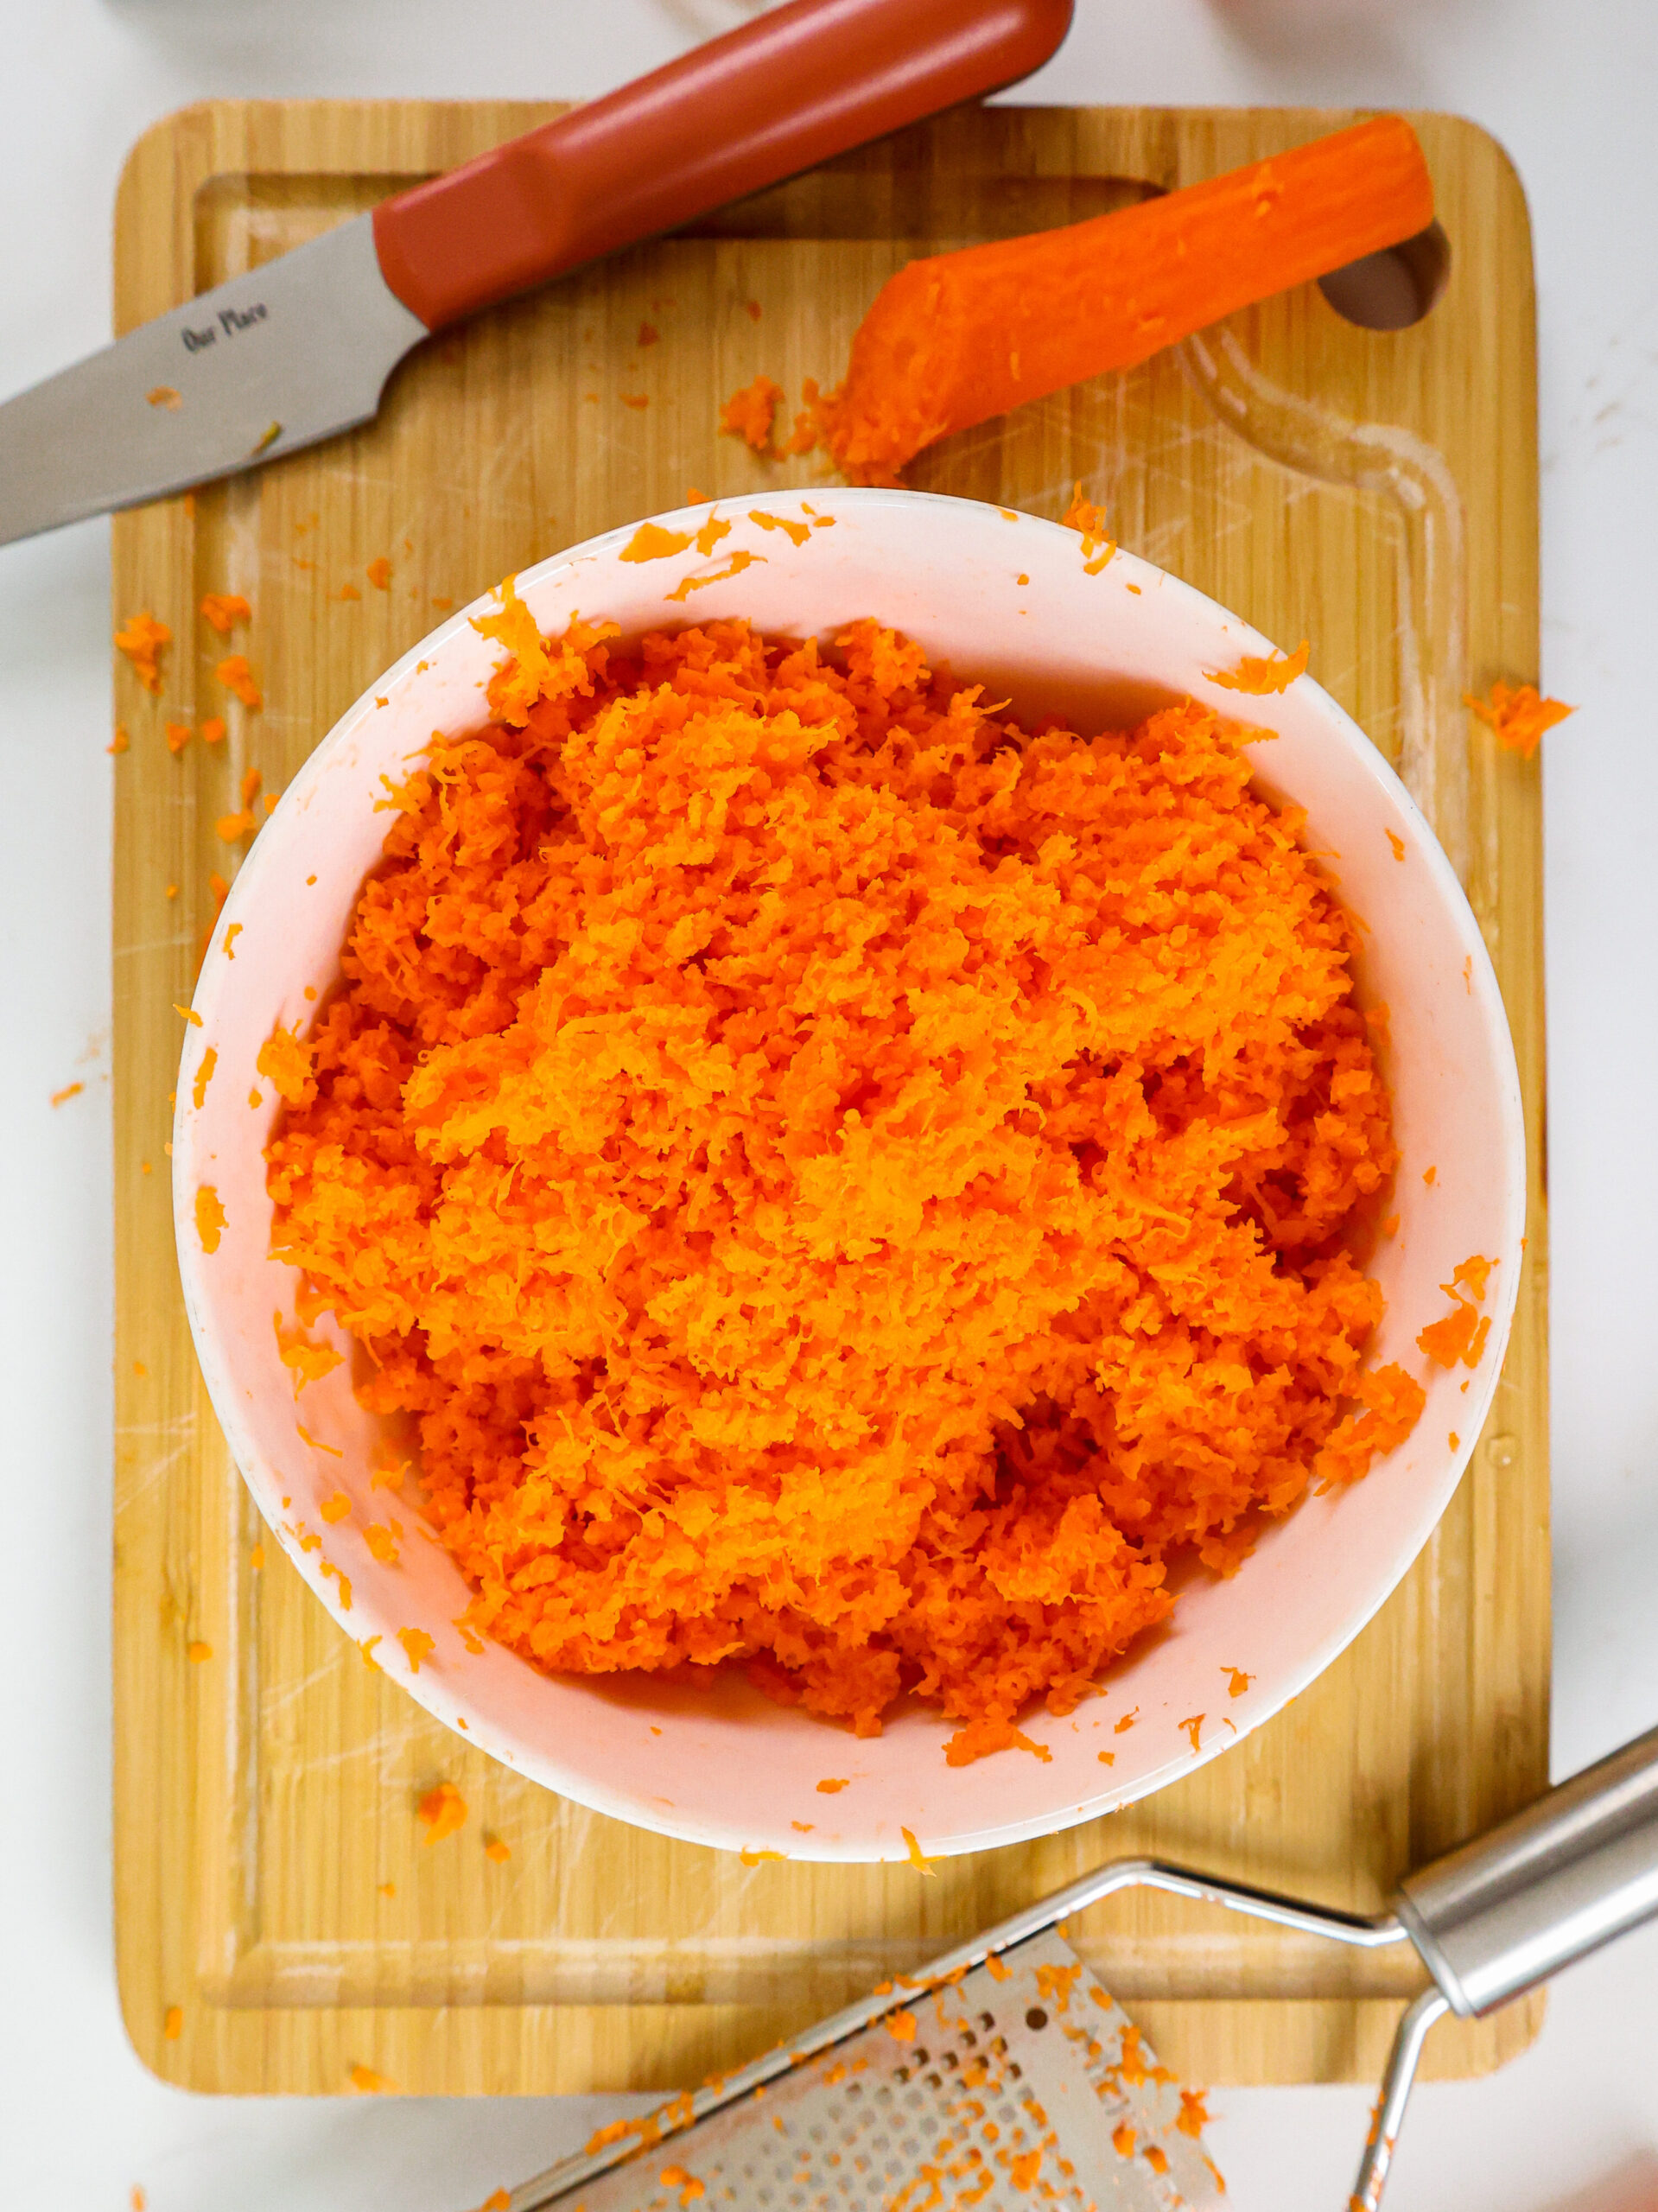
- Shredded Carrots – I like to buy large carrots that come in a 1 lb. bag. You can also buy loose carrots, just be sure to weigh them at the store to make sure you get 1 lb. Don’t use pre-grated carrots! They are dry and their lack of moisture will make the cake layers less moist.
Substitutions and Swaps – Cream Cheese Frosting
- Unsalted Butter – If you only have salted butter on hand, you can use it in place of the unsalted butter. Just be sure to omit the salt that this frosting recipe calls for. You can also use vegan butter in its place (and omit the salt)!
- Cream Cheese – I find full fat cream cheese that comes in a block works best in this recipe. Avoid whipped cream cheese or cream cheese that comes in a tub. They usually contain additives to make them more spreadable.
- Heavy Cream – Whole milk or alternative milk (soy, almond, oat) will work fine in this frosting recipe if that’s what you have on hand.
- Green and Orange Gel Food Coloring – Gel or oil-based food coloring works best to color the buttercream. Liquid food coloring can be used, but it’s more difficult to create vibrant colors.
Making This Carrot Cake in Different Sizes
I used 4, 7-inch cake pans to make this cake, but this recipe can be used to make different sized cakes.
You can make three, 8-inch or four, 6-inch cake layers with one batch of batter. Bake the cake layers at 350 F / 175 C for 25-30 minutes or until a toothpick comes out with a few moist crumbs.
One batch of batter can also be used to make one 9×13-inch sheet cake. Bake it at 350 F / 175 C for 30-40 minutes and use flower nails or heating cores to help the cake bake evenly. It should end up being about 2 inches tall.
If you want to make cupcakes, I highly recommend using my carrot cake cupcake recipe. One batch makes a dozen cupcakes.
What Makes This Carrot Cake So Moist?
There are three ingredients in this recipe that make it super moist. The first is the amount of shredded carrots!
This recipe uses an entire pound of shredded carrots. The water from all the carrots turns into steam as the cake batter bakes, which creates an amazing texture.
I am a maniac and shred them by hand on a microplane grater, but I highly recommend shredding them with a food processor or a KitchenAid attachment.
This cake recipe also uses oil instead of butter. This adds moisture to the recipe and allows you to mix the carrot cake batter by hand, without a stand mixer.
The final ingredient that makes this carrot cake so moist is buttermilk!
I love baking with buttermilk and felt like this recipe needed a bit. Buttermilk adds a wonderful tang and adds…you guessed it! More moisture 🙂
Tips for Making the Best Carrot Cake
- Properly measure your flour (spoon into the cup measure, then level) or use a kitchen scale to measure your dry ingredients.
- Use a serrated knife to level your cake layers once they’re fully cooled, to make it easier to assemble and frost your cake.
- Use a microplane grater to shred your carrots into super fine pieces! It’s a bit of extra work, but it gives the cake an amazing texture.
- Chill your cake layers in the freezer for about 20 minutes before assembling the cake. It makes it so much easier to stack and frost.
- Mix your cake batter just until the ingredients are incorporated. This will ensure your cake layers are tender and fluffy.
- Don’t use pre-grated carrots! They are dry and their lack of moisture will make the cake layers less moist.
Making This Moist Carrot Cake in Advance and Storage Tips
Make your cake layers in advance and freeze them. It breaks the process up and makes it more approachable.
You can also make the frosting ahead of time too, or save any leftover frosting! It can be stored in an airtight container in the fridge for up to 2 weeks, or in the freezer for up to a month. Be sure to give it a good stir once it thaws to get the consistency nice and smooth again.
A frosted cake can last in the fridge for up to a week, or in the freezer for up to a month. The buttercream locks in all the moisture, keeping the cake fresh and delicious!
If you cut into the cake and have leftovers, use any remaining frosting to cover the cut section to keep it moist and store in the fridge for up to a week.
Let Me Know What You Think!
If you try my moist carrot cake recipe, I’d love to hear what you think of it! Please leave a rating and comment below.
Tag me @chelsweets and use #chelsweets on social media so I can see your amazing creations!
Other Recipes You Might Like:
Moist Carrot Cake
Ingredients
Carrot Cake
- 1 cup packed light brown sugar 200g
- 1 cup granulated sugar 200g
- 1 cup vegetable or canola oil 225g
- 6 large eggs, room temperature 336g
- 3 cups all-purpose flour 375g
- 2 tsp baking soda 12g
- 1 tsp baking powder 4g
- 1 tsp fine salt 6g
- 1 Tbsp ground cinnamon 7g
- 1/2 tsp ground nutmeg 1g
- 1/4 tsp ground cloves < 1g
- 1/2 cup buttermilk, room temperature 120g
- 2 tsp vanilla extract or vanilla bean paste 8g
- 1 lb. carrots, peeled and finely grated – about 3 1/2 cups of grated carrots 454g
Cream Cheese Buttercream Frosting
- 2 cups (4 sticks) unsalted butter, room temperature 452g
- 1 cup or 8 oz. full-fat cream cheese, room temperature 226g
- 1 Tbsp vanilla extract or vanilla bean paste 12g
- 1 tsp fine salt 6g
- 11 cups powdered sugar 1375g
- 2 Tbsp heavy whipping cream, room temperature 30g
- green and orange gel food coloring
Instructions
Carrot Cake Layers:
- Preheat oven to 350°F / 175°C. Line four, 7-inch or three, 8-inch round pans with parchment rounds and grease with non-stick baking spray, or brush them with homemade cake release. You can also use this recipe to make 4, 6-inch cake layers but the bake time will be 5-8 minutes longer. If you don't have 4 cake pans, the batter can sit at room temperature for a few hours. Bake as many layers at a time as you can at a time.
- In a large bowl, whisk together 1 cup of light brown sugar, 1 cup of granulated sugar, and 1 cup of oil until combined.
- Then mix in 6 eggs, 2 at a time. Whisk together until the batter is smooth.
- In a separate large bowl, sift or whisk together 3 cups of all-purpose flour, 2 tsp baking soda, 1 tsp baking powder, 1 tsp salt, 1 Tbsp cinnamon, 1/2 tsp nutmeg, and 1/4 tsp cloves.
- Add half the dry ingredients into the sugar/egg mixture and mix until just combined. Scrape the sides and bottom of the bowl as needed with a rubber spatula.
- Mix in 1/2 cup of buttermilk and 2 tsp of vanilla until combined.
- Then mix in the remaining dry ingredients and whisk until just combined.
- Peel and finely grate 1 lb. of carrots. Don't worry about squeezing the excess moisture out of the grated carrots – the extra liquid helps the cake layers bake up super moist and tender. You should end up with about 3 1/2 cups of shredded carrots. Fold the grated carrots into the batter.
- Divide the batter evenly between the prepared cake pans. I like to use a digital kitchen scale to weigh my pans so that they all have the same amount of batter. This guarantees the layers will be the same height once baked.
- Bake the cake layers for 25-28 minutes or until a toothpick comes out with a few moist crumbs.
- Let the pans cool for 10 minutes, then run a small offset spatula around the perimeter of the pans to separate the cake layers from the pan.
- Place the cake layers in the freezer for 45 minutes to accelerate the cooling process. Once the layers are fully cooled, carefully flip the pans and remove the layers from the pans.
- Use a serrated knife to level the tops of the layers. If you're making these layers in advance, wrap and freeze the cake layers at this point.
Cream Cheese Buttercream Frosting:
- While the cake layers bake and cool, make the cream cheese frosting.
- Beat 2 cups of butter and 1 cup of cream cheese on a medium speed for 30 seconds with a paddle attachment until smooth.
- Add in 1 Tbsp of vanilla and 1 tsp of salt. Beat on low until the ingredients are fully incorporated.
- Slowly mix in 11 cups of powdered sugar on a low speed. Halfway through add 2 Tbsp of heavy cream to make the frosting easier to mix.
- If the frosting is too thick, add in additional cream (1 Tbsp at a time). If the frosting is too thin, add in more powdered sugar (a quarter of a cup at a time).
- Wait to color the frosting until the cake is fully frosted.
- Cover the uncolored cream cheese frosting with a piece of plastic wrap to prevent it from crusting and set it aside. This can sit at room temperature for up to 4 hours, but if you make it in advance be sure to store it in the fridge.
Assembling This Layered Carrot Cake
- Stack and frost cake layers on a greaseproof cake board using a dab of frosting to help stick the first cake layer to the board.
- Stack the cake layers and add an even layer of uncolored cream cheese frosting between each cake layer with a large offset spatula.
- Use a large offset spatula and/or bench scraper to cover the cake in a thin layer of frosting to trap in any crumbs, then chill it in the fridge (30 minutes) or freezer (10 minutes) until the frosting is firm to the touch.
- Then add another layer of frosting around the cake and smooth the frosting with a bench scraper. This layer doesn't have to be perfect because we're about to pipe frosting carrots around the side of the cake!
- Place 1/4 of the remaining frosting in a separate bowl and color it green with gel food coloring. Place in a piping bag fitted with a Wilton 1M or 2D frosting tip. Seal the top of the bag with a rubber band or clip.
- Color the remaining frosting orange with gel food coloring. Place in a piping bag fitted with a large round piping tip or an opening cut about 1 inch wide. Seal the top of the bag with a rubber band or clip.
- Pipe vertical lines of orange frosting on the sides of the cake to look like carrots.
- Pipe green frosting swirls around the top edge of the cake to look like carrot tops, then enjoy!
Video
Notes
Substitutions and Swaps
If you need to make any substitutions or swaps in this recipe, please check out my section on ingredient substitutions above.My Tips for Making the Best Moist Carrot Cake
- Ingredients at room temp mix together better! Set out any cold ingredients ahead of time.
- Properly measure the flour (spoon into the cup measure, then level). Or better yet, use a kitchen scale to measure your dry ingredients.
- Use a scale to weigh your cake pans as you fill them. It helps the cake layers bake to the same height and bake more evenly.
- Level your room temperature or thawed cake layers with a serrated knife to make them easier to stack.
- Chill the cake layers in the freezer for about 20 minutes before assembling the cake. It makes it so much easier to frost them!
- Don't use pre-grated carrots! They are dry and their lack of moisture will make the cake layers less moist.
I am so excited to make this cake today! In your video I think you used 5 eggs. Is that correct?
It’s six eggs! So sorry about that, I updated it right after I posted, but am behind in answering comments :/
It says to add eggs, but there are no eggs in the ingredients list. How many is there? It looks amazing and I can’t wait to try it!
It’s six eggs! So sorry about that, I updated it right after I posted, but am behind in answering comments :/
Love your page and recipes! How many eggs are in the carrot cake?
It’s six eggs! So sorry about that, I updated it right after I posted, but am behind in answering comments :/
Can you please describe how many eggs?
Ops. I’ve seen now. I’m sorry ?
Hi. How many eggs are needed for this recipe? It is not shown on the recipe.
Thank you
so sorry about that!! I’ve updated it to show it uses 6 large eggs <3
Hi Chelsey, do you need to use a flower nail in the center while baking this cake?
I don’t use them when I’m making 7 or 8 inch cake layers! but if I’m making cake layers bigger than that, I do use a flower nail <3
I love the way you decorated this carrot cake! I wish I could replicate the look but I have my doubts it would look anything like carrots! lol I LOVE nuts in my carrot cake and wouldn’t bother eating it without them. 🙂
haha that’s totally fair! Some people live for the texture and taste they add, and I totally respect that <3 I bet if you give it a try, it’d turn out better than you think!!!
I’ve been on the hunt for a new recipe for my carrot cake this Easter. I really wanted one with buttermilk!!! I’m sold. Im making it tomorrow (but i will sprinkle the top with pecans).
so happy to hear that Katie!! I hope it turned out wonderfully 🙂
Cake directions #2 and 7 both say to add the oil. Which step is preferred?
sorry that was a typo!! Step #2 is when it should be added, but if you add it at step 7 the cake should still turn out just fine <3
The recipe mentions adding oil twice, once with the sugars and once with the vanilla. Is it supposed to be divided?
Am I just not reading anywhere what tips to use for piping carrots? And swirls – maybe 1M I guess?
The carrot tops are made with a Wilton 1M and the carrots are made with Wilton 2A, but any round top (or even just sniping the tip of the piping bag) will work!
Hello! This cake looks amazing. I am making my friends weeding cake soon which will be three tiers. She wants her bottom tier as carrot cake but I’ll be making 4 10inch sponges. What should I time your recipe by in order to get 4 10 inch sponges? Thank you!!
I’d recommend placing two flower nails upside down in your pans to help them bake more evenly and quickly! with them, the baking time should be pretty similar to what it for 7 or inch layers, especially if you make layers that are the same height. I’d check on them after 25 minutes, and then every few minutes after that if they look like they need a bit more time. This recipe bakes pretty quickly because of all the carrots in it, so just keep an eye on them 🙂
Oops! Wedding*
What tip did you use for the carrot body and the top ruffle
The ruffle is made with a wilton 1m tip 🙂
Hi Chelsea. I love the look of this recipe. I was going to make it in a 9×13 inch rectangle pan. Do I need to adjust the recipe or will this amount of batter be ok? Thank you.
One batch of batter will make 2, sheet cakes that are 9x 13 inches (And about 1 inch tall)! I’d also recommend placing a couple flower nails upside down to help the layers bake more evenly and quickly 🙂
Could you add crushed pineapple to this? Would it add to much liquid?
This cake recipe is already super moist, so I’d be worried that adding crushed pineapple would be too much liquid :/ Maybe you could try to reduce a bit of the buttermilk and swap in the pineapple though??
I have a customer that request carrot cake cupcakes, I love this recipe for my cakes but wasn’t sure if you’d recommend it as a cupcake?
This cake recipe makes great cupcakes! It’s a lot of batter though, so I think it’ll make 2-3 dozen cupcakes <3
@Alex Boker, how long did you bake the cupcakes? At 350 F I’m assuming? Thanks!
Chelsea, you’re amazing. Thanks so much for all the very detailed instructions! I’m making a carrot wedding cake for my friend and it will be semi naked. It’s a 3 tier 12,9 &6 inches. For some reason all my layers turned out at exactly 2 inches tall. They’re super flat too (not domed). I have two questions. 1) is the cream cheese frosting recipe here thin enough to be for a semi naked cake or should I add another tablespoon of cream? 2) Is 3×2” plus frosting too tall for each tier (about 7.5 inches tall)? If so, do you think I should make the layers thinner by slicing off to make them 1.5 inches tall? I’m reluctant to just do two layers per tier because I’m going for the tall effect. But if you think I should just do that, I will. Thanks so so much!
Hi Thamara! You are too sweet 🙂 I think you comment may have posted twice, and I responded to the earlier comment <3
Hi Chelsey,
Two questions: 1) If I want to make a semi naked carrot cake, should I add more cream to the frosting recipe above? It’s a wedding cake: 3 tiers 12, 9 and 6 inches. Each layer within each tier cane in at 2 inches. Do you think that would make the cake too gigantic? Should a slice off a half inch from each cake or should I just leave it? Any suggestion on how tall it should be (avg and max) would be great! Thanks!!
Hi Thamara,
Since this is cream cheese frosting, it’s already a bit thinner than my normal frosting. I wouldn’t recommend adding anymore cream, it should be a great consistency for a semi naked cake as it 🙂
How many layers are going into each tier?? I usually make wedding cakes with 3 or 4 cake layers that are a little taller than 1 inch, with about 1/4 of an inch of frosting between each layer. My tiers usually aren’t super tall, but it’s all about whatever look you’re after!! My tiers are between 4-6 inches, but if you use layers that are 2 inches tall, maybe you do only 2 or 3 layers?? Tall tiers are definitely in right now, so there’s nothing wrong with making them tall!
Can I use egg whites instead of whole eggs?
Hi, love your recipes and big fan.
Can I use egg white instead of whole eggs in this recipe?
Also can you provide me the adjustments to make a small batch (3 tier 6 inch cake) rather than the 3tier 8″ with this carrot cake recipe?
Hi Martha!! I’ve never made this recipe with egg whites, but the conversion would be able 8 egg whites, or 1 1/4 cup of egg whites.
To make this recipe in 3, 6-inch pans, I’d recommend using 2/3 of this cake recipe. Or you can use a full batch to make 4, 6-inch cake layers. Hope that helps, happy baking!!
How long do you bake the cupcakes?
Hi Tammy! These should be done baking after 18-20 minutes in a 350 degree oven, or whenever a toothpick comes out clean (or with a few loose crumbs). Hope that helps!
Would this recipe work for cupcakes?
Hi Katherine,
I actually haven’t tried it out as cupcakes yet! I plan to next week though, stay tuned!! Or if you try it, let me know how it turns out <3
Hey Chels! I made this layer cake once and absolutely loved it. I had someone ask to make a 9×13 cake – 2 layers. Do you know how much batter I would put in?
Oops I should’ve read the comments above. I see that you already said this recipe will make 2 – 9×13 cake layers. Thanks anyway!
Hi Chelsea! If I was going to make a 6in cake with 3 layers, would you adjust the batter/ frosting at all? Thank you!! 🙂
Hi Nicole! So sorry for the delayed response! I usually use 2/3 of a batch of batter to make 3, 6-inch cake layers. Happy baking!
I was hoping to make this cake using 9 inch cake pans and was wondering if that would work and how many layers would the batter make using 9’inch pans?
Hi Yvette! One batch makes 2 9-inch cake layers, so I’d recommend making 1.5 batches if you want to make a taller layer cake with 3 layers. Hope that helps, happy baking!
Hey there!! I’m so excited to try this recipe! The customer had asked if I can add raisins to the cake? What are your thoughts?
Hi Heather! I think adding raisins should work just fine with this recipe! I’m not personally a fan of raisins in carrot cake, but if she likes it then power to her 🙂
Would this cake batter be okay to bake in a 9.5in bundt pan?
Hi Vivian! This recipe makes a fantastic bundt cake! It should bake for 50-70 minutes, depending on the shape of your bundt pan. I recommend making a cream cheese glaze to drizzle over it! Happy baking!! <3
Can you add raisins to this recipe and if so how much would be recommended?
Hi! Was wondering if doing 3 6inch layers I could use the rest of the batter for cupcakes?
Hi Teal,
You totally can! use about 2/3 of the batter to make the cupcakes, then use the rest of the batter to fill your cupcake liners about 3/4 of the way full. Hope that helps, happy baking!
Hi!! Trying this recipe very soon. I also wanted to say how much I love your TikTok and I admire your baking! x
Aw thank you Holly! I have gotten so into TikTok lately it’s wild!! I hope your cake turns out great 🙂
I really love this recipe! Does it work for cupcakes too??
Hi Destiny,
So happy to hear that! It does!! Fill the cupcake liners about 3/4 full, and bake for 15 mins at 350 degrees F.
I’m making this for Easter right now actually and I don’t have 7 in or 8 in, I only have 9 in pans how many layers would you do for that?
Hi Sydney,
This recipe can be used to make 2, 9-inch cake layers <3 Happy Easter!
This cake was so good!!! Definitely making it again next year! 🙂
Aw thanks Jaclyn!! Your comment put the biggest smile on my face 🙂
Hey!! I have a 10″ by 10″ pan that’s 4″ deep – could i bake the whole batter in this or should i only use half of it? How long would I need to bake it for?
Hi Anca,
You can bake one batch of batter in that! When I bake sheet cakes, I place two or three flower nails (like these: https://amzn.to/39oJK3I) spaced evenly apart in the center of each pan (and spray them), to help the layers bake more evenly and quickly. With flower nails, the cake layers bake in 37-40 minutes in my oven. I hope that helps, happy baking!!
Yum this looks so good I’m going to make it this weekend
You totally should Shanti!! Happy baking 🙂
I made this recipe today into cupcakes. I made 12 good sized cupcakes, filled about 3/4 full, and I made a crumble topping for them. Very good!! Baked in my oven for around 18 minutes at 350. Love that this recipe doesn’t include nuts, raisins or pineapple!!!! They make a nice spice cake with a great texture, and I think the crumble on top just completes them beautifully.
Omg that sounds incredible Paula!!! Now I want to try that 🙂 Thank you so much for sharing!
Hi! Can I use this cream cheese frosting to pipe rosettes on the cake? I’m making a 3 layer 6” cake with rosettes. How much frosting do you think I would need?
Hi Mary,
Apologies for the delayed response! You totally can! It’s quite stiff for a cream cheese frosting, and works well for piping! You can also add a touch less heavy cream if you want it to be thicker!
The amount of frosting listed for this recipe should be enough to pipe rosettes on a 6″ layer cake. I hope that helps, happy baking!!
Hello! I was planning on making this cake soon but I had a few questions! Do I need buttermilk? Could I use milk or milk with something in it? Also how much do these cakes rise, because in my past cakes they don’t rise that much and I’m left with a very short cake :/ Thanks!
Hi Ally,
You can use whole milk + 1 Tbsp vinegar or lemon juice in place of the buttermilk in this recipe! This recipe doesn’t rise a ton, which is why I like to make 4, 7-inch cake layers with it! That way I get a pretty tall cake 🙂 Hope that helps, happy baking!
Hi. I made your carrot cake recipe and it turned out really good! I never had carrot cake before (because of all the extra stuff that does not belong in a cake – nuts, raisins, pineapple). It was my first attempt to bake a cake from scratch. Thank you for the yummy recipe. The only problem is that I had never made a layered cake and did not know the importance of leveling off the layers. The frosting, was yummy and was my first time frosting a multi layer not from a box cake. It was a very sad attempt. It was very good, but the presentation was pathetic. I am making the carrot cake again this week. Do you have any suggestions on making it into a sheet cake? Thanks again
I am so happy to hear that Elizabeth! Leveling the layers definitely makes it easier to assemble!!
Haha if only I could show you my first layer cake, you’d laugh 🙂 It was lopsided and the frosting was a mess, but boy did it taste good! I promise layer cakes get easier the more you make them <3
I actually have a sheet cake version of this recipe, here’s the link: https://chelsweets.com/2020/04/11/carrot-cake-sheet-cake/
Just made the cake and it’s perfect. Thank you for sharing the recipe!
So happy to hear that Janelle!!
Hey! I want to make this cake but it seems like a really big cake, is it? If it is then i will half it :). I follow you on Tiktok 🙂
Hi Bea,
You can totally halve this recipe!! And that’s awesome, I love TikTok 🙂 Happy baking!
Hello! Thanks for sharing all of this advice! I am going to be making my first wedding cake for a friend with the top tier being 4 layers 6inches as this amazing sounding carrot carrot cake and the bottom 8 inch being your moist layer chocolate cake.
Can you recommend a frosting that would work with both as a semi naked cake? I was thinking you American Vanilla Buttercream as it will be out of refrigeration for 2 days.
Also I only have room in the oven for 2 layers at a time. Will the mixture be affected if not cooked immediately?
Thank you for all your help!
Hi Vicky,
That’s so wonderful! I think my american buttercream would work great for a semi naked cake! Just be sure to add simple syrup to the cake layers if you’re making it in advance and it’s going to be semi-naked, to prevent it from drying out <3
Both of those batters should be fine to sit for a bit as you bake all the layers in stages. Hope that helps, and that the wedding cake turns out great!!
Hello! You are so inspirational and you inspire me and so many others! I love your TikTok account and I cannot wait to make this cake for Mothers Day! This is my first cake I’ve ever made from scratch and I am really excited. Can I use pre-grated bagged carrots for this recipe, or is it best to just grate them by hand, to contract all the moisture. Thank you so much!
Aw you are too sweet Isabella! I hope your Mother’s Day cake turns out great! You can use pre-shredded carrots, but the texture of the cake will be slightly different. It will still be delicious though 🙂 Happy baking!
Try with the crumble. Awesome!!
I am DYING to try it with a crumble!! I’m def doing that next time I make this recipe 🙂
Thank you so much! I just made the Mother’s Day cake yesterday and it turned out amazing!!! I also decided to put the grated carrots in a kitchen blender, to contract more moisture. I am usually not a big fan of carrot cake, but I am in love with this recipe! I can’t wait to try it again!
That’s a great idea!! So happy you loved this recipe Isabella 🙂
Hi! Would you say this would make cupcakes also? 🙂
Hi Patricia,
It does! Fill the cupcake liners 3/4 full and bake at 350F for 15-16 minutes, or until a toothpick comes out clean 🙂 Happy baking!
How many cupcakes would it make?
Hi Patricia,
I’ve never made cupcakes with an entire batch, but I’d guess about 3 dozen!
I used the cake recipe and I made 12 good sized cupcakes that I filled 3/4 full, and I made a crumble topping for them. Very good!!!
Yum Paula!! I still need to try out a crumb topping with carrot cake cupcakes, that sounds so delicious!
Hi, I was looking at these ingredients and 11 cups of powdered sugar in the frosting seems like a LOT!!! I’m a bit confused how that works? Thanks!
Oh! My! Goodness! I made this cake for my mums birthday (with a cup of walnuts because she loves walnuts) and it was INCREDIBLE. Thank you so much! Even though I am not a huge fan of carrot cake I loved it. Thank you again!
Hi Chelsea, I wanted to make a smaller batch of this cake, any idea what the measurements would be for everything (including frosting) if I wanted to make a 3 layer cake with 6 inch pans? I have a hard time converting recipes into smaller or larger batches!
Made cupcakes with this recipe, turned out amazing! the spices came through so nicely, and perfect amount of carrots. Moist, and delicious! paired them with a brown sugar cream cheese frosting.
How thin do the shredded carrots have to be? Could I just buy shredded carrots or do they need to be thinner and more like flakes? I’ve never made carrot cake before.
Just curious if you think this cake would pair well with a caramel drip? Also curious how “grated” the carrots should be? Making this today and very excited!
Hi Chel! First off I made this cake and literally everyone went crazy! The moistness was out of this world! Question I wanna make this cake into a four inch? Could I use your batter conversion chart to figure how many tablespoon in each pan ? Thank you !
Hi Chelsea
Hope you well! Love all your recipes. Can this cake be covered in fondant as a tiered cake? Is it stable enough?
Thank you
Hi! I need to make this into 2, 6 inch 3 layer cakes. Would there be enough? Or if there wasn’t and i did 2 batches and used the extra to make cupcakes, couls i freeze the cupcakes for a week??
Hi Chels ! Would it be ok to skip the ground cloves ? Is there an alternative or will this ruin the recipe ?
Thanks,
Terrie
I absolutely love your stuff! Would this recipe be okay to use to make cupcakes?
hey Chelsey…..love your recipes…however I was wondering if I could substitute almond flour for the AP flour and how much should I use…..thanks in advance
Can I please ask if I can use 6 inch pans instead of 7 inch ones? Would that change the baking time?
Can I use this recipe for cupcakes?
Could I use this recipe to make cupcakes?
Can you use this cake mix to make cupcakes? I have to work Easter this year and thought I would bring in a treat for my coworkers!
How long would you recommend for cupcakes? If you even recommend this recipe for that
Hi – firstly love your recipes, i always have such good luck. With this one though, it says that the butter is 2 cups or 4 sticks or 678 grams for the frosting. 2 cups of butter is usually closer to 450 grams. That’s a pretty big difference. Am i missing something? I’m going to go with 450 grams or 4 sticks, but that’s a big discrepancy. Thanks!
Hii, is it okay if i use cake flour instead of all purpose flour ? What will happen ? Thank you in advance. I love all of your videos!
I liked u page and the recipe , I have a question in carrot cake a we suppose to add milk maybe
Hey Chelsea, is there a way to make this recipe gluten free? Thanks!
I made this cake last year dairy free (used some vinegar in cashew milk as my buttermilk) and it was fabulous. This year I’m going to attempt to make it gluten free AND vegan. I’m excited to see how it turns out. If anyone has any advice or has tried it, I am curious to know how yours ended up like. My goal is something not gummy 🙂
So I don’t have buttermilk in hand. Could I use just milk?
How much can I cut down the filling if I don’t want to decorate /pipe the outside the cake. I only need a filling amount.
Hi Chel!
I want to make this into a 6 inch – could I follow your conversion chart for cups of batter and adjust to cook time by a few minutes ?
Me & my guests absolutely loved this cake!! I would love to make carrot cupcakes. How can I use this for 12-24 cupcakes?
Can this recipe be used for cupcakes as well?
Have you ever tried this recipe using GF flour??
Can I use this recipe for cupcakes?
In the buttercream recipe, the gram measurement doesn’t match the cup/stick measurement. 4 sticks/2 cups are 453 grams, but it lists 678g. Which is correct?
Can this same recipe be used for cupcakes? Would you make any modifications other than time?
Hi Chelsie,
I’m so excited to make this cake. Your so amazing with your work of art with your cakes. I’ve used so many of your recipes. I honestly can’t thank you enough. I’ll send you a picture when my cake is finished. I’m so excited to get started. Thank you again for all of your hard work and sharing your amazing ideas.
You have a great day. Pictures later if your site allows them, I’ve never tried. Happy Wednesday. And God bless.???
Terri
I make a ton of your delicious recipes! They are well written & easy to replicate. Question though: when it calls for heavy cream (for instance when used to make buttercream) do I pull it straight from the fridge cold, or is this the 1 cold ingredient that you don’t let come to room temperature 1st before adding it? Thanks in advance, Happy Easter! LaGena
Hi.. I made this cake and it came out very good, but i felt the baking soda measurement is higher that baking powder, I could get the baking soda taste,,
Hi Sahana,
Happy to hear the cake turned out great!! With the volume of batter and the tiny amount of baking soda, you shouldn’t be able to taste it at all! Maybe you’re tasting something else in the batter? Was it too salty?
Hi Chelsea,
Do you think this cake needs simple syrup? I have made the cake layers in advanced and freezed them
Hi Angeli,
I usually don’t add simple syrup to this recipe because it’s pretty moist, but I also usually cut into this cake a day or two after I make it. I made this recipe for a friend’s wedding cake and did add it then and it tasted great. My general rule of thumb is if I’m worried about making a cake far in advance, I usually add simple syrup to give myself peace of mind 🙂 Hope that helps, happy baking!
Hi! Could I swap out AP flour for a 1:1 gluten free flour and keep the rest of the recipe the same?
(Aside from over mixing and letting the batter sit before baking)
Hi Kasti,
You totally can! That should work great in this recipe 🙂 Happy baking!!
Can this cake be made to stack for a wedding cake?
Hi Stephanie,
It totally can! I used this recipe to make one of my best friend’s wedding cakes and it turned out amazing 🙂 Hope that helps, happy baking!
Hi Chelsea ! What If I wanted to do a tiered carrot cake .. a 10”, 8” and 6”. Should I do the recipe 4x , separate batches?
Hi Rose,
It depends on how many layers you want to be in each tier, but if you want 3 layers in each tier you’ll need 3 batches, and if you want 4 layers in each tier you’ll need 4 batches. Hope that helps, happy baking!
Would this work for a sheet cakes?
Hi Rem,
Great question! It can, but it’d probably be easier to just use my carrot cake sheet cake recipe 🙂 It’s essentially the same recipe! Here’s the link: https://chelsweets.com/carrot-cake-sheet-cake/
Hope that helps, happy baking!
Wait, I thought that when I saved this recipe, it had pureed roasted carrots in it, in addition to shredded carrots. Where did that recipe go??
Hi Anne,
I think you might be thinking of someone else’s recipe! I’ve never made a carrot cake with roasted carrots in it. That sounds delicious though, maybe I should!!
Made this cake for Easter and it was absolutely perfect!!!! Thank you for sharing this recipe with us all!!
Hi Tammy,
That is so wonderful to hear!! Thank you for sharing & happy baking 🙂
I baked this cake for Easter because obviously lol and it tasted great! Super moist and flavorful. The only issue that came up is my layers baked very flat and didn’t rise much like yours seemed to of. 3×8 layers, any insight?
Hi Megan,
So happy to hear this cake was a big hit for Easter!! Sometimes layers rise up less if the ingredients are fully at room temperature. Is there a chance some of them might have been a tiny bit cold? Do you think there’s a chance that could be it? Hopefully we’ll be able to figure it out together!
This recipe is amazing! I just made your carrot cake and cream cheese frosting for a birthday and it did not disappoint. It made a beautiful, tall, 4-layer 7in cake. The cake was moist and tasted delicious and the frosting was the perfect consistency. Thank you for sharing it. ??
Hi Tamar,
Thank you so much for sharing 🙂 I’m so happy to hear that!!
I found this recipe a few years ago, but then could not find it. I hate to bake but will make this recipe for special people.
How can I alter this recipe for 3 9 1/2 in pans, 2 in high?
Could I use this recipe for 2 9 1/2 inch round cakes, 2 inches tall?
Hi Karly,
This recipe makes about 10 cups of batter, which can be used to make 2, thick, 9-inch cake layers. I’m not sure they’ll be quite 2 inches tall once leveled, but they should bake up pretty tall. Hope that helps, happy baking!
Would I use one batch for a 10 inch cake?
Great question Karly! One batch of this batter can be used to make 2, 10-inch cake layers. Bake time will be a bit longer to cook through the center (and I highly recommend using a flower nail or heating core to help the layers bake through faster / quicker). Hope that helps, happy baking!
Hi! I loved your traditional carrot cake recipe with the coconut and pineapple, but I see it’s taken off your website. Any chance you can bring it back? I’ll have to write it down this time, it’s my families favorite!
Thank you!
Hi Amanda,
The bad news, yes that recipe is gone :/ The good news, a very similar version of it still exists!! My spicy carrot cake is exactly what my traditional carrot cake recipe was plus some cayenne.
Just omit the cayenne from this recipe and you’ll be good to go: https://chelsweets.com/cayenne-carrot-cake-with-bourbon-maple-cream-cheese-frosting/
Hope that helps, happy baking!!
Hi! I love this cake and how moist it is. But can I add walnuts to it? If so, how much would you suggest?
Hi Sandra,
Great question! You can totally add in walnuts! I’d add about 1/2 cup of chopped walnuts. Hope that helps, happy baking!
I am making this for a wedding cake and am decorating the outside with ribbons (lines using a scraper). How do you think your frosting recipe will hold up to this? Will it be too sheer or work okay? They want the cream cheese frosting but I know from experience it can be more difficult to work with than buttercream. Thanks!
Hi Shea,
I have never used that technique before, but I would think that this frosting recipe would up for that design, it keeps it’s shape pretty well! It’s very similar to regular American buttercream. Hope that helps and that the cake turns out great!!
Would this be suitable for a tiered cake? I’m struggling to find a carrot cake recipe that will work for stacking like that. Also, how might one convert this into a 9 inch round cake? Thanks in advance!
Hi Jamie,
This totally would! I actually used this recipe to make a 3 tiered wedding cake for one of my best friends!! It worked great. I have a great cake batter calculator that helps do exactly that, here’s the link: https://chelsweets.com/how-much-cake-batter-per-pan/
One batch of this recipe makes 10 cups of batter for reference. Hope that helps, happy baking!
hello,
did you squeeze out the liquid from the grated carrots?
Hi Ana,
Great question! The good news is that this recipe actually turns out both ways, whether you squeeze out the grated carrots or not! I prefer to actually not squeeze them in this recipe, it makes the layers even more moist and fluffy! The water from the carrots turns into steam as the layers bake and gives them a delicious texture. Hope that helps, happy baking!
11 cups of sugar? Wow! I used only about 2 and a half and THAT was already pretty sweet.
Hi Megan,
The cream cheese frosting uses an American buttercream, which is super sweet and does use quite a bit of powdered sugar. But keep in mind there is also 3 cups of butter/cream cheese to balance it out! The general ratio of 1/2 cup of butter or fat to 2 cups of powdered sugar is the standard to give the frosting the perfect consistency for decorating and piping. You can add less to match your preferences, or you can make a less sweet frosting like my Swiss meringue buttercream or my hybrid buttercream. Both are quite a bit less sweet than this cream cheese buttercream.
Hope that helps for the future, happy baking!
Made this cake for my husband’s birthday and everyone loved it! I used sour cream instead of buttermilk and three 8in pans. Kind of tastes like a pumpkin loaf from starbucks because of the spices and so moist. Will be my go-to carrot cake recipe!
I’m so happy to hear that Maria!! That is a great comparison 🙂 Thank you for sharing!!!
Hey Chelsey,
Do I need to adjust the temperature for a fan assisted oven? I plan on using 3 x 8 inch cake tins.
First time using one of your recipes after following you on insta for a while, I’m in the UK so not sure if our ovens are different from yours!
Thanks so much in advance!
Hi Dee,
Great question, and I’m so happy to hear that!! You’d want to reduce the temperature by 20 C to 160 C if you’re using a fan assisted oven in this recipe (and all my others – I use an oven that doesn’t have a fan). Hope that helps, and that your cake turns out great! Happy baking!
Best carrot cake recipe! I’ve made this more times than I can count over the years and it never disappoints – friends and family have requested it for many different occasions because it is that good!
I am so happy to hear that Kim 🙂 Thank you for sharing!!
Best best carrot cake recipe ever. An absolute crowd pleaser and I love how easy it is to double the recipe or split it in half.
I am so happy to hear that Cecilia 🙂 Thank you for sharing!!
Hi. Would this recipe work if I add pecan nuts
Hi Megan,
Yes, absolutely! This carrot cake recipe works beautifully with pecans added in.
For best results, I recommend folding in about 1 cup of chopped pecans at the very end of mixing the batter. That way, they’re evenly distributed and don’t sink to the bottom. You can also toast the pecans first to really bring out their flavor! Just bake them on a sheet at 350°F for 5–7 minutes until fragrant, then let them cool before adding.
Totally optional, but if you love texture, you could also toss in some golden raisins or shredded coconut too, it’s a super forgiving batter. Hope it turns out amazing!
Hi Chelsey! I am making a three-tiered wedding cake for the first time for a friend, and they asked if I could make a carrot cake for their wedding cake. I am planning to do a 10 inch bottom, 8 inch middle, and 6 inch top (three layers for each tier). My question is: do you think this cream cheese frosting would be okay to sit out for multiple hours at the church they’re getting married at? It’ll need to be sitting out for at least a good 4 to 5 hours at room temperature I’d say. Or do you think it would be better to use a buttercream frosting for this case? I wasn’t sure how easy the cream cheese frosting would be to work with or not–I’m very new to cake-making! Also, one more question–for the bottom tier of 10 inches (being baked with three 2-inch cake pans) how much batter would you recommend for the bottom tier? Thank you so much in advance!
Hi Rachel,
Ok great questions! I’ve actually made this recipe for a wedding before, and what I ended up doing was filling the cake with cream cheese frosting and piping a ring around the edge with regular buttercream (a frosting dam) to keep the softer filling in place. Then I frosted the outside of the cake with regular buttercream, which is much more stable! It worked great. Just make sure you support the tiers properly by building them on their own cardboard cake rounds, and using either thick bubble tea straws or wooden dowels between the tiers to support the weight of the cake.
For each 10-inch cake layer, you’ll need 5 cups of batter per pan. So if you’re making 3 layers you’ll need 15 cups (1.5 batches of this recipe, one batch makes 10 cups of batter). Hope that helps, and that the wedding cake turns out great!!
Hi Chelsey, this helps me out so much, thank you so much for your reply on this!! It makes me feel better that you’ve made it yourself into a wedding cake, so I’m feeling better about it! 🙂
I made an 8-inch practice cake using this recipe, and it was a hit with everyone! The Bride and Groom absolutely loved it 😀
I’m so happy to hear that! And practice cakes are SO SMART!!! You’re doing all the right stuff!! Let me know if you have any other questions as you make it!!