
Christmas Tree Cake
This festive Christmas tree cake is decorated with delicious buttercream frosting! It’s made from scratch and is so fun to decorate.
Making This Christmas Tree Cake: Step-by-Step Tutorial
Let’s walk through each step of this cake together to make sure it turns out as amazing as possible!
I figured it might be helpful to know what tools I use too, so I’ve shared a list below.
Not all of these are mandatory, but they make the process a lot easier. If you don’t have all these things on hand, feel free to improvise and work with what you have.
- Serrated Knife
- Spinning cake stand
- Electric hand mixer or stand mixer
- 8-inch greaseproof cake board
- Small offset spatula
- Thick bubble tea straw or wooden dowel
- 2 Large piping bags
- 3 Small piping bags
- 1 Open star piping tip (like a Wilton 1M)
- 1 Large French piping tip (like a Wilton 6B)
- 2 Small round piping tips (like a Wilton 10)
- 1 Small French piping tip
Step 1: Bake the Spice Cake Layers
The first step is to make the spice cake layers. Line the pans with parchment rounds and grease with non-stick baking spray or homemade cake release.
Use the green gel food coloring to color half the batter light green and half of the batter a darker shade of green. Add spoonfuls of both colors of batter into the prepared pans, filling them each to the same height (about 1-inch high).
Then use a butter knife or offset spatula to swirl the batter together to create a marbled look.
Bake the layers then let the cake layers cool in the pans for 10 minutes. Run a small offset spatula around the perimeter of the pan to separate the cake from the pan.
Flip the cake layers onto a wire rack to cool. Use a serrated knife to level the tops of the layers once they’re fully cooled, then stack the cake layers and trim them into the tapered shape of a Christmas tree.
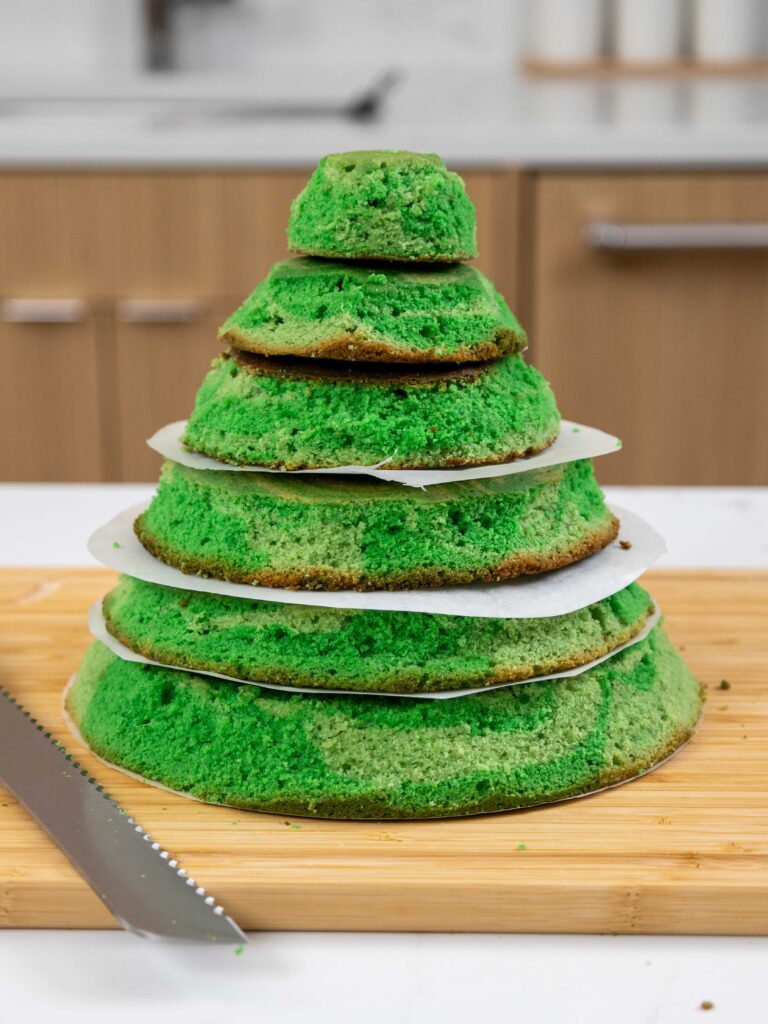
If you make these in advance, wrap and freeze them at this point. Take them out of the freezer about 20 minutes before you want to assemble the cake.
Step 2: Make the Buttercream Frosting
Next, we work on the buttercream frosting. I chose to make this cake with regular vanilla buttercream, but any type of frosting should work great on this cake.
I find American buttercream is sturdier and easier to smooth, which is why I chose to use it for this design.
If the frosting seems too thick after mixing all the ingredients, add in additional heavy cream or milk (1 tablespoon at a time).
Or if the frosting is too thin, add in more powdered sugar (1/4 cup at a time).
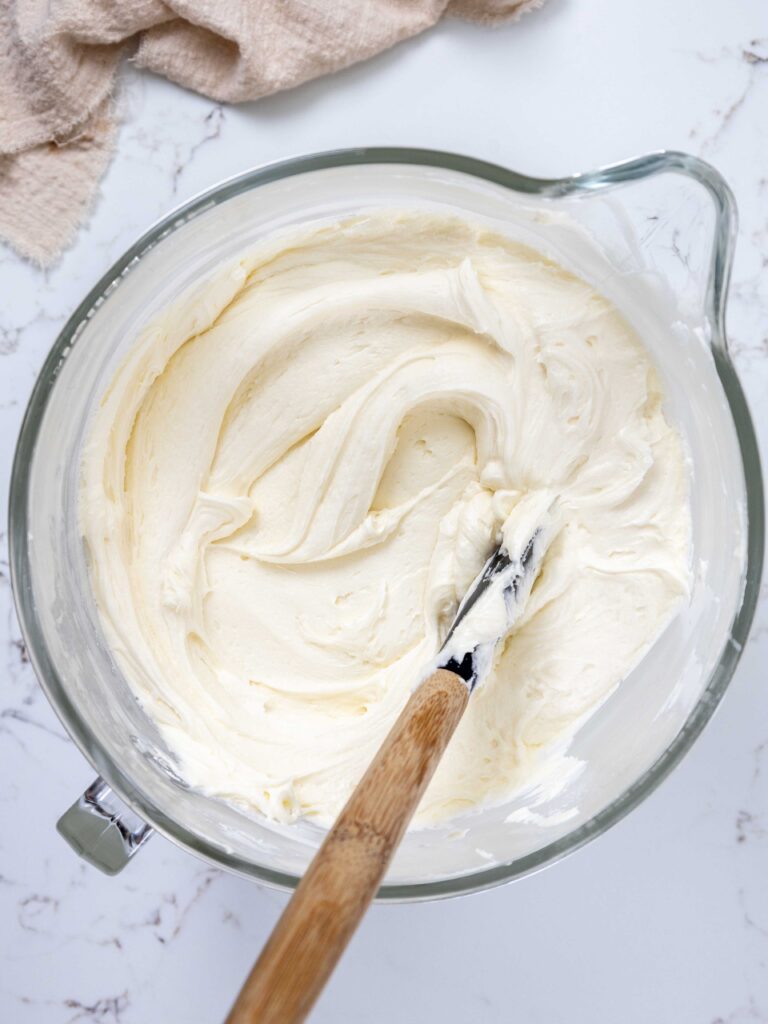
If you’re unsure how thick your frosting should be, you can learn what consistency you’re looking for in my frosting consistency post.
Wait to color the frosting until we’ve crumb coated the cake. Cover the frosting flush with plastic wrap and set aside.
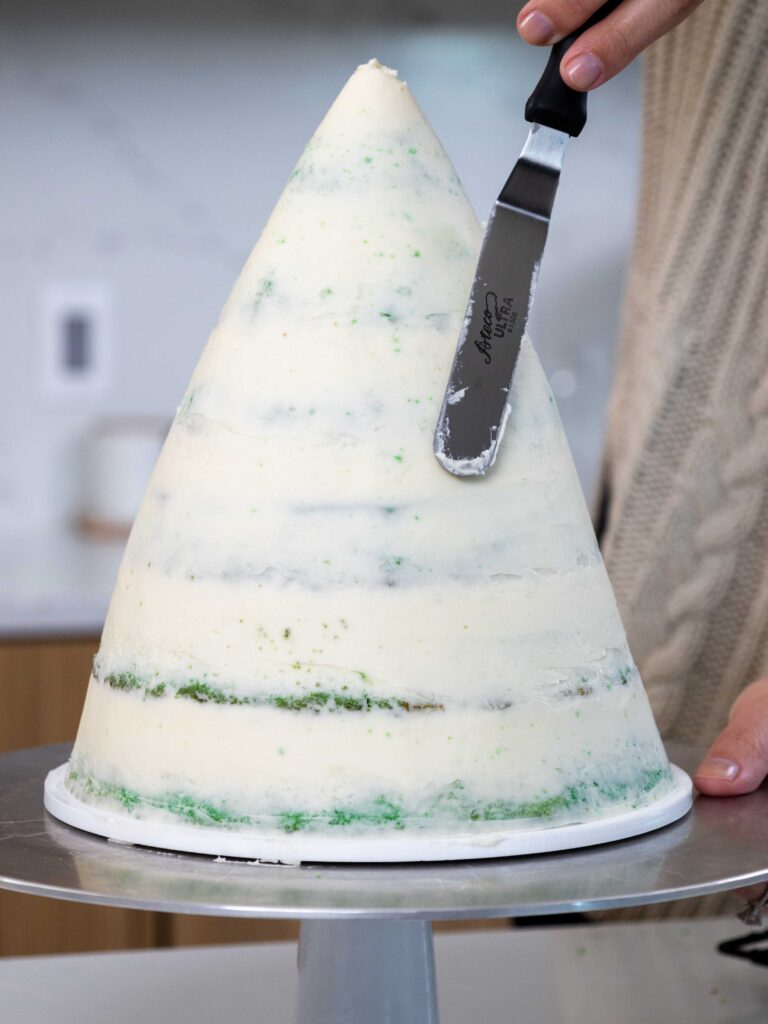
Step #3: Stack and Frost the Cake Layers
Stack and frost cake layers on an 8-inch greaseproof cake board or flat plate using a dab of frosting to help stick the first cake layer to the board.
I highly recommend chilling your cake layers in the freezer for about 20 minutes before assembling the cake. It makes it so much easier to stack and frost them!
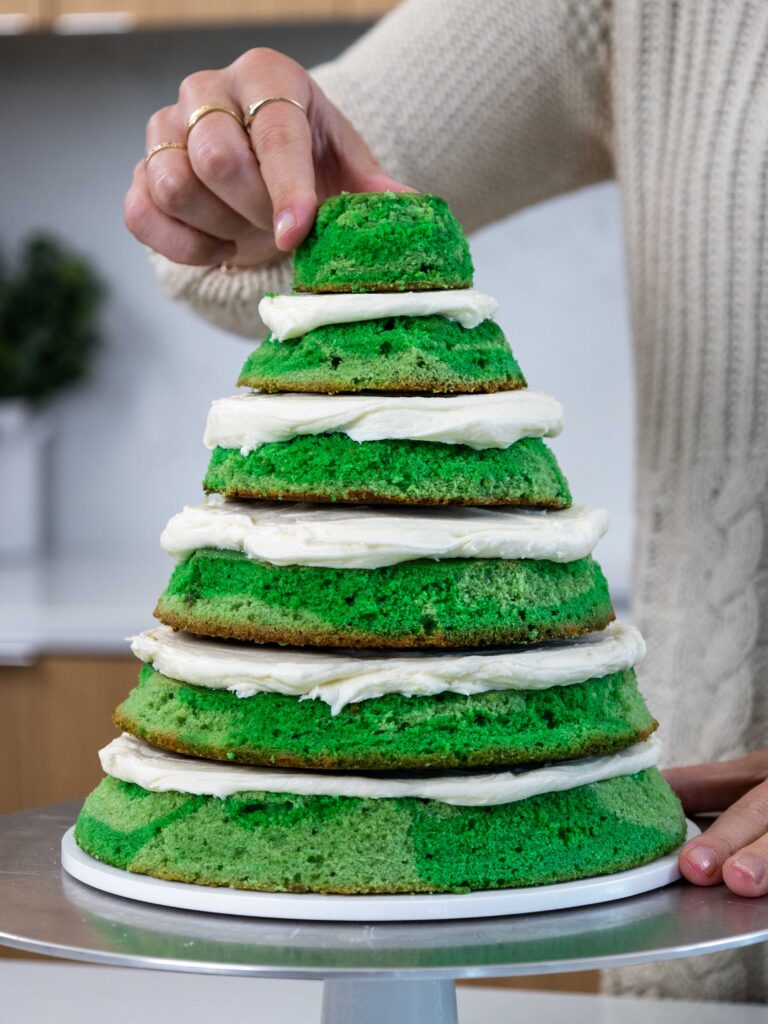
Add an even layer of buttercream between each cake layer with an offset spatula.
Spread a thin coat of frosting around the top two cake layers with a small offset spatula or acetate sheet, then chill the cake in the fridge (30 minutes) or freezer (10 minutes) until the frosting is firm to the touch.
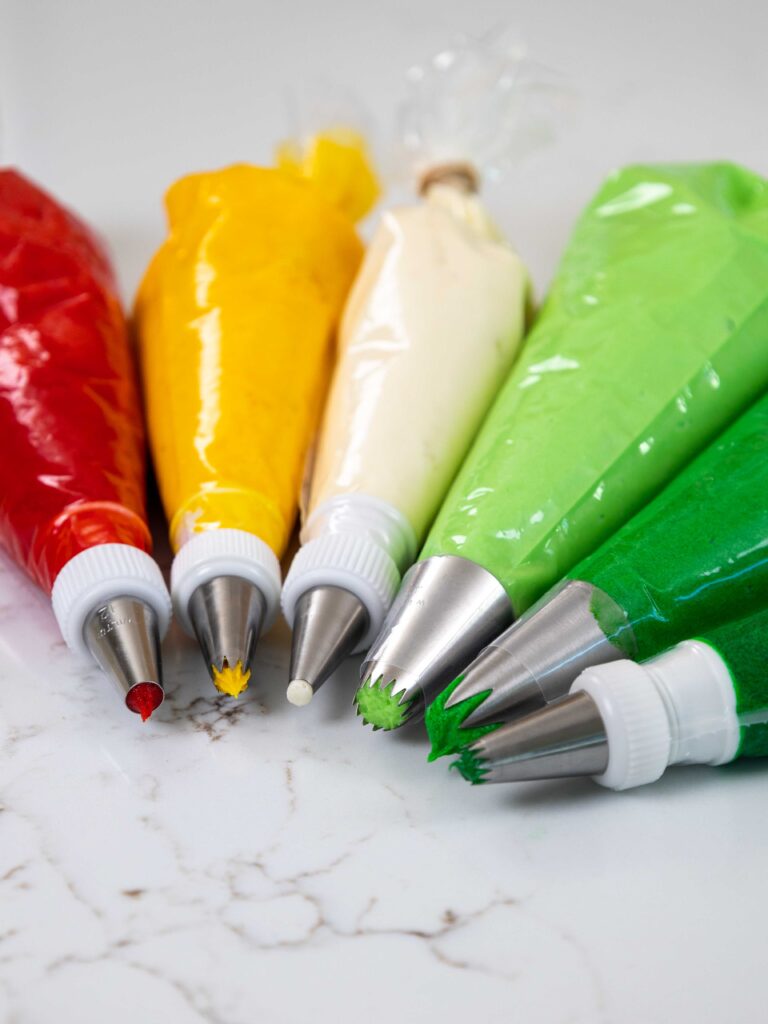
Step 4: Color the Buttercream
Next, we color the buttercream. It’s going to sound crazy, but all the frosting can be colored in one bowl.
We start with the lightest colors and work our way to the darkest, so it works out great!
I recommend using gel food coloring to color the frosting. It allows you to create vibrant colors without throwing off the consistency or taste of the buttercream.
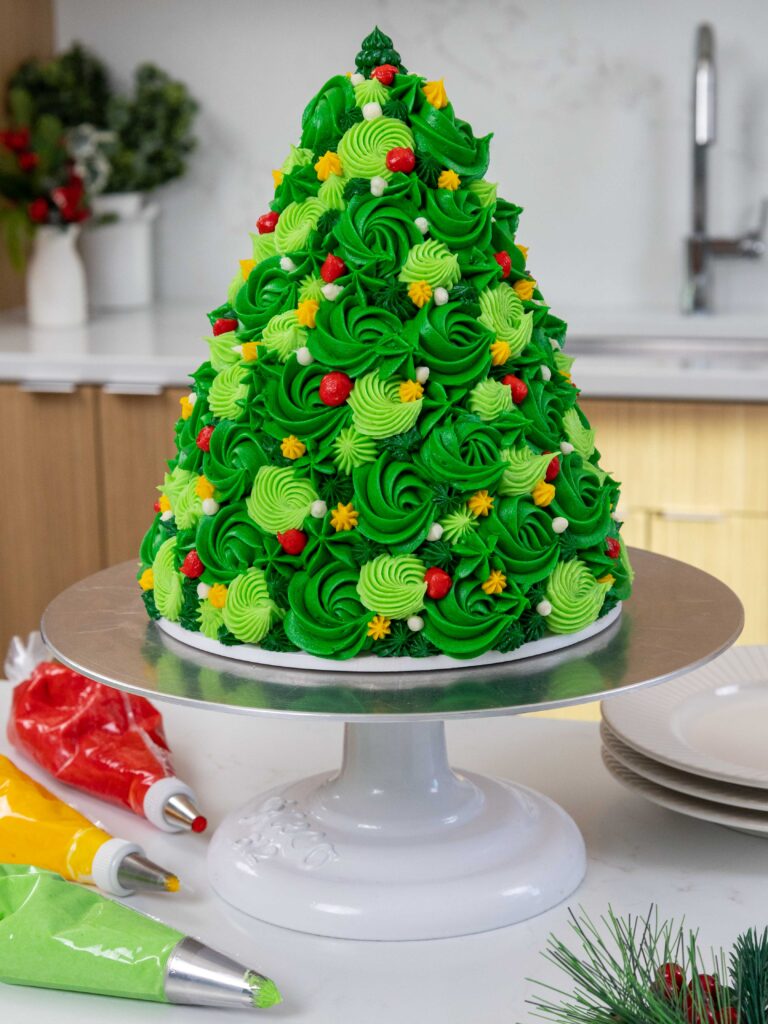
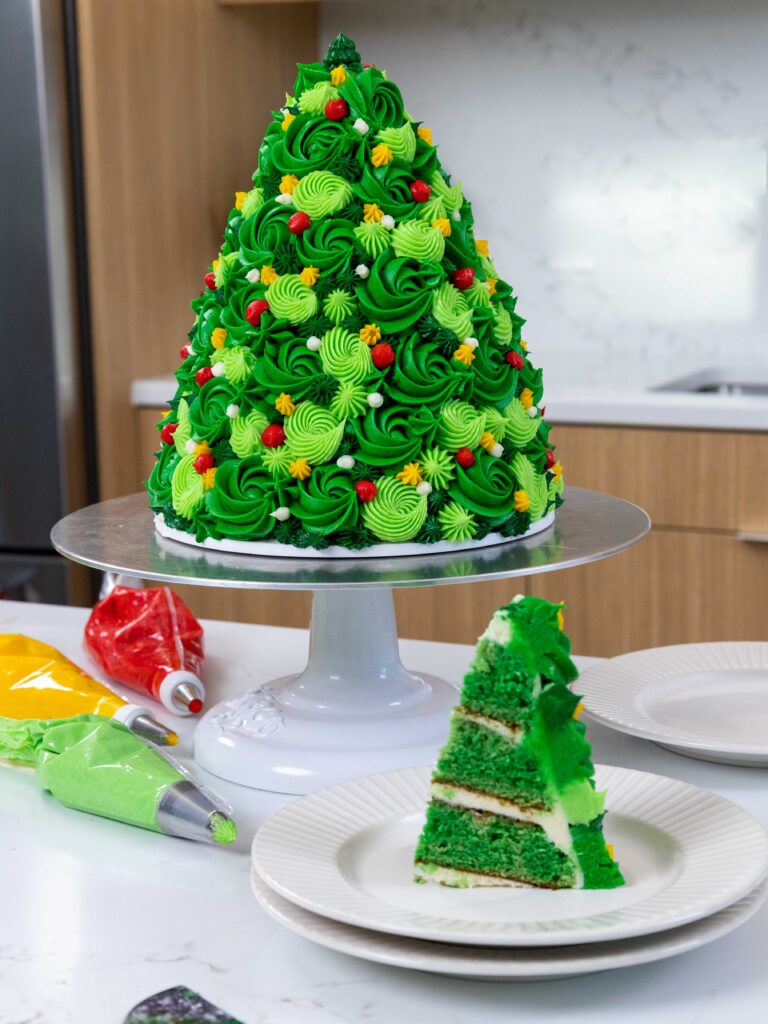
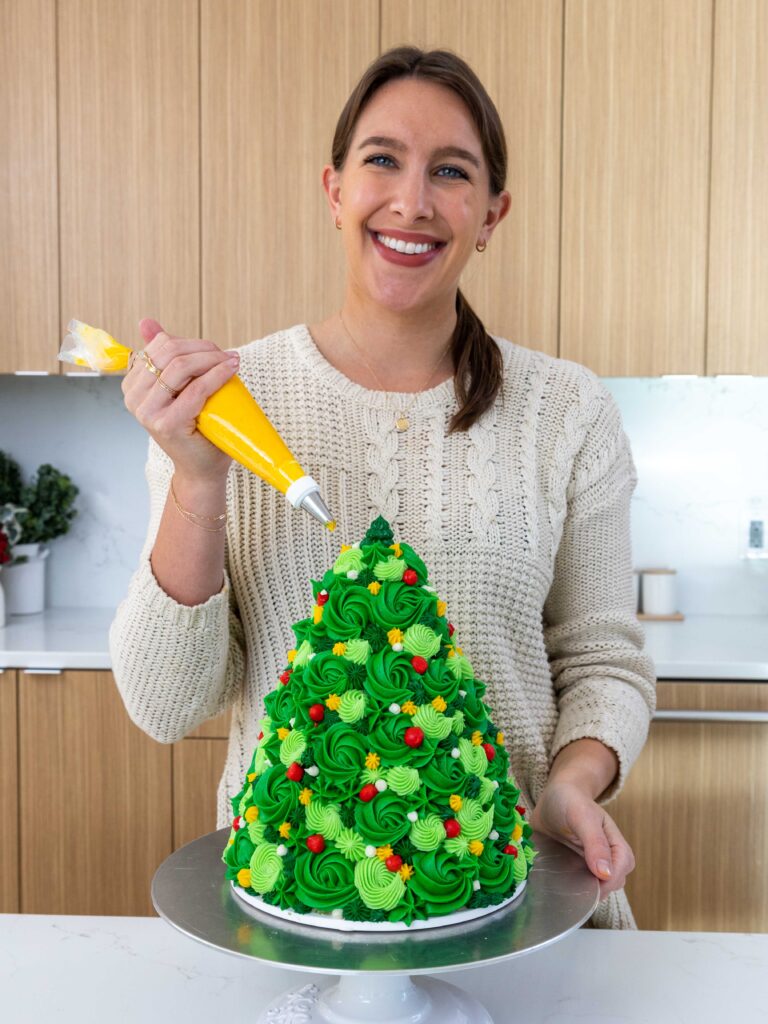
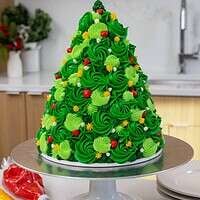
Step 5: Pipe the Decorations onto This Christmas Tree Cake
Then it’s finally time to decorate our Christmas tree cake!
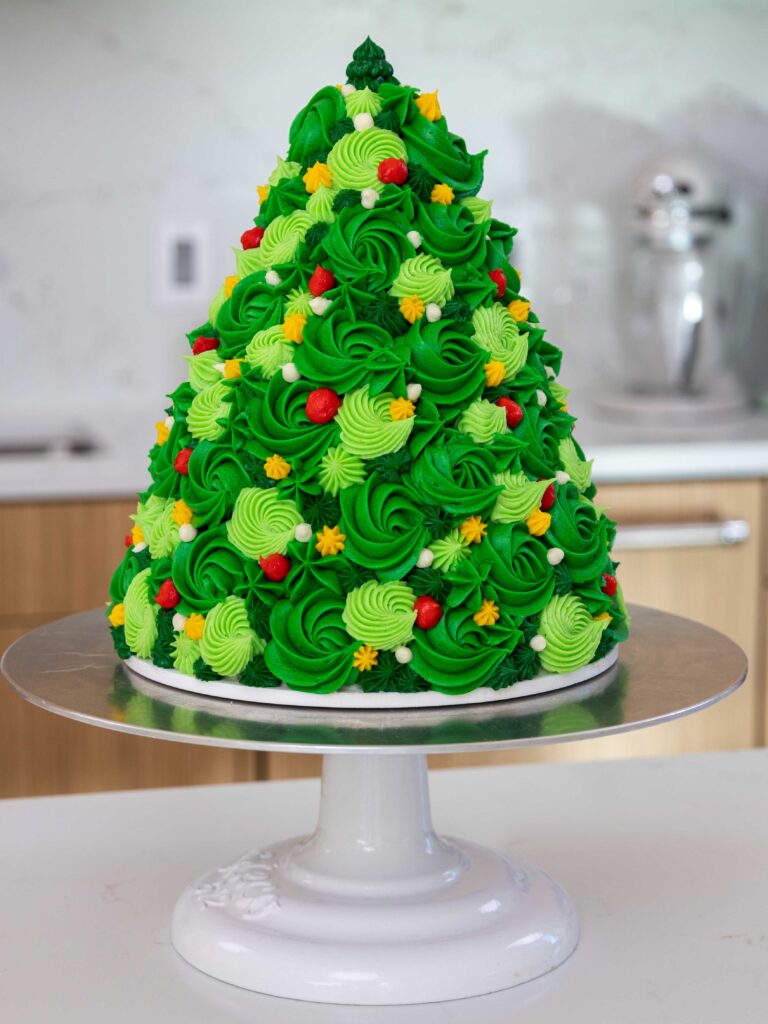
Use the green frosting to pipe rosettes around the cake, then fill in with frosting dollops of red, yellow, and white frosting.
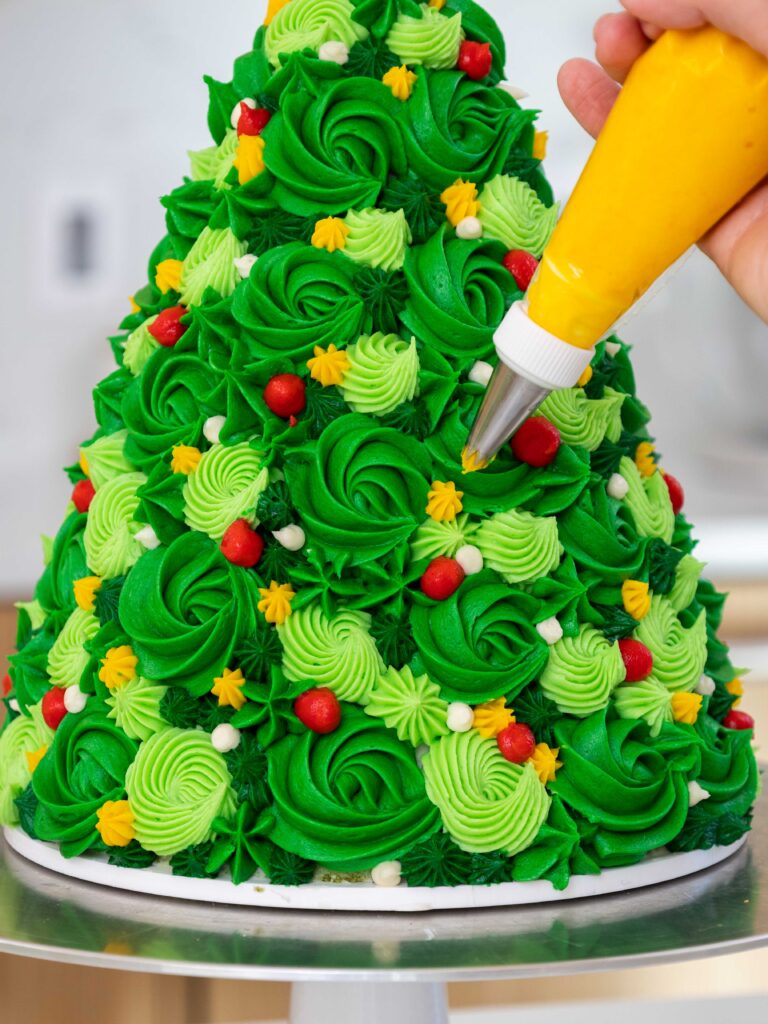
If your hands run hot, wrap a paper towel, or thin kitchen towel around your piping bag to prevent the transfer of heat from your hands into the frosting.
If you make this cake in advance, store the frosted cake in the fridge and let the cake sit at room temperature for 1-2 hours before serving to make it easier to cut.
Substitutions and Swaps – Spice Cake Layers
This Christmas tree cake uses quite a few ingredients and I know you might not have them all on hand. Or if you have food allergies or restrictions, I’ve got you covered.
Below are some swaps and substitutions that can be made in this cake recipe.
- All Purpose Flour – This recipe turns out best with AP flour, but you can use a gluten free flour blend if needed.
- Granulated and Light Brown Sugar – I do not recommend reducing the amount of sugar or changing the type of sugar, as it will change the texture of the cake layers.
- Unsalted Butter – If you only have salted butter on hand, you can use it in place of the unsalted butter in this recipe. Just be sure to omit the salt that this recipe calls for. You can also use vegan butter in its place!
- Eggs – If you have an egg allergy you can try using flaxseed eggs or an egg replacer.
- Sour Cream – You can also use full fat yogurt, sour cream, whole milk, or an alternative yogurt or milk (almond, soy, oat) if you’re dairy free.
Substitutions and Swaps – Buttercream Frosting
- Unsalted Butter – If you only have salted butter on hand, you can use it in place of the unsalted butter. Just be sure to omit the salt that this frosting recipe calls for. You can also use vegan butter in its place!
- Heavy Cream – Whole milk or alternative milk (soy, almond, oat) will work fine in this frosting recipe too.
- Vanilla Extract – Other extracts can also be used in place of the vanilla extract.
Making This Christmas Tree Cake in Advance & Storage Tips
Make your cake layers in advance and freeze them. It breaks the process up and makes it more approachable.
You can also make your frosting ahead of time too or save any leftover frosting. It can be stored in an airtight container in the fridge for up to a month. Or store it in the freezer for up to 3 months! Be sure to give it a good stir once it thaws to get the consistency smooth again.
A frosted cake can last in the fridge for up to a week. The buttercream locks in all the moisture, keeping the cake fresh and delicious.
If you cut into the cake and have leftovers, use any remaining frosting to cover the cut section to keep it moist. It can be stored in the fridge like this for up to a week.
Tips for Making the Best Christmas Tree Cake:
- Properly measure your flour (spoon into the cup measure, then level) or use a kitchen scale to measure your dry ingredients.
- Ingredients at room temperature mix together better. Set out any cold ingredients ahead of time.
- Trim your cake layers before stacking and frosting them! It makes it so much easier to get the shape of the tree just right.
- Chill your cake layers in the freezer for about 20 minutes before assembling the cake. This makes it a lot easier to stack and frost.
- Make a vegan or dairy free Christmas tree cake if needed! Use your favorite type of dairy free milk to replace the sour cream and heavy cream and use vegan butter sticks in place of the butter. For the eggs I recommend using an egg replacer like this.
- Be patient and give yourself lots of time! Take your time piping the frosting and adding on the details to this cake.
- If your hands run hot, wrap a paper towel, or thin kitchen towel around your piping bag to prevent the transfer of heat from your hands into the frosting.
Let Me Know What You Think!
If you make this Christmas tree cake, I’d love to hear how it goes! Let me know by leaving a comment and rating below.
If you share on social media, tag me @chelsweets and #chelsweets so that I can see your amazing creations!
Other Recipes You Might Like:


Christmas Tree Cake
Ingredients
Spice Cake Layers
- 3 cups all-purpose flour 375g
- 1 1/2 cups granulated sugar 300g
- 1 1/2 cups packed light brown sugar 300g
- 2 1/2 tsp baking powder 10g
- 1 tsp fine salt 6g
- 2 tsp ground cinnamon 6g
- 1 tsp ground ginger 3g
- 1/2 tsp ground nutmeg 2g
- 1/2 cup unsalted butter, room temperature 113g
- 4 large eggs, room temperature 224g
- 1 cup full-fat sour cream, room temperature 255g
- 1/2 cup unsweetened apple sauce 90g
- 1/2 cup vegetable or canola oil 105g
- 1 tsp vanilla extract or vanilla bean paste 4g
- Green gel food coloring
Buttercream Frosting
- 3 cups unsalted butter, room temperature 678g
- 1 Tbsp vanilla extract or vanilla bean paste 12g
- 1 tsp fine salt 3g
- 10 cups powdered sugar 1250g
- 1/2 cup heavy whipping cream, room temperature 120g
- Green, yellow, and red gel food coloring
Recommend Tools and Equipment
- Serrated Knife
- Spinning cake stand
- Electric hand mixer or stand mixer
- 8- inch greaseproof cake board
- Small offset spatula
- Thick bubble tea straw or wooden dowel
- 2 Large piping bags
- 3 Small piping bags
- 1 Open star piping tip like a Wilton 1M
- 1 Large French piping tip like a Wilton 6B
- 2 Small round piping tips like a Wilton 10
- 1 Small French piping tip
Instructions
Spice Cake Layers:
- Preheat th oven to 350°F/175°C. Line one 8", one 7", two 6", and two 4"pans with parchment rounds and grease with non-stick baking spray.
- Mix together 3 cups flour, 1 1/2 cups granulated sugar, 1 1/2 cups brown sugar, 2 1/2 tsp baking powder, 1 tsp salt, 2 tsp cinnamon, 1 tsp ginger and 1/2 tsp nutmeg in a large bowl until fully combined.
- Mix 1/2 cup of unsalted butter slowly into the dry ingredients on a low speed. Continue to mix until no large chunks of butter remain.
- Mix in 4 large eggs on low until just incorporated, 2 at a time.
- Add 1 cup sour cream, 1/2 cup unsweetened apple sauce, 1/2 cup vegetable oil and 1 tsp of vanilla extract. Mix on a low speed until just incorporated.
- Scrape down the sides of the bowl with a rubber spatula, then beat on a medium speed for about a minute to make sure everything is properly mixed together.
- Use the green gel food coloring to color half the batter light green and half of the batter a darker shade of green.
- Add spoonfuls of both colors of batter into the prepared pans, filling them each to the same height (about 1-inch high). Then use a butter knife or offset spatula to swirl the batter together to create a marbled look.
- Bake for 28-33 minutes or until a toothpick comes out with a few moist crumbs. Let the cake layers cool in the pans for 10 minutes, then run a small offset spatula around the perimeter of the pan to separate the cake from the pan.
- Flip the cake layers onto a wire rack to cool. Use a serrated knife to level the tops of the layers once they're fully cooled, then stack the cake layers and trim them into the tapered shape of a Christmas tree.
- If you make these cake layers in advance and freeze them, let them thaw for about 20 minutes before making your cake. The cake layers should still be slightly cold to the touch, which will make it easier to assemble your cake.
Buttercream Frosting:
- While the cake layers bake and cool, make the buttercream frosting.
- Beat 3 cups of butter (6 sticks) on a medium speed for 30 seconds with a paddle attachment until smooth.
- Mix in 1 Tbsp of vanilla extract and 1 tsp of salt.
- Gradually mix in 10 cups of powdered sugar and 1/2 cup of heavy cream on a low speed.
- If the frosting seems too thick, add in additional cream (1 TBSP at a time). If the frosting is too thin, add in more powdered sugar (quarter of a cup at a time). Wait to color the buttercream until the cake is stacked and crumb coated.
Assembling This Christmas Tree Cake:
- Stack and frost the cake layers on a greaseproof cake board or flat plate using a dab of frosting to help stick the first cake layer to the board. Stack the layers from largest to smallest, to create a Christmas tree shape.
- Spread an even layer of buttercream on top of each cake layer. Once the layers are stacked, insert a wooden dowel or thick straw into the center of the cake layers to help keep them in place.
- Cover the cake in a thin coat of frosting. Smooth using an offset spatula or bench scraper, then chill the cake in the fridge (30 minutes) or freezer (10 minutes) until the frosting is firm to the touch.
- While the cake chills, color the remaining buttercream. Scoop 1/2 cup of white frosting into a small piping bag fit with a small round piping tip. Set aside.
- Color 1/2 cup of frosting red with gel food coloring. Place this in a small piping bag fit with a small French tip. Set aside.
- Color 1/2 cup of frosting yellow with gel food coloring. Place this in a small piping bag fit with a small round tip. Set aside.
- Color half of the remaining frosting light green, and color the other half dark green with green gel food coloring. Place each frosting in its own large piping bag fit with an open star tip. Set aside.
- Use the green frosting to pipe rosettes around the cake, then fill in with frosting dollops of red, yellow, and white frosting.
In looking at the bare cake layers, and the required cake pans, I do not see in your instructions which layers need to be trimmed to form the complete tree.
It is not shown in the video, or written directions for cake assembly?
I am assuming it will be the 6″ & 4″ layers? Please confirm.
Kind regards.
Hi Babs,
Apologies for the confusion! The step to trim the cake layers in the recipe card is included once the cake layers are baked and cooled (step 10 in the spice cake layer section). Hope that helps, happy baking!
Can you please show how to cut the entire cake? I cant visualise cutting the top section ? thanks!!
Hi Steph,
Sadly I don’t have a video showing me cutting the whole cake, but I cut down about half way, then insert the knife underneath the slice and pull it out. The good news is that there’s no wrong way to cut this cake, so you can cut it however you think makes the most sense / is easiest for you. Hope that helps, happy baking!
Hii it’s just Fab to look at the edible chirtmas tree ?.. you are doing a g8 job ..I have doubt.. should we stack the cake layers only with the spiced cake or even the normal vanilla/ chocolate cake works good for assembly the layers? And also have u used any dowel / straws for fixing it?
Thank you Abitha!! This cake design would work great with a regular vanilla or chocolate cake recipe too, as long as the layers are sturdy enough to be trimmed into the shape of a Christmas tree. I did use a straw or dowel in this cake and highly recommend doing so! It makes it a lot easier to frost. Hope that helps, happy baking!
Thank you for this fabulous Christmas cake idea! I made it for an upcoming Christmas party and am thrilled with the results, despite my amateurish piping skills. My husband’s granddaughters will be delighted when I bring this to the table. I can’t wait to see their reactions!
@Christine Arway, I’m doing the same cake, Christine. New baby in the family so it’s a first Christmas party. I’ll send a picture if it turns out good..probably will with our great recipe from Chelsweets..love her!
aww you guys are so sweet!!! Happy baking!!! 🙂
How tall did it end up being?
Hi Janie,
It was about 12 inches I believe! The height can vary a bit though depending if you level your cake layers, and based on how much frosting your use between the layers. Hope that helps, happy baking!
10/10