
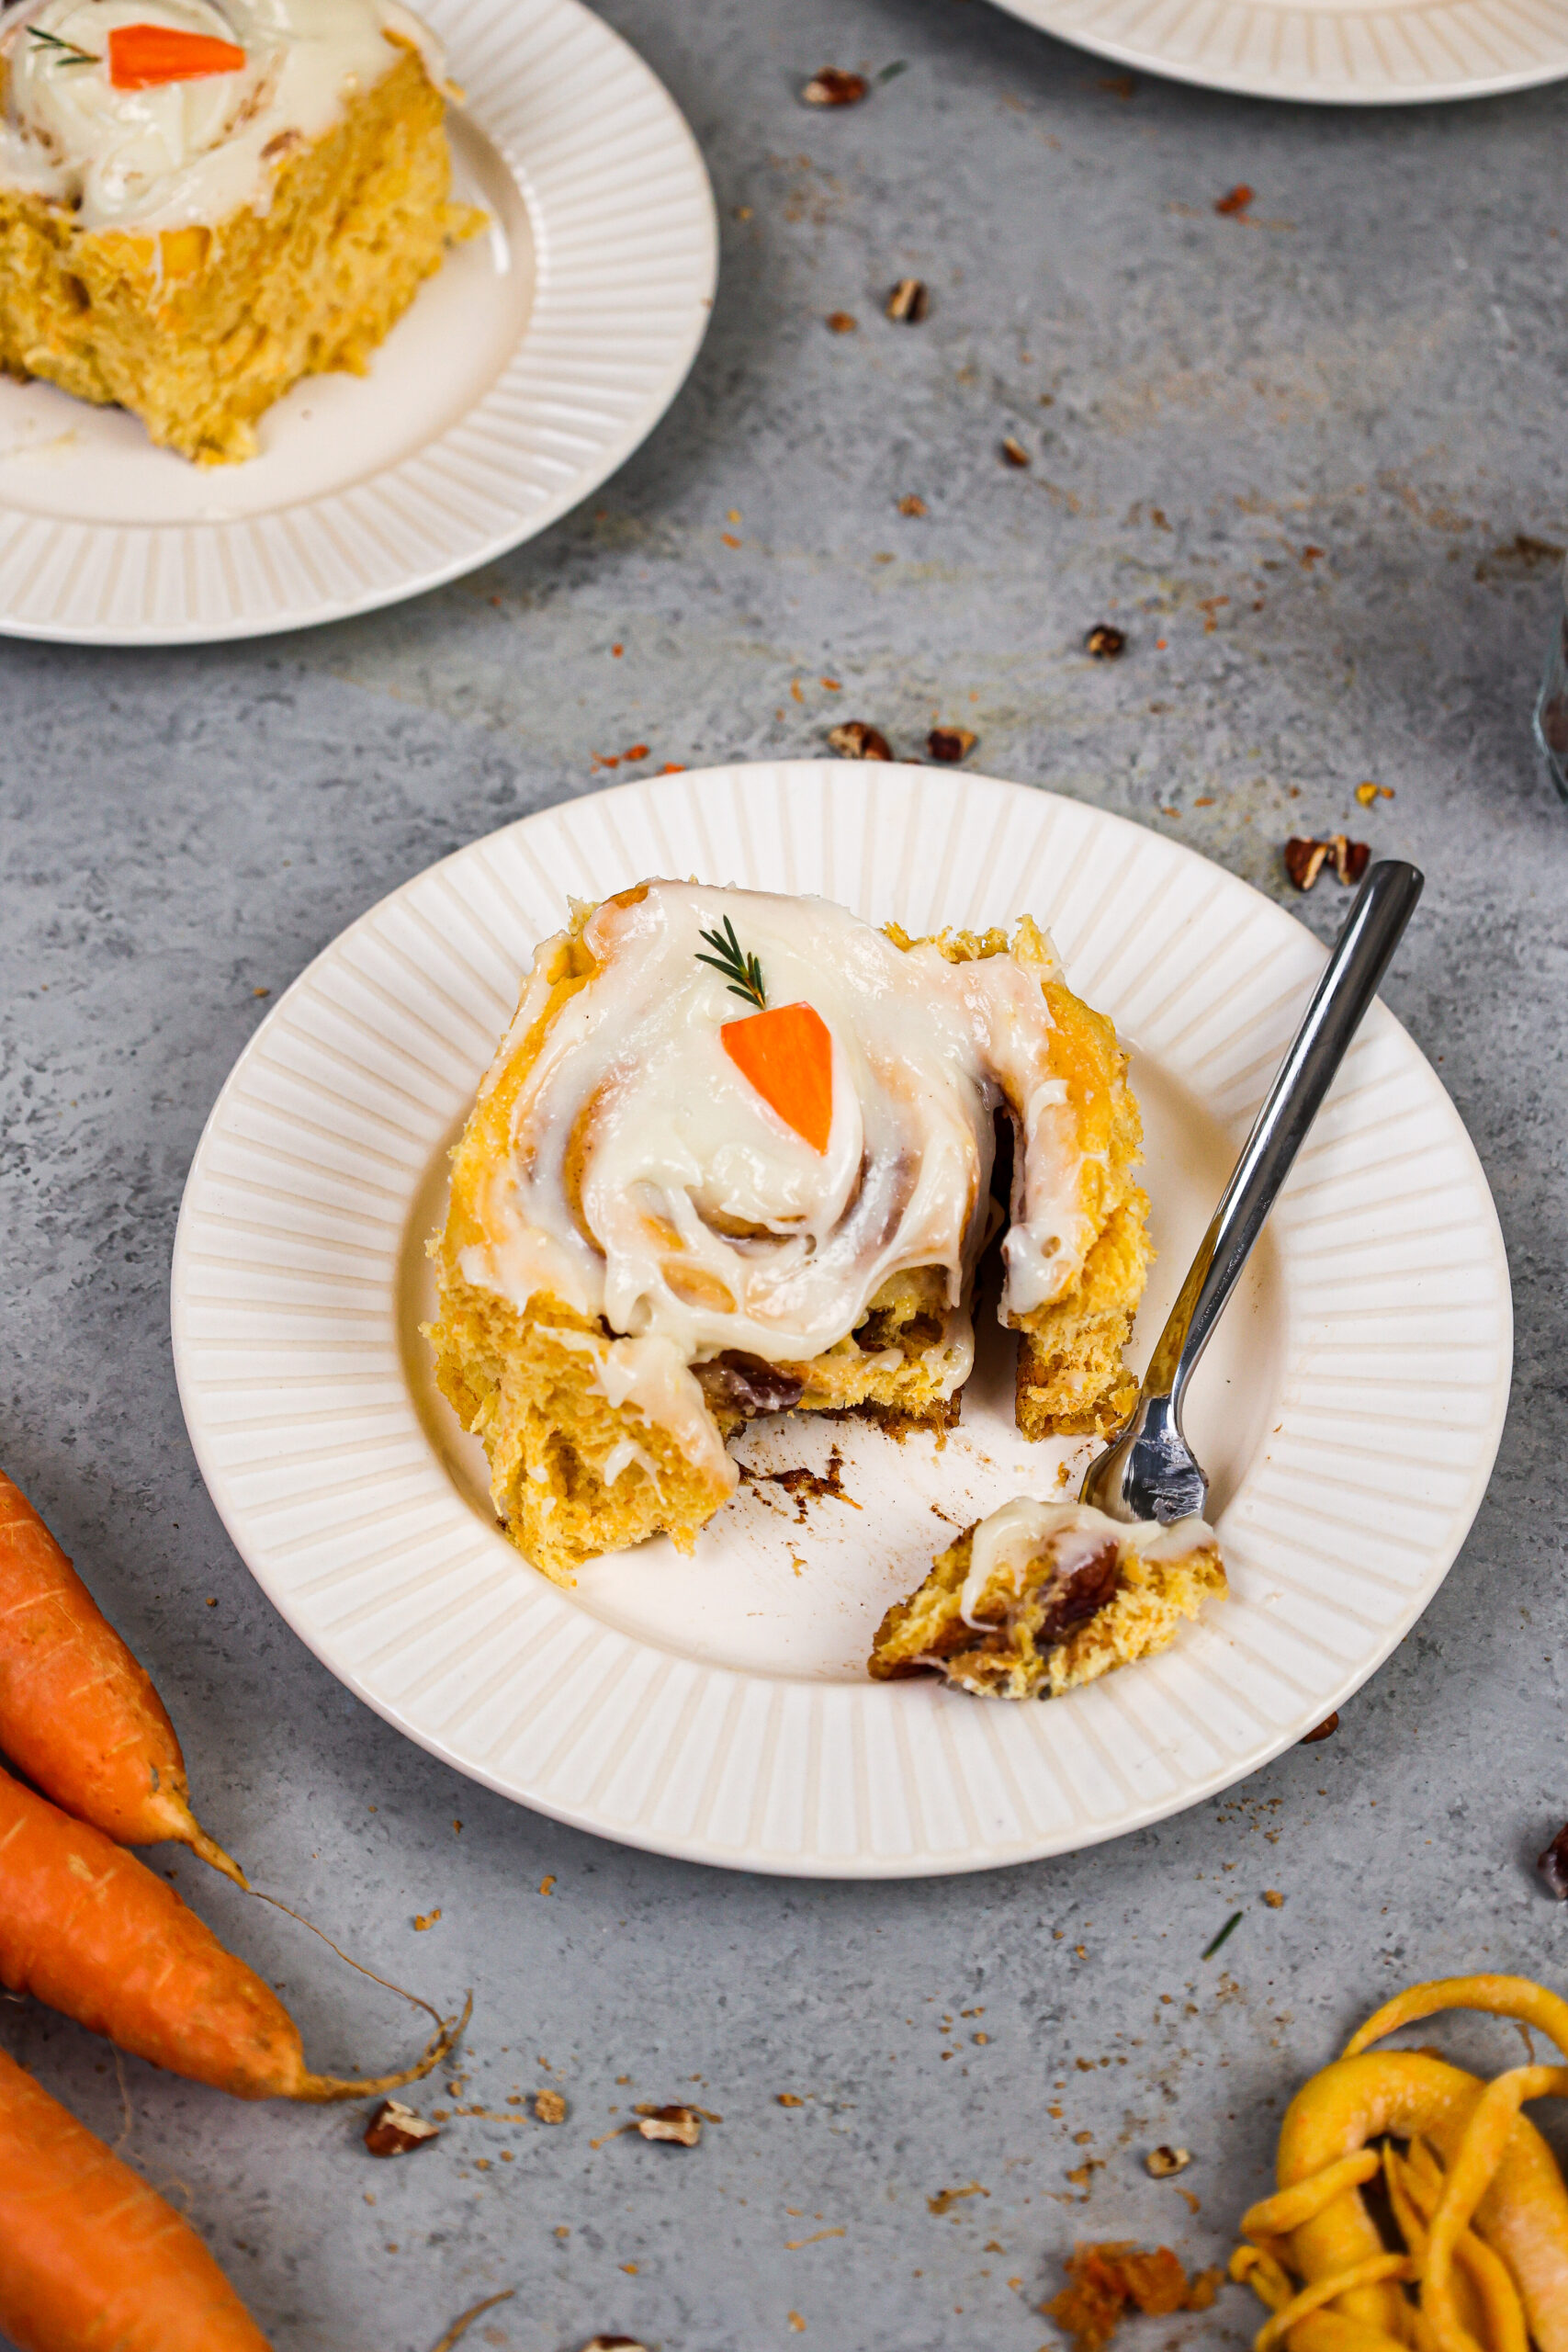
6 Inch Carrot Cake Recipe
While I love my favorite carrot cake recipe, it makes a pretty big cake. What if you need a smaller, 6-inch carrot cake recipe??
I’ve received some emails requesting exactly that, so here is my small batch carrot cake recipe.
How Many Layers Does This 6-Inch Carrot Cake Recipe Make?
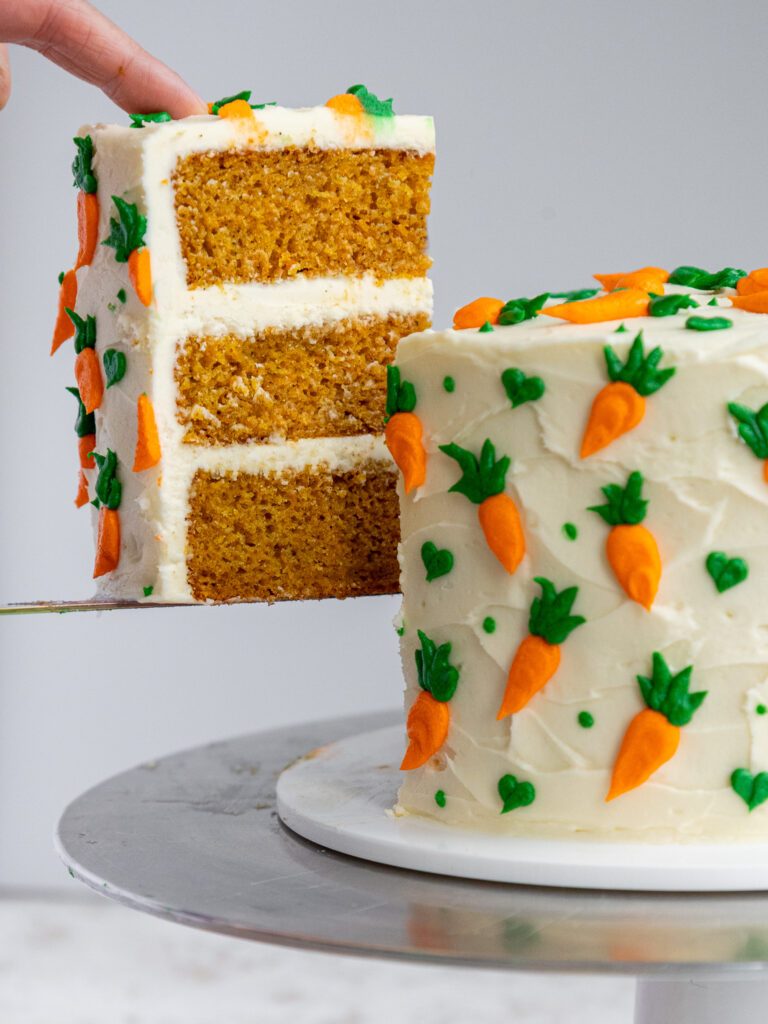
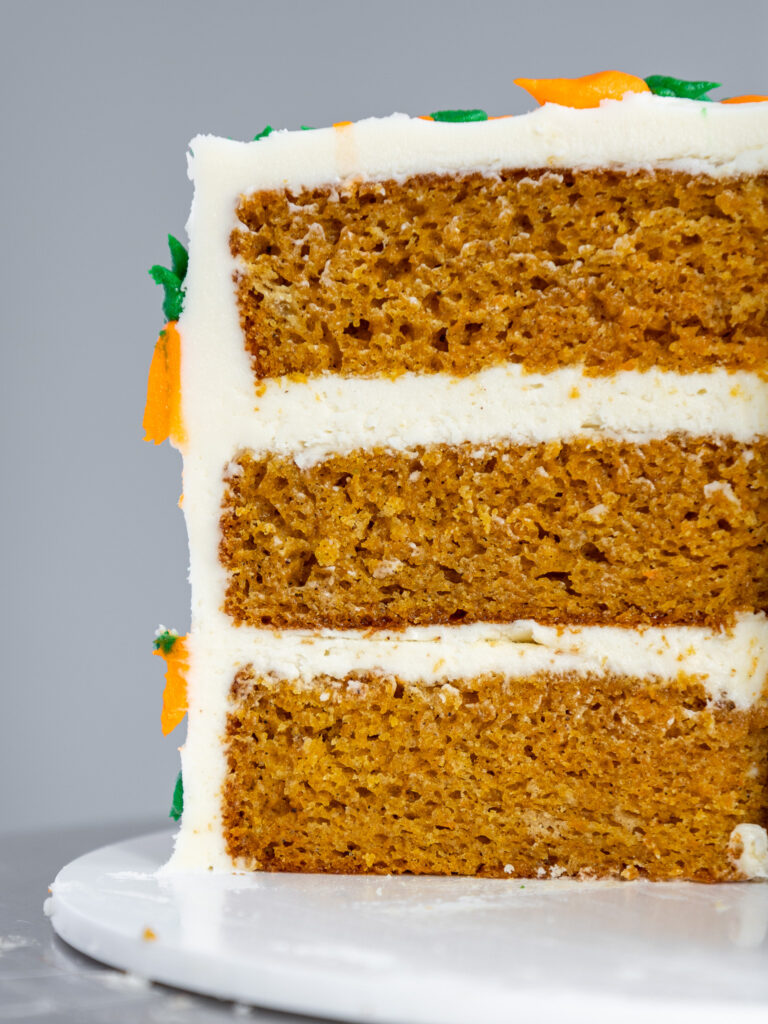
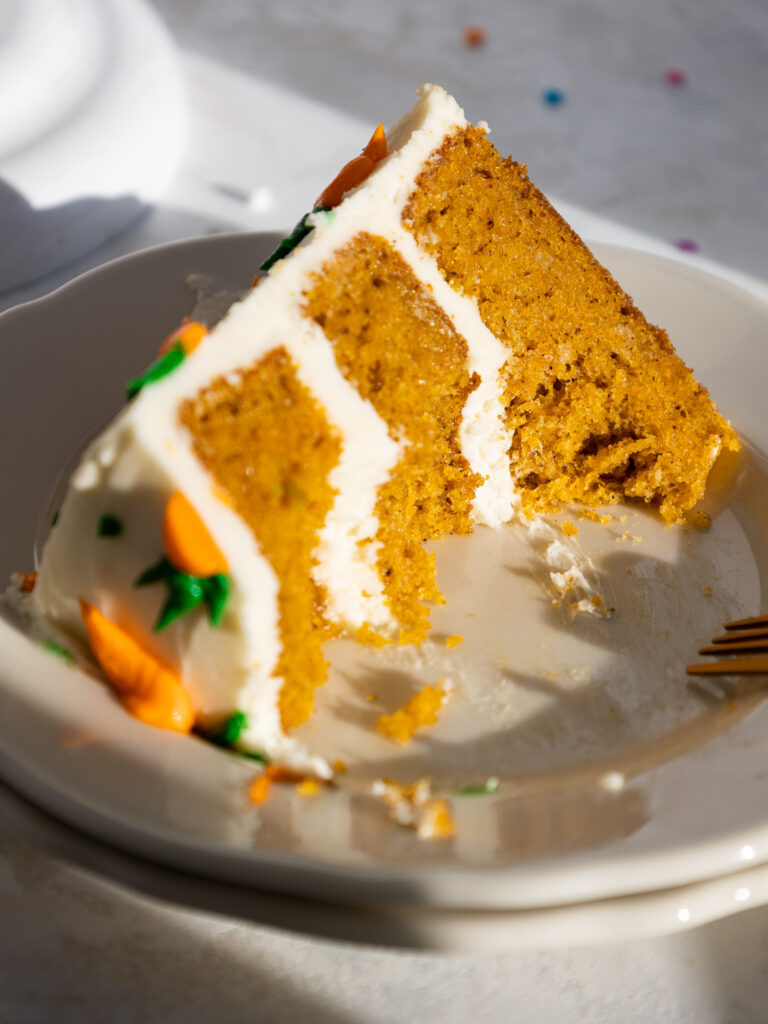
This small batch recipe makes 3, perfect little 6-inch cake layers.
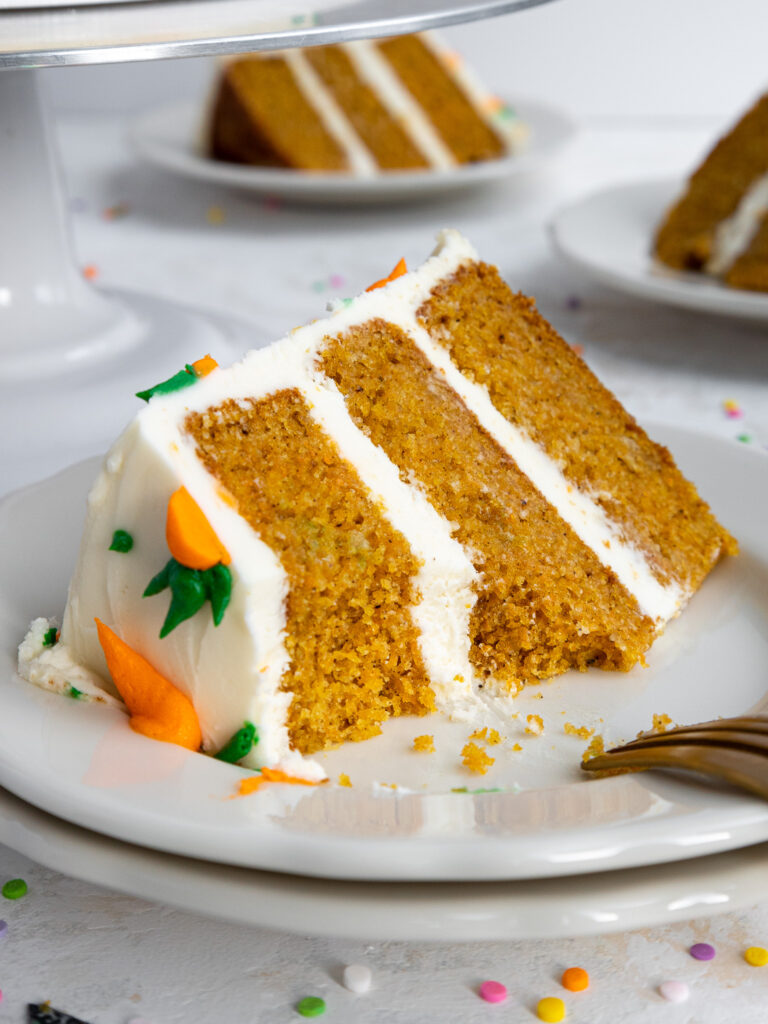
These cake layers bake up with a bit of a rounded top, so I recommend leveling them with a serrated knife. With that in mind, you should end up with cake layers that are about 1 inch tall.
Initially I thought I could just cut the recipe in half. You can do this, but the cake layers turn out quite thin.
In the end, I found that making 2/3 of a batch is the ideal amount of batter for a 6-inch layer cake.
How to Make This 6-Inch Carrot Cake Recipe
To make sure this cake turns out as amazing as possible, let’s walk through each step together! I’ve also included a video tutorial of the process below.
I figured it might be helpful to know what tools I use too, so I’ve shared a list below too.
Not all of these are mandatory, but they make the process a lot easier.
If you don’t have all these things on hand, feel free to improvise and work with what you have.
- 3, 6-inch Cake Pans
- Spinning Cake Stand
- Whisk
- Serrated Knife
- 8-inch Greaseproof Cake Board or Flat Plate
- Large Offset Spatula
- Bench Scraper
- 2 Small Piping Bags
- 1 Very Small Piping Tip (like a Wilton 3)
- 1 Small Piping Tip (like a Wilton 10)
- Orange and Green Gel Food Coloring
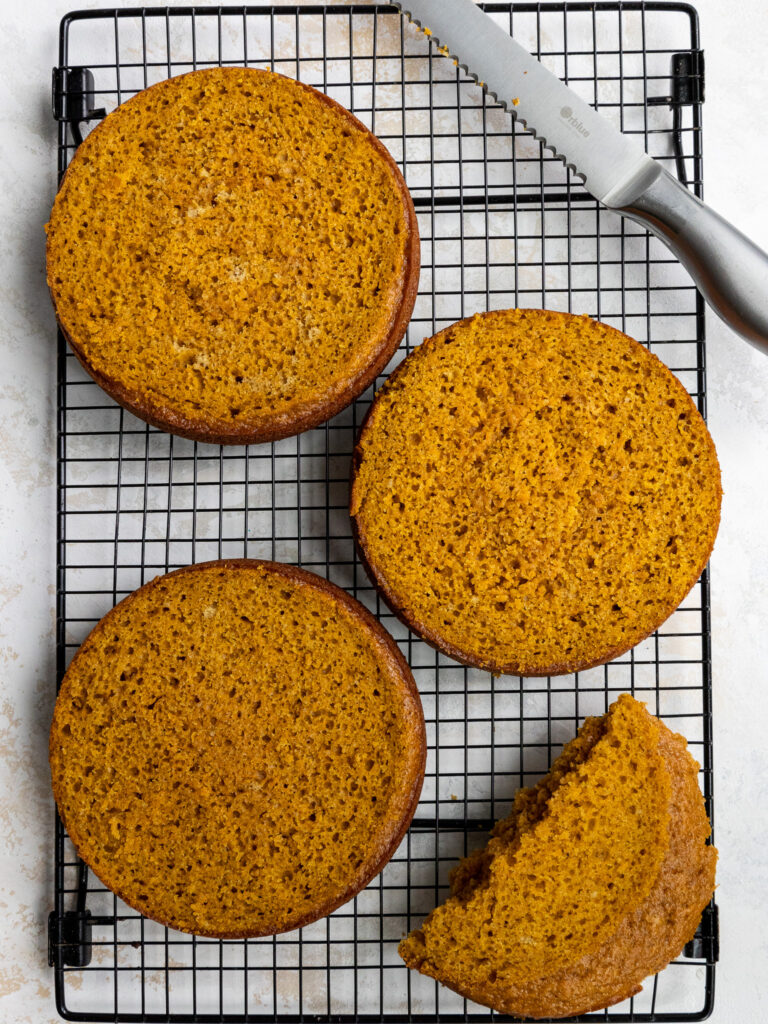
Step 1: Bake the Moist Carrot Cake Layers
Make the carrot cake batter first following the recipe card at the bottom of this post.
I love this cake recipe because it can be made by hand and comes together so quickly.
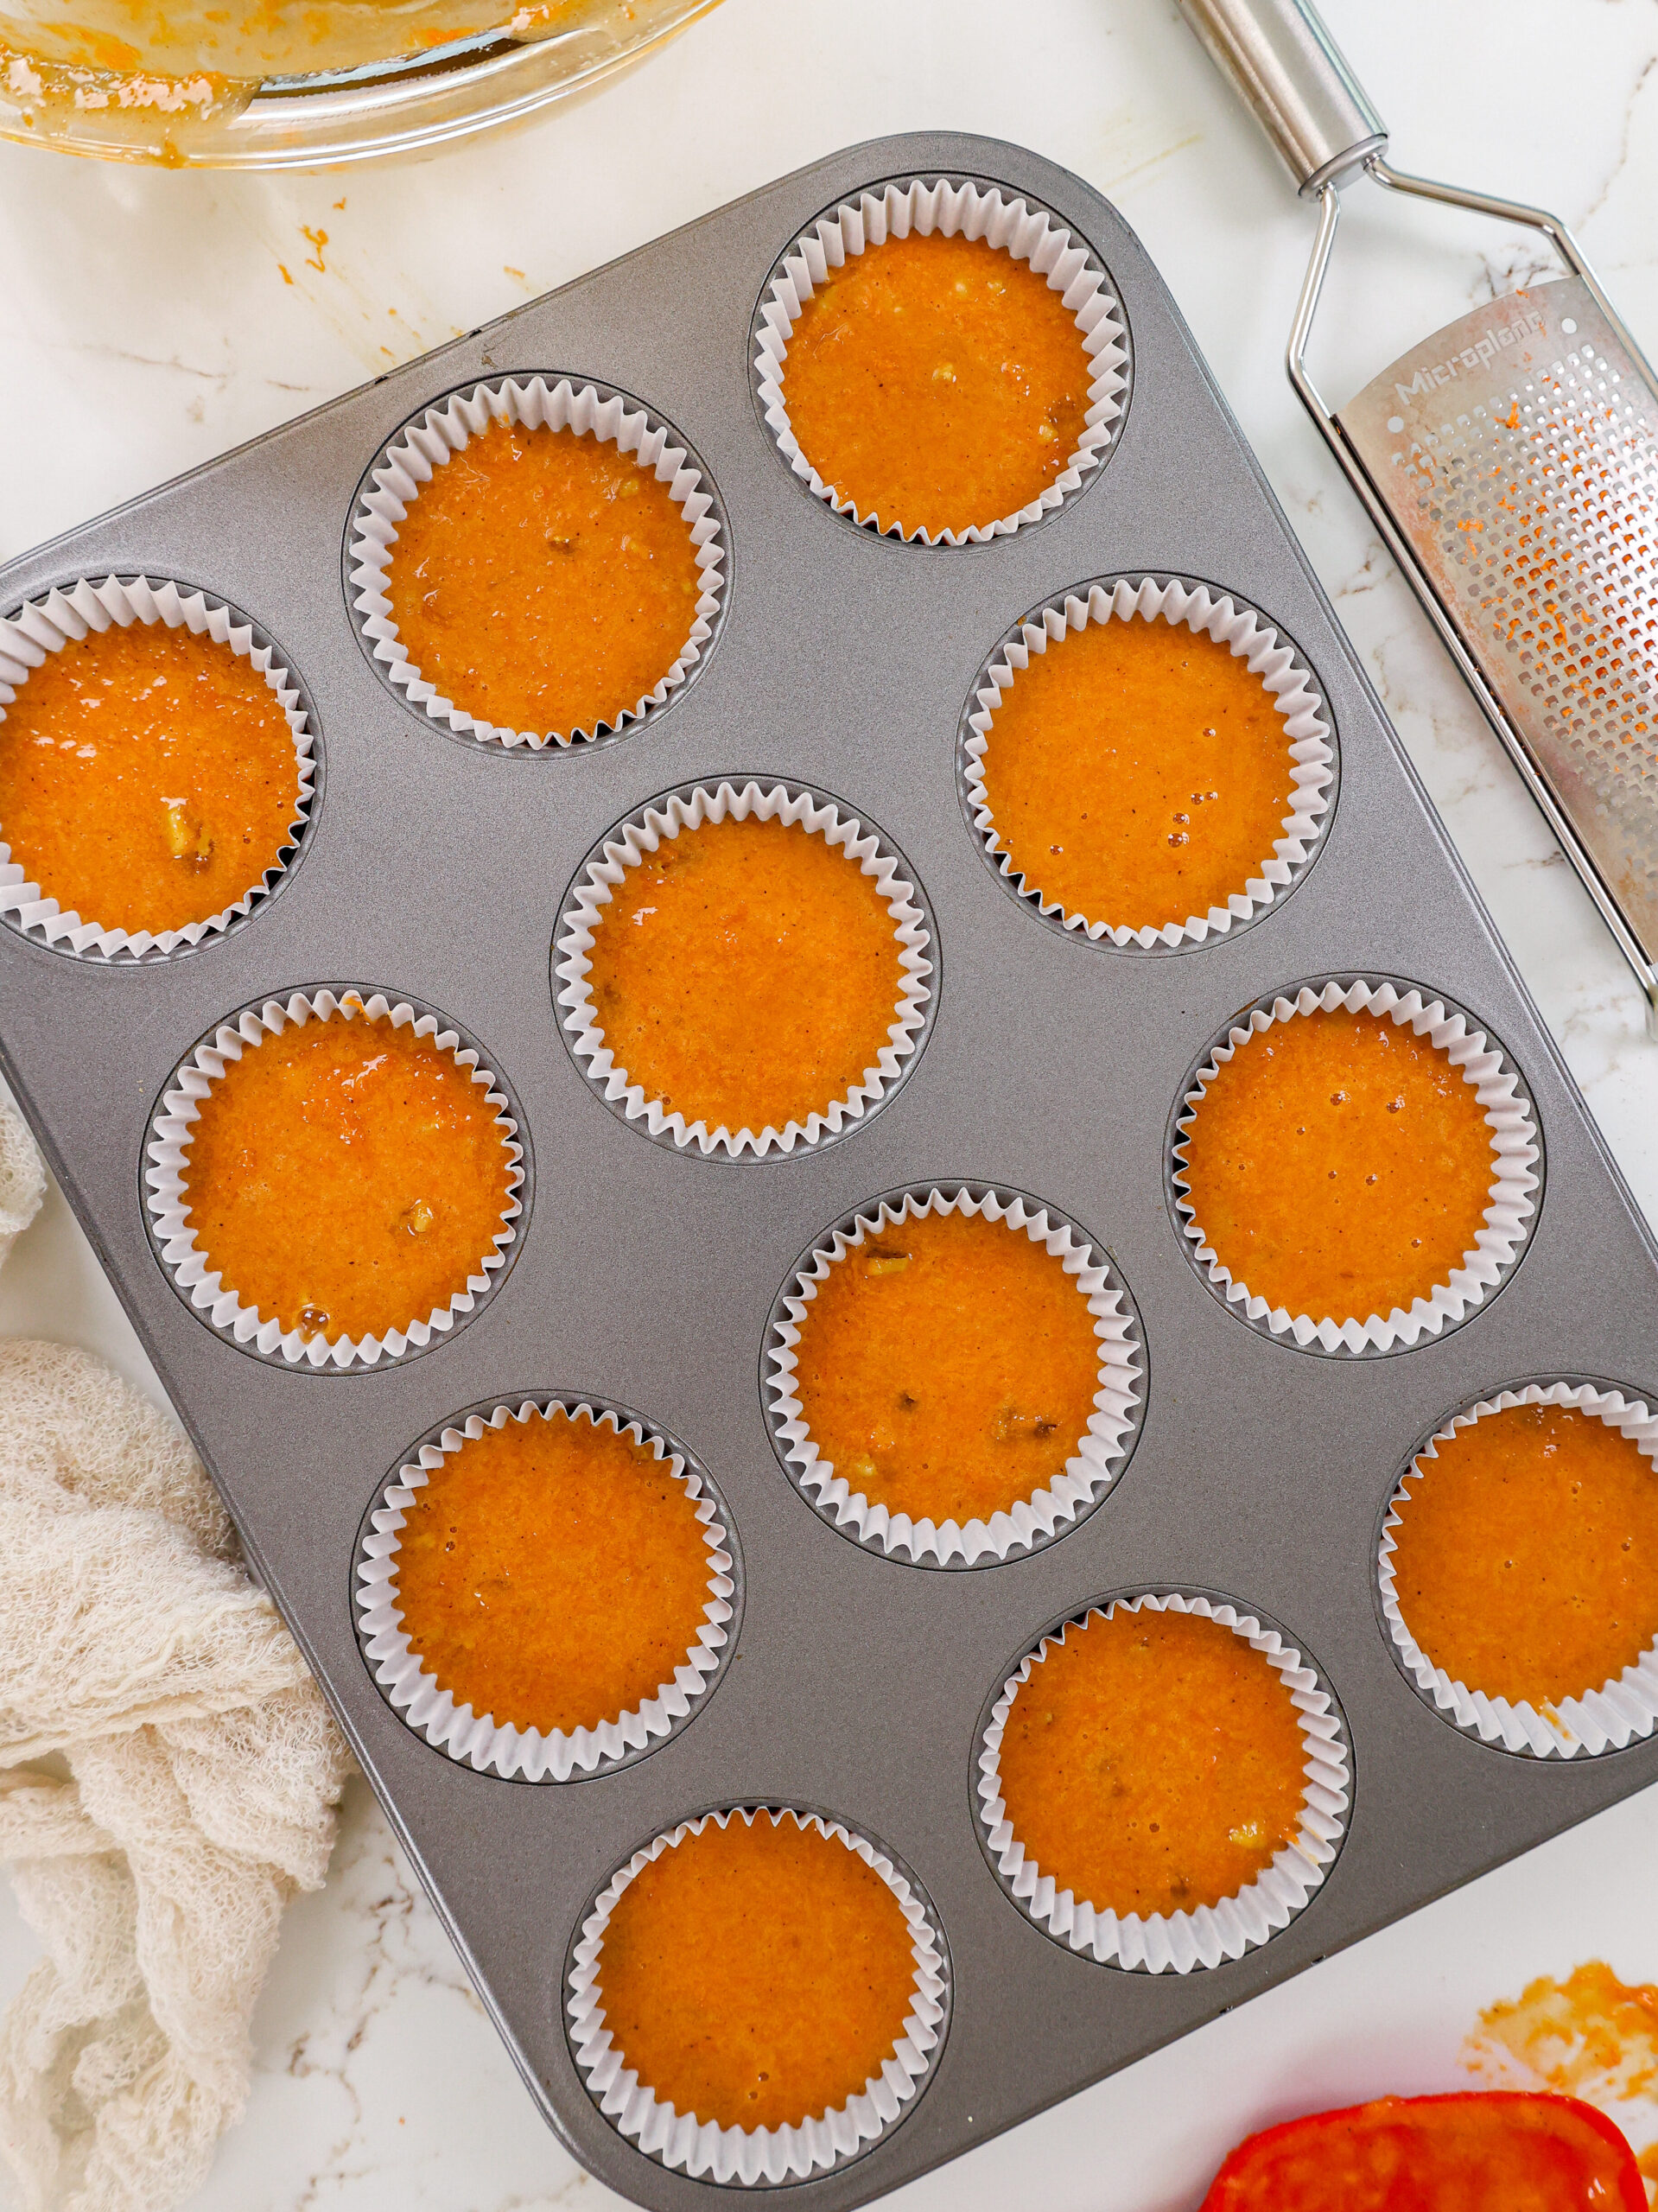
Divide the batter evenly between the prepared cake pans and bake for 28-32 minutes or until a toothpick comes out with a few moist crumbs.

Remove the cake layers from the oven and let them cool in the pans for about 30 minutes. Or if you’re in a rush, place the pans directly in the freezer to accelerate the cooling process.
Then gently run an offset spatula around the rim of the cake pans to loosen them and flip them onto wire racks to finish cooling.
These layers bake up with a rounded top, so leveling them is recommended! Use a serrated knife to level the top of each cake layer once they’re fully cooled.
If you’re making these in advance, you can wrap and freeze them at this point.
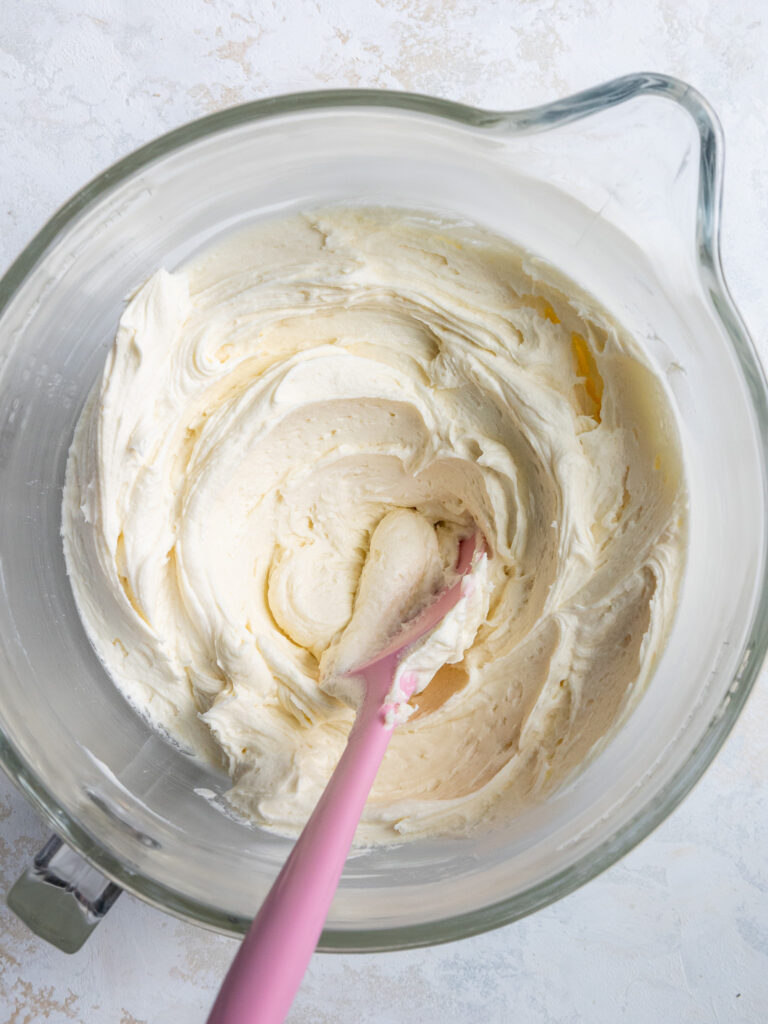
Step 2: Make the Cream Cheese Frosting
While the cake layers bake and cool, make the cream cheese frosting.
I love cream cheese frosting, but I know that some people find it quite sweet!
If you want to use a less sweet frosting, I’d recommend making a half batch of my Swiss meringue buttercream or a batch of my hybrid buttercream.
This frosting can also be made in advance if needed and kept in the fridge for up to 2 weeks or in the freezer for a month.
Wait to color the frosting until we’ve filled and frosted the cake.
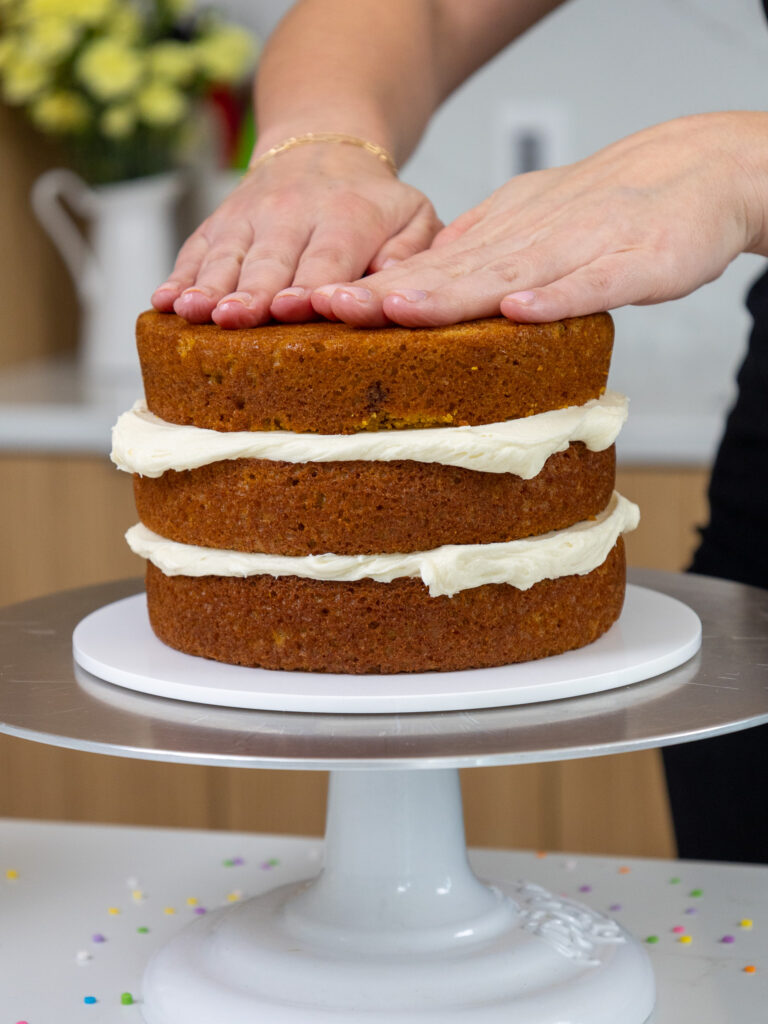
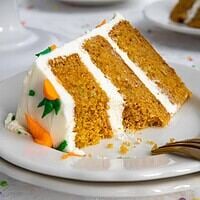
Step 3: Stack and Frost the Cake Layers
Then it’s time to assemble this cake! Stack and frost cake layers on a greaseproof cake board or flat plate. Use a dab of buttercream to help stick the first cake layer to the board.
Spread an even layer of buttercream on top of the cake layer with a large offset spatula.
Repeat with the remaining cake layers and place the top cake layer upside down to make the cake easier to frost.
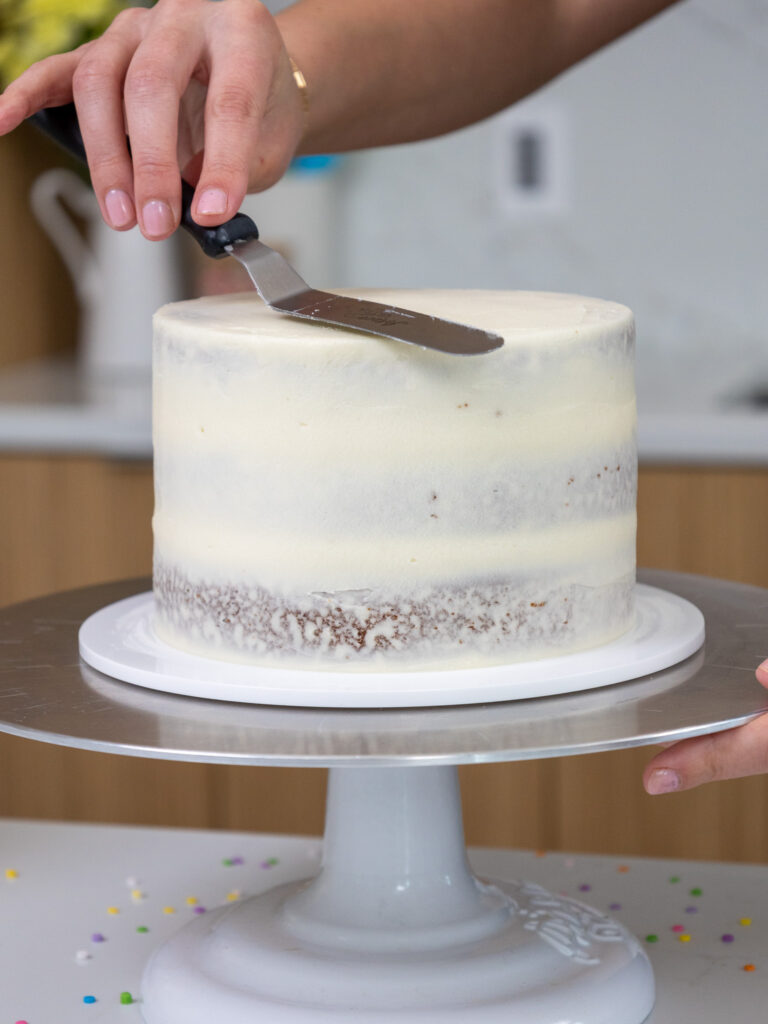
Step 4: Crumb Coat the Cake
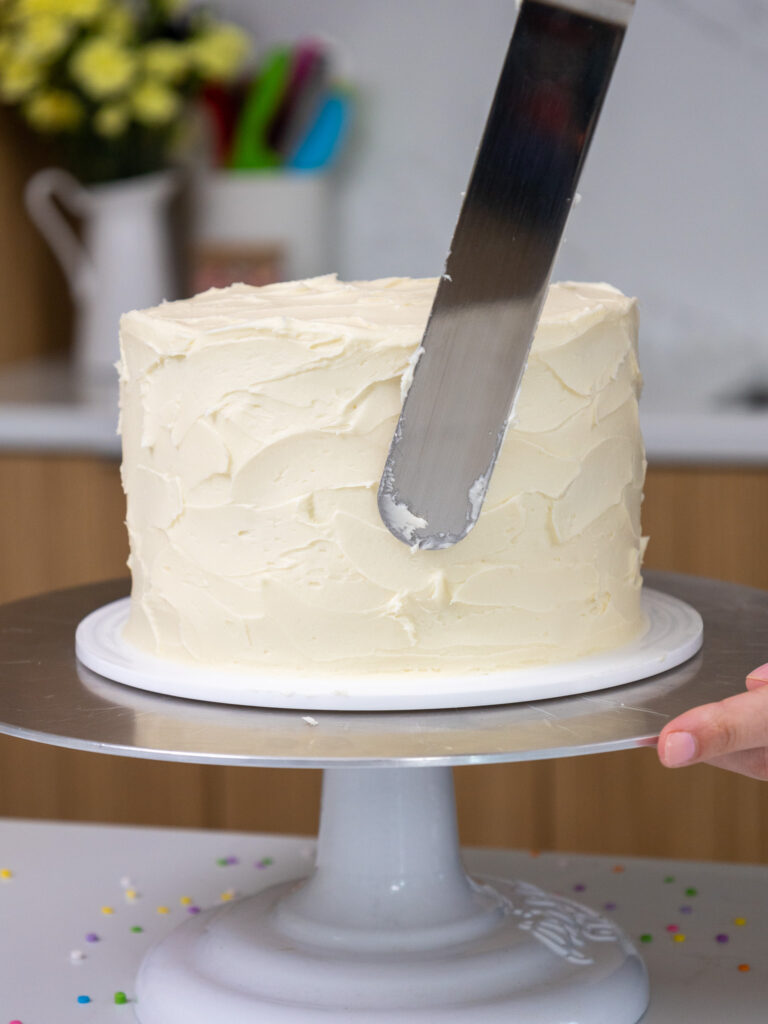
Spread a thin coat of frosting around the cake to fully cover the cake layers.
Smooth the frosting using a large offset spatula and/or bench scraper, then chill the cake in the fridge (30 minutes) or freezer (10 minutes) until the frosting is firm to the touch.
Step 5: Add the Second Layer of Frosting
Then add another layer of frosting around the cake and create a textured look using a large offset spatula or the back of a spoon.
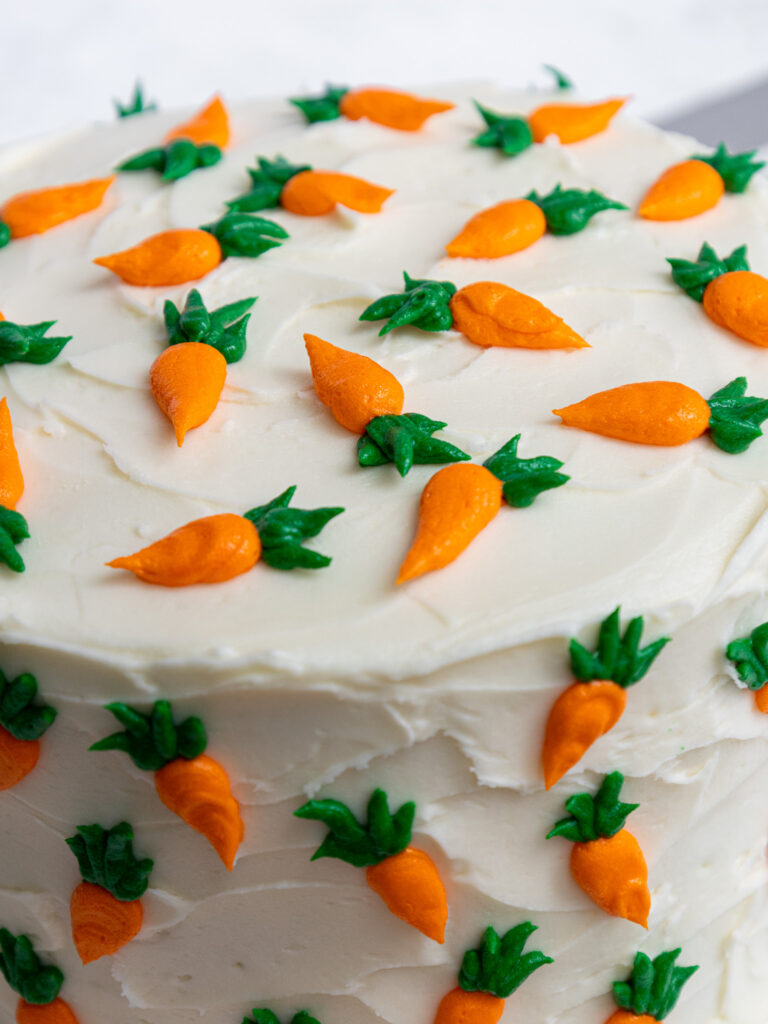
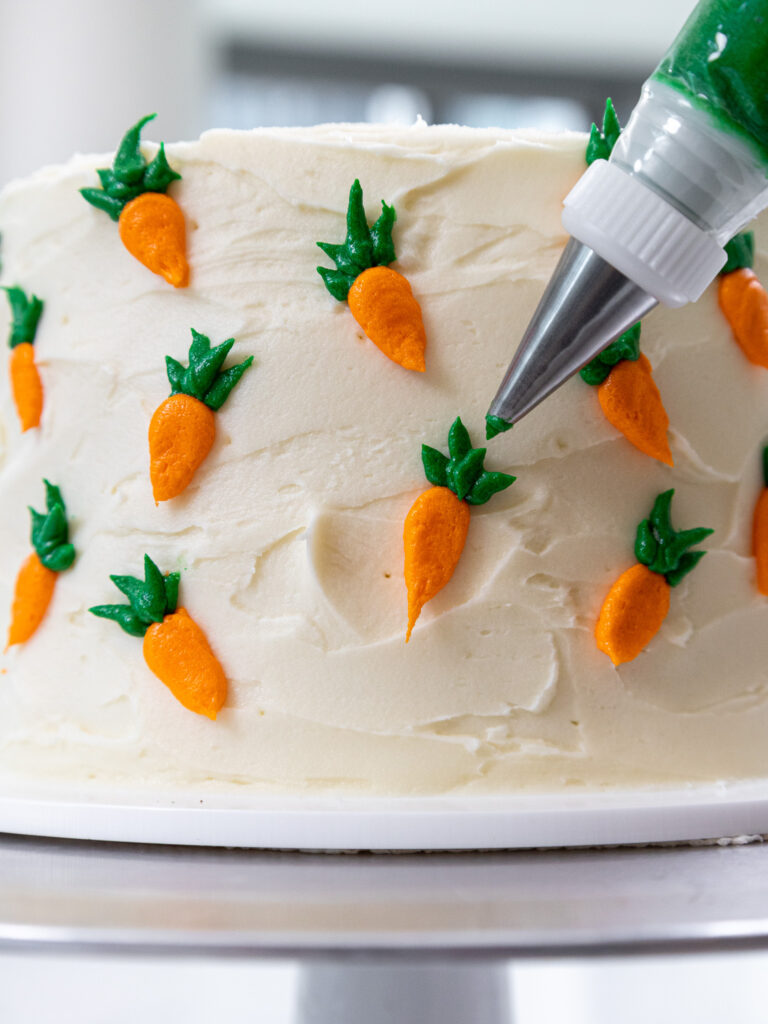
Step 6: Color the Remaining Frosting and Decorate the Cake
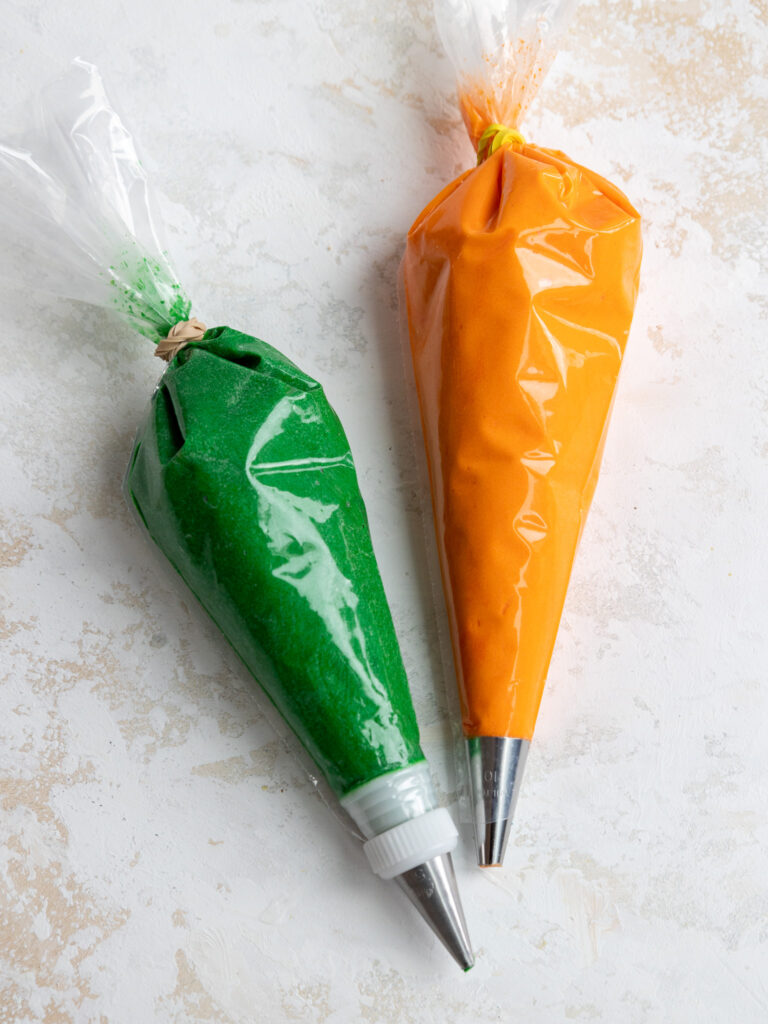
Place half of the remaining frosting in a separate bowl and color it green with gel food coloring.
Place it in a piping bag fitted with a very small frosting tip (like a Wilton 3). Seal the top of the bag with a rubber band or clip.
Color the remaining frosting orange with gel food coloring. Place it in a piping bag fitted with a small round piping tip (like a Wilton 10) or cut an opening about 1 cm wide. Seal the top of the bag with a rubber band or clip.
Use the green and orange frosting to pipe little carrots around the cake, then enjoy!
If you’re making this cake in advance, it can sit at room temperature for a few hours or be stored in the fridge for up to a week.
Substitutions and Swaps – Carrot Cake Layers
This recipe uses quite a few ingredients and I know you might not have them all on hand. Or if you have food allergies or restrictions, I’ve got you covered.
Below are some swaps and substitutions that can be made in this cake recipe.
- All Purpose Flour – This recipe turns out best with AP flour, but you can use a gluten-free flour blend or cake flour if that’s what you have on hand.
- Granulated Sugar – I do not recommend changing the type or reducing the amount of sugar because it will change the texture of the cake layers.
- Brown Sugar – I prefer using light brown sugar, but you can also use dark brown sugar if needed.
- Ground Spices – These are the star of the show in this cake, so I don’t recommend skimping on them! Make sure your spices are fresh and fragrant.
- Large Eggs – If you have an egg allergy, you can try using flaxseed eggs or a vegan egg replacer.
- Vegetable Oil – Any flavorless oil will work in this recipe. Canola or even sunflower oil would work great!
- Buttermilk – You can also use full fat yogurt, whole milk, sour cream, or an alternative yogurt or milk (almond, soy, oat) if you’re dairy free.
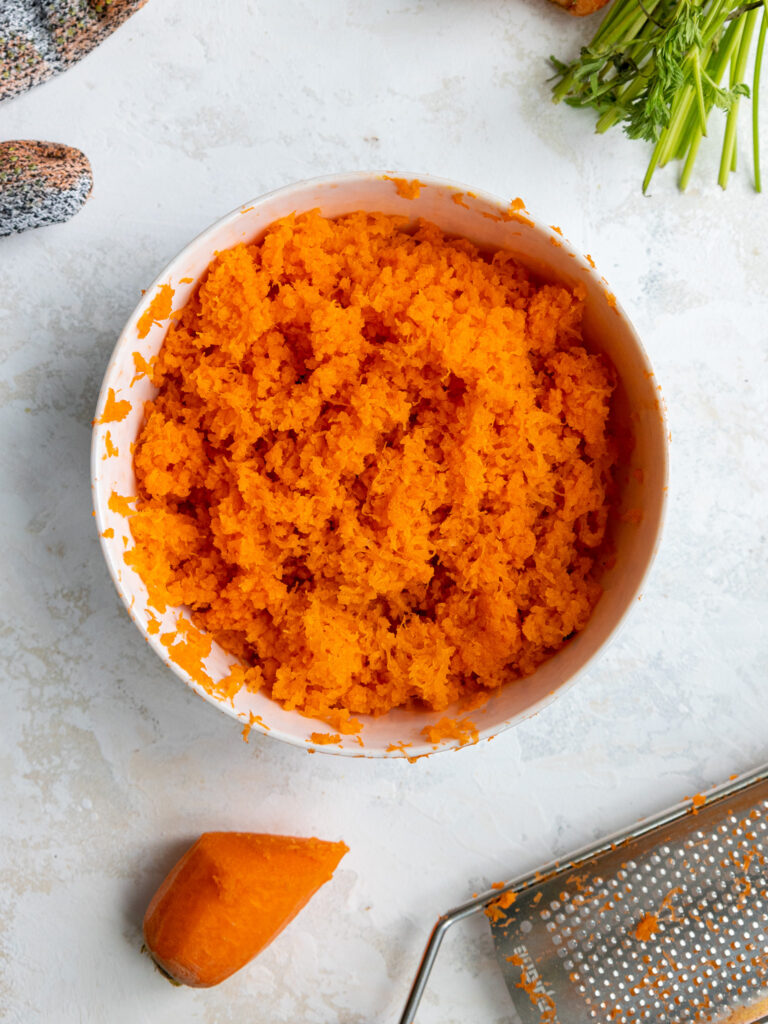
- Shredded Carrots – I like to buy large carrots, peel them, then finely grate them using a microplane grater. It gives this carrot cake an amazing texture! However, you can also use a regular grater or a food processor to shred the carrots. Just be sure you don’t use pre-grated carrots! They are dry and their lack of moisture will make the cake layers less moist.
Substitutions and Swaps – Cream Cheese Frosting
- Unsalted Butter – If you only have salted butter on hand, you can use it in place of the unsalted butter. Just be sure to omit the salt that this frosting recipe calls for. You can also use vegan butter in its place (and omit the salt)!
- Cream Cheese – I find full fat cream cheese that comes in a block works best in this recipe. Avoid whipped cream cheese or cream cheese that comes in a tub. They usually contain additives to make them more spreadable.
- Heavy Cream – Whole milk or alternative milk (soy, almond, oat) will work fine in this frosting recipe if that’s what you have on hand.
- Green and Orange Gel Food Coloring – Gel or oil-based food coloring works best to color the buttercream. Liquid food coloring can be used, but it’s more difficult to create vibrant colors.
Carrot Cake Troubleshooting & FAQs
While I’d love to think everyone’s carrot cake will turn out perfectly, I know that sometimes things don’t go to plan.
Below are some tips and advice to help, along with some answers to frequently asked questions.
Why Did My Carrot Cake Layers Sink in the Middle?
Sunken cake layers can be caused by a few different things, but most of the time it happens because the layers are underbaked.
This can happen if your oven runs a bit cold, or if the batter isn’t evenly distributed between your pans.
Usually, baking the cake layers a couple minutes longer fixes this, but if that doesn’t work, I’d recommend checking out my detailed post on why cake layers can sink or my cake troubleshooting guide.
But if one or more of your cake layers sunk, don’t worry! Usually you can barely tell once you level the cake layers.
Level them down to the bottom of the sunken center or trim away the underbaked center and fill it with cake top scraps or extra frosting.
Can I Make This Carrot Cake in Different Sizes?
I used 3, 6-inch cake pans to make this cake, but this recipe can be used to make different sized cakes.
You can make two, 8-inch cake layers with one batch of batter. Bake the cake layers at 350 F / 175 C for 28-32 minutes or until a toothpick comes out with a few moist crumbs.

One batch of batter can also be used to make one 9×13-inch sheet cake. Bake it at 350 F / 175 C for 30-40 minutes and use flower nails or heating cores to help the cake bake evenly. It will end up being about 1 inch tall.
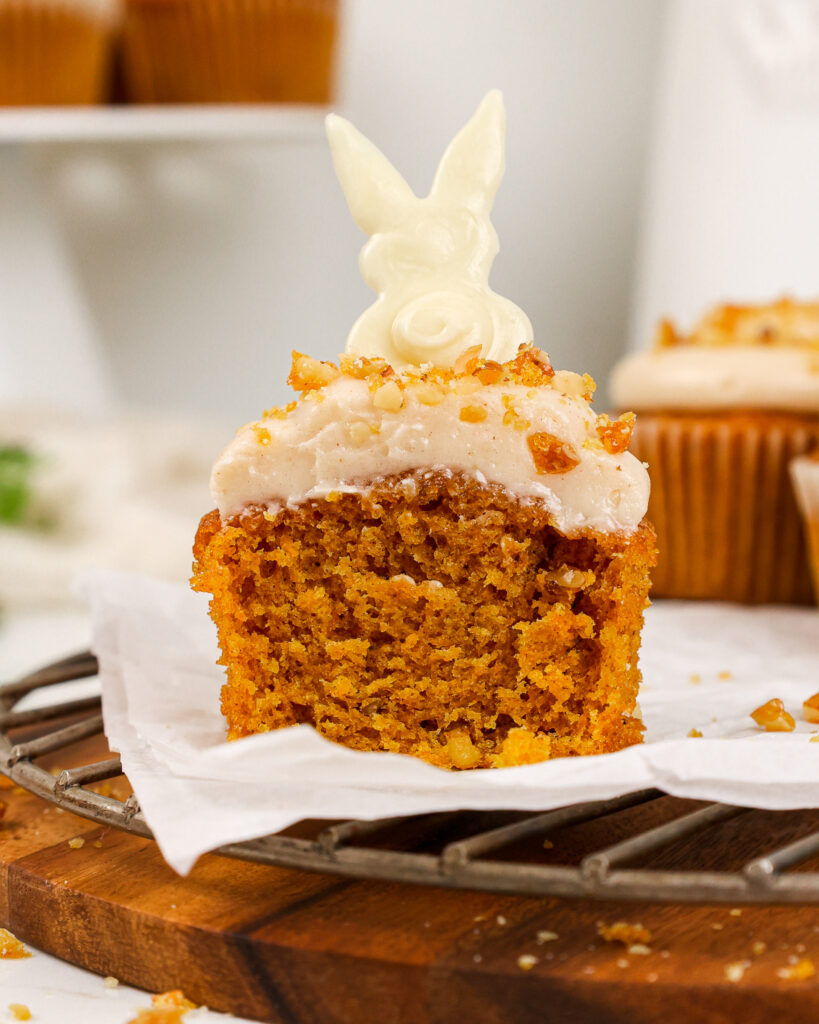
If you want to make cupcakes, I highly recommend using my carrot cake cupcake recipe. One batch makes a dozen cupcakes.
What’s the Best Way to Shred Carrots for Carrot Cake?
This carrot cake recipe turns out best when it’s made with finely grated carrots. I like to grate them by hand with a microplane grater.
While it takes a bit more work, it gives the carrot cake such an amazing, soft texture. The carrots almost dissolve into the batter and I love that!
However, you can also shred them with a food processor or a KitchenAid attachment. This is a great option if you’re short on time or don’t want to grate the carrots by hand.
Do note that the texture of the layers will be slightly different though!
Can I Add Nuts to This Carrot Cake Recipe?
Yes! While I usually don’t include nuts in my carrot cake, I know some people like to!
Feel free to add 1/2 cup of your favorite chopped nuts to give this carrot a bit of texture. Or better yet, toast the nuts before adding them to create a more complex flavor.
Tips for Making the Best Small Carrot Cake
- Properly measure the flour (spoon into the cup measure, then level) or use a kitchen scale to measure the dry ingredients.
- Use a microplane grater to shred the carrots into super fine pieces! It’s a bit of extra work, but it gives the cake a wonderful texture.
- Mix the cake batter just until the ingredients are incorporated once you add in the flour. This will ensure your cake layers are tender and fluffy.
- Use a serrated knife to level the cake layers once they’re fully cooled to make it easier to assemble the cake.
- Chill the cake layers in the freezer for about 20 minutes before assembling the cake. It makes it so much easier to stack and frost.
- Don’t use pre-grated carrots! They are dry and their lack of moisture will make the cake layers less moist.
Making This 6-Inch Carrot Cake Recipe in Advance and Storage Tips
I highly recommend making these cake layers in advance and freezing them. It breaks the process up and makes it more approachable.
You can also make the frosting ahead of time, or save any leftover frosting! It can be stored in an airtight container in the fridge for up to 2 weeks, or in the freezer for up to a month.
Be sure to give it a good stir once it thaws to get the consistency nice and smooth again.
A frosted cake can last in the fridge for up to a week, or in the freezer for up to a month. The buttercream locks in all the moisture, keeping the cake fresh and delicious!
If you cut into the cake and have leftovers, use any remaining frosting to cover the cut section to keep it moist and store it in the fridge for up to a week.
Let Me Know What You Think!
If you try this 6-inch carrot cake recipe, I’d love to hear what you think of it! Please leave a rating and comment below.
Tag me @chelsweets and use #chelsweets on social media so I can see your amazing creations!
Other Recipes You Might Like:
6 Inch Carrot Cake Recipe
Ingredients
Carrot Cake
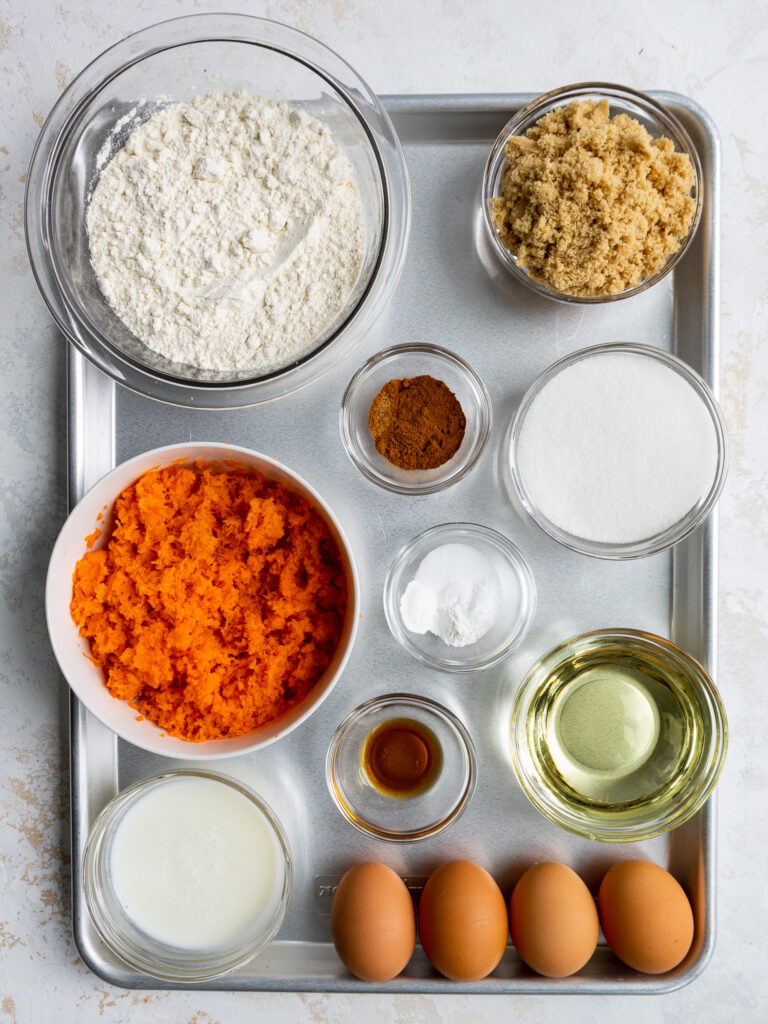
- 2 cups all-purpose flour 250g
- 2/3 cup packed light brown sugar 133g
- 2/3 cup granulated sugar 133g
- 1 1/4 tsp baking soda 7g
- 3/4 tsp baking powder 3g
- 1/2 tsp fine salt 3g
- 2 tsp ground cinnamon 5g
- 1/4 tsp ground nutmeg
- 1/8 tsp ground cloves
- 4 large eggs, room temperature 224g
- 2/3 cup vegetable or canola oil 150g
- 1/3 cup buttermilk, room temperature 80g
- 1 tsp vanilla extract or vanilla bean paste 4g
- 2 1/4 cups peeled and finely grated carrots – about 4 large carrots 300g
Cream Cheese Buttercream Frosting
- 1 1/2 cups (3 sticks) unsalted butter, room temperature 339g
- 1/2 cup or 4 oz. full-fat cream cheese, room temperature 113g
- 2 tsp vanilla extract or vanilla bean paste 8g
- 1/2 tsp fine salt 3g
- 7 cups powdered sugar 907g or a 2 lb. bag
- 1 Tbsp heavy whipping cream, room temperature 15g
- green and orange gel food coloring
Recommended Tools and Equipment
- 3, 6- inch Cake Pans
- Spinning Cake Stand
- Whisk
- Serrated Knife
- 8- inch Greaseproof Cake Board or Flat Plate
- Large Offset Spatula
- Bench Scraper
- 2 Small Piping Bags
- 1 Very Small Piping Tip like a Wilton 3
- 1 Small Piping Tip like a Wilton 10
- Orange and Green Gel Food Coloring
Instructions
6-Inch Carrot Cake Layers:
- Preheat the oven to 350°F / 175°C. Line three, 6-inch with parchment rounds and grease with non-stick baking spray, or brush them with homemade cake release. You can also use this recipe to make 2, 8-inch cake layers (same bake time). If you don't have 3 cake pans, the batter can sit at room temperature for a few hours. Bake as many layers at a time as you can at a time.
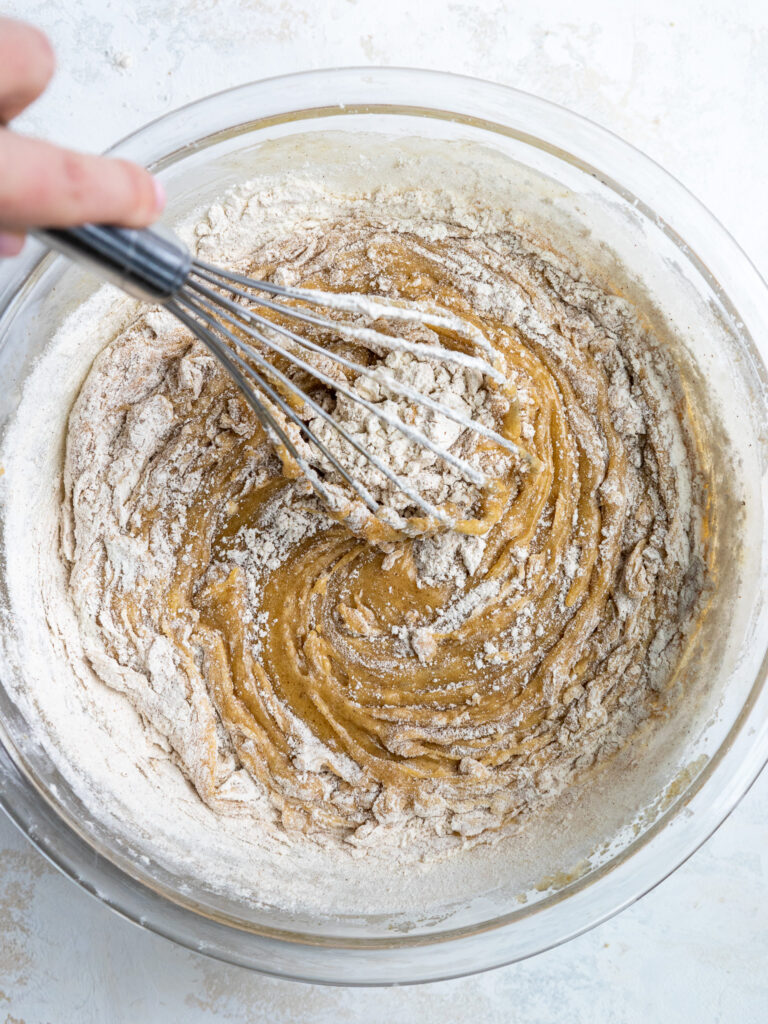
- In a large bowl, whisk together 2 cups all-purpose flour, 2/3 cup light brown sugar, 2/3 cup granulated sugar, 1 1/4 tsp baking soda, 3/4 tsp baking powder, 1/2 tsp salt, 2 tsp cinnamon, 1/4 tsp nutmeg, and 1/8 tsp cloves. Set aside.
- In a separate, large bowl, whisk together 4 eggs, 2/3 cup oil, 1/3 cup buttermilk, and 1 tsp of vanilla until combined.
- Add the dry ingredients into the wet ingredients and mix until just combined.
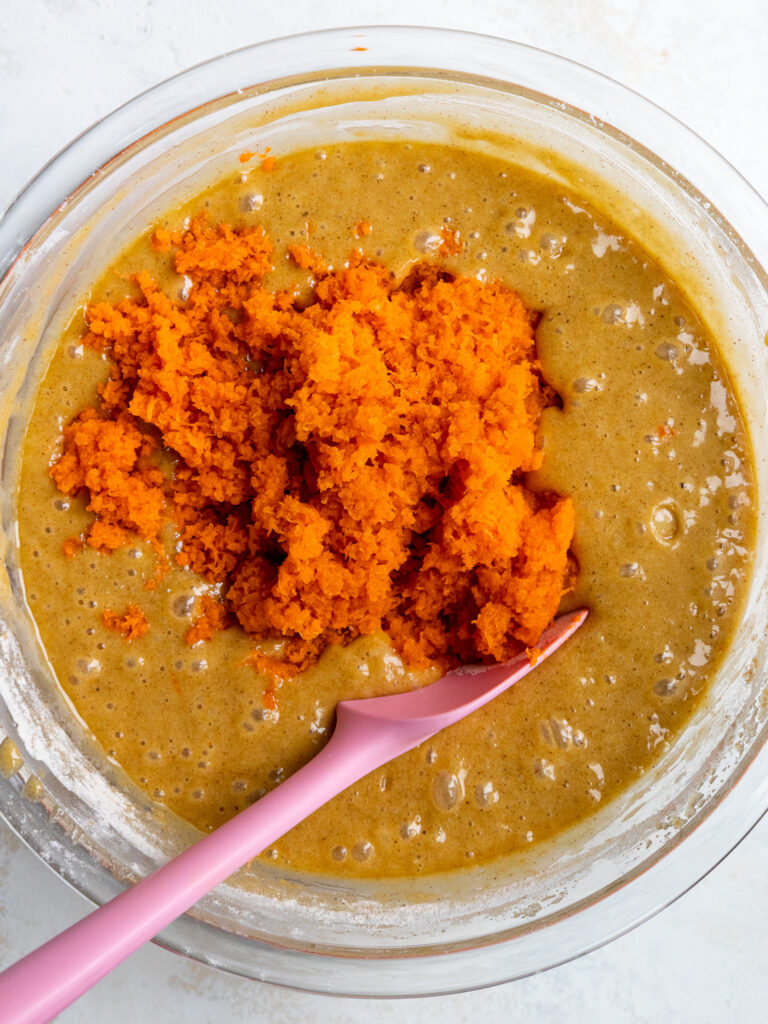
- Fold 2 1/4 cups of finely grated carrots into the batter with a rubber spatula.
- Divide the batter evenly between the prepared cake pans. I like to use a digital kitchen scale to weigh my pans so that they all have the same amount of batter (one batch is about 1260g, so add 420g to each pan if you're making 3 layers). This guarantees the layers will be the same height once baked.
- Bake the cake layers for 28-32 minutes or until a toothpick comes out with a few moist crumbs.
- Let the pans cool for 10 minutes, then run a small offset spatula around the perimeter of the pans to separate the cake layers from the pan.
- Place the cake layers in the freezer for 45 minutes to accelerate the cooling process. Once the layers are fully cooled, carefully flip the pans and remove the layers from the pans.
- Use a serrated knife to level the tops of the layers. If you're making these layers in advance, wrap and freeze the cake layers at this point.
Cream Cheese Buttercream Frosting:
- While the cake layers bake and cool, make the cream cheese frosting.
- Beat 1 1/2 cups of butter and 1/2 cup of cream cheese on a medium speed for 30 seconds with a paddle attachment until smooth.
- Add in 2 tsp of vanilla and 1/2 tsp of salt. Beat on low until the ingredients are fully incorporated.
- Slowly mix in 7 cups of powdered sugar on a low speed. Halfway through add 1 Tbsp of heavy cream to make the frosting easier to mix.
- If the frosting seems too thick, add in additional cream (1 Tbsp at a time). If the frosting seems too thin, add in more powdered sugar (1/4 cup at a time).
- Wait to color the frosting until the cake is fully frosted.
- Cover the cream cheese frosting with a piece of plastic wrap to prevent it from crusting and set it aside. It can sit at room temperature for up to 4 hours, but if you make it in advance be sure to store it in the fridge.
Assembling This 6-Inch Carrot Cake
- Stack and frost the cake layers on a greaseproof cake board using a dab of frosting to help stick the first cake layer to the board.
- Spread an even layer of buttercream on top of the cake layer with a large offset spatula.
- Repeat with the remaining cake layers and place the top cake layer upside down to make the cake easier to frost.
- Use a large offset spatula and/or bench scraper to cover the cake in a thin layer of frosting to trap in any crumbs, then chill it in the fridge (30 minutes) or freezer (10 minutes) until the frosting is firm to the touch.
- Then add another layer of frosting around the cake and create a textured look using a large offset spatula or the back of a spoon.
- Place half of the remaining frosting in a separate bowl and color it green with gel food coloring. Place it in a piping bag fitted with a very small frosting tip (like a Wilton 3). Seal the top of the bag with a rubber band or clip.
- Color the remaining frosting orange with gel food coloring. Place it in a piping bag fitted with a small round piping tip (like a Wilton 10), or cut an opening about 1 cm wide. Seal the top of the bag with a rubber band or clip.
- Use the green and orange frosting to pipe little carrots around the cake, then enjoy!
Video
Notes
Substitutions and Swaps
If you need to make any substitutions or swaps in this recipe, please check out the section on ingredient substitutions in the post above.My Tips for Making the Best Small Carrot Cake
- Ingredients at room temp mix together better! Set out any cold ingredients ahead of time.
- Properly measure the flour (spoon into the cup measure, then level). Or better yet, use a kitchen scale to measure your dry ingredients.
- Use a microplane grater to shred your carrots into super fine pieces! It's a bit of extra work, but it gives the cake a wonderful texture.
- Mix the cake batter just until the ingredients are incorporated once you add in the flour. This will ensure your cake layers are tender and fluffy.
- Use a scale to weigh your cake pans as you fill them. It helps the cake layers bake to the same height and bake more evenly.
- Level your room temperature or thawed cake layers with a serrated knife to make them easier to stack.
- Chill the cake layers in the freezer for about 20 minutes before assembling the cake. It makes it so much easier to frost them!
- Don't use pre-grated carrots! They are dry and their lack of moisture will make the cake layers less moist.
Small batch oreo cookies n cream cake and red velvet small batch cake next plzzz
Haha I definitely have some more small batch cake recipes coming your way!! Stay tuned 🙂
@Chelsweets, made the carrot cake for my husband’s Birthday today and omg it was a huge hit. Delicious and moist. Wasn’t to keen on making a huge cake as there isn’t many of us eating it.. so this was a perfect sized cake for the family. Thanks for sharing your recipe. Eagerly awaiting more of the 6” cakes
So happy to hear that this cake was a big hit Abida!! I love smaller cake recipes like this too 🙂 I’ll have to share more in the future!!
hey. i’ve been trying really hard to find a 6inch carrot cake recipe and i have come across your recipe:) i am planning to make this for two birthdays this month and i’m really hoping all goes well, what temperature do you suggest to cook the cakes if using a fan oven??
Hi Char,
So happy to hear that, I hope both turn out wonderful! I would recommend baking the layers 20 C / 30 F degrees below what the recipe calls for. Happy baking!
Made two cakes for my coworkers and it was a hit! Let me know if i could make this with fondant
I am so happy to hear that Miss Tarah!! Thank you so much for sharing 🙂 You can absolutely cover this cake with fondant once it’s crumb coated and/or frosted and chilled! Hope that helps, happy baking!
Hi I wont to make 2 tins
6×4 carrot cake please can you give me recipe.
Also when do I add walnuts.
Hello, I have a fine grater but not a micoplane grater. Should my fine grated carrots still measure to 300g for the recipe? I am making this for a birthday next week. ?
Hi LL,
Apologies for the delayed response! A fine grater should work just fine for this recipe and I would say to still use 300 grams. Hope that helps for the future and that your cake turned out amazing!!
Loved this recipe. Will use it to make one of 3 wedding cakes. If I was wanting slightly larger 7” pans, how would i adjust the batter quantity?
So happy to hear you loved this recipe Di! When you say slightly larger 7″ pans, do you mean taller pans? Like do you want thicker layers? or like 8″ pans??
Hello, can this recipe be made in to cupcakes? I have multiple places to go on Mother’s Day and don’t want to lug half a cake around lol
Hi Chelsie,
Totally! Fill the liners 3/4 full and bake for 18-21 mins, or until the center is set and a toothpick comes out with a few moist crumbs. Or you can also just use my carrot cake cupcake recipe (it’s delish too!!): https://chelsweets.com/carrot-cake-cupcakes/
Hope that helps, and happy early mother’s day!!
Hello,
Is 7 cups of powdered sugar right? That seems like a lot with only 4oz of cream cheese.
Hi Dayna,
I know it sounds like a lot, but it’s 7 cups of powdered sugar for 2 cups of fat (3 sticks of butter + the 4 oz. cream cheese), and this is the standard ratio for an American style frosting. You can always add a cup or two less powdered sugar, but the frosting will be a bit thinner and a bit less opaque. I hope that helps, and that your cake turns out great!