
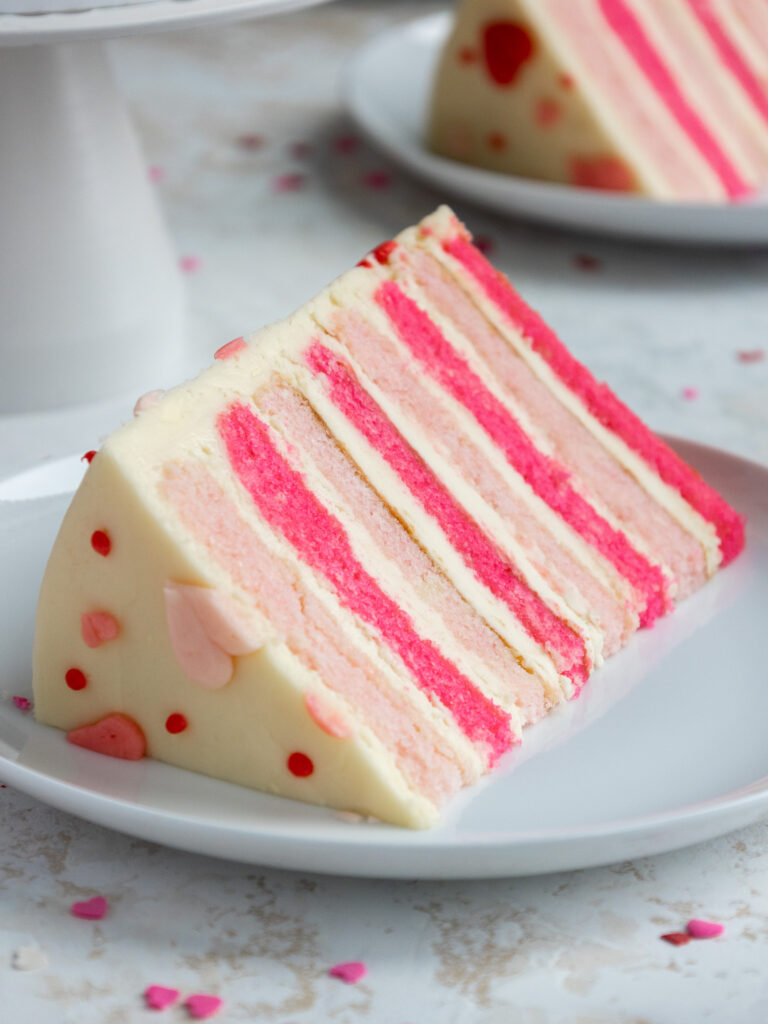
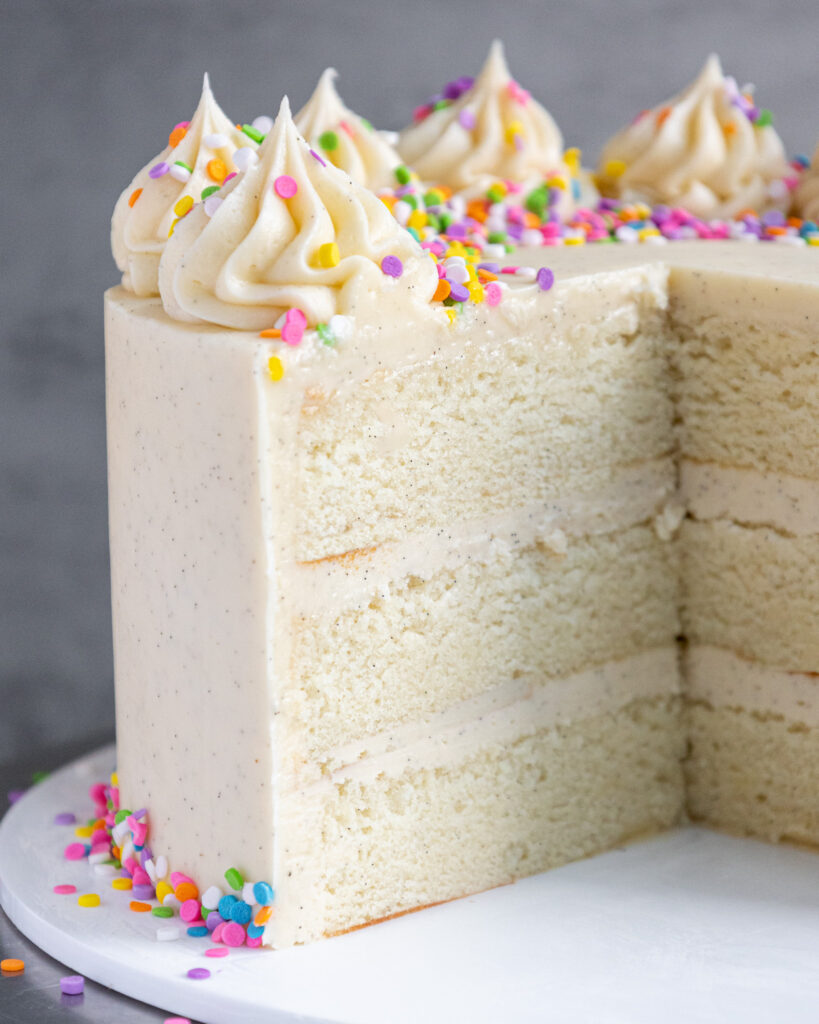
Pink Velvet Cake
Whether you plan to spend Valentine’s Day with your friends, galentines, or significant other, this delicious pink velvet cake is the perfect way to celebrate.
It’s made with tender pink velvet cake layers and rich cream cheese buttercream frosting. If that combination doesn’t say “Happy Valentine’s Day,” I don’t know what does!
How to Make This Pink Velvet Layer Cake
To make sure this cake turns out as amazing as possible, let’s walk through each step together! I’ve also included a video tutorial of the process in the recipe card at the bottom of this post.
Step 1: Bake the Pink Velvet Cake Layers
Make the pink velvet cake layers first, following the recipe card at the bottom of this post.
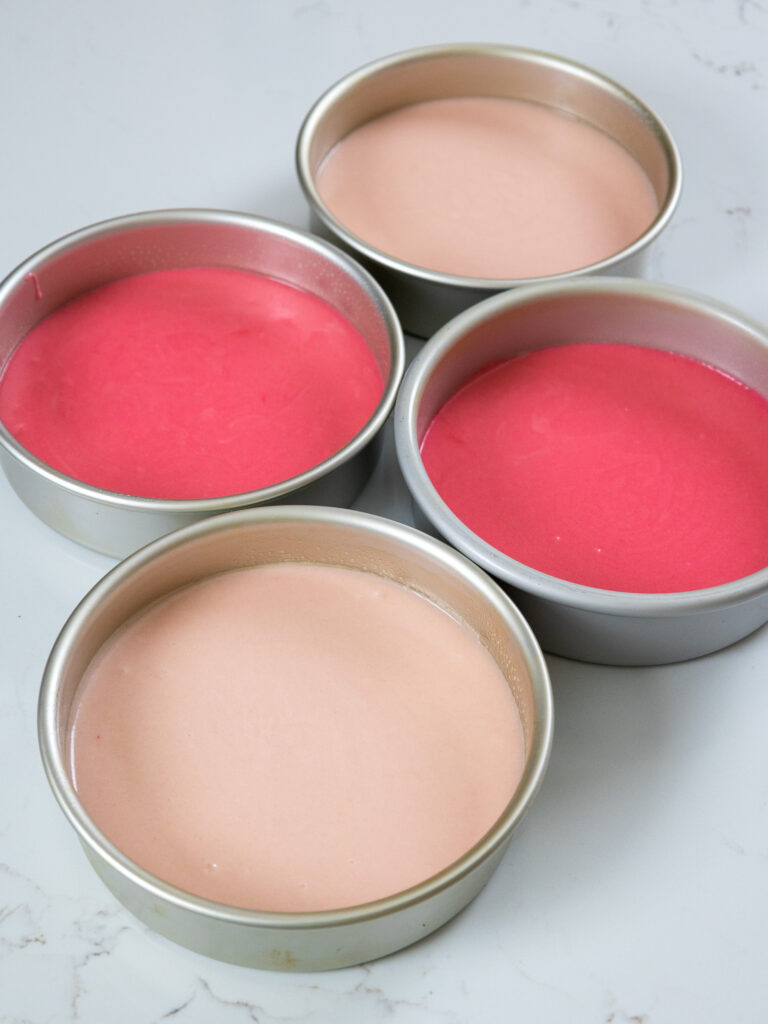
After coloring the batter, divide it evenly between the prepared cake pans and bake for 33-37 minutes or until a toothpick comes out with a few moist crumbs.
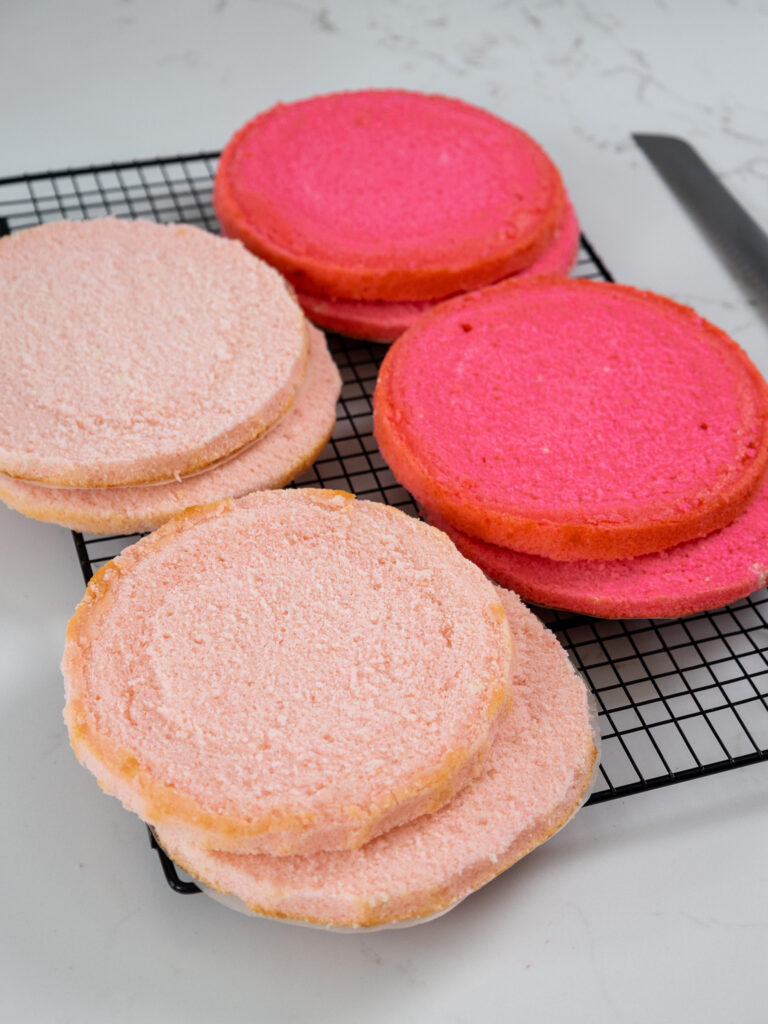
Remove the cake layers from the oven and let them cool in the pans for about 30 minutes. Or if you’re in a rush, place the pans directly in the freezer to accelerate the cooling process.
Then gently run an offset spatula around the rim of the cake pans to loosen them and flip them onto wire racks to finish cooling.
These layers bake up pretty flat, so leveling them is optional! If you want to level them, use a serrated knife to level the top of each cake layer.
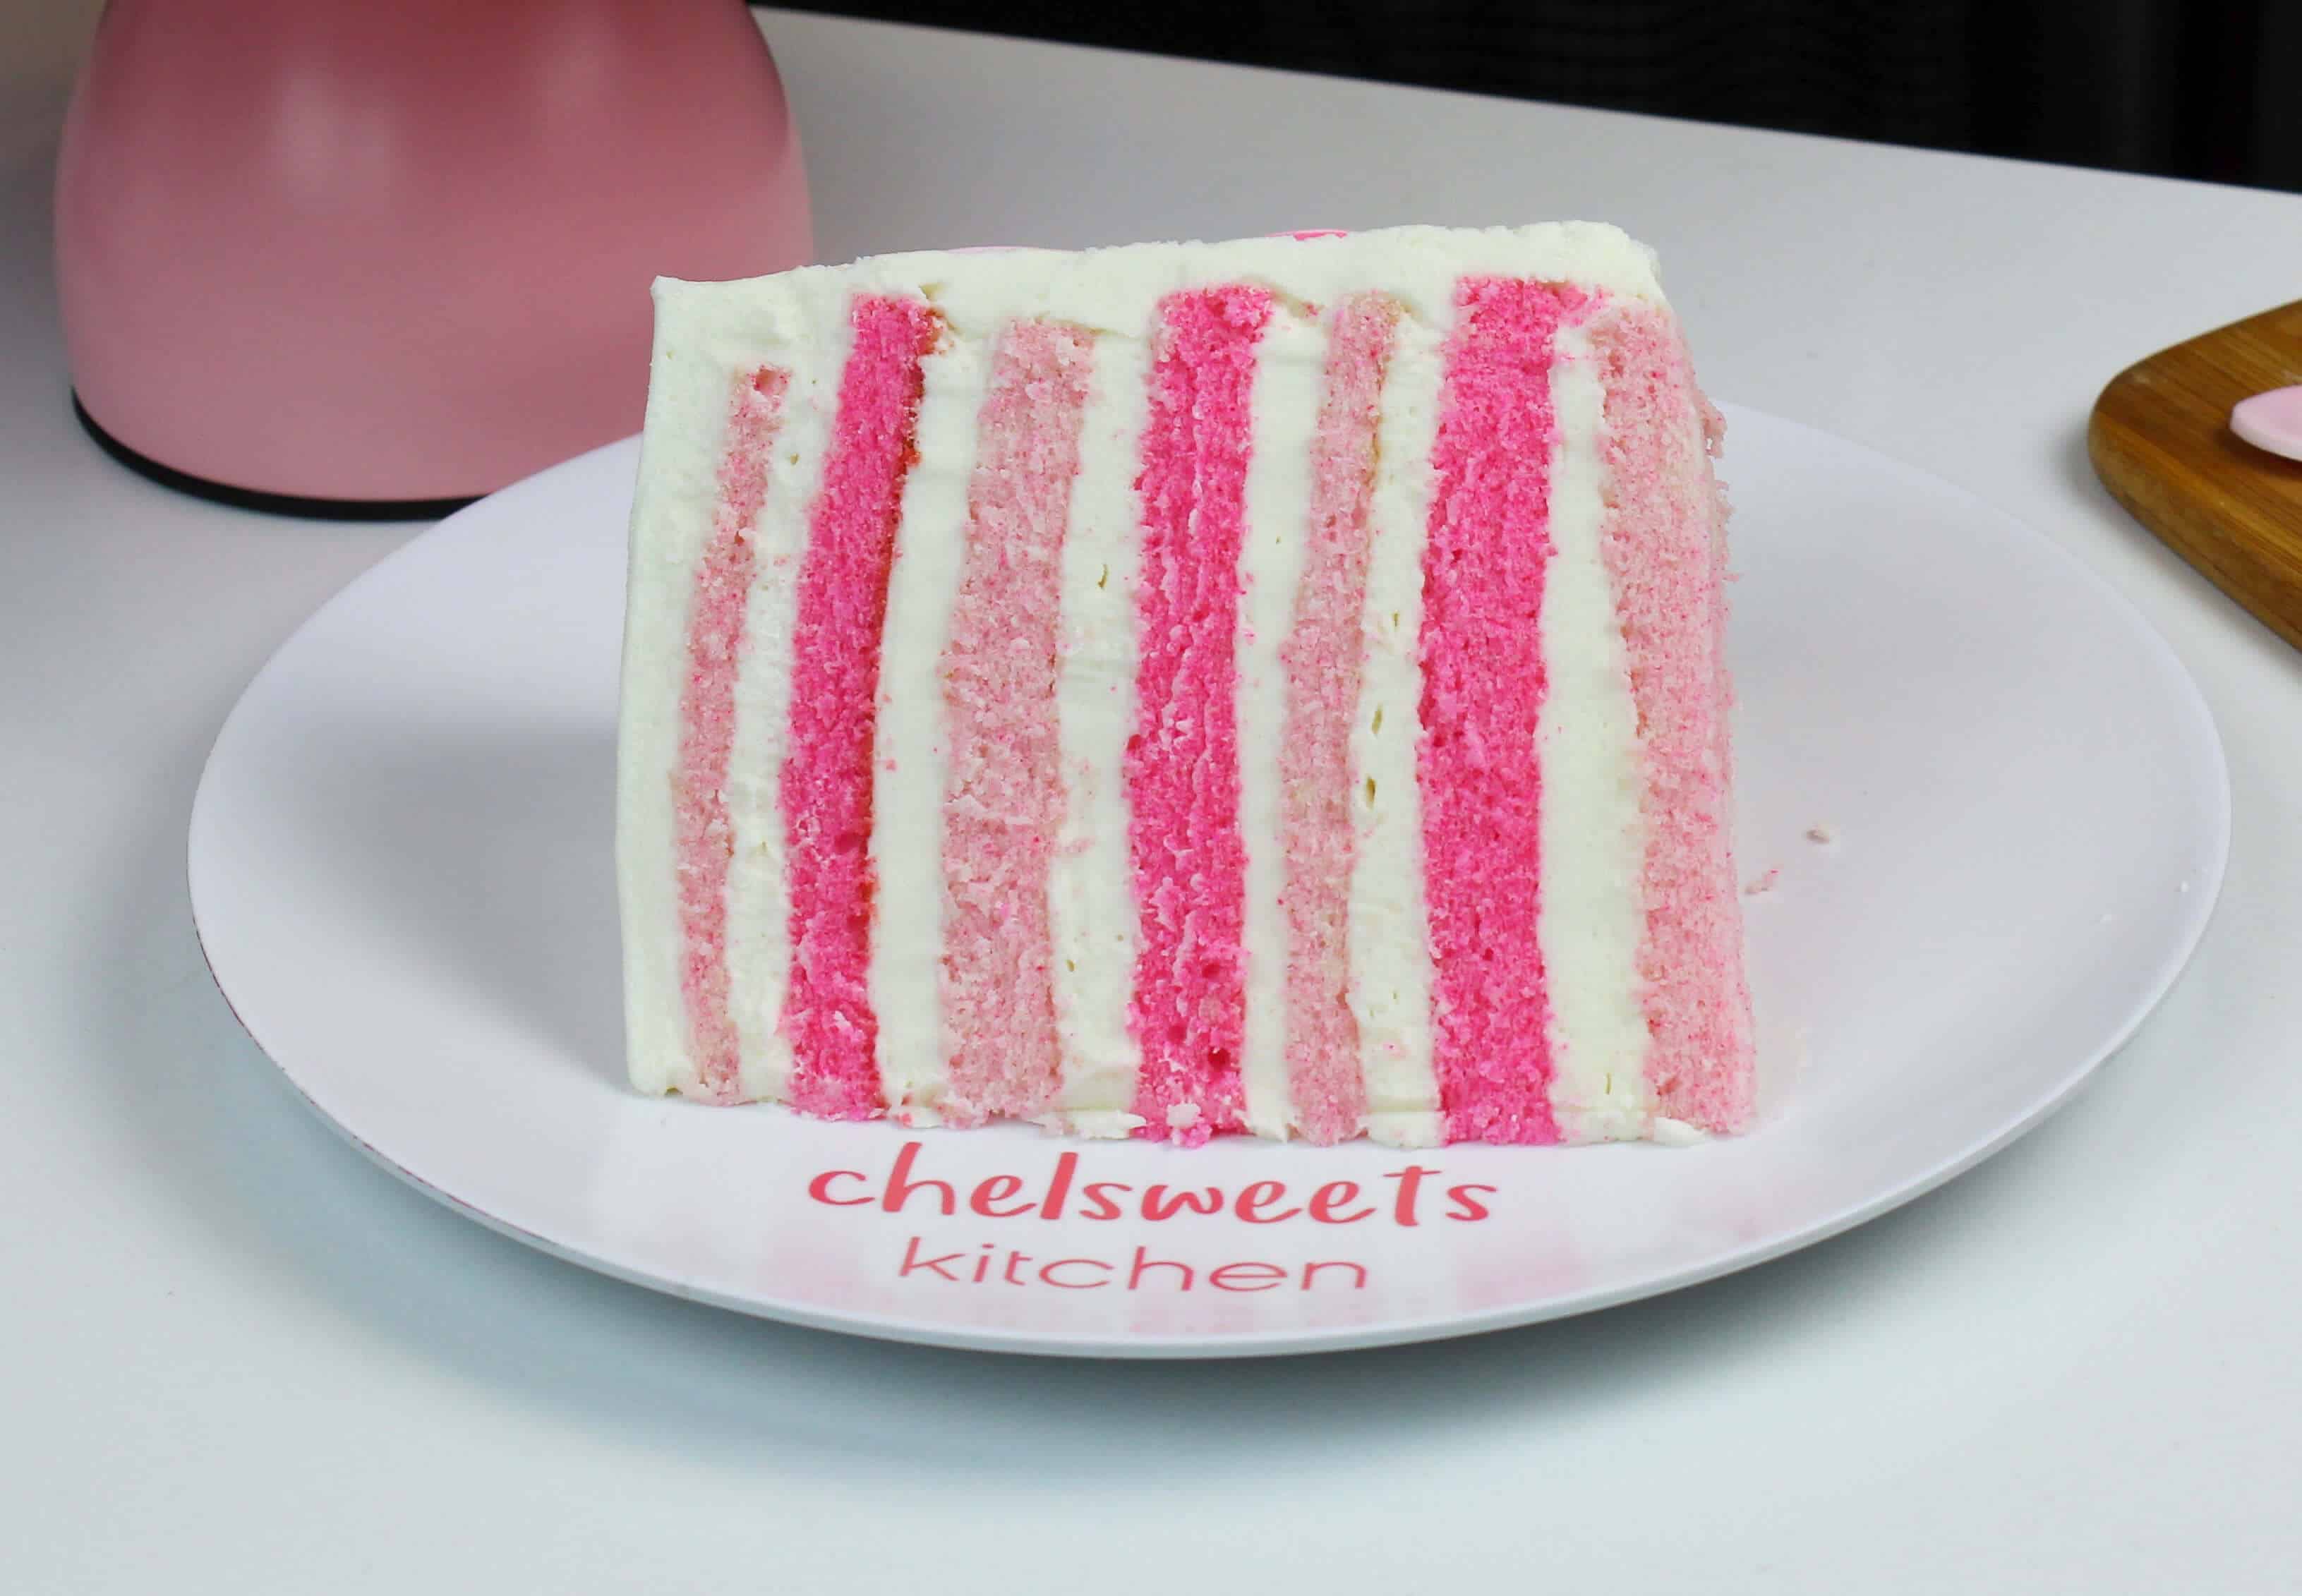
I also like to trim away the caramelization around the sides of the layers and tort each layer to create eight, thinner layers.
If you’re making these in advance, you can wrap and freeze them at this point.
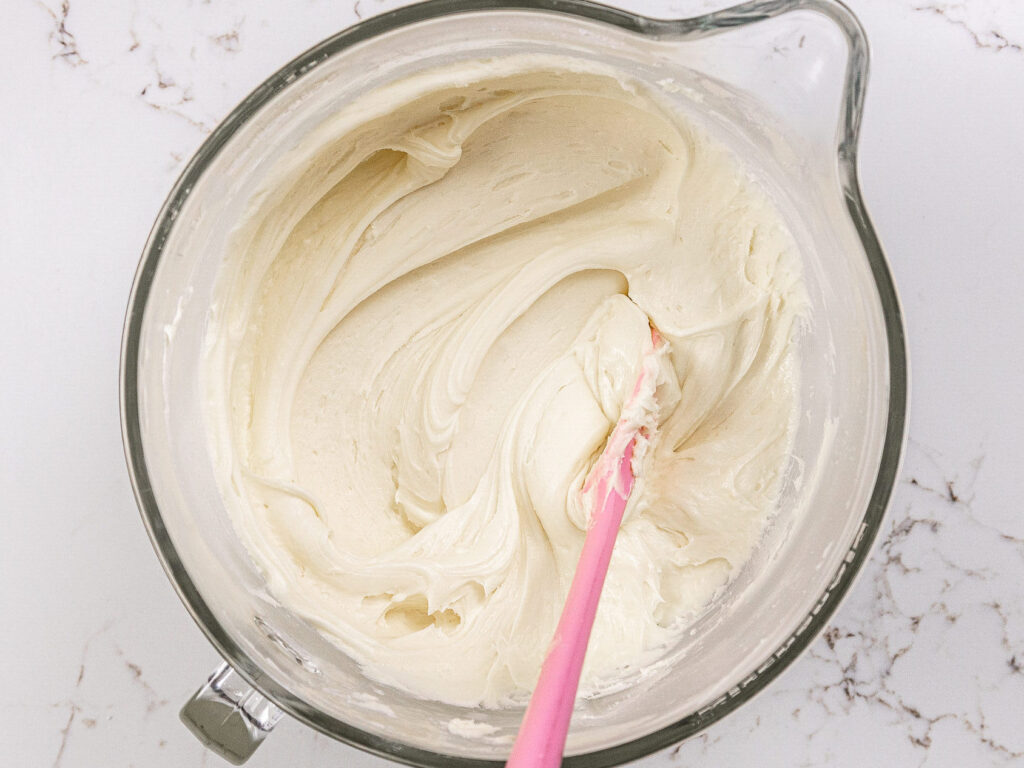
Step 2: Make the Cream Cheese Buttercream Frosting
While the cake layers bake and cool, make the cream cheese buttercream.
I like to use an American buttercream base to make this frosting because I think it’s the easiest to make, and I love eating it. However, it is quite sweet!
If you want to use a less-sweet frosting base, I’d recommend making a batch of my Swiss meringue buttercream or my hybrid buttercream and using the same ratio of butter to cream cheese that this recipe calls for.
This frosting can also be made in advance if needed and kept in the fridge for up to 2 weeks or in the freezer for a month.
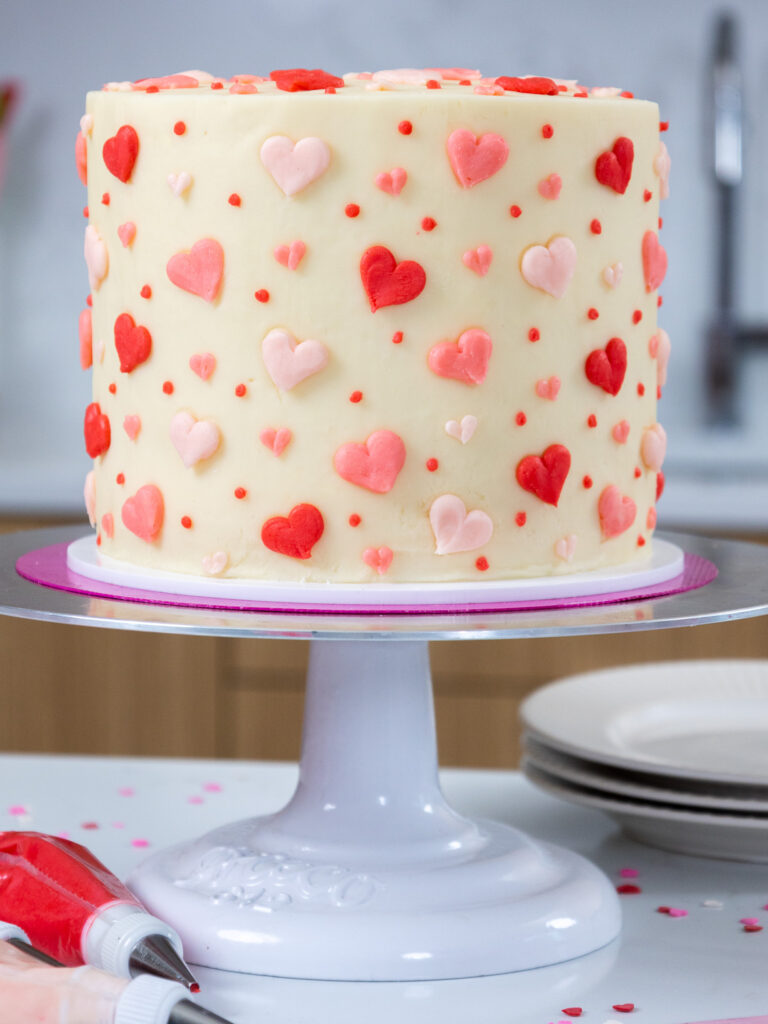
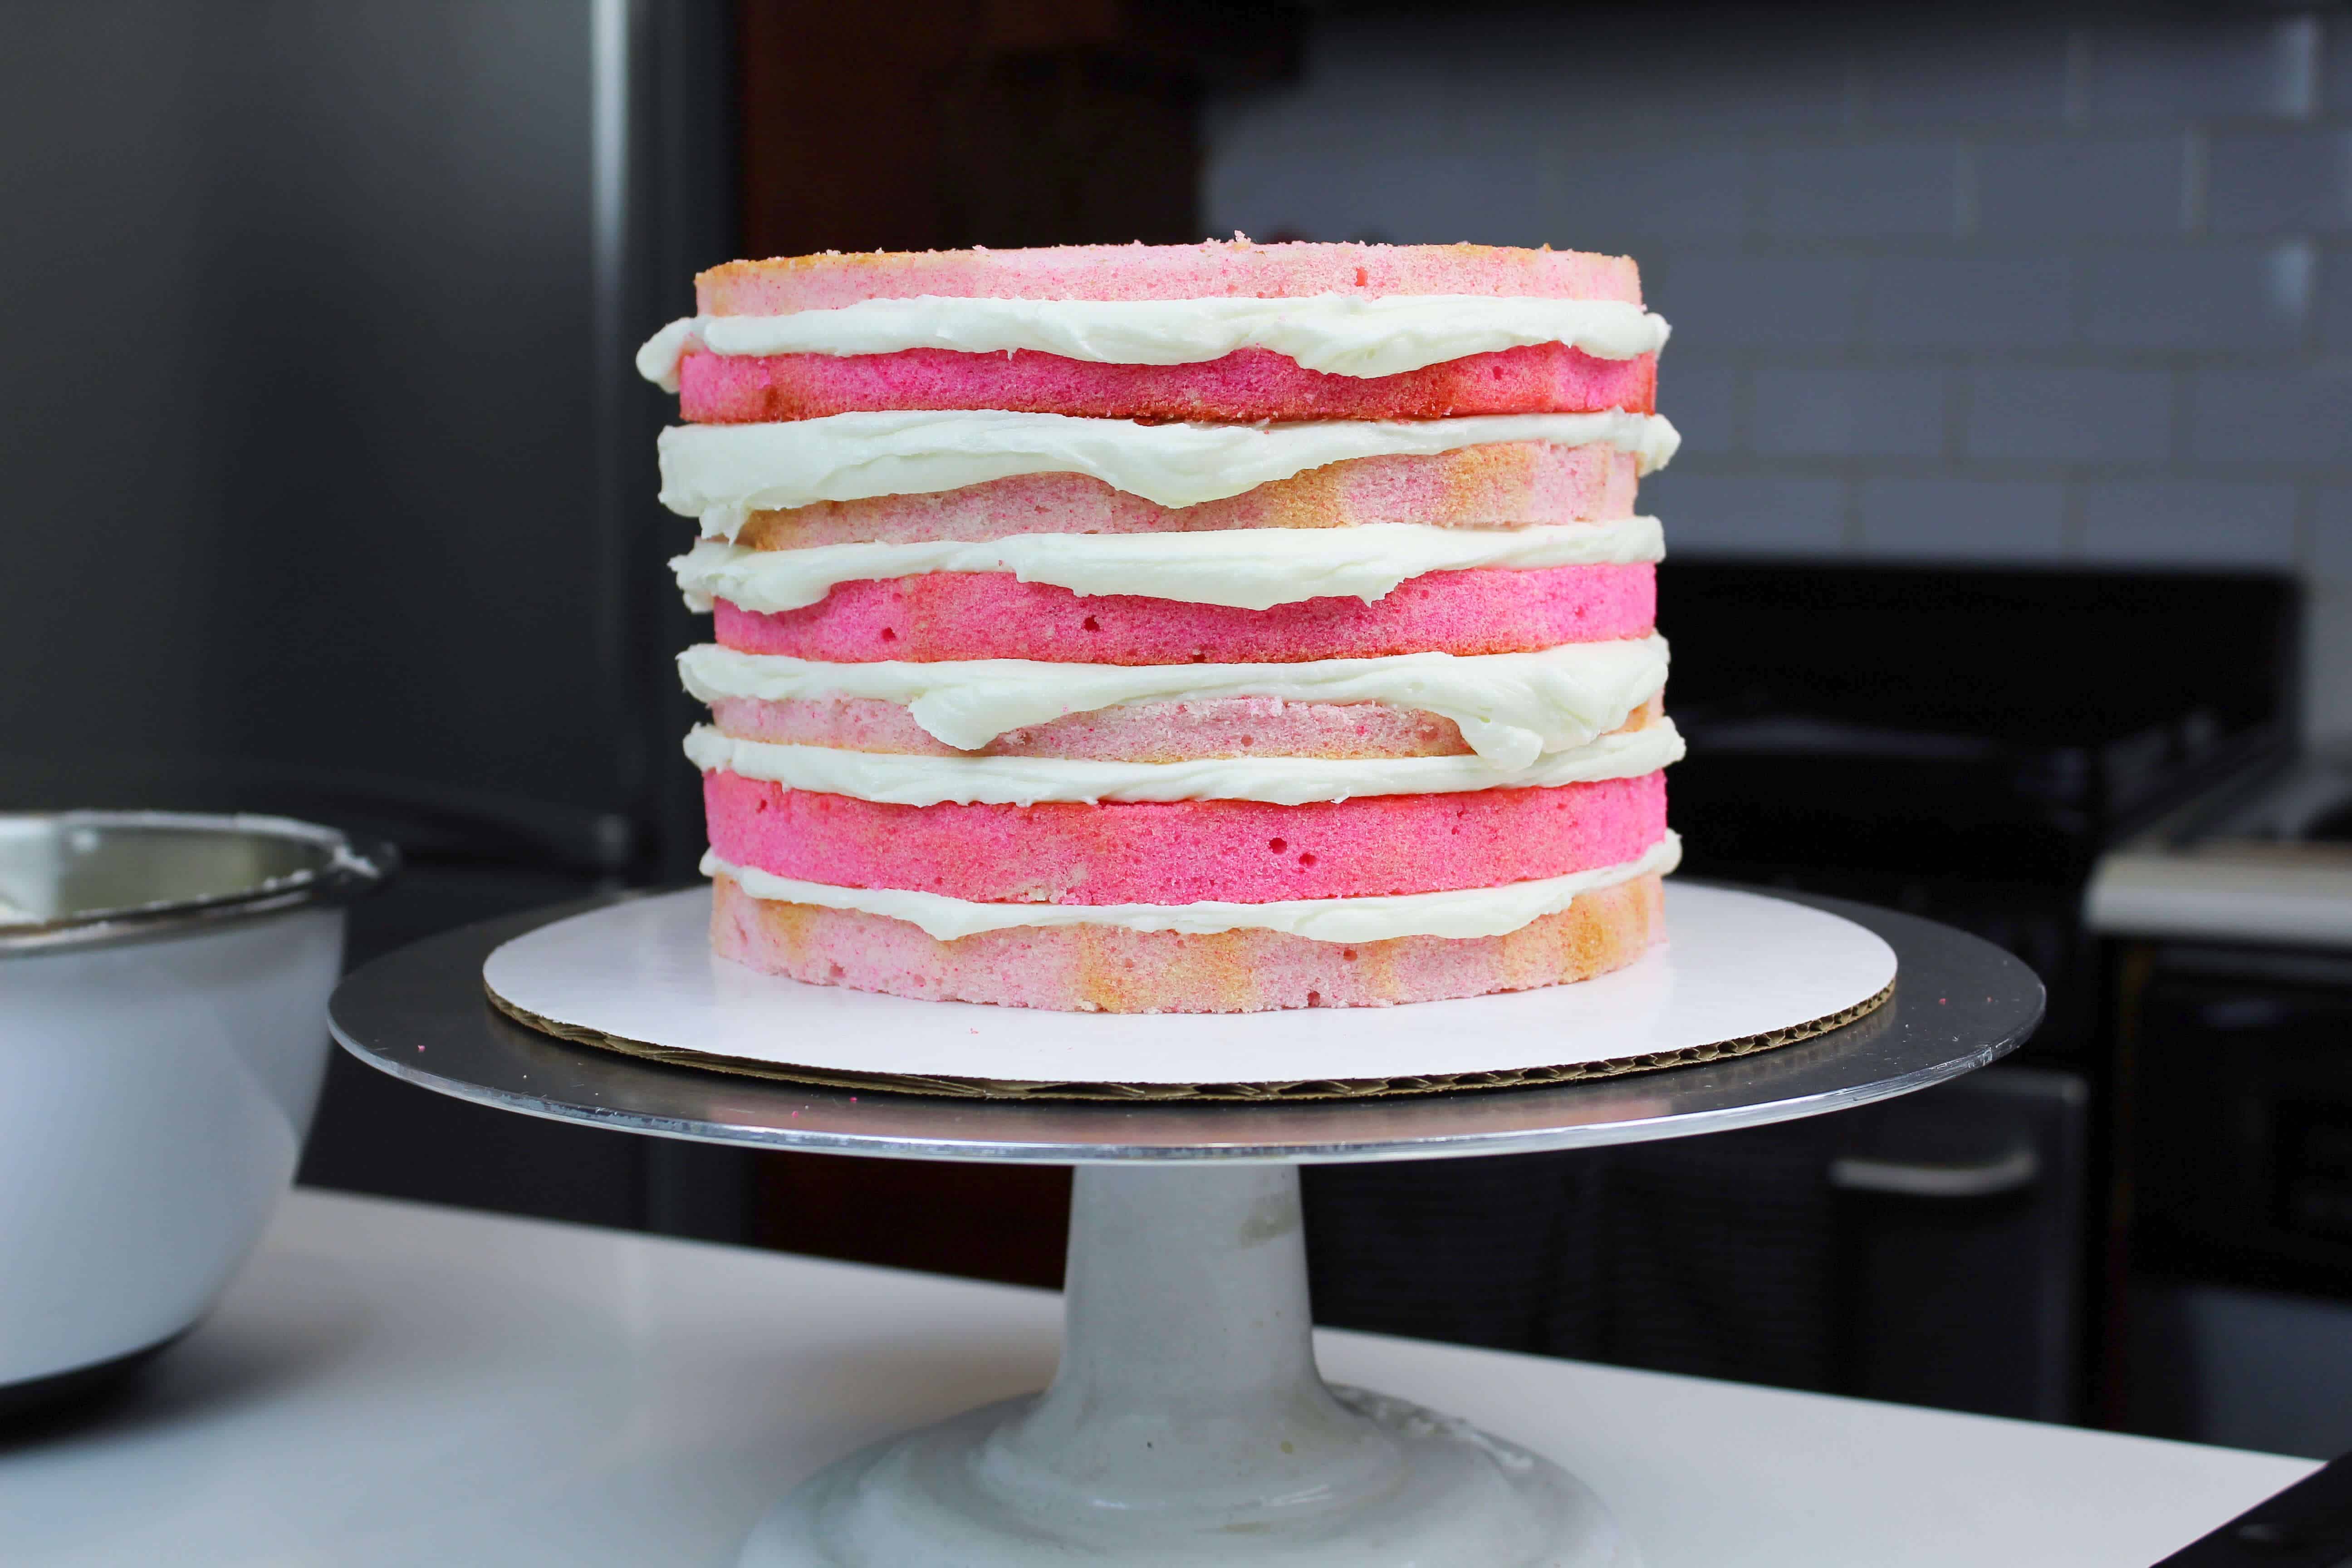
Step 3: Stack and Frost the Cake Layers
Then it’s time to assemble this cake! Stack and frost cake layers on a greaseproof cake board or flat plate. Use a dab of buttercream to help stick the first cake layer to the board.
Spread an even layer of cream cheese buttercream on top of each cake layer with a large offset spatula.
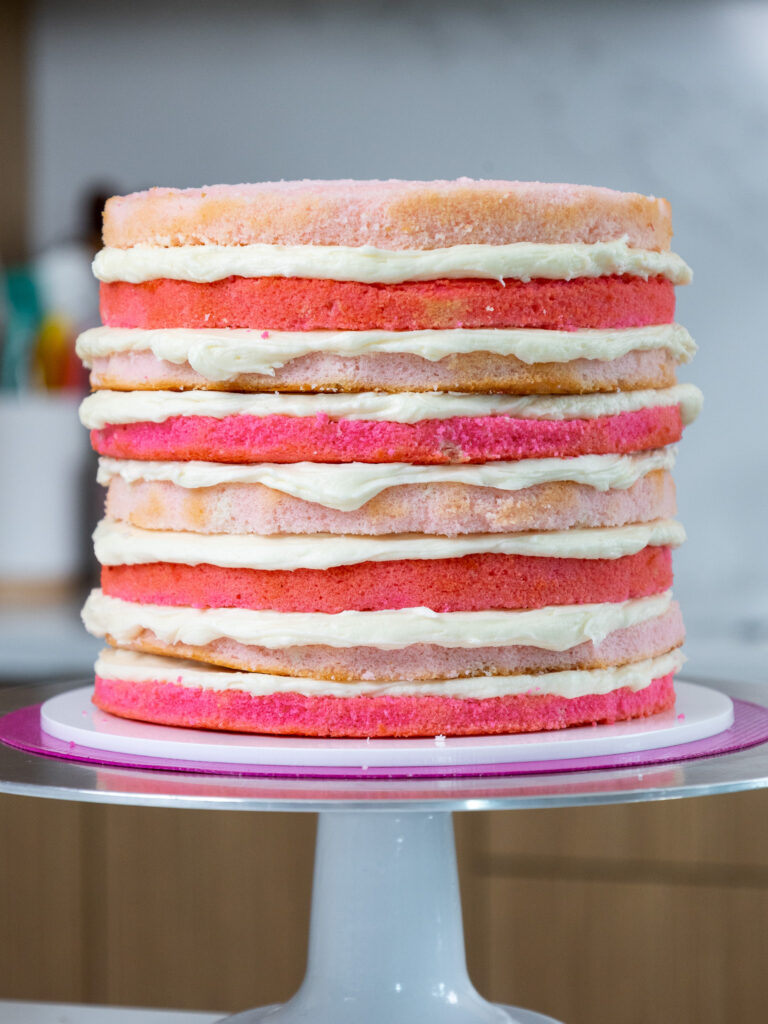
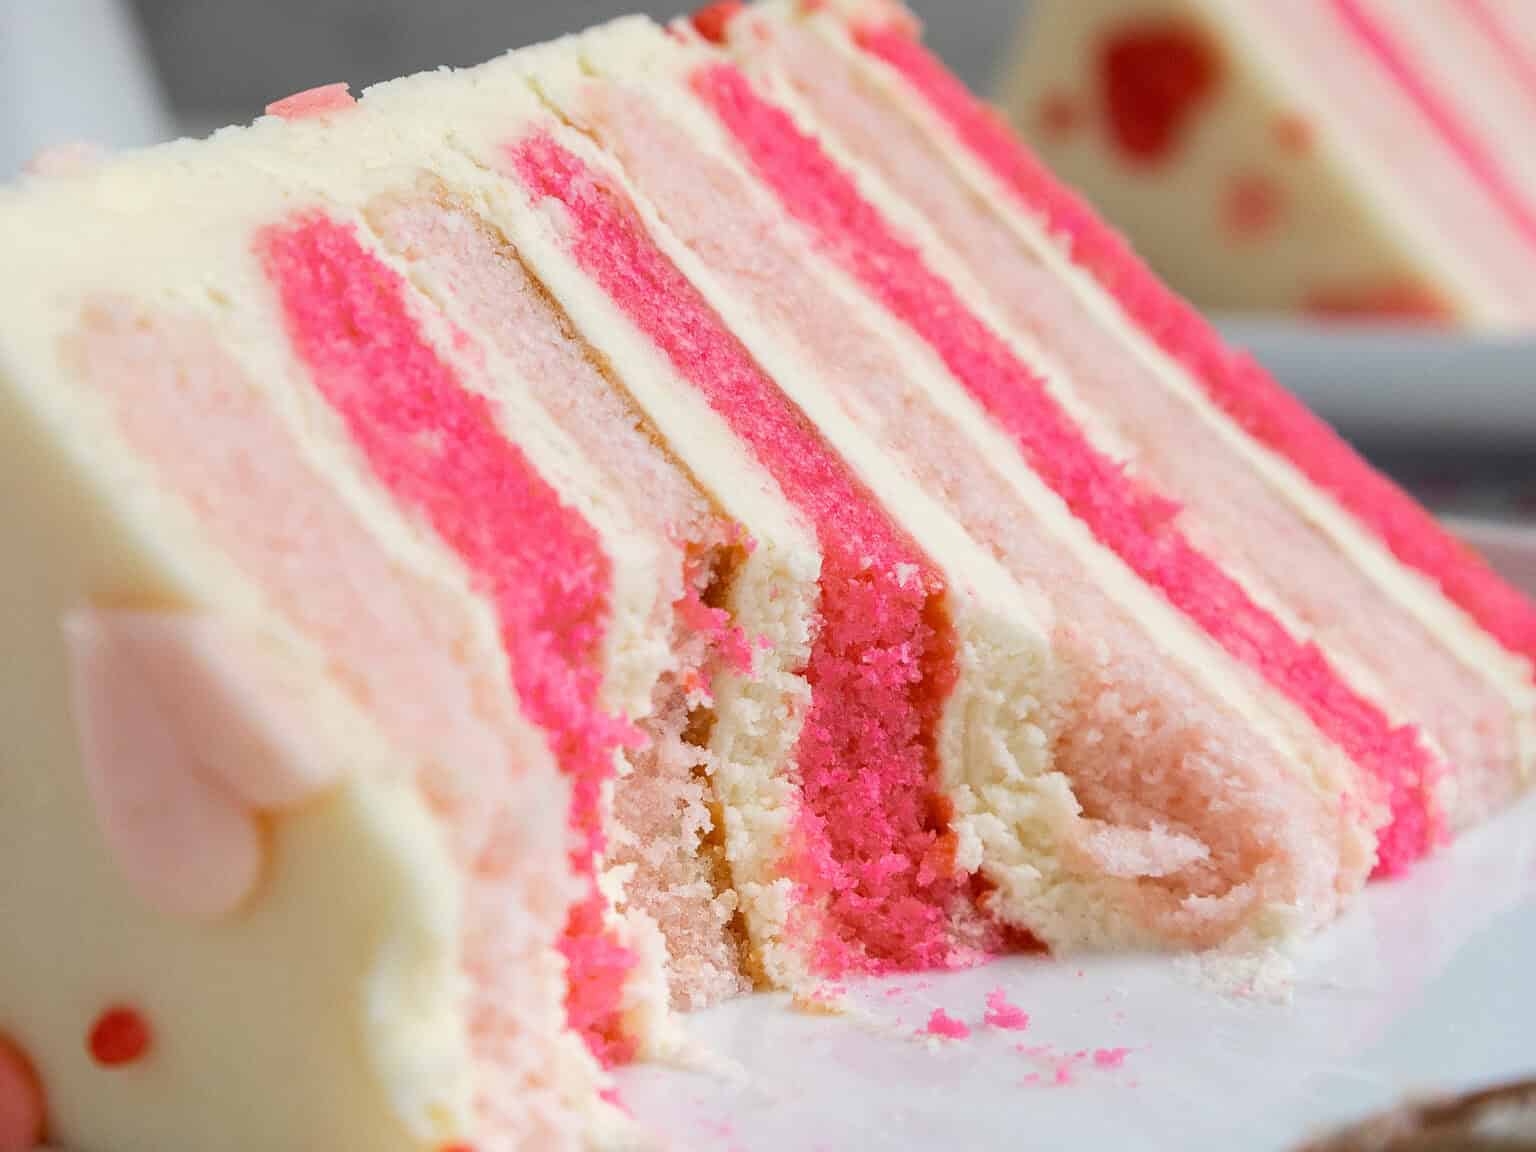
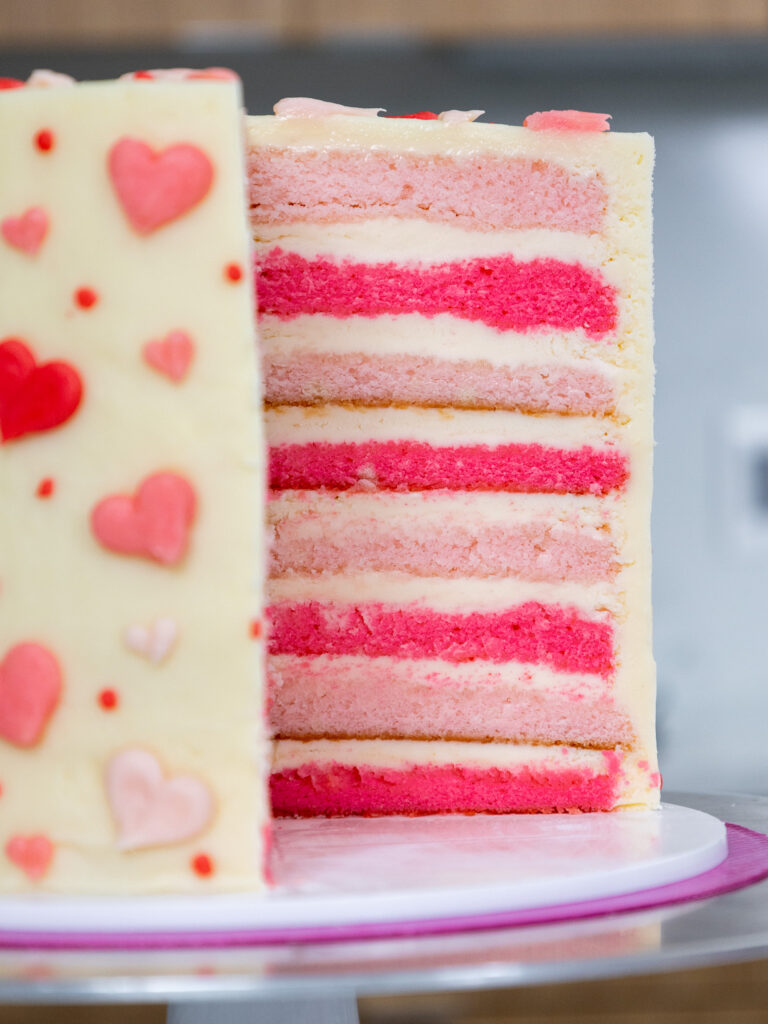
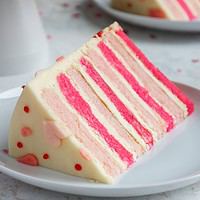
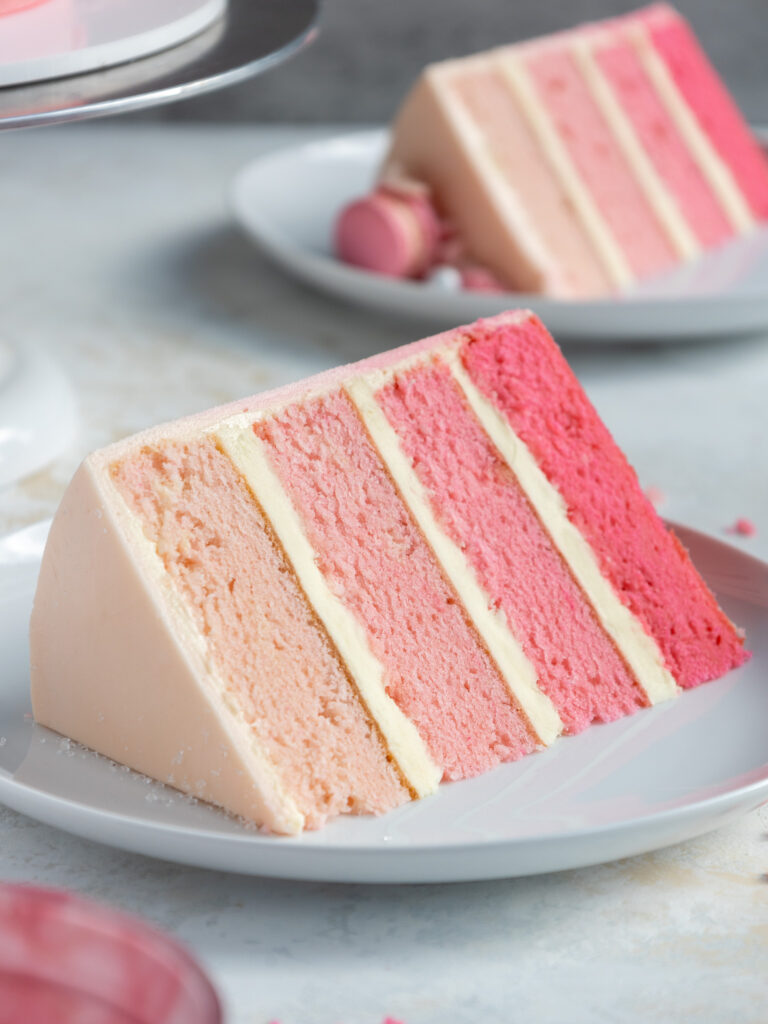
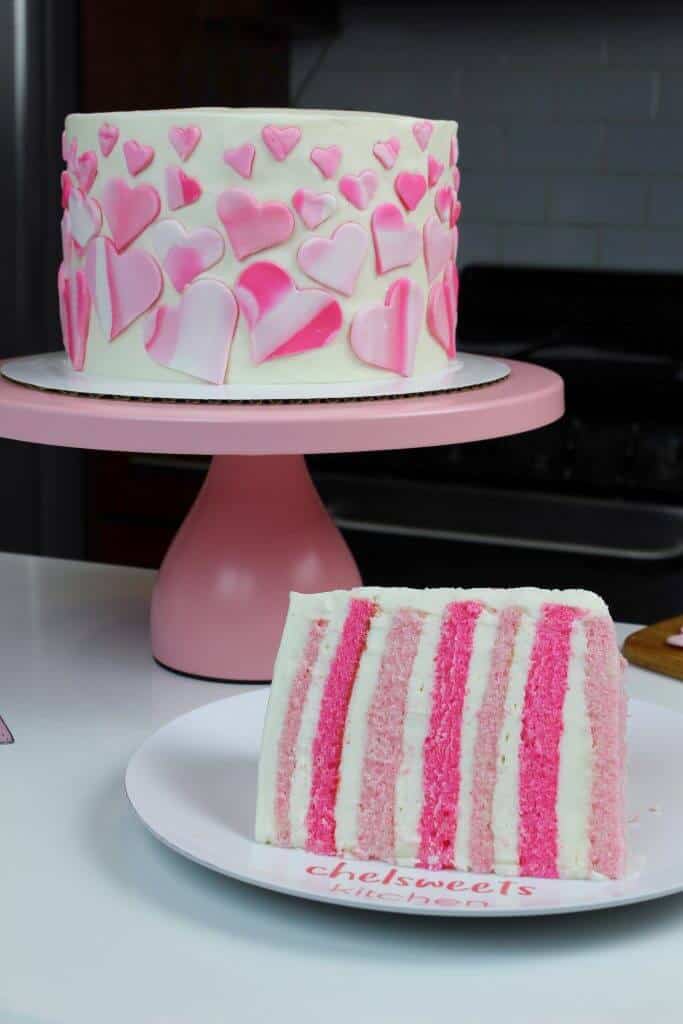
Alternate the light pink and dark pink cake layers.
Repeat with the remaining cake layers and place the top cake layer upside down to make the cake easier to frost.
Step 4: Crumb Coat the Cake
Spread a thin coat of frosting around the cake to fully cover the cake layers.
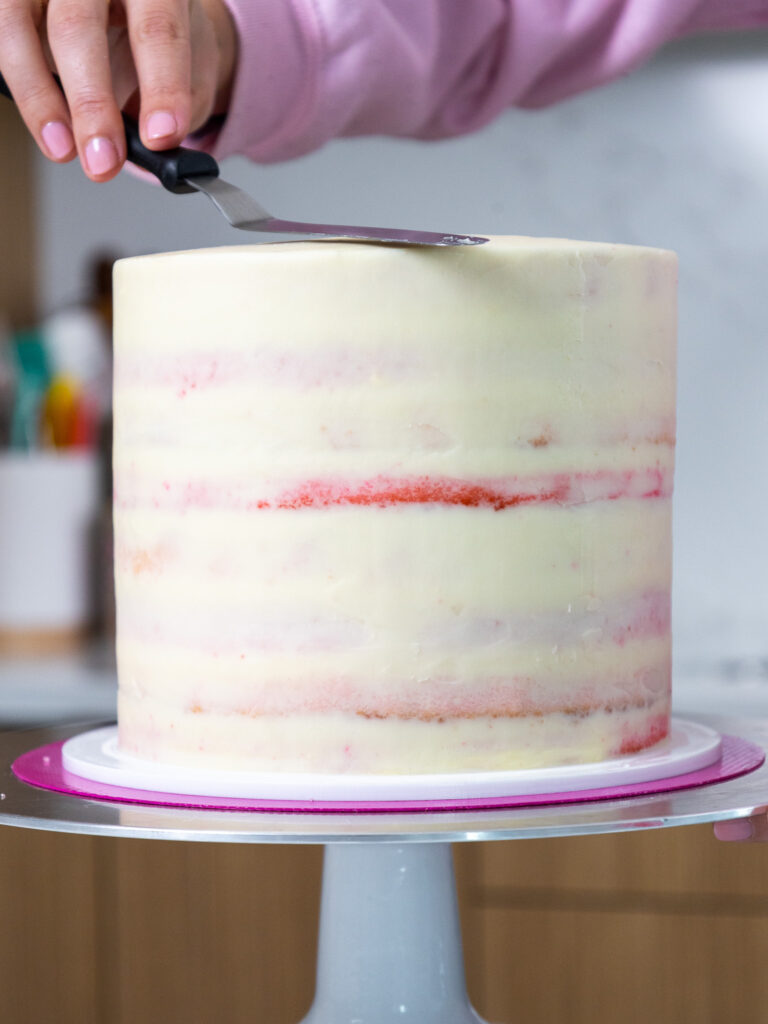
Smooth the frosting using a large offset spatula or bench scraper, then chill the cake in the fridge (30 minutes) or freezer (10 minutes) until the frosting is firm to the touch.
Step 5: Add the Second Layer of Frosting & Decorate
Then add a second, thicker layer of frosting to the cake.
Smooth the frosting using a large offset spatula or bench scraper.
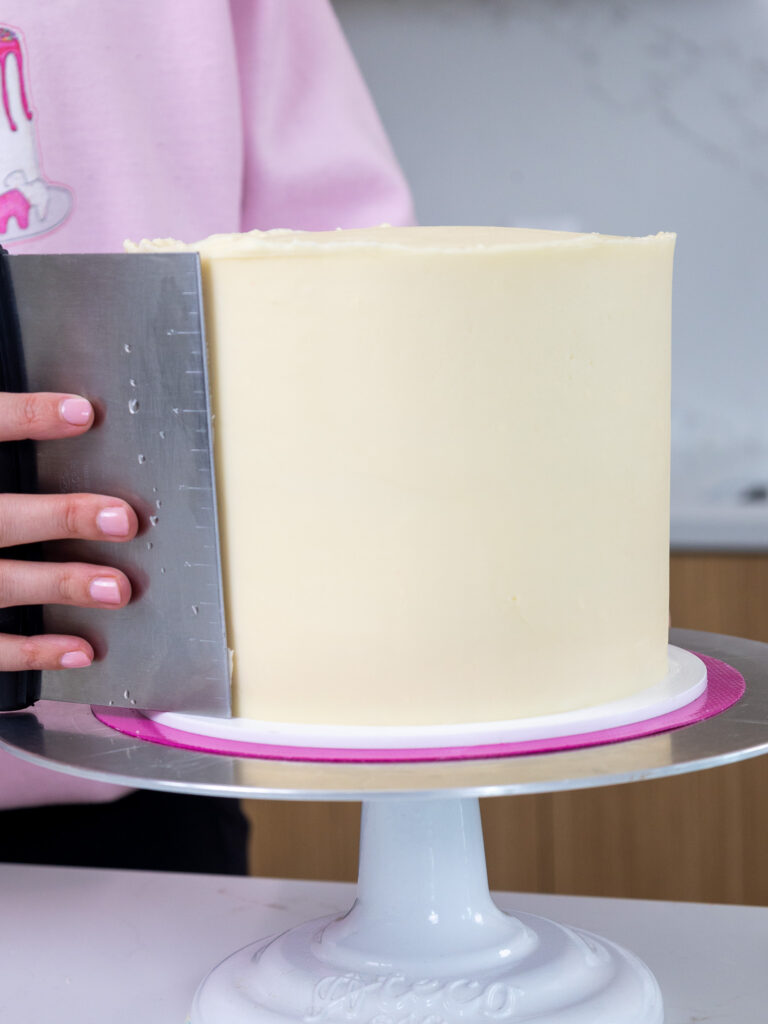
If you’re struggling to get smooth sides on the cake, check out my video tutorial on how to frost a cake smoothly.
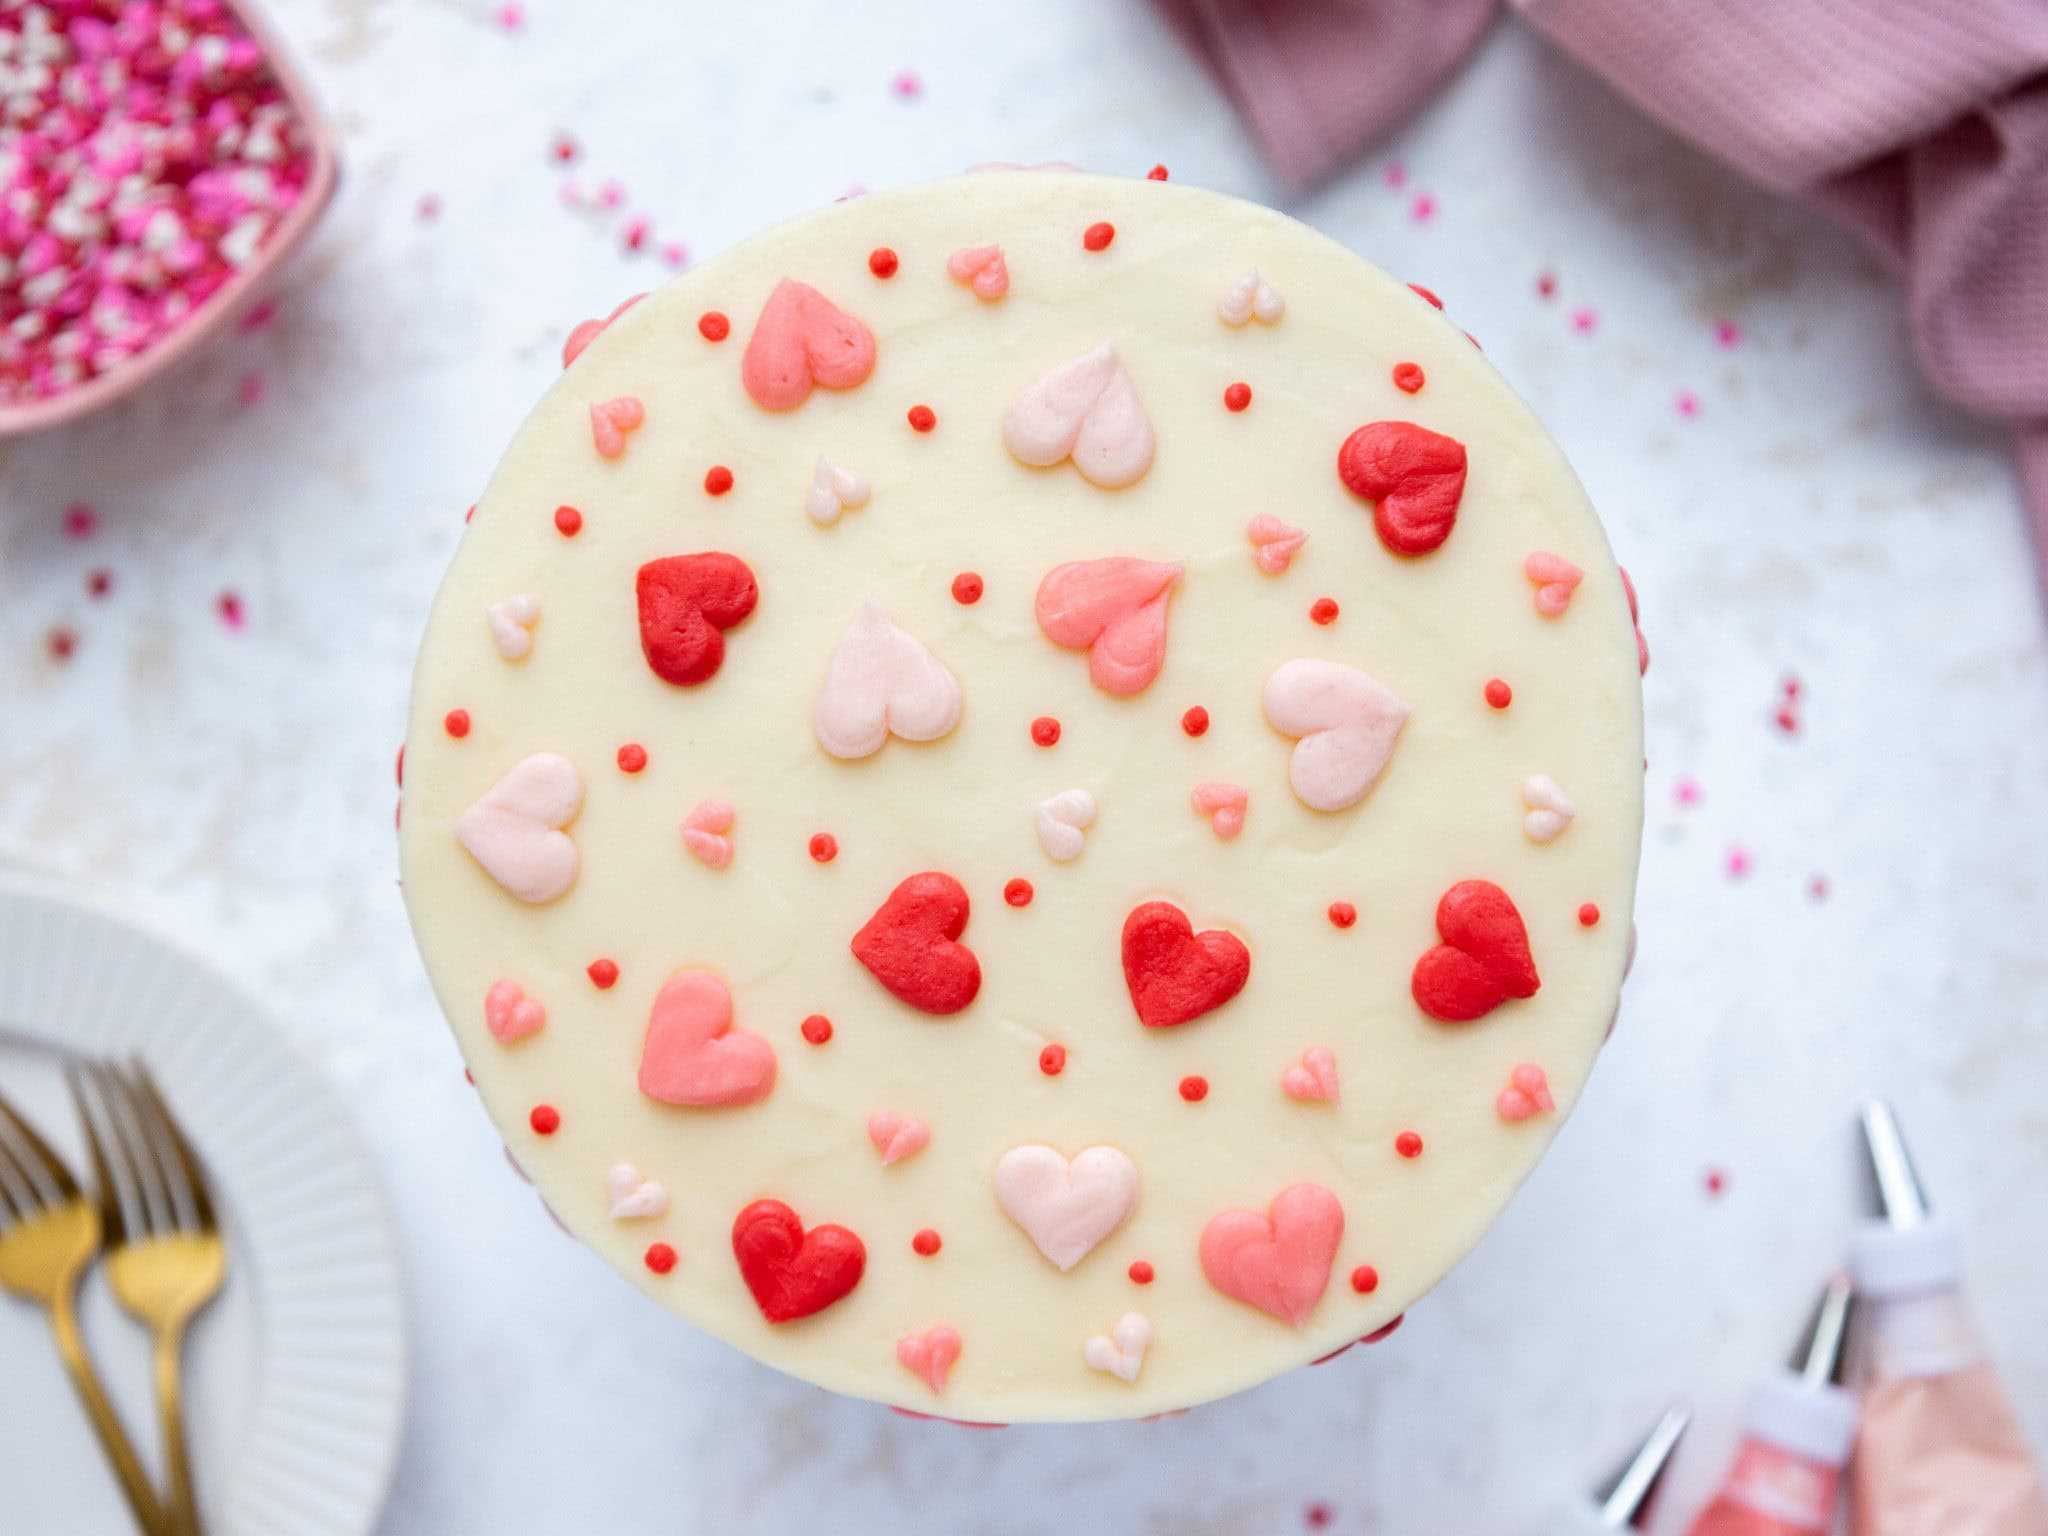
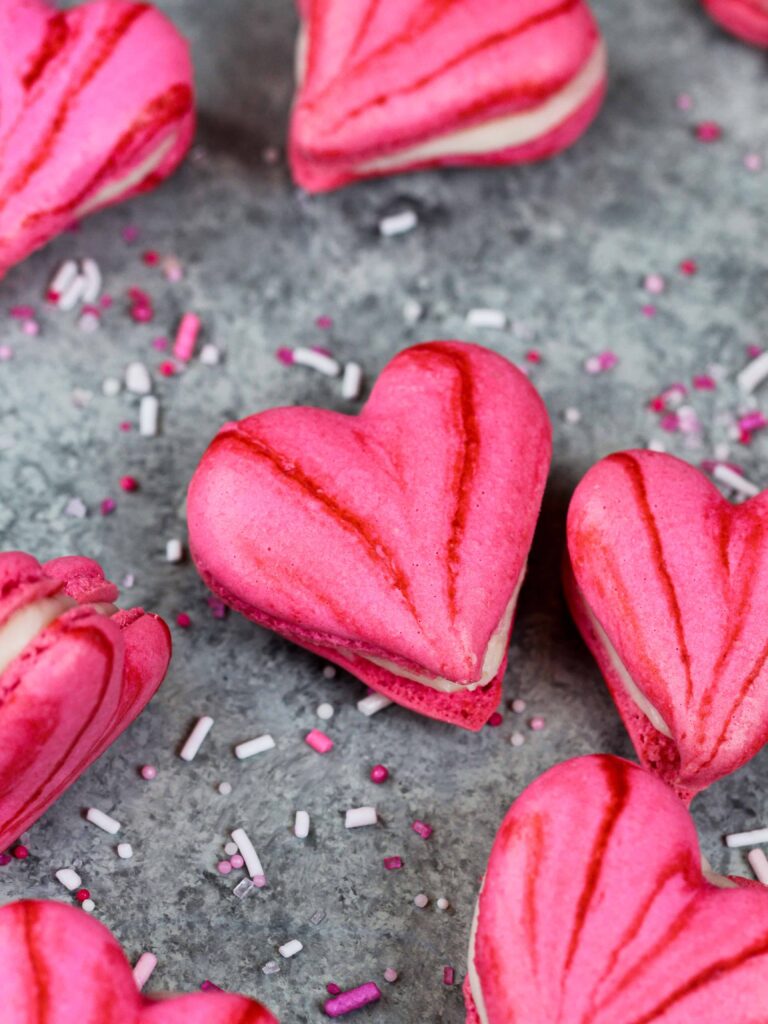
Color the remaining buttercream 3 different shades of pink using the same gel food coloring you used to make the cake layers.
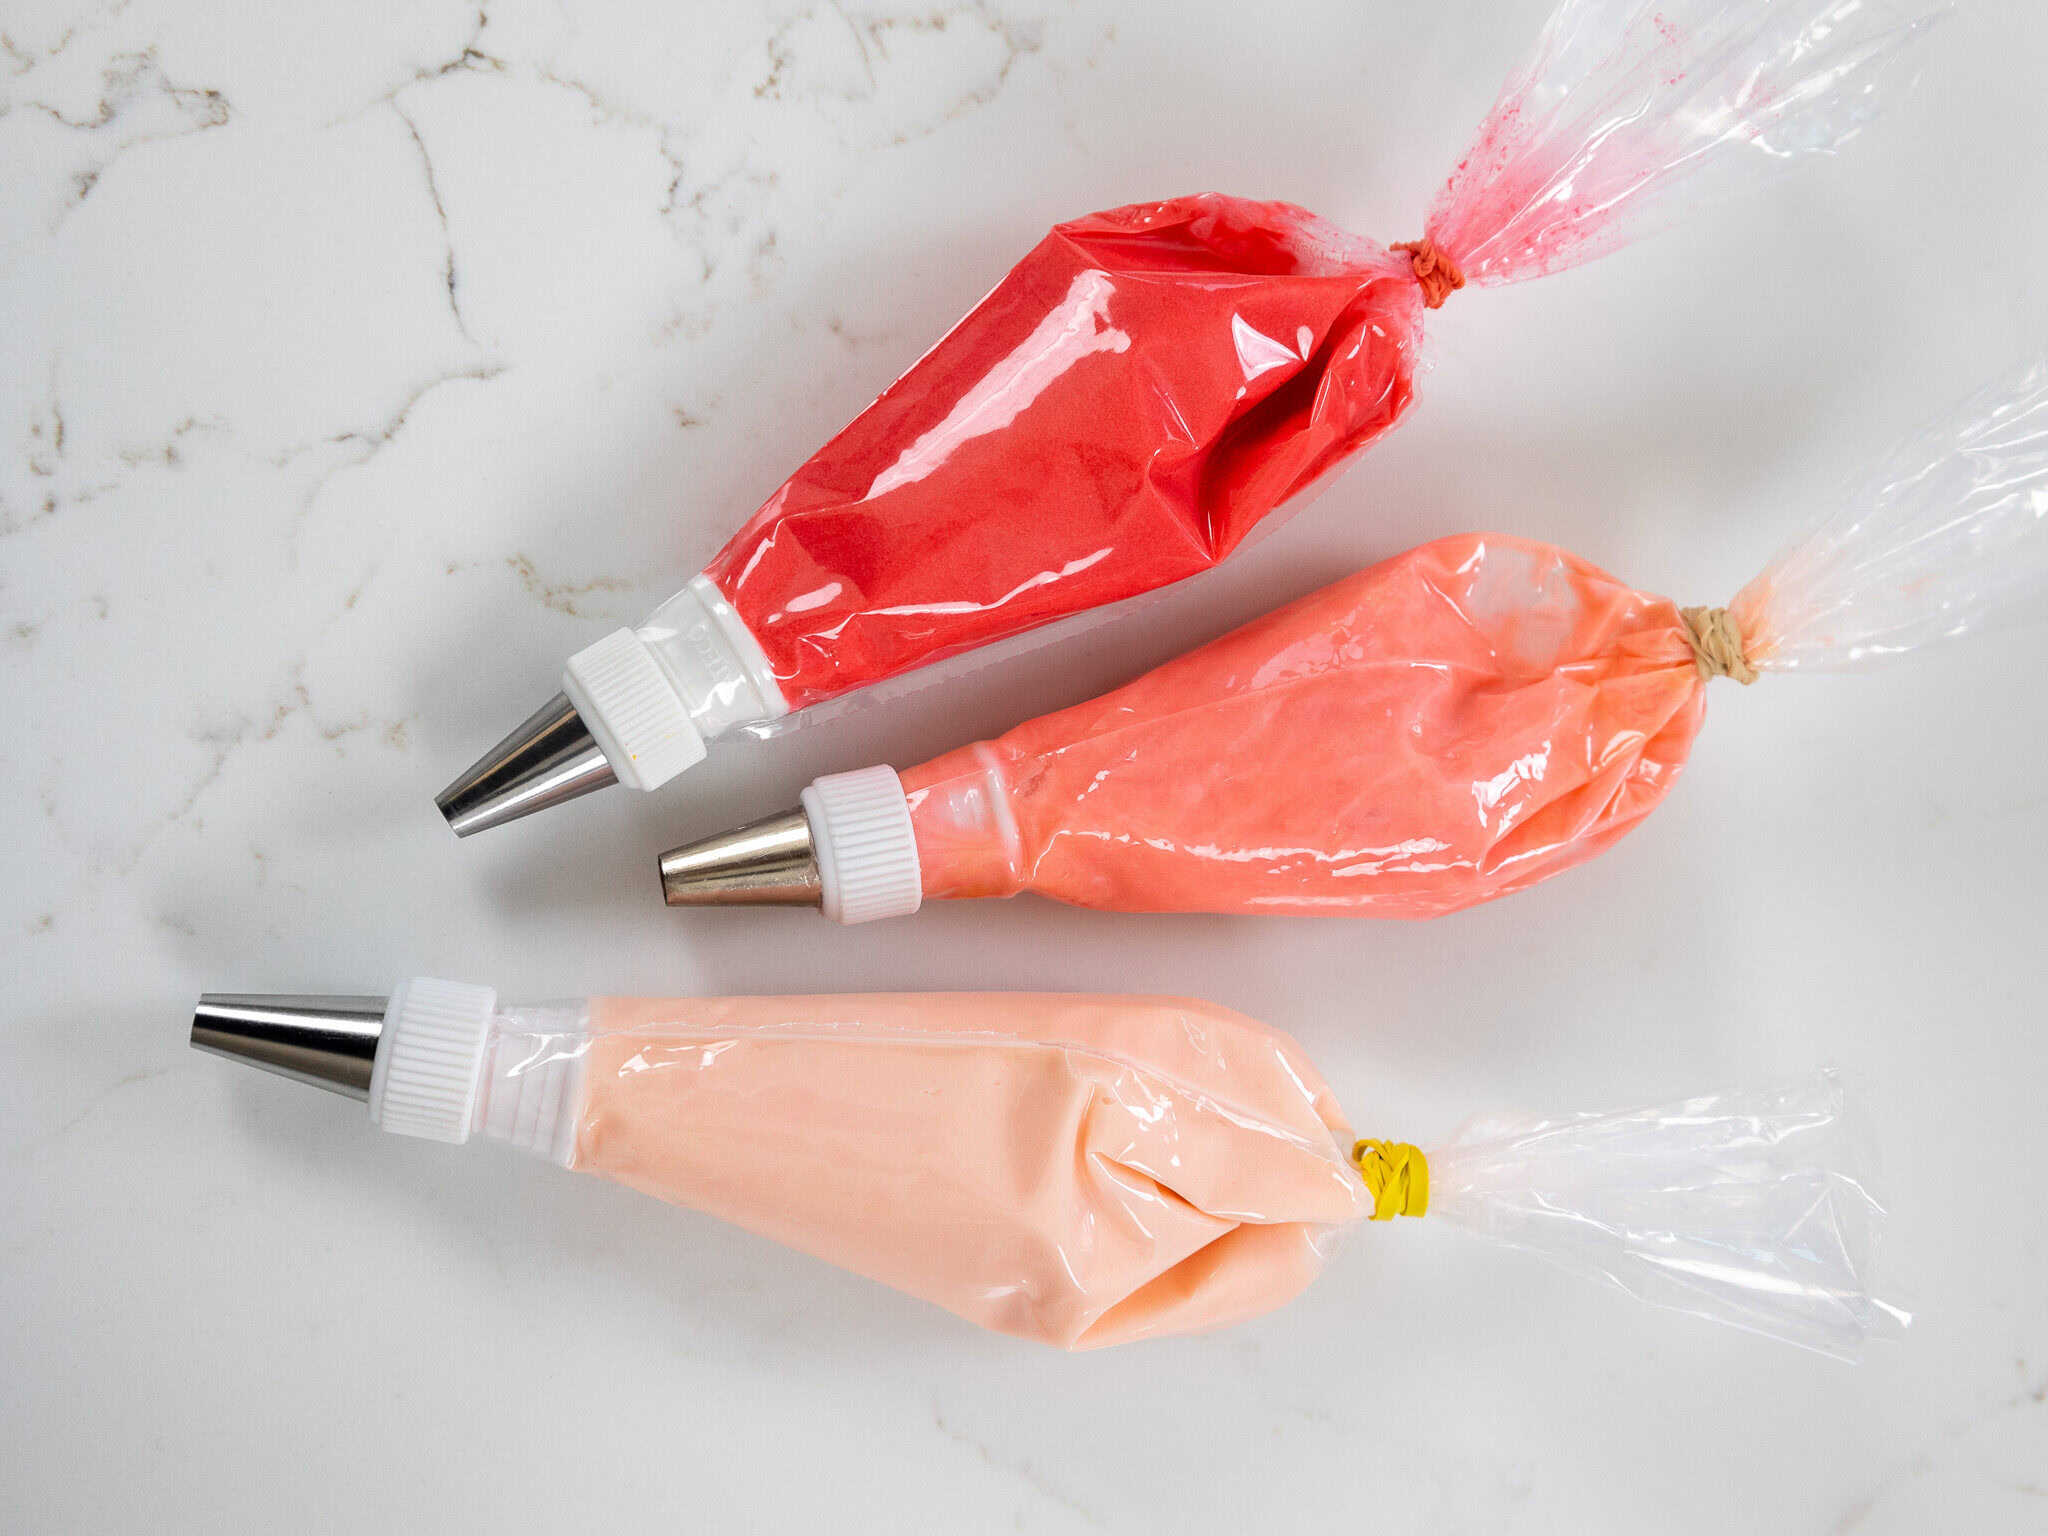
Place them in small piping bags fitted with a coupler and a small round tip like a Wilton 10.
I like to use a small heart-shaped cookie cutter to map out where I want to pipe the hearts and to make sure they end up being roughly the same size.
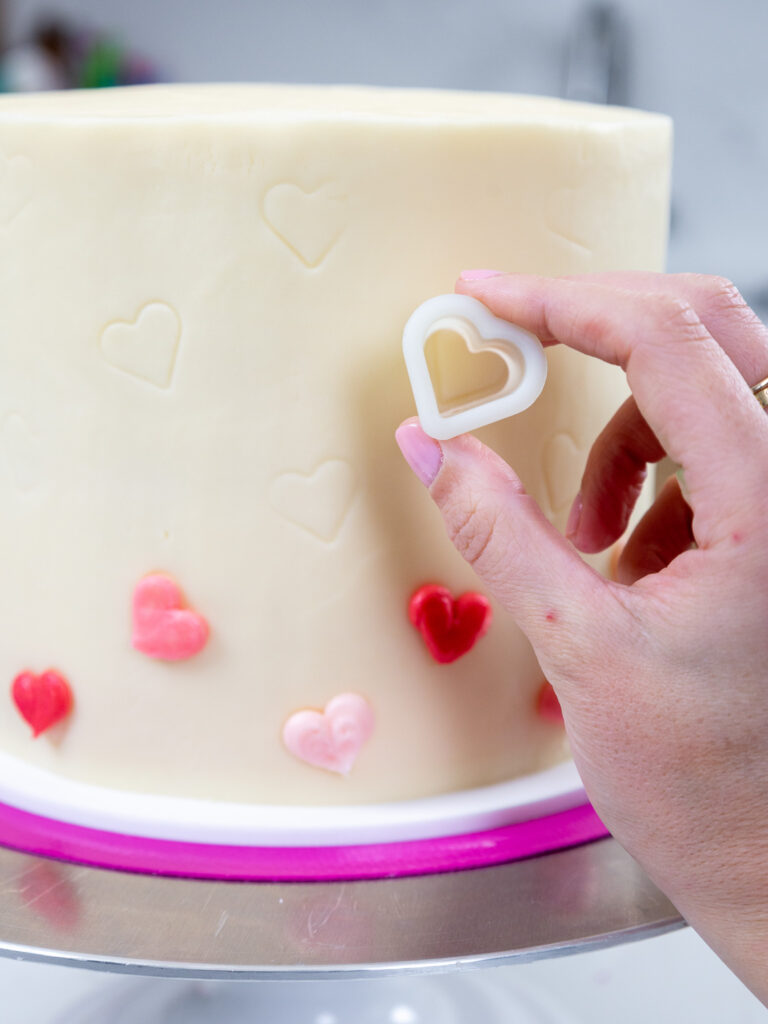
Pipe hearts around the cake with the different colored frosting, then swap out the piping tip for a smaller round tip like a Wilton 3.
Pipe little dots and hearts between the bigger hearts to fill in any empty spaces or gaps.
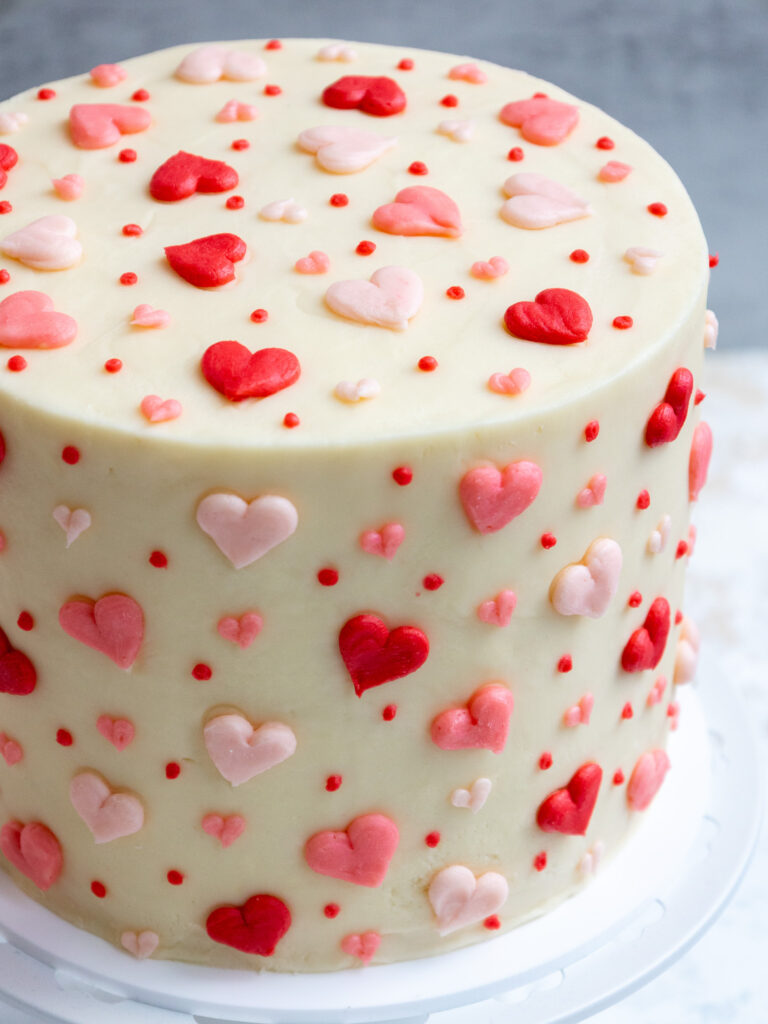
Then enjoy! If you’re making this cake in advance, it can sit at room temperature for a few hours or be stored in the fridge for up to a week.
Substitutions and Swaps – Pink Velvet Layers
This recipe uses quite a few ingredients, and I know you might not have them all on hand. Or if you have food allergies or restrictions, I’ve got you covered.
Below are some swaps and substitutions that can be made in this cake recipe.
- Cake Flour – This recipe turns out best with cake flour, but you can use a gluten-free flour blend or all-purpose flour if that’s all you have on hand.
- Granulated Sugar – I do not recommend changing the type or reducing the amount of sugar because it will change the texture of the cake layers.
- Unsalted Butter – If you only have salted butter on hand, you can use it in place of the unsalted butter in this recipe. Just be sure to omit the salt that this cake recipe calls for. You can also use vegan butter in its place (and also omit the salt)!
- Egg whites – I like to use the pasteurized egg whites that come in a carton, but you can also use 7 fresh egg whites or 4 whole, large eggs. If you have an egg allergy, you can use flaxseed eggs or a vegan egg replacer.
- Buttermilk – You can also use full-fat yogurt, whole milk, sour cream, or an alternative yogurt or milk (almond, soy, oat) if you’re dairy-free.
- Vegetable Oil – Any flavorless oil will work in this recipe. Canola or even sunflower oil would work great!
- Pink Gel Food Coloring – Gel food coloring works best to color these cake layers. Liquid food coloring can be used, but it’s more difficult to create vibrant colors.
Substitutions and Swaps – Cream Cheese Buttercream Frosting
- Unsalted Butter – If you only have salted butter on hand, you can use it in place of the unsalted butter. Just be sure to omit the salt that this frosting recipe calls for. You can also use vegan butter in its place (and omit the salt)!
- Cream Cheese– This recipe turns out best with full-fat cream cheese. I recommend using the type that comes in a block.
- Heavy Cream – Whole milk or alternative milk (soy, almond, oat) will work fine in this frosting recipe if that’s what you have on hand.
Making This Pink Velvet Cake in Different Sizes
I used 4, 7-inch cake pans to make this cake, but this recipe can be used to make different-sized cakes.
You can make three 8-inch or four 6-inch cake layers with one batch of batter. Bake the cake layers at 350 F / 175 C for 34-40 minutes or until a toothpick comes out with a few moist crumbs.
One batch of batter can also be used to make one 9×13-inch sheet cake.
Bake it at 350 F / 175 C for 40-50 minutes and use flower nails or heating cores to help the cake bake evenly. It should end up being about 2 inches tall.
If you want to make cupcakes, I highly recommend using my vanilla cupcake recipe and adding a bit of pink gel food coloring. One batch makes a dozen cupcakes.
Tips for Making the Best Pink Velvet Cake
- Ingredients at room temperature mix together better! Set out any cold ingredients ahead of time.
- Properly measure the cake flour (spoon into the cup measure, then level). Or better yet, use a kitchen scale to measure your dry ingredients.
- Use a scale to weigh your cake pans as you fill them. It will make the cake layers bake up to the same height and bake more evenly.
- Level the room temperature or thawed cake layers with a serrated knife to make them easier to stack.
- Make sure the buttercream is the right consistency. This will help give the cake proper structure and make it easier to decorate.
- Chill the cake layers in the freezer for about 20 minutes before assembling the cake. It makes them so much easier to stack and frost!
- If your cake layers turn out less than perfect, read my cake troubleshooting guide to see where things might’ve gone awry.
Making This Pink Velvet Cake in Advance
I highly recommend making these cake layers in advance and freezing them. It breaks the process up and makes it more approachable.
You can also make the frosting ahead of time, or save any leftover frosting! It can be stored in an airtight container in the fridge for up to 2 weeks or in the freezer for up to a month.
Be sure to give it a good stir once it thaws to get the consistency nice and smooth again.
A frosted cake can last in the fridge for up to a week or in the freezer for up to a month. The buttercream locks in all the moisture, keeping the cake fresh and delicious!
If you cut into the cake and have leftovers, use any remaining frosting to cover the cut section to keep it moist and store in the fridge for up to a week.
Let Me Know What You Think!
If you make this pink velvet cake recipe, I’d love to hear what you think! Let me know by leaving a rating and comment below.
And don’t forget to tag me @chelsweets and use #chelsweets if you share on social media, so that I can see your amazing creations.
Pink Velvet Cake Recipe
Ingredients
Pink Velvet Cake Recipe
- 3 cups cake flour 360g
- 3 cups granulated sugar 600g
- 2 1/2 tsp baking powder 10g
- 1 tsp fine salt 6g
- 1 cup unsalted butter, room temperature 226g
- 1 cup carton egg whites or 7 large egg whites, room temperature 235g
- 1 1/2 cups buttermilk, room temperature 360g
- 2 Tbsp vegetable or canola oil 30g
- 1 tsp vanilla extract or vanilla bean paste 4g
- pink gel food coloring
Cream Cheese Buttercream Frosting
- 2 cups unsalted butter, room temperature 452g
- 1 cup cream cheese, room temperature 226g
- 1 Tbsp vanilla extract or vanilla bean paste 12g
- 1 tsp fine salt 6g
- 11 cups powdered sugar 1375g
- 1/4 cup heavy whipping cream, room temperature 60g
- pink gel food coloring
Recommend Tools and Equipment
- 4, 7- inch cake pans
- Spinning cake stand
- Electric hand mixer or stand mixer
- 10- inch greaseproof cake board
- Serrated Knife
- Large offset spatula
- Bench Scraper
- 3 Small Piping Bags
- 3 Plastic Couplers
- 3 Medium-Sized Round Piping Tips like a Wilton 10
- 1 Small Round Piping Tip like a Wilton 3
Instructions
Pink Velvet Cake Layers
- Preheat oven to 350°F / 175°C. Line four, 7-inch or three 8-inch pans with parchment rounds and grease with non-stick baking spray or homemade cake pan release. I used 7-inch cake pans.
- Mix 3 cups cake flour, 3 cups sugar, 2 1/2 tsp baking powder, and 1 tsp salt together in a stand mixer with a paddle attachment or hand mixer until fully combined.
- Mix in 1 cup of room temperature, unsalted butter slowly into the dry ingredients on a low speed. Continue to mix until no large chunks of butter remain, and the mixture looks like moist sand.
- Pour in 1 cup of egg whites and mix on low until just incorporated. Scrape the sides and bottom of the bowl as needed with a rubber spatula.
- Then mix in 1 1/2 cups buttermilk, 2 Tbsp of vegetable oil, and 1 tsp of vanilla extract on a low speed until fully incorporated. Scrape down the sides of the bowl with a rubber spatula one more time, then beat on a medium speed for about 30 seconds to make sure everything is properly mixed together. This also helps lighten the texture of the cake layers. The batter will be thin, but don't worry! That's how it's supposed to be.
- If you make four 7-inch cake layers, pour half of the batter into a separate bowl (roughly 900g). Color one bowl light pink and the other bowl a deeper shade of pink using pink gel food coloring. Divide the batter evenly between the prepared pans, making 2 light pink and 2 deeper pink cake layers. I like to use a scale to make sure each pan has the same amount of batter and will bake up to the same height.
- If you make three 8-inch cake layers, pour 1/3 of the batter into a separate bowl (roughly 600g). Color the bowl with more batter light pink, and the other bowl a deeper shade of pink using pink gel food coloring. Divide the batter evenly between the prepared pans to make 2 light pink cake layers and 1 deeper pink cake layer
- Bake for 33-37 minutes or until a toothpick comes out with a few moist crumbs. Rotate the pans halfway through to help them bake evenly.
- Let the pans cool for 10 minutes, then run a small offset spatula around the perimeter of the pan to separate the cake from the pan.
- Place the cake layers into the freezer for 30 minutes to accelerate the cooling process. Once the layers are fully cooled, carefully flip the pans and remove the layers.
- Use a serrated knife to level the tops and remove any caramelization around the sides of the layers. I also like to torte the cake layers horizontally (see picture above) to create thinner cake layers, but this is optional. You can also trim the layers, then wrap and freeze them if you're making them in advance.
- If you make these cake layers in advance and freeze them, let them thaw for about 15 minutes before making the cake. The cake layers should still be slightly cold to the touch, which will make it easier to assemble the cake.
Cream Cheese Buttercream Frosting
- While the cake layers bake and cool, make the cream cheese buttercream frosting.
- In the bowl of a stand mixer or a large bowl, beat 2 cups of unsalted butter and 1 cup of cream cheese on a medium speed for 30 seconds with a stand mixer and paddle attachment or hand mixer until smooth.
- Mix in 1 Tbsp of vanilla extract and 1 tsp salt on a low speed. Then, gradually mix in 11 cups of powdered sugar and 1/4 cup of heavy cream on a low speed.
- Continue to mix on a low speed for a few minutes until the desired consistency is reached. If the frosting seems too thick, add in additional cream (1 Tbsp at a time). If the frosting seems too thin, add in more powdered sugar (a quarter of a cup at a time).
- Wait to color the buttercream until we've filled and frosted the cake. Cover the buttercream flush with plastic wrap to prevent crusting, then set aside.
Assembling This Pink Velvet Layer Cake
- Stack and frost cake layers on a greaseproof cake board or flat plate using a dab of frosting to help stick the first cake layer to the board.
- Spread an even layer of buttercream between each cake layer with a large offset spatula.
- Then add a thin coat of frosting around the cake to fully cover the cake layers.
- Smooth using a bench scraper, then chill the cake in the fridge (30 minutes) or freezer (10 minutes) until the frosting is firm to the touch.
- Add a second, thicker layer of frosting to the cake and smooth using a bench scraper. If you're struggling to get smooth sides on the cake, check out my in-depth tutorial on how to frost a cake smoothly.
- Color the remaining buttercream three different shades of pink using the same gel food coloring you used to make the cake layers. Place each color in its own small piping bag fitted with a plastic coupler and a small round tip like a Wilton 10.
- I like to use a small heart-shaped cookie cutter to map out where I want to pipe the hearts, and to make sure they end up being similar in size. Pipe hearts around the cake with the different colored frosting, then swap out the piping tip for a smaller round tip, like a Wilton 3. Pipe little dots and hearts between the bigger hearts to fill in any empty spaces or gaps.
- Then enjoy! If you're making this cake in advance, it can sit at room temperature for a few hours or be stored in the fridge for up to a week.
Video
Notes
Recipe Variations
One batch of cake batter makes about 1800 grams, or 10 cups. If you plan to use four circular cake pans, add 450 grams of batter to each pan. If you make 3 layers, add 600 grams to each pan. This recipe can also be used to make a pink velvet sheet cake! One batch will make 2, 9 x 13-inch cake layers that are about 1 inch tall. Bake for 35-40 mins at 350 F / 175 C. I recommend using heating cores if you have them to help large cake layers like this bake more evenly and quickly. You can also make one 9 x 13-inch cake layer that’s about 2 inches tall, but bake time will be 45-55 minutes at 350 F/ 175 C.Tips for Making the Best Pink Velvet Cake
- Ingredients at room temp mix together better! Set out any cold ingredients ahead of time.
- Properly measure your flour (spoon into the cup measure, then level). Or better yet, use a kitchen scale to measure your dry ingredients.
- Use a scale to weigh your cake pans as you fill them. It will make the cake layers bake up to the same height and bake more evenly.
- Level the room temperature or thawed cake layers with a serrated knife to make them easier to stack.
- Make sure the buttercream is the right consistency. This will help give the cake proper structure and make it easier to decorate.
- Chill the cake layers in the freezer for about 20 minutes before assembling the cake. It makes them so much easier to stack and frost!
- If your cake layers turn out less than perfect, read my cake troubleshooting guide to see where things might’ve gone awry.
Making This Pink Velvet Layer Cake in Advance & Storage Tips
Make these cake layers in advance and freeze them. It breaks the process up and makes it more approachable. This cream cheese frosting can also be made ahead of time, or you can save any leftover frosting! It can be stored in an airtight container in the fridge for up to 2 weeks, or in the freezer for up to a month. Be sure to give it a good stir once it thaws to get the consistency nice and smooth again. A frosted cake can last in the fridge for up to a week, or in the freezer for up to a month. The buttercream locks in all the moisture, keeping the cake fresh and delicious! If you cut into the cake and have leftovers, use any remaining frosting to cover the cut section to keep it moist and store it in the fridge for up to a week.Nutrition
Other Recipes You Might Like:
For a walk down memory lane, here are some pictures of my original version of this cake from back in 2018.
Hi, I like to ask how you stick your fondant to buttercream? Thank you.
Great question! I actually added the hearts to this cake right after I added the second layer of buttercream, so it hadn’t crusted yet! However, if yours has, you can just a tiny dab of buttercream to the back of each heart, and gently press it into the buttercream. if you go this route, it helps to chill the cake before doing this!
Why is there vinegar in the cake? I don’t remember there being any vinegar in any of your other cakes.
Vinegar is a common ingredient in red velvet cake recipes, and I usually use it in any version of a “velvet” cake I make ??
Is there a way you could send me a link to your easy funfetti cake with teal frosting I can’t find it on your website.
i actually didn’t share a post for that cake, but its the same cake and buttercream recipe (minus the cookie dough) i used in this post: https://chelsweets.com/2019/01/27/funfetti-cookie-dough-drip-cake/
Hope that helps!
@Chelsweets, I don’t see vinegar as an ingredient … did the recipe change when it was updated? Thank you!
Hi Sheila,
I did tweak this recipe when I updated it in Feb 2023 and I removed the vinegar! I think the buttermilk gives the recipe enough of a tang. Apologies for any confusion!
Hi I was wondering why there is vinegar in this recipe as I don’t remember it in some of your other recipes. Thanks
Most red velvet or “velvet” cake recipes use a bit of vinegar, which adds to the texture and flavor of the cake! Since this is a pink velvet cake recipe, I felt it needed a bit of vinegar 🙂
Hey, was wondering if this cake would work as a double barrel cake. I’m making a redvelvet double barrel with two 7 inch cakes with 3 layers each. Would this be sturdy enough?
I’ve never made a double barrel cake before, but this cake recipe is pretty sturdy, and keeps it’s shape well!! Hope that helps Topaz <3
Oh my gosh thanks so much for replying!! I also have another question, is there a difference between this recipe and the redvelvet you made for your oreo red velvet cake.. I’ve been going back and forth between which one to use. Which one do you think is sturdier? Ahhh decisions decisions lol
They’re both pretty sturdy / have the same structure! haha it really just comes down to what look / flavor you’re after <3 Happy baking Topaz!!
Hello, I love your recipes! Just wondering if you’ve ever made this recipe as cupcakes?
Thanks! I haven’t, my cake recipes are designed to bake pretty flat, so it isn’t ideal for cupcakes! It still works, but they’ll make super flat cupcakes! They’ll taste delicious though 🙂
Taste is what matters, my family doesn’t mind extra icing 😉
We love your cakes! Do you find that the fondant accents hold up in the frig, if you make the cake ahead of time? Or should I wait to add them the day of? Making a 1st birthday cake and trying to get as much done ahead of time as possible 🙂
Hi Rebekah! I usually add them the day of, just to be safe! Pink heart like this are usually ok if they’re flush against the cake, but if there’s anything sticking off / up from the cake, those can sometimes soften and lose their shape! They also can get condensation if you live in a humid or warm place, or in the summer heat! The safest best is to add the day off <3
Hi I love your cakes and I have actually made 2 of your recipes but my question is why you have whole eggs on this recipe for a cake that is white and only egg whites for the vanilla? I am seen all other white velvet use only egg whites
Hi Rossy! Since I’m adding pink gel food coloring to the batter, the egg yolks don’t really change the end color of the batter! I’ve received tons of comments from people asking if they can use whole eggs in my vanilla cake recipe, so I wanted to try to keep things simple in this pink velvet cake recipe! <3
Hi can u please tell me if i am using liquid pink food color how much do i have to use?
Hi Catherine,
You’d probably need to add about 1 Tbsp of liquid pink food coloring. Hope that helps, happy baking!!
Can I make the Red Velvet Recipe and just use pink dye instead of Red to get the same effect but texture/softness of redvelvet?
Hi Rhianna,
You totally can! Or you can use my red velvet cake recipe, which is more of a classic red velvet cake: https://chelsweets.com/2019/11/04/red-velvet-layer-cake/
Hope that helps, happy baking!
@Chelsweets, if you use the traditional red velvet recipe with the pink dye. Do you still use the cocoa powder?? Cause wouldn’t that make it brownish color?
Hi Edy,
I do not use cocoa powder when I make pink velvet cakes for that very reason! The pink is just such a delicate shade, cocoa totally ruins it :/ This recipe is based on my white velvet cake recipe which doesn’t use any cocoa powder.
Good morning, would this cake be sturdy enough to use rolled fondant instead of frosting?
Looks so good! Can I make this cake using just the egg whites instead of the whole eggs?
Hey!!! Been using your cake recipes for everything and they never disappoint!
I am looking to make this cake for Easter this year but need to do a Gluten Free version. Would I be able to just do a cup for cup substitute for the flour? I usually use Cup4Cup GF Flour but if you think a different gluten free flour would work better I am open to suggestions!
Thanks!
Quick question your vanilla layer cake has 13g (2.5tsp) of baking powder on the recipe card but this pink velvet says 2tsp is 13g of baking powder. Just trying to make sure I have the right numbers so they each bake correctly. I have made the vanilla cake many times with the 10g of baking powder it says. Please advise! Cannot wait to try this pink velvet recipe!
Thank you for all you do!
Hi ! Its such a beautiful cake ….. I want to make an eggfree cake as I don’t consume eggs …. What would be the best egg replacement for this cake ….thanks …take care
Hi Shashi,
Thank you!! I would recommend either using 4 flax eggs (1 tbsp ground flax + 3 Tbsp water per egg) or apple sauce (1 cup in place of the egg whites). It will change the taste and texture a bit, but it should still taste great. Hope that helps, happy baking!
Hi I’m going to be using 5×2” cake pans. How do I cook them? Thanks!
Hi Bianca,
I’d recommend making 6, 5-inch cake layers, and baking them for 30-35 minutes. I hope that helps, happy baking!
There’s a lot of sugar in this recipe, think if I took out a cup I’d have to decrease the other ingredients too much?
Hi Jackie,
This cake recipe does use a lot of sugar, but the sugar helps give these cake layers a tender, soft texture. If you decrease it by 1 cup, the cake layers will bake up a lot less tender. This recipe makes a pretty big cake though, so the sugar gets spread out between a lot of people/servings 🙂 Hope that helps, happy baking!
Hi thanks for the recipe. Made this cake for my daughter’s first birthday 2 weeks ago, it was sooooo good that i’m making it again today for my husband’s birthday?
Yay, I’m so happy to hear that Nausheen!! 🙂 Thank you for sharing!!
Hi Chelsea, i commented on an old post from your cream cheese buttercream recipe but thought i’d message here as well. Is the only difference between the two, the quantity? It looks like this calls for 11 cups of powdered sugar vs 7 cups in the other one. i am planning on using your moist chocolate cake recipe with the cream cheese buttercream frosting here. Would that work?
Love your recipes!
Hi Monica,
The ratio of cream cheese to butter is slightly higher in this recipe, but yes the main difference is just the quantity. This cake has a ton of layers and you need extra frosting to pipe on the decorations, so it needs to have a higher yield.
It’s funny that you want to make that combination, I actually have a recipe that is exactly that 🙂 Here’s the link: https://chelsweets.com/chocolate-cake-with-cream-cheese-frosting/
Hi Chelsey – I made this cake for my daughter’s baby shower this week and it was a huge hit! So much so that I got asked to make one for a guest’s wedding cake.
The taste and texture are amazing. Simply the best-tasting cake I have ever made and I have made a lot.
I usually make my cakes the day before any event but I decided to make these in advance following the method on your blog. I will be doing this in the future for any multi-layer cake as it makes it much easier to level and ice them.
Thanks for sharing all your great recipes and techniques.
Hi Karen,
I’m so happy to hear that, thank you so much for sharing 🙂 And right?? Being able to make cakes in advance is such a game changer, especially for big cakes!!
Did you change this recipe???? Where is the original recipe?!??
Hi Kim,
I haven’t updated this recipe in years! Are you maybe thinking of a different recipe? Or did you use it several years ago? What about it do you think is different? Hopefully I can figure out what you’re looking for and direct you to the right recipe 🙂
Hi! I’m making this cake for my daughter’s 5th birthday party. If I add vinegar will it make the cake Keven more tender/moist? If so how much to add?
Hi Chanel,
Love that, I hope it turns out amazing! This cake recipe uses buttermilk which is basically the equivalent of using milk and lemon juice or vinegar, so it kind of already has that effect with the buttermilk! If you wanted to add additional vinegar you could add a teaspoon or two, but because this recipe also uses cake flour it really is tender and moist without any additional vinegar. Hope that helps, happy baking!
Hello! This looks lovely! I ant to make a 4 layer 8 inch cake for my daughter’s birthday. Do I need to change anything? or timing?
Hi Chanel,
You totally can do that the cake layers will just turn out a little bit thinner, and we’ll bake a bit faster! I’d recommend checking on them a few minutes earlier than the recipe card says, and testing the center with a toothpick to see if they’re done. Once the toothpick comes out with a few moist crumbs they’re ready to go! Hope that helps and that your daughters keep turns out great!