
Geode Cake
I finally hopped on the geode cake bandwagon this weekend and am happy to report that this stunning design is a lot easier to make than you might think!
All you need is a frosted cake, clear rock candy, gel food coloring, and some clear extract or alcohol!
This cake was inspired by an amazing amethyst/geode wedding cake made by Intricate Icings Cake Design. To help the purple pop even more, I added a silver border with edible art paint.
I modified the design to make it a bit more approachable for all of us home bakers!
Making this Geode Cake: Step by Step Tutorial
Let’s walk through each step of this cake together to make sure it turns out as amazing as possible!
Step 1: Bake and Trim Your Cake Layers
Line four 7-inch round cake pans with parchment rounds and grease with non-stick baking spray or homemade cake release. 6-inch pans work too, the cake will just be slightly taller!
Divide the cake batter evenly between the prepared pans and bake for 33-36 minutes or until a skewer comes out with a few moist crumbs.
Let them cool for 10 minutes, then run an offset spatula around the perimeter of the pan to separate the cake from the pan. Flip the cake layers onto a wire rack to finish cooling.
Once the cake layers are fully cooled, use a serrated knife to level the tops of 3 of the layers before you assemble your cake. You can also wrap and freeze them if you’re making them in advance.
If you make these cake layers in advance and freeze them, let them thaw for about 20 minutes before making your cake. The cake layers should still be slightly cold to the touch, which will make it easier to assemble your cake.
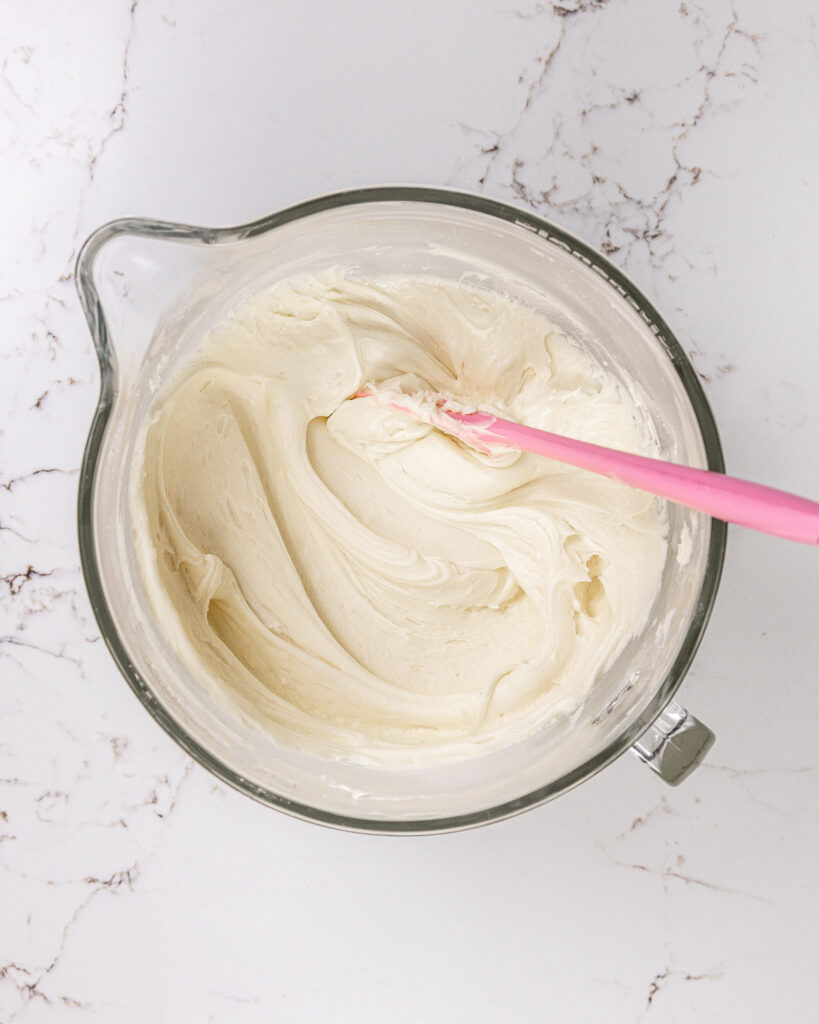
Step #2: Make the Buttercream Frosting
While the cake layers bake and cool, make the vanilla buttercream frosting. You can use either an electric hand mixer or a stand mixer.
If your frosting seems too thick after mixing together all your ingredients, add in additional cream (1 teaspoon at a time). Or if the frosting is too thin, add in more powdered sugar (1/4 cup at a time).
If you’re unsure about how thick your frosting should be, you can learn what consistency you’re looking for in my frosting consistency post.
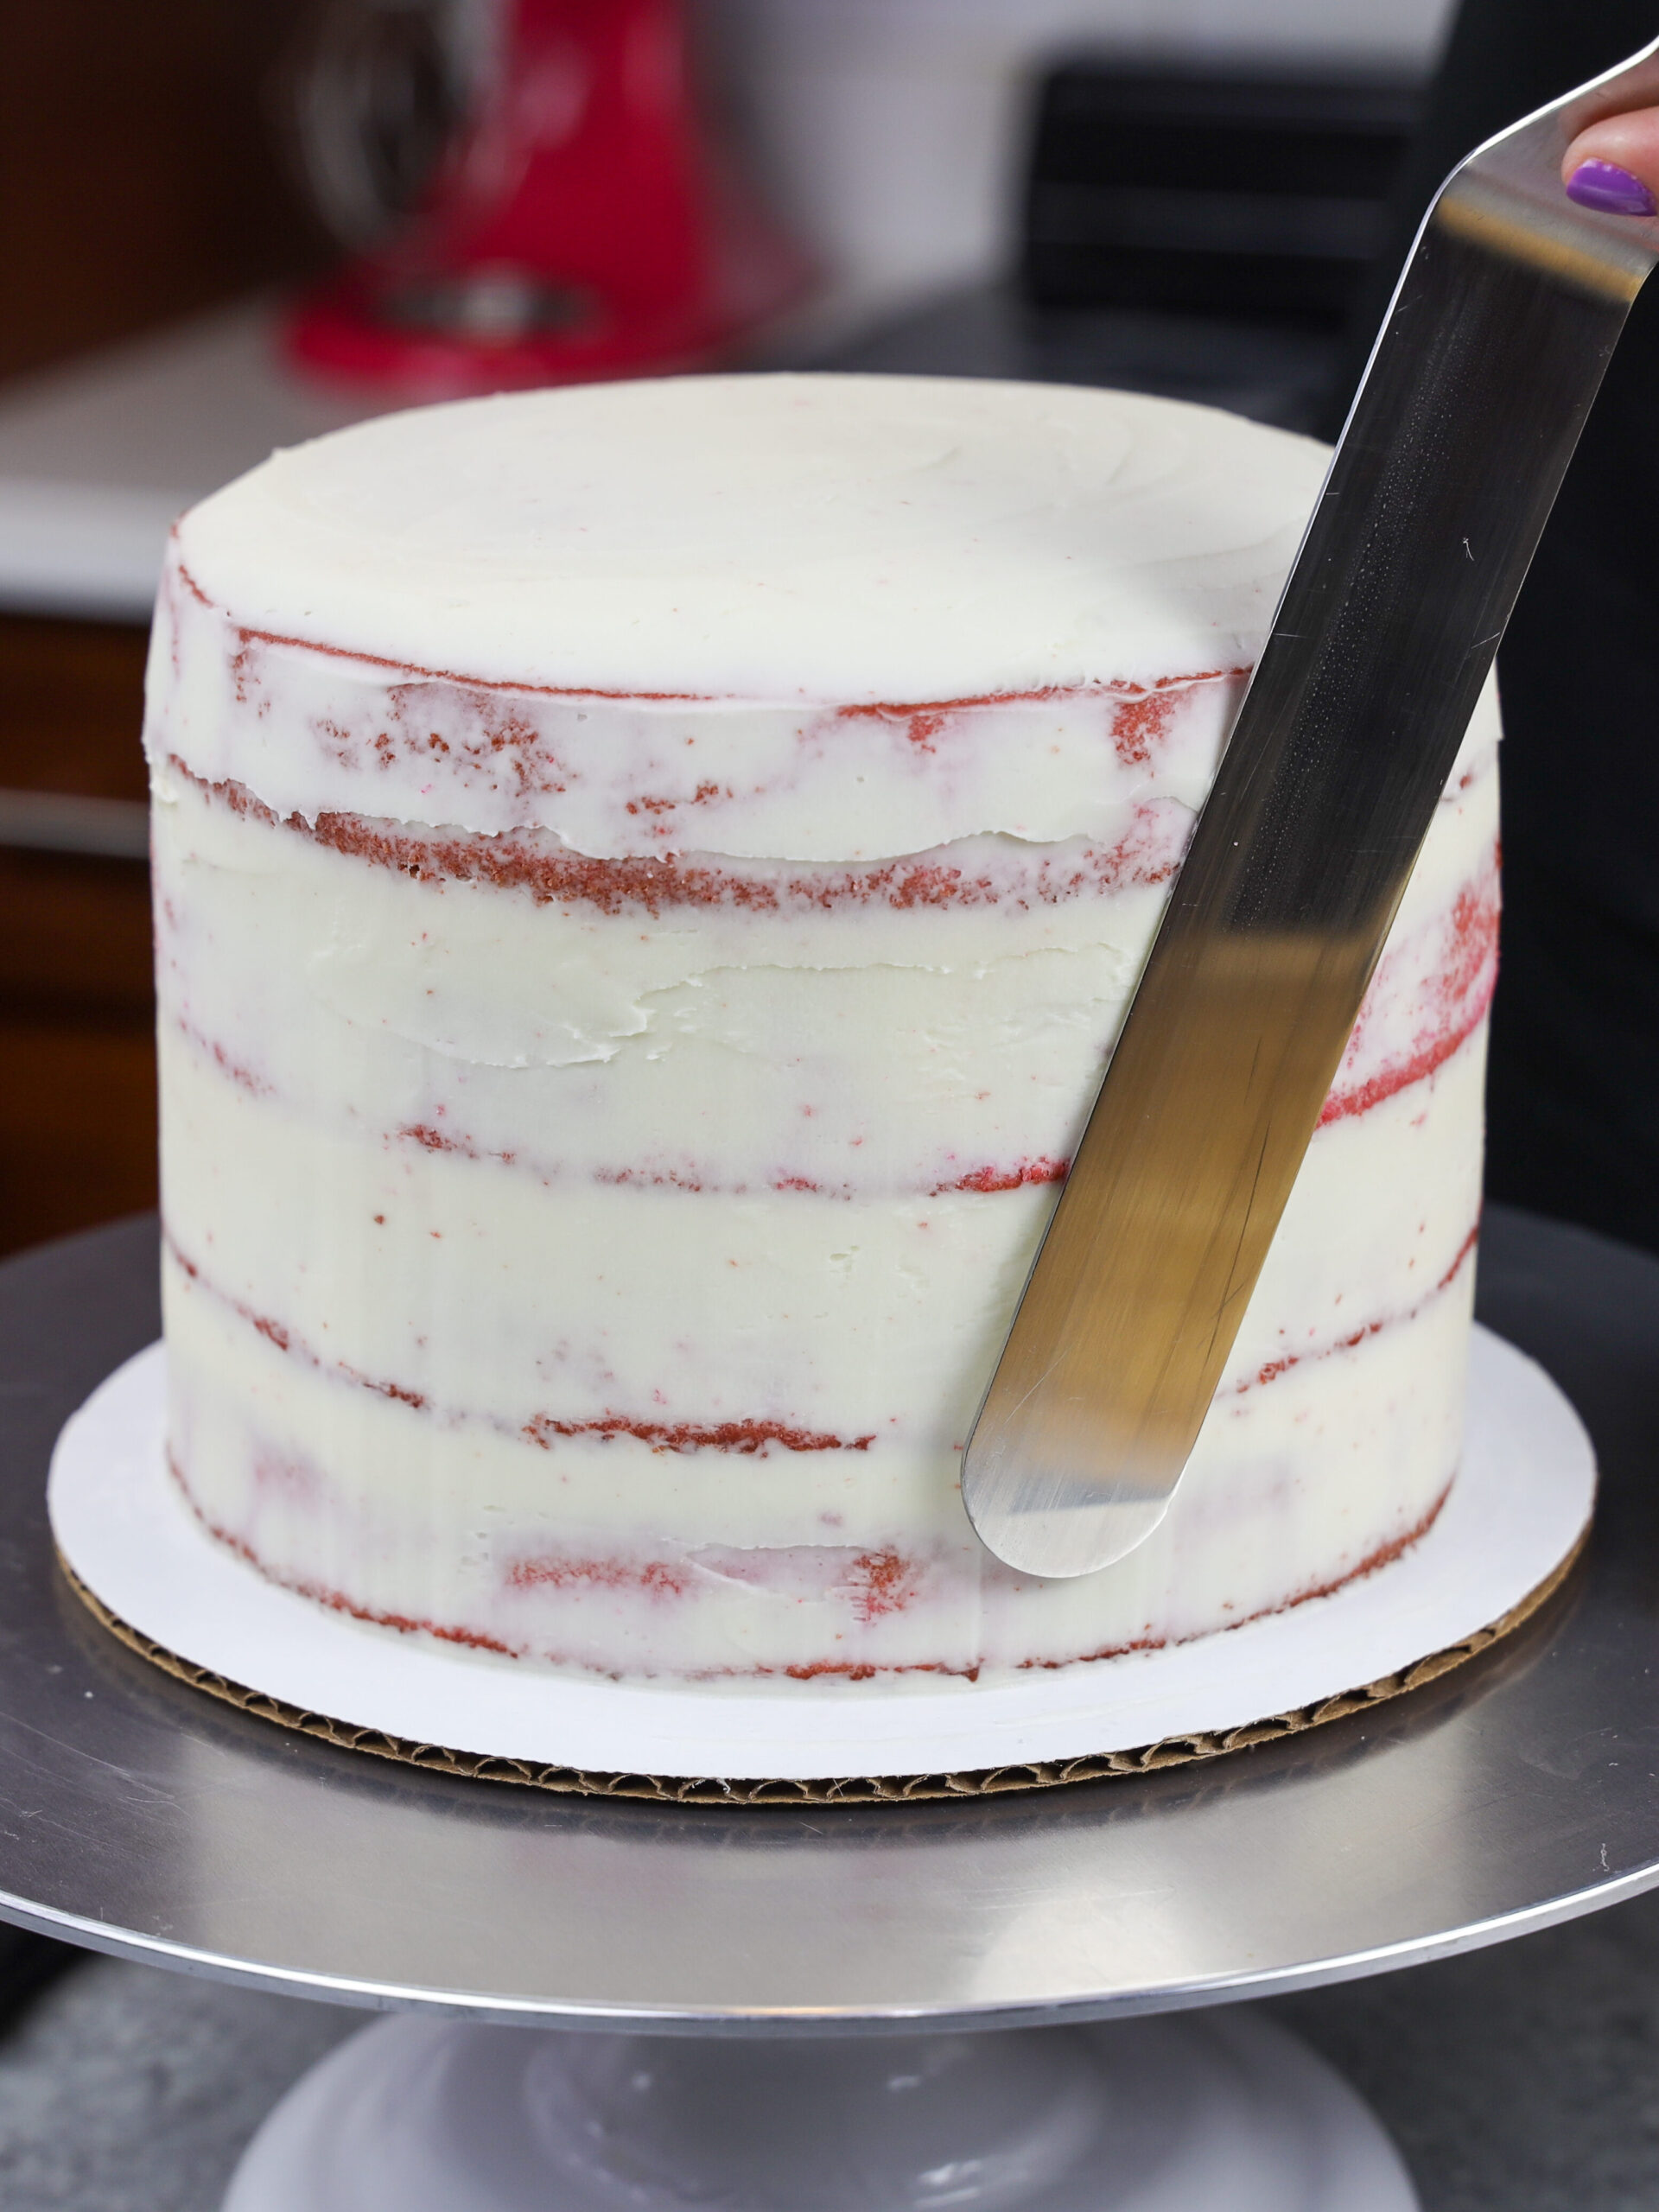
Step 3: Stack and Crumb Coat the Cake Layers
Next, it’s time to assemble the cake! I recommend freezing your cake layers for about 20 minutes before stacking them. It will make them way easier to handle and frost.
Stack and frost the cake layers on a 10-inch greaseproof cake board. Use a dab of frosting to help stick the bottom cake layer to the board.
Spread an even layer of frosting between each cake layer with an offset spatula. Place the unleveled cake layer on top, to give the cake a rounded top.
Smooth with a small offset spatula and/or acetate sheet, then chill the cake in the fridge (30 minutes) or freezer (10 minutes) until the frosting is firm to the touch.
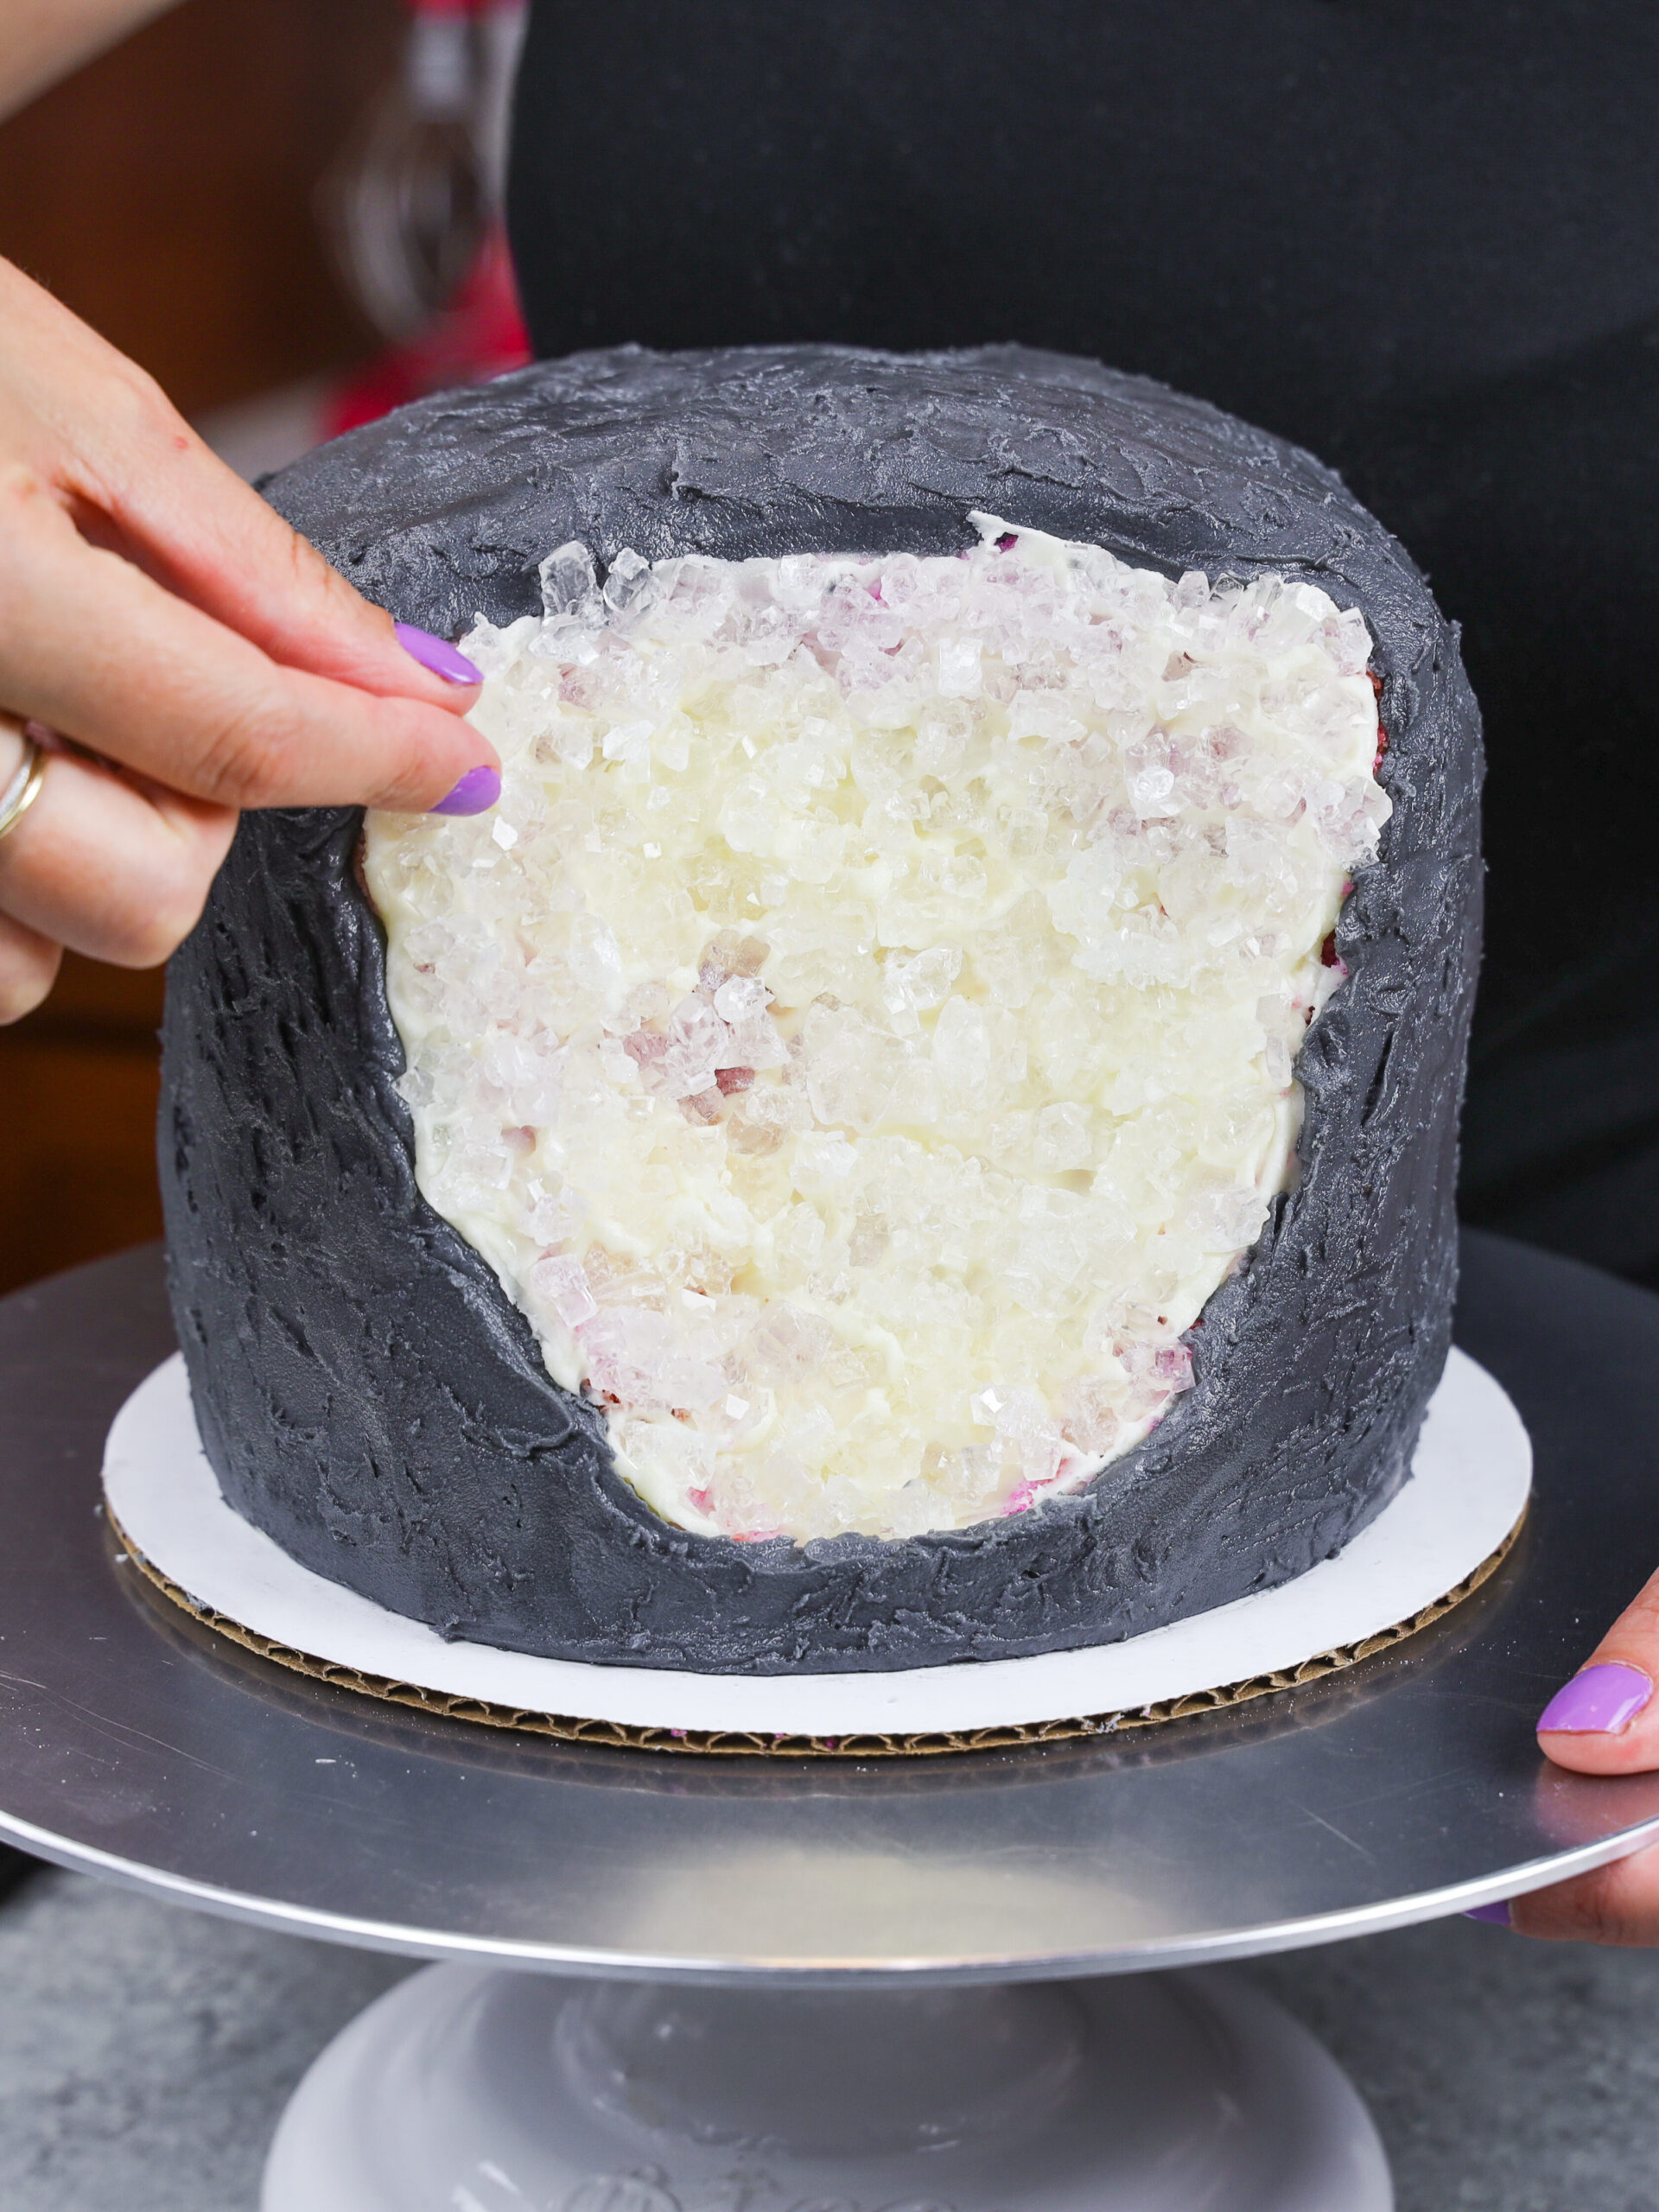
Step 4: Cut Out a Section of the Cake
Once the cake is chilled, use a sharp knife and spoon to cut out a large section from one side of the cake. This can be as small/large, or shallow/deep as you want!
I like to keep mine pretty shallow so that I’m not removing too much cake, but you can create whatever shape you want.
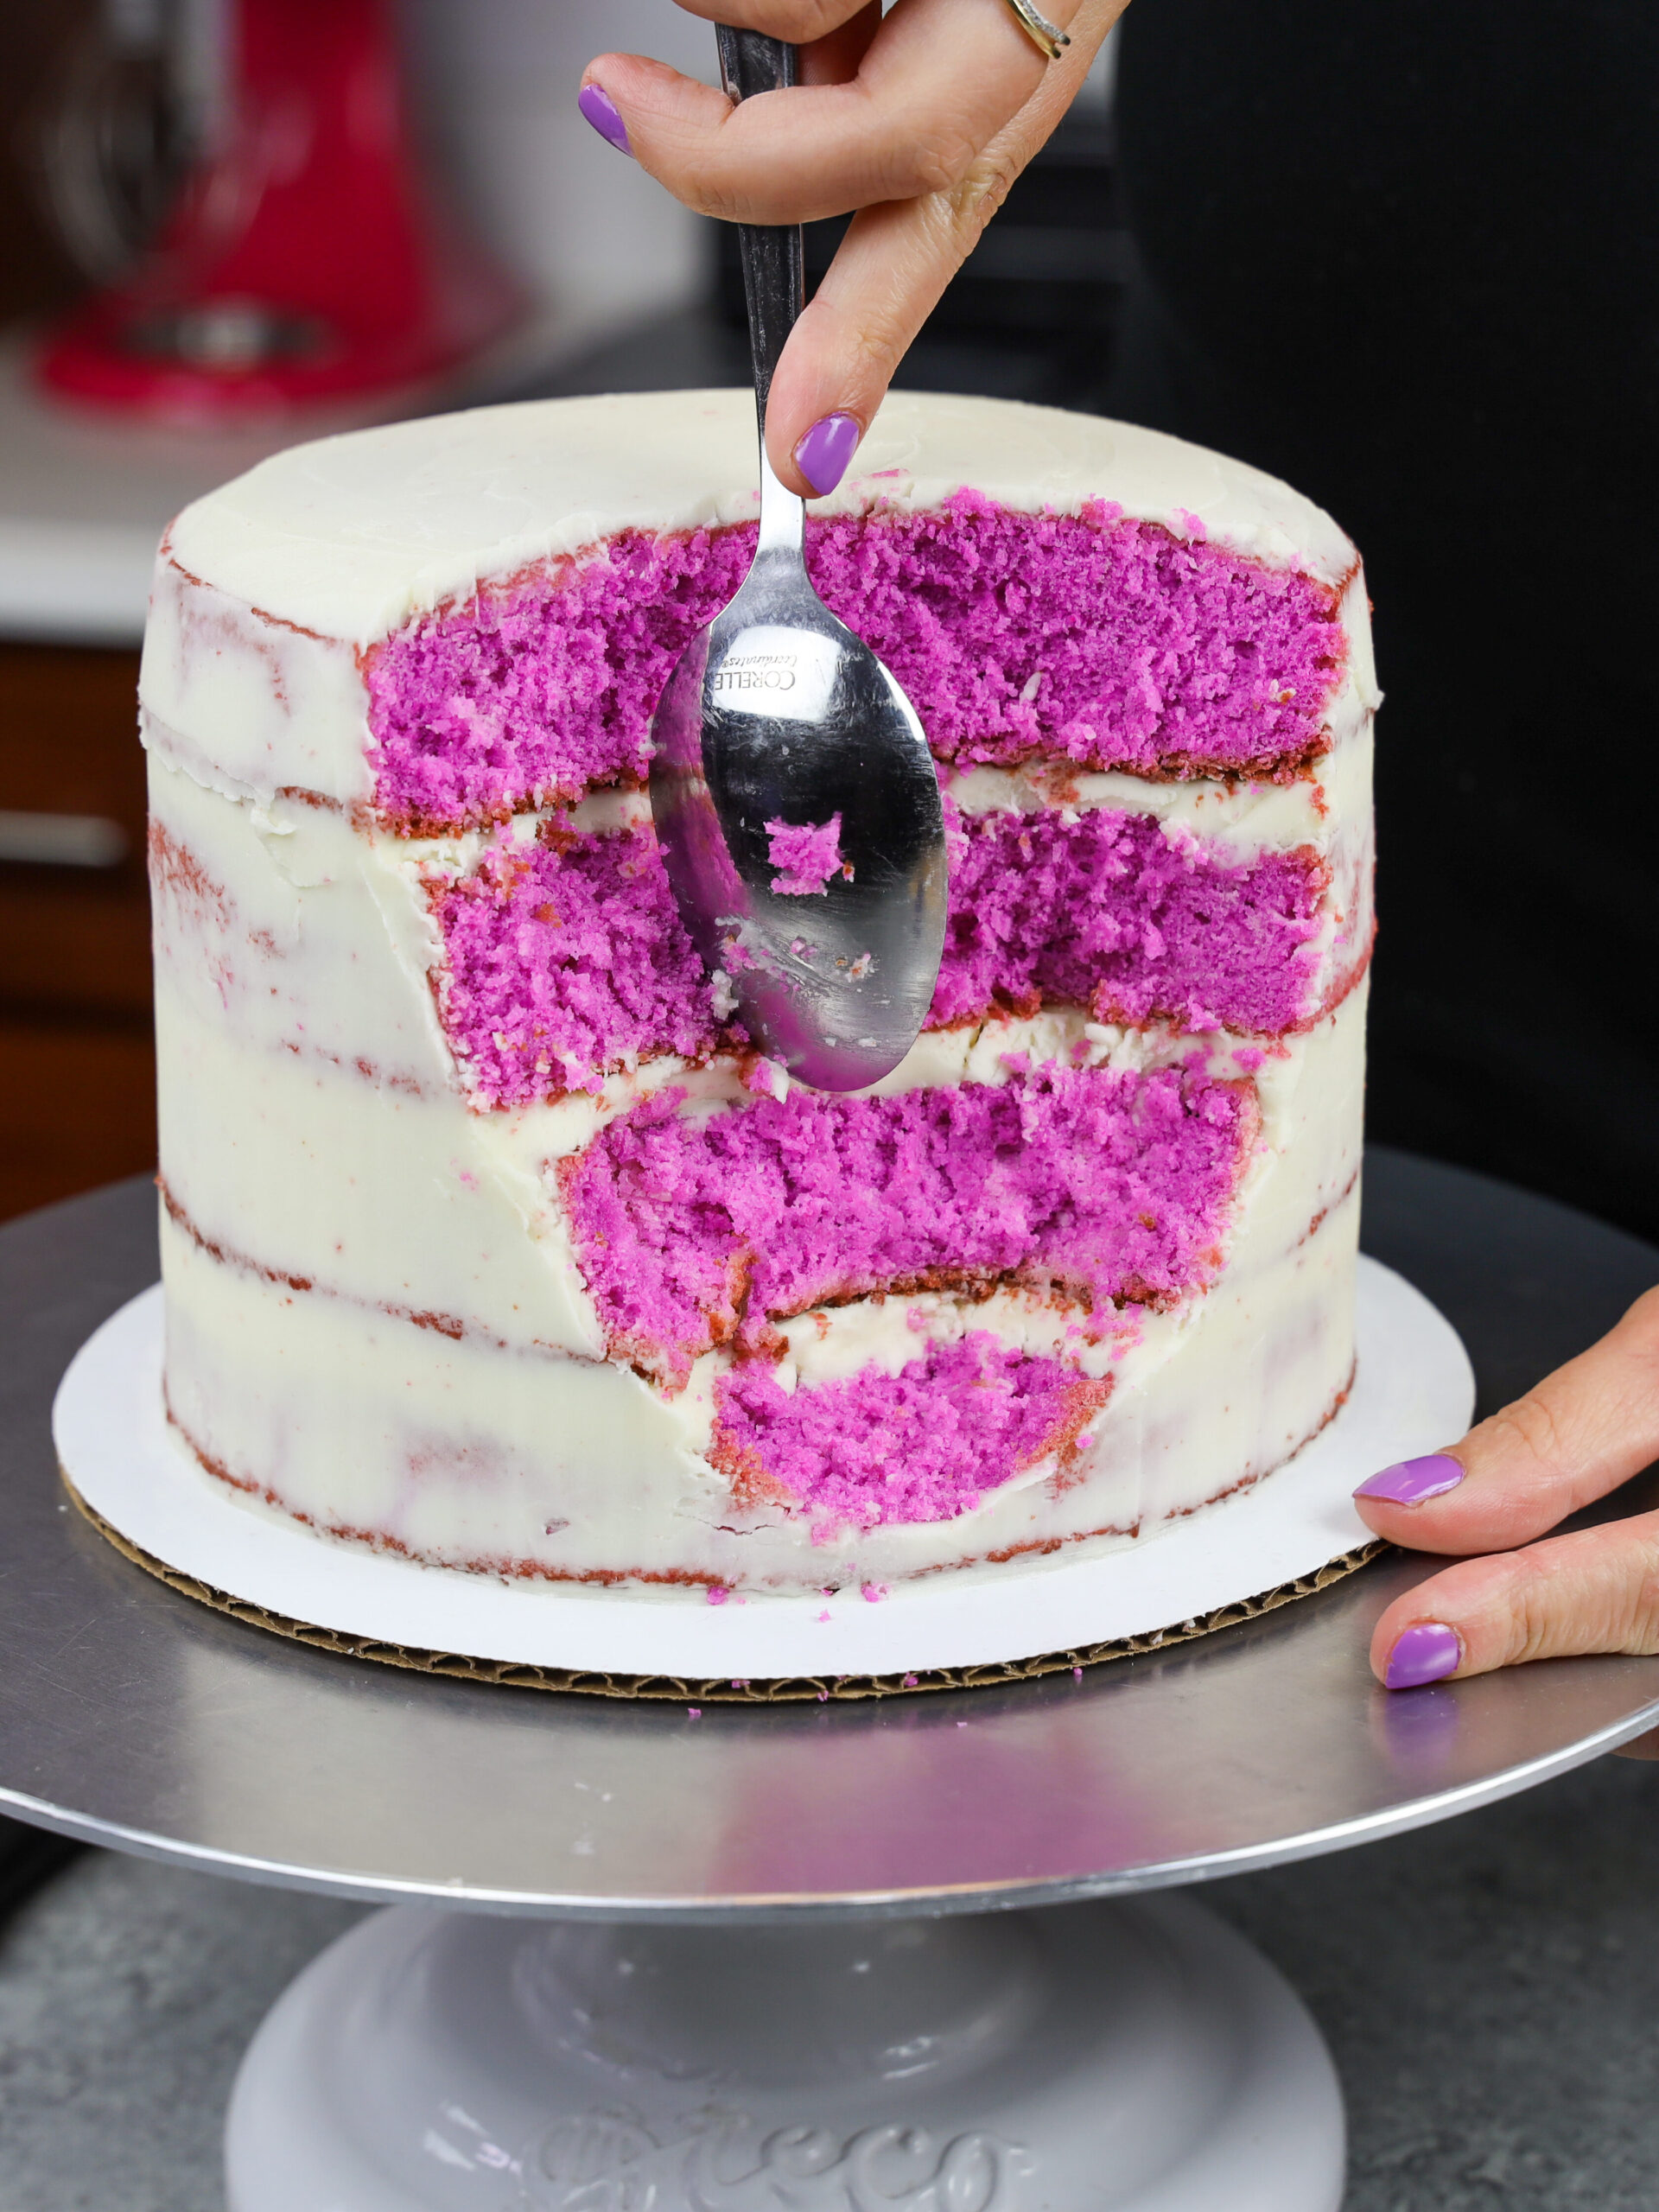
Cover the cut-out section with a layer of white buttercream.
Step 5: Add the Second Layer of Frosting
Color the remaining buttercream grey by mixing in a few drops of black gel food. Add a second, thicker layer of grey frosting around the cake, avoiding the cut-out section.
Use an offset spatula or acetate sheet to create a texture look that resembles a rock.
Press bits of rock candy into the cut-out section until it is fully covered.
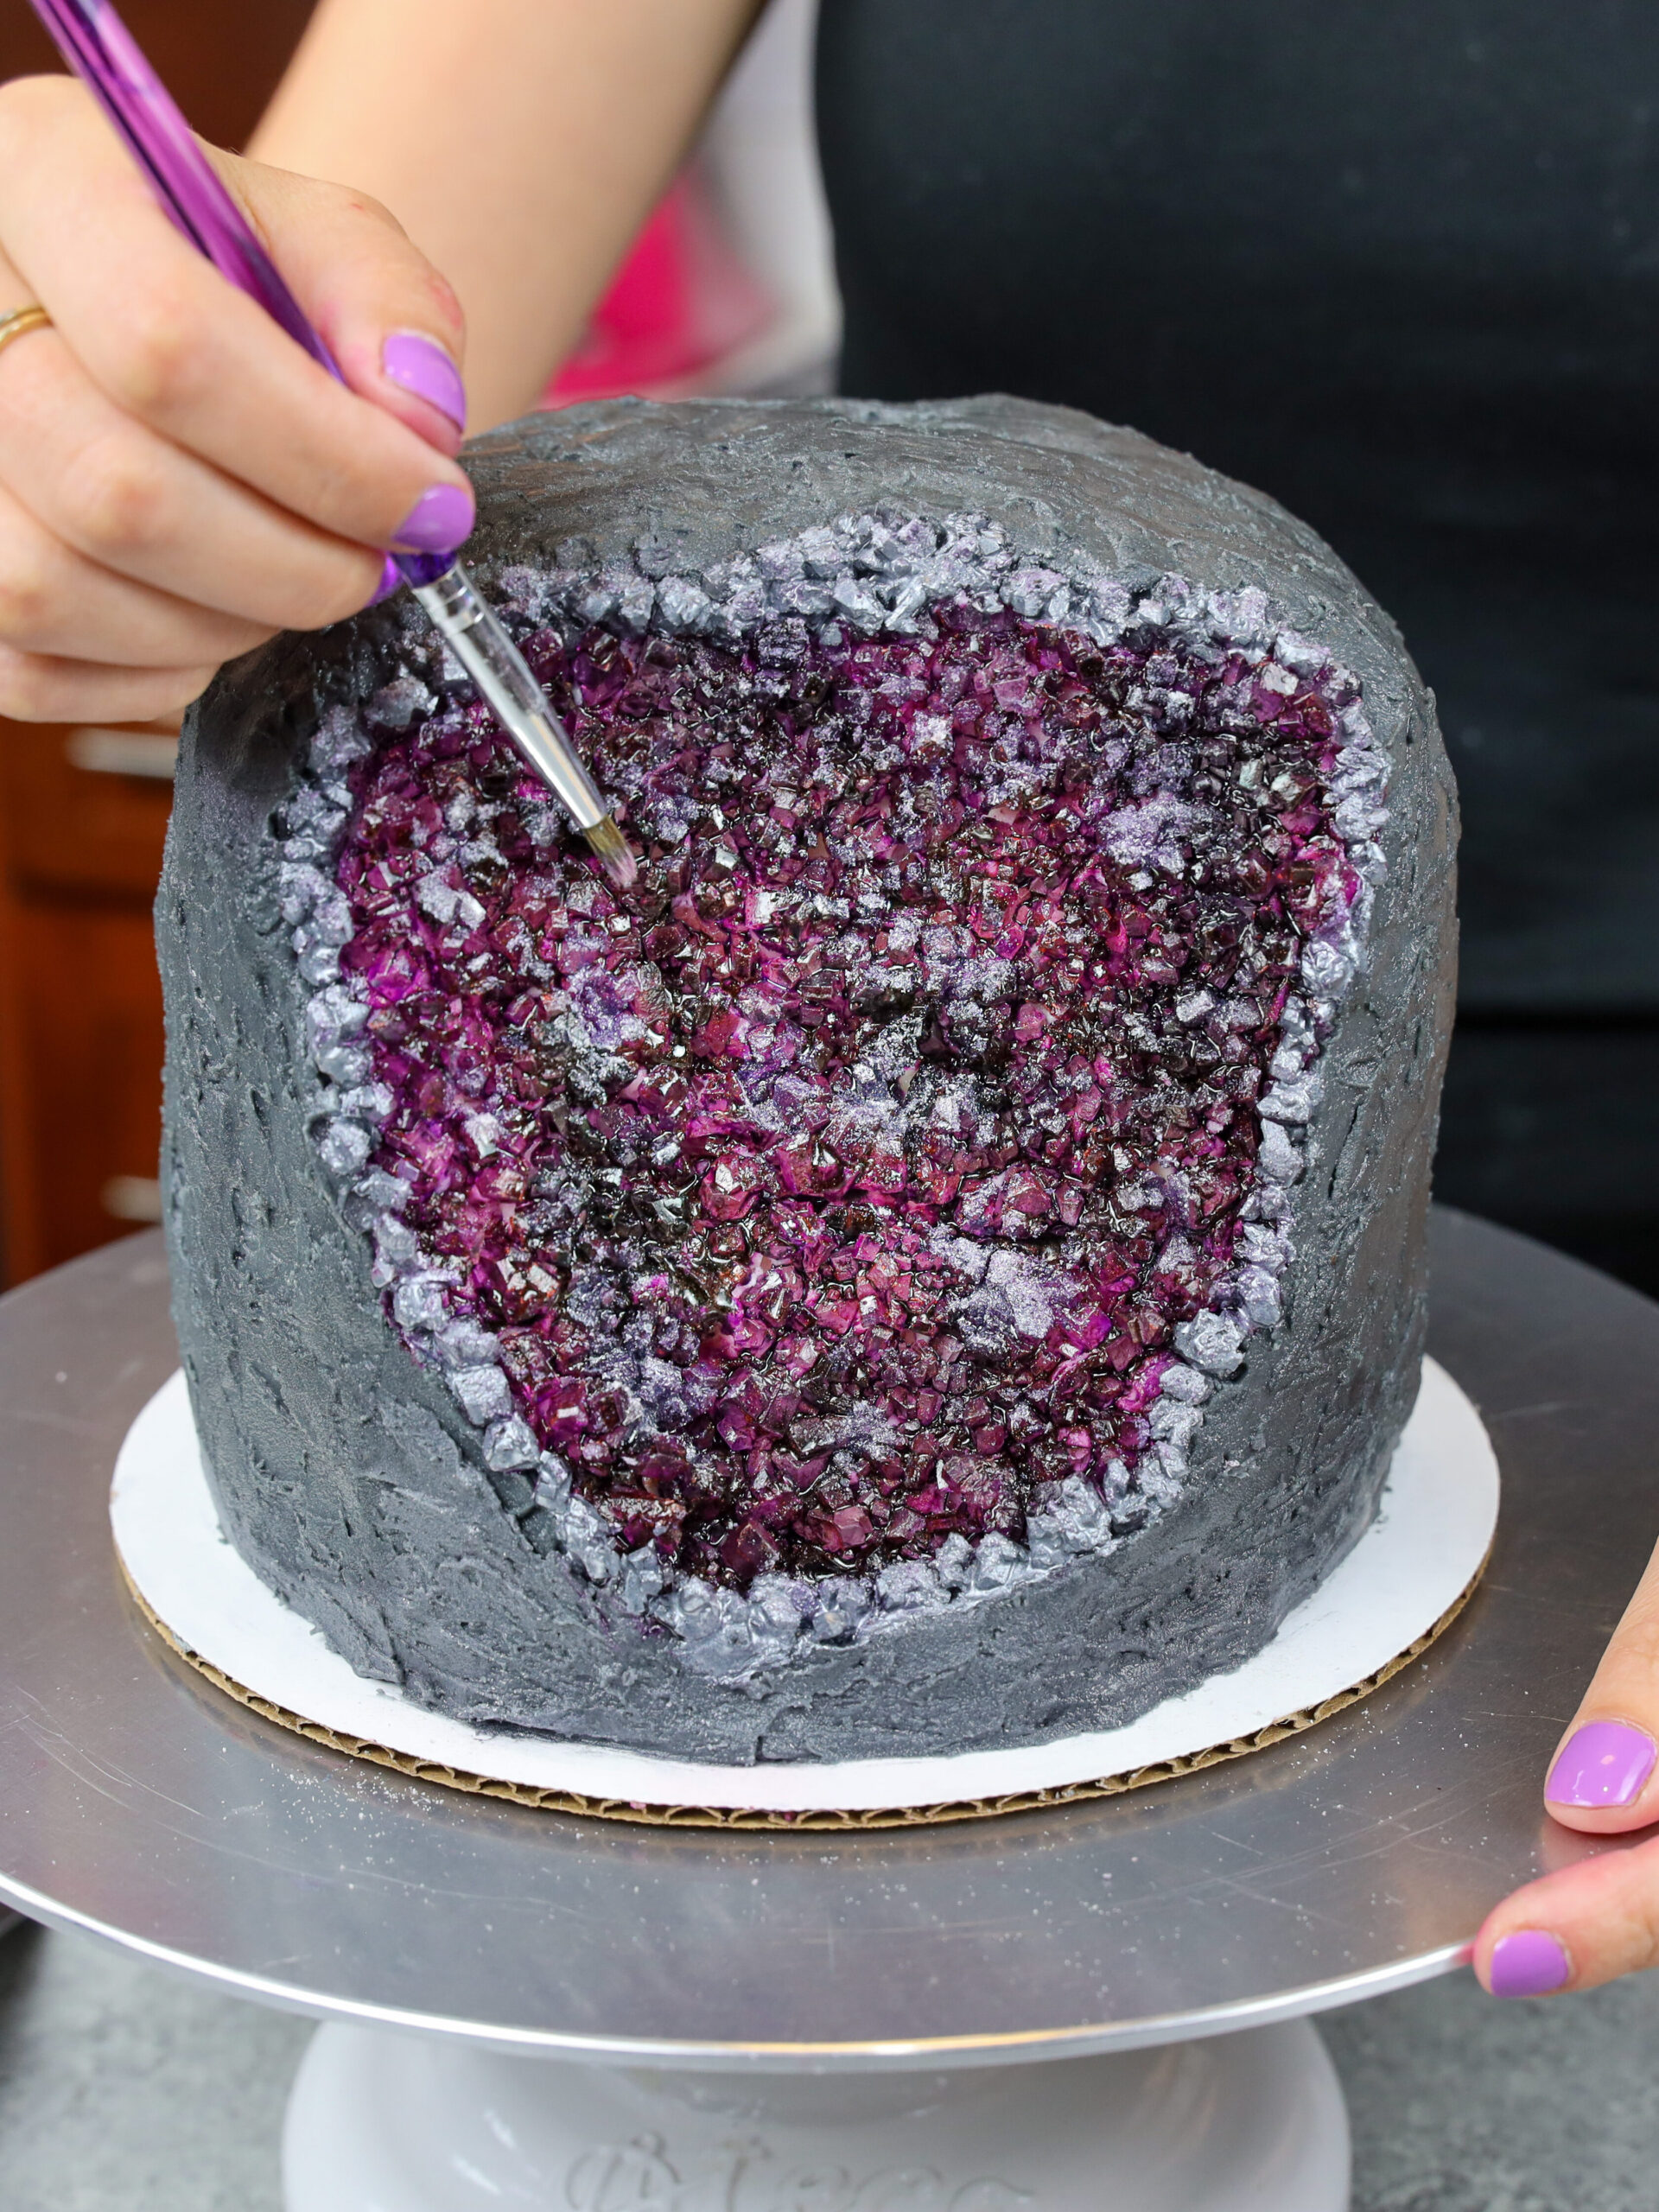
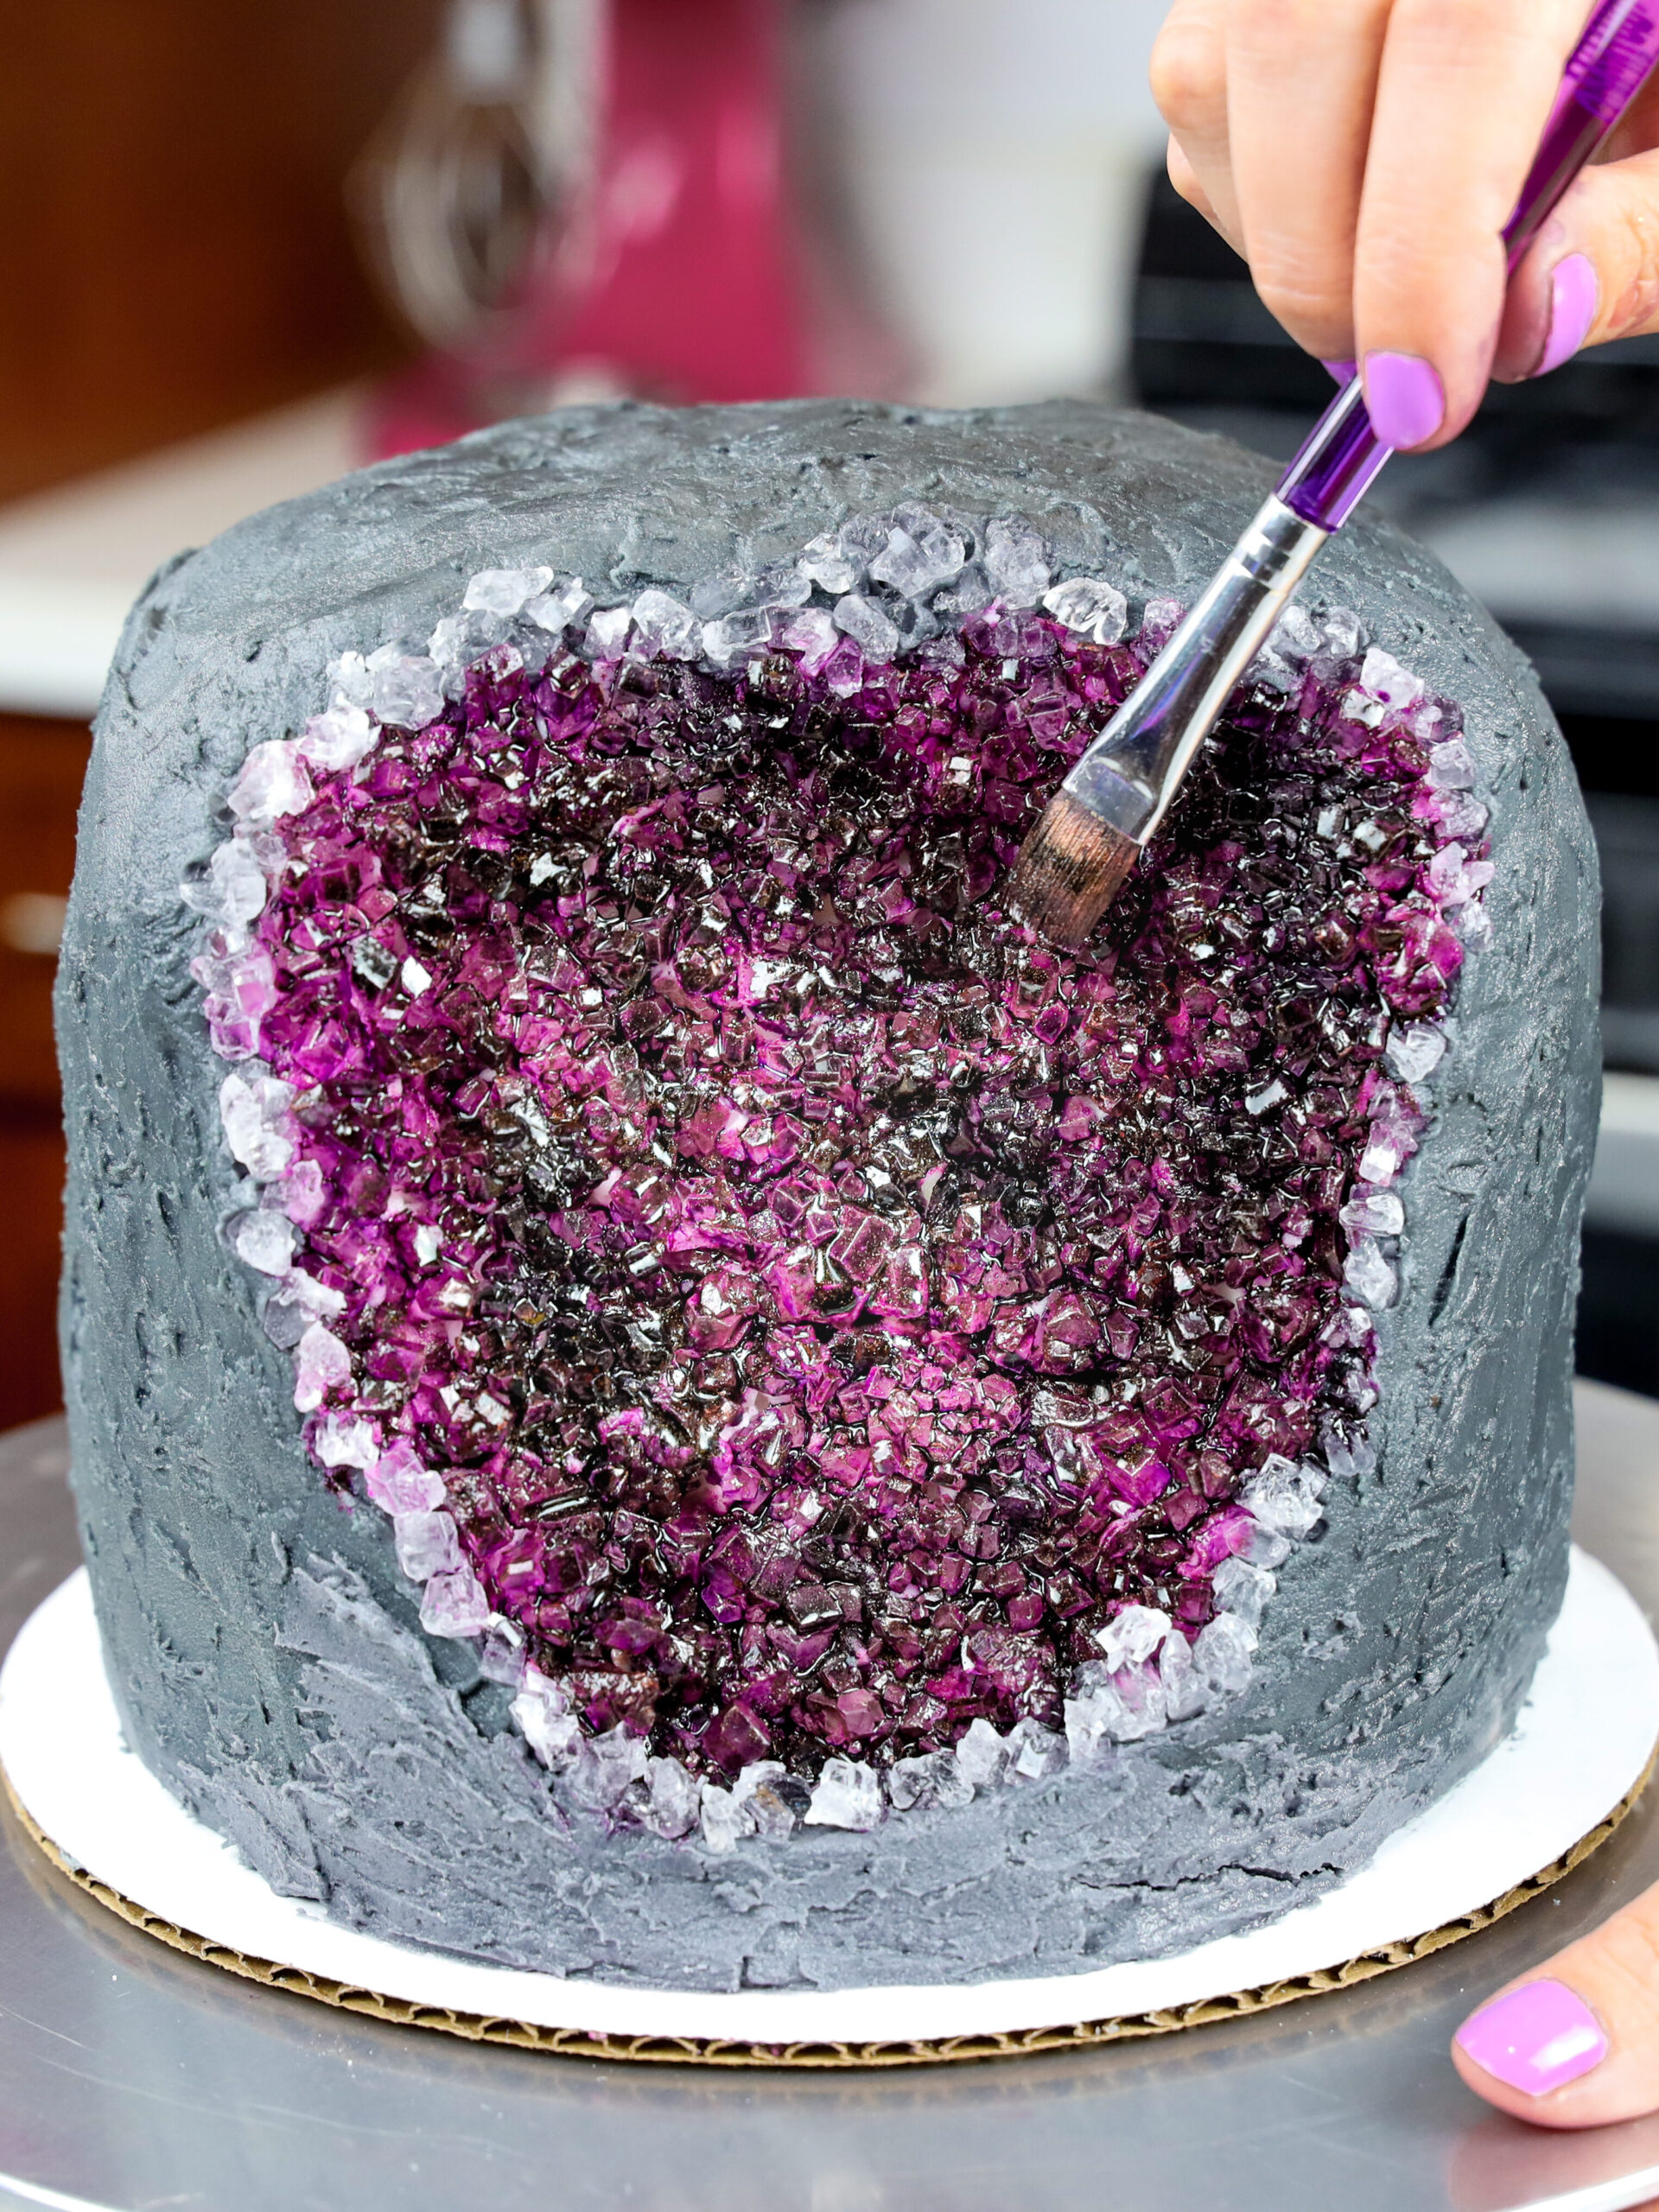
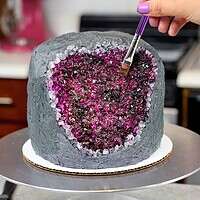
Step 6: Color the Rock Candy
Combine 1 Tbsp of clear extract or liquor with a generous squirt of gel food coloring. Stir the mixture until it’s combined, then use a clean paint brush to paint the rock candy.
I used purple gel food coloring to make an amethyst, but you can make this any color or make an ombre pattern if you want!
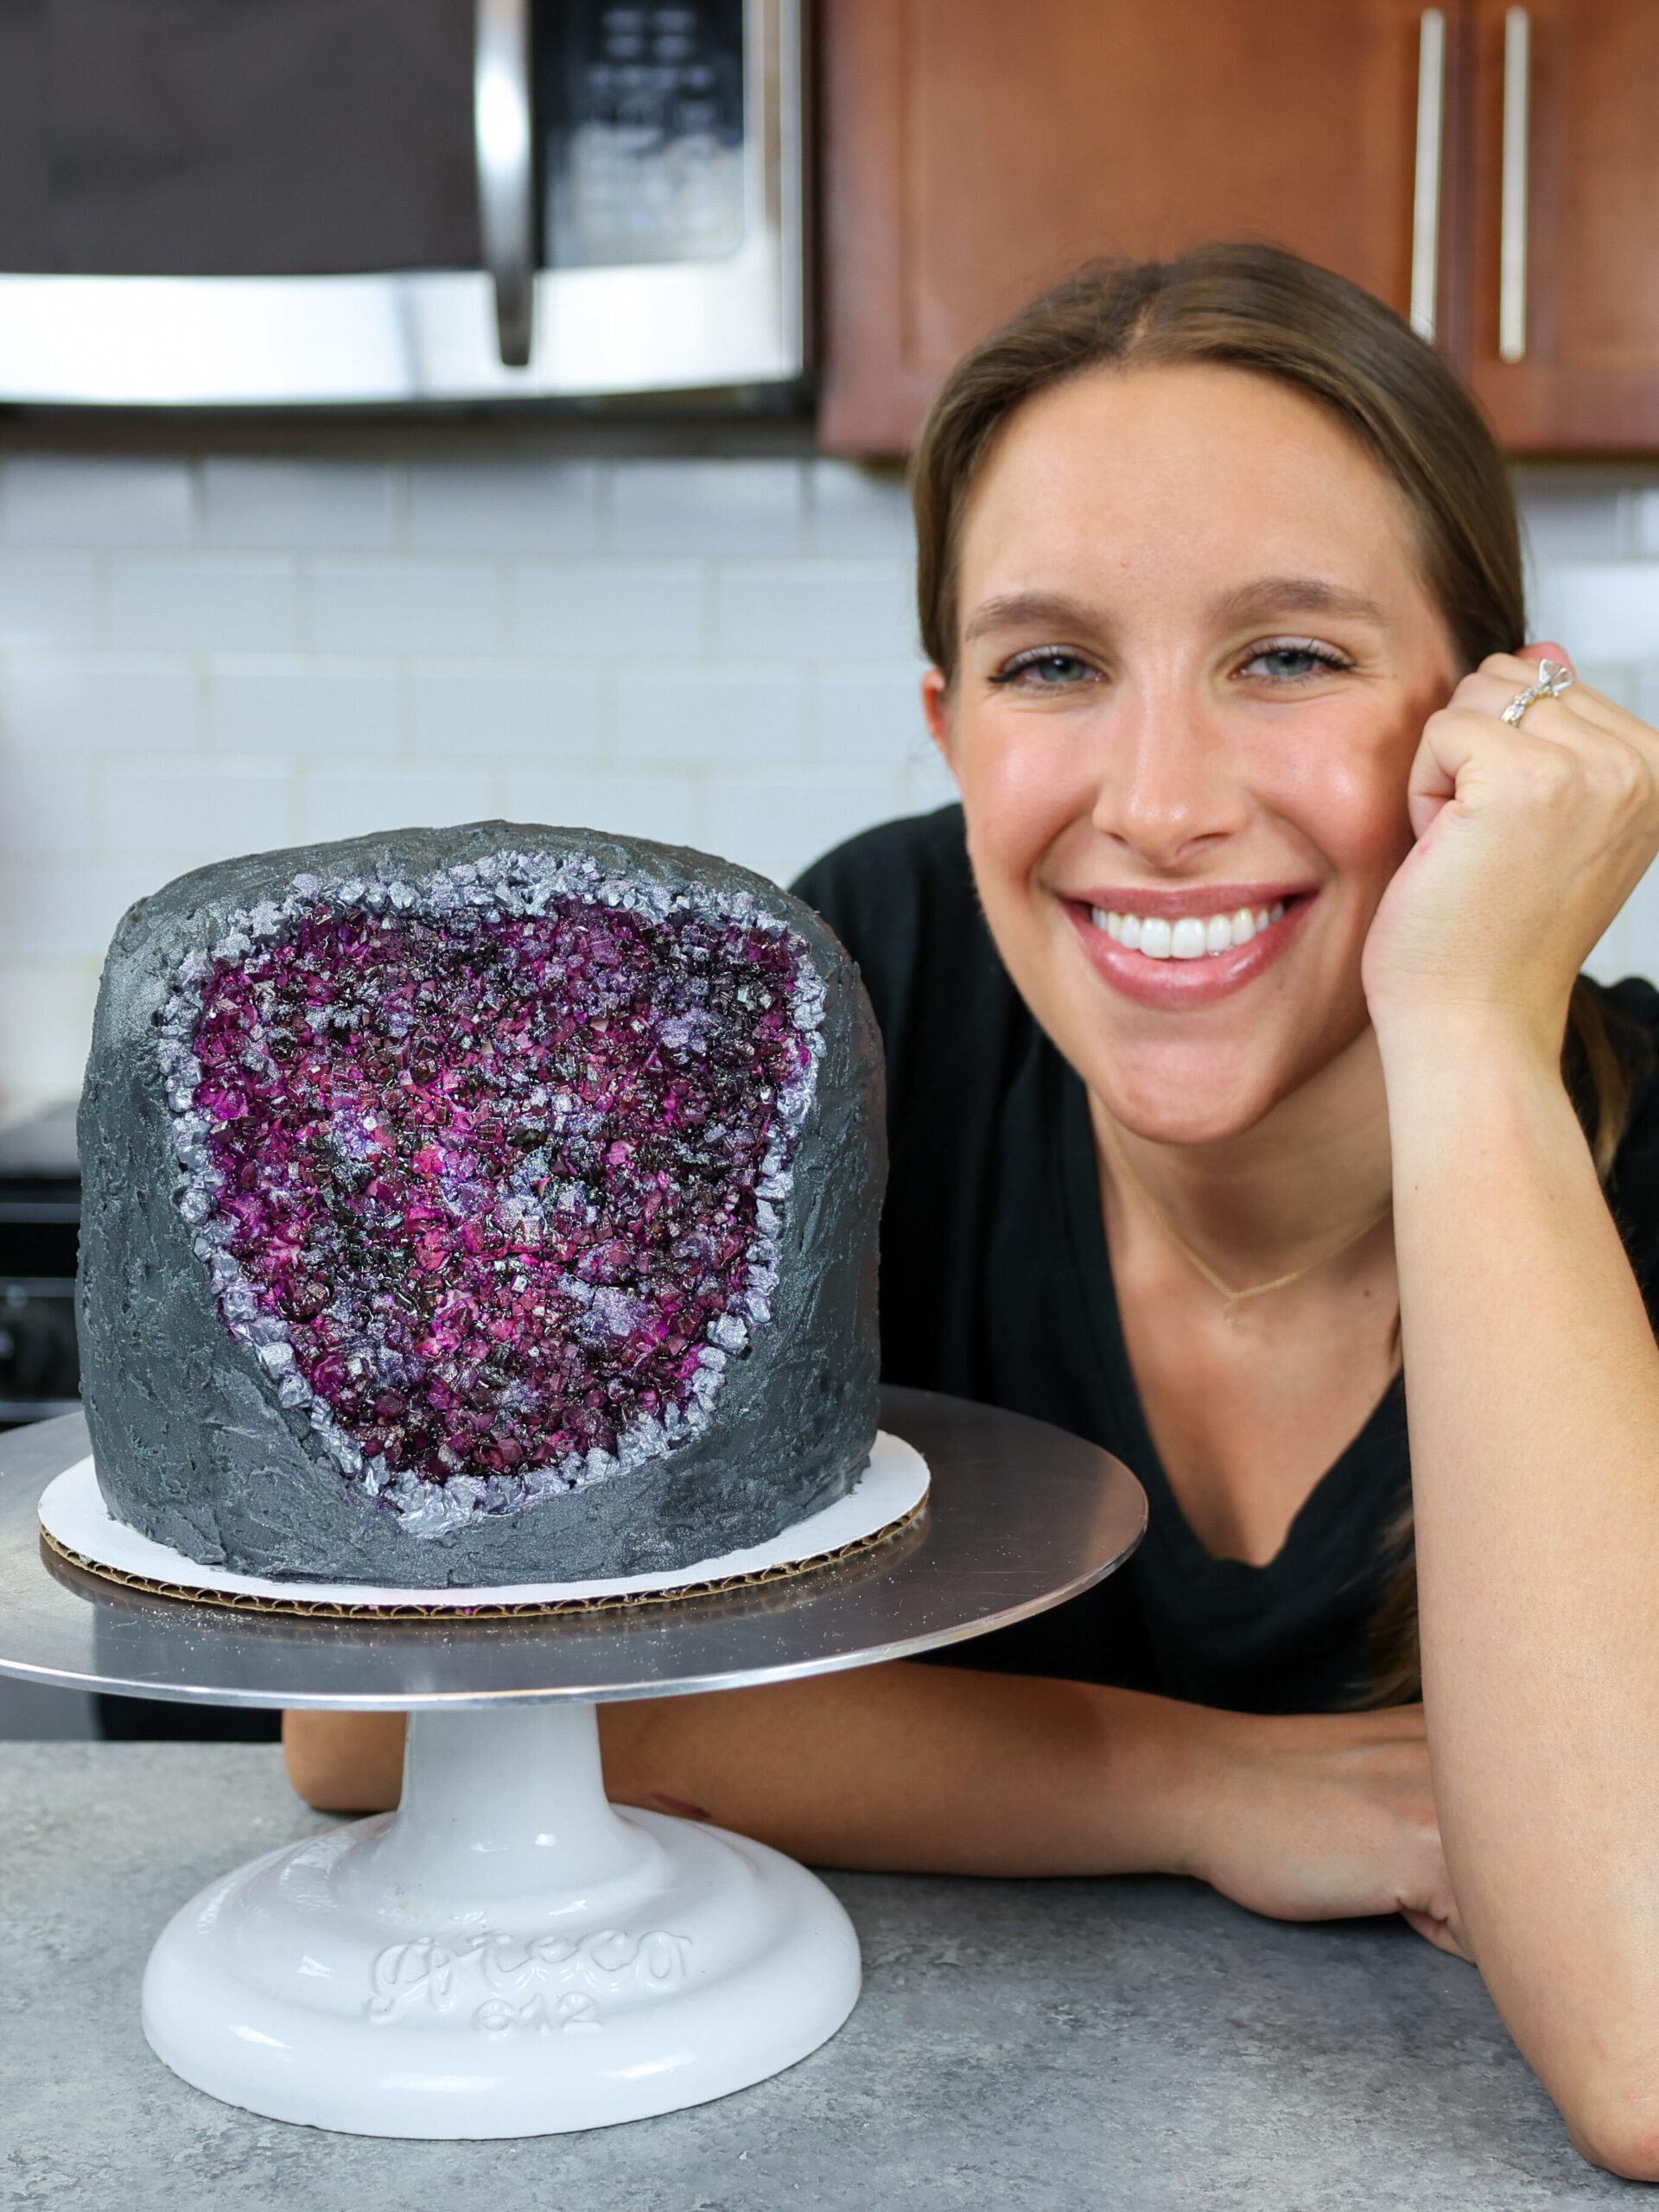
Step 7: Add the Finishing Touches
This last step is optional, but you can paint the edge of the geode with edible silver or gold paint to really make it pop!
Geode Substitutions and Swaps
Below are some swaps and substitutions that can be made in this geode cake recipe.
- All Purpose Flour – This recipe turns out best with AP flour, but you can use a gluten free flour blend or cake flour if that’s all you have on hand.
- Granulated Sugar – I do not recommend reducing the amount of sugar or changing the type of sugar, as it will change the texture of the cake layers.
- Buttermilk – You can also use full fat yogurt, sour cream, whole milk, or an alternative yogurt or milk (almond, soy, oat) if you’re dairy free.
- Egg whites – You can use 4 whole eggs in place of the egg whites in this recipe. Or if you have an egg allergy you can use a flaxseed egg or vegan egg replacer.
- Vegetable Oil – You can use any flavorless oil in this recipe, so canola or even sunflower oil would work great!
- Unsalted Butter – If you only have salted butter on hand, you can use it in place of the unsalted butter in this recipe. Just be sure to omit the salt that this frosting recipe calls for. You can also use vegan butter in its place!
- Heavy Cream – Whole milk or alternative milk (soy, almond, oat) will work fine in this frosting recipe if that’s what you have on hand.
Making This Geode Cake in Advance & Storage Tips:
Make your cake layers in advance and freeze them. It breaks the process up and makes it more approachable.
Make your frosting ahead of time too, or save any leftover frosting! It can be stored in an airtight container in the fridge for up to a month, or in the freezer for up to 3 months. Be sure to give it a good stir once it thaws to get the consistency nice and smooth again.
A frosted cake can last in the fridge for up to a week. The buttercream locks in all the moisture, keeping the cake fresh and delicious!
If you cut into the cake and have leftovers, use any remaining frosting to cover the cut section to keep it moist and store in the fridge for up to a week.
Tips for Making the Best Geode Cake:
- Properly measure your flour (spoon into the cup measure, then level) or use a kitchen scale to measure your dry ingredients.
- Ingredients at room temp mix together better, so be sure you set out any cold ingredients ahead of time.
- Mix your cake batter just until the ingredients are incorporated. This will ensure your cake layers are tender and soft.
- Chill your cake layers in the freezer for about 20 minutes before assembling the cake. This makes it easier to stack and frost.
- Make this geode cake vegan or dairy free if needed! Use your favorite type of dairy free milk to replace the buttermilk and heavy cream and use vegan butter sticks in place of the butter. For the eggs I recommend using an egg replacer like this.
Other Recipes You Might Like:

Let Me Know What You Think!
If you make this geode cake, I’d love to hear what you think of it! Let me know by leaving a rating below.
If you plan to share on social media, tag me @chelsweets and #chelsweets so that I can see your amazing creations!!
Geode Cake
Ingredients
Vanilla Cake Recipe
- 3 cups all-purpose flour 375g
- 3 cups granulated sugar 600g
- 2 1/2 tsp baking powder 10g
- 1 tsp fine salt 6g
- 1 cup unsalted butter, room temperature 226g
- 1 cup carton egg whites or 7 large egg whites, room temperature 235g
- 1 1/2 cups buttermilk, room temperature 360g
- 2 Tbsp vegetable or canola oil 28g
- 2 tsp vanilla extract or vanilla bean paste 8g
- purple gel food coloring – if desired
Vanilla Buttercream Frosting
- 2 cups unsalted butter, room temperature 452g or a 1 lb. box
- 1 Tbsp vanilla extract or vanilla bean paste 12g
- 1/2 tsp fine salt 3g
- 7 cups powdered sugar 907g or a 2 lb. bag
- 3 Tbsp heavy whipping cream, room temperature 45g
- black gel food coloring
Decorations
- Clear Rock Candy
- Purple Gel Food Coloring
- Clear Extract Almond, Lemon, Clear Vanilla or Clear Alcohol (Gin or Vodka)
- Clean Paintbrush
Instructions
Vanilla Cake Layers:
- Preheat oven to 350°F/175°C. Line four 7" or four 6" pans with parchment rounds and grease with non-stick baking spray.
- Mix together 3 cups all purpose flour, 3 cups sugar, 2 1/2 tsp baking powder and 1 tsp salt in a stand mixer with a paddle attachment or hand mixer until fully combined.
- Mix in 1 cup of unsalted butter slowly into the dry ingredients on a low speed. Continue to mix until no large chunks of butter remain, and the mixture looks crumbly.
- Pour in 1 cup of egg whites and mix on low until just incorporated. Mix in 1 1/2 cups buttermilk in two installments on a low speed.
- Add in 2 Tbsp of vegetable oil and 2 tsp of vanilla extract and mix at a low speed until fully incorporated. If you plan to color your cake layers, add in the gel food coloring with the vanilla and oil. I like to color the cake layers to make the color of the geode, but this is optional.
- Scrape down the sides of the bowl with a rubber spatula, then beat on a low speed for about 30 seconds to make sure everything is properly mixed together.
- Divide the batter evenly between your prepared pans.
- Bake for 33-36 minutes or until a toothpick comes out with a few moist crumbs.
- Allow the pans to cool for 10 minutes, then run a small offset spatula around the perimeter of the pan to separate the cake from the pan.
- Place cake layers into the freezer for 30 minutes to accelerate the cooling process. Once the layers are fully cooled, carefully flip the pans, and remove the layers.
- Use a serrated knife to level the tops of 3 of the layers and leave one layer unleveled.
- You can wrap and freeze them at this point if you're making them in advance. If you make these cake layers in advance and freeze them, let them thaw for about 20 minutes before making your cake. The cake layers should still be slightly cold to the touch, which will make it easier to assemble your cake.
Vanilla Buttercream Frosting:
- Beat 2 cups of unsalted butter on a medium speed for 30 seconds until smooth with a paddle attachment / stand mixer or a hand mixer.
- Mix in 1 Tbsp vanilla extract or vanilla bean paste and 1/2 tsp salt on a low speed.
- Slowly add in 7 cups of powdered sugar while mixing slowly on the lowest setting. Half way through add in 3 Tbsp of heavy cream or milk to make it easier to mix. I like to place a kitchen towel over my mixer to contain any powdered sugar clouds.
- Mix on low until the ingredients are fully incorporated and the desired consistency is reached.
- If the frosting is too thick, add in additional cream (1 Tbsp at a time). If the frosting is too thin, add in more powdered sugar (quarter of a cup at a time).
- Wait to color the buttercream until the cake is filled and crumb coated.
Assembling this Geode Cake:
- Stack and frost cake layers on a greaseproof cake board using a dab of frosting to help stick the first cake layer to the board.
- Add an even layer of buttercream between each cake layer with a large offset spatula. Place the non-leveled cake layer on top to give the cake a rounded top.
- Add a thin coat of frosting around the cake that fully covers the cake layers.
- Smooth using a bench scraper, then chill the cake in the fridge (20 minutes) or freezer (5 minutes) until the frosting is firm to the touch.
- Once chilled, use a sharp knife to cut out a large section from one side of the cake. This can be as small/large, or shallow/deep as you want! I like to keep mine pretty shallow so that I'm not removing too much cake, but you can create whatever shape you want.
- Cover the cut-out section with a layer of white buttercream.
- Color the remaining buttercream grey by mixing in a few drops of black gel food. Add a second, thicker layer of grey frosting around the cake, avoiding the cut-out section. Use an offset spatula or acetate sheet to create a texture look that resembles a rock.
- Press bits of rock candy into the cut-out section until it is fully covered.
- Combine 1 Tbsp of clear extract or liquor with a generous squirt of gel food coloring. Stir the mixture until it's combined, then use a clean paint brush to paint the rock candy. I used purple gel food coloring to make an amethyst, but you can make this any color or make an ombre pattern if you want!
- This last step is optional, but you can paint the edge of the geode with edible silver or gold paint to really make it pop!
- Either enjoy the cake immediately, or store in the fridge for up to a week! If you refrigerate the cake, take it out an hour or two before you want to cut into it, to let it warm up to room temperature.
Video
Notes
Tips for Making the Best Geode Cake:
- Properly measure your flour (spoon into the cup measure, then level) or use a kitchen scale to measure your dry ingredients.
- Ingredients at room temp mix together better, so be sure you set out any cold ingredients ahead of time.
- Mix your cake batter just until the ingredients are incorporated. This will ensure your cake layers are tender and soft.
- Chill your cake layers in the freezer for about 20 minutes before assembling the cake. This makes it easier to stack and frost.
- Make this geode cake vegan or dairy free if needed! Use your favorite type of dairy free milk to replace the buttermilk and heavy cream and use vegan butter sticks in place of the butter. For the eggs I recommend using an egg replacer like this.
Please do a tutorial for:
1) korean bean paste flowers
2) batik roll cake
My son would like a rock cake for his birthday. Is there something I could use in place of the vodka when painting the rock?
sure, you can use lemon juice!!
Why vodka or lemon juice? What is the purpose?
it thins out the gel food coloring so it’s easier to paint with, and it helps the gel food coloring dry faster!
My daughter desperately wants to make this for her birthday? Where do you find such big chunks of rock candy? I’ve only seen it on a stick or on a string.
they’re that kind! I’ve simple broken them off the string or stick, and placed the small chunks into the frosting! it takes a big of time, but it’s worth it 🙂
would this work the same if instead of vodka i use something different ?
yah! you can use lemon juice or even just a tiny bit of water! the vodka just evaporates more quickly 🙂
Thank you for the tutorial! I’m making my own rock candy, so I will just color it at that time. You made this look very approachable!
That’s awesome!! I wanted to, but didn’t start far enough in advance to have it form in time! Props to you for making your own!!! 🙂
Hi Chelsweets! Can I put the whole cake in the refrigerator once it’s finished, or will the buttercream get weird?
You definitely can, I do that all the time! just be sure to let it slowly warm to room temp the next day, to minimize the risk of condensation! The buttercream will crust as it’s exposed to the air, but it doesn’t change the taste at all!
I know this question has been asked but where did you purchase the strings of rock candy for this cake? I am getting married with a geode cake but the baker can’t find the right rock candy to use..
I ordered mine on amazon! There are a ton of different vendors, and it’s all pretty much the same product just different quantities.
You can find pre broken to candy on amazon
@Christine Mulvaney hobby lobby or amazon
Hi
How much rock candy did you need for this cake?
i probably used about 12 rock candy sticks! but it can vary depending on how large of a cut you make, and how big your cake is!
Hi Chelsea. Will this work on a textured cake
like Italian cream or carrot cake with cream cheese frosting instead of butter cream? Any advice is greatly appreciated ?
it should! I do find cream cheese frosting is harder to smooth though!
Thanks for sharing this! I want to make one for my daughter’s 30th! How thick are each of the layers? You said they are 8″ but they look much flatter. Thanks!
They are 8 inches across, and about 1 inch tall!
Thank you!
I use lemon extract with my colors and dusts to paint with them
Yes, lemon extract is a great alternative!
Hi! What is your favorite brand of edible gold paint to use?
I love edible art!! it works so well!! <3
Hi, a question on cake and buttercream recipe.
“I used my favorite vanilla layer cake recipe (bakes perfectly flat), which I colored purple with gel food coloring.
I baked 4, 8-inch round cake layers, and frosted the layers with american buttercream (I used 1.5 batches).”
Did you take 7inch cake recipe and took 1.5 times? Also 1.5 times recipe from you 7” buttercream recipe?
I make one batch of cake layers to make four, eight inch layers! My layer cake recipe can be used to make seven or eight inch cake layers, it just makes less thick layers when they’re 8 inches across! I didn’t want this cake to be too tall, so I made the layers 8 inches.
The second line you included means I made 1.5 batches of buttercream frosting! I updated the wording to make it more clear that I’m referring to the frosting. Hope that helps, I’m so sorry for any confusion ??
Thank You Chelsey!
That helps. Could you tell me how tall was the cake when all done?
I’d say it was about 6-7 inches tall! but it can vary based on much frosting you add between your layers <3
I followed your advice on the coloring geode white candy using vodka and americolor last nighy but the rocks are still wet and leaving color all over my fongers . What do i do to fix this
it sounds like you may have used too much gel food coloring! You should only add a couple drops to about 1 teaspoon of vodka, and it should dry within an hour! you can try to point a fan at the cake on a low sped to accelerate the drying <3
Love this cake! Thank you for sharing how you accomplished it. Can I gel color (and let them dry) the rock candy before I pat them into the cake? I think that would be easier for me.
I’ve never tried it that way before, but as long as they’re fully dried, I think that should work! I’d love to hear if it works, let me know how it goes, Vicki!
How many pounds of rock candy would you suggest for a two tiered cake like this?
I think I used about 2 lbs of rock candy, and I had a little left over!! I had to break it off the sticks, so a lot of it got crushed into tiny pieces I couldn’t use :/
Love this cake, I am going to try this today. My only concern would be putting it in the fridge. I know what will happen to the buttercream with the condensation but was wondering how the rocks react to being in the fridge over night, and taken out for an event the next day?
The rocks should be fine as long as the cake is kept indoors / in an air conditioned room once it’s out of the fridge. I live in NYC, and the only time I have issues with condensation is when I take cakes straight out of the freezer. If you live in a really warm or humid environment though, you may have more condensation that I’m used to <3
im making a 4 tier geode fake wedding cake, in the middle will be an open heart, im covering it in fondant and inside the heart will be the rock candy my concern is i was going to use piping gel to stick the rock candy to but i dont think it will be strong enough to hold the candy upside down in the heart, do you think i should use royal icing or any other ideas?
Hi Gina,
I would be worried about that too, I don’t think piping gel would be strong enough! I’d say try royal icing, or even secure it into the cake using a wire or skewer!! Anything that defies gravity makes me nervous!! I hope that helps, please let me know how it turns out <3
i had asked a question but i dont see it in the comments and have been waiting for a response
I’m so sorry! Sometimes it takes me a while to approve and respond to comments, but I usually get to it once a week! Hopefully you see your comment and my response to it now <3
Hi! I was wondering how this would keep? I want to make the cake completely one day and serve it the next. Will the candy rocks go bad? Thanks!
Hi Michelle! It should keep fine overnight in the fridge. If you live in a really warm or humid place you might have some condensation, but this time of year you should be ok! Hope that helps, happy baking!
Thanks! I did end up putting it in the fridge and it turned out wonderful. The rock candy remained crunchy too. My family loved it. Thanks for the recipe!
Hi there! Just wanted to know if the frosting would work on this cake with a swiss meringue buttercream?
Hi Molly,
This look would definitely work with SMBC too! Hope that helps, happy baking!
This looks amazing!! Is there any non-alcoholic substitute for vodka to dilute the food coloring?
hi Lauren,
for sure! You can use a clear extract like lemon or almond to dilute the food coloring. Hop that helps, happy baking!
Do you think that you could have online classes for kids
Hi Charlotte,
I have loads of cake tutorials up on my Youtube channel that are kid friendly 🙂 Here’s the link: https://www.youtube.com/chelsweetsbakery
Hi Chelsy, could I make this as a 6” cake or do you think the geode design would have to be too small to be proportional to the cake?
Hi,
How much rock candy do I need to make this geode? Like, how many sticks?
Hi Chelsey,
I made your Geode Cake and it was delicious. Im going to make it in the small 6 inch version for my daughters wedding. I’m going to make sheet cakes for guests and I was wondering about proportions. I know you make layer cakes but do you have any suggestions. We want YOUR cake and frosting recipe, not a bakerys’
Thanks
Shelley
Do you know if it is possible to put he fully assembled cake, including the rock candy, in the freezer for a week? I’m having chemo treatment and need this cake done to perfection for a birthday party. I need to work on it when I’m feeling well and was thinking of doing it ahead an freezing it. I would then take it out to put in the fridge for 2 days before delivering. Do you think this will work without food coloring running or the rock candy being impacted?
Thank you. It’s a beautiful cake that you’ve made.
How much food coloring did you need to make the whole geode?looks great!!
How well did the rock candy hold up to the buttercream frosting? Im worried it will melt into the frosting if I make it a day early.
Hi Alison,
My rock candy held up great against my frosting! There’s so much butter in the buttercream that is doesn’t really dissolve the rock candy. Hope that helps, happy baking!