Geode Cake
This geode cake is surprisingly easy to make! With the help of some rock candy and food coloring, your cake will look just like a stunning amethyst!
Servings: 24
Calories: 526kcal
Ingredients
Vanilla Cake Recipe
- 3 cups all-purpose flour 375g
- 3 cups granulated sugar 600g
- 2 1/2 tsp baking powder 10g
- 1 tsp fine salt 6g
- 1 cup unsalted butter, room temperature 226g
- 1 cup carton egg whites or 7 large egg whites, room temperature 235g
- 1 1/2 cups buttermilk, room temperature 360g
- 2 Tbsp vegetable or canola oil 28g
- 2 tsp vanilla extract or vanilla bean paste 8g
- purple gel food coloring - if desired
Vanilla Buttercream Frosting
- 2 cups unsalted butter, room temperature 452g or a 1 lb. box
- 1 Tbsp vanilla extract or vanilla bean paste 12g
- 1/2 tsp fine salt 3g
- 7 cups powdered sugar 907g or a 2 lb. bag
- 3 Tbsp heavy whipping cream, room temperature 45g
- black gel food coloring
Decorations
- Clear Rock Candy
- Purple Gel Food Coloring
- Clear Extract Almond, Lemon, Clear Vanilla or Clear Alcohol (Gin or Vodka)
- Clean Paintbrush
Instructions
Vanilla Cake Layers:
- Preheat oven to 350°F/175°C. Line four 7" or four 6" pans with parchment rounds and grease with non-stick baking spray.
- Mix together 3 cups all purpose flour, 3 cups sugar, 2 1/2 tsp baking powder and 1 tsp salt in a stand mixer with a paddle attachment or hand mixer until fully combined.
- Mix in 1 cup of unsalted butter slowly into the dry ingredients on a low speed. Continue to mix until no large chunks of butter remain, and the mixture looks crumbly.
- Pour in 1 cup of egg whites and mix on low until just incorporated. Mix in 1 1/2 cups buttermilk in two installments on a low speed.
- Add in 2 Tbsp of vegetable oil and 2 tsp of vanilla extract and mix at a low speed until fully incorporated. If you plan to color your cake layers, add in the gel food coloring with the vanilla and oil. I like to color the cake layers to make the color of the geode, but this is optional.
- Scrape down the sides of the bowl with a rubber spatula, then beat on a low speed for about 30 seconds to make sure everything is properly mixed together.
- Divide the batter evenly between your prepared pans.
- Bake for 33-36 minutes or until a toothpick comes out with a few moist crumbs.
- Allow the pans to cool for 10 minutes, then run a small offset spatula around the perimeter of the pan to separate the cake from the pan.
- Place cake layers into the freezer for 30 minutes to accelerate the cooling process. Once the layers are fully cooled, carefully flip the pans, and remove the layers.
- Use a serrated knife to level the tops of 3 of the layers and leave one layer unleveled.
- You can wrap and freeze them at this point if you're making them in advance. If you make these cake layers in advance and freeze them, let them thaw for about 20 minutes before making your cake. The cake layers should still be slightly cold to the touch, which will make it easier to assemble your cake.
Vanilla Buttercream Frosting:
- Beat 2 cups of unsalted butter on a medium speed for 30 seconds until smooth with a paddle attachment / stand mixer or a hand mixer.
- Mix in 1 Tbsp vanilla extract or vanilla bean paste and 1/2 tsp salt on a low speed.
- Slowly add in 7 cups of powdered sugar while mixing slowly on the lowest setting. Half way through add in 3 Tbsp of heavy cream or milk to make it easier to mix. I like to place a kitchen towel over my mixer to contain any powdered sugar clouds.
- Mix on low until the ingredients are fully incorporated and the desired consistency is reached.
- If the frosting is too thick, add in additional cream (1 Tbsp at a time). If the frosting is too thin, add in more powdered sugar (quarter of a cup at a time).
- Wait to color the buttercream until the cake is filled and crumb coated.
Assembling this Geode Cake:
- Stack and frost cake layers on a greaseproof cake board using a dab of frosting to help stick the first cake layer to the board.
- Add an even layer of buttercream between each cake layer with a large offset spatula. Place the non-leveled cake layer on top to give the cake a rounded top.
- Add a thin coat of frosting around the cake that fully covers the cake layers.
- Smooth using a bench scraper, then chill the cake in the fridge (20 minutes) or freezer (5 minutes) until the frosting is firm to the touch.
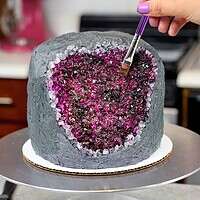
- Once chilled, use a sharp knife to cut out a large section from one side of the cake. This can be as small/large, or shallow/deep as you want! I like to keep mine pretty shallow so that I'm not removing too much cake, but you can create whatever shape you want.
- Cover the cut-out section with a layer of white buttercream.
- Color the remaining buttercream grey by mixing in a few drops of black gel food. Add a second, thicker layer of grey frosting around the cake, avoiding the cut-out section. Use an offset spatula or acetate sheet to create a texture look that resembles a rock.
- Press bits of rock candy into the cut-out section until it is fully covered.
- Combine 1 Tbsp of clear extract or liquor with a generous squirt of gel food coloring. Stir the mixture until it's combined, then use a clean paint brush to paint the rock candy. I used purple gel food coloring to make an amethyst, but you can make this any color or make an ombre pattern if you want!
- This last step is optional, but you can paint the edge of the geode with edible silver or gold paint to really make it pop!
- Either enjoy the cake immediately, or store in the fridge for up to a week! If you refrigerate the cake, take it out an hour or two before you want to cut into it, to let it warm up to room temperature.
Video
Notes
Tips for Making the Best Geode Cake:
- Properly measure your flour (spoon into the cup measure, then level) or use a kitchen scale to measure your dry ingredients.
- Ingredients at room temp mix together better, so be sure you set out any cold ingredients ahead of time.
- Mix your cake batter just until the ingredients are incorporated. This will ensure your cake layers are tender and soft.
- Chill your cake layers in the freezer for about 20 minutes before assembling the cake. This makes it easier to stack and frost.
- Make this geode cake vegan or dairy free if needed! Use your favorite type of dairy free milk to replace the buttermilk and heavy cream and use vegan butter sticks in place of the butter. For the eggs I recommend using an egg replacer like this.
Making This Geode Cake in Advance & Storage Tips:
Make your cake layers in advance and freeze them. It breaks the process up and makes it more approachable. Make your frosting ahead of time too, or save any leftover frosting! It can be stored in an airtight container in the fridge for up to a month, or in the freezer for up to 3 months. Be sure to give it a good stir once it thaws to get the consistency nice and smooth again. A frosted cake can last in the fridge for up to a week. The buttercream locks in all the moisture, keeping the cake fresh and delicious! If you cut into the cake and have leftovers, use any remaining frosting to cover the cut section to keep it moist and store in the fridge for up to a week.Nutrition
Serving: 1 | Calories: 526kcal | Carbohydrates: 70g | Protein: 5g | Fat: 26g | Saturated Fat: 15g | Polyunsaturated Fat: 9g | Cholesterol: 65mg | Sodium: 263mg | Sugar: 57g