
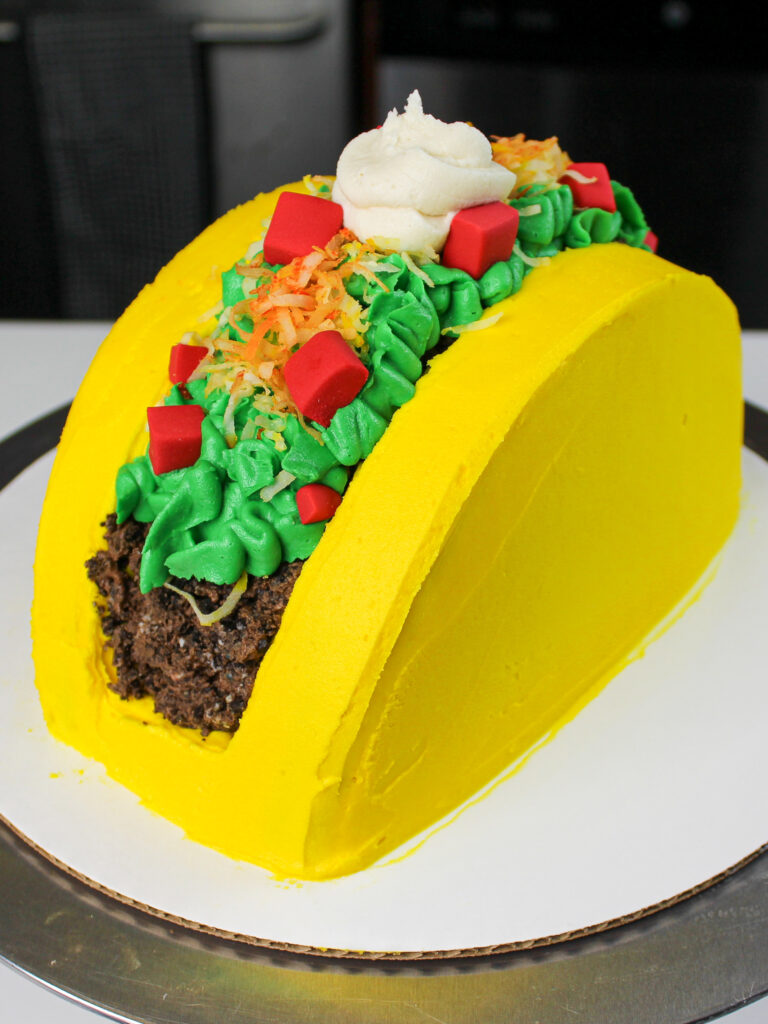
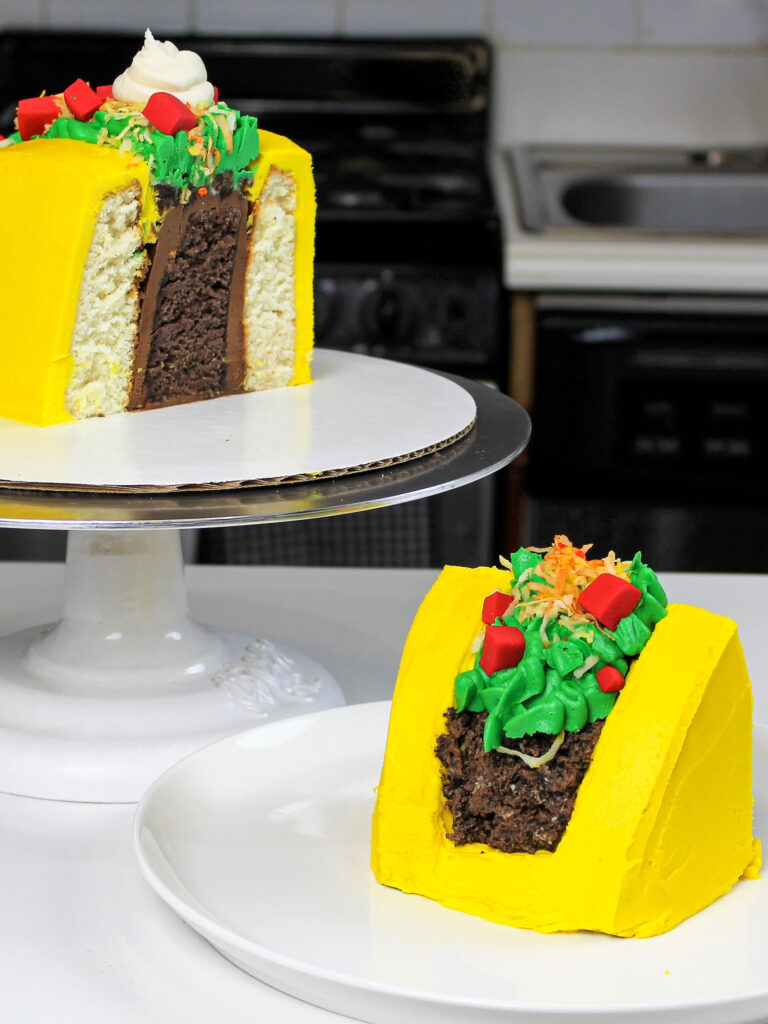
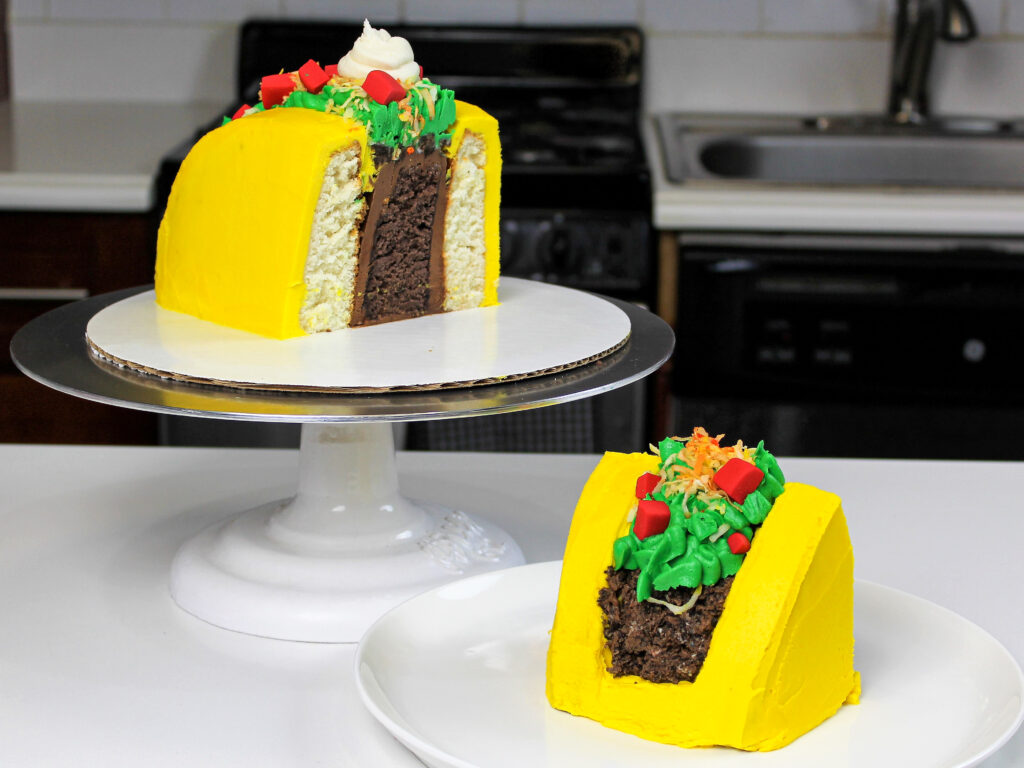
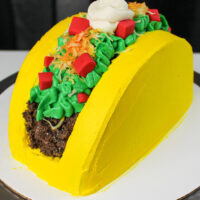
Taco Cake
Everyone loves a good taco, so I figured most people would appreciate a taco cake!!
While the shape of the cake makes it seem complicated to make, I promise it’s easier than you’d think!
Making This Easy Taco Cake: Step-by-Step Tutorial
Let’s walk through each step of this cake together to make sure it turns out as amazing as possible! I’ve shared a video below.
I figured it might be helpful to know what tools I use, too, so I’ve shared a list below.
Not all of these are mandatory, but they make the process a lot easier. If you don’t have all these things on hand, feel free to improvise and work with what you have.
- Electric hand mixer or stand mixer
- 1, 7-inch Cake Pans
- 1, 6-inch Cake Pans
- Spinning Cake Stand
- 8-inch Cake Board
- Offset Spatula
- Bench Scraper
- Gel Food Coloring
- 2 Small Piping Bags
- 1 Large Piping Bag
- Petal Piping Tip (like a Wilton 104)
Step 1: Bake the Cake Layers
Our first step is to bake the cake layers. Line one 6-inch cake pan and one 7-inch cake pan with parchment rounds and grease with non-stick baking spray or homemade cake release.
Divide the batter evenly between the cake pans and bake for 35-38 minutes.
Remove the cake pans from the oven and set them on a wire rack. Run an offset spatula around the edge of the pan to help release the cake layers from the pan. Let the cakes cool fully in the pan.
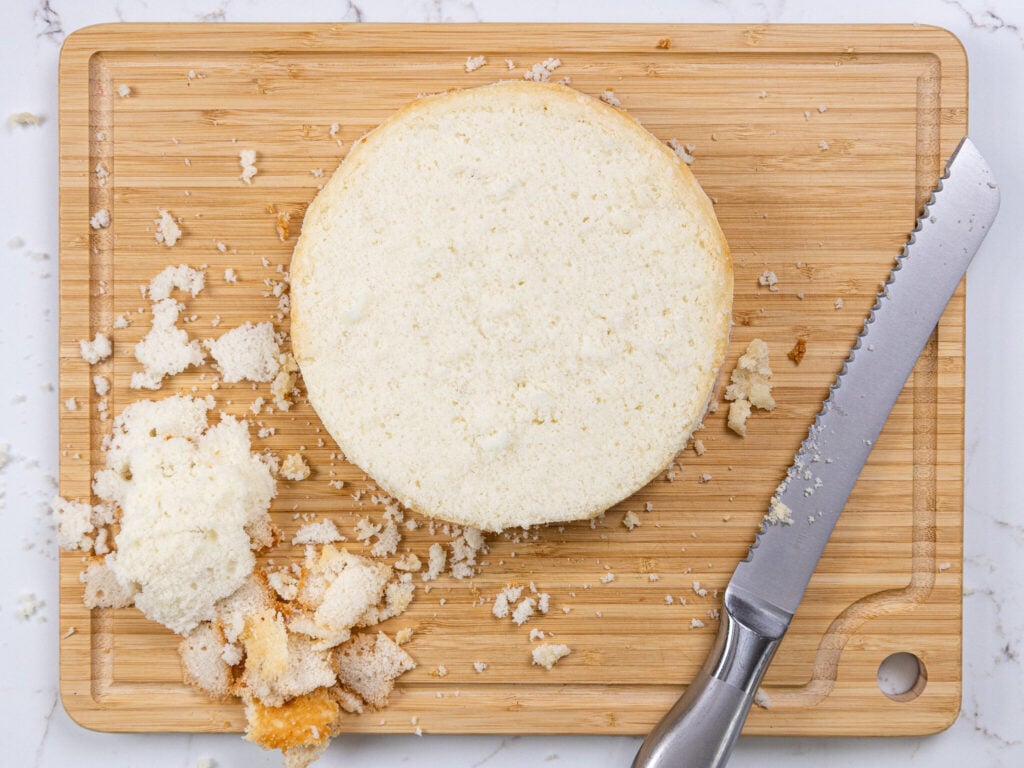
Once the layers have fully cooled, level the top of both layers using a serrated knife. While these layers bake pretty flat, it’s important that the layers are flat because we’ll be stacking them upright!
If you make these in advance, wrap and freeze them at this point. Take them out of the freezer about 20 minutes before you want to assemble the cake.
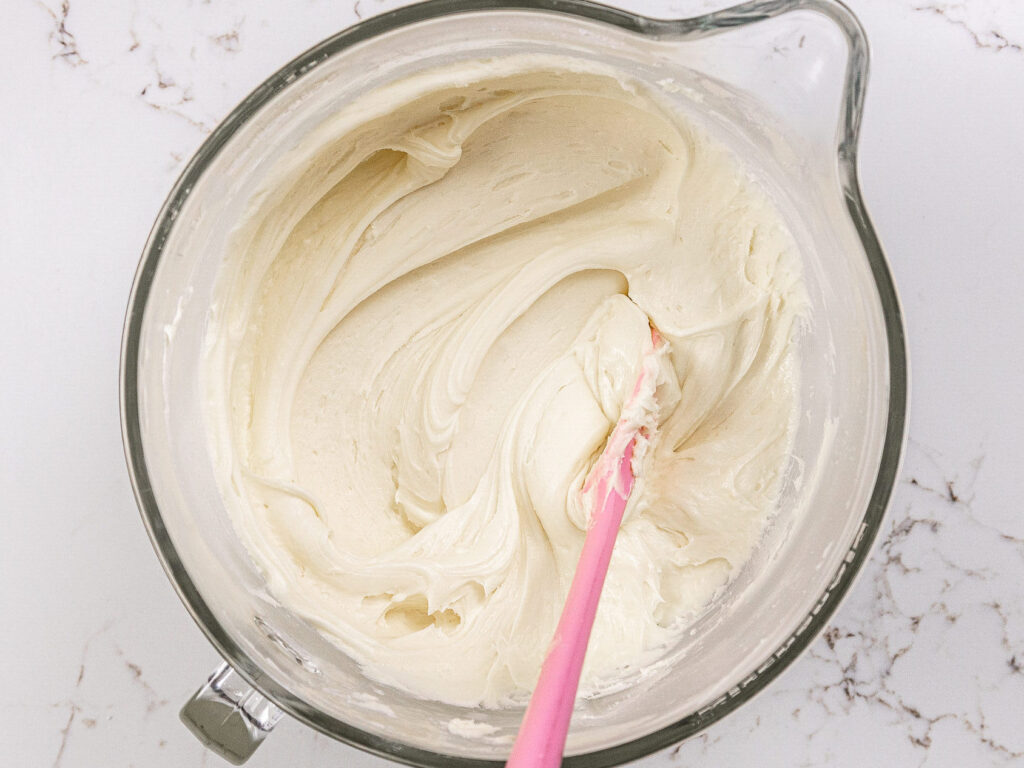
Step 2: Make the Buttercream Frosting
Then it’s time to make the buttercream frosting for this cake! I like to use an American buttercream because I think it’s the easiest to decorate with and I love eating it.
It might seem like a lot of frosting for this size of cake, but we need a lot to keep those cake layers in place and make the fix-ins for our taco.
If you want to use a less sweet frosting, I’d recommend using a batch of my Swiss meringue buttercream or my hybrid buttercream.
We need to make this frosting a few different colors to decorate this cake. I highly recommend using gel food coloring. It creates super vibrant colors without throwing off the consistency of the frosting.
If you can’t get your hands on gel food coloring, liquid food coloring can be used too.
Step #3: Stack and Frost the Cake Layers
Chill the cake layers in the freezer for 20 minutes before assembling this cake, if possible. It will make them so much easier to stack upright and frost!!
If you made the layers ahead of time and they’re already frozen, let the layers sit out for 20 minutes to thaw, then assemble the cake. You want them to be cold to the touch, but not fully frozen.
Cut the cake layers in half so you have 4 half-circles. Spread 2 Tbsp of yellow buttercream across the center of the cake board where the cake layers will go. This will help keep them in place.
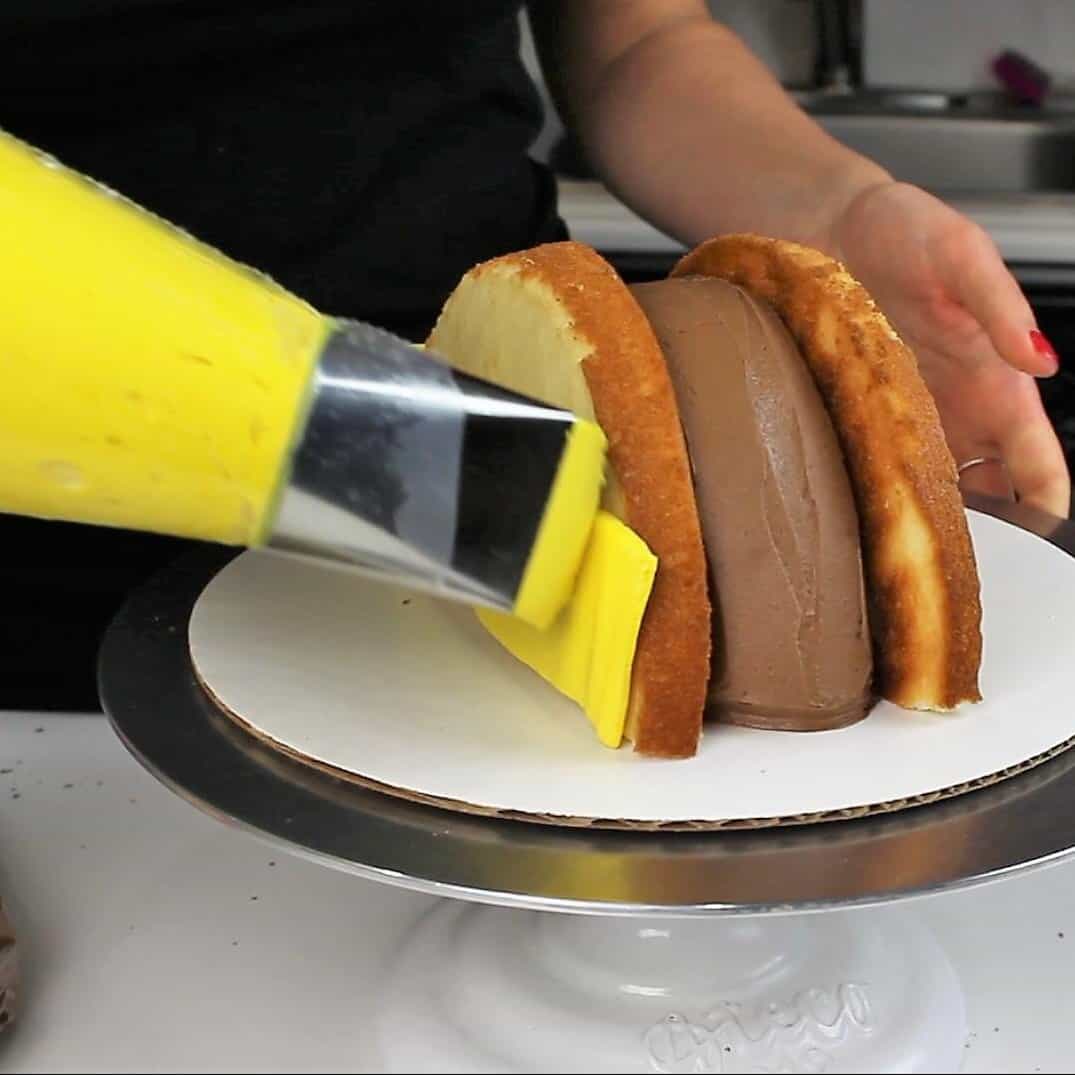
Place one of the halves of the 6-inch cake layer in the center of the cake board vertically. Cover the entire cake layer with an even layer of chocolate buttercream.
This layer is going to be completely covered, so don’t worry about making the frosting perfect on this layer.
Place the two halves of the 7-inch cake round vertically against the frosted layer and cover these two layers with yellow buttercream. These two layers will be the taco’s shell.
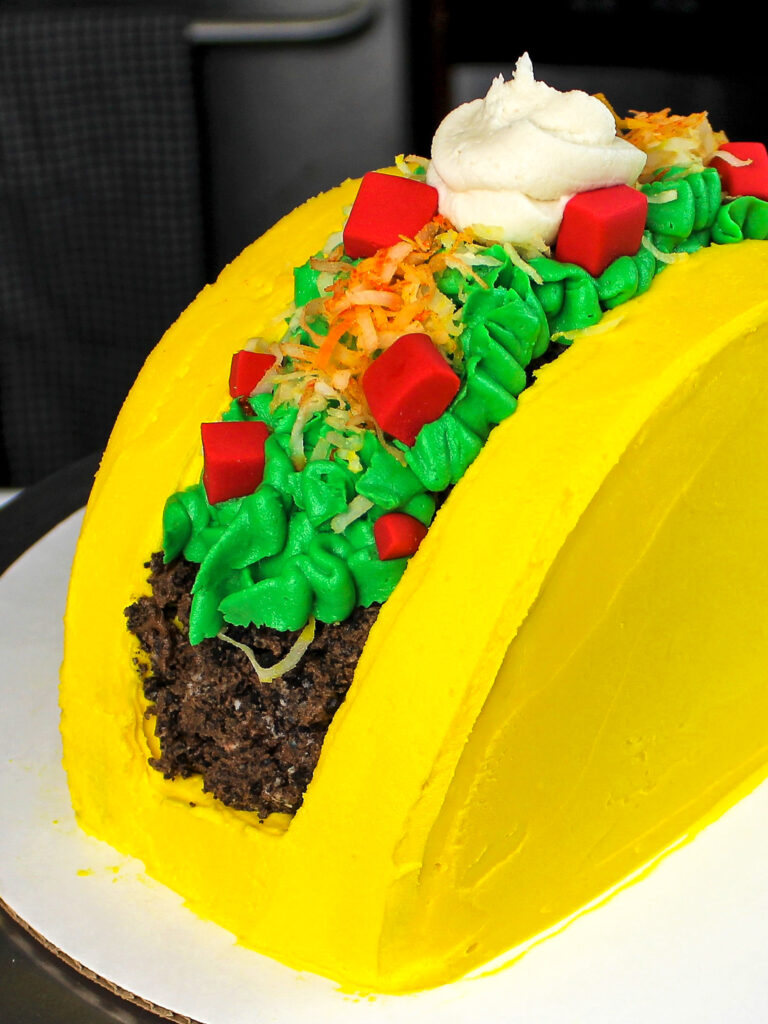
Smooth using a bench scraper or acetate sheet, then add the crushed Oreo/chocolate frosting mixture on top of the 6-inch cake layer.
Next, pipe some green buttercream on top of the Oreo mixture to look like lettuce.
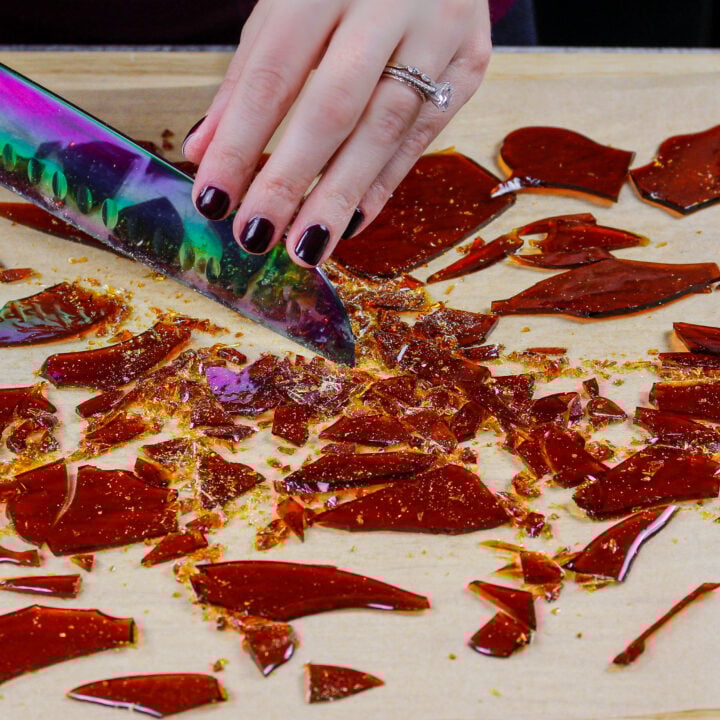
Gently place some of the colored shredded coconut on top, then add the red fondant cubes to look like diced tomatoes.
The last step is to top the cake with a dollop of white buttercream to look like sour cream. Then enjoy!
What About the Chocolate Layer in the Center of Your Cake?
In the cake shown above, I actually ended up using a chocolate cake layer for the center of the cake. I happened to have one left over from another baking project!
In my recipe below, I instruct you to make vanilla cake layers. I wanted to keep this recipe as easy as possible. Otherwise, you’d have to make two cake batters, and it would take a lot more work!
If you’re totally set on having a chocolate cake layer in the center of your cake, you can put half of your cake batter in a separate bowl.
Mix in 1/3 cup baking cocoa, an extra Tbsp of buttermilk, and an extra Tbsp of egg whites. Pour this batter into the six-inch prepared cake pan, and bake as instructed below.
Customizing This Taco Cake
One of my favorite parts of this taco cake is that you can decorate it to look just like your favorite tacos!
Love beef picadillo (guilty as charged!)? Use some chocolate buttercream and crushed Oreos to make the “beef!”
Or if you’re a huge guacamole fan, color some of the buttercream an earthy shade of green and top your cake with a generous dollop!
Feel free to get creative and make this taco cake your own.
Taco Cake Substitutions and Swaps
Below are some swaps and substitutions that can be made in this recipe.
- All-Purpose Flour – This recipe works best with all-purpose flour, but you can use cake flour or a gluten-free flour blend if needed.
- Unsalted Butter – If you only have salted butter on hand, you can use it in place of the unsalted butter and omit the salt in this recipe. You can also use vegan butter in its place!
- Egg Whites – You can also use 2 large eggs, or if you have an egg allergy, you can use an egg replacer like this. However, it will slightly change the color and texture of these cake layers.
- Buttermilk – You can also use whole milk, full-fat yogurt, sour cream, or alternative yogurt or milk (almond, soy, oat) if you’re dairy free.
Making This Buttercream Taco Cake in Advance & Storage Tips
Make the cake layers in advance and freeze them. It breaks the process up and makes it more approachable.
Make the frosting ahead of time or save any leftover frosting! It can be stored in an airtight container in the fridge for up to a month or in the freezer for up to 3 months. Be sure to give it a good stir once it thaws to get the consistency nice and smooth again.
A frosted cake can last in the fridge for up to a week or in the freezer for up to a month. The buttercream locks in all the moisture, keeping the cake fresh and delicious!
If you freeze this cake, transfer it to the fridge the day before you plan to eat it to help minimize temperature shock and reduce condensation.
If you cut into the cake and have leftovers, use any remaining frosting to cover the cut section to keep it moist and store in the fridge for up to a week.
Tips for Making the Best Taco Cake
- Ingredients at room temperature mix together better! Set out any cold ingredients ahead of time.
- Properly measure your flour (spoon into the cup measure, then level) or use a kitchen scale to measure the dry ingredients.
- Bang your cake pans on the counter before putting them in the oven. This brings any air bubbles that are trapped in the batter to the surface.
- Make this taco cake vegan or dairy-free if needed! Use your favorite type of dairy-free milk to replace the buttermilk and heavy cream, and use vegan butter sticks in place of the butter. For the eggs, I recommend using an egg replacer like this.
- Make sure your buttercream is the right consistency before frosting your cake. It will help give your cake proper structure and make it easier to decorate.
Let Me Know What You Think!
If you make this taco cake, I’d love to hear what you think! Let me know by leaving a rating and comment below.
If you plan to share on social media, tag me @chelsweets and #chelsweets so that I can see your amazing creations!
Taco Cake Recipe
Ingredients
Vanilla Cake Batter
- 1 1/2 cup all purpose flour 190g
- 1 1/2 cups granulated sugar 300g
- 1 1/4 tsp baking powder 5g
- 1/2 tsp fine salt 3g
- 1/2 cup unsalted butter, room temperature 113g
- 1/2 cup carton egg whites or 4 large egg whites, room temperature 120g
- 3/4 cup buttermilk, room temperature 180g
- 1 Tbsp vegetable or canola oil 14g
- 1 tsp vanilla extract or vanilla bean paste 4g
Vanilla Buttercream Frosting
- 2 cups unsalted butter, room temperature 434g
- 1 Tbsp vanilla extract or vanilla bean paste 12g
- 1/2 tsp fine salt 3g
- 7 cups powdered sugar 907g or a 2 lb. bag
- 2 Tbsp heavy whipping cream, room temperature 30g
Additional Decorations
- 1/4 cup red fondant, cut into 1 cm cubes
- 1 cup crushed Oreos
- 1/2 cup shredded coconut, tossed in a ziplock bag with yellow and orange food coloring to make it look like shredded cheese.
Recommend Tools
- 1, 7- inch Cake Pans
- 1, 6- inch Cake Pans
- Spinning Cake Stand
- 8- inch Cake Board
- Offset Spatula
- Bench Scraper
- Gel Food Coloring
- 3 Small Piping Bag
- Petal Piping Tip like a Wilton 104
Instructions
Vanilla Cake Layers:
- Preheat the oven to 350°F/175°C. Line one seven-inch pan and one six-inch pan with parchment rounds and grease with non-stick cooking spray. Set aside.
- Mix together 1 1/2 cups of flour, 1 1/2 cups sugar, 1 1/4 tsp baking powder, and 1/2 tsp salt in a stand mixer with a paddle attachment or in a large bowl with a hand mixer until fully combined.
- Mix 1/2 cup of room temperature butter slowly into the dry ingredients on a low speed. Continue to mix until no large chunks of butter remain and the mixture becomes crumbly.
- Pour in 1/2 cup of egg whites and mix on low until incorporated. Then mix in 3/4 cup of buttermilk, 1 Tbsp of oil, and 1 tsp vanilla on a low speed until fully incorporated. Scrape down the sides of the bowl with a spatula, then beat on medium-low speed for about 30 seconds. This helps make sure everything is properly mixed together and lightens the texture of the cake layers.
- Divide batter between the two prepared cake pans, filling them roughly the same height.
- Bake for 35-38 minutes or until a skewer comes out with a few moist crumbs. Let the layers cool in the pans for 10 minutes, then run an offset spatula around the perimeter of the pan to separate the cake from the pan. Place the cake layers into the freezer for 45 minutes to accelerate the cooling process.
- Once the layers have fully cooled, level the top of both layers using a serrated knife. While these layers bake pretty flat, it's important that the layers are totally flat because we'll be stacking them upright!
Vanilla Buttercream:
- While the cake layers bake and cool, make the buttercream frosting. Beat 2 cups of unsalted butter on a medium speed for 1 minute in a large bowl with a hand mixer or in a stand mixer fit with a paddle attachment.
- Add in 1 Tbsp vanilla extract and 1/2 tsp salt. Mix on a low speed until the ingredients are combined.
- Gradually mix in 7 cups of powdered sugar and 2 Tbsp of heavy cream on a low speed. Scrape the sides and bottom of the bowl as needed.
- Once fully mixed, check its consistency. If the frosting seems too thick, add in additional heavy cream (1 tsp at a time). If the frosting is too thin, add in more powdered sugar (quarter of a cup at a time). If your frosting looks broken, add in more room-temperature butter, 1 Tbsp at a time until it comes back together.
- Place 1 cup of frosting into a separate, medium-sized bowl and color it a bright shade of green with gel food coloring. Put this frosting into a small piping bag with a Wilton 104 tip (or any small petal tip). Seal the top of the bag with a rubber band or piping tip. This will be used to make the lettuce on this cake.
- Place 1 1/2 cups of frosting into the same bowl the green frosting was made in and mix in 1/4 cup of cocoa and 1 Tbsp of heavy cream to make chocolate buttercream. To create the "beef" in this taco cake, mix 1/2 cup of this chocolate frosting with 1 cup of crushed Oreos in a different bowl. Cover and set aside. Place the rest of the chocolate frosting in a small piping and cut a 1-inch opening at the base of the bag. Seal the top of the bag with a rubber band or piping tip. This will be used to cover the middle layer of the cake.
- Add 1/4 cup of uncolored frosting into a small piping bag and cut a 1-inch opening at the base of the bag. This will be the sour cream! Set aside.
- Color the remaining frosting a bright shade of yellow with gel food coloring. Cover the yellow frosting flush with plastic wrap and set aside.
Assembling This Taco Cake:
- Chill the cake layers in the freezer for 20 minutes before assembling this cake if possible. It will make them so much easier to stack upright and frost!! If you made the layers ahead of time and they're already frozen, let the layers sit out for 20 minutes to thaw, then assemble the cake. You want them to be cold to the touch, but not fully frozen.
- Cut the cake layers in half. Spread 2 Tbsp of yellow buttercream across the center of the cake board where the cake layers will go. This will help keep them in place.
- Place one of the halves of the 6-inch cake layer in the center of the cake board vertically. Cover the entire cake layer with an even layer of chocolate buttercream. This layer is going to be completely covered, so don't worry about making the frosting perfect on this layer.
- Place the two halves of the 7-inch cake round vertically against the frosted layer and cover these two layers with yellow buttercream. These two layers will be the taco's shell.
- Smooth using a bench scraper or acetate sheet, then add the crushed Oreo/chocolate frosting mixture on top of the 6-inch cake layer. Next, pipe on some green buttercream on top of the Oreo mixture to look like lettuce.
- Gently place some of the colored shredded coconut on top, then add the red fondant cubes to look like diced tomatoes. The last step is to top the cake with a dollop of white buttercream to look like sour cream. Then enjoy!
Video
Notes
Tips for Making the Best Buttercream Taco Cake
- Ingredients at room temp mix together better! Set out any cold ingredients ahead of time.
- Properly measure the flour (spoon into the cup measure, then level). Or better yet, use a kitchen scale to measure your dry ingredients.
- Bang the cake pans on the counter before putting them in the oven. This brings any air bubbles that are trapped in the batter to the surface.
- Level the room temperature or thawed cake layers with a serrated knife to make them easier to stack.
- Chill the cake layers in the freezer for about 20 minutes before assembling the cake. It makes it so much easier to stack and frost them!
- Use an acetate sheet to make the frosting super smooth. I buy them in big squares on Amazon and then cut them into smaller pieces with scissors to make them easier to use.
Making this Taco Cake in Advance and Storage Tips
Make the cake layers in advance and freeze them. It breaks the process up and makes it more approachable. Make the frosting ahead of time or save any leftover frosting! It can be stored in an airtight container in the fridge for up to a month. This frosting can also be stored in the freezer for up to 3 months! Just be sure to give it a good mix once it thaws to make it nice and smooth again. A frosted cake can last in the fridge for up to a week or in the freezer for a month. The buttercream locks in the moisture and keeps the cake fresh and delicious.Nutrition
Other Recipes You Might Like
Hi,
I would like to know how much is it 12 cups in grams.
Tank you!
not sure, but here is a converting link: http://dish.allrecipes.com/cup-to-gram-conversions/
Can I make the taco cake ahead of time? Keep in fridge or freezer?
Thanks
yes you can! If you put it in the freezer, be sure to transfer it to the fridge for a while before taking it out and letting it warm to room temperature. That way you will reduce the amount of temperature shock/condensation!
What’s your recipe for the chocolate cake
https://chelsweets.com/2017/03/02/the-best-chocolate-layer-cake-recipe/
Hi there! I wanted to make this into a smash cake for my son’s first birthday party. I would have to make two…. How would you suggest making the cakes smaller? I feel like they would be way too big as they are now. Thanks!!! You’re so talented and creative!
you could definitely bake smaller cake layers to make smaller smash cakes <3
Will this work with boxed cake mix?
Honestly not sure since I haven’t used boxed cake mix in a long time, but if you freeze the layers and they’re sturdy enough I would think it should!
I like Duncan Hines cake mix. It is less sweet & denser which makes it good for decorating. Also, make these changes to any box mix for home-made taste:
1. Add 1-2 additional eggs
2. Replace water with milk
3. Replace oil with melted butter
@Chelsweets, I used a boxed cake mix today as I thought it would be faster. It did not work very well as the cake was not dense enough.
If only making one cake can the frosting ingredients be cut in half? I know it’s always tricky altering recipes in baking.
The recipe calls for 2-7″pans and 2-6″ pans. I assume the 6″pans are for the center but if I use your chocolate cake recipe it calls 7″ pan. Can you clarify if the 6″ pan is what I should use for the center of the taco and if what cooking time I need to adjust on the chocolate cake recipe for the pan size change? thanks!
This is really just a half batch of my normal vanilla layer cake recipe! With my original recipe I had enough batter to make an entire extra 7 inch cake layer, that I saved to use for a future baking project. If you poured all the batter into one 6 inch and one 7 inch pan, they’d be too thick and not look proportional once they’re frosted. I’ve update the recipe to make just two, larger layers to avoid this! Sorry for the confusion!!
Thank you!
Hello,
I was trying to follow your response to Scott, but I have some additional questions. #1) the cake recipe that is included within the recipe will be all the cake batter that needs to be made to assemble this cake, #2) if this is the case, am I still using the 2 different size cake pans, and #3) you stated that you updated the recipe to make just 2 larger layers…is this reflective of the ingredient list shared on this page. Sorry for all the questions, but I am trying to make sure I get it correct.
Angela
Yes, this recipe makes all the cake you need, and it needs to be made in 2 different sized pans. The current post reflects my latest changes. Hope that helps, and happy baking!!
Thank you!
Hey. I made it this past weekend and actually used 2-9″ cake pans for the vanilla cake to make a larger taco shell for the two cakes and then made a separate chocolate 7″ cake for the center of both. Worked really well for the 2 9″ vanilla cakes using the recipe just had to monitor the cook time.
Thank you!
Thank you for this tasty and fun recipe! I just wanted to note that the cake batter was barely enough to make one taco – fortunately I only needed to serve 2 people! The icing was enough to make 3-4 tacos, so I had a ton of icing left over.
I always air on the side of having extra frosting, since there’s nothing worse than running out of frosting! left over frosting keeps for up to a month in the fridge, and I usually can find ways to repurpose it! I will revise the recipe to make less frosting though, just because I don’t think most people bake as much as I do 😛 thanks for the feedback 🙂
Is it okay if i use a 10 and 9 in pan?
yes, but you may need to increase the amount of batter you use to get layers that are the same thickness!
The vanilla recipr makes 2 8in?
yup!
Do you have the half recipe for the Chocolate too so I can make the 2 cakes instead of 4? Sorry for all the questions, this is the first time I will be making a cake NOT from a box!
I’m just wondering if your buttercream recipe can be used to make flowers. Does it firm up nicely in the freezer?
it def can, and it firms up great in the freezer!
I just want to clarify, it says one 7” pan and one 8” pan, does that mean it makes two tacos, one 7” long and one 8” long? Also to make two tacos do I just cut your chocolate cake recipe in half, or smaller since it is for 4 layers?
This is a half batch of my cake recipe! You make two cake layers, and cut both of them in half. One half of the 7 inch cake recipe becomes the center of the taco, and the two halves the 8 inch cake recipe become the taco shell. You will end up having one half of the 7 inch cake layer as a leftover, but you can eat it with buttercream, as a taste test of the cake 😛 Hope that helps!
I was really confused, and I think this explains it pretty well — however, I have a 9″ and 8″ pan. Will this work? I’m not sure how to know how much batter to put in each pan either. Can you help? I want to make this within the next day or two….
so sorry for the delayed response Lynn! I usually try to fill my pans about 1 inch high with batter.
I’m so confused by your directions. It states this recipe makes 2 tacos….but even though you list 2 different sized pans, you don’t talk about the chocolate cake recipe!? The two sized pans in your directions change sizes too – you talk about 8 and 7′ pans first, then 6 and 7″?! I really want to make this cake – but it’s hard to follow. 🙁
So sorry for the confusion Lynn! I updated this a while back and clearly somethings got lost in translation! There is no chocolate cake layer! I mention at the bottom that in the sliced photo I used a chocolate cake layer I had on hand from a separate baking project, but this recipe is made with two vanilla cake layers, to keep things simple and prevent you from having to make two different types of batter! The middle vanilla cake layer is simply frosted with chocolate buttercream, to be the “beef” center! I updated the recipe to make a seven inch and six in cake layer, because I wanted the layers to be a tiny bit thicker!
I hope that helps clear things up!! Happy baking 🙂
Did you have a recipe for the chocolate frosting in the middle?
I do!! here’s the link to my chocolate frosting recipe: https://chelsweets.com/2019/03/28/chocolate-buttercream-frosting/
Hi! I want to make the cake ahead of time and then store it in the fridge for a couple of days and was wondering how many days does it store in the fridge?
And my second question is: how do i store it without it grtting messy? Do i have to cover it with plastic film or can it be stored openly without any cover in the freezer and fridge?
Best regards
A frosted cake can stay good in the fridge for up to a week! As long as the frosting is completely covering the cake layers, it should lock in all the moisture, and the cake should stay nice and moist 🙂 I let cakes sit in the fridge overnight, or for a few days all the time! I usually leave my cakes just open in the fridge without a covering! It should be fine as long as you don’t have anything fragrant in your fridge (like fish or onions).
Or it can stay good in the freezer for up to a month! Just be sure to cover the cake in plastic wrap once it’s chilled / the buttercream has firmed up. Hope that helps Anna!
I followed your guide and made this cake for my son’s first birthday party. I used an 18″ half round cake pan,altered the frosting for the taco mixing in crushed chocolate Graham crackers to give it a more realistic look, and used chopped swedish fish for the tomatoes. It was enormous! So I put skewers down thru the cake and into a wrapped styrofoam layer below the cake. It stood upright all day. People told me it was hands down the best cake they’ve ever seen!! Thanks for the tips!!
Hi Marci,
That has to have been MASSIVE!! Wowza!!!! So happy the supports worked well (and that you had the foresight to add them!), and that the cake turned out so amazing! 🙂
Thank you that helps!
I was wondering one more thing. If i want the middle cake to be brown could i make the batter as described here and then put the white cake in the big cake pan. Then before putting the batter into the smaller cake pan, could i put in some cocoa into the batter, just for the coloring or maybe some food coloring instead of the cocoa, without ruining the cake?
Best regards
*for clarification i meant cocoa powder or mixing red, green and yellow food coloring to make it brown.
Best regards
I really want to try this cake! Is the Wilton 103 tip to make the lettuce? What is the large tip you use to put the icing on the cake?! Thanks!
You can use a wilton 103 or 104 (both will work, or really any petal tip). The large flat tip is a wilton 789, and it works great for covering cakes. It makes it so much easier to smooth <3
Here’s the link to the wide frosting tip, I ordered mine on amazon: https://amzn.to/2LykyO5
I just finished making a three taco and a single taco cakes. I put a strawberry jam in the middle of each layer and strawberries on top for salsa. Heavenly tasting.
Hi Barbara,
That sounds delicious!! And is such a fun and creative idea 🙂 I bet they were a big hit!!
Hi where can I find the Sunday zoom
Hi Jade,
Here’s the link: https://www.rmh-newyork.org/events/chelsweets <3
Thank you For the inspiration! I made this cake with a little of my own twist. check mine out @kati_laiz on Instagram!
That’s awesome, your cake turned out great Kati!! 🙂
I saw this on your tik tok page, which I love, and I thought I would try it, it kind of worked but I know what to do to make it perfect in the futur. But have you got any ideas to stop it falling apart when you cut it. Also please can can you follow my tik tok I re-enacts a lot of your recipes it’s @daisyjane_x xxx
Hi Daisy,
That’s awesome! To help get clean cake slices I like to use a super sharp knife, and chill the cake in the fridge a bit before cutting in. That helps the slices keep their structure. Hope that helps for next time, happy baking!!
If I make the cake several days before the party and put it in the fridge, do I need to wrap it or anything? Or can I just put it straight in the fridge with nothing on it?
Do you have another recommendation for the “cheese”. I’m making this cake for my son’s second birthday (Taco Twosday!) My family isn’t the biggest fan of coconut.
Hi Emily,
You could also use cut up fondant or yellow fruit roll ups <3 Such a cute theme!!
Also make sure that you didn’t bake your cake the same day. Cakes need to “rest” at least a few hours or overnight, which makes them a little firmer and not crumble. Freshly baked cakes can crumble if not allowed to rest. Like when you frost a freshly baked cake and the frosting peels off the top layer of the cake no matter how many times you try to frost it. Chill your cakes or freeze them which also helps too.
Trying to share my photo but it won’t copy and paste to here.
Anyway thanks for the idea! It turned out great!
Hi Pam,
I know, it’s such a bummer we can’t upload pictures in the comment!! So happy your cake turned out great though 🙂
This cake was really good
I made this today and it was quite frustrating to assemble. The outside half-rounds kept wanting to fall outwards even after I cut their base to be angled towards the centre. I think using a boxed cake mix made too light of a cake as the half-rounds were challenging to handle without breaking.
The kid that has asked for a taco cake for his birthday is happy tho, so thanks for the pattern to follow.
Hi Melissa,
I’m sorry to hear it was a struggle! Boxed cake mix definitely does have a different texture, and would be harder to create this design with. Glad you made it work in the end though!!
I want to make this and use on top of a sheet cake as a decoration, so there is more cake for the party. I’ll use the sheet cake as the base and to write “Taco ‘bout Love” for the couples bridal shower theme, and their names, of course, then pipe some decorative edging, etc. Any suggestions? Thinking I need to support the taco on thin board and a couple of long picks.
I think that could definitely work I agree that’s it’s a good idea to built the taco cake on its own cake board and put supports in the sheet cake underneath it to help support it! Hope that helps and that the cake turns out great, happy baking!
My dtr wants a taco themed birthday and I love to make the cakes at home! This will be perfect, but I’m wondering if I can substitute the vegetable/canola oil for avocado?
Hi Sarah,
That sounds like such a fun birthday theme! She’s a lucky girl!!
Yes, you can absolutely substitute avocado oil for the vegetable or canola oil in the recipe. Avocado oil has a neutral flavor and works really well in baking. It won’t affect the taste or texture of the cake at all. Just use the same amount and you’re good to go! Hope that helps, happy baking!