
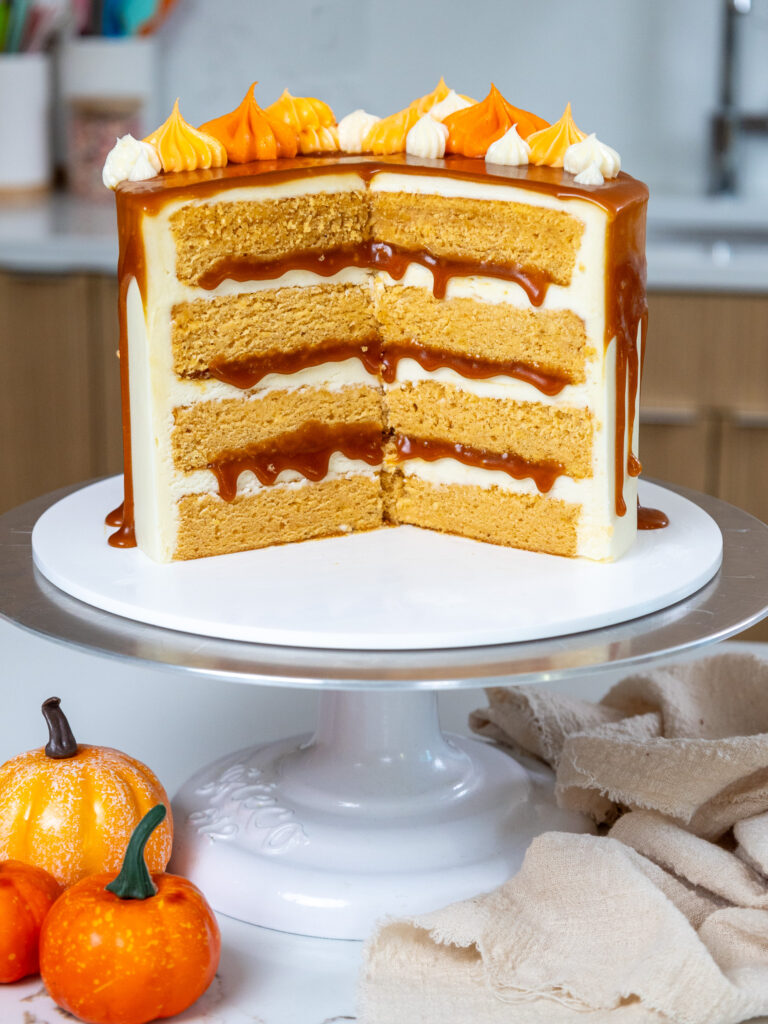
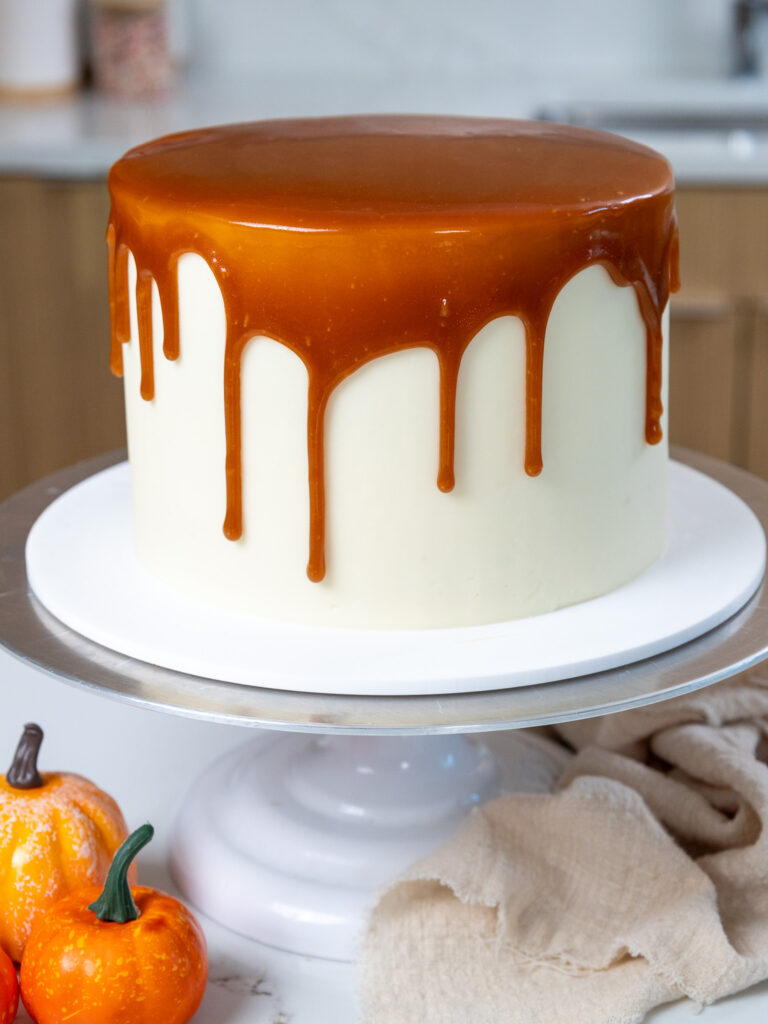
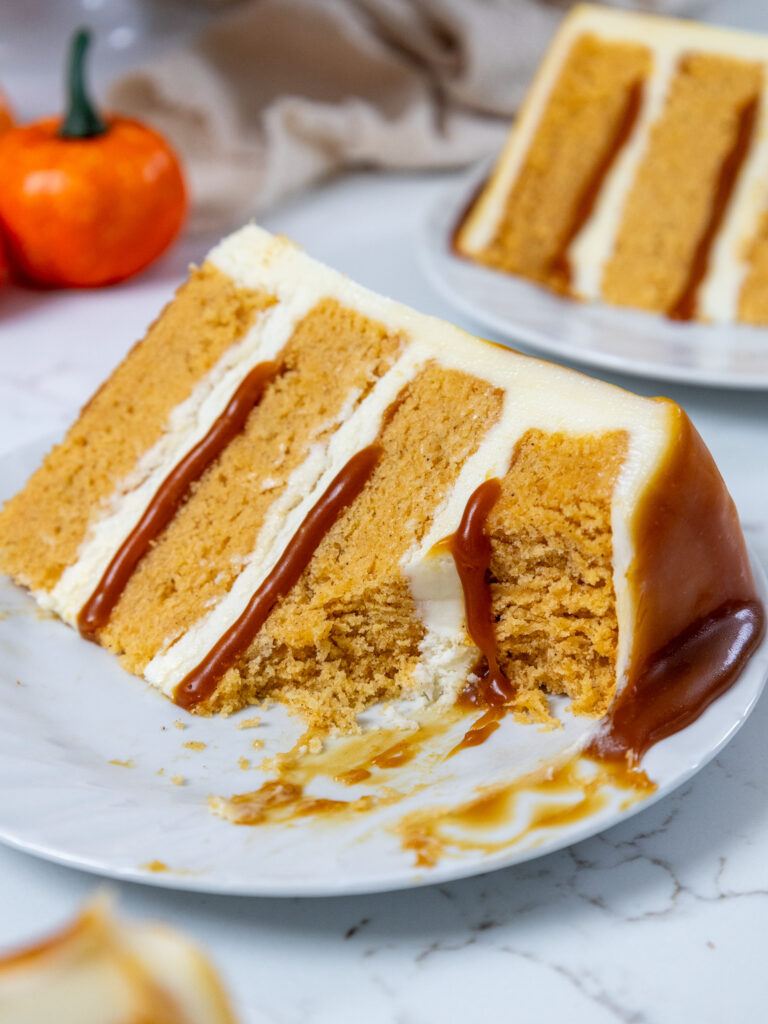
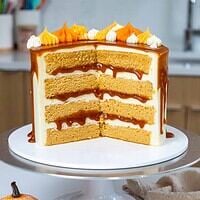
Pumpkin Caramel Cake
This pumpkin caramel cake is moist, tender, and absolutely delicious! It’s made with pumpkin cake layers, fluffy cream cheese buttercream, and buttery caramel.
How to Make This Pumpkin Caramel Cake
To make sure this cake turns out as amazing as possible, let’s walk through each step together!
I figured it might be helpful to know what tools I use too, so I’ve shared a list below too.
Not all of these are mandatory, but they make the process a lot easier. If you don’t have all these things on hand, feel free to improvise and work with what you have.
- Saucepan
- 4, 7-inch Cake Pans or 3, 8-inch Cake Pans
- Spinning Cake Stand
- Electric Hand Mixer or Stand Mixer
- Serrated Knife
- 10-inch Greaseproof Cake Board or Flat Plate
- Large Offset Spatula
- Bench Scraper
- 1 Piping Bag
- 1 Open Star Piping Tip (like a Wilton 1M)
- Rubber Spatula
Step 1: Make the Caramel
Make the caramel first, because it needs time to cool and thicken before it’s used to fill the cake.
Making caramel from scratch might seem a little intimidating, but I promise it’s easier than you’d think!
Turn the stove to a medium heat and place a saucepan over the element. Once the saucepan has warmed up, gradually pour in the sugar, adding 1/4 cup at a time.
Wait until the sugar is mostly liquified, then add in the next bit of sugar. As the sugar melts it will slowly deepen in color.
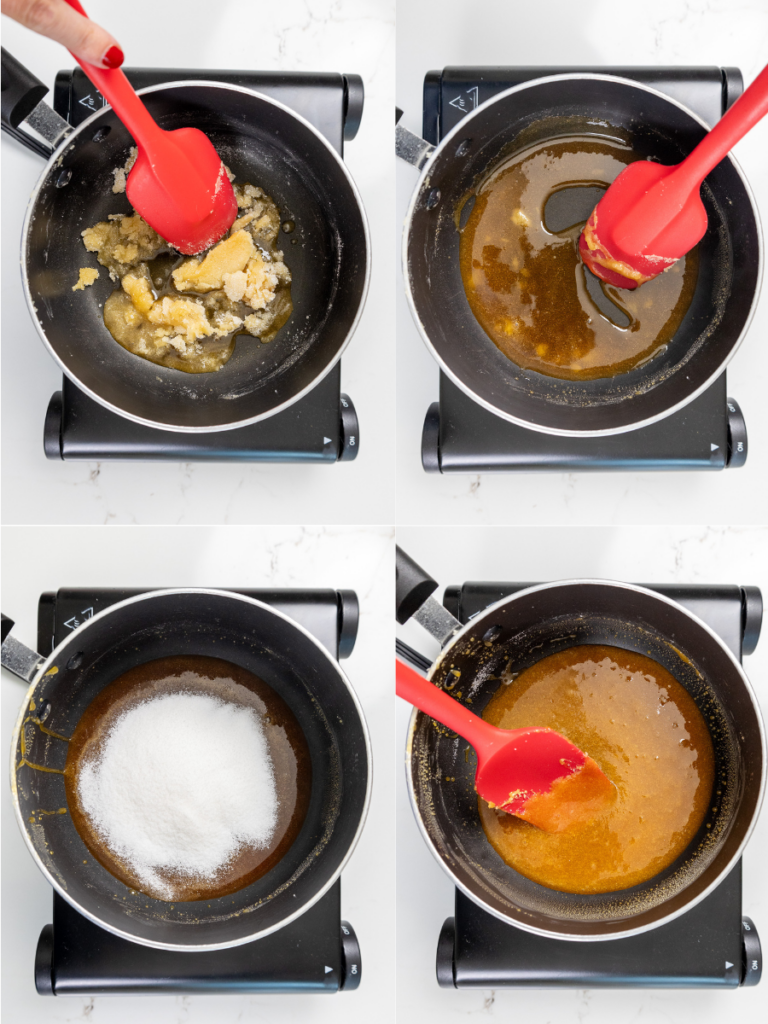
I try to stir it as little as possible, and let the heat melt it down. If you feel like the sugar might be burning or getting too dark, remove the pan from heat and turn down the temperature a bit.
Stir as needed until the sugar is fully dissolved and is an amber color. Turn off the heat.
Slowly mix in the butter, then stir in the heavy cream and salt. The mixture will be very thin at this point but will thicken as it cools.
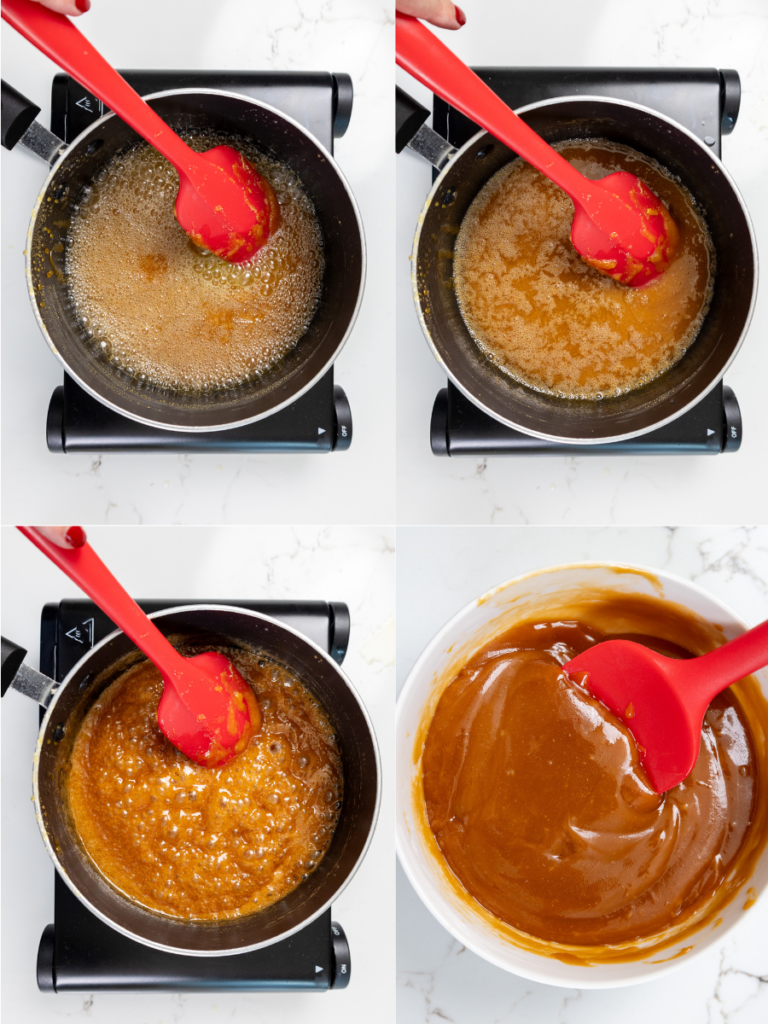
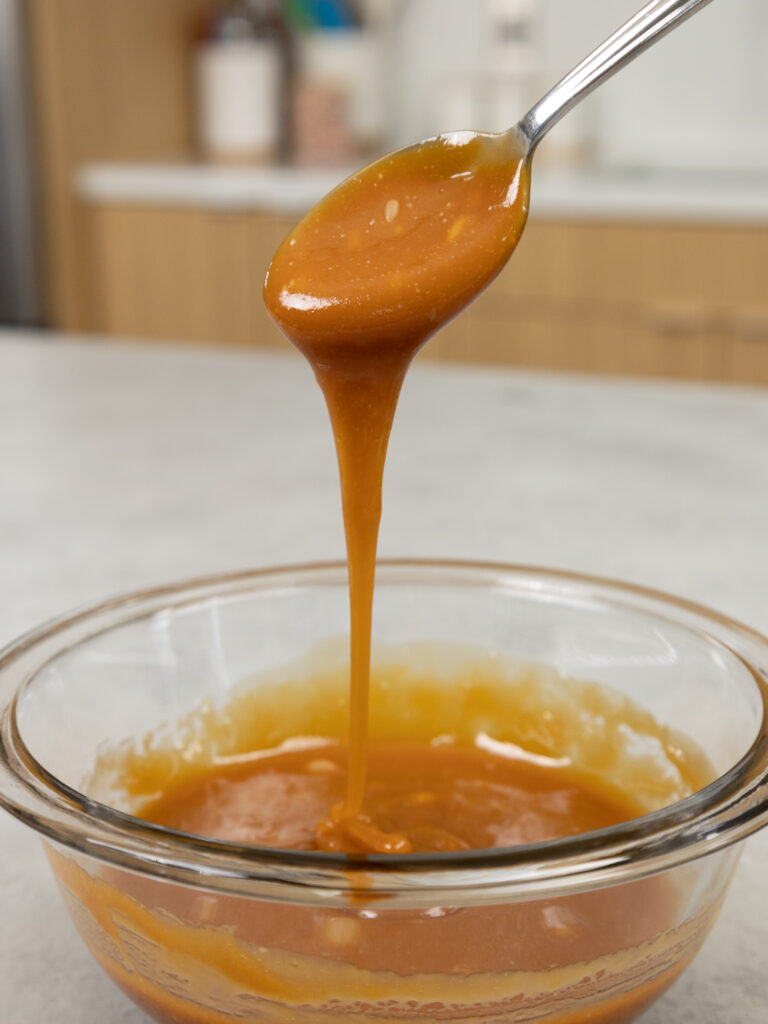
Pour the caramel into a separate container and set aside to cool.
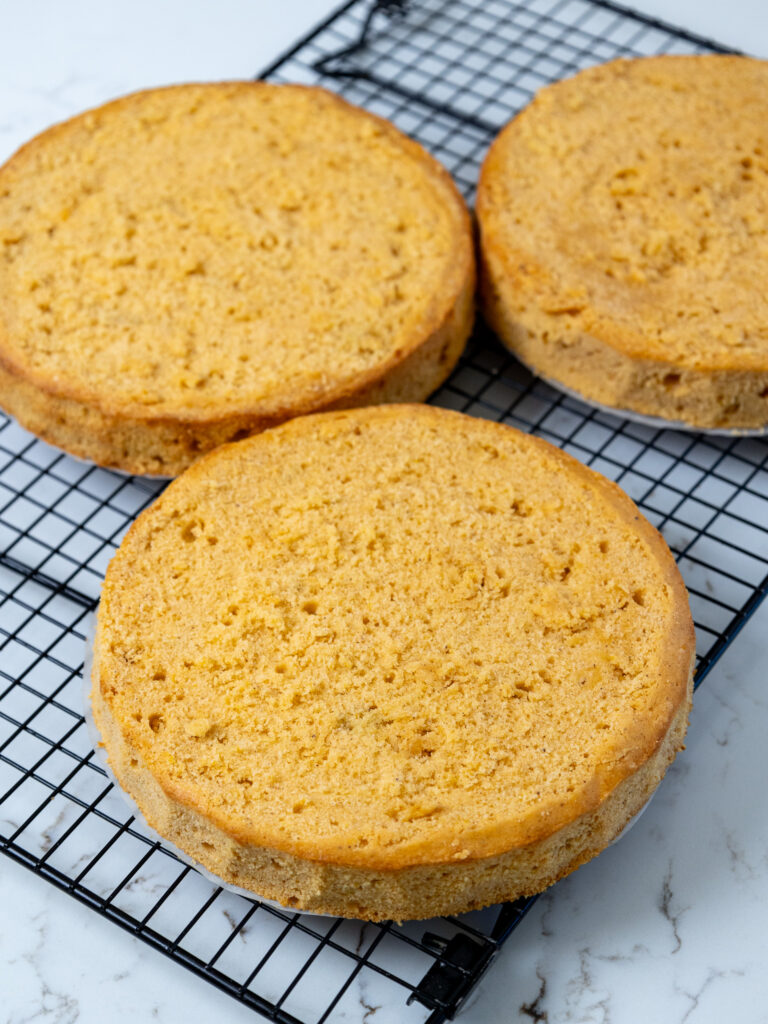
Step 2: Bake the Pumpkin Cake Layers
Make the pumpkin cake layers next following the recipe card at the bottom of this post.
Divide it evenly between the prepared cake pans and bake for 33-36 minutes or until a toothpick comes out with a few moist crumbs.
Remove the cake layers from the oven and let them cool in the pans for about 30 minutes. Or if you’re in a rush, place the pans directly in the freezer to accelerate the cooling process.
Then gently run an offset spatula around the rim of the cake pans to loosen them and flip them onto wire racks to finish cooling.
These layers bake up pretty flat, so leveling them is optional! If you want to level them, use a serrated knife to level the top of each cake layer. I also like to trim away the caramelization around the sides of the layers.
If you’re making these in advance, you can wrap and freeze them at this point.
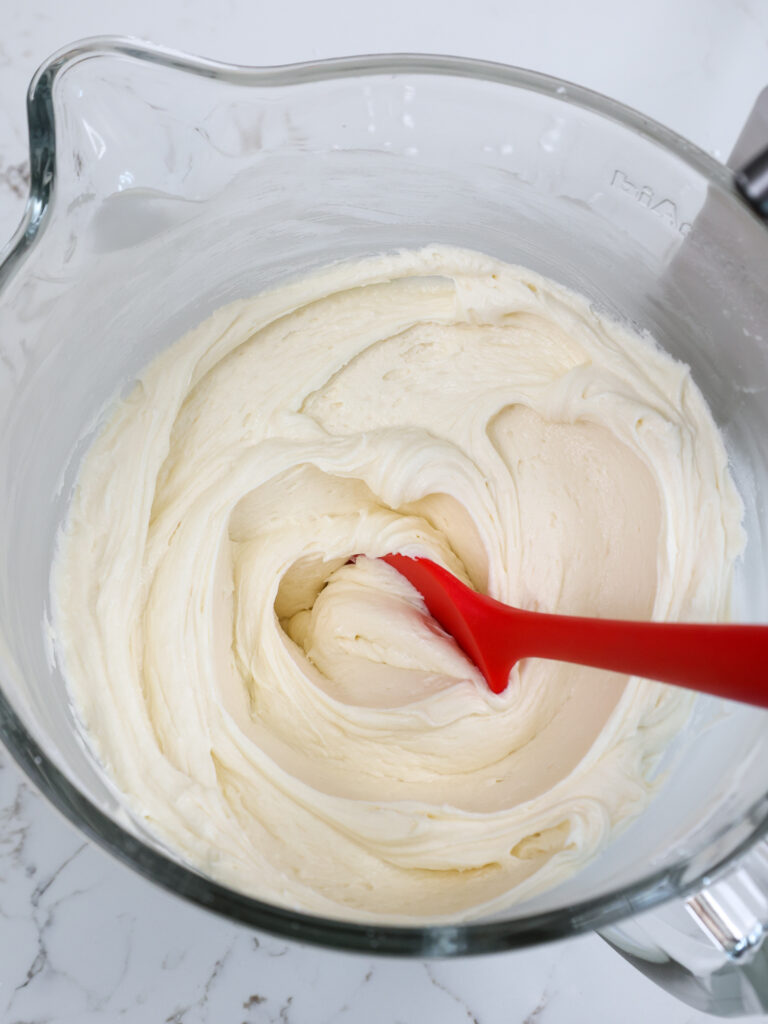
Step 3: Make the Cream Cheese Buttercream Frosting
While the cake layers bake and cool, make the cream cheese buttercream.
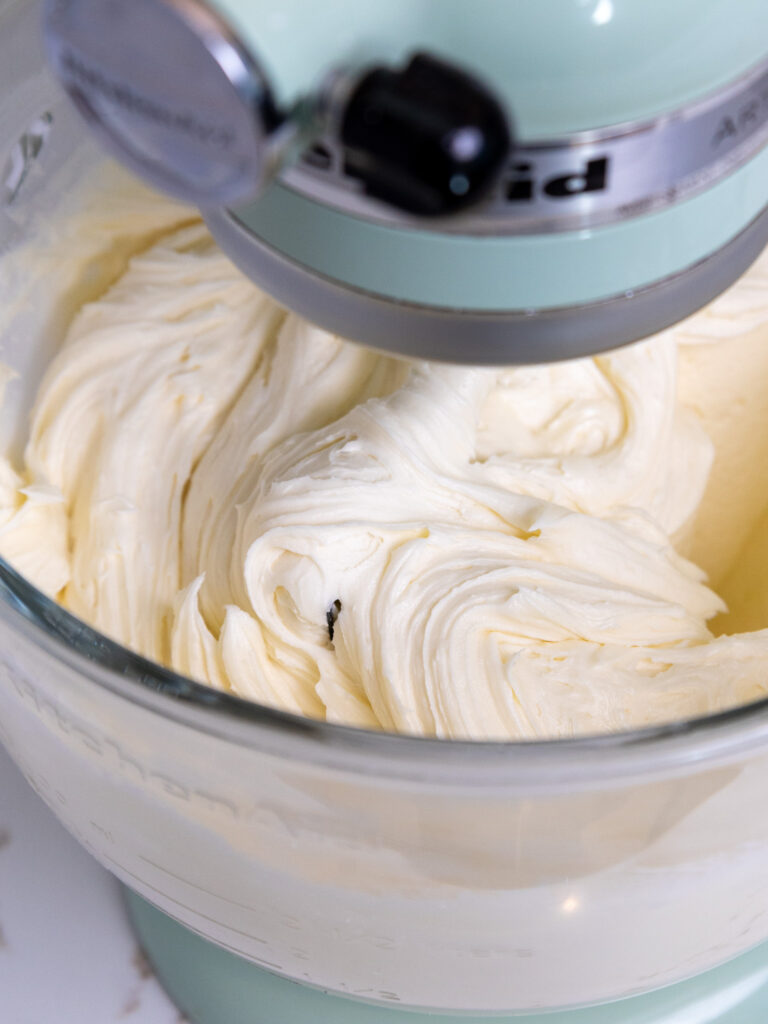
If you want to use a less sweet frosting or regular vanilla frosting, I’d recommend making a batch of my Swiss meringue buttercream or 1.5 batches of my hybrid buttercream.
This frosting can also be made in advance if needed and kept in the fridge for up to 2 weeks or in the freezer for a month.
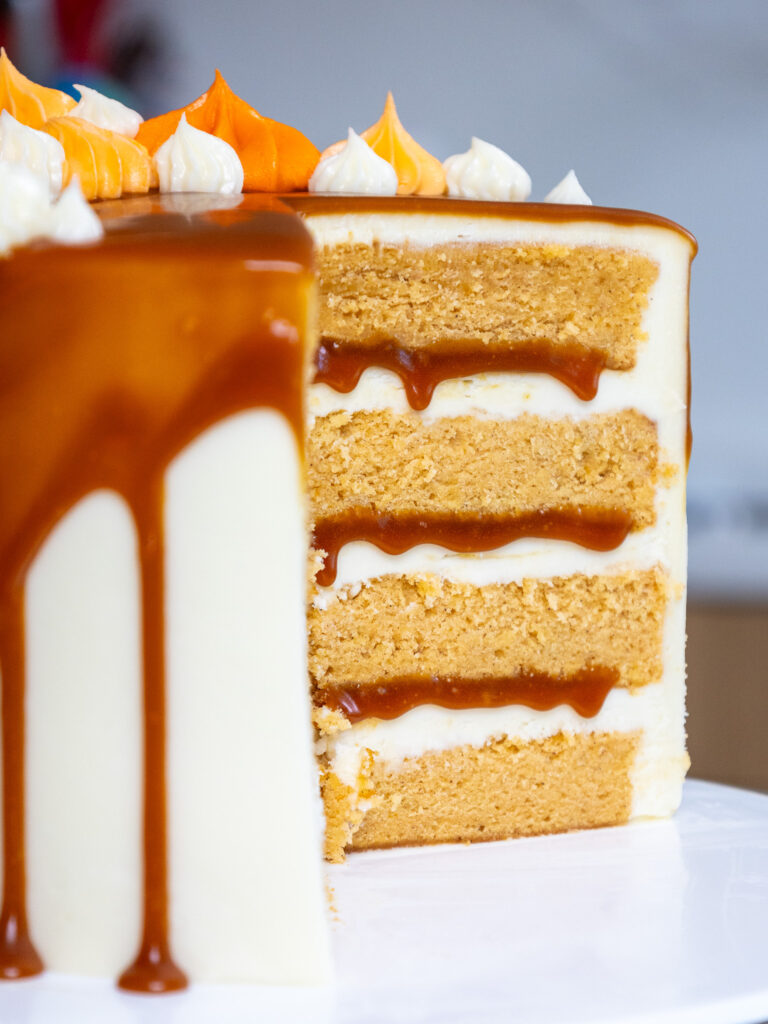
Step 4: Stack and Frost the Cake Layers
Then it’s time to assemble this cake! Stack and frost cake layers on a greaseproof cake board or flat plate. Use a dab of buttercream to help stick the first cake layer to the board.
Spread an even layer of cream cheese buttercream on top of each cake layer with a large offset spatula.
The caramel at this point should have thickened but still be fluid enough to drizzle. If it’s not, heat it up in the microwave in 10-second intervals until it is.
Use a large spoon to drizzle a few spoonfuls of caramel on top of the frosting.
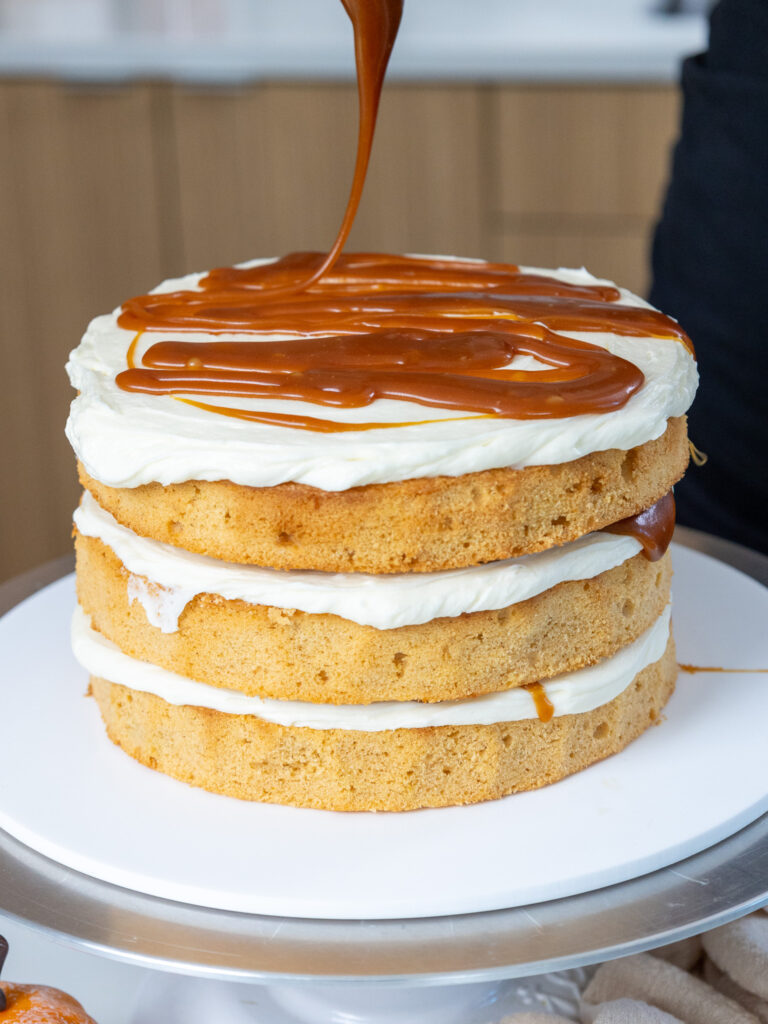
If the cake layers start to slide around as you stack them, pop the cake into the freezer for 5 minutes to help the frosting between the layers firm up.
Step 5: Crumb Coat the Cake
Spread a thin coat of frosting around the cake to fully cover the cake layers.
Smooth the frosting using a large offset spatula and/or bench scraper, then chill the cake in the fridge (20 minutes) or freezer (10 minutes) until the frosting is firm to the touch.

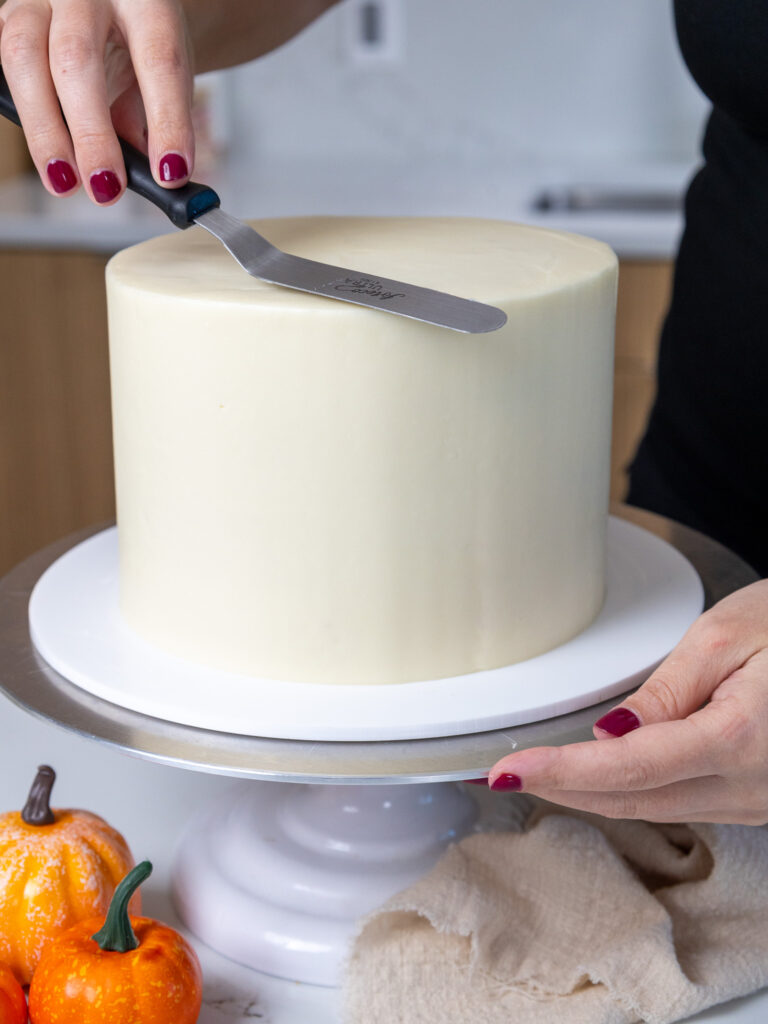
Step 6: Smooth on the Second Layer of Frosting
Cover the chilled cake with a second, thicker layer of buttercream. Smooth using an offset spatula and bench scraper.
If you’re struggling to get smooth sides on the cake, check out my video tutorial on how to frost a cake smoothly.
Chill the cake one more time in the fridge (20 minutes) or freezer (5 minutes) until the frosting is firm to the touch.
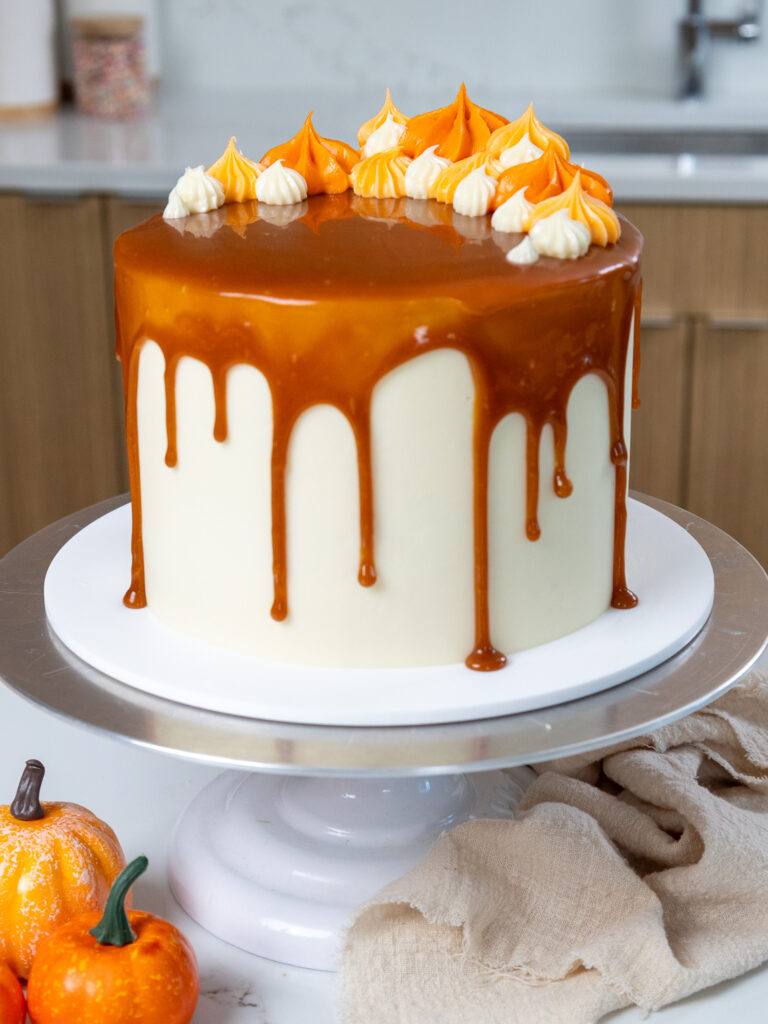
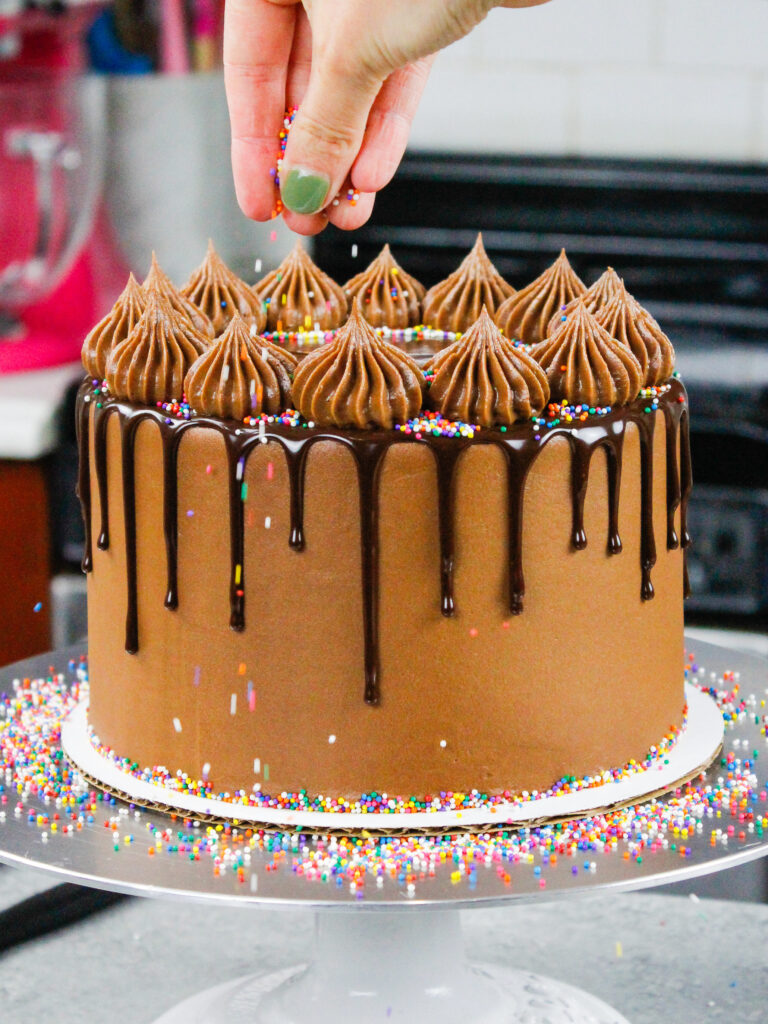
Step 7: Add the Caramel Drips Around the Cake and Decorate
Make sure the caramel is still a little bit warm to the touch and fluid, then pour the remaining caramel on top of the cake and gently push it out to the edge of the cake and over the edge with a small offset spatula or the back of a spoon.
The drips may look a bit short and stubby at first, but that is actually exactly what you want them to look like.
Give them some time (10-20 minutes) and I promise the caramel will continue to slowly drip down the cake.
Once the drips have reached a length you’re happy with, place the cake in the freezer to help lock the caramel drips in place.
Place the remaining buttercream in a large piping bag fit with an open star piping tip (like a Wilton 1M). Seal the top with a rubber band or clip and then pipe little frosting dollops on top of the cake.
Make sure the caramel is completely cooled on top of the cake before adding the frosting dollops, or else they can slide off the cake!
I colored my buttercream with orange gel food coloring, but that’s optional.
If you’re making this cake in advance, it can sit at room temperature for a few hours or be stored in the fridge for up to a week.
Substitutions and Swaps – Pumpkin Layers
This recipe uses quite a few ingredients and I know you might not have them all on hand. Or if you have food allergies or restrictions, I’ve got you covered.
Below are some swaps and substitutions that can be made in this cake recipe.
- All-Purpose Flour – This recipe turns out best with AP flour, but you can use a gluten-free flour blend or cake flour if that’s what you have on hand.
- Granulated Sugar – I do not recommend changing the type or reducing the amount of sugar because it will change the texture of the cake layers.
- Unsalted Butter – If you only have salted butter on hand, you can use it in place of the unsalted butter in this recipe. Just be sure to omit the salt that this cake recipe calls for. You can also use vegan butter in its place (and also omit the salt)!
- Egg whites – I like to use the pasteurized egg whites that come in a carton, but you can also use 4 large egg whites or 2 whole, large eggs. If you have an egg allergy you can try using flaxseed eggs or a vegan egg replacer.
- Pumpkin Puree – While the ground spices give this cake most of its flavors, the pumpkin puree gives these layers a tender texture and a bit of color. If you don’t have any pumpkin on hand, you can use an additional 1/2 cup of egg whites in its place.
- Buttermilk – You can also use full-fat yogurt, whole milk, sour cream, or an alternative yogurt or milk (almond, soy, oat) if you’re dairy-free.
- Vegetable Oil – Any flavorless oil will work in this recipe. Canola or even sunflower oil would work great!

Substitutions and Swaps – Cream Cheese Buttercream Frosting
- Unsalted Butter – If you only have salted butter on hand, you can use it in place of the unsalted butter. Just be sure to omit the salt that this frosting recipe calls for. You can also use vegan butter in its place (and omit the salt)!
- Cream Cheese – Full-fat cream cheese that comes in a block works best. I prefer the Philadelphia brand (not sponsored – just truly the best for baking!).
- Heavy Cream – Whole milk or alternative milk (soy, almond, oat) will work fine in this frosting recipe if that’s what you have on hand.
Using this Recipe to Make Different Sized Cake Layers
One batch of cake batter makes about 1800 grams or 10 cups. If you plan to use four circular cake pans, add 450 grams of batter into each pan. If you make 3 layers, add 600 grams to each pan.
While I usually make 3, 8-inch cake layers or 4, 7-inch cake layers with this recipe, it can also be used to make 4, 6-inch cake layers, but they will take a few minutes longer to bake.
This recipe can also be used to make a caramel pumpkin sheet cake! One batch will make 2, 9 x 13-inch cake layers that are about 1 inch tall.
Bake for 35-40 mins at 350 F / 175 C. I recommend using heating cores if you have them to help large cake layers like this bake more evenly and quickly.
You can also make one 9 x 13-inch cake layer that’s about 2 inches tall, but the bake time will be 45-55 minutes at 350 F/ 175 C.
Tips for Making the Best Caramel Pumpkin Layer Cake
- Ingredients at room temp mix together better! Set out any cold ingredients ahead of time.
- Properly measure your flour (spoon into the cup measure, then level). Or better yet, use a kitchen scale to measure your dry ingredients.
- Use a scale to weigh your cake pans as you fill them. It will make the cake layers bake up to the same height and bake more evenly.
- Level the room temperature or thawed cake layers with a serrated knife to make them easier to stack.
- Make sure the buttercream is the right consistency. This will help give the cake proper structure and make it easier to decorate.
- Chill the cake layers in the freezer for about 20 minutes before assembling the cake. It makes them so much easier to stack and frost!
- If your cake layers turn out less than perfect, read my cake troubleshooting guide to see where things might’ve gone awry.
Making this Pumpkin Caramel Layer Cake in Advance & Storage Tips
Make these cake layers in advance and freeze them. It breaks the process up and makes it more approachable.
The caramel can also be stored in an airtight container in the fridge for up to a month.
You can also make the frosting can also be made ahead of time too or you can save any leftover frosting! It can be stored in an airtight container in the fridge for up to 2 weeks, or in the freezer for up to a month.
Be sure to give it a good stir once it thaws to get the consistency nice and smooth again.
A frosted cake can last in the fridge for up to a week, or in the freezer for up to a month. The buttercream locks in all the moisture, keeping the cake fresh and delicious!
If you cut into the cake and have leftovers, use any remaining frosting to cover the cut section to keep it moist and store it in the fridge for up to a week.
Let Me Know What You Think!
If you make this pumpkin caramel cake recipe, I’d love to hear what you think of it! Let me know by leaving a rating and comment below.
And don’t forget to tag me @chelsweets use #chelsweets if you share on social media so that I can see your amazing creations.
Pumpkin Caramel Cake
Ingredients
Caramel Filling & Drip
- 1 cup granulated sugar 200g
- 6 Tbsp unsalted butter, room temperature 85g
- 1/4 cup heavy whipping cream, room temperature 60g
- 1/4 tsp fine salt 2g
Pumpkin Cake Layers
- 3 cups all-purpose flour 375g
- 3 cups granulated sugar 600g
- 2 1/2 tsp baking powder 10g
- 2 tsp ground cinnamon 6g
- 1 tsp ground ginger 3g
- 1 tsp fine salt 6g
- 1/2 tsp ground nutmeg 2g
- 1 cup (2 sticks) unsalted butter, room temperature 226g
- 2/3 cup pumpkin puree 112g
- 1/2 cup carton egg whites or 4 large egg whites, room temperature 120g
- 1 1/2 cups buttermilk, room temperature 360g
- 2 Tbsp vegetable or canola oil 28g
- 2 tsp vanilla extract or vanilla bean paste 8g
Cream Cheese Frosting
- 1 1/2 cups (3 sticks) unsalted butter, room temperature 339g
- 1/2 cup or 4 oz. full-fat cream cheese, room temp 113g
- 7 cups powdered sugar 904g or a 2 lb. bag
- 1/2 tsp fine salt 3g
- 2 Tbsp heavy whipping cream, room temperature 30g
- 1 tsp vanilla extract or vanilla bean paste 4g
Recommend Tools and Equipment
- Heavy Bottomed Saucepan
- 7- or 8-inch round cake pans
- Large offset spatula
- Bench Scraper
- Electric Hand Mixer and Stand Mixer
Instructions
Caramel Filling & Drip
- Make the caramel first, because it needs time to cool and thicken before it's used to fill the cake. Making caramel from scratch might seem a little intimidating, but I promise it's easier than you'd think!
- Turn the stove to medium heat and place a saucepan over the element.
- Once the saucepan has warmed up, pour in 1 cup of sugar gradually, adding 1/4 cup at a time. Wait until the sugar is mostly liquified, then add in the next bit of sugar. As the sugar melts it will slowly deepen in color. I try to stir it as little as possible, and let the heat melt it down. If you see large chunks of sugar form, try to break them up with a rubber spatula to help them melt down fully. If you feel like the sugar is burning during this process, remove the pan from the element and turn down the heat a bit.
- Stir as needed until the sugar is fully dissolved and is an amber color. Turn off the heat.
- Slowly mix in 6 Tbsp of butter, 2 Tbsp at a time. Stir until each addition of butter is fully incorporated before adding the next bit. Then stir in 1/4 cup of heavy cream and 1/4 tsp salt. The mixture will be very thin but will thicken as it cools.
- Pour the caramel into a separate container and set aside to cool. If you make this in advance, cover the caramel and store it in the fridge for up to a month.
Pumpkin Cake Layers:
- Preheat oven to 350°F/175°C. Line four 7-inch or three 8-inch round pans with parchment rounds, and grease with non-stick cooking spray or homemade cake release. I used 7-inch cake pans.
- Mix 3 cups flour, 3 cups sugar, 2 1/2 tsp baking powder, 2 tsp cinnamon, 1 tsp ginger, 1 tsp salt, and 1/2 tsp nutmeg together in a stand mixer with a paddle attachment or hand mixer until fully combined.
- Gradually mix 1 cup of room-temperature unsalted butter into the dry ingredients at a low speed. Continue to mix until no large chunks of butter remain, and the mixture looks like moist sand.
- Mix in 2/3 cup pumpkin puree and 1/2 cup egg whites on low until just incorporated. Scrape the sides and bottom of the bowl as needed with a rubber spatula.
- Then mix in 1 1/2 cups buttermilk, 2 Tbsp of vegetable oil, and 1 tsp of vanilla extract on a low speed until fully incorporated. Scrape down the sides of the bowl with a rubber spatula one more time, then beat on a medium speed for about 30 seconds to make sure everything is properly mixed together. This also helps lighten the texture of the cake layers.
- Divide the batter evenly between the cake pans (450g per pan if you make 4 layers, 600g per pan if you make 3 layers). Bake for 33-36 minutes or until a toothpick comes out with a few moist crumbs. Rotate the pans halfway through to help them bake evenly.
- Let the pans cool for 10 minutes, then run a small offset spatula around the perimeter of the pan to separate the cake from the pan.
- Place the cake layers into the freezer for 30 minutes to accelerate the cooling process. Once the layers are fully cooled, carefully flip the pans, and remove the layers.
- These cake layers bake up pretty flat, but I like to use a serrated knife to level the tops and remove any caramelization around the sides of the layers. This step is optional but makes the cake a lot easier to frost. You can also trim the layers, then wrap and freeze them if you're making them in advance.
- If you make these cake layers in advance and freeze them, let them thaw for about 15 minutes before making the cake. The cake layers should still be slightly cold to the touch, which will make it easier to assemble the cake.
Cream Cheese Buttercream Frosting:
- While the cake layers bake and cool, make the cream cheese buttercream frosting.
- In the bowl of a stand mixer or a large bowl, beat 1 1/2 cups of unsalted butter and 1/2 cup of cream cheese on a medium speed for 30 seconds with a stand mixer and paddle attachment or hand mixer until smooth.
- Mix in 1 Tbsp of vanilla extract and 1/2 tsp salt on a low speed.
- Gradually mix in 7 cups of powdered sugar and 2 Tbsp of heavy cream on a low speed.
- Continue to mix on a low speed for a few minutes until the desired consistency is reached. If the frosting seems too thick, add in additional cream (1 Tbsp at a time). If the frosting seems too thin, add in more powdered sugar (a quarter of a cup at a time).
- Cover the buttercream flush with plastic wrap to prevent crusting, then set aside.
Assembling This Pumpkin Caramel Cake:
- Stack and frost cake layers on a greaseproof cake board or flat plate using a dab of frosting to help stick the first cake layer to the board.
- Spread an even layer of cream cheese buttercream on top of each cake layer with a large offset spatula.
- The caramel at this point should have thickened but still be fluid enough to drizzle. If it's not, heat it up in the microwave in 10-second intervals until it is. Use a large spoon to drizzle a few spoonfuls of caramel on top of the frosting. If the cake layers start to slide around as you stack them, pop the cake into the freezer for 5 minutes to help the frosting between the layers firm up.
- Top with the next cake layer and repeat until all the cake layers are stacked. Spread a thin coat of frosting around the cake to fully cover the cake layers.
- Smooth using a bench scraper, then chill the cake in the fridge (20 minutes) or freezer (10 minutes) until the frosting is firm to the touch.
- Cover the chilled cake with a second, thicker layer of buttercream. Smooth using an offset spatula and bench scraper.
- Chill the cake one more time in the fridge (20 minutes) or freezer (5 minutes) until the frosting is firm to the touch.
- Make sure the caramel is still a little bit warm to the touch and fluid, then pour the remaining caramel on top of the cake and gently push it out to the edge of the cake and over the edge with a small offset spatula or the back of a spoon. The drips may look a bit short and stubby at first, but that is actually exactly what you want them to look like. Give them some time (10-20 minutes) and I promise the caramel will continue to slowly drip down the cake. Once the drips have reached a length you're happy with, place the cake in the freezer to help lock the caramel drips in place.
- Place the remaining buttercream in a large piping bag fit with an open star piping tip (like a Wilton 1M). Seal the top with a rubber band or clip and then pipe little frosting dollops on top of the cake. Make sure the caramel is completely cooled on top of the cake before adding the frosting dollops, or else they can slide off the cake! I colored my buttercream with orange gel food coloring, but that's optional.
Notes
Recipe Variations
One batch of cake batter makes about 1800 grams or 10 cups. If you plan to use four circular cake pans, add 450 grams of batter into each pan. If you make 3 layers, add 600 grams to each pan. While I usually make 3, 8-inch cake layers or 4, 7-inch cake layers with this recipe, it can also be used to make 4, 6-inch cake layers, but they will take a few minutes longer to bake. This recipe can also be used to make a caramel pumpkin sheet cake! One batch will make 2, 9 x 13-inch cake layers that are about 1 inch tall. Bake for 35-40 mins at 350 F / 175 C. I recommend using heating cores if you have them to help large cake layers like this bake more evenly and quickly. You can also make one 9 x 13-inch cake layer that's about 2 inches tall, but the bake time will be 45-55 minutes at 350 F/ 175 C.Tips for Making the Best Caramel Pumpkin Layer Cake
- Ingredients at room temp mix together better! Set out any cold ingredients ahead of time.
- Properly measure your flour (spoon into the cup measure, then level). Or better yet, use a kitchen scale to measure your dry ingredients.
- Use a scale to weigh your cake pans as you fill them. It will make the cake layers bake up to the same height and bake more evenly.
- Level the room temperature or thawed cake layers with a serrated knife to make them easier to stack.
- Make sure the buttercream is the right consistency. This will help give the cake proper structure and make it easier to decorate.
- Chill the cake layers in the freezer for about 20 minutes before assembling the cake. It makes them so much easier to stack and frost!
- If your cake layers turn out less than perfect, read my cake troubleshooting guide to see where things might've gone awry.
Making this Pumpkin Caramel Layer Cake in Advance & Storage Tips
Make these cake layers in advance and freeze them. It breaks the process up and makes it more approachable. The caramel can also be stored in an airtight container in the fridge for up to a month. You can also make the frosting can also be made ahead of time too or you can save any leftover frosting! It can be stored in an airtight container in the fridge for up to 2 weeks, or in the freezer for up to a month. Be sure to give it a good stir once it thaws to get the consistency nice and smooth again. A frosted cake can last in the fridge for up to a week, or in the freezer for up to a month. The buttercream locks in all the moisture, keeping the cake fresh and delicious! If you cut into the cake and have leftovers, use any remaining frosting to cover the cut section to keep it moist and store it in the fridge for up to a week.Nutrition
Other Recipes You Might Like:
Hi! What would be the baking time and temperature for cupcakes?
Hi Dara,
Great question! If you want to make cupcakes using this recipe, fill the liners about 3/4 full and bake at 350F / 175 C for 19-21 minutes, or until a toothpick inserted in the center comes out with a few moist crumbs. Hope that helps, happy baking!!
How do you store a completed cake in the fridge or freezer? Does it need to be wrapped in cling wrap or just put into a box?
Also I stored the wrapped layers in the fridge instead of freezer overnight (read the instructions wrong,) will this affect the cake texture ?
Hi Melissa,
It depends on how long you want to store the cake in the fridge / freezer, but if it’s just a few days I usually leave it uncovered. If you’re worried about the cake absorbing smells from your fridge (like seafood or aromatics like garlic or onion) or you need to store it for a while, I’d recommend chilling the cake in the freezer until it’s firm to the touch, then wrapping it in cling wrap. You can also store it in a box, but that won’t really protect it the same way that the plastic wrap will.
If you wrapped and stored the cake layers in the fridge overnight, they should be just fine! The wrapping should lock in all the moisture, and as long as they’re cold to the touch they should be easier to stack and frost. Hope that helps, happy baking!
We served this last night after a small dinner party. It was amazing and the hit of the party.
I struggled with the caramel, though and ended up making it twice. It was a little bit too thick to drizzle without warming it up enough to melt the icing.
My presumption is that my substitution heavy whipping cream instead of heavy table cream impacted the consistency.
Do you have any thoughts about how to thin the caramel prior to use without overheating it?
Hi Harry,
So happy to hear the cake was a big hit!! The caramel can be difficult, my first guess if it was a bit too thick would be that the sugar was cooked a tiny bit too long (this has happened to me before)! Sometimes it comes down to the type of pot/pan you’re using. A thick, enamel-coated cast-iron pot or thick bottom pot works best, but any kind of stainless steel or light-colored pan works too. I also like to let my pan get warm before I add in the sugar, which I think speeds up the process. Do you think that might have had an impact on your caramel?
In terms of the cream, table cream does have less fat that heavy whipping cream, which also could have affected the consistency. Hope that helps for the future, happy baking!