
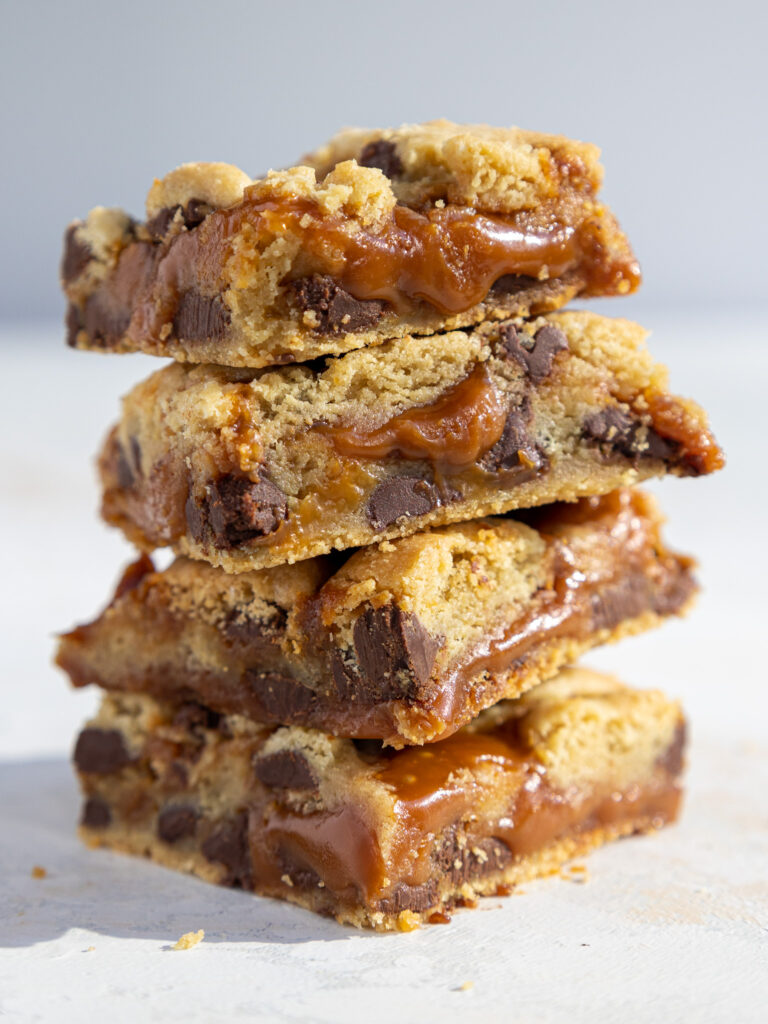
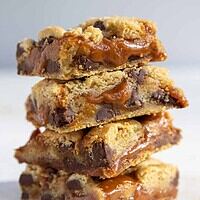
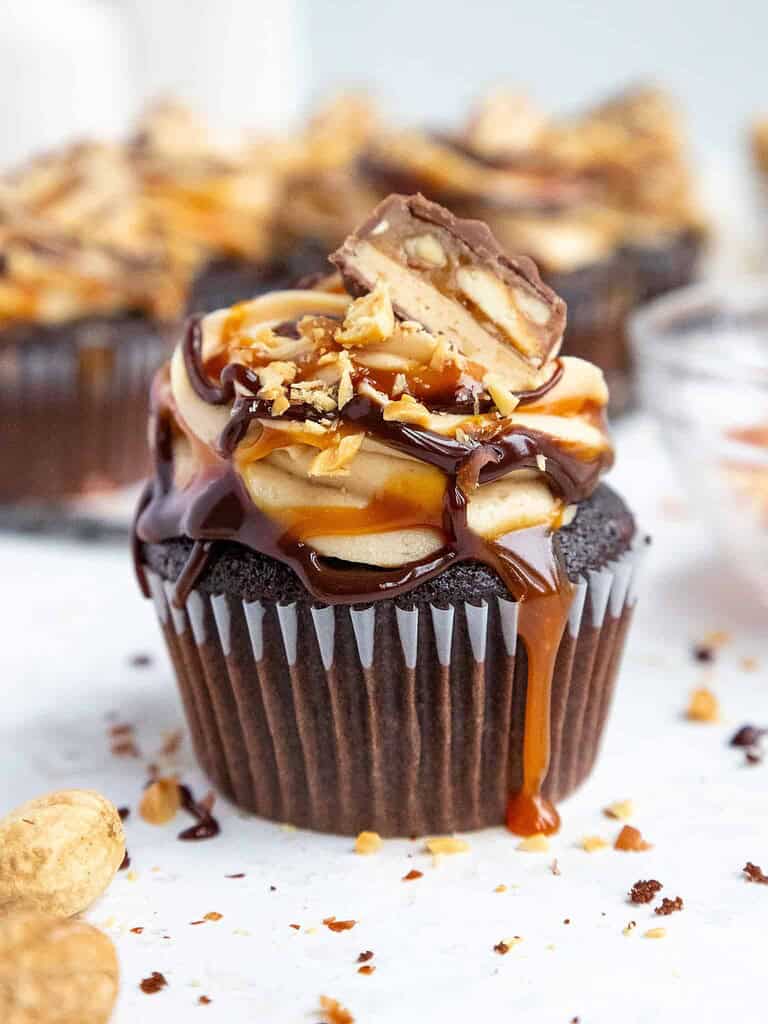
Caramel Cookie Bars
These caramel cookie bars are a fun twist on a classic!
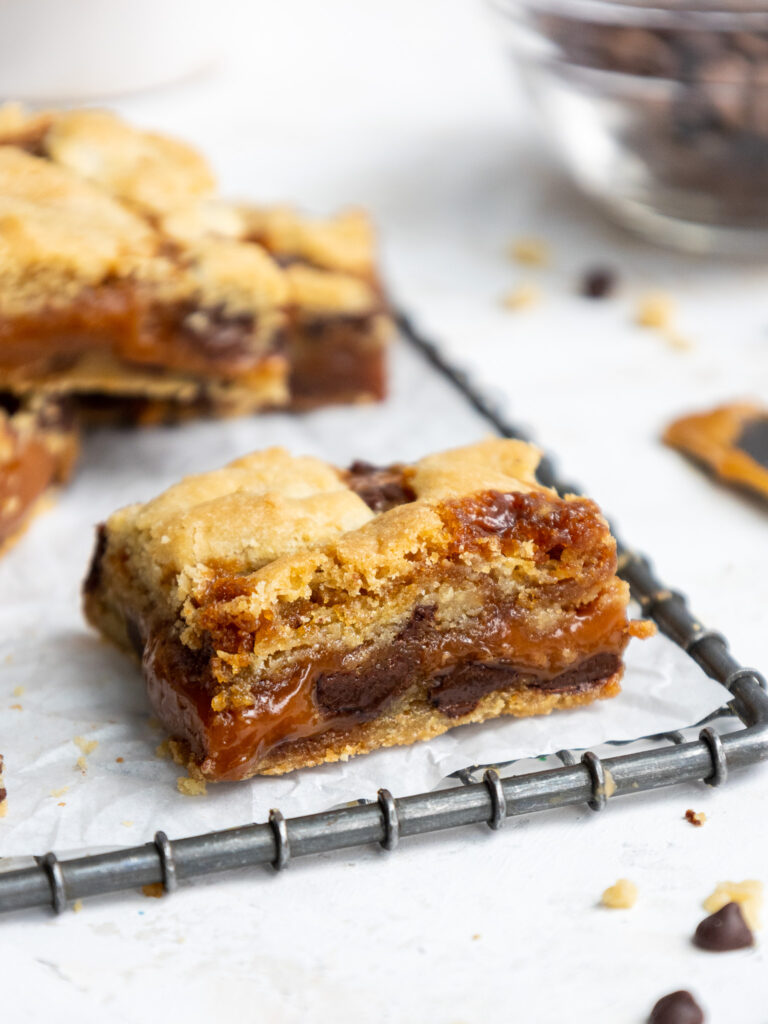
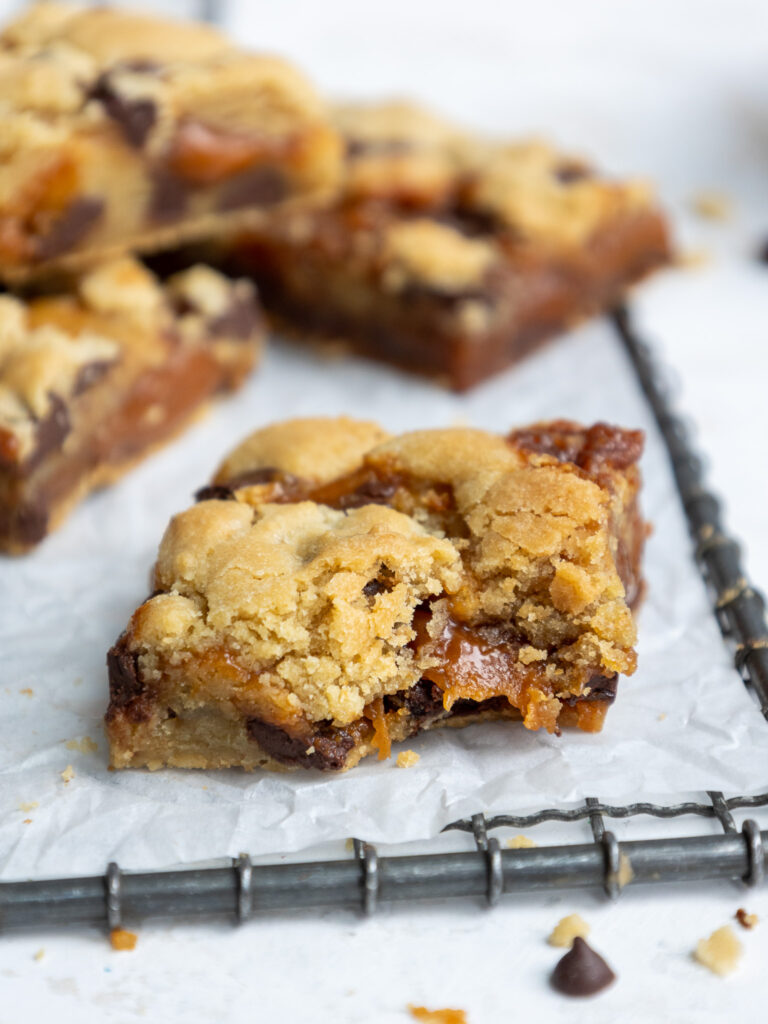
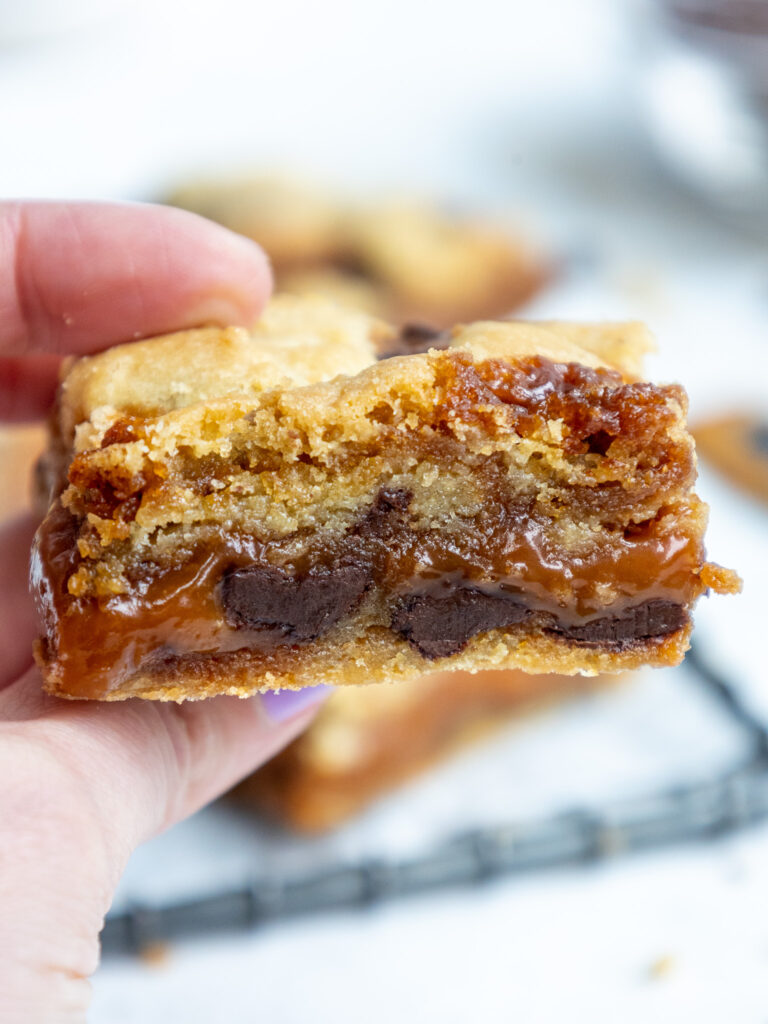
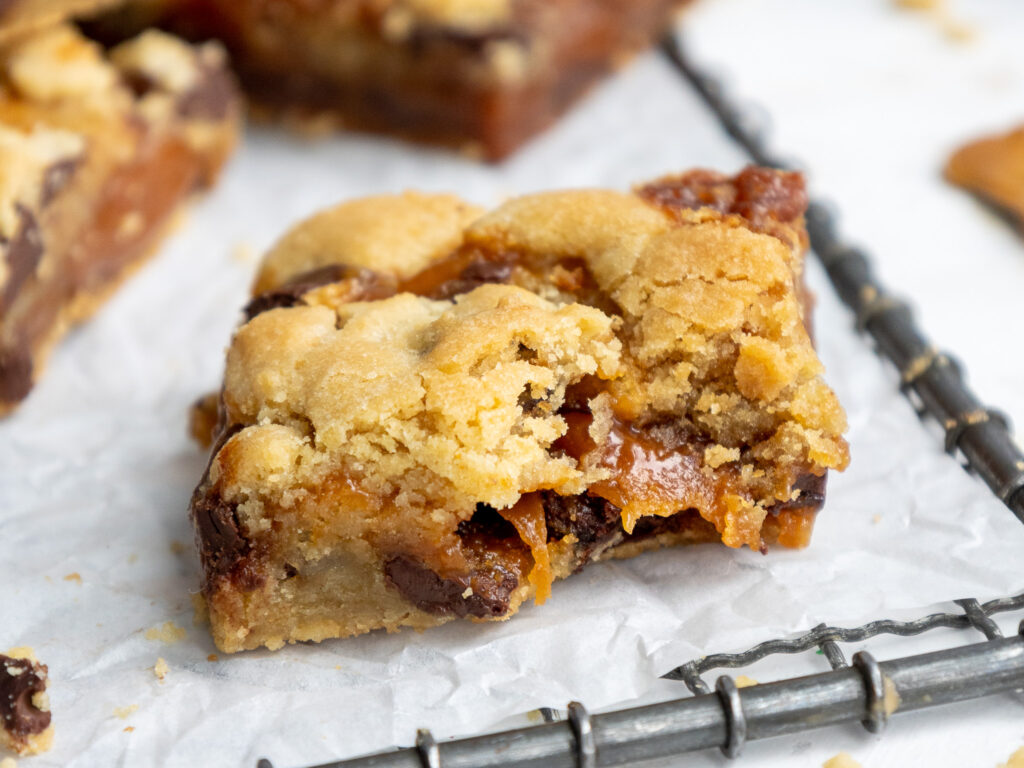
Soft-batch, chocolate chip cookie dough is sandwiched around a generous layer of buttery, homemade caramel to give these bars a salty, sweet, and wonderfully chewy texture.
How to Make These Caramel Cookie Bars
To make sure these cookie bars turn out as amazing as possible, let’s walk through each step together! I’ve also included a video tutorial of the process below.
I figured it might be helpful to know what tools I use too, so I’ve shared a list below too.
Not all of these are mandatory, but they make the process a lot easier.
If you don’t have all these things on hand, feel free to improvise and work with what you have.
Step 1: Make the Caramel
Make the caramel filling first so that it has time to cool before being added between the cookie dough layers. It can also be made up to a month in advance and stored in the fridge.
Making caramel from scratch might seem a little intimidating, but I promise it’s easier than you’d think!
Place a saucepan over medium heat and pour in the sugar gradually, adding 1/4 cup at a time.
Wait until the sugar is mostly dissolved, then add in the next bit of sugar. As the sugar melts it will slowly deepen in color.
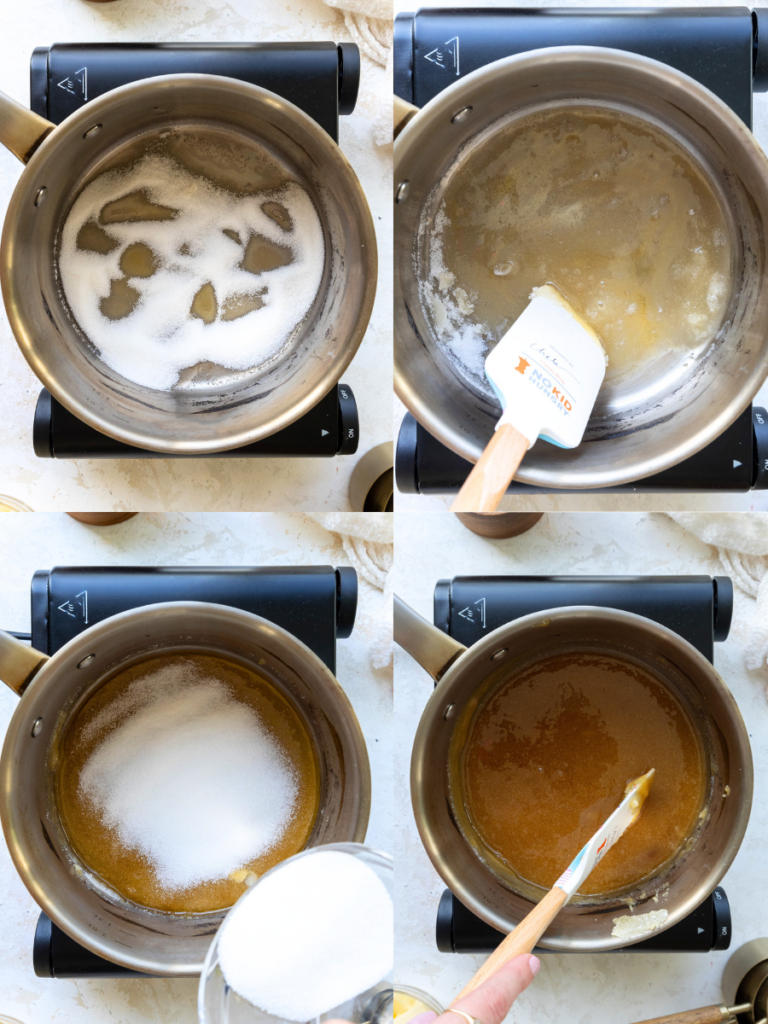
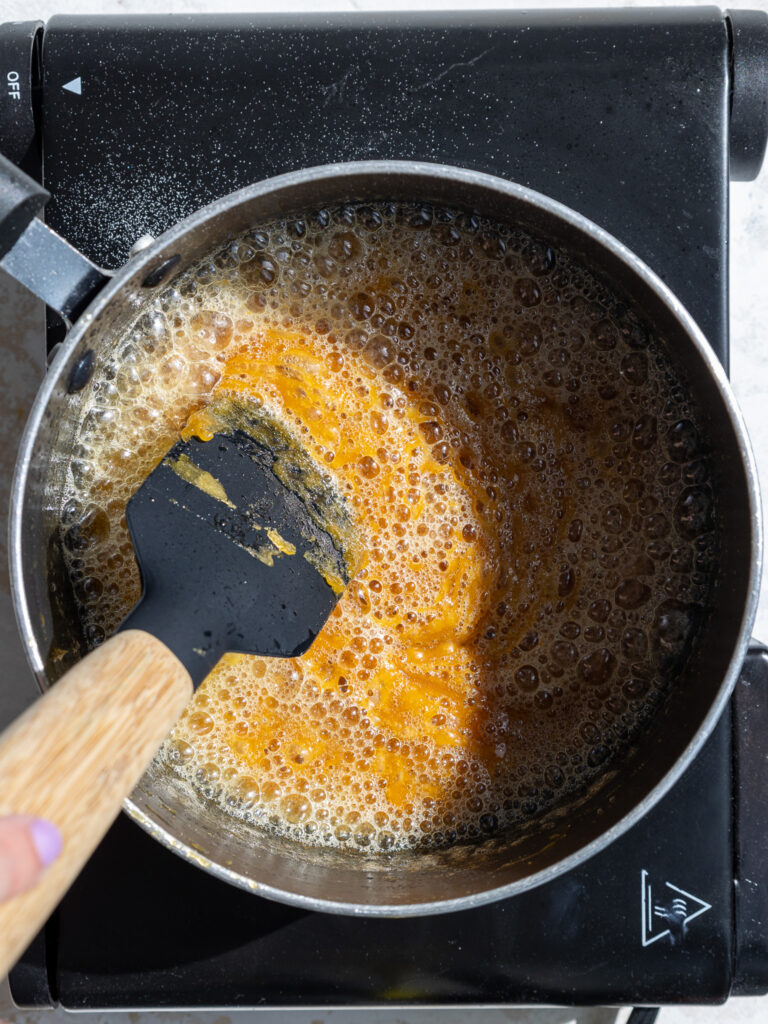
Stir occasionally until the sugar is fully dissolved and has become a deep amber color, then turn off the heat.
Slowly mix in the butter, followed by the heavy cream and salt.
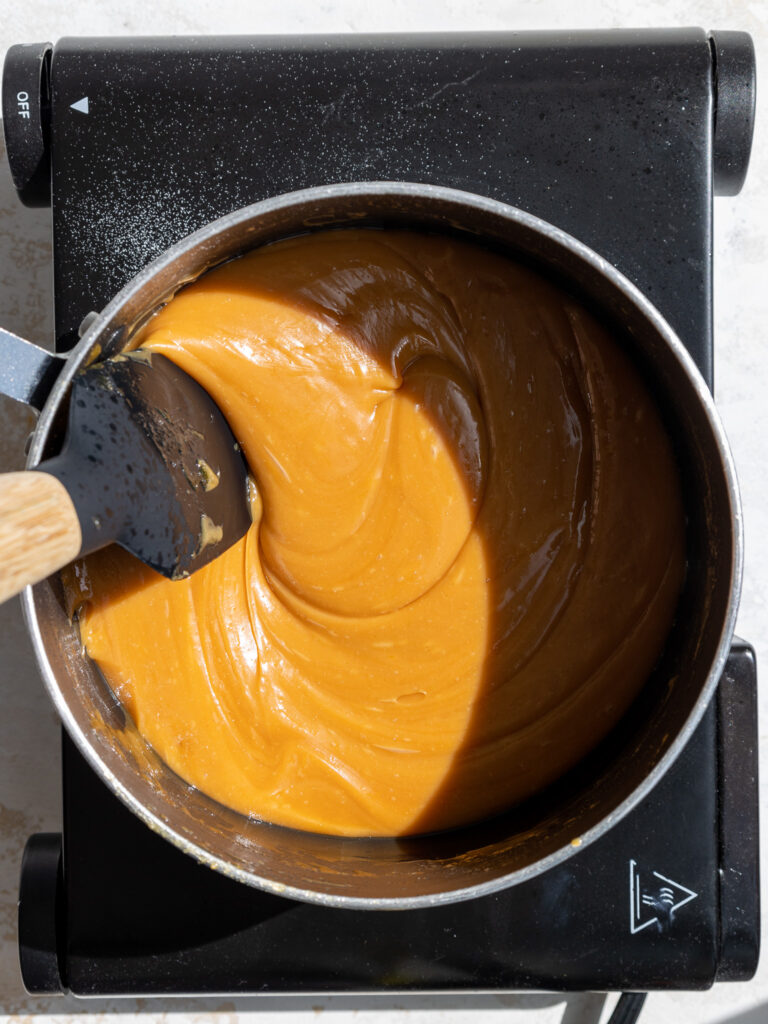
Then mix in the white chocolate chips and stir until they’re fully melted.
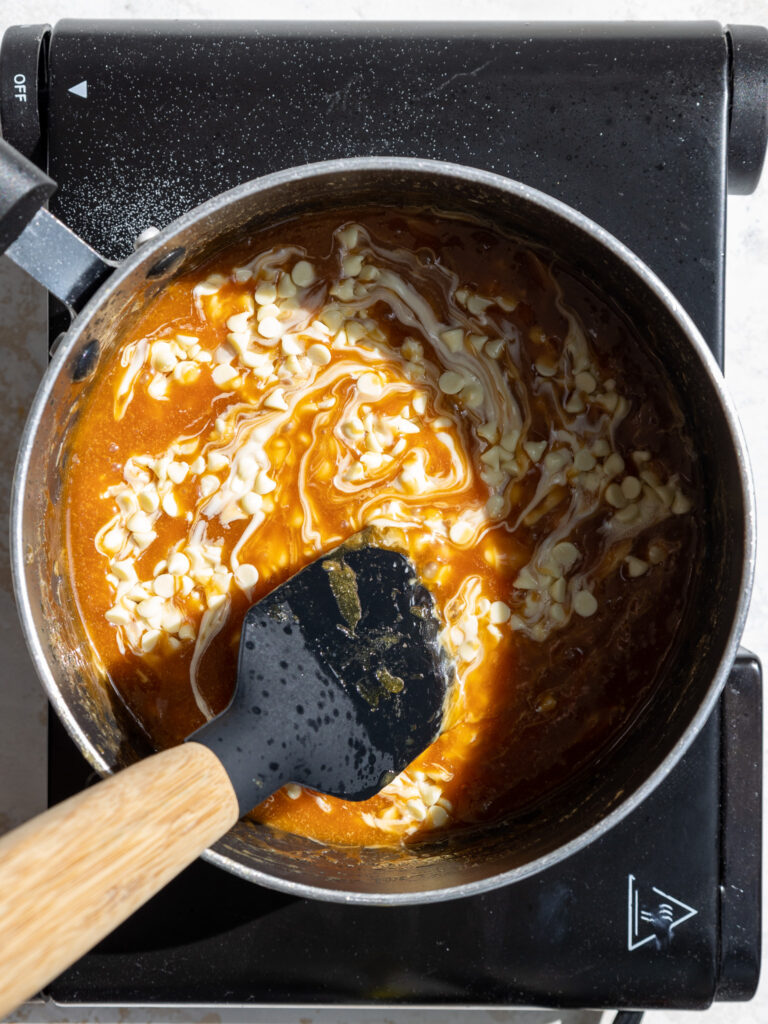
The caramel should be pretty thick. Set aside to cool.
Step 2: Make the Cookie Dough
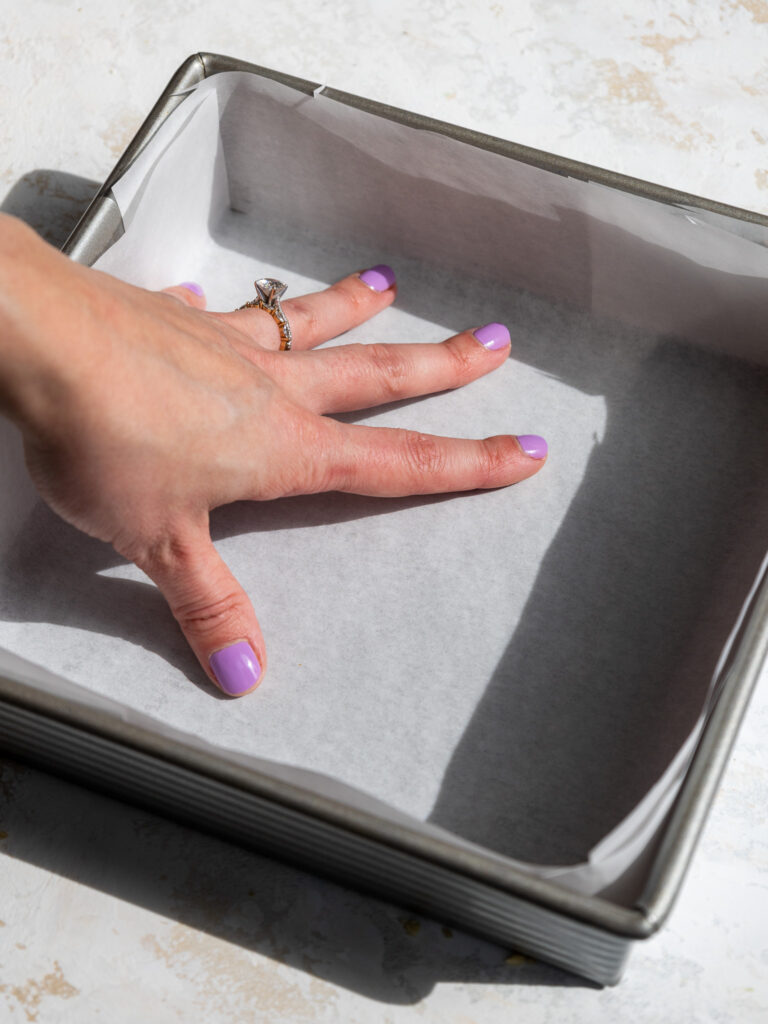
Next, we make the cookie dough. Preheat the oven to 350 F / 175 C. Line an 8×8-inch or 9×9-inch metal pan with parchment paper and set aside.
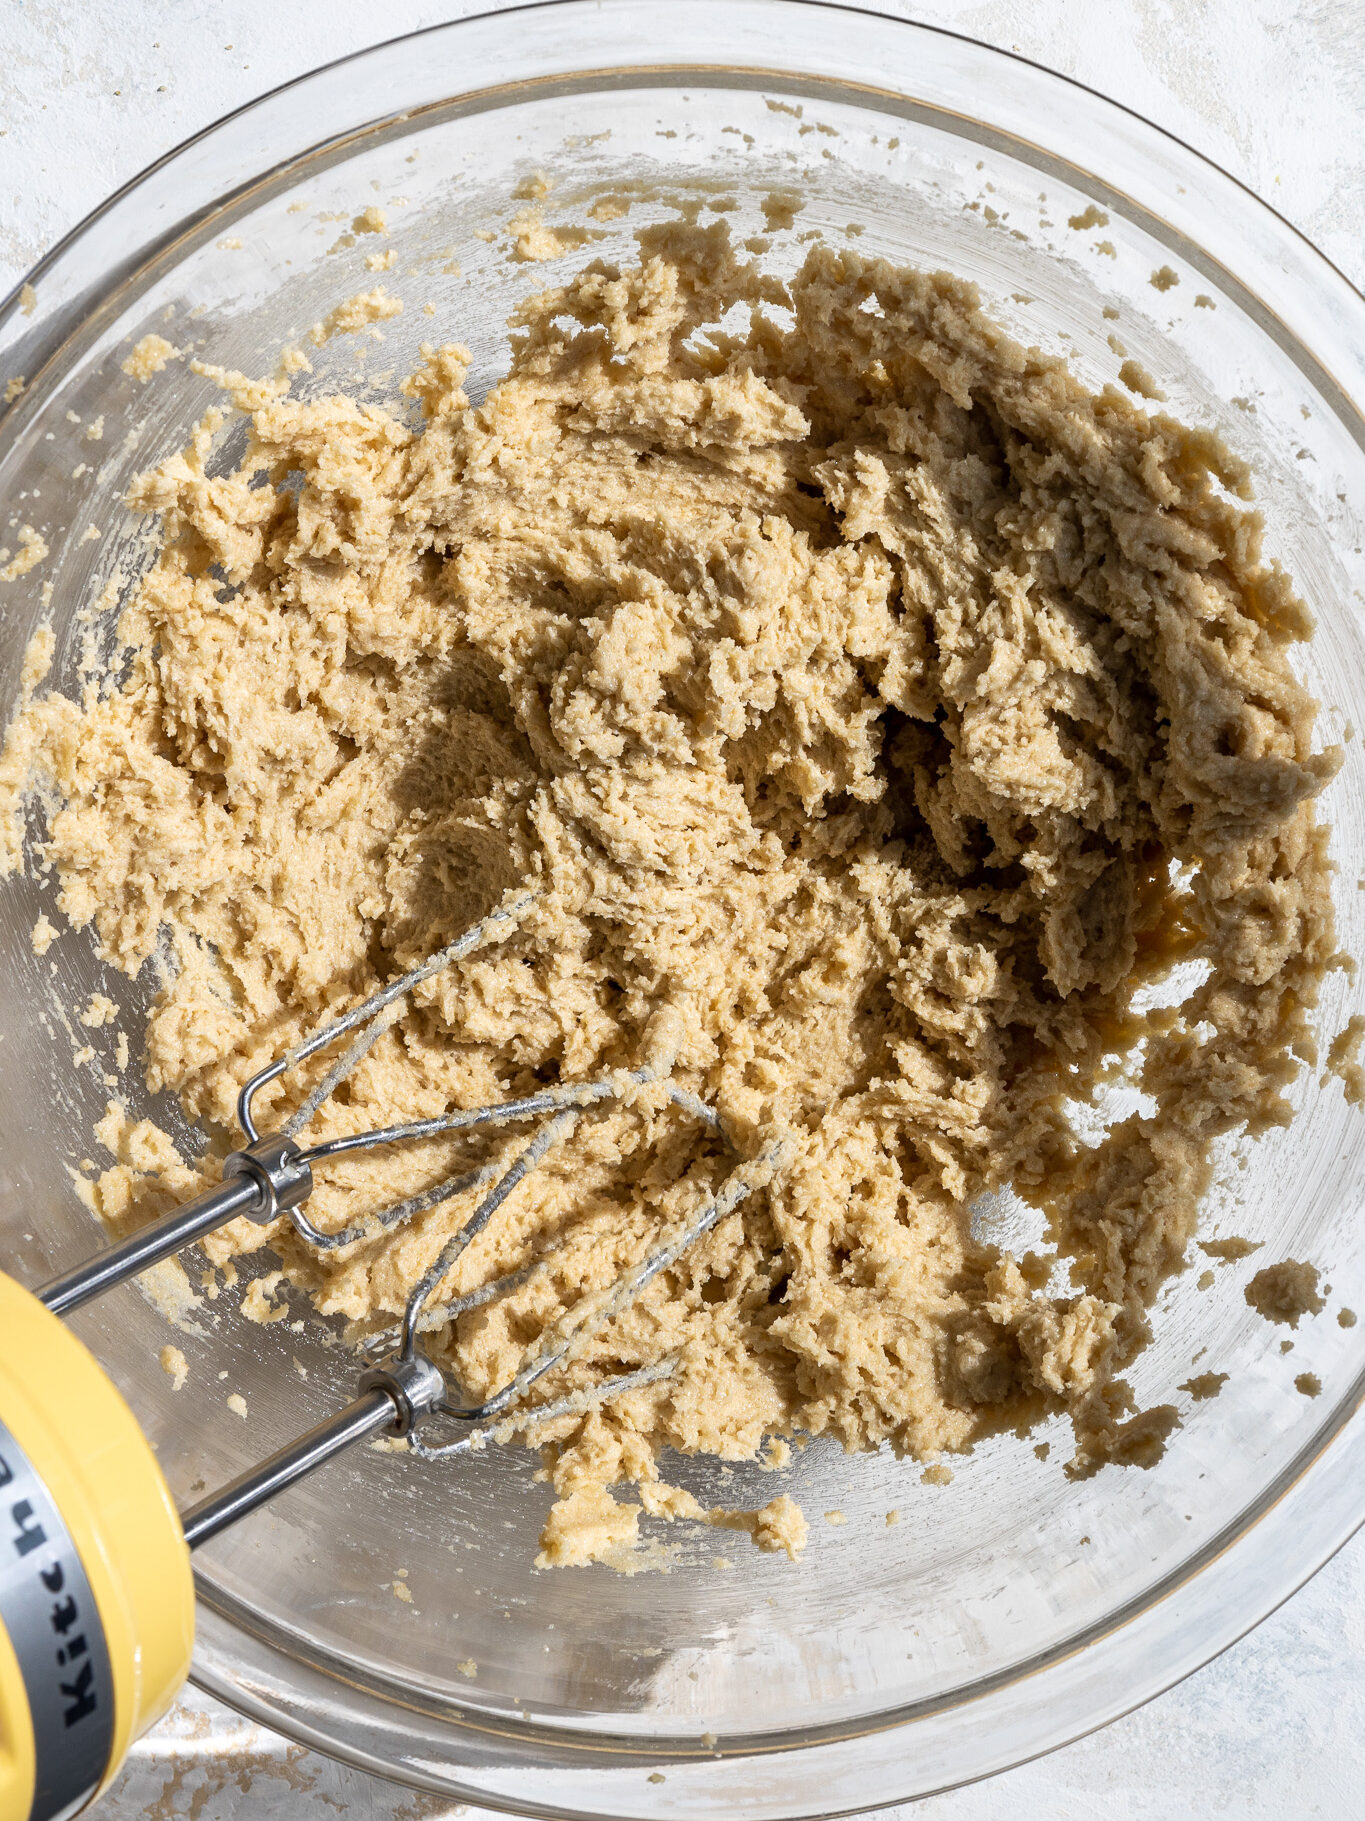
Use a stand mixer fit with a paddle attachment or a large bowl and hand mixer to cream together the butter, brown sugar, and granulated sugar.
Beat for a couple minutes, until the mixture is lighter in color and looks fluffy.
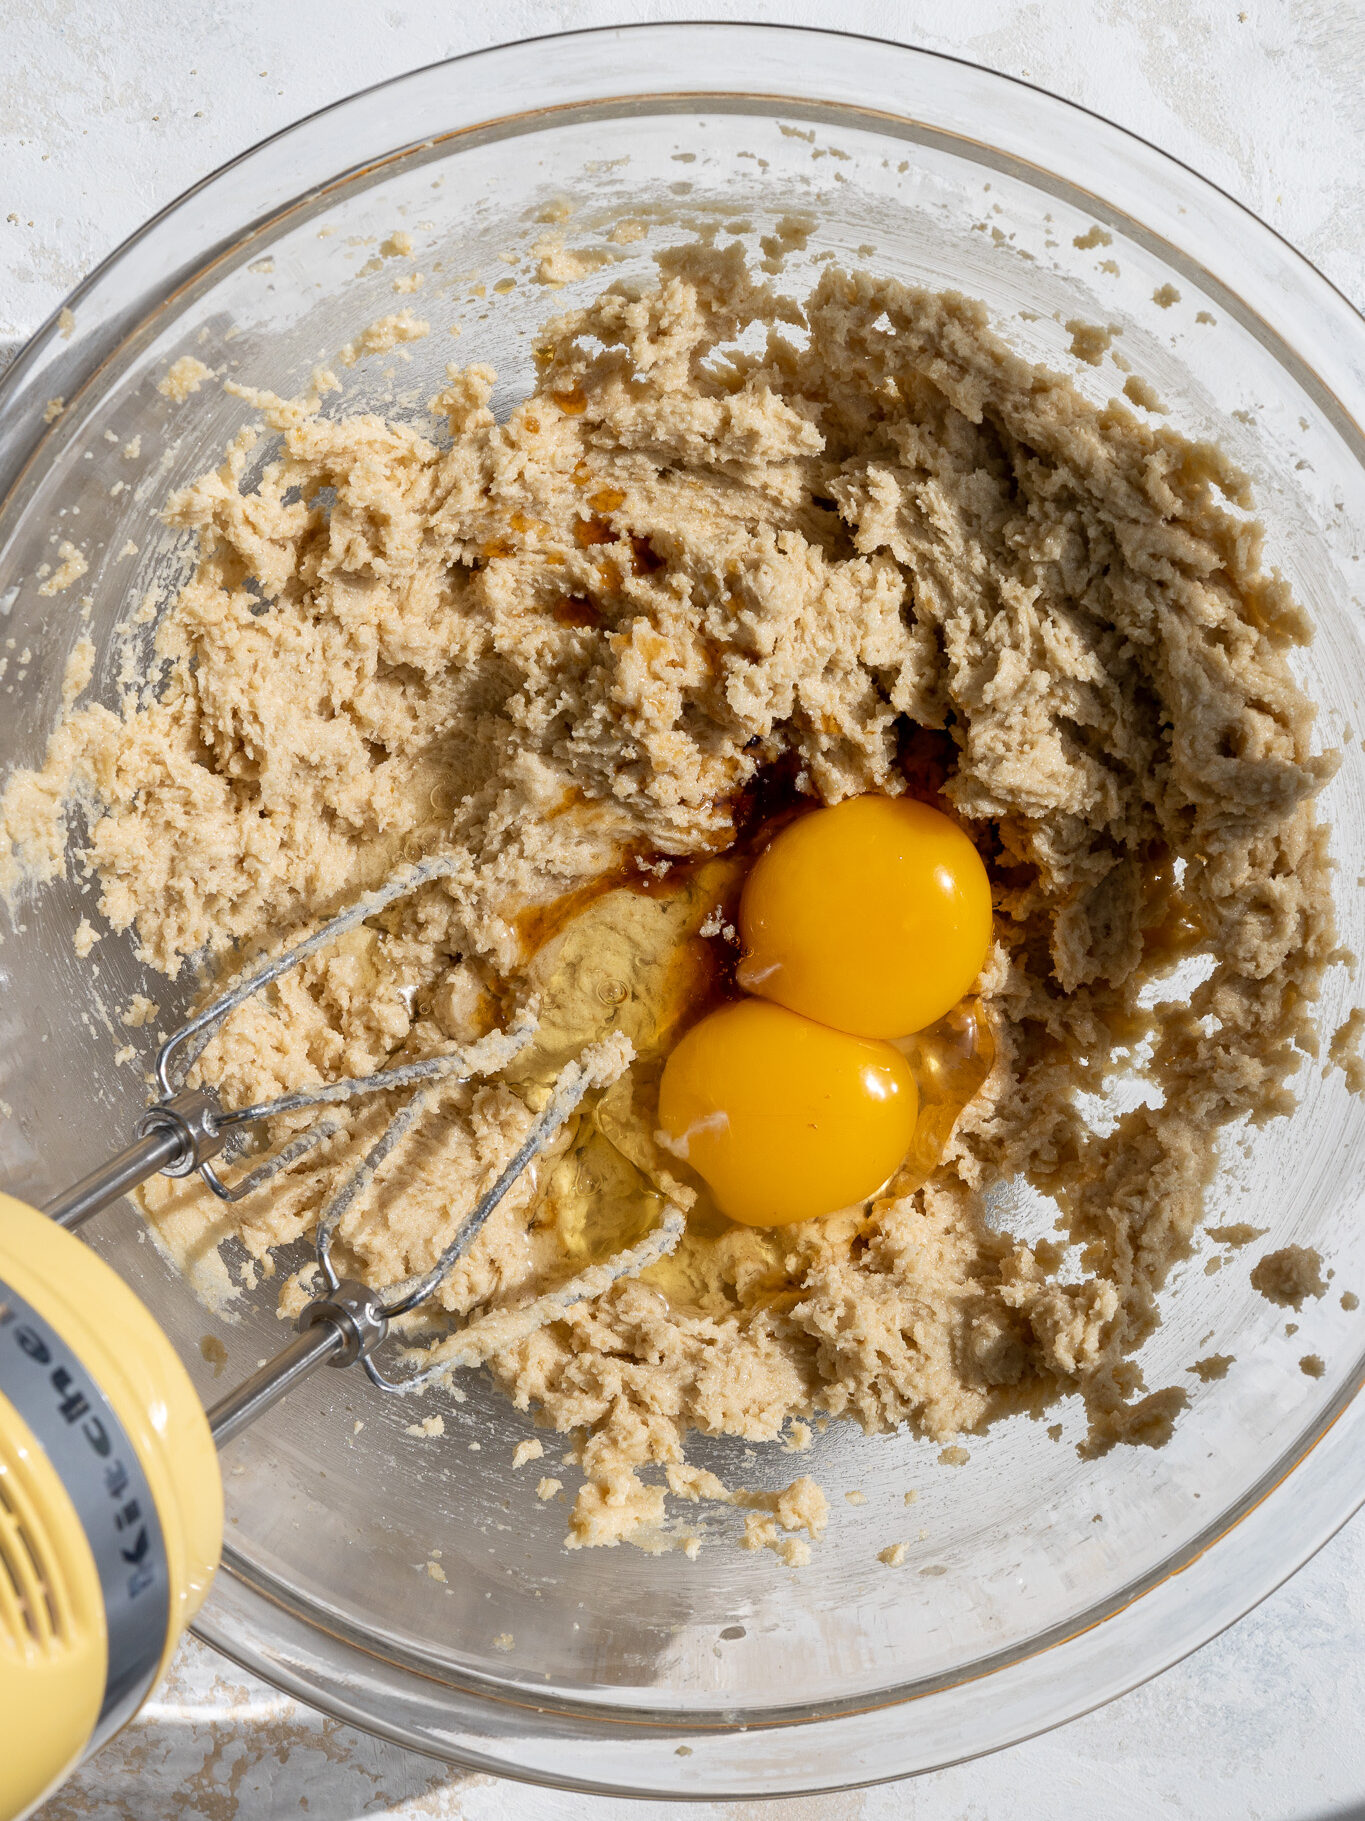
Mix in the large egg, egg yolk, and vanilla extract on a medium speed until combined.
Then add in the flour, corn starch, baking soda, and salt. Mix on low until just combined, and scrape the sides and bottom of the bowl as needed with a rubber spatula.
Mix in your favorite type of chocolate chips on a low speed until they’re evenly distributed throughout the dough.

Step 3: Layer the Cookie Dough and Caramel
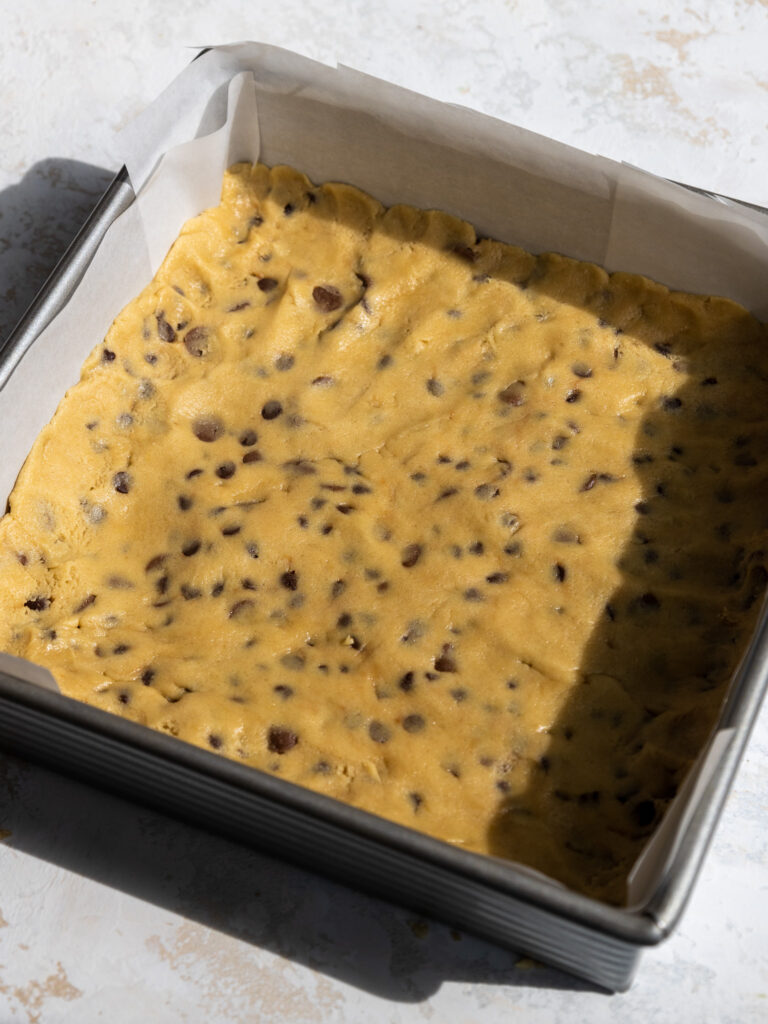
Then comes the fun part, layering these bars! Press 2/3 of the cookie dough (about 730g) into the bottom of the prepared pan.
Press it a little bit up the edges of the pan to prevent the caramel from sticking to the side of the pan.
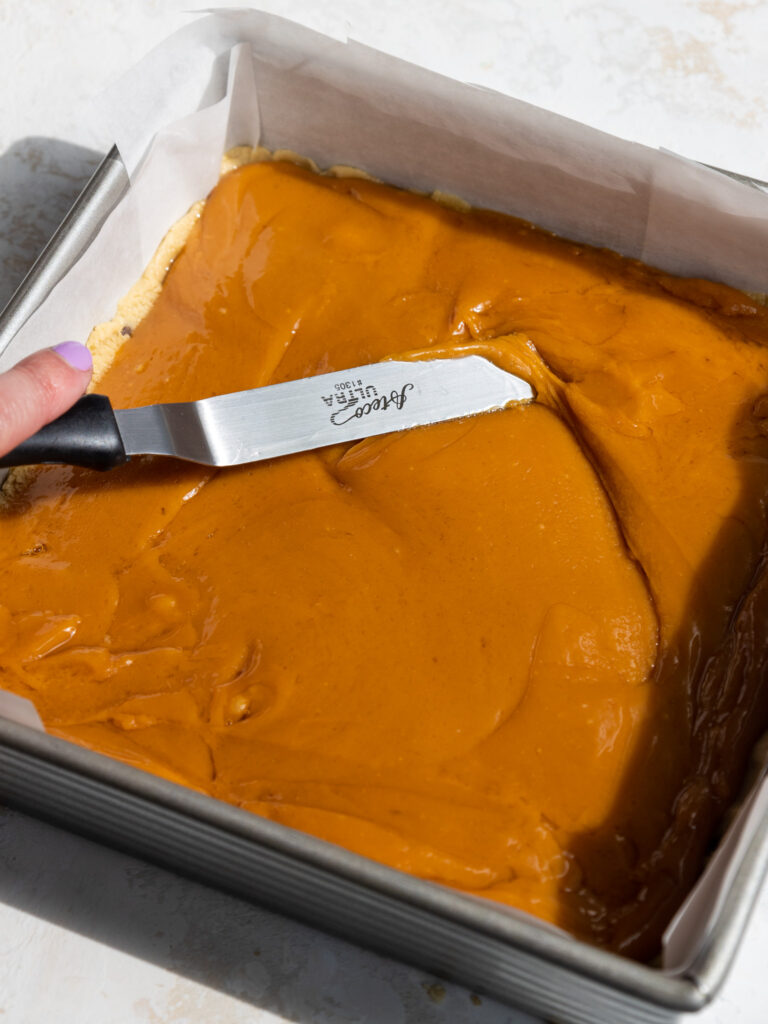
Pour the cooled caramel over the cookie dough.
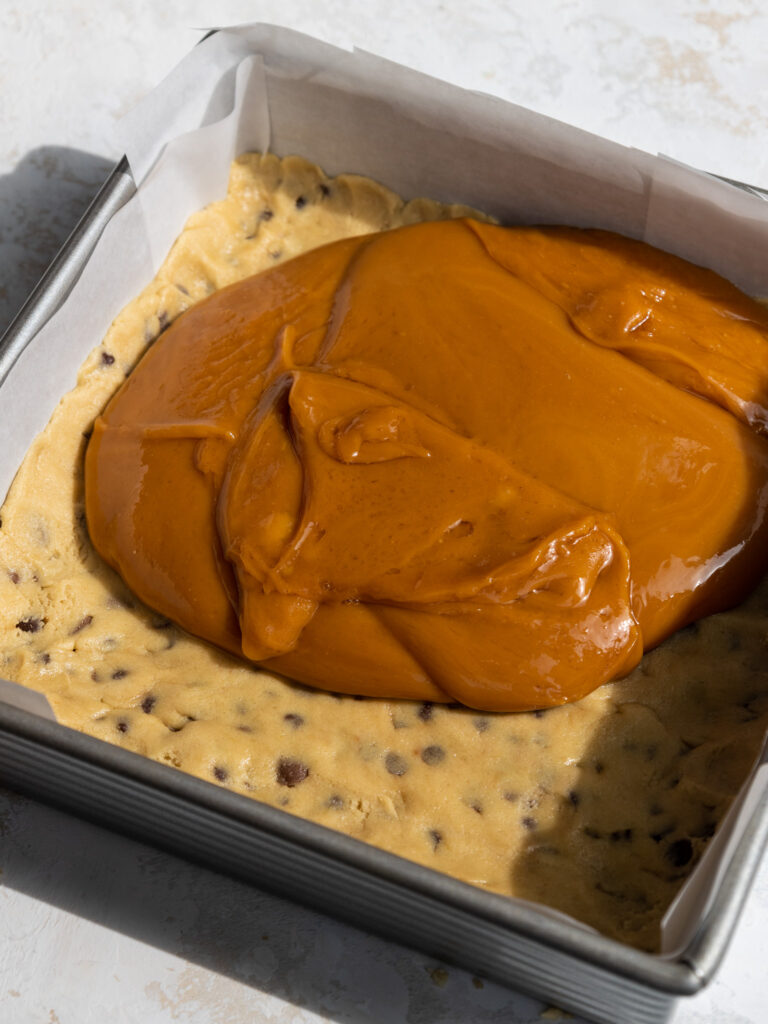
It should be thick, but still fluid enough to spread out with a spoon or offset spatula to create an even layer.
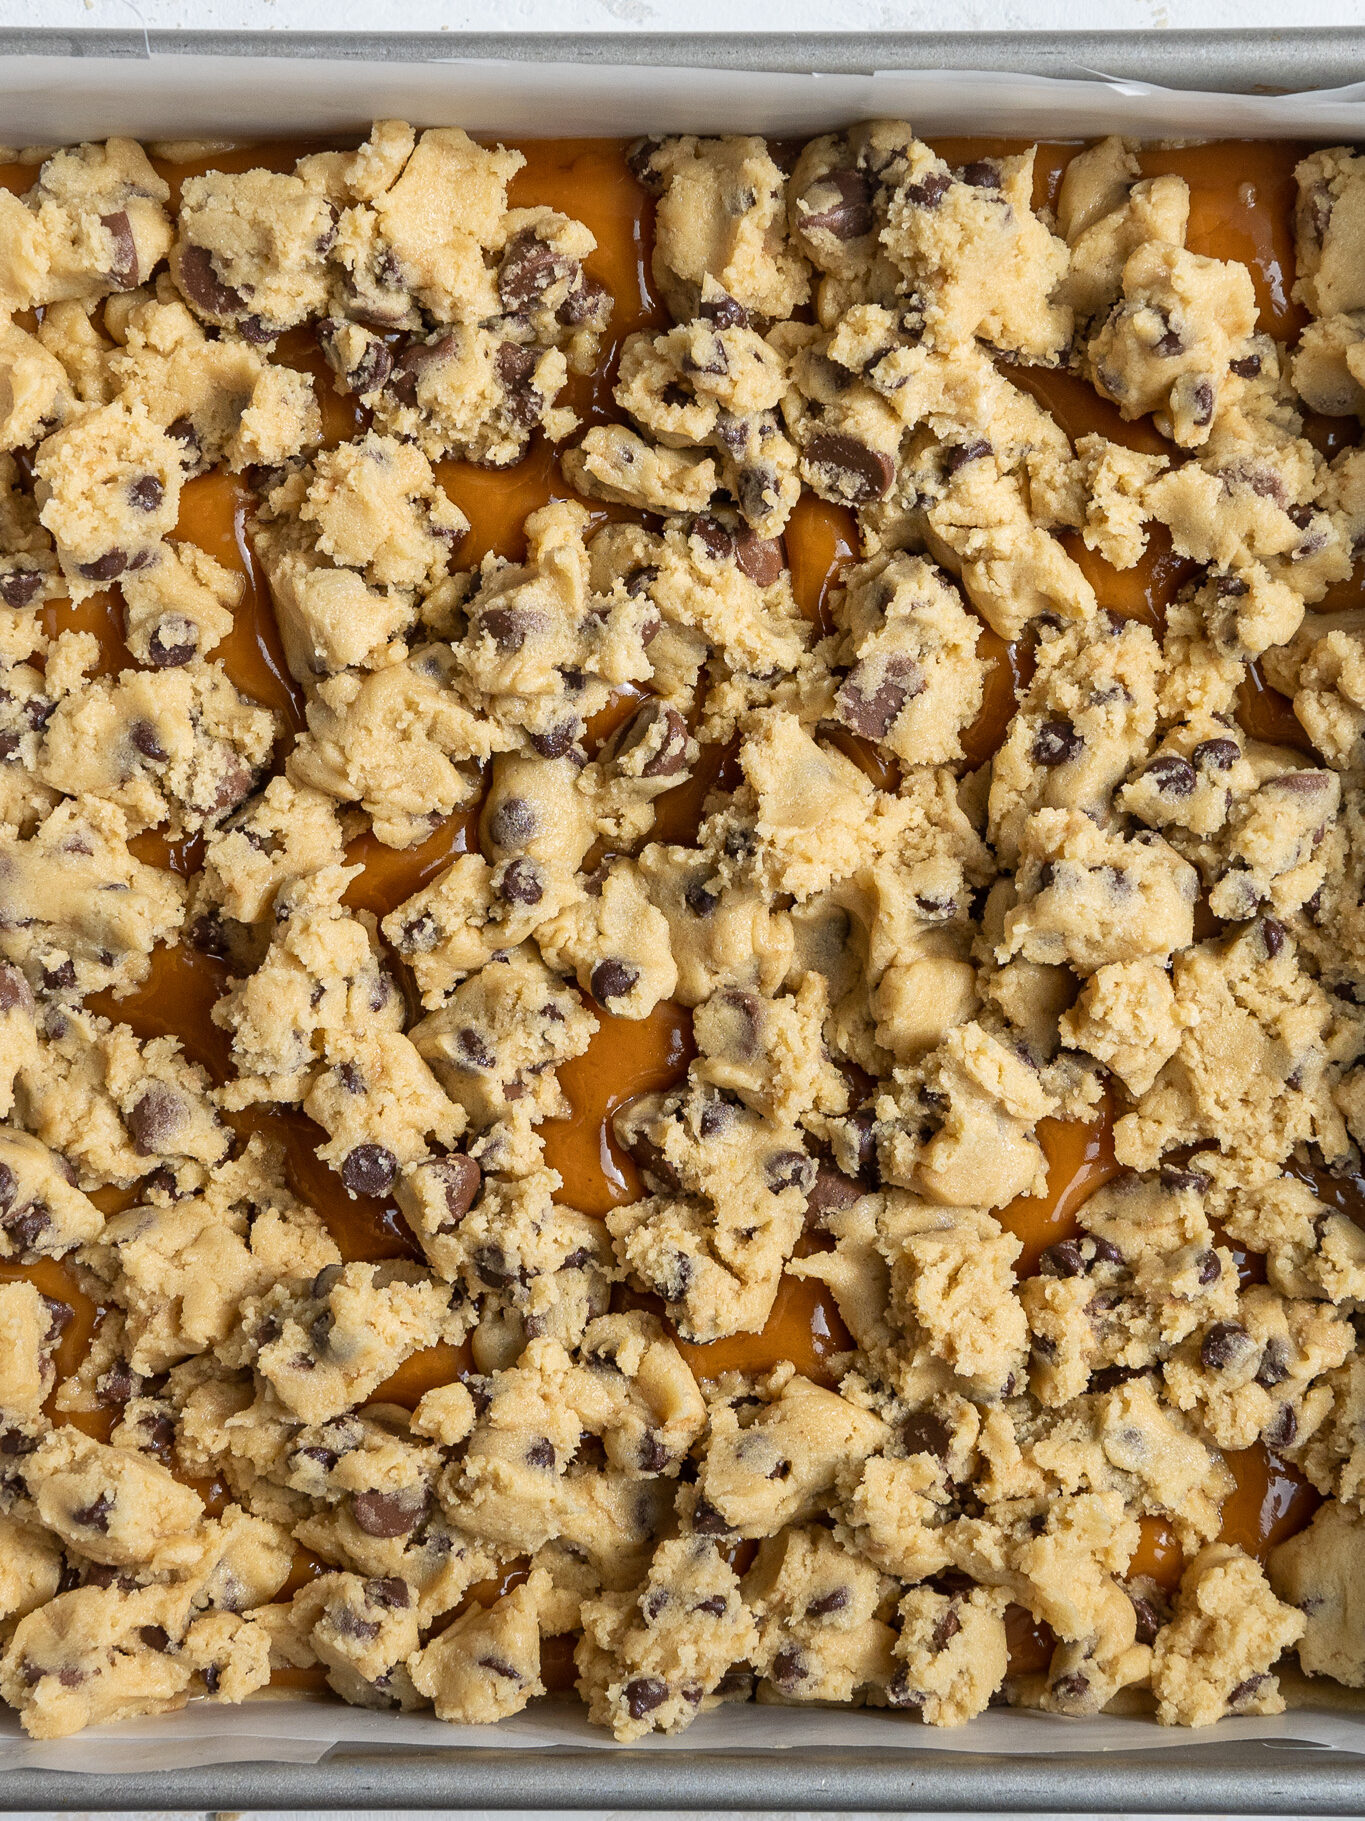
Crumble the remaining cookie dough on top of the caramel with your hands.
Step 4: Bake the Bars and Fully Cool Them
Bake for 27-32 minutes, or until the edges are set and golden brown.
I over-baked this batch a bit and accidentally let the entire top get brown! I recommend pulling them out of the oven when just the edges are golden brown. That will guarantee they are soft and chewy.
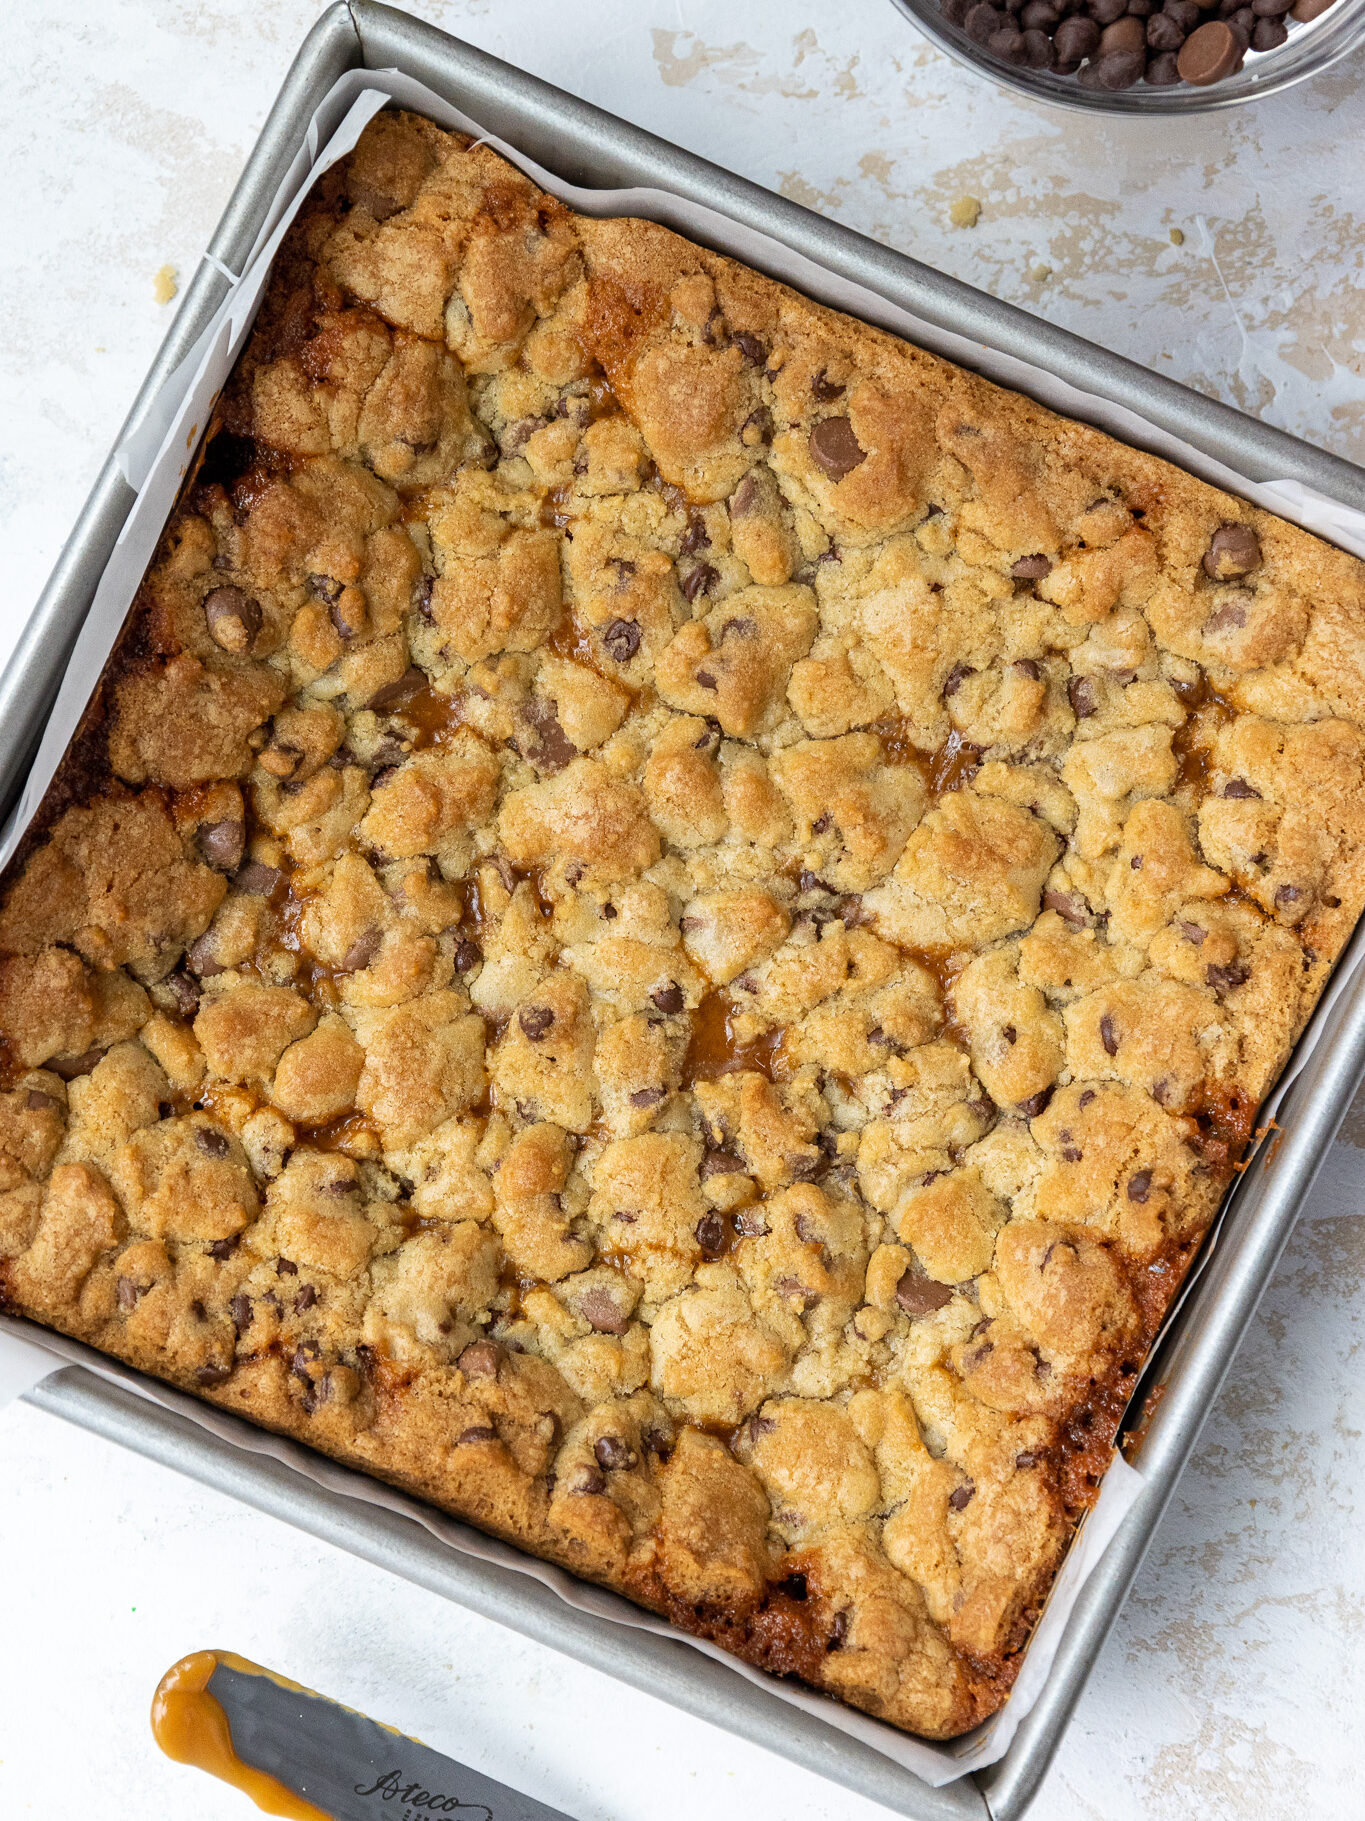
Place the baking pan on a wire cooling rack and let the bars cool in the pan for a couple of hours, or place directly in the freezer and chill for an hour.
It’s important that you let the bars cool fully before cutting in, or else the caramel will ooze out of them as you cut them!
Use the parchment paper to lift the cookie bars out of the pan, then cut into squares and enjoy.
These caramel cookie bars can be stored at room temperature for up to a week in an airtight container.
Substitutions and Swaps – Caramel Cookie Bars
This recipe uses quite a few ingredients and I know you might not have them all on hand. Or if you have food allergies or restrictions, I’ve got you covered.
Below are some swaps and substitutions that can be made in this recipe.
- Unsalted Butter – If you only have salted butter on hand, you can use it in place of the unsalted butter. Just be sure to omit the salt that this recipe calls for. You can also use vegan butter in its place (and omit the salt)!
- Heavy Cream – Heavy whipping cream can be used too, or coconut cream if you need to make a dairy-free version. Milk cannot be substituted; it will throw off the consistency of the caramel.
- White Chocolate – The white chocolate is crucial for thickening and stabilizing the caramel in this recipe. I do not recommend reducing the amount. If you’re not a fan of white chocolate, don’t worry! You really can’t taste it in the caramel, it’s solely there to thicken it.
- Brown Sugar – I prefer using light brown sugar, but you can also use dark brown sugar if needed.
- Granulated Sugar – I do not recommend changing the type or reducing the amount of sugar because it will change the texture and flavor of the bars.
- Large Eggs – If you have an egg allergy, you can try using flaxseed eggs or a vegan egg replacer.
- All-Purpose Flour – This recipe turns out best with AP flour, but you can use a gluten-free flour blend if needed.
- Chocolate Chips – Milk, white, or dark / semi-sweet chocolate can be used to make these bars. Feel free to have fun with the shape you use too! Mini chocolate chips, chocolate chunks, or chocolate couvertures will all work great.
Caramel Cookie Bar Troubleshooting & FAQs
While I’d love to think everyone’s cookie bars will turn out perfectly every time, I know that sometimes things don’t go to plan. Below are some tips and advice to help!
Why Did the Center of My Cookie Bars Sink?
In order for our cookie bars to be soft and chewy, we want the edges to be set but the center to be soft when we remove them from the oven.
However, this naturally causes the center of the cookie bars to sink a bit as they cool. This is totally normal!
If it bothers you that the edges are raised higher than the center, you can always trim away the edges to make your squares more equal in height. I usually do this when I’m photographing a recipe and then snack on the edges 🙂
Why Did the Caramel Seep Out of My Bars?
There can be a few reasons why the caramel might seep out of these caramel cookie bars. The first is that there was too much dough on top of the caramel.
It’s important that you add 2/3 of the dough beneath the caramel layer and only 1/3 of the dough on top. Otherwise, the weight of the dough can push the caramel outward toward the edges of the pan.
Another reason could be that you didn’t let the bars cool fully before cutting them. When I was recipe testing, I accidentally did this, only to watch the caramel slowly ooze out of each bar once they were cut.
The caramel should be thick enough not to flow out completely when cooled, but it will kind of overflow and ruin the clean look of each square if it’s still warm. Make sure the bars are completely cool in the center or chill the bars in the freezer briefly before cutting them.
Another cause could be that the caramel wasn’t cooked enough. Caramelizing the sugar affects its viscosity, and the longer you cook the caramel, the chewier and thicker it will be at room temperature.
While adding the white chocolate helps stabilize the caramel, it’s also important that the sugar is a deep amber color and that all the sugar is melted before mixing in the butter and cream.
How Do I Know When My Caramel Cookie Bars Are Done?
Every oven bakes a bit differently and the time it will take your bars to bake can vary. Some ovens also have hot spots, so I recommend rotating the pan halfway through to help them bake evenly.
The best way to tell when they’re done is to look at the edges of the cookie bars. They should look set and be golden brown in color.
I like to pull the bars out before the entire top of the cookie dough is golden brown.
If the bars seem to brown a lot on top before they reach the recommended bake time or look severely underbaked, you might want to test your oven with an oven thermometer and see if the temperature is accurate. I once had an oven that ran hot by 50 degrees F!
Making These Caramel Chocolate Chip Cookie Bars in Advance
These caramel cookie bars can be stored at room temperature for up to a week in an airtight container.
You can also freeze these bars for up to two months! I like to freeze the whole sheet of bars, then cut them once they’re thawed. Freeze the bars on a sheet pan until they’re firm to the touch, then wrap them in a layer of plastic wrap and foil.
You can also cut them and wrap them individually before freezing them.
When you want to enjoy the bars, set them out overnight to thaw, then unwrap and enjoy them the following day.
How to Make the Best Caramel Cookie Bars
- Be sure the ingredients are at room temperature. It helps them mix together better.
- Make sure you properly measure your flour! I like to use a scale, but the fluff and level method works great too.
- Bake these cookie bars in a metal pan, not a glass pan. Glass gets hotter than metal pans. If you have to bake these in a glass pan, bake them at 325 F / 162 C.
- Don’t over-bake these bars. Unlike cake layers, a toothpick inserted into the center won’t come out clean when they’re done. You’ll know when they’re done when the edges are set and golden brown.
- Add a sprinkle of flaky sea salt once these come out of the oven to make them taste even more amazing.
- Wait until these cookie bars are fully cooled before cutting into them! It will make them much easier to cut and prevent the caramel from seeping out. Or better yet, chill the bars in the fridge or freezer to get super clean cuts and use a warm knife.
- If you want to make this recipe in a 9 x 13-inch pan, double the recipe and bake at 350 F / 175 C for 25-30 minutes.
Let Me Know What You Think!
If you try this caramel cookie bar recipe, I’d love to hear what you think of it! Please leave a rating and comment below.
Tag me @chelsweets and use #chelsweets on social media so I can see your amazing creations!
Caramel Cookie Bars
Ingredients
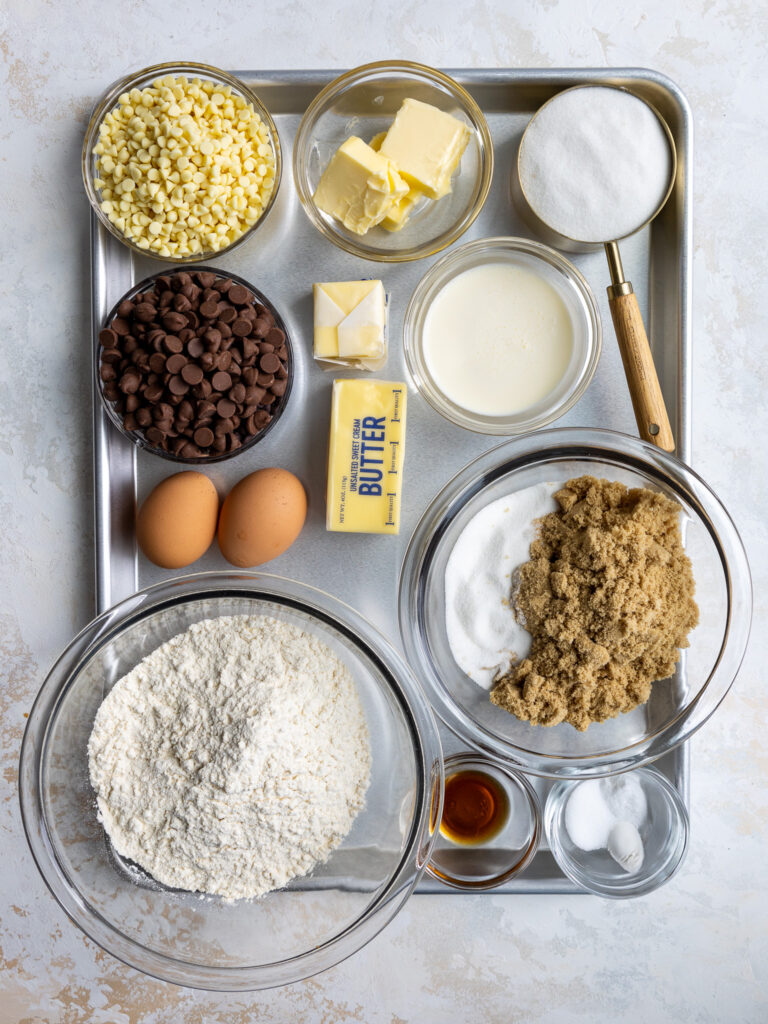
Caramel Filling
- 1 cup granulated sugar 200g
- 6 Tbsp unsalted butter, room temperature 85g
- 3 Tbsp heavy whipping cream, room temperature 45g
- 1/4 tsp fine salt 2g
- 1 cup white chocolate 170g
Chocolate Chip Cookie Dough
- 3/4 cup unsalted butter, room temperature 170g
- 1 cup packed light brown sugar 200g
- 1/2 cup granulated sugar 100g
- 1 large egg + 1 large egg yolk, room temp 80g
- 1 tsp vanilla extract or vanilla bean paste 4g
- 2 1/4 cups all-purpose flour 285g
- 2 tsp cornstarch – optional 18g
- 3/4 tsp baking soda 5g
- 1 tsp fine salt 6g
- 1 1/2 cup dark or milk chocolate chips 240g
Recommended Equipment
Instructions
Caramel Filling
- Make the caramel filling first so that it has time to cool before being added between the cookie dough layers. It can also be made up a month in advance and stored in the fridge.
- Place a small saucepan over medium heat.
- Pour in 1 cup of sugar gradually, adding 1/4 cup at a time. Wait until the sugar is mostly dissolved, then add in the next bit of sugar. As the sugar melts it will slowly deepen in color. Stir occasionally until the sugar is fully dissolved and has become a deep amber color, then turn off the heat.
- Slowly mix in 6 Tbsp of butter (2 Tbsp at a time), followed by 3 Tbsp of heavy cream and 1/4 tsp salt.
- Then mix in 1 cup of white chocolate chips. Stir until they're fully melted. The caramel mixture should be pretty thick. Set aside to cool.
Chocolate Chip Cookie Dough
- Preheat the oven to 350 F / 175 C. Line an 8 x 8-inch or 9 x 9-inch pan with parchment paper and set aside.
- Use a stand mixer fit with a paddle attachment or a hand mixer to cream together 3/4 cup butter, 1 cup packed brown sugar, and 1/2 cup granulated sugar in a large bowl. Beat for about a couple minutes, until the mixture is lighter in color and looks fluffy.
- Mix in 1 large egg, 1 egg yolk, and 1 tsp of vanilla extract on a medium speed until combined.
- Add 2 1/4 cups flour, 2 tsp cornstarch, 3/4 tsp baking soda, and 1 tsp salt into the sugar / egg mixture. Mix on low until just combined. Scrape the sides and bottom of the bowl as needed with a rubber spatula.
- Mix in 1 1/2 cups of your favorite type of chocolate chip on a low speed until they're evenly distributed throughout the dough.
- Press 2/3 of the cookie dough (about 730g) into the bottom of the prepared pan. Press it a little bit up the edges of the pan to prevent the caramel from sticking to the side of the pan.
- Pour the cooled caramel over the cookie dough. It should be thick, but still fluid enough to spread out with a spoon or offset spatula to create an even layer. If you made the caramel in advance, heat it up in 10 second intervals until you're able to spread it over the cookie dough.
- Crumble the remaining cookie dough on top of the caramel with your hands.
- Bake for 27-32 minutes, or until the edges are set and golden brown. Rotate the pan halfway through to help them bake evenly.
- Place the baking pan on a wire cooling rack and let the bars cool in the pan for a couple hours, or place directly in the freezer and chill for an hour. It's important that you let the bars cool fully before cutting in, or else the caramel will ooze out of them as you cut them!
- Use the parchment paper to lift the cookie bars out of the pan, then cut into squares and enjoy. These caramel cookie bars can be stored at room temperature for up to a week in an airtight container.
Video
Notes
Substitutions and Swaps
If you need to make any substitutions or swaps in this recipe, please check out my section on ingredient substitutions above.Making These Caramel Bars in Advance
These caramel cookie bars can be stored at room temperature for up to a week in an airtight container. You can also freeze these bars for up to two months! I like to freeze the whole sheet of bars, then cut them once I thaw them. Freeze the bars on a sheet pan until they're firm to the touch, then wrap them in a layer of plastic wrap and then foil. You can also cut them and wrap them individually before freezing them. When you want to enjoy the bars, set them out overnight to thaw, then unwrap and enjoy them the following day.How to Make the Best Caramel Cookie Bars
- Be sure the ingredients are at room temperature. It helps them mix together better.
- Make sure you properly measure your four! I like to use a scale, but the fluff and level method works great too.
- Bake these cookie bars in a metal pan, not a glass pan! Glass gets hotter than metal pans. If you have to bake these in a glass pan, bake them at 325 F / 162 C.
- Don’t over-bake these bars!! Unlike cake layers, a toothpick inserted into the center won't come out clean when they're done. You'll know when they're done when the edges are set and golden brown.
- Add a sprinkle of flakey sea salt once these come out of the oven to make them taste even more amazing.
- Wait until these cookie bars are fully cooled before cutting into them! It will make them much easier to cut and prevent the caramel from seeping out. Or better yet, chill the bars in the fridge or freezer to get super clean cuts and use a warm knife.
- If you want to make this recipe in a 9 x 13-inch pan, double the recipe and bake at 350 F / 175 C for 27-33 minutes.
Nutrition
Other Recipes You Might Like:
I followed the recipe with the exception of the bake time. I added a few minutes and the bars were still raw on the inside. I used a 9X9 pan and cooked for 35 minutes.
Hi Marie,
I’m so sorry to hear that, that is wild!! What type of pan where you using, was it metal? Were your eggs by chance cold??
My best guesses are that either your oven might run a bit cool, the eggs where cold and caused the bars to bake more slowly, or that you used a pan that wasn’t metal and caused them to bake differently than mine did.
Do you think it might be any of those? Hopefully we’ll be able to figure out what happened together!
I’ve tried to make the Carmel 2 times now and both times was a huge fail. The sugar keeps on crystallizing when I add in butter and heavy cream.
Room temp butter adding in 2 tbsp at a time what am I doing wrong?!
Hi Chelsey,
I’m so sorry to hear that!! Caramel can be tricky, and there are a lot factors that can cause that. But usually crystallization at that stage means the caramel has been cooked for too long. However, it can also happen if the sugar hasn’t been cooked long enough. It can be tricky finding the sweet spot!
If you think it’s overcooked, I’d recommend turned down the temperature a little bit, or letting the sugar brown a bit less and see if that does the trick??
Or if you think it was a lighter brown and undercooked, cook it just a tiny bit longer. Hope that helps for next time, let me know how it goes if you try it again!
@Chelsey,
I had a hard time when I first started making caramel too. I pour the whole cup in to a HEAVY BOTTOM sauce pan with a fitted lid on and turn to medium heat. (glass lid is best so I can see through and keep an eye on it) Keep it covered and left alone for a couple minutes until you see the sides come a bit liquified. Take the pot by the handle and shake just a little, keeping lid on, then return back to burner. Wait another couple minutes and repeat. Once sugar is almost all gone, then take the lid off and stir with a spatula. Keep an eye on the color and remove once it’s LIGHT amber because even with the heat off it will continue to cook.
Hopefully this helps! Everyone has their techniques, you just need to find yours!
-Kimber
Thank you for sharing Kimber, that’s so helpful!! It sounds like a great method 🙂
I just made these cookie bars for my daughter and her friends and they were a HUGE hit. They are still messaging me to tell me how INSANE they are! I used an 8” pan and followed the recipe exactly. The caramel was a bit fussy, but I stuck with it and adjusted the heat a couple times, and it came together beautifully. You have to stick with it. Despite having some weight in the tin, they are not bricks. The rich caramel flavor coupled with the chocolate is a match for the ages. But what really makes them special is the moistness and soft texture. They are PERFECTION. Thank you for creating and perfecting such a wonderful recipe.
Hi Jane,
So happy to hear that!!! The caramel can be a bit finicky, but I’m glad you stuck with it and that they turned out so well 🙂 Thank you for sharing!
I seriously don’t know how to thank you for this amazing recipe, it is just more than perfection. The main thing I saw challenging was the caramel because as soon as I added the butter it didn’t mix with the sugar properly, and when it came to adding the chocolate, it became very challenging to mix since it became very solid. However I kept turning the heat on and off until it worked. Then finally when I came to spread the caramel layer in between the cookie dough it was kinda thick and hard to spread despite the fact that I heated it up. If u have any tips I’d really appreciate it because for sure I’ll be doing this recipe again.
Hi Doha,
So sorry to hear that! sometimes that can happen if the sugar is overcooked, or if it’s not warm enough / thin enough to incorporate the butter! I’d recommend maybe heating the sugar at a slightly lower temperature next time and seeing if that helps! Hopefully it does, happy baking!
Oh man oh man oh man, these look fantastic! Would it still work if I were to sprinkle some coconut and pecans on top of the first cookie layer, and then proceed with pouring on the caramel sauce, etc.? Since this will be the first time for this octogenarian to attempt such a thing, is there any chance I could use a bottled caramel sauce and thicken it with the white chocolate, in case I’m unsuccessful with that part of the procedure? Thank you for this exactly-what-I-was-looking-for recipe!
Hi John,
Great question! I think that adding in some coconut and pecans would be delicious and should work great! I’m not sure if you’d be able to thicken bottled caramel, I haven’t tried that out and I honestly just have do idea! I am a little bit worried it might not thicken enough and then ooze out of the bars, but it also might work! If you try it, please let me know how it goes. Happy baking!
After making the caramel, a butter liquid separated from it. Not sure why? I wish I could insert a picture.
Hi Suzanne,
I know what you’re talking about! Sometimes that can happen it the caramel is too warm when the butter is added or the butter is too cold. The good news is that if you keep the caramel on a low heat and keep stirring, it usually will come bake together!! Hope that helps for the future!
I want to make a large batch if I wanted to do this on a cookie sheet do you think it would wor?
Hi Ruth,
Great question! These bars bake up pretty tall, but if you spread one batch of them thinly on a large cookie sheet (9×13-inch pan) with a lip it would probably work! They’ll definitely be shorter than mine turned out and the caramel layer will be thinner, unless you double the batch.
However, I am worried that a double batch would rise up above the edge of a cookie sheet pan though, and that the caramel might ooze over the side as they bake. I’ve only tested a double batch of this recipe in a quarter sheet cake pan (9×13 inches) that had 2 inch tall sides. If you try it, please let me know how it goes!
Save yourself a lot of grief and just melt some unwrapped caramels with a little bit of milk (a tablespoon?) and proceed with the rest of the recipe.
INCREDIBLE!!
I didn’t have the exactly right size pans because I needed a LOT for a party. I tripled the recipe and used a 8×8, 9×9 and 10×10 pan. They turned out amazing! I had just enough of everything and more than enough caramel. I followed your recipe exactly and everything was perfect. I had just made a 6 layer caramel filled chocolate cake for a birthday. And it’s a family favorite. My son and husband said these were better and I need to start making them regularly. Everything was a room temperature so that’s important. I didn’t have unsalted butter so I used salted and didn’t add the salt. Except by the time I got to the cookie part I had completely forgot. So I added the salt but realized before mixing. So I scooped out as much of the salt as I could see and added a bit more flour and cornstarch. I was worried, but that part of the recipe was forgiving because it tasted great and wasn’t too salty. But don’t do what I did. I’m not saying to add salt if you use salted butter. I was just lucky enough to make it work. We love this recipe. Thank you for sharing!!
Hi Maria,
I am so happy to hear that!! Thank you so much for sharing and putting my recipe to good use 🙂
Hi!
First of all, I love your recipes.
I need some help with the caramel tho. I made the caramel in advance, and it’s hard now. What can I do now? Do you have any idea of what I did wrong?
Thank you!
Hi Danielle,
When you say hard did you store it in the fridge and it’s like firm to the touch? I would just pop it in the microwave and heat it up in 15 second intervals until it reaches a workable consistency again. It should get softer as you heat it up. Hope that helps and if it doesn’t let me know and we can keep troubleshooting!!