
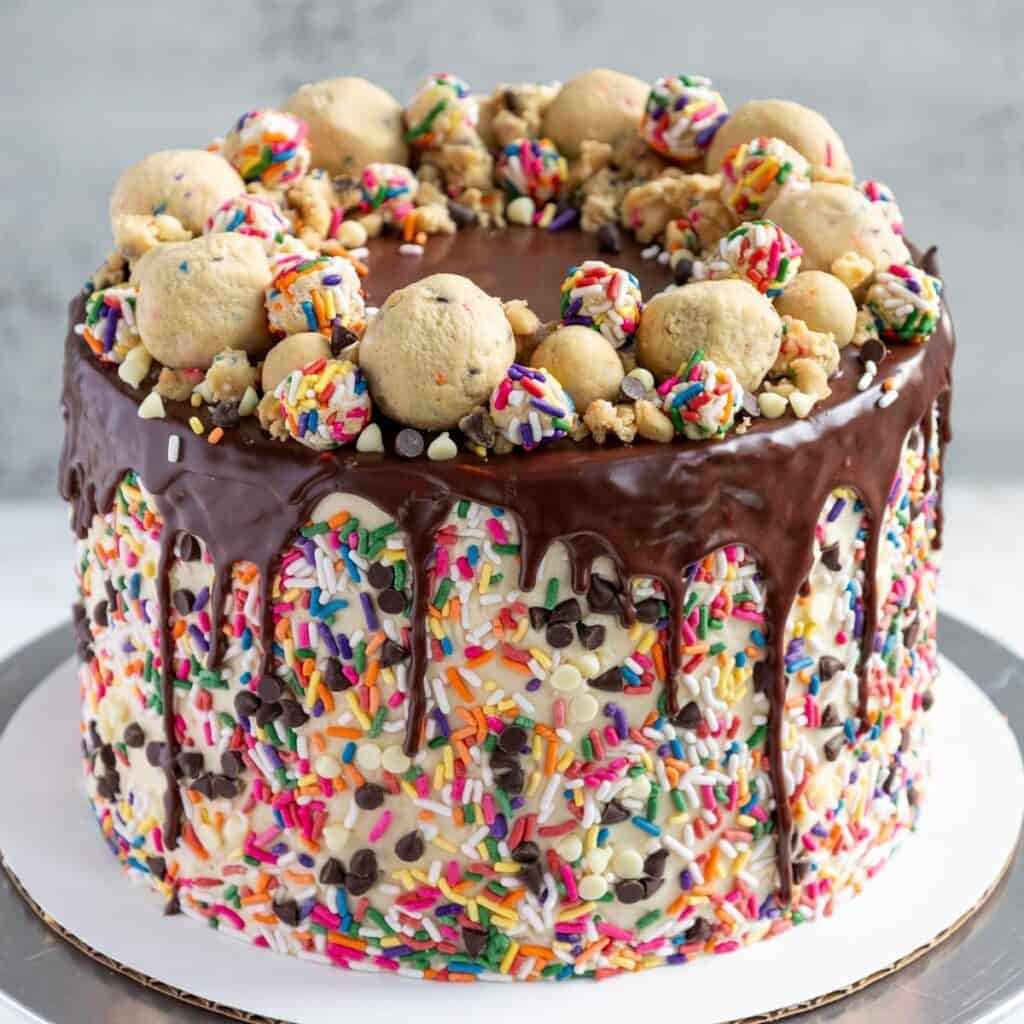
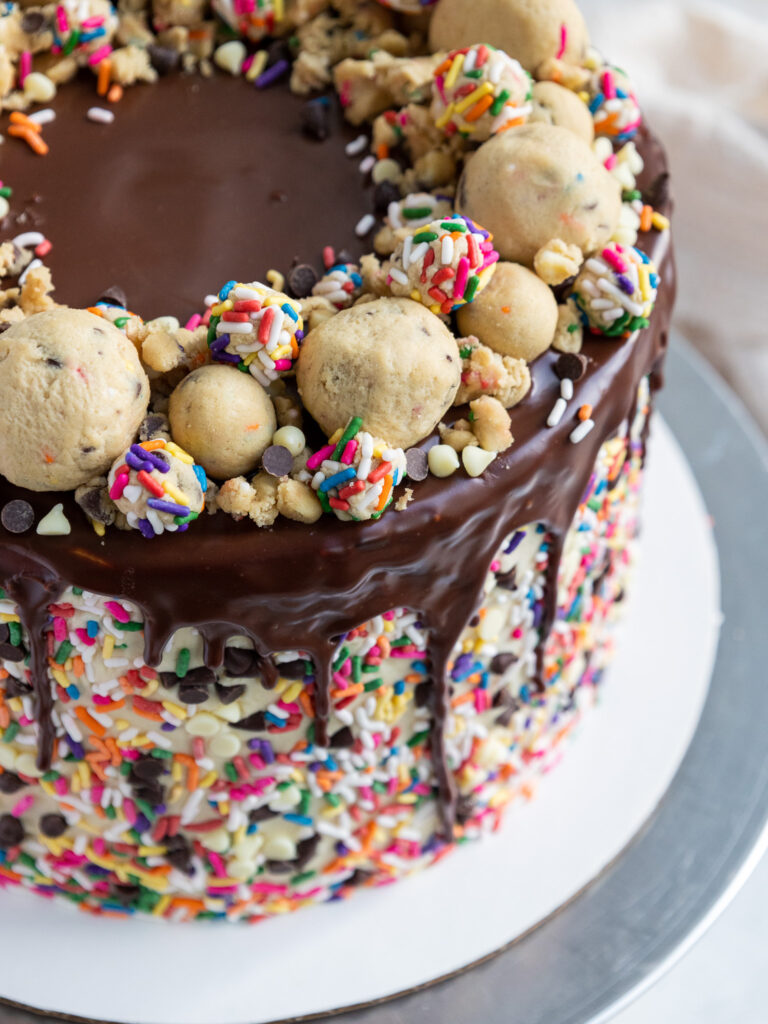
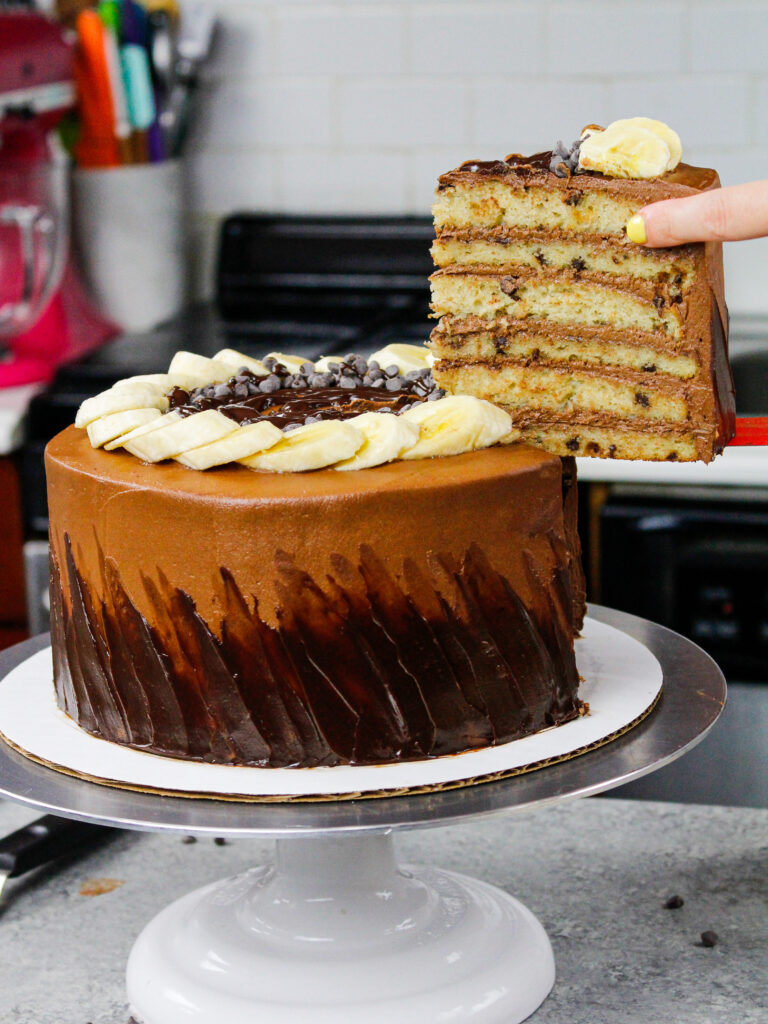
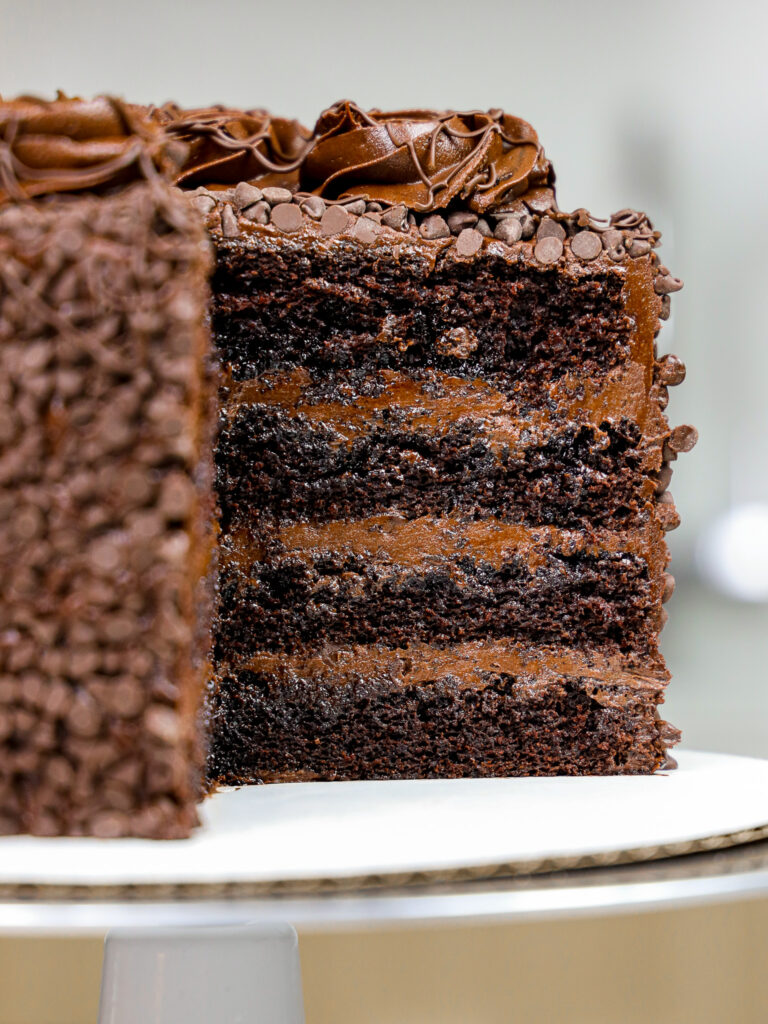
Cookie Dough Cake
This cookie dough cake is made with tender, chocolate chip-studded cake layers and is filled with delicious layers of edible cookie dough and brown sugar buttercream.
How to Make This Cookie Dough Layer Cake
To make sure this cookie dough cake turns out as amazing as possible, let’s walk through each step together! I’ve also included a video tutorial of the process in the recipe card at the bottom of this post.
If you don’t have all these things on hand, feel free to improvise and work with what you have.
Step 1: Make the Edible Cookie Dough
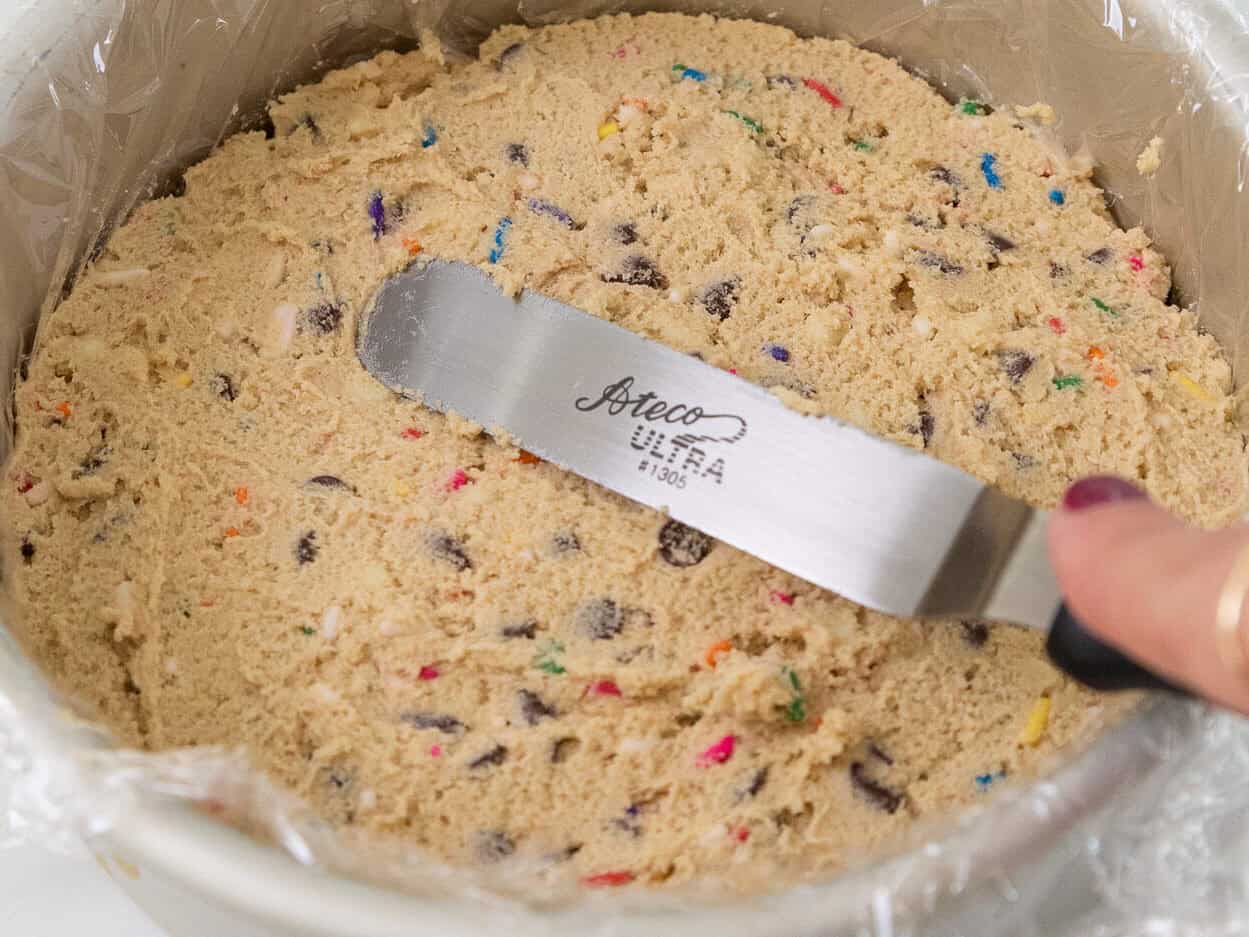
Make the cookie dough cake filling first. I like to make it a day or two before I make the rest of the cake to break up the work.
One thing to keep in mind about this cookie dough cake filling- it’s important that you use heat-treated flour to make the dough so that the cookie dough is safe to eat raw (more on that below).
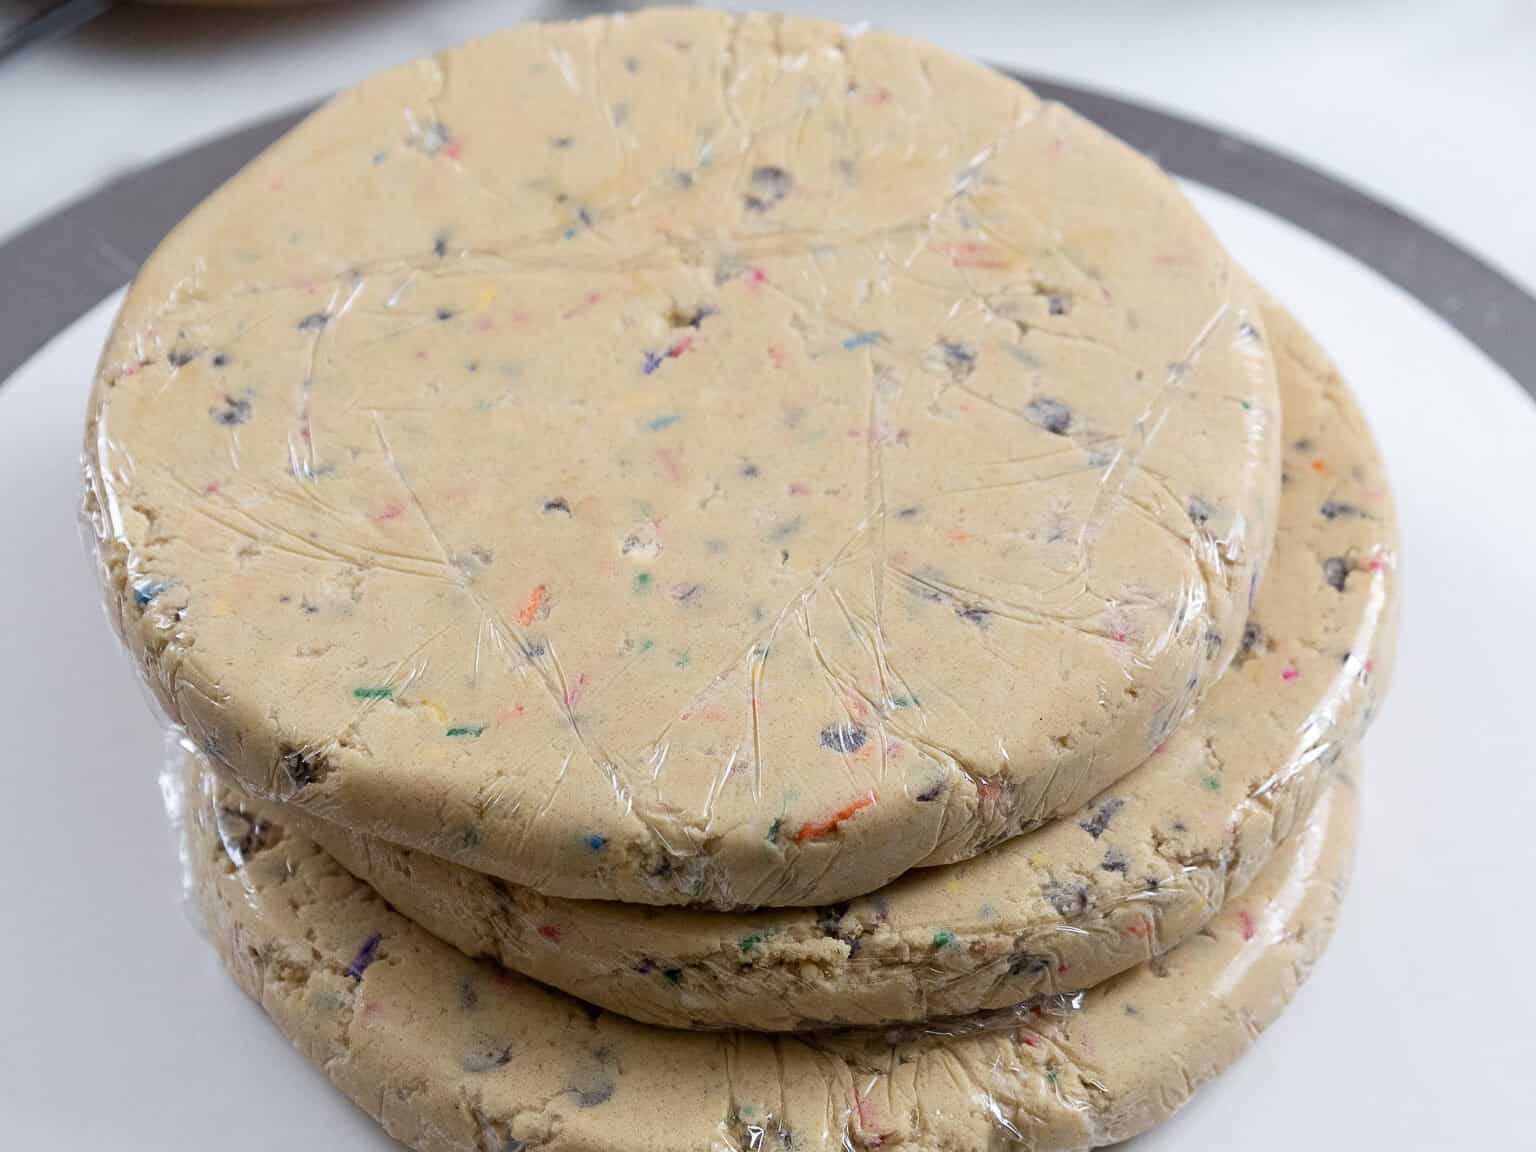
Make either 2 or 3 cookie dough discs depending on how many cake layers you have (you need two to fill three 8-inch, and three to fill four 7- or 6-inch cake layers). Divide the cookie dough evenly to make each disc.
Line a 7-inch or 6-inch pan with plastic wrap and shape the cookie disks in each pan.
You can use 8-inch cake pans, but the cookie dough disks will stick out a little bit past the cake layers when you try to assemble the cake. Cake layers contract a bit once they’re baked, and this can make the cake difficult to frost.
Place the cookie dough disks in the fridge to firm up.
Once they’re firm to the touch, you can pull the discs out of the pan and place them back in the fridge to save space in your fridge.
If you don’t want to make discs, you can sprinkle bits of cookie dough between the cake layers.
Use the remaining cookie dough to create cookie dough balls in a variety of sizes, ranging from 1/4-inch to 1-inch, to decorate the top of the cake.
Roll some of the smaller cookie dough balls in sprinkles until they’re fully coated. Place them in an airtight container and set aside.
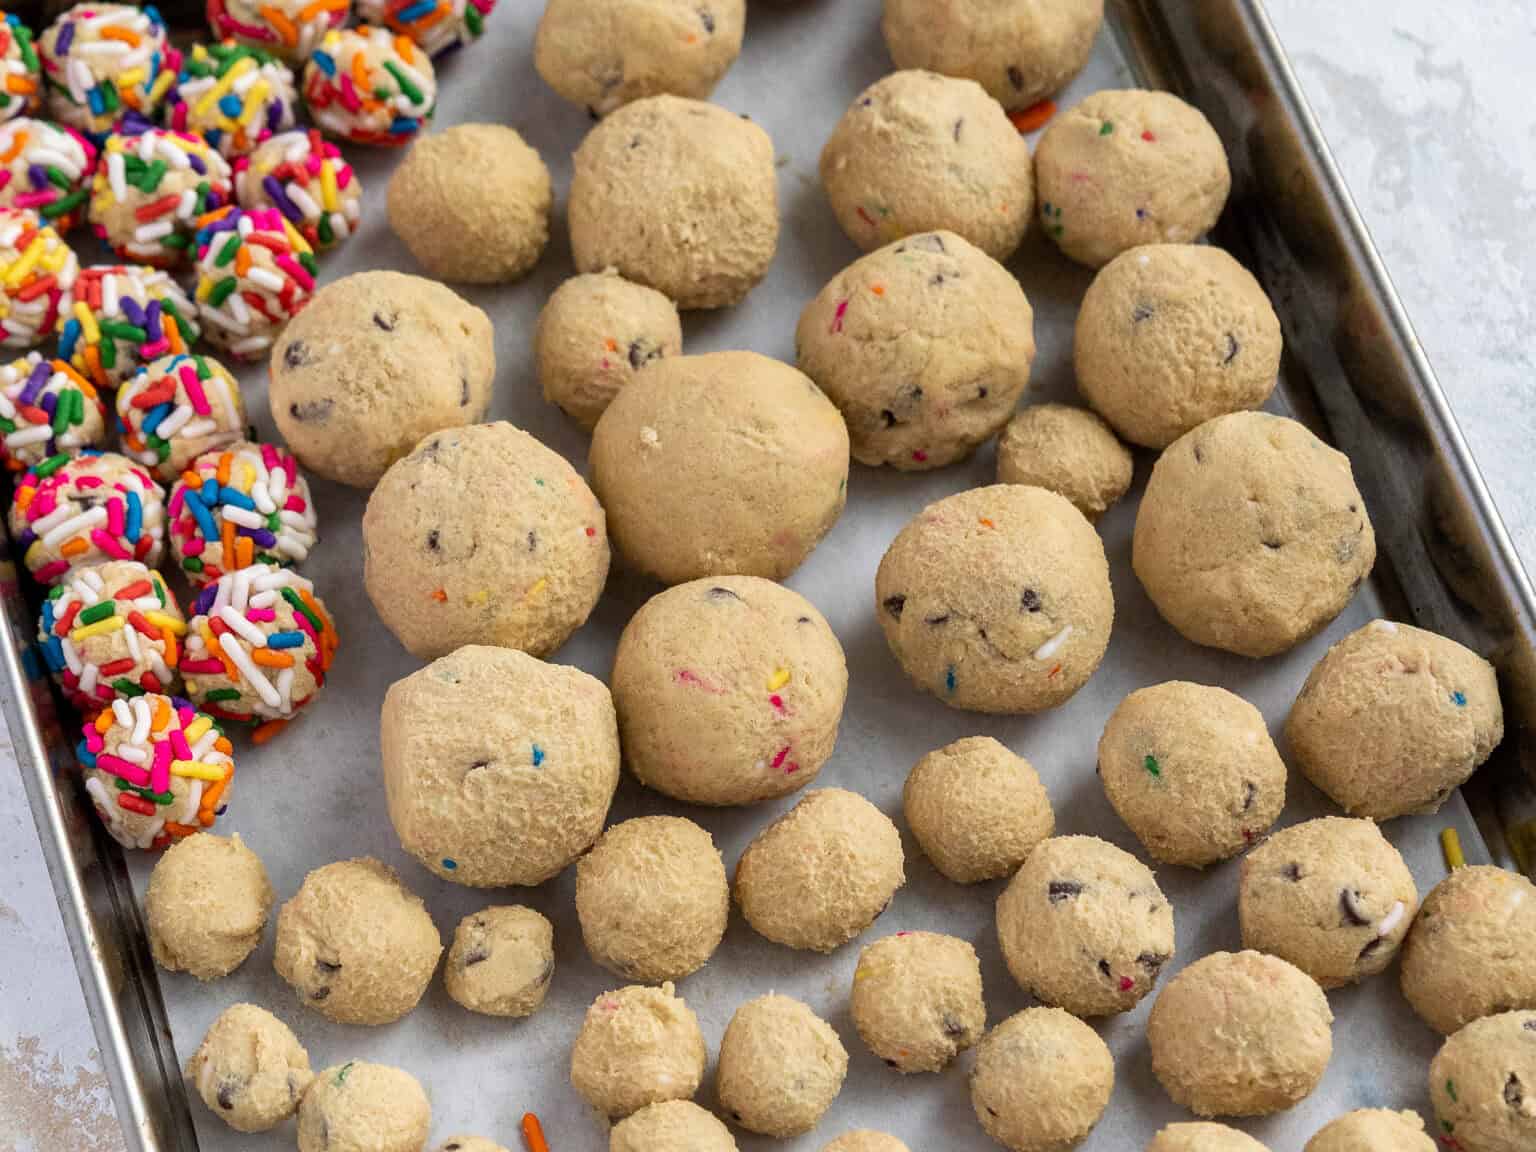
If you’re making these in advance, they can be stored in the fridge for up to 2 weeks.
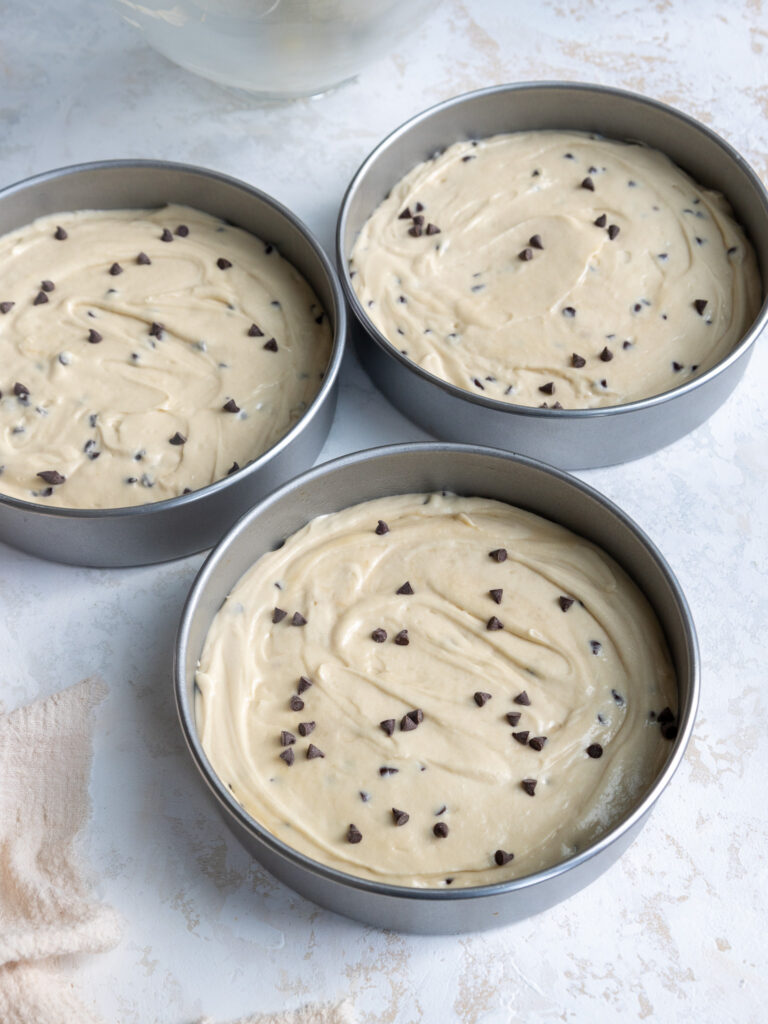
Step 2: Bake the Cookie Dough Cake Layers
Next, we make the cookie dough cake layers following the recipe card at the bottom of this post.

Divide the batter evenly between the prepared cake pans and bake for 34-38 minutes or until a toothpick comes out with a few moist crumbs.
Remove the cake layers from the oven and let them cool in the pans for about 10 minutes.
Gently run an offset spatula around the rim of the cake pans to loosen them, then flip them onto wire racks to finish cooling.
These layers bake up pretty flat, so leveling them is optional! If you want to level them, use a serrated knife to level the top of each cake layer.
If you’re making these in advance, you can wrap and freeze them at this point.
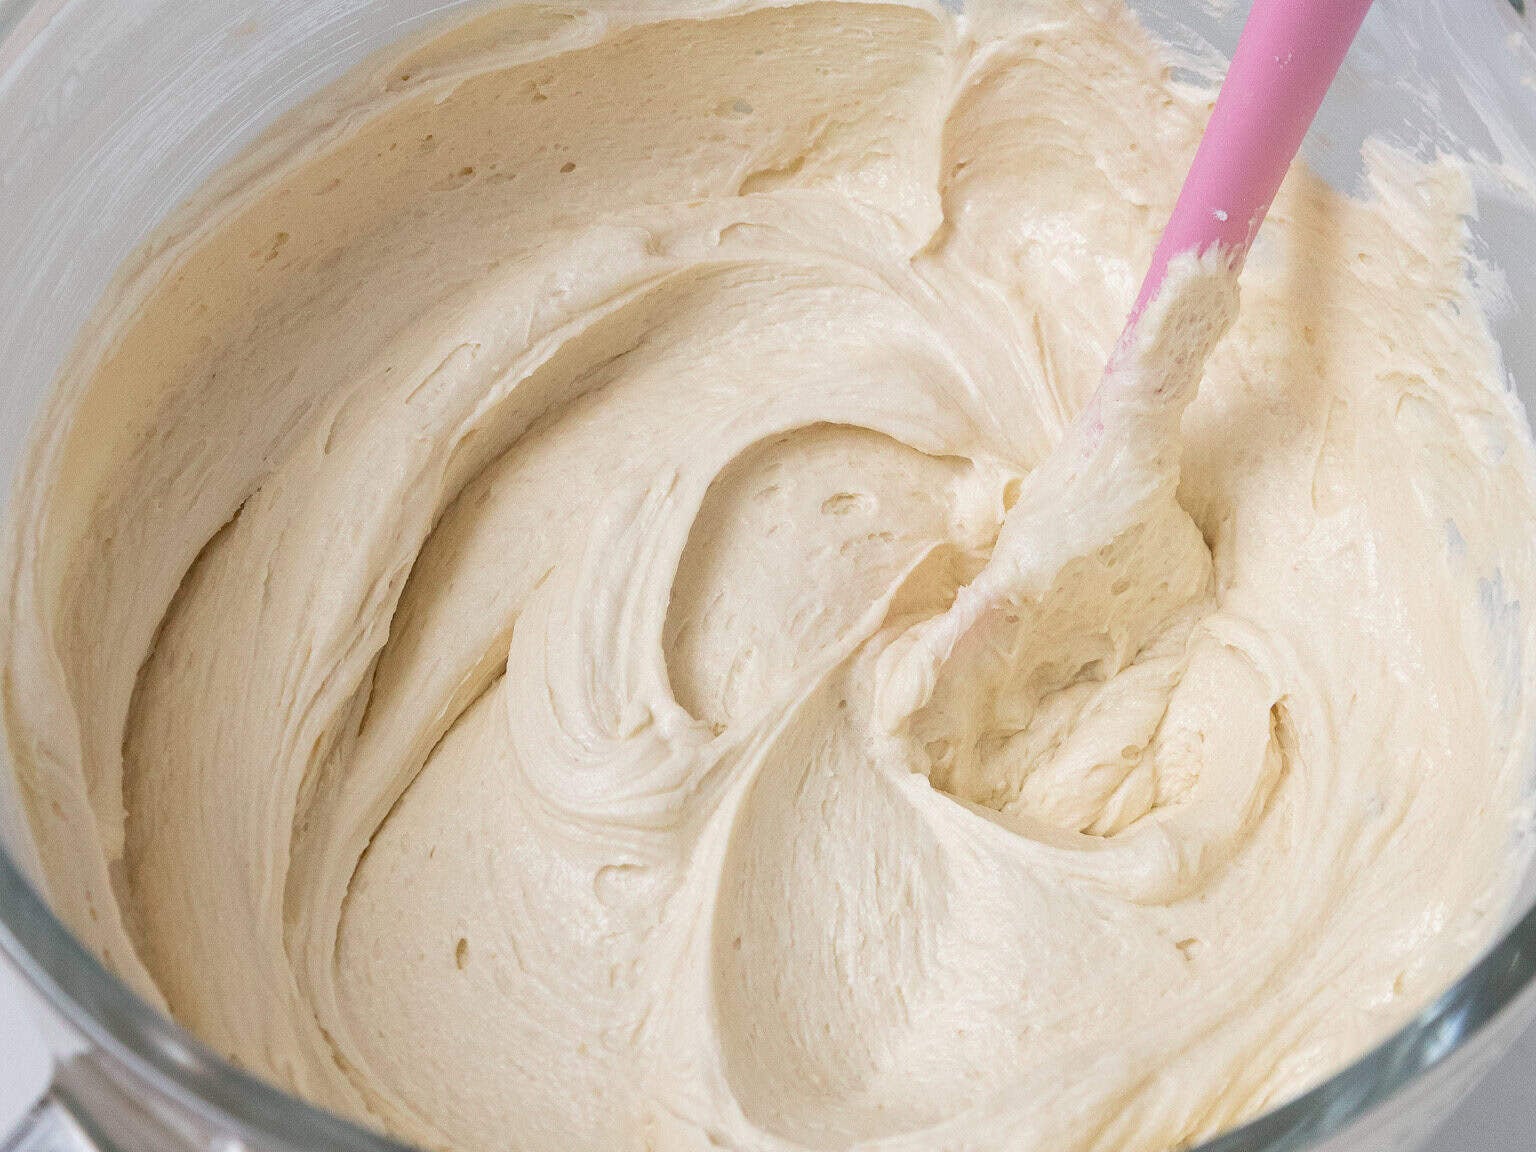
Step 3: Make the Brown Sugar Buttercream Frosting
While the cake layers bake and cool, make the brown sugar buttercream frosting.
I like to use an American buttercream base to make this frosting because I think it’s the easiest to make, and I love eating it. However, it is quite sweet!
If you want to use a less sweet frosting base, I’d recommend making a batch of my Swiss meringue buttercream or my hybrid buttercream.
This frosting can also be made in advance if needed and kept in the fridge for up to a month.
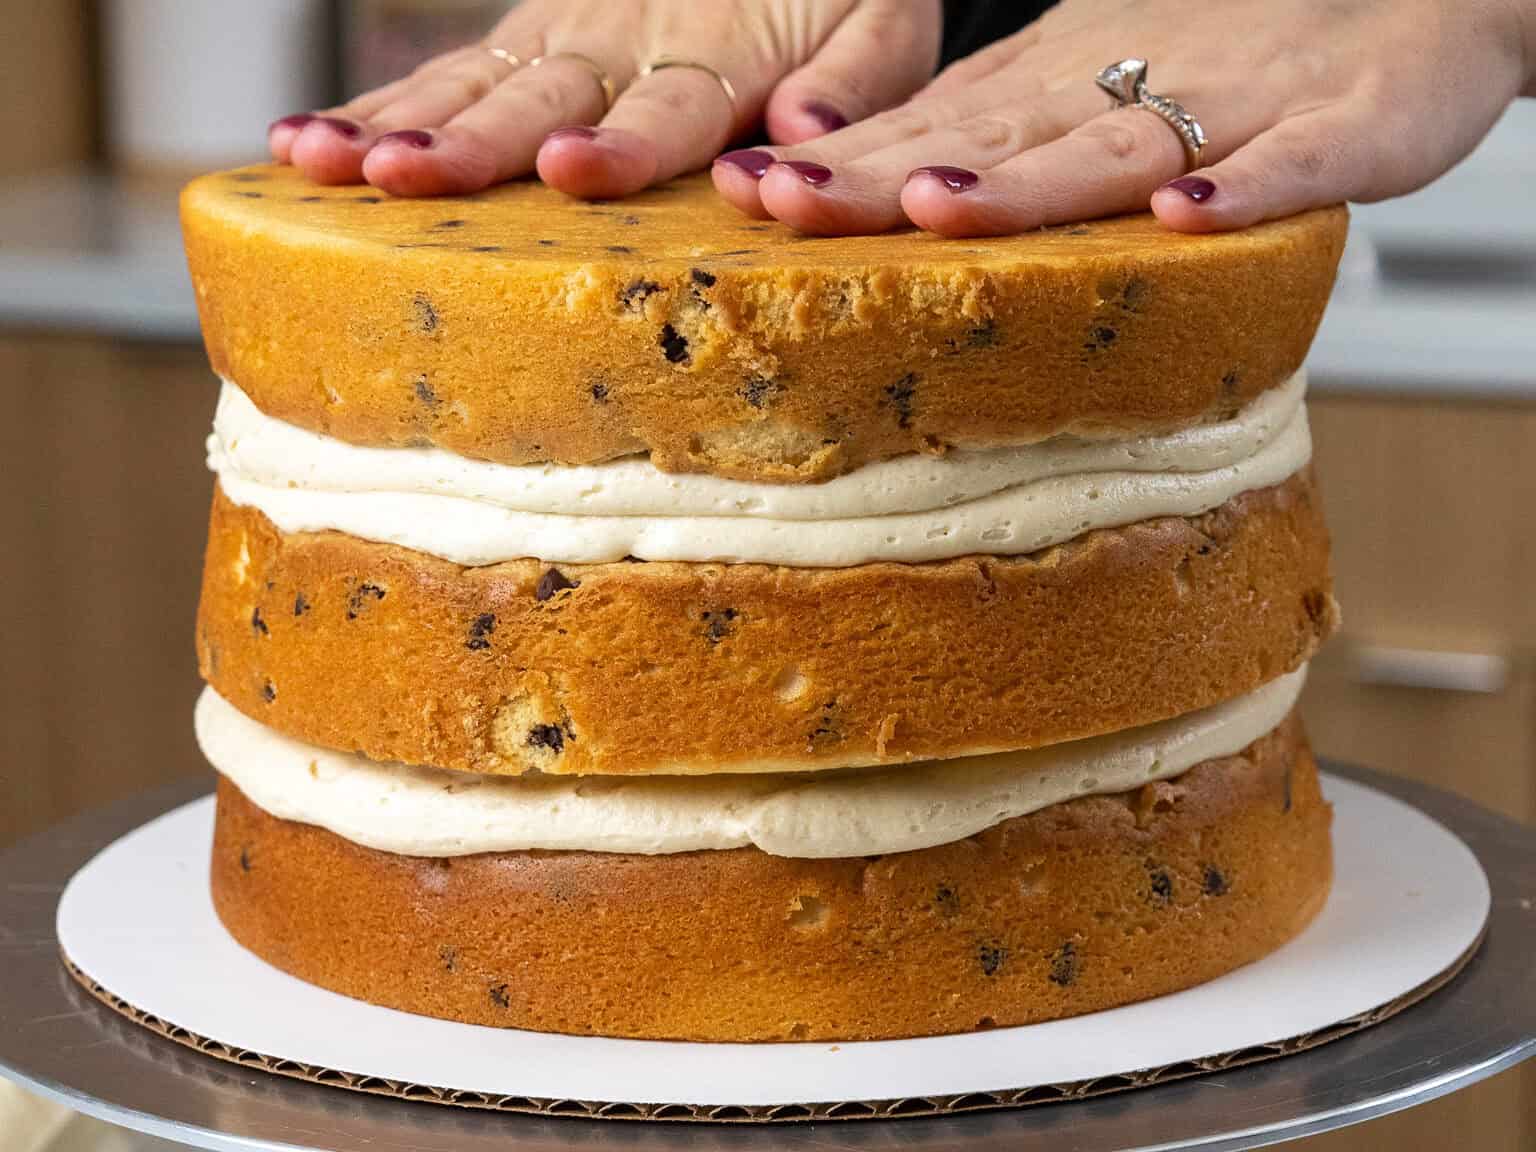
Step 4: Stack and Fill the Cake Layers
Then it’s time to assemble this cake! Stack and frost cake layers on a greaseproof cake board or flat plate. Use a dab of buttercream to help stick the first cake layer to the board.
Spread an even layer of buttercream on top of each cake layer with a large offset spatula.
Place a chilled cookie dough disc on top of the buttercream.

Pipe a ring around the edge of the cookie dough disc, then repeat with the next cake layer.
Place the top cake layer upside down to make the cake easier to frost.
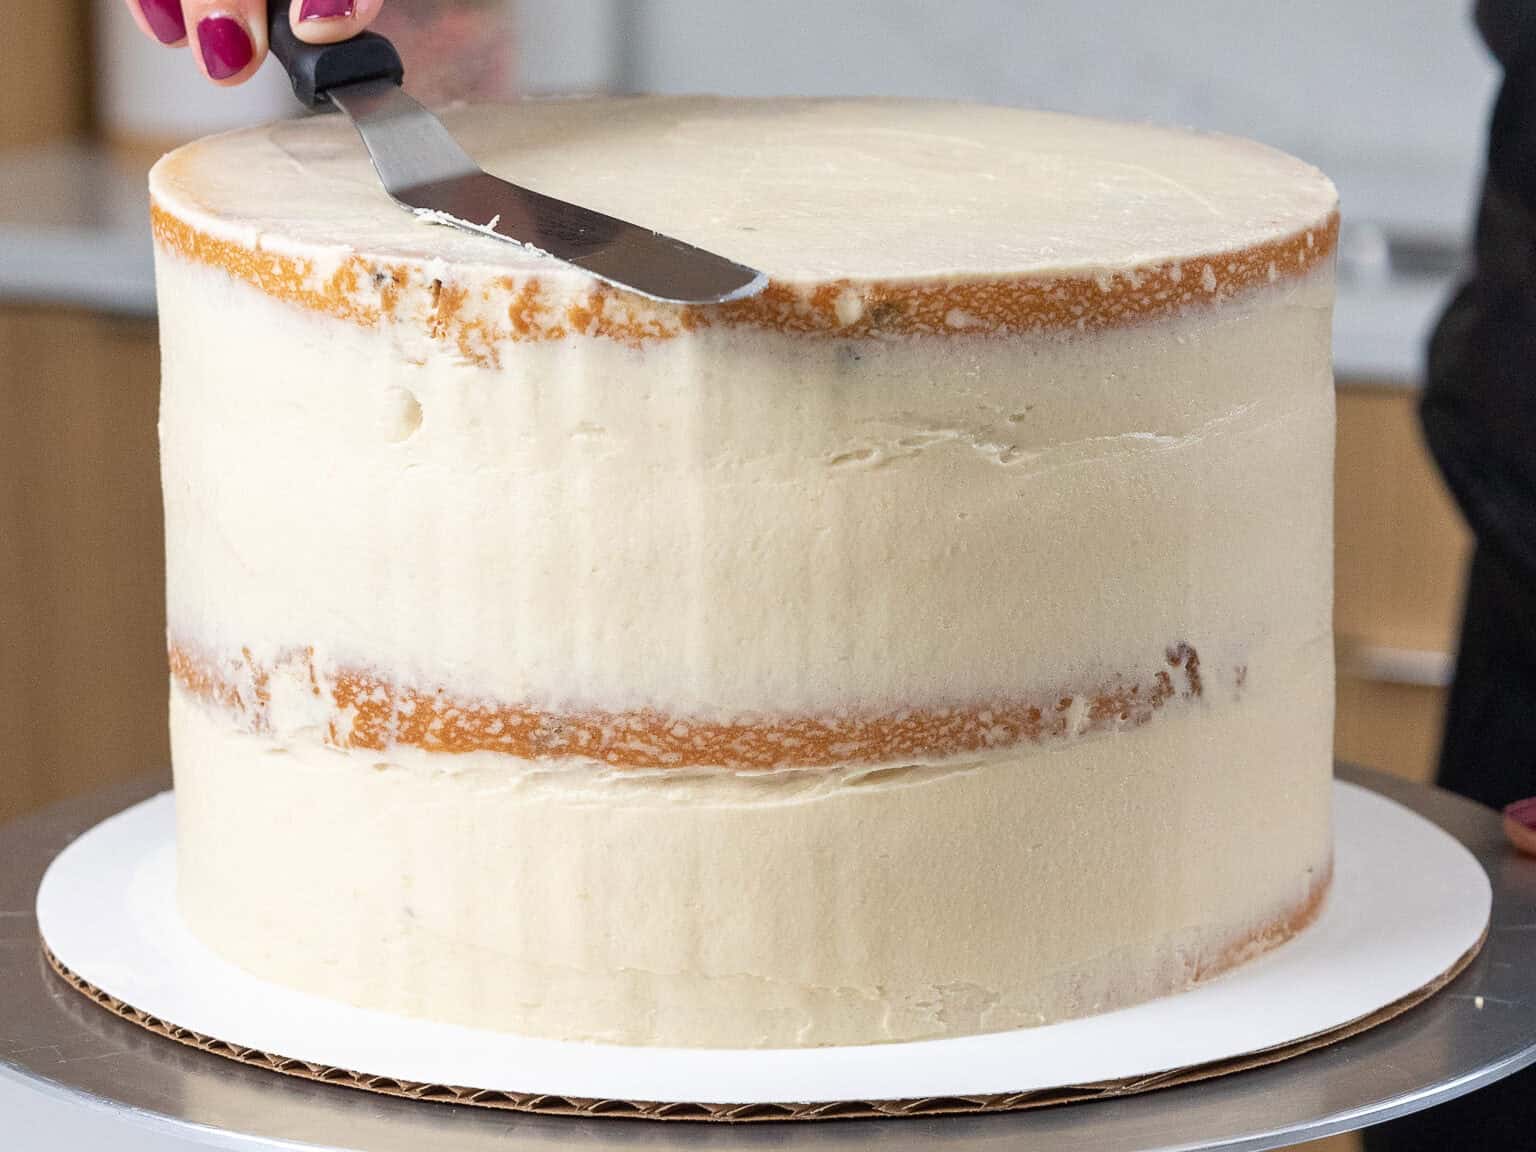
Step 5: Crumb Coat the Cake
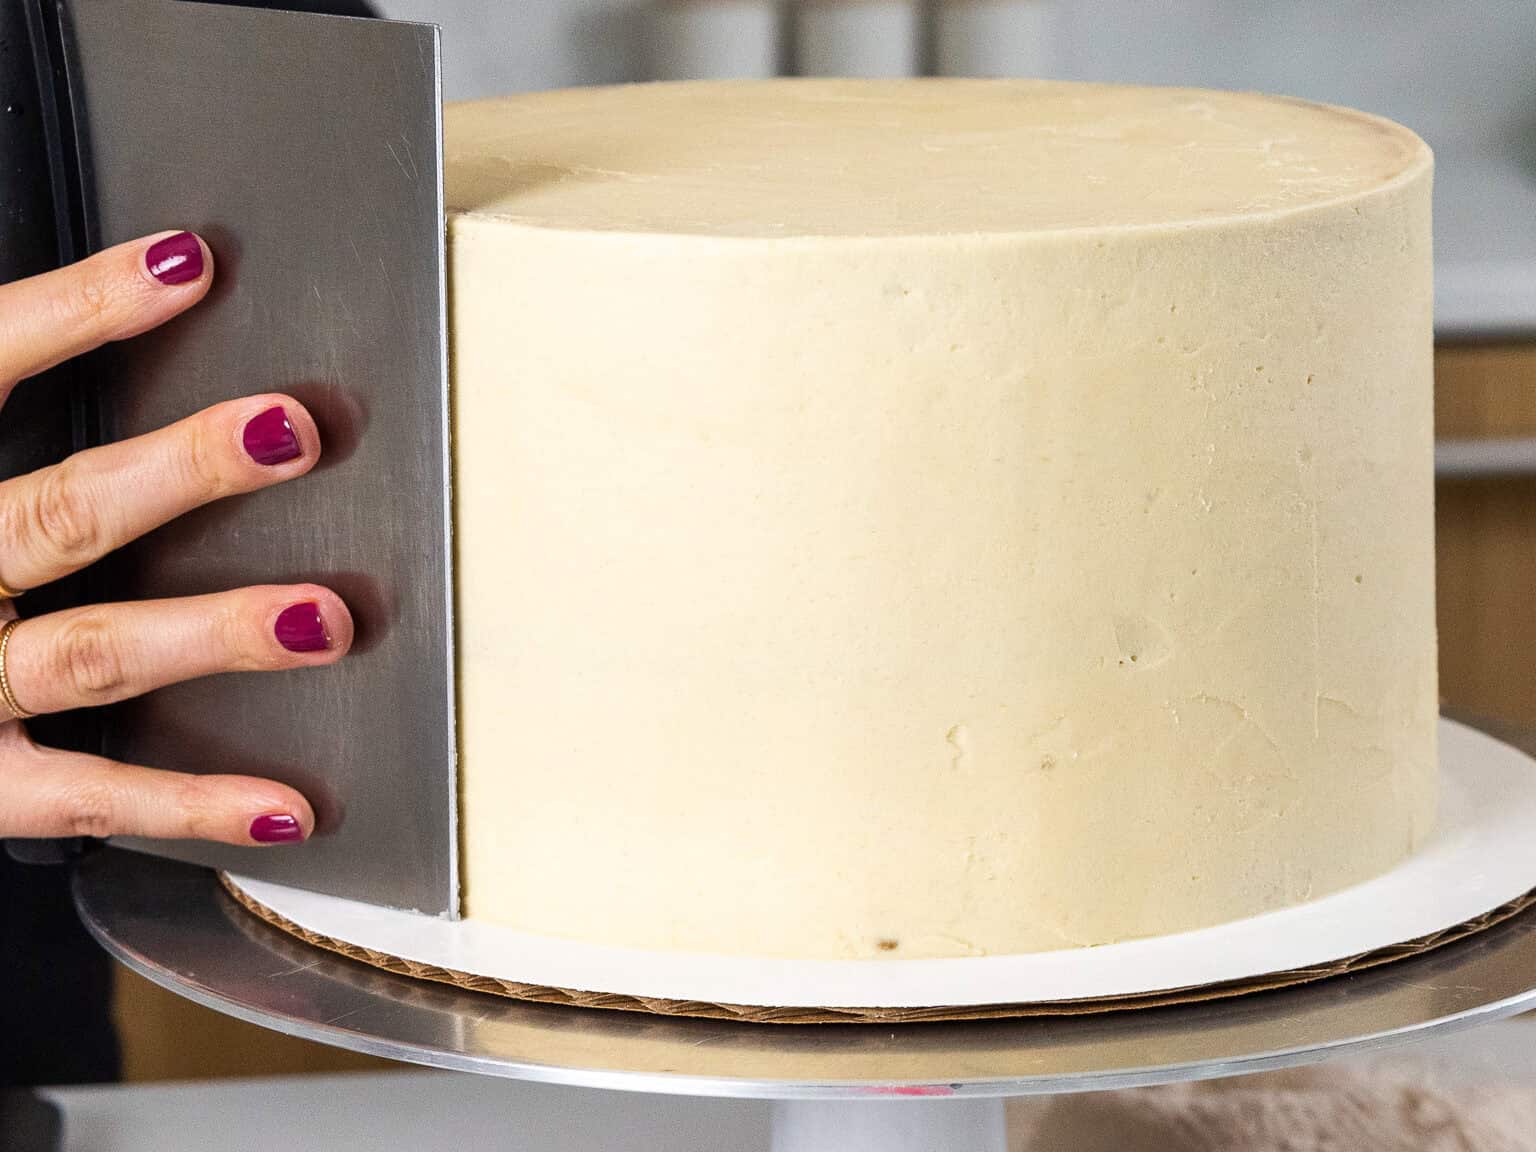
Spread a thin coat of frosting around the cake to fully cover the cake layers.
Smooth the frosting using a large offset spatula or bench scraper, then chill the cake in the fridge (30 minutes) or freezer (10 minutes) until the frosting is firm to the touch.
Step 6: Add the Second Layer of Frosting & Decorate
Then add a second, thicker layer of frosting to the cake.
Smooth the frosting using a large offset spatula or bench scraper.
Don’t worry about getting it perfectly smooth, it’ll be covered up with the next step.
Place the cake in a large, rimmed baking sheet, then gently press sprinkles and mini chocolate chips into the frosting around the cake.
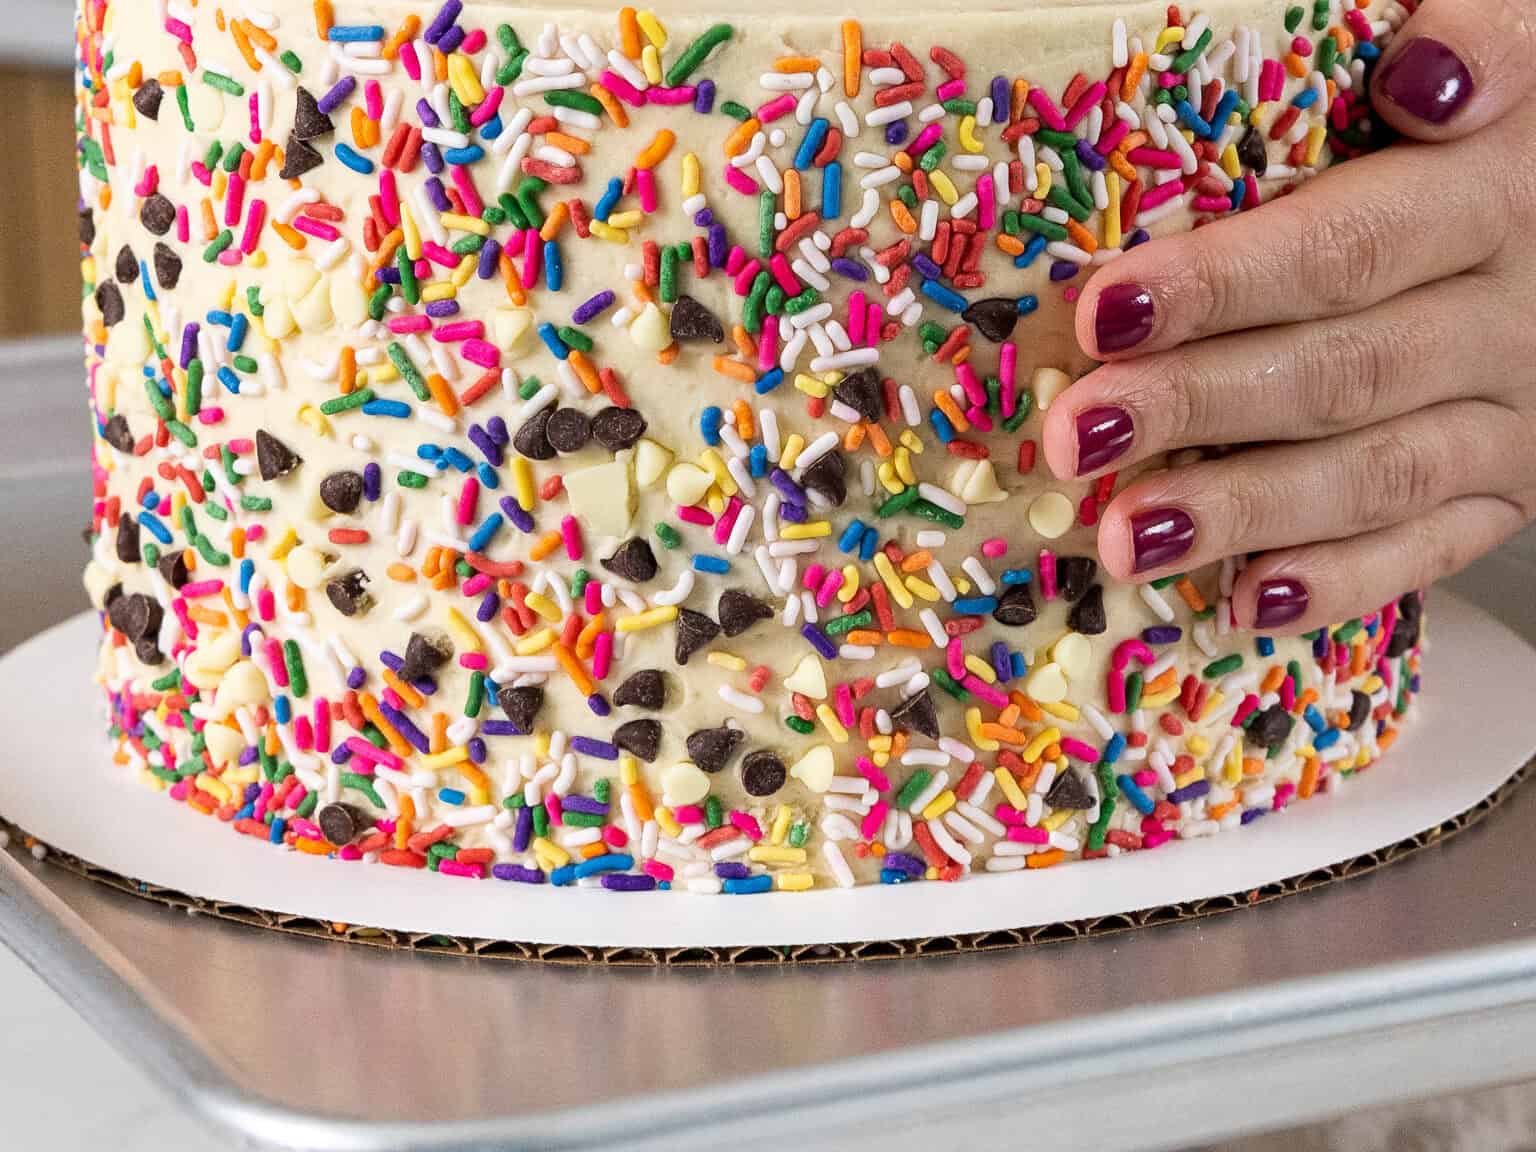
Chill the cake one more time in the fridge (20 minutes) or freezer (5 minutes) until the frosting is firm to the touch.
Step #7: Add the Chocolate Drips
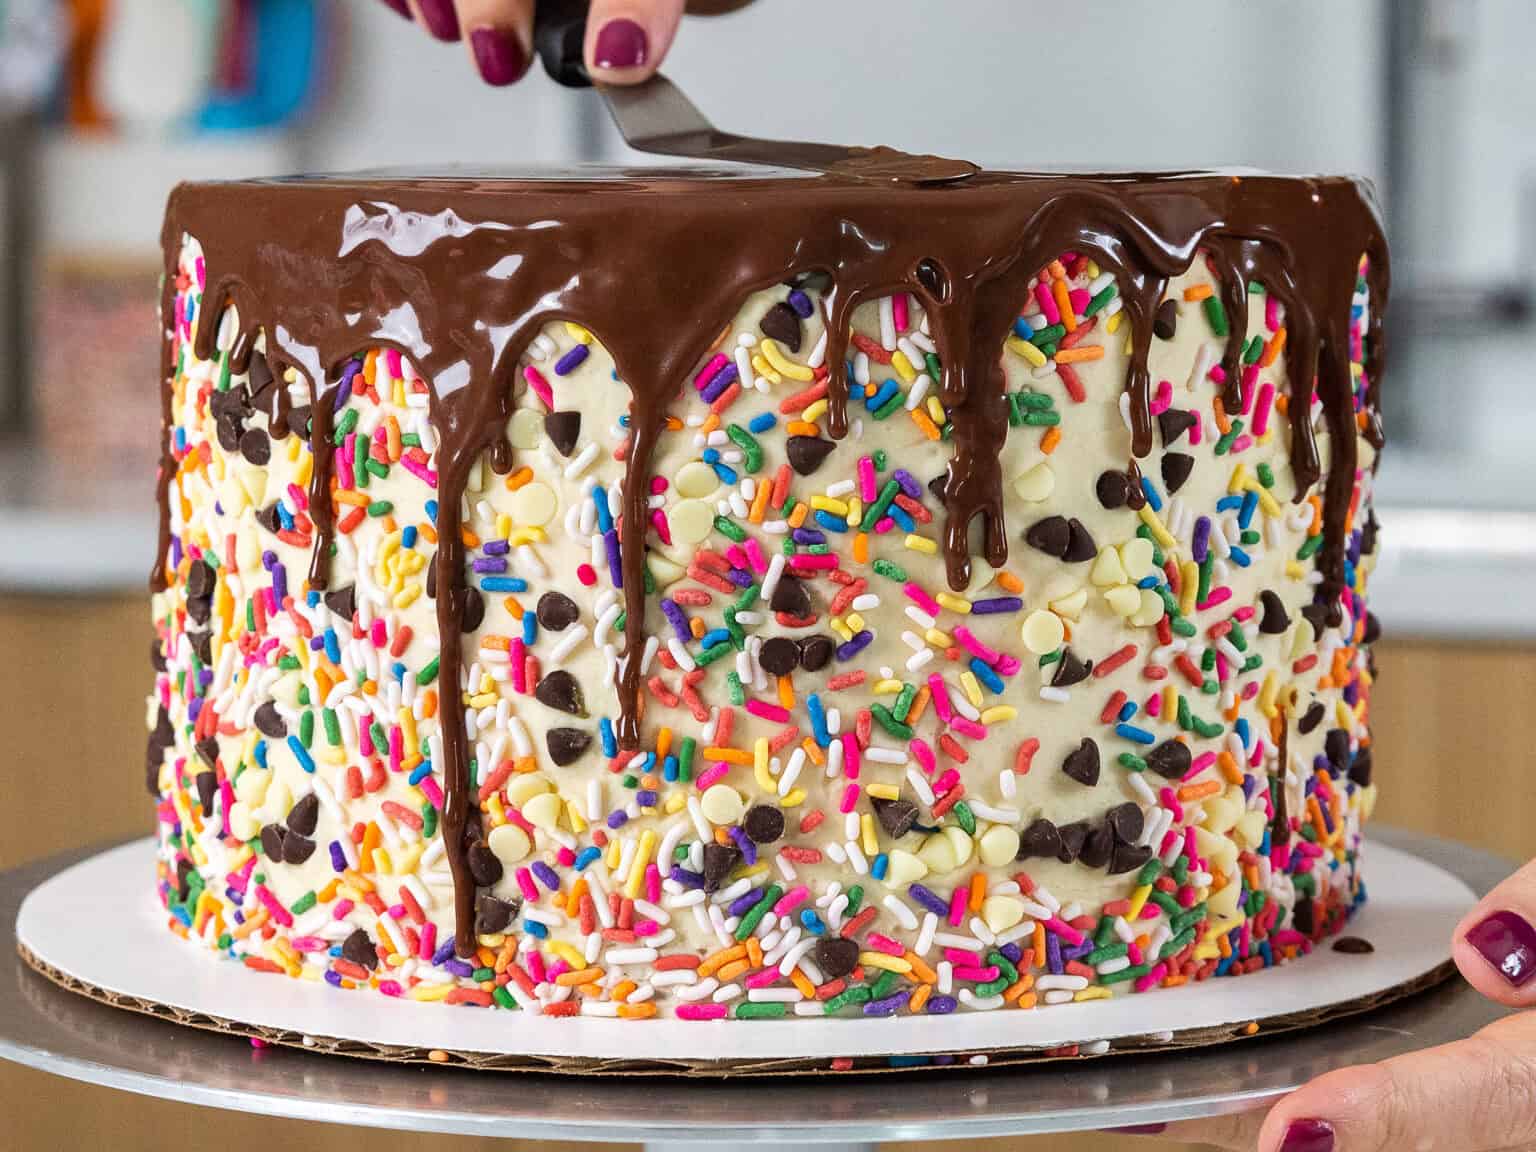
The last step is to add some chocolate drips around the cake!
Pour the ganache on top of the cake and spread it around with a small offset spatula.
Carefully push the ganache towards the edge of the cake, letting it flow over the edge to create drips.
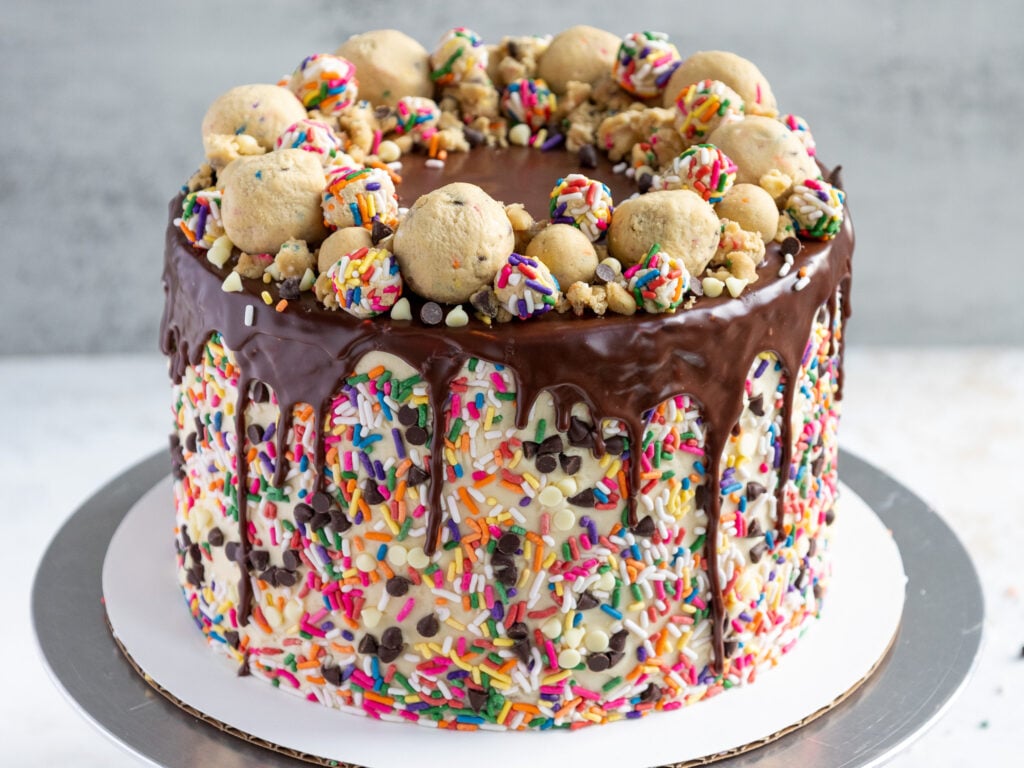
Once the drips are in place, chill the cake one final time in the fridge (20 minutes) or freezer (5 minutes). I promise this is the last time!
This helps the ganache set and will prevent the cookie dough balls from sliding off the cake.
Place the cookie dough balls in a ring around the top of the cake, then enjoy!
If you’re making this cake in advance, it can sit at room temperature for up to a day or be stored in the fridge for up to a week.
Substitutions and Swaps – Chocolate Chip Cake Layers
This recipe uses quite a few ingredients, and I know you might not have them all on hand. Or if you have food allergies or restrictions, I’ve got you covered.
Below are some swaps and substitutions that can be made in this cake recipe.
- All-Purpose Flour – This recipe turns out best with AP flour, but you can use a gluten-free flour blend or cake flour if that’s all you have on hand.
- Granulated Sugar – I do not recommend changing the type or reducing the amount of sugar because it will change the texture of the cake layers.
- Unsalted Butter – If you only have salted butter on hand, you can use it in place of the unsalted butter in this recipe. Just be sure to omit the salt that this cake recipe calls for. You can also use vegan butter in its place (and also omit the salt)!
- Egg whites – I like to use the pasteurized egg whites that come in a carton, but you can also use fresh egg whites or 4 whole, large eggs. If you have an egg allergy, you can use flaxseed eggs or an egg replacer.
- Sour Cream – You can also use full-fat yogurt, whole milk, or an alternative yogurt or milk (almond, soy, oat) if you’re dairy-free.
- Vegetable Oil – You can use any flavorless oil in this recipe. Canola or even sunflower oil would work great!
- Mini Chocolate Chips – I find that mini chocolate chips bake up best in these cake layers. If you can’t find any, chop up regular-sized chocolate chips to make smaller pieces.

Substitutions and Swaps – Buttercream Frosting
- Unsalted Butter – If you only have salted butter on hand, you can use it in place of the unsalted butter. Just be sure to omit the salt that this frosting recipe calls for. You can also use vegan butter in its place (and omit the salt)!
- Light Brown Sugar – I prefer this frosting recipe with light brown sugar, but you can also use dark brown sugar if needed. Make sure it’s a fresh, soft bag of brown sugar to prevent any hard lumps of brown sugar in the buttercream.
- Heavy Cream – Whole milk or alternative milk (soy, almond, oat) will work fine in this frosting recipe if that’s what you have on hand.
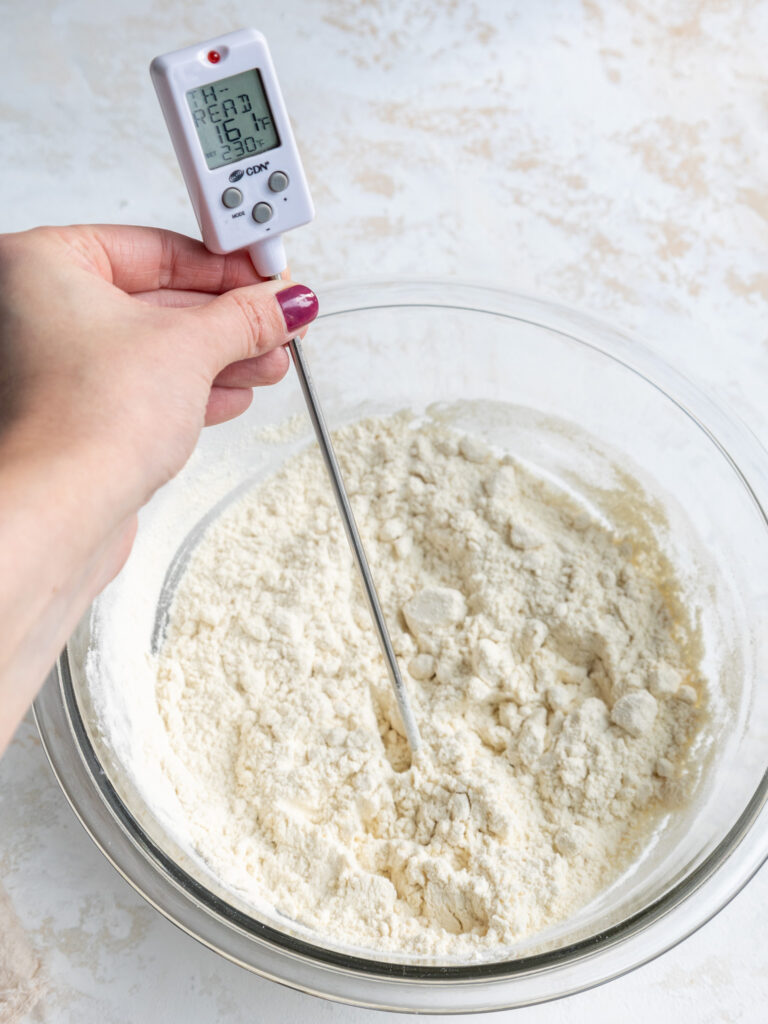
How Do I Heat Treat or Pasteurize My Flour?
There are two easy ways to heat treat the flour for this recipe. I usually use my microwave, but you can also use an oven to pasteurize the flour.
MICROWAVE INSTRUCTIONS: Pour the flour into a large, heat-proof bowl. Heat it in 30-second intervals until the temperature of the flour reaches 160°F/71°C.
Mix the flour around with a spoon between intervals to make sure it heats evenly.
The time it takes to reach this temperature can vary a lot based on the size and age of your microwave. Mine takes 4 intervals (total of 2 minutes).
Let the flour cool to room temperature (takes about 30 minutes), then use it however you like!
OVEN INSTRUCTIONS: Preheat your oven to 300°F/150°C. Line a large, rimmed baking sheet with parchment paper. Spread the flour out evenly on the prepared pan.
Bake the flour in 2-minute intervals and pull the pan out of the oven to check its temperature between each interval.
Mix the flour around with a spoon or rubber spatula each time you check the temperature to help it heat evenly.
Check the temperature of the flour in a few different spots to make sure the entire batch is properly heated. Some ovens have hot spots, and this can cause the flour to heat unevenly.
Repeat this process until the temperature of the flour reaches 160°F/71°C.
When it reaches this stage, carefully lift the sheet of parchment paper and funnel the flour into a separate bowl to let it cool to room temperature. This usually takes about 30 minutes.
Making This Cookie Dough Cake in Different Sizes
I used 8″ cake pans to make this cake, but this recipe can be used to make different-sized cakes. You can also half or double the ingredients to make a half or double batch!
You can make four 7- or 6-inch cake layers with one batch of batter. Bake the cake layers at 350°F/175°C for 35-40 minutes or until a toothpick comes out with a few moist crumbs.
One batch of batter can also be used to make one 9×13-inch sheet cake. Bake it at 350°F / 175°C for 40-50 minutes and use flower nails or heating cores to help the cake bake evenly. It should end up being about 2 inches tall.
If you want to make cupcakes, I highly recommend using my vanilla cupcake recipe as a base and adding in 1/3 cup of flour-dusted mini chocolate chips. One batch makes 12 moist vanilla cupcakes, which can be filled with edible cookie dough.
I’d recommend making a 1/4 batch of buttercream to frost a dozen cupcakes.
Tips for Making the Best Cookie Dough Cake
- Properly measure the flour (spoon into the cup measure, then level) or use a kitchen scale.
- Make sure any cold ingredients are at room temperature. It helps them mix together better.
- Make sure the buttercream is the right consistency. This will help give the cake proper structure and make it easier to decorate.
- If your cake layers turn out less than perfect, read my cake troubleshooting guide to see where things might’ve gone awry.
- You can also use regular chocolate chips, chocolate wafers, or even a chopped-up chocolate bar to make the chocolate ganache.
- Use heavy cream or heavy whipping cream! You need the high-fat content to create the right consistency in both the frosting and the ganache. Milk cannot be used in place of the cream.
Making This Cookie Dough Cake in Advance and Storage Tips
Make these cake layers in advance and freeze them. It breaks the process up and makes it more approachable.
You can also make the frosting ahead of time too or save any leftover frosting! It can be stored in an airtight container in the fridge for up to a month or in the freezer for up to 3 months. Be sure to give it a good stir once it thaws to get the consistency nice and smooth again.
Make this ganache drip recipe ahead of time or save leftovers! Once it’s made, wrap the bowl with plastic wrap or cover the top of the plastic bottle and store in the fridge for up to 3 weeks.
To use chilled ganache, heat the bottle or bowl in the microwave for 10-second intervals until it reaches the right consistency. Use leftover ganache to top cupcakes, cookies, or even ice cream!
A frosted cake can last in the fridge for up to a week or in the freezer for up to a month. The buttercream locks in all the moisture, keeping the cake fresh and delicious!
If you cut into the cake and have leftovers, use any remaining frosting to cover the cut section to keep it moist and store in the fridge for up to a week.
Let Me Know What You Think!
If you make this cookie dough cake recipe, I’d love to hear what you think of it! Let me know by leaving a rating and comment below.
And don’t forget to tag me @chelsweets and use #chelsweets if you share on social media so that I can see your amazing creations.
Cookie Dough Cake
Equipment
- Bench Scraper optional
Ingredients
Edible Cookie Dough Cake Filling
- 1 1/2 cups (3 sticks) unsalted butter, room temperature 339g
- 2 1/4 cups packed light brown sugar 454g or 1 lb. box
- 2 Tbsp heavy whipping cream, cold 30g
- 1 tsp vanilla extract or vanilla bean paste 4g
- 1 tsp fine salt 6g
- 2 1/4 cup heat-treated all-purpose flour 280g
- 1 cup mini chocolate chips 175g
- 1/2 cup mini white chocolate chips 85g
- 1/2 cup rainbow sprinkles 80g
Chocolate Chip Cake Recipe
- 3 cups all-purpose flour 375g
- 3 cups granulated sugar 600g
- 2 1/2 tsp baking powder 10g
- 1 tsp fine salt 5g
- 1 cup (2 sticks) unsalted butter, room temperature 226g
- 1 cup carton egg whites or 7 large egg whites, room temperature 240g
- 1 1/2 cups full-fat sour cream, room temperature 360g
- 2 Tbsp vegetable or canola oil 28g
- 1 tsp vanilla extract or vanilla bean paste 4g
- 3/4 cup mini chocolate chips, tossed in flour 140g
Brown Sugar Buttercream Frosting
- 2 cups (4 sticks) unsalted butter, room temperature 452g
- 1 cup packed, light brown sugar 200g
- 1 Tbsp vanilla extract or vanilla bean paste 12g
- 1/2 tsp fine salt 3g
- 7 cups powdered sugar 904g or a 2 lb. bag
- 1/4 cup heavy whipping cream, room temperature 60g
Chocolate Drip Recipe
- 1/3 cup heavy whipping cream, room temperature 80g
- 1/3 cup semi-sweet chocolate 60g
Additional Decorations
- 2 cups rainbow sprinkles 350g
- 1 cup mini chocolate chips 185g
Instructions
Cookie Dough Cake Filling
- Make the cookie dough cake filling first. I like to make it a day or two before I make the rest of the cake to break up the work.
- Cream together 1 1/2 cups of unsalted butter and 2 1/4 cups of packed light brown sugar in a large bowl with a hand mixer or stand mixer and paddle attachment. Mix on a medium-high speed for 1 minute. The mixture should become a bit lighter in color as air is incorporated into it.
- Add in 2 Tbsp heavy cream, 1 tsp vanilla extract, and 1 tsp salt. Mix on a low speed until combined.
- Mix in 2 1/4 cups of heat treated flour on a medium-low speed. Scrape the sides and bottom of the bowl with a rubber spatula as needed.
- Pour in 1 cup mini chocolate chips, 1/2 cup mini white chocolate chips, and 1/2 cup rainbow sprinkles. Mix on a low speed until the mix-ins are evenly distributed throughout the dough.
- Line two 7-inch or 6-inch pans with plastic wrap and shape a cookie disk in each pan. You can use 8-inch cake pans, but cookie dough disks will stick out a little bit past the cake layers when you try to assemble the cake. Cake layers contract a bit once they're baked, and this can make it difficult to frost the cake. You can also freehand this part, but you want discs that are about 6 inches in diameter.If you decide to make 4, 6-inch cake layers, line 3 pans and use 1/4 of the dough per pan (the rest will be used as a garnish.
- Make either 2 or 3 cookie dough discs depending on how many cake layers you have (you need two to fill three 8-inch, and three to fill four 7- or 6-inch cake layers). Divide the cookie dough evenly to make each disc. Place the cookie dough disks in the fridge to firm up. Once they're firm to the touch, you can pull the discs out of the pan and place them back in the fridge to save space. If you don't want to make discs, you can sprinkle bits of cookie dough between the cake layers.
- Use the remaining cookie dough to create cookie dough balls in a variety of sizes ranging from 1/4-inch to 1-inch to decorate the top of the cake. Roll some of the smaller cookie dough balls in sprinkles until they're fully coated. Place them in an airtight container and set aside. If you're making these in advance, they can be stored in the fridge for up to 2 weeks.
Cookie Dough Cake Layers
- Next, make the cookie dough cake layers. Preheat the oven to 350°F/175°C. Line 3, 8-inch cake pans with parchment rounds and grease with nonstick spray. You can also use this recipe to make 4, 6-inch cake layers, but the bake time will be a few minutes longer. If you don't have enough cake pans, the batter can sit at room temperature for a few hours. Bake as many layers as you can at a time.
- Mix 3 cups all-purpose flour, 3 cups granulated sugar, 2 1/2 tsp baking powder, and 1 tsp salt together in a stand mixer with a paddle attachment or hand mixer until fully combined.
- Mix 1 cup of room temperature, unsalted butter into the dry ingredients on a low speed. Continue to mix until no large chunks of butter remain and the mixture looks like moist sand.
- Pour in 1 cup of egg whites and mix on low until just incorporated. Mix in 1 1/2 cups of sour cream on a low speed.
- Add in 2 Tbsp of vegetable oil and 1 tsp of vanilla extract and mix at a low speed until fully incorporated.
- Scrape down the sides and bottom of the bowl with a rubber spatula, then beat on a medium speed for about 30 seconds to make sure everything is properly mixed together. This also helps lighten the texture of the cake layers a bit.
- Fold 3/4 cup of flour-dusted mini chocolate chips into the cake batter.
- Divide batter evenly between the prepared cake pans. Bake for 34-38 minutes or until a toothpick comes out with a few moist crumbs. Let the pans cool for 10 minutes, then run an offset spatula around the perimeter of the pan to separate the cake from the pan.
- Place the cake pans into the freezer for 45 minutes to accelerate the cooling process. Once the layers are fully cooled, carefully flip the pans and remove the layers from the pans.
- These layers bake up pretty flat, so leveling them is optional! If you want to level them, use a serrated knife to level the top of each cake layer. If you make these in advance, wrap and freeze them at this point.
Brown Sugar Buttercream Frosting
- While the cake layers bake and cool, make the brown sugar buttercream frosting. Make sure that you use a fresh, soft bag of brown sugar to prevent any hard lumps of brown sugar in the buttercream.
- Add 2 cups of unsalted butter, 1 cup of brown sugar, 1 Tbsp vanilla extract, and 1/2 tsp salt into a large bowl or the bowl of a stand mixer. Beat on a medium-high speed for 2 minutes with a stand mixer and paddle attachment or hand mixer. Then, let the mixture sit for about 5 minutes to give the brown sugar time to dissolve.
- Gradually mix in 7 cups of powdered sugar and 1/4 cup of heavy cream on a low speed.
- Continue to mix on a low speed for a few minutes until the desired consistency is reached. If the frosting seems too thick, add in additional cream (1 Tbsp at a time). If the frosting is too thin, add in more powdered sugar (a quarter of a cup at a time).
- Place the buttercream in a large plastic piping bag and seal the top with a rubber band. Cut a 1-inch opening at the base of the bag, then set aside.
Assembling This Cookie Dough Cake
- Stack and frost the cake layers on a greaseproof cake board or a flat plate using a dab of frosting to help stick the first cake layer to the board.
- Spread a layer of frosting on top of each cake layer, then add a cookie dough disc on top of the frosting. Pipe a ring of frosting around the edge of the cookie dough disc, then repeat with the next cake layer. Place the top cake layer upside down to make the cake easier to frost.
- Cover the cake in a thin coat of frosting that fully covers the cake layers. Smooth the frosting using a bench scraper, then chill the cake in the fridge (20 minutes) or freezer (5 minutes) until the frosting is firm to the touch.
- Cover the chilled cake with a second, thicker layer of buttercream. Smooth using a bench scraper and offset spatula. Don't worry about getting it perfectly smooth, it'll be covered up with the next step.
- Place the cake on a large, rimmed baking sheet, then gently press sprinkles and mini chocolate chips into the frosting around the cake. Chill the cake one more time in the fridge (20 minutes) or freezer (5 minutes) until the frosting is firm to the touch.
Chocolate Ganache Drips
- While the cake chills, make the chocolate ganache. Heat 1/3 cup of heavy cream in a heatproof bowl in the microwave for 30-45 seconds, until it's just beginning to bubble. Gently pour 1/3 cup of semi-sweet chocolate chips into the heavy cream, making sure they are fully covered with cream. Let the mixture sit for 1 minute.
- Stir until the cream and chocolate are combined and smooth. If the mixture seems too thin or thick, you can add a touch more chocolate chips or heavy cream. The type of cream and chocolate that you use can affect the consistency, along with the temperature of the ganache. Feel free to adjust as needed.
Decorating This Cookie Dough Cake
- Let the chocolate ganache sit for about 5 minutes, then pour it on top of the cake and spread it around with an offset spatula. Carefully push the ganache towards the edge of the cake and let it run over to create the drips. You can also use a squirt bottle or spoon to add on the drips.
- Once you're happy with the drips, chill the cake one final time in the fridge (20 minutes) or freezer (5 minutes). I promise this is the last time!! This helps the ganache set and will prevent the cookie dough balls from sliding off the cake.
- Place the cookie dough balls in a ring around the top of the cake, then enjoy! If you're making this cake in advance, it can sit at room temperature for up to a day or be stored in the fridge for up to a week.
Video
Notes
Making Sure This Edible Cookie Dough is Safe to Eat Raw
To make sure this edible cookie dough is safe to consume raw, I highly recommend pasteurizing or heat-treating the flour in this recipe by microwaving it or heating it in the oven. MICROWAVE INSTRUCTIONS: Pour the flour into a large, heat-proof bowl. Heat it in 30-second intervals until the temperature of the flour reaches 160°F/71°C. Mix the flour around with a spoon between intervals to make sure it heats evenly. The time it takes to reach this temperature can vary a lot based on the size and age of your microwave. Mine takes 4 intervals (total of 2 minutes). Let the flour cool to room temperature (takes about 30 minutes), then use it however you like! OVEN INSTRUCTIONS: Preheat your oven to 300°F/150°C. Line a large, rimmed baking sheet with parchment paper. Spread the flour out evenly on the prepared pan. Bake the flour in 2-minute intervals and pull the pan out of the oven to check its temperature between each interval. Mix the flour around with a spoon or rubber spatula each time you check the temperature to help it heat evenly. Check the temperature of the flour in a few different spots to make sure the entire batch is properly heated. Some ovens have hot spots, and this can cause the flour to heat unevenly. Repeat this process until the temperature of the flour reaches 160°F/71°C. When it reaches this stage, carefully lift the sheet of parchment paper and funnel the flour into a separate bowl to let it cool to room temperature. This usually takes about 30 minutes.Tips for Making the Best Cookie Dough Cake
- Properly measure the flour (spoon into the cup measure, then level) or use a kitchen scale.
- Make sure any cold ingredients are at room temperature. It helps them mix together better.
- Make sure the buttercream is the right consistency. This will help give the cake proper structure and make it easier to decorate.
- If your cake layers turn out less than perfect, read my cake troubleshooting guide to see where things might’ve gone awry.
- You can also use regular chocolate chips, chocolate wafers, or even a chopped-up chocolate bar to make the chocolate ganache.
- Use heavy cream or heavy whipping cream! You need the high-fat content to create the right consistency in both the frosting and the ganache. Milk cannot be used in place of the cream.
Making This Cookie Dough Cake in Advance and Storage Tips
Make these cake layers in advance and freeze them. It breaks the process up and makes it more approachable. You can also make the frosting ahead of time too or save any leftover frosting! It can be stored in an airtight container in the fridge for up to a month, or in the freezer for up to 3 months. Be sure to give it a good stir once it thaws to get the consistency nice and smooth again. Make this ganache drip recipe ahead of time or save leftovers! Once it’s made, wrap the bowl with plastic wrap or cover the top of the plastic bottle and store in the fridge for up to 3 weeks. To use chilled ganache, heat the bottle or bowl in the microwave for 10 second intervals until it reaches the right consistency. Use leftover ganache to top cupcakes, cookies, or even ice cream! A frosted cake can last in the fridge for up to a week, or in the freezer for up to a month. The buttercream locks in all the moisture, keeping the cake fresh and delicious! If you cut into the cake and have leftovers, use any remaining frosting to cover the cut section to keep it moist and store in the fridge for up to a week.Nutrition
Other Recipes You Might Like:
I cannot wait to make this!! I made one of your other cakes for the holidays. The red velvet oreo cake and i made it gluten free. It was amazing!!
So for this one, I need to make it gluten free as well. Do you think the measurement on flours will be the same?
On the last recipe of yours I made gluten free, I should have reduced the cooking time a little is all.
Any advice I’m welcome to!! Also, I am going to use the recipe to make 3 smaller cakes because my husband and 2 adult daughters all have birthdays in February!
Jill
So happy to hear you loved my red velvet oreo cake and that it turned out great GF!!
Swapping in your fav GF flour for the AP flour in this recipe should work too! As always I’d recommend also letting the batter rest for 30 minutes before baking, and giving the batter an extra minute of mixing once it’s made to help give the right structure. Other than that you should be good to go! I hope it turns out delicious 🙂 I’d love to hear how it goes! Happy baking!
Is your baking temperature and time using a convection oven?
Thanks!
Hi Lauren,
Great question! The temp and time listed are using a non-convection oven. Hope that helps, happy baking!
Can you use this recipe to make cupcakes, if so what adjustments would you recommend?
Hi Patty,
If you want to make cookie dough cupcakes, I highly recommend using my vanilla cupcake recipe as a base and adding in 1/3 cup of flour-dusted mini chocolate chips. One batch makes 12 moist, vanilla cupcakes, which can be filled with edible cookie dough. I’d recommend making 1/4 batch of the cookie dough recipe from this cake. Hope that helps, happy baking!
Can this be adapted to make cupcakes? If so what would you recommend?
hi…I’m making this cake this week but it seems super sweet. will your hybrid not too sweet buttercream frosting work for this recipe? if so does it need to be doubled.
Hi Terry,
Great question! This cake is quite sweet, so my hybrid buttercream would be a great alternative for this recipe 🙂 I would recommend making 1.5 batches to make sure you have enough. Hope that helps, happy baking!
@Chelsweets, another question about the hybrid buttercream. Can I add brown sugar in place of some of the powder sugar, as you do in the recipe above? Or would the hybrid frosting loose some stability with the sugar swap? Thank you!
Hi Becky,
I haven’t test brown sugar in my hybrid buttercream recipe before, but I think that should work! If you try it please let me know how it goes!
This cake was easy and delicious!
So happy to hear that Karissa! Thank you for sharing 🙂
Hello! I was curious if Swiss meringue buttercream would be good with this recipe to help reduce some of the sweetness?
Thank you!
Hi Corwin,
Great question! I think that would be a great way to cut the sweetness in this recipe and would be delicious 🙂 Happy baking!
This was truly one of the best cakes I’ve ever made. It was definitely time consuming but that’s what I love & made it so worth it. I high recommend making the pieces in batches over a couple of days! The edible cookie dough was my absolute fave part & think I need to have a stash in my house at all times. All my family was so impressed and love it!
Thank you so much Nicole 🙂 And I totally agree!! This comment made my day!!
Made this for my husband’s birthday last year and it was not only such a hit, moist and SO tasty but the directions are so easy to follow – I swapped the icing w the Chels vanilla buttercream I always use just because it’s my favorite and it was CHEFS KISS. I truly rely on Chelsea’s recipes at this point! They’re so reliable
I am so happy to hear that Jennifer 🙂 That sounds absolutely DELISH! Thank you for sharing!!
Hi,
Can I freeze the cookie dough layers?
Thank you,
Anastasia
This looks delicious! Do you think this would be stable enough to be made into a tiered cake?
It says in step 6 to make two cookie dough discs in each pan which made me think I had to make 4 discs. I was so confused lol. But I’m so excited to make this later today!
So sorry for the confusion Caitlin! Just updated the wording to make it more clear. I hope your cake still turned out amazing!!
Hello! I’m at the step to make the chocolate Gamache. I am confused as the recipe calls for 1/2 cup Heavy Cream and 1/3 cup Semi-sweet chocolate chips.
In the making of the Ganache you have it inverted to
” heat 1/3 cup heavy cream…then gently add 1/2 cup semi-sweet chocolate chips…”
Which is the correct amount of each ingredient to be used?
BTW, the cake itself us amazing! I had to cut off parts of it as it was a bit too tall. Buttercream is great and so is thar cookie dough! I never knew it could be made at home.
Thank you for the recipe. It’s for my daughter’s 37th birthday tomorrow.
I am so sorry for the delayed response and the confusion Katherine! My recipe cards have been having some glitches lately!!
It should be 1/3 cup of heavy cream and 1/3 cup semi sweet chocolate for the ganache. The good news is that the drip should still turn out even if you did the other ratios you just would want it to be either a bit warmer or a bit colder to have the consistency right for the drips. I hope your cake still turned out amazing!!
I am looking to make this as a 10 inch round cake. How would I need to adjust the recipe to accommodate the same thickness in cake layers, frosting, and cookie dough? Also, looking for cook time suggestions as well.
Hi Lauren,
So glad you’re planning to try this cake!! If you’re making it as a 10-inch round cake and want to keep the same thickness in your layers, I’d recommend increasing the recipe by about 1.5x. That should give you enough batter, frosting, and cookie dough to keep the proportions similar to the original 8-inch version.
For bake time, the larger layers might take a bit longer—usually around 35–40 minutes, but keep a close eye and check with a toothpick in the center. If it comes out with a few moist crumbs, you’re good to go!
Hope that helps, and happy baking! Let me know how it turns out!!
If wanting to use only chocolate chips for the cookie dough discs, would you use the same amount or use two cups of mini chocolate chips? Thanks!
Hi Kate,
Great question! If you’re using just chocolate chips for the cookie dough discs, I’d recommend using about 2 cups of mini chocolate chips — they mix in more evenly and help keep the discs easy to cut through. Regular-sized chips work too, but mini ones give you a smoother texture and more chocolate in every bite!! Hope you love it!
Hello, I’m wondering if this cake could be made large by doubling it. What would you recommend?
Hi Hannah,
It depends on how many people you need to feed! It is already a pretty indulgent, dense cake and feeds about 24 people as is. You can double the recipe and make 4, 10-inch cake layers, but that would be a massive cake!!
A fantastic cake overall if you’re looking for a showstopper! Personally I felt the sugar and butter content are over the top but I never fuss with a new recipe. I did make this as a 9 x 13 layered cake, baked 2 cakes, cut each into two layers after leveling and used 3 of the 4 layers, with two thin layers of cookie dough filling between the cake layers. After having made it for my son’s birthday, I did confirm my need to scale the sugar way back next time I make this based on mine and other attendees feedback. Thanks for the recipe – it was still very much enjoyed! (even if in small doses, lol) NOTE: I did have to bake the 9 x 13 cakes for about 55 minutes each.
Hi Stephanie,
Thank you so much for the thoughtful feedback, and I love how you adapted it into a 9×13 layered cake! That’s such a fun format, and using three layers with cookie dough filling sounds absolutely dreamy. Totally hear you on the sugar and butter, it’s definitely a rich one, meant to be indulgent, but scaling it back for your taste makes total sense (and I’m glad it was still a hit, even in small slices, haha!). Happy baking!
Hi! I will be attempting to make this beautiful cake for my son’s 3rd birthday. I only have 3 9 inch pans. Would adjustments of any would you suggest for that size pan? I can get 8 inch pans if I must but I would prefer not to spend the money if I don’t have to! Thank you so much for the advice and recipe!
Hi Tylara,
That sounds like such a sweet celebration, your son is lucky to have a homemade cake from you! The good news is that you can absolutely use your 9-inch pans without needing to buy new ones. Here’s what to adjust:
The original recipe is designed for three 8-inch pans, which hold slightly less batter than 9-inch pans. So when you use 9-inch pans, your layers will just turn out a bit thinner, which is totally fine and still delicious. To help compensate, you can either:
1) Stick with the original recipe and just reduce the bake time slightly—start checking the cakes about 3-5 minutes earlier than the recipe says, since thinner layers bake faster.
2) Make 1.25x the recipe if you want regular height 9-inch layers that are closer to the original 8-inch height. If you go this route, keep an eye on bake time as it may stay similar or increase slightly.
3) Or just make 2, 9-inch cake layers! They’ll be a tiny bit taller than the 8-inch layers, but that’s probably the easiest option!
Whatever option you choose, just be sure to grease and line those pans well for easy removal. Hope that helps, and that the cake turns out amazing!!! Happy baking!
I’m planning to make this and you mention I could halve the recipe – what would you recommend as the best way to then make the cake? Two thinner 8″ cakes with one layer of cookie dough?
Hi Jaclyn,
Great question! If you make 2, 8-inch cake layers, they’ll end up really thin. You can do this, but bake time will be quite a bit shorter.
I’d suggest baking it in two 6? pans (if you have that size) so they’re more similar in height to the original recipe (bake time will be a few minutes longer) Then you can stack them with one nice layer of cookie dough filling in the center. You’ll still get all the delicious flavors and textures, but in a smaller, more manageable cake.
Hope that helps, happy baking!!
Why is my
Cookie dough so brown? Darker than normal cookie dough.
@Ashley, I made sure to use light brown sugar
Hi Ashley,
That can happen for a couple different reasons! One big one is if the butter and sugar aren’t fully creamed together the dough can end up looking darker and a little denser. It can also come from using darker brown sugar (but I know you said you used light brown sugar), or sometimes even from the brand of vanilla. Do you feel like your butter and sugar were really light and fluffy before adding the rest of the ingredients? Was your dough a lot darker than the cookie dough in the pictures of this post? Hopefully we’ll be able to figure it out together!
I just made the cake and it’s stuck to the pan.?I don’t know why I followed the instructions.
Hi Michelle,
So sorry to hear that! The cake layers are stuck to the pan? Is it like the sides? Usually if you run a small offset spatula or butter knife around the sides of the pan, the cake layers will pop free. The bottom should release easily because the pan is lined with parchment paper, but sometimes the sides can get a little sticky even when they’re sprayed with nonstick spary, especially with certain types of pans. If it’s not that, let me know and we can keep troubleshooting!
Sounds delicious! Thoughts on using buttermilk vs sour cream?
Hi Krista,
Both work great, and it’s honestly a preference thing! I almost always use buttermilk in my cake recipes, but it does add a tang! Because this cake has so much else going on with it and I really wanted the cookie dough/brown sugar flavor to shine, I chose to use sour cream for a more neutral flavor. But it would taste great with buttermilk too!
Hi! Whats your thought process for using egg whites instead of whole eggs? Doesn’t just using the whites dry it out a bit?
Hi Claire,
Hi! Great question. In this cake, the egg whites are there to help keep the crumb a little lighter and softer. Since the cake uses the reverse creaming method, it naturally has a tighter, denser crumb than cakes made with the traditional creaming method. Using egg whites instead of whole eggs helps balance that out a bit and gives the layers a softer, more tender texture. Whole eggs would add more fat from the yolks, which can make the cake a bit richer and heavier. So while egg whites can dry out some cakes if there isn’t enough fat or moisture elsewhere in the recipe, in this one they’re really helping create the texture I was aiming for. Hope that helps, happy baking!!
I made my trial run of this cake for my son’s birthday today and it was delicious! However the brown sugar buttercream icing was grainy, is that because my brown sugar wasn’t literally freshly opened or is there advice you can give for troubleshooting that?
Hi Tara! I’m so glad the cake was delicious, but sorry the buttercream gave you trouble! It doesn’t have to be a literally brand-new bag of brown sugar, but it does need to be really soft and lump-free. If the brown sugar has dried out at all, those little crystals or hard bits can stay grainy in the frosting.
For this batch, you can try letting the frosting sit for 10-15 minutes, then mix it again on low/medium-low speed for a few minutes. You can also add a tiny splash of heavy cream to help smooth it out. That said, if the graininess is from hardened brown sugar bits, they may not fully dissolve once they’re already in the buttercream.
For the actual birthday cake, I’d use a fresh, soft bag of light brown sugar, break up any lumps before adding it, and beat it really well with the butter before adding the powdered sugar. Letting the butter/brown sugar mixture sit for a few minutes before moving on also helps the sugar soften into the butter. Hope that helps, and happy birthday to your son! 🙂
I made this cake yesterday. I worried that it may be too sweet but I have never been disappointed with any of your recipes so decided to go for it. Oh my goodness! If you like cookie dough this is your cake! The cake is so moist and amazing. I did not have sour cream so I used whole Greek yogurt. So so good. I had extra frosting and cookie dough but gonna save that for the next one I make. Huge hit in my household! Thank you for providing consistent, solid recipes!
Hi Stephanie,
So happy to hear you loved this cake 🙂 Thank you so much for sharing!!