
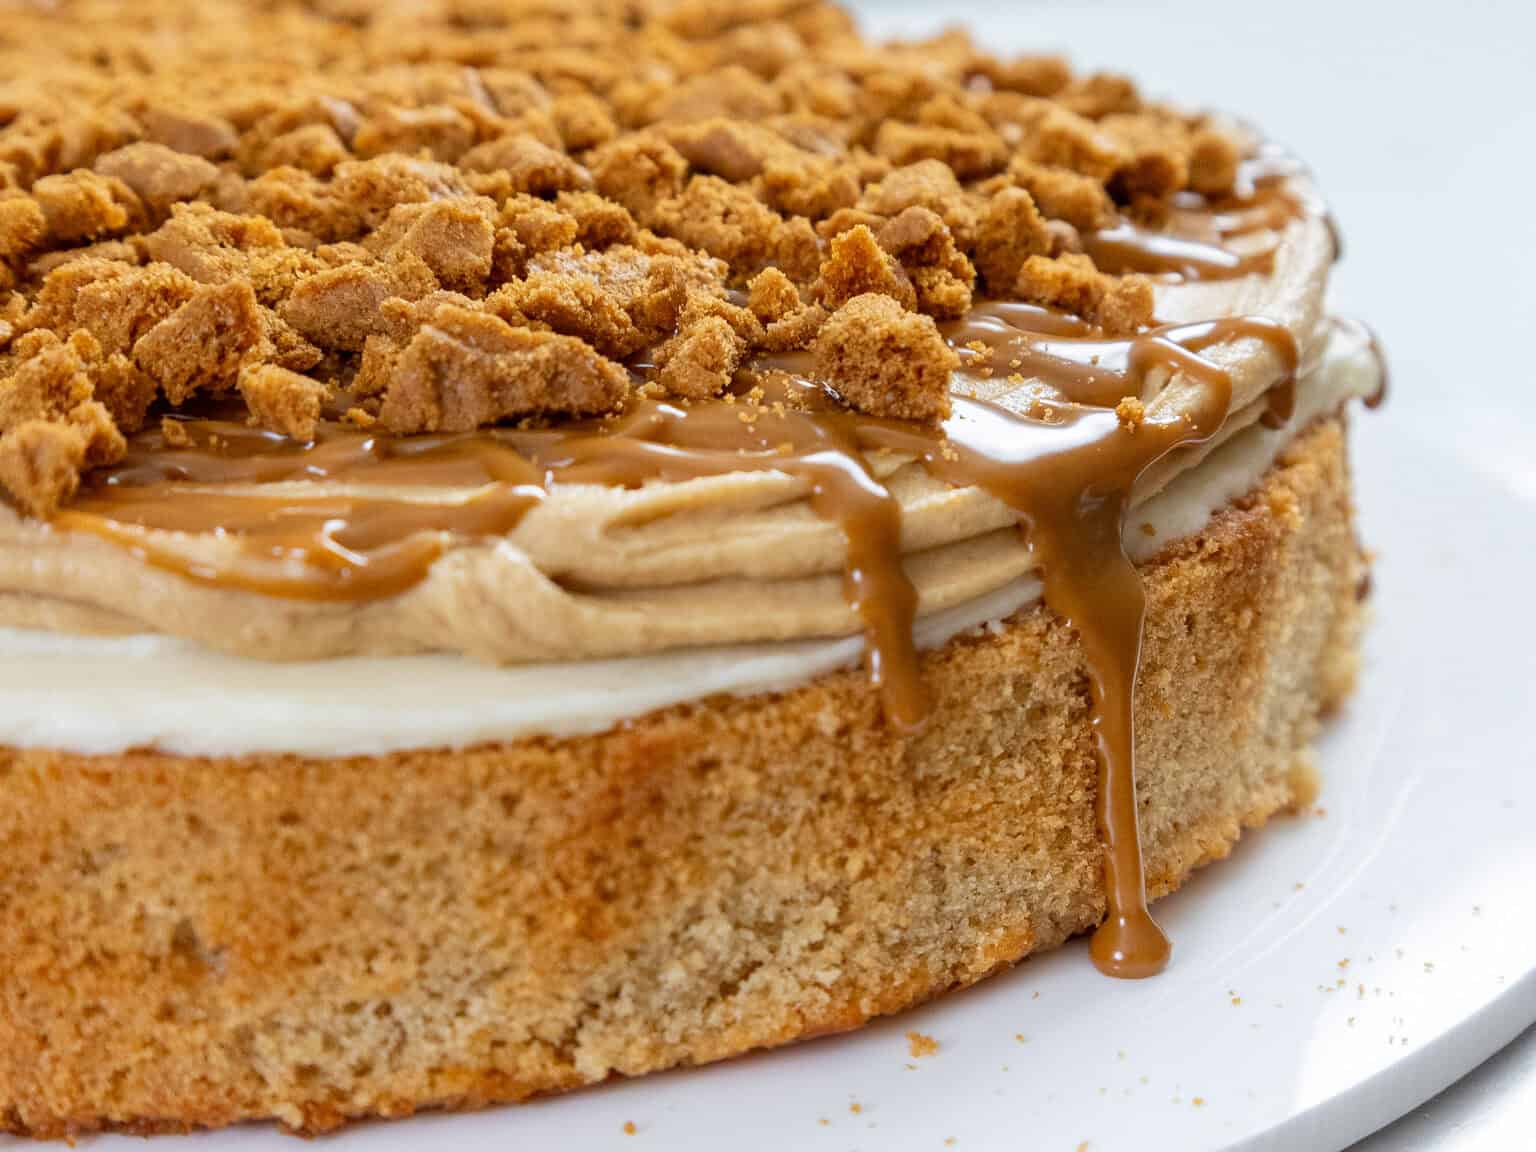
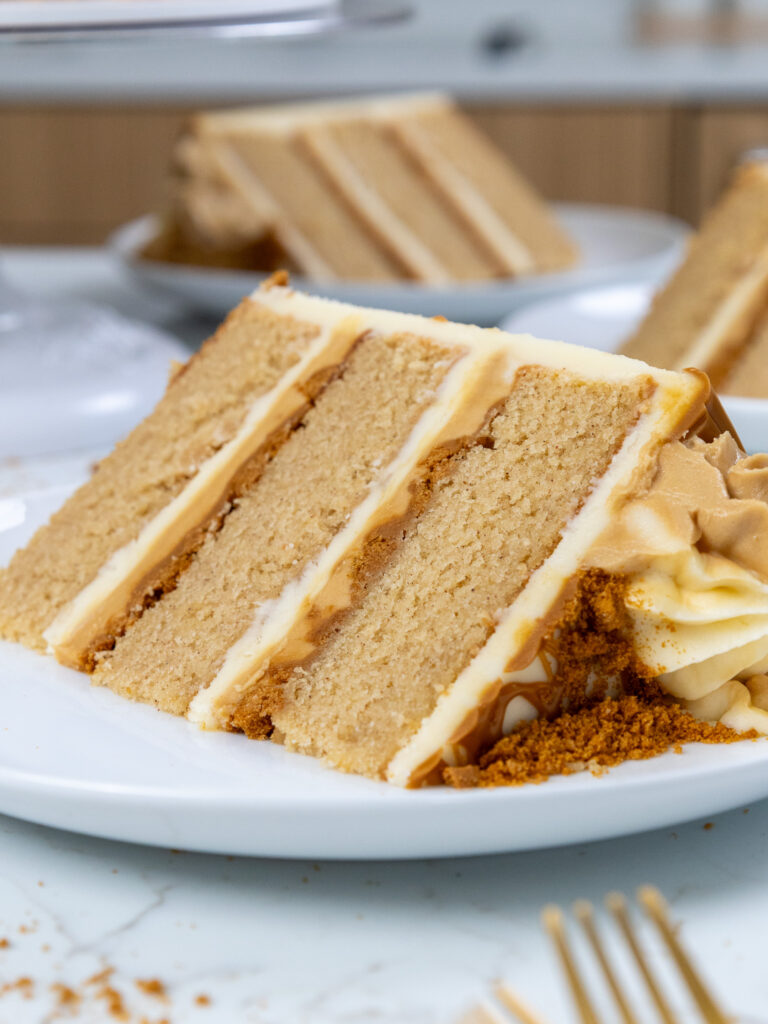
Biscoff Cake
This biscoff cookie butter cake is inspired by the iconic Biscoff cookie and is packed with delicious brown sugar and cinnamon flavor.

Staying true to the ingredients used in Biscoff cookies, the main flavors in this cake are dark brown sugar and cinnamon.
Packing This Cookie Butter Cake with Biscoff Flavor
When I say that this cake is packed with Biscoff flavor, I mean it!
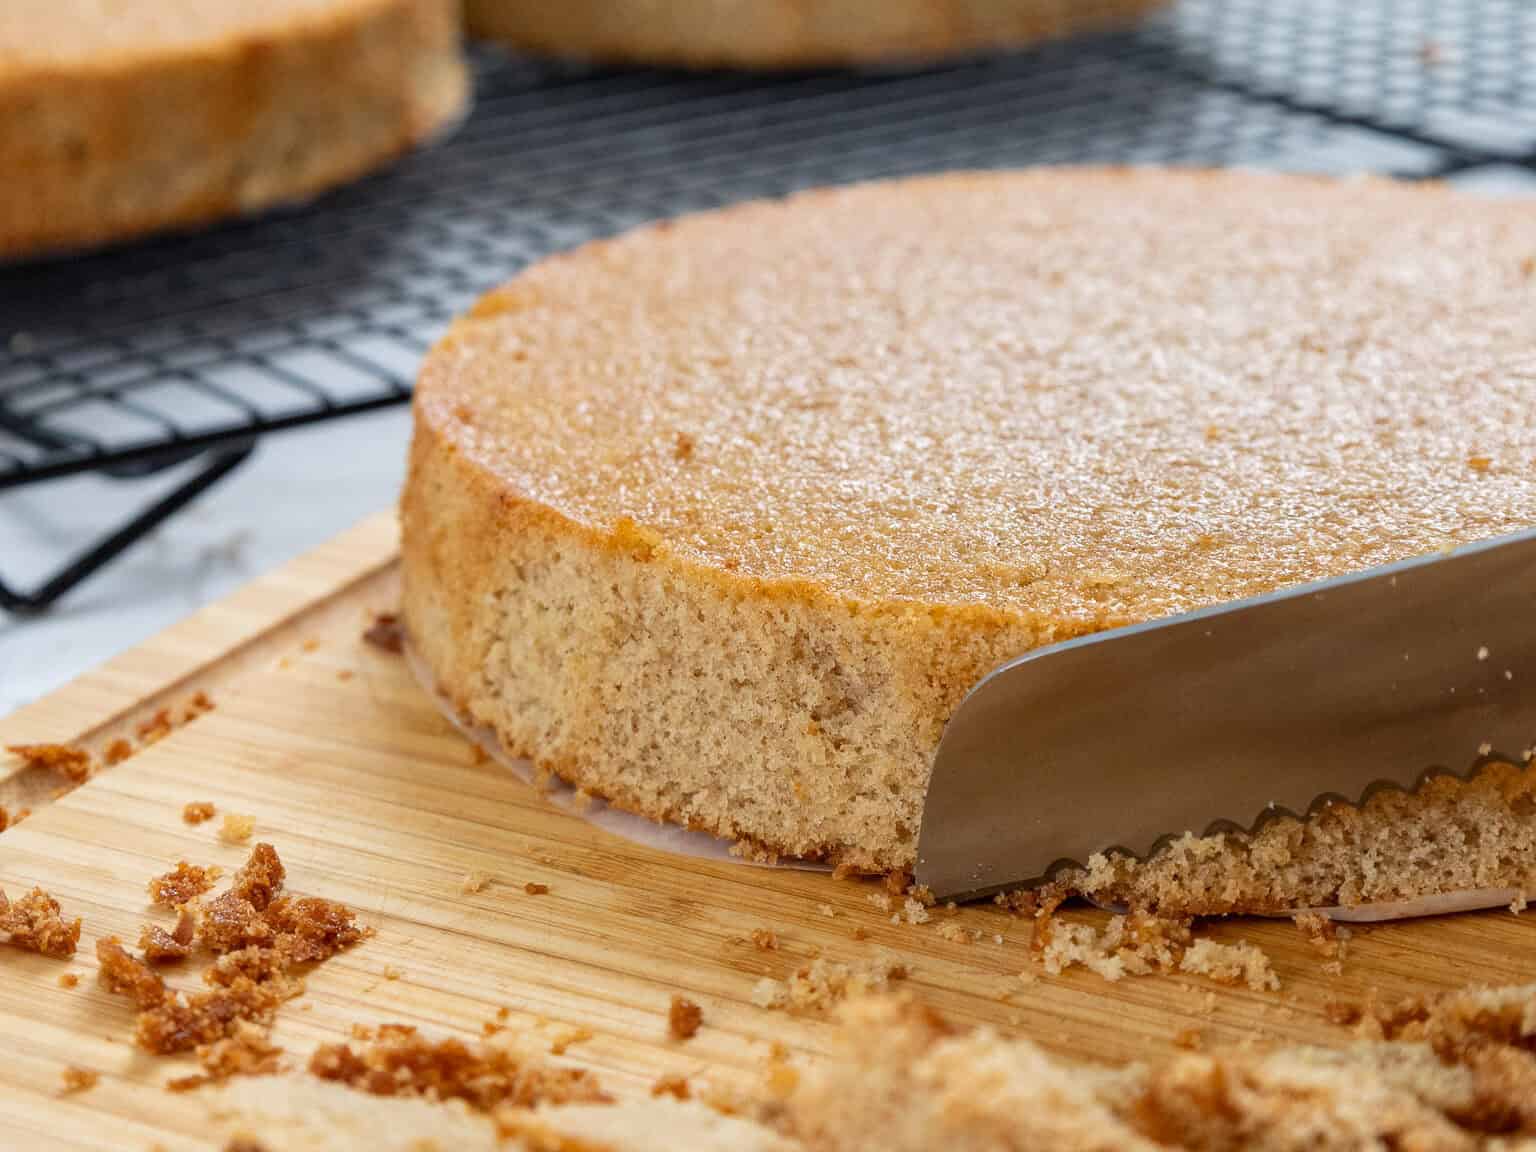
These cake layers are made with dark brown sugar and ground cinnamon, which makes them incredibly tender and delicious.
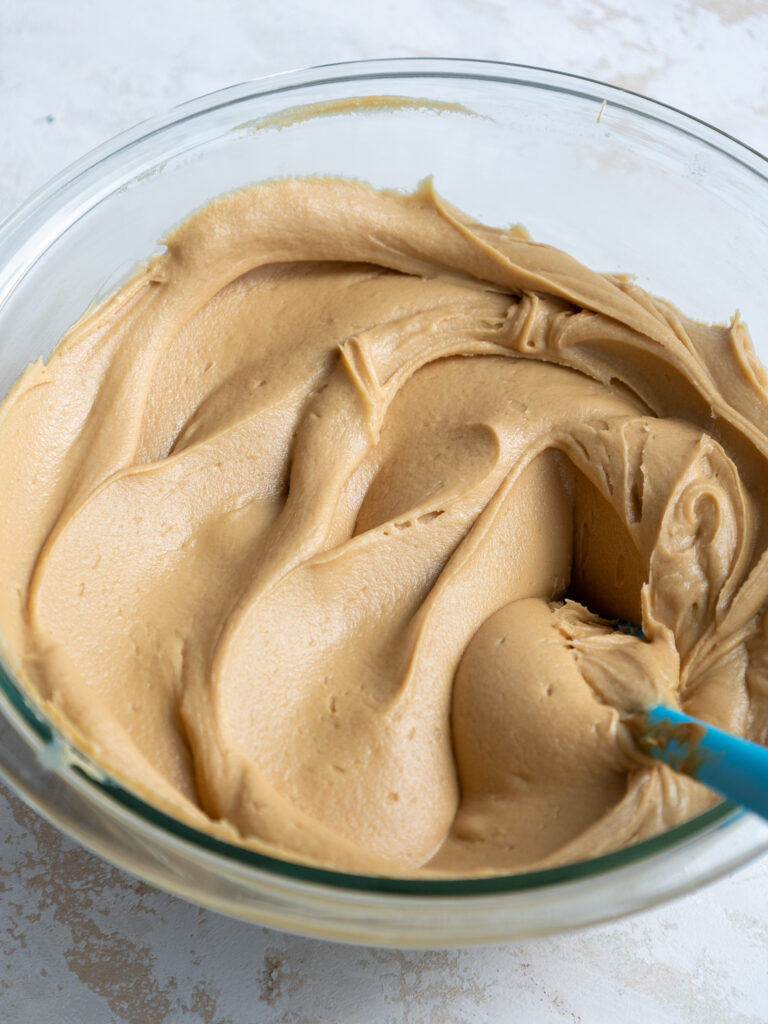
But I didn’t stop there. I also fill the cake with cookie butter frosting.
The best part about it is that the frosting is literally 2/3 frosting, 1/3 cookie butter. It’s decadent, creamy, and absolutely delicious!!
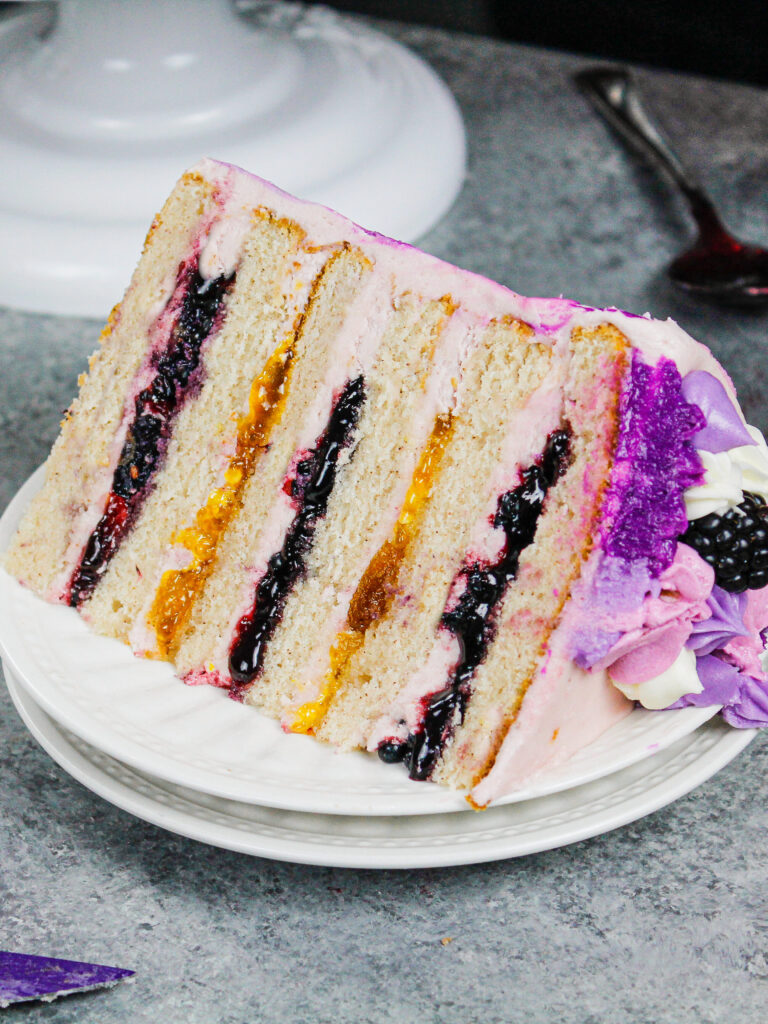
The finishing touch is a cookie butter drizzle between each cake layer. It really adds an extra pop of flavor to each bite!!
You can also sprinkle some crushed Biscoff cookies between the layers for texture.
Substitutions and Swaps – Biscoff Cake Layers
This cake recipe uses quite a few ingredients, and I know you might not have them all on hand. Or if you have food allergies or restrictions, I’ve got you covered.
Below are some swaps and substitutions that can be made in this recipe.
- All-Purpose Flour – This recipe turns out best with AP flour, but you can use a gluten-free flour blend if needed.
- Brown Sugar – You can use light or dark brown sugar, but I think dark brown sugar in this recipe tastes best!
- Egg Whites – I use egg whites out of a carton to make life easier, but you can also use 4 large eggs in place of the egg whites. If you have an egg allergy, you can try using 4 flaxseed eggs or 1 cup of unsweetened applesauce + 1 extra Tbsp baking powder
- Unsalted Butter – If you only have salted butter on hand, you can use it in place of the unsalted butter. Just be sure to omit the salt the recipe calls for. You can also use vegan butter in its place!
- Buttermilk – You can also use full-fat yogurt, sour cream, whole milk, or an alternative yogurt or milk (almond, soy, oat) if you’re dairy-free.
Substitutions and Swaps – Cookie Butter Frosting
- Unsalted Butter – If you only have salted butter on hand, you can use it in place of the unsalted butter. You can also use vegan butter in its place!
- Heavy Cream – Whole milk or alternative milk (soy, almond, oat) will work fine in this frosting recipe if that’s what you have on hand.
- Cookie Butter – There are tons of brands of cookie butter out there, and any of them will work in this recipe!
How Much Cake Batter Does This Recipe Make?
One batch of this cookie butter cake recipe makes about 10 cups of batter. While I usually make 7- or 8-inch cake layers, you can use this recipe to make lots of different-sized cake layers.
This amount of cake batter can be used to make the following-sized cake layers:
- Two 10-inch cake layers: bake for 2-3 minutes longer than instructed, with heating cores if possible
- Two 9-inch cake layers: bake for 3-5 minutes longer than instructed, with heating cores if possible
- Three 8-inch cake layers: bake as instructed
- Four 7-inch cake layers: bake as instructed
- Four 6-inch cake layers: bake for 3-5 minutes longer than instructed
- One quarter sheet cake (9 × 13-inch): bake at 325°F for 40-50 minutes with 2 heating cores if possible to help the cake bake more evenly and quickly.
I usually make this cake with three 8-inch cake layers like the video in this post, but below is a photo of a 7-inch layer cake I made with this recipe a while back.
Making This Biscoff Cake in Advance and Storage Tips
I highly recommend making these cake layers in advance and freezing them. It breaks the process up and makes it more approachable.
You can also make the frosting ahead of time or save any leftover frosting! It can be stored in an airtight container in the fridge for up to a month or in the freezer for up to 3 months. Be sure to give it a good stir once it thaws to get the consistency nice and smooth again.
A frosted cake can last in the fridge for up to a week or in the freezer for up to a month. The ganache locks in all the moisture, keeping the cake fresh and delicious!
If you cut into the cake and have leftovers, use any remaining frosting to cover the cut section to keep it moist and store it in the fridge for up to a week.
Tips for Making the Best Biscoff Layer Cake
- Properly measure your flour. Either spoon it into the cup measure, then level with a knife, or use a kitchen scale.
- Make sure your ingredients are at room temperature to help them mix together better.
- Don’t level your cake layers until they are completely cooled.
- Add chopped-up bits of Biscoff cookies between the layers for some texture!
- Heat your cookie butter in the microwave for 20 seconds to make it easier to drizzle.
- Make this cookie butter cake vegan or dairy-free! Use your favorite type of dairy-free milk to replace the buttermilk and heavy cream, vegan butter sticks in place of the butter, and flaxseed eggs.
- Use this recipe if you want to make Biscoff cookie butter cupcakes!
Let Me Know What You Think
If you try this biscoff cake recipe, please leave a rating and comment below.
And don’t forget to tag me @chelsweets and use #chelsweets if you share on social media so that I can see your amazing creations!
Biscoff Cake
Equipment
Ingredients
Biscoff Cake Layers
- 3 cups all-purpose flour 375g
- 1 cup granulated sugar 200g
- 2 cups packed dark or light brown sugar 400g
- 2 1/2 tsp baking powder 10g
- 2 tsp ground cinnamon 5g
- 1 tsp fine salt 6g
- 1 cup (2 sticks) unsalted butter, room temperature 226g
- 1 cup carton egg whites or 7 large egg whites, room temperature 240g
- 1 1/2 cups buttermilk, room temperature 360g
- 2 Tbsp vegetable or canola oil 28g
- 2 tsp vanilla extract or vanilla bean paste 8g
Vanilla Buttercream Frosting
- 3 cups (6 sticks) unsalted butter, room temperature 678g
- 1 Tbsp vanilla extract or vanilla bean paste 12g
- 1 1/2 tsp fine salt 9g
- 10 cups powdered sugar 1250g
- 1/2 cup heavy whipping cream, room temperature 120g
Cookie Butter Buttercream Frosting Add-Ins
- 1 cup cookie butter 390g
- 1/4 cup heavy whipping cream, room temperature 60g
Additional Decorations and Filling:
- 12 Biscoff cookies cut into small pieces
- 1 cup cookie butter 390g
Instructions
Biscoff Cake Layers:
- Preheat oven to 350°F/175°C. Line four 7-inch or three 8-inch cake pans with parchment rounds and grease with non-stick baking spray. Set aside.
- Mix together 3 cups all-purpose flour, 1 cup granulated sugar, 2 cups brown sugar, 2 1/2 tsp baking powder, 2 tsp cinnamon, and 1 tsp salt with a stand mixer (with a paddle or whisk attachment) or hand mixer until fully combined.
- Mix 1 cup of unsalted butter into the dry ingredients on a low speed. Continue to mix until no large chunks of butter remain, and the mixture looks crumbly.
- Pour in 1 cup of egg whites and mix on low until incorporated.
- Next, mix in 1 1/2 cups buttermilk, 2 Tbsp of vegetable oil, and 2 tsp of vanilla extract and mix on a low speed until fully incorporated. Scrape down the sides of the bowl with a rubber spatula, then beat on a medium speed for 30 seconds to make sure everything is properly mixed together.
- Divide the batter evenly between the prepared pans. I like to use a digital scale to make sure each pan has the same amount of batter so that each cake layer is the same height.
- Bake for 33-35 minutes or until a toothpick comes out with a few moist crumbs. Rotate the pans halfway through to help them bake evenly.
- Let the pans cool for 10 minutes, then run a small offset spatula around the perimeter of the pan to separate the cake from the pan.
- Place cake layers into the freezer for 30 minutes to accelerate the cooling process. Once the layers are cooled, carefully flip the pans and remove the layers.
- Use a serrated knife to level the tops right before you plan to assemble your cake, or you can wrap and freeze them if you're making them in advance.
- If you make these cake layers in advance and freeze them, let them thaw for about 20 minutes before making your cake. The cake layers should still be slightly cold to the touch, which will make it easier to assemble your cake.
Vanilla Buttercream Frosting:
- While the cake layers bake and cool make the buttercream frosting.
- Beat 3 cups of unsalted butter on a medium speed for 30 seconds with a paddle attachment, until smooth.
- Mix in 1 Tbsp of vanilla extract and 1 1/2 tsp salt on a low speed.
- Slowly add in 10 cups of powdered sugar, 1 cup at a time. Add 1/2 cup of cream halfway through to make the frosting easier to mix.
- Continue to mix on low speed for a few minutes, until the desired consistency is reached.
- If the frosting seems too thick, add in additional cream (1 Tbsp at a time). If the frosting is too thin, add more powdered sugar (a quarter of a cup at a time).
- Scoop 2 cups of the vanilla frosting into a separate bowl to make the cookie butter frosting. Set aside.
- Cover the remaining vanilla frosting with plastic wrap to prevent it from crusting, then set aside.
Cookie Butter Frosting:
- Mix 1 cup of cookie butter and 1/4 cup of heavy cream into the reserved 2 cups of buttercream. Stir with a rubber spatula until the cookie butter is fully incorporated and the frosting is smooth.
- Cover with plastic wrap and set aside.
Assembling This Biscoff Cake:
- Build this cake on a greaseproof cake board or flat plate. Use a dab of frosting to help stick the first cake layer to the board.
- Add an even layer of vanilla frosting on top of the cake layer, then chill the cake in the freezer for 5 minutes.
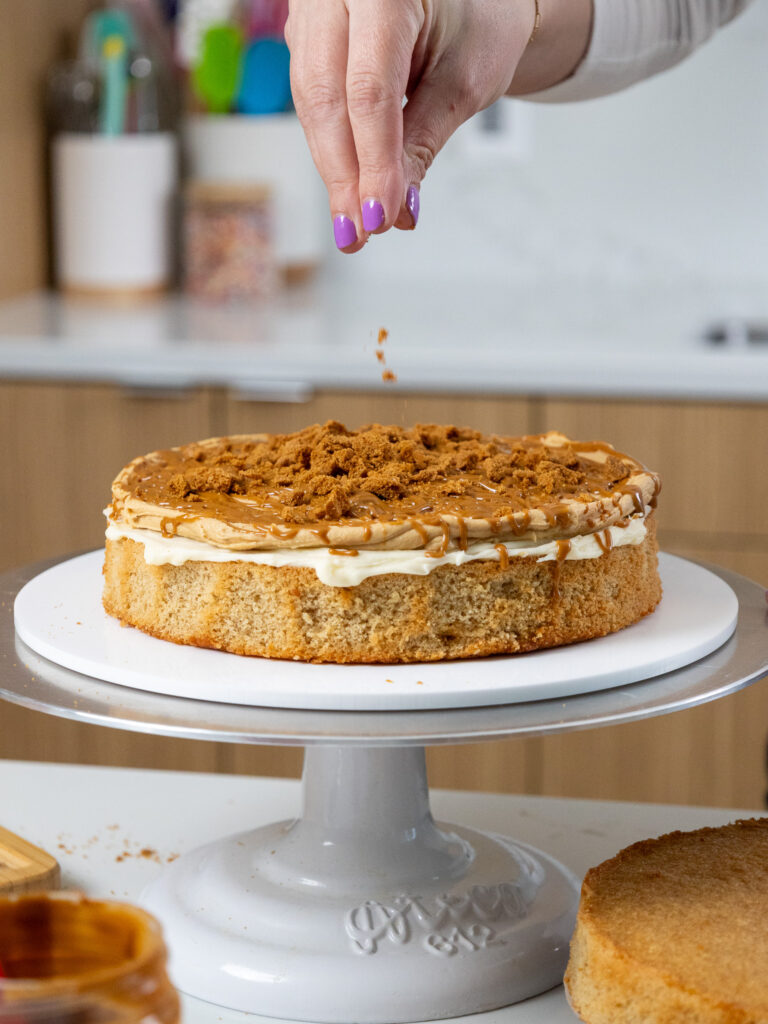
- Spread a second layer of cookie butter frosting on top of the vanilla frosting. Drizzle 1/4 cup of warm cookie butter on top of the cookie butter frosting. Repeat with the remaining layers until all are stacked.
- Spread a thin coat of frosting around the cake to fully cover the cake layers to help lock in any crumbs.
- Smooth using a bench scraper, then chill the cake in the fridge (20 minutes) or freezer (5 minutes) until the frosting is firm to the touch.
- Add a second, thicker layer of vanilla frosting around the cake and smooth using a bench scraper.
- Carefully press the chopped-up Biscoff cookies around the cake. Press larger chunks of cookies around the base and smaller bits higher up to create a cookie gradient.
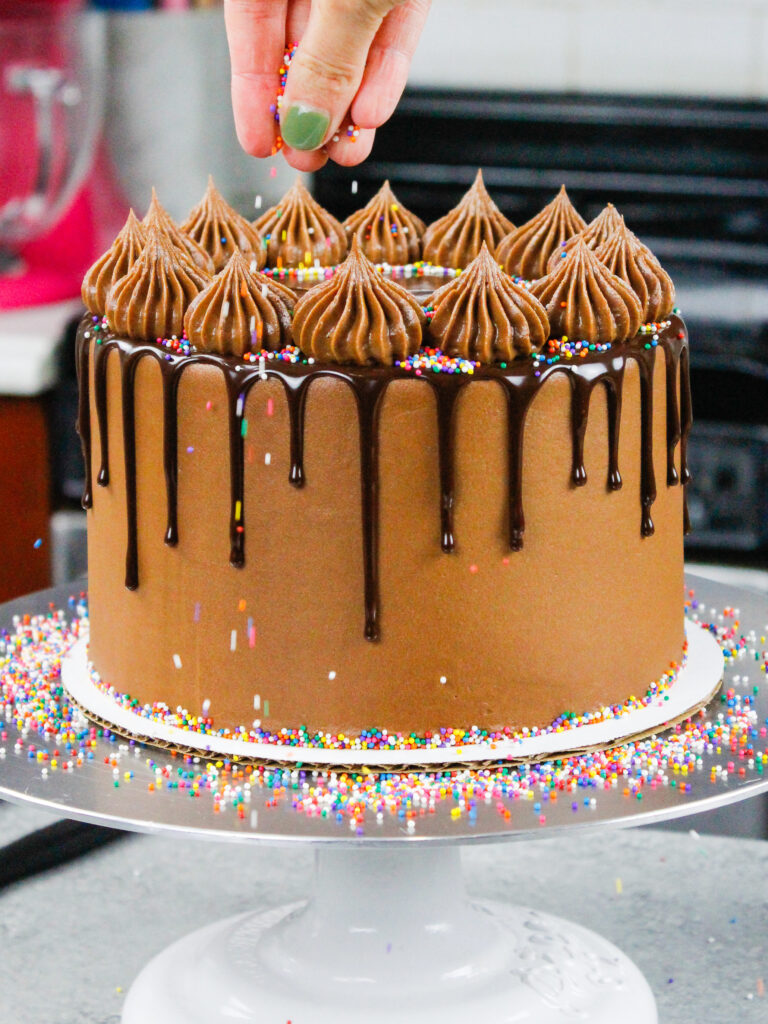
- Pipe a border around the top of the cake with the remaining frosting using your favorite piping tip. Top with a final drizzle of warm cookie butter and enjoy!
Video
Notes
Making this Biscoff Layer Cake in Different Sizes
One batch of batter is about 1800g or 10 cups, so I add roughly 450g to each of my cake pans when using 4, 8-inch cake pans. You can also use one batch of batter to make 2, 9-inch cake layers or 4, 6-inch cake layers. Bake time will be a few minutes longer at 350°F /175°C. If you want to make a tiered cake with this recipe, check out my cake batter calculator to see how many batches of batter you’ll need. If you want to make biscoff cupcakes, I recommend using my biscoff cupcake recipe.My Tips for Making the Best Biscoff Cake
- Ingredients at room temperature mix together better! Set out any cold ingredients ahead of time.
- Properly measure your flour (spoon into the cup measure, then level). Or better yet, use a kitchen scale to measure your dry ingredients.
- Use a kitchen scale to weigh your cake pans as you fill them. It helps the cake layers bake to the same height and bake more evenly.
- Bang your cake pans on the counter before putting them in the oven. This brings any air bubbles that are trapped in the batter to the surface.
- Level your room temperature or thawed cake layers with a serrated knife to make them easier to stack.
- Chill the cake layers in the freezer for about 20 minutes before assembling the cake. It makes them so much easier to frost.
- Add chopped-up bits of Biscoff cookies between the layers for some texture!
- Heat your cookie butter in the microwave for 20 seconds to make it easier to drizzle.
- Make this cookie butter cake vegan or dairy-free! Use your favorite type of dairy-free milk to replace the buttermilk and heavy cream, vegan butter sticks in place of the butter, and flaxseed eggs.
Making This Biscoff Cake in Advance & Storage Tips
I highly recommend making your cake layers in advance and freezing them. It breaks the process up and makes it more approachable. You can also make your frosting ahead of time too or save any leftover frosting! It can be stored in an airtight container in the fridge for up to a month or in the freezer for up to 3 months. Be sure to give it a good stir once it thaws to get the consistency nice and smooth again. A frosted cake can last in the fridge for up to a week or in the freezer for up to a month. The buttercream locks in all the moisture, keeping the cake fresh and delicious! If you freeze the cake, transfer it to the fridge the night before you plan to eat it. This will help it gradually thaw and minimize any temperature shock. Remove the cake from the fridge about 30 minutes before you plan to cut into it. If you cut into the cake and have leftovers, use any remaining frosting to cover the cut section to keep it moist and store it in the fridge for up to a week.Nutrition
Other Recipes You Might Like:
This looks amazing!
Thanks!!! It seriously tasted so good!!
Omg this looks sooo delicious!! I love Biscoff cookies too! Can’t wait to try it!
Just wondering if a regular sized kitchen aid mixer can take 16 cups of powdered sugar in one go or do you have to make the frosting in two batches??
I’d recommend making it in 2 batches if you have a standard sized kitchen aid!!
Where’s the recipe for the cookie butter?
most people buy cookie butter! You can get it at Trader Joe’s, or most grocery stores near the the peanut butter and nutella!
Since I’m from Germany i can’t buy it any cookie butter.. is there anywhere the receipt for the cookie butter ?
We do have the Bischoff cookies!
Love your beautiful cakes they look awesome ?
oh no! here’s a link for a recipe to make your own cookie butter, it should taste just like the cookie butter we buy! https://www.seriouseats.com/recipes/2017/10/homemade-cookie-butter-recipe.html
Trying to make this one this weekend!! Can’t wait 🙂
yay! It’s so worth it!! happy baking 🙂
Just made this cake…. do the edges on this cake 10 to carmelize a bit more?
Generally yes, since it has to bake longer! But you can always trim them with a serrated knife!!
You said four 7 inch pans or if you use 8 inch, how many? Thank you!
I usually make 4 layers with 8 inch pans as well!
Or could you use 3 9 inch?
You can, but they’ll be thinner layers!
Awesome! Thank you for responding!!??
Hi: In your “Additional Decorations” instructions, you reference “16 cups powdered sugar” in addition to the 16 cups of powdered sugar identified in the Buttercream Frosting ingredient list … how are we supposed to use the 2nd 16 cups of powdered sugar? Thanks!
whoops! Just updated that!! you don’t need any additional powdered sugar besides what’s in the frosting
So happy I could “help” with the recipe
… your cake tutorials, videos and observations are incredibly creative and fun! From a grateful Chelsweets fan!
Absolutely marvelous… only rave reviews from my usually sweet-avoidant friends and family!
I used 4 Round Wilton Performance 8 inch cake pans and mixed up the frosting as directed but in two batches (my standard KitchenAid
stand mixer would only accommodate 4 sticks
of butter and 8 cups of powdered sugar at a time) then followed the written instructions.
But I figured out that the top layer does not receive two coats of frosting and a cookie butter drizzle below the crumb coat… the top layer gets just the crumb coat, then the finishing white frosting, and eventually the decorations and drizzle of cookie butter.
This beautiful cake must feed about 20 people… I had some very hungry folks here, and there was plenty left over.
Thank you, Chelsweets, for the fabulous recipe and great project!
So great to hear that! Yes, this cake definitely feeds quite a few people!! Happy your friends and family enjoyed it 🙂
Happy to post happy feedback! Let me know if you are interested in photos amd if so where to send them ???
How big of a bench scraper do you use on your standard 4 layer cakes? How do you freeze your layers for future cakes and how far ahead can you decorate and freeze a cake? Sorry for all the questions, especially if you’ve answered them somewhere already.
I use a 6 inch bench scraper! I make my cake layers a few days in advance, and either wrap them in plastic wrap to keep them fresh, or place them in an airtight container once they’re fully cooled. They can be stored like this for up to a week!
I was going to try to make these into cupcakes. Can I change your vanilla recipe into the brown sugar cake recipe you made?
Do you mean my vanilla cupcake recipe? I’ve never tried it! I think they might be slightly more dense, but I think it’d taste great!
I’m making this for my brother’s girlfriend’s birthday and she is an amazing baker (I am nervous!). Can I make the frosting and decorate 24 hours in advance or will the cookies get soggy? Thanks!
definitely!!! The cookies will be less crunchy, but the cake will still taste great!! I almost always make my cakes in advance 🙂 Best of luck, and happy baking!!
I’m not a big fan of American buttercream. Would this recipe work well with Italian meringue buttercream?
Yah, it should be fine with italian meriqune bc!
I just made this cake last week and it was SO GOOD. Thanks for all the cake inspiration! Keep it comin’, you’re our favorite!
I’m so happy to hear that!! thank you for sharing Katherine 🙂
Hi Chelsea,
I’ve never heard of Biscoff cookies before, I’m from Ontario Canada. I looked them up and is the shortbread style the only cookie they carry? Is that what you used?
yup! it’s a crunchy cookie 🙂
Thanks Chelsea!
Has anyone ever made a cake using half the ingredients? I really want to make this cake but don’t need that big of a cake.
Yes, if you half the recipe it should work just fine!
This looks amazing! Just a question. Where it reads: “Add another layer of cookie BUTTER on top of this, and spread evenly on top of the vanilla buttercream” – should it say “Add another layer of cookie BUTTERCREAM…”?
yup! good catch! just updated 🙂
I think this is my favorite cake of all time!!! When I took my first bite I could hardly believe how WONDERFUL it was!!! Moist,spicy, and the cookie butter filling and vanilla icing along with the cake OMG!!! my family loved it as well. I’ve made it 3 times already? love you and your recipes and tutorials??? Thank you!!
This looks so good. Any chance that you have weight measurements? Thanks.
Sadly I don’t, so sorry!
Thank you for this awesome recipe! I have been wanting to try a cookie butter cake since I saw someone make one on Cake Wars (lol). Gave this recipe a try yesterday. Its delicious!! The cookie butter buttercream is amazing! (We are using the left over as a dip for the cookies! ) The cake is just beautiful and even prettier when cut! I will definitely be making this recipe again.
aw so happy to hear that!!! and thank you 🙂
Great post , thank you
Any alternative to buttermilk
Where I come from it’s hard to find buttermilk
You can use whole milk in it’s place!
Chelsea and Chandi: I “make my own” buttermilk for all Chelsweets’s amazing cakes: Put 1 T. white vinegar in a 1 c. measuring cup, add milk (whole is best, or skimmed milk with a bit of heavy cream) and microwave on high for 30 seconds … let it stand in the microwave for a few minutes until it “curdles”, then stir it up and Voila! “Buttermilk”! Hope this helps.
yes, thank you for sharing Nicola 🙂
This looks amazing! I would like to try it for my daughters birthday but will be using fondant. Will this cake hold up to fondant? Thanks!!
it should, they layers are pretty sturdy!
Thanks so much! I cant wait to try it!
Can I make this cake and freeze it for a week and then frost it? I am making it for my friend’s birthday next week, but we are leaving for vacation in a day. I won’t have time to actually make everything before her birthday, so I wanted to cut down on time by making it ahead of time.
yup! you can freeze the cake layers for up to a week! Just be sure to wrap them in saran wrap or place them in an airtight container!
I would love to make this into cupcakes. Can you recommend any adaptations required. I’m looking to make 24! Thank you x
I’d either half or third the recipe. Other than that you should be good to go!
Can we save this on Pintrest?
of course! You can use the link to create a pin 🙂
My boss made this cake and brought it into work! It was absolutely delicious! Thank you for your baking creativity!
aw I’m so happy to hear that!!! that’s wonderful to hear 🙂
How far in advance can I make this entire cake, frosting and all? If I put in in an airtight container and in the refrigerator, will it last a few days, or what is your storage suggestion? Will it still be good? I know the cookies may get soggy, I may leave those off the sides. Thank you.
I make cakes several days in advance all the time!! once they’re frosted I just leave them in my fridge! I don’t cover them, but I also don’t really keep any other food in my fridge other than butter and baking ingredients (we don’t cook!).
i have been looking forward to making this! I went to buy the 7 inch pans, but our Michaels did not carry…so i bought the 8 inch. After making the batter, there was barely enough to fill 3 pans, no way to make 4. The three cakes were very flat..about 1-maybe 1.5 inches! I remade the batter, but only used 2 of the 8 inch pans! Cakes were not that much taller, but better. I haven’t completed the cake yet, that will be tomorrow, but was a bit disappointed.
I order my 7 inch pans online from amazon! But I frequently use this amount of batter to make 3 or 4 (thin) layers in 8 inch pans! I usually use 8 inch pans when I am filling a cake though, so it still has a decent height. If you want super thick layers, I’d recommend using 7 inch pans, or even 6 inch depending on what you’re after.
I was writing down the cookie butter cake batter and got through the whole recipe and saw there was no cookie butter in this batter, so where does the cookie butter come into this cookie butter cake batter recipe come in? I don`t want it just in the frosting
The batter doesn’t use actually cookie butter, but incorporates the flavors of it (brown sugar and cinnamon). This allows it to taste like cookie butter, without throwing off the consistency of the cake layers.
Omg….I cannot wait to make this for my son’s 16th birthday next week! I have looked into tons of different cakes and could not believe I found this. He LOVES, LOVES, LOVES Biscoff cookies! I do have a question. Have you ever tried to make.a Cookie Butter ganache? My son has always wanted a drip cake. I wonder if I replace some heavy cream with the speculous, would I get a pourable icing that would firm up? Hmmmm. Let me know what you think!
I have not, just because cookie butter always seems kind of oily!! I am not sure it would work, which is why I’ve never tested it out! I’m not saying it won’t, I just have no idea. If you do try it, please let me know how it goes! I’d love to know 🙂
I might try that as an experiment!
Another question please! My family does not really like sweet American buttercream and I found a really fast and easy way to make SMBC where you add the sugar-egg mixture to whipped butter. Light and fluffy and not too sweet. Frosts great. You said IMBC would work with cookie butter. I am making cake tonight for my son’s birthday tomorrow on the 15th of April. Have you heard if Swiss Meringue will definitely work if adding cookie butter? Thanks so much Chelsea! Big fan…Love your website!
Hi Chelsea!
UPDATE: 3/4-1 cup of the cookie butter (CB) incorporated into my Easy Swiss Buttercream perfectly. I don’t make meringue.Just melt sugar into All-Whites carton eggs and add to whipped butter…viola!
Second, I did not need to try and make a CB ganache for drips. I took a chance and heated the CB to a slightly more liquid state than the CB you put into layers. After doing a final cool-down of the layered cake in the fridge, the CB poured beautifully down into drips on the side of cake, but didn’t run too fast because the cooled cake firmed it up. This cake was literally the best cake I have ever made! Everyone loved it and eaten pretty quickly…..and it was a BIG cake.
I never would have attempted all of this without your wonderful baking skills to give me confidence. Thank you!
For time an convenience, I was going to buy the vanilla buttercream (don’t judge!). How much does vanilla buttercream does your recipe yield so that I can combine properly? Thanks!
no judgement here! Baking takes forever, so I totally understand. it can vary based on how much air you whip into it, but I’d say you’ll need about 12 cups of frosting
Hello! I have a quick question about the texture of the cake, is it spongy due to the egg whites or is it a more dense cake? Thank you!
It’s definitely more on the dense side! It’s not a sponge cake, it’s a butter cake 🙂
Do you have a printable version of this recipe?
Hi Lisa,
same response for this one :/ I started using those recipe cards this year, and sadly I haven’t converted all my old recipes yet. So sorry!!
Aaa I really want to make this cake!! Looks sooo nice, however I’m from Europe so I don’t have cup measurements 🙁 is there any other similar recipe on your site where you have added gram measurements?
Hi Bea,
Sadly this recipe doesn’t have gram measurements, but all of my recent cake recipes do! I’m working to add them to my older recipes, but sadly I haven’t gotten to this one. I really love my red velvet cake recipe, which does have grams: https://chelsweets.com/2019/11/04/red-velvet-layer-cake/
My oreo cake is also super tasty: https://chelsweets.com/2019/07/22/oreo-drip-cake/
Hope that helps! <3
Hi. If I done this in 6 inch pans (4 layers) – do you have any advice on how long they would take to cook? Thank you
Also – is there any chance you could add metric measurements to this like in some of your more recent recipes? I love you recipes, they always come out perfect for me. Thank you
Hi Louise,
This recipe would bake for 30-33 minutes if used to make 4, 6-inch cake layers. Hope that helps, happy baking!
Can you make the batter and then refrigerate for a few hours/or set to one side before you bake or should I put it straight in the oven?
Would I half the recipe if making a 3 layer 6 in cake?
Or would I half the recipe if I was making only 2 8 in layers and torting them?
Hi. heavy cream is diary or non-diary whipping cream?
Hi
Would it taste the same if I used the 4 whole eggs instead of whites, like you mentioned in the notes? Or does it affect the taste/ texture?
If I want to make (about) 3 6″ layered cake, can I half this recipe?
I just finished this cake for a friend, of course I had to indulge in the scraps… And OMG, it is just like what you would imagine a soft biscoff cookie would taste like. This is something I will be making again, ASAP! As well as the Oreo cupcakes with Oreo buttercream frosting. These both were a big hit.
This looks amazing, thx for sharing the recipe. Is it possible to make this recipe in two 6in pan then divide each one into 2? If yes, how many minutes need in the oven?
I doubled the buttercream recipe and it turned out to look like soupy cottage cheese. I’m not sure what went wrong this time because i’ve made it another time and it came out perfectly. (Perhaps it was too warm in my house?) This is most likely an error on my part, but im not sure what i did wrong. I was pretty confident in making sure i put the right amount of each ingredient. I’d love someone’s thoughts on how I can improve my buttercream.
For the cookie butter frosting, when you mix in 1/4 cup heavy cream, do you beat the heavy cream first and then combine it with the cookie butter and buttercream, or do you just mix in without beating it first? Thank you in advance 🙂
I am going to make this cake this week, but I only have 2 x 7″ pans, will the batter be fine to sit while I cook the first two cakes?
How much batter would I need if I was doing a half sheet cake? Thank you!!
Can i use whole fresh eggs ?
Hi Divinia,
Great question! You can use whole eggs in place of the egg whites in this recipe. Use 4, large whole eggs in place of the cup of egg whites. Hope that helps, happy baking!
Looks delish, what’s the addition of the cream for? Would you not have to keep the cake in the fridge if it contains cream or milk?
Hi Danica,
Thank you!! The cream in the frosting is important to give it the right consistency! This buttercream/cake can sit out for a day, but in general I recommend storing the cake in the fridge to help it keep its shape / look its best. Hope that helps, happy baking!
Can this be converted into cupcakes also???
Hi D’Andria,
Great question! It can, but I’d recommend just using my biscoff cupcake recipe instead! It’s just as delicious and one batch makes a dozen cupcakes 🙂 Here’s the link: https://chelsweets.com/biscoff-cupcakes/
Hope that helps, happy baking!
Hi! This looks amazing I can’t wait to try it. Quick question – do we reserve 2 or 3 cups of the vanilla bc for the cookie butter bc? Step 7 in the vanilla bc part says use 2 cups but step 1 of the cookie butter bc says 3.
Also, if we are doing 8 inch rounds, does it make 3 layers or 4 layer cake? From reading I thought 3 but a lot of the comments seem to imply 4 layers with the 8 inch size. Thank you!!
Hi Megan,
Ah I’m so sorry for the confusion!! I updated this recipe right before I went into labor and I think my brain was a little bit scrambled!! It should be 2 cups of buttercream that you use to make the biscoff frosting. I’ve updated the recipe card to fix this, thank you for letting me know!
I like to make 3, 8-inch layers using one batch of this recipe! You can make 4, 8-inch layers, but they’ll be thinner and the bake time will be less. I prefer a slightly thicker cake layer, which is why I usually make 3! If I use 7-inch cake pans, I’ll make 4, 7-inch cake layers though. Hope that helps, happy baking!
This was the best cake I ever made. It was a huge hit! And it wasn’t too difficult to make. Chelsweets’recipes never fail me. 10/10.
You are too sweet Jessica! So happy to hear you loved this recipe, thanks for sharing!!
Ok, I have made many cakes, and this was absolutely, hands-down the best one I have ever made. I made it for a friend for a huge celebration, and it was gone quickly. If you follow the directions exactly, it will turn out perfectly. So, so, so happy with it – to the point where I found the baker’s site to use her other recipes. It’s a lot of work, but it’s 100% worth it! Thank you!
Hi Chelsea! Your recipes are always my favorite for baking and you’re my fave insta baking account. I’m going to give this a whirl but it’s for someone who requested vanilla cake. Do you think this would still be tasty if I did all cookie butter frosting (instead of vanilla and cookie butter) and with regular vanilla cake instead of the cookie cutter cake, or is the cookie butter frosting best in small doses and might be overwhelming on the whole cake?
@Mykaela, curious what you did for the cake? I was also wondering why not use cookie butter throughout.
This cake is definitely worth the steps. Flavorful, moist, and definitely a hit at the tables. I will definitely make this cake for every Thanksgiving and throughout the fall.
Can this be made into a bundt cake?
If I used 3 9” pans will I have to change the bake time?
Hi Mya,
Yes! Bake time will be several minutes shorter (test the center with a toothpick for doneness – they’re ready when a toothpick inserted into the center comes out with a few moist crumbs), and they layers will be quite a bit thinner. Hope that helps, happy baking!
Made this cake and everyone absolutely loved it!
Personally buttercream is always too sweet for me. Any alternatives that aren’t as sweet? Beginner friendly ideal
Wondering if one could add other spices to make it more of a spice cake? Or would the cake be too much that way?
If you think so, would this combo work?
1 and 1/2 teaspoon ground cinnamon
1 teaspoon ground ginger
1/2 teaspoon ground nutmeg
1/2 teaspoon ground cloves
The absolutely best cake ever. I did use Swiss meringue buttercream. Does the cake need to be refrigerated or cake it stay on the countertop before cutting?
Buttercream can sit at room temp for up to 2 days! But sometimes (if your kitchen is warm) the buttercream can get soft as it sits and the cake can lose it’s structure! So I usually put cake si nthe fridge if I don’t plan to eat them within a few hours. Hope that helps, happy baking!
Planning to make this this weekend for my (biscoff loving) sisters 50th birthday. Reading through the recipe, it seems like there’s a lot of frosting…especially powdered sugar. This is the correct amount for a 3 layer 8 inch cake? Thanks in advance!
@Martha, I have the same question!
Can this cake be poured into a regular sheet pan cake? I am wanting to make this recipe for my cake jars
I have a quick question, is there a reason why the biscoff cupcake recipe would be better for cupcakes rather than this one? I noticed a couple different ingredients and wondered why I couldn’t just use this recipe as cupcakes.
For sure! I like cupcakes to have a slightly lighter texture than layer cakes! Layer cakes need a bit more structure so they can be stacked and stand up to all the frosting. Hope that helps, happy baking!
This cake is amazing! The only change I made was to not add crumbled cookies in between cake layers. I pressed the crumbles around the side of the cake and sprinkled some on top.
Teenage boys and 10/10!
So happy to hear that Elizabeth!! Thank you for sharing 🙂
This cakes seems extremely moist. Is that normal? I doubled the recipe but seems like while I’m stacking it may fall a part. So I’m a bit nervous it’s for a 2 tier cake.
Hi Jenna,
It should be moist, but def not falling apart! The layers should actually have great structure.I wish you could share pictures on here so I could see. Sometimes the tops are a little sticky, but the actual cake part should stay together well. I hope it turned out ok!!!
Gonna try this
Yesss!! Let me know how it turns out 🙂 Happy baking Rahma!!
I made this for my birthday. It was incredible!! Made three 8 inch cakes. Recipe makes tons of icing which is too much for one cake but will use on cupcakes. I’ve made many of your recipes and they all are amazing. Thank you!!
Hi Jenni,
Happy (belated) birthday! I’m so glad you chose this recipe to celebrate—and even happier to hear it turned out amazing! Great call on using the extra frosting for cupcakes (never a bad problem to have, right?). Thank you so much for baking and for the kind words—it truly means a lot!
I’m obsessed. I love to bake, I bake a lot of cakes, I also really love Sally’s baking blog, this recipe is easy to follow, easy ingredients to get and everything about it is perfect. Cake is soft, but sturdy, both frostings are great but that Biscoff frosting is the best frosting I have ever made. 10/10 recommend making this cake. For reference I used 3 – 9 inch pans and had perfect size layers.
Hi Brenna,
Ahh this made my day—thank you! I’m so flattered you enjoyed the recipe, especially coming from someone who bakes often and follows Sally’s blog too (she’s amazing!). I’m so glad you loved the Biscoff frosting—honestly, it’s one of my all-time faves too. And thank you for sharing the pan size note—super helpful for others reading through. So happy it was a 10/10 for you!
Is it posible to make half of the recipe without ruin it?
Hi Danielle,
Absolutely! You can totally make half of the cookie butter cake recipe without ruining it. Just be sure to halve all the ingredients evenly. Also keep an eye on the bake time—smaller batches usually bake a bit faster. Let me know what size pans you’re using and I can help you tweak the timing if needed!
This was delicious ?
I love your recipes.
Aw thank you so much Charlene!!! I am so happy to hear that 🙂
Can you swap out the buttercream for cream cheese frosting instead?. If so which recipe should I use?
Hi Monique,
You totally can use cream cheese frosting! I’d recommend using this recipe: https://chelsweets.com/the-best-cream-cheese-frosting/
Hope that helps, happy baking!
Oh my word. This cake is delicious!! I used 3 9inch pans, at 325°convection for exactly 30 minutes. They came out so tender and perfect I wasn’t convinced they were actually done baking. But I’m SO glad I went with it because everyone raved about this cake! I will definitely be making it again!!
Hi Denise,
Yay!! I’m so happy to hear that! Baking in 9-inch pans at convection can definitely make the cake bake up nice and evenly, sounds like you nailed it. I love that you trusted your instincts, and even better that it was such a hit with everyone. Thank you for sharing your experience 🙂
How come you didn’t use all Biscoff buttercream for your cake. Why did you decide to use two flavors?
Hi Russell,
Great question! In this case it’s for the look of the cake. I just didn’t want it to be a brown cake with brown frosting!! But you can totally frost the cake in biscoff frosting if you want. I felt like it had enough flavor from the spiced cake layers, biscoff drizzle, biscoff frosting inside the cake, and the chopped up bits of biscoff, but if you want more you can def do that! Hope that helps, happy baking!
Hello, I’m wanting to make this for my friends wedding. I need to make a 10” and 8” tiered cake. Do you think these cake layers are sturdy enough for that? Also can I use one batter batch to make 2- or 3- 10 inch layers?
Hi Tasha,
Great question! This recipe is great for stacking and will hold up well in a tiered cake as long as it’s supported properly 🙂 In terms of how much batter you’ll need, I actually have a great post on that to help figure it out: https://chelsweets.com/how-much-cake-batter-per-pan/
One batch of this recipe makes 10 cups of batter, and can be used to make 2, 10-inch cake layers. Hope that helps, and that your cake turns out amazing 🙂
Made this for a party this weekend and it was absolutely delicious! Was hoping to have some leftovers but it was such a hit that it was completely gone by the end of the night!
Hi Hayley,
That is the best kind of compliment!! I am so happy to hear everyone loved this recipe, it is so good!! Thank you for sharing 🙂
Can we add cookie butter into the cake layers for extra biscoff flavor or do you think that would be too overpowering? if so, would you recommend mixing it together with the butter or swirling it once the batter is in the pans? thanks!
Hi Erin,
Great question! Cookie butter has a lot of oil in it, and I’d be worried that if you added some into the cake batter, it might change the texture of the cake layers and make them denser. I’d suggest adding extra cookie butter to the frosting, or adding extra between the layers if you want a stronger biscoff flavor! You can also drizzle some warm cookie butter over each slice once they’re plated 🙂 Hope that helps, happy baking!
This cake was amazing! I made it for my son’s 14th birthday. He is allergic to eggs, dairy, peanuts, and tree nuts. This is the first cake that was entirely eaten by everyone! Thank you so much for a great recipe with excellent substitutions that don’t take away flavor! Best cake ever!!!
So happy to hear that!!! That is absolutely wonderful, happy belated birthday to your Son!!! Thank you for sharing 🙂
This cake is so delicious! I’ll be making it again.
I did make Chelsweets regular amount of buttercream (4 sticks of butter instead of 6) and halved the cookie butter buttercream which turned out to be the right amount. I’m always sad when I trash so much extra buttercream.
Other than that, this is perfection!
Hi CT,
So happy to hear you loved this recipe 🙂 I always try to include some extra frosting in my cake recipes, because some people need extra to get the sides smooth or add on decorations like big swirls or a fun border. But I totally get that not everyone needs it!
But wait you trash any leftover buttercream?!? I usually store any leftovers in fridge and then use it fill cookies sandwiches or frost cupcakes or something!
made this for thanksgiving!! ABSOLUTELY AMAZING!! 10 out of 10!!
yessssss!!! love hearing that Haley, thank you for sharing 🙂
The cake is excellent! I did the buttercream a little differently. I decided to do a French buttercream for it so I could use up the egg yolks. I also prefer it because it’s not as sweet. It probably would have been a little prettier with a whiter frosting since the egg yolks made it kind of yellow but it was absolutely delicious. French buttercream combined easily with the cookie butter for the cookie butter layer as well.
Hi Lauren,
That’s so smart, and I bet that tasted great! Glad to hear you loved this recipe, and thank you for sharing 🙂
We made this for Thanksgiving this year and to say it was a hit with our family is a huge understatement! First of all, it was a showstopper! So visually stunning once we assembled and decorated that people thought we bought it from a bakery. The cake is so tender yet sturdy enough to hold all of the delicious vanilla cookie butter buttercream. My 16 year old son asked us to make this for his birthday and he has never asked for a cake for his birthday simply because he doesn’t love cake. That’s a true testament to this cake! Takes some work and time to put together but SO worth it!!!
That is so wonderful to hear!! It does sound like it was a big hit 🙂 Thank you so much for sharing!
We were having a meal at Church and I though why not try this cake, it’s has fallish flavors and it will either be a hit or a miss. It was a HUGE HIT to say the least. We had another dinner the next month and I didn’t make it I made something for the diabetic people in my church and everyone wanted to know why I didn’t do the Biscoff cake. So we are having a dinner for our Preacher’s Bday and I am going to try making cupcakes with this recipe since I need more than 12 cupcakes.
Hi Sandra,
This comment just made my day! That is the best kind of baking compliment, when people are still talking about a cake a month later!!
I love that you’re planning to turn it into cupcakes for your preacher’s birthday, that’s a great idea for feeding a crowd. You can absolutely use this recipe for cupcakes. One batch of batter should bake between 2-3 dozen cupcakes! Fill the liners about 3/4 full and start checking them around 18–22 minutes. They should spring back lightly when touched and a toothpick should come out with just a few moist crumbs.
Also, major kudos to you for making something for the diabetic members of your church, that’s incredibly kind! Hope that helps, happy baking!!
I should’ve left this review sooner! I used this recipe for the first time 2 years ago and now my husband begs for it each year on his birthday! It is time consuming but well worth the effort. This year, he said all he wanted for his birthday was this cake and wanted to be able to give some to his employees. So instead of making a 3 layer cake, I made a 2 layer version and used the other 3rd of the batter to make mini-cupcakes. After icing the 2 layer cake, I used the leftover icing to ice the cupcakes and drizzled the melted cookie butter on top and stuck half a Biscoff cookie in each one. It did not disappoint! I couldn’t have done it without this amazing recipe. Thank you for sharing!
Hi Lauren,
That is so wonderful to hear!! And so sweet that he wanted to share it with his employees!!!! 🙂 Appreciate your feedback, thanks for letting me know how much you guys love this recipe!
my cake did not rise much and ended up being really dense. My baking powder was new so not sure why that might have happened. would love to know if you have idea why that might have happened because im clueless. otherwise the cake was delicious.
Hi Jessica,
This recipe uses the reverse creaming method, so it doesn’t rise up much! But that’s what gives it that super tender, moist crumb 🙂 Hope that helps for next time, happy baking!
Really loved it! The cake especially. The icing was very sweet, but that’s to be expected with most icings!
Hi Samantha,
I’m so happy you loved it, especially the cake!! And I totally hear you on the icing, it is definitely on the sweeter side. Thank you so much for trying the recipe and taking the time to leave a review 🙂