
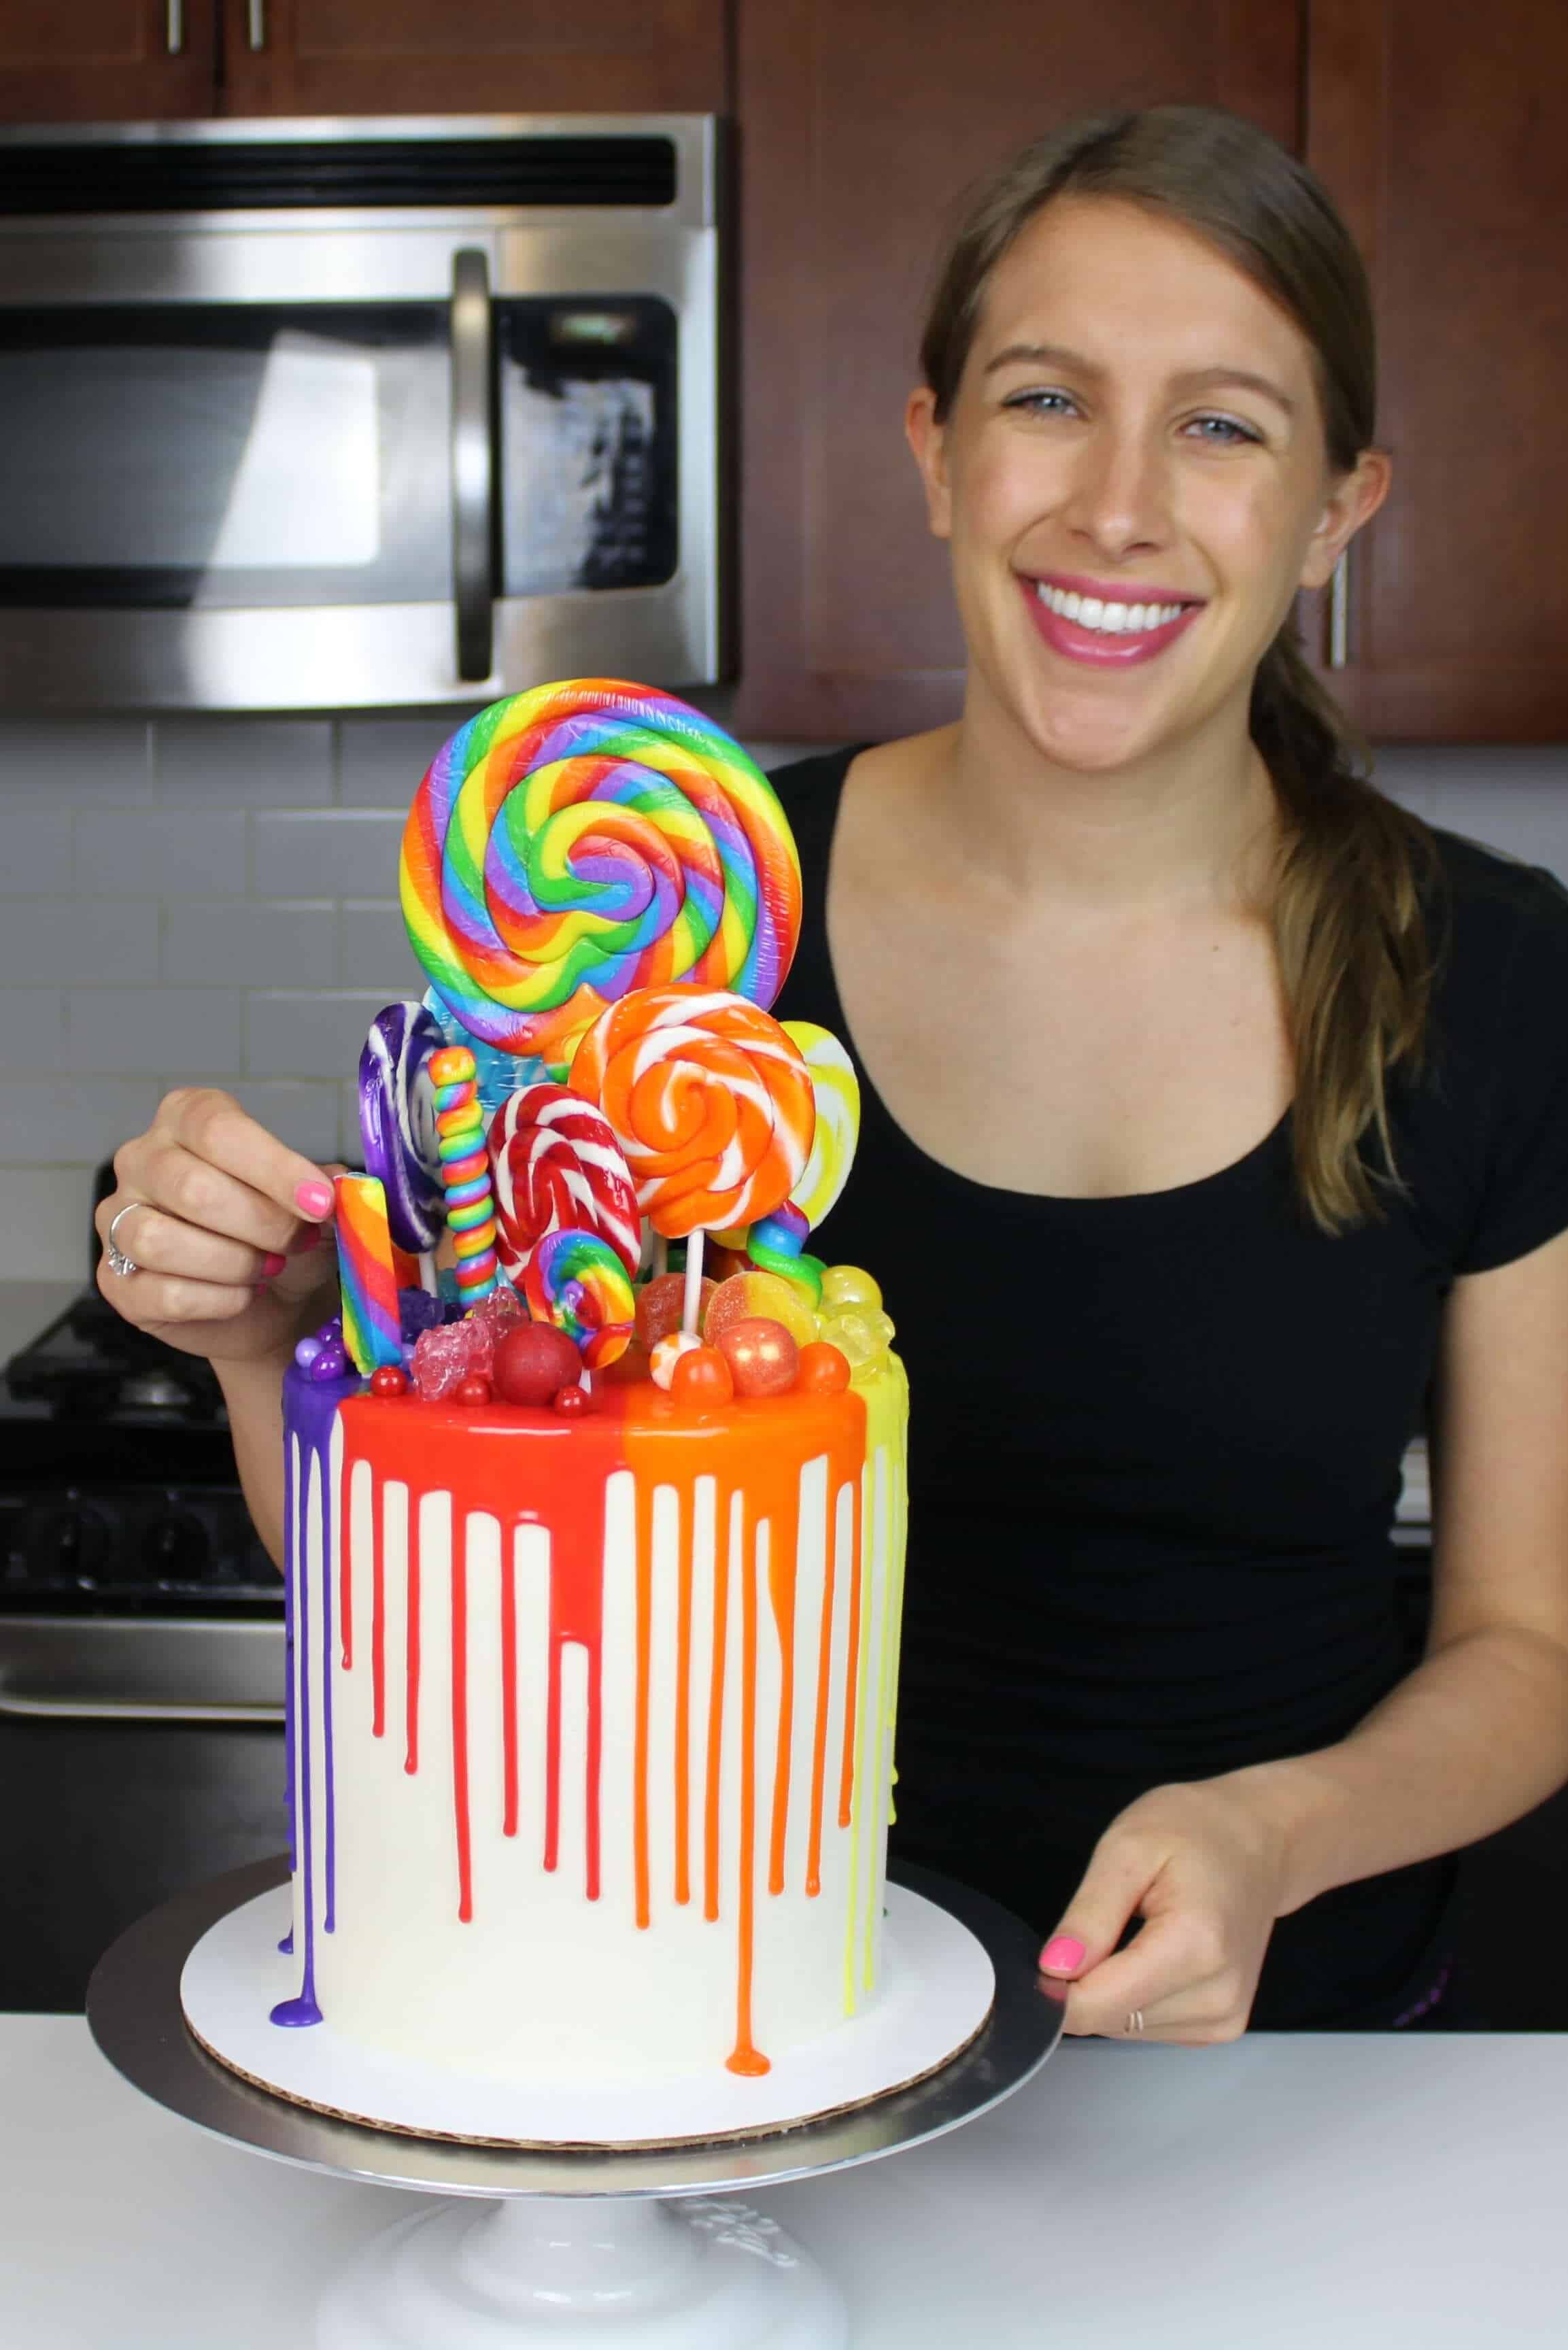
Rainbow Drip Cake
I may have gone a little overboard, but I couldn’t resist when I was asked to make an over-the-top rainbow drip cake!!
This cake is made with my favorite vanilla cake recipe, and is colored with Americolor gel food coloring.
I swear by Americolor, it’s the only gel food coloring I use.
How To Make Super Colorful Cake Layers And Drips
If you want your cake layers and colorful drip to be a super vibrant color, I highly recommend using gel food coloring.
Liquid food coloring won’t give you as bright of a color. It can also throw off the consistency of the cake batter or rainbow drips if you add too much.
Gel food coloring is much more concentrated, so it allows you to use less. A couple drops will create beautiful, bright colors.
Gel coloring is also thicker, and won’t change the consistency of whatever you add it to.
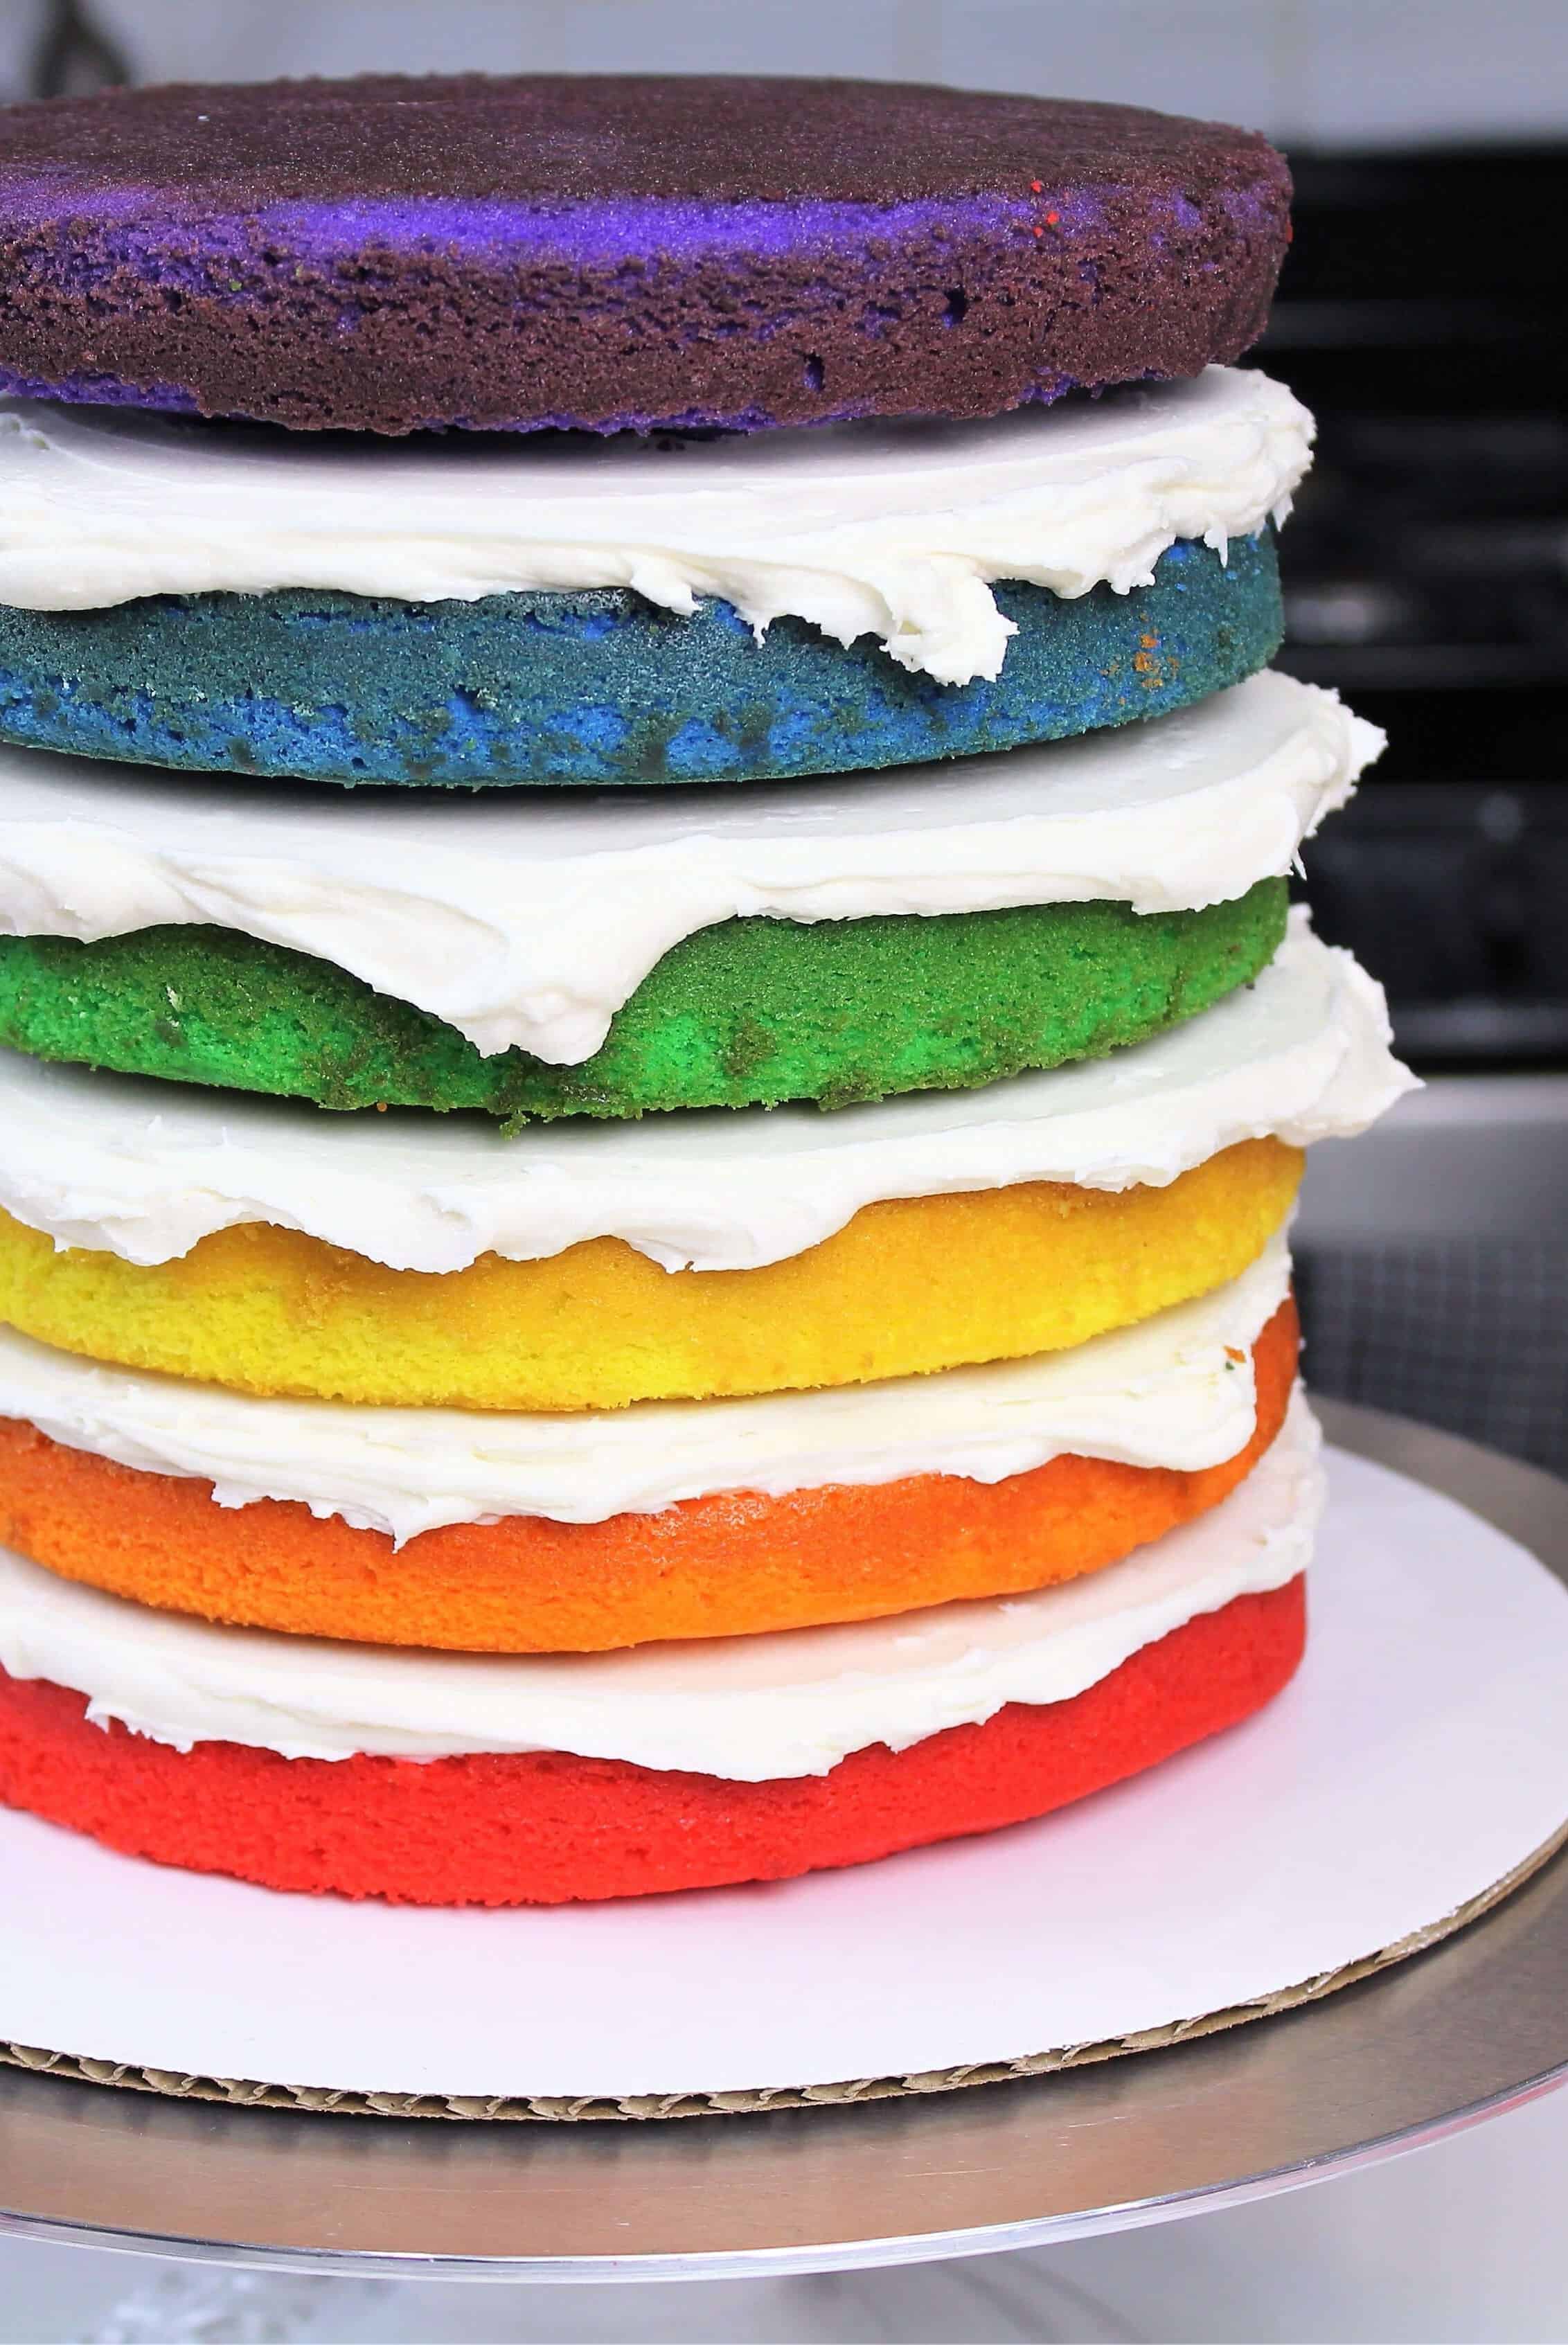
The Proper Color Order
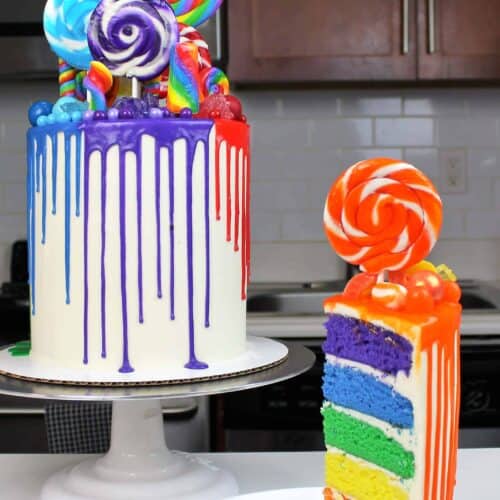
The cake layers in this rainbow drip cake are arranged following the color order of the visible spectrum.
As a kid I had the hardest time remember the order of the colors in the rainbow. Then, my world was rocked when my art class teacher taught us ROYGBV.
In my head, I read ROYGBV as Roy-GiB-Vee. I’ve had no trouble remember it since that day!!
Which is a good thing, because nothing makes trolls on the internet more angry than messing up the color order.
Heaven forbid you place the orange cake layer next to purple (violet) layer!!!!
All jokes aside, my neurotic side really does enjoy having the colors in the proper order.
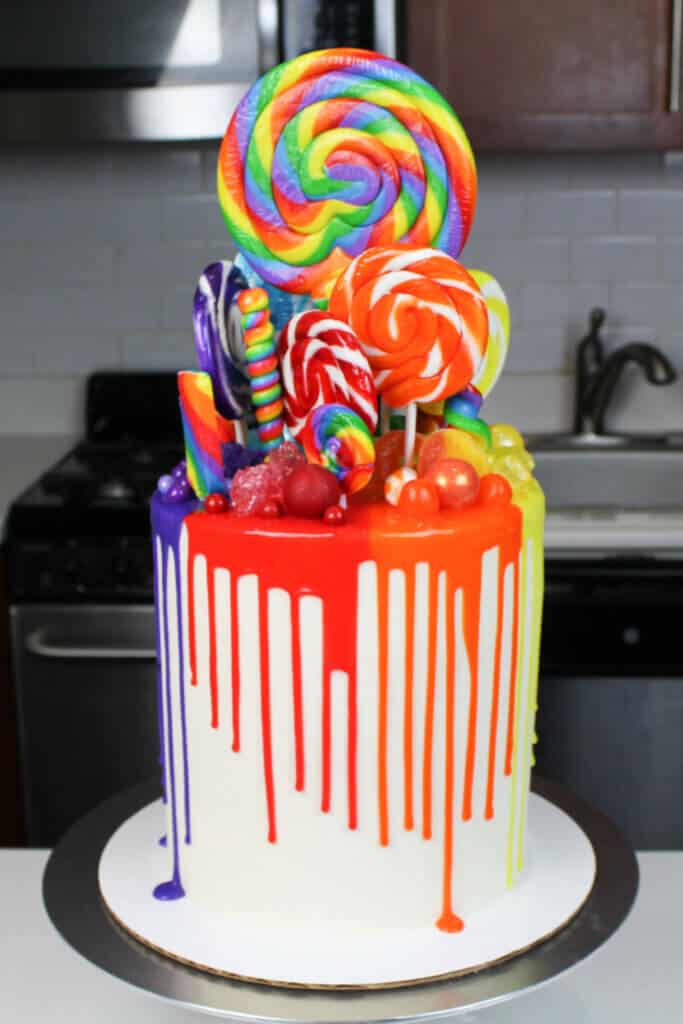
It feels like everything is right where it’s supposed to be. And then adding the color coordinated lollipops and candy?! I could’ve stared at this cake all day.
Rainbow Candy
While on the topic of candy, I know that it can be hard to find monochromatic candy like this.
I live a few blocks from Dylan’s candy bar, and got most of this candy from their color sorted candy buckets.
However, Amazon has tons of monochromatic candy, and party city also has a great selection.
If you don’t mind doing some sorting, you can also using rainbow colored candies like skittles, gummy bears, or Mike and Ikes!
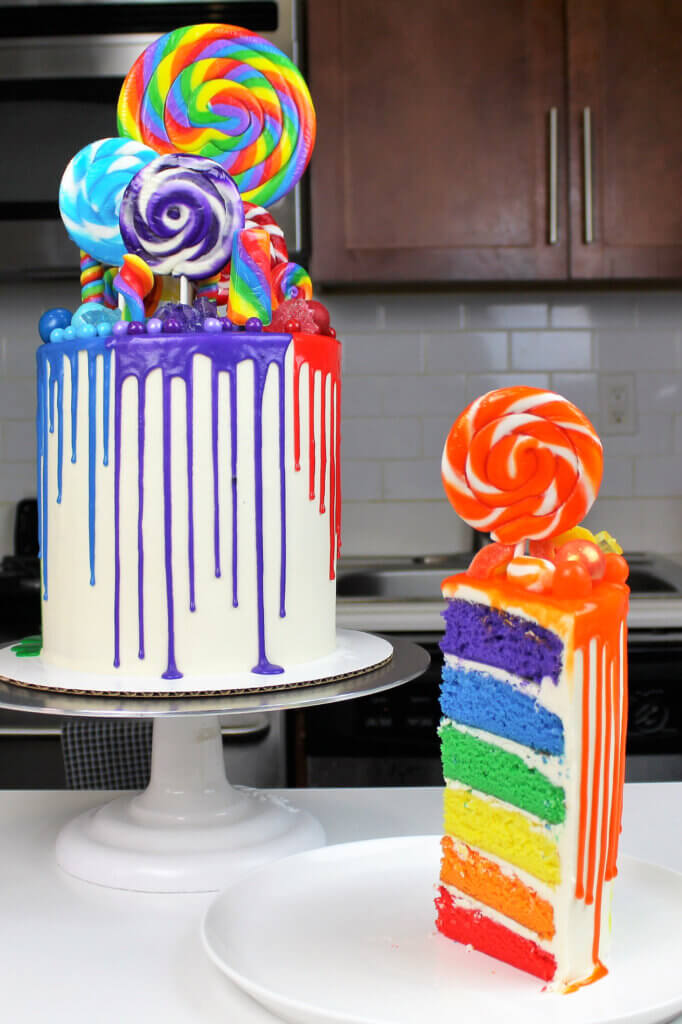
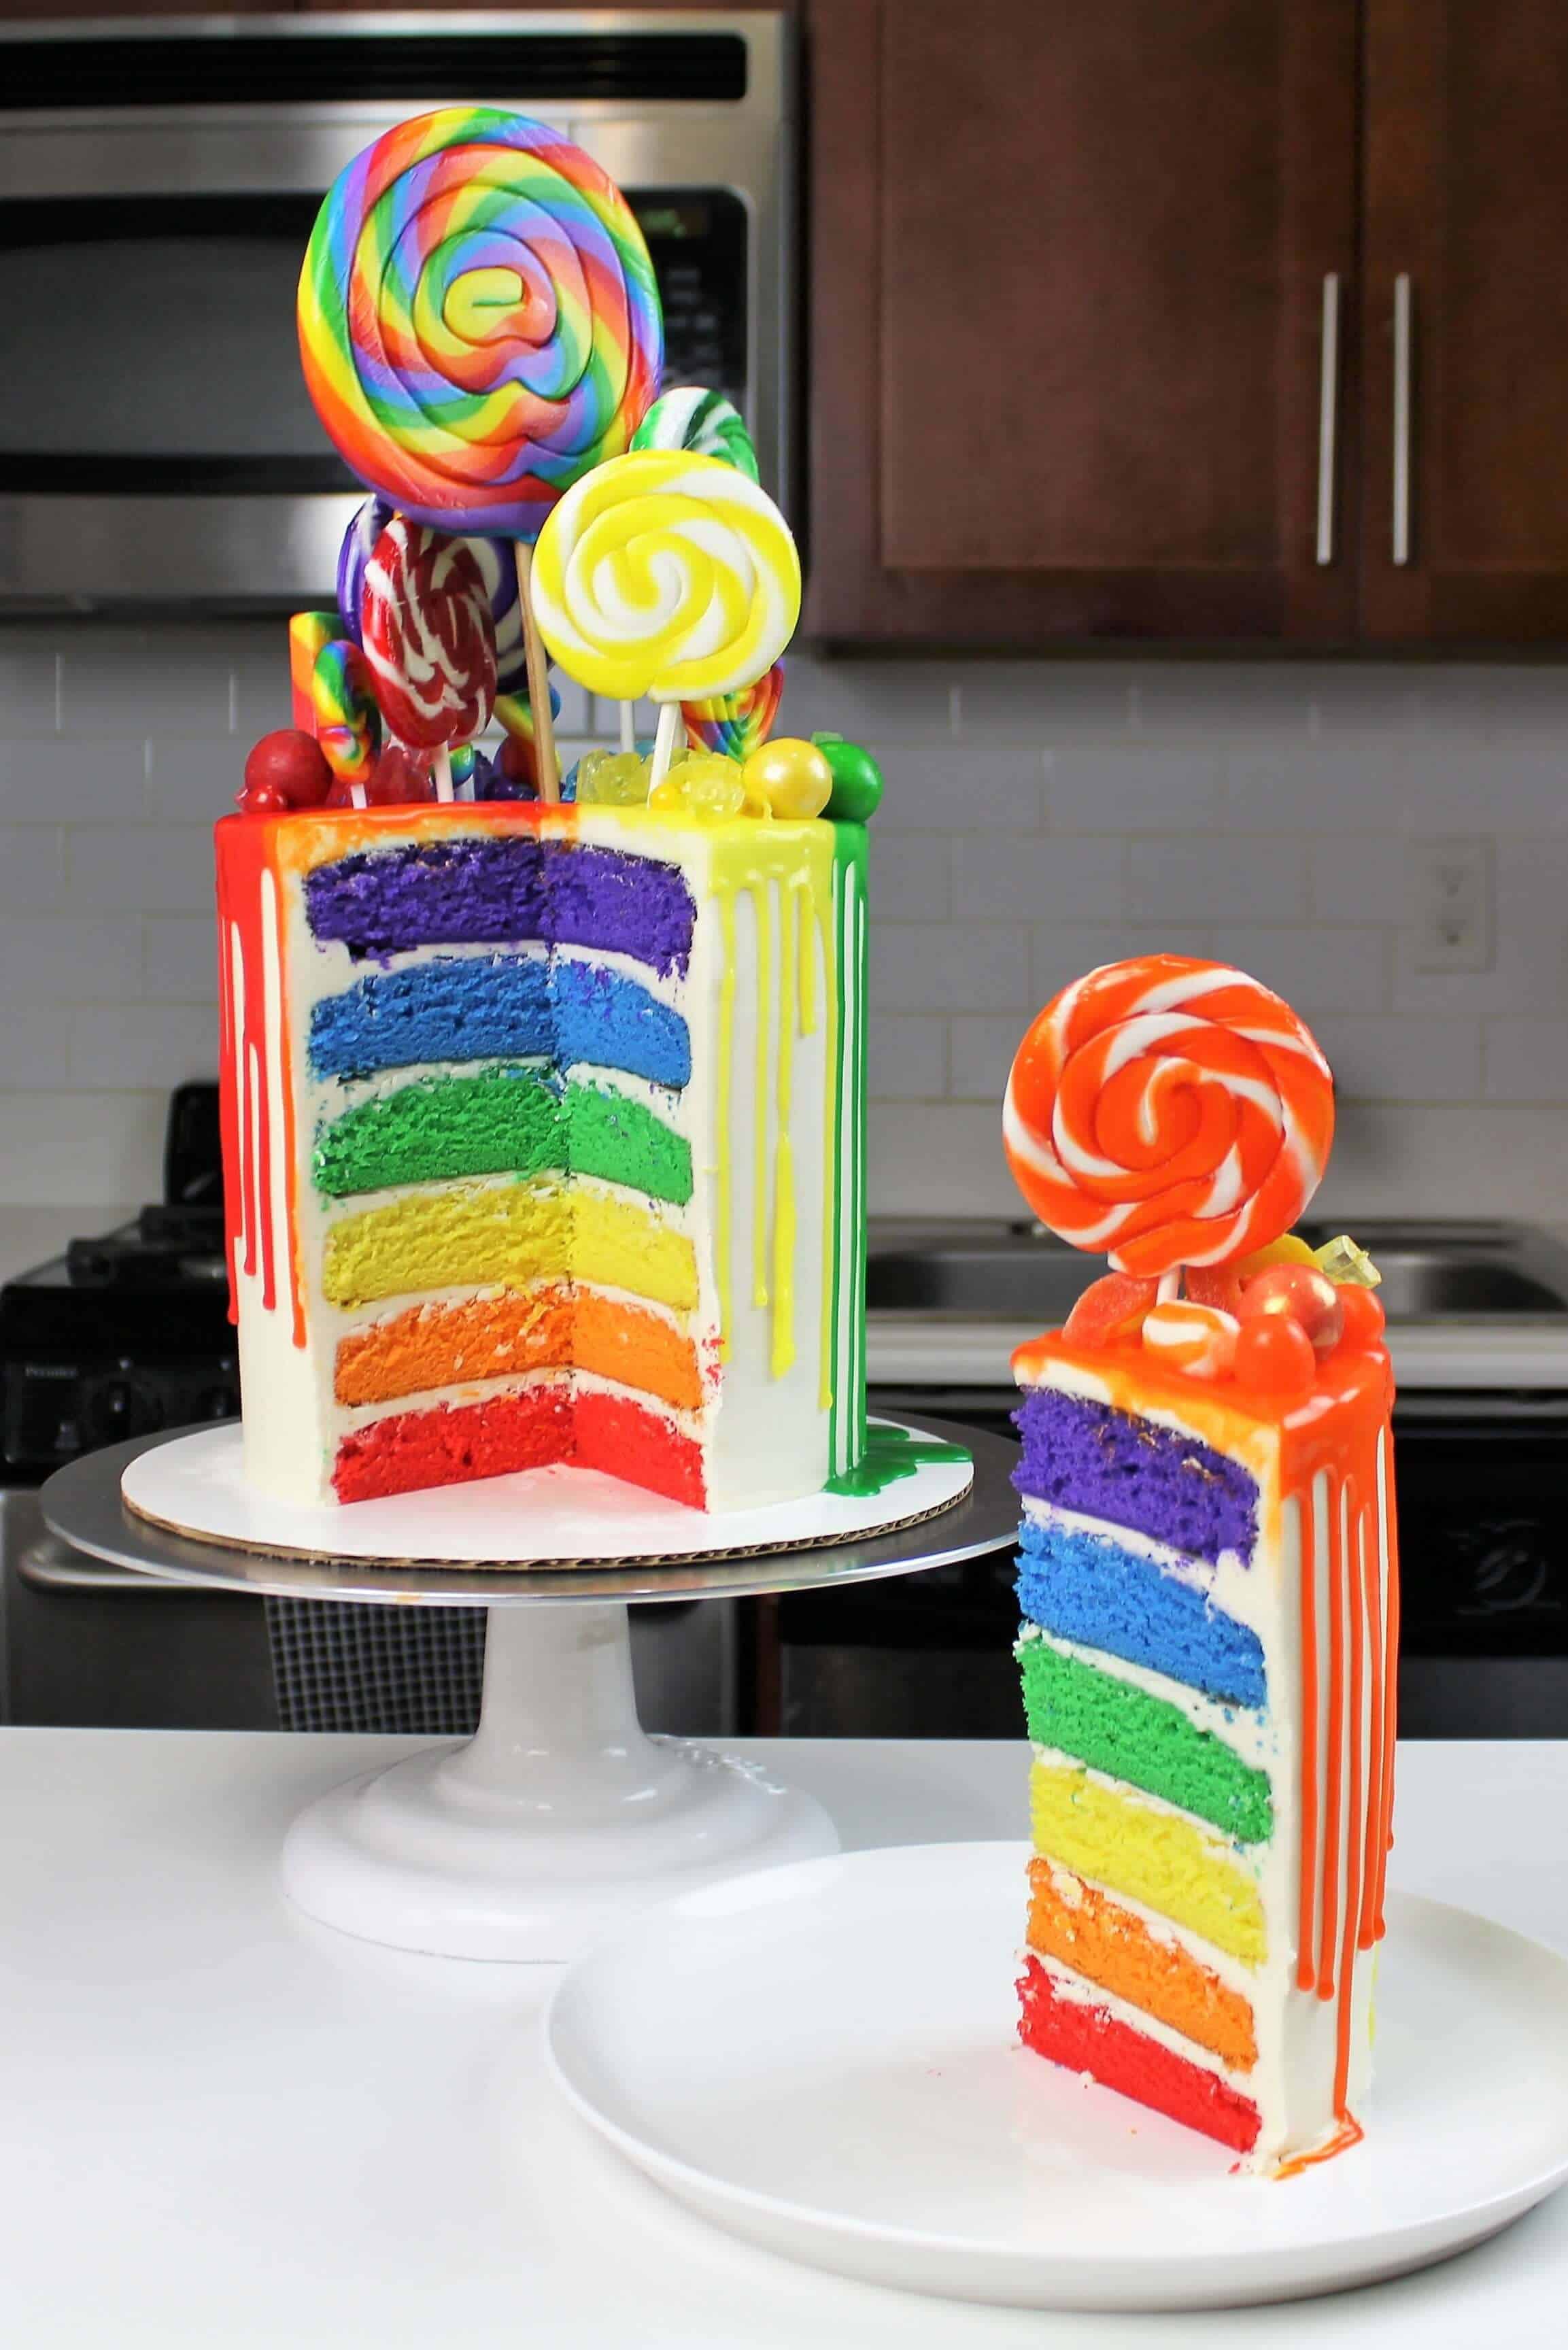
Getting The Perfect Slice
This cake is six layers tall, which can make it a bit of a challenge to cut into.
If you’ve gotten this far, you’ve put hours into baking and decorating this cake. The last thing you want to do is mangle the first slice!
To cut and serve this rainbow drip cake, I recommend starting with a very sharp knife.
It is easiest to cut a tall cake like this when it’s still slightly chilled. If made in advance, remove from the fridge about 45 minutes before you plan to cut into the cake.
This way, the frosting will still be a bit cold and will help the cake keep its structure once it’s sliced.
My next tip is to cut the cake with a warm knife. Fill a tall glass with very hot water, and let your knife sit in the cup for a minute.
This will heat up the blade, and make cutting into your cake…a piece of cake! Forgive me for that one, I couldn’t resist!! 😛
Dry off the blade, then slowly cut a decent sized slice. A large first slice will make it easier to remove it, and cut additional slices.
Cut each cake slice in half horizontally, to create more reasonably-sized slices.
Share Your Creations With Me!
If you try this rainbow drip cake recipe, please tag me @chelsweets. Also use the #chelsweets so that I can see your amazing creations!
Nothing makes me happier than when I get emails or DMs with photos of your amazing cakes. Please don’t hesitate to reach out to me with your triumphs, or questions <3
Rainbow Drip Cake
Ingredients
Rainbow Cake Layers
- 3 cups all-purpose flour 390 grams
- 3 cups granulated sugar 600 grams
- 2 1/2 tsp baking powder 10 grams
- 1 tsp fine salt 6 grams
- 1 cup unsalted butter, room temperature 226 grams – 2 sticks
- 2 tsp. vanilla extract or vanilla bean paste 8 grams
- 1 cup carton egg whites, room temperature or about 7 egg whites (235 grams)
- 1 1/2 cups buttermilk, room temperature 345 grams
- 1/8 cup vegetable or canola oil 28 grams
- Red, orange, yellow, green, blue, and purple gel food coloring
Vanilla Buttercream Frosting
- 2 cups unsalted butter, room temperature 434 grams
- 7 cups powdered sugar 907 grams – or a 2lb bag
- 1/2 tsp fine salt 3 grams
- 2 Tbsp heavy whipping cream, room temperature or whipping cream (30 grams)
- 1 Tbsp vanilla extract or vanilla bean paste 12 grams
Colorful Drip Recipe
- 2/3 cup heavy whipping cream, room temperature 154 grams
- 2 cup white chocolate chips 350 grams
- Red, orange, yellow, green, blue, and purple gel food coloring
Additional Decorations
- rainbow lollipops
- rainbow candies
Instructions
Rainbow Cake Layers:
- Preheat oven to 350°F. Line six, 6-inch pans with parchment rounds, and grease with a light spray of non-stick cooking spray.
- Mix together all dry ingredients (flour, baking powder, sugar, and salt) in a stand mixer with a paddle with a few gentle pulses.
- Mix chunks of room-temperature butter slowly into the dry mix, on a low speed. Continue to mix until no large chunks of butter remain, and the mixture becomes crumbly.
- Pour in egg whites, and mix on low until just incorporated. Mix in the buttermilk in two installments, on a low speed.
- Add in vanilla and oil, and mix at a low speed until fully incorporated. Scrape down the sides of the bowl with a spatula, then beat on low speed for about 15 seconds.
- Divide the batter evenly between six bowls (about 300 grams of batter per bowl). Create red, orange, yellow, green, blue, and purple batter using a couple drops of gel food coloring. Mix by hand with a spatula until the batter is evenly colored.
- Pour each color into one of the prepared cake pans.
- Bake for 30-32 minutes, or until a toothpick comes out clean. Allow the pans to cool for 10 minutes, then run an offset spatula around perimeter of the pan to separate the cake from the pan.
- Place cake layers into the freezer for 45 minutes, to accelerate the cooling process. Once the layers are fully cooled, carefully flip the pans and remove the layers from the pans.
- Use a serrated knife to level the top of each layer.
White Chocolate Ganache Rainbow Drips:
- Heat heavy cream in a heat-proof bowl in the microwave for 45 seconds, until it’s just beginning to bubble. Gently pour white chocolate chips into the heavy cream, making sure they are fully covered with cream. Allow mixture to sit for 1 minute.
- Stir slowly until the cream and white chocolate are combined. Some bits of chocolate may not be fully melted yet. Heat the mixture again for 20 seconds, and stir. Repeat as necessary until all the chocolate bits are fully melted and incorporated.
- Divide the ganache evenly between six small bowls. Use gel food coloring to make red, orange, yellow, green, blue, and purple white chocolate ganache. Allow to cool until desired viscosity is reached (barely warm to the touch).
- Either pour into plastic squirt bottles (if you have some on hand), or place plastic wrap over the bowls to prevent the ganache from forming a skin.
Vanilla Buttercream Frosting:
- While the cake layers bake and cool, make the vanilla buttercream frosting.
- Beat the butter on a medium speed for 30 seconds with a paddle attachment, until smooth. Slowly add in the powdered sugar, 1 cup at a time. Alternate with small splashes of cream.
- Once fully mixed, add in the vanilla and salt, and beat on low until the ingredients are fully incorporated, and the desired consistency is reached.
- If the frosting is too thick, add in additional cream (1 teaspoon at a time). If the frosting is too thin, add in more powdered sugar (quarter of a cup at a time).
- Cover with plastic wrap to prevent crusting, and set aside.
To Assemble This Rainbow Drip Cake:
- Stack and frost the rainbow cake layers on a greaseproof cake board, using a dab of frosting to help stick the first cake layer to the board. Start with the red layer on the bottom of the cake, then follow the color spectrum (ROYGBV) to arrange the remaining cake layers.
- Add an even layer of buttercream between each cake layer.
- Apply a thin coat of frosting around the the cake, to fully cover the cake layers. Smooth using a bench scraper, then chill the cake in the fridge (10 minutes) or freezer (5 minutes) until the frosting is firm to the touch.
- Add a second, thicker layer of frosting to the cake, and smooth using a bench scraper. Place the cake in the freezer to chill for 10-15 minutes, or in the fridge for 30 minutes.
- Carefully divide the top of the cake into six equal sections (almost like slices of cake).
- Add one color of white chocolate ganache drips to each section. Use either a plastic squirt bottle and a spoon to add the drips to the cake.
- Top each section with matching lollipops and candy.
Hello 🙂 how do you make your drips such intense colours and opaque? I used your drip recipe today for a trial run of my daughters birthday cake and the pink drips seemed a tad clear. I am in Canada, so I used whipping cream (highest MF% I could find), Wilton gel colours and white chocolate chips. Thank you very much 🙂
I’d recommend adding a bit more chocolate! you can also try letting it cool a bit longer, which also helps the drips be more concentrated. Hope that helps <3
Hi what gel food colouring do you use? I live in the U.K. And watch you all the time but my cakes are never as brightly coloured as yours and it drives me crazy, I currently use colorflair food gels, thank you?
This should say sugar flair not colour flair ? Sorry it’s quite late here.
I use Americolor, it’s my favorite!!
@Chelsweets, yes! That’s what I used omg my cake turned out perfect! Making it again for another birthday!
Yay!! So happy to hear that Jeanne!! 🙂
Hi. How many servings do you get from this cake? Thanks
This cake was super tall, so I’d say it would feed about 30-35 people (cutting the tall slices in half)
Hi! Does this recipe yield the 30-35 people serving size you said above? Also I watched the video and you mentioned freezing the cake layers. Does this mean I can back and freeze the cake layers a few days ahead of time and simply decorate the day before or day of and leave out to defrost? Thanks! My almost 3 year old has tasked me with making a rainbow cake for her birthday party this weekend ??
Yes! But 30 small slices, not bakery style! If you have a big party, you can make 1.5 batches of the cake batter. And yupp! I make my layers in advance, and let them defrost for about 20 minutes before decorating!
@Chelsweets, I made this rainbow cake and suggested they cut as mentioned but even better was apparently the party attendant made pie slices layer by layer which I would hv never thought of as another way to cut a tall cake
Hello was wondering about storing buttercream cakes. Should you always keep them in the fridge after completed. Wondering if you ever have an issue with condensation on your cakes?
It depends on the situation, but buttercream can sit out overnight and it won’t go bad! I usually put completed cakes in the fridge, but I also don’t live in a very humid climate, so i don’t have many problems with condensation.
My daughter is having me make this cake this weekend for her bday party (fingers crossed) but what i am wondering is how the cake will hold up during the party until its cake time because its at a park. i live in fl Any Ideas?
keep it in the fridge until right before you head to the park! and add the candy right before you leave. If you refrigerate it and the air is humid, it can cause condensation on the candy. Hope that helps!! 🙂
Hi I always wanted good white cake recipe to make a rainbow cake dose it taste better then a box cake thanks in advance.
i definitely think so!!
Hi, is there any risk of the cake “sinking” under the weight of the candies stacked on top? Thanks.
definitely not! this is a some what dense cake recipe, which keeps it’s shape extremely well! as long as your frosting it’s too thin, it should hold up just fine!
Hi! I am going to attempt this cake form my 11 year old son’s birthday party! He prefers chocolate frosting so I will be using your Easy Chocolate Buttercream recipe. I am not great at measurements, any chance you can provide me with the measurements needed for the chocolate recipe for this cake? Thank you so much!!!
how fun! when you say the chocolate is the recipe, do you mean the amount of cocoa used in the chocolate buttercream?
Thank you so much for getting back to me. We actually switched gears and will now be making a scaled down version of this cake. It will be a 4 layer 8″ cake. I am pretty sure I should double your Easy Chocolate Buttercream recipe. Can you confirm if this is what I need to do since the recipe is for a 7″ layer cake. Sorry! I am not very good at the conversion game LOL!
Oh, sorry! Yes, I meant the chocolate in the buttercream 🙂
Hi, you may have answered this already but whats the best white chocolate chips to use for the drip?
I love using the Whole Foods mini white chocolate chips, because they melt super easily! but if you can’t get those, I also like the Ghirardelli brand!
Thank you!
Can you tell me how many cups of batter this recipe makes? I am using 8×2 rounds and estimated I need total of 21 cups of batter according to fat daddio website. Thanks.
I want to attempt this cake this weekend but I’ll be using 8 inch rounds instead of 6 and using fat daddios pans comes out to about 21 cups of batter and I noted this recipe you said makes roughly 10 and 1/2 cups batter so basically I could double the recipe and be fine right?
Yup! I usually use one batch of batter to make 3, 8 inch cake pans, so a double batch of my batter should work great for making 6, 8-inch cake layers 🙂
Do you suggest using dowels or something similar to support this size cake? Thank you!
My cake recipe is pretty sturdy, but if you had a hard time stacking the layers or frosting them, you could definitely use a central dowel!
Hi Chelsea! I couldn’t find 6inch pans so had to buy 8inch pans. Is this recipe enough for 6 8inch cakes or do I need to double the recipe? Thanks so much !
You would definitely need to double the recipe, and it’ll be one massive cake! I also have another way to make a rainbow cake, which involves less layers: https://chelsweets.com/2019/04/08/rainbow-cake-recipe/
not sure if that’s the look you’re after, but thought I’d throw the idea out there 🙂
Hello, your cake is gorgeous! I followed your ganacge recipe for the drips and mines was too thin & looked watery. I let them sit over night And they got a little more opaque and did not run as fast…but what makes it more thicker? My first ever decorated cake, it wasn’t too bad!
Thanks Cheryl!!
I suggest letting the ganache cool more before adding it next time, or even adding in a bit more chocolate! The consistency can vary based on the brand of white chocolate you use. It’s also super important that your cake is totally chilled (at least 15 mins in the freezer) before you add the drip. This also helps the drips run less far down the cake, and thicken up. Hope that helps!! <3
I share all my tips and tricks on drip cakes here, if that doesn’t fix the problem: https://chelsweets.com/2019/04/30/drip-cake-recipe/
Hi, thank you for sharing! I was just wondering..can the drip be stored and reused another time if left overs please? And how, by reheating? Many thanks! Lorena.
Hi Lorena,
Great question! it sure can! I usually put my drips in plastic bottles, and then just put the leftover ganache in the fridge. It last for up to 3 weeks! When I want to use it again, I simply pop the bottle into the microwave for 10 second intervals, until it’s the right viscosity. You can do the same thing with a bowl, if you’re using a spoon instead of a bottle to add the drips. Hope that helps, happy baking!
Hi,
My twins birthday is on Thursday and attempting to make a rainbow explosion cake. I am trying to make the cake batter dairy free….butter can be replaced with non dairy one but what can I replace buttermilk with??
Hi Johanna,
You can actually use pretty much any alternative milk! soy, oat, or almond milk should all work in this recipe. For the butter, I find earth balance or a similar vegan butter works wonderfully!
Hi! Do you use the store bought confectioners sugar or do you just grind the sugar at home? And does it make any difference?
Hi Shweta,
I use store bought! It is 10x refined, so it has an ultrafine texture. I think this is much finer than I’d ever be able to grind down on my own at home. I’d suggest using store-bought powdered sugar if possible for that reason <3
how much butter milk do you use for this like how do you measure it out and do you use vinegar or lemon juice
Hi Peyton,
I use either a measuring cup or a scale! I buy my buttermilk so I don’t need to add in additional vinegar or lemon juice. You only do that if you’re making your own buttermilk with regular whole milk, in which case you’d add 1 1/2 Tbsp of vinegar or lemon juice to 1 1/2 cups of whole milk. Hope that helps, happy baking!
Hi I am making a trolls version of this cake I. Am wondering Can I use this colorful drip on a covered whipped cream cake
Hi Julie,
Sounds like such a fun cake! As long as it’s a stabilized whipped cream frosting and you can freeze / chill the cake, the drips should work on it!
I just tried this recipe and it came out horribley wrong! I thought I followed the recipe to a t but after reading all the other comments I messed up on my measurements for the batter it seems like it. I made batter as noted 3 cups all purpose flour and after adding all the ingredients I divided into 6 pans… is that correct?
HI
i AM GOING TO ATTEMPT TO BAKE THIS CAKE FOR MY BETTER HALFS BIRTHDAY THIS WEEKEND.
I UNFORTANATLY ONLY HAVE 3 CAKE PANS SO WOULD THE BATTER BE FINE TO STAND WHILE I BAKE 3 AND COOL THEM AFTERWARDS AND THEN BAKE THE REMAINING ONES OR SHOULD I HALF THE RECIPE AND THEN ONLY MAKE THE SECOND HALF ONCE THE FIRST 3 IS DONE?
@KEVIN RICHARDS, @chelsweets,
I am on the same boat as Kevin. I don’t have have enough pans to bake the 6 layers at the same time. What is the best way to manage this?
Hi Barbara,
Don’t worry! If you don’t have 6 cake pans, the batter can sit at room temperature for a few hours. Bake as many layers at a time as you can at a time, then let them cool, remove the cake layers, rinse them out, and bake the remaining batter/layers. Hope that helps, happy baking!
Hi, I’m just wondering if it would be okay to sub in cake flour instead of AP?
My 3 cups of ap flour weighed 510 grams. Hopefully it doesn’t mess this recipe up as now I’m questioning all the measurements
I truly appreciate you recipe. Tried it out and the only thing I think was a little thin was the drip. Overall it was awesome
Hello, i know this is an old post , bit its very pretty and i was inspired to make a cake like it. I made 7 layers of 6inch . however the 6inch weren’t high , kind of like half the height. So the final height was like kind of yours. Nut how did you support yours, how it didn’t move during transportation, mine slid and everything went wrong, I put straws and board after the 4 layers, so actually they didn’t move, but the board on the bottom, the cake slid a bit. So what’s your advice for the next time cake, especially if I want to transport it myself?
I made this – I absolutely LOVED it. So over-the-top I just couldn’t resist. I brought it to a meeting and was SO amazing, everyone just took heapings. Will DEFINITELY remake a lot. Thx
YAY!! It definitely is an over the top cake, but that is what makes it so fun 🙂 Thanks for sharing Erin!!
Hi! This cake was delish thx Chels
Hellooo…. i want to make an 8in square cake – should i double the recipe and how tall would the cake be approximately
thank you
Hi Marion,
Great question! If you double the cake recipe, you should end up with an 8 inch, square cake that is the same height as my 6-inch, round cake in these picture 🙂 Happy baking!
Thanks for the tutorial! I made this for my little guys birthday and it turned out fantastic. I went with 8 in layers instead of the 6 and baked them for about 15 min.
I am so happy to hear that Pam!! YAY 🙂 Thank you for sharing, and tell your little guy happy belated bday for me!!
Hey! I’m attempting to use the drip technique on my own cake for a school project – Any tips for how to apply it with minimal errors? The cake will be 8 inch, and 15cm in height (don’t know the inches for that sorry!)
I made this cake for my granddaughter and it turned out amazing! The weight of the candy made the cake start to sink so I would advise putting it on right before serving!