
Gluten Free Vanilla Cupcakes
While I’m not gluten free myself, I get a lot of requests for gluten free recipes on social media, as well as in my cake and cupcake classes. That’s why I’m sharing this recipe for gluten free vanilla cupcakes!!
I used to think that gluten free baking was super intimidating, but there are so many wonderful gluten-free flour blends out there nowadays!! They make gluten free baking so much more approachable.
If you didn’t tell me that these cupcakes were gluten free, I’d have no clue. The texture and taste are just like a regular vanilla cupcake 🙂
What’s in Gluten Free Flour??
There are a lot of gluten free flour blends out there. Each brand uses a unique mixture of wheat flour alternatives, like rice flour, brown rice flour, and even almond flour!
It can be difficult to get the texture of gluten free flour just right for baking. A lot of these alternative flours have a finer texture than all-purpose flour.
Some type of starch is usually added to help give the mixture better structure, and a bit of binding power. Tapioca and potato starch are the most commonly used starches.
One other ingredient in gluten free flour that might sound a little strange is xanthan gum. It’s a key ingredient in gluten free baking. Xanthan gum has a big impact on the texture of gluten free baked goods too.
Gluten adds an elasticity and stickiness to dough and batter. Xanthan gum emulates these characteristics in gluten free baking and helps lock in moisture.
What Brand of Gluten Free Flour is Best?
I’ve tried this recipe with a few different brands of gluten free flour, and so far, each of them has worked great:
- King Arthur gluten free measure for measure flour
- Cup4Cup gluten free multipurpose flour blend
- Bob’s Red Mill gluten free 1-to-1 baking flour
My favorite brand of gluten free flour for this recipe was King Arthur. However, any brand of gluten free flour you can find at your grocery store should work.
My only word of caution is to be sure you use some sort of gluten free flour blend.
Using a single type of gluten free flour like almond flour or cassava flour in this recipe will not yield the same results!
Most grocery stores carry at least one blend of gluten free flour. Stores like Whole Foods or Trader Joe’s also have lots of great options.
If all else fails, Amazon is another easy way to get your hands on a gluten-free flour blend. I order most of my baking supplies on Amazon, including most of my specialty ingredients 🙂
Swapping Out the Buttermilk for Sour Cream
This gluten free vanilla cupcake recipe is based on my vanilla cupcake recipe, but I did have to make a few changes.
Gluten-free baked goods have come a long way in the past few years, but a lot of people still think of them as gritty, dense, and even gummy.
Using a good gluten free flour blend can fix most of these issues. However, I found that the gluten free version of my vanilla cupcake recipe couldn’t handle the same amount of buttermilk.
The cupcakes ended up being too moist, and texture wasn’t quite right. To help lighten up this recipe and create a fluffier texture, I use sour cream in place of buttermilk.
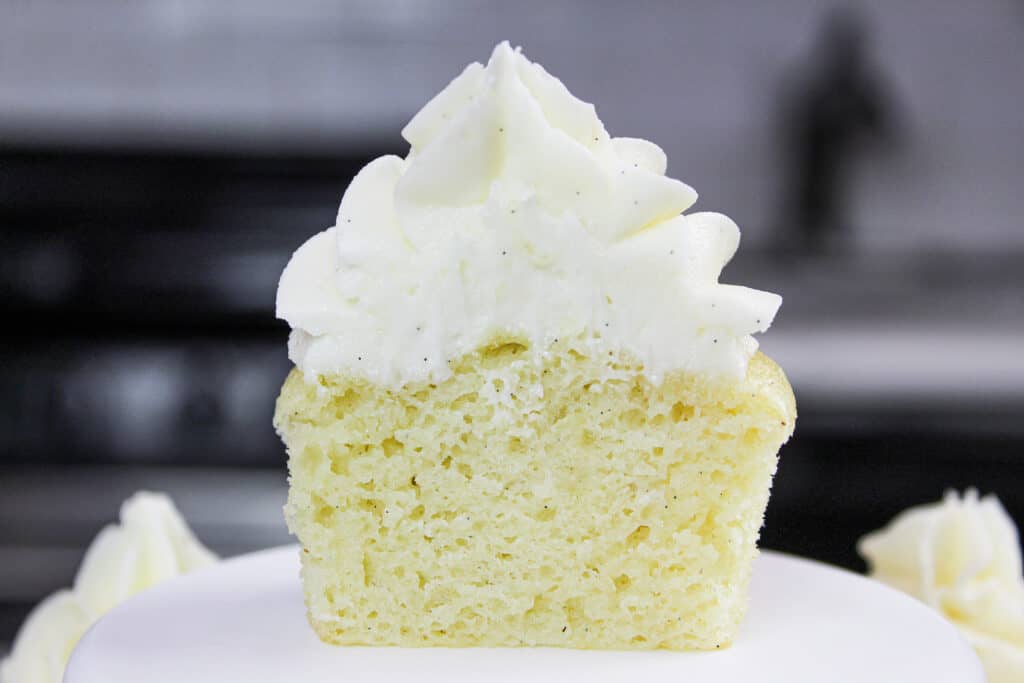
This gives the cupcakes a tender crumb, while keeping them moist and fluffy.
Why This Recipe Works with Gluten Free Flour
Another reason this cupcake recipe works is because it uses oil as a fat instead of butter. Oil is easier for the gluten free flour to absorb.
The cupcake texture was spot on, with the help of the following gluten free baking tips.
Tip #1: Over-mix Your Batter
While I strongly advise against over mixing batter in other recipes, and even design my recipes to have as little mixing as possible, gluten free batter is different.
The whole reason you don’t want to over mix your batter is that it develops thick strands of gluten, which can lead to dense, tough cupcakes. But when you’re using gluten free flour, this isn’t a problem.
In fact, over-mixing gluten free flour can actually give the cupcake better structure! This helps cupcakes rise better as they bake and gives the cake a more tender crumb.
The additional mixing can also make it easier to bite into these cupcakes and enjoy them. The incremental structure helps prevent the cupcakes from crumbling as they’re bitten into.
Tip #2 Let Your Batter Rest
Remember earlier when I said that gluten free flour blends can have a hard time absorbing moisture and fats?
If you let the batter sit for a bit before baking it, you give the flour more time to absorb all that goodness. This helps thicken the batter and prevents your cupcakes from having a gritty texture.
I unintentionally did this as I was photographing and filming this gluten free vanilla cupcake batter. You’d be surprised how long it takes to get a perfect shot of scooping cupcake batter into a pan!
Letting the batter sit for about 30 minutes drastically improves the texture of these cupcakes, so be sure you don’t skip this step!!
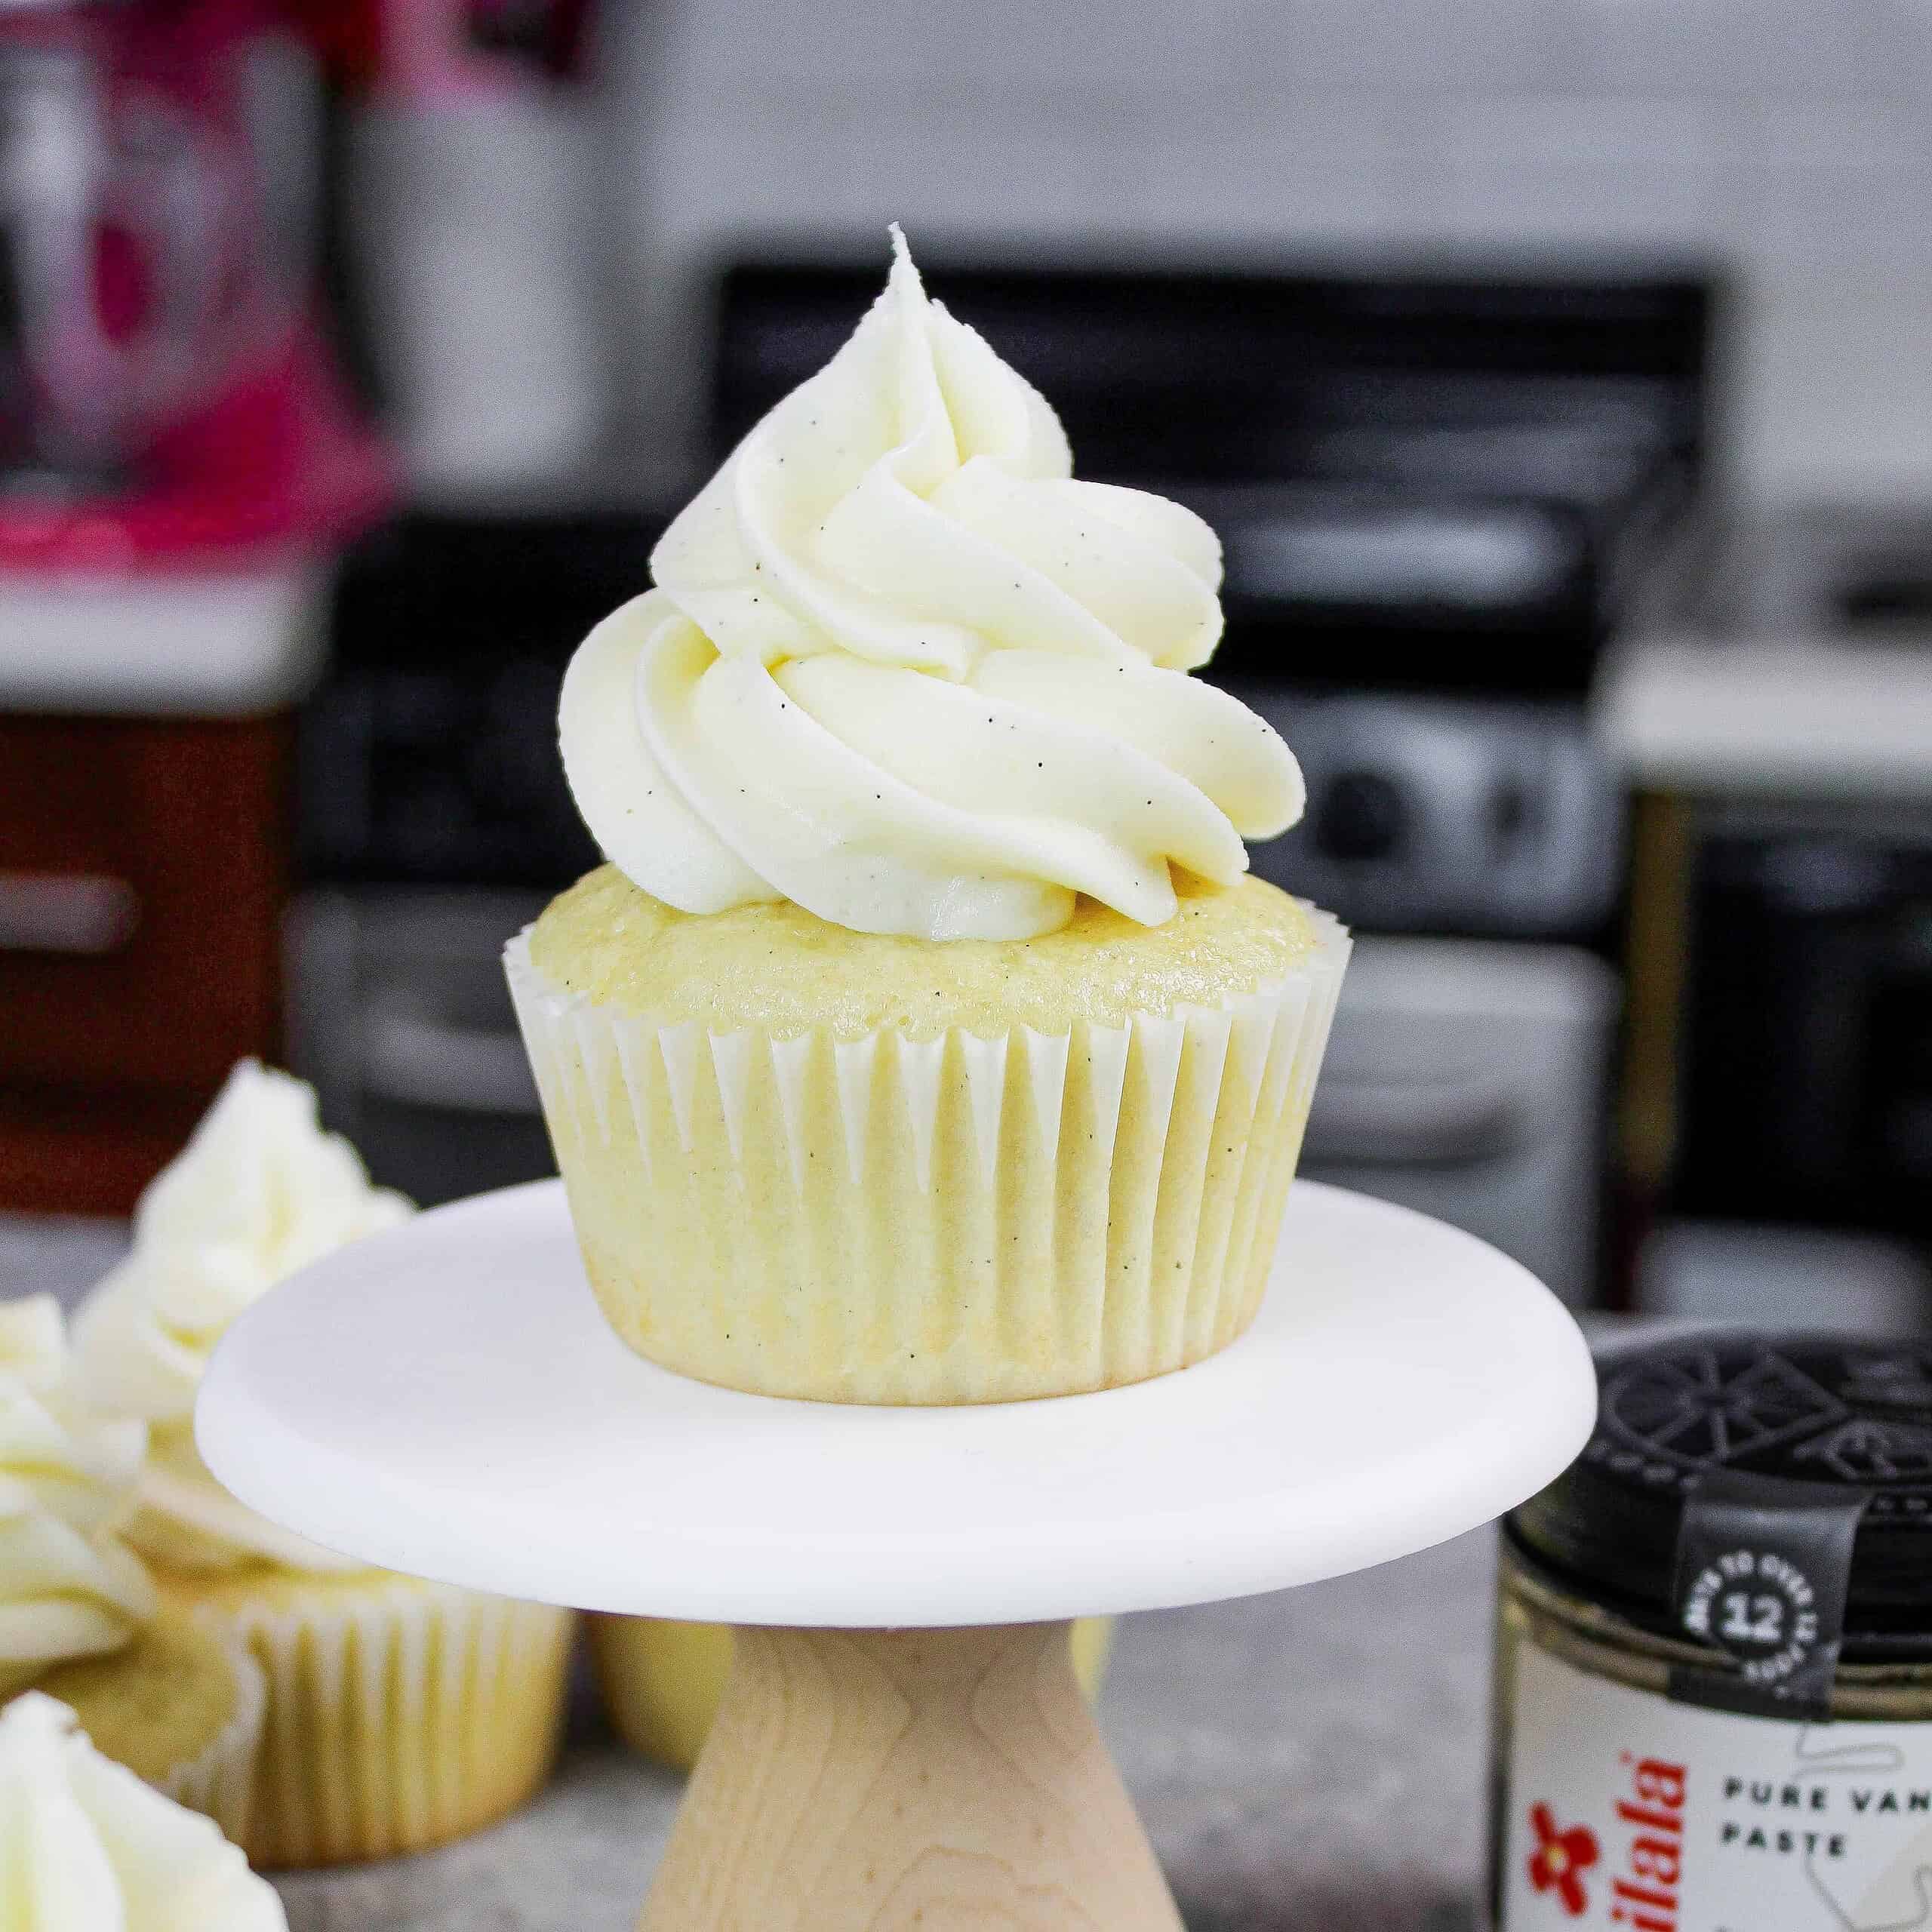
Why I Prefer Vanilla Bean Paste Over Vanilla Extract in This Recipe
It’s important to use good-quality vanilla when it’s the only flavor in a baked good like this. I used vanilla bean paste in this recipe, and I think it makes a huge difference in taste!
I prefer vanilla bean paste to vanilla extract in this recipe for a couple of reasons. The first reason is that I love the little flecks of vanilla bean in the buttercream frosting and cupcakes.
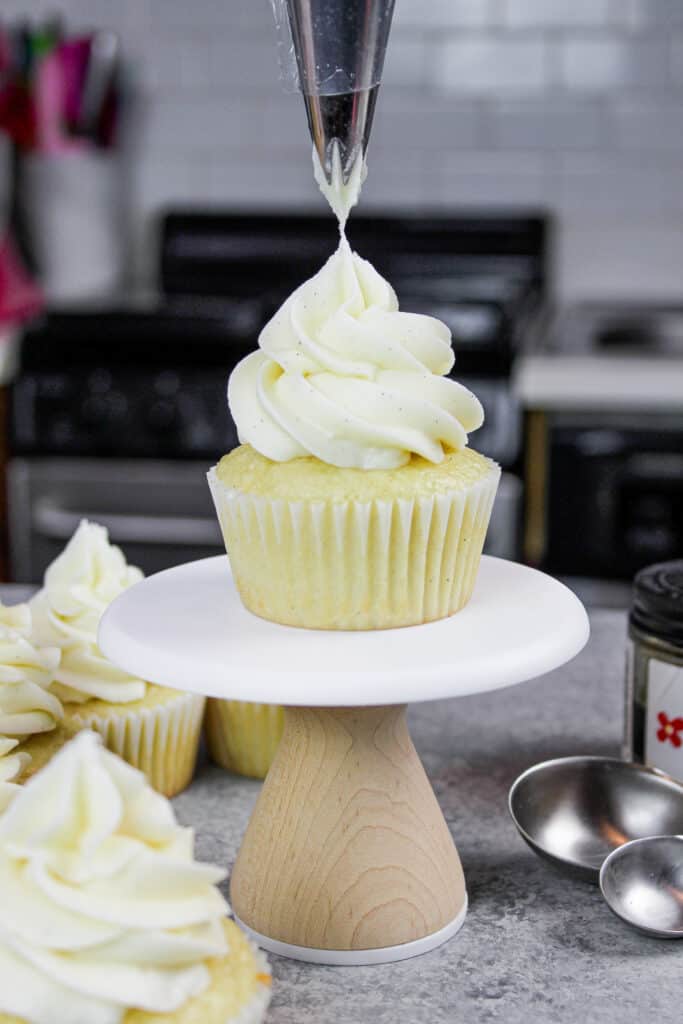
They’re beautiful!! It’s like you can see that warm, delicious flavor incorporated throughout the cupcake.
I also think that the vanilla bean paste adds a stronger, better flavor than vanilla extract. If you haven’t tried it before, I highly recommend giving it a try. It’s not too expensive, and it really elevates the flavor of these cupcakes!
If you don’t want to buy another ingredient or prefer using vanilla extract, that’s ok too! Just be sure to use real vanilla extract. Imitation vanilla just doesn’t do it for me flavor-wise.
Tips for Making the Best Gluten Free Vanilla Cupcakes
- Don’t be afraid to over-mix your batter! Vigorously whisk your batter for a few minutes once it’s made, to help give it structure.
- Let your batter sit for about 30 minutes before baking to help the gluten-free flour absorb more moisture from the batter.
- Properly measure your gluten-free flour (spoon into the cup measure then level) or use a kitchen scale to measure your dry ingredients.
- Use a cookie scoop to easily fill your cupcake liners.
- Ingredients at room temperature mix together better, so be sure you set out any cold ingredients ahead of time.
- If you want to make a gluten-free cake, I recommend using my gluten-free vanilla cake recipe.
- Use vanilla bean paste to give your cupcakes an amazing flavor!
Making These Gluten Free Vanilla Cupcakes In Advance & Storage Tips
- Make your cupcakes in advance! If stored unfrosted in an airtight container, they can last for 2 days at room temperature, up to a week in the fridge, or up to 3 months in the freezer.
- Make your frosting ahead of time, too, or save any leftover frosting! It can be stored in an airtight container in the fridge for up to a month or in the freezer for up to 3 months. Be sure to give it a good stir once it thaws to get the consistency nice and smooth again.
- Frosted cupcakes can sit out at room temperature overnight in an airtight container, but I find frosting them right before serving is best.
Let Me Know What You Think!
If you try this recipe for gluten free vanilla cupcakes, I’d love to hear what you think of it! Please leave a rating and let me know your thoughts in the comments section.
Gluten Free Vanilla Cupcakes
Ingredients
Gluten Free Vanilla Cupcakes
- 1 1/3 cup gluten-free flour 156g
- 1 cup granulated sugar 200g
- 1 1/2 tsp baking powder 6g
- 3/4 tsp fine salt 4g
- 1/2 cup water 120ml
- 1/2 cup full-fat sour cream, room temperature 127g
- 1/4 cup vegetable or canola oil 56ml
- 1 large egg, room temperature 56g
- 2 tsp vanilla extract or vanilla bean paste 8ml
Vanilla Bean Buttercream Frosting
- 1/2 cup (1 stick) unsalted butter, room temperature 113g
- 1 tsp vanilla extract or vanilla bean paste 4ml
- 1/4 tsp fine salt 2g
- 1 3/4 cups powdered sugar 220g
- 1 Tbsp heavy whipping cream, room temperature 15ml
Instructions
Gluten Free Vanilla Cupcakes
- Preheat your oven to 350°F (175°C) and place 12 cupcake liners in a cupcake pan.
- Add the gluten free flour, sugar, baking powder and salt to a large bowl and gently whisk together.
- Make a well in the center of your dry ingredients and add the water, sour cream, vegetable oil egg, and vanilla bean paste or extract.
- Whisk together the wet ingredients together until they start to combine, then slowly begin to mix them into the dry ingredients.
- Mix for a couple minutes to help give the batter structure. You don't have to worry about over-mixing because there's no gluten in this batter!
- Let the batter sit for about 30 minutes to give the gluten free flour time to absorb more of the moisture in the batter. This will help prevent the cupcakes from having a gritty texture.
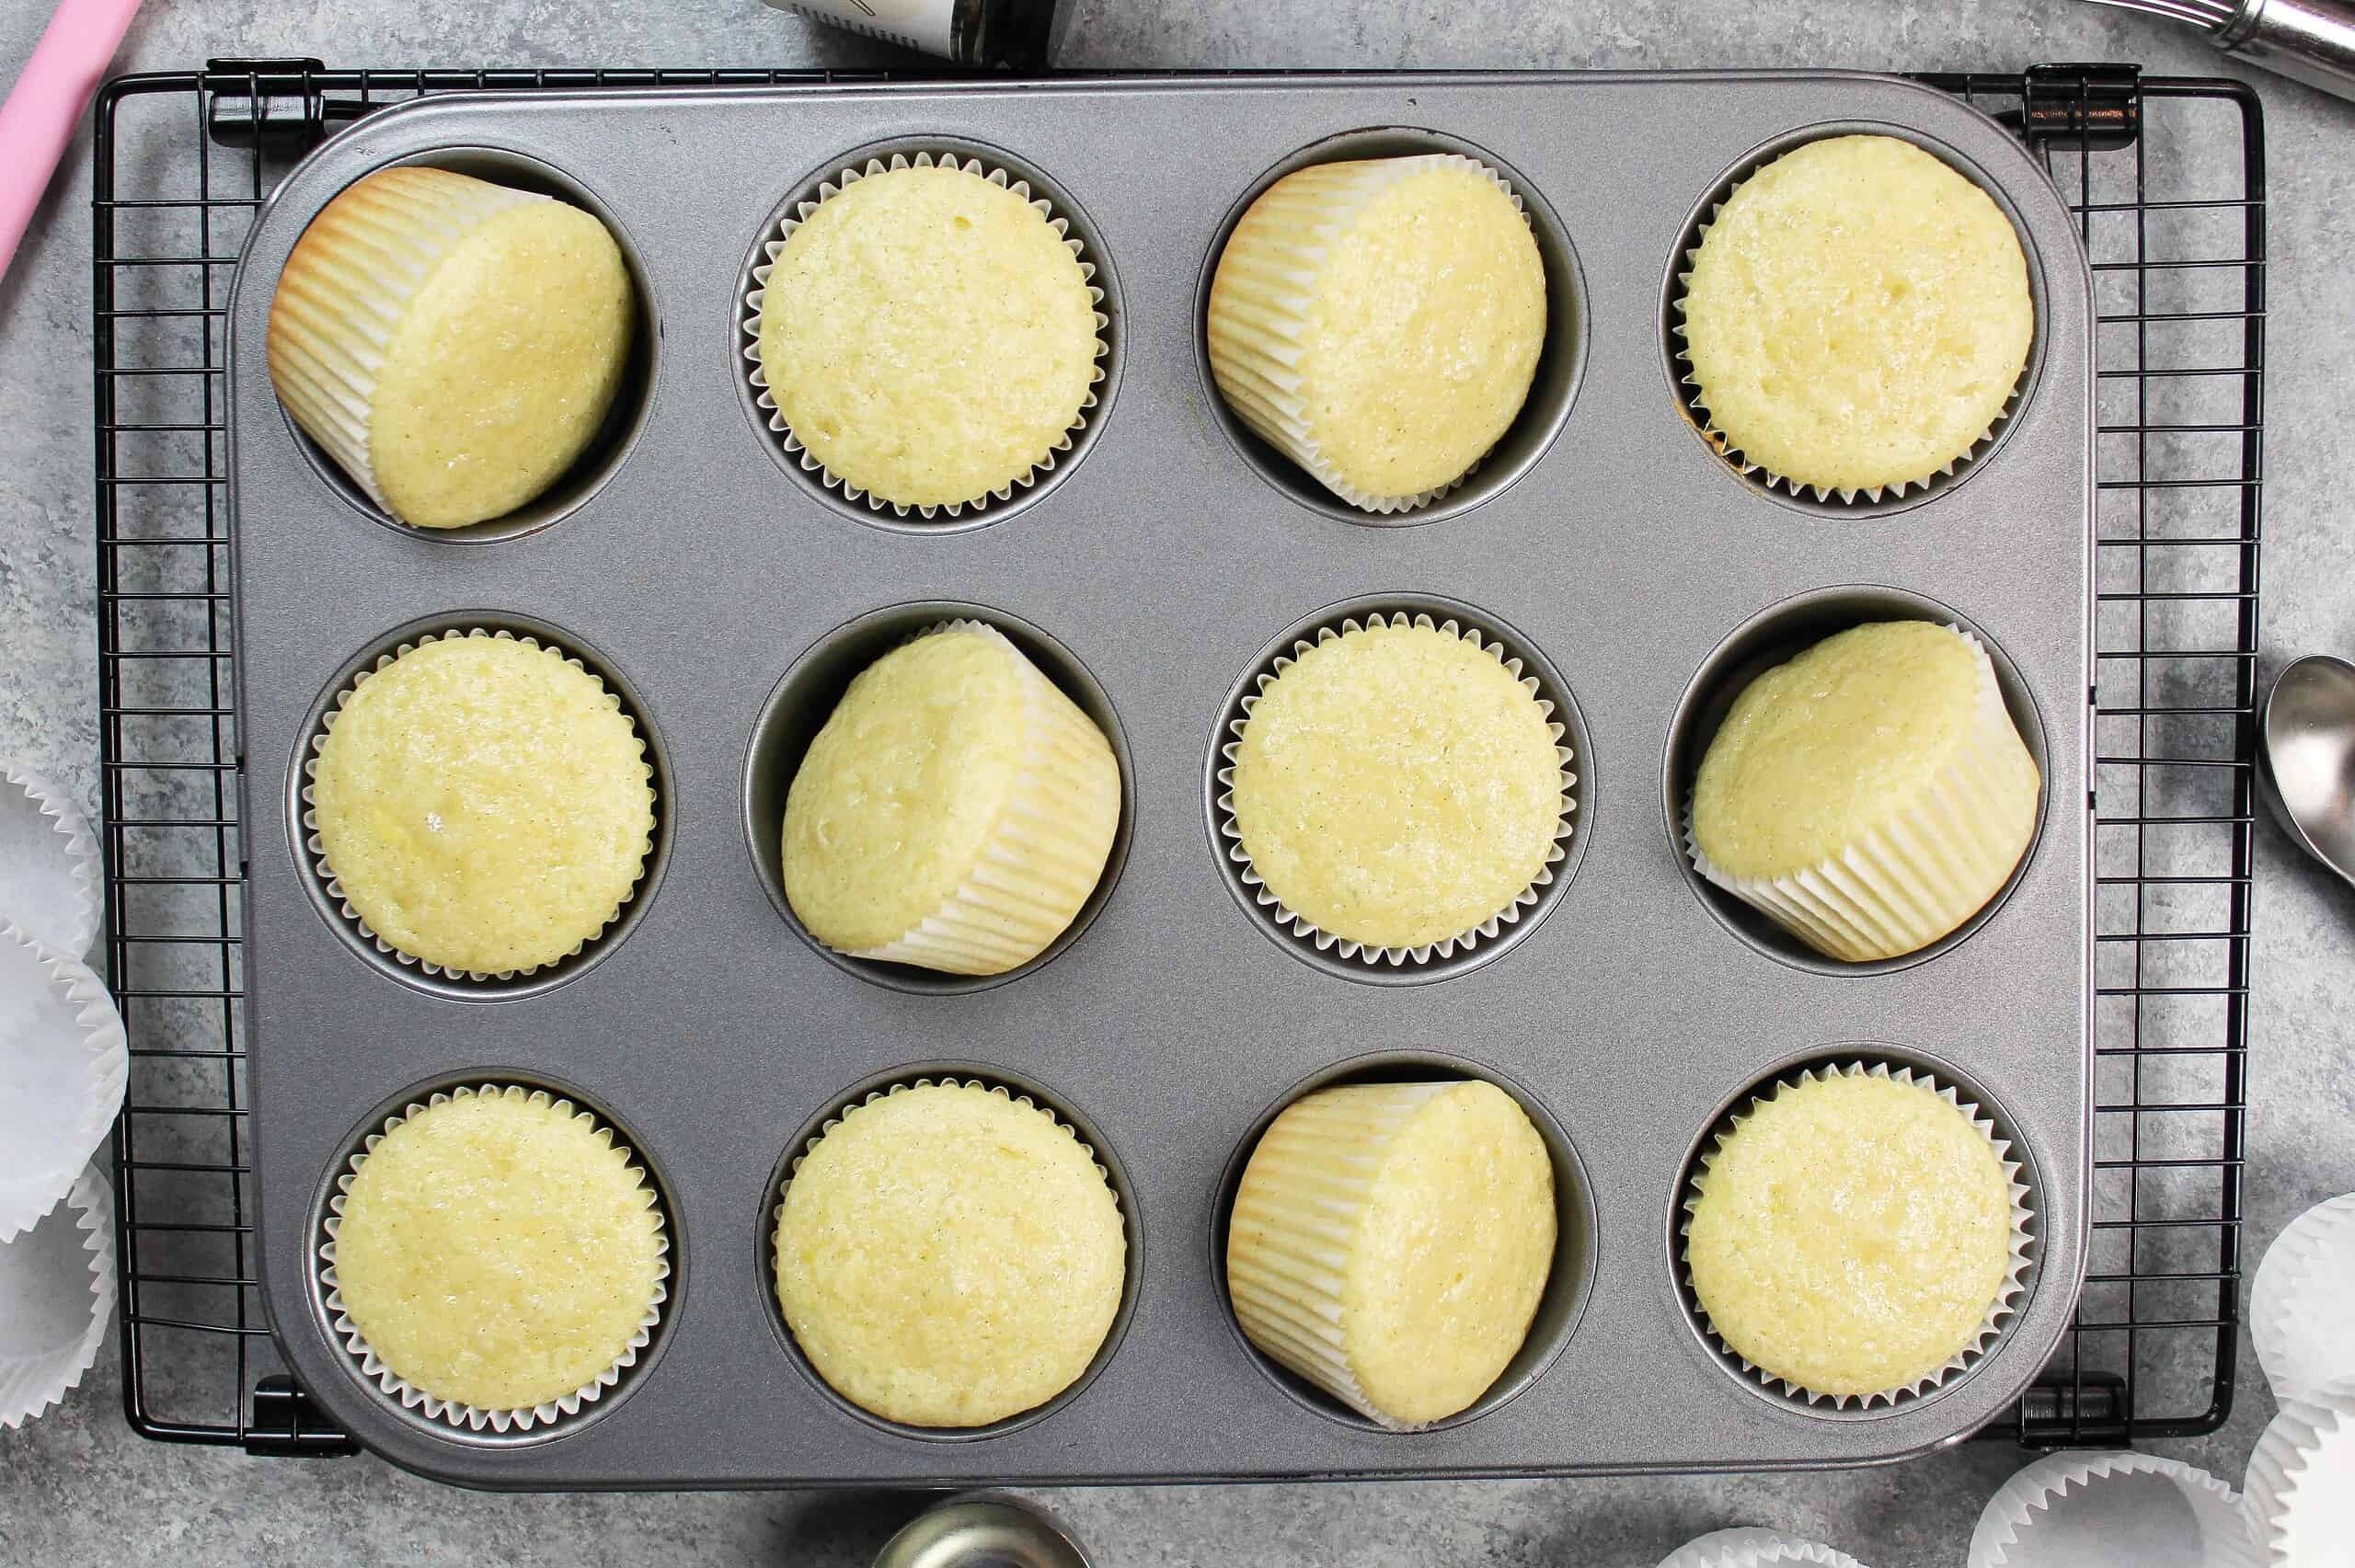
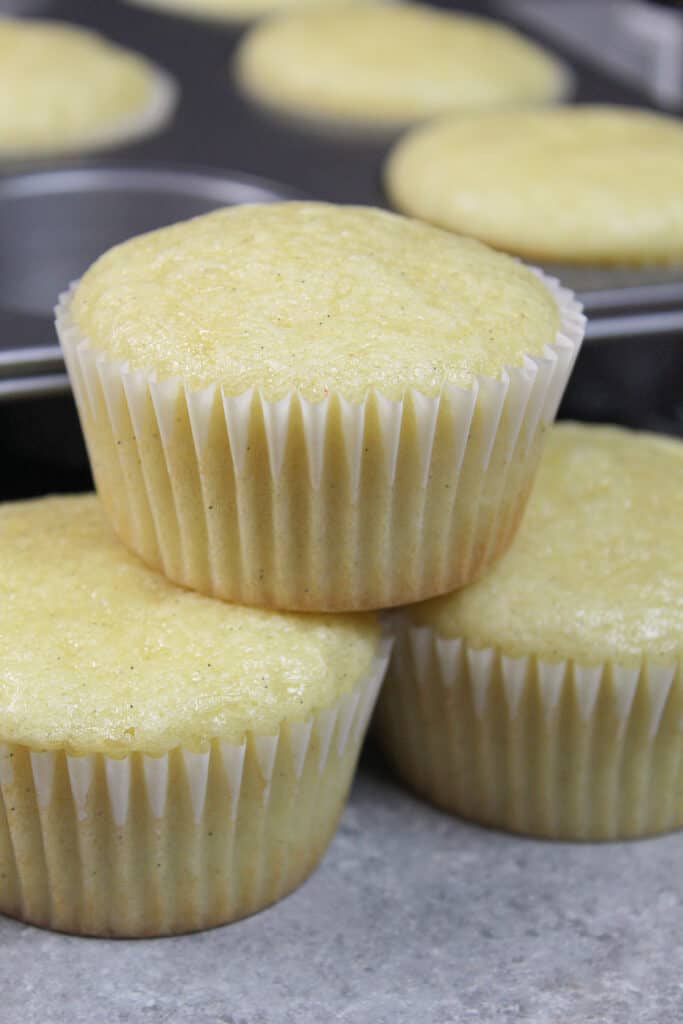
- Fill the cupcake liners about 2/3 way full, dividing the batter evenly between the liners. I like to use a cookie scoop to help me fill them evenly.
- Bake for 18-20 minutes or until a toothpick comes out clean.
- Let the cupcakes cool for 5 minutes, then move them to a cooling rack to finish cooling.
Vanilla Bean Buttercream
- Beat the butter on a medium speed for 30 seconds with a whisk or paddle attachment until smooth.
- Mix in the vanilla bean paste or vanilla extract and salt on a low speed.
- Slowly mix in the powdered sugar and heavy cream on a low speed until they are fully incorporated. Scrape the sides and bottom of the bowl as needed with a rubber spatula.
- Continue to mix on low for a minute to make the frosting extra smooth and the desired consistency is reached.
- If the frosting is too thick, add in additional cream (1 Tablespoon at a time). If the frosting is too thin, add in more powdered sugar (quarter of a cup at a time).
- Place the buttercream in a piping bag fit with your favorite frosting tip and pipe large swirls onto the fully cooled cupcakes.
Video
Notes
Making Mini Gluten Free Cupcakes
This recipe can also be used to make mini gluten free cupcakes! One batch of batter makes about 40 mini cupcakes in a mini muffin tin. Bake them for 10-12 minutes at 350 F / 175 C, or until a toothpick inserted in the center comes out with a few moist crumbs.Tips for Making the Best Eyeball Cupcakes
- Ingredients at room temp mix together better. Be sure you set out any cold ingredients ahead of time.
- Properly measure your gluten free flour (spoon into the cup measure and then level) or use a kitchen scale to measure your dry ingredients.
- Use a large cookie scoop to easily fill your cupcake liners. It also makes sure your cupcakes end up being the same height.
- Bang your cupcake pan on the counter before putting it in the oven. This brings any air bubbles that are trapped in the batter to the surface.
- Seal off the top of your piping bags with a rubber band to prevent any frosting from seeping out the top of the bag and make the piping bags easier to use.
Gluten Free Cupcake Variations
To make gluten free and dairy free cupcakes, I recommend using gluten free flour in my dairy free cupcake recipe.Making These Gluten Free Cupcakes In Advance & Storage Tips
Make your cupcakes in advance! If stored unfrosted in an airtight container, they can last for 2 days at room temp, up to a week in the fridge, or up to 3 months in the freezer Make your frosting ahead of time too or save any leftover frosting! It can be stored in an airtight container in the fridge for up to a month, or in the freezer for up to 3 months. Be sure to give it a good stir once it thaws to get the consistency nice and smooth again. Frosted cupcakes can sit out at room temperature overnight or be stored in the fridge for up to a week in an airtight container. However, I find frosting them right before serving is best.Nutrition
Other Gluten Free Recipes You Might Like:

Hi, thank you for this recipe. I will try. What brand Pr gluten free flower Did you use?
Hi Dalila,
Yay! I used the king arthur gluten free flour blend with these ones, and loved the way it turned out. Hope that helps, happy baking!
Hello,
I would really like to make this cupcake recipe however, I am wanting to make them both gluten free and dairy free. The only ingridient in the cupcake itself in this recipe is sour cream, do you have any suggestions of what I could use instead of sour cream that is dairy free. I completely understand if you dont know as you likely havent made these amazing looking cupcakes dairy free before but thankyou anyway! 🙂
Hi, I have some vegan friends and very often have to think outside the box- I think that dairy free natural yogurt should work ok,
I hope that helps a little x
Hi Chelsey! Can’t wait to try this recipe! Quick question, at what point does the Xanthum Gum get added? Is it already in the flour you recommend? Thanks so much!!
Hi Christina,
Most gluten free blends already have the xanthan gum added in, so you don’t have to worry about adding it 🙂
Hi Chelsey. Very excited about making this recipe as I need something GF for this weekend…. Can I make this recipe and instead of making cupcakes make Cake? I have 4 8X2 rounds pans I am going to use.
Hi Destiny,
I haven’t tested this cupcake recipe as a cake, so sadly I’m not sure! I’m working on a GF vanilla cake recipe right now though, and am hoping to share it soon! Stay tuned 🙂
Hello! Could coconut oil be used in place of vegetable oil? Thanks! Aimee
Hi Aimee,
I haven’t tested it out, but I would think that it should work just fine!! If you try it, please let me know how it turns out 🙂
@Chelsweets,
I made this yesterday with Coconut Oil and Bob’s 1:1flour but used cheesecake flavoring and raspberry buttercream! To die for! Loved! The coconut oil works fantastically!
Hi Chelsea! Have you used this in 6 or 8 in round pans? What are some tips for those?
Hi Katie,
Sadly I haven’t! I’m working on a separate gluten free vanilla cake recipe, which i’m hoping to share soon! 🙂 Stay tuned!!
Hey I love how you have detailed the whole recipe my quick question is can this same recipe yield a 1kg cake or?
Hi Maryanne,
I haven’t tested this recipe out as a cake layer, but I’m planning to this weekend! I’m also playing around with a separate GF vanilla cake recipe, and I’m hoping to share whichever works best soon. Stay tuned <3
Made these today using King Arthur’s measure for measure flour. I’m new to gluten free baking…can’t say I’m a fan in general of it, but it’s a necessity at the moment. Thanks for the tip about letting the batter rest. I made another gluten free vanilla cupcake recipe today as well and when I tasted that batter and cooked cupcake it was very grainy. Your recipe solved that problem (and they baked up fluffier too). While I still prefer the cupcakes I make that have gluten, these will be the gluten free version I make from now on. Thanks for the recipe.
Aw I am so happy to that you enjoyed this recipe Cindy!! Gluten free baking is definitely different, but with the right tricks it doesn’t have to be so bad 🙂 Happy baking!!
Can I replace some ingredients to make it vegan:
Sour cream for vegan sour cream or applesauce ;
The egg for ground flaxseed?
I haven’t tested that out, but you can definitely try it! Please let me know how it goes if you do 🙂
@Nitacha, how did they turn out? I need to make a vegan one also.
I made these and they were by far the best cupcakes ever!! They were much better than anything we have found in a bakery! They were light and moist and pure heaven! Thank you so much for sharing!!
Aw I am so happy to hear that Renee!! Thank you 🙂 Happy baking!
Do you think I can use this with the gluten-free chocolate cupcake recipe to create marble cupcakes? If not, any ideas on how to do marble cupcakes gluten-free?
Hi Debbie,
I think that using this with my GF chocolate cupcake recipe to make marbled cupcakes would work great!! You’ll end up making about 2 dozen with both batches of batter, but I think they’ll be delicious 🙂 I’d love to hear how they turn out!!
Hi Chelsea, I’m also a home grown baker who (almost) makes my income by baking. I’ve been dying to find a good and new gluten free vanilla recipe and then I found yours. I’ve used your chocolate one and it’s divine, but this vanilla one was not. At all. Like not even a little bit lol. I know it’s something I did but I’m not sure what I could have done. I’m a professional baker so I usually know when I’ve made a mistake but in this case, I have NO CLUE what I’ve done. My cupcakes came out gummy and the texture was almost bread-like. The flavor was good but they were so bad they were almost inedible. Do you have any idea where I may have gone wrong? I’ve read and reread your instructions and followed them to a tee, and would you to help me figure this out. I know you’re really busy, so no worries if you can’t/don’t want to. I’ll keep trying! Thank you!
Heidi from Heidi’s Baking Table
I am so sorry to hear that Heidi! We’ll definitely get to the bottom of this together!!
My first guess would be the flour you used, what gluten free flour blend did you use? did you overmix the batter a bunch at the end, to help give the cupcakes the structure they need to bake up?
These were so good! I’ve made the recipe twice already. Once as normal sized cupcakes and then as mini cupcakes. I had leftover mini ones so I froze them for about two weeks until I needed to show up with dessert for a family birthday dinner and they still tasted great. I used a plant based sour cream too and everything turned out amazing!
That’s awesome! I haven’t tried plant based sour cream before but now I’m super curious! I’ll have to look for it my grocery store next time I go (or once things settle down here in NYC and the grocery stores get restocked). Now I also want to make mini cupcakes 😛 Haha you’re giving me some serious baking inspo!!
It’s not your fault! I did something clearly because based on reviews this should have worked beautifully.
I used the Bob’s Mill baking mix which is also what I used for the chocolate ones and they were divine. Per your recommendation I ordered the King Arthur brand online and will be attempting these again because I’m determined to nail them.
I let the batter rest for a half hour, I over-mixed, and I followed your specifications to a tee. I’m wondering if the problem wasn’t the actual batter but maybe in the baking process. Perhaps I pulled them out too early and they didn’t have a chance to fully bake and set. No idea. I’ll let you know how my second attempt goes! Thank you for responding!
Heidi
Hopefully that’s it!! Fingers crossed your next attempt turns out great 🙂 Can’t wait to hear how it goes!!!
Hi! I baked the gluten free vanilla cupcakes and they turned out amazing! But the batter was a little bit runny. I was wondering what I could do next time for them not to be so runny. I would love to know what I could do??
Hi Camila,
So happy to hear that! That’s totally fine if the batter is a little runny, that’s just from all the ingredients being at room temp. The batter is sometimes thicker if some of the ingredients aren’t at room temp, but they cake up best if they are. You could add a tiny bit less water to make the batter thicker, but that will make the cupcakes a bit denser. Hope that helps, happy baking!
Destiny – I would like to make this as a cake too. Did you and how did it go?
The second attempt was better. I tested them two ways: baking half immediately and letting the other half rest for a half hour as recommended. Something weird happened. The batch I baked immediately turned out really well. The texture was much better and the weren’t sticky on top. The batch I allowed to rest had almost a bread-like texture to it. They weren’t as fluffy and were hard to swallow. I wonder if the humidity in my home is affecting it. Or something else I can’t discern. Thankfully the batch I baked immediately was great so I feel good after the second attempt that I have a workable recipe. Thanks for all your help!
Do you live in a really humid area?? Maybe that is playing into it! I’ve never really had to bake in a humid climate so I don’t have much experience with the struggles that come with that :/
Happy to hear the one batch worked out well though!! I really do respect your determination to get these just right 🙂
I am nothing if not determined ? I do live in a humid area. I’m in Kentucky and it’s been in the 60’s and 70’s and very humid. I caught my buttercream trying to melt on me the other day. I scolded it fiercely.
I hope you’re staying safe in New York! I’ve actually thought a lot about you (not in creepy way I swear) during all of this and have prayed for you a lot as well as the rest of the state. America cares about New York, I promise. Thanks again for your help!
Haha that’s wild!! I can’t imagine it being that hot out right now!
You’re too sweet Heidi! Things here in NYC have been ok, but the city is pretty much shut down! It’s a good thing though!
Hope you’re doing well in Kentucky!! <3
Came out AMAZING!!!
We made a few changes: (1) in some of them we put 1 spoon of Nutella in the middle – came out PERFECT!!
(2) Since we don’t like frosting, we just decorated with whipped cream.
The kids (and us) were in heaven! These are the best Vanilla Cupcakes we’ve ever eaten, GF or not! Thank you!!
Omg that sounds DELICIOUS!!! So happy to hear that you guys enjoyed these Shiri 🙂
I had the same question! I’ll look forward to the GF vanilla cake!
It works!! Double the recipe and make 3 6-inch cake layers! bake for 35-37 minutes 🙂
Hey Chelsweets, I have had a request to bake a cake for a birthday boy, who has a gluten and egg allergy. I really want to try this recipe, but what would you suggest I replace the egg for? I know this is a cupcake recipe, and I saw you said you were working on a cake version but I’m in need of something now as I have to have his cake made by the 16th…. and I want to do a practice run before then to make sure the taste and texture is great! I’m open to any suggestions as this is a first for me!!!
Thanks- Jessica
Hi Jessica,
So sorry for the delayed response! Flax eggs would work great (ground flaxseed and water), or you can use 1/4 cup unsweetened applesauce in place of each egg!! You can taste the applesauce a bit, but it gives the cake a super tender texture. Hope that helps, happy baking!
Softest cupcakes I have ever seen! My dad loves them. And I haven’t even iced them yet ?
Love hearing that Rhianna!! Yay 🙂 I know, they’re so tasty they barely need frosting!!!
Just curious, why do you use water instead of milk?
Hi Bethany,
Water gives the cupcakes a lightly, fluffier texture! 🙂
Hey! This recipe turned out awesome!! I did substitute veg oil for coconut oil and plain yogurt for the sour cream as that’s what I had in the house, turned out great! I did find that the butter cream recipe made a TON so I would cut it in half next time but very yummy! THANKS! I’ve been looking for an easy gf cupcake recipe for a while!
So happy to hear that Jessica!! I def am heavy handed with the frosting and like to use a lot, so you can totally make a smaller batch next time if you use less 🙂 Happy baking!
The first I did this they turned out AMAZING. I couldn’t believe the fluffiness.
I tried again yesterday (same ingredients, only 1 week later so no temp changes) and they were so wet in the middle it was like they didn’t cook. I even baked for longer time.
I thought maybe I didn’t mix enough. So I tried again and I OVER MIXED! but still the result.
I’m wondering if the first time I didn’t over mix as much as the 2nd and 3rd and thats why they were perfect. Can you overmix the overmixing? lol.
Hi Rhianna,
That is wild! I have never been able to overmix the overmix step, but it’s hard to know if you did or not without being able to see how you made them. Did you make the batter by hand or with a stand mixer?
Are you sure your oven was fully preheated? That’s the only other thing I can think of that may have caused them not to turn out. Hopefully we’ll be able to figure it out together!
I know it was so strange! I did them all by hand with a whisk. I used the same tools, same ingredients ? I’ll try again!
Yah that’s what I do too! That’s nuts!! Fingers crossed the next batch / all future batches are a success <3
I bought a cookie scoop to help make them even. I got the number 40 one like in your link. Do you do 2 scoops per cupcake? That’s what I did and looks about right.
trying to work out what I did wrong the second Time I made these so fingers crossed
Hi Rhianna,
That is exactly what I do!! I do about 1 and 3/4 scoops, or until the batter is divided evenly between the liners 🙂 Hope that helps for next time!!
Hi there! We tried these cupcakes for our st.patricks day cupcakes due to my daughters newly wheat allergy. And we LOVED them! My husband said they were better then regular ones and I agree, so moist! A question my daughters birthday is coming up next week and I wondered if you ever done this recipe for a cake? I just wondered if I’d get the same moist result and if I need to double the recipe. Thankful for answer!
I am so happy to hear that Mariah! This recipe can be double to make a 6 inch layer cake with 3 layers, or you can try my gluten free vanilla cake recipe!
Here’s the link: https://chelsweets.com/2020/05/11/gluten-free-vanilla-cake/
Hope that helps, happy baking!
I made these cupcakes with almond flour and followed the recipe to a T. They ended up sinking in the middle. Extremely disappointed in how they ended up.
Hi Julia,
So sorry to hear that! I share in this post that it’s super important that you use a gluten free flour blend, and not almond flour :/
It just doesn’t bake up well in this recipe, and the texture isn’t as good. Next time I recommend using a GF flour blend, and they should bake up great. Hope that helps for the future!
Can you use this recipe to bake a small cake, rather than cupcakes?
Hi Anna,
You can, but it’d be easier to just use me GF vanilla cake recipe 🙂 here’s the link: https://chelsweets.com/2020/05/11/gluten-free-vanilla-cake/
I made these cupcakes today and no idea what I did wrong. I followed the recipe to the letter. I used a GF flour mix called Better Batter (From Gluten Free on a Shoestring). Its usually a very good flour no problems in past. The dough was very thick even after the water and sour cream. They raised nicely in the oven, however, as soon as I took them out they all sunk. The flavour is good but they are very doughy and dense, I cooked them longer than 19 minutes as the tootpick didnt come out clean at 19. Baked at 350 degrees. What the heck did I do wrong, so many other comments saying how good they are. The better batter flour has a similiar mix to the King Edward flour?
Hi Patricia,
I’m so sorry to hear that! If they sunk in the middle, it sounds like (surprisingly) they needed to bake a bit longer. Were all your ingredients at room temp, and did you let the batter sit before baking them?
I haven’t tried that GF flour blend, but that could also be the reason. I know some people have had trouble using other GF flour blends, but it worked when they used the King Arthur type. Hope that it’s one of those, and that it’s an easy fix for next time <3
Thanks for replying! I did use room temp ingredients and actually baked for an extra 10 minutes. The better batter mix is very similar to King Arthur with brown rice and same starches! Oh well I tried maybe it’s my oven not getting hot enough ! Keep up with the great recipes looks like other people have had great success with this one just not me lol!!!!
Hi Patricia,
OMG! Ok you def baked them long enough then!!! Maybe try getting a cheap oven thermometer on amazon to test out your oven temp?? That’s all I can think of too :/ Hopefully the next recipe of mine you try will turn out better <3
@Chelsweets,
Better batter definitely produces different results than other GF flour blends. Sometimes it’s better and other times it’s worse. I have a french baguette recipe that truly only works with Better Batter. In other recipes, I find blending the Better Batter blend with oat flour (80/20) helps with texture and taste. Looking forward to trying your cupcake recipe today.
Hi! If i wanted to make these chocolate cupcakes can I just add id cocoa powder?
Hi Chelsey! This recipe really is on point. I was quite skeptical when I was letting my batter rest that these would produce a good product, and you really can’t even tell they’re GF. Also good call on the vanilla bean paste- I used extract this time just because I was making a test batch and I agree that paste is the way to go here. Also for any one interested I used Trader Joe’s all purpose GF flour and these turned out beautifully. This will definitely be my go-to GF Cake recipe. Thanks for putting in the grunt work, Chelsey!
Thank you Chelsey!!! This recipe is perfect!!! I used KA flour, which is my favorite. They came out moist amd fluffy ?
UGH! I don’t know what I did wrong, but I have tried 3 times and every time it come out gummy like texture! Idk what I could have done wrong. I have made your gf chocolate recipe and it is so perfect! All ingredients were room Temp, have an oven thermometer, baked a little longer, and still have that weird texture. I used bob mills 1 for 1. Any tips? This is the first recipe that I just can’t get right.
Also weight measure all
The ingredients.
I made them yesterday and was disappointed. They were very gummy. Good flavor. They rose nicely but then deflated and sank in the middle. I followed the recipe as written without any substitutions. Is there to much moisture? Did I overmix?
Julie exactly what happened to me when I made them!!!
Julie – the same thing happened to me. I cooked them a few minutes longer than indicated and they ended up in the garbage.
WOW! Made these for my son’s birthday for his girlfriend cause she can’t have gluten. Used the King Arthur GF blend flour. Followed recipe exactly, accept for the cooking time, took closer to 25/30 mins to cook. I learned from the GF cake recipe, which came out ok but could have been better, even though the toothpick came out clean it would have been better if it was cooked a little longer!! Cupcakes came out awesome and the flavor was perfect!! I also filled them with strawberry jam. Added a little strawberry jello so it didn’t make the cake soggy! Worked like a charm!! Definitely will use this again for future desserts when gf is needed!!
I had the exact same problem! I used bob red mill’s 1 to 1 flour blend. Oversized the batter, and let is sit for a little over half an hour. They did not come out fluffy!
Chelsea, help!!!
I need to make birthday cupcakes for a friend that is Celiac this weekend. I tried this recipe and they didn’t turn out well for me at all. Trying to decide where I went wrong. They turned out very gummy and slightly greasy. I whisked the batter together thoroughly and then let the batter rest for 30 minutes. I baked for 18 minutes and they passed the poke test and toothpick test. When I let them cool they seemed to deflate a bit and I could squeeze them down like a greasy sponge.
I used vanilla extract instead of paste, but that was the only substitution. I used Bob’s Red Mill 1-for-1 gluten free blend. I used a digital scale to weigh the ingredients.
I am a very experienced baker, yet have no experience with gluten free baking, so any advice on where I went wrong will be SO appreciated.
Hi Chelsea, would I be able to add sprinkles to make like a funfetti ? Thanks Tammi
Hi what kind of sour cream did you use for this recipe? Different sour creams in the market have either high fat or low fat content. I’m wondering if this can effect the over all texture of the cupcake?
Can I use a little lemon juice for lemon cupcakes?
The taste of these is devine, but like many other readers, after 2 batches and following the recipe to the t, the cupcakes sink in the middle and spill over the pan. Unfortunate given their devine taste.
This recipe is the second I’ve tried from you, and it didn’t disappoint! Monday night was my first foray into making cupcakes and frosting because I was looking for a gluten free dessert to make for my coworker that the whole office would like. I made the chocolate cupcakes first because, hello, chocolate! And I decided to make the vanilla Tuesday so the office would have options for the celebration on Wednesday. I’m so glad I found this blog. This recipe is easy, I only had to buy two ingredients that I didn’t already have, and they came out delicious. Everyone in the office loved them, and several commented that they couldn’t tell they were gluten free.
Yum! Gonna try this! I learnt a lot about gluten free baking today, thank you!
Hi! Just wondering if you have any experience with substituting monk fruit sweetener for the sugar and how that would turn out?
I’m really confused how this recipe was supposed to work. I followed the instructions but it all turned out super dry, even after adding half a cup more heavy cream to the buttercream frosting mixture. This was just disappointing.
I made this today, it’s really good. I substituted the sugar for date sugar & added two tbs cocoa powder to the dry mix. Substituted the egg for egg replacer and oil subbed with 1/4 cup applesauce.
The sour cream I subbed with thick coconut cream. Great recipe. Everyone loves.
Hi! I tried these and they disn’t come out so nicely. I notices the GF flour I used didn’t hace xanthan gum in the mix. Could this be the cause? How much should I add? Thank you.
thank you for posting this recipe. I used all the same ingredients as in the recipe, all with in date… oven thermometer read 350 F… egg at room temp…..but cupcakes were a bit gummy and did not really rise … Any ideas?
thank you
Ahh! I live in Denmark and did NOT think this recipe would work with the GF flour blend I have here… but it did! These are PERFECT! Thank you!!! (The flour blend is Semper Fin Mix, if anyone in Scandinavia is reading 😛 )
Hi !
I am going to be making these tomorrow for a GF friend. I bought Bob’s Red Mill GF 1 to 1 Baking Flour and the Bob’s website says there are a 148 g to a cup of their flour. Should
I trust their site or go with the amount of grams in your recipe ?
Thanks for all of your great recipes !
Thank you for all this great information. I am new to GF baking & have learned a lot.
Oh my god. Ok. I just have to say something. I’m in the middle of Mother’s Day cupcake bouquet prep. These cupcakes turned out BETTER than the regular (non-gf) ones I made. I am absolutely kicking myself for not using your regular vanilla cupcake recipe for those. You have never steered me wrong. I have half a mind to remake them!!!! Thank you for being awesome and knowing how to write and convey rock solid recipes. Bless.
Hi, so I’ve made this before and they turned out beautiful ??
But this time I am trying to change the flavour by adding pink champagne to the batter instead of water. Do you have any recommendations for me?
Hi,
Is there any way to half this recipe? Making some for a friend of mine and I only want to make 6.
Thanks!
Can this recipe be made into a cake by doubling it?
Best cupcakes ever. We folded in 1/4 cup finely chopped fresh strawberries at the end and substituted vanilla extract for vanilla paste. We made mini cupcakes and baked for 13-15 minutes. King Arthur measure for measure gluten free flour.
I’ve just made a batch of these and they are sooooo yum! I didn’t have vegetable oil so I swapped the exact weight with melted butter. I cannot explain to you how delicious they are!
Thanks for the recipe ?
I made this recipe for my niece’s baby shower as my sister is gluten free. My sister is also lactose intolerant so I subbed regular sour cream for lactose-free. They turned out incredible and were super moist and delicious. They were topped with your American buttercream using almond milk and Becel. It was nice making a recipe where it says it makes 12 and it actually does. Thank you for making a wonderful recipe that can be adapted for dietary restrictions.
These are delicious – fluffy and not grainy. Thank you for the recipe
Where’s the xanthan gum in the recipe?
This recipe sounds great!
Do you have a recipe for gluten free chocolate cupcakes?
Hi. This sounds great. Can I substitute Greek yogurt for the sour cream
I’d like to make the mini cupcakes but the pan is for only 8. Will the batter be ok sitting all the extra time?
I love your gf chocolate cupcakes, so I want to give these a try too! If I wanted to just use vanilla beans, how many do you think I would need? I’ve been wanting to buy some from our local co op to use in some of my baking. Would scraping the vanilla out of the beans and then measuring 2 teaspoons be the same as using the paste? Thanks!
This is the third recipe that I have used and I must say by far the best!! The consistency is amazing! The one I used before was soooo dry and hard even though it tasted good. It was almost like a muffin. One question, I didn’t have vanilla paste and used extract instead. Is the paste strong enough to dampen the taste of the sour cream? It is rather strong. If not can we use yogurt instead of sour cream? Thank you so much, you saved me as I needed the cupcakes for my sister’s get together.
I don’t know what happened but my cupcakes sunk. I made these once before and this didn’t happen, I’m not sure what happened
I have not made this recipe but I will! Will it work for cake layers or do you have a different recipe for cakes?
I am not generally a fan of GF baked goods. Would rather just skip to a chocolate bar! But I tried these using Robinhood GF flour blend and lactose-free sour cream. I had one without icing just now, and thought “not bad.” And then ten minutes later I was craving another one! They are definitely a winner for GF baking.
Hi i was wondering if you could swap out the water for milk? Have you tried or do you know if I swapped the water for buttermilk if that would change the cupcake too much or would it help with creating more moisture to the cake?
Hi! I made the recipe, it’s great! Some of the cupcakes have a big air bubble in the bottom. They taste just fine. What could have happened and how can I prevent this from happening again? Thanks!
I made these exactly as directed except I used less sugar and they are horrible. So gummy and nasty texture and funky taste. I’ve never had this happen with any recipe so I’m not sure what happened
Hi Jessica,
Reducing the amount of sugar will have a big impact on the texture of these cupcakes. Sugar isn’t just added for sweetness, it creates tenderness in baked goods and deepens color. This is especially important in GF baked goods, where you don’t have gluten to help with the texture of the cupcakes. If you use the amount of sugar this recipe calls for, the texture should turn out great. Hope that helps, happy baking!
Hello! This is one of my favorite recipes. However, the conversion to frame is not correct. When using grams – there is WAY more than 1 C of sugar in 200g. I’ve done it several times – using cups measurements and using the grams measurement, and they turn out very differently. Any tips?
@Cassie, *grams not frame 🙂
Hi Cassie,
Are you using a US measuring cup? Some countries have slightly different sized cups like the UK and Australia, but a standard US cup of granulated sugar is 200 grams. The only other thing I can think of is that maybe you’re overfilling the cup measure, and leveling it flat? Hopefully we’ll be able to figure out what’s causing your measurement to be so different.
You should be able to print the recipe without all the ads on it.
Hi Molly,
Agreed, and you totally can! If you click the print button underneath the picture on the recipe card, you’ll get an ad free version of the recipe that’s printer friendly 🙂 Hope that helps, happy baking!
I will be making these vanilla cupcakes….can this be made a white cupcake without the egg yolk?? Thank you linda
These are the best cupcakes ever. Everyone loves them. I actually played around with the ingredients and switched some. I used goat milk and goat yogurt instead of sour cream. I also used sugar cane juice sugar instead of regular sugar. Goat buttwr instead of regular butter. And olive oil instead of vegetable oil. So my version is cleaner and not as bad as the original one. But thank u! You really set it up nicely to replace with some adjustments. ??