
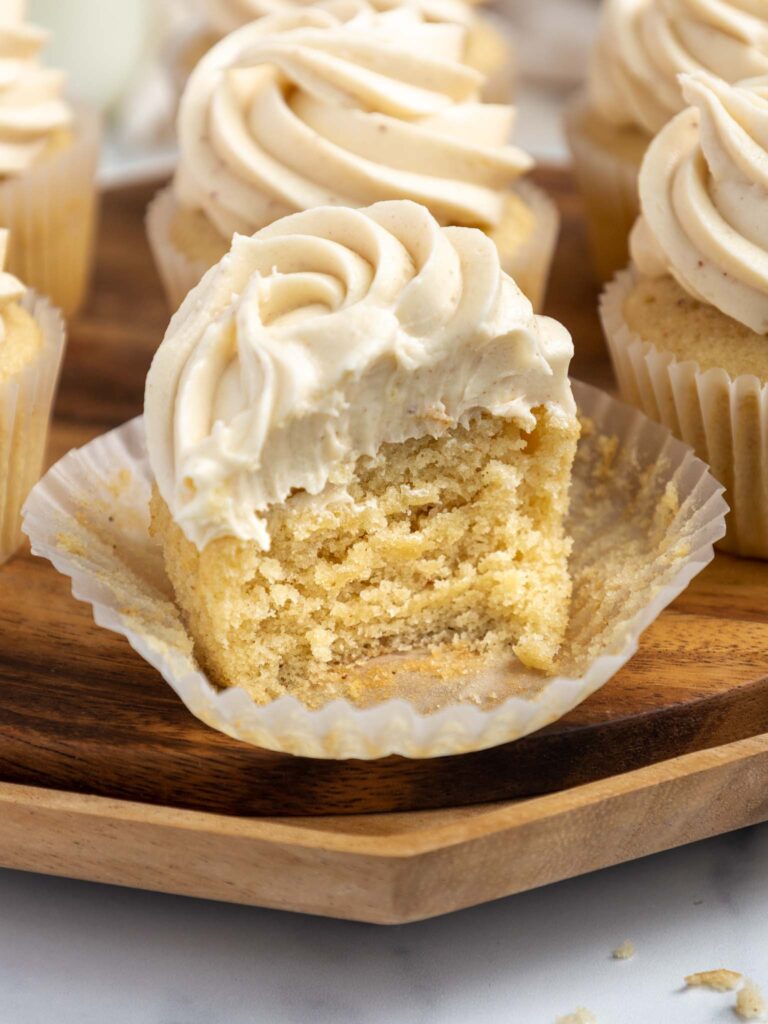
Vanilla Bean Cake
This vanilla bean cake bakes up tender, delicious, and studded with beautiful flecks of vanilla bean!
I know some people think vanilla flavored desserts are boring, but this recipe is anything but!
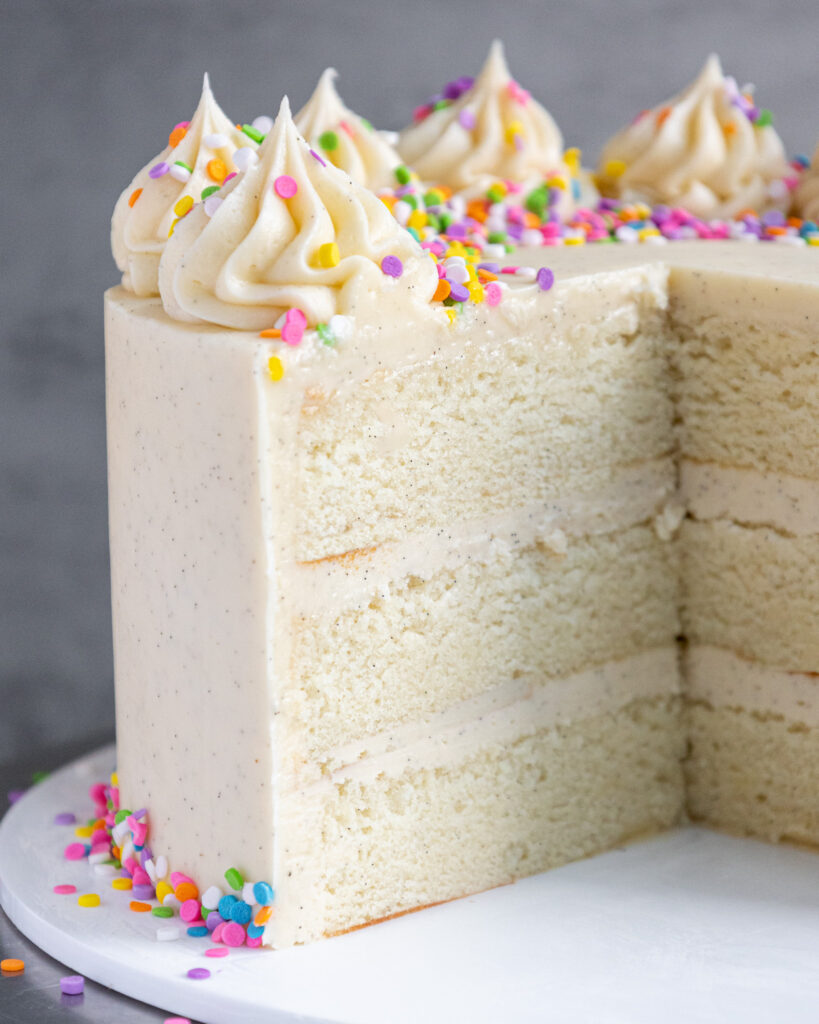
It uses a generous amount of vanilla bean paste in both the cake batter and frosting to give this cake a delicious, warm, vanilla-forward flavor.
How to Make This Vanilla Bean Layer Cake
To make sure this vanilla bean cake turns out as amazing as possible, let’s walk through each step together! I’ve also included a video tutorial of the process below.
I figured it might be helpful to know what tools I use, too, so I’ve shared a list below.
Not all of these are mandatory, but they make the process a lot easier. You can also check out this post on all of my favorite baking tools.
If you don’t have all these things on hand, feel free to improvise and work with what you have.
- 3, 8-inch cake pans
- Spinning cake stand
- Electric hand mixer or stand mixer
- 10-inch greaseproof cake board
- Large offset spatula
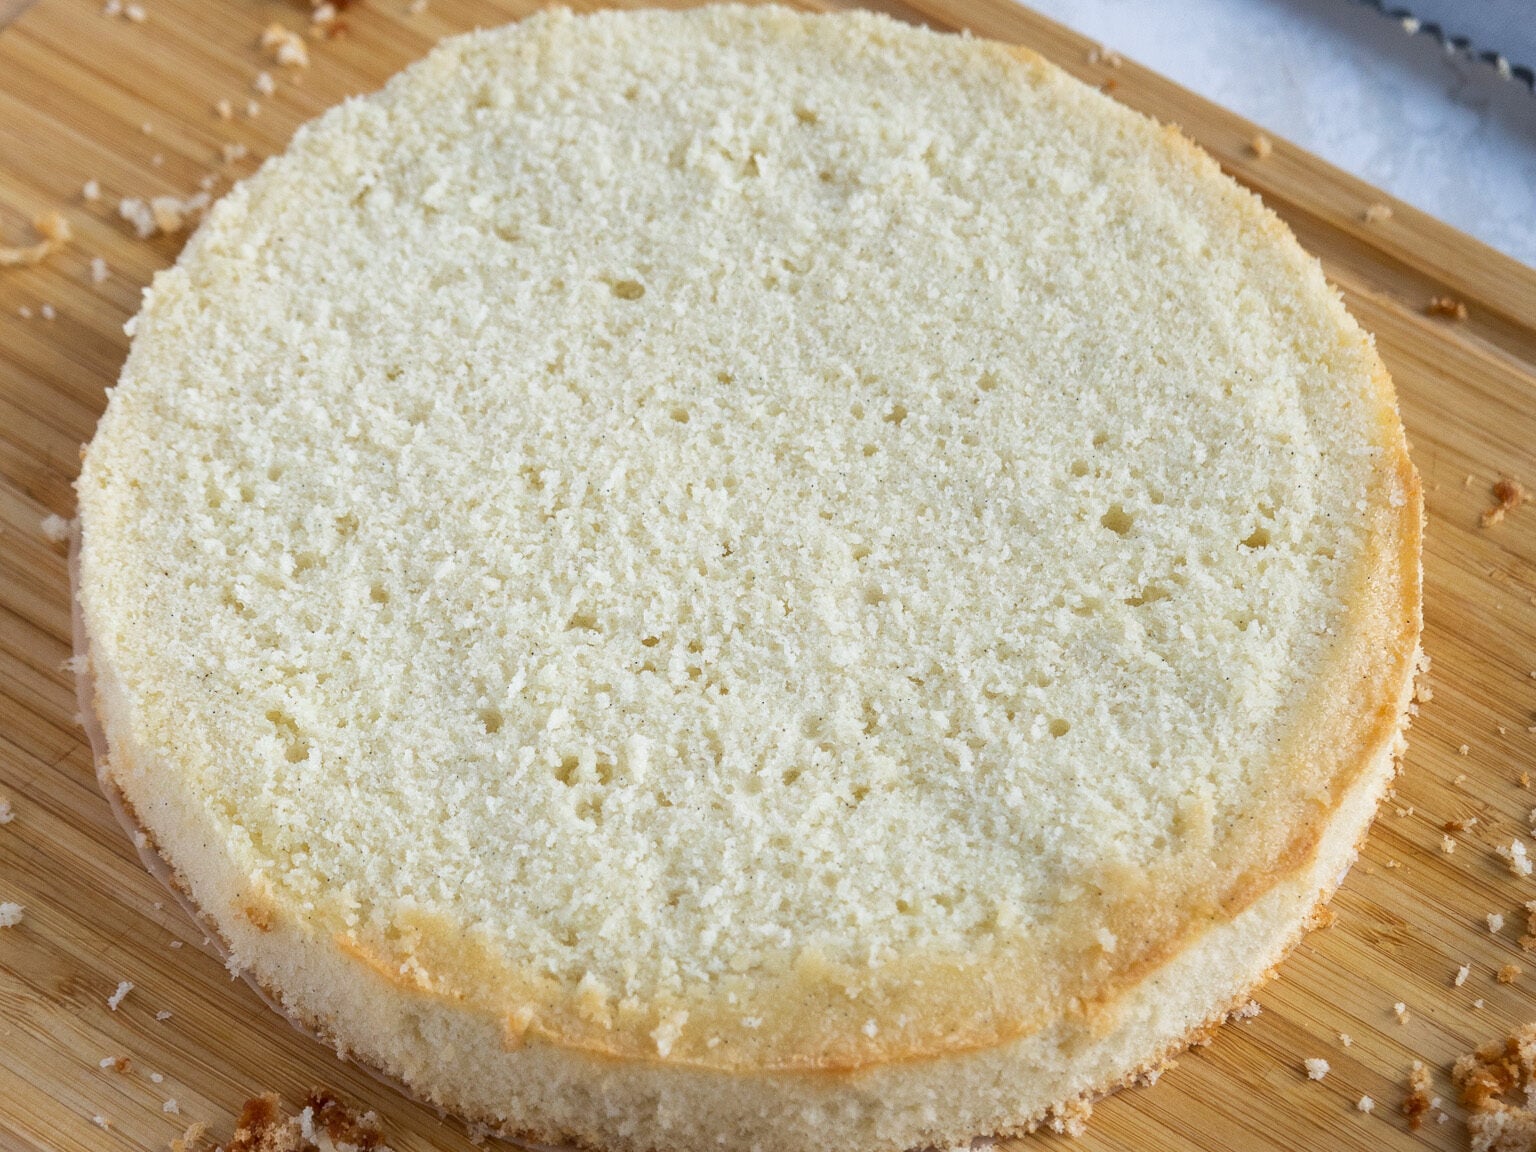
Step 1: Bake the Vanilla Bean Cake Layers
Make the vanilla bean cake layers first, following the recipe card at the bottom of this post.
Divide the batter evenly between the prepared cake pans and bake for 33-35 minutes or until a toothpick comes out with a few moist crumbs.

Remove the cake layers from the oven and let them cool in the pans for about 30 minutes.
Gently run an offset spatula around the rim of the cake pans to loosen them, then flip them onto wire racks to finish cooling.
These layers bake up pretty flat, so leveling them is optional! If you want to level them, use a serrated knife to level the top of each cake layer.
I also like to trim away the caramelization around the sides of the layers.
If you’re making these in advance, you can wrap and freeze them at this point.
Step 2: Make the Vanilla Bean Buttercream Frosting
While the cake layers bake and cool, make the vanilla bean buttercream.
I like to use an American buttercream base to make this frosting because I think it’s the easiest to make and I love eating it. However, it is quite sweet!
If you want to use a less sweet frosting base, I’d recommend making a batch of my Swiss meringue buttercream or my hybrid buttercream and adding the same amount of vanilla bean paste that this recipe calls for.
This frosting can also be made in advance if needed and kept in the fridge for up to a month.
Step 3: Stack and Frost the Cake Layers
Then it’s time to assemble this cake! Stack and frost cake layers on a greaseproof cake board or flat plate. Use a dab of buttercream to help stick the first cake layer to the board.
Spread an even layer of vanilla bean buttercream on top of each cake layer with a large offset spatula.
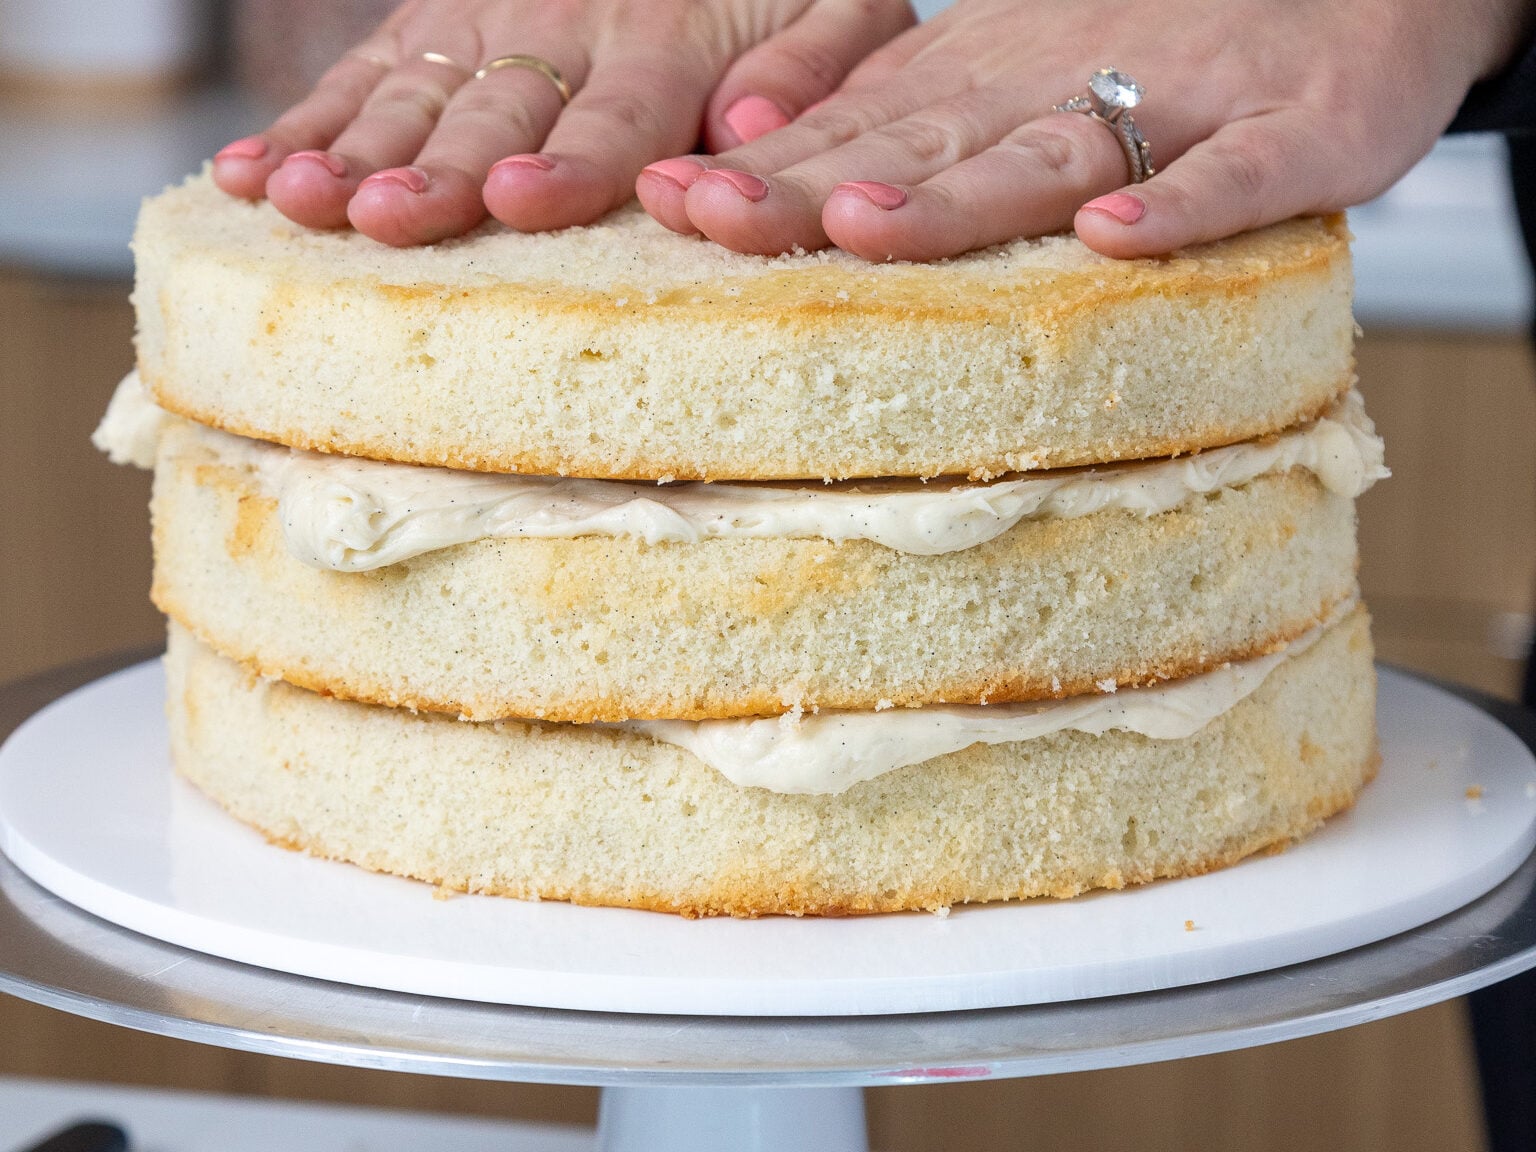
Repeat with the remaining cake layers and place the top cake layer upside down to make the cake easier to frost.
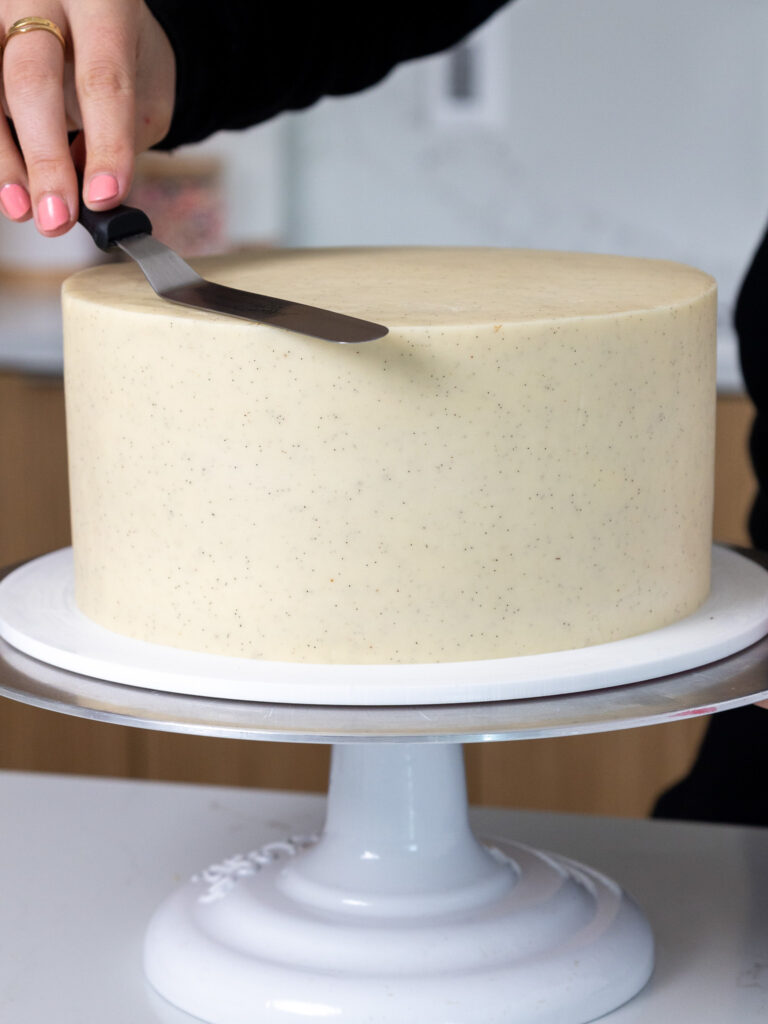
Step 4: Crumb Coat the Cake
Spread a thin coat of frosting around the cake to fully cover the cake layers.
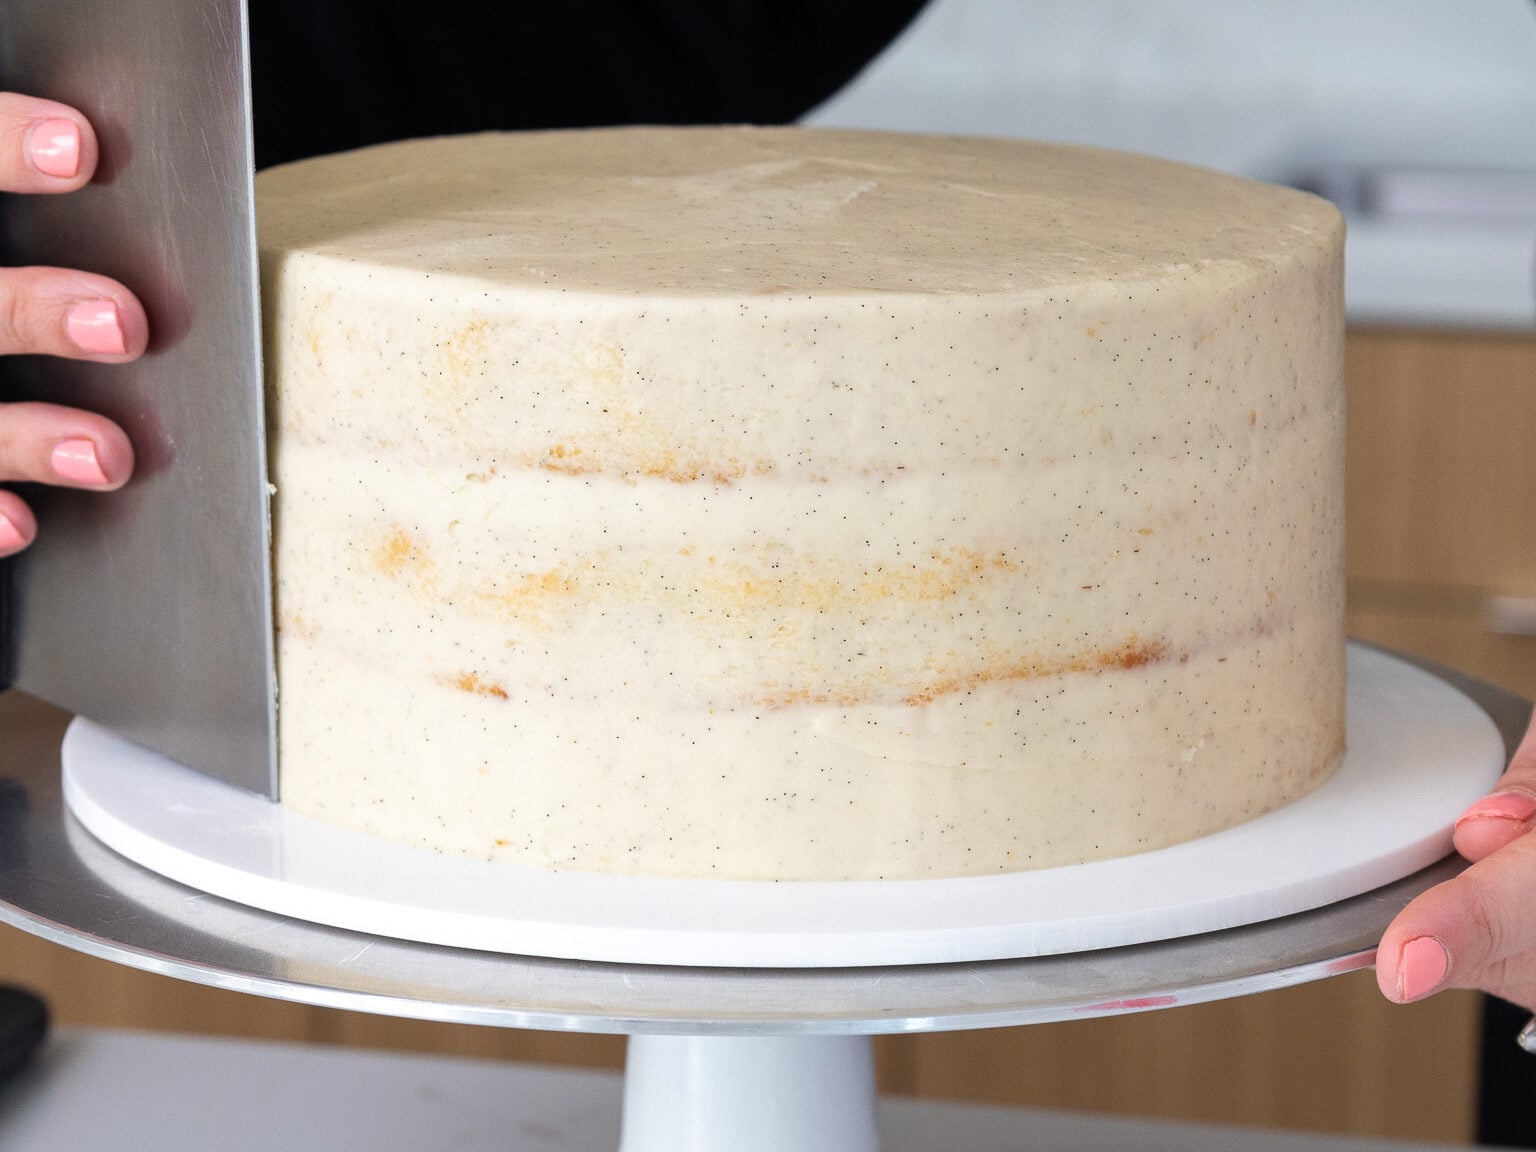
Smooth the frosting using a large offset spatula or bench scraper, then chill the cake in the fridge (30 minutes) or freezer (10 minutes) until the frosting is firm to the touch.
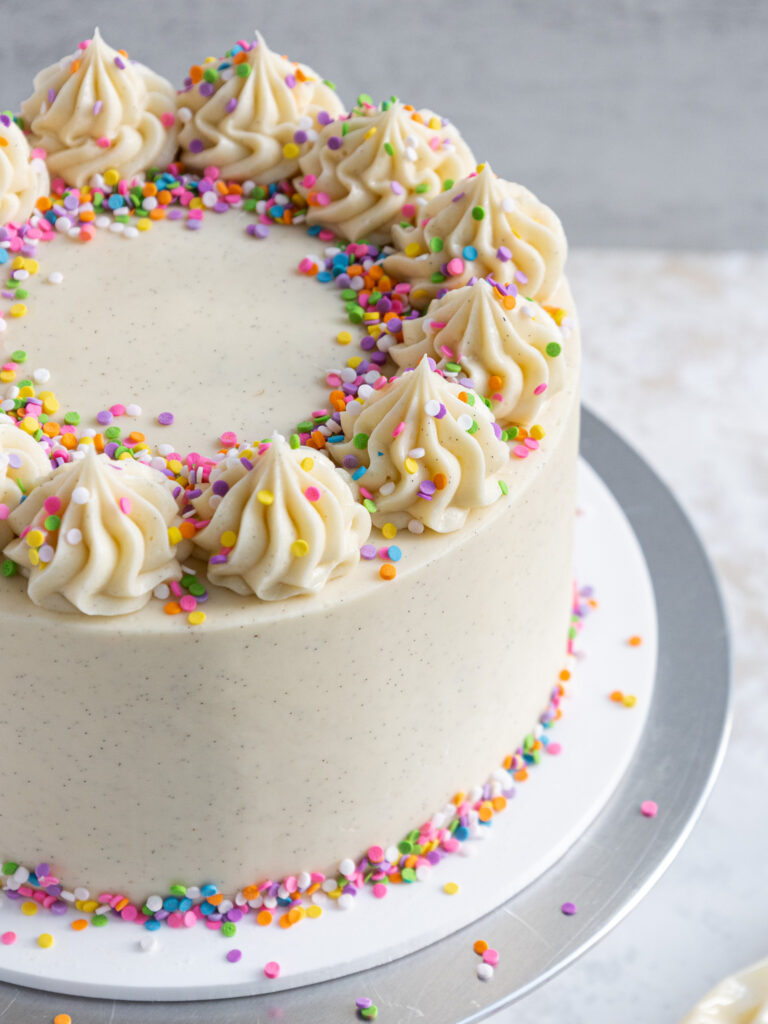
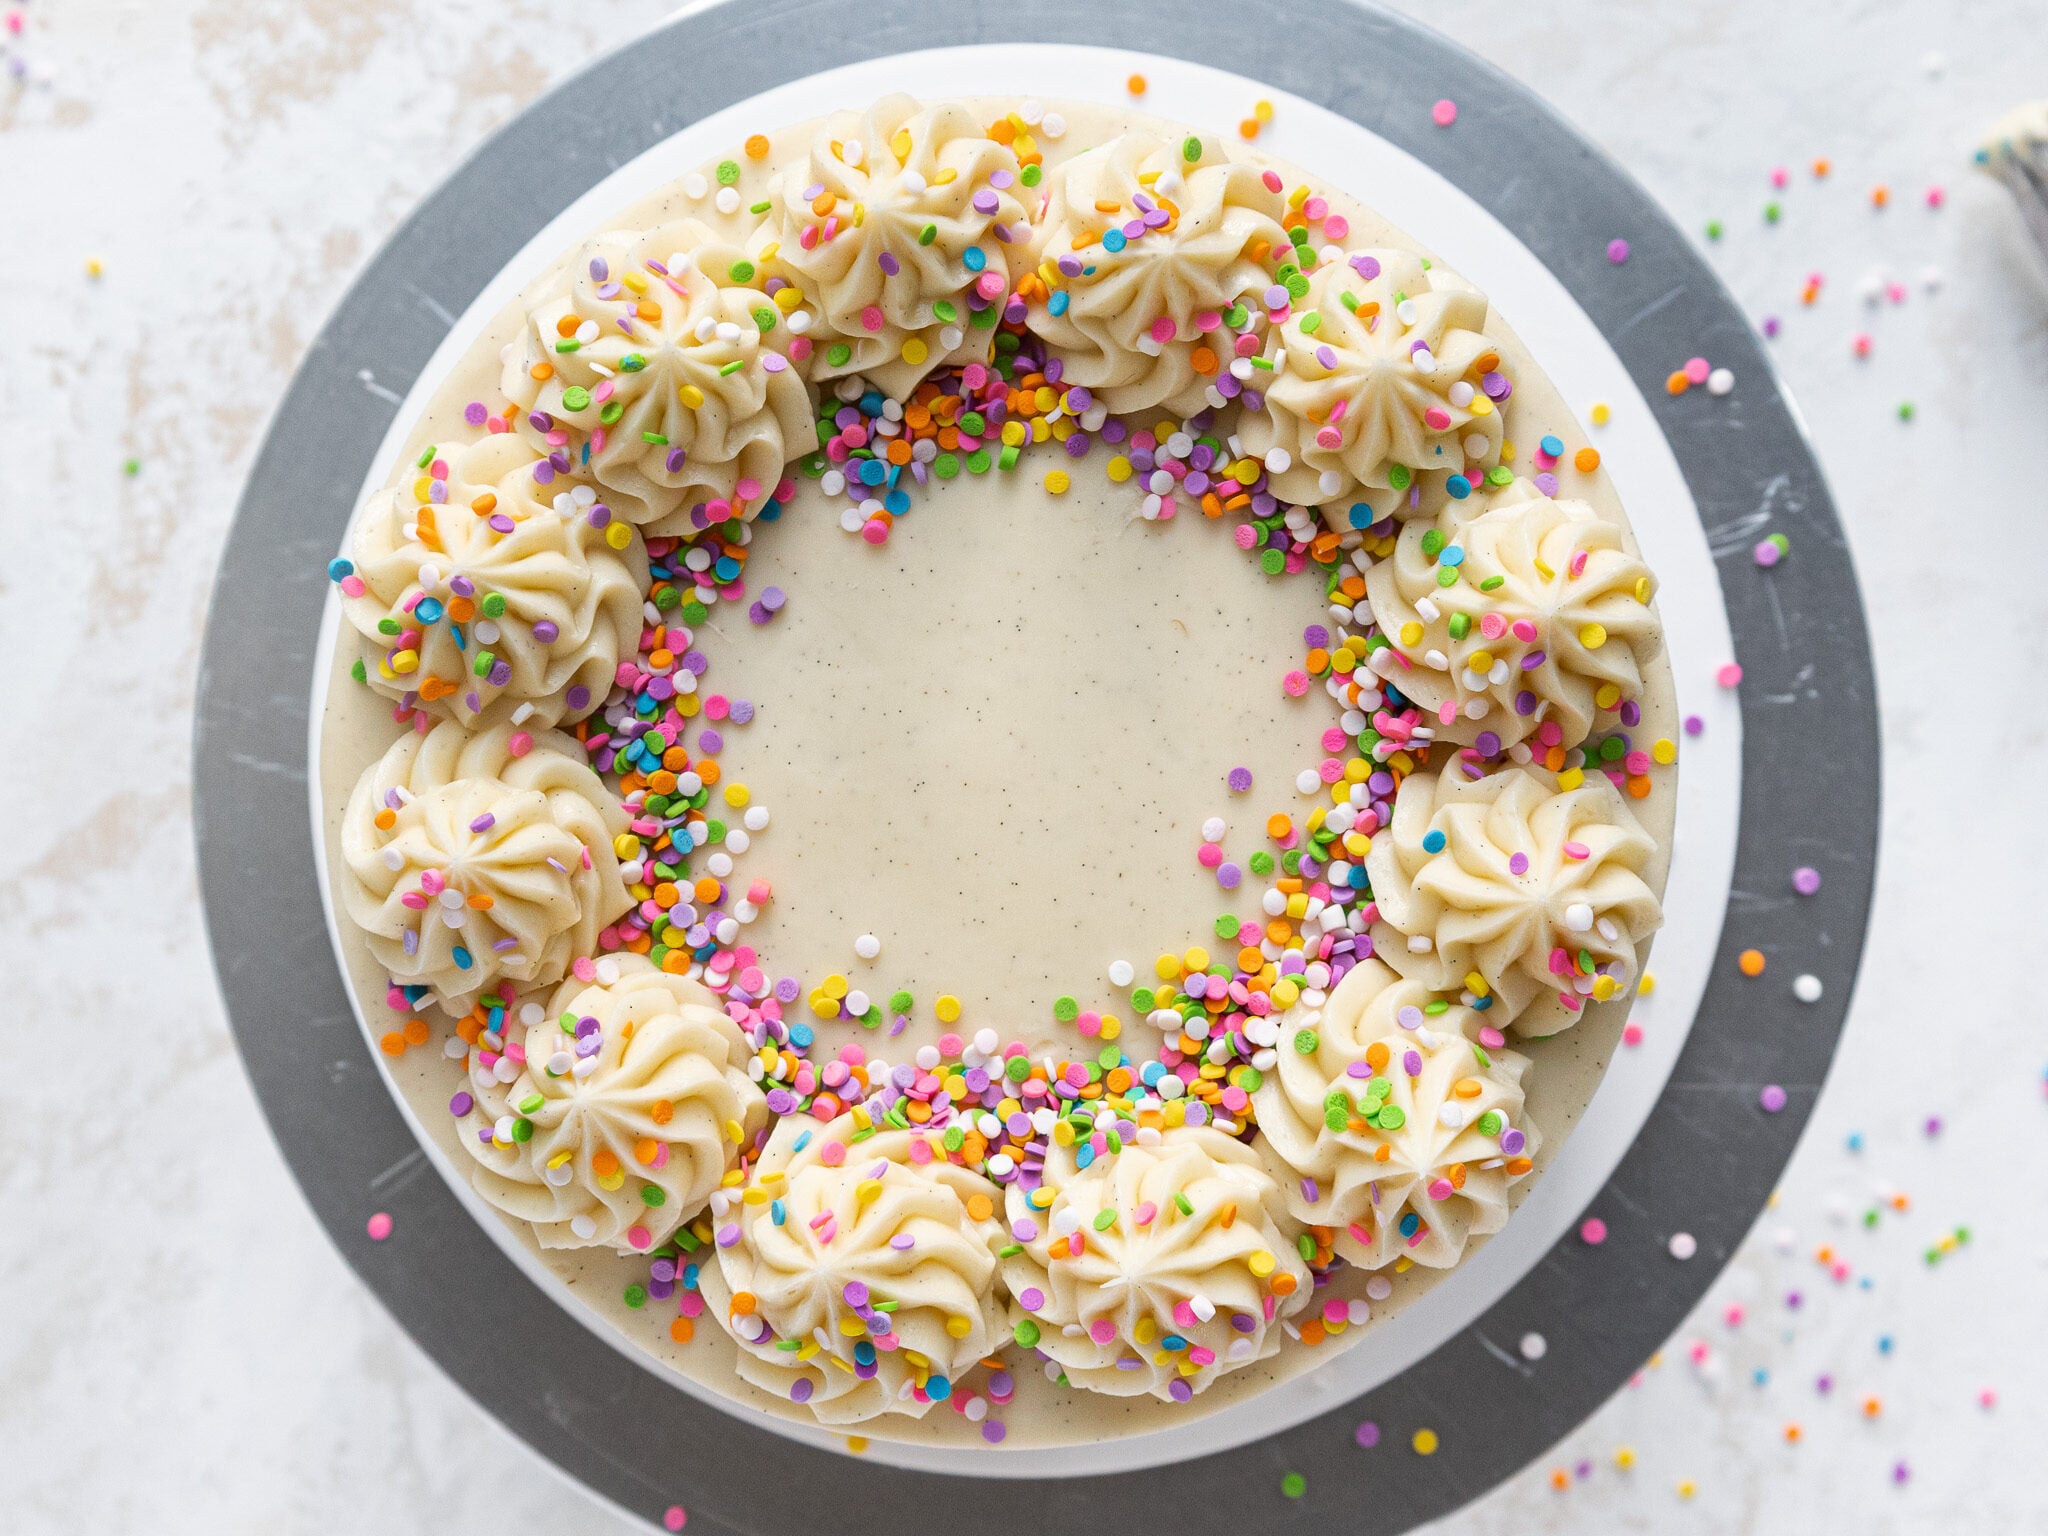
Step 5: Add the Second Layer of Frosting & Decorate
Then add a second, thicker layer of frosting to the cake.
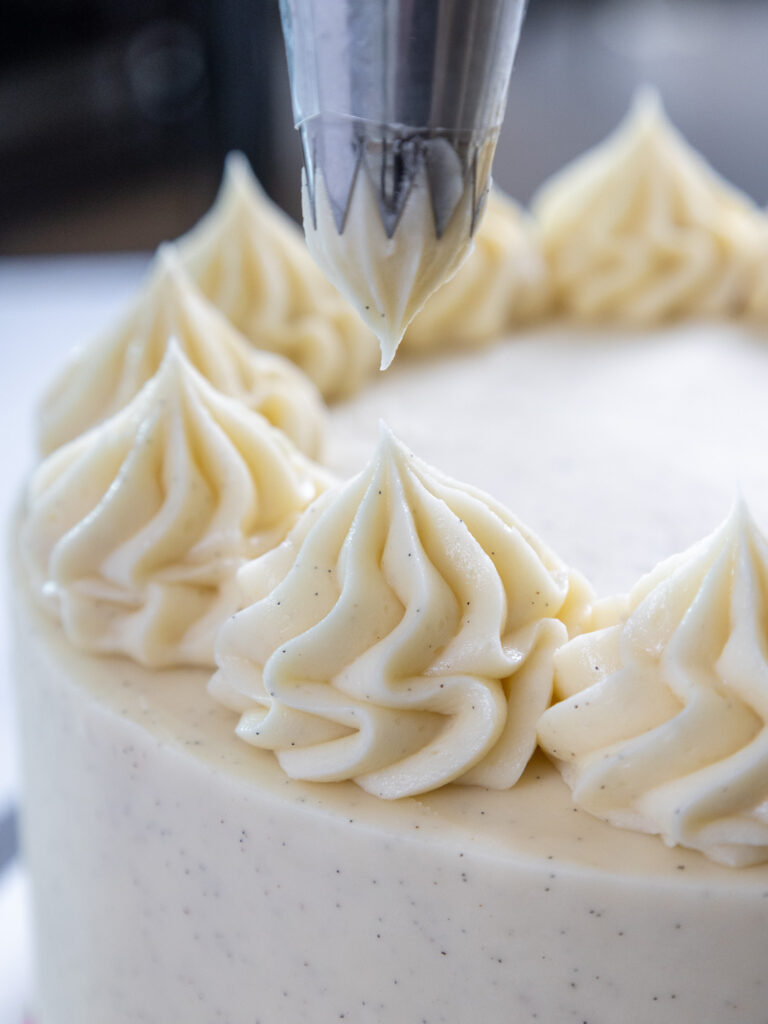
Smooth the frosting using a large offset spatula or bench scraper. Decorate as desired, then enjoy!
If you’re making this cake in advance, it can sit at room temperature for up to a day or be stored in the fridge for up to a week.
Substitutions and Swaps – Vanilla Bean Layers
This recipe uses quite a few ingredients, and I know you might not have them all on hand. Or if you have food allergies or restrictions, I’ve got you covered.
Below are some swaps and substitutions that can be made in this cake recipe.
- All-Purpose Flour – This recipe turns out best with AP flour, but you can use a gluten-free flour blend or cake flour if that’s all you have on hand.
- Granulated Sugar – I do not recommend changing the type or reducing the amount of sugar because it will change the texture of the cake layers.
- Unsalted Butter – If you only have salted butter on hand, you can use it in place of the unsalted butter in this recipe. Just be sure to omit the salt that this cake recipe calls for. You can also use vegan butter in its place (and also omit the salt)!
- Egg whites – I like to use the pasteurized egg whites that come in a carton, but you can also use fresh egg whites or 4 whole, large eggs. If you have an egg allergy, you can use flaxseed eggs or an egg replacer.
- Sour Cream – You can also use full-fat yogurt, whole milk, or an alternative yogurt or milk (almond, soy, oat) if you’re dairy-free.
- Vegetable Oil – Any flavorless oil will work in this recipe. Canola or even sunflower oil would work great!
- Vanilla Bean Paste – A high-quality vanilla bean paste is an absolute must in this recipe! I love using Heilala or Nielsen-Massey. You can use vanilla extract if you have to, but the flavor and look (no vanilla bean specs) won’t be the same.
Substitutions and Swaps – Vanilla Bean Buttercream Frosting
- Unsalted Butter – If you only have salted butter on hand, you can use it in place of the unsalted butter. Just be sure to omit the salt that this frosting recipe calls for. You can also use vegan butter in its place (and omit the salt)!
- Heavy Cream – Whole milk or alternative milk (soy, almond, oat) will work fine in this frosting recipe if that’s what you have on hand.
- Vanilla Bean Paste – A high-quality vanilla bean paste is an absolute must in this recipe! You can use vanilla extract if you have to, but the flavor and look (no vanilla bean specs) won’t be the same.
Making This Vanilla Bean Cake in Different Sizes
I used 8″ cake pans to make this cake, but this recipe can be used to make different-sized cakes.
You can make four 7- or 6-inch cake layers with one batch of batter. Bake the cake layers at
350°F/175°C for 34-40 minutes or until a toothpick comes out with a few moist crumbs.
One batch of batter can also be used to make one 9×13-inch sheet cake. Bake it at
350°F/175°C for 40-50 minutes and use flower nails or heating cores to help the cake bake evenly.
It should end up being about 2 inches tall.
If you want to make cupcakes, I highly recommend using my vanilla cupcake recipe and using vanilla bean paste in place of the vanilla extract in that recipe.
Tips for Making the Best Vanilla Bean Cake
- Ingredients at room temperature mix together better! Set out any cold ingredients ahead of time.
- Properly measure your flour (spoon into the cup measure, then level). Or better yet, use a kitchen scale to measure your dry ingredients.
- Use a scale to weigh your cake pans as you fill them. It will make the cake layers bake up to be the same height and bake more evenly.
- Level the room temperature or thawed cake layers with a serrated knife to make them easier to stack.
- Make sure the buttercream is the right consistency. This will help give the cake proper structure and make it easier to decorate.
- Chill the cake layers in the freezer for about 20 minutes before assembling the cake. It makes them so much easier to stack and frost!
- If your cake layers turn out less than perfect, read my cake troubleshooting guide to see where things might’ve gone awry.

Making This Vanilla Bean Cake in Advance
I highly recommend making these cake layers in advance and freezing them. It breaks the process up and makes it more approachable.
You can also make the frosting ahead of time too or save any leftover frosting! It can be stored in an airtight container in the fridge for up to a month or in the freezer for up to 3 months.
Be sure to give it a good stir once it thaws to get the consistency nice and smooth again.
A frosted cake can last in the fridge for up to a week or in the freezer for up to a month. The buttercream locks in all the moisture, keeping the cake fresh and delicious!
If you cut into the cake and have leftovers, use any remaining frosting to cover the cut section to keep it moist and store in the fridge for up to a week.
Let Me Know What You Think!
If you make this vanilla bean cake recipe, I’d love to hear what you think of it! Let me know by leaving a rating and comment below.
And don’t forget to tag me @chelsweets and use #chelsweets if you share on social media so that I can see your amazing creations.

Vanilla Bean Cake
Equipment
Ingredients
Vanilla Bean Cake Recipe
- 3 cups all-purpose flour 375g
- 3 cups granulated sugar 600g
- 2 1/2 tsp baking powder 10g
- 1 tsp fine salt 6g
- 1 cup unsalted butter, room temperature 226g
- 1 cup carton egg whites or 7 large egg whites, room temperature 240g
- 1 1/2 cups full-fat sour cream, room temperature 360g
- 2 Tbsp vegetable or canola oil 30g
- 1 Tbsp vanilla bean paste 12g
Vanilla Bean Buttercream Frosting
- 2 cups unsalted butter, room temperature 452g
- 2 Tbsp vanilla bean paste 24g
- 1/2 tsp fine salt 3g
- 7 cups powdered sugar 875g
- 1/4 cup heavy whipping cream, room temperature 60g
Instructions
Vanilla Bean Cake Layers:
- Preheat oven to 350°F/175°C. Line four 7" or three 8" pans with parchment paper, then grease with nonstick spray or homemade cake release. Set aside.
- Mix 3 cups all purpose flour, 3 cups sugar, 2 1/2 tsp baking powder and 1 tsp salt together in a stand mixer with a paddle attachment or hand mixer until fully combined.
- Then, mix in 1 cup of room temperature, unsalted butter slowly into the dry ingredients on a low speed. Continue to mix until no large chunks of butter remain, and the mixture looks like moist sand.
- Pour in 1 cup of egg whites and mix on low until just incorporated. Scrape the sides and bottom of the bowl as needed with a rubber spatula.
- Then mix in 1 1/2 cups sour cream, 2 Tbsp of vegetable oil, and 1 Tbsp of vanilla bean paste on a low speed until fully incorporated.
- Scrape down the sides of the bowl with a rubber spatula one more time, then beat on a medium speed for about 30 seconds to make sure everything is properly mixed together. This also helps lighten the texture of the cake layers.
- Divide the batter evenly between the prepared pans. I like to use a scale to make sure each pan has the same amount of batter and will bake up to be the same height.
- Bake for 33-35 minutes or until a toothpick comes out with a few moist crumbs. Rotate the pans halfway through to help them bake evenly.
- Let the pans cool for 10 minutes, then run a small offset spatula around the perimeter of the pan to separate the cake from the pan.
- Place the cake layers into the freezer for 30 minutes to accelerate the cooling process. Once the layers are fully cooled, carefully flip the pans and remove the layers.
- Use a serrated knife to level the tops of the layers right before you plan to assemble your cake, or you can wrap and freeze them if you're making them in advance.
- If you do freeze the cake layers, let them thaw for about 20 minutes before making the cake. The cake layers should still be slightly cold to the touch, which will make it easier to assemble the cake.
Vanilla Bean Buttercream Frosting:
- While the cake layers bake and cool, make the vanilla bean buttercream frosting.
- In the bowl of a stand mixer or a large bowl, beat 2 cups of unsalted butter on a medium speed for 30 seconds with a stand mixer and paddle attachment or hand mixer until smooth.
- Mix in 2 Tbsp of vanilla bean paste and 1/2 tsp salt on a low speed. Gradually mix in 7 cups of powdered sugar and 1/4 cup of heavy cream on a low speed.
- Continue to mix on a low speed for a few minutes until the desired consistency is reached. If the frosting seems too thick, add in additional cream (1 Tbsp at a time). If the frosting seems too thin, add in more powdered sugar (quarter of a cup at a time).
- If you plan to color the buttercream, add in the gel food coloring once the frosting is fully made, and beat on low until it reaches the desired color.
- Cover the buttercream flush with plastic wrap to prevent crusting, then set aside.
Assembling This Vanilla Bean Layer Cake:
- Stack and frost cake layers on a greaseproof cake baord or flat plate using a dab of frosting to help stick the first cake layer to the board.
- Spread an even layer of buttercream between each cake layer with a large offset spatula. Add a thin coat of frosting around the cake to fully cover the cake layers.
- Smooth using a bench scraper, then chill the cake in the fridge (30 minutes) or freezer (10 minutes) until the frosting is firm to the touch.
- Add a second, thicker layer of frosting to the cake and smooth using a bench scraper. Then decorate as desired and enjoy! I used a Wilton 1M piping tip to decorate the top of the cake, but any open star piping tip would work great!
Video
Notes
Recipe Variations
One batch of cake batter makes about 1800 grams, or 10 cups. If you plan to use four circular cake pans, add 450 grams of batter into each pan. If you make 3 layers, add 600 grams to each pan. This recipe can also be used to make a vanilla bean sheet cake! One batch will make 2, 9 x 13-inch cake layers that are about 1 inch tall. Bake for 35-40 mins at 350°F/175°C. I recommend using heating cores if you have them to help large cake layers like this bake more evenly and quickly. You can also make one 9 x 13-inch cake layer that’s about 2 inches tall, but bake time will be 45-55 minutes at 350°F/175°C.Tips for Making the Best Vanilla Bean Cake
- Ingredients at room temperature mix together better! Set out any cold ingredients ahead of time.
- Properly measure your flour (spoon into the cup measure, then level). Or better yet, use a kitchen scale to measure your dry ingredients.
- Use a scale to weigh your cake pans as you fill them. It will make the cake layers bake up to be the same height and bake more evenly.
- Level the room temperature or thawed cake layers with a serrated knife to make them easier to stack.
- Make sure the buttercream is the right consistency. This will help give the cake proper structure and make it easier to decorate.
- Chill the cake layers in the freezer for about 20 minutes before assembling the cake. It makes them so much easier to stack and frost!
- If your cake layers turn out less than perfect, read my cake troubleshooting guide to see where things might’ve gone awry.
Making This Vanilla Bean Layer Cake in Advance & Storage Tips
I highly recommend making your cake layers in advance and freezing them. It breaks the process up and makes it more approachable. This vanilla bean frosting can also be made ahead of time, or you can save any leftover frosting! It can be stored in an airtight container in the fridge for up to a month or in the freezer for up to 3 months. Be sure to give it a good stir once it thaws to get the consistency nice and smooth again. A frosted cake can last in the fridge for up to a week or in the freezer for up to a month. The buttercream locks in all the moisture, keeping the cake fresh and delicious! If you cut into the cake and have leftovers, use any remaining frosting to cover the cut section to keep it moist and store in the fridge for up to a week.Nutrition
Other Recipes You Might Like:

Hi Chelsweets cant wait to try this recipe. Do you also have a recipe for a traditional black forest cake you can share with me thanks?
Hi Ren,
Yay, I hope you love this recipe! Sadly I don’t have a traditional black forest recipe, but here’s the link to one that is amazing: https://livforcake.com/black-forest-cake/
Hope that helps, happy baking!
Thanks so much for making all these recipes so doable for the mamas out there. The sectioned portions make it so much less intimidating, especially if you have little ones and not large chunks of time to do the whole cake. Can’t wait to make this for valentines for my family!
Aw of course!! I absolutely swear by making cakes in stages, it makes the whole process so much more manageable and enjoyable 🙂 I hope your cake turns out amazing!!
Any suggestions for baking this at high altitude? Thank you!
Hi Whitney,
Sadly I’ve never baked at high altitude, so I don’t have many tips! But here is a great post on baking cake at high altitude: https://blog.wilton.com/high-altitude-baking/
Hope that helps, happy baking!
@Whitney, I’m at 3600′ and I tried two different methods with this cake. I didn’t alter the ingredients, but the first pan, I put in a water bath (about an inch and a half up the pan) – which took a lot longer to bake (after the regular cooking time, just keep testing). This created a very dense and moist cake with a very slight sinking in the middle. My boyfriend loved it. The second pan, I put a pan of water on a rack below the cake. Again, took a lot longer to bake, but this created a fluffier cake (also very good), and also perfectly even bake (zero sinking).
Are you a mind reader??? I was just talking to my mother in law about how my vanilla cake recipe is fine but I wanted to find one that was a wow. How would I turn this into a 3-layer 6” cake? Can’t wait to try this.
Thanks so much!!
Hi Kate,
Hahahaha I love that!! And great question. I usually like to use 2/3 batch to make 3, 6-inch cake layers. An easy work around would be to use my 6-inch vanilla cake recipe (which makes 2/3 batch of my normal vanilla cake recipe), then use sour cream instead of buttermilk, and vanilla bean paste in place of the vanilla extract in that recipe.
Here’s the link: https://chelsweets.com/6-inch-cake-recipe/
Hope that helps, happy baking!
Could this same recipe be used for cupcakes? Would the measurements be different?
Hi Katie! You can in theory, but this recipe is designed to make cake layers that bake up nice and flat. I find it can also stick to the cupcake liners.
If you really want to use it to make cupcakes though, fill them about 3/4 full and bake for 18-20 minutes, or until a toothpick inserted into the center comes out with a few moist crumbs.
Otherwise, I’d highly recommend using my vanilla cupcake recipe and using vanilla bean paste in place of the vanilla extract in that recipe. Here’s the link: https://chelsweets.com/classic-vanilla-cupcake-recipe/
Hope that helps, happy baking!
Hey Chelsea! How does this compare to your Best Vanilla Cake? I use vanilla bean paste in that one and love it but curious if I should switch over. Note that I use that recipe to make tiered cakes and it’s AMAZING
I’m so happy to hear that Maria! This recipe pretty much is my best vanilla cake plus TONS of vanilla bean paste! It has a slightly different crumb (a bit softer, a tiny bit less moist) because it uses sour cream instead of buttermilk, which really lets the vanilla bean shine.
I would recommend using this recipe for special cakes or situations where people would appreciate the vanilla bean (since it’s so expensive)! I like both recipes for different reasons. I’d say give this one a try and see what you think!! Happy baking 🙂
I made this recipe: and find this cake to be too sweet. Your recipe calls for 3 cup flour and 3 cups sugar. Next time I will try using less sugar.
Hi Kurlene,
Did you find the cake too sweet, or the frosting? The amount of sugar in the cake recipe gives the layers their tender texture, and if you reduce the amount of sugar the cake layers will become more dense. This recipe uses the reverse creaming method, so the ratios of sugar and flour are different than you might find in a traditional sponge cake recipe.
Rather than reducing the amount of sugar, I’d suggest using a less sweet frosting like a stabilized whipped cream or Swiss meringue buttercream. Hopefully that will help the frosted cake have the right amount of sweetness. Hope that helps, happy baking!
This looks delicious – will it come out dense? It may be an unpopular opinion but I’m trying to find a recipe that will create a dense, vanilla cake.
Hi Lisa,
This recipe uses the reverse creaming method, so it does make dense, tender cake layers. I’m also a big fan of denser cake layers 🙂 Hope that helps, happy baking!
I noticed this cake is similar to your vanilla layer cake but this one has sour cream instead of buttermilk. What does the sour cream do versus the buttermilk? Thanks!
Hi Alyssa,
They are very similar, but I chose to use sour cream in this recipe because I wanted the flavor of the vanilla bean paste to really shine through. I love baking with buttercream, but it adds a pretty strong tang to baked goods. The sour cream also lightens the color of the batter, so you can more easily see the vanilla bean specs 🙂
Hi Chelsey, your cakes are wonderful 🙂 How many slices could you get out of this cake for a party?
Thank you
Hi Rox,
Thank you, you’re too sweet! It depends on the size of slices you cut, but I usually say a cake this size feeds 20-24 people. Hope that helps, happy baking!
So incredibly delicious! Best cake I’ve ever made
Yay!! So happy to hear that Ashlyn 🙂 Thank you for sharing!!
Hello! Tastes wonderful! Is there a reason why one of my layers sunk instead of rising? I am at high altitude so perhaps that’s why
Hi Saige,
So happy to hear your cake layers taste great!
There can be quite a few reasons why a cake layer might sink, the most common is that that pan might have had slightly more batter in it, and because of that been slightly underbaked. Some ovens also don’t bake evenly, so certain areas might be hotter or colder, so if you don’t rotate your pans as the cake layers bake that can also cause some layers to bake less than others.
Do you think it might be either of those? Hopefully we’ll be able to figure it out together!
Help. I made this cake but it didn’t turn out real moist any suggestions? I’m also making this for my daughters wedding. My house is about 30 minutes from the venue. How long can a cake stay out when should I take it to the venue?
Hi Audrey,
Oh no! I’m so sorry to hear that!! This cake could turn out dry if the cake layers are over baked, or if the flour isn’t measured properly. Is there a chance it could be either of those? Did you make any substitutions? Hopefully we’ll be able to figure out what went wrong.
I usually add simple syrup to my wedding cakes, which can also help it stay moist while you assemble and frost it. If the cake is fully chilled it can sit out for a few hours as long as it isn’t placed outside in the sun or something. Hope that helps, happy baking!
@Chelsweets, I didn’t weigh the flour. If the wedding starts at 130 but we are not eating the cake till after 5 it will need to be refrigerated till a few hours before.
Thank you
@Chelsweets, , I didn’t weigh the flour. If the wedding starts at 130 but we are not eating the cake till 5:15 it will need to be refrigerated till a few hours before.?
Thank you
Hi Audrey,
That should be fine! If the wedding cake is fully chilled before being set out, it takes quite a while for it to thaw to room temperature. As long as the cake isn’t outside, in the sun, or in a really warm room, 4 hours should be ok. Hope that helps, happy baking!
Made this cake on Saturday for my daughter’s birthday. Loved it!
So happy to hear that Cheryl!! Thank you for sharing 🙂
Hands down my favorite recipe ever. Like even surpasses my to die for Chocolate cake. And I don’t even normally like Vanilla cake.
I am curious though, how does this recipe hold up adding in things like sprinkles or crushed Oreos. Does it alter the fluffiness and moistness at all?
Aw you are too sweet (no pun intended)!!! Thank you! This recipe holds up great with add-ins. I recommend using 3/4 cup of whatever you want to mix in (sprinkles, crushed oreos, etc.). They don’t alter the moisture of the layers, but they can give them a little bit of texture! Sometimes the sprinkles or Oreos can add a little bit of crunch depending on their size.
Hope that helps, happy baking!
I would love to make a small 4 inch layered cake and some cupcakes for my 1 year old daughters party that’s coming up soon. How would I alter this recipe to suit the 4 inch pans and cupcakes? Also, do you think this would pair well with your white chocolate frosting and raspberry filling?
Hi Katrina,
I think this recipe would taste great with my white chocolate buttercream and my raspberry cake filling.
If you want to make a 4-inch cake with this recipe, fill the 4-inch cake pans about 1 inch high with batter and bake them until a toothpick inserted in the center comes out with a few moist crumbs (time will vary based on how much batter is in the pans).
Then you can use the remaining batter to fill cupcake liners 3/4 full and bake for 18-20 minutes at 350 F /175 C. Hope that helps, happy baking!
Best vanilla cake ever! I used your lemon curd recipe as the filling and it was so delicious
Love that Izzie! That sounds like such a delicious combination!! 🙂
Hello!!
I seriously LOVE this recipe! It’s one of my absolute favorites, but the last few times I baked the cake layers they keep sinking in the middle. What am I doing that causes this? They bake so nice and as soon as I touch them boom a big hole in the middle 🙁 I also make sure to bang my cake pans on the counter before I put them in the oven to release any air. Help!
Hi Candice,
So happy to hear that! 🙂 It sounds like they might need a few more minutes to bake? Are you leveling the cake layers? Does the center seem like it’s fully cooked through? My best guess would be that they just need to bake a tiny bit longer. If that doesn’t work, could it be that your leavening agents are old? Hopefully we’ll be able to figure it out together!
@Chelsweets,
So I think you are right about needing more time. I’ve tried to fit them in 3 6” pans instead to make thicker layers and that is usually when they tend to sink.
Ah that totally makes sense! Baking them longer should definitely help fix that for the future 🙂
I have tried a few vanilla cake recipes over the years and finally tried your recipe and it is by far the best vanilla cake recipe I have done. I haven’t even frosted it yet, which I went with your cream cheese frosting recipe, (also amazingly great frosting) and it’s still delicious all by itself. You have a winner with this recipe. Can’t wait to try the finished product this weekend!
Aw I am so happy to hear that!!! Thank you so much for sharing 🙂
Would this be ok for a baby to eat for first birthday ? I know it says feeds 24 but I will leftover batter to make cupcakes
Hi Kc,
The frosting has a decent amount of sugar in it! I would recommend using my hybrid buttercream or my Swiss meringue buttercream frosting for a smash cake if you want a less sweet frosting. Hope that helps, happy baking!
Hi Chelsea! Love your recipes! I’m planning on making a tiered cake for an anniversary party and was wondering if this recipe would be enough for 3 6in pans and 3 4in pans? Thanks!
Hi Keisha,
Great question! One batch should be enough batter to make 3, 6-inch layers and 3, 4-inch layers!
I have a great guide that actually helps you figure out how much batter you need for different sized cake layers, here’s the link: https://chelsweets.com/how-much-cake-batter-per-pan/
For reference, one batch of this recipe makes about 10 cups of batter. Hope that helps, happy baking!
I made this recipe for my son’s wedding. 3 layer 6 inch heart for bride and groom to cut and 12 dozen of your vanilla bean cupcakes for guests. It was amazing. Received so many compliments. Very moist and delicious. I love this recipe. I also have made your german chocolate cupcakes and tonight making the rose water cupcakes! Thanks for the inspiration!?
Hi Michele,
Yay!! I’m so happy to hear that!! Thank you for sharing 🙂
Hi I would like to make a 10 inch layer cake for my grandson, should I double the recipe ?, thank you very much
Can I use two 9 inch pans for this cake?
Hi Gloria,
Great question! You can use this recipe to make 2, 9-inch cake layers. Happy baking!
Hi! I am really excited to try this cake. My daughter really wants a Strawberry vanilla cake, do you know if I add a compote in the middle that will goof up the cake? I’m planning on just adding some on the top for decoration as well.
Thanks! 🙂
Hi Janina,
Great question! I have a delicious vanilla strawberry cake recipe that uses this as the base recipe which I think would be perfect for that, here’s the link: https://chelsweets.com/the-best-strawberry-cake/
Hope that helps, and that your daughter’s cake turns out great!
Hi there! Was thinking of trying this recipe for an 8″ round, 3 layers. As I prefer taller layers (like 1 1/2″ tall), can you tell me about how tall each layer would be if baked in 3 8″ rounds, making this full recipe? Thank you!
Hi Paula,
Great question! Once these layers are baked and leveled, they end up being about 1-inch tall when one batch is used to make 3, 8-inch cake layers. Hope that helps, happy baking!
Hello, I Want to Make this for a party But I’d want it to Be a Sheet pan. do you think this recipe would work for a sheet pan?…. Lmk if you See this! Thank You.
Hey! How would I make this recipe work for a 3 layer 10 inch cake? Thanks!! 🙂
Hi Becca,
I would recommend making 1.5 batches of this recipe, and adding 5 cups of batter to each pan. Hope that helps, happy baking!
Hi!
I am eager to try this recipe. I am considering doing whole milk yogurt and whole milk for the cake. How much of each would you suggest? I was thinking 1 cup whole yogurt and 1/4 cup milk. Thanks!
Hi Brooke,
If you want to substitute the sour cream in this recipe, you’ll need a total of 1 1/2 cups. If you want to use both whole yogurt and milk, I’d recommend using 1 cup whole yogurt and 1/2 cup of milk. You also can just use 1 1/2 cups of whole yogurt. Hope that helps and that your cake turns our great, happy baking!
Hi Chelsweets,
I can’t wait to try this recipe for my 18th birthday cake, How much batter would I need to make a 8 inch cake with 4 layers? Thank you!
Hi Sapphire,
Happy early birthday!! I’d recommend making 1.3 batches of the batter to make 4, 8-inch cake layers. You can also do 1 1/2 batches to make the math easier, but the layers will need a couple minutes longer to bake. Hope that helps and that your bday cake turns out amazing!!
2/2024
This cake recipe from start to finish is awsome. I followed it to a tee.
I made a 9×13 cake pan.
It is super moist, great vanilla bean taste and Very Rich.
rating this a 10+
Thank you
Aw I’m so happy to hear that Connie!! Thank you for sharing 🙂
What is the difference of the vanilla bean and fun fetti recipe besides sprinkles, is there much of a difference.
Could you add the sprinkles in the vanilla bean one?
Hi Ann,
Great question! They are super similar, but the main difference is that one uses sour cream and the other uses buttermilk! If you love this recipe though, you can totally just add the amount of sprinkles my funfetti cake recipe calls for to this recipe 🙂 Hope that helps, happy baking!
For an 11x 15 sheet pan how much batter do you think I would need?
Hi Kiara,
It depends on how tall you want the cake layer to be, but I’d recommend making 1.5 batches of batter for an 11×15-inch pan. You could also use one batch of batter, but the layer wouldn’t be very tall. Hope that helps, happy baking!
Hello! Wanting to make this delicious cake but hoping to make a three layer 9.5inch cake. And suggestions on changes to batter?
Hi Elise,
Great question! One batch of batter makes about 10 cups of batter, and a 9.5inch cake pan should need about 4.5 cups of batter! So I’d recommend making about 1.5 batches of batter, and then the bake time will probably be a tiny bit longer because there will be a little bit more batter in each pan than if you made 3, 8-inch cake layers. For the future, I have a great cake batter calculator chart that shows you how much batter you need for different sized cake pans, here’s the link: https://chelsweets.com/how-much-cake-batter-per-pan/
Hope that helps, happy baking!
This is now my go to birthday cake.
I’ve made it a few times and everyone raves about how good it is. Will be trying more of your recipes soon.
I am so happy to hear that Jodee! What an honor 🙂 Thank you for sharing!!
Hi, just wondering if you can use real vanilla from pods instead of paste?
Hi Tonya,
You can totally use real vanilla from pods! The seeds from 1 pod should be roughly equivalent to 1 Tbsp vanilla bean paste. Hope that helps, happy baking!
Hi Chelsea! I have made many of your cakes and I’m so excited to try this one as a half birthday cake. Do you have a 6in adaptation?
Hi Lachmi,
I don’t have one for this exact recipe, but you can use my small batch vanilla cake recipe and just swap the vanilla extract for vanilla bean paste, and the buttermilk for sour cream and it should be pretty much the same thing 🙂 Hope that helps, happy baking!
Hello!
I made your death by chocolate cake and it was amazing! I loved how moist it was! I was wondering if this cake is equally as fluffy and moist? If not, is there a way to make that death by chocolate cake in vanilla?
Thank you! 🙂
Hi Karina,
So happy to hear you loved my death by chocolate cake! Sadly there isn’t really a vanilla equivalent of the death by chocolate cake. If you swap out the cocoa powder for more flour, it ends up super oily. The cocoa powder really is the ingredients that pulls it all together. I’ve been working on an oil based vanilla cake for a while now but have yet to perfect it!
This cake is delicious but has a totally different texture! It uses butter as the fat and the reverse crumbing method, so they layers are denser but still tender and moist. Hope that helps, happy baking!
Hi. I’m going to try this recipe. This seems more like a White cake. Can I use whole eggs?
@Fran, was looking for the answer to this. So sad it wasn’t responded to ?
Hi Rhiannon,
Apologies, missed the original comment during my mat leave last summer! I like to use the pasteurized egg whites that come in a carton to lighten the texture, but you can also 4 whole, large eggs.
I always include a substitutions and swaps section in my blog posts (it’s about 2/3 of the way through this post) where I share these types of things for future reference! Hope that helps, happy baking!
Hi Fran,
Apologies, missed this during my mat leave last summer! I like to use the pasteurized egg whites that come in a carton to lighten the texture, but you can also 4 whole, large eggs.
I include a substitutions and swaps section in my blog posts (it’s about 2/3 of the way through this post) where I share these types of things for the future! Hope that helps, happy baking!
Can I turn this recipe into cupcakes? I really loved the cake
THE most incredible cake I’ve ever made ? it literally melts in your mouth. It’s so tender and pillowy soft, with a beautiful crumb and not overly sweet. Honestly can’t believe how good it is every time I take a bite. My go to recipe for vanilla cake!
I love this cake! Have been making it faithfully with just a few adjustments for about a year now for cake orders! Question for you Chelsweets, am I able to add crumbled oreo cookies into the batter for a cookies and cream cake? Would this change the batter or texture at all?
oh absolutely!! You can add chopped up Oreos (centers and all) into the batter, and it will bake up great. I’d add 1/2 cup – 1 cup of chopped up Oreos, depending on how intense of a look and flavor you’re after. Hope that helps, happy baking!
Hi there,
Can you use this recipe for cupcakes as well? Obviously baking time will change.
Hi Chelsea, I just want to make sure the flour measurement is accurate. With King Arthur flour I thought 120grams is a cup? Love your recipes.
Hi Angela,
My standard weight for flour is 125g. I’ve tried fluffing it to high heavens, then spooning and leveling it, and I’ve never been able to get it under 125g. If you feel more comfortable using 120g/cup, you can totally do that! Or you can try fluffing it then measuring it and seeing what weight you end up with. This recipe isn’t very finicky and will still turn out that way 🙂 Hope that helps, happy baking!!
Hi Chelsey!
I’m on the hunt for a good vanilla bean cake and love you and your bakes. I prefer a fluffier white cake and was curious if I could whip up the egg whites and then fold in the other ingredients to help make it fluffier. Do you think this could be possible? I’ve read about half of the blog and other comments, so if this is a repeat of information, I’m so sorry!
Thank you!
Hi Lyss,
You could whip up the egg whites, but because this cake method uses the reverse crumbing method, I don’t think that would really change the texture much! But if you try it, please let me know how it turns out!!
Because it uses the reverse crumbing method, the texture is super tender but somewhat dense (I would def not call if fluffy). But it’s absolutely delicious!! While I prefer this texture in my cakes, I’m not sure it’s going to be what you’re looking for based on what you’re describing :/ I’m so sorry!
Oh! And do you think I could substitute cake flour instead of all purpose?
Thanks!
You can use cake flour in place of the all purpose flour in this recipe if you want! The texture will be very similar, but a tiny bit softer. Hope that helps, happy baking!
I see this is your vanilla cake recipe with sour cream instead of buttermilk. How does this change affect the end result?
Thanks
Buttermilk adds a lot of moisture and a little tang of flavor which I think balances the sweetness of my regular vanilla cake nicely, but sour cream gives a cake a really tender texture and a more neutral flavor which I like better with this recipe so that the vanilla bean flavor can really shine. Hope that helps, happy baking!
I had a cake tasting party at the beginning of the month. I made four cakes and this one was rated number one! I was so pleased with how it came out. I trimmed the crystalized edges of the cake and this is an extra step I don’t usually take but I’m so glad I did because it made for such a beautiful finish and design when cutting into the cake. It looked like a white cake.
Thank you sooo much for sharing this recipe and for the detailed instructions. It’s going to be my go to for a birthday or anytime I’m just craving a delicious vanilla bean cake.
Hi Denise,
This is amazing—I love that you had a cake tasting party (seriously, what a fun idea!) and I’m so honored this one came out on top! Trimming the caramelized edges was such a great move—it really does make those slices look extra polished. I’m thrilled the detailed instructions helped and that the cake is now your go-to. Thank you for taking the time to share this—it means a lot!
Hi, this recipe looks great, looking forward to trying it out – do you think it would work as a bundt cake? The specs say it produces about 10 cups of mixture so in a 10 cup bundt tin?
Yup a 10 cup bundt pan should work great!!
Hi Chelsweet, this recipe looks lovely! Though I’m wondering if it would work in a bundt tin?
Hi Rob,
Hi! So glad you’re interested in the recipe, it’s one of my favorites!Yes, you can bake the vanilla bean cake in a bundt tin, but there are a couple things to keep in mind:
Grease that pan well, every nook and cranny! I recommend a baking spray with flour or brushing it with melted butter + flour to help prevent sticking.
Baking time will be longer than for regular round layers. Start checking around the 45–50 minute mark, but it may take up to 60+ minutes depending on your bundt pan size. Let it cool for at least 15–20 minutes in the pan before turning it out to help it release cleanly.
The crumb is tender but still sturdy enough to hold up in a bundt shape. It should turn out beautifully, and if you want to level it up, a vanilla glaze or dusting of powdered sugar on top is chef’s kiss!! Hope that helps, happy baking!
I’m a home baker and I have tried many vanilla cake recipes. I actually had a very delicious one I’ve been using from another also very talented recipe creator. However, I needed a white vanilla cake to add blue food coloring for a gender reveal cake. My go-to recipe turned the cake green. I was devastated so searched exhaustively until I found this recipe and OMG!!! This is by far the best vanilla cake I’ve tried. It is absolutely delicious. Congratulations on this one because it is just genius. The cake was a massive hit I just baked another one for a wedding cake I have this week and I know its going to be another winner. I removed the side crumbs, reserved them, and ate the whole thing ? (sorry not sorry). I can’t thank you enough for this recipe ?. Thank you!
Hi Italia,
Ahh this makes me SO happy to hear!! I’m so glad you found this recipe just when you needed it, and that it delivered for such a special moment like a gender reveal cake! The fact that you’re already using it again for a wedding cake seriously means the world. And honestly, eating the reserved crumbs is basically a baker’s rite of passage, haha. Thank you for the sweet words and for taking the time to share this, it totally made my day 🙂
Hi! love the recipe came out great, just wondering for health purposes would I be able to decrease the sugar amount without ruining the recipe?
Hi Grace,
So happy you loved it! With this vanilla cake, the sugar isn’t just for sweetness, it also helps with the texture and structure since the recipe uses the reverse creaming method. If you reduce it too much, the cake can end up more dense or dry. That said, you can usually cut back about 10–15% of the sugar without major issues. Any more than that and you may notice a difference in the crumb and moisture. Hope that helps, happy baking!!
Thank you for this recipe! After calling many bake shops near me, I was unable to find this family favorite. I took the chance to try it myself and the cake turned out really well. My only adjustment for the future would be to add more vanilla bean paste to the cake batter. Otherwise it’s perfect! The icing is so yummy all by itself!
Hi Angela,
I’m so glad you decided to give it a try and that it turned out so well! Adding a little extra vanilla bean paste next time sounds like the perfect way to make it your own. And I couldn’t agree more, the frosting is definitely good enough to eat by the spoonful 🙂
I would like to make this recipe my birthday, and I was hoping to throw in a few blueberries from my garden. Will that mess too much with the consistency, or is there a modification I could make that would help? Or is it better to just make my own blueberry compote to use between layers? Thanks for any help.
Hi Joanne,
Fresh blueberries sound like such a lovely touch for a birthday cake! You could fold some into the batter, but they do add extra moisture and have a tendency to sink while baking, which can affect the texture a bit. If you really want them baked in, toss them lightly in flour before folding them into the batter. It helps them stay more evenly distributed. Also if you can find wild blueberries, use them! They’re smaller and don’t sink as much as the jumbo sized blueberries!
That said, making a blueberry compote or even just layering fresh blueberries with the filling between the cake layers is usually the safer (and tastier!) option. You’ll get that fresh blueberry flavor without changing the structure of the cake itself. Hope that helps and that your bday cake turns out amazing!! Happy early bday!!!!
Love your recipes. I just want to confirm the flour measurement. 1 cup of King Arthur flour is 120 grams making 3 cups 360. Should I use a little more than 3 cups.
Hi Angela,
You’re totally right! The weight of 1 cup of flour can vary a bit depending on the source and how it’s measured. Some places list it as 120g, others as 130g, and when I’ve weighed it out myself, I usually land around 125g per cup. That’s the number I use in my recipes.
That said, this cake is pretty forgiving, so whether you go with 120g or 125g per cup, it’ll turn out great. The key is just to stay consistent with whichever method you choose. Hope that helps, happy baking!!
I absolutely loved this cake it is exactly what I was looking for. I am making it for my friends wedding it is going to be a 3 tier cake but the layers will be thicker. How long would you suggest baking a thicker cake?
Hi Staci,
Ahh, I’m so glad you loved it!! 🙂 For wedding cakes with thicker layers, the main thing is giving the centers enough time to bake through without over-browning the edges. Here are some tips:
– Lower the oven temp slightly. Drop it to 340°F so the cake bakes more evenly. Thicker layers can take longer to bake, but bake time will vary depending on the exact pan size and how full they are. Start checking at the 40-minute mark and keep an eye on the middle. A toothpick should come out clean with a few moist crumbs. You can also gently press the center, it should spring back.
– Cake strips (wrapped around pans) really help prevent doming and over-browning on the edges when baking taller/thicker layers.
Since you’re doing a 3-tier wedding cake, I definitely recommend a test bake with your chosen pan sizes to get a feel for the exact timing in your oven. That way you’ll go into the big day with confidence!! Hope that helps, happy baking!!
Made this as a cake and loved it! I am wanting to make it as cupcakes for my daughter’s birthday party..how many cupcakes would this make and what would be the best time and temperature?
Hi Valeria,
You can make cupcakes with this recipe by filling cupcake liners about 3/4 tall, and baking them for 19-21 minutes in a preheated 350F oven or until a toothpick inserted in the center comes out with a few moist crumbs. The yield can vary a bit based on the size of you cupcake tins and liners, but you should get about 3 dozen. Hope that helps, happy baking!
This is my new favorite vanilla cake recipe. It was so moist and delicious. Got lots of compliments!
Hi Barbara,
So so happy to hear that!!!!!!! I love this recipe too 🙂 Thank you for sharing!!!!
I would like to start with vanilla beans (it’s what I’ve got on hand) instead of the paste. Suggestions?
Thanks!
Hi Michael,
If that’s the case, you always make your own vanilla bean paste, it’s actually super easy! I’ve shared my recipe for it here: https://chelsweets.com/how-to-make-vanilla-bean-paste/
Hope that helps, happy baking!
This cake looks so delicous, moist, and dense. Could you explain why both butter and oil are needed for the cake batter? I was considering only using butter in the recipe.
Hi Mikayla,
This recipe uses the reverse creaming method, so butter is the main fat in the recipe. A bit of oil adds moisture, and the layers taste best with both. Is there a reason you want to omit the oil?
Hi, I was curious about adding raspberry filling between the layers? Would that be okay with this recipe and what would you suggest?
Hi Gigi,
This cake would be delicious with a raspberry filling between the layers! I actually have a delicious raspberry cake filling recipe here: https://chelsweets.com/raspberry-cake-filling/
Hope that helps, happy baking!
I have made the cake tonight and am icing tomorrow how should I keep the cake overnight
Hi Jane,
You can store baked cake layers in either an airtight container, or you can wrap them tightly in plastic wrap. If it’s just overnight, you can leave them at room temperature or put them in the fridge or freezer. I’d probably leave them at room temperature if it was me. Hope that helps, happy baking!
el proceso es diferente pero el resultado es muy bueno, buena consistencia, buen sabor, excelente para usar en pastel de boda o pasteles que necesitan resistir.
Seriously good. I test a lot of cakes and this one has had the most compliments BY FAR by my guests! Thanks for an amazing recipe!
Yay!!!! That’s wonderful, I’m so happy to hear you loved this recipe Anne, thanks for sharing 🙂
Hi Chelsey! I’m wondering if you think this recipe would work as a base for a tres leches flavored layer cake? I’m looking for something a little more stable than a traditional tres leches recipe and am torn between a vanilla cake and a hot milk cake. I intend to do a VERY light milk wash (with cinnamon) and a tres leches mousse, with a light layer of dulce de leche. I’d be interested in knowing your thoughts. Thank you!!
Hi Victoria,
Great question! I love this idea, and yes, I think this vanilla bean cake would be a great base for a tres leches-inspired layer cake. It’s sturdy enough for stacking, but still moist and tender, so it should hold up better than a traditional tres leches cake as long as the milk wash is light.
I’d treat the milk wash more like a simple syrup and brush on a thin layer rather than soaking the cake. I’d also chill the cake layers before assembling, use a firm frosting dam around the filling, and keep both the tres leches mousse and dulce de leche layers on the thinner side so the cake stays stable.
I’d choose this over a hot milk cake for what you’re describing. Hot milk cake is delicious and absorbs liquid really well, but it can become more delicate once moisture is added. This vanilla bean cake should give you more structure while still letting you bring in that tres leches flavor. Hope that helps, and let me know how it turns out if you try it!!