
Quick Yeast Cinnamon Rolls
These quick yeast cinnamon rolls are ready in 90 minutes, bake up soft and fluffy with gooey centers, and are topped with the best cream cheese frosting!
How to Make These Quick Yeast Cinnamon Rolls
Let’s walk through each step of this recipe to make sure it turns out as amazing as possible!
I’ve also shared a video tutorial on how to make them below, along with the tools I used. If you don’t have all of these on hand, feel free to get creative and work with what you’ve got!
Tools / Equipment
- 8×8-inch Metal Square Pan or 8-inch Round Pan
- Parchment Paper
- Stand Mixer w/ Dough Hook or Danish Dough Whisk
- Ruler
Step 1: Make the Cinnamon Roll Dough
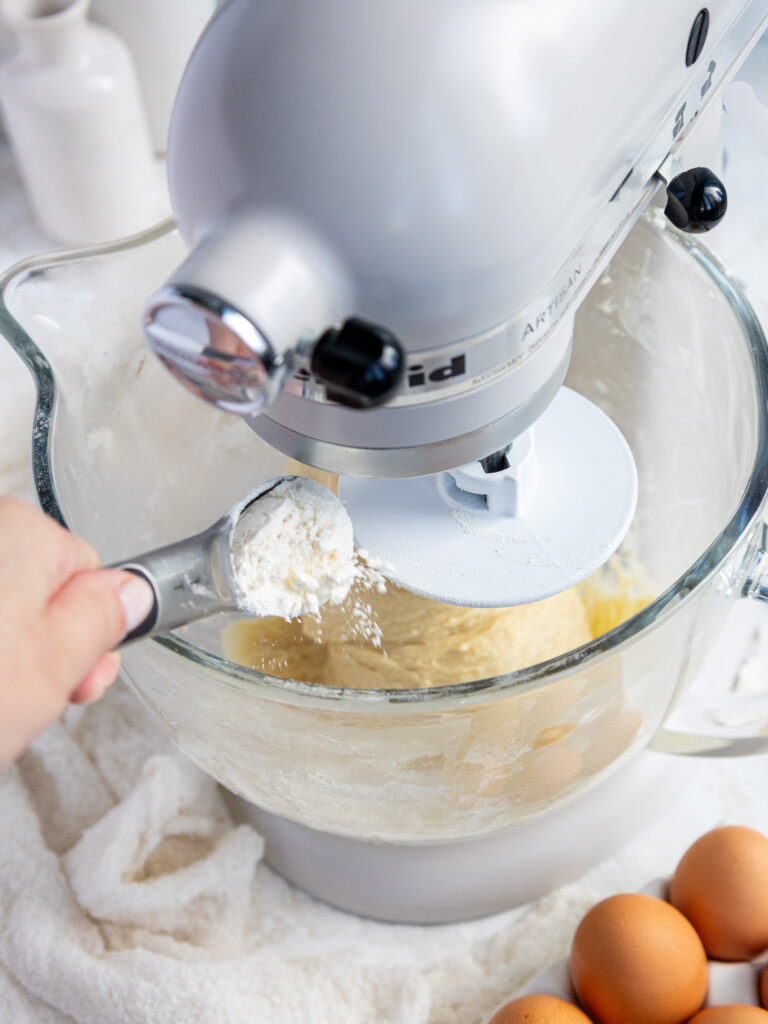
Preheat your oven to 200 F / 95 C. In a large bowl or the bowl of a stand mixer, combine 3 1/2 cups flour, 2 1/4 tsp or 1 packet instant dry yeast, and 1 tsp salt.
In a separate bowl, combine 1 cup milk, 1/2 cup granulated sugar, and 1/4 cup butter. Heat for 1 minute in the microwave, then stir to combine the ingredients. The butter should be mostly melted, and the mixture should feel warm but not hot to the touch. If it’s too hot, it can kill the yeast!
Slowly pour the warm milk mixture into the dry ingredients and mix on medium speed with a dough hook or by hand with a dough whisk. If you don’t have a dough whisk, you can use a large wooden spoon.
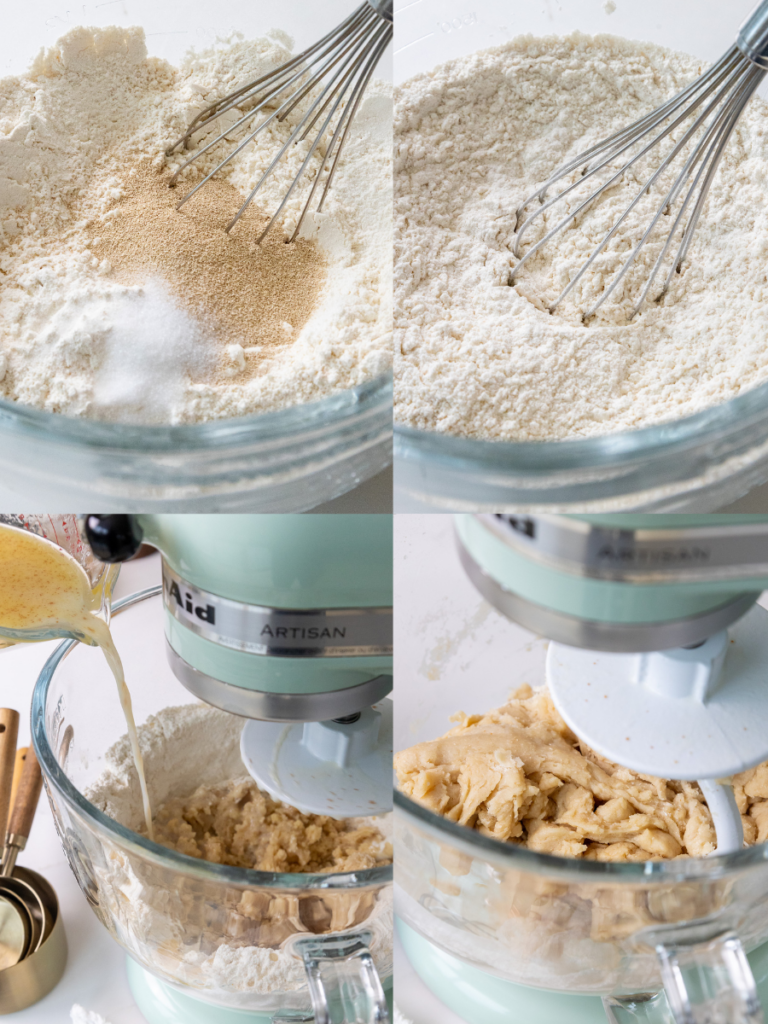
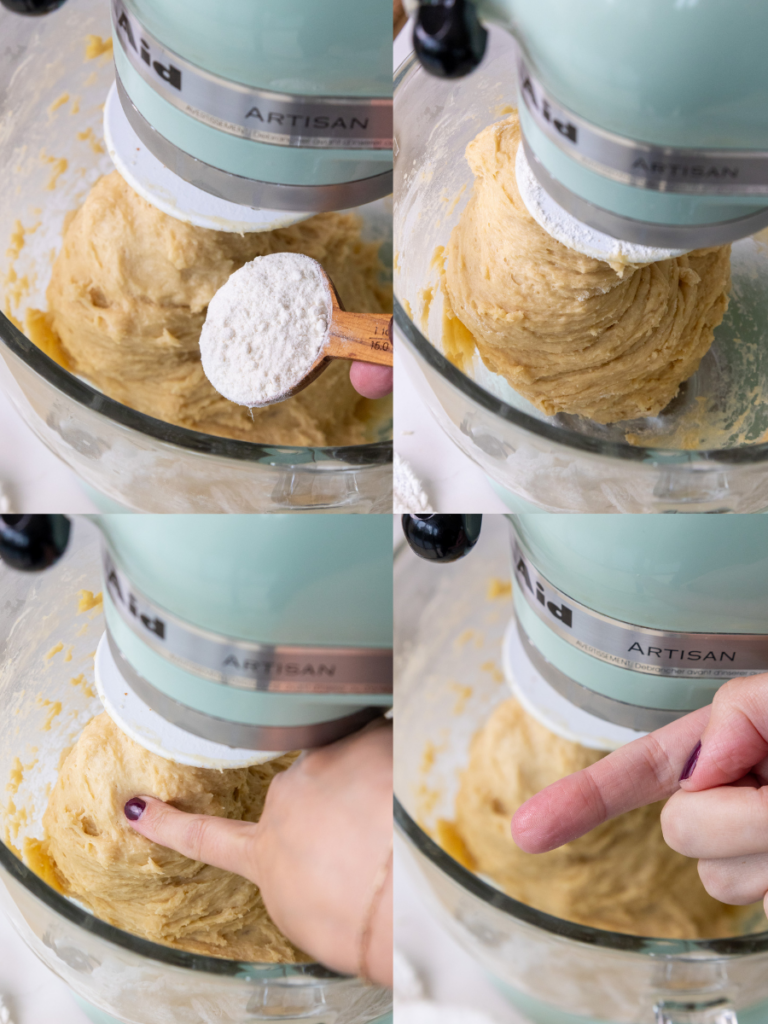
Add 1 large egg and mix on a low speed until a sticky dough ball forms. Continue to mix on a medium-low speed for a couple of minutes until the dough becomes more elastic.
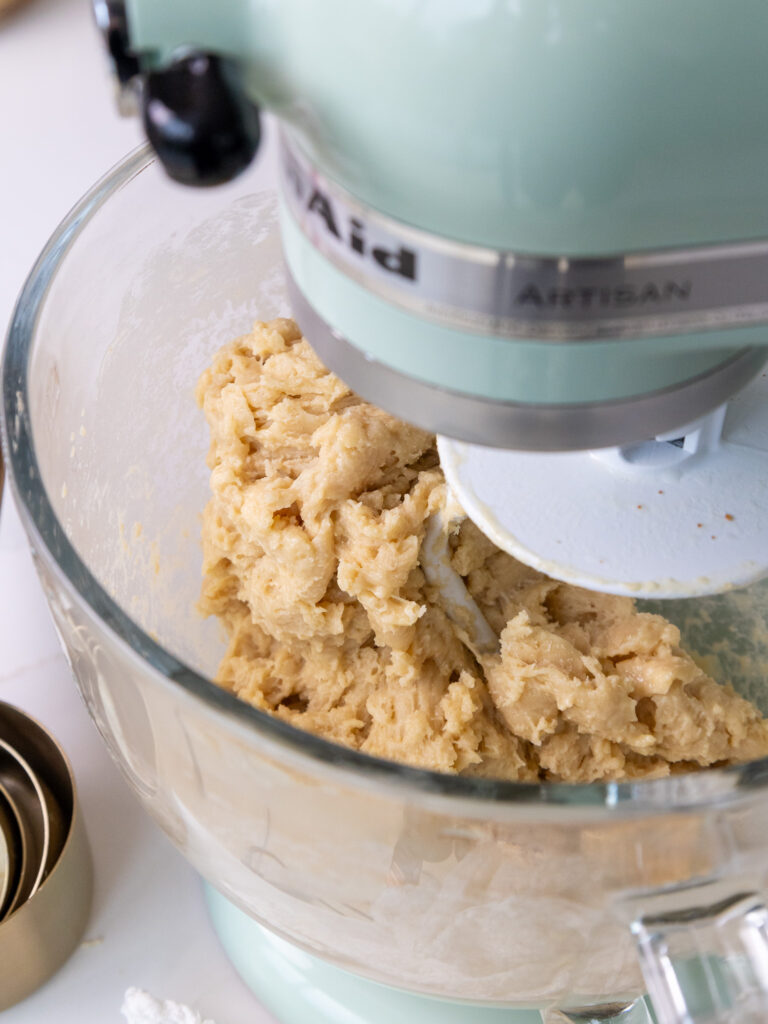
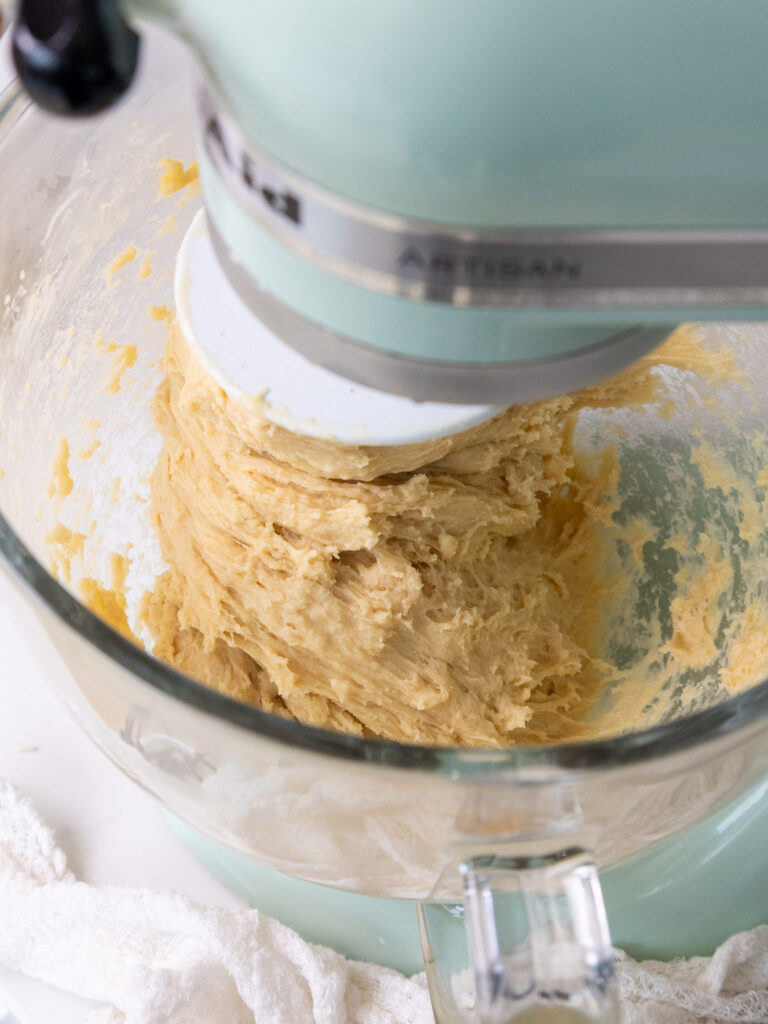
As the dough mixes, add additional flour 1 Tbsp at a time until the dough begins to leave the sides of the bowl. I usually add 1-3 additional Tbsps of flour.
My favorite way to know if my dough is ready is to poke it with my finger. It should feel tacky but not sticky. As you pull your finger away, there should be no residue on your finger.
Cover the bowl with plastic wrap and set aside to let the dough rest for 10-20 minutes. This will make it easier to roll out.
Step 2: Make the Cinnamon Roll Filling
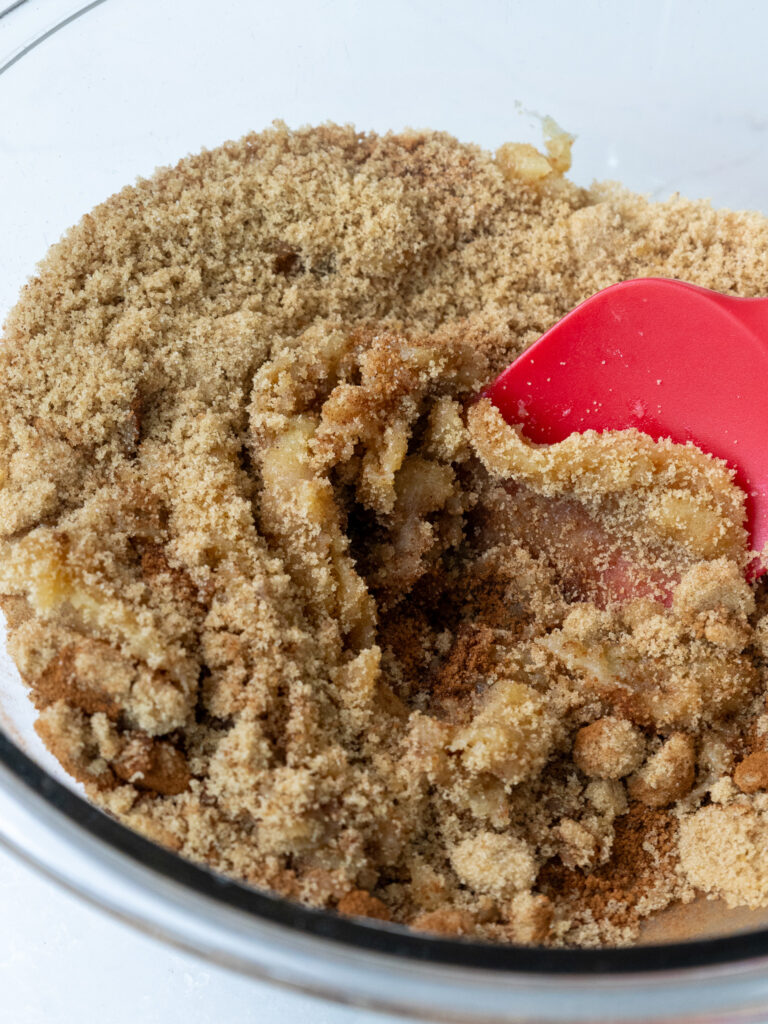
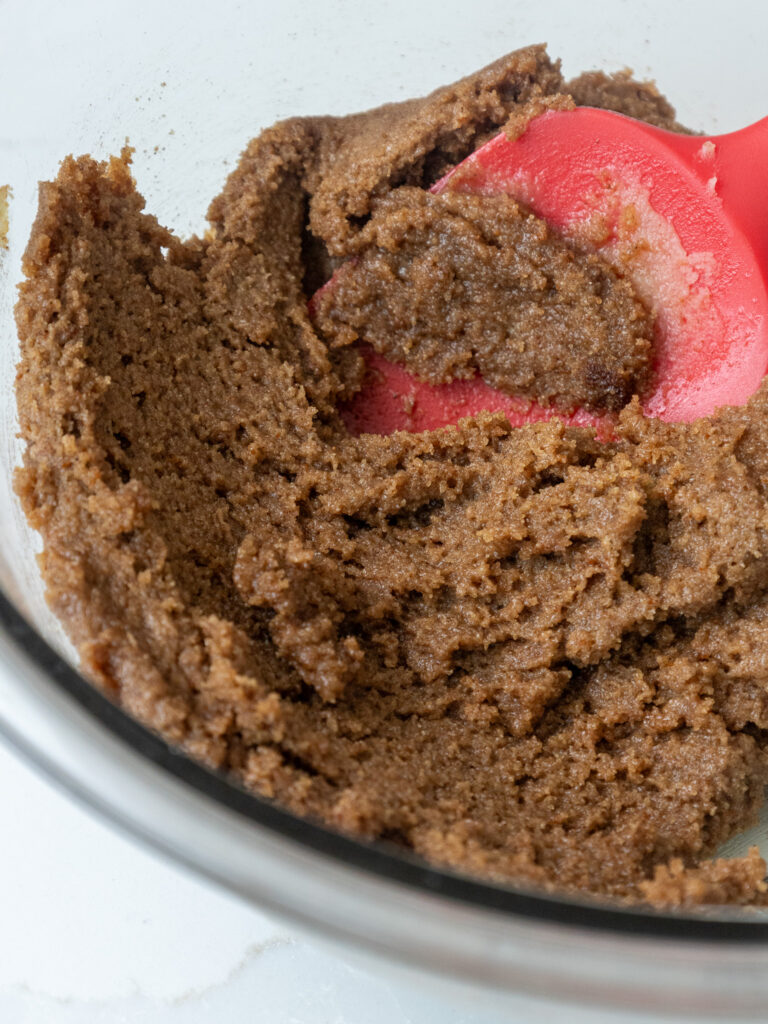
While the dough rests, make the cinnamon roll filling. To be able to combine the filling into a paste-like consistency, the butter needs to be really soft (but preferably not melted). It should be spreadable/softer than at room temperature.
I usually heat room-temperature butter in the microwave in 5-second intervals to get this consistency – just be sure not to fully melt it!
Add 4 Tbsp of very soft butter, 1/2 cup packed brown sugar, 1 Tbsp ground cinnamon, and 1/2 tsp fine salt to a medium-sized bowl.
Mix together until combined then set aside. The mixture should have a thick, paste-like consistency.
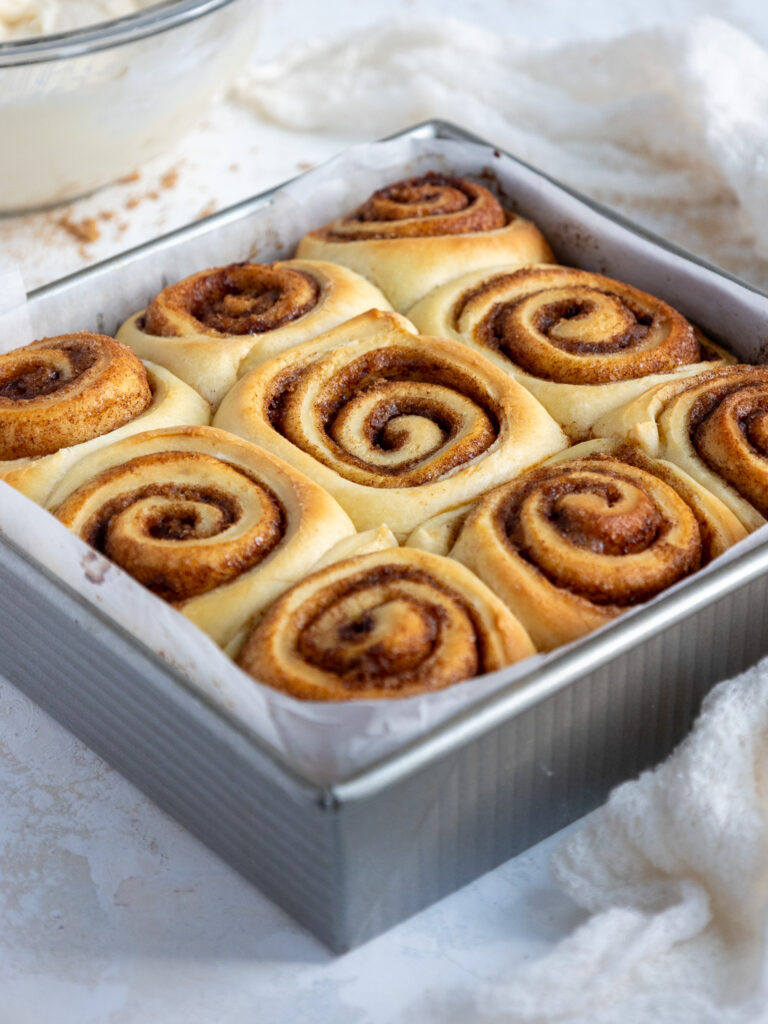
Step 3: Roll Up and Bake the Cinnamon Rolls
Line an 8×8-inch square or round pan (light-colored metal preferable) with parchment paper and set aside. If you don’t have metal, glass will work too. If you use glass, lower the oven temperature by 25 F and bake for a few minutes longer.
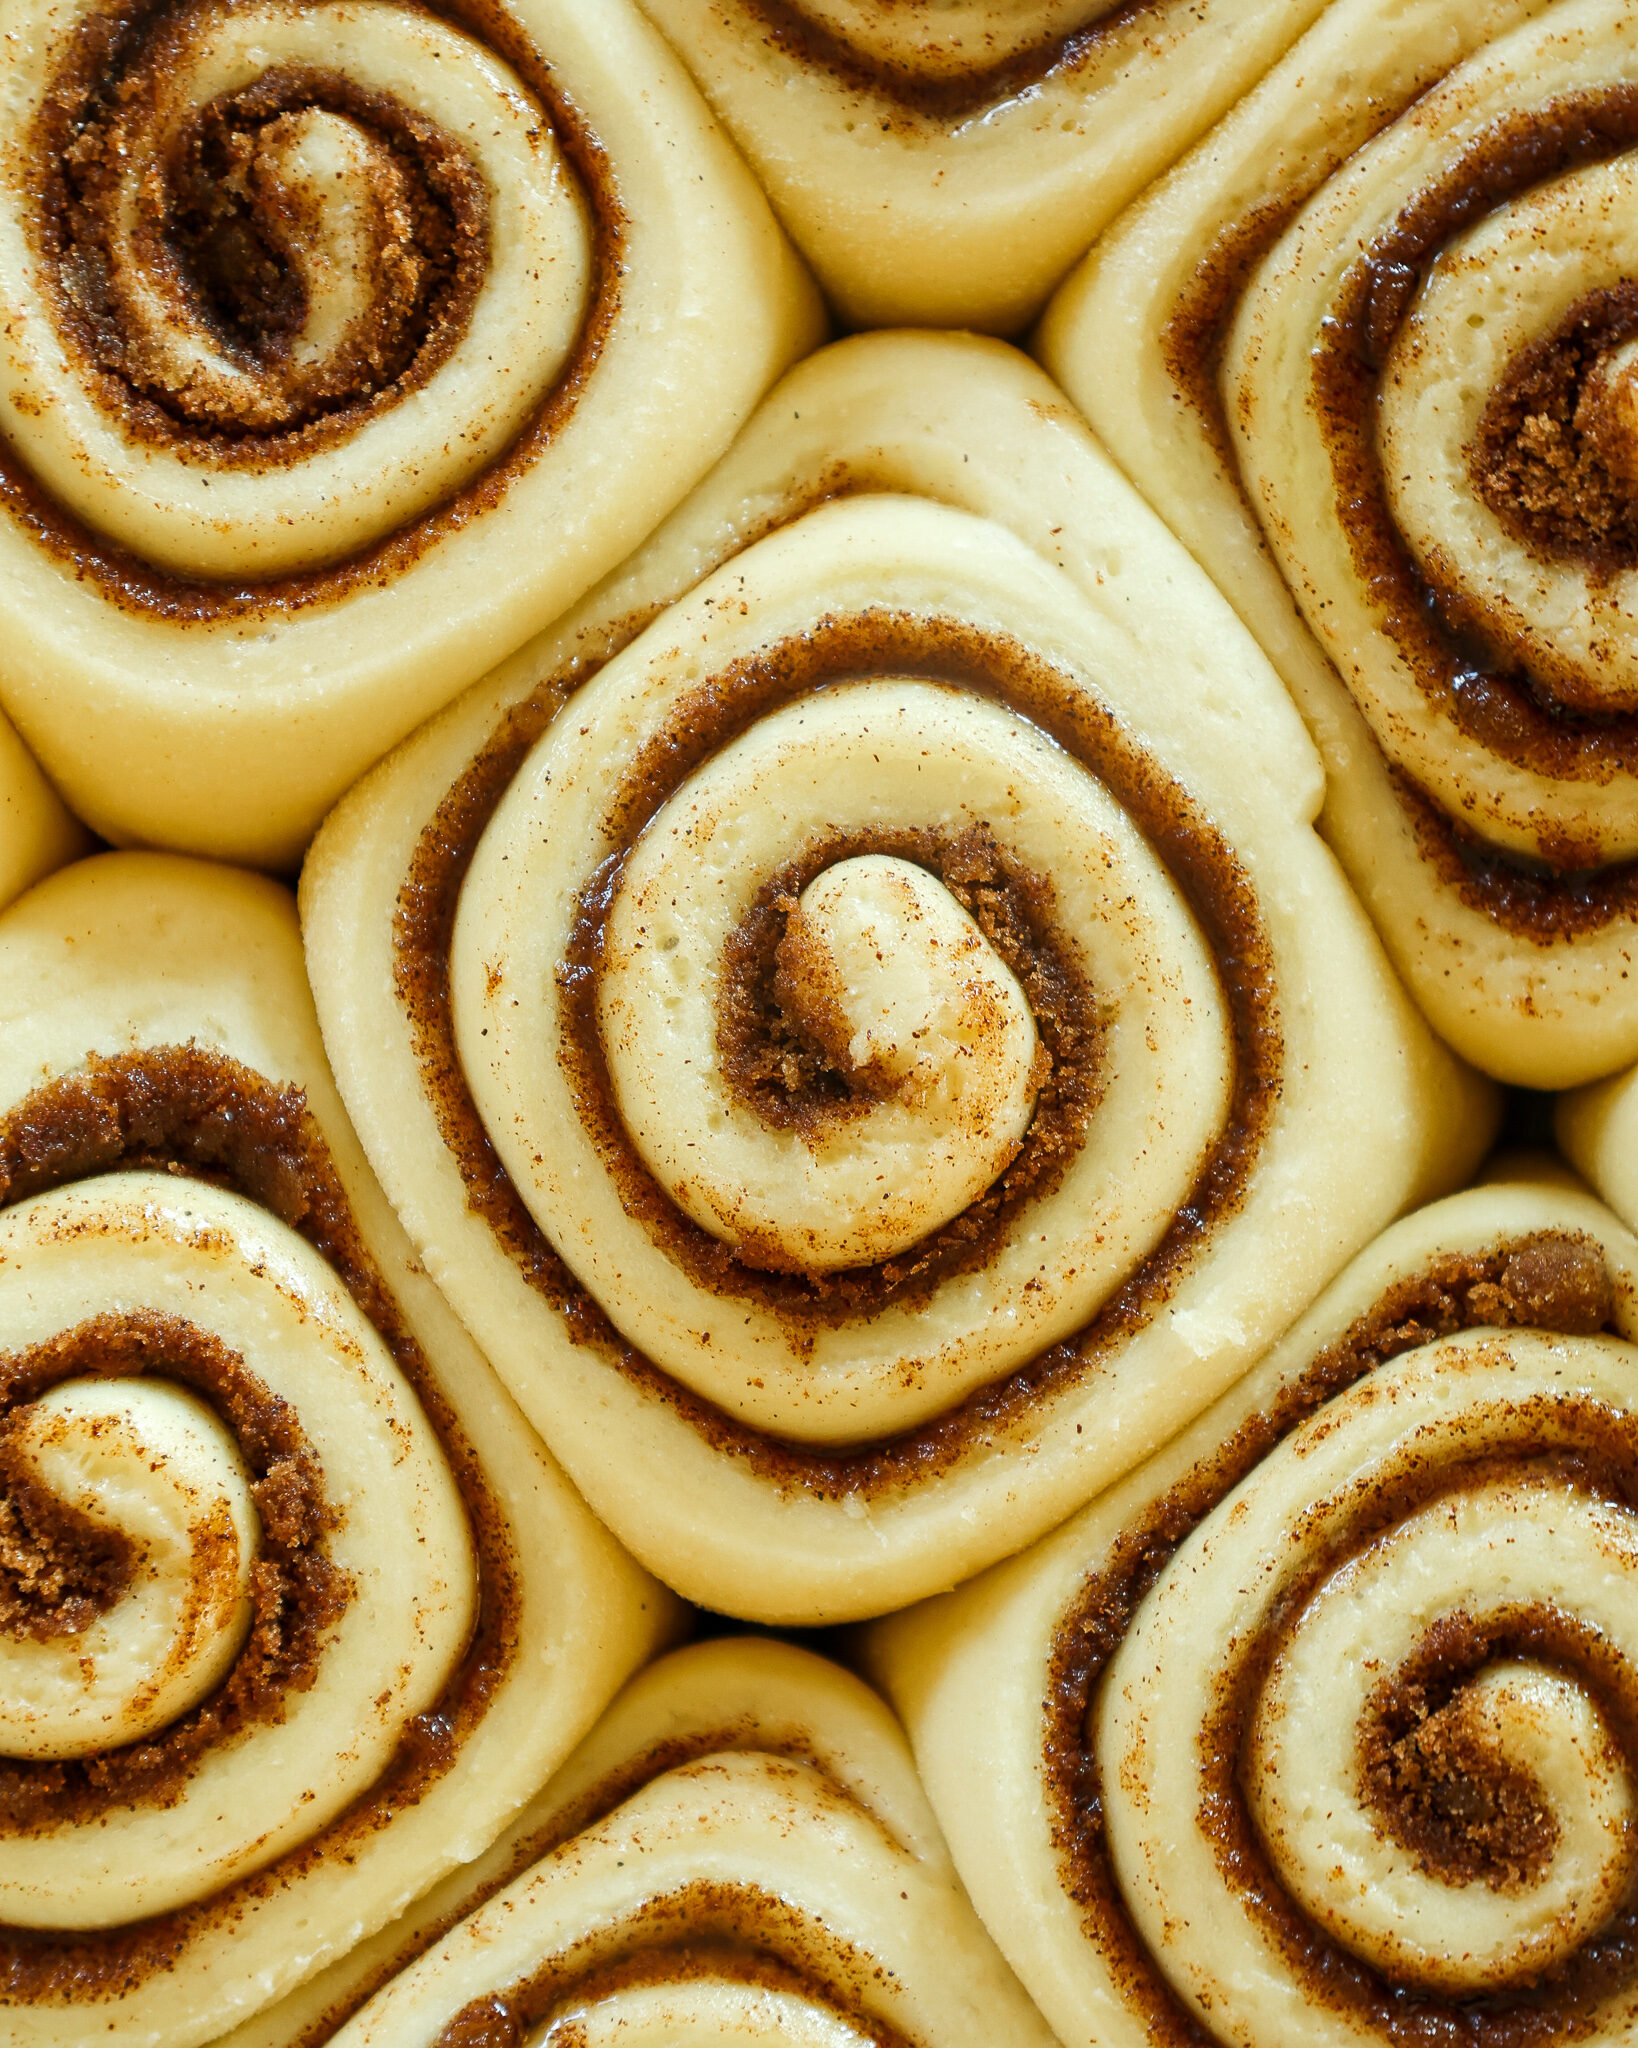
Once the dough has had a chance to rest, place it on a lightly floured surface and roll it into a large rectangle that’s roughly 18×12 inches. It should be about 1/2 cm thick.
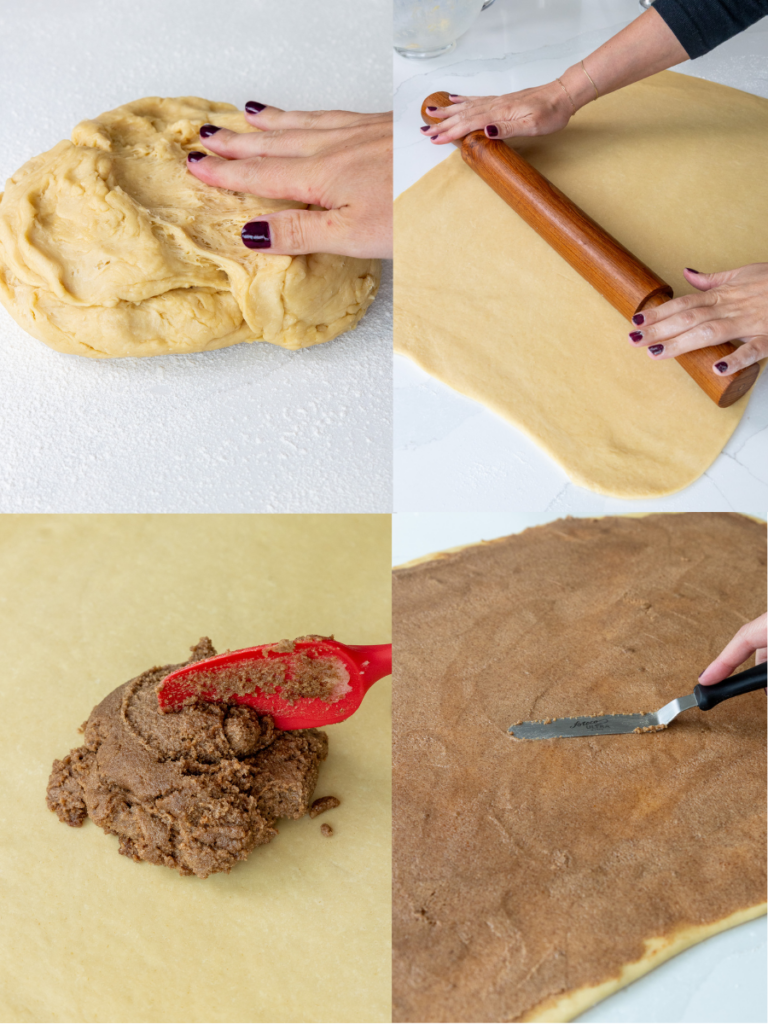
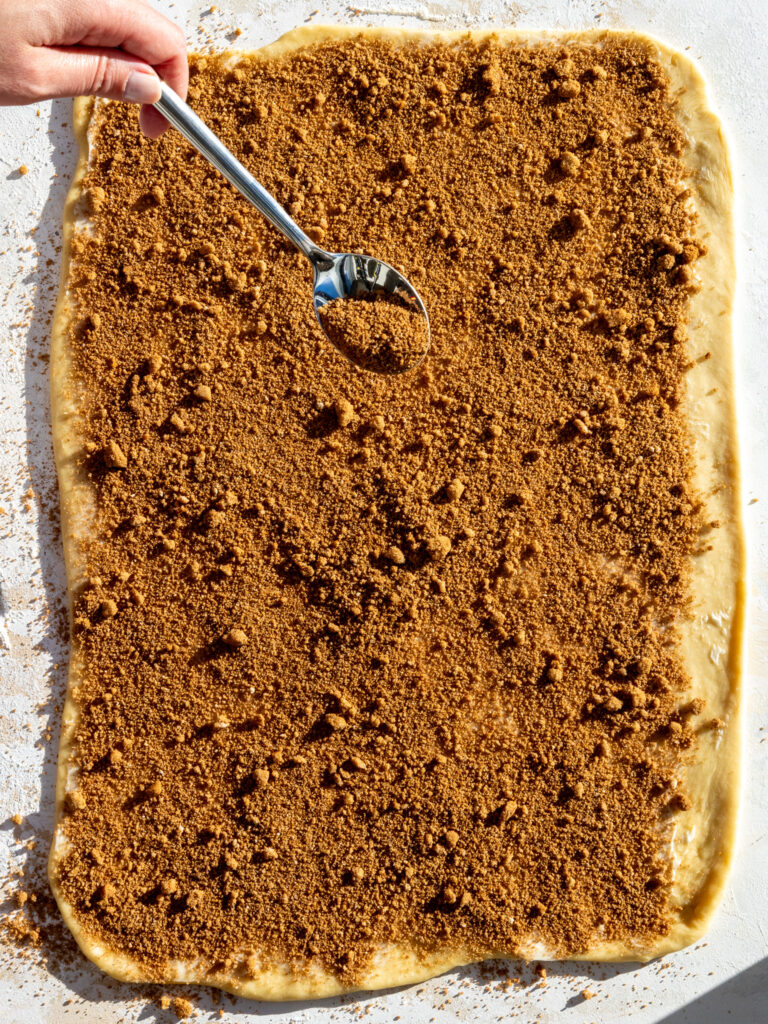
Spread the filling in a thin, even layer across the dough with an offset spatula or butter knife.
There are two options for rolling and cutting these:
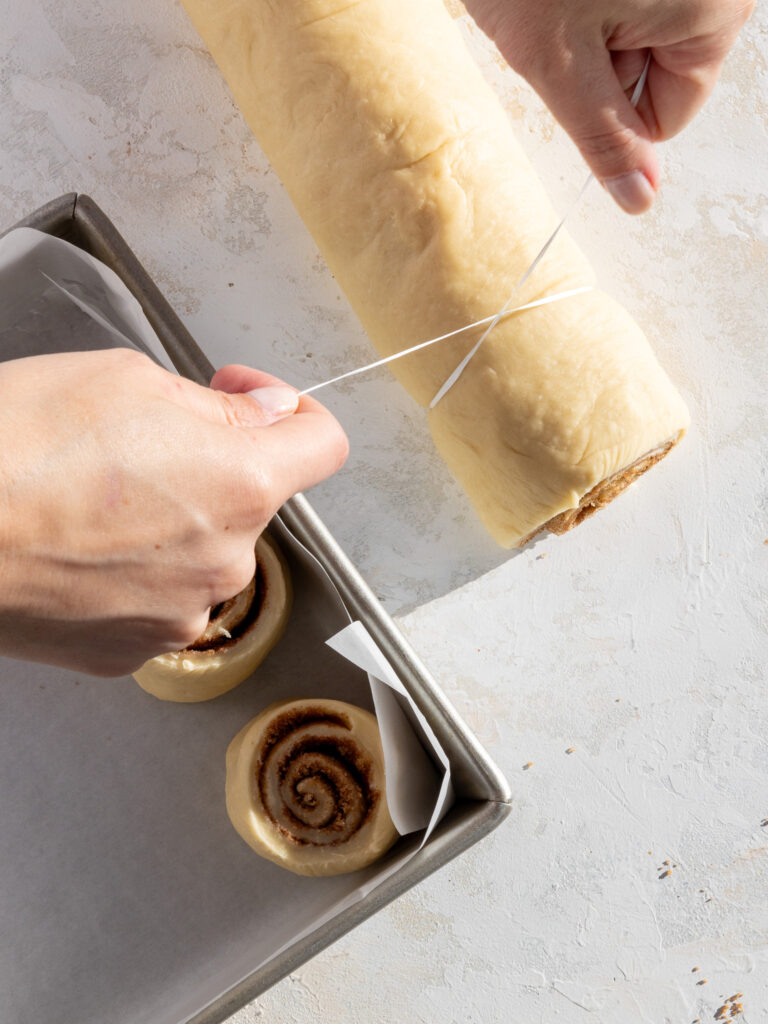
- Traditional Roll and Cut Method: Roll the dough horizontally, then cut 9 equal pieces using dental floss, and place them in the prepared 8×8-inch pan.
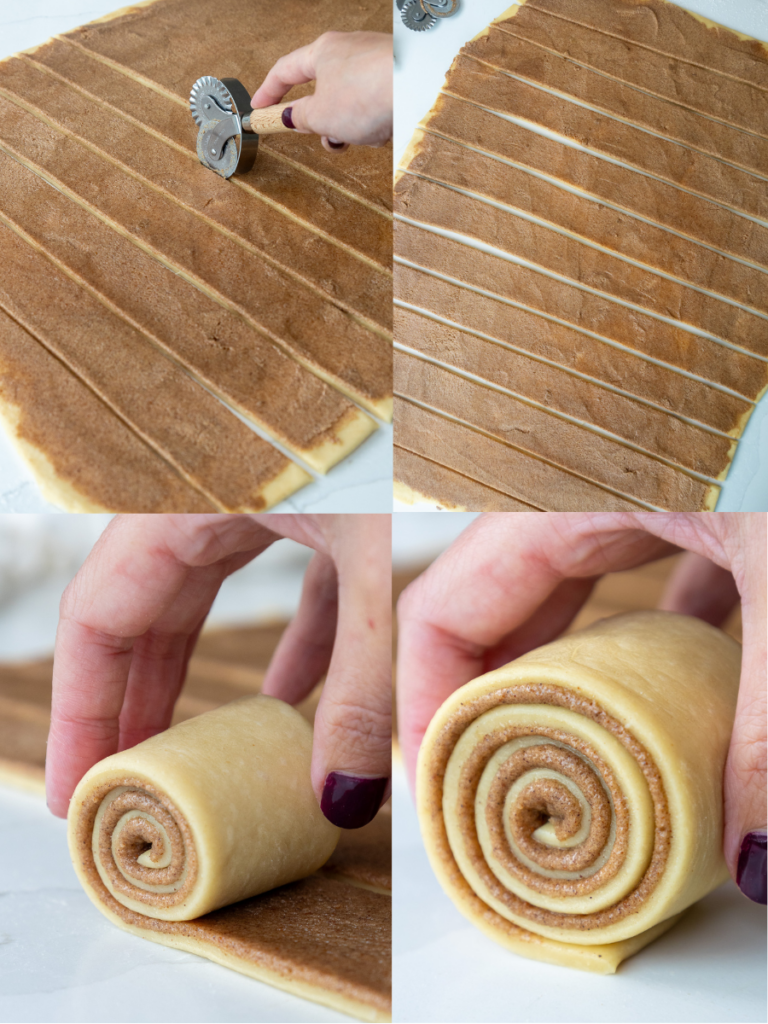
- Cut THEN Roll Method (my preferred method): Use a pastry rolling cutter or pizza cutter to cut 9 equal strips that are about 2″ wide – this is why it’s important that the dough is 18″ wide! If it’s shorter, you may need to cut your strips a bit narrower. Then roll each cinnamon roll up individually and place them in the prepared 8×8-inch pan.
Step 4: Proof and Bake the Cinnamon Rolls
There are also two options for proofing and baking these rolls! Follow the instructions below based on when you chose to make these rolls.
- If you are making these cinnamon rolls the night before, cover the cinnamon rolls tightly with plastic wrap and place them in the fridge overnight. The following morning, take them out of the fridge and preheat the oven to 200 F/93 C. Then turn off the oven, cover the rolls with foil, and place the rolls in the oven for about 30 minutes until they’ve risen. Remove them from the oven and take off the tinfoil.
- If you make these the morning of, turn off the oven, cover the rolls with foil, and place them in the oven to rise for about 30 minutes. MAKE SURE YOU’VE TURNED THE OVEN OFF. We want a nice cozy place for the rolls to rise, but we don’t want to bake them yet. Remove them from the oven and take off the tinfoil.
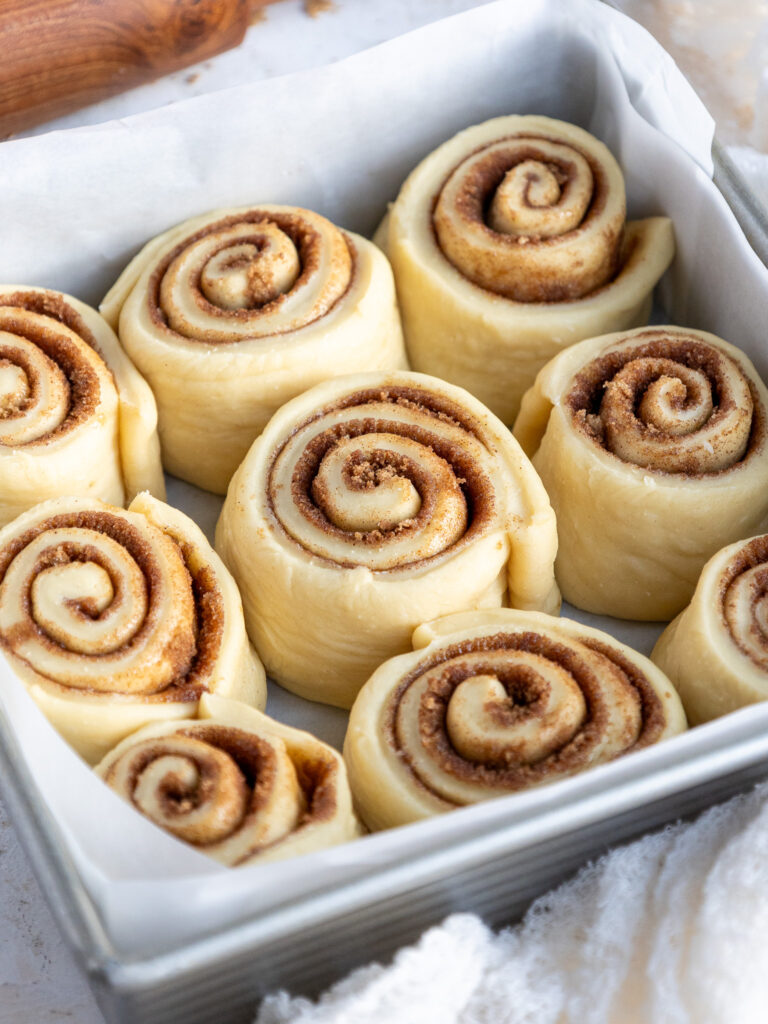
At this point, they should look puffier and have grown about twice in size. Don’t worry if some of the butter has melted out around the base of the cinnamon rolls. Preheat the oven to 350 F / 175 C.
Then bake the rolls for 26-30 minutes, or until the rolls are just starting to brown. Rotate the pan halfway through to help them bake evenly.
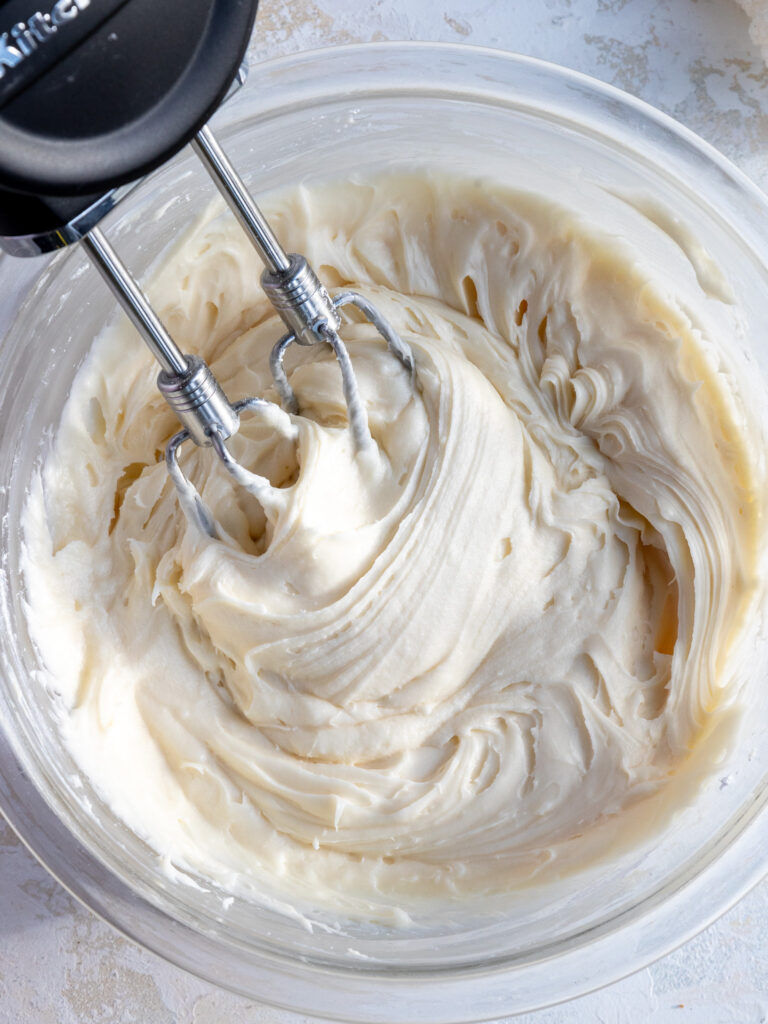
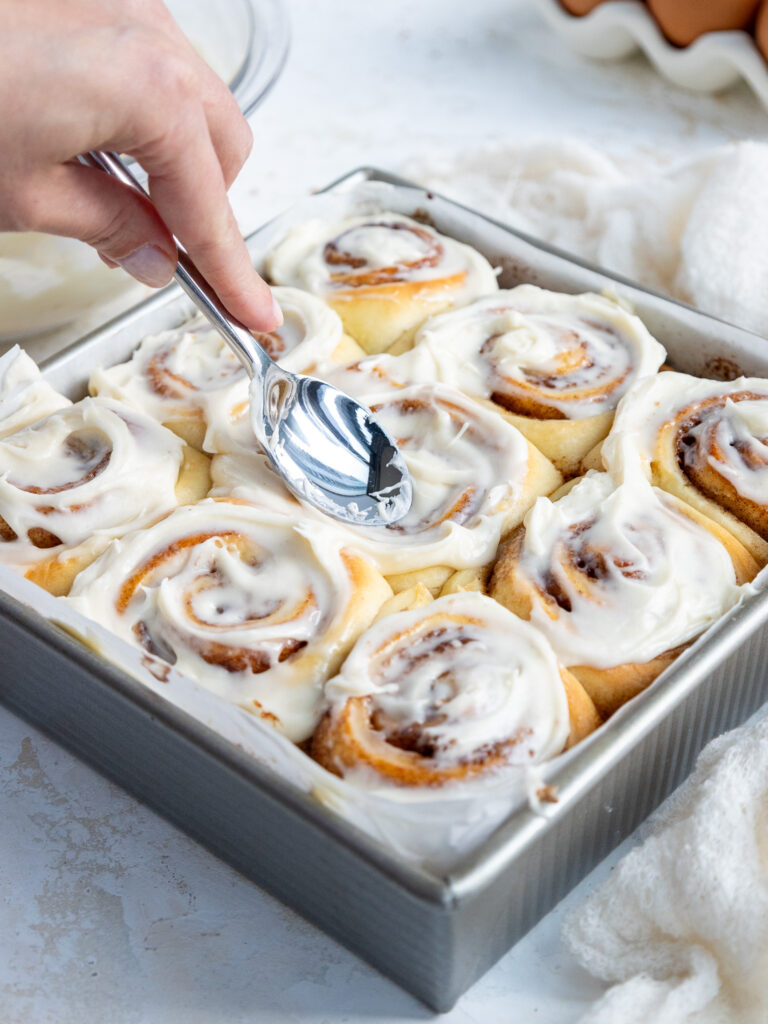
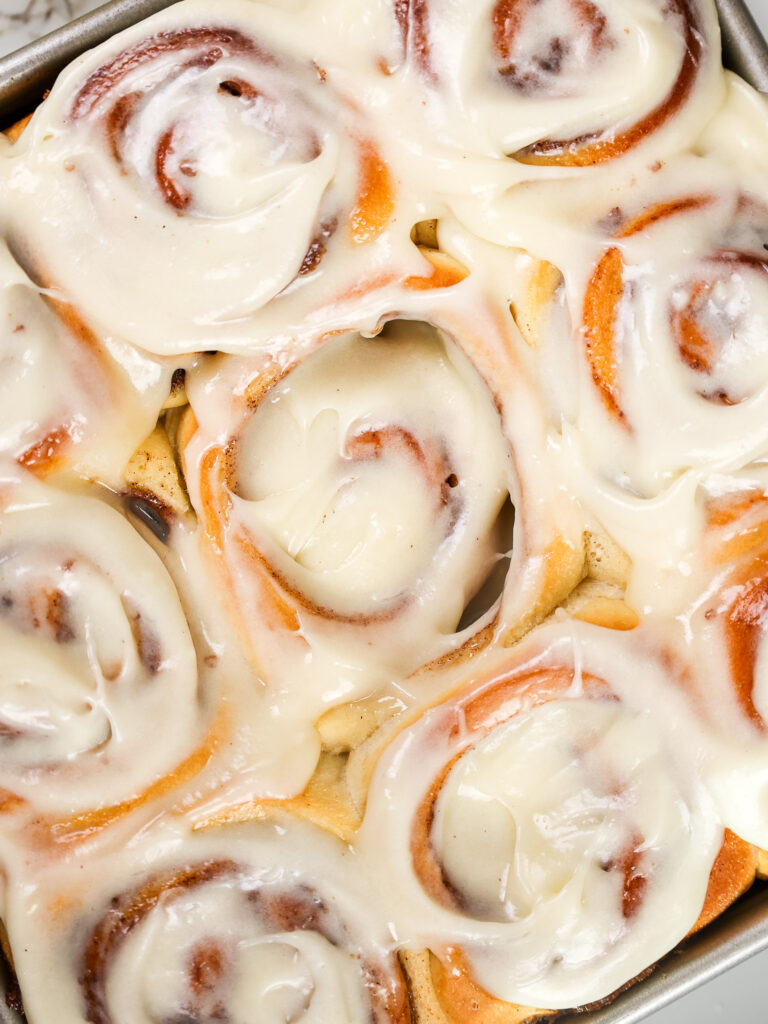
Step 4: Make the Cinnamon Roll Frosting
The last step is to make the frosting! Mix together 1/4 cup of cream cheese, 1/4 cup of butter, 2 tsp vanilla extract, and 1/4 tsp salt with a spoon or electric mixer.
Then mix 1 1/2 cups of powdered sugar and 2 Tbsp of heavy cream at a low speed until combined. Scrape the sides and bottom of the bowl as needed with a rubber spatula.
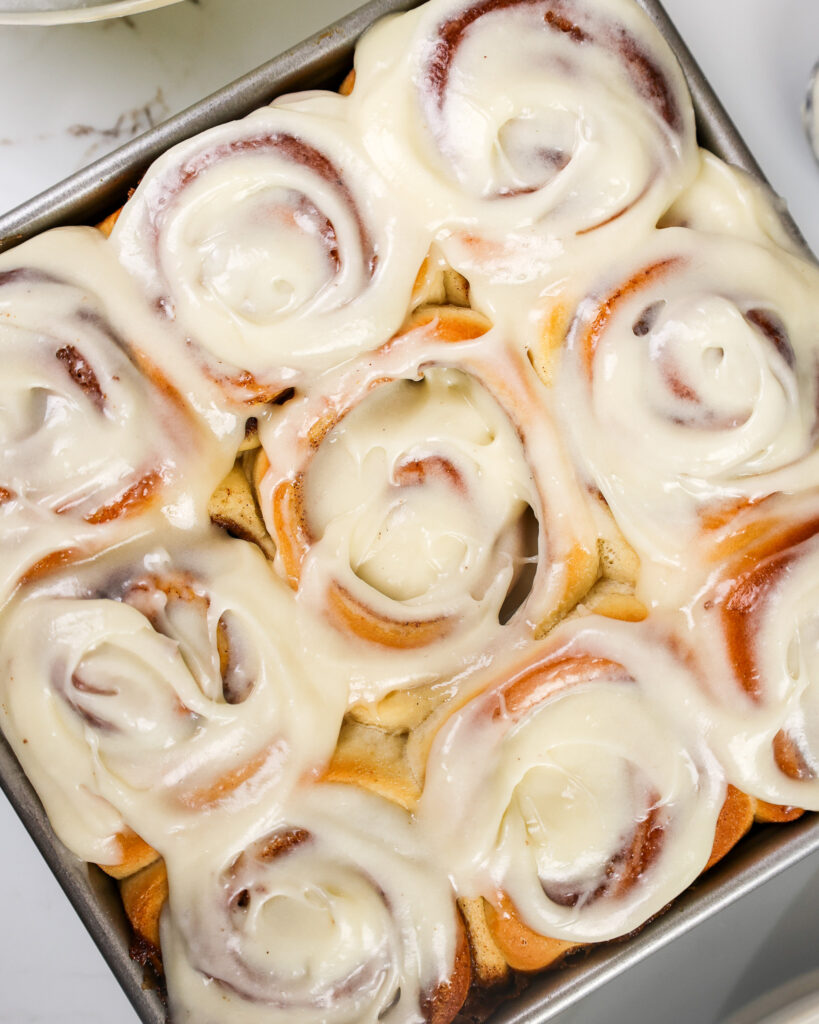
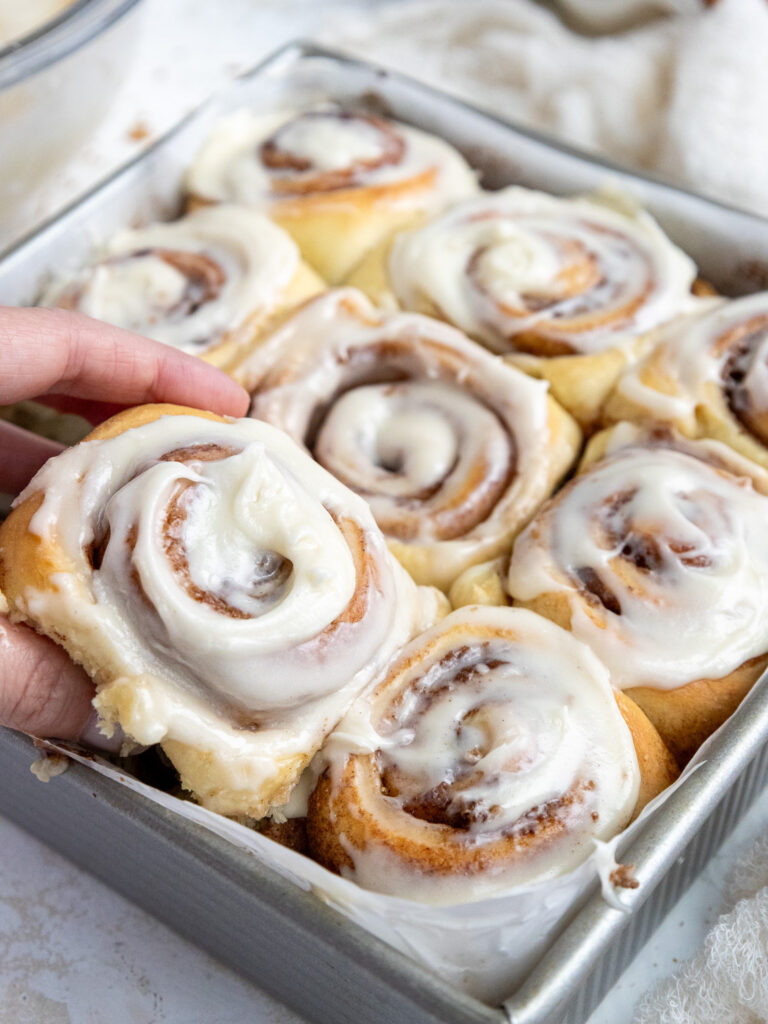
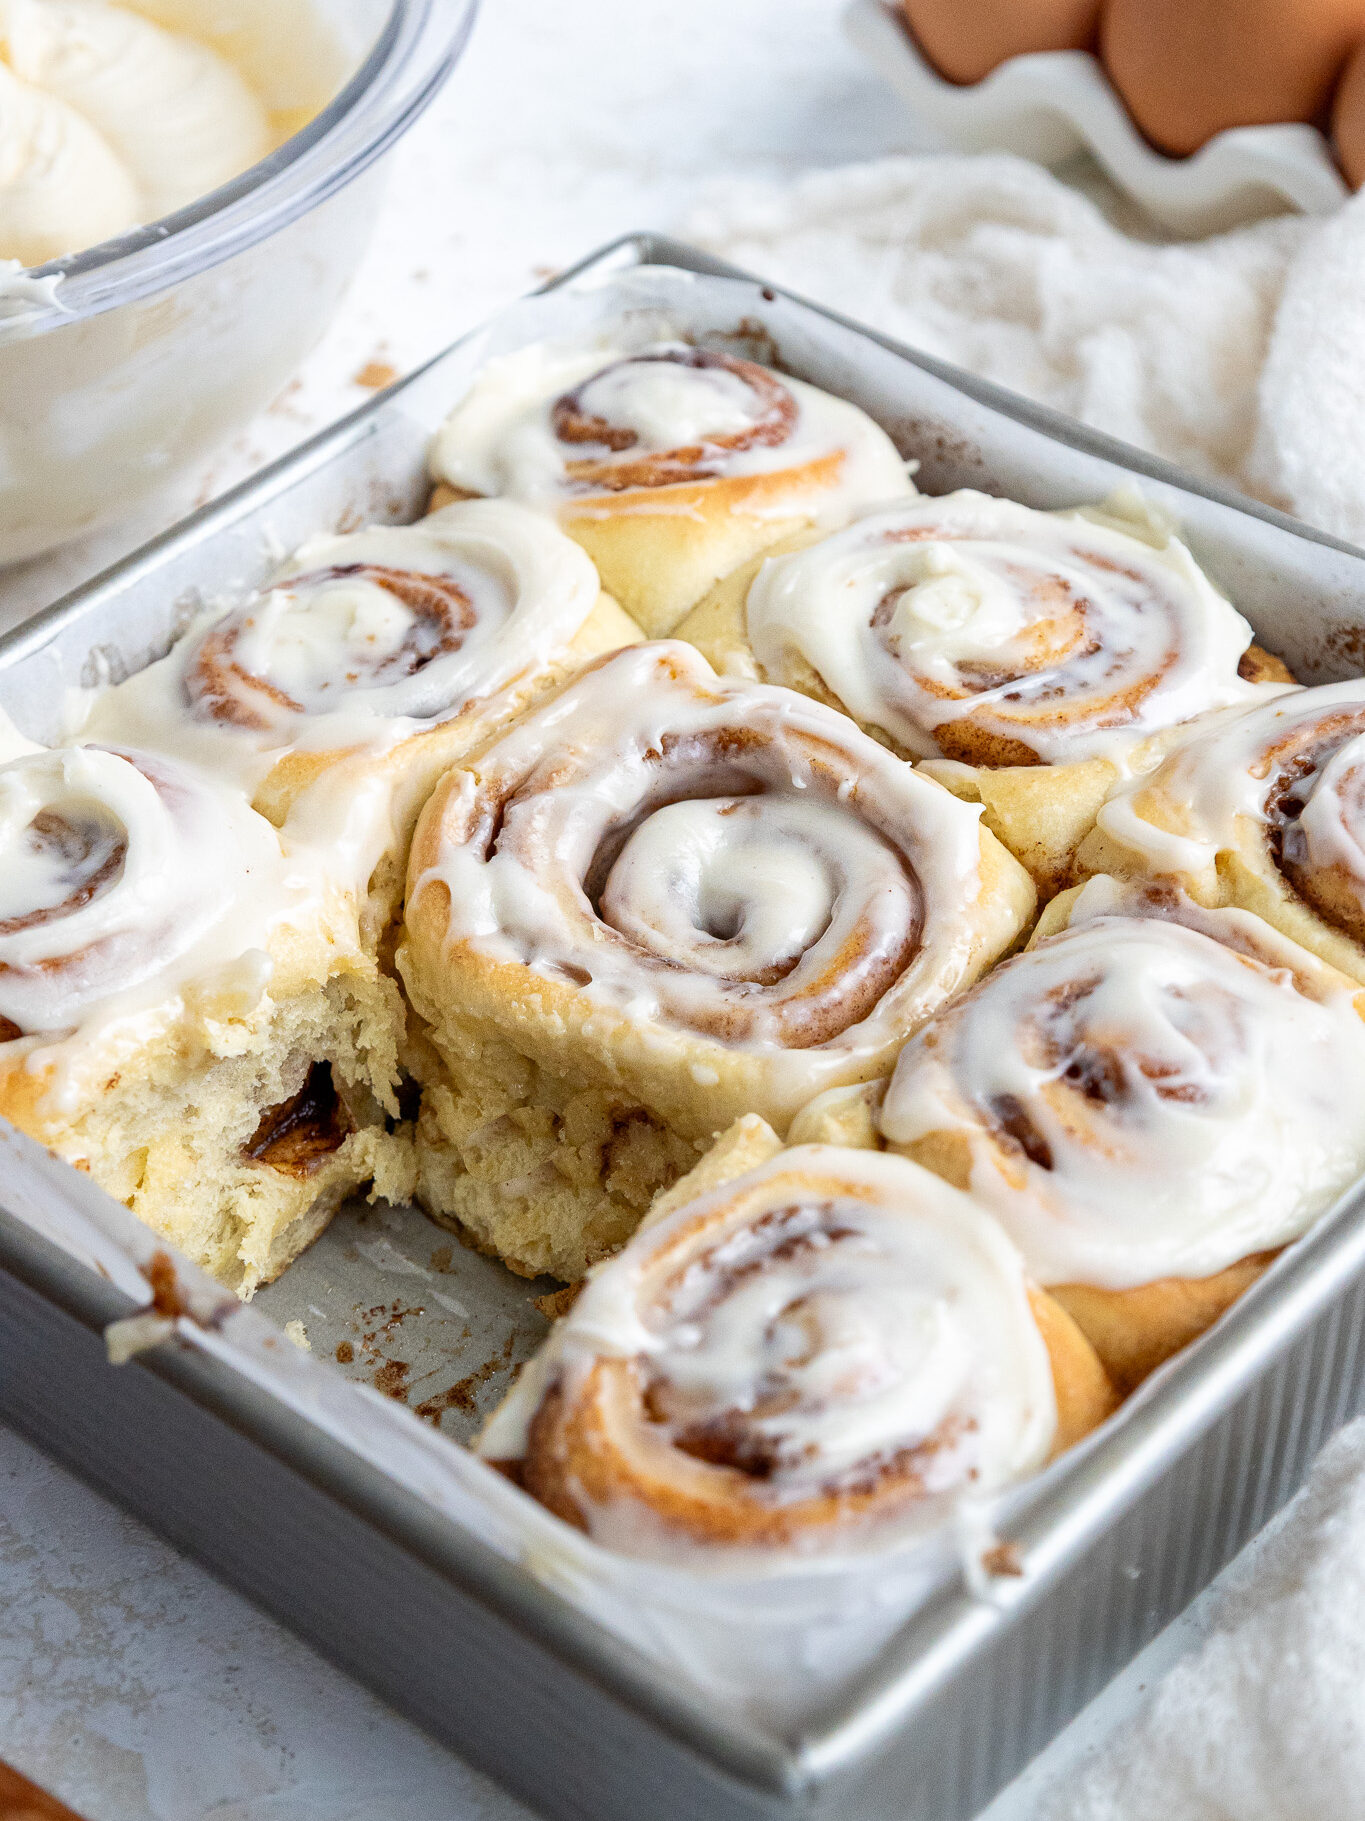
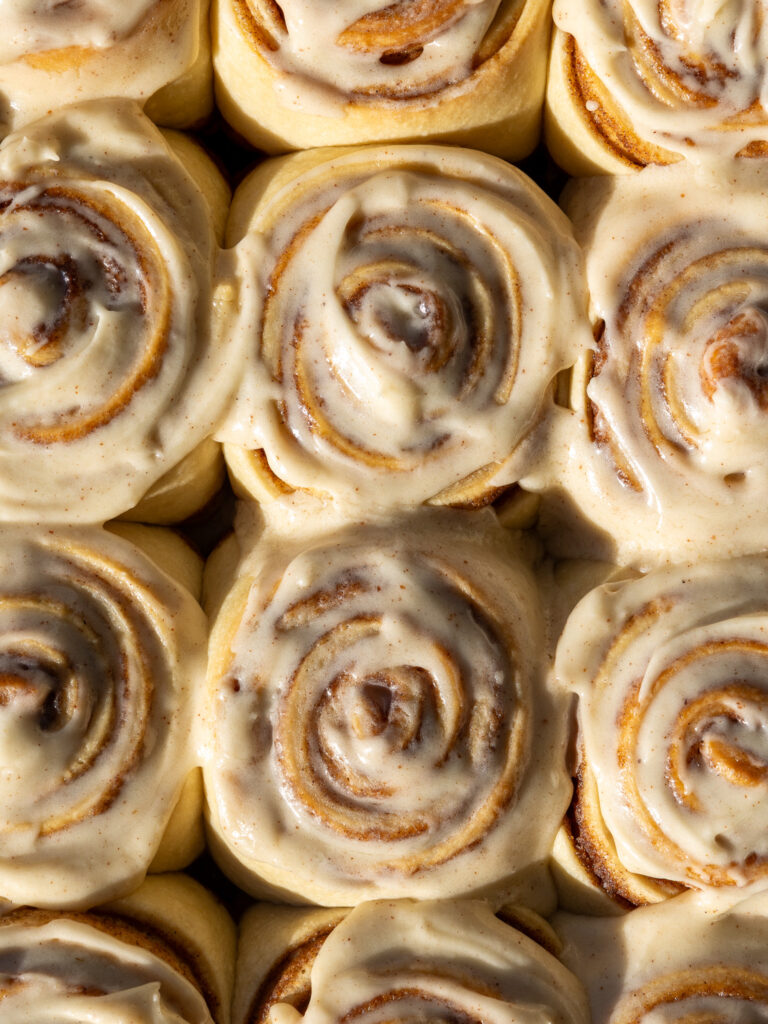
Let the cinnamon rolls cool for about 10 minutes, then spoon the frosting over each cinnamon roll and serve warm.
How Much Flour Am I Supposed to Use?
One part of this recipe that can be a bit daunting or hard to interpret is the amount of flour this recipe uses.
I tried so hard to find the perfect amount, but the truth is it will vary from batch to batch and kitchen to kitchen.
I’ve made these by hand, in a stand mixer, here in NYC, and in my childhood home in Seattle. Each time I use a slightly different amount of flour.
Now, the amount of flour you start with is set at 3 1/2 cups of all-purpose flour.
But as you add in your wet ingredients and the egg, a sticky dough ball forms, and you will need to add in additional flour.
I add 1 Tablespoon of flour at a time as I knead the dough. You need to add enough flour to create an elastic, workable dough that you can roll out.
However, if you add too much flour, you can end up with dense, chewy cinnamon rolls.
This is why it’s a range. When using my stand mixer, I usually add anywhere from 1-3 additional tablespoons of flour. Sometimes I end up using less than that, and occasionally I use more!
Making These Quick Yeast Cinnamon Rolls By Hand vs. Stand Mixer
This recipe can be made by hand or with a stand mixer and a dough hook.
It is definitely easier to make using a stand mixer, but a little elbow grease never hurt anyone.
Whichever method you use to make the dough, just be sure to knead or mix the dough until it gets an elastic texture and pulls away from the bowl or counter.
Once you get to this point, stop and let the dough rest for about 10 minutes. This little break lets the gluten relax and makes the dough easier to roll out.
If you continue to work the dough, the gluten strands can become too tight. Just like adding in too much flour, this can also lead to dense cinnamon rolls.
It’s pretty easy to sense when the dough is ready if you’re kneading by hand. However, if you’re using a stand mixer keep a close eye on your dough to ensure you don’t accidentally overwork it.
The Assisted Rise
Another thing that helps these cinnamon rolls turn out soft, fluffy, and tall is an assisted rise.
This recipe uses your oven to help the yeast rise. Don’t worry, the oven is preheated at a low temperature (200 F/ 95 C) and then turned off before you place the cinnamon rolls in there to rise.
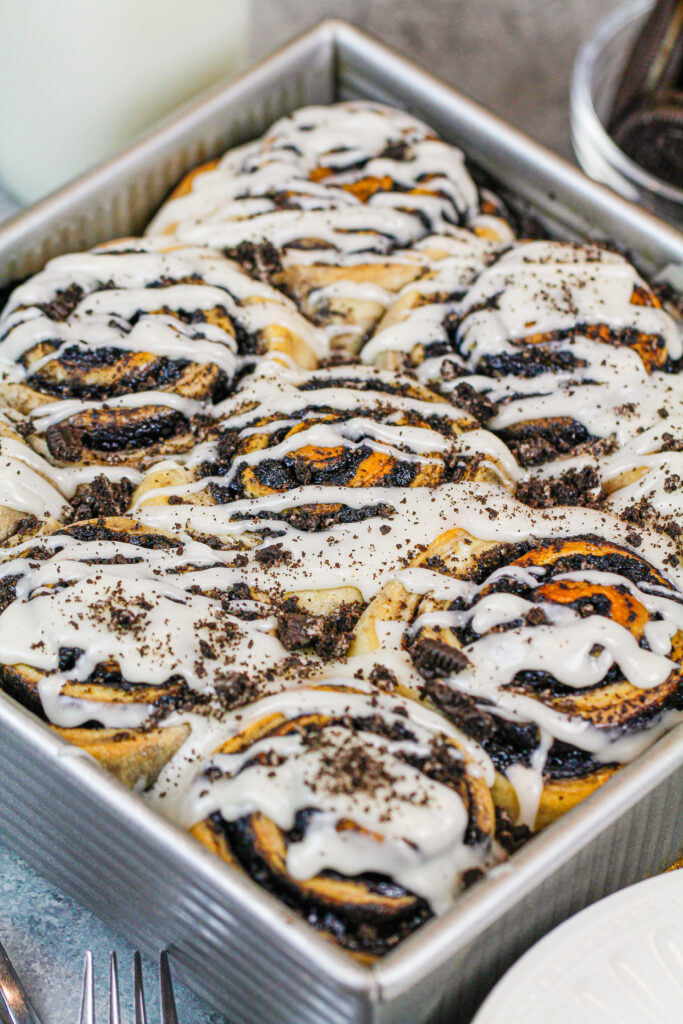
Below is a picture of my quick yeast cinnamon rolls after popping them into the oven to rise.
The cinnamon roll pan is also covered with foil to ensure no actual baking takes place.
I love this method because in the winter my house is always cold. It’s almost impossible to find a warm spot for the cinnamon rolls to rise.
No matter what temperature your kitchen is, your cinnamon rolls are guaranteed to rise and puff up with this method.
You also know how long it will take for them to rise (about 30 minutes), rather than anxiously checking on them every 10 minutes to see if they’ve risen.
If your oven has a proof setting, you can also simply turn that on and place the cinnamon rolls uncovered in the oven for about 30 minutes.
Substitutions and Swaps in This Recipe
While I love this recipe just the way it is, I know you might not have all these ingredients on hand!
Below are some swaps and substitutions that can be made in this recipe.
- All-Purpose Flour – I haven’t tested this recipe out with gluten-free flour, but it should work if you use a good blend like King Arthur’s GF flour. Just be sure to knead the dough a bit longer to help give it structure, and bake the rolls for a few extra minutes.
- Instant / Rapid Rise Yeast – You can use active dry yeast in place of the instant yeast in this recipe, just be sure to activate the yeast with warm water and sugar before adding it, and allow the dough to rise for a bit longer (active yeast takes longer to rise than instant).
- Unsalted Butter – If you only have salted butter on hand, you can use it in place of the unsalted butter in this recipe. Just be sure to omit the salt that this recipe calls for. You can also use vegan butter in its place!
- Whole Milk – Most alternative milks work fine in this recipe, including soy, oat, and almond milk.
- Granulated Sugar – I don’t recommend changing the type or amount of sugar used in the dough.
- Large Egg – This is an enriched dough, so it uses an egg. For best results, use a large, room-temperature egg.
- Brown Sugar – You can use light or dark brown sugar to make the filling for these cinnamon rolls. I prefer using light in this recipe!
Can I Double This Recipe?
Yes, you can! If you want to make more cinnamon rolls, I’d recommend doubling the ingredients, cutting 12 cinnamon rolls, and baking them in a 9×13-inch metal pan. Bake them at 350F / 175 C for 28-32 minutes, or until golden brown.
This will yield cinnamon rolls that are a bit taller and larger.
Making These Quick Yeast Cinnamon Rolls in Advance
If you want to make these cinnamon rolls ahead of time, be my guest! I’m all about working ahead and making life easier.
This recipe can be made the evening before and then baked the following morning. I’ve included instructions for this in the recipe card below.
You can also bake the cinnamon rolls, then let them cool and freeze them individually.
This is what I do with our leftover cinnamon rolls. I leave the leftover rolls unfrosted, then tightly wrap each roll in a layer of plastic wrap, then foil.
I move individual cinnamon rolls from the freezer to the fridge the night before I want to eat them.
Then in the morning, I unwrap the cinnamon roll and heat it up in the microwave until it’s warm and gooey. This usually takes about 30 seconds in my microwave.
Tips for Making the Best Homemade Cinnamon Rolls
- Don’t add too much flour! Add in additional flour 1 Tbsp at a time, and check the dough using the finger test. When you poke the dough with your finger, it should feel tacky but not sticky. As you pull your finger away, there should be no residue on your finger.
- Use a ruler to make sure your dough is rolled out to the right size (12 in x 18 in).
- Cut 9 equally sized cinnamon rolls to make sure they all bake evenly.
- Bake the cinnamon rolls in a metal, 8-inch square pan if possible! A round, 8-inch metal pan can be used too.
- Try to let the cinnamon rolls cool for about 10-20 minutes, then add the frosting. This will let it perfectly melt over the cinnamon rolls!
- Store leftover cinnamon rolls or cinnamon rolls made ahead of time in an airtight container to keep them fresh.
Let Me Know What You Think
If you try this recipe for quick yeast cinnamon rolls, I’d love to hear what you think! Please leave a rating and comment below.
You can also tag me on social media @chelsweets or use #chelsweets so I can see everything you’re baking up!!

Quick Yeast Cinnamon Rolls
Ingredients
Quick Yeast Cinnamon Roll Dough
- 3 1/2 cups all-purpose flour 440g + addition flour added later in the process
- 2 1/4 tsp (1 packet) instant dry yeast 7g, 1/4 oz.
- 1 tsp fine salt 6g
- 1 cup whole milk 240g
- 1/2 cup granulated sugar 100g
- 1/4 cup unsalted butter, room temperature 56g
- 1 large egg, room temperature 56g
Cinnamon Roll Filling
- 4 Tbsp (1/2 stick) unsalted butter, very soft 56g
- 1/2 cup packed light brown sugar 100g
- 1 Tbsp ground cinnamon
- 1/2 tsp fine salt
Cream Cheese Frosting
- 1/4 cup full fat cream cheese, room temperature 56g
- 1/4 cup unsalted butter, room temperature 56g
- 2 tsp vanilla extract or vanilla bean paste 8g
- 1/4 tsp fine salt
- 1 1/2 cups powdered sugar 190g
- 2 Tbsp heavy whipping cream, room temperature 30g
Instructions
Cinnamon Roll Dough
- Preheat your oven to 200 F / 95 C (if you're making these the day before, no need to preheat the oven). In a large bowl or the bowl of a stand mixer, combine 3 1/2 cups flour, 2 1/4 tsp or 1 packet instant dry yeast, and 1 tsp salt.
- In a separate bowl, combine 1 cup of milk, 1/2 cup of granulated sugar, and 1/4 cup of butter. Heat for 1 minute in the microwave, then stir to combine the ingredients. The butter should be mostly melted, and the mixture should feel warm but not hot to the touch. If it's too hot, it can kill the yeast!
- Slowly pour the warm milk mixture into the dry ingredients and mix on medium speed with a dough hook or by hand with a dough whisk. If you don't have a dough whisk, you can use a large wooden spoon.
- Add 1 large egg and mix on a low speed until a sticky dough ball forms. Continue to mix on a medium-low speed for a couple of minutes until the dough becomes more elastic.
- As the dough mixes, add additional flour 1 Tbsp at a time until the dough begins to leave the sides of the bowl. I usually add 1-3 additional Tbsps of flour. My favorite way to know if my dough is ready is to poke it with my finger. It should feel tacky but not sticky. As you pull your finger away, there should be no residue on your finger.
- Cover the bowl with plastic wrap and set aside to let the dough rest for 10-20 minutes. This will make it easier to roll out.
Cinnamon Roll Filling
- While the dough rests, make the cinnamon roll filling. To be able to combine the filling into a paste-like consistency, the butter needs to be really soft (but preferably not melted). It should be spreadable/softer than room temperature. I usually heat room-temperature butter in the microwave in 5-second intervals to get this consistency – just be sure not to fully melt it!
- Add 4 Tbsp of very soft butter, 1/2 cup packed brown sugar, 1 Tbsp ground cinnamon, and 1/2 tsp fine salt to a medium-sized bowl. Mix together until fully combined, then set aside. The mixture should have a thick, paste-like consistency.
Roll Up & Bake the Cinnamon Rolls
- Line an 8×8-inch square or round pan (light-colored metal preferable) with parchment paper and set aside. If you don't have metal, glass will work, too. If you use glass, lower the oven temperature by 25 F and bake for a few minutes longer.
- Once the dough has had a chance to rest, place it on a lightly floured surface and roll it into a large rectangle that's roughly 18×12 inches. It should be about 1/2 cm thick.
- Spread the filling in a thin, even layer across the dough with an offset spatula or rubber spatula. It might seem like there isn't enough filling at first, but I promise there is! It just takes a bit of time to get it fully spread out over the dough.
There are two options for rolling and cutting these:
- Traditional Roll and Cut Method: Roll the dough horizontally, then cut 9 equal pieces using dental floss, and place them in the prepared 8×8-inch pan.
- Cut THEN Roll Method (my preferred method): Use a pastry cutter or pizza cutter to cut 9 equal strips that are about 2" wide – this is why it's important that the dough is 18" wide! If it's shorter, you may need to cut your strips a bit narrower. Then roll each cinnamon roll up individually and place them in the prepared 8×8-inch pan.
- Proof & Bake the Cinnamon Rolls
- There are also two options for proofing and baking these rolls! Follow the instructions below based on when you chose to make these rolls.
- If you are making these cinnamon rolls the night before, cover the cinnamon rolls tightly with plastic wrap and place them in the fridge overnight. The following morning, take them out of the fridge and preheat the oven to 200°F/C. Then, turn off the oven, cover the rolls with foil, and place the rolls in the oven for about 30 minutes until they've risen. Remove them from the oven and take off the tinfoil.
- If you make these the morning of, turn off the oven, cover the rolls with foil, and place them in the oven to rise for about 30 minutes. MAKE SURE YOU'VE TURNED THE OVEN OFF. We want a nice cozy place for the rolls to rise, but we don't want to bake them yet. Remove them from the oven and take off the tinfoil.
- At this point, they should look puffier and have grown about twice in size. Don't worry if some of the butter has melted out around the base of the cinnamon rolls. Preheat the oven to 350 F / 175 C. Then bake the rolls for 26-30 minutes, or until they're just starting to brown. Rotate the pan halfway through to help them bake evenly.
Cinnamon Roll Frosting
- While the rolls bake, make the cream cheese frosting. Mix 1/4 cup of cream cheese, 1/4 cup of butter, 2 tsp vanilla extract, and 1/4 tsp salt with a spoon or electric mixer.
- Then, mix 1 1/2 cups of powdered sugar and 2 Tbsp of heavy cream at a low speed until combined. Scrape the sides and bottom of the bowl as needed with a rubber spatula.
- Let the cinnamon rolls cool for about 10 minutes, then spoon the frosting over each cinnamon roll and serve warm.
Video
Notes
Using the Right Type of Yeast: Active vs. Instant Yeast
Make sure you are using instant yeast! It comes in small packets that can usually be found in the refrigerated section of your grocery store. You can use active dry yeast in place of the instant yeast in this recipe, just be sure to activate it with a bit of warm water and sugar before adding it to the dough and allow the dough to rise for longer (active yeast takes longer to rise than instant).Can I Double This Recipe?
Yes, you can! If you want to make more cinnamon rolls, I’d recommend doubling the ingredients, cutting 12 cinnamon rolls, and baking them in a 9×13-inch metal pan. Bake them at 350°F / 175°C for 28-32 minutes, or until golden brown. This will yield cinnamon rolls that are a bit taller and larger.Tips for Making the Best Quick Yeast Cinnamon Rolls
- Don’t add too much flour! Add in additional flour 1 Tbsp at a time, and check the dough using the finger test. When you poke the dough with your finger, it should feel tacky but not sticky. As you pull your finger away, there should be no residue on your finger.
- Use a ruler to make sure your dough is rolled out to the right size (18×12 inches) and cut into even pieces.
- Cut 9 equal-sized cinnamon rolls to make sure they all bake evenly.
- Make sure you’re using INSTANT YEAST! It speeds up the process and helps these rolls rise and bake much faster than active yeast.
- Try to let the cinnamon rolls cool for about 10-20 minutes, then add the frosting. This will allow it to perfectly melt over your cinnamon rolls!
Making These Quick Yeast Cinnamon Rolls in Advance
If you want to make these cinnamon rolls ahead of time, be my guest! I’m all about working ahead and making life easier. This recipe can be made the evening before and then baked the following morning. I’ve included instructions for this in the recipe card below. You can also bake the cinnamon rolls, then let them cool and freeze them individually. This is what I do with our leftover cinnamon rolls. I leave the leftover rolls unfrosted, then tightly wrap each roll in a layer of plastic wrap, then foil. I move individual cinnamon rolls from the freezer to the fridge the night before I want to eat them. Then in the morning, I unwrap the cinnamon roll and heat it up in the microwave until it’s warm and gooey. This usually takes about 30 seconds in my microwave.Nutrition
Other Recipes You Might Like:
These look awesome! What would be the best way to make them ahead of time?
Thanks Kelsey!! This recipe really is designed to be made the morning of, so I wouldn’t recommend making them too far ahead of time. I’m working on an overnight cinnamon roll recipe this month though, and am hoping to share it soon. Stay tuned!!
@Chelsweets, in my opinion you do not need another recipe. I made these on a Saturday to serve to my girls when they came for coffee on Monday morning. I just popped them into the microwave for a few seconds and they were just as delicious as they were on Saturday. I just saved the glaze and put it on after I warmed them on Monday.
Doubled with no issues except kids couldn’t wait so I frosted two minutes out of oven. Thanks Chelsey!!
Haha so happy to hear that!! Sounds like a perfect Sunday morning 🙂
Thanks for the recipe, Chelsey! Tried making the rolls today and they turned out perfect 🙂
So happy to hear that Salome!! Thank you for sharing ?
Hi,
I will be trying these this weekend so I went to the store and bought packets of the instant yeast. I could only find packets that are 2 1/4 teaspoons while a tablespoon has 3 teaspoons. Is there a certain brand you used? Or would the 2 1/4 packets work? I bought fleischmanns instant yeast.
Hi Geoffrey,
So sorry for the delayed response! I usually scoop mine out of a container, but the amount in a packet will work too (1/4 oz). I’ve updated the recipe card to reflect this, to make it more clear because I think most people (like you) use the packets. Hope that helps, happy baking!
Getting all my ingredients ready tonight so I can make this first thing in the morning for my husband’s birthday. In the frosting directions, it says to “stir with spoon of stand mixer”…is that supposed to be “paddle”? Can’t wait until morning!
Hi Meghan,
I hope you cinnamon rolls turned out great! So sorry about that type, it should have said spoon or stand mixer. I like to make the frosting by hand just to make less dishes, but you can also use a stand mixer with either a whisk or paddle attachment.
Hope that helps for the future, I updated the recipe card to fix that 🙂 happy baking!!
That’s a great idea, thank you for working on it.
Thank you Giovanna!! 🙂
I bought a packet that is 2 1/4 teaspoon but the recipe calls for a packet or a tablespoon which is 3 teaspoon. Does one packet still work or do I need to open 1 and some? It was the only packets available at the store.
Hi Geoffrey,
One packet should be just fine, even if it is 2 1/2 tsp 🙂 I hope your cinnamon rolls turn out great, happy baking!!
Made these for the first time today and wow! So quick and easy to make and super delicious!!!
Aw so happy to hear that Rachel!!! 🙂 Thank you for sharing!!
Hi Chelsey
I have seen other recipes that freeze them after all prepared, then pop out of freezer when needed.
Is this something this recipe is capable of, if so, at what stage would you recommend freezing, if at all?
Thanks so much and I LOVE your baking knowledge that you so generously give.
Kathy
Hi Kathy,
If you want to make these quick yeast cinnamon rolls ahead of time, be sure to use regular yeast rather than instant yeast, and double the amount (some of the yeast may be damaged when frozen, so doubling the amount ensures your cinnamon rolls will rise properly). Freeze the cinnamon rolls after they have been cut and proofed in a greased pan.
Cover the cinnamon rolls with an airtight lid or plastic and freeze for up to a week. To thaw, take them out 2 hours before you plan to bake them, and then follow the recipe to bake.
Hope that helps, happy baking!
I just baked the rolls. Can I wait and frost them in the morning?
Hi Kim,
I always think they’re best fresh out of the oven, but if you made them ahead of time you can wrap them tightly, then reheat them the following morning and add the frosting them. Hope that helps, happy baking!!
I know with this recipe you say the flour is pretty much give or take, but when you make this do you take your measuring cup and scoop directly into the flour or do you use a spoon to scoop the flour into the measuring cup? When I make your cakes you have the weighted measurements, which I use, but curious when there is no weight, what’s the scoop. ?
Hi Heather,
While I am a huge proponent of properly measuring flour for cakes and most baking, for this I scoop out of the bag! I don’t recommend doing that with other recipes, but for this one it works fine. Hope that helps, happy baking!
The cinnamon sugar mixture seems grainy. Any thoughts on how to get the mixture to be more smooth and gooey? I may have over baked it by just a few minutes because it didn’t turn golden after the allotted time, maybe that’s why? And I did use cornstarch… other than that it was delicious! The dough was easy to make and work with! I deep fried the scraps and dusted with powdered sugar and it was delicious! No waste!!
Hi Lisa,
Love that!! I’d recommend baking the cinnamon rolls slightly longer next time! That should help the filling get a bit more gooey. You also can roll the dough out to be slightly taller, to create more surface area to spread the filling (which can help it melt down more easily). Hope that helps, happy baking!
These were delicious. Thank you. Could these be made a head and frozen? If yes, would you freeze them un-baked or pre-baked?
Hi Amy,
You totally can! If you want to make these quick yeast cinnamon rolls ahead of time, be sure to use regular yeast rather than instant yeast, and double the amount (some of the yeast may be damaged when frozen, so doubling the amount ensures your cinnamon rolls will rise properly). Freeze the cinnamon rolls after they have been cut and proofed in a greased pan.
Cover the cinnamon rolls with an airtight lid or plastic and freeze for up to a week. To thaw, take them out 2 hours before you plan to bake them, and then follow the recipe to bake.
Hope that helps, happy baking!
Are you able to use active dry yeast instead of instant dry
Hi Talia,
Active dry yeast rises a bit less than instant dry yeast, but you can use it if you don’t have instant dry yeast on hand. You might want to use a bit of extra yeast to adjust for that though! Hope that helps, happy baking!
My first ever attempt at cinammon buns, even though I’ve been baking and decorating for years! These worked great, and tasted really good. Mine did seem a little tight in the square pan, so if I needed to use a 9×13, could I just slice a few more rolls, have them shorter, but fill the pan and still have enough room to rise? Or did I not roll them tightly enough?
Hi Maureen,
What size square pan did you use? You can totally use a 9×13 inch pan and cut more rolls from the cinnamon roll log if that works better for you! I like mine to rise really high and have slightly gooey centers, which is why I prefer a square pan / having them be more crowded. But I think it’s all a matter of preference / there’s not really a wrong way to make a homemade cinnamon rolls once you get to that stage 🙂 Hope that helps, happy baking!
Is it okay if the pan is glass?
Hi Gabrielle,
That’s totally fine if the pan is glass! They will still bake up great 🙂 Happy baking!
How do i put in the yeast?
Hi Sydney,
Because this recipe calls for instant yeast, you can just pour it right out of the package into the bowl with the flour. Hope that helps, happy baking!
Hey Chelsey! So I Am baking them right now, but their not rising. I turned the oven back on and put them in there. I’m not sure what to do.
Hi Jo,
I’m so sorry to hear that! Did you use instant rise yeast? Was the yeast fresh?? Sometimes yeast can expire, which can have a big impact on the rise. what brand and type of yeast did you use?? Hopefully we’ll be able to figure out what went wrong <3
Do you really mean 1 whole tablespoon of vanilla?
Hi Div,
I really love vanilla, so I use a lot of it in my recipes! You can add less though, or add whatever amount you prefer! The frosting will still turn out if you use less extract. Hope that helps, happy baking!
Am I supposed to leave the foil on for the full bake?
Hi Margo,
You should remove the tin foil for the full bake! Sorry for not making that more clear, I’ll update the recipe card to avoid future confusion 🙂 Happy baking!
Have you tried making these Gluten Free?
Hi Jeanette,
I haven’t tried making these GF yet, so I’m not sure how they’d turn out! While I feel pretty comfortable with GF cakes and cupcakes, I haven’t played around with GF yeast dough before :/ Sorry I can’t be of more help! If you try it, please let me know how it turns out!
Today i decided i wanted to bake and i thought of what i should do. When i went on Tiktok , i thought of you! So i checked your tiktoks and looked you up on my computer. Now i have a good thing to bake!! Thank you!!
Aw that’s awesome Chloe!! I’m so happy to hear that 🙂 Happy baking!
I did use an 8×8 pan, it just seemed a lot smaller than your picture.
Tried them again today, and now they don’t seem to be rising as well as last time. (To be fair, I had to run out while they rose last time, and were in the oven much longer than 30 min.) I am leaving them in the oven for an extra 30-45 min today, and hope they rise. Did I not knead the dough long enough in the stand mixer?
Hi Maureen,
Leaving them in the oven for too long most likely caused the dough to overproof :/ that can definitely impact the final rise of the cinnamon rolls. I’d only leave them in the oven for the recommended amount of time for your next batch.
You may also want to knead the dough a bit more next time. Hopefully one (or both) of those will make your next batch rise up better. Please let me know how it turns out <3
@Chelsweets, just received my very first stand mixer and I started searching for homemade cinnamon rolls. Your receipt popped up. Looks amazing. I”ll try it this weekend. Can you explain how instant yeast works? What type of yeast and brand do you recommend for sweet doughs and what yeast brand or type do you recommend for white bread? What do you mean by overproof? (you mentioned it in the previous reply to Maureen)
Hi Cindy,
I hope your cinnamon rolls turned out great! I don’t really make bread, I mostly stick to desserts and sweet rolls! I like to use the instant yeast that comes in little packs at the grocery store. Any brand of instant yeast should work great, I usually use Fleischmanns. I wouldn’t worry about overproofing as long as you follow the instructions you shouldn’t run into that 🙂 Hope that helps, happy baking!
Instructions were perfect and if you follow exactly what she says they will come out just right! My husband devoured them. Thank you sooo much
Aw I am so happy to hear that Athanasia!! Thank you for sharing 🙂 Happy baking!!
Hi! Do you bake for the 25 minutes with the tinfoil still on? Or do you remove it?
Hi Kate,
I remove the tin foil for the full bake!! sorry for not making that more clear, I just updated the recipe card to reflect that 🙂 Hope that helps, happy baking!
Would they still work without a bread hook for the mixer?
Hi Megan,
They totally will! I make these by hand when I go home for the holidays, and they turn out just as great 🙂 Just be ready for a good arm workout!! haha happy baking!
These look amazing. I am planning on trying the recipe. One question… Do you have any advice on using spelt flour instead of wheat? We have a family member that can’t eat wheat. Thanks!
Hi Kat,
Sadly I’ve never baked with spelt flour, so I have no idea :/ So sorry I can’t be of more help!
do you leave the tinfoil on when baking?
Hi Zoey,
Yup! When you bake the cinnamon rolls at the end you don’t need any tinfoil 🙂 Hope that helps, happy baking!
This recipe was so awesome! Thank you for making baking so much easier!
So happy to hear that Ari!! 🙂 Thank you for sharing!
Hi! I’m planning on doing these today. I don’t have whole milk but I have evaporated milk will that be ok?
Hi Ivette,
So sorry for the delayed response! Evaporated milk can be used in place of the whole milk! 1/2 cup evaporated milk and 1/2 cup of water will equal the 1 cup of whole milk this recipe calls for. Hope that helps, happy baking!
I only have active dry yeast- how do I activate it before adding it to the dough?
Hi Catherine,
So sorry for the delayed response! You can use active dry yeast with a small adjustment!
To substitute active dry for instant (or rapid rise) yeast, use 25% more active dry. For example, if the recipe calls for 1 teaspoon of instant yeast, use 1 1/4 teaspoons of active dry. Hope that helps, happy baking!
Hi I get confused from instructions 16 to 18 can I please have a more specific explanation
Thz
Hi Maleehah,
This helps create a controlled, warm environment where your cinnamon rolls can rise without having the yeast be killed by too much heat. Letting them rise/proof for about 30 minutes helps them bake up super fluffy and soft. Hope that makes sense, happy baking!
I follow you on tic tok, I love baking too. Your bakes are on a different level tho wow I’m doing the cinnamon buns now!
Aw thanks Livi!! You’re too sweet 🙂 I hope your cinnamon buns turn out wonderfully!!
Hi! I would like to know how much 1 cup in grams represents. Thank you!! Kisses from Portugal.
Hi Melanie,
1 cup in grams varies a ton based on what you’re measuring. For example, one cup of flour weighs 130 grams, and 1 cup of oil weighs about 224 grams. What ingredient are you asking about?
These are by far the best cinnamon rolls I have ever had. My boyfriend said the same thing. They were soo easy to make as well. Highly recommend!!! Just be careful, you’ll want to eat the whole pan 🙂
Haha aw thanks Mandy! I’m so happy to hear that 🙂 Thank you for sharing!!!
Yum yum, I am making my second batch of these rolls during our quarantine. The first batch disappeared very quickly. Easy to make, good size recipe and perfect sized rolls.
That’s awesome Richard!! So happy to hear that 🙂
Hi Chelsea-
If I want to make these this afternoon and bake them in the morning, but not freeze them, am I okay to still use active yeast (not instant) and just put them in the fridge overnight? Should I still double the active yeast even though I’m not freezing them? Thanks!
Sadly I haven’t tested them that way so I’m not 100% sure, but I think that should work!! I don’t think you’d need to add in extra yeast. Please let me know how they turn out, I’d love to know!
Hi! I don’t have any all-purpose flour left, but i have a lot of whole wheat flour, so i wondered if you think it is possible to do your recipe with this type of flour, without changing the final result?
Hi Siham,
I haven’t tested it out, but I think that should work just fine! Replace the AP flour with your whole wheat flour cup for cup. Please let me know how it turns out if you try it 🙂
Really sad they didn’t work ;( I guess they didn’t rise as much as they were supposed to? But they barely rose and I didn’t know what to do so I just continued and baked them and they aren’t fluffy at all :(( I used active dry yeast, maybe that’s the issue. Any way I can salvage it?
Hi Danya,
Sadly active dry yeast doesn’t rise as much as instant, which is probably what caused that issue :/ If you want to use that type of yeast in this recipe in the future, use 1.5x the amount of yeast the recipe calls for. By continuing to bake them they probably got overcooked and dried out! I think the only way to salvage them is to completely slather them in frosting and hope that can moisten them up a bit.
Sadly there’s not a ton you can do after the fact, but hopefully next time will be a success <3
Is it possible to do this without yeast? Badly want to try it out but due to quarantine I can’t go out to get yeast
Hi Sulla,
I’m still working on a separate yeast free cinnamon roll recipe, but sadly this one can’t really be adapted like that :/ In the meantime, here’s a great yeast free cinnamon recipe you can use: https://sugarspunrun.com/easy-cinnamon-rolls-no-yeast-required/
If i am making these for the next day but just have instant yeast whats the best way to do that?
Hi Asia,
After you’ve rolled out and cut the cinnamon rolls, you can put them in the fridge to bake the following morning.
Remove them from fridge 1 hour before you plan to bake them. Let them rest in a warm area for 40 minutes, then start preheating oven to 325 F. Once the oven is heated, bake rolls for 20-25 minutes (until lightly browned).
I love your recipes, they’re so easy to understand and I love your TikTok videos, that’s actually how I found out about your website !
That is so wonderful to hear Camila!! Thank you 🙂 I am obsessed with TikTok!!!
I tried it out, and my Dad (in picture) loved it! He said they’re better than Cinnabon!
Now, I’m excited to try out your recipes!
So happy to hear that!! That’s wonderful 🙂
Hi! Wondering if there is an appropriate yeast substitute? Seems to be sold out everywhere !
Hi Jess,
Sadly there isn’t :/ Or at least not one that I’ve been able to figure out. But I am working on a no yeast cinnamon roll recipe which I’m hoping to share soon! Stay tuned 🙂
Hi, I have a few questions. Can you use bread flour? and also on average how much time is used for the dough to rise? Looks so good!!
Hi Hailey,
So sorry for the delayed response! I haven’t tested this recipe with bread flour, but I’d think it should work if that’s all you have on hand! The cinnamon rolls might be a bit chewier though bc of the higher protein content!!
These cinnamon rolls rise for about 30 minutes (in an assisted rise) before being baked. Hope that helps, happy baking!
My hubs likes orange rolls. Do you have any suggestions on how to make these into orange rolls?
Hi Justina,
So sorry for the delayed response! I’d suggest adding some fresh lemon zest into the dough, and maybe swapping out a bit of the milk for some fresh squeezed orange juice! You could also use some orange marmalade for the filling 🙂 Hope that helps, happy baking!
Hi
I am trying to make your Cinnabons. I was wondering if after I leave them in the oven covered for 30 minutes, can i wait a few hours ( 3 to 4) before baking them completely?
Hi Saleha,
You can, but I think they turn out best when baked right after rising <3
so can still use instant yeast??
Hi Dali,
Yup, this recipe uses instant yeast!
Can you use salted butter instead of unsalted?
You can, just be sure to omit the salt in this recipe. Hope that helps, happy baking!
Hi Chelsea! These look quick and easy. Can’t wait to try them. What would you recommend using to substitute the egg to make them vegan? Similarly, what would be the proportions if I just use powdered sugar and water for the icing? Thank you.
Hi Lisa,
I would recommend using a flax egg in place of the egg. I’ve never made a glaze with just water and powdered sugar, so sadly I’m not sure! You can add tiny bits of water until the consistency seems right though, that’s what I’d do <3
I REALLY wish this would have said *there is a different in active dry and instnat yeast in the ingredients and not at the end in the notes. For DIPS like me 🙂 I missed that. Rolls are currently in oven trying to rise so we’ll see what happens. Here’s hoping I can still bake them and they’ll be good. Certainly a good lessen learned for first time using yeast in baking. Oops!
hahaha I am so sorry to hear that stephanie, that’s the worst!!! I’ve done that before and it’s such a terrible moment when you realize :/
Fingers crossed they still rose up a bit and tasted great in the end! <3
I see that you put more cream cheese to make it more tangy. I don’t love cream cheese, so
if I did 1/4c instead of 1/2c do you think it would still turn out okay? Would I need to add more of something else? Thanks! 🙂
Hi Carolyn,
For sure! You can even swap out the cream cheese and use all butter! These are your cinnamon rolls, and you can make the frosting however makes it taste best to you 🙂 The consistency should still be great. I actually use an all butter no cream cheese frosting on my funfetti cinnamon rolls and they taste great! Here’s the link, hope that helps for next time!
https://chelsweets.com/2020/05/01/funfetti-cinnamon-rolls/
Hi Chelsea! Really appreciate what u r doing…so excited to make these tonight! Yummy yummy ……well I have a question….any replacement for cream cheese?
Haha so happy to hear that Armeen!! You can use additional butter in place of the cream cheese to make the frosting! <3 Hope they turned out great!!
I thought ! Tbsp was a bit much as it was pretty heavy flavored with this much but still tasted VERY good
Haha I’m definitely heavy handed with extracts in my recipes! Happy to hear that you loved the way they tasted though!! 🙂
Hi! I was getting ready to make these tomorrow morning and I noticed 1 cinnamon roll was 763 calories is that correct? I’m exited to make them!
Hi Kiersten,
Usually I don’t end up using all the frosting, but the way the recipe card calculates the calories per serving is based on the entire recipe. I don’t think each cinnamon roll is actually that many calories, but they probably do end up being 500-600 calories after adding on a modest amount of frosting. It’s definitely an indulgent way to start the day though!
I tried them today and they came out AMAZING !!!!thank you for the share
So happy to hear the Justmella!! 🙂
Hi!!! I want to make these but am running low on whole milk… can I use almond milk as substitute? Thank you!
Hi Marina,
Almond milk should work great in this recipe! Hope your cinnamon rolls turn out wonderfully <3
Ahh, I promised my little guy I was making these tomorrow and realized it calls for instant yeast….I only have the original Active yeast packets. Can I still use that and just mix with the warm liquids first to get it going??
Hi Julie,
You’re such a sweet mom! You totally can do that, the dough might just take a bit longer to proof up. So allow it a bit more time to rise before baking them. Hope that helps, and that your cinnamon rolls turned out great!
Can you use raw sugar instead of brown sugar in the filling
What Can you use instead of brown sugar In the filling
Hi Sahra,
You can try replacing the brown sugar with regular granulated sugar, but the taste won’t be quite the same!
If i want to make them to give as a gift during quarantine, how would you reccomend doing that?? Baked and frosted to be reheated ? Or have them bake them themselves ?
Hi Alexandra,
I love that idea, it’s so sweet! I’d say either baked and unfrosted so they can heat them up and add the frosting to them when they’re warm, or rolled and proofed but unbaked, so they can get the joy of their house smelling like cinnamon rolls 🙂 No matter what approach you take, you can’t go wrong when you’re giving someone homemade cinnamon rolls!
Hope that helps, happy baking!
Hi, when and how would you recommend adding active dry yeast to activate it? To the 1 cup of milk?
Hi Katie,
I’d suggest actually activating it separately with a Tbsp or two of warm water! Then pouring it into the dough when you add in the milk mixture. Hope that helps, happy baking!
These are amazing there not dry and they are just perfect the kids could not wait so i put the icing on 1 minute after but they were so good and so quick I also follow you on tik tok ?????
Haha I feel you Sophie, I always want to put the frosting on them the second they’re out of the oven!!! I’m happy to hear they were tasty! And yay, I love TikTok!!! 🙂
I’ve watched your TikTok on these cinnamon rolls I just had to try them. I’m a young baker let’s just say going into middle school and I thought these rolls would be a really big step up for me. I love your social media accounts and I can’t wait to taste these! ( of course I’m a huge fan of your TikTok)
That’s awesome Kiana! Yeast recipes are definitely a big step to take and I’m proud of you for making them! I hope they turned out wonderfully 🙂
SO GOOD!! I made these for my family and I and it is my new favorite dessert. So impressed with how good they turned out, and they tasted even better! We finished them within 2 days! Will definitely make again 🙂
Love hearing that Emily!! 🙂 Thank you for sharing!!
Made these with my 6 year old daughter this afternoon and it went great! A little messy but fun and she got to cut the rolls with the floss! Love your page and have used several different recipes. Thank you for sharing!!
That’s wonderful to hear Jazzmine 🙂 That scene is exactly what I hope for one day when I have kids!!
Made these today and they are quite possibly the BEST cinnamon roll I have ever had, EVER!!! I still can’t believe I made them myself ?
That is so awesome to hear Michelle!!! Baking from scratch really is the best 🙂
I used active dry yeast and I just let them rise longer and they came out perfect…I’d say your yeast was dead ?
Happy to hear that active dry yeast worked great in this recipe for you Michelle 🙂
I tried it and they came out great ! ? how do I store them?
That’s awesome to hear Kevanna! I’d place them in an airtight container and refrigerate them (especially if they’re frosted). When you’re ready to eat them, you can heat them in the microwave for 15-30 seconds to warm them up. You can also save any leftover frosting and add it to them once they’re reheated. Hope that helps, happy baking!
Can you use milk instead of heavy cream for the frosting
Hi Amanda,
You sure can! You might just want to use a bit less since it will thin out the frosting more than heavy cream.
Thank you so much, Chelsea! I will try the flax egg. I’ve had success with it in other baked recipes. I’ll also try mixing powder sugar with non-dairy milk and vegan cream cheese for the icing and see how it comes out. Thanks for your great recipes and tips. I might try these this weekend. XO
No problem!! 🙂 Hope they turn out great!! Happy baking!!
OMG these are the best thing I’ve ever made. I will talk about this for years. My family will ask me to make them for holidays. 100/10 hands down fantastic.
Idk if this helped but I didn’t bake them right away. I covered with foil for 2-3 hours on the counter because I made them too early. When I put them in the oven, they rose so high, which is exactly what I wanted.
Would just add 5 min to baking time as the center piece was a touch doughey.
I never thought I’d say but I may also make less frosting. 2/3 is plenty to gob along the top and have extra. It’s the best frosting in the world though. My god, thank you Chelsea!!
I am so happy to hear that Courtney! I think I was a bit heavy handed with my frosting amount, so I just updated the recipe card to make a bit less frosting, and make a longer range for the bake time. Thank you for your feedback, I really appreciate it! 🙂
i made these gluten free as i am gluten free myself and had no choice but make them like that and to my opinion they where delicious and also i follow your tik tok account and always love to see what you make and then come try it out for myself (although its never as good as yours look) thx for this great recipe.
from tracey.
That is great to know tracey, thank you so much for sharing!! I’ve been wondering how these would turn out GF! Happy to hear yours were delicious 🙂
And yay, I love am obsessed with TikTok right now!!
HI! I love all of your recipes! When I made these, they did not rise and the batter did not seem warm enough after sitting. I use a Kitchenaid stand mixer but it has a steel bowl rather than a glass bowl. Do you think that made a difference? I was wondering if the steel pulled the heat from the dough?
Hi Susan,
If your kitchen was cold then maybe! The heat comes from warming up the milk/butter/sugar mixture in the microwave, which then should fog up the plastic wrap. Did they not rise even with assisted rise in oven? If so, is there a chance your yeast was old? Were you using instant yeast?? Those are my best guesses as to what could have gone awry!
I want to make these but can’t find any yeast in the stores. I do have a sourdough starter I just got from a friend. Could I use some of that?
Hi Shari,
I know, it’s been hard for to me find yeast at the store too! I had to order my last batch on amazon. I have never used sourdough starter before, but after doing a little research it sounds like you can Substitute 1 cup of starter for each package of yeast, and then subtract about 1/2 cup of water and 3/4 cup of flour from the recipe to compensate for the water and flour in the starter. Hope that helps, happy baking!
HENL0!!!!!!! i want to make this deliciousness but there is no yeast in stores due to miss rona 🙁 is there any alternative
I feel you Helen, I’ve been struggling with that too! Amazon actually has some that’s not too expensive, here’s the link to the kind I just ordered: https://amzn.to/3gcXhiS
Or here are some alternatives you can try! They won’t work quite as well as yeast, but it’s worth a try: https://www.thekitchn.com/yeast-substitutes-23019019
Could I use 1% milk to make these?
Hi Abbie,
1% milk should work just fine, that’s actually what I end up using most of the time bc it’s what we have on hand! <3
I made these today and my family and I all agree that they are THE BEST cinnamon rolls we’ve ever had! So perfectly soft and the cream cheese icing is amazing! The addition of cornstarch in the filling is a game changer. I am unable to find rapid yeast anywhere but I got the 2 lb. bag of yeast on Amazon, which works fine but it took much longer to rise. When I make them again, can I put the cinnamon rolls in the fridge after rising to bake the next morning? Will they dry out?
That’s so great to hear Jules 🙂 Thank you for sharing!!!
You totally can do that, in fact that helps some of the flavors develop more 🙂 I’d recommend covering them tightly with plastic wrap, and they should stay nice and moist. Hope that helps, and that your next batch turns out just as great!!
Just made these, and they were amazing! I gave one to my boyfriend and he said they were freaking amazing! That’s when you know they’re good I’ll definitely make these again!
Aw that’s so great to hear Danielle! Thank you for sharing 🙂
Finally made these today for the holiday! The family loved them. They came out great. I used non-dairy milk and a flax egg so they were vegan. My icing broke a little because I didn’t use vegan cream cheese and I used non-dairy butter but it tasted just fine. I might cut the sugar down slightly next time just because we like our baked goods a little less sweet but overall they were a big hit and I can’t wait to make them again! I tagged you in my Instagram Story photo. Thanks, Chelsea! P.S. Wish they had a cinnamon roll emoji! ??
That’s so wonderful to hear Lisa! And very good to know, I might just have to work on a vegan cinnamon roll recipe!! You’re inspiring me 🙂 Thank you so much sharing!!
Tried to end with a heart but it turned into question marks. LOL!
hahaha no worries!!!! 🙂
Hi these are amazing!!!!!!!! I get cinnamon rolls from the bakery in the town and I have always wanted to make my own cinnamon rolls ever since but never found a good recipe but now I have this fab one and I am making them all the time. Thanks I am actually a huge fan. I first saw you on TikTok and fell in love with all the things you were backing and now backing is all I do in quarantine!
That’s so great to hear Jessica! Haha nothing beats a homemade cinnamon roll, I swear!! And I definitely feel you, baking has been such a great way to pass the time during quarantine 🙂 Thank you for sharing!!
Thank YOU, Chelsea! Family loved them and I will definitely make them again. And the dental floss worked like a charm! I was in awe! Genius!!!
Haha right?! It’s also so much more fun to cut them with dental floss 😛
This recipe yielded perfect cinnamon rolls and cutting with floss really works! Thank you for this great recipe.
So happy to hear that!! 🙂 Thank you for sharing!!
I was thinking about making these but can’t drink whole milk… could I use almond or Macintosh milk instead?
I haven’t made homemade cinnamon roll is such a long time! I love these and am going to make several batches for our camping trip! Everyone will be slightly surprised! I’m so excited 🙂
Amazing recipe! This was the first time I made cinnamon rolls and love how they turned out! Mine were a tiny bit chewy but that was ok. My brother was skeptic about the cream cheese frosting but he ended up loving it too. I have already tried out a lot of your recipes and they are all amazing witch has inspired me to also make my own recipes!
Thank you!!!!
These were sooo good!! Everyone in the family enjoyed them. I added some chocolate chips and I might add a little less sugar next time but other than that they were perfect!! Also, your floss cutting idea is very useful. Thank you so much for this recipe. It was very easy to follow along.
Have made these a handful of times now and they always taste GREAT!! Although it definitely takes me longer than an hour, usually closer to 2, with all ingredient prep. Maybe I’m just slow moving in the kitchen ???????????????
I seem to over knead dough using my electric mixer, do you have any recommendations on kitchenaide mixer settings?
This is the best cinnamon roll recipe I’ve made! I just made a batch this morning and wow! So good! The floss cutting technique really works!
Hi Chelsea! Since it’s strawberry season, would it work to make a fresh strawberry filling for the cinnamon rolls? If so, could I just finely dice a pint or two of strawberries and add to the filling or will that make it too runny?
Did you intend to have the 1/4C of softened butter melted in with the yeast and milk? The recipe states later to spread the 1/4C milk over the rolled out dough. I’m wondering if the butter is really supposed to be melted in with the milk?
Sorry, I’m referring to step 3 in the dough instructions. I meant milk and sugar mixture, not milk and yeast mixture. Hope I’m not being confusing!
I made these this morning and despite the fact that I forgot to put the egg in, they still turned out quite nice.
you could do softened butter with a strawberry jam?
Hi Charlotte,
Do you mean for the filling? I bet that would be delicious!! 🙂
I made these the other night and the filling baked out of them 🙁 not sure what I did wrong. Help pleasseeee 🙁
So sorry to hear that Kimberly! Do you mean it baked up on the top? Sometimes that can happen if the filling isn’t spread super evenly on the dough. I find a lot of times my filling wants to be thicker in the center than on the sides. Next time you make them I’d suggest pushing more of the filling to the edges of the dough. Hopefully that’ll do the trick!! <3
Best cinnamon rolls!! First time making homemade cinnamon rolls and it was a painless process! with your steps/ recipe! Made a double batch of these yesterday. they are all gone already lol
I made a mistake reading the recipe wrong, for the filling i thought the 1/4 butter was mixed into the cinnamon sugar mix as well as spread on the dough so my filling baked out a little bit and caramelized the bottom of the rolls but they were still delicious nonetheless. I know for next time to not do this lol
These were incredible. Best recipe for homemade cinnamon rolls I’ve tried!! They are DECADENT ?
Do you have any suggestions on how to omit the egg? My older son loves you and wants to make this recipe so badly, but my younger son has an egg allergy. Thanks!
Help I made these and they did not rise. I don’t know what I did wrong
Brand new good yeast that I just made bread with, didn’t rise. Got a little rise during bake. Not a fluffy cinnamon roll. It was just all right. I know better than to look for a quick way. The best way is the right way, no shortcuts.
Amazing cinnamon rolls, it was my second recipe I tried and I’m do happy I did. Found a video on Instagram and momentarily searched for the recipe and tried them out. I will recommend it to everyone 🙂 Remember people, don’t overwork your dough, it won’t rise then 🙂
Thanks Chelsweets for this recipe. It is tradition for me to make cinnamon rolls for my family on Black Friday while we take our family Christmas Pictures and for Easter Brunch. This one will definitely replace my previous recipe. It was easy and I love that you gave us the tip to making in advance and freezing. Now I won’t have to get up so early on Black Friday or Easter to roll out dough, etc. I can make in advance and just cook them that morning. I am so grateful for this recipe. Thank you again!!
Getting all my ingredients together now. I only have 1% milk. Will that work?
These are the easiest and most delicious cinnamon rolls I’ve ever baked! I just switched up the icing a bit by adding dulce de leche and omitting the powdered sugar. Thank you for sharing this recipe ?
Thanks for an easy, fantastic recipe that doesn’t require hours of raising.
When i bake in a Pyrex 8×8 pan the center roll doesn’t cook through but the outer rolls get very brown. Do you recommend covering the outer ones with foil during baking and go longer? I do this with pie crust.
Hi! I just made these and they are delicious! When I did the assisted rise, some of the filling (butter) melted down into the bottom of the pan and when I baked it, some parts became chewy/crusty. Any advice on how to avoid this? Thank you!
Did you make that overnight recipe?
I made these the other day and they were so good! They came out perfect. Thanks for sharing.
Thank you for this detailed recipe!! I made them and they came out perfect! Next time I think I’ll add some orange zest and juice. ?
I love this Recipe. I didn’t make it with the frosting this time because I didn’t want too much sweetness.
I forgot the step to let the dough rest for 10 mins and as a result (or not, I don’t know) my buns did not rise at all . To fix this, I filled another baking pan with boiling water and put it on the lower rack of the oven. I also covered the buns with a tea towel instead of foil. To my surprise, this trick totally assisted the rise and all was not lost. I re-boiled the water once and let them rise a total of about an hour. I also found my oven only took 15 minutes to bake so would adjust my temperature down next time.
An additional 1/4 cup of butter needs to be added to the ingredients list 🙂
Please delete this and my previous comment…I can’t read
Hello,
Can I rise this dough in the fridge overnight ? And if so, should be first or second rise ?
I’m confused. I swear I saw 1/4 cup butter (and brown sugar etc for the filling) and also 1/4 cup butter to spread on. Now I don’t see that!
You might be confusing the filling and the frosting. They both use 1/4 cup each. The frositing you would mix it in and for the filling you would spread on.
In your write up you say you like a 2:1 ratio in the frosting but then the recipe calls for 1/4 cup each cream cheese and butter. Do you use more cream cheese when you make it yourself? Thanks! Making today for the second time, attempting a vegan version. First batch turned out heavenly.
I made these last night cut them and put them in the fridge. Took them out thus morning let them sit for an hour and baked them. I use penny’s Vietnamese cinnamon which is stronger.the only thing I would change is maybe do a bit of white sugar into the filling because of the strength of the cinnamon and that is just my personal choice. Couldn’t be easier I couldn’t find my dough hook and I was making them at 2 am (I stress bake lol ) and it couldn’t gage been easier even by hand
I saw this recipe and I tried it, the first time, I forgot the egg, and they still came out big and awesome, and now it’s my Saturday ritual, EVERY Saturday, without fail. I love these, they’re HUGE and delicious. For the filling though, I don’t use the starch, I mix the sugar, cinnamon and butter together and add 1/2tsp vanilla extract, then I spread the mixture onto the dough. Will be making these tomorrow as usual. My cousin requested them, lol, saying that I have spoilt her on Saturdays.
These cinnamon rolls were simply amazing. I think they were better than Cinnabon. I have been disappointed the last few times I have gotten Cinnabon rolls. These were soft and tender even two days after I made them. I just pop them in the microwave for a few seconds. Delicious! I will definitely share this.
This was my first time making a Chelsweets recipe, it was perfect! Easy to make and super tasty. Thanks so much!
Made these cinnamon rolls today 6/5/20 , there were great. Thanks for the recipe. I have 2 other recipes that I use also, but I like this one just as well, I do love the fact that, there is only 1 rising time to it.
Love the idea using dental floss, I now keep non mint floss in my kitchen just for that purpose, they cut so much easier.
I like using orange flavoring instead of vanilla in my icing , but I do like the vanilla also, but on the cinnamon rolls I like the orange .
Most definitely will be making these again. It did take me a little more time than what it said, but I kept going back to read the recipe, each time it will decrease I’m sure. (But still satisfied)
The flour tip is a real good one too. Because before if the recipe would call for 31/2 cups to 4 cups it seems that I would end up putting it all in there and then some, that is not counting the flour for the roll out. This time I used 31/2 cups plus 3 TBSP. And a little for the roll out and still had a little left over out of 4 cups. Thanks again.
Just one question I wanna go eggless . So what will be the changes .
Can you use self rising flour instead of all purpose flour?
finally got around to making these! They are simply the best cinnamon rolls I have ever made!! I have also experimented with different flavours with the recipe and they’ve turned out perfectly every time!! Thank you!!
Looking forward to trying these! Your tips before the actual recipe state you prefer a 2:1 cream cheese to butter ratio, but the recipe ratio is 1:1. Would you recommend doubling the amount of cream cheese?
What level do you use on the microwave to heat the sugar, butter and milk.
I have a question aboit grams ?
In recipe are you convert or measure? I wonder in my country only grams.
Made these this evening. They turned out great. Hopefully they are as good tomorrow morning! Topping recipe made quite a bit, but I’m okay with that. Haha.
I needed a quick recipe for a work pot luck in the morning. Unfortunately, I wasted a lot of time as this recipe is lacking and didn’t work out at all. I ended up staying up until past 2 am starting over with someone else’s recipe.
I completely messed these up somehow lol My dough ended up very dense. No rise at all and no rise even when baked 🙁 I used oat milk so maybe that completely messed up the whole thing. I’m actually a great baker but cinnamon rolls I can NEVER seem to get right! Whomp whomp Anyone else try these successfully with vegan milk or butter?
Thank you soooo much for this recipe!!! It’s so easy to follow & turns out exactly as you say! I even made them with dairy-free substitutes using the same quantities, and they are to die for!!!! I ate way too many myself! ? going to be making these A LOT!!! ?
I’ve tried to make these a couple times and my two main issues are: 1. The rise of 30 mins is not enough, they puff up much more significantly after 1-2 hours.
2. They’re hard, I used the minimum amount of flour and the outside of the bun is more like a dinner roll.
I do need to try softened not melted butter because I didn’t realize it had to be blended while still kinda chunky but soft- that may be part of the problem?
looooooove this recipe! the filling is super flavorful and makes a bit of a crispy crust on the bottom of the rolls and the cream cheese frosting is delicious!
These are hands down THE best. I was wondering if you had thoughts on adding whole wheat flour or making them 100% whole wheat. I’d love to have this flavor (and maybe orange) but with the rustic density of whole wheat.
Mine are definitely needing longer to prove once they’ve been cut, but it’s also very cold so the 200F oven might not have been warm enough? Also in the blog it mentions that the frosting is best with a 2:1 ratio of cream cheese to butter but the actual recipe is 1:1 with a quarter cup of each so I’m confused. Unless I just can’t math properly which is entirely possible.
Hi, looking forward to creating this recipe. Can the buns be frozen after making and baking. Can they be reheated, from fresh?
Sort of a dumb question, but if I were to double this recipe what would I roll the dough out to to make twice as much rolls? Would I just double that measurement too? I don’t work with dough often so not sure. Thank you in advance!! Terrific recipe reminds me of Cinnabon!!!
Hi Destiny,
That’s a great question! If you want to double this recipe, I’d recommend rolling the dough out to be 36 in x 12 in! So just doubling the length / making a log that’s twice as long as the original recipe. Hope that helps, happy baking 🙂
In the process of making these following strict instructions and using instant yeast. At first they did not rise in the oven for 30m as suggested. So I put a steaming hot container of water under a shared towel over the rolls and kept them in the oven and they rose! Just a tip if anyone else has trouble.
Hi Renee,
That is a great tip!! Thank you for sharing 🙂
Hi! Can you use buttermilk in this recipe?
Hi Julia,
You can use buttermilk in place of the milk in this recipe. Happy baking 🙂
Hi! I made this recipe. They tasted good but the consistency was more like cake as opposed to bread??? I followed the recipe exactly.
Hi Ann,
When you say the consistency of cake, what does that mean? Like they were too soft and fluffy, compared to bread? If you want a firmer texture, you can always knead the dough a bit more to develop the gluten more. Or if you mean something else, let me know & hopefully we can figure it out together!
One of our kiddos has an egg allergy. Would Bob’s Red Mill egg replacer work in this recipe?
Hi Krystal,
I haven’t tested this recipe with an egg replacer, so sadly I’m not sure! I’d recommend trying this really popular vegan cinnamon recipe that has received rave reviews and is egg free: https://minimalistbaker.com/the-worlds-easiest-cinnamon-rolls/
Hope that helps, happy baking!
These were awesome. Everyone bragged on them. Thanks. Super easy.
So happy to hear that Sharen!! Thank you for sharing 🙂
I made them today except did not have cream cheese for icing. They were very soft and wonderful.
Hi Bonnie,
Yay, so happy to hear that!! While I love cream cheese frosting on these, sometimes I do use just a vanilla glaze or vanilla buttercream and it’s still so delicious 🙂 Glad you enjoyed them!!
If you refrigerate your rolls overnight, do you take the plastic wrap off in the morning for them to rise for an hour? Or leave it on while they rise?
Hi Maureen,
Great question! Either way is fine, but I usually leave it on. Hope that helps, happy baking!
Hi, this is the first time making this recipe. I followed the recipe to a “T,” using SAF Premium Instant Rise Yeast. But I’m having a couple of issues. I had a super hard time rolling out the dough. It was really stiff. I finally got it to the right size rectangle but it took about 50 minutes to get the dough shaped and ready for the filling. I used a stainless steel rolling pin – could that have been the problem? Should I have kneaded the dough longer in my stand mixer? The cut rolls needed to rise 60 minutes because 30 minutes wasn’t enough. They look beautiful going into the oven for baking and my kitchen smells wonderful. Just hoping they will taste as good as they look. I’ll comment again and let you know how they ultimately turned out. Meanwhile, any troubleshooting ideas for me on the issues I encountered making them? Thanks!
Hi Pamela,
Sometimes the dough can be hard to roll out if your kitchen is a little bit cold, or if you really worked the gluten while mixing the dough! I find that either adding a little less flour, kneading the dough a little less long, or letting the dough rest a bit longer can make it easier to roll out. A cool rolling pin also probably did make it a little bit more challenging! In the summer I don’t think it would be an issue, but in the winter I could see that making it harder.
I hope that helps for the future, happy baking!
Update to previous comment, even though I had some issues rolling the dough and my rolls needed extra rising time, they baked up beautifully and came out perfect. So good 🙂
Ah so happy to hear that Pamela!! Thank you for sharing 🙂
This was my first time ever making cinnamon rolls and they came out fantastic! The recipe was super easy to follow. Thank you!
Only thing was that they came out a bit too sweet, and I think it was the frosting. So I may cut back the powdered sugar in the icing next time by 1/4 cup. But that’s just a taste preference ?? These were absolutely amazing and will be my go to recipe!
Yay!! I am so glad you loved this recipe Briana 🙂 You can definitely reduce the powdered sugar a bit in the frosting to suit your palette for next time. Happy baking!
I think I maybe made cinnamon rolls homemade once as a teenager, so now that I’m in my middle age I thought I’d make them for Christmas morning. I didn’t start early enough to have them for breakfast. I kneaded my dough in my food processor, which worked wonderfully well. I covered the dough to rest and left for my family gathering. When I got home the dough was huge! I knocked it out and then rolled it and followed the rest of the steps. I had a few for an evening snack and am taking the rest into work tomorrow. These turned out great. Thanks for the recipe.
So happy to hear you loved this recipe Jessica!! I think they’d be delicious any time of day 🙂 Thank you for sharing!!
I am not an experienced baker but, on Christmas morning I decided to make these cinnamon rolls.
They were OUTSTANDING!
Thank you for this amazing recipe!
Hi Mandy,
I am so happy to hear that!!! Yay 🙂 Thank you for sharing!
Just made these with the advance method, stored wrapped in the fridge overnight. In the morning, I let them rest on the counter 1.5 hours, then covered in foil and let rise in oven heated to 200 degrees then turned off. Baked 30 minutes at 350 and they were amazing. My son said they were the best cinnamon buns he’d ever eaten and that includes Cinnabon. This recipe is a keeper… thank you!
YAY!! So happy to hear that Rhonda 🙂 I love making these ahead of time too! Thank you for sharing!!
Made these with active yeast and didn’t have cream cheese for the frosting so used melted butter, powdered sugar and vanilla. These are the bomb?? So delicious, my husband loves them??
Love that Cindy!! Improvising at it’s finest 🙂 Thank you for sharing!!
Fabulous!!
I actually had to keep the entire rested raw doughball in the fridge overnight, then shaped, filled, rolled, and baked according to your directions. It came out Superbly!! Thank you!?
Hi T,
So happy to hear these turned out great! Thank you for sharing 🙂 Happy baking!
Dear goodness these are absolutely phenomenal! So pillowy, so tender, great flavors. Do yourself a favor and make the double batch. Eat them all yourself, share them at work, around the neighborhood, with family.. you will make fast friends.
I’m a very novice baker when it comes to breads or anything risen but these were SO easy to whip together.
I can’t wait for the next pot luck etc so I can show off with these beauties!! Thank you Chelsey!!
Aw I’m so happy to hear that Kristy 🙂 Your comment put the biggest smile on my face!!!! Thank you for sharing!!
Gawd damn, these turned out so delicious! I love how you put the measurements into the directions (that’s how I write down my own recipes). Thank you!
So happy to hear that Kelly!! And right?? That’s how I like recipes to be when I’m baking too, it makes it so much easier to bake things without having to scroll up and down in the recipe card! Happy baking 🙂
I am trying to make these the night before and than bake in the morning. Once I roll, fill, and cut my rolls, I place them in a greased dish. But my question is, do I give them the 30 minute oven rise or do I do that in the morning? Or is that omitted because I have to take them out 1-2 hours before baking? Lovely recipe and looks delicious!
Hi Layla,
You are right! It’s omitted because of the 1-2 hours they have in the morning before being baked! You can also speed up the process in the morning by doing the low-temp oven rise before baking them. Hope that helps and that they turn out amazing 🙂
I’ve tried several recipes for cinnamon rolls and this produced by far the best batch! So good!! I will definitely be making these again!
I am so happy to hear that Emily 🙂 Thank you for sharing!!
The best recipe!! I never get my dough quite rectangular enough but everyone loves them!
I am so happy to hear that Nikki 🙂 Thank you for sharing!!
This is now my favourite go to recipe for cinnamon rolls and I’ve tried a few! Super quick and easy and always a great result and of course tastes delicious
I am so happy to hear that Caroline 🙂 Thank you for sharing!!
Added some chopped pecans with the cinnamon…..these were great
That sounds amazing!! I need to try that the next time I make these 🙂
OH MY GOSH! I have tried many cinnamon roll recipes and they are never good. This though, this recipe is stellar! I cannot wait to try it again! I’m so proud of them that I feel confident making them for my coworkers ?.
Just came across this and I have everything but the egg is there something I can substitute it with!
I love this recipe but always have trouble with the center roll not baking. I cover the edges with foil to try to get the center to bake but it’s still gooey. Any suggestions?
Hi, making these for Christmas Eve and Day ahead of time. I made the 9 cinnamon roll regular batch size. I didn’t have a 8” x 8” cake pan (only 9” x 9” square). Is it ok to use the 9” pan or should I switch to my 8” round cake pan?
Thanks a lot! Always use your recipes 🙂
Either would work, I think it’s mostly a preference thing! I’d probably pick the 8″ round pan!! Hope that helps, happy baking! 🙂
Ugh mine didn’t poof!! I made sure to me careful with the temp of the milk but they’ve been in the oven for about 30 minutes and are the same size. Any suggestion!
I am so sorry to hear that, that is such a bummer!! Ok my first thoughts about what might have caused that – what type of yeast are you using? Is it instant or active? Is it still good (sounds silly, but it can lose it’s potency if it’s old)? Sometimes mine don’t proof up properly if I’m using oldish yeast that’s been sitting in my fridge for a long time!
Hello! I made these last week & they were amazing! I was wondering if the 440g of flour is equivalent to the 3 1/2 cups or is that also including the “additional flour” you use later?
Hi Dani,
Great question! The 440g is just the initial amount of flour that is used in this recipe, and does not include the additional Tbsp of flour added at the end. Hope that helps, happy baking!
i treated myself to a stand mixer in the new year and these are the first treats that i make with it. they might be the best cinnamon rolls i’ve ever had and are definitely the best i’ve ever baked myself. they’re also super easy! i might have to make them every weekend now. thank you for the recipe!!
Yessssss!!! I am so happy to hear the Chloé!!! Put that new stand mixer to good use 😉
Hi Chelsea – I’ve made these both the night before and day of. I like the night before method – but noticed that the step before baking causes the sugar mixture to leach out if the rolls and create a caramel situation when baking. Do you have any suggestions on how to keep that from happening? Maybe lower than 200F when proofing before the bake?
Hi Angie,
Totally hear you, that happens to me too when I make them ahead of time. You can try lowering the temp of the oven for proofing! Some ovens don’t really go lower than that, which is why I picked that temperature. But you can absolutely do like 150 F if your oven will let you! I hope that helps with it, happy baking!
I made these this weekend. So good! Instead of cream cheese frosting, I made mascarpone cheese frosting just because I had some cheese I wanted to finish and my husband doesn’t like cream cheese very much. The cinnamon buns were a hit! Can’t wait to make them again. Thank you Chelsey!
I consider myself to be a regular baker. I highly recommend Chelsweets recipes to those who are just starting out baking. Her instructions are always easy to follow. One thing I love about Chelsweets recipes is that she adds extra notes. For example, at first I thought the brown sugar filling wouldn’t be enough but I saw in her notes that she said it won’t look like enough at first but it takes time to spread out. And that was true! Thanks again!
Hi Tina
I am so glad to hear they turned out great, thank you for sharing! I try to make my recipe cards as clear as possible, and I’m so happy to find all my little notes helpful 🙂 Happy baking!!
Hi, is it ok to make these a few days ahead of time? I was planning ro make on a Sunday but bake Tuesday AM?
Hi Angie! I haven’t tested making these multiple days in advance but I feel like if you make them on Sunday and make them Tuesday morning that should be just fine. I feel like as long as they’re tightly wrapped in plastic wrap they should stay nice and fresh. Hope that helps and please let me know how they turned out if you try it! Happy baking!!
I was wondering if I could make 1 giant cinnamon roll using this recipe or will i need to change anything up? ?
Ok I am obsessed with this idea Julia!! I haven’t tested it (but now plan to this weekend!!!!). I plan to just follow the recipe, cut the strips, then wind them around each other until they’re all used. I’d bake it in a cake pan, but I’m not sure what size would be best. Maybe an 8 or 9-inch?? If you try it, please let me know how it turns out!
Absolutely amazing recipe, these worked perfectly on the first try. They were a massive hit
Hi Laura,
Yay!! I’m so happy to hear they turned out perfectly and were such a hit 🙂 Thanks so much for trying my recipe and taking the time to share, happy baking!
The best recipe I have used so far for overall texture! I will say though, my filling completely disappeared from my rolls, so I am not sure how that happened. Do you have any suggestions on what I could’ve done wrong?
Hi Madeline,
I’m so glad you loved the texture!! When you say the filling disappeared, can you clarify what you mean? Did it melt out the bottom of the rolls while baking, or did it just not seem noticeable once baked? That’ll help me troubleshoot and give you the best tips!
I love this recipe!!!
I have a friend who loves cinnamon rolls and is gluten free. Would it be possible to use measure-per-measure flour in these?
Would I just need to knead it more?
Thanks!
Hi Jacie,
So happy you love the recipe! And for your friend, you can swap in a good 1:1 gluten-free flour blend (look for one with xanthan gum included – I love using bob’s red mill cup for cup!). The texture will be different since gluten-free doughs don’t have the same stretch, but you don’t need to knead it more. Actually, less kneading is better, because over-working GF doughs can make them crumbly.
I’d recommend letting the dough rest a bit after mixing (about 20–30 minutes) to help the flour hydrate, then proceed as usual. They may be a touch more delicate to roll, but they’ll still bake up delicious!
Can’t go wrong with one of her recipes! The cinnamon rolls came out great. Next time I will make more of the feeling (just my family’s preference).
Hi Jalissa,
Aw, I love hearing that!! 🙂 I’m so glad the cinnamon rolls turned out great! And yes, adding extra filling is such a good tweak if you love them extra gooey!! Sometimes the extra filling can kind of sink through to the bottom, but it just makes extra gooey bottoms!! Hope you next batch turns out amazing!
Would a tangzhong elevate this recipe?
Also could I repurpose the dough to make sweet rolls?
Thank you.
Hi Helen,
You can totally make these with a tangzhong if you want! I think they bake up quite soft and tender as is, but I’m sure they’d be delicious with that method too 🙂 And yes, you definitely can repurpose this dough to make sweet rolls. Hope that helps, happy baking!
Such a delicious and easy to follow recipe!
Yay!! So happy to hear that. Sarah 🙂 Thank you for sharing!!!
Am going to make these cinnamon rolls but wondered if you could use almond extract instead of vanilla for the frosting. Thank you so much.
Hi Penny,
You totally can!That would be delicious 🙂 Hope your cinnamon rolls turn out amazing!!
I’ve seen some recipes where they put a bit of heavy cream on the top of the cinnamon rolls before baking. Could I do that with these or would it not make a difference?
Hi Jennifer,
You can do that if you want, but these already bake up super soft, so it doesn’t really improve the texture! It would just make them richer, but you can try it and see if you like it better that way! Hope that helps, happy baking!
Hi,
Is the egg weight (56g) with or without the shell?
Thanks!
Hi Tina,
Great question! That’s without the shell. The gram weight is for the egg itself after it’s cracked out of the shell. Hope that helps, happy baking!!
I’ve made a few different versions of these and for this recipe it never rises after I make the rolls. It still bakes up nicely and tastes good but they don’t rise once I make the rolls. Any guesses as to what I’m doing wrong?
Hi Dawn,
That is wild!! Like they don’t puff up at all? Are you leaving them to rest somewhere pretty warm in your house? Sometimes if my kitchen is cold I find they don’t rise as well or take a lot longer to rise.
My only other question would be what type of yeast are you using, and how fresh is it? But I bet you’ve already looked at that part to make sure it isn’t the yeast!