
Easy Mirror Glaze Recipe
Mirror glaze cakes have taken the internet by storm, and I decided it was time to master this stunning technique!!
While some of us might think using a mirror glaze is a new technique, traditional pastry chefs have been using it to decorate cakes and pastries for decades. It’s an old-school french technique that has been around for about 40 years.
What Is Mirror Glaze?
Traditional mirror glaze recipes can seem complicated! I’ve seen recipes with ingredients I’ve never heard of. However, at the base of every mirror glaze recipe, sugar and gelatin are the key ingredients.
Most recipes heat the mixture to allow the gelatin to dissolve and combine with the other ingredients. The glaze is then poured over a chilled dessert.
A lot of what gives mirror glaze its shine is being poured at the right temperature, which is around 110°F / 43°C.
Most mirror glaze recipes set at 90°F/32°C, so they have to be warmer than that when they’re poured.
My easy mirror glaze recipe is a bit different and sets at a slightly lower temperature, so I actually find it’s best to pour my glaze when it’s around 90°F/32°C!
My recipe uses a couple of different ingredients that make it unique and change the temperature it sets at.
How Is This Easy Mirror Glaze Recipe Different from A Classic Mirror Glaze?
The biggest difference? White chocolate. I don’t know if you’ve ever tasted plain gelatin (or even smelled it), but it is simply disgusting.
Every time I mix plain gelatin with water to let it bloom, my gag reflex kicks in. However, it is an indispensable ingredient in mirror glaze recipes to help them set properly.
With that being said, I wanted to add something to this recipe to cover that flavor! I ended up settling on white chocolate and sweetened condensed milk. These are the primary flavor of this mirror glaze.
Adding these ingredients gives this glaze a bright white base, which will make it easier to color.
These ingredients also make the mirror glaze a tiny bit thicker and more forgiving. It covers the cake in a thicker layer of glaze than a traditional mirror glaze.
The only downside is that the white chocolate does make the glaze a tiny bit less shiny!!
This mirror glaze will reflect everything when it’s poured, but over time it can lose some of its shine.
Why Is This Recipe Easier Than a Normal Mirror Glaze?
Traditional mirror glaze recipes involve more ingredients and additional equipment. This easy, five-ingredient recipe makes the technique way more approachable.
Another bonus?! It can be made just using your microwave!! If you don’t have a microwave, you can use a stovetop/double boiler to heat the mixture and melt the chocolate.
While this all seems insanely simple, it does help to have a digital thermometer so you know exactly when your glaze is ready to be poured (90 F / 32 C).
I was shocked by how quickly I was able to make this and how easy it was to pour over a cake.
Traditionally, mirror glaze cakes involve pouring the glaze over a perfectly smooth, mousse-covered cake.
I experimented and found that it can also easily be poured over a classic buttercream cake!
The key to pouring it over buttercream is to make sure the cake is thoroughly chilled and that the frosting is super smooth.
When I say thoroughly chilled, I mean that the cakes must be fully chilled and firm to the touch. This means at least 20 minutes in the freezer, or at least an hour in the fridge.
How Much Mirror Glaze Does One Batch Make?
This easy mirror glaze recipe makes enough glaze to cover two six-inch layer cakes. It would also definitely be enough to cover an eight-inch layer cake.
While this style of cake is beautiful to make, it involves pouring tons of glaze over the cake. This is necessary to make sure the cake is fully covered in glaze.
You can try to salvage the glaze that runs off, but it can be more difficult to reuse if your colors combine.
Leftover glaze can be stored in an airtight container and refrigerated.
Reheat the mixture in 10-15 second intervals until it reaches 90°F/32°C, then use as desired.
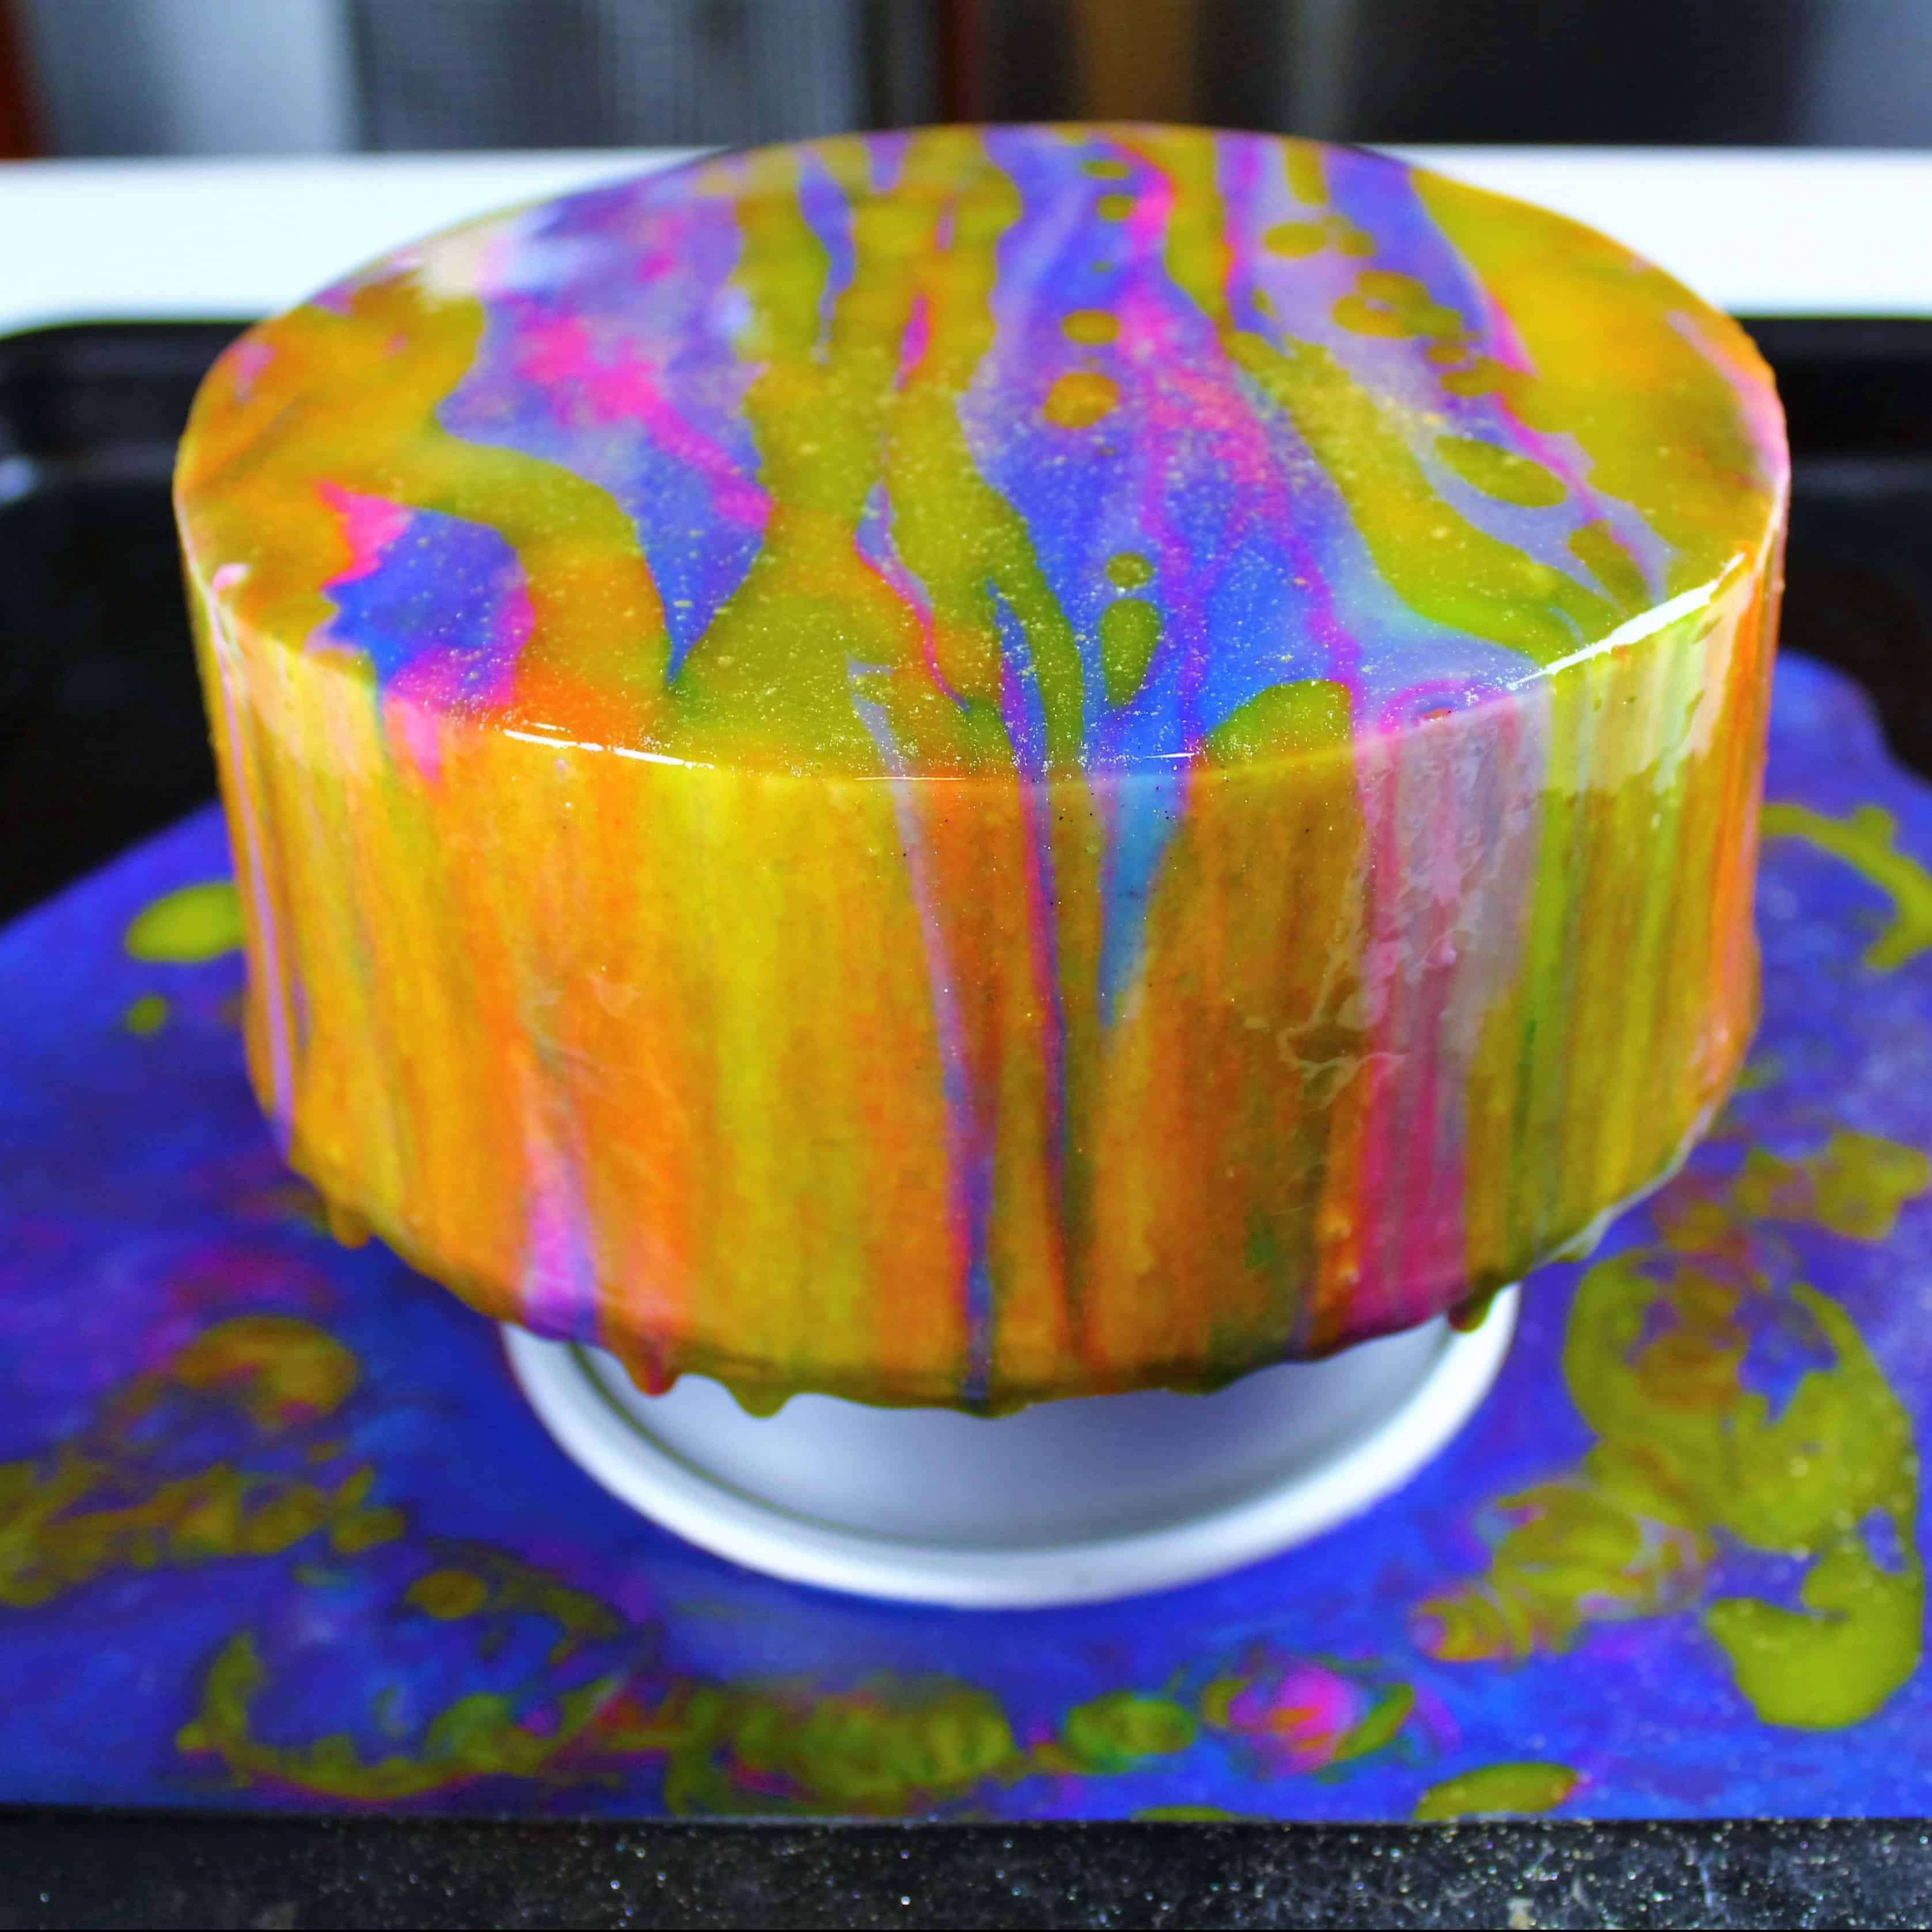
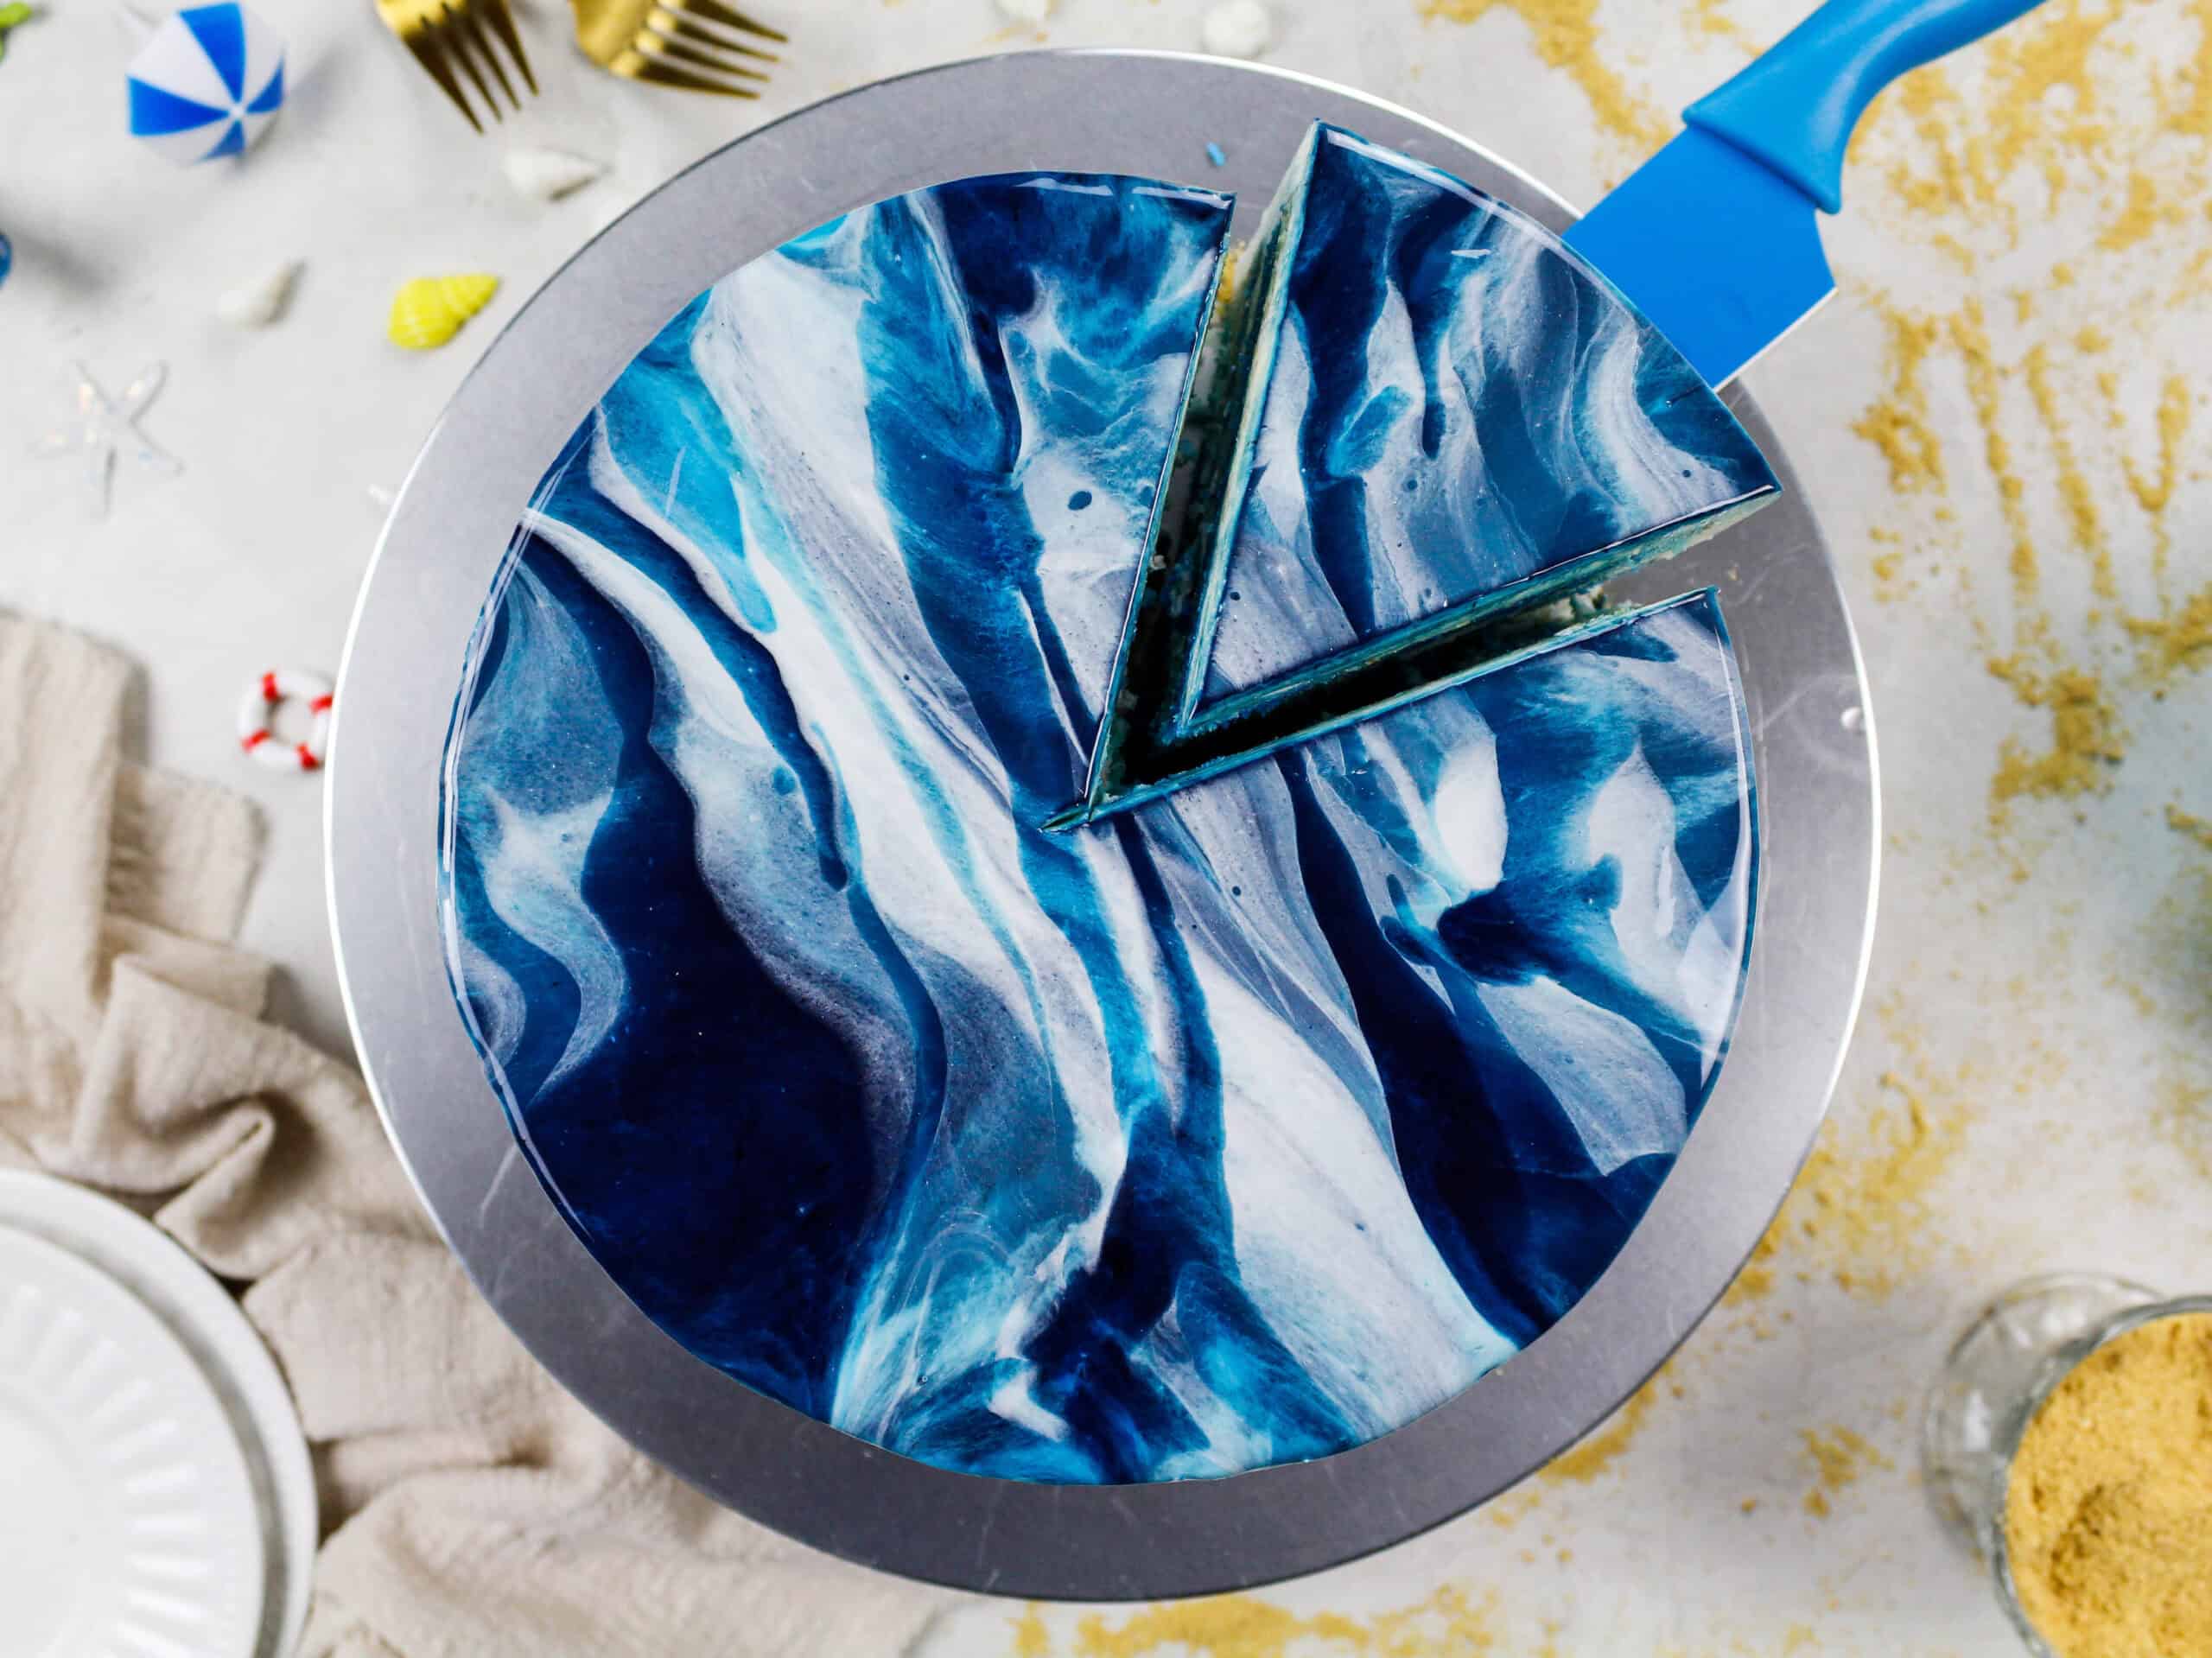
How To Color This Mirror Glaze Recipe
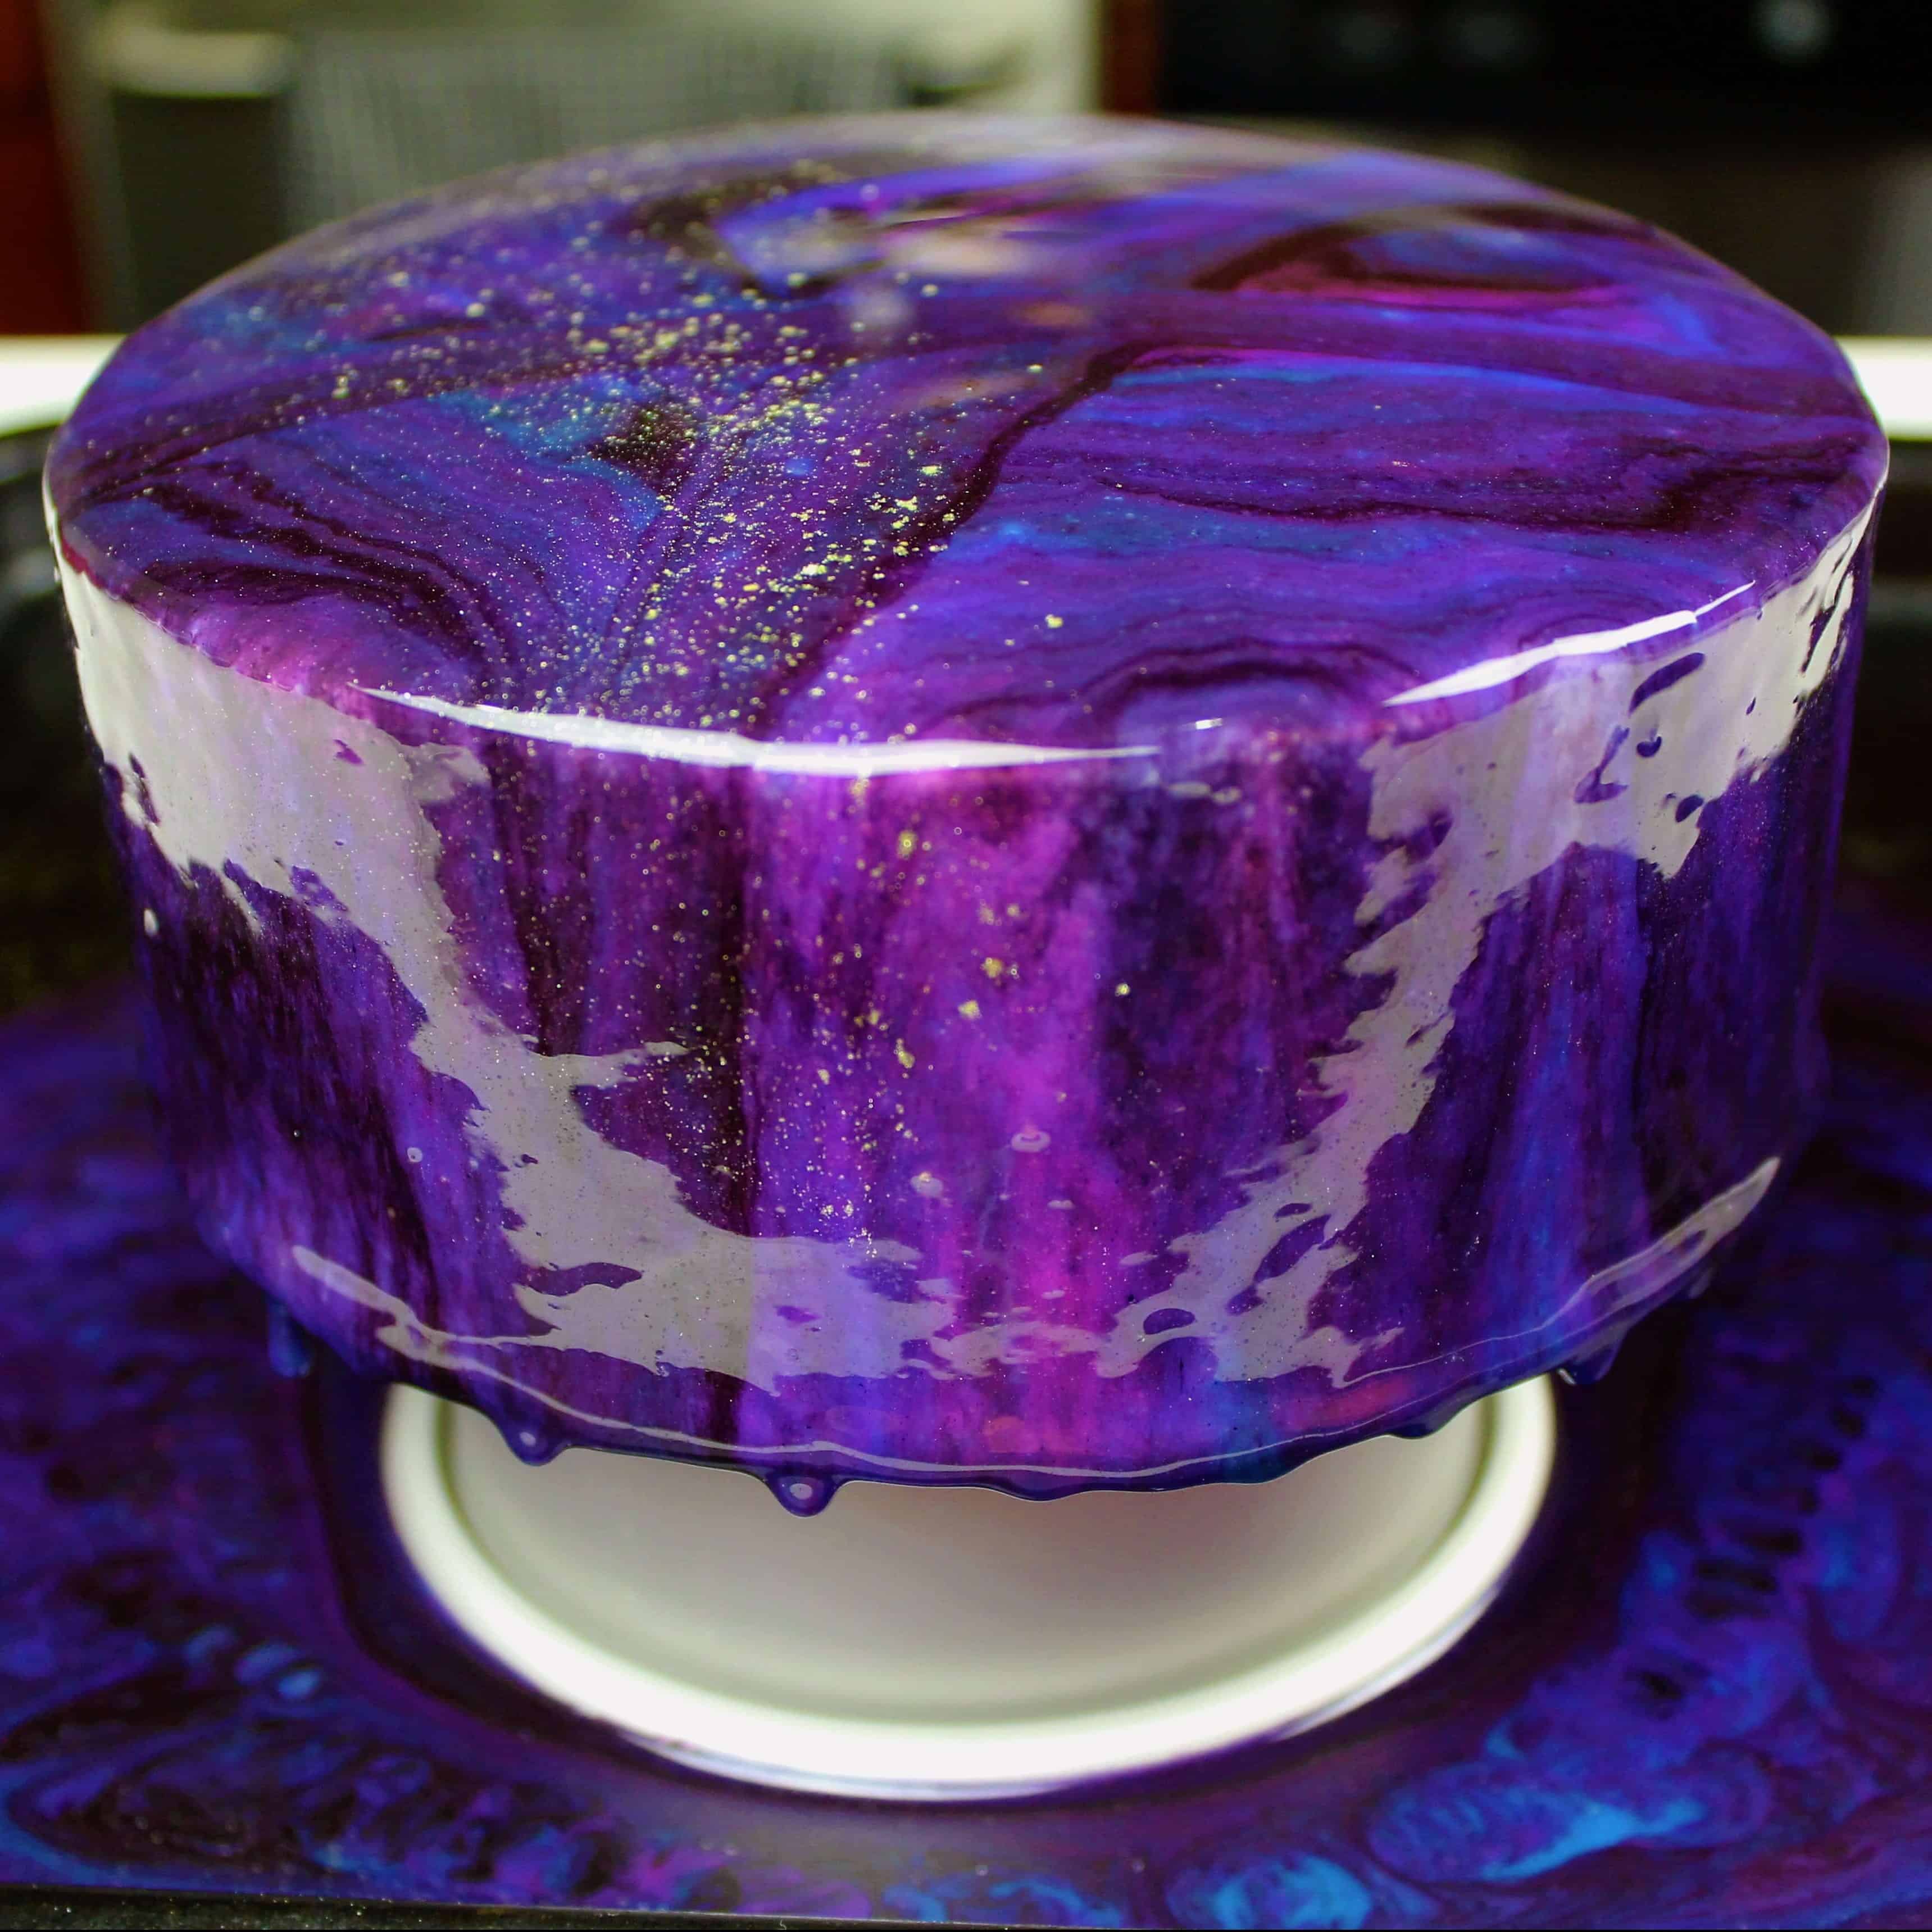
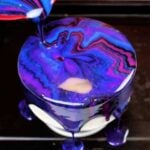
While my original mirror glaze cake was galaxy themed, you can create so many different looks with different colors.
Whatever colors you end up making, it’s super important that you use gel food coloring to color this glaze.
Gel food coloring creates vibrant shades because it is more concentrated than liquid food coloring.
This also means you don’t have to use much to get the color you’re after.
If you try to use liquid food coloring, you will have to use a ton to get bright colors, and this can throw off the consistency of the glaze.
How to Properly Pour Mirror Glaze Over a Cake
After trying a few different methods, this is definitely the best way to pour mirror glaze over a cake.
Remove the chilled buttercream cake from the fridge or freezer (the frosting should be completely firm to the touch) and place it on a circular object that is slightly smaller than the base of the cake. I like to rest the cake on a small cake pan or a wide, short bowl.
Place the pan and cake on top of a large, rimmed baking sheet to catch the run-off glaze.
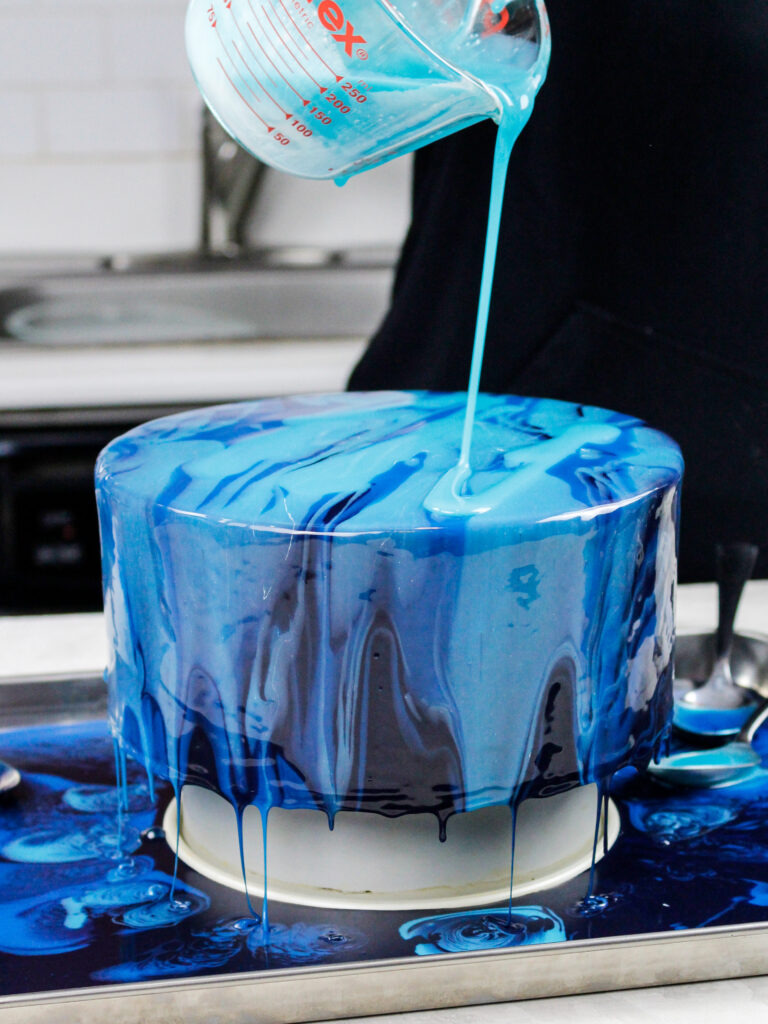
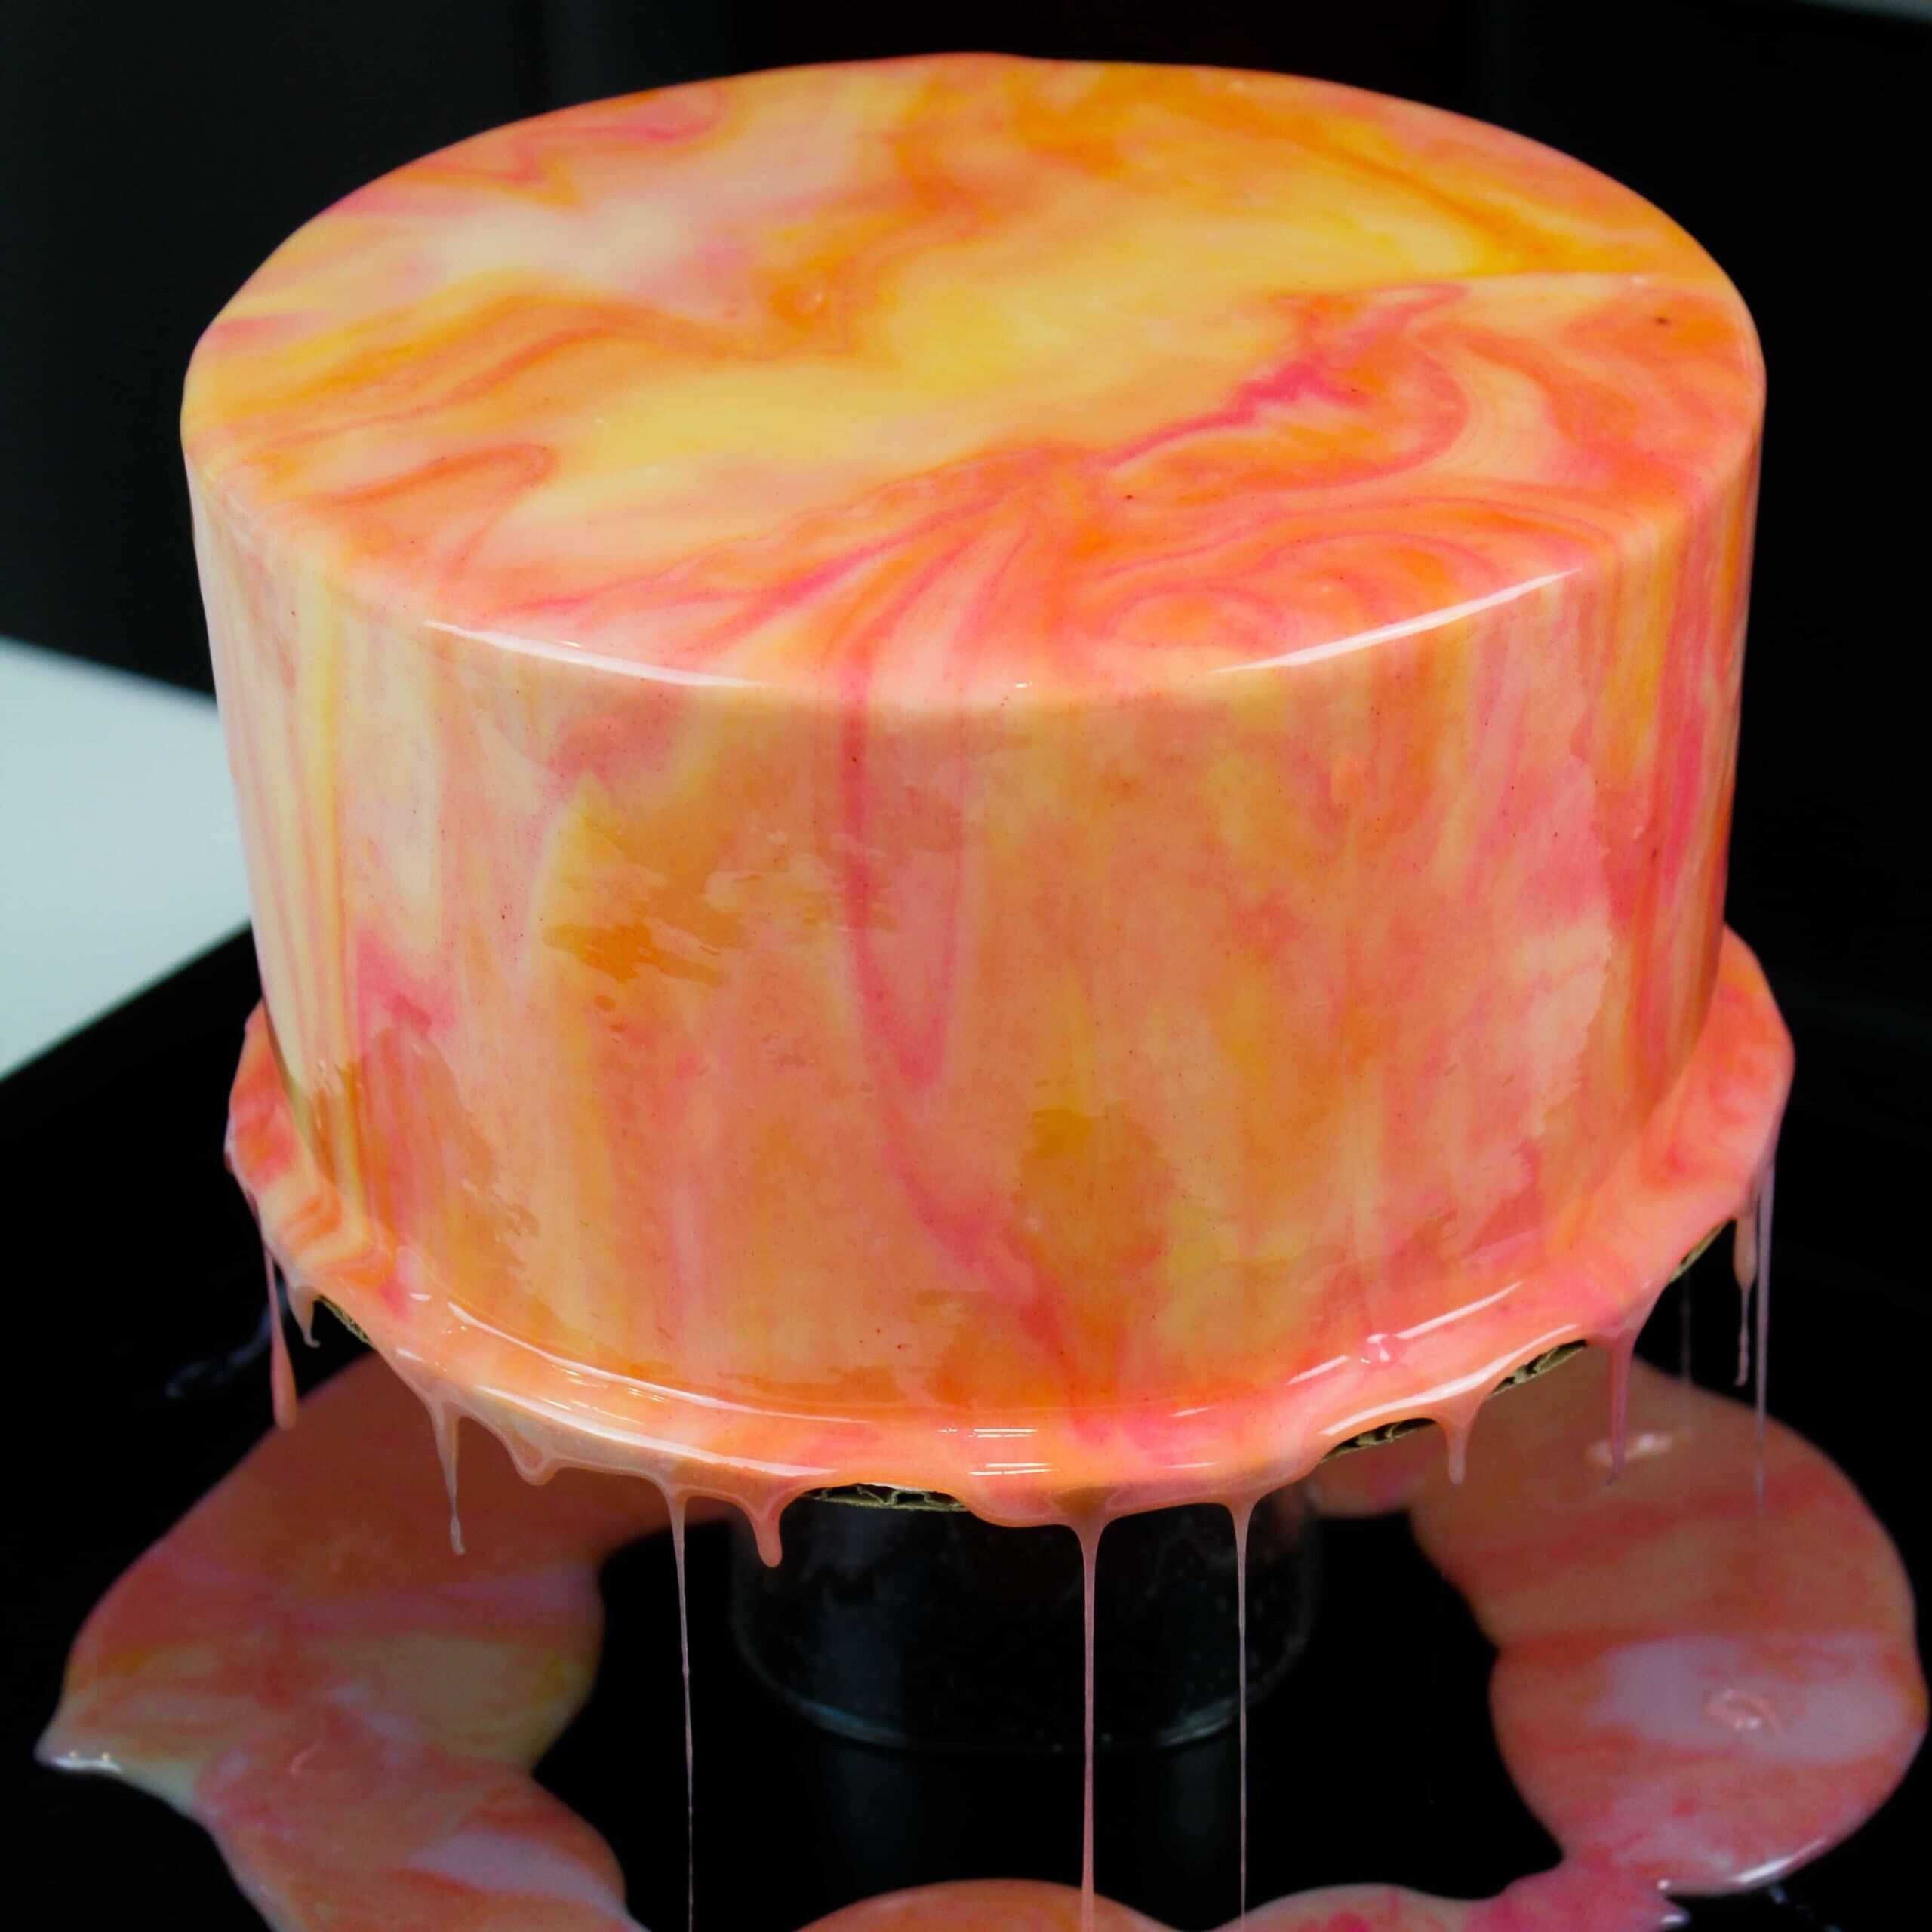
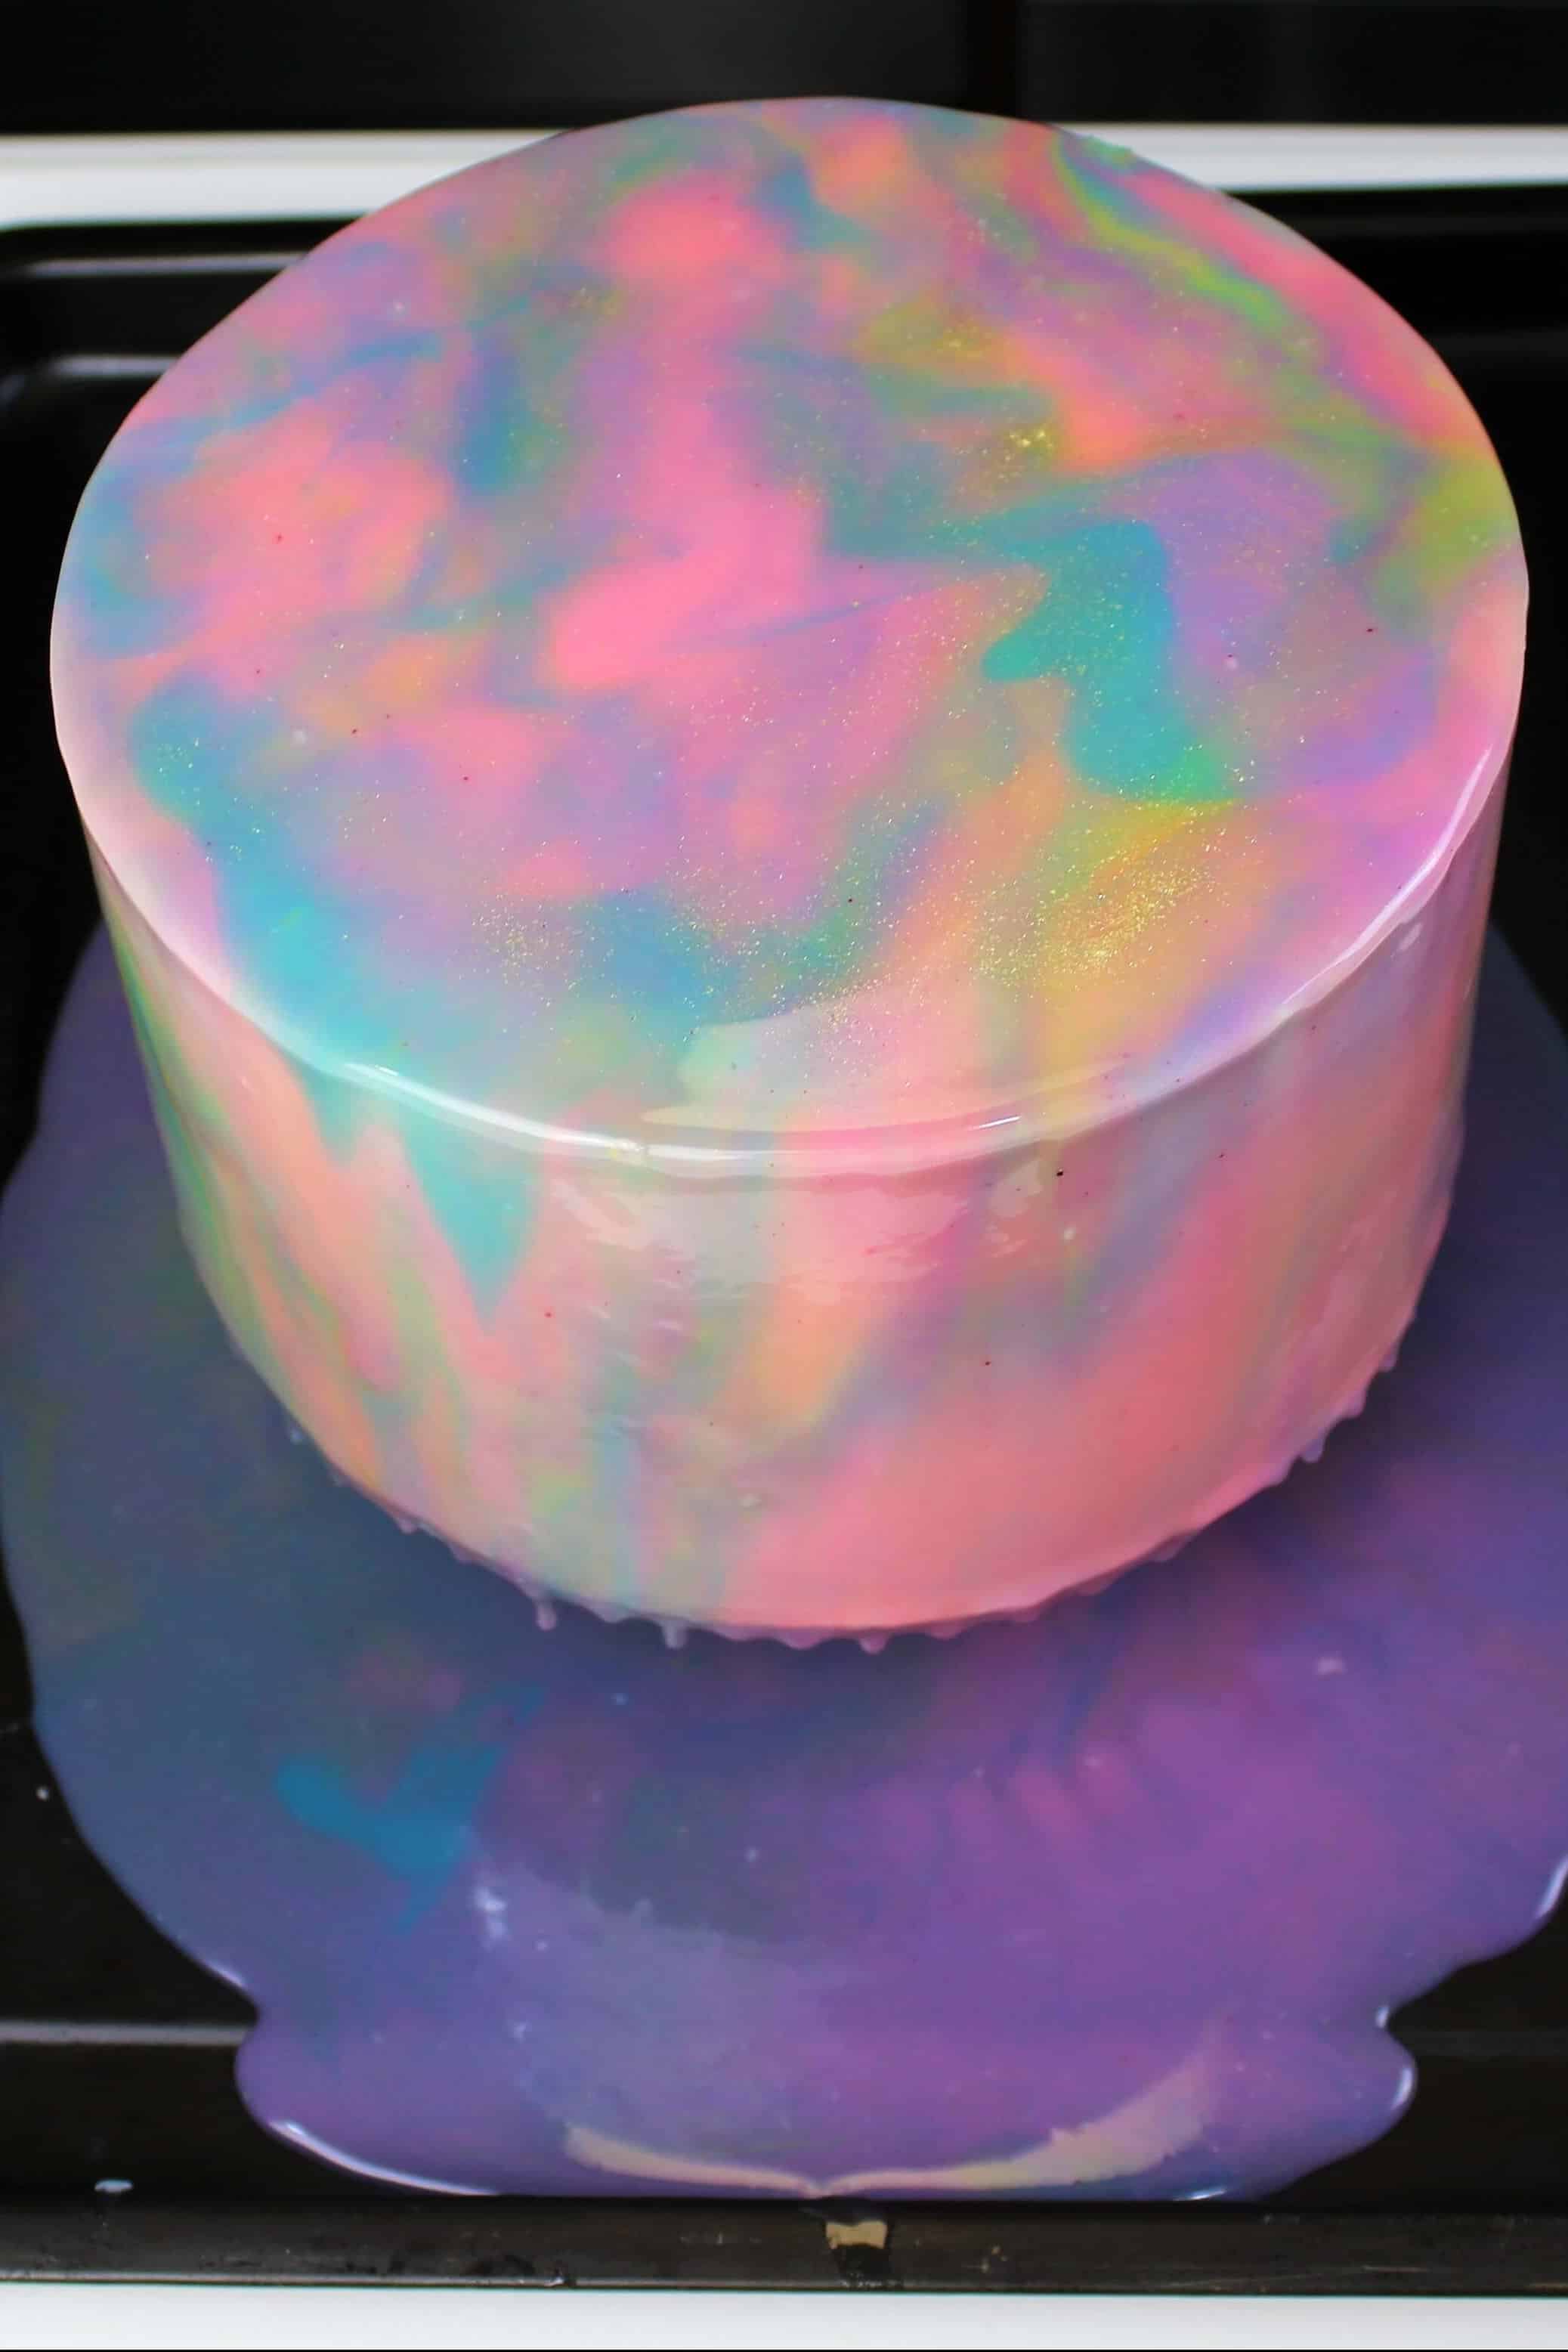
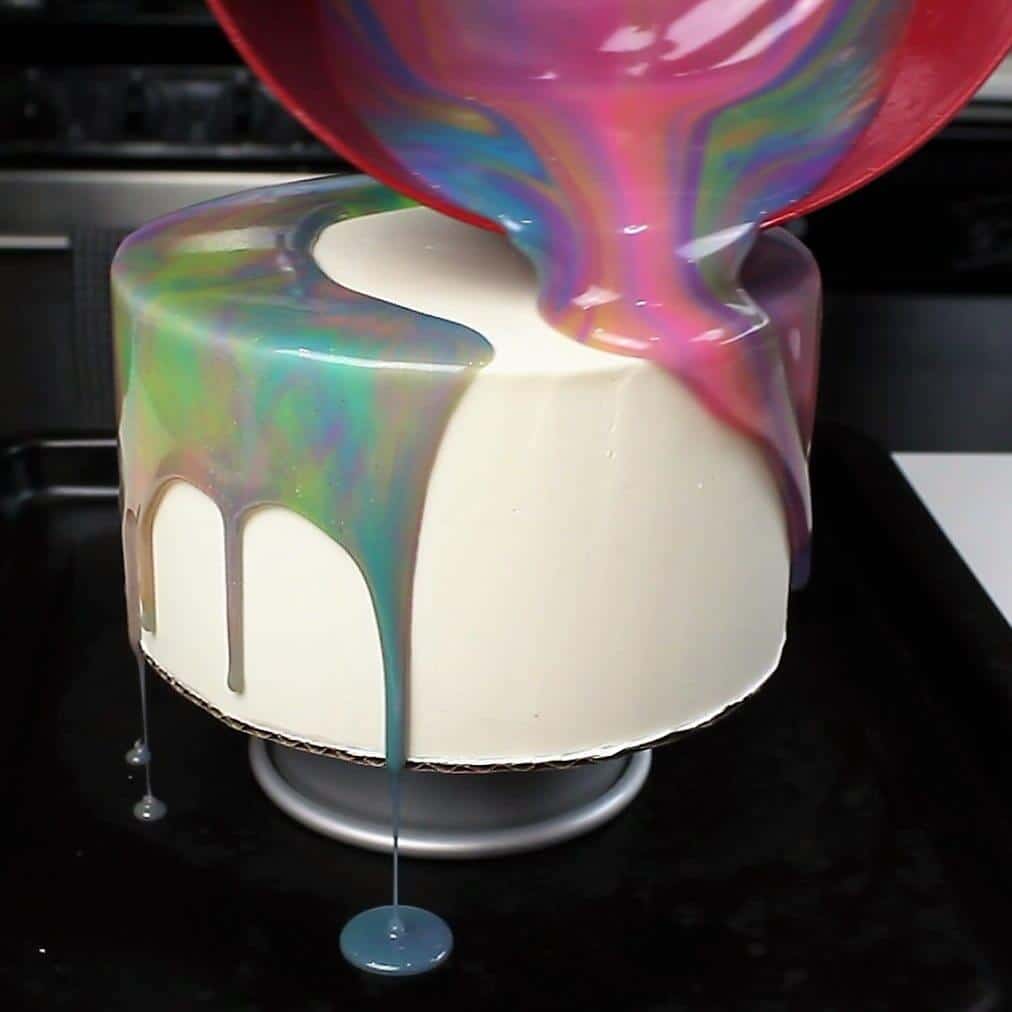
Begin pouring the mirror glaze over the center of the cake, then slowly work your way out to the edges. Drizzle additional colors over the base glaze to create a beautiful, marbled look. Once the cake is fully covered, sprinkle a bit of edible glitter over the top.
Let the glazed cake sit for about 10 minutes, then use a small offset spatula to scrape away any drips from the cake board.
The glaze should be mostly set at this point. Place the cake in the fridge if you don’t plan to eat it within a few hours.
Tips for Making the Best Mirror Glaze Cake
- This recipe can be used on any type of buttercream cake that is properly chilled. I do not recommend pouring it over a cake covered in whipped cream.
- Make the cake on a cake board that is the same size as the cake layers. It allows the glaze to drip directly off the bottom of the cake and makes it easier to get a clean, finished look.
- Don’t use this mirror glaze recipe on fondant. It can do weird things to the fondant and create a goopy mess.
- I prefer using mini white chocolate chips in this recipe, but any good-quality white chocolate chip or finely chopped white chocolate bar will work.
- The glaze should be thin enough to pour over the cake, but thick enough that it is opaque and has a vibrant color. If you start to pour and it seems too thick or thin, adjust the temperature as needed to get it to the desired consistency.
- Do not use flavored Jello in place of the unflavored gelatin in this recipe.
Making This Recipe in Advance & Storage Tips
If you plan to eat the cake within a few hours after pouring the glaze, leave it out at room temperature.
If you pour the glaze in advance, store the cake in the fridge. Remove the cake from the fridge a couple of hours before you plan to cut into it.
Make this mirror glaze ahead of time or save leftovers! Once it’s made, wrap the bowl or container with plastic wrap and store in the fridge for up to a week.
To use chilled glaze, heat the bowl in the microwave for 15-20 second intervals until it reaches 90°F/32°C and is the right consistency.
Use leftover glaze to top cupcakes, cookies, or even ice cream!
Let Me Know What You Think!
If you try this easy mirror glaze recipe, I’d love to hear what you think! Please leave a rating comment below.
Tag me @chelsweets and use #chelsweets so I can see your beautiful creations on social media!
Easy Mirror Glaze Recipe
Equipment
- Microwave or Double Boiler
Ingredients
Mirror Glaze Recipe
- 2 1/2 tsp (1 envelope) powdered unflavored gelatin, bloomed in 1/4 cup of additional water 7g
- 1 1/2 cups granulated sugar 300g
- 3/4 cup water, room temperature 180ml
- 2/3 cup sweetened condensed milk 170g
- 2 cups mini white chocolate chips 350g
- gel food coloring
Instructions
- Mix 1 envelope of about 2 1/2 tsp of gelatin in a bowl with 1/4 cup of water. Set aside to let the gelatin bloom while you begin the glaze. NOTE: The amount of gelatin in this recipe differs from the video shared on YouTube in 2016. I have revamped the recipe to reduce the volume, and the scaled-down version uses 1 envelope or 2 1/2 tsp of gelatin. It makes enough to glaze 2, 8-inch layer cakes.
- Pour 1 1/2 cups of granulated sugar, 3/4 cup of water, and 2/3 cup of sweetened condensed milk into a heatproof bowl.
- Heat for 90 seconds on high power in the microwave. Remove the mixture from the microwave and give it a good stir. The sugar should be mostly, if not fully, dissolved at this point. If it isn't, heat the mixture in additional 10-second intervals until it is.
- Add in the bloomed gelatin and whisk until the gelatin is fully dissolved.
- Melt 2 cups of mini white chocolate chips in the microwave by heating them in 15-second intervals, stirring between intervals. Once the white chocolate is fully melted, pour the white chocolate into the warm gelatin mixture.
- Carefully whisk the mixture until fully combined. Pour through a sieve to remove any bits of unmelted chocolate or stubborn bits of gelatin.
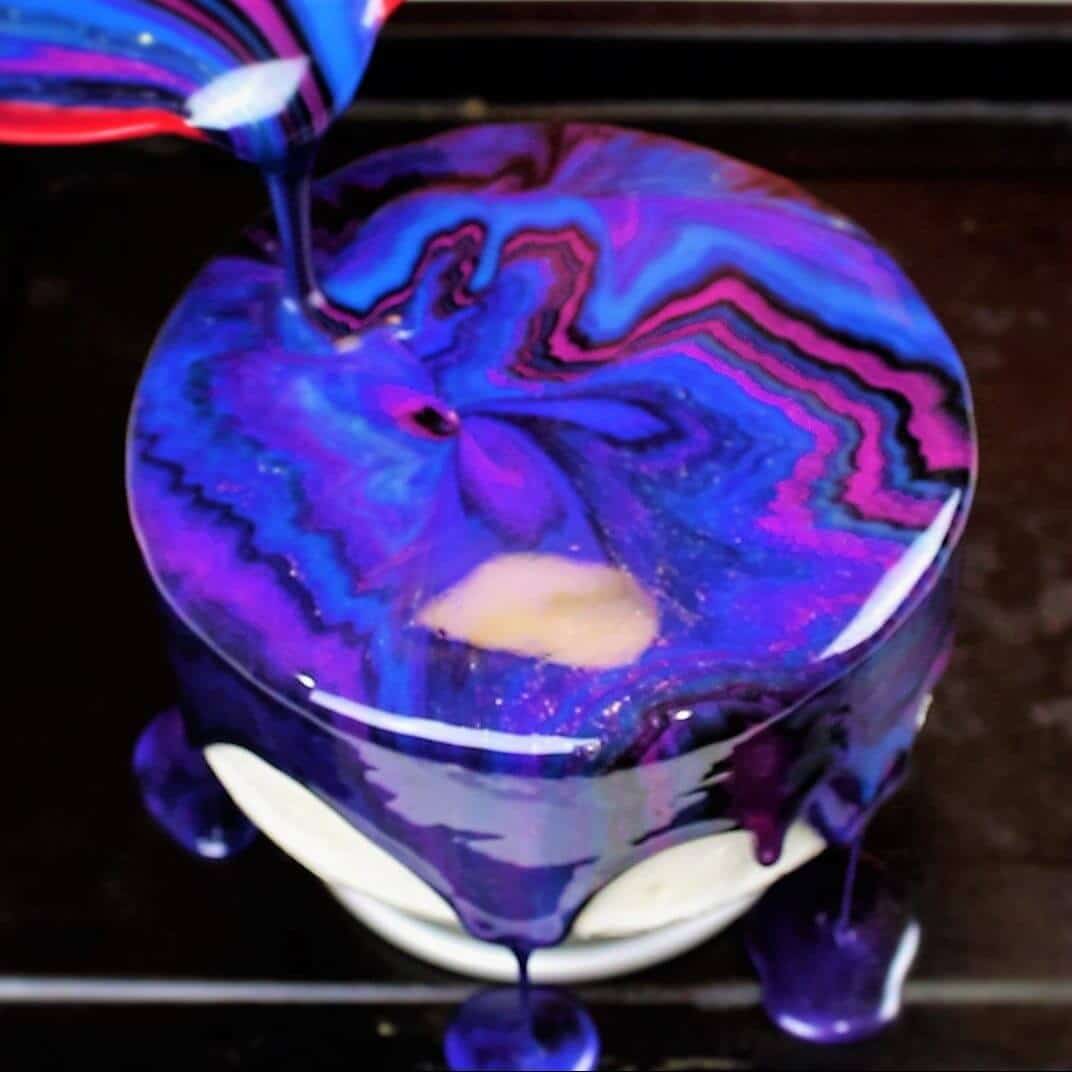
- Divide the glaze evenly between four bowls. Color them in different shades using gel food coloring. To create this galaxy mirror glaze, color them blue, purple, black, and pink.
- Continue to stir occasionally (to prevent a skin from forming) until the glaze has reached 90°F/32°C, or is just slightly warm to the touch.
- Pour each color of glaze back into one large bowl, alternating colors and drizzling the colors together as you pour them.
- Place a chilled buttercream cake (in the freezer for at least 10 minutes or the fridge for 1 hour) on top of a circular object smaller than the cake board, and set this on top of the large rimmed baking sheet to catch the run-off glaze.
- Begin pouring the glaze over the center of the cake, then slowly work your way out to the edge of the cake in a circular motion until the cake is fully covered.
- Let the glaze drip for about 10 minutes, then scrape away any excess glaze from the bottom of the cake board using a small offset spatula or butter knife.
Video
Notes
Tips for Making the Best Mirror Glaze Cake
- This recipe can be used on any type of buttercream cake that is properly chilled. I do not recommend pouring it over a cake covered in whipped cream.
- Make the cake on a cake board that is the same size as the cake layers. It allows the glaze to drip directly off the bottom of the cake and makes it easier to get a clean, finished look.
- Don’t use this mirror glaze recipe on fondant. It can do weird things to the fondant and create a goopy mess.
- I prefer using mini white chocolate chips in this recipe, but any good-quality white chocolate chip or finely chopped white chocolate bar will work.
- The glaze should be thin enough to pour over the cake, but thick enough that it is opaque and has a vibrant color. If you start to pour and it seems too thick or thin, adjust the temperature as needed to get it to the desired consistency.
- Do not use flavored Jello in place of the unflavored gelatin in this recipe.
Making This Recipe in Advance & Storage Tips
If you plan to eat the cake within a few hours after pouring the glaze, leave it out at room temperature. If you pour the glaze in advance, store the cake in the fridge. Remove the cake from the fridge a couple of hours before you plan to cut into it. Make this mirror glaze ahead of time or save leftovers! Once it’s made, wrap the bowl or container with plastic wrap and store in the fridge for up to a week. To use chilled glaze, heat the bowl in the microwave for 15-20 second intervals until it reaches 90°F/32°C and is the right consistency. Use leftover glaze to top cupcakes, cookies, or even ice cream!Nutrition
Other Recipes You Might Like:

Hi Chelsey! Love this easy recipe for the glaze but I had a quick question. Once the glaze is on the cake, do you recommend storing it in the fridge or at room temp? I need to go ahead and glaze the cakes the day before I serve them and just wanted to check. Thanks so much!
I recommend putting them in the fridge if you’re making them the day before 🙂
You think there is any risk of doing it the day before if kept in the fridge…like colors running, etc? Thanks!!
Nope! The glaze sets as it sits on the cold cake, so there’s no risk of colors running 🙂
Which type of gelatin did you use ( as in like where did you buy it?)
I use the knox brand, and I got it at Morton Williams (my local grocery store). Whole Foods also has unflavored gelatin, and I think most large grocery stores should too <3
I followed this recipe to a T and used it on panna cotta. It failed miserably… it was at the right temp but just kept sliding off and ended up opaque. Super disappointing 🙁 Any thoughts as to why?
Hi Bethany,
This recipe definitely would not stick to panna cotta! It’s designed to stick to a chilled buttercream cake. I think fundamentally, a mirror glaze isn’t going to stick to panna cotta because of it’s texture on consistency. So sorry!
Hi! I’m super tempted to try making this sometime soon! Your work is beautiful! I was hoping to ask what brand of food coloring you use?
Thanks!! You totally should! I use americolor gel food coloring, it’s the best (IMO)!!
If I want to use gelatin leaves instead of gelatin powder, how many leaves should I use?
Sadly I haven’t tested out this recipe with gelatin leaves! but from looking online, it sounds like one package (1 tablespoon) of powdered gelatin equals 4 sheets. This recipe uses 2 tablespoons, so it sounds like you should use 8 sheets for this recipe!
@Chelsweets, I loved your YouTube video, by the way!
I tried to make this recipe today, but the glaze remained runny and didn’t set on the cake.
It seems there’s a discrepancy between the amount of gelatine required in this recipe, (- you’ve recommended to the person above that this recipe uses two tablespoons gelatine – but the recipe above states only 2 1/2 tsp (teaspoons).
I’d like to try to make it again with 2 tablespoons gelatine, but wonders if I can reuse the batch I’ve already made and mix in some extra bloomed gelatine?
Thanks so much for your help. ?
Hi Rhian,
Apologies for any confusion! That comment is from back in 2019, before I cut the recipe in half. I felt like it was making too much glaze for a single cake, so I reduced the amount. 2 1/2 tsp (or 1 packet) of powdered gelatin is the correct amount for this recipe. For reference, 2 1/2 tsp is just shy of 1 Tbsp.
If your glaze didn’t set, it might have been too warm when it was poured. Did you take the temperature of the glaze with a thermometer? Did it thicken once it cooled to room temperature? It should firm up and have a texture almost like jello once it’s cooled. Also, what type of gelatin are you using? Hopefully we’ll be able to figure out why your glaze didn’t set together.
When is the best time to glaze?will it stay shiny if it’s refrigerated? Glaze then serve? Please advise.
For best result glaze and serve shortly after, once the glaze has set!
Hello!! Everything worked out perfectly until the glazing part. Once I started to pour, the glaze melted off the cake into a blotchy mess. I even tried doing multiple layers after a few minutes and it still does not look right. I have read everywhere the cake and frosting needs to be frozen when adding the glaze, but is that incorrect?
Yes, the cake has to be fully frozen before the glaze is poured!! That is an absolutely crucial step. I’ve updated my post to make this more clear.
Yes, I tried pouring it over a buttercream frosting that was completely frozen (12+ hours) along with the cake. I noticed some recipes use glucose or light corn syrup, but I wanted to avoid the ingredient if I can. This is my first time with this so I experimented with thawed cake and frosting as well, but it did the same thing. I cannot figure out what I did wrong!
Hmm what temperature was the glaze when you poured it? Maybe it was still a little bit too warm?? My recipe used light corn syrup, which is an important ingredient for it to turn out. Did you use a different recipe or substitute something else in for it?
That’s it! You don’t have light corn syrup on the list of ingredients!! How much do I need? I poured it as close to 85 degrees as I could. Dealing with multiple colors can be difficult. haha
So sorry TOTALLY having a brain fart!! I was thinking of a different recipe I’ve tried in the past. The amount of sugar and water in this recipe, along with the sweetened condensed milk make it so you don’t need corn syrup, like in other recipes. Yes, it’s hard to maintain the temperature while trying to get all the colors mixed and combined before pouring!! haha
@Chelsweets,
Same thing happened to me. It’s because the recipe says 1 package of gelatin but the video says 2.
So do you need one package of gelatin or two? My glaze was way too thin. I used a white butter cream cake from Wal-Mart in this test run, and my result is like that white cake with a thin layer or water coloring on it. Also, the bag of Ghiradelli white chocolate chips I used was only 11oz. (amount husband brought me). I did use gel coloring, and the colors turned out nicely in the bowls. Does the reduced amount of chocolate chips account for how thin my glaze was, or do you suppose it was something else? The cake had been chilling in the freezer for about 30 minutes.
@Kara, it sounds like your cake had condensation on the buttercream and that causes your glaze to slip off. Next time take a paper towel and pat dried before glazing.
Hi! Can you tell me how large is your cup that you are using for measuring?
Not sure which cup you’re referring to, but all the measurements and included in the recipe 🙂
You can buy measuring cups from most shops that sell baking equipment. For me it used to be frustrating because in the UK we don’t use ‘cups’ as measurements haha. But you can usually buy measuring cups wherever you’re from… that’s what the cups refer to here.
A 1 cup cup. 6 oz
1 standard US measuring cup is 8 ounces!
@Mary,
@Doroteja, The North American standard measuring cup is 237 ml. That equals 237 g of water. Other liquids might differ from that (oil is lighter and heavy cream is heavier).
How many layers of 6″ vanilla cake did you use. Should I use your vanilla cake recipe and the american buttercream frosting? Can this cake be frozen after it is glazed? I don’t think I need two mirror cakes in the same week.
Thanks and I live for your blog!!
I used two thin layers! You can freeze it after, but it will not be as shiny!! You can also just make one larger cake, these two cakes were very small (6 inch cake rounds), and was only about 3 inches tall!
Thank you for your easy to follow recipes and tutorials.
As a -not professional baker- mom of a 3 y/o with a Moana party, we had amazing success using your go to vanilla cake, American buttercream and easy mirror cake recipes to create an amazing cake that really even impressed me!
I did some tests and found that the mirror cake frosting tastes best fresh (the sweetened condensed milk taste fades with time).
The waves were made with uneven buttercream and looked like whitecaps and the mirror frosting really topped off the look of water with varied colors!
Thank you! Not sure how to share a picture…
sounds like it turned out amazing!!! so happy this recipe worked well for you 🙂
Just wondering, if I pour this mirror glaze on frozen mini cakes.. Will the glaze last well or could it melt in the 25+ Degree heat in a shaded area when kept for at least 5 hours? Thanks
The gelatin in the glaze should be set and keep it’s shape, but I’ve never had a mirror glaze cake in that warm of a setting! 5 hours is a long time, so I am not sure it will hold up that long!!
Did you mean 2tsp of gelatin? 2Tbsp to 1/4 cup water made a thick solid glob…
once bloomed it is one solid glob, which is then melted into the glaze! I used two packets of gelatin.
@Chelsweets, I’m so confused. One envelope or 2 of the gelatin…?
@Chelsweets, was the bloomed gelation supposed to literally be of a glob consistency? I looked up what bloom means, and I read all I needed to do was let it sit in the water 3-5 minutes. It did but was still of a liquid consistency.
@Chelsweets, Do you have an undated version of this recipe that includes the correct amount of gelatin and the corn syrup? I’d like to test this before I make it with my baking students.
I am looking to do this mirror glaze on a cake for silent auction, so the cake would be sitting out all day. Will it hold up?
I’ve never had one sit out for more than a few hours, so I’m not sure!
Is there a good substitute for sweetened condensed milk that would be suitable for a dairy free cake?
I’m not sure, but I’ve made a sweetened condensed milk out of coconut milk for a banana pudding! Not sure it would work with this glaze, but you could try that?
A bit confused on the water part. You say 1c is needed and 1/4c is needed for the gelatin. Do we take 1/4c from the 1c and use what’s left for the condensed milk and sugar?
just updated the wording! It’s an additional 1/4 cup of water!
Going to try this soon but had a question. If you use a frozen cake and then glaze it how long does it then take for the cake to thaw and does that result in any condensation forming?
it depends on how large of a cake you glaze, but it takes 2-3 hours. Once the cake is glazed, if you don’t plan to leave it out/eat it shortly after, I recommend putting it in the fridge! Condensation shouldn’t be an issue on the glaze. Hope that helps!
Can I use Swiss meringue buttercream? I’m wondering if the glaze will melt it since is so much lighter than the American buttercream.
yes you can! as long as it’s fully frozen!!
i can not get a deep purple color for my glaze been practicing all week 🙁 have to make this cake for Saturday 🙁 help
I use americolor gel in the violet shade to get it really dark!! For a more vibrant purple I use the royal purple shade. Hope that helps!!!
Hi. Do you use regular white chocolate chips? Or baking bar? What do you recommend? Thanks.
I use white chocolate chips, so I’d recommend using those!! You could also use a bar too though!
so I was thinking of doing a paint splatter cake but would most likely do a base color of black do you think it would mess up the bottom tier to add a second tier (a relatively small cake in all)? Also could you maybe post a tutorial how we might accomplish a paint splattered 2 tier cake? I am wanting to make it for my birthday which is august 14th. Thanks ?
with neons of pink, turquoise, yellow, purple, and green splattered on the black background of the tiers .
I actually made a rainbow splatter cake with ganache a while back: https://www.youtube.com/watch?v=G9tVPkASBtc
however, whatever you use to splatter a black frosting will need to be very opaque and bright! idk if ganache would be strong enough in color to show up well!
hi, quick question. I live in puerto rico, lots of humidity. I’m afraid of the cake sweating after i take it out the freezer. Will that mess up my glaze??
You can try letting it sit in the fridge for a couple hours before pouring to try to manage the condensation! I honestly am not sure, it’s not as humid in NYC so I haven’t run into that issue, so sorry!
Hey, nice recipe! I want to try it out. btw, a quick question, can I prepare the glaze a day prior, and pour it over the cake on the next day? And where should I store the glaze? In the fridge or at room temperature?
you can, but it forms a film. I would place a layer of saran wrap directly on top of the glaze and put it in the fridge. The following day, heat it up to the appropriate temperature, then you should be able to pour it just fine!
hey, nice recipe! i wanna try it out. a quick question btw, Can i make the glaze a day prior and pour it over the cake on the next day? will the glaze hold its shine? and should i store the glaze in the fridge? or at room temperature?
Thank You in advance. 🙂
I’d recommend making it the day of! it doesn’t take long to make, and is shiniest right after it’s poured! it will lose shine overtime :/
Hello–I have a couple of questions: I am making a two layer 9×13 cake that will be covered with buttercream, and I will freeze before trying this technique. Will this recipe be enough glaze for a cake that size?
Secondly, can I use “Wilton Icing Colors” to color this, or do I have to use a gel that is in liquid form? Hope you don’t mind replying quickly–starting to work on this tomorrow! 🙂 Thanks!!
I have never tried the recipe on the size of cake, so i’m not quite sure! However, I do always have tons of leftovers!!Any gel food coloring should work !! Happy baking!
Hi, is there a specific reason why recipes call for white chocolate chips? Not really a fan of it. Can I sub dark choco chips or take out the chocolate (white/dark/reg) chips for that matter? Thanks!
the different types of chocolate have different amounts of cocoa butter, so they cannot be swaped! However, there are tons of chocolate mirror glaze recipes out there if that’s what you prefer! I haven’t made a chocolate mirror glaze yet. Thanks!
What type of food coloring did you use? And what brand?
Hi, all the measurements are in cups. Can you please tell me in grams? Especially the chocolate and sugar?
here is a great converting tool: http://www.goodtoknow.co.uk/recipes/531168/cups-to-grams-converter
Can we use mirror glaze on whipped cream frosting.
as long as it’s frozen, you should be able to!
Hi Chelsweets, Do you think this would work poured over a cream cheese frosting? (as long as the cake and frosting is frozen?) Would the mirror glaze flavor and the cream cheese flavor mesh well?
definitely! I think so, white chocolate and cream cheese frosting should taste fine together!
I tried this for the first time today, on my daughters 18th birthday, and I’m so happy with the results! I didn’t have edible glitter but will definitely get some for next time. I can’t wait to try different colors! Thank you so much for the recipe! I love watching your videos too!
So happy to hear that 🙂 Happy baking!!!!
Hi, I have a question for you. If you freeze the cake, how long does it take for the cake to thaw? And also if the cake has been in de freezer for more than 4+ hours does it take longer for the cake to thaw?
It depends on the size of the cake! It can take anywhere from 3-6 hours! I usually place the cake in the fridge after glazing, which helps it thaw slightly, then take it out a few hours before I plan to cut into it!
Can this be done on aahipped cream iced cake?
I’ve never tried it, but I think that it should work as long as it’s a white cake!
Whipped cream*
Hi, thanks for the great recipes. Can we use this over ganache?
If you can get it back to a smooth consistency by reheating it, then yes!
Can you decorate with fondant or buttercream on top of the glaze???
you can, it sets pretty firm once it cools!
Hi there, your recipe states 1.5 cups of sugar, what kind of sugar do you suggest using?
granulated sugar!
Hi there, your recipe states 1.5 cups of sugar, what kind of sugar do you suggest using?
granulated sugar!
I watched your YouTube tutorials as I was determined to make a lava looking cake for my son’s Jurassic World cake. It came out great! I received so many compliments on my cake. Thank you for sharing your recipes.
aw I’m so happy to hear that!! and of course! Keep up the amazing baking 🙂
Your video says to use 2/3 c sweetened condensed milk, your recipes says 3/4 c, or 1 14oz can, which is 1-1/4 c. So, which is correct?
2/3 cup! Sorry about that, I just switched over to using recipe cards on my blog posts and am still working out some glitches! Thank you for catching that!
Hi there! I am going to be doing this for a wedding a cake. If I make this in the morning, will it be ok to sit out all day?!
It should be! the gelatin in the glaze allows it to set and stay in place! The glaze will get less shiny overtime though!! <3
Hi, Chelsea, thank you for sharing this recipe. I was wondering, if I only have a studio size mini fridge, would it be okay to make this cake and refridgerate it? Would it come out the same if the cake is not frozen but refridgerated before and after glazing? How long would the cake have to refridgerate before mirror glazing? Would I be able to make a jello cake covered with a white chocolate ganache buttercream under this glaze? Also, has anyone ever mentioned staining of the mouth if using just black gel food coloring with the mirror glaze? And, would I be able to put fondant decorations on the mirror glaze before or after it sets? I?d like to try this for the first time for my honey?s birthday in Dec. I?ll definately fill you in with how things went if this is possible. Thank you :)?
yah, that should work as long as you refrigerate it overnight <3 I haven’t experienced any complaints with staining of the mouth, but it can vary based on how much food coloring you use. If you do want to add fondant decorations, I recommend doing so after the glaze has set, and right before you serve the cake. Hope that helps, happy baking <3
Hi, Chelsea. Thank you for your response. Next time I make this recipe on a cake I will make sure I just make cake and not a jello cake. It came out too moist and started falling apart, when I removed the two round cake from the trays they were in and stacked them, just by frosting them with the white chocolate ganache buttercream. And, I used way too much gel food coloring that it really colored my tongue dark blue. I didn?t use fondant decorations either. The cake came out super sweet and the mirror glaze was hard to cut in to with a fork. Not bad for my first time but mirror glaze is not for me. I did, however, have fun making everything and putting it together. Again, thank you for posting this recipe. 🙂
haha that sounds like quite an experience!! it’s definitely not for everyone, but I’m glad you enjoyed the process 🙂
Ok, I’m going to try this but 0.66 cups?! That’s 5.28 ounces….that’s a weird measurement. How exactly do you measure it out?
I’d use a 1/3 measuring cup, and fill it twice!
Hi! Thanks for the recipe! Most other recipes for mirror glaze say it is pretty crucial to use high quality white chocolate. Could you tell me what brand of white chocolate chips you have had success with?
Hi Megan! Sure, I like to use the Whole Foods mini chocolate chips! I think they have a great taste, and they melt really easily. This recipe is much more forgiving than most mirror glaze recipes, but I also recommend using a white chocolate with a taste you enjoy, because it’s the main flavor in this glaze ?
It looks fabulous!
Just wondering if I will need to buy a sugar thermometer or if the mirror glaze can be made without one?
Thanks! You can definitely go off of feeling, but it’s a bit less precise, especially if you’ve never made a mirror glaze cake before!
I make small desserts this is something I would like to try on a mini cake. I am making cupcakes this weekend, have you tried this on a cupcake or something small like that?
I haven’t, but I’ve wanted to! I think it would be messy though, it really runs, and I haven’t been able to think of a way to not have it run down the liners! Maybe if the cupcakes are frosted and totally frozen, the glaze would set quickly though! Let me know how it goes if you try it 🙂 I’d love to know!
How can I remove the bubbles from the glaze? Its full of them and i don’t want to pour it like that. Can it be rewarmed or I have to use it right away?
I recommend pouring it through a sieve to make it really nice and smooth! Leftovers can be rewarmed /reused <3
In the USA one cup equals eight ounces.
Correct!
Unfortunately this was a fail for me. I am wondering if the gelatin was the culprit as it didn’t really mix in well with the chocolate. In a mousse recipe I make, it states to microwave the gelatin after blooming until it all melts. Perhaps doing that would have helped.
yes, the gelatin definitely needs to be fully dissolved for the glaze to work! It sounds like your mixture may not have been warm enough when the bloomed gelatin was added :/ I’m so sorry!
Does it go hard or just set like a jelly?
Hi Jess! It sets like jelly!!
We left a little of the colors to add at the end but ours turned it wonderful. I have pictures. 🙂
So happy to hear that Beth!! I wish WordPress let you guys share pics so I could see!!! <3
Hi! Planning to make this for the first time and I’m corcern about the amount of glaze. It will be a 9×4 cake, will it be enough glaze, have you try to double the recipe?
Hi! I will try to make this soon and Im concerned about the amount of glaze. It will be a 9×4 cake, is this recipe enough, have you double the recipe in the past? Thanks
Hi Hiriana,
I think it will definitely be enough! I have a lot left over when I use it on 7 or 8-inch layer cakes!!
Would love to use this on a few scattered round cakes as part of my daughter wedding cake table. Any suggestions to create a marbling of ivory and gold, burgundy and gold or navy and gold.
You can add luster dust or edible glitter into the mirror glaze, or dust it on top! It won’t really marble through in thick streaks, but it’ll make it shimmer!
I am confused that use of condensed milk and white chocolate makes the glaze too sweetened, tell the solution, and some guys use icing gel instead of condensed milk and gelatin, what would you recommend? Please answer
The glaze turned out great except after 30 minutes it became dull and lost its shine. Any suggestions.
The glaze does get a bit less shiny as it sits! I’d recommend pouring it right before you plan to eat it, or adding a bit less white chocolate to make it shine more <3
I trialled this before my event and it was a success then of course had to fail for the actual event. Confused! You have put 2 different methods up so I’m picking I did both and one worked out and the other didn’t. The results for me were polar opposites. Do not recommend trying this for any cake that is required even a day post-glazing if you are in humid or warmer weather. Even with a freezer and commercial chiller to keep it, it virtually melted off when it came out to room temp…Scarred for life.
Hi Alyce! I am so sorry to hear that :/ I don’t live in a humid environment, but the gelatin in the recipe should set almost like jello. I am so sorry it was such a disaster for your event!!
@Alyce Charlesworth, You should have probably stuck with what you knew worked the first time instead of trying a new method before an event…
Hi. How are you? I wish to try this in a few weeks but I am making a Nutella buttercream cake. So the icing will be brown. Will the colours for the mirror glaze still show up? Or only if I use the darker colours? Thank you.
Hi Zainab! Sadly I don’t recommend using a colorful glaze on a chocolate cake! The colors just don’t show up the same, and it looks a lot less vibrant. if you plan to use darker colors, it should work though! Hope that helps, happy baking!
Thank you baker chelswets. Simple and well explanatory.
Aw thank you!! 🙂
I tried your recipe on 2 tester cakes and worked great. But on the 3rd and real event cake, the glaze thinned out along small portions of the edges showing my buttercream below. My cake was in freezer for 2 hours and the glaze was at low to mid 90 degrees before pouring. Can I add another layer of glaze on top of the 1st which has already set?
Hi Martha!
So sorry to hear that! I’ve never tried double glazing a cake before, but I think it should work! as long as the first glaze is super chilled, I think it should stay set as you pour the second layer over. Really hoping that works, please let me know how it turns out!!
Hi try your recipes but my glaze was translucent and my butter cream melted alittle
Hi Catherine,
So sorry to hear that! If the glaze is too warm when it’s poured, it can cause it to be too thin, and look translucent. Did you let it cool to the recommended temperature? I’d suggest letting it cool a bit more next time. That will also help prevent it from melting your buttercream.
It’s also super important that the cake is fully chilled before you pour the glaze. If the frosting is fully firm to the touch, the glaze shouldn’t have an impact on it. Hope that helps!
For cupcakes I’d think you could freeze them after frosting them and dip in the mirror glaze, pull up and let excess dip off and flip right side up to set. In my head it works anyway 🙂
Haha I’ve been dreaming of doing that for the longest time, but I keep putting it off for some reason!!! I feel like it should too 🙂
Have you ever added corn syrup? Saw a recipe just like yours but it also had corn syrup. Just wondering how that would change things.
Corn syrup thickens the glaze, and makes it a bit shinier! I found it also makes it harder to get the consistency right and have it set properly, which is why i don’t include it in mine ?? Hope that helps, happy baking!!
Is there something else I can substitute in place of the chocolate? I am allergic to chocolate of any kind.
Hi Sarah! Sadly I don’t know of anything you can successfully substitute for chocolate in this recipe ? I’m so sorry!!
Could I freeze the glazed cake? Or is there a recipe I could use for freezing a cake? I need to decorate one for my granddaughters birthday but it isn’t for 2 weeks and I only have time today.
Hi Cheryl,
You can totally freeze a mirror glazed cake, but it will lose it’s shine. You can freeze pretty much any of my other cake recipes though! Just be sure to transfer it to the fridge a day before you plan to bring it to room temp, so that you don’t get a ton of condensation. Hope that helps, happy baking!!
Hi, I wanted to know will icing color be ok to use for coloring the glaze?
Hi Andrea,
I’m not quite sure what icing color is! as long as it’s a thick food coloring (like gel food coloring made by americolor or wilton), that should work great! Hope that helps, happy baking!
Im doing my 3 tiered wedding cake, stacked before pour. Ive done this recipe before but everytime the glaze sets so gummy you need a bread knife to get through it.
What would cause that pls? I want a very thin layer that slices through just like icing.
Also, i need to do the cake on fri and store it in the venues fridge til sat 500 wedding. Will it thaw overnight in their fridge and be ok set out 2 hours before cutting pls?
Hi Rebecca,
I’d recommend pouring it at a slightly warmer temperature, to make a thinner layer that’s easier to cut!
I think letting it sit in a fridge overnight would be fine! it needs to be out for at least 2 hours to help it come to room temp before you cut into it, so that sounds like a good plan. Hope that helps, happy baking!
I’m curious – have you tried this with chocolate instead of white chocolate? I’m not worried about colour, because I’m happy for it to just be chocolate colored, but I’m thinking of putting the glaze on top of a chocolate peanut butter cake, so I don’t think white chocolate will taste as good. But I haven’t seen mirror glaze using regular chocolate.
Hi Abigail,
I haven’t tried this recipe with regular chocolate, but I think that should work! If you try it please let me know how it turns out <3 I’d love to know!
Can you use liquid food coloring instead of gel? If not why not?
Hi Nicole,
Liquid food coloring can throw off the consistency of the glaze and won’t give you as vibrant of a color. I don’t recommend it, so sorry!
Tried this and all the colors blended together into one black blob.
Hi Lisa,
So sorry to hear that! Did they blend together after you poured the glaze, or before? Did you accidentally stir the colors together?? Hopefully we’ll be able to figure out what went wrong!
Hi Lindio,
Sounds like the glaze wasn’t warm enough when you poured it over the cake! Sometimes the strength of your microwave can impact how warm your glaze gets. Next time I’d recommend heating it for slightly longer, and make sure the consistency is thinner before pouring it. It also really helps if you have a thermometer on hand to check too. Hope that helps, happy baking!
Will the glaze works with my cake covered with ganache? Tnx
Hi Rona,
It will work as long as the ganache is a white chocolate ganache / light in color! If it’s a chocolate ganache the colors won’t be as vibrant / colorful and they’ll be harder to see.
Can i use sheet gelatin instead of powdered?
Hi Katie,
You can! You can substitute sheet gelatin for powdered gelatin in any recipe by using the following scaling:
1 (0.25 oz.) envelope granulated gelatin = 1 tablespoon powdered gelatin = 3 sheets leaf gelatin.
This recipe was so easy to make!!! And it honestly keeps a pretty good shine for a while! My sons birthday was a week ago and the leftover cake is still pretty shiny! This came together in minutes!! But quick tip if you make your buttercream with shortening instead of butter you’ll want to freeze the cake overnight to make sure that soft shortening is solid enough to hold the glaze on (some of my frosting melted away but not enough to wreck the cake it still turned out fantastic!
So happy to hear that Desiree! And that is a great point, thank you for sharing!! 🙂
Hi I made a normal velvet cake mix with butter icing then i used your mirror glaze recipe i was a bitt nervous as i was not able to find any Gel coloring due to lockdown so i used different food colorings but i then put the mane color blue on first let it stand for few seconds then i used little red with gold dust on top my sons loves his space planet cake for his 7 birthday . thanks for a great recipe! from South Africa???
Aw that’s wonderful to hear Nadia!! I’m so happy it turned out so well 🙂 Thank you for sharing!!
So the cake is not as shiny the next day. I wonder if you needed to make ahead of time if you mist the cake with an alcohol like ever clear to make it shine. Kind of like one would do with fondant or royal icing to get the shine.
I had a similar problem Lisa. Perhaps I mixed kelly green, purple, royal blue and orange. When poured over the cake, if you looked closely you could see almost an iridescent look, but it mostly read as solid forest green. When I did this the first time, I poured the colors on from their individual containers. Here, when I poured them into a single container to pour them over the cake, they combined on their own. Worked better for me to pour them on separately.
With all of this covid stuff, my daughter turning 6 is pretty bummed that we can’t have a big family birthday celebration. I told her we can still make it special. I ordered gel food coloring and edible luster dust and we just did a practice mirror glaze galaxy cake (she’s really into stars). Would love some tips based on what I experienced.
1. Do I need to use a lot of food coloring? My colors weren’t as vibrant as yours. I thought they were pretty bold. But when I poured the in the cake the Black seemed more grey and everything kinda ran together.
2. I could still kinda see through the glaze, especially on the sides – was it too cool/warm? Feels like it should’ve been a little thicker…
3. It felt like my colors mixed together more than yours both when I poured them into my big bowl and on the cake….thoughts?
I appreciate your time!! Just trying to make all of this Coronavirus stuff full of fun memories?
Hi Eliese,
I totally understand, and that’s so sweet of you to make her an extra special cake!!
I do add a generous squeeze of americolor gel food coloring to each color I make, to make the colors really vibrant!
If you’re having issues with the colors running together, I’d recommend pouring the black base first, then drizzling the brighter colors over it to help them really pop!
If the glaze seems a little see through it’s either a bit too warm when you poured it, or you might want to add a bit more white chocolate. Letting it cool or adding more chocolate will make it more opaque. Based on your description I’d say let it cool a bit more next time 🙂
hope that helps, and that your daughter’s cake is a big hit!! happy baking!
Hi Chelsea.
This is a good recipe but please specify
whether the temperature is Degrees Celsius or Degrees Fahrenheit.
I assumed it was Degrees Celsius and ended melting off the butter-cream on the sides of the cake.
I realised my error and will try again next time
Thank you
So sorry that happened to you! I will update the recipe card to share that it’s in F <3
Hi! How are you recommending gel coloring, which is a water-based coloring, when you have a fat (chocolate) as a component? That usually makes the chocolate get thicker and/or seize, so the glaze gets lumpy. Usually with chocolate, you need to use a fat-soluble coloring, like a powder. If you use this gel, you’d have to use something like “Flo-Coat” first.
Hi Michael,
Because there are other ingredients / liquids included in this glaze, the gel food coloring does not cause it to seize. I totally agree if you added gel food coloring to straight white chocolate, it would cause it to seize. However it works great in this recipe! No need for flo coat.
Hi,
I just wanted to say I love your videos,I love baking and I do it for a hobby .I love Creating things that others have never done before. I worked at the Walmart bakery for about four years and created an apple for teachers made out of a cupcake and also a coffee cup made out of a cupcake and other things.But I just wanted to let you know your videos are awesome and I’ve learned more on your website than I have ever learned before thank you.
Shannon
That’s awesome Shannon! Baking is definitely a wonderful creative outlet, and I’m sure make a lot of incredible cakes 🙂 I bet your customers love you!
And thank you! I’m so happy to hear that!! Happy baking <3
I am getting ready to make my son’s graduation cake and want to mirror glaze 3 square 9″ x 9″ x 3″ cakes. Can I triple this recipe and it still work or should I make individual batches?
Hi Dawn,
This recipe actually makes a lot of mirror glaze, so I think if you double it you should have enough for that size of cake! This recipe works fine if you double it and make just one batch. It does lose it’s shine overtime, so I recommend adding the glaze shortly before you plan to cut in and serve the cake if possible.
Hope that helps, and that your Son’s graduation cake turns out great 🙂
Can this glaze be used on cake pops? Does the glaze harden?
It can be used on cake pops, and it does eventually set kind of like jello from the gelatin in the glaze. However it isn’t hard to the tough! It’s almost a little sticky. Hope that helps, happy baking!
I just made this glaze and it stayed shiny for 3 days. No problem. I covered the cake in a plastic cake holder.
That’s awesome, I am so happy to hear that Dee 🙂 Thank you for sharing!
Well I tried your process for this glaze, and did not exactly work out as planned.. Although I used a premium white chocolate chip, the chocolate was trying to scorch rather then just melt as it should have. So I wound up with tiny chocolate bits in the glaze..The colors didnt exactly stream out as I would have liked but other then the chocolate issue lol, the rest of process went fine. I think I will try mixing the colors into one bowl and then pouring onto cake next time.. So although this didnt come out perfect, I am not dissuaded from trying again lol.. (Practice makes perfect lol)
Haha I love your attitude Tina!!
Next time you can also pour the glaze through a strainer before coloring it to make sure there’s no unmelted bits of chocolate stuck in there <3 I hope your next go at it turns out great!
Nice recipe! I found some of the chocolate didn’t fully combine into the glaze mixture – ran it through a sieve and that took the bits out.
Also I always find my glazes run off the cake too quickly and only leave a thin, see-through layer – I added three layers of glaze, waiting a few minutes between each one, and this helped a lot. Also found it poured well down to about 27 degrees C, and seemed to stick a bit better at the cooler temp.
Hi Izzy,
That’s good to know! Are you using gelatin sheets or gelatin powder? Also, what type of white chocolate are you using? The consistency and thickness can definitely vary a bit based on those factors, and I’m so happy you found a method that works best for you 🙂
Hi! I had a question about the storage and apply when ready tip… So should you color before or after you store it? I’m assuming after based on the wording, because I’m guessing you wouldn’t combine before putting in the fridge and you said cover bowl not bowls lol! Just don’t want to ruin all my hard work… I’m making this for Blueberry Entremets which doesn’t have a galaxy mirror just a purple (plus I like yours better) and it’s a long process so by the time I’m to the glaze I’ll just want to have everything done and ready to put together the following day lol! THANKS!!
Can whipped frosting be use for the mirror glaze?
Hi, I’m planning to use this recipe for my moms bday cake.Its really hard to find gel coloring in our country.Will it make a difference if I use liquid coloring instead of gel??:/
hey,Im planning to use a mirror glaze for the first time on my cake .Its hard to find gel food coloring in our country will it make a difference if I use liquid coloring instead?
Hi! I wanted to cover a cheesecake with this glaze for a birthday. I have a couple questions I hoped you could help me with.
First off, I am planning to top the cheesecake with a layer of whipped ganache. Because the glaze is warm when poured, would it melt or deflate the ganache?
Also, would it be able to adhere on all the different layers(ganache, cheesecake, and crust)? Or should I frost everything with the whipped ganache first(assuming it probably won’t melt or deflate)?
How much time before serving should I glaze it (I want to leave it at room temperature as cheesecake tends to get hard when cold)?
Lastly, like many other commenters, I also only have liquid food colouring. I don’t need a very bright glaze though, a pastel colour would also be satisfactory. Can I use 2-3 drops of the colouring without affecting the temperature?
Please reply soon.
Thank you!
*the consistency
I bloomed my 2 tbsp of gelatin in 1/4 cup water like instructed. When the instructions say to pour the gelatin, did you mean scrape it out? Because it was very thick and not liquid. Also after I tried to dissolve it as well as I could, the gelatin still had little bits throughout the glaze. I’m wondering if it should call for more water or less gelatin.
Hey! I love how easy this recipe is. I used it to make my niece’s birthday cake for her 8th b-day. She requested a skateboard cake so I used a square and round cake to make the shape and then Covered it I. A mirror glaze of her favorite colors. However I did notice a bit of an issue. I watched ur video and read you directions. In the video you said to use 2 TBSP (2 envelopes) of gelatin but in the written instructions it says to use 2 TSP (1 envelope). That is a pretty big difference. I followed the video that said 2 envelopes so hopefully it’s ok, we haven’t tasted it yet. It looks pretty good so I’m hoping that means I did it ok.
Hey Chels! Just wanted to ask if you know if the measurements will change if I use Agar Agar instead of the gelatin? Is it still 2 tsp?
SOS! makin this in the morning. can you lease confirm if it’s 2 TBSP or 2 TSP of gelatin and 1/4 cup water? There seems to be a discrepancy between the video and written recipe.
@Amber, I used the recipe exactly as written (with 1 packet gelatin) and it came out perfectly!
I noticed that discrepancy too and would love to know which measurement it should be before I attempt! (Using powdered gelatine)
Hi
Can i glaze over a ganached cake or does this work with buttercream only?
same here! I used 2 TSP and it totally failed. I’m gonna try 2 tablespoon instead. totally wasted a whole batch of icing !
Hi there! Your video and comments all say two tablespoons for the gelatin, but the written recipe says teaspoons just FYI. Made it yesterday and I think that’s where I made an error, but attempting again today! 🙂
i melting the chocolate and most recipes say, put it all together to melt together.
Hey! I think there’s an error with the amount of gelatine you listed, in your youtube video its 2 tablespoons, but here its only 2 and 1/4 teaspoons?
I watched the video and you say 2 tablespoons, but the printed recipe says 2 teaspoons…….please advise asap
Hi, have a question making a red velvet cake & cutting into small squares (like petite fours) once cut can i freeze them & then pour the glaze without icing them? thank you
I loved the glaze, it turned out really well! I saw a few pics & videos of mirror glaze cakes online and thought I really want to try that. I stumbled upon this recipe and I’m glad I did! It was easy and the best bit is you don’t need any extra kitchen ware to make it.
Thank you xx
Can I replaced Water with Liquer? Thought of adding liquor to the glaze.
Hi Chelsey,
My daughter and I will be attempting a mirror glaze cake next weekend using this recipe. With regards to the amount of glaze this recipe makes…if we make the buttermilk cake recipe you link to in the post (which says it makes 3 x 8” cake layers), will the amount of glaze in this recipe be enough to cover that cake?
Thanks!
Kristin.
Hi! I’m planning on making half of the recipe, does that mean I have to heat it for 45 seconds in the microwave?
Hey I’m making my first mirror glaze cake for my boyfriend’s 18th birthday. I’m only 16, but I love baking and I practice a lot. The only issue I had was that I thought the glaze was too runny. I think that has to do with temperature? Would a cooler temp be better?
Its 2/3 cup which is .666666 its a very common measurement
can we use milk or dark chocolate instead of white chocolate
Did this work with 2 Tablespoons? Mine came out quite thin even letting it get a little cooler that 90*
A “cup” is actually a different size in UK vs USA vs NZ/Australia so it is confusing as a measurement in recipes. A metric measuring cup is 250 millilitres, a US cup is a little less.
I am making a four-tier chocolate cake with nine-inch pans, so do you think this recipe will be enough, or should I double it?
Can i melt the chocolate on a double boiler instead of a microwave?
I did my first mirror glaze back in May and I used a double boiler, not the microwave. Worked fine!
Can i use a cool whip frosting recipe as long as its frozen
Hi Chelsea! Thank you for this easy to follow recipe! I’m wondering if it is okay to use low fat sweetened condensed milk? Thank you ahead
One cup on the US is equal to 8 fluid ounces
Hello! You do gorgeous work! Love your explanation and enthusiasm as well!
I have my daughters layers for a frozen cake in the freezer waiting to be constructed.
I wanted to know what type of frosting I should use underneath before pouring the glaze.
Also, I need to make this in the AM and the party isn’t till evening. Will the glaze be ok in the freezer?It won’t crack or anything right? Thanks so much!!!
I tried this yesterday and it didn’t quite go to plan. It was wayyyy too runny, even at the correct temperature. I purposefully did this as a trial yesterday having never done it before, so no drama that it didn’t work!
I’m thinking it might be to do with the amount of gelatin – the recipe says 2.5 tsp, but in the comments you mention 2.5 tbsp. Should it be tablespoons, and the lack of gelatin was my issue?
Thanks
My best friend is extremely allergic to soy; an ingredient found in white chocolate. Is there a substitute for it in mirror glaze recipes?
Thanks for a great recipe! Just please make a note to change the amount of gelatin to 2 envelopes as stated in your YouTube video, the recipe above says 1 envelope:)
My cake turned out fabulous!!
Hi there! Wonder easy recipe. I was wondering if you could use this for yeast donuts? Thanks so much
Followed your recipe exact. Came out awsome. Perfect mirror effect. Better then I was expecting.
Thank you for this. It was really tasty, and so, so close to being the right consistency! I poured this over a cake with a buttercream crumb coat that had been in the fridge for 18 hrs. Sadly I think that the glaze was too thin, as I could still see the cake through it. Any hints appreciated. One question was about the water content. Overall, you list 3/4 cups, but on the recipe mention 1/4 cup then 3/4. Should the latter have been 1/2?
Hi. I tried your mirror glaze and followed the recipe exactly! I wondered why it wasn’t setting and sadly ruined hours of work making a six layer sponge for my son’s first birthday. Then I saw in the comments that you use 2 tablespoons of gelatin powder! In the recipe it says 2 tsps… Teaspoons. No wonder it didn’t set. so disappointed. It might be worth changing this incase others make the same mistake. I didn’t have a sachet of gelatin so I relied on your other measurements.
Your recipe says one package of gelatin but in the video you say two. I just made the recipe with 1 package and the entire topping dripped right off the cake.
Hi Chelsea. I’m a bit confused. Your recipe says 2.5 TEASPOONS of gelatine powder, while the YouTube video states 2 TABLESPOONS of gelatine powder. How much gelatine should I use for this glaze? It would be really helpful if you could reply, my sisters birthday is coming up shortly?
The video directions are different from the written directions??
Can you substitute the condensed milk with something else? I’m not able to have that
So I made this and it came out all nice and shiny. We put it in the fridge and pulled it out this morning and it isn’t shiny anymore. How do you keep the shine?
Is the correct amount of gelatin 1pkt (2.5 teaspoons) OR is it 2 Tablespoons?? In the print recipe on this page, it says the first amount, 2.5 tsp. In your video you say (and it shows up on the screen in words) 2 Tablespoons. I’m making a mirror glazed cake for my daughter’s birthday, so this is important! Thank you!!
is it necessary to add condensed milk or is it fine with just sugar? is there replacement for condensed milk?
I made this but the icing looks so running and I can see the butter cream
What did I do wrong the temperature got below 90 degree before putting it on the cake ? Will that affect it 🙁
I followed this recipe step by step for my sons first birthday and it was a total disaster came out nothing like this but it won’t let me post a photo
Hi, I was wondering if I could use less sugar in the recipe; would that affect the setting of the gelatine?
hiya quick question is it ok to use dr oetker gelatine for a mirror glaze tia
Hi!
You make this sound easy. Wow. This is appreciated.
My concern–My sister was going to make and decorate our 50th wedding anniversary cake. There is a story to our wedding cake and this would have been a continuation of the story. She can’t do it. Not her fault. COVID is destroying her business. She has to be there, so she can’t come here. I don’t want to ask a local baker to make a cake. That’s not where the story is. I am not asking her for advice. She has had a really hard time over having to turn me down, let alone looking to, possibly, close her shop.
Anyway, I have decided to make cheesecakes. I am good at that. The center cheesecake will be our anniversary “cake”. I am interested in making your gel topping. I have never done this before. Will the chocolate make it white if I don’t add any colors? Ivory is fine, too. I would like to put a spray of edible, gold roses with small lavender and white flowers added. Lavender and white were our wedding colors. I can’t find rose sprays, let alone gold flowers, on-line that do not cost a small fortune. God gave my sister all the skills to be a most excellent cake decorator. God has gifted me in many ways; however, He did not see fit to give me that gift. So, do you have any ideas? I could sure use some good advice. Many thanks–and for reading my long message.
Cherie Freewalt
Do you know if there’s a recipe without chocolate
Is there a recipe without chocolate
Hi, just made my first mirror glazed cake over the weekend. I’m not really sure what went wrong but every time I touched the cake the glaze basically coloured my fingers. Is not runny, did set on the cake, is shiny but isn’t firm to touch. I used sugarflair food colouring. Would be very much appreciated if you could tell me what I did wrong. Many thanks!
I’m a few years late to the mirror glaze trend, but finally tried the technique with this recipe. I had fun and the results were ok, but I’d do some more testing with it next time I try. Now that I’ve read the comments, maybe I do need to double the gelatin (only used 1x Knox pkg) or use less water (I had a total of 1c with the blooming gelatin and in the sugar mixture). Or maybe I need to do some experiments with the chocolate-I used chipits chocolate chips but maybe I didn’t have them at the right temperature and tempered them or something scientific? my glaze never fully set by the time we served it an hour or so later and the coolest effects on the sides were lost, but it still impressed my family. We had just barely enough glaze to fully cover a 3 layer 8” cake but it tasted good and worked great over Swiss Meringue BC.
Hi Chelsey, I’m making a holiday ice cream cake for a dinner party and would like to make it special by adding this glaze using holiday colors. Would this work on an ice cream cake? The top lay of this cake is ice cream and of course once I glaze it, I’ll need to put it back into the freezer almost immediately.
Thanks.
Does this work on chocolate buttercream?
You need to fix the written recipe. It calls for half the gelatin that your video uses. I could not get the video to play at first so I made it according to the recipe. My daughters birthday cake is beautiful but the glaze keeps running off from not setting. After troubleshooting I can only guess that it is too little gelatin.
Glaze did not stick to frosting, leaving strange effect on the cake. Also had grains of something all over the cake.
What did I do wrong? And glaze did not set.
How do I send pics of cakes?
I like to do a cream cheese frosting, will that be okay instead of buttercream with this glaze?
Hi Chelsea, I just tried this mirror glaze substituting semi sweet chocolate for white chocolate chips. The shine on the top is beautiful but the chocolate slid off the sides of the cake and did not stick well. I poured at 90 degrees on a cake that has been refrigerated for 24 hours. Do you know why this might have happened and how to avoid it in the future?
This was very easy to do. I have been wanting to try this forever! Thanks for the recipe. I only have one question. It seems like it could have been a little thicker? You can see the top edge of my chocolate cake that’s underneath. Thank you!
This ruined my dessert it came out way thin did not cover at all. Im a baker and should have done it the correct way. Wow what waste of expensive product.
I made this easy microwaveable recipe for my daughter’s 10th birthday. It was so exciting to see it come together. She is right, best results are when glaze is 90’F. Thank you for the wonderful instructions and detailed video! Thank you!
I would like to use this in the bottom tier of a 2 tiered cake. Will the glaze be solid enough to stack a second cake on top of?
I want to make a two layer cake with the mirror glaze on the bottom layer. Once it sets is the glaze hard enough to stack a second cake on? Thank you!
Tried this glaze tonight for a birthday cake and it was a fail. I couldn’t figure out what I had done wrong but alas, it wasn’t my fault lol
Your recipe uses the abbreviation “tsp” which is for teaspoon but when I just watched your video it’s calls for tablespoons “tbsp”. So I didn’t have nearly enough gelatine as I put 2 1/2 tsp in as per the written recipe ?????
Do you think the glaze would work over cream cheese frosting ?
Please watch this video:
https://youtu.be/ZXqQGuAt7SE
If you have any questions, and I mean any, please don’t hesitate to ask!!!
Hi!
Can white baking chips be used, instead of white chocolate chips? The white chocolate chips with cocoa butter are proving a little harder to find on short notice.
Hey do you think it would still work if I used sweetened condensed oat milk instead of regular?
I have made this before, used this recipe, and my family loved it. I am back today because I am doing a Black mirror glaze for a Bikers Memorial Cake for Saturday. He loved Black Black Bikes etc. So I am doing the Black Mirror glaze, Sugar Glass Flames and a Mini Harley for decoration, it’s a German Chocolate cake, barrel cake, right now I am hoping my Black Chocolate Buttercream sets up, as I have never made a Barrel cake before, and the last cake I did with a soft type filling failed so wish me luck lol
what will happen if my glaze is hot and i pour over my frozen cake?
I have gelatin sheets and not powder. Can I substitute and if so how many sheets? I’m doing a practice cake today for my daughter’s wedding next weekend!!
I used the stove and made sure the gelatin got to temp. It still didn’t set up, ruined my cake. I put it in the freezer at least 30 minutes before pouring, but I see in the comments the cake needs to actually be frozen, should have tead them beforehand. Luckily my toddler doesn’t care if it’s a goopy runny mess.
Hi Chelsey I’m gonna use this on a dummy cake. Do you think it will be ok to be out?
I don’t think it will spoil, but i do think it will collect a lot of dust! It sets with kind of a jello-ish consistency.
Hi Chelsey. I’m planning to use this on a dummy cake that is covered with buttercream first, do you think it will be ok left out?
It completely failed. I am an extremely experienced baker and I wanted to see if a more simple mirror glaze would work and it doesn’t. It looked alright at first but then it just soaked into the frozen mousse. 0 out of 10. Complete waste of ingredients.
Your recipe printed on your YouTube video called for 2 TB (2 envelopes) of gelatin but the recipe here calls for 2 1/2 tsp. (1 envelope). I followed the one here and the glaze is very runny and isn’t getting firm.
Hi Josette,
That YT video is from back in 2016, and I’ve slighted tweaked this recipe since then. I’m sorry to hear yours isn’t thickening. Are you using powdered gelatin? Sometimes the type of white chocolate you use can impact the consistency as well. I find high quality white chocolate works best!
Usually as the glaze cools it gets quite thick as the gelatin begins to set. The other thing that can help is using a scale to make sure you’re using the exact right quantity of ingredients. Hopefully that helps, happy baking!
do you have a dark chocolate mirror glaze recipe
Hi Marion,
Sadly I don’t, but here a link to an awesome one I’ve used in the past: https://www.recipetineats.com/chocolate-mirror-glaze/
Hope that helps!
The recipe calls for 1 package of gelatin, but the video calls for 2. I plan to try this, but want to make sure I am using the correct amounts. Should I use 1 or 2 packs of gelatin?
Hi Julie,
Apologies for any confusion! The video is from back in 2016 and I’ve made some updates to the recipe since then. The original recipe made a TON of glaze, so I reduced it a bit to make the yield more reasonable for a single layer cake.
My recipe cards are always the latest and greatest, so if there are ever any discrepancies between my videos and recipe cards, always follow the recipe card. Hope that helps, happy baking!
Can you do a ganache under the glaze?
Hi Kahla,
As long as it’s a white chocolate ganache that should work just fine! It just has to be light in color so that the colorful glaze will still show through!
Hello. I thought I got it perfect. But a short time after finishing pouring the glaze left white spots on top edges of cake. The cake had buttercream frosting and was in the fridge overnight until I poured the glaze…
Hi Joan,
I’m so sorry to hear that! When you say white spots, do you mean the glaze was too thin in certain areas, or that it didn’t stick to certain areas? Sometimes if the cake gets condensation on it that can cause the glaze not to stick as well. Is there a chance that’s what caused it?
The other cause might be that the glaze was a little bit too warm / not thick enough when it was poured. Those are my best guesses! Hopefully we’ll be able to figure out what caused it together.
Hey!
I wondered if you could clarify the measurement of gelatine please?
I’ve watched your video on youtube of this recipe and on there the recipe in the description uses 2 tablespoons unflavoured gelatine but in the video you use two sachets (14g) where as this blog recipe says 2.5 teaspoons of gelatine with 7g in brackets and all the other ingredients have the same amounts as written in this blog post. Just want to make sure I do it right and it sets. Any help would be greatly appreciated! Thank you in advance and the mirror glaze looks amazing!
Hi Emma,
The recipe card is the most up to date! The YouTube video is from 6 years ago, and the original recipe made more than twice as much mirror glaze. I’ve reduced the overall yield of the recipe because I don’t think you that much to cover a cake. That is why the recipe card uses less gelatin than the video. Please follow the amounts listed in the recipe 🙂 Happy baking!
Hi! Do you have any tips on moving the cake once glazed? Placing it on an upside down mason jar makes sense but in order to move it to a cake stand I’d need to make sure I only touch the bottom? Or do I use a knife or something to lift it off? Thank you!
Hi Nihara,
Great question! I like to use a large offset spatula to help lift the cake once it’s glaze and carefully place it on it’s final plate. I do this really carefully and do only touch the bottom cake board. If you let the glaze fully set, it should have an almost jelly texture and it’s a lot easier / more forgiving to move. Hope that helps, happy baking!
How would I make a black mirror glaze ? I want it to look thick and black, like tar !
Thank you,
Andy
Hi Andy,
I’d recommend using a chocolate mirror glaze base and coloring it with black gel food coloring. I don’t have a chocolate mirror glaze recipe, but here is a link to a great one: https://www.recipetineats.com/chocolate-mirror-glaze/
Hope that helps, happy baking!
I just used this recipe over the weekend and it was easy to use and delicious! I have also been using your American Buttercream Recipe since earlier this year and love that one as well!
Hi Therese,
So happy to hear that!! I’m so glad you loved this recipe too. Thank you for sharing 🙂
Hi Chelsey! Love this easy recipe! Really very help! Just have one question, my galze seem to be very runny… Almost ran completely off the cake the longer I felt it to stand… Where is my problem?
Thank you!
Jackie
Hi Jackie,
It could be two things! My first guess is that you might have had some condensation on your cake? Do you live in a warm or humid place? Or was your kitchen quite warm? sometimes frozen cakes can sweat, and this can cause the glaze to kind of slide off the cake!
My second guess would be that the glaze might have been a little bit too warm when you poured it. Hopefully it’s one of those, but if not let me know and we’ll try to figure it out together <3
This recipe, done exactly as written, worked flawlessly for me and I ended up with an absolutely gorgeous 3 layer 9-inch layer cake. I made and chilled the chocolate cake with chocolate buttercream frosting the day before. Everyone was incredibly impressed with both the look and the taste!
Hi Mary,
Thank you so much for sharing!! Your pictures of your cake were absolutely STUNNING!!! 🙂
Hi! Do you think I could use this over a chocolate truffle?
Hi Helen,
I haven’t tried it, but I think it should work! You might need to let the glaze cool off a little bit more to make sure you get a thick enough layer to cover them. If you try it, I’d love to hear how it goes!!
I’m making a Baby Yoda cake today for my granddaughter’s birthday. I used colored chocolate chips… Which didn’t quite melt correctly.
But I put everything in my blender, and VOILA!! Makes for a better consistency and an easier pour!!
Hi Theresia,
Love that, such a smart work around!! thank you for sharing 🙂
There seemed to be some discrepancies with the amount of gelatin so I compared this recipe with others and decided to use 2 envelopes of gelatin instead of just one. I followed all the other amounts and directions exactly. It came out great! Birthday boy was very pleased and hubby said it was the best cake I ever made.
So for all those who are having runny, melting right off problems- double the gelatin.
Do you think I could pour over a cheesecake?
Hi Sharyn,
I haven’t tested it, but I think as long as the cheesecake is frozen it should work! I also think this would work on a baked cheesecake, but I’m not so confident about a no-bake cheesecake. Hope that helps, happy baking!
What does mirror cake glaze taste like on a cake?
I’m planning on making your recipe, but I also want the cake to taste good.
I read somewhere else that is doesn’t taste great.
Hi Wendy,
Great question! This mirror glaze recipe mostly just tastes like white chocolate. There are a ton of mirror glaze recipes and they use a variety of ingredients, so they can end up tasting a lot of different ways. But that’s why I love mine! I think it’s relatively easy to make and tastes really good on cakes 🙂 Hope that helps, happy baking!
I love this ..thank you for a very thorough recipe and info. You made something a bit intimidating so easy. Wishing you well.
Thank you Sharyn! I’m so happy to hear that 🙂 Happy baking!
Would it be possible to dip product like frozen cookies, cake pops, cake sickles, etc?
Hi Jo,
Great question! You should totally be able to dip frozen desserts that are covered in buttercream into this mirror glaze. You might want to let it cool down a bit more to be slightly thicker than when you pour it over a cake though!
Also, the mirror glaze sets kinda like jello, so the back side of the cakesicles might be kind of weird. Maybe try setting them on parchment paper and then in the fridge to firm up? Hope that that helps, happy baking!
Hello Chelsey,
What is the strength of the gelatin you use in this recipe?
Hi Xinnia,
I’m using 100% powdered gelatin. This is the brand I use: https://amzn.to/3N7xhbD
Hope that helps, happy baking!
This was too runny and slid right off my cake and all you could see was the cake through ??? I did everything in the recipe. What happened?
Hi Hannah,
So sorry to hear that! The most common cause for that is that the glaze was too warm when it was poured. Did you use a thermometer to make sure it was the recommended temp before pouring it? The brand of white chocolate you use can also have a a big impact on the consistency of the glaze. What brand did you use?
Hopefully we’ll be able to figure out what happened!
@chelsweets can I add flavoring to my mirror glaze or will it mess everything up?
Hi Robyn,
Great question! You can add a tsp or two of liquid extract to this glaze and it should still set just fine. I’d recommend picking a flavor that will go well with white chocolate, which is the predominant flavor in this glaze. Hope that helps, happy baking!
Can I substitute Splenda instead of using sugar
Hi Mary,
I’ve haven’t tested this recipe with Splenda before so sadly I’m not sure! I feel like it would affect the consistency of the glaze! If you try it, please let me know how it goes!
Hi!
I’m sure I’ve followed this recipe correct, but the glaze seems to be quite thin, compared to your pictures…
The cake came straight out from the freezer (was stone cold), and the glaze, when poured was 32 deg c. Any ideas?! Thanks!!
Hi Jimmy,
The type of white chocolate you use can have a big impact on the consistency of the glaze. That’s probably my first guess! What brand of white chocolate did you use? Hopefully we’ll be able to figure it out together!
Can I mirror glaze an ice cream cake?
Hi Pam,
I haven’t tested it, but as long as the ice cream cake is covered in a stabilized whipped cream or some type of frosting, I’d think it should work. If you try it, please let me know how it turns out!
Brilliant recipe! Super easy to follow, worked perfectly and tasted really good! First time making mirror glaze and it worked without a hitch.
Thank you!
Yay, I’m so happy to hear that Njeri!! Thank you for sharing 🙂
Hi Chelsey
My question is does it have to be on a round cake only? I am making a rectangular cake and wanted to try This to look like the water.
Thanks I hope to hear from you soon
Tammy
Hi Tammy,
Great question! You can totally pour this glaze over a rectangular cake, that should work great! If you want it to look like water, I’d recommend using my blue mirror glaze recipe, which looks like water! Here’s the link: https://chelsweets.com/blue-mirror-glaze-cake/
Hope that helps, happy baking!
Chelsey,
Thank you for sharing your recipe. Can you stack a mirror glazed cake tier on top of a regular buttercream frosted cake tier? I’m making a cake that would look great with a shiny top tier and regular buttercream look for the bottom tier.
Hi Tammy,
Great question! I’ve only ever poured this mirror glaze over an entire stacked tiered cake, but the glaze sets firmly like gelatin, so it should be fine to stack on top of other tiers. It might be a little tricky to handle it, but as long as you’re careful lifting it you should be good 🙂 Hope that helps, happy baking!
Hi I can’t wait to try this recipe! I need it for a party in a couple of weeks, can I glaze the cake and freeze it? Thanks
Hi Sandy,
Great question! I haven’t frozen a mirror glaze cake for that long, but I think it should be ok! I usually keep mine in the fridge for up to a week though, so I don’t see why the freezer for longer shouldn’t work. If you try it, let me know how it goes!!
Hey there! I’m dying to check out your recipe! I’m making my son’s birthday cake next month and thinking of trying this out, but it’s a half-sheet cake. If I was going to make this for a half-sheet cake, how much mirror glaze do you think I’d need? The recipe says it yields 4 cups, do you think I’d need to double or triple?
Hi Shay,
Hmm, I haven’t tried covering a cake that size before, but I think it should be easier to cover because it’s not as tall as a layer cake. One batch makes a lot of mirror glaze, so I think a double batch should definitely be enough!! Hope that helps, happy baking!
My glaze is good but at/above/or below 90 degrees the glaze just drips right off the sides and show the white buttercream. Cake is frozen. What am I doing wrong? I’ve followed the recipe to the T.
Hi Jill,
Is it warm or humid where you live? Sometimes condensation can build up on the side of the frozen cake and that can prevent the mirror glaze from adhering properly. It can be difficult to avoid this if you live somewhere really warm, but you might want to try storing the cake in the fridge to reduce the amount of condensation before pouring the glaze or you can try patting the cake dry with paper towel before pouring it. Hopefully that helps, happy baking!
3 hours! This took me 3 hours. My partner Jeoff was really upset with the outcome. I didn’t have white chocolate so we substituted it with mashed banana which was really tasty and much less sugar so much more healthy but it did not set at all. I’m not sure if I get the tempretures wrong or if my thermometer is broken honestly but we ended up having to freeze it in the cold store and then by the time it set all the colors had run. Jeoff told me next year we have to just buy a cake ha ha. Worst mirror glaze recipe I’ve used I’m sorry won’t be trying again
Hi Moira,
Unfortunately, you can’t substitute the white chocolate in this recipe! It will totally throw off the consistency and it won’t set. I spent a lot of time testing this recipe to get it just right, and it’s intended to be made as it states in the recipe card. If a recipe of mine does have substitutions that can be made I usually share them in my blog post. Please keep that in mind for the future!
@Moira Rose-Henry, did you substitute your brain for a banana too?
@Moira Rose-Henry,
I can’t tell if your comment is satire or not. In what universe is a banana and a block of chocolate the same thing.
Can you put this over a mousse cake?
Hi Joyce,
As long as the mousse is fully chilled and firm to the touch, that should work just fine. Happy baking!
Could you use this on an ice cream cake?
Hi Sabrina,
I haven’t tried it, but as long as it’s frosted in a frosting that is firm to the touch when chilled, I’d think it should work?? I’m not sure if it would work on whipped cream frosting though. If you try it, please let me know how it turns out!
Can you glaze a cheesecake
Hi Scott,
Great question! I haven’t tested it out, so sadly I’m not sure. I feel like it should work though?? If you try it, please let me know how it goes!
Can we use agar agar instead of gelatin for this?
Hi Katherine,
I haven’t tested this recipe with agar agar, so sadly I’m not sure! However, here is a recipe for mirror glaze that uses agar agar: https://veenaazmanov.com/vegetarian-mirror-glaze-recipe/
Hope that helps, happy baking!
What you recommend if I was doing this for cake pops? Should I put a small layer of buttercream on the cake pop before glazing? Or could I just dip them without putting anything on the cake pop? Thank you!
Hi Jessica,
Great question! I haven’t tried doing that before, but I’d think covering the cake pops in a layer of white buttercream would be a good idea before dipping them in the glaze, just to help the glaze show up better.
Hi. I love this recipie and want to try it for my daughters birthday.
Can I make the cake 2 days before or will it make the colour go funny?
Hi Paula,
Great question! You can totally make this cake a few days in advance. The colors should hold up just fine and the glaze should stay shiny. I hope her cake turns out amazing, happy baking!
Hi Chelsey 🙂
I am going to be using this recipe on Monday. I am just wondering, I plan to be glazing a 10″, double layer cake. Can you please help guide me on how much glaze I will need for this, and any other tips you might have for glazing a larger cake?
Thanks in advance!!
Hi, thank you for details how to make it mirror glaze. But please can you let me know why I can’t use flavoursome jelly, I have to make cake for someone that has lots of vegan friends or family. And I can’t find plain gelatin that is vegan, I prefer to use powdered instead that one in paper forms.
Kind regards and thank you soooo much appreciated.
Hi Ivona,
If you want to make a vegan mirror glaze, I’d recommend trying this recipe that uses agar agar: https://veenaazmanov.com/vegetarian-mirror-glaze-recipe/
Hope that helps, happy baking!
Can you use this over a cheesecake?
Hi Madalyn,
I haven’t tested pouring mirror glaze over cheesecake, but I’d think that as long as the cheesecake is fully chilled it should work. If you try it, I’d love to hear how it goes!
Hey pls provide the measures in metric units as we don’t use cup measures in the uk .thanks
Hi Kat,
I’m confused, I include the metric measurements (grams) in the ingredients sections of the recipe card of all my recipes, including this one. Are you not able to see them?
Mine was a complete failure:( it never set. Completely frozen cake even the excess run off never solidified. Don’t know what i did wrong. Followed it to a T only thing is maybe too much water? I was reading comments where he said a cup was 6oz but an American cup is 8 so maybe I only needed 4.5oz instead of the 6 oz in a normal 3/4 cup
Hi Krystal,
I’m so sorry to hear that :/ I use American cups, so it should’ve been the 6 oz / 3/4 of a US cup of water! What type of gelatin did you use? What type of white chocolate? It’s going to sound silly, but also worth confirming that you used sweetened condensed milk and not evaporate milk?
Do you live somewhere that’s really warm or humid? Sometimes that can impact how the glaze sets. Hopefully we’ll be able to figure out what happened together!
Foolproof way to melt the chocolate is to have the sweetened condensed milk by itself and microwave that and let the chocolate melt in it.
Can a store bought cake be used as a base. Last year I made it myself hoping to avoid a step
Hi Meg,
You can use store bought cake as long as it’s frosted in buttercream that firms up when chilled. Hope that helps, happy baking!
I see you recommend storing in the fridge if you make it the night before. What if I don’t have fridge space to store it? Will it still be ok if i put it in a box and store on the counter over night?
Hi Sherry,
As long as you live in a cool place and your kitchen isn’t too warm, it should be ok to leave out overnight. It won’t spoil, but sometimes the buttercream can soften as it comes to room temperature and lose it’s shape. Storing it in the fridge is best if possible!
Could you pour this over modeling chocolate?
Hi Caren,
I haven’t tested this glaze over modeling chocolate, but I would think it should work as long as the cake is fully chilled?! If you try it, please let me know how it goes!
Hi. First time commenter, long time reader. 🙂 Could I use this glaze on cut out sugar cookies?
Honored to have you here Lisa!! You can use this to glaze sugar cookies, but it doesn’t have a ton of flavor, and might not add the sweetness you’d want for the icing of a cookie. It also wouldn’t show up super vibrantly unless the cookies are very light in color, or you use really brightly colored glaze made with a generous amount of gel food coloring.
I’d recommend using my marbled sugar cookie recipe instead! It gives a similar look and sets better for cookies. It uses royal icing and I think would taste better! Here’s the link: https://chelsweets.com/marbled-christmas-tree-sugar-cookies/
Hope that helps, happy baking!
Thank you so much for enlightening us more on this, it’s so amazing
Hi! I’m super interested in this super cool design. But I know mirror glaze isn’t known for its taste. I’m making this for a party and am wondering how it tastes?
Hi Chelsey
I’m going to try your mirror glaze recipe. I would just like to know what a 1/4 cup of water is in grams, please? There are so many different answers on the Internet and I want to get it right.
Thank you so much.
Followed instructions exactly and found the glaze didn’t coat the sides. Temp was at 90F and ran right off the buttercream cake. I chilled cake 2 hours in fridge and it was cool to the touch. What should I do differently next time as I love the look of your cakes
Hi Maureen,
I’m so sorry to hear that, that’s so frustrating!! Do you live somewhere that’s warm or humid? Sometimes condensation on the cake can prevent the glaze from fully sticking! If you think that’s the issue, you can try dabbing the cake with a paper towel (the frosting should be firm to the touch so it shouldn’t get smudged!) to absorb any moisture that’s beaded there, then pour the glaze. Hopefully that helps, but if not let me know and we will keep troubleshooting! Happy baking 🙂
Have you ever tired freezing after glazing? My customer wants a glazed wedding cake that needs to be transported.
90 degrees was too warm for my glaze pour. I preferred the pour I got at 75-80 degrees.
Made this recipe and followed it to the T. My cake was frozen and my glaze never firmed up. It made soooo much! I thankfully keep frozen cakes in my freezer waiting to be decorated. I ended up glazing a 8 inch 3 layer and a 6 inch 4 layer and still had enough for yet another one! I will definitely be cutting this recipe in half next time. The glaze was an UGLY tacky mess… I kept it in the freezer only to unthaw briefly before serving. I will be using twice as much gelatin next time. I will admit they are beautifully impressive looking especially splashed with gold glitter and vibrant colors.
From the comments I saw I’m not the only one who had issues with the glaze setting properly.
So sorry to hear that Kerry! What type of white chocolate did you use, and what type of gelatin?? If you end up adding double the gelatin, it can make it more difficult to pour it and get a smooth finish. Hopefully we’ll be able to figure out what happened together!
Can you use any flavour of cake
You can! As long as it’s covered in buttercream and fully chilled 🙂 Hope that helps, happy baking!
Hello, Can this icing be poured over an uniced cake? I have mini rabbit pans. Icing with buttercream would cause a loss of detail.
Thanks for this recipe. You got some awesome results.
Thank you!
Hi Carolyn,
Great question! You can pour it over an uniced cake as long as it’s chilled. I’d pop the cake in the freezer for like 15 minutes before pouring the glaze to help it stick. However, the colors won’t be be as bright/colorful and it won’t look as good as it would if the glaze was poured over buttercream. Hope that helps, happy baking!
Do you think this recipe will work for a cheesecake?
Hi Randy,
As long as the cheesecake is fully chilled, and smooth it should work great! Hope that helps, happy baking!
Hi Chelsey, I wanted to use this recipe to cover a two-layer, 8″ round cake. Can I double the mirror glaze recipe? Thanks!
Hi Courtney! Yes, you can absolutely double the mirror glaze recipe to cover a two-layer 8? round cake, but one batch of this recipe is more than enough to cover a cake that size! Hope that helps, happy baking!!
My kids think I’m a professional now. I don’t usually leave comments, but after reviewing a billion mirror glaze recipes and youtubes I went with this one in a pinch because it gave specific instructions on temperature and required no special ingredients. I needed to nail it on the first try for an event. A lot of fails out there where the glaze can’t be spread or is too thin and only pools on the top leaving the sides pretty thin etc. I followed this exactly and I ended up with a two tiered galaxy cake that is more beautiful than anything I could find online. I got edible glitter packets from walmart, and so after covering the cake in glaze I added glitter to the remaining glaze and went back in with some extra swirls of color with glitter. The effect of some stripes plain transparent, and some with glitter is fantastic. Looks like modern art. 100% recommend this recipe as this was my first mirror glaze and I had zero issues. Froze the cake, poured glaze at about 87 degrees and had plenty of time with play with it and add more before it set up.
Hi Vanessa,
Your cake sounds absolutely stunning, and I’m beyond impressed that you nailed it on your first try, especially for an event! That’s no small feat with mirror glaze, and I love how you made it your own with the glitter and swirl technique. The clear and glittery combo sounds like a total showstopper.
And thank you so much for taking the time to leave such a thoughtful comment, especially since you don’t usually leave them. It seriously means a lot, and I know it’ll help give other bakers the confidence to go for it too! Your kids are totally right, you ARE a professional now!!
I hate to leave a bad review, but I’m really frustrated. I’ve successfully done mirror glazes before and I tried this recipe and it completely failed for me, for my son’s birthday cake. Twice! I had enough ingredients so I tried it again and it still didn’t work. The temperature was fine. The cake was cold. Everything was exactly as it was supposed to be and it just ran off the cake both times and just turned purple. I don’t know where the issue is. Does humidity or the heat of the house make a difference?
Hi Sara,
I’m so sorry to hear this happened, especially for such an important occasion. I know how frustrating that must have been after trying it twice. A few things that can cause a mirror glaze to slide off are if the glaze is a bit too warm when poured, if the cake isn’t frozen/very cold, or if there’s any condensation on the cake.
Humidity and a warm kitchen can definitely cause condensation, which makes it harder for the glaze to stick and has a HUGE impact on how this turns out. Was your kitchen pretty warm when you tried to pour it? Do you live somewhere really humid? How long did you chill the cake, and did you chill it in the fridge or freezer? Hopefully we’ll be able to figure it out!!
So disappointed. In spite of following the recipe to the T and having a COLD cake and the pouring temperature slightly lower than 31 degrees, all the glaze ran straight off the cake. It was heart breaking!
Hi Bron,
I’m so sorry that happened, I know how frustrating it is when you put in all that effort and it doesn’t turn out the way you hoped. What type of white chocolate did you use? Do you live somewhere really warm or humid? Sometimes that can cause condensation on the cake, which can make it really difficult for the glaze to stick.
The best way to reduce condensation is to make sure your cake is well-chilled but also give it a few minutes at room temp before glazing, so excess moisture can evaporate. Blotting any visible condensation with a paper towel helps too. You’ll also can keep the cake wrapped tightly in plastic while freezing and store it in an airtight container to prevent moisture from forming in the first place. Then, once glazed, let it set in a cool, dry spot rather than the fridge if possible (since humidity in the fridge can cause more condensation). Those little adjustments usually make a big difference in getting the glaze to stick and stay smooth. Hope that helps for the future, happy baking!!
There was only one big problem with my batch(s). When I went to put it on the cake, which was completely chilled/frozen and the right frosting, it didn’t set. I put it in the freezer for an hour, I needed this cake that evening for a birthday and I had to make another batch. The second batch was also ruined like the first. I look up different problems and narrowed it down to not enough gelatin. So for the 3rd I added 3x the amount of gelatin, and it Dey up perfectly. So if you have this problem add more gelatin. Other than that it worked great and looked cool.
Hi Adelaide,
That is wild!! I wonder if there is a difference in strength between the gelatin in the UK and the US. Are you using powdered gelatin or sheets? Does it say what the strength is? Appreciate you sharing this!!
This is my second time making this recipe- both times I’ve allowed it to cool to 85 degrees before pouring, but the glaze refuses to set! Most of it drips of the cake within the first ten minutes, and what little remains stays thin and watery even when left in the fridge overnight- then drips off when you try to cut a slice of cake. I’ve even tried using 3+ layers of mirror glaze to no avail. While it looks pretty for 30 seconds after glazing, the glaze will all drip off within 10 minutes as it simply does not set. I’m very disappointed as I’ve wasted a lot of white chocolate making this recipe 2 times. Furthermore, each time I’ve weighted out my ingredients exceptionally carefully- to the gram-using a kitchen scale, so I know all my measurements are correct.
I’m so sorry you’ve had that experience, that sounds super frustrating, especially after being so precise with your measurements. Mirror glaze can be really finicky, and the most common culprit when it won’t set is the gelatin or the type of white chocolate. If it’s not bloomed long enough, not dissolved fully, or if a different brand/strength is used, the glaze will stay runny no matter how carefully the rest is measured.
A few things that may help:
Check your gelatin strength: Some recipes assume standard powdered gelatin in the U.S. (about 225 bloom strength). If yours is different, the set will vary.
You can try cooling slightly lower than 85°F: If the glaze is still sliding off, try letting it cool closer to 80°F before pouring. That thicker consistency helps it cling.
Cake temperature: Make sure your cake is fully chilled when glazing but also check for condensation. If you live somewhere humid or if your kitchen is really warm, the cake can sweat and this can prevent the glaze from sticking to the frosting.
Thin vs. thick pour: A single slow, even pour usually sets better than layering multiple coats, since each new layer warms and softens the one beneath.
White Chocolate Brand: What brand of white chocolate are you using? Some brands include more stabilizers, and this can also impact how it melts down and how the mirror glaze sets.
I know it’s disheartening to waste ingredients, but with those tweaks you should be able to get that gorgeous shiny finish that actually sticks to your cake.
If you don’t think it’s any of those things let me know and we can keep trying to trouble shoot!
Hope that helps if you decide to try this again <3
I’ve had the exact same experience! I even tried to add gelatin but it’s not working. I am using a different brand of white chocolate, what should it be at?
So sorry to hear that! What type of white chocolate are you using Luiza?
This worked out perfectly for me, thank you!! Wish I could upload a picture to show how it came out.
So happy to hear that Brandi! And I know, I wish we could share pictures on here, I’d love to see it!!!
Hi
This recipe looks good
Would it work on a mousse cake or pastry
Hi Shejeeah,
This recipe works best on chilled buttercream cakes, but it should work on a chilled mousse cake or similar type of pastry. Hope that helps, happy baking!
I am wondering, would this work on a completely chilled cheesecake?
Hi Cheona,
I haven’t tested it, but a completely chilled cheesecake might work, but I’d really recommend freezing it instead before adding the mirror glaze. Mirror glaze sets best when it’s poured over a frozen cake or cheesecake, because the cold surface helps the glaze thicken and stay in place as it runs down the sides.
If the cheesecake is just refrigerated, the glaze may slide off more easily or take longer to set. I’d freeze the cheesecake until it’s firm, then pour the glaze once it has cooled to the right temperature listed in the recipe. Hope that helps, happy baking!!