
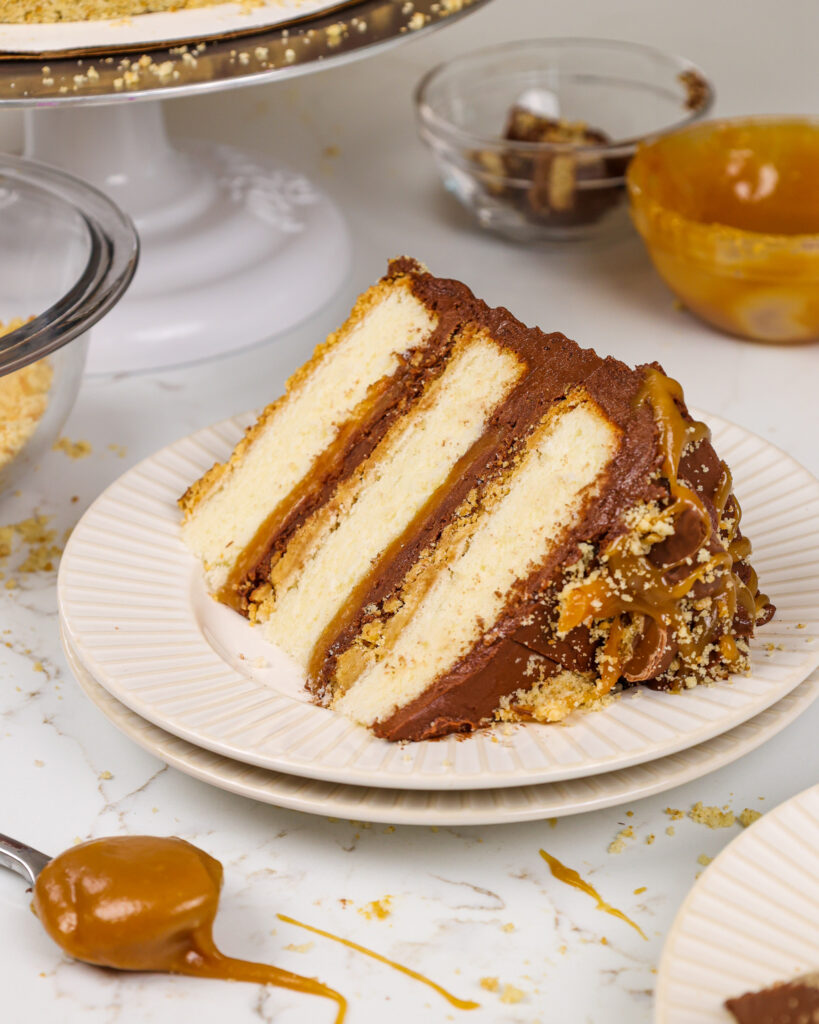
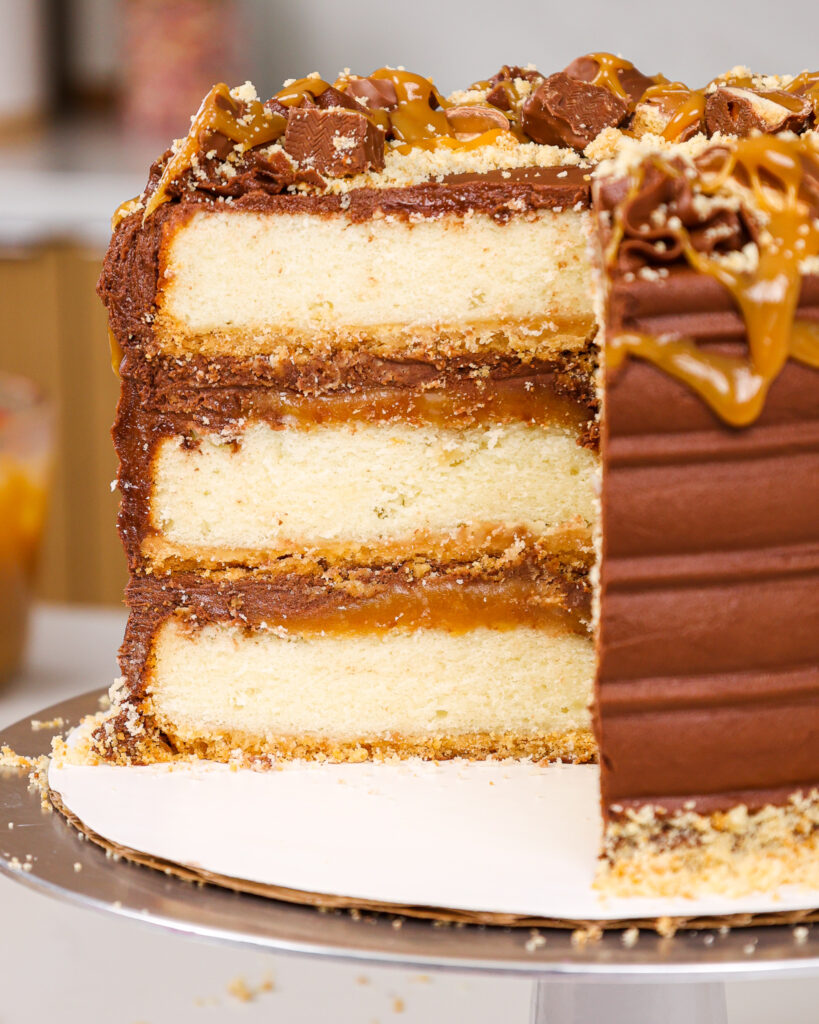
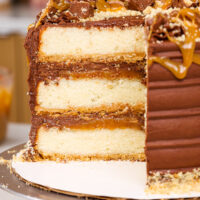
Twix Cake
This Twix cake tastes and looks just like our favorite candy bar! Its tender vanilla cake layers have a shortbread crust and are filled with thick, buttery caramel and decadent chocolate buttercream!!
How to Make This Twix Cake
To make sure this cake turns out as amazing as possible, let’s walk through each step together!
I’ve also included a video tutorial of the process below.
Step 1: Make the Thick Caramel Cake Filling
Make the caramel cake filling first so that it can cool before being added to the cake.
This can be made up to a month in advance and stored in the fridge.
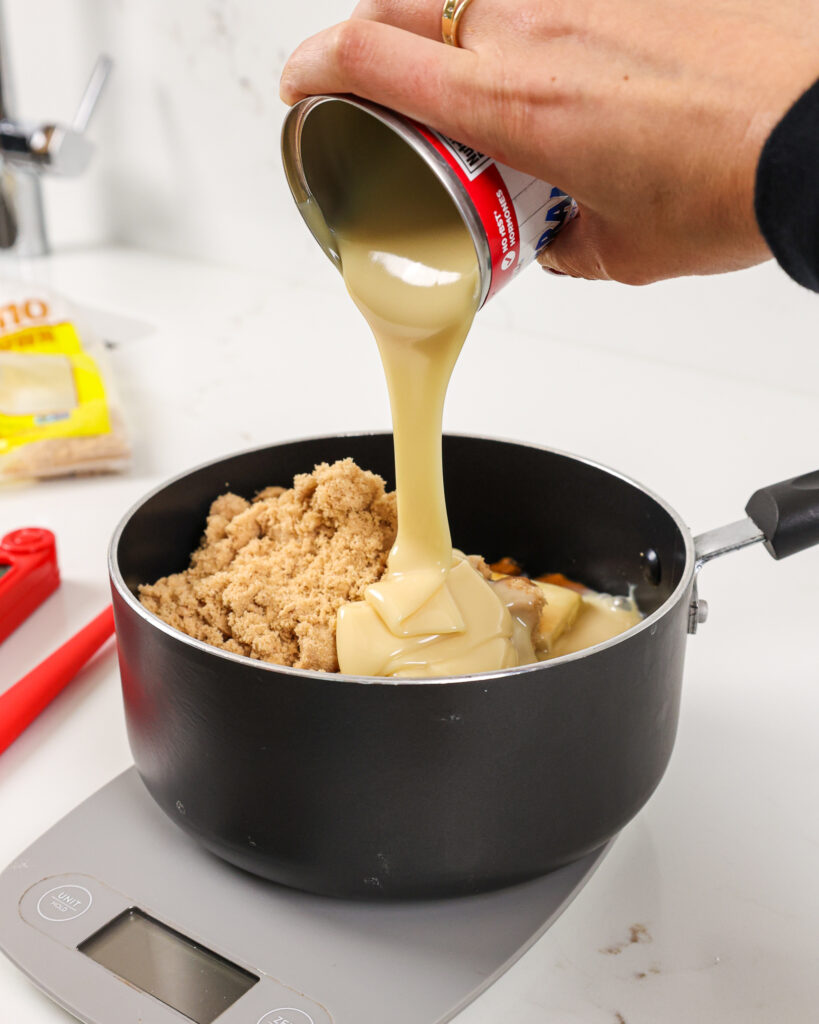
Add the unsalted butter, light brown sugar, corn syrup, and sweetened condensed milk into the saucepan. Heat over a medium-high heat. Stir constantly until the mixture starts to bubble.
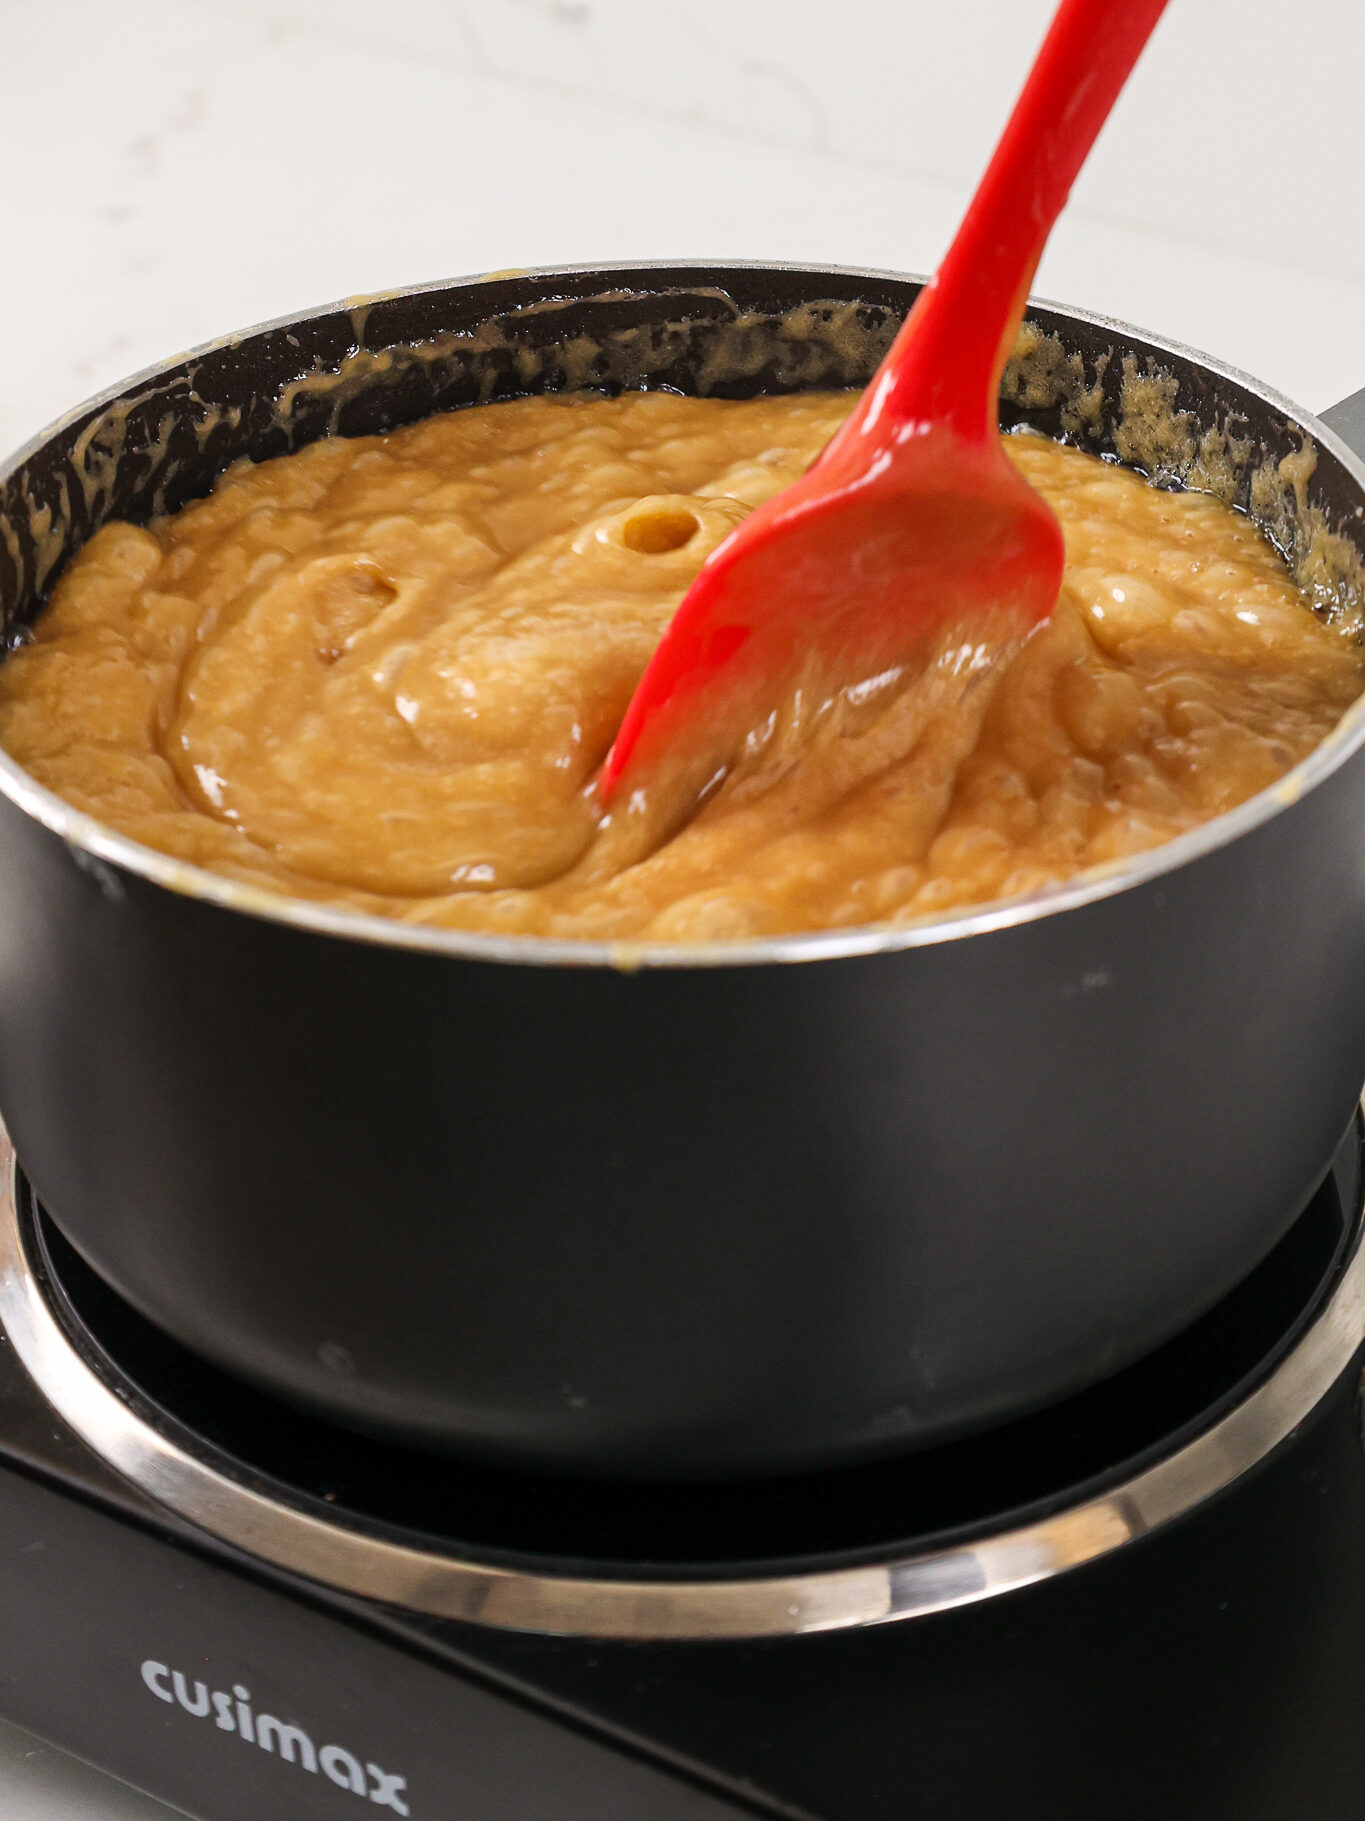
Slowly stir in 1 Tbsp of heavy cream. Place a digital thermometer in the pan at this point.
Continue to stir until the caramel reaches 225°F / 110°C (just before the soft ball stage).
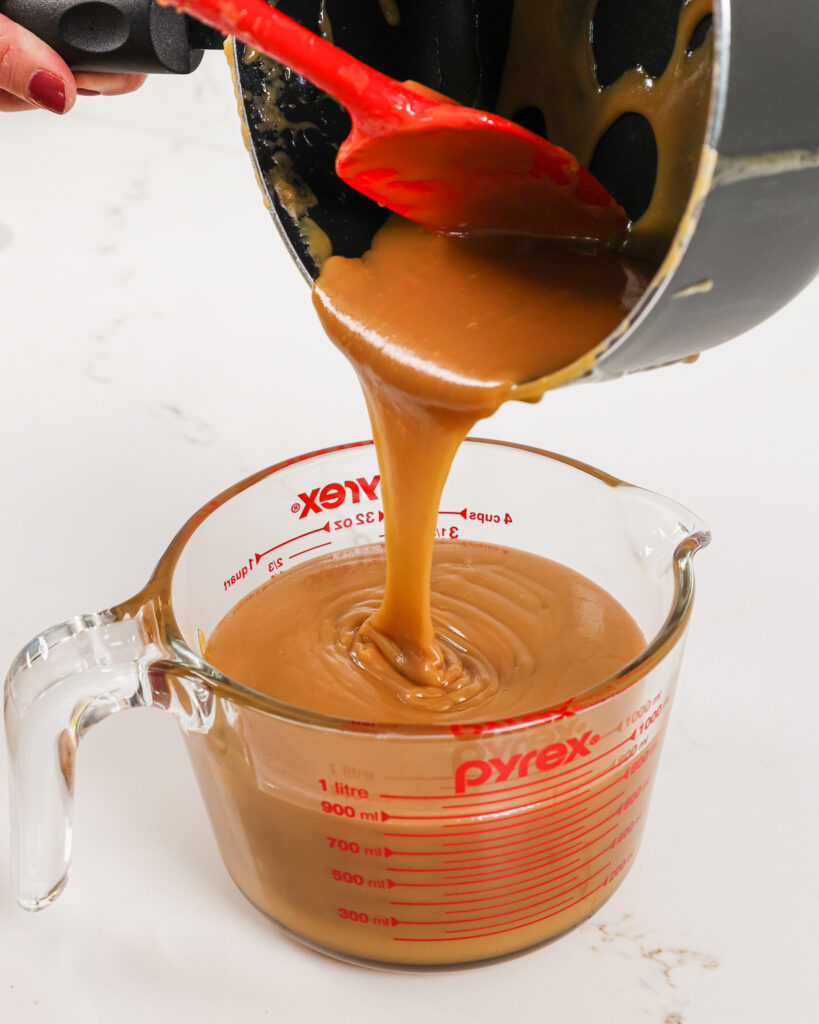
Remove from heat and add the vanilla and salt.
Pour into a separate container to let the caramel cool. Cover the bowl once the caramel has reached room temperature.
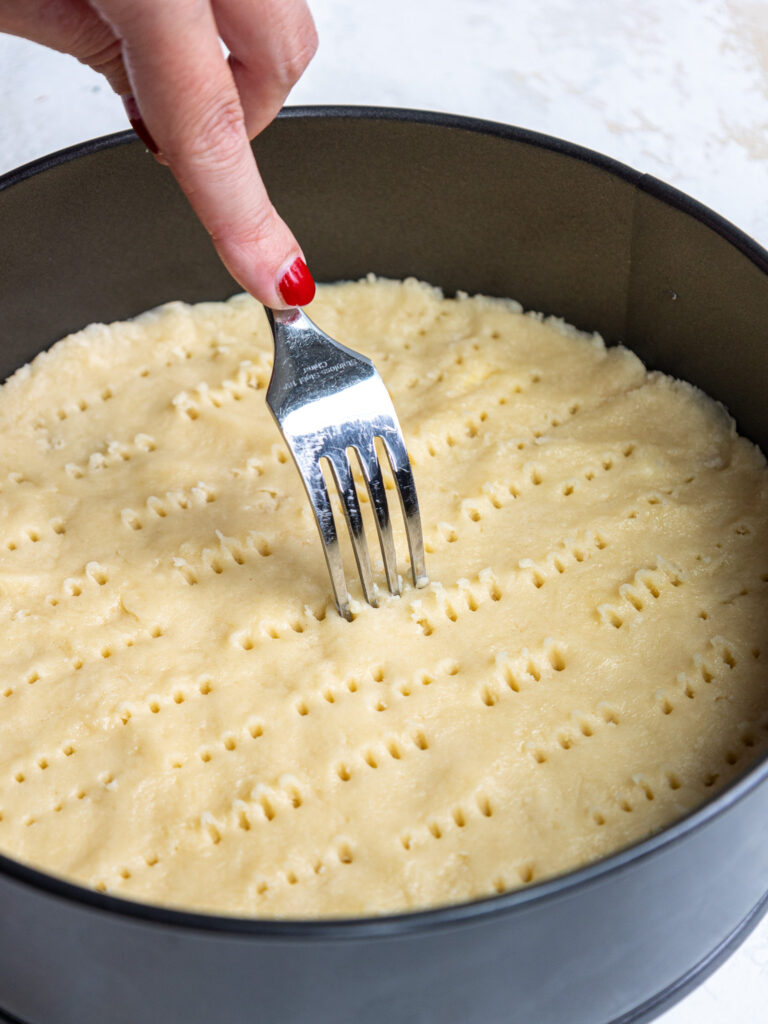
Step 2: Make the Shortbread Crust
Next, make the shortbread-crusted vanilla cake layers!
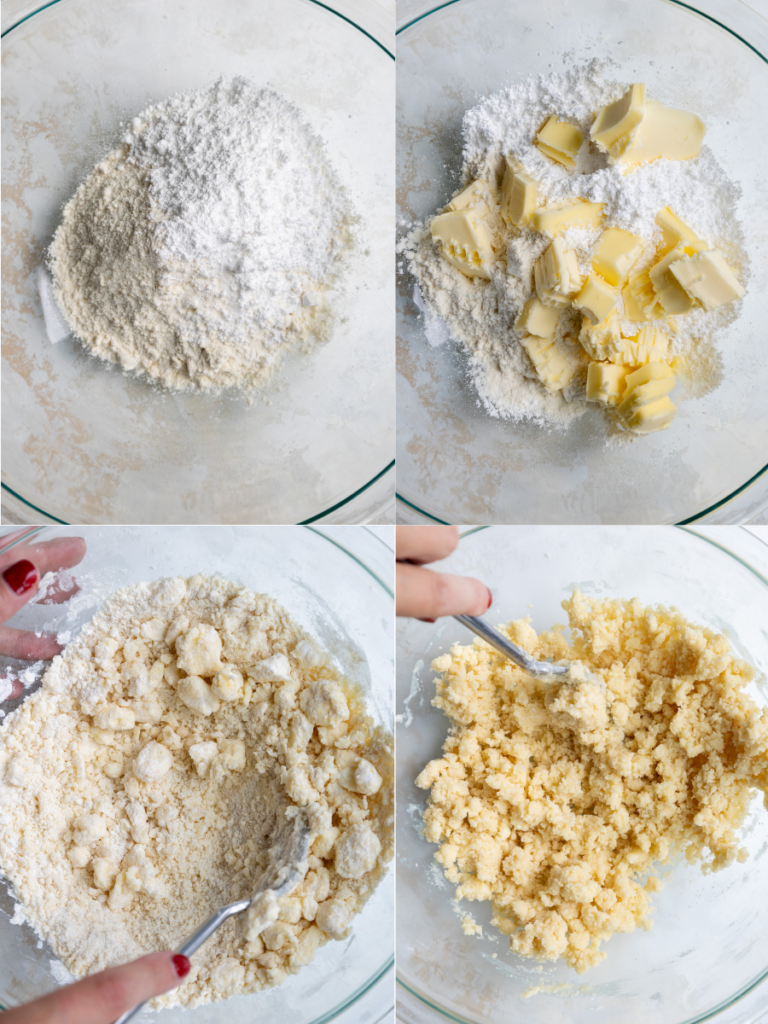
Divide the dough into three equal portions and press them into the bottom of the prepared pans with your fingers to create an even layer.
Prick the crust thoroughly with a fork, then bake for 22-25 minutes, or until the edges are just starting to brown.
Place the pan on a wire rack to cool and keep the oven.
Step 3: Make the Vanilla Cake Batter
Next, make the vanilla cake batter. Pour the batter on top of the baked shortbread crusts, dividing the batter evenly between the pans.

Bake for 34-46 minutes or until a toothpick comes out with a few moist crumbs. Rotate the pans halfway through to help them bake evenly.
Remove the cake layers from the oven and let them cool in the pans for about 10 minutes.
Gently run an offset spatula around the rim of the cake pans to loosen them. Be careful as you do this so that you don’t break up the shortbread crust at the bottom!
Then flip them onto wire racks to finish cooling. Once the cake layers have cooled to room temperature, use a serrated knife to level the top of each cake layer.

It makes the cake so much easier to stack and assemble!! If you’re making these in advance, you can wrap and freeze them at this point.
Step 4: Make the Chocolate Buttercream
While the cake layers bake and cool, make the chocolate buttercream.
Mix the frosting on the lowest speed with a paddle attachment once it’s made to push out any excess air.
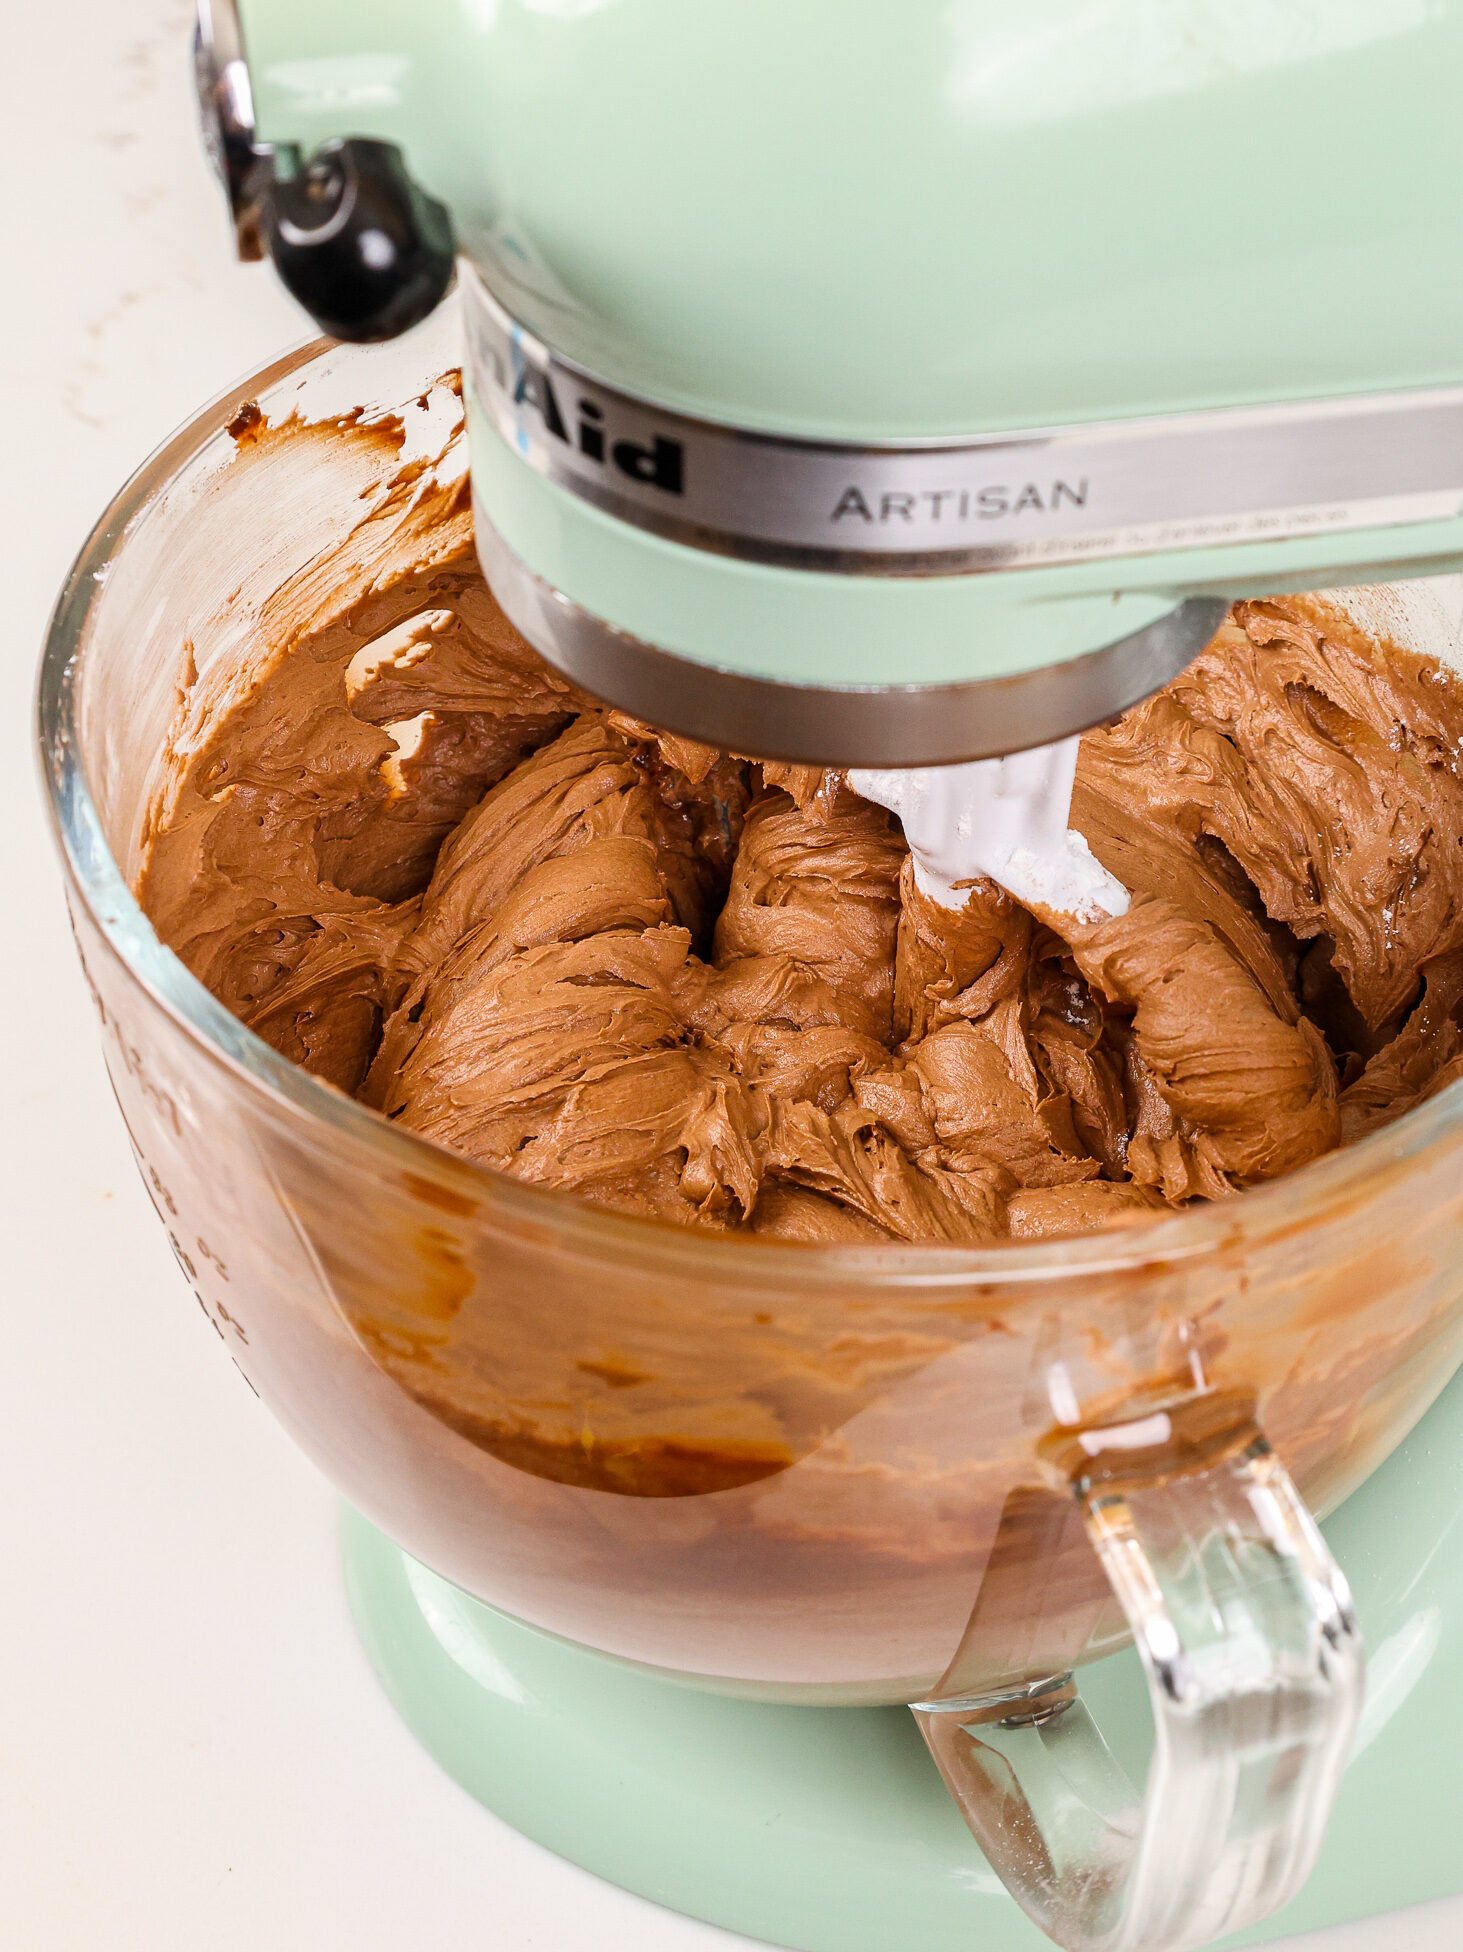
I also like to stir it by hand with a rubber spatula once it’s fully made. This makes the frosting silky smooth, and easier to smooth onto your cake.
This frosting can also be made in advance if needed and kept in the fridge for up to a month.
Step 5: Stack and Fill the Cake Layers
Stack and frost the cake layers on a greaseproof cake board. Use a dab of chocolate buttercream to help stick the first cake layer to the board (crust side down).
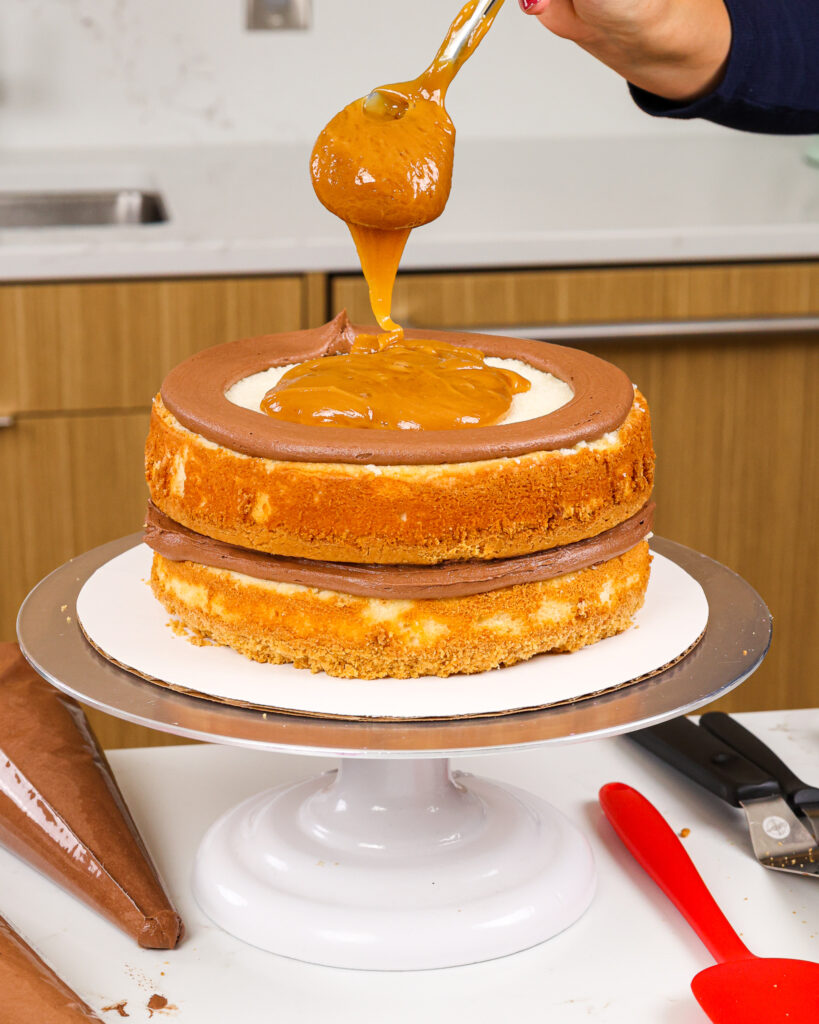
As you assemble the cake, pipe a ring of chocolate buttercream around the cake layer. Then spread an even layer of caramel inside the buttercream ring.
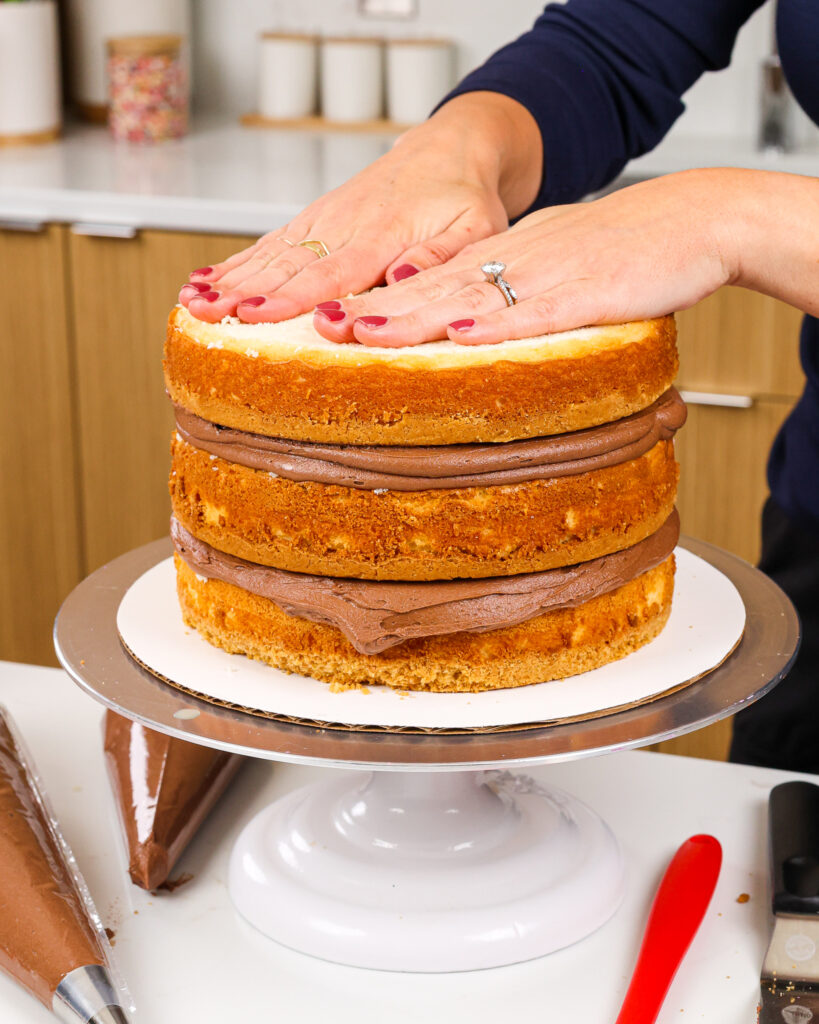
Cover the caramel with a layer of chocolate buttercream. Repeat with the remaining cake layers.
Once you’ve stacked the cake layers, smooth a thin coat of chocolate buttercream around the cake with a large offset spatula and bench scraper.
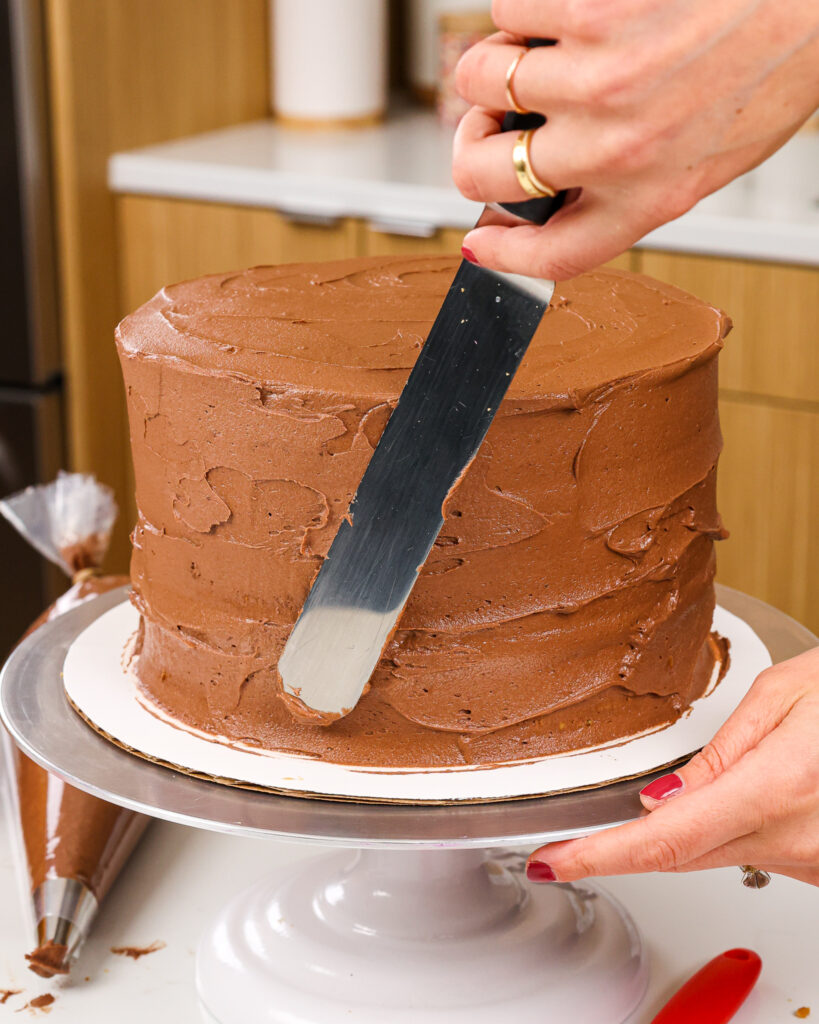
Freeze the cake for about 10 minutes in the freezer or 30 minutes in the fridge, until the frosting is firm to the touch.
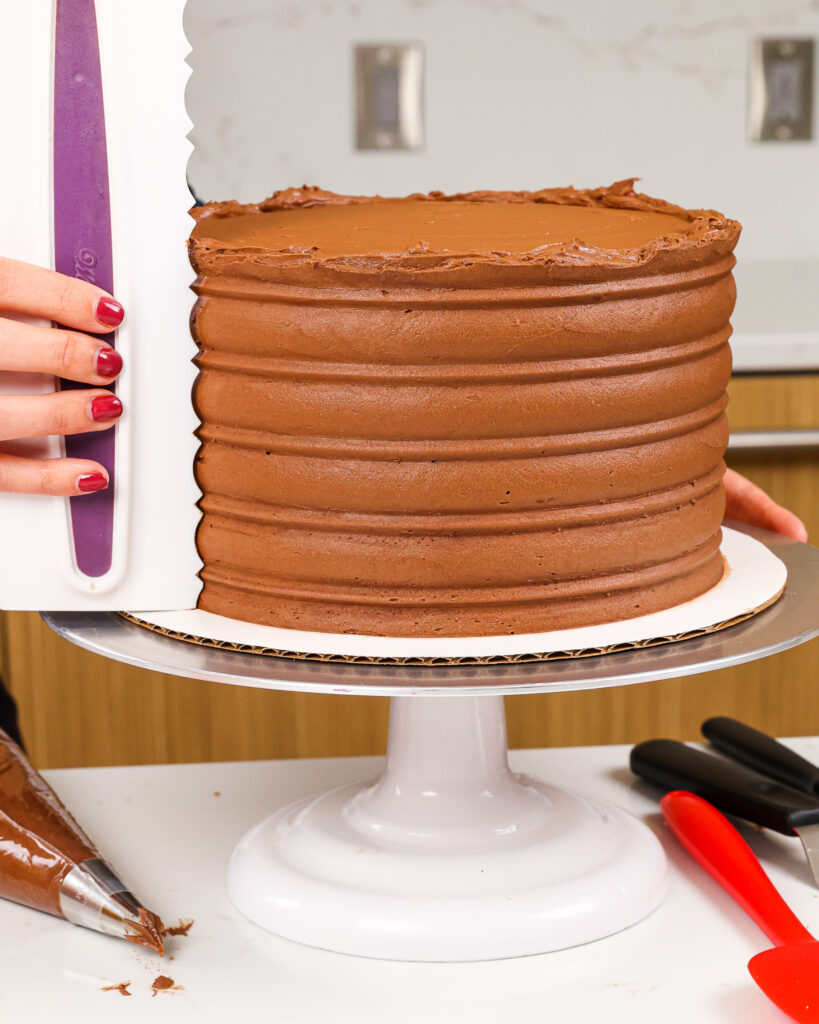
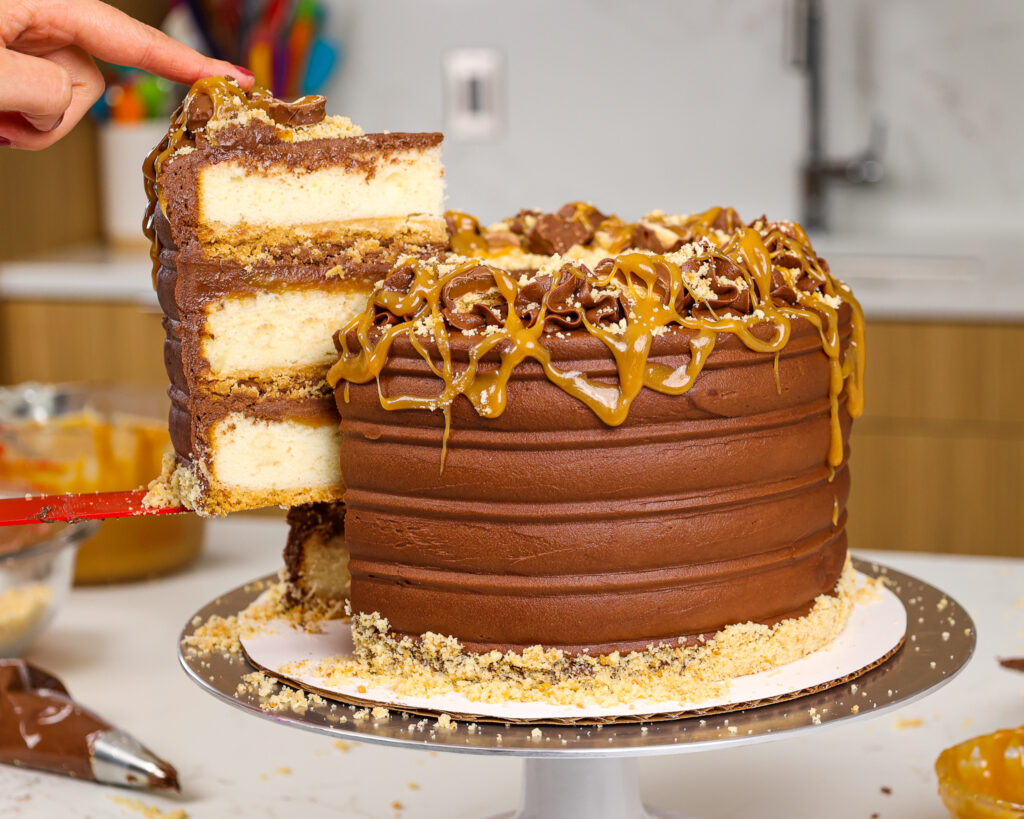
Step 6: Spread on a Thick, Second Layer of Frosting & Decorate
Cover the cake with a second, thicker layer of chocolate buttercream and smooth using a bench scraper. If desired, use an icing comb to add a fun pattern to the sides of the cake.
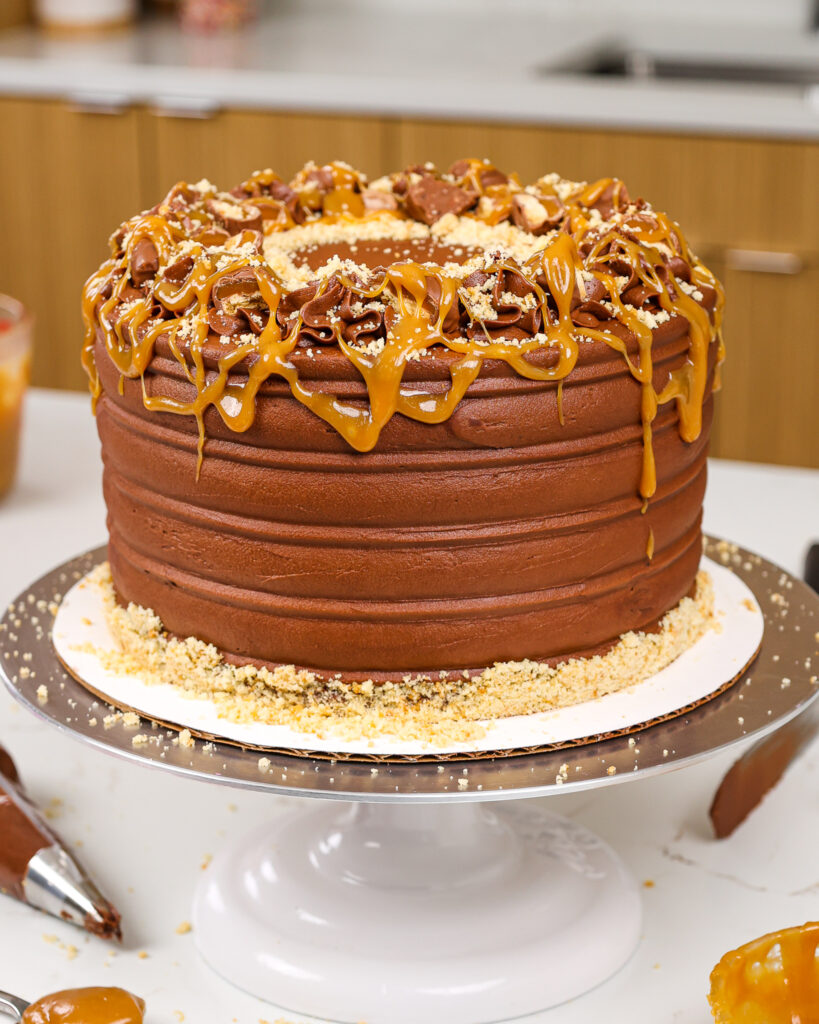
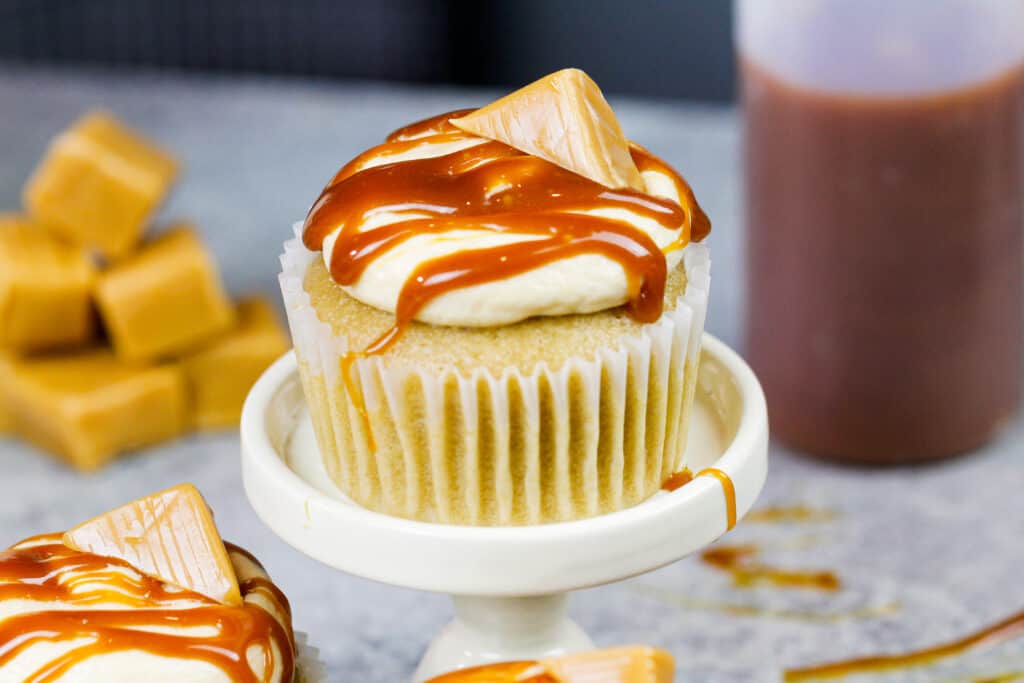
Decorate the top of the cake with a ring of chopped up candy bars and frosting dollops.
Heat up the remaining caramel in the microwave in 10 second intervals until its consistency is thinner, then drizzle it over the top of the cake and enjoy!
Substitutions & Swaps – Twix Cake
Some swaps and substitutions that can be made in this recipe include:
- Unsalted Butter – If you only have salted butter on hand, you can use it in place of the unsalted butter. Just be sure to omit the salt that this recipe calls for. You can also use vegan butter in its place!
- Cake Flour – This recipe turns out best with cake flour. If you can’t find cake flour, you can make your own makeshift cake flour using this method. You can also swap in a good gluten free flour blend (like this) if needed. Just be sure to stir the batter longer than normal to help give the cake proper structure, and let the batter sit for about 20 minutes before baking it if you opt to make a gluten free version.
- Egg whites – I like to use the type that come in a carton so that I don’t have to separate my eggs, but you can also use fresh egg whites. If you have an egg allergy, you can try using a vegan egg replacer in the cake batter.
- Sour Cream – You can also use full fat yogurt, buttermilk, whole milk, or an alternative yogurt or milk (almond, soy, oat).
- Vegetable Oil – Use any flavorless oil in this recipe.
Substitutions & Swaps: Milk Chocolate Buttercream
- Unsalted Butter – If you only have salted butter on hand, you can use it in place of the unsalted butter. Just be sure to omit the salt that this frosting recipe calls for. You can also use vegan butter in its place!
- Heavy Cream – You can use whole milk or alternative milk (soy, almond, oat) instead of heavy cream or whipping cream. This will thin the frosting out more though, so I recommend using about half the amount the recipe calls for.
- Semi-Sweet Chocolate Chips – I used chocolate chips but you can use baking chocolate, or good-quality chocolate bars to melt and add into the frosting. Alternatively, you can also use milk or dark chocolate if you have a strong preference.
Tips for Making the Best Chocolate Twix Cake
- Ingredients at room temp mix together better! Set out any cold ingredients ahead of time.
- Properly measure your flour (spoon into the cup measure, then level). Or better yet, use a kitchen scale to measure your dry ingredients.
- Use a scale to weigh your cake pans as you fill them. It will make your cake layers bake to the same height and bake more evenly.
- Level your room temperature or thawed cake layers with a serrated knife to make them easier to stack.
- Chill your cake layers in the freezer for about 20 minutes before assembling the cake. It makes it so much easier to stack and frost them!
Making This Twix Cake in Advance and Storage Tips
Make your cake layers in advance and freeze them. It breaks the process up and makes it more approachable.
Make the chocolate frosting ahead of time or save any leftover frosting. Store it in an airtight container in the fridge for up to a month. Just be sure to give it a good stir once it thaws to make it nice and smooth again. This cake can last in the fridge for up to a week.
Make the caramel filling up to a month is advance! Store it in an airtight container in the fridge.
A frosted cake can last in the fridge for up to a week, or in the freezer up to a month. If you freeze the cake, transfer it to the fridge the night before you plan to eat it.
This will help it gradually thaw and minimize any temperature shock. Remove the cake from the fridge about 30 minutes before you plan to cut into it.
Let Me Know What You Think
If you try this cake recipe, I’d love to hear what you think! Please leave a rating below and comment below.
Don’t forget to tag me @chelsweets and use #chelsweets on social media so I can see your amazing creations!
Twix Cake
Ingredients
Thick Caramel Filling
- 1/2 cup unsalted butter, room temperature 113g
- 1 cup packed light brown sugar 200g
- 1/2 cup light corn syrup 120ml
- 7 oz or 1/2 can sweetened condensed milk 198g
- 1 Tbsp heavy whipping cream, room temperature 15ml
- 1 tsp vanilla extract or vanilla bean paste 4ml
- 1 tsp fine salt 6g
Shortbread Base
- 1 1/2 cups (3 sticks) unsalted butter, room temperature 339g
- 3 cups all-purpose flour 375g
- 3/4 cup powdered sugar 95g
- 1 tsp fine salt 6g
Vanilla Cake Recipe
- 1 cup (2 sticks) unsalted butter, room temperature 226g
- 3 cups granulated sugar 600g
- 1 cup carton egg whites or 7 large egg whites, room temperature 240ml
- 3 cups cake flour 360g
- 2 1/2 tsp baking powder 10g
- 1 tsp fine salt 6g
- 1 1/2 cups full-fat sour cream, room temperature 360g
- 1/4 cup vegetable or canola oil 60ml
- 1 tsp vanilla extract or vanilla bean paste 4ml
Chocolate Buttercream Frosting
- 2 cups (4 sticks) unsalted butter, room temperature 452g
- 1/2 cup unsweetened baking cocoa 40g
- 1 tsp vanilla extract or vanilla bean paste 4ml
- 1/2 tsp fine salt 3g
- 6 cups powdered sugar 750g
- 2/3 cup heavy whipping cream, room temperature 180ml
- 1 cup semi-sweet chocolate chips, melted and cooled 180g
Recommended Tools
- Digital Kitchen Thermometer
- 8- inch cake pans
- Spinning cake stand
- 10- inch greaseproof cake board
- Large offset spatula
- Electric hand mixer or stand mixer
- Icing Comb
Instructions
Caramel Filling
- Make the caramel filling first so that it can thicken up before being added to the cake. This can be made up to a month in advance and stored in the fridge.
- Add 1/2 cup of unsalted butter, 1 cup of light brown sugar, 1/2 cup of corn syrup, and 7 oz. of sweetened condensed milk into a large saucepan.
- Heat over a medium-high heat. Stir constantly until the mixture starts to bubble.
- Slowly stir in 1 Tbsp of heavy cream. Place a digital thermometer in the pan at this point. Continue to stir until the caramel reaches 225 F / 110 C (just before the softball stage).
- Remove from heat and add 1 tsp of vanilla and 1 tsp of salt. Pour into a separate container to let the caramel cool. Cover the bowl once the caramel has reached room temperature. This can be stored at room temperature for up to 2 days, or a month in the fridge.
Shortbread Crust
- Use a fork or pastry cutter to combine 1 1/2 cups softened butter, 3 cups flour, 3/4 cup powdered sugar, and 1 tsp fine salt. It should form a slightly crumbly dough once combined.
- Divide the dough into three equal portions and press them into the bottom of the prepared pans with your fingers to create an even layer.
- Prick the crust thoroughly with a fork, then bake for 22-25 minutes, or until the edges are just starting to brown.
- Place the pan on a wire rack to cool and keep the oven.
Vanilla Cake Layers
- Add 1 cup of unsalted butter into the bowl of a stand mixer or a large bowl and beat with a whisk attachment on a medium speed until smooth and creamy.
- Add 3 cups of granulated sugar and cream together on a high speed for 2-3 minutes with a whisk attachment or hand mixer. Scrape the sides of the bowl with a rubber spatula as needed. The mixture should become lighter in color.
- Pour in 1 cup of egg whites and mix at a medium speed until incorporated.
- Whisk together 3 cups of cake flour, 2 1/2 tsp baking powder, and 1 tsp salt by hand in a medium-sized bowl, then mix half of the dry ingredients into the butter/egg mixture on a medium speed until combined.
- Add 1 1/2 cups of sour cream, 1/4 cup vegetable oil, and 1 tsp vanilla extract. Mix at a medium speed until combined, scraping the sides and bottom of the bowl as needed.
- Mix in the remaining half of the dry ingredients on a medium speed. Scrape the sides of the bowl with a rubber spatula as needed.
- Pour the batter on top of the baked shortbread crusts, dividing the batter evenly between the pans. I like to use a digital kitchen scale to weigh my pans to make sure my layers will be the same height.
- Bake for 34-36 minutes or until a toothpick comes out with a few moist crumbs. Rotate the pans halfway through to help them bake evenly.
- Allow the pans to cool for 10 minutes, then run an offset spatula around the perimeter of the pan to separate the cake from the pan. Be careful as you do this so that you don't break up the shortbread crust at the bottom!
- Place cake layers into the freezer for 45 minutes to accelerate the cooling process. Once the layers are fully cooled, carefully flip the pans and remove the layers from the pans.
- Use a serrated knife to level the top of each cake layer. Set the cake layers aside or wrap them and freeze them at this point if you're making them in advance.
Chocolate Buttercream Frosting
- Melt 1 cup of semi-sweet chocolate chips first so that it has time to cool off before being added to the frosting. Otherwise, it can melt the butter! Melt the chocolate chips by heating them in 15-second intervals in the microwave (stirring between) or with a double boiler.
- Beat 2 cups of butter on a medium speed for 30 seconds with a paddle attachment or in a large bowl with a hand mixer until smooth.
- Add in 1/2 cup of baking cocoa, 1 tsp of vanilla extract, and 1/2 tsp fine salt. Mix on low until the ingredients are fully incorporated.
- Slowly mix in 6 cups of powdered sugar. Halfway through, add in 2/3 cup of heavy cream to make the frosting easier to mix.
- Once all the powdered sugar has been incorporated, add in the melted and cooled chocolate.
- Mix on a low speed until the ingredients are fully incorporated and the desired consistency is reached. I also like to stir it by hand with a rubber spatula once it's fully made. This will help make the frosting silky smooth, and easier to smooth onto your cake.
- Place the frosting in 2 large piping bags and set aside.
Assembling This Twix Cake
- Stack and frost the cake layers on a greaseproof cake board or flat plate, using a dab of chocolate buttercream to help stick the first cake layer to the board (crust side down).
- As you assemble the cake, pipe a ring of chocolate buttercream around the cake layer. Heat up the caramel filling for 15-30 seconds, until it's just fluid enough to spread. Spread about 1 cup of the caramel in an even layer inside the buttercream ring. Be careful not to overheat the caramel or else the layers can slide around as you assemble the cake. If you run into this, chill the cake after adding each layer of caramel.
- Cover the caramel with a layer of chocolate buttercream. Repeat with the remaining cake layers, and reserve about 1/4 cup of caramel filling to decorate the cake later.
- Once you've stacked the cake layers, smooth a thin coat of chocolate buttercream around the cake with a large offset spatula and bench scraper. Freeze the cake for about 10 minutes in the freezer or 30 minutes in the fridge, or until the frosting is firm to the touch.
- Cover the cake with a second, thicker layer of chocolate buttercream and smooth using a bench scraper. If desired, use an icing comb to add a fun pattern to the sides of the cake.
- Decorate the top of the cake with a ring of chopped-up Twix and frosting dollops. Heat up the remaining caramel in the microwave in 10-second intervals until it's thinner, then drizzle it over the top of the cake and enjoy!
Video
Notes
My Tips for Making the Best Twix Cake
- Ingredients at room temp mix together better! Set out any cold ingredients ahead of time.
- Properly measure your flour (spoon into the cup measure, then level). Or better yet, use a kitchen scale to measure your dry ingredients.
- Once you add in the flour, mix your cake batter just until the ingredients are incorporated. This will ensure your cake layers are tender and fluffy.
- Use a scale to weigh your cake pans as you fill them. It helps the cake layers bake to the same height and bake more evenly.
- Level your room temperature or thawed cake layers with a serrated knife to make them easier to stack.
- Chill your cake layers in the freezer for about 20 minutes before assembling the cake. It makes it so much easier to frost them!
Making This Twix Cake in Advance & Storage Tips
- Make your cake layers in advance and freeze them. It breaks the process up and makes it more approachable.
- Make your chocolate frosting ahead of time or save any leftover frosting! It can be stored in an airtight container in the fridge for up to a month. This frosting can also be stored in the freezer for up to 3 months. Just be sure to give it a good stir once it thaws to make it nice and smooth again.
- The caramel can be made up to a month is advance if stored in an airtight container in the fridge.
- A frosted cake can last in the fridge for up to a week, or in the freezer up to a month. If you freeze the cake, transfer it to the fridge the night before you plan to eat it. This will help it gradually thaw and minimize any temperature shock. Remove the cake from the fridge about 30 minutes before you plan to cut into it.
Nutrition
Other Recipes You Might Like:
For the caramel, should I continue to stir while the thermometer is in there? It didn’t say to so I didn’t and I think I have a bunch of burnt bits in there now. Should I just skim those out or does it affect the final taste? Thank you!!
@Tanya, so sorry for the confusion! I do hold the thermometer in place, but a lot of candy thermometers also have a clip so you can just clip it to the side of the post.
Would I need to adjust the cake layers for high altitude? And if so, what should I do?
Would this same crusted cake layer concept work with an oreo crust on your oreo drip cake?
@Laura That would be so delicious, and should work great!
Can this be made into a 4 or 6 inch cake? How would you convert it?
@Molly, sure! You can make 4, 6″ cake layers, but they might take a few minutes longer to bake. Happy baking!
I made this yesterday as a token of appreciation for someone. It turned out beautifully. I didn’t get to taste it but they were all raving about it. I will definetly be making it again .
@Kirsten, so happy to hear that!! 🙂
Hi Chel.. is there a substitute for corn syrup??
@Sandra, I use cane syrup (from sugar cane not corn) for my bakes … Lyle’s Golden Syrup! You can get it from Amazon or Whole Foods.
Can you make this recipe into cupcakes?? Similar idea. crust, cake, icing?
@Sarah Bush,
That what I can to the comments to find out. Did you try it?
This looks AMAZING! What kind of shortbread cookies do you recommend using? Also, how long do you recommend baking three 6″ pans? Will half of the recipe be enough to fill three 6″ pans? Thank you for your help!
Hey,
I love this cake! But I had a lot of trouble with the caramel. Had to make it 3 times. :D. But when I reheated it in the microwave the butter separated out & made it extremely difficult to use. Any tips for next time?
@Allison,
I had the same issue and am not new to caramel. I debated taking it to that temp. I think next time, perhaps taking it from 5-10° cooler on the candy thermometer should work. Hope this helps! 🙂
@Pati good to know!! I’ve adjusted the caramel recipe to take down the temp a bit so that hopefully others won’t run into the same issue. I appreciate both of your feedback!! <3
The cake recipe didn’t work great for me. Think there was too much sugar and/or the layers were too thick. They browned too much prior to being done.
Question: the instructions (for the cake layers) are a little confusing about using a whisk or a paddle attachment. If we start with creaming the butter and sugar with a whisk (which didn’t work very well) , do we switch to a paddle attachment to add the flour?
Hi Summer,
Apologies for any confusion! I use a whisk attachment to make the cake batter the entire time. The butter and sugar should creaming together nicely and become lighter in color when mixed on a high speed. Is there a chance your butter wasn’t fully at room temperature?
However, I do use a paddle attachment to make the frosting in this recipe! It find it gives the buttercream a smoother texture. Hope that helps, happy baking!
When you make this, do you follow your measurements in imperial? Or are you using the weights? Because the weight for the cookies is way off. The sugar is slightly off as well. I’m just confused which measurements I should trust.
Hi Brooke,
I bake with a scale! I just double checked and all the weight measurements look right to me! Which sugar measurement do you think is off?
In regard to the weight of the cookie crumbs, the weight can vary based on the brand of cookies you’re using, and how finely you crushed the cookies.
Can’t wait to try! I have made several of your recipes and they all turn out wonderfully. What brand of shortbread cookies do you use? Thank you!
Hi Hanna,
Yay, I love this recipe so much! I’ve made this recipe with a few different brands, but I usually use these ones from whole foods: https://amzn.to/3N0oYME
They honestly have so much butter in them though, the crumbs almost holds together without any additional butter! It’s wild. Other brands work great too though!
Hi, I want to make this a tiered cake with two 8 inch cakes for the base and two 6 inch cakes for the top. If I use this batter amount would all the tins just be a tiny bit less full than usually and how would you suggest adjusting the baking time. I would bake the two 8 inch ones together and the two 6 inches together but separate for the 8 inch.
Hi Michelle,
I would recommend making 1.5 batches of batter, otherwise your cake tiers will be super short. The layers will bake up to be pretty thick, and will need to bake longer. But I think that will give your cake the right look! Hope that helps, and that your cake turns out great!!
I have made this cake twice. It’s just delicious! The cake itself is so incredibly moist! All the components go so well together. I also love how the recipe itself is written out so I do not have to keep scrolling back to the ingredient list. Thank you for this recipe! It’s a keeper. 🙂
Hi Jen,
So happy to hear that!! I try to make things as easy as possible in my recipe cards, and I love that you appreciate that!! Thank you so much for sharing 🙂
In the text of your post, it says bring the caramel to 238 degrees but in the recipe it says 225…..just FYI
Hi Stacey,
Apologies for any confusion!! I’ve updated that bit in the post to match the recipe card, it should be 225 degrees. Thank you for calling this out, I really appreciate it 🙂 Happy baking!
This might be a long shot but do you have any recommendations for making a smaller cake? Either a 4 inch 3 tier or just 2 tier 8 inch? Even just a 1 tier 9 inch or a sheet cake. I would like to make this for my husbands birthday but we do not need this much cake and I would rather not waste ingredients if I don’t have to. Any advice would be greatly appreciated, thanks!
Hi Jessie,
Great question! I’d recommend halving the entire recipe and making 3, 6-inch cake layers or 1, 9-inch cake layer. Hope that helps, happy baking!
First of all, I want to say thank you for how you wrote your instructions out with the measurements included with the steps. Second, that cake was amazing!! I made it for my daughter’s birthday. She loved it and so did everyone else! I had so much fun making this cake. Definitely saving this recipe.
Hi Valerie,
So so happy to hear that!!! 🙂 YAY! Thank you so much for sharing, and happy belated birthday to your daughter!
Can i make this cakr using your amazing vanilla cake recipe: “My very best Vanilla Cake – stays moist 4 days!” ?
Its one of my new favourites and im just wondering if it would be okay/work. Please let me know
Hi Kaitland,
Great question! You can totally use my “best vanilla cake recipe” to make this cake, that would taste great too 🙂 Happy baking!!
I made this for Thanksgiving and it was such a hit! It is beautiful and delicious. I made and refrigerated my cakes 2 days before decorated the next day. It was fun making this and assembling it. I agree, your directions were so great.
Hi Sharon,
Yay!! I’m so happy to hear that 🙂 Love that you broke up the process, that really does make it so much more enjoyable!! Thank you for sharing!
Hi dear..wanna ask u I didn’t get shortbread cookies over here so what can I use instead of it? Digestive biscuits???pls reply soon as I wanna make it tmmr
Hi,
What temperature do you bake the cakes at ?? And the crust? Thanks!
Hi Caitlin! My recipe card at the bottom of this post includes all the steps and shares the bake temp for all the components of this cakes 🙂 hope that helps happy baking!
I made it. Everything went well until I the assembly. It kept squishing out the caramel and tipping over. I ended up putting it in the freezer, and straightening it out a few times as it got chilled. First cake I’ve ever made lol, wish I could share a picture. Made it for my girlfriend for her birthday. She loved it anyways and it was delicious.
Hi Brad,
You should be so proud—first cake ever and you went for one with homemade caramel?! That’s ambitious and amazing!!
The caramel can definitely be a little tricky to work with—it can make things slide around during assembly, especially if the layers are warm or the filling isn’t chilled. Popping it in the freezer was a smart move! Honestly, that kind of problem-solving is half the battle with cake making.
I’m so glad your girlfriend loved it! I wish I could see a picture too—I bet it turned out wonderfully!
After assembling the cake and it is finished, do you keep it in the fridge or at room temp?
Hi Amy,
Great question! Once the cake is fully assembled, I recommend storing it in the fridge, but it can in theory sit at room temp for a day! If you live somewhere warm though, the buttercream can sometimes lose its shape. I usually store mine in the fridge, then take it out about 1–2 hours before serving so it can come to room temp and get nice and soft again. It tastes best that way! Hope that helps, happy baking!
Hi this looks and sounds amazing!
My oldest daughter‘s birthday is in a couple of weeks and I wanted to make her something yummy for dessert. She loves Twix so this cake sounds perfect. The only thing is, it’s a small group of us so I’d prefer to make a two layer cake rather than a three layer do you know how I would cut down the recipe so that I don’t have too much cake batter and frosting if I only wanna make a two layer cake. Thank you so much
Susan ?
Hi Susan,
Aw thank you!! I’m so honored you’re thinking of making this cake for your daughter’s birthday—Twix lovers unite! For a two-layer version, you can simply cut the cake and frosting recipes down to 2/3 of the original amounts. That way, you’ll still have the right ratios without tons of extra batter or buttercream. If it’s easier, you could also bake the full recipe and freeze one cake layer for a rainy day treat. Let me know how it goes—I hope your daughter has the sweetest birthday!
I see that you say you can replace the shortbread cookies with graham crackers in the recipe but I don’t see anything about using shortbread cookies in the recipe. I have made this previously and I could’ve sworn I used shortbread cookies for it. I just want to double check before I attempt to make this again for a birthday this weekend.
Hi Angel,
Great question!! I revamped this recipe last year, and changed the crust to make it so that we make our own shortbread crust (no shortbread cookies needed). I somehow missed that section when I made the update, but have removed that snippet now. Thank you for letting me know, and I hope that the cake turned out amazing this weekend!
@Chelsweets, Do you still have the instructions for using shortbread cookies somewhere? I’ve made this cake recipes several times using them and we all loved it and would love to be able to use the same recipe again:)
I do!! Here you go:
Shortbread Base:
24 oz or about 48 butter shortbread cookies, crushed (681g)
1/4 cup unsalted butter, melted (56g)
Instructions:
1. Begin by preheating the oven to 350 F / 175 C. Line three, 8-inch pans with parchment rounds and spray the sides of the pan with non-stick baking spray.
2. Use a food processor or Ziplock bag and a rolling pin to crush the shortbread cookies into a fine crumb. Some brands have enough butter in the cookies to moisten the mixture and help it stick together. If your cookie crumbs look dry and don’t stick together when you squeeze them in the palm of your hand (see picture above), add 1/4 cup of melted butter and mix until combined.
3. Place 1/2 cup of the crumb mixture in a separate bowl and set aside. This will be used later to decorate the sides and top of the cake.
4. Divide the remaining cookie mixture evenly between the prepared pans. Use the flat bottom of a measuring cup or glass to press down firmly and create a compact, even crust.
5. Bake for 6 minutes then remove the pans from the oven and place them on a wire rack to cool. Be sure to keep your oven on!
Hope that helps, happy baking Alisson!
This cake is unbelievable. I’ve made it 2-3 times now. It’s a big undertaking and time consuming but so worth it. My family RAVES over it and asks for it all the time haha one of my favorite cakes I’ve ever made.
Hi Angel,
This makes me so happy to read. When a cake becomes the one your family keeps requesting, that’s the highest compliment.
I know it’s a bit of a project, so hearing that it’s worth the time and that you’ve made it multiple times means so much. Thank you for trusting the recipe and for sharing this, it truly makes my day 🙂
what temperature should the cakes be baked at and for how long
Hi Jackie,
I share all the details for this recipe in the recipe card located at the bottom of this post. If you don’t want to scroll, you can click the jump to recipe button at the top of the post. Hope that helps, happy baking!