
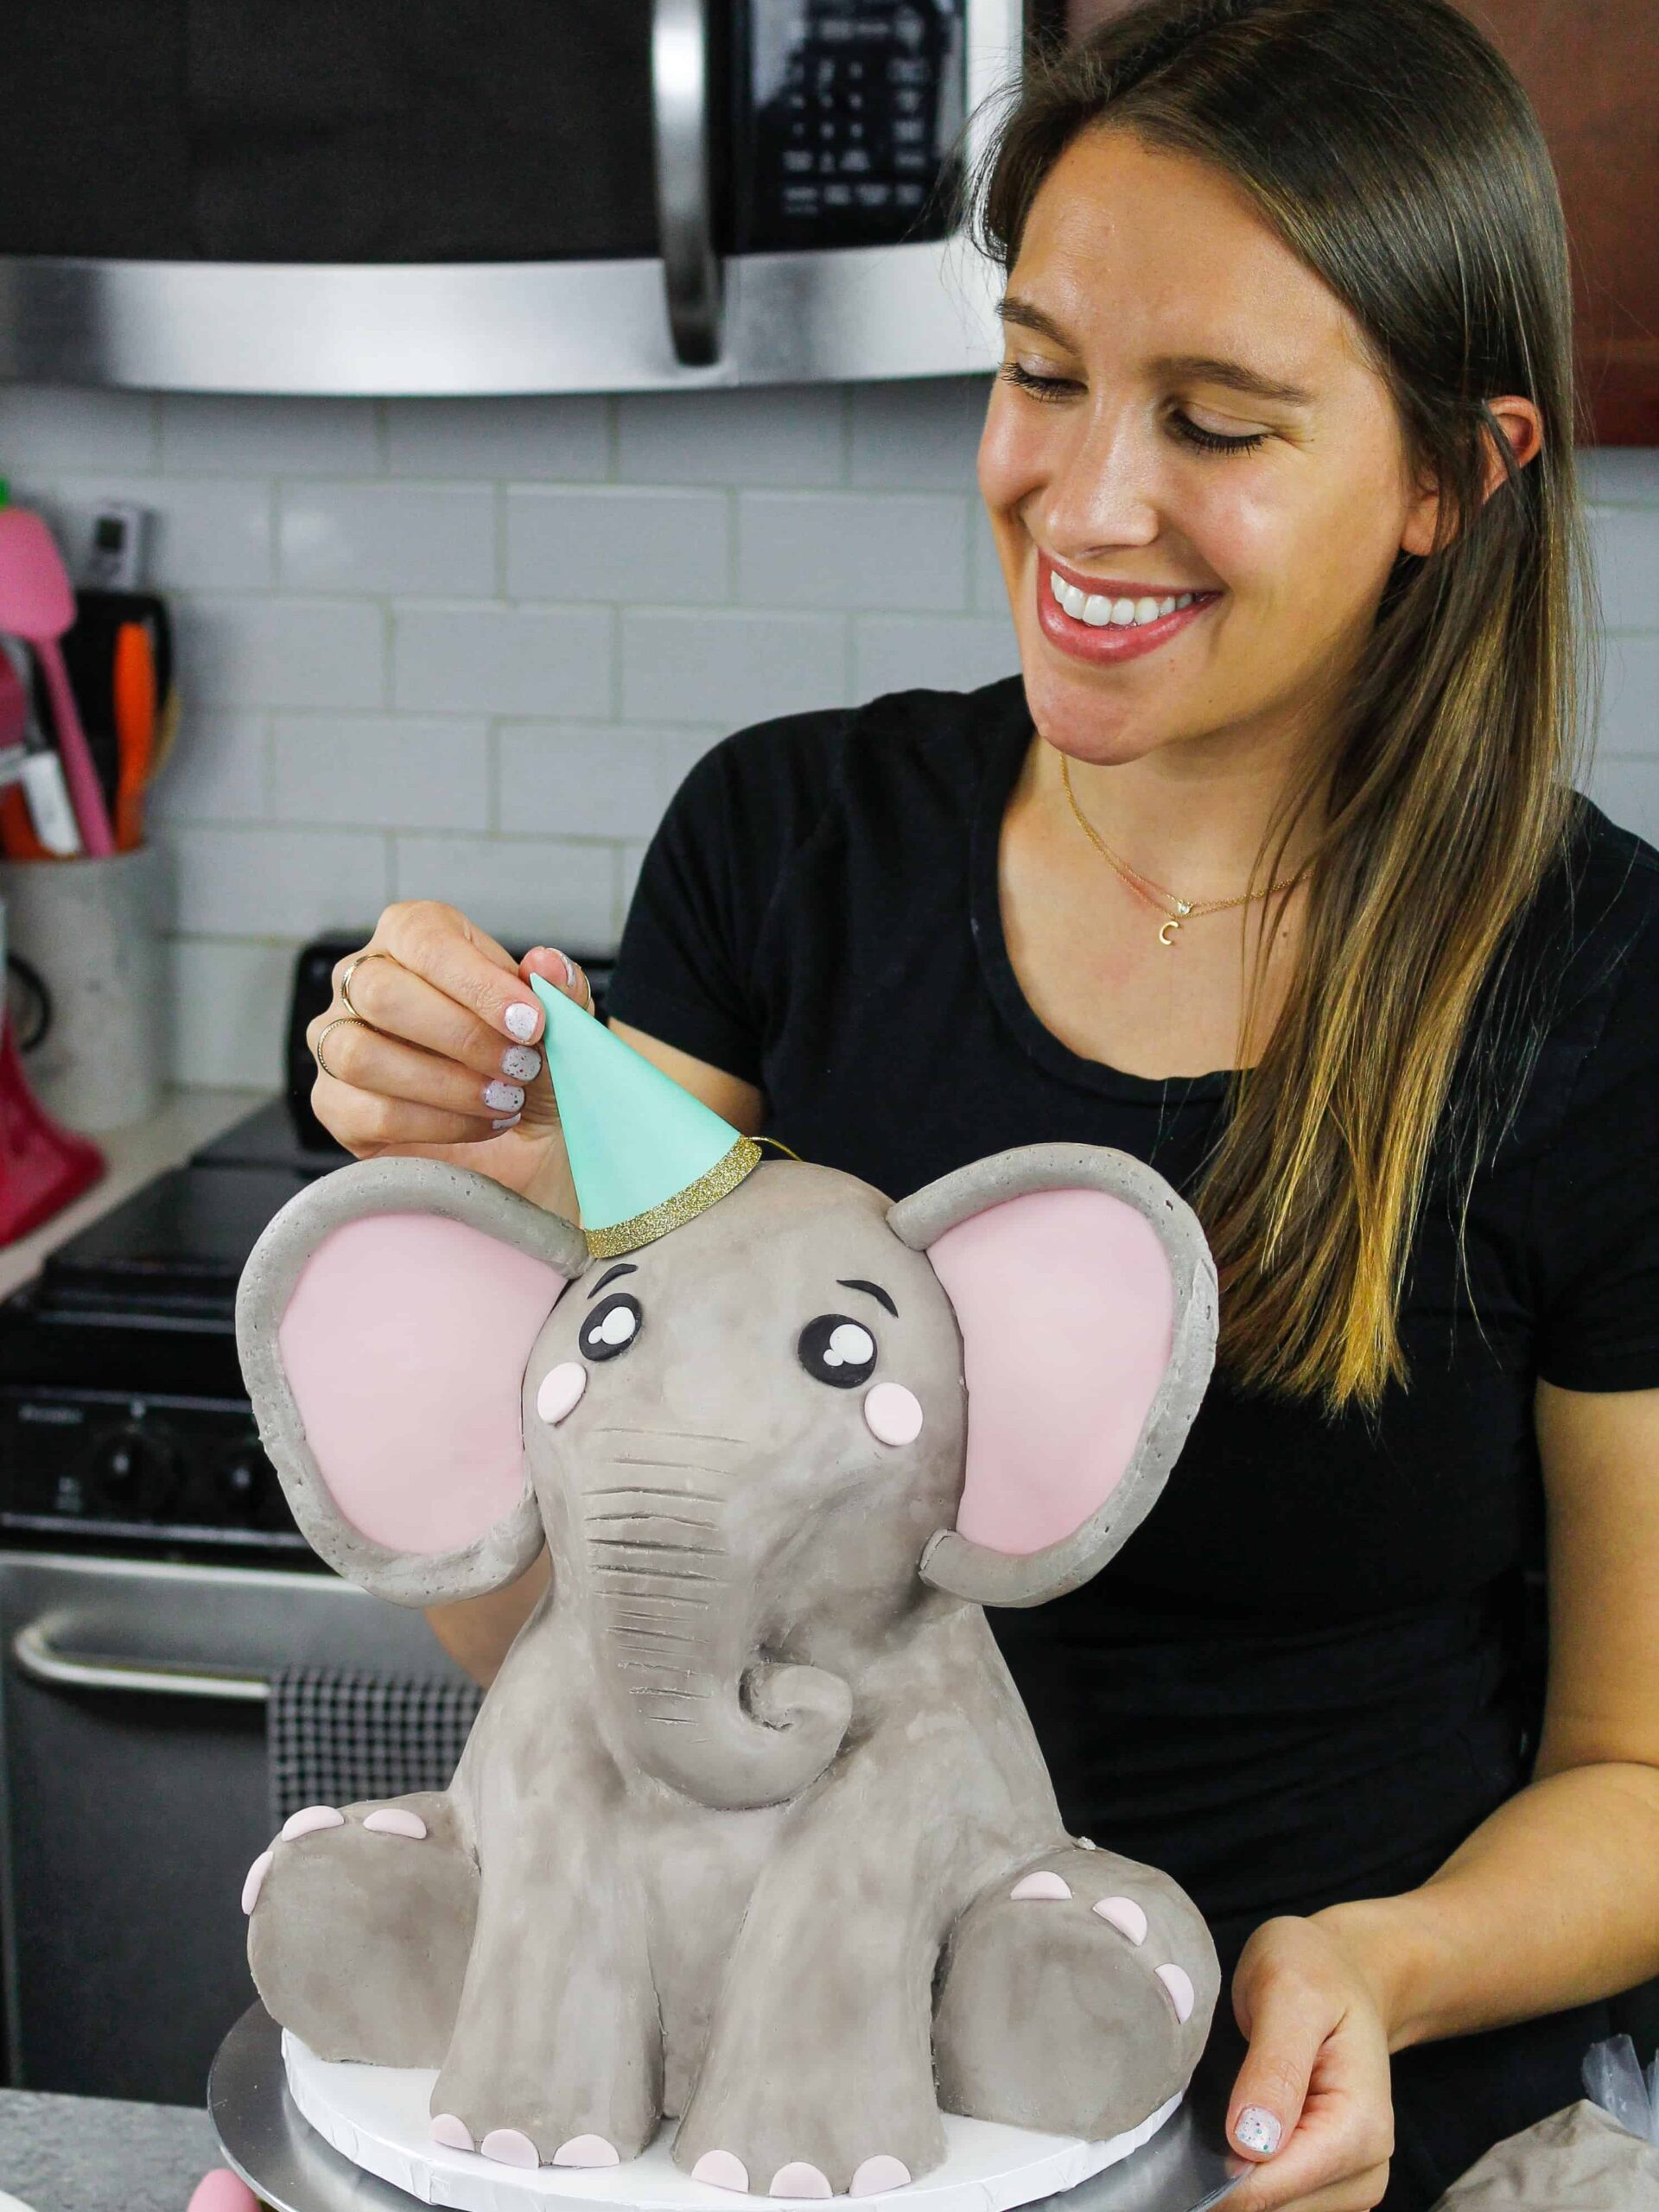
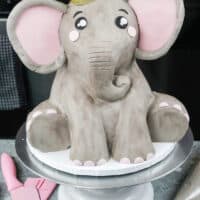
Elephant Cake
We may still be celebrating things virtually, but that has yet to stop me from baking for my friends and family. We’re hosting a virtual baby shower for my friend today and I wanted to make this adorable elephant cake to match her nursery theme!
While we might not be able to enjoy the cake together, it’s the thought that counts.
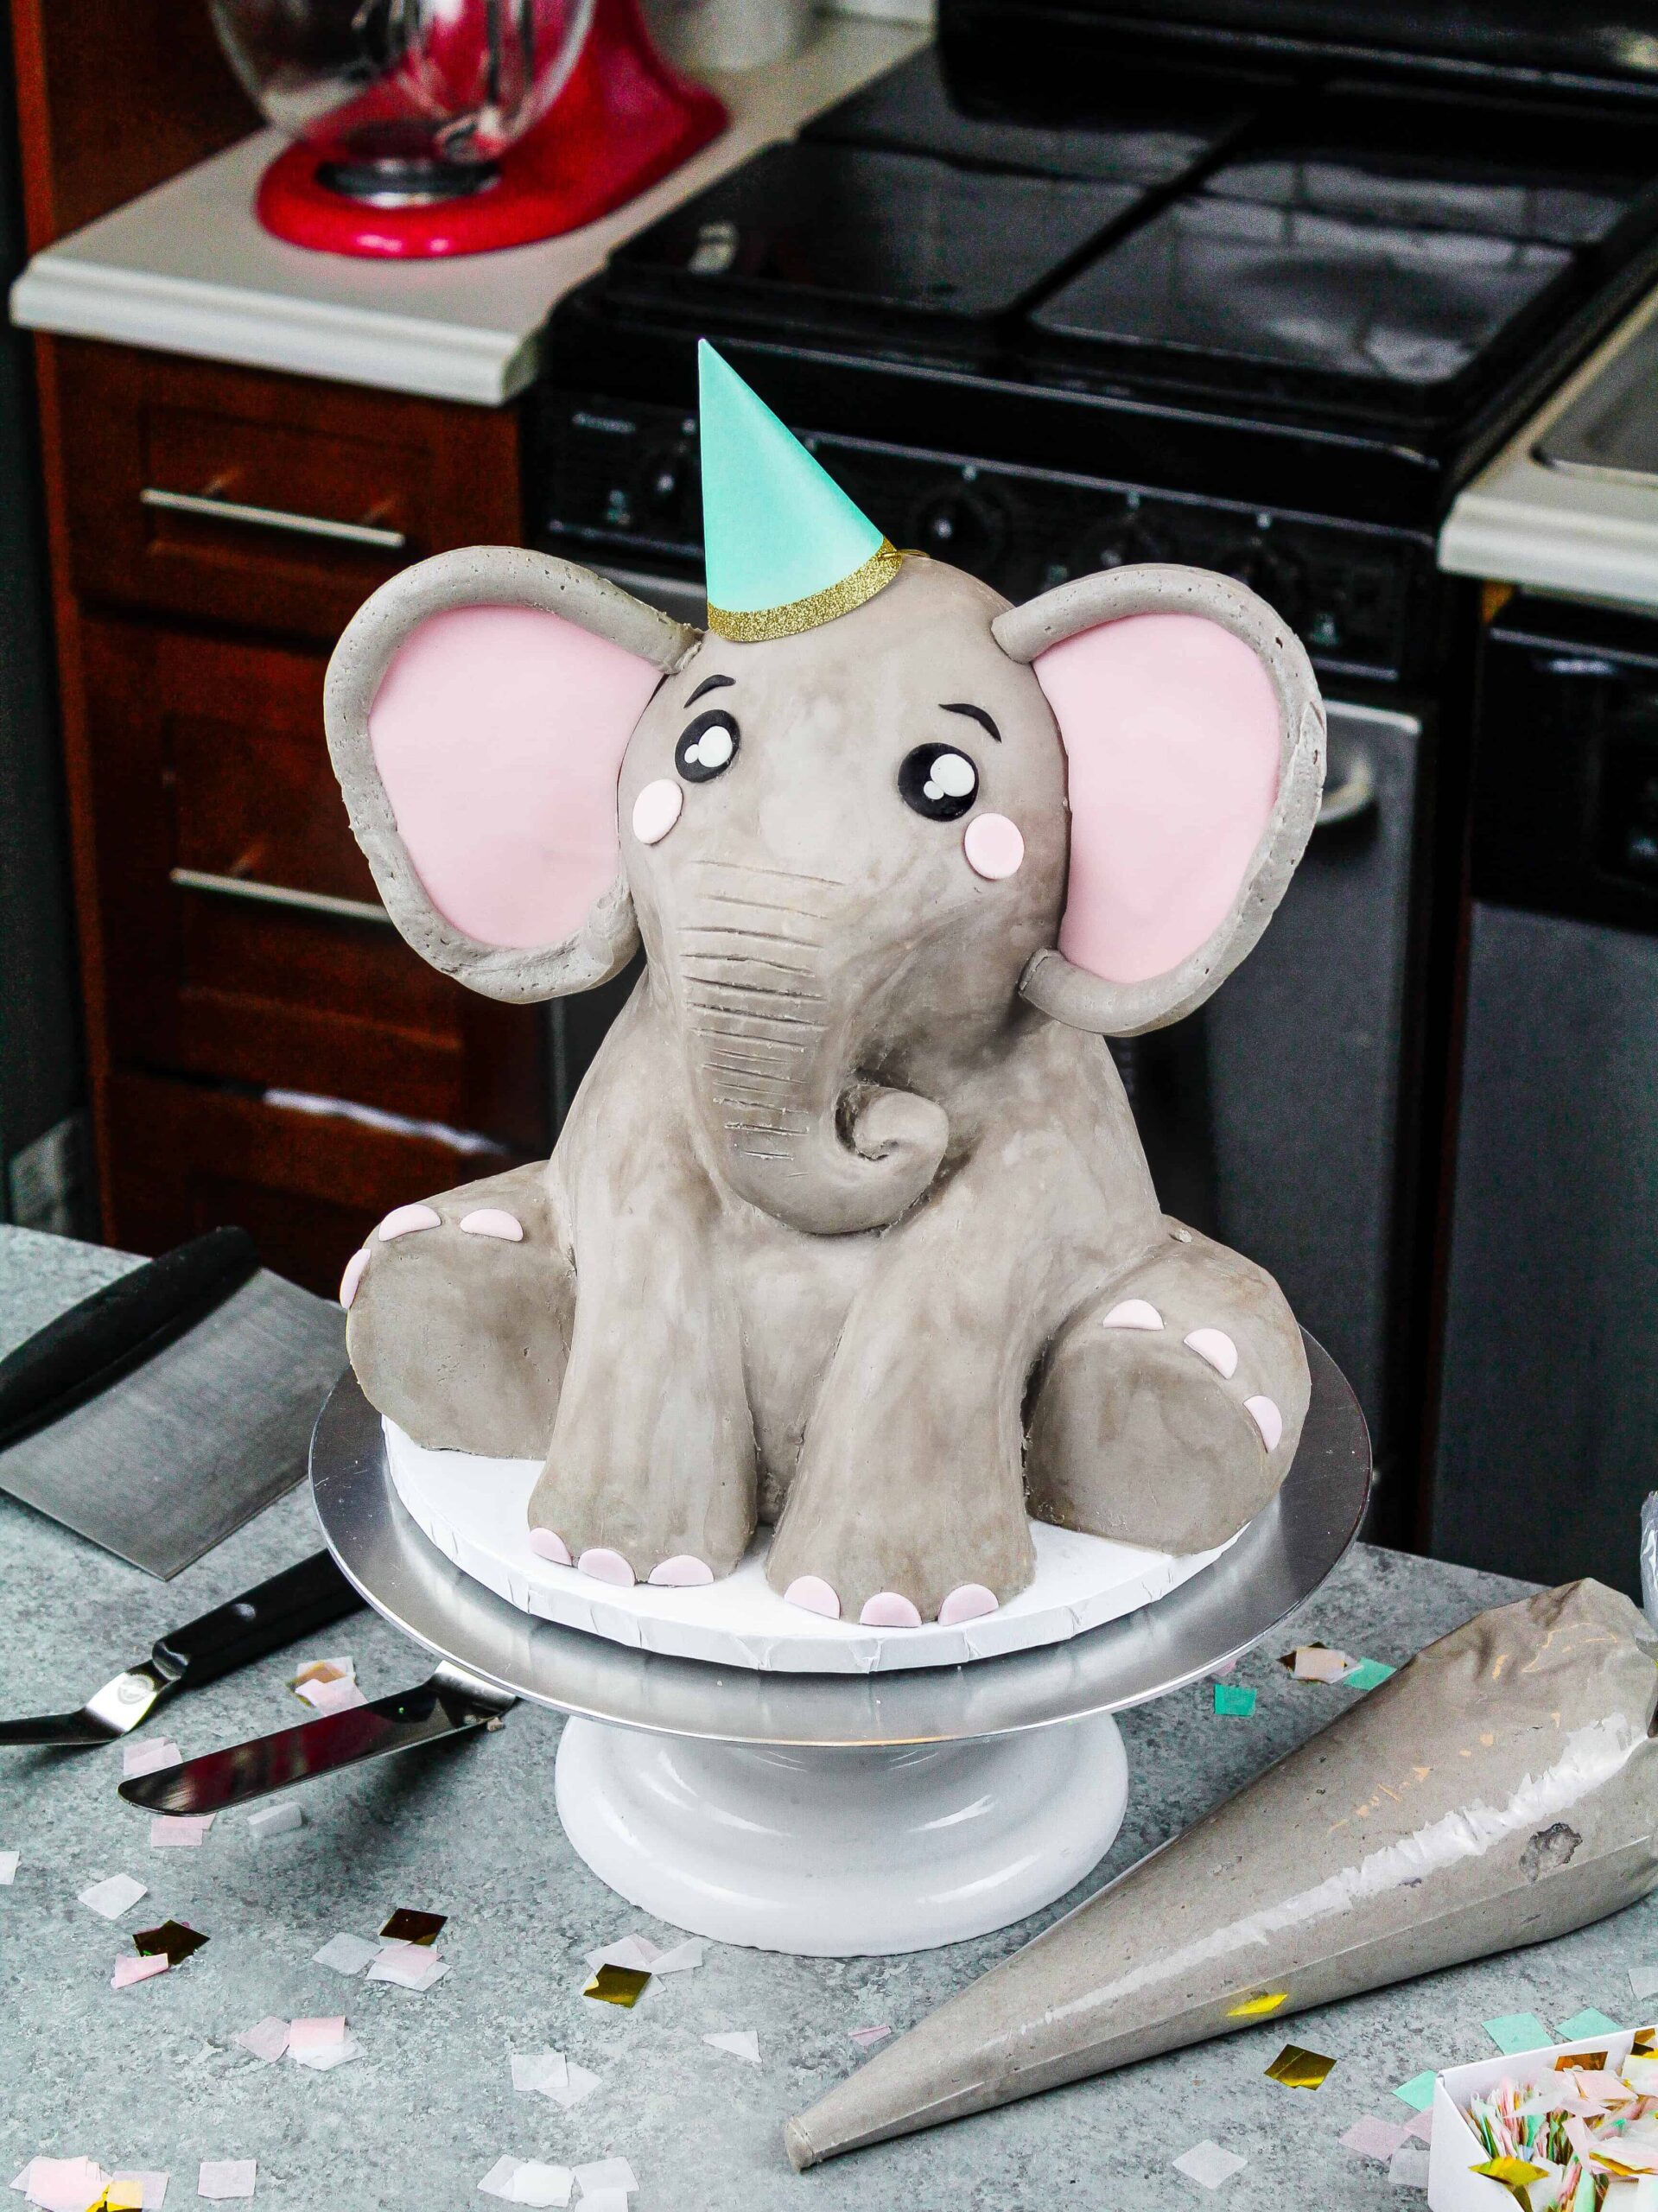
I’ve avoiding making an elephant cake for the longest time because I was always scared of the trunk and the ears.
But after a little strategizing to figure out how to make this cake, I realized it’s not as hard as you might think!
With the help of some cake decorating-friendly rice krispies (more on that below) and pink fondant, this elephant cake is a lot of fun to make.
Making This Little Elephant’s Ears & Face
While I’m always team buttercream, there are some situations where using a bit of fondant just makes sense.
Plus, we’ve already put so much energy into making the cake layers and buttercream from scratch, a tiny but of fondant never hurt anyone.
I used black, white, and pink fondant to make my elephant’s face and ears.
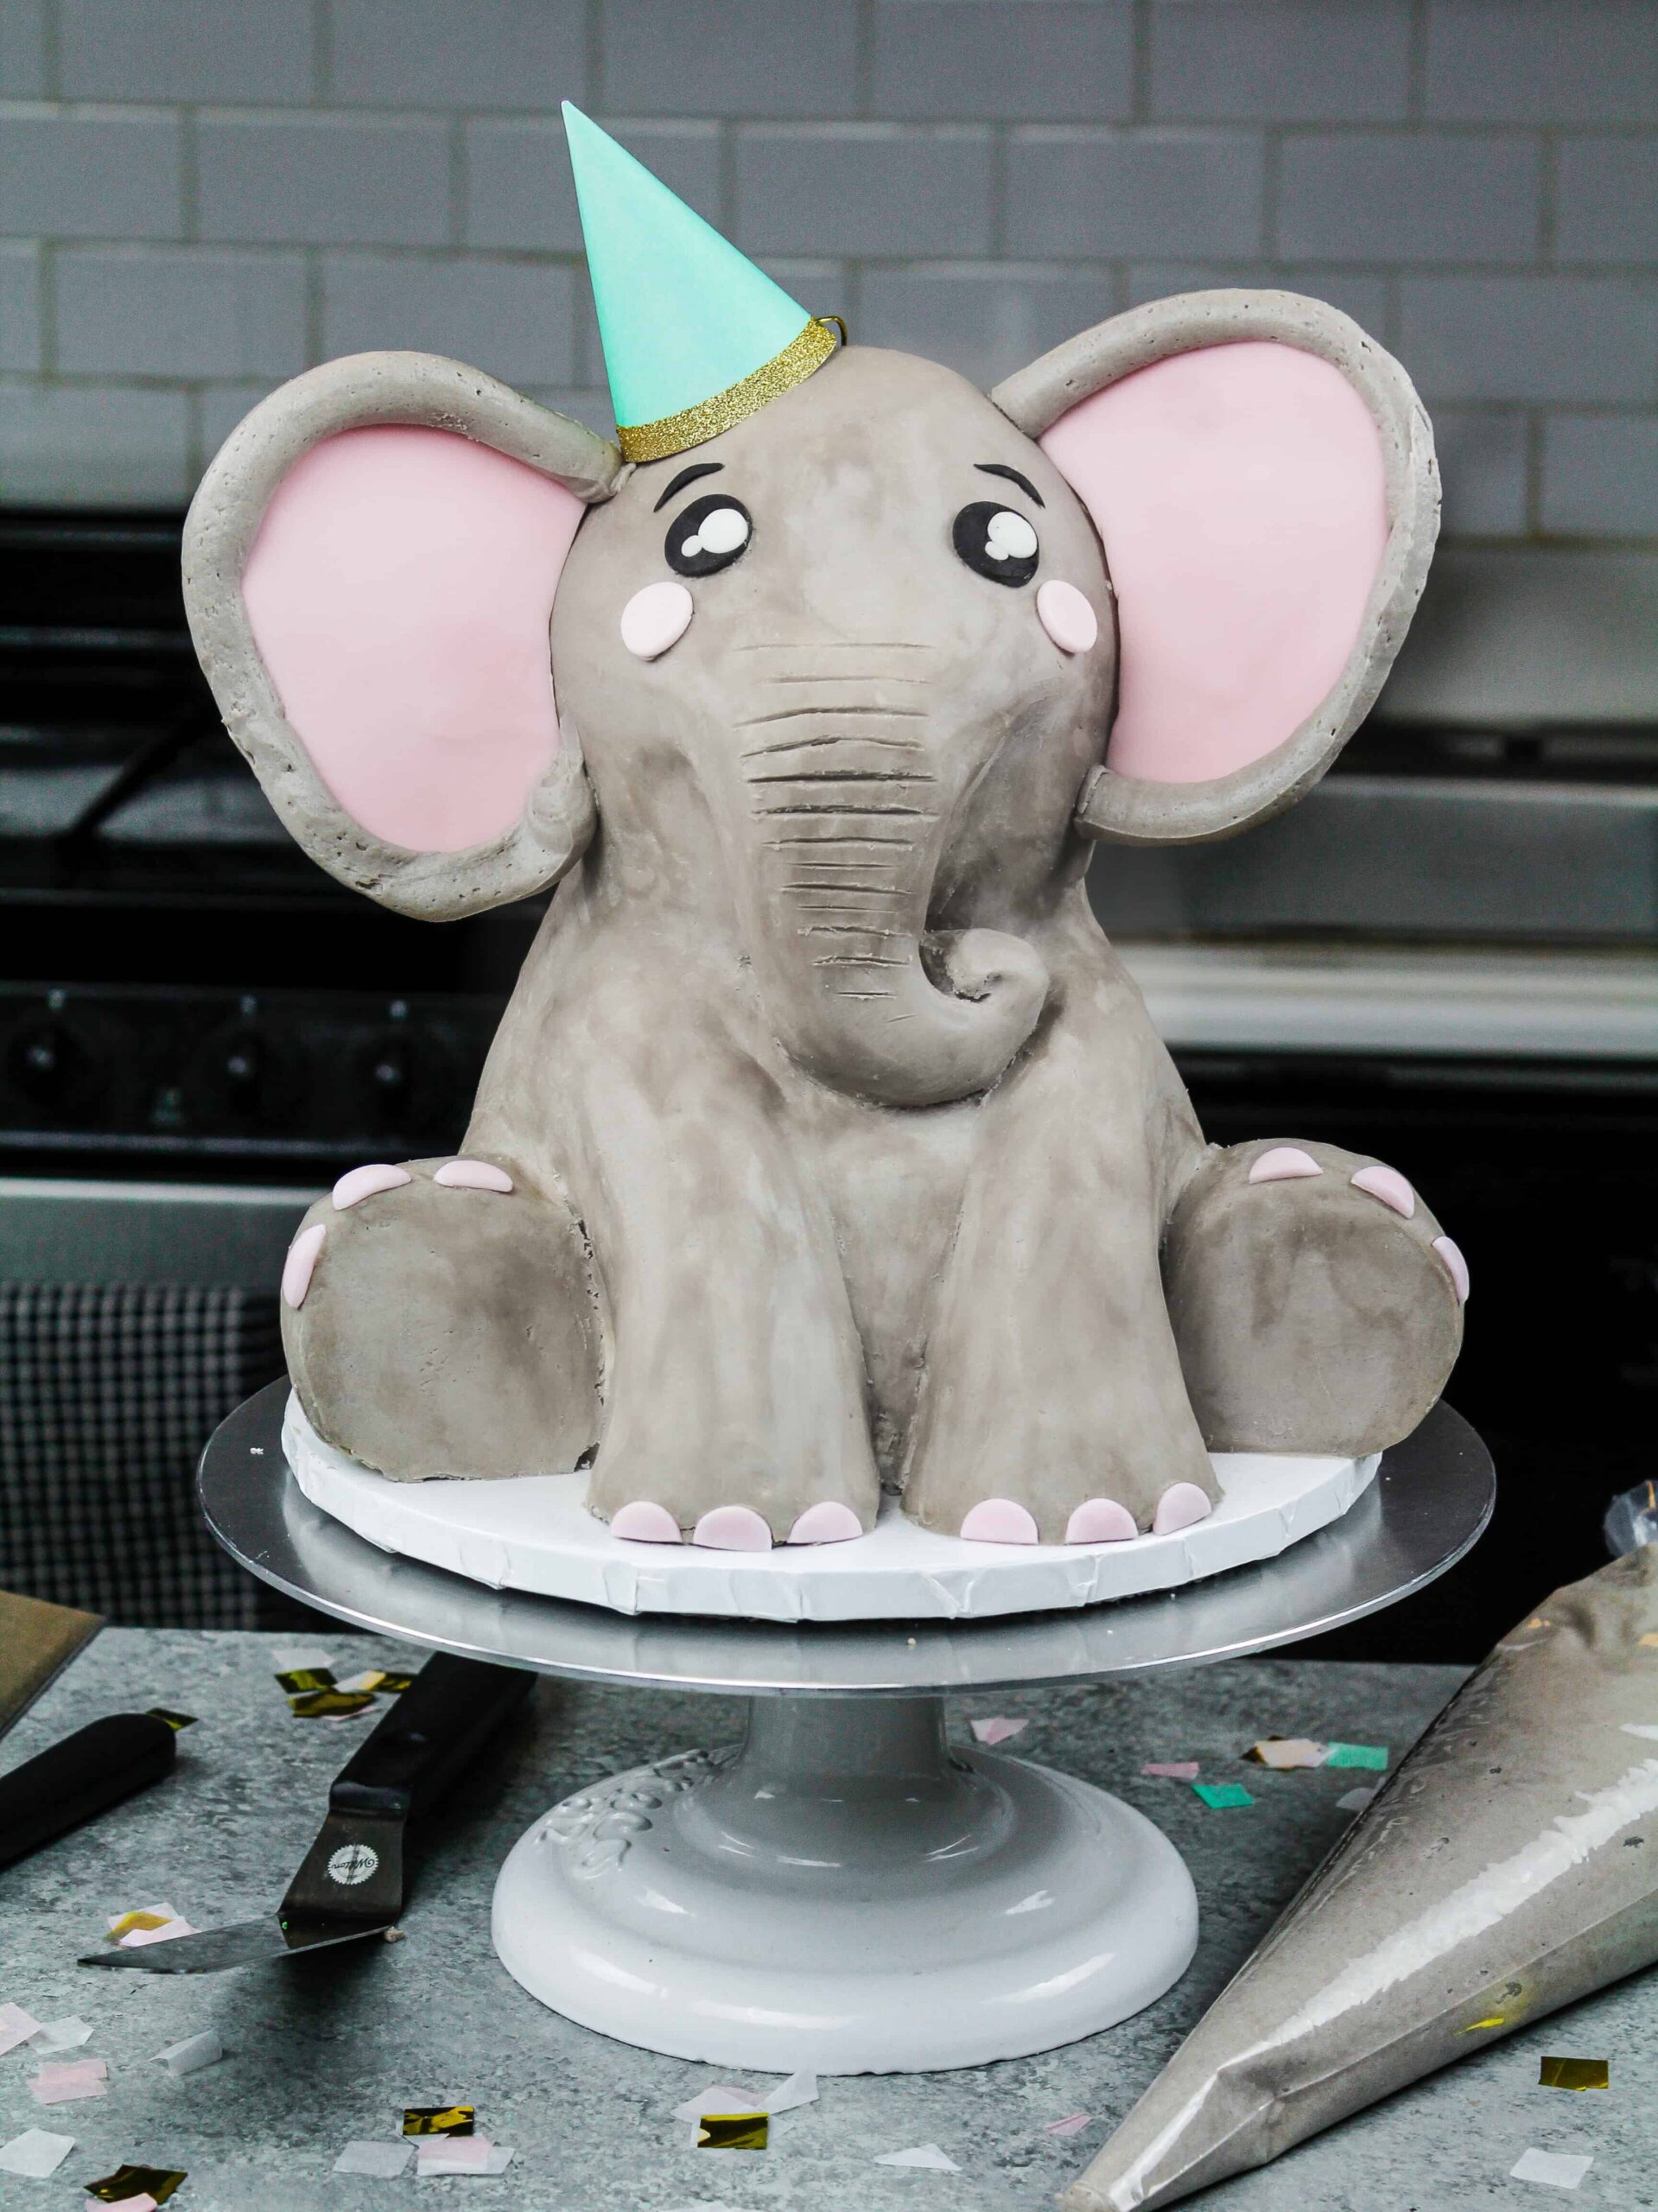
Those ears would be just about impossible to get right without using fondant.
Trust me, I tried using rice krispie treats and it was a no-go. They were way too thick!!
Making this Elephant Cake with Rice Krispie Treats
You read that right! A batch of cake decorating-friendly rice krispies makes this challenging cake shape so much more manageable.
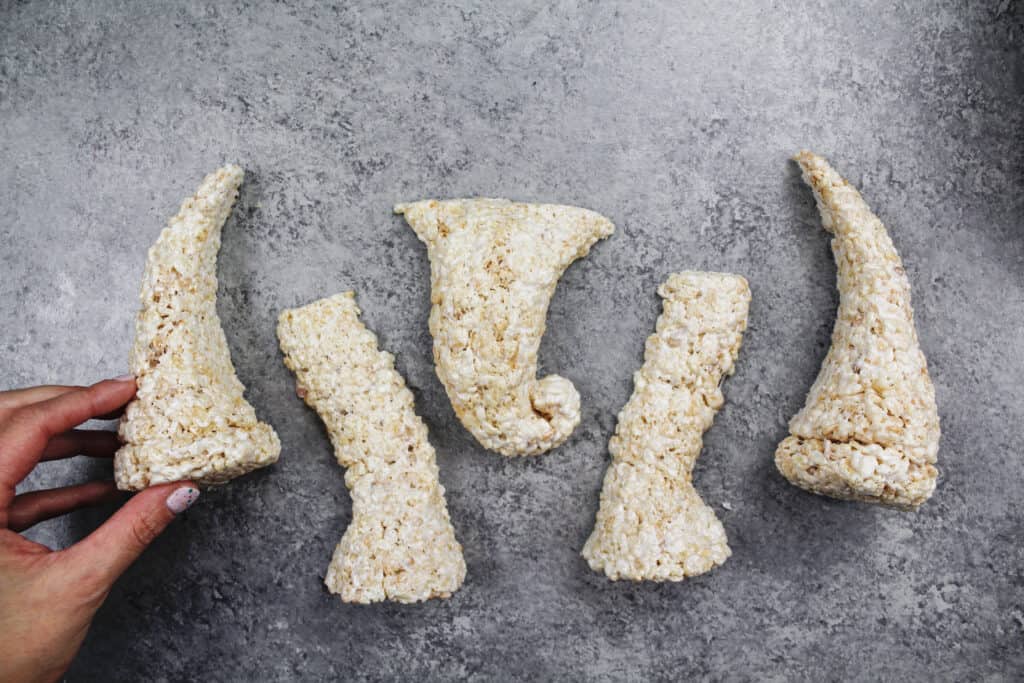
By omitting the butter that is in most rice krispie treats, these rice krispie treats set firmly once they’re cooled.
This lets you easily shape any type of sculpted cake. I used the same technique to make my Patrick Star cake I highly recommend if for larger shaped cake like this.
Substitutions and Swaps – Pink Funfetti Cake Layers
This elephant birthday cake uses quite a few ingredients and I know you might not have them all on hand. Or if you have food allergies or restrictions, I’ve got you covered.
Below are some swaps and substitutions that can be made in this elephant cake recipe.
- All Purpose Flour – This recipe turns out best with AP flour, but you can use a gluten free flour blend or cake flour if that’s all you have on hand.
- Granulated Sugar – I do not recommend reducing the amount of sugar or changing the type of sugar, as it will change the texture of the cake layers.
- Unsalted Butter – If you only have salted butter on hand, you can use it in place of the unsalted butter in this recipe. Just be sure to omit the salt that this cake recipe calls for. You can also use vegan butter in its place!
- Egg whites – If you don’t have egg whites on hand (I use the type out of the carton), you can use 4 whole eggs in place of the egg whites. Or you have an egg allergy you can use flaxseed eggs or an egg replacer.
- Sour Cream – You can also use full fat yogurt, buttermilk, whole milk, or an alternative yogurt or milk (almond, soy, oat) if you’re dairy free.
- Vegetable Oil – You can use any flavorless oil in this recipe. Canola or even sunflower oil would work great!
- Vanilla Extract – Other extracts can also be used in place of the vanilla extract. Feel free to use almond, coconut, or even pistachio extract.
- Gel food coloring – Natural food coloring (either liquid or powder) can be used in place of the pink gel food coloring to make this cake!
- Sprinkles – I find rainbow jimmies work best in this funfetti cake recipe and highly recommend using them. If you don’t have any you can omit them from this recipe.
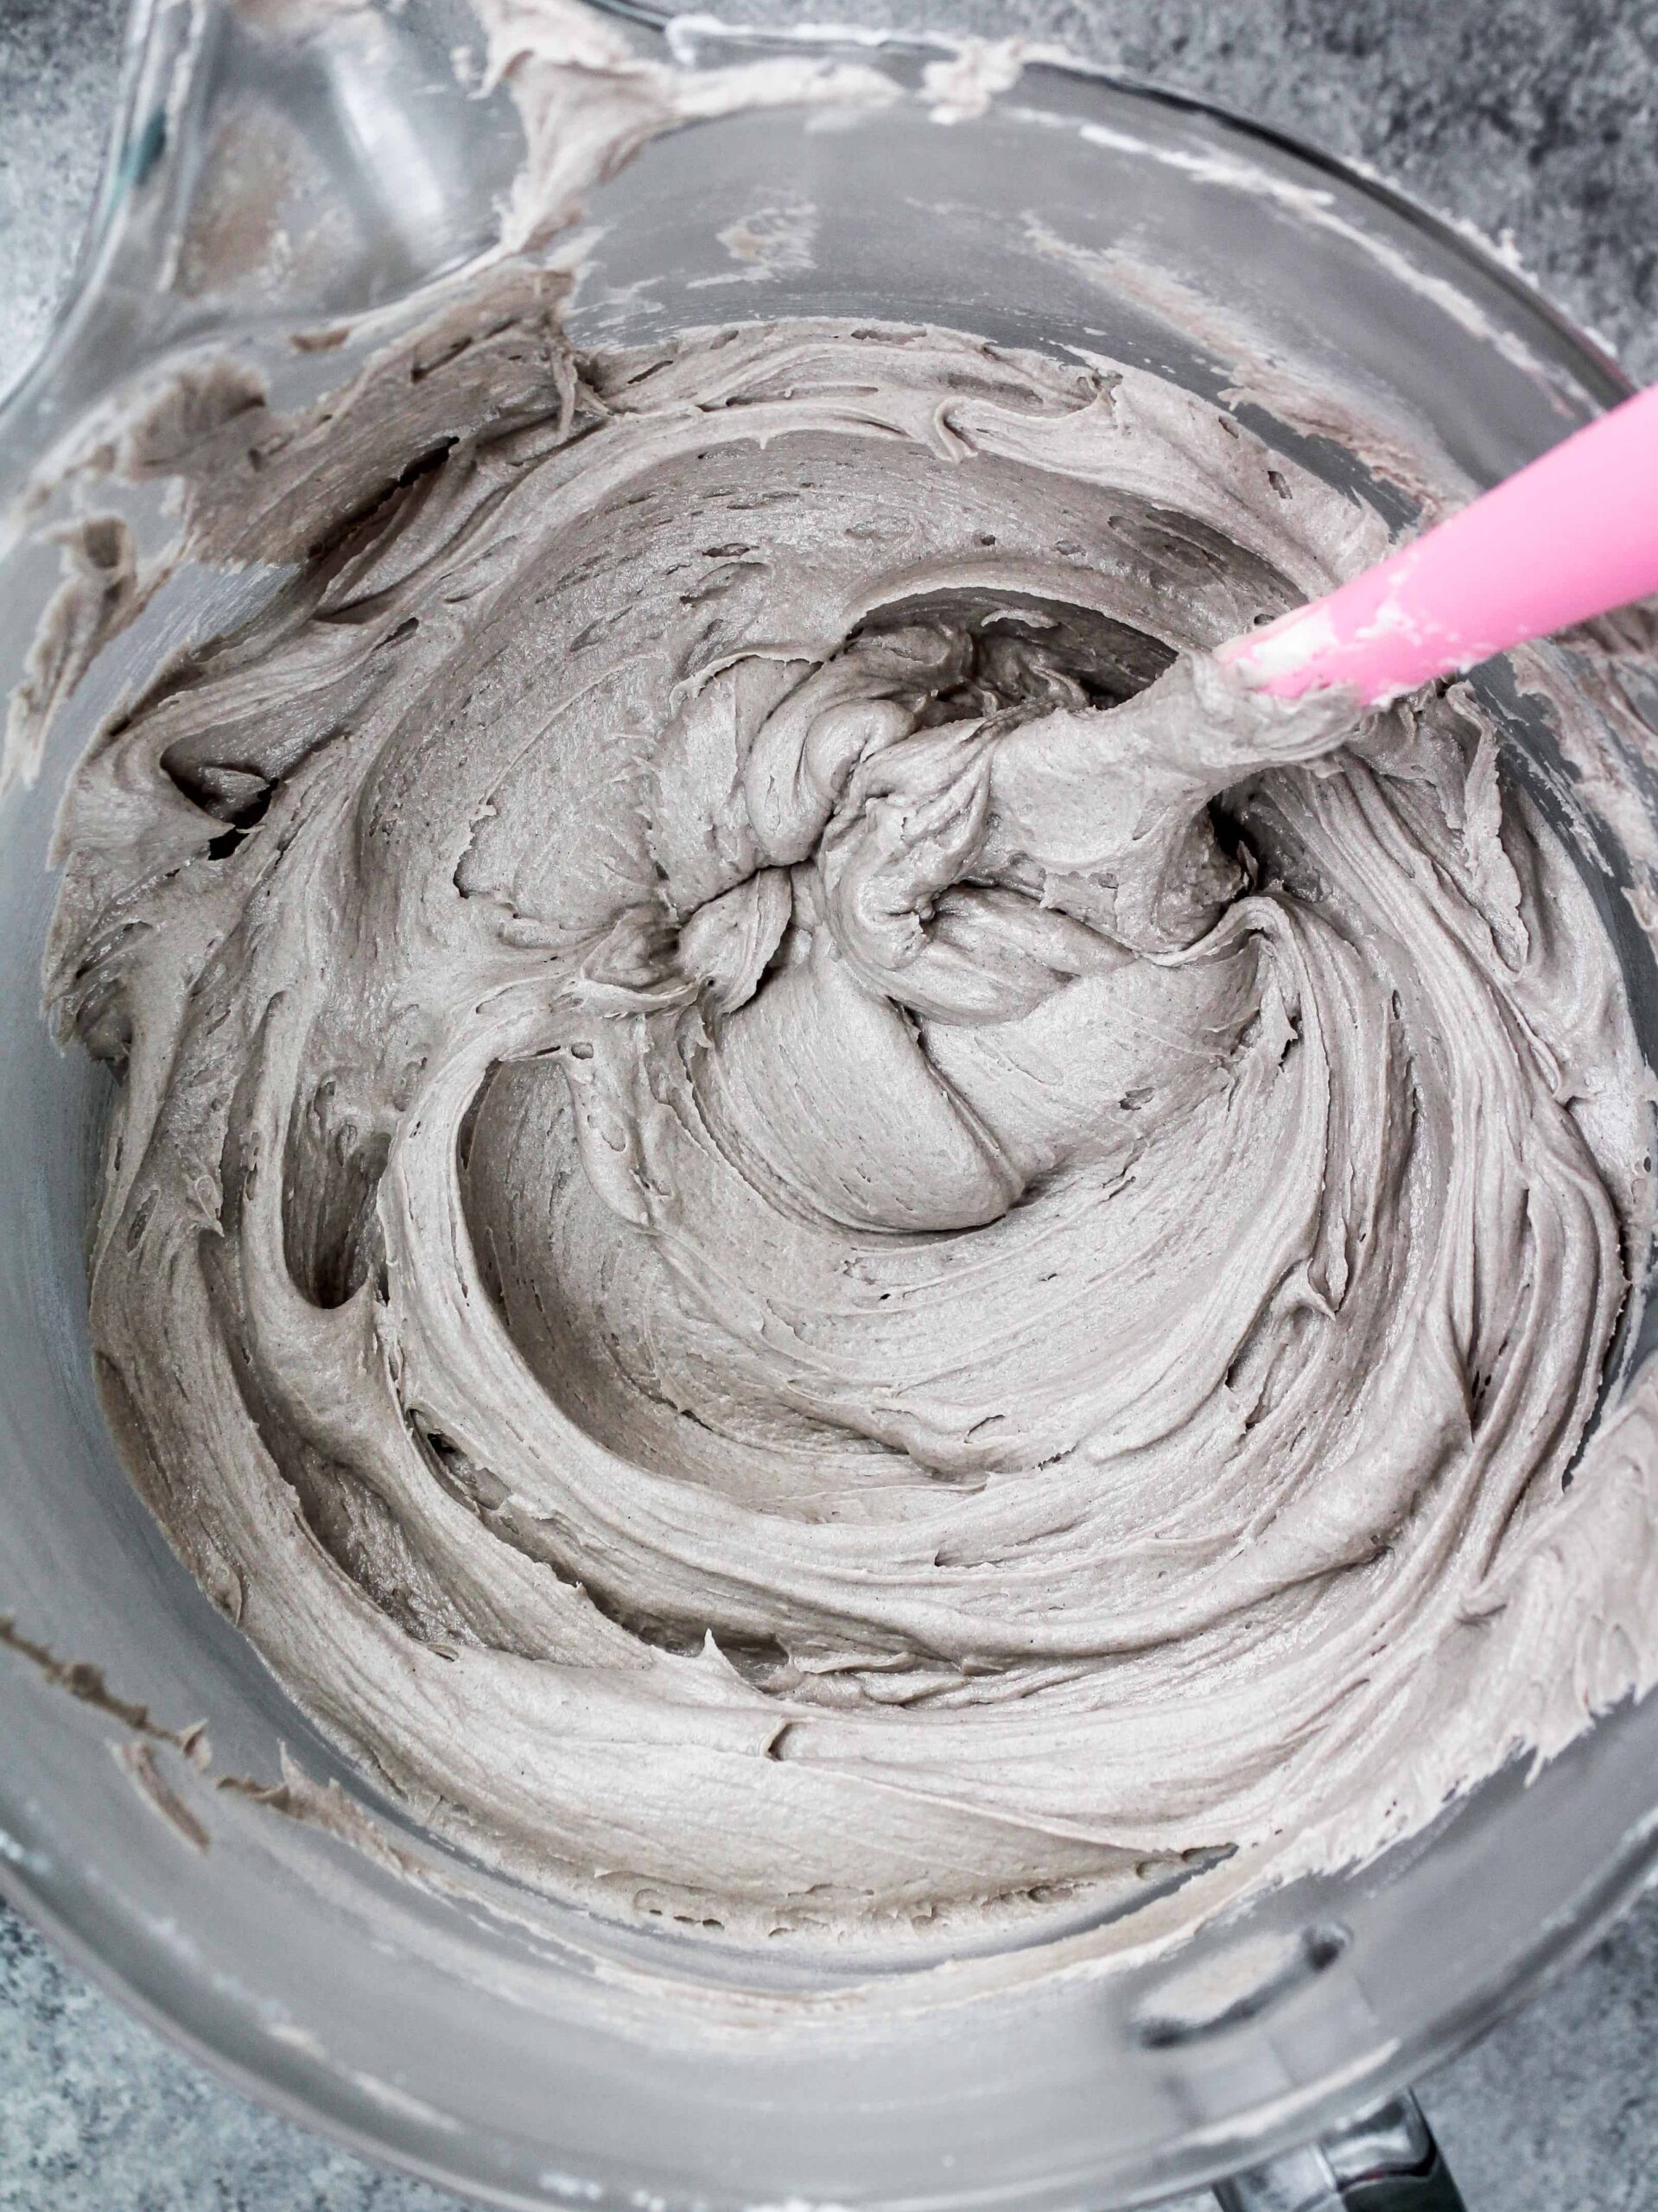
Substitutions and Swaps – Grey Buttercream Frosting
- Unsalted Butter – If you only have salted butter on hand, you can use it in place of the unsalted butter. Just be sure to omit the salt that this frosting recipe calls for. You can also use vegan butter in its place!
- Heavy Cream – Whole milk or alternative milk (soy, almond, oat) will work fine in this frosting recipe if that’s what you have on hand.
- Vanilla Extract – Other extracts can also be used in place of the vanilla extract. Feel free to use coconut extract, hazelnut extract, or even pistachio extract.
- Black Cocoa Powder – I like to use black cocoa to give this frosting a natural grey shade! You can also use black gel food coloring or a tiny bit of activated charcoal or squid ink.
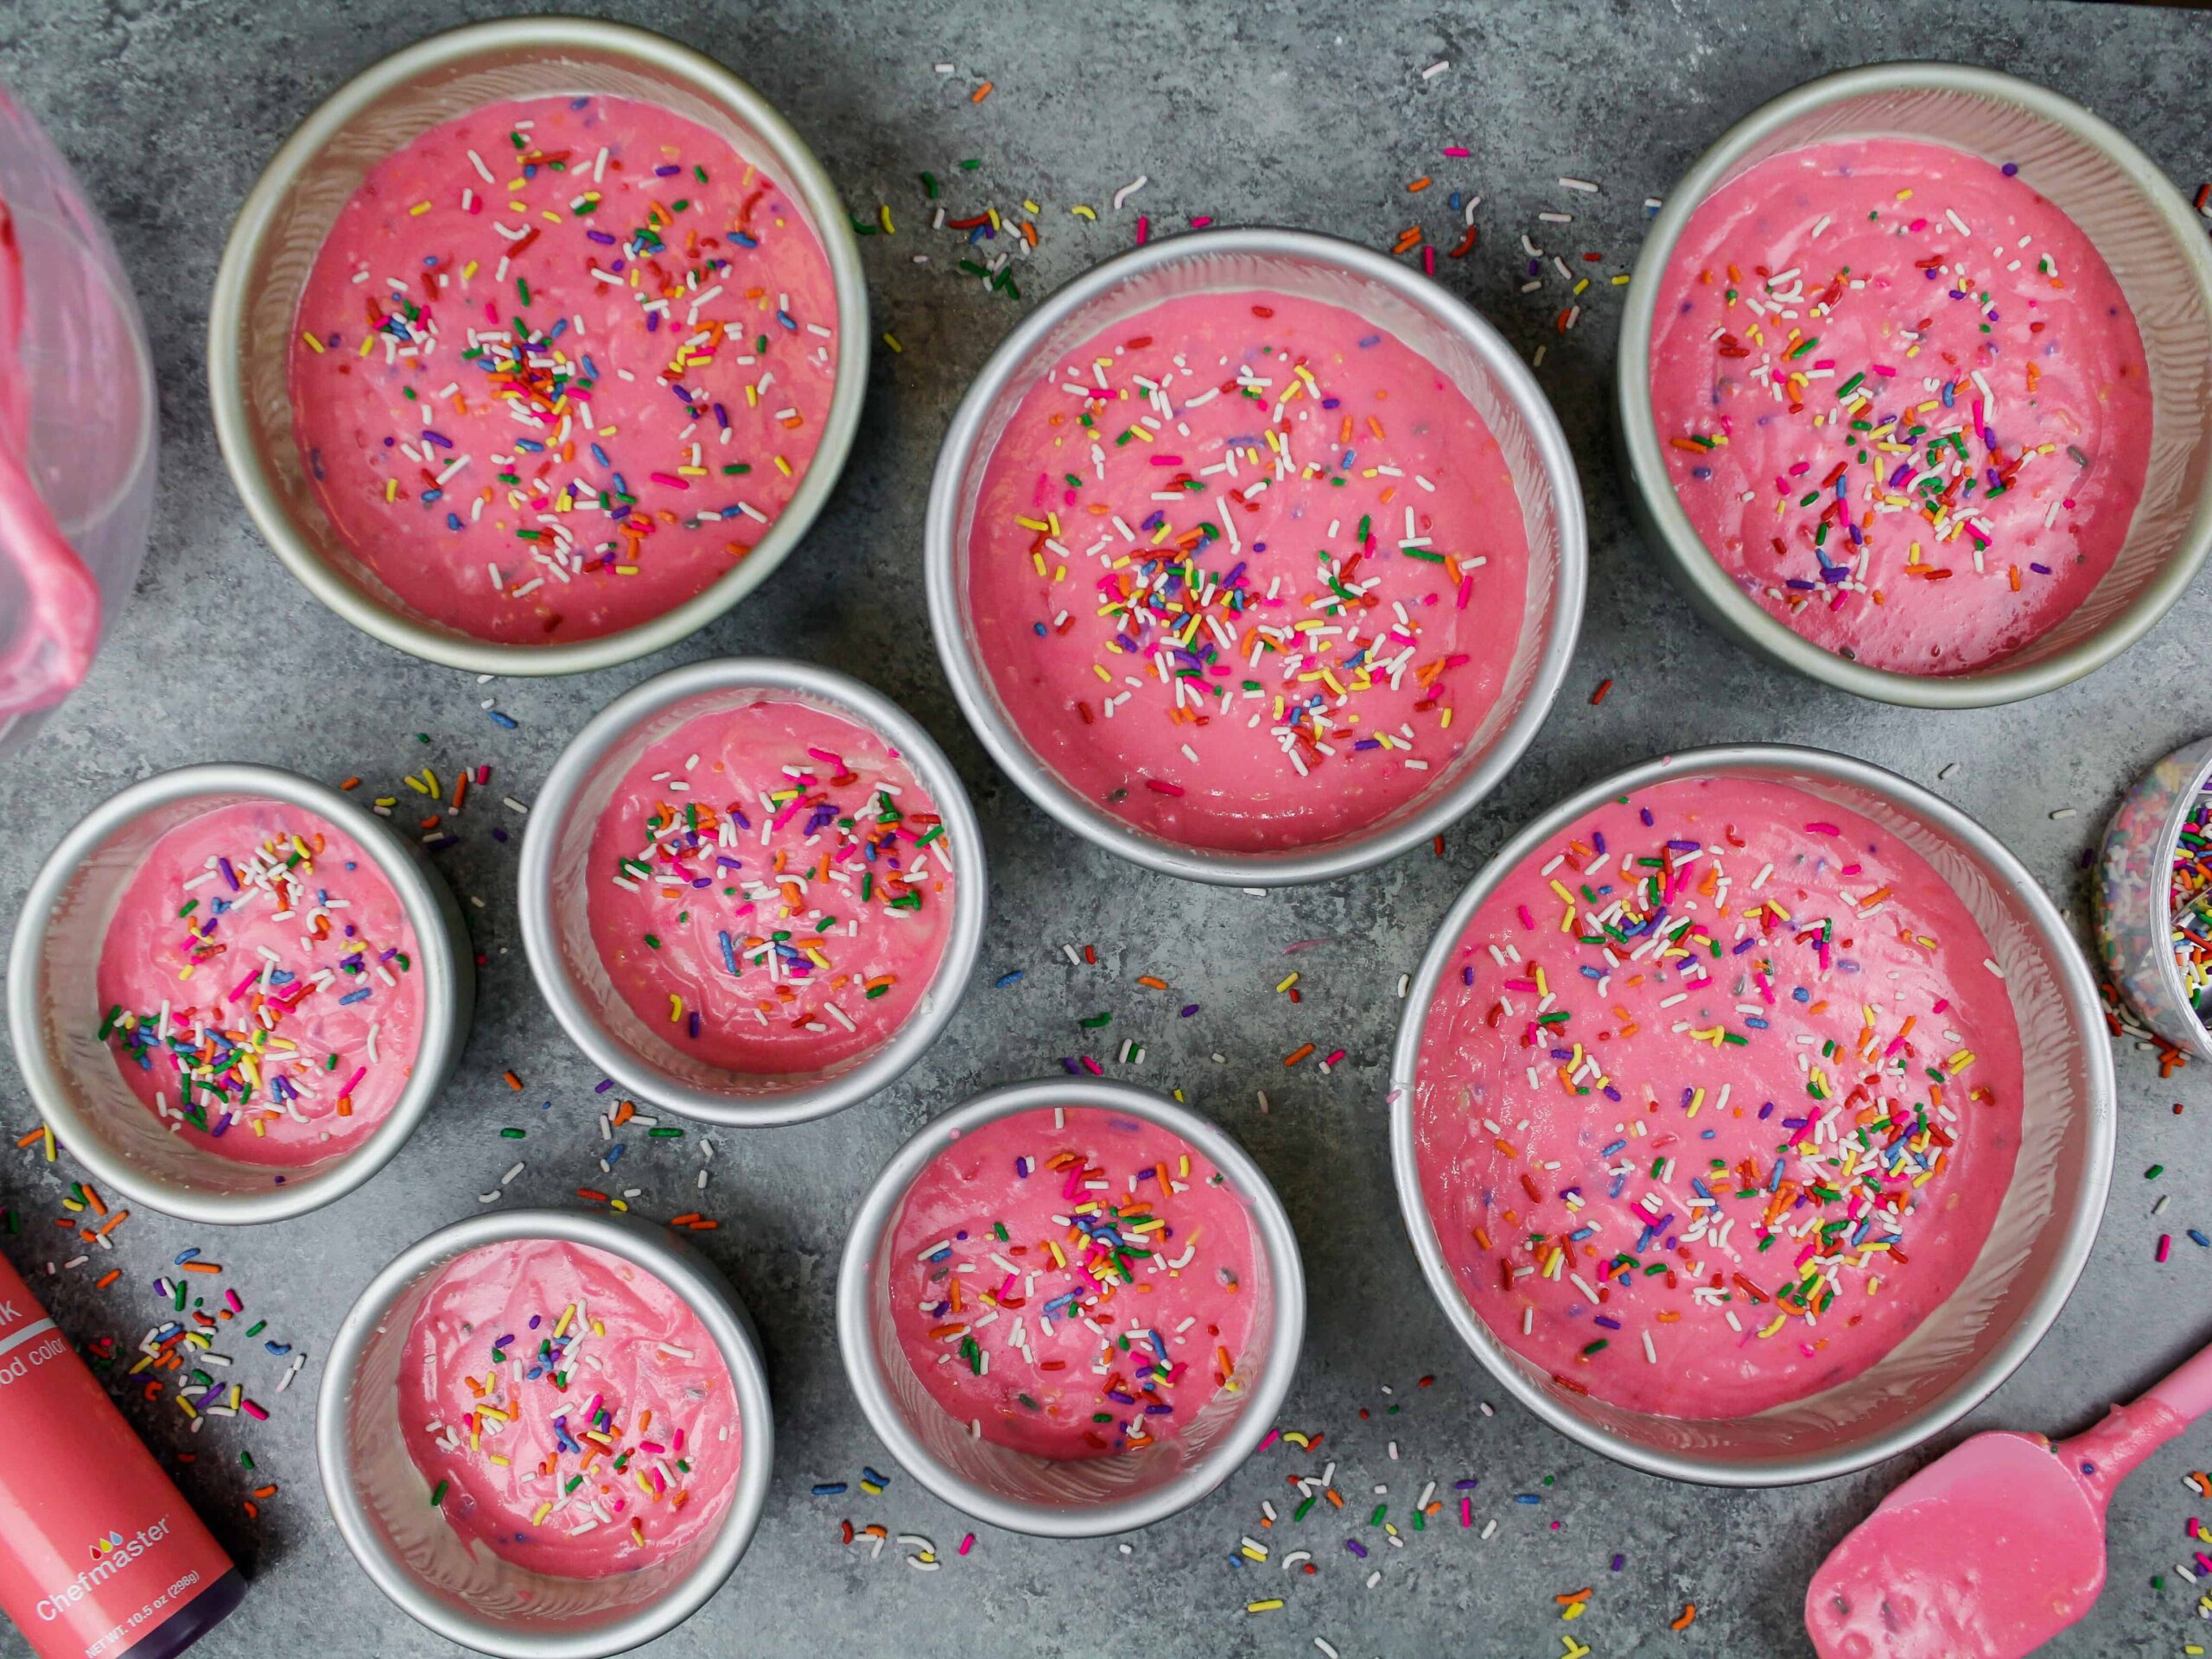
Coloring These Funfetti Cake Layers
Coloring these funfetti cake layers is totally optional, but it creates a fun surprise when you cut into the cake!
I used gel food coloring to make these cake layers pink. Liquid food coloring can work too, but it can throw off the consistency of the cake batter if you add too much.
I highly recommend using gel food coloring. Gel food coloring is concentrated so it allows you to use less. A couple squirts will create a beautiful pink shade.
Gel food coloring is also thicker, so it won’t change the consistency of the cake batter. Americolor and Chef Master are my go-to brands of gel food coloring and I order them on amazon.
Natural food coloring (either liquid or powder) can be used in place of the gel food coloring! The colors won’t be quite the same, but it will still be beautiful.
Tips for Making the Best Elephant Cake:
- Properly measure your flour (spoon into the cup measure, then level) or use a kitchen scale to measure your dry ingredients.
- Natural food coloring (either liquid or powder) can be used in place of the gel food coloring. The colors won’t be quite the same, but it will still be beautiful.
- Ingredients at room temp mix together better, so be sure you set out any cold ingredients ahead of time.
- Chill your cake layers in the freezer for about 20 minutes before assembling the cake. This makes it easier to stack and frost.
- Make this elephant cake vegan or dairy free if needed! Use your favorite type of dairy free milk to replace the buttermilk and heavy cream and use vegan butter sticks in place of the butter. For the eggs I recommend using an egg replacer like this.
- Insert a thick bubble tea straw or wooden dowel through the layers once they’re stacked to help keep the cake stable as you decorate it.
- Shape the fondant ears before you start assembling the cake. This will give them a chance to firm up before you have to add them to your cake.
- Use an acetate sheet to help you get your final coat of frosting super smooth.
Making This Elephant Cake in Advance & Storage Tips:
- Make your cake layers in advance and freeze them. It breaks the process up and makes it more approachable.
- Make your frosting ahead of time too or save any leftover frosting. It can be stored in an airtight container in the fridge for up to a month. Or store it in the freezer for up to 3 months! Be sure to give it a good stir once it thaws to get the consistency smooth again.
- A frosted cake can last in the fridge for up to a week. The buttercream locks in all the moisture, keeping the cake fresh and delicious.
- If you cut into the cake and have leftovers, use any remaining frosting to cover the cut section to keep it moist. It can be stored in the fridge like this for up to a week.
Let Me Know What You Think!
If you try this elephant birthday cake recipe, I’d love to hear what you think of it! Please leave a rating and comment below.
Don’t forget to tag me @chelsweets and use #chelsweets so that I can see your amazing creations on social media.
Other Recipes You Might Like:
Elephant Cake
Ingredients
Funfetti Cake Layers
- 3 cups all-purpose flour 375g
- 3 cups granulated sugar 600g
- 2 1/2 tsp baking powder 10g
- 1 tsp fine salt 6g
- 1 cup unsalted butter, room temperature 226g
- 1 cup carton egg whites or 7 large egg whites, room temperature 235g
- 1 1/2 cups full-fat sour cream, room temperature 380g
- 2 Tbsp vegetable or canola oil 28g
- 2 tsp vanilla extract or vanilla bean paste 8g
- pink gel food coloring – optional
- 3/4 cup rainbow jimmies or long strand sprinkles 130g
Grey Buttercream Frosting
- 3 cups unsalted butter, room temperature 678g
- 1 Tbsp vanilla extract or vanilla bean paste 12g
- 2 Tbsp black cocoa powder 12g
- 1 tsp fine salt 6g
- 11 cups powdered sugar 1375g
- 1/3 cup heavy whipping cream, room temperature 80g
Rice Krispie Treats – Elephant Legs & Trunk
- 4 cups mini marshmallows 200g
- 6 cups puffed rice cereal 150g
Elephant Cake Decoration
- 1 Tbsp black fondant
- 1 tsp white fondant
- 1 cup light pink fondant
- Small offset spatula
- Small acetate sheet
Instructions
Step 1: Make the Funfetti Cake Layers
- Preheat oven to 350°F / 175°C. Grease and line the following pan sizes: one 7-inch cake layer, three 6-inch cake layers, and three 4-inch cake layers. Set aside.
- Mix 3 cups all purpose flour, 3 cups sugar, 2 1/2 tsp baking powder and 1 tsp salt in a stand mixer with a paddle attachment or in a large bowl hand mixer on a low speed until combined.
- Mix in 1 cup of unsalted butter slowly into the dry ingredients on a low speed. Continue to mix until no large chunks of butter remain, and the mixture looks crumbly.
- Pour in 1 cup of egg whites and mix on low until just combined.
- Mix in 1 1/2 cups sour cream, 2 Tbsp of vegetable oil, 2 tsp of vanilla extract, and a squirt of gel food coloring if desired. Mix on a medium-low speed until incorporated.
- Scrape down the sides of the bowl with a rubber spatula then beat on a low speed for about 30 seconds to make sure everything is properly mixed together.
- Fold 3/4 cup rainbow sprinkles into the cake batter using a rubber spatula and mix just until they're evenly distributed.
- Pour the batter evenly between the prepared pans, then bake for 30-35 minutes or until a toothpick comes out with a few moist crumbs. The small pans should bake faster, so be sure to check them first. Rotate your pans halfway through to help the cake layers bake evenly.
- Let the layers cool in the pan for about 15 minutes, then flip them onto a wire rack to finish cooling.
- Once the cake layers have finished cooling use a serrated knife to level the tops and set the cake layers aside.
- If you make these cake layers in advance, wrap and freeze them like this. When you're ready to assemble the cake, unwrap the frozen layers and allow them to thaw for about 30 minutes before you plan to frost the cake.
Step 2: Make the Grey Buttercream Frosting
- While the cake layers bake and cool, make the buttercream frosting.
- Beat 3 cups of butter on a medium speed for 30 seconds with a paddle attachment or hand mixer until smooth.
- Add in 1 Tbsp of vanilla extract, 2 Tbsp black cocoa and 1 tsp of salt and mix on a low speed.
- Slowly add in 11 cups of powdered sugar, 1 cup at a time. Add 1/3 cup of heavy cream halfway through to make it easier to mix.
- Once fully mixed and has reached the desired consistency, beat on low until for a couple extra minutes to make the frosting super smooth and to push any extra air out of the frosting.
- If the frosting is too thick, add in additional cream (1 Tablespoon at a time). If the frosting is too thin, add in more powdered sugar (quarter of a cup at a time).
- Cover the buttercream with plastic wrap to prevent crusting, then set aside.
Step 3: Assemble the Elephant Cake
- Before you start to make the cake, use black, white and pink fondant to create the elephant's eyes, cheeks, nails and ears (roughly 4.5-in. x 2.5-in). Make the fondant ears about 1/2 inch thick to allow you to press 3 toothpicks into them like in the video. This will allow you to securely add the ears to the cake later.
- Place the fondant pieces on a wire rack or piece of parchment paper to let them dry and firm up while you assemble the cake.
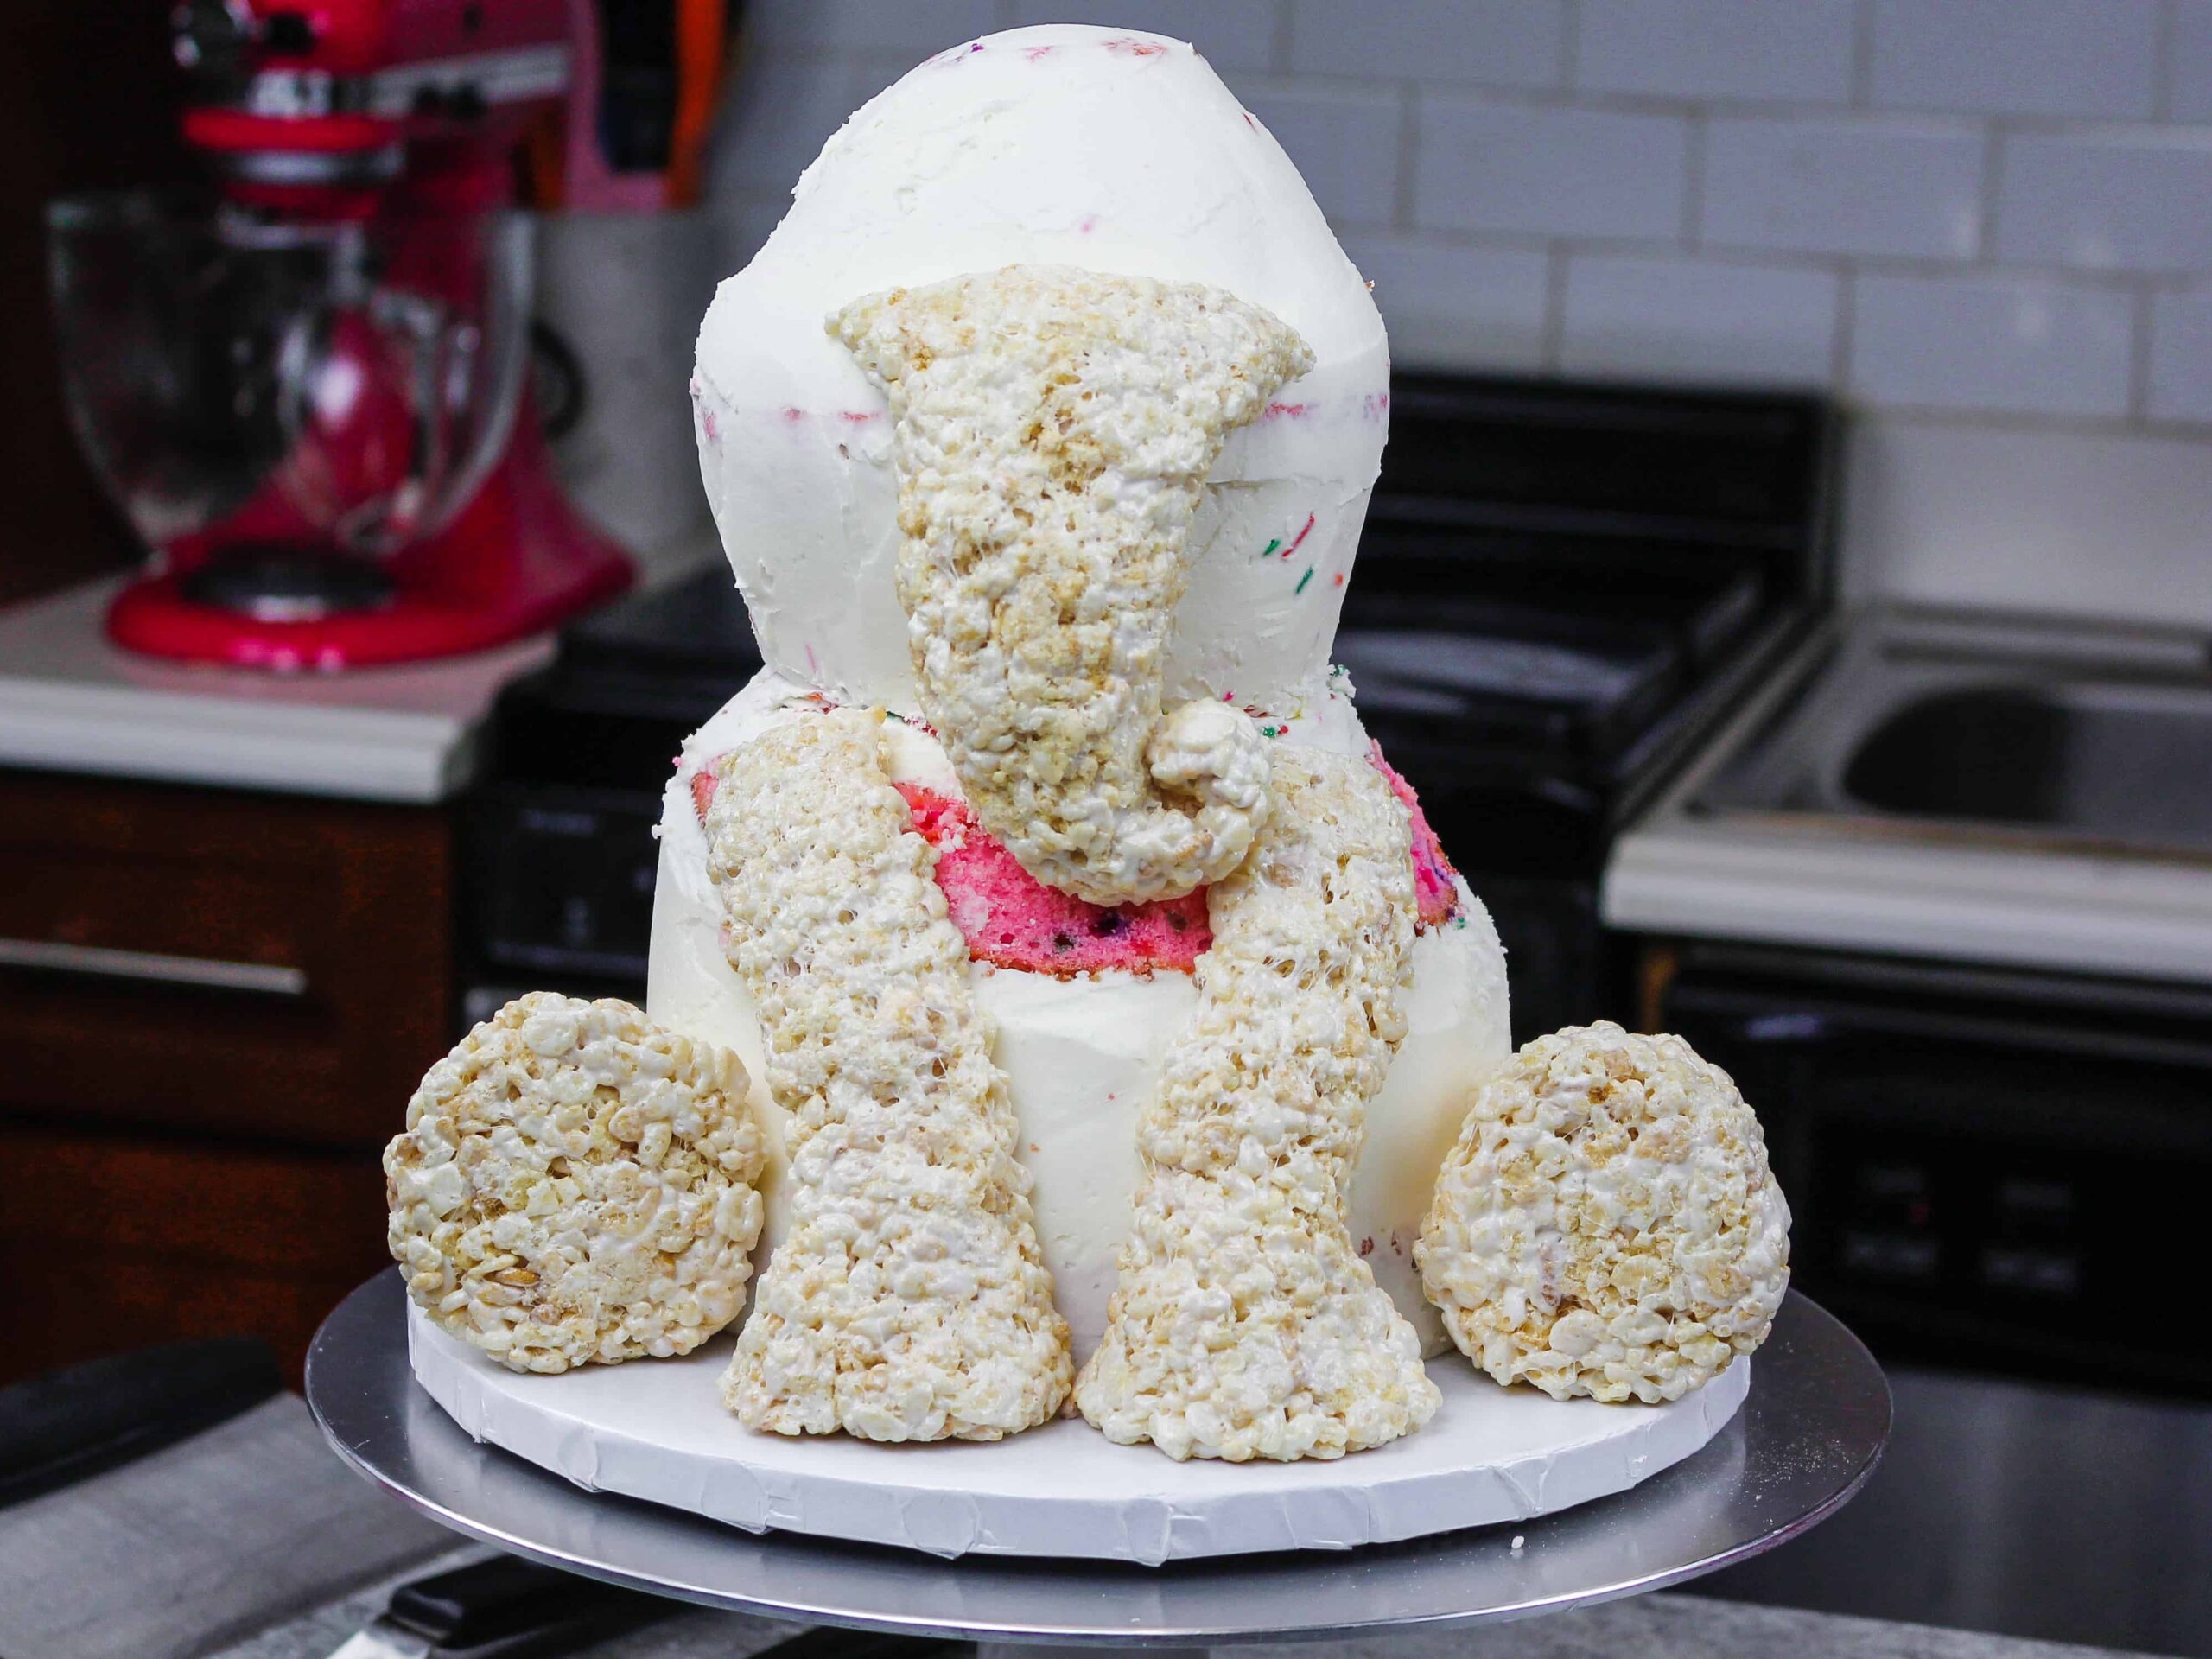
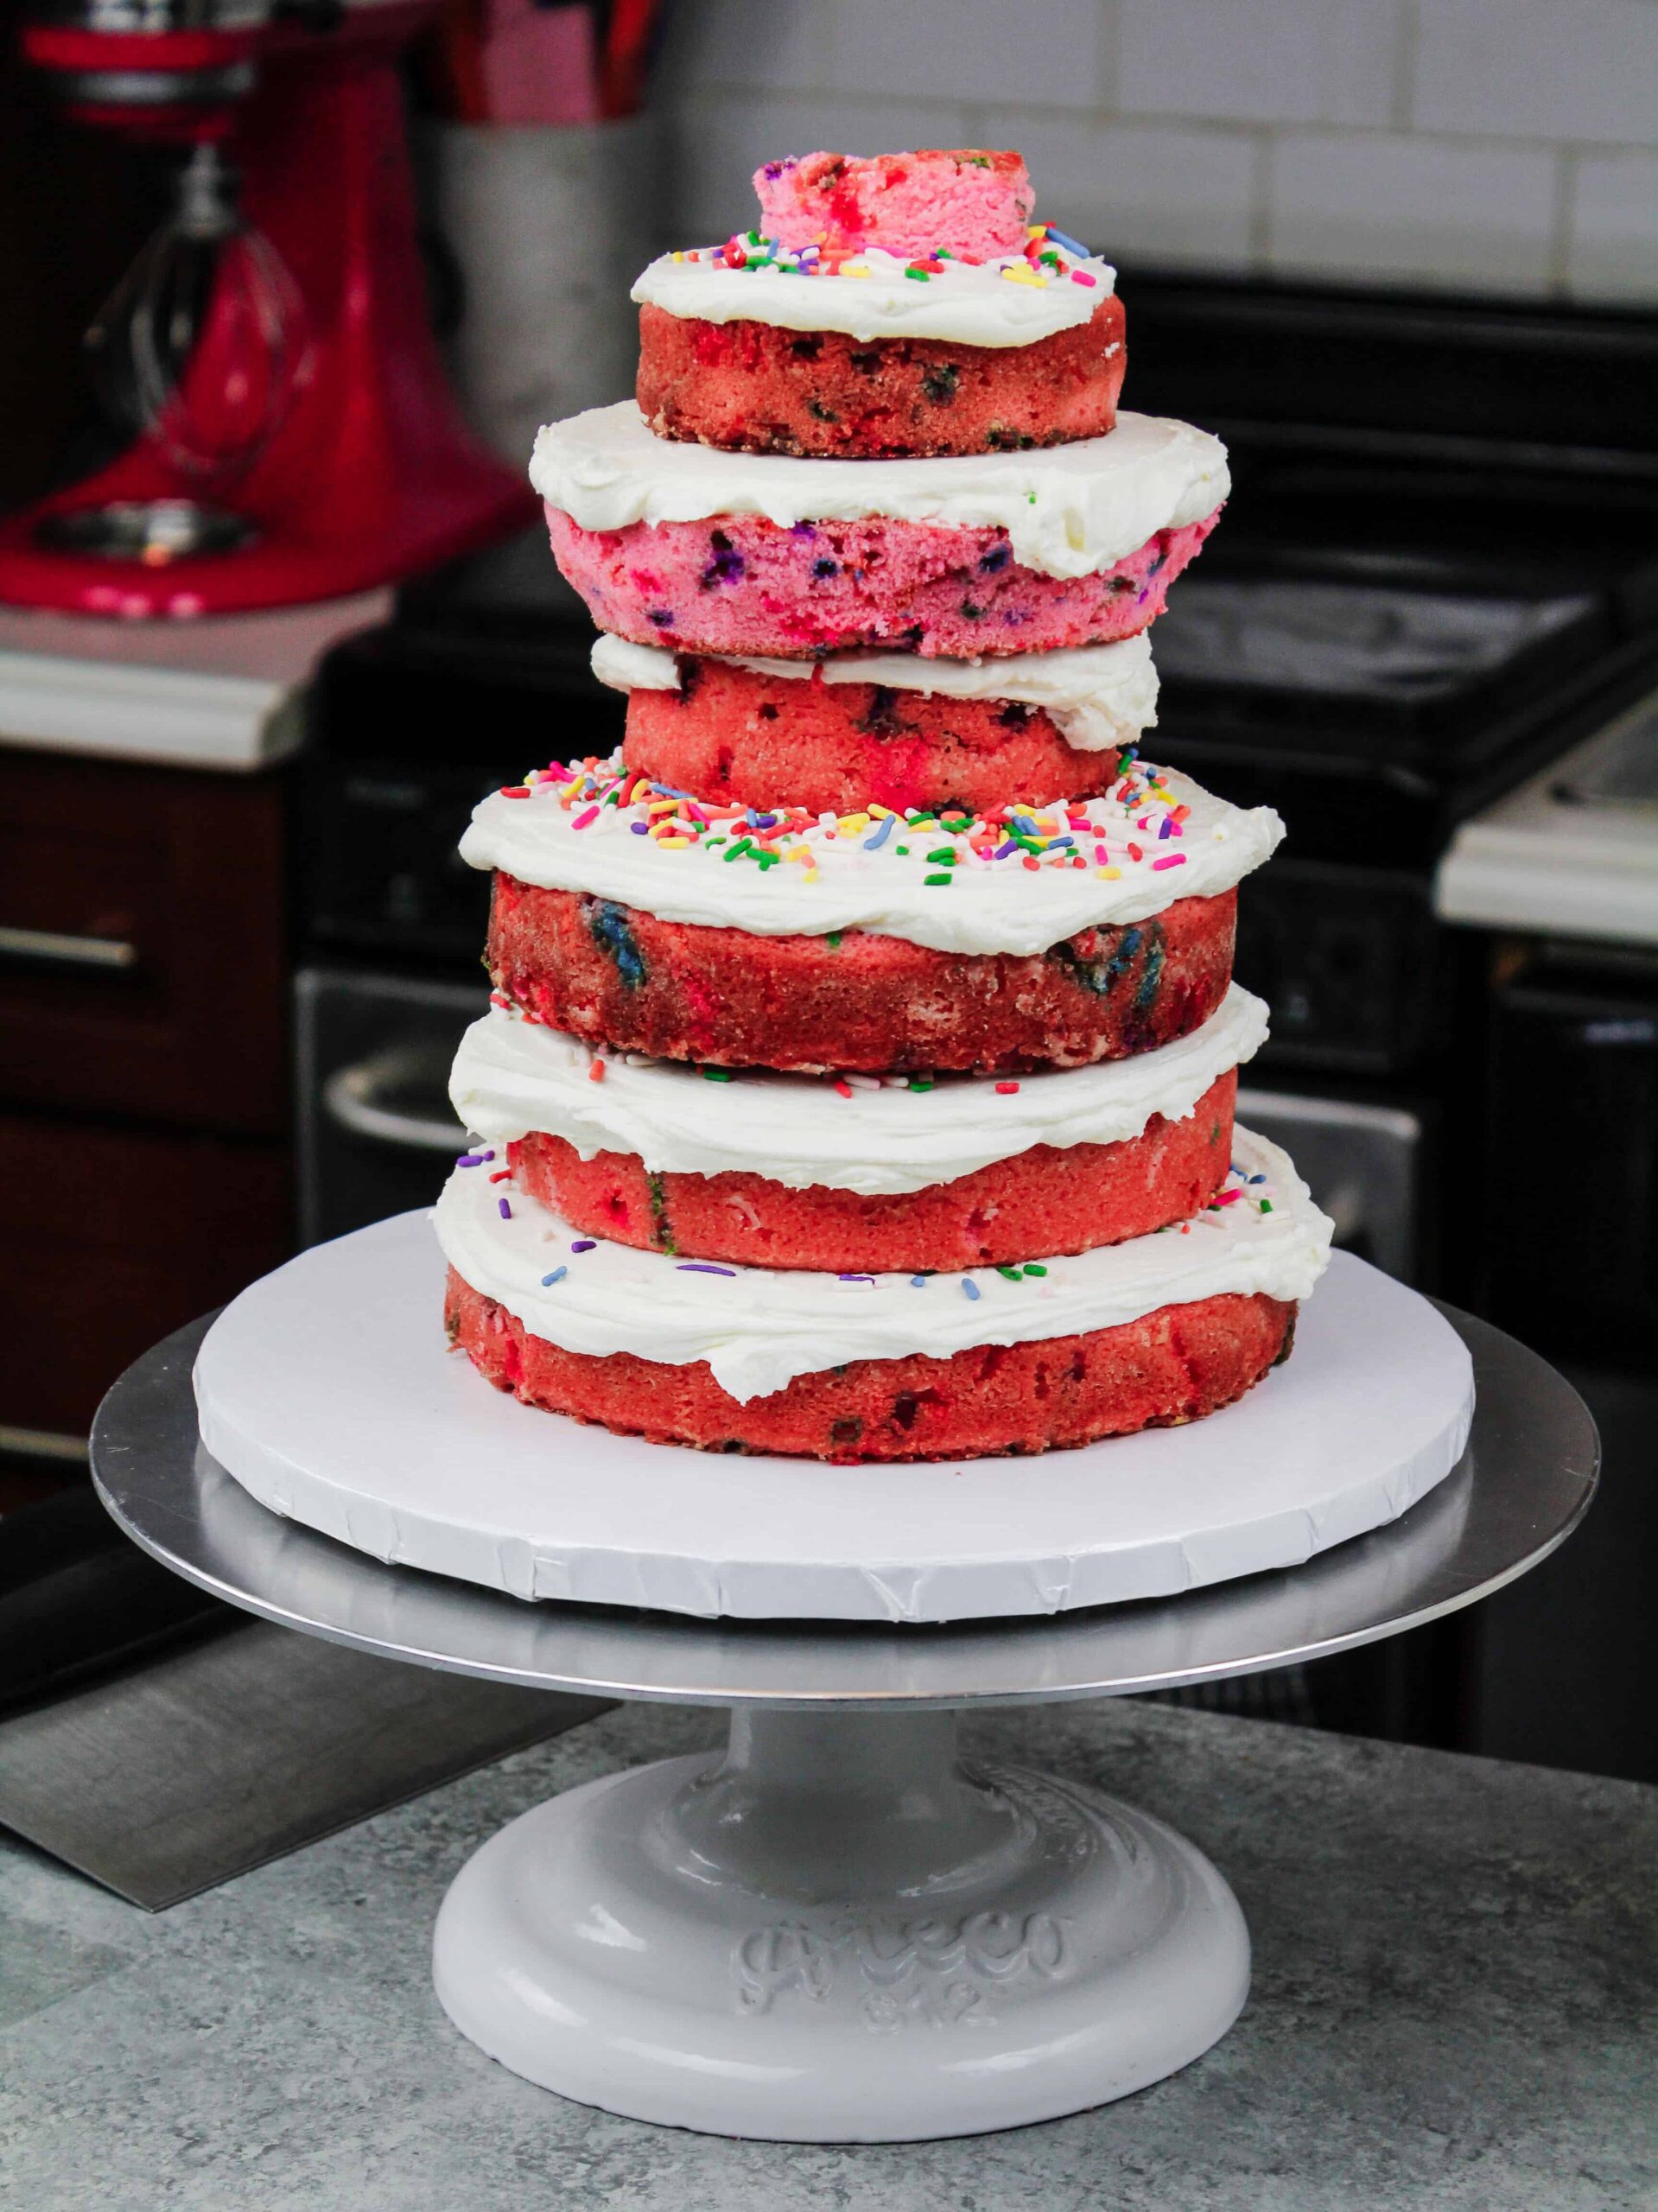
- Stack and frost cake layers on a 10-inch greaseproof cake board using a dab of frosting to help stick the first cake layer to the board.
- Add an even layer of buttercream between each cake layer with a large offset spatula and stack them in the following order: 7-inch, 6-inch, 6-inch, 4-inch, 6- inch, 4-inch, 4 inch. Use a serrated knife to trim the cake layers as needed to give the elephants body a rounder shape.
- Insert either a thick plastic straw (like a bubble tea straw) or a wooden dowel through the center of the cake layers to help stabilize them.
- Spread a thin coat of frosting around the cake to fully cover the cake layers. Smooth using a bench scraper then chill the cake in the fridge (30 minutes) or freezer (10 minutes) until the frosting is firm to the touch.
Step 4: Make the Legs & Trunk with Rice Krispie Treats
- Place 4 cups of mini marshmallows in a heatproof bowl and heat in the microwave for 30 seconds at full power.
- Stir then heat in 15 second intervals until the marshmallows are melted.
- Pour in 6 cups of rice krispies or puffed rice cereal and stir until the cereal is fully coated in melted marshmallows.
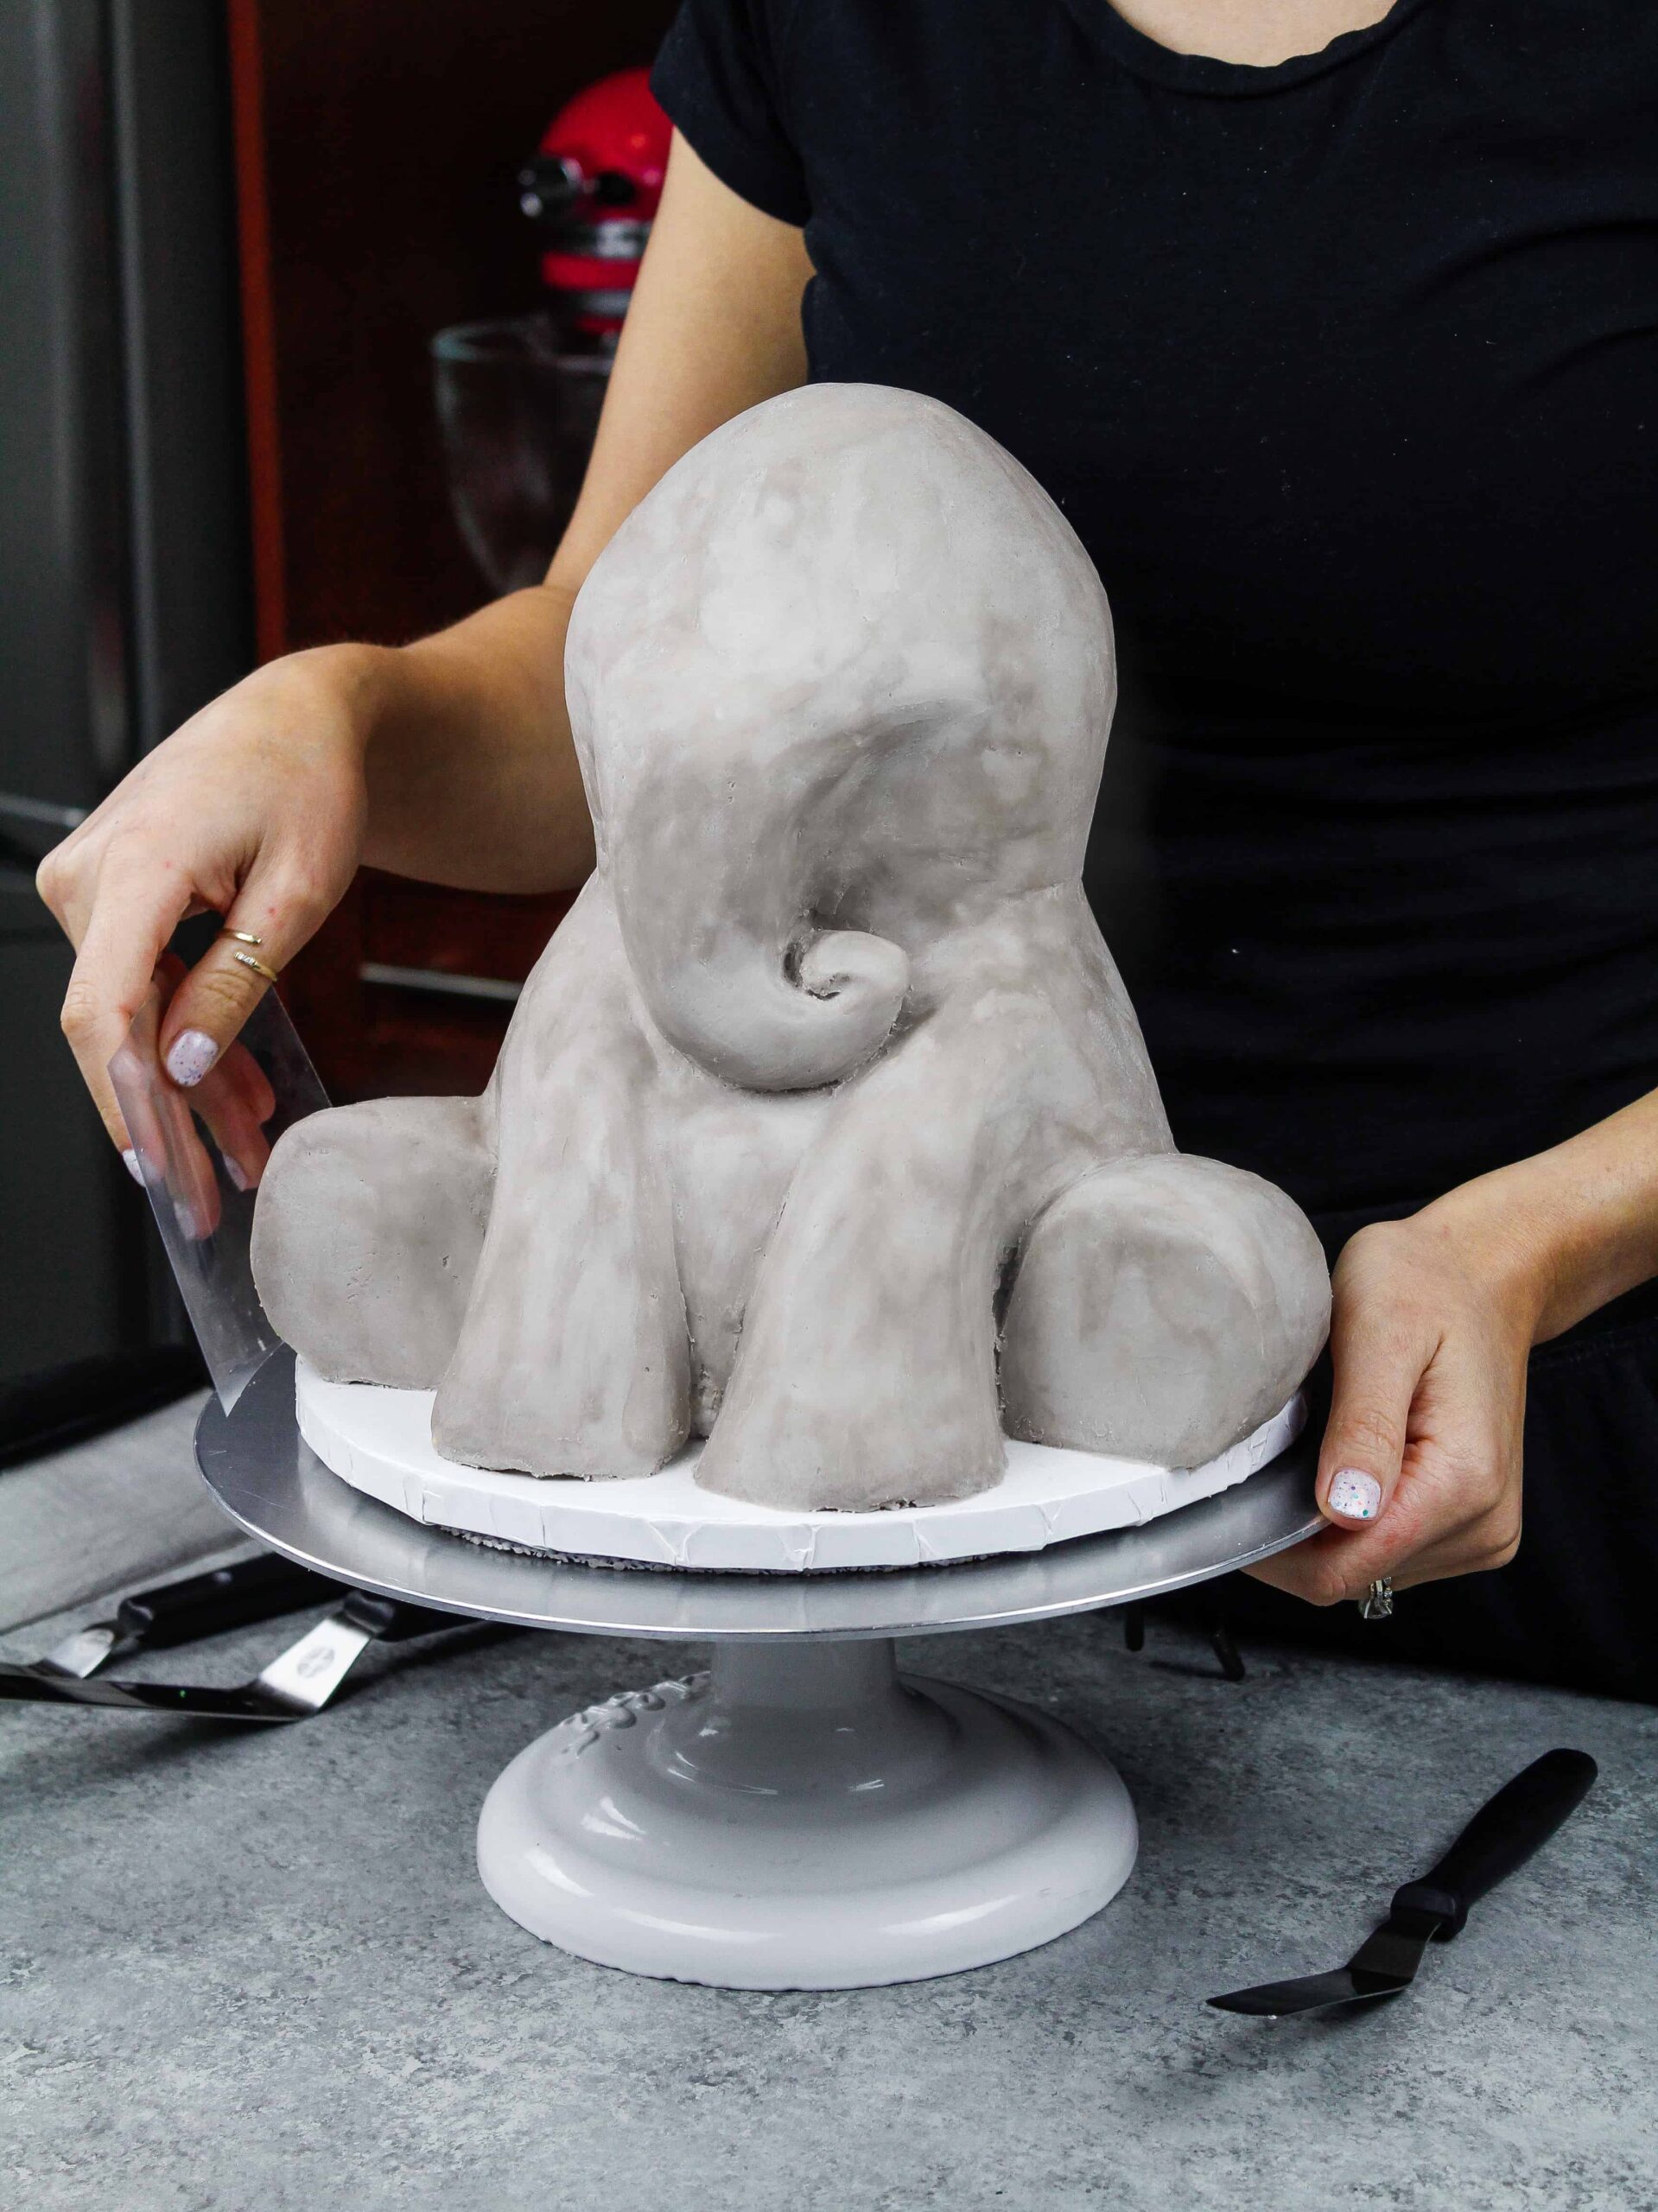
- Grease your hands with cooking spray then shape two front legs, two hind legs, and a trunk with the rice krispie mixture. Place the legs and trunk against your cake as you make them to ensure they are proportionate and shaped properly.
Step 5: Decorate the Elephant Cake
- Press the rice krispie treat legs and trunk into place on the cake.
- Add a second, thicker layer of grey buttercream around the cake and rice krispies. Smooth using a small offset spatula and an acetate sheet.
- Chill the cake again in the fridge (30 minutes) or freezer (10 minutes) until the second coat of frosting firms up.
- Place the fondant facial features on the chilled cake with a small dab of buttercream.
- Carefully press the ears into the sides of the elephant's head and pipe grey buttercream around the edge of each ear. Pipe a thin layer of buttercream on the back of each ear, then chill the cake again in the fridge or freezer to help lock the ears into the place.
- Let the cake sit out at room temperature for 1-2 hours before serving to make it easier to cut.
Video
Notes
Tips for Making The Best Elephant Cake:
- Properly measure your flour (spoon into the cup measure, then level) or use a kitchen scale to measure your dry ingredients.
- Natural food coloring (either liquid or powder) can be used in place of the gel food coloring. The colors won’t be quite the same, but it will still be beautiful.
- Ingredients at room temp mix together better. Set out any cold ingredients ahead of time.
- Chill your cake layers in the freezer for about 20 minutes before assembling the cake. This makes it easier to stack and frost.
- Make this elephant cake vegan or dairy free if needed! Use your favorite type of dairy free milk to replace the buttermilk and heavy cream, and use vegan butter sticks in place of the butter. For the eggs I recommend using an egg replacer like this.
- Insert a thick bubble tea straw or wooden dowel through the layers once they're stacked to help keep the cake stable as you decorate it.
- Shape the fondant ears before you start assembling the cake. This will give them a chance to firm up before you have to add them to your cake.
- Use an acetate sheet to help you get your final coat of frosting super smooth.
Absolutely beautiful. Can I 1/2 the cake batter if I am making a dolly varden princess cake?
Hello! Is there a way to just convert the cake recipes and make a sheet cake instead of using the multiple layer round cake pans? Do you think if I just put the batter into a large sheet pan and watch the time it would work out the same? I’ve sent you two messages on IG trying to ask the question with no response.
Super cute! Can you post which parts of the you trimmed to male the body round please.
I made this cake for my little girls third birthday because he requested a saggy baggy elephant. I had no idea if I could manage to make anything recognizable out of the hunk of cake but I just did as the instructions said and it did turn into an adorable elephant. ??? Wish I could figure out how to share the photo. I made homemade fondant and it worked great. The cake recipe is amazing (fairly rich I thought despite it just being a regular white cake) The icing worked great as well.
I don’t often post feedback but wanted to say thank you for this! My 6 year old wanted an elephant cake like his soft toy elephant. I didn’t think I could do it but followed all your advice and it worked out so well. Thank you for sharing your wisdom and advice. One happy 6 year old and proud 42 year old! Brilliant.
I’m so happy to hear that Anna! Comment like this are literally why I do what I do 🙂 Thank you for using this recipe / tutorial!!
Thank you so much for your tutorial!
I made the elephant cake for my grandson’s 6th birthday because he asked for an elephant cake ?
He LOVED it!
I am so happy to hear that Deborah!! Wish him a happy birthday for me <3
Fantastic cake! I made this for my daughters 1st birthday and I was amazed at what I could achieve and that’s all thanks to your video, instructions and recipe!
Thank you! ?
Hi Meg,
That makes me so happy to hear!! What a special milestone to bake for! I’m thrilled the recipe and video helped you feel confident, and I bet your little one’s first birthday cake was absolutely perfect. Thank you for sharing 🙂
Why don’t you tell how many cakes and sizes and in the picture you show 8 cakes but the assembly only has 6.
I’m sorry I found the cake sizes.
Great!! I was going to say they’re in the recipe card 🙂