
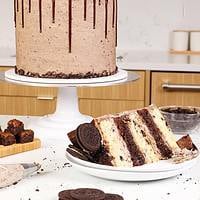
Brownie Oreo Cake
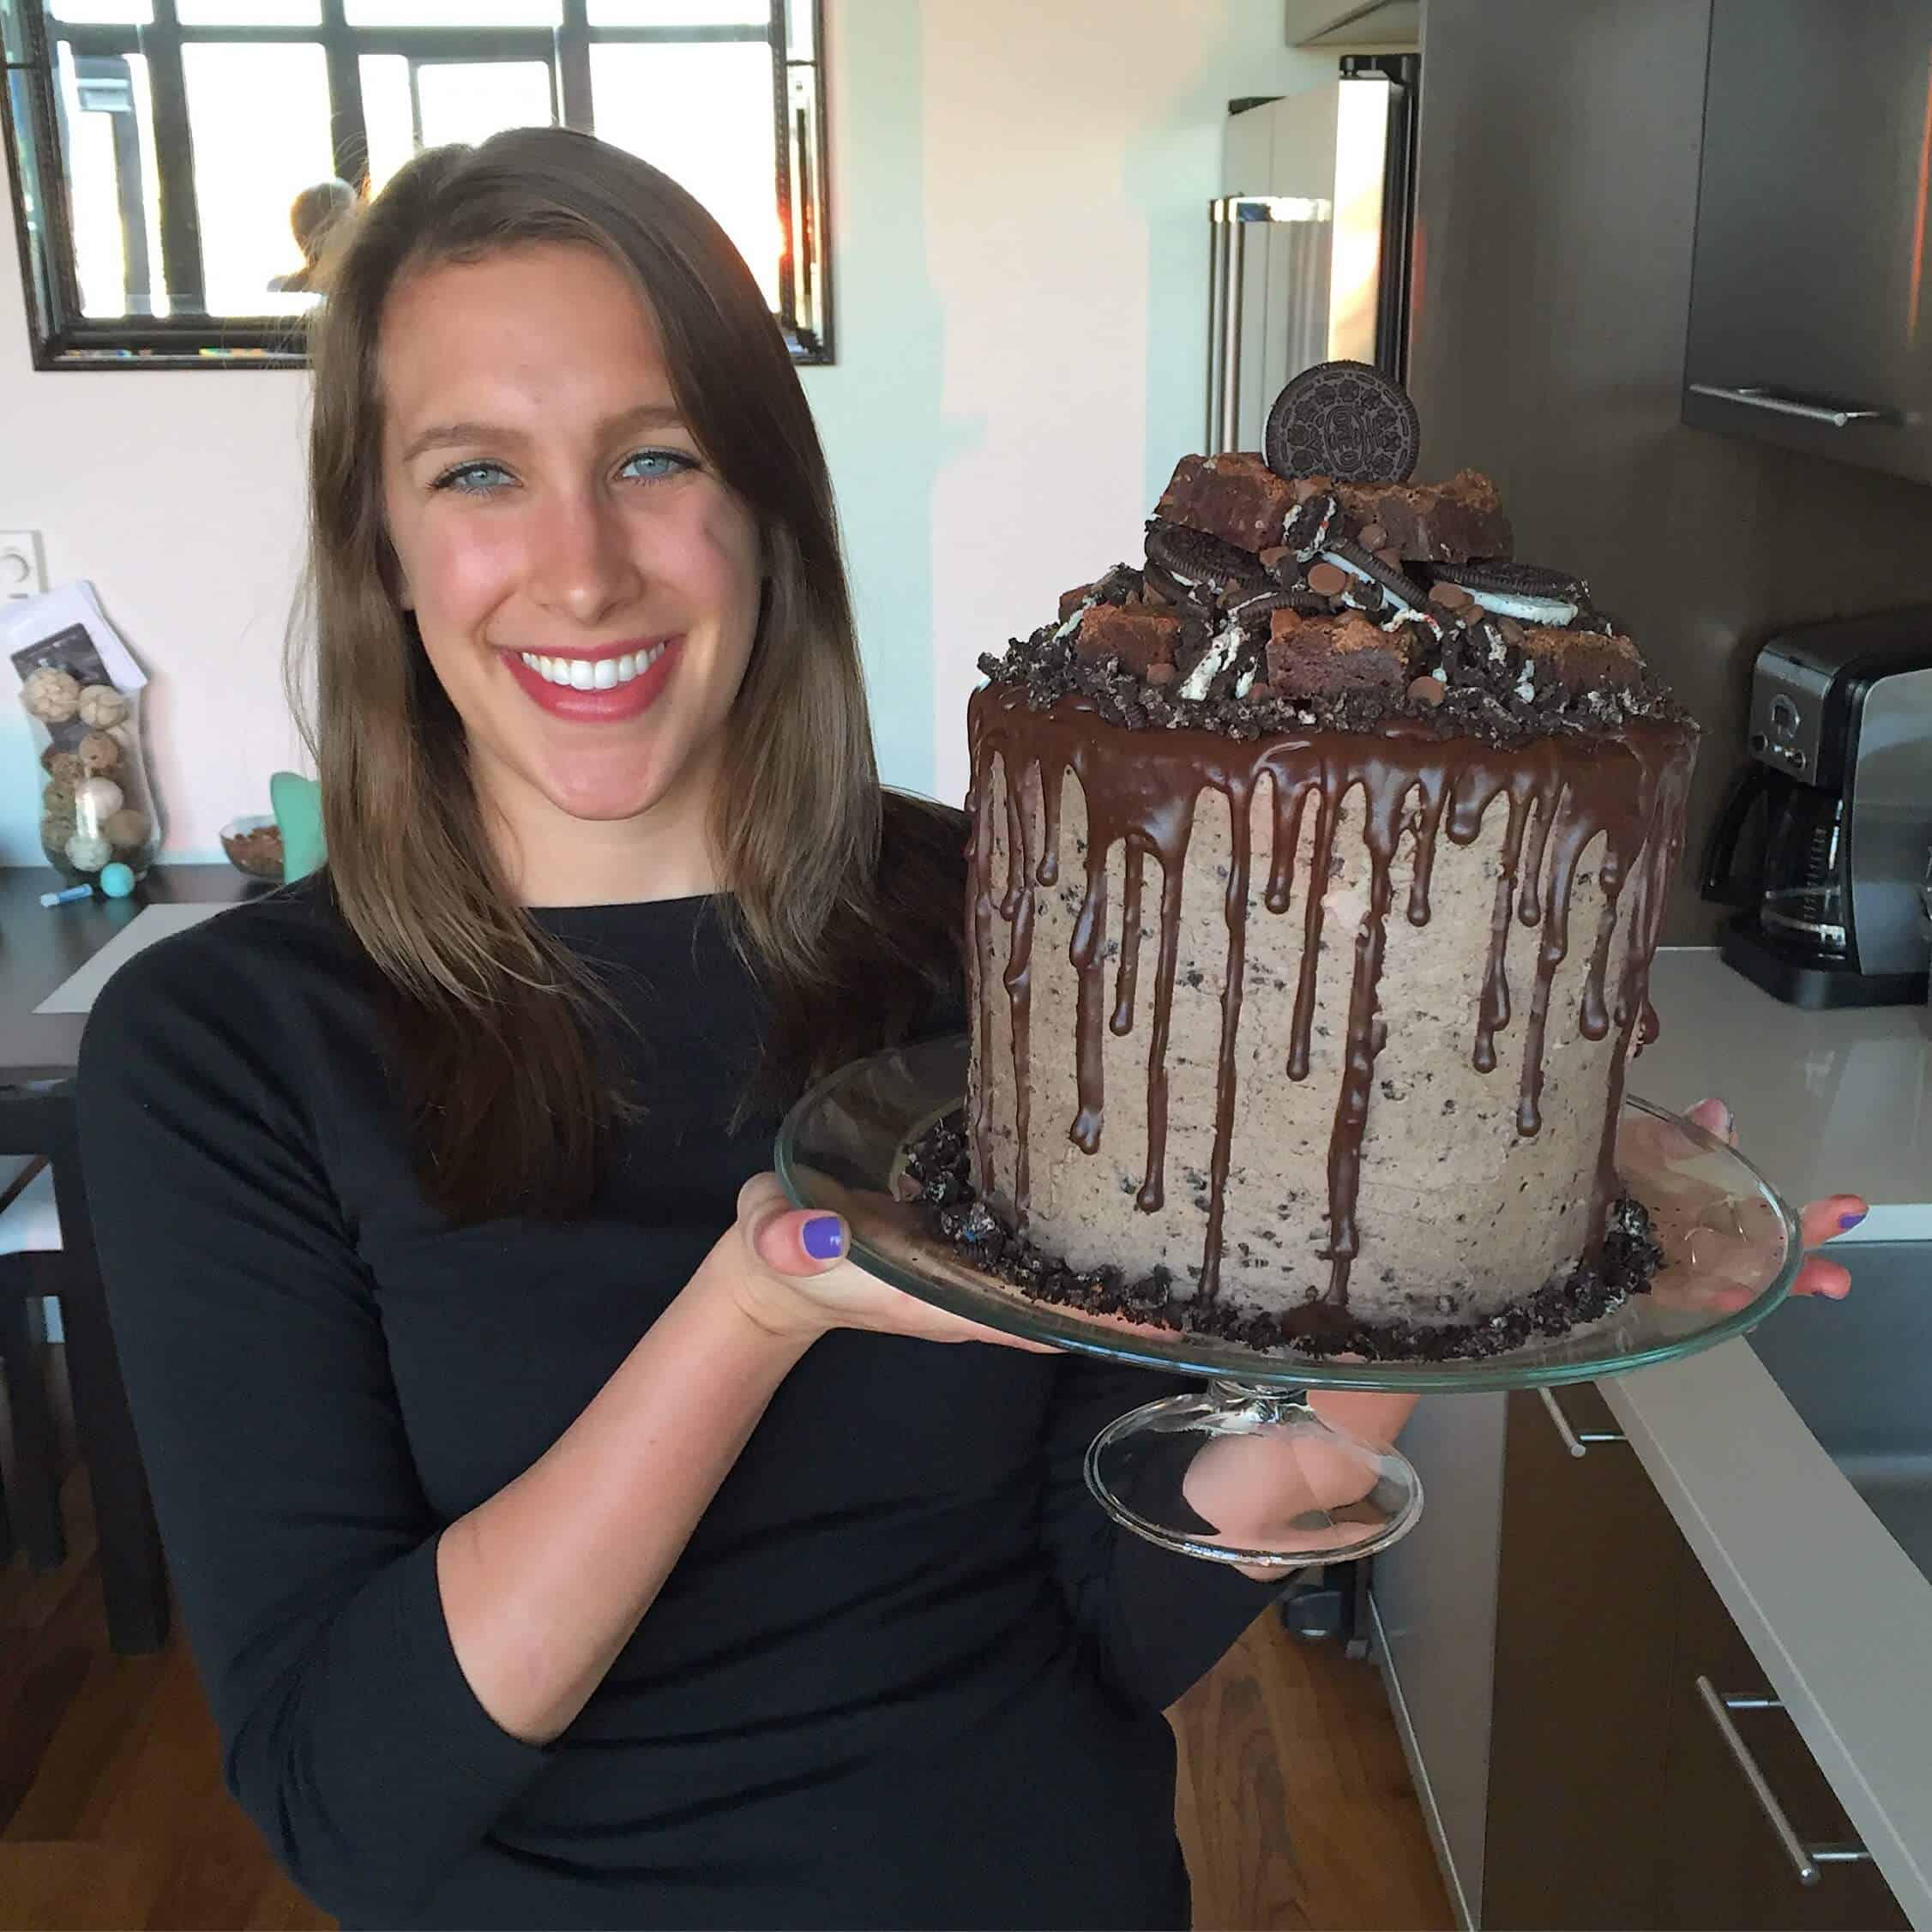
It’s my brother-in-law’s birthday and this year I wanted to recreate the epic 5-layer brownie Oreo cake I made him in 2016.
His lucky number is 5, and he jokingly said he’d like a five-layer cake.
Little did he know, his comment would result in this ginormous cake!
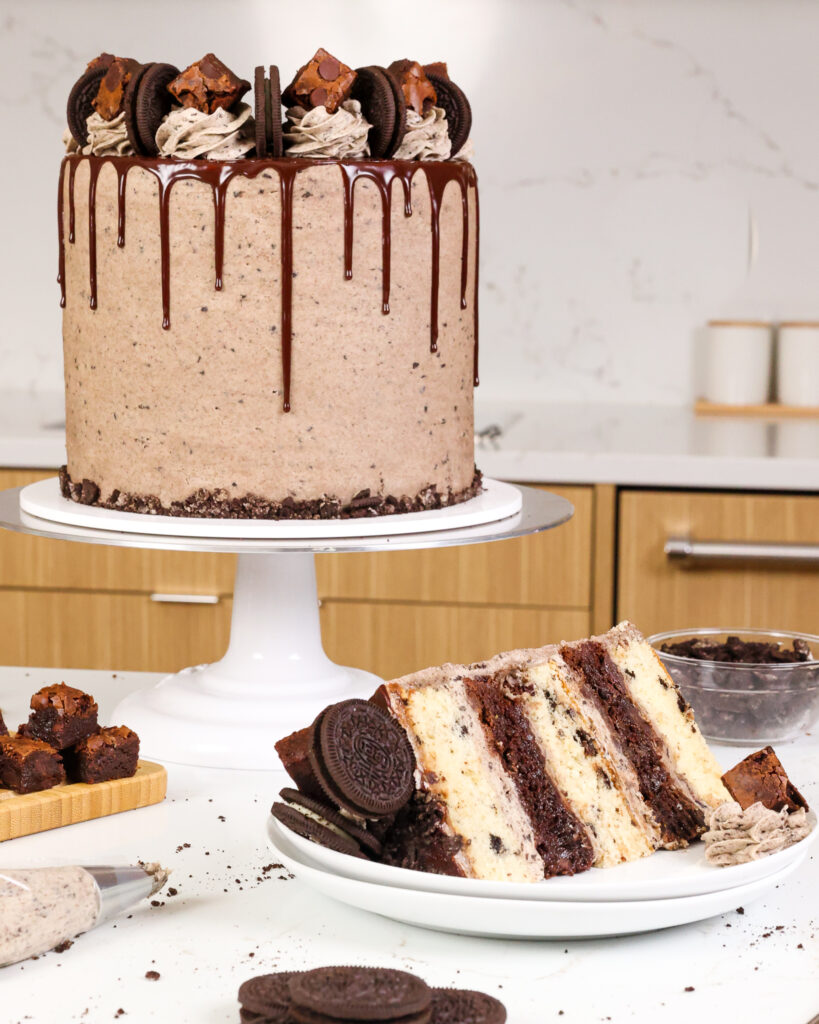
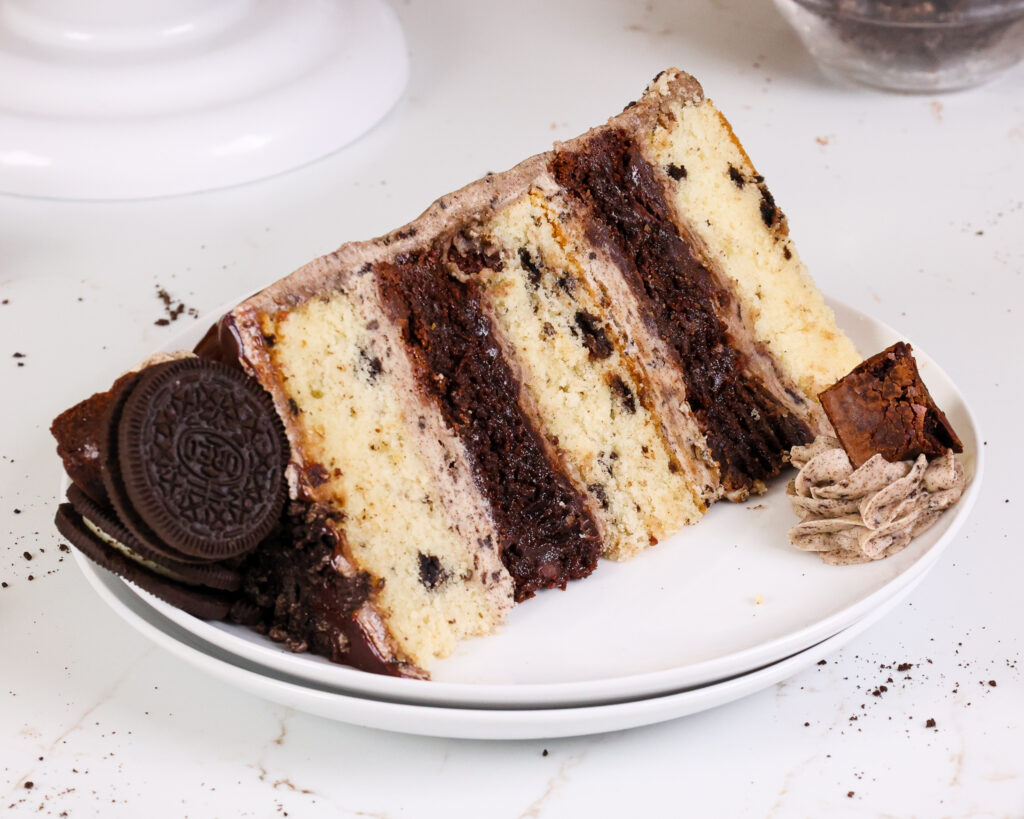
It has alternating layers of tender Oreo cake and brownies and is frosted with homemade Oreo buttercream.
While this cake does have a few different components, it’s totally worth the effort!! I recommend making this cake in stages so that you can enjoy the process.
How to Make This Brownie Oreo Cake
To make sure this cake turns out as amazing as possible, let’s walk through each step together!
I’ve also included a video tutorial of the process below.
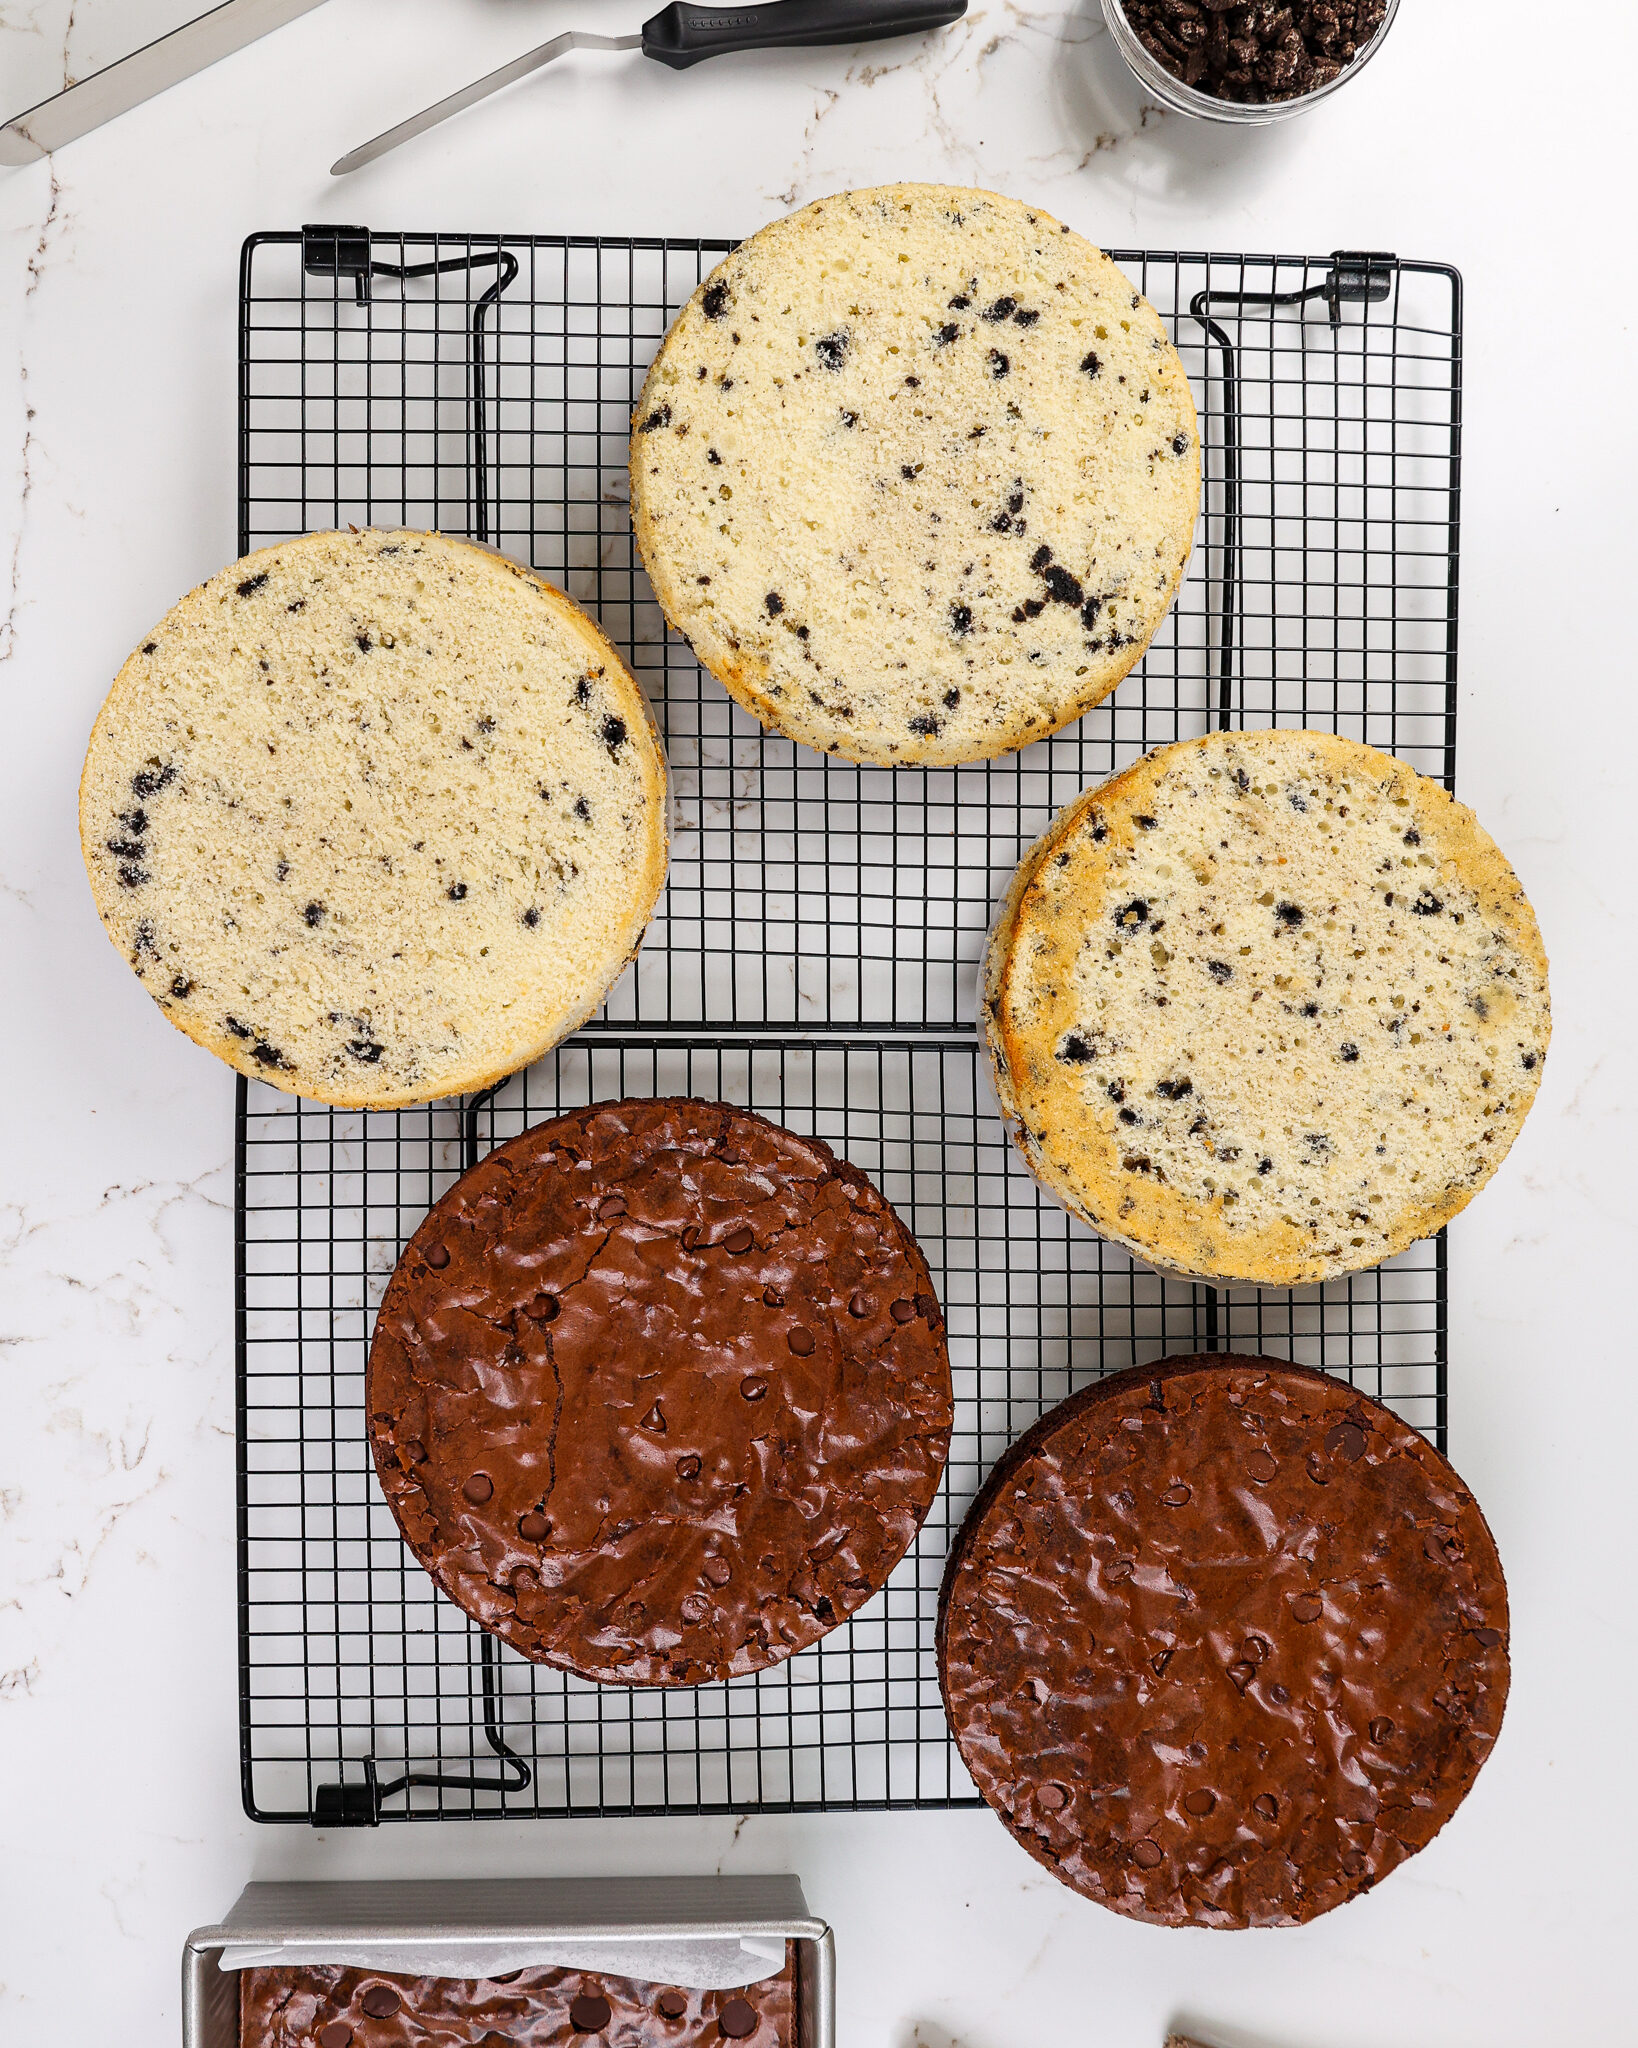
Step 1: Make the Oreo Cake Layers
Make the Oreo cake layers first. Once the batter is made, pour it evenly between the prepared, 8-inch cake pans.
I like to use a scale to make sure each pan has the same amount of batter and will bake up to be the same height.

Bake for 34-36 minutes or until a toothpick comes out with a few moist crumbs.
Let the pans cool for 10 minutes, then run an offset spatula around the perimeter of the pan to separate the cake from the pan.
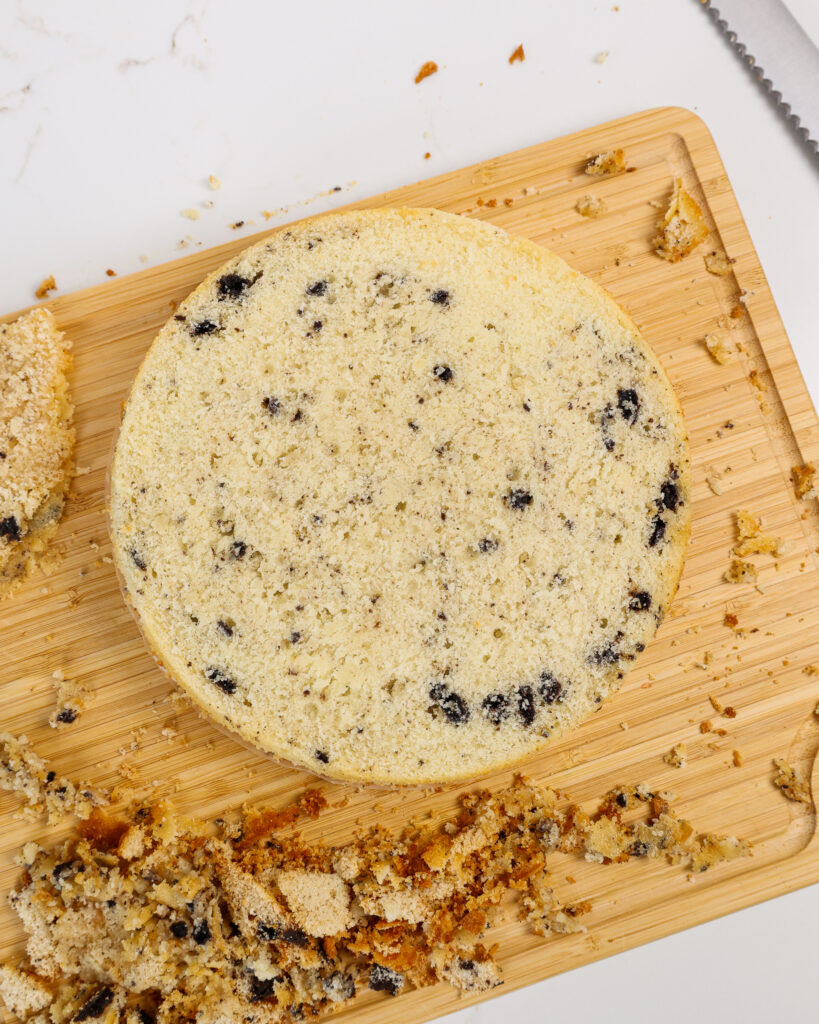
Once the layers are fully cooled, carefully flip the pans and remove the layers from the pans. Use a serrated knife to level the tops of the cooled cake layers.
If you make these in advance, wrap and freeze them at this point. When you’re ready to use them, let them thaw for about 20 minutes before making your cake.
The cake layers should still be slightly cold to the touch, which will make it easier to assemble your cake.
Step 2: Make the Brownie Layers
Next, make the brownies! It’s a big batch, but we need a lot of brownies to fill the cake and decorate it.
Line and grease 2 round, 8-inch cake pans and 1 square, 8-inch cake pan.
Divide the batter evenly between the prepared pans.

Bake in a preheated oven for 43-53 minutes. The circular pans should take about 5 minutes longer to bake than the square pan.
Remove from the oven and let the pans cool on wire rack, then set aside.
Step 3: Make the Oreo Buttercream
While the cake layers and brownies bake and cool, make the Oreo buttercream frosting.
Mix the frosting on the lowest speed with a paddle attachment once it’s made to push out any excess air, then add in the crushed Oreos.

I also like to stir the frosting by hand with a rubber spatula once it’s fully made. This makes the frosting nice and smooth and easier to smooth onto your cake.
If the frosting seems too thick, add in additional cream (1 Tbsp at a time). If the frosting is too thin, add in more powdered sugar (quarter of a cup at a time). Cover with plastic wrap and set aside.
This frosting can also be made in advance and kept in the fridge for up to a month.
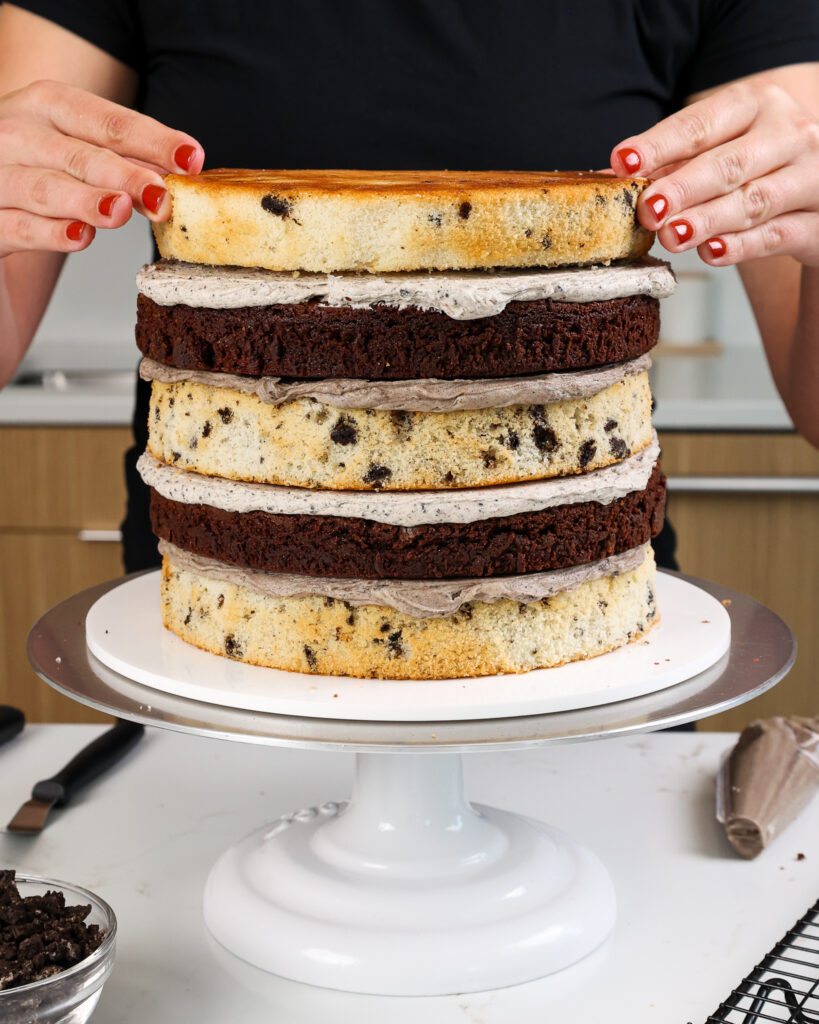
Step 4: Assembling This Oreo Brownie Cake
Stack and frost the alternating Oreo and brownie layers on a greaseproof cake board using a dab of frosting to help stick the first cake layer to the board.
Add an even layer of Oreo buttercream between each cake layer and brownie layer.
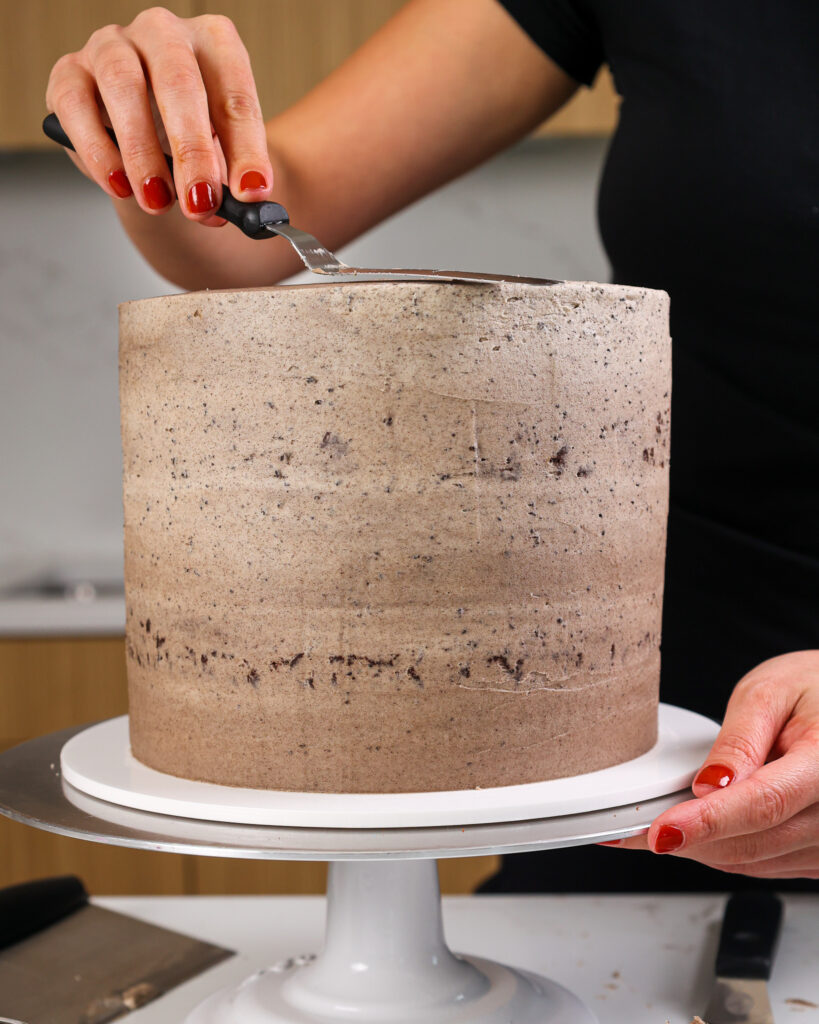
Spread a thin coat of frosting around the the cake to fully cover the cake layers.
Smooth using a bench scraper, then chill the cake in the fridge (30 minutes) or freezer (10 minutes) until the frosting is firm to the touch.
Step 5: Spread on a Thick, Second Layer of Frosting & Decorate
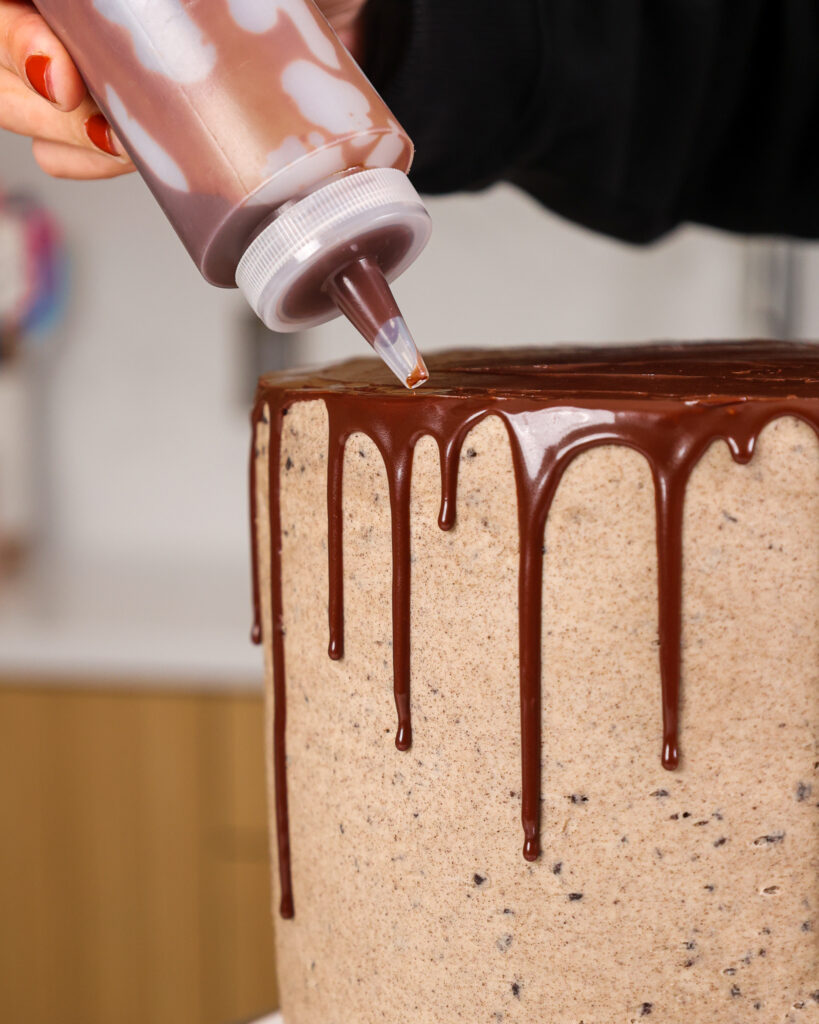
Add a second, thicker layer of Oreo frosting to the cake and smooth using a bench scraper.
If you want to add a drip around the cake, use my chocolate ganache drip recipe.
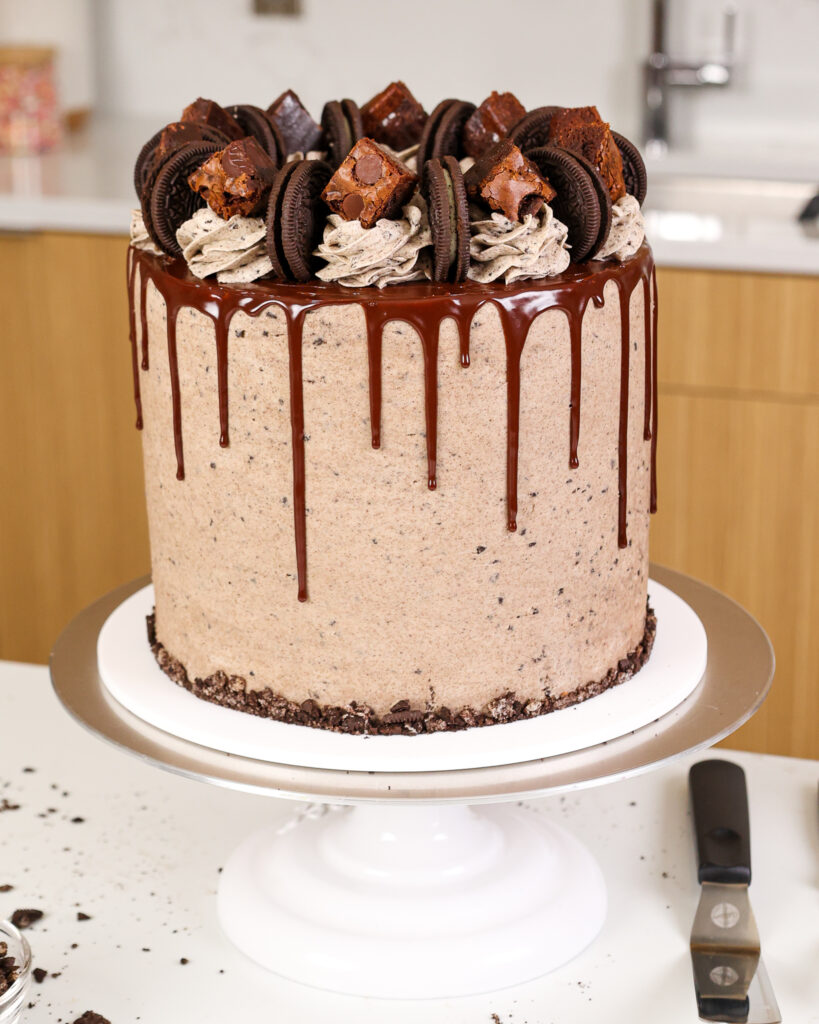
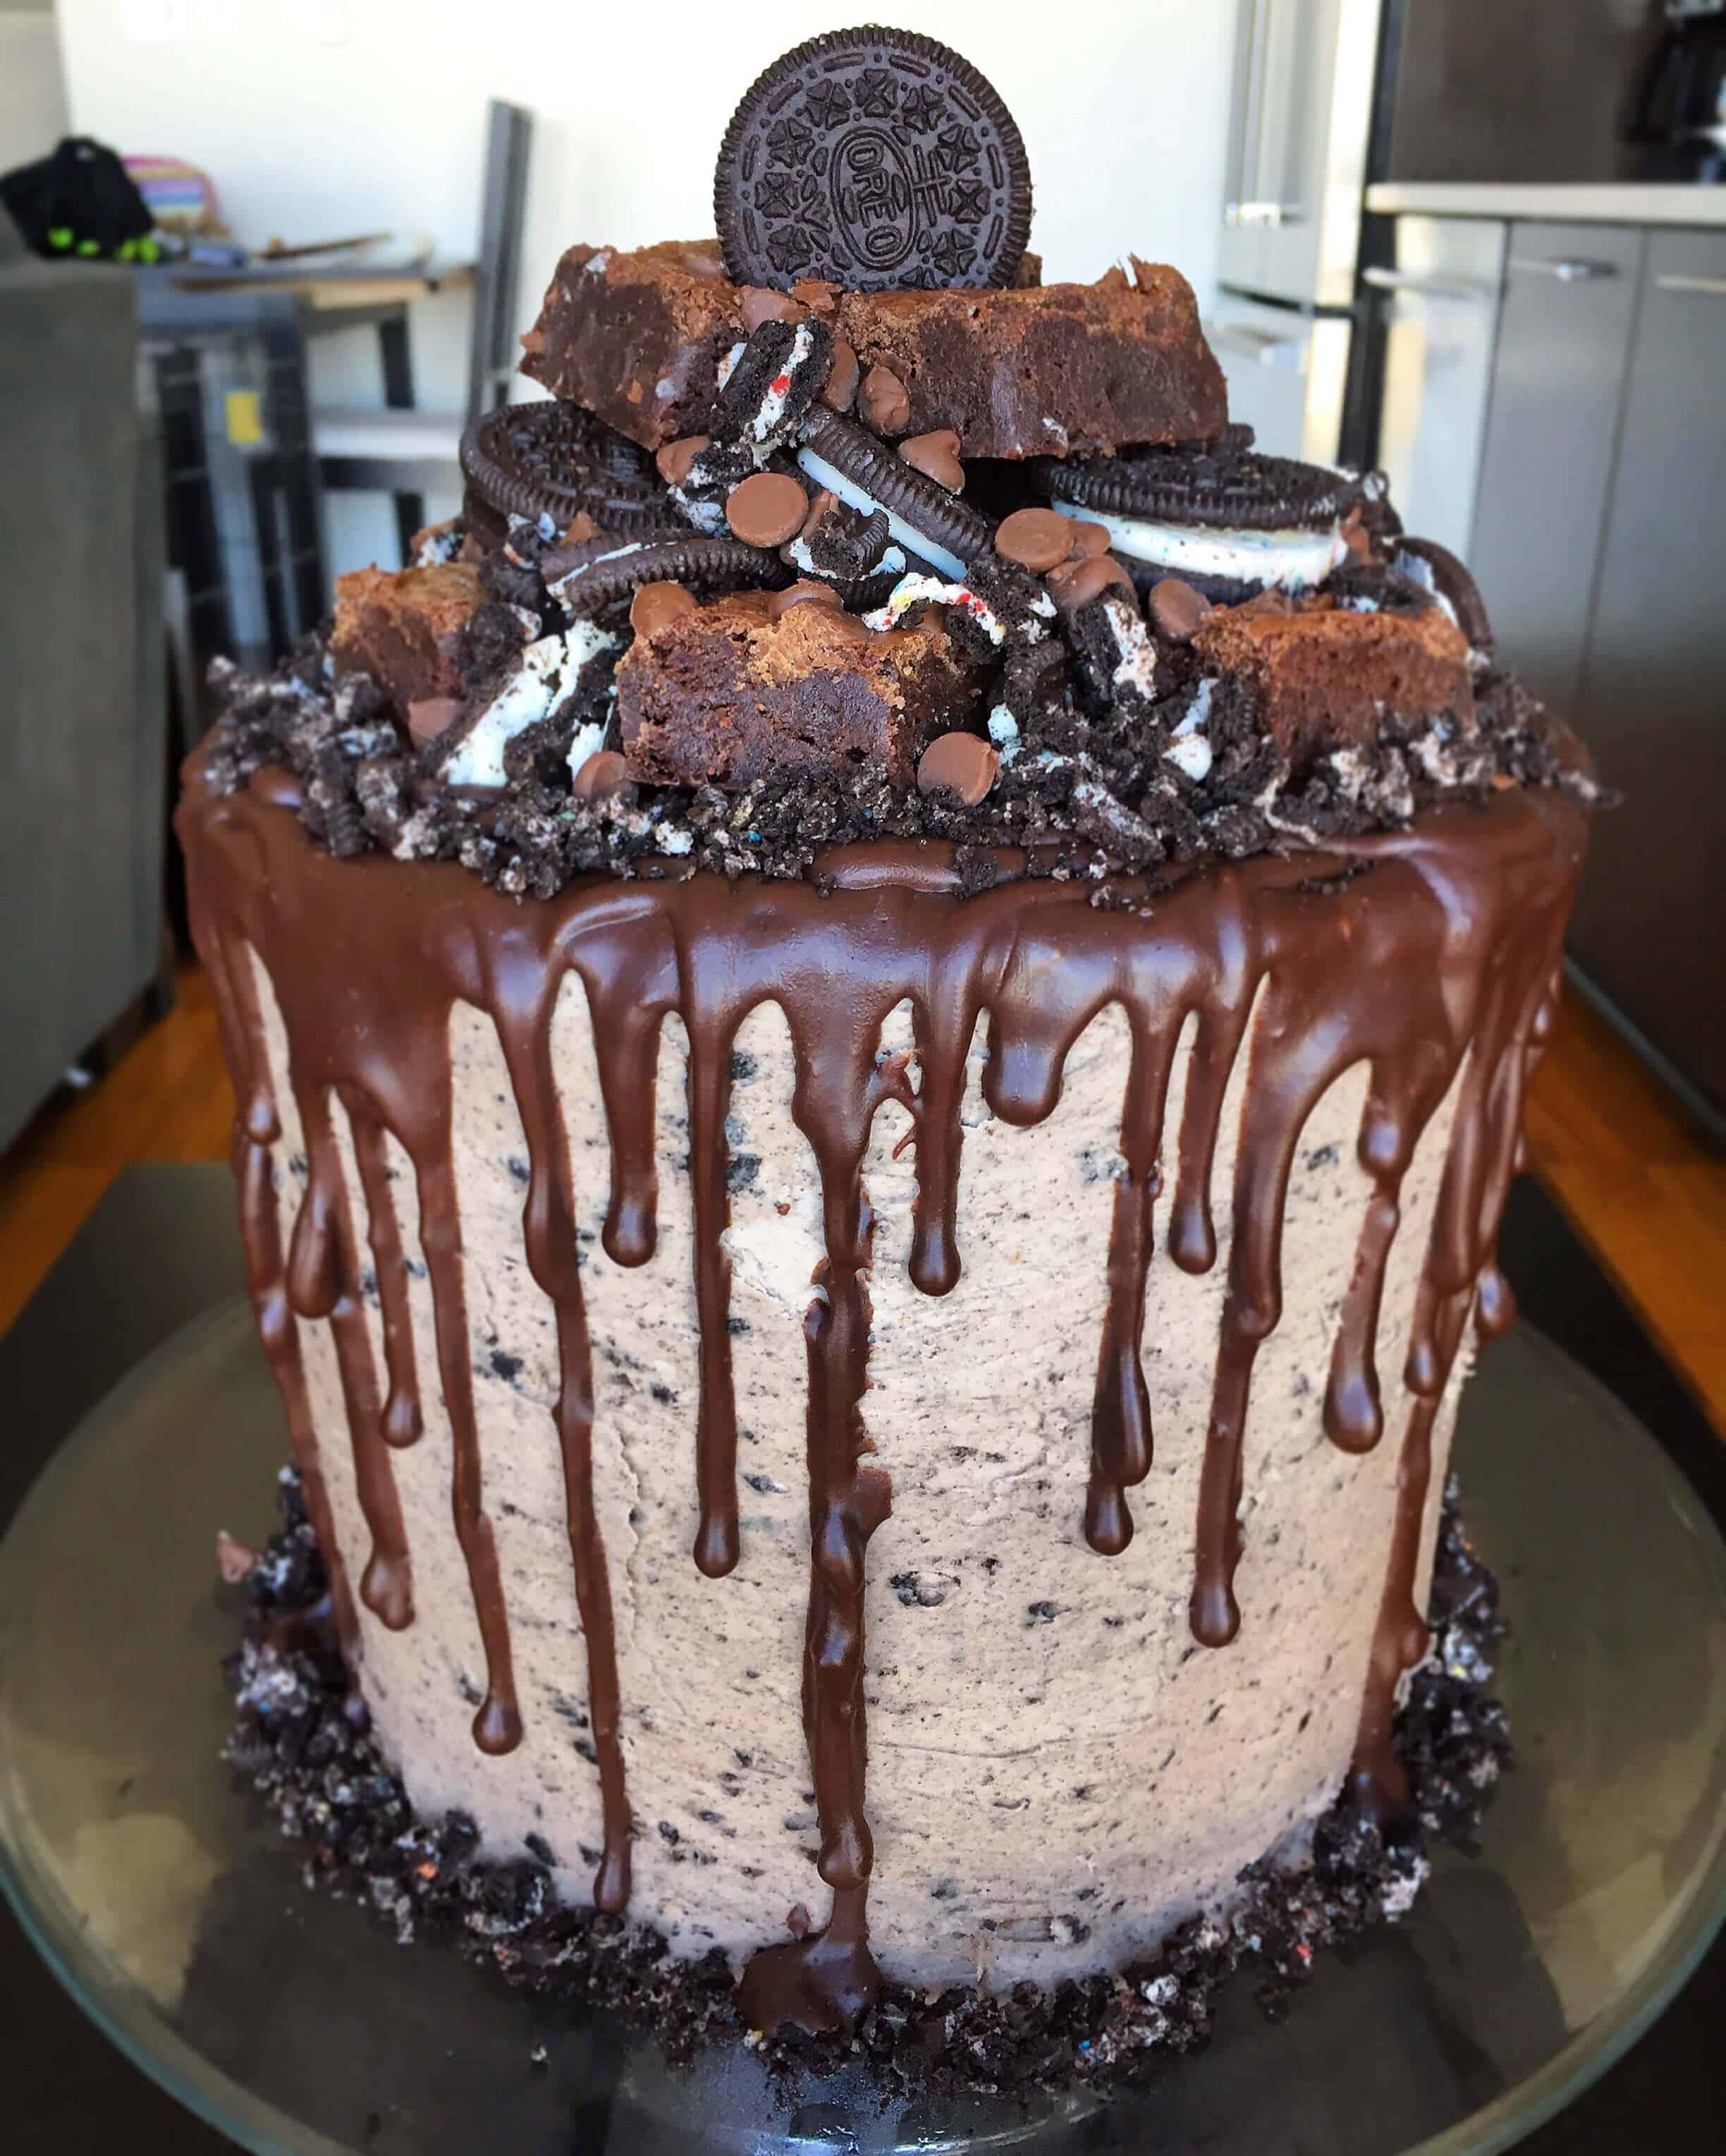
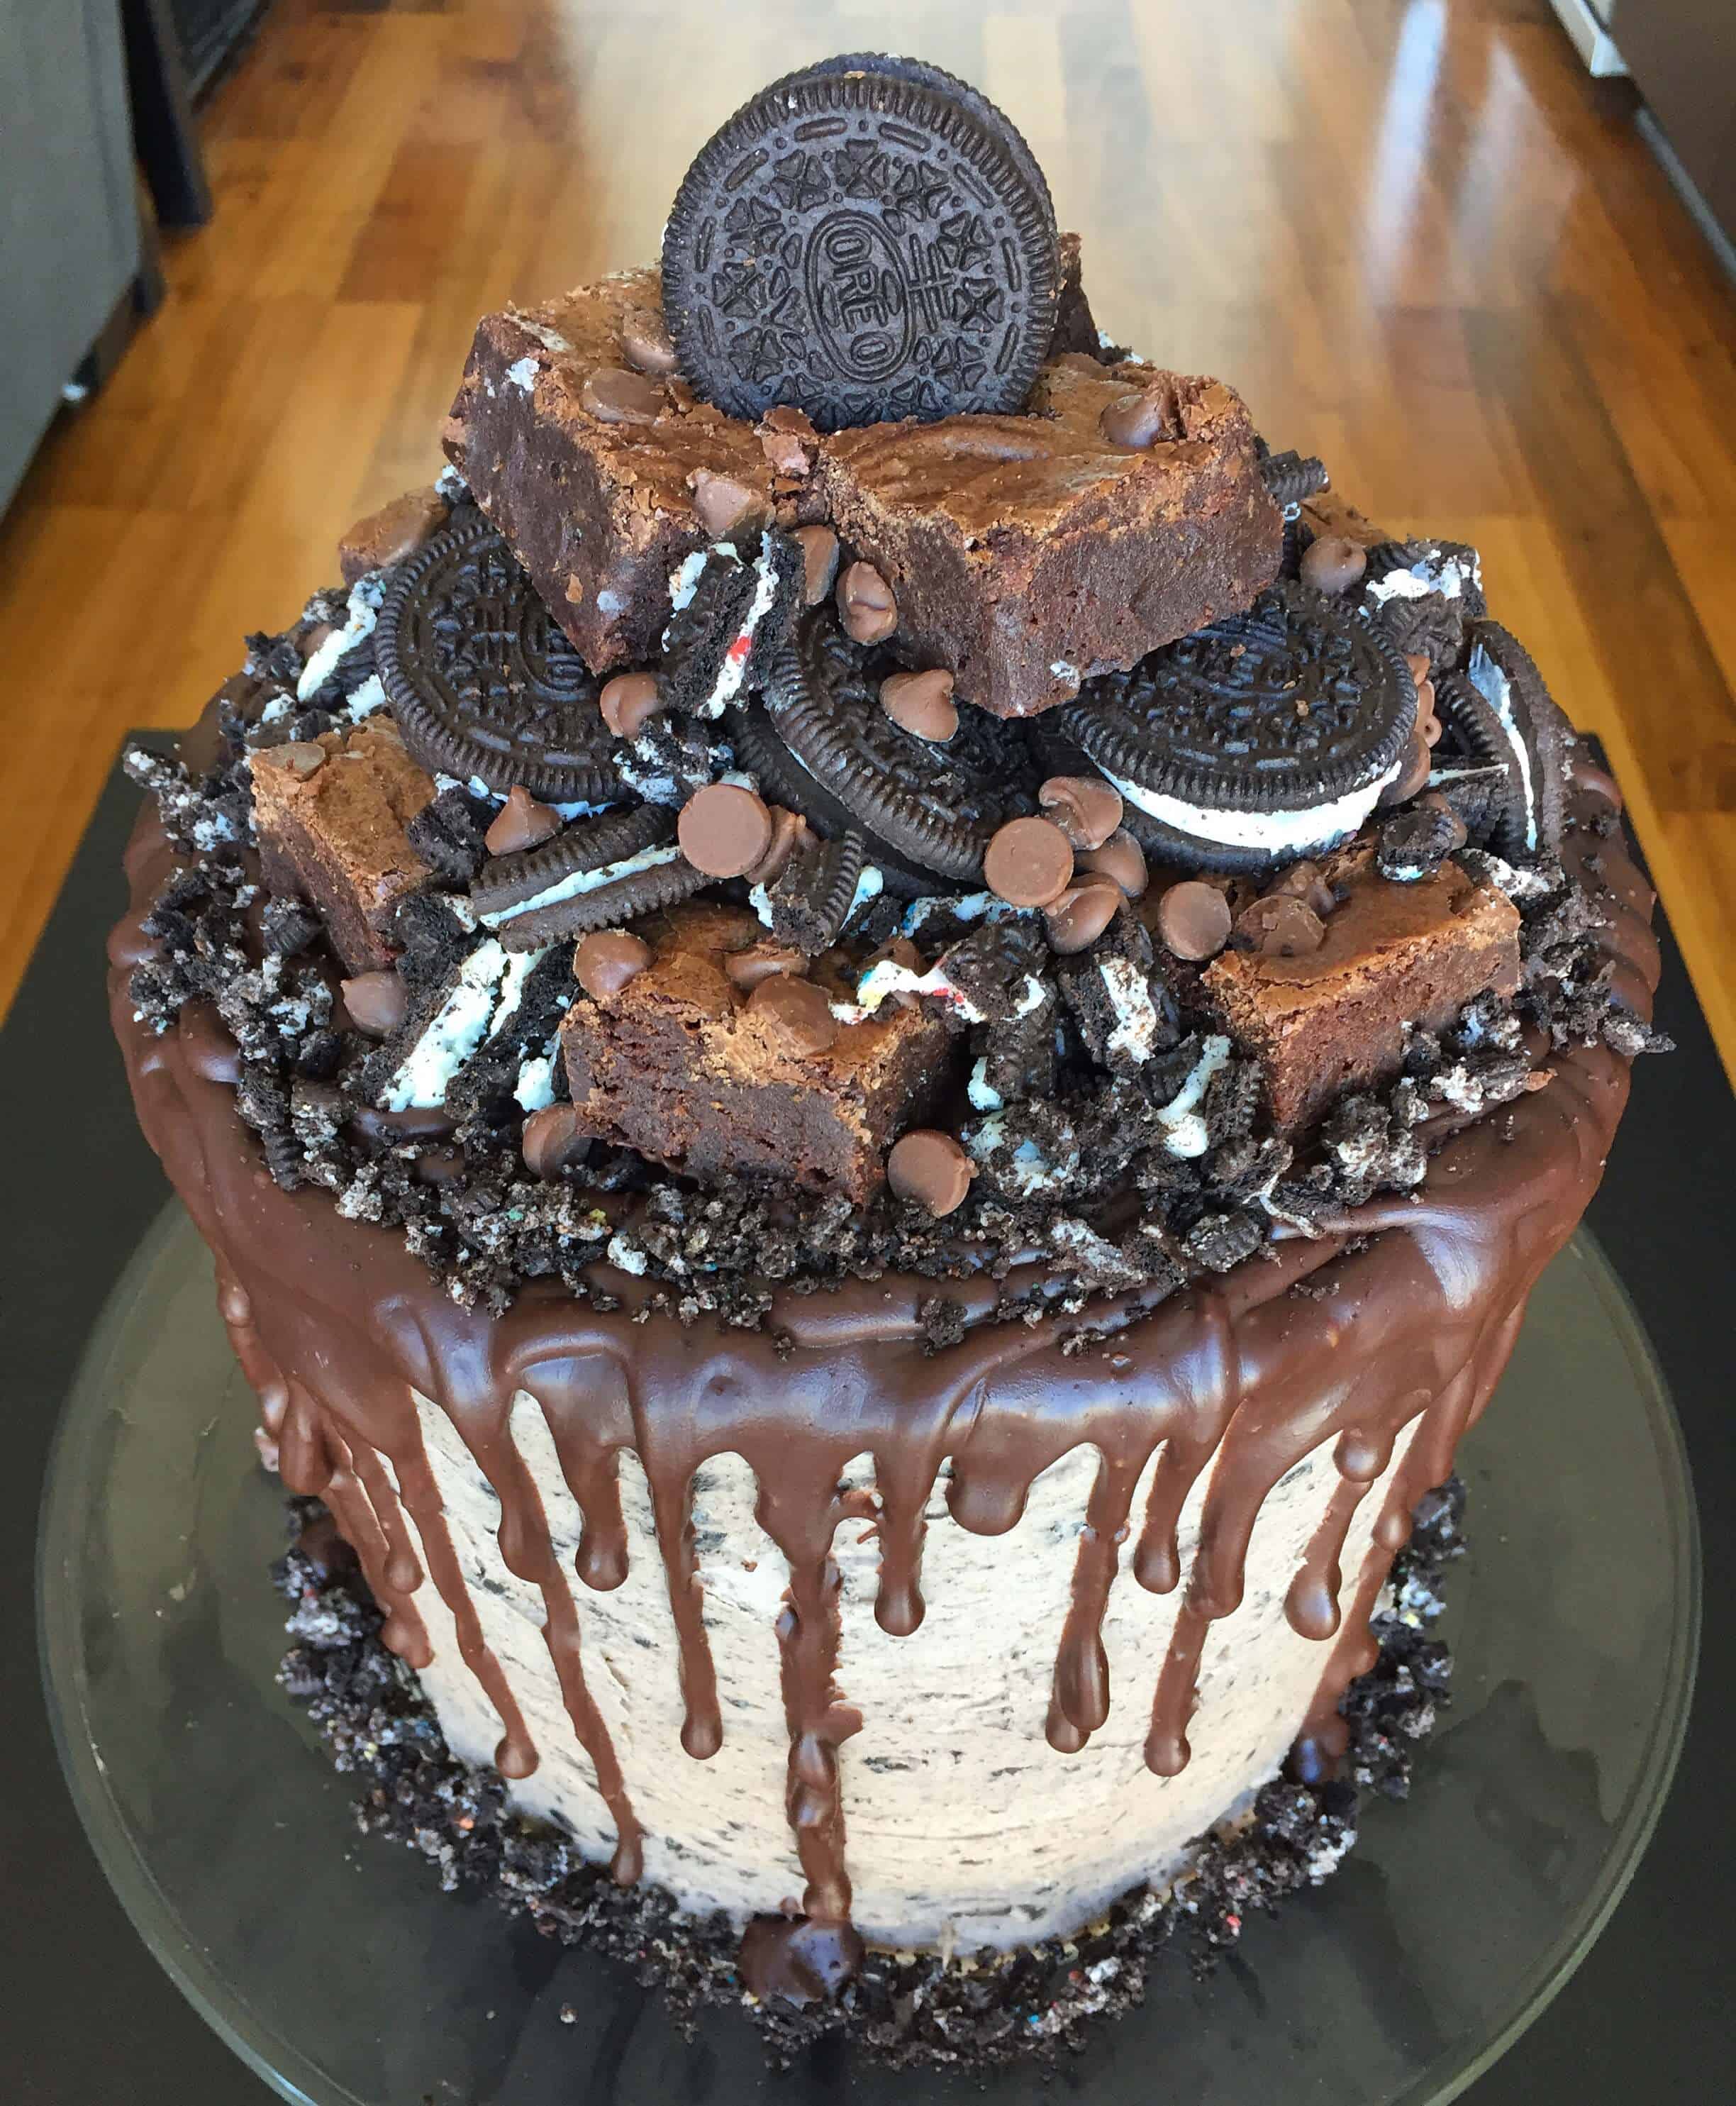
Cut up the remaining square pan of brownies into small, 1-inch squares.
Use them to decorate the top of the cake with buttercream swirls and Oreos, then enjoy! Use a sharp, warm knife to cut clean slices.

Brownie Oreo Cake Recipe Variations
This recipe can also be used to make a sheet cake! One batch will make 2, 9-inch x 13-inch cake layers that are about 1 inch tall.
Use the brownie batter to bake one 9-inch x 13-inch sheet pan of brownies and place it in between the cake layers.
Tips for Making the Best Brownie Oreo Layer Cake
- Ingredients at room temperature mix together better! Set out any cold ingredients ahead of time.
- Properly measure your flour (spoon into the cup measure, then level). Or better yet, use a kitchen scale to measure your dry ingredients.
- Mix the cake batter just until the ingredients are incorporated. This will ensure your cake layers are tender and fluffy.
- Use a scale to weigh your cake pans as you fill them. It will make your cake layers bake to the same height and bake more evenly.
- Level your room temperature or thawed cake layers with a serrated knife to make them easier to stack.
- Chill your cake layers in the freezer for about 20 minutes before assembling the cake. It makes it so much easier to stack and frost them!
Making This Brownie Oreo Cake in Advance & Storage Tips
I recommend making your cake layers and brownies in advance and freezing them. It breaks the process up and makes it more approachable.
You can also make your frosting ahead of time or save any leftover frosting! It can be stored in an airtight container in the fridge for up to a month or in the freezer for up to 3 months. Be sure to give it a good stir once it thaws to get the consistency nice and smooth again.
A frosted cake can last in the fridge for up to a week or in the freezer for up to a month. The buttercream locks in all the moisture, keeping the cake fresh and delicious!
If you cut into the cake and have leftovers, use any remaining frosting to cover the cut section to keep it moist and store in the fridge for up to a week.
Let Me Know What You Think
If you try this brownie Oreo cake recipe, I’d love to hear what you think! Please leave a rating below and comment below.
Don’t forget to tag me @chelsweets and use #chelsweets on social media so I can see your amazing creations!
Brownie Oreo Cake
Ingredients
Oreo Cake Layers
- 3 cup all-purpose flour 375g
- 3 cups granulated sugar 600g
- 2 1/2 tsp baking powder 10g
- 1 tsp fine salt 6g
- 1 cup (2 sticks) unsalted butter, room temperature 226g
- 1 cup carton egg whites or 7 large egg whites, room temperature 235g
- 1 1/2 cups buttermilk, room temperature 345g
- 2 Tbsp vegetable or canola oil 28g
- 2 tsp vanilla extract or vanilla bean paste 8g
- 1 cup chopped Oreos – about 9 Oreos 75g
Brownie Layers
- 4 1/2 cups granulated sugar 900g
- 2 1/4 cups all-purpose flour 280g
- 2 cups unsweetened baking cocoa 160g
- 1 1/2 cups powdered sugar 190g
- 1 1/2 cups milk or dark chocolate chips 255g
- 2 tsp fine salt 12g
- 6 large eggs, room temperature 336g
- 1 1/2 cups vegetable or canola oil 340g
- 1/3 cup water 80g
- 1 Tbsp vanilla extract or vanilla bean paste 12g
Oreo Buttercream Frosting
- 3 cups unsalted butter, room temperature 678g
- 1 Tbsp vanilla extract or vanilla bean paste 12g
- 1 tsp fine salt 6g
- 11 cups powdered sugar 1375g
- 1/2 cup heavy whipping cream, room temperature 120g
- 1 cup finely crushed Oreo crumbs – about 12 Oreos 100g
Recommended Tools & Equipment
- Stand Mixer or Electric Hand Mixer
- Large Piping Bag
- Wilton 1M frosting Tip
- 8- inch cake pans
Instructions
Oreo Cake Layers:
- Preheat oven to 350°F/175°C. Line three, 8-inch pans with parchment rounds and grease with non-stick cooking spray.
- Whisk together 3 cups all-purpose flour, 3 cups sugar, 2 1/2 tsp baking powder, and 1 tsp salt in the bowl of a stand mixer or in a large bowl until combined.
- Mix in 1 cup of room temperature, unsalted butter slowly into the dry ingredients on a low speed with either a paddle attachment or a hand mixer. Continue to mix until no large chunks of butter remain and the mixture looks like moist sand.
- Pour in 1 cup of egg whites and mix on low until just incorporated. Mix in 1 1/2 cups of buttermilk in two installments, at a low speed.
- Add in 2 Tbsp of vegetable oil and 2 tsp of vanilla extract. Mix on a low speed until combined.
- Scrape down the sides of the bowl with a rubber spatula, then beat on a medium speed for about 30 seconds to make sure everything is properly mixed together.
- Gently fold 1 cup of chopped Oreos into the batter and pour it evenly between the prepared cake pans. I like to use a kitchen scale to make sure each pan has the same amount of batter and will bake up to the same height.
- Bake for 34-36 minutes or until a toothpick comes out with a few moist crumbs. Let the pans cool for 10 minutes, then run an offset spatula around the perimeter of the pan to separate the cake from the pan.
- Place cake layers into the freezer for 30 minutes to accelerate the cooling process. Once the layers are fully cooled, carefully flip the pans and remove the layers from the pans.
- Use a serrated knife to level the tops of the cooled cake layers. If you're making these in advance, wrap and freeze them at this point.
- If you make these cake layers in advance and freeze them, let them thaw for about 20 minutes before making your cake. The cake layers should still be slightly cold to the touch, which will make it easier to assemble your cake.
Brownie Layers:
- Keep the oven on and make the brownie layers next! This is a triple batch of brownies, so make sure you get out your biggest bowls.
- Line and grease 2 round, 8-inch cake pans and 1 square, 8-inch cake pan.
- Whisk together 4 1/2 cups sugar, 2 1/4 cups flour, 2 cups baking cocoa, 1 1/2 cups powdered sugar, 1 1/2 cups chocolate chips, and 2 tsp salt in a large bowl. Set aside.
- In a separate large bowl whisk together 6 large eggs, 1 1/2 cups vegetable oil, 1/3 cup water, and 1 Tbsp vanilla extract.
- Add the dry ingredients to the wet ingredients and stir until combined.
- Divide the brownie batter evenly between the prepared pans (about 830g per pan).
- Bake in a preheated 350°F/175°C oven for 43-53 minutes. The circular pans should take about 5 minutes longer to bake than the square pan.
- Remove from the oven and let the pans cool on a wire rack. Run an offset spatula around the perimeter of the pan to separate the brownies from the pan while the brownies are still warm.
Oreo Buttercream Frosting:
- While the cake layers and brownies bake and cool, make the Oreo buttercream frosting.
- Beat 3 cups of unsalted butter on a medium speed for 30 seconds with a paddle attachment until smooth.
- Mix in 1 Tbsp of vanilla extract and 1 tsp salt on a low speed.
- Slowly mix in 11 cups of powdered sugar on a low speed. Add 1/2 cup of heavy cream halfway through to make the frosting easier to mix.
- Continue to mix on low speed for a few minutes, until the desired consistency is reached.
- If the frosting seems too thick, add additional cream (1 Tbsp at a time). If the frosting is too thin, add in more powdered sugar (a quarter of a cup at a time).
- Fold in 1 cup of finely crushed Oreos until they're evenly distributed throughout the frosting. Cover with plastic wrap and set aside.
Assembling This Brownie Oreo Cake:
- Stack and frost the alternating Oreo cake and brownie layers on a greaseproof cake board using a dab of frosting to help stick the first cake layer to the board.
- Add an even layer of Oreo buttercream between each cake layer and brownie layer.
- Spread a thin coat of frosting around the cake to fully cover the cake layers. Smooth using a bench scraper, then chill the cake in the fridge (30 minutes) or freezer (10 minutes) until the frosting is firm to the touch.
- Add a second, thicker layer of Oreo frosting to the cake, and smooth using a bench scraper.
- If you want to add a drip around the cake, use my chocolate ganache drip recipe.
- Cut up the remaining square pan of brownies into small, 1-inch squares. Use them to decorate the top of the cake with buttercream swirls and Oreos, then enjoy! Use a sharp, warm knife to cut nice clean slices.
Video
Notes
Yield:
One batch of cake batter makes about 1900 grams, so when I'm making a cake with three layers I add about 630 grams of batter into each pan. One batch of brownie batter makes about 2500 grams of batter, so you can add about 830 grams per pan.Brownie Oreo Cake Recipe Variations
This recipe can also be used to make a sheet cake! One batch will make 2, 9-inch x 13-inch cake layers that are about 1-inch tall. Use the brownie batter to bake one 9-inch x 13-inch sheet of brownies and place it in between the cake layers.Tips for Making the Best Brownie Oreo Layer Cake
- Ingredients at room temp mix together better! Set out any cold ingredients ahead of time.
- Properly measure your flour (spoon into the cup measure, then level). Or better yet, use a kitchen scale to measure your dry ingredients.
- Mix the cake batter just until the ingredients are incorporated. This will ensure your cake layers are tender and fluffy.
- Use a scale to weigh your cake pans as you fill them. It will make your cake layers bake to the same height and bake more evenly.
- Bang your cake pans on the counter before putting it in the oven. This brings any big air bubbles that are trapped in the batter to the surface.
- Level your room temperature or thawed cake layers with a serrated knife to make them easier to stack.
- Chill your cake layers in the freezer for about 20 minutes before assembling the cake. It makes it so much easier to stack and frost them!
Making This Brownie Oreo Cake in Advance & Storage Tips
Make your cake layers in advance and freeze them. It breaks the process up and makes it more approachable. Make your frosting ahead of time too or save any leftover frosting! It can be stored in an airtight container in the fridge for up to a month, or in the freezer for up to 3 months. Be sure to give it a good stir once it thaws to get the consistency nice and smooth again. A frosted cake can last in the fridge for up to a week, or in the freezer for up to a month. The buttercream locks in all the moisture, keeping the cake fresh and delicious! If you cut into the cake and have leftovers, use any remaining frosting to cover the cut section to keep it moist and store in the fridge for up to a week.Nutrition
Other Recipes You Might Like:
For a walk down memory lane, below are some pictures from when I first made this cake in 2016.
woah! Five layers?! That’s amazing!
Hi. I’m interested in this cake for 5/2 . Is it possible?
Unfortunately I’m booked until the beginning of June, I’m so sorry!!
Am I reading on your five layer brownie Oreo cake four and a half cups of sugar .
yes! it has a lot of sugar and not a lot of flour, the recipe is kind of reminiscent to a flourless chocolate cake. It’s a lot of butter and eggs too – __ –
The espresso powder included in the white cake ingredients doesn’t appear to be in the actual directions. Should it be added with buttermilk and vanilla?
I’m so sorry, that was simply a typo! I’ve removed it from the ingredients list. I sadly wasn’t as thorough on my recipes when I first started my blog!!
This looks amazing!! Do you think it would work to cut the recipe in half? I’d like to make it for my fiancé’s birthday but it would just be the two of us eating it.
This looks amazing!! Do you think it would work to cut the recipe in half? I want to make it for my fiancé’s birthday and it would just be the two of us.
Hi Susie,
You should totally be able to cut this recipe in half! That’s so sweet of you, I’m sure he’s going to love it!
I’d like to see the inside of the cake?
Hi Debbie,
I made this cake a few years ago for my brother in law, and sadly I didn’t take any pictures of the inside when we cut into it because we were at a restaurant. I’m so sorry!
I made a tiered version of this cake for my daughter’s choir concert/dessert auction this past Tuesday. They saved my cake for last for the auction, and it brought in the most money of the night! It sold for $310, and it all went toward the choir program! It was a hit! I wish I could post a picture of the cake for you to see! I am so thankful for your post! Thank you for the inspiration!
Aw I am so happy to hear that Stephanie, that is awesome!! 🙂 I wish you could share a picture too, I bet it was beautiful!
Why do you put a white icing on before the oreo icing? Is that like a crumb coat? What recipe do you use for the white icing
how long would you have to bake the cakes in a 9×13 pan?
do you think this cake could be done with just the brownie layers?
Hi Chelsea! Do you think if I used this recipe for a two-tiered (homemade wedding) cake alternating brownie layers with chocolate cake layers instead, would the brownie layers be too heavy on top of chocolate cake? Thanks! I’m a huge fan of yours. 🙂
Can I make this cake ahead of time and freeze it? Thanks
Hi there,
I just realised this brownie recipe is different from the original. Is there a reason you removed the butter and added vegetable oil instead?
Great question! I found that making the brownie layers with oil in this recipe let the chocolate flavor shine through a bit more, and tasted better with the richness of the oreo buttercream. You can totally use melted butter in place of the of oil in the brownie recipe if you want though! Hope that helps, happy baking!
@Chelsweets, Thank you so much!
Hi!
I know you can make the Oreo part ahead of time and freeze it. Can you do the same with the brownie layers?
Hi Ally,
Great question! You totally can make the brownie layers ahead of time too. Wrap them with plastic wrap to keep them fresh and store them in the freezer for up to a month. Set them out about an hour before you want to assemble the cake to let them thaw a bit. It’s ok if they’re still a bit cold to the touch as you assemble the cake, but you don’t want them to still be like fully frozen. Hope that helps, happy baking!
Followed directions without any deviation. Brownie layers overcooked. Should have removed same time as square pan and not extended 5 min per directions. Overall cake tasted amazing! Decorated cake exactly as pictured in recipe and looked perfect. Our party guests thought I bought from a bakery. Will definitely make this again for future parties.
Hi, would this be too much cake batter if I want to use 2 8x8x2 inch square pans? Would the baking time remain the same? I plan to use box brownie mix for the brownie. TIA