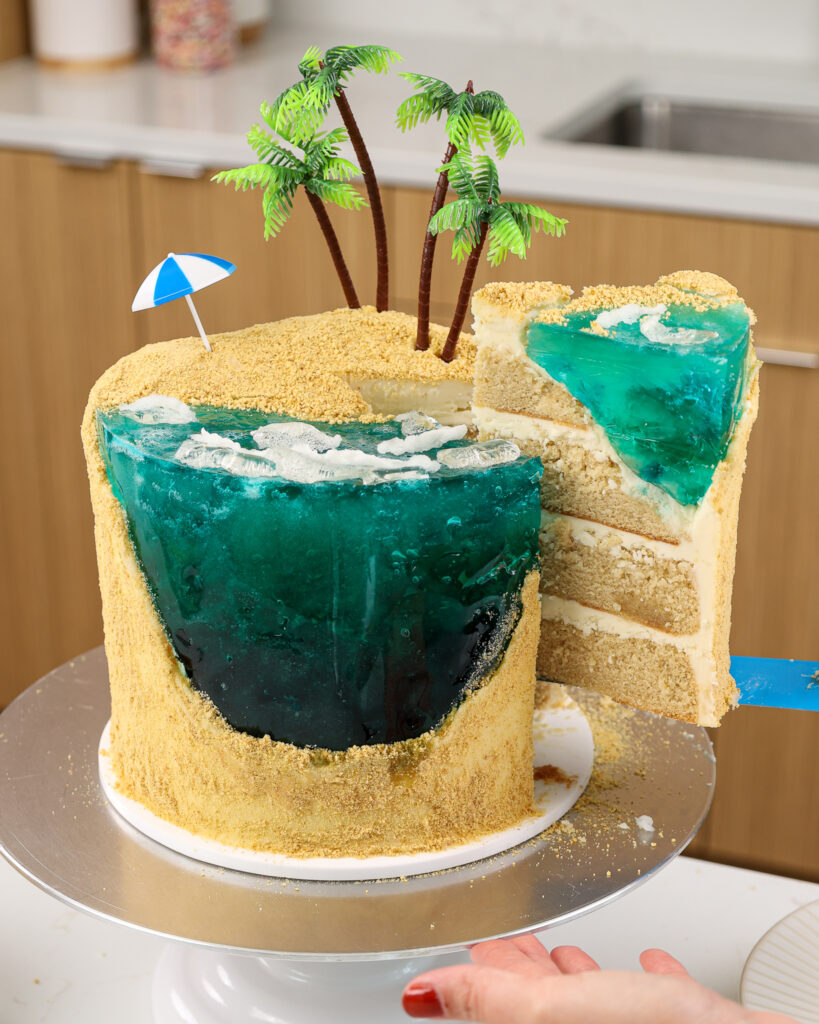
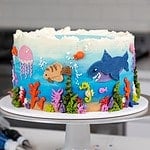
Under the Sea Cake
This under-the-sea cake is made from scratch and decorated with adorable buttercream sea animals. It’s tender, moist, and so delicious!!

How to Make This Under the Sea Cake
To make sure this cake turns out as amazing as possible, let’s walk through each step together! I’ve also included a video tutorial of the process below.
I figured it might be helpful to know what tools I use, too, so I’ve shared a list in the recipe card at the bottom of this post.
Not all of these are mandatory, but they make the process a lot easier. If you don’t have all these things on hand, feel free to improvise and work with what you have.
Step 1: Bake the Funfetti Cake Layers
The first step is to make the funfetti cake batter following the recipe card at the bottom of this post.
After folding the rainbow sprinkles into the batter, divide the batter evenly between the prepared cake pans.
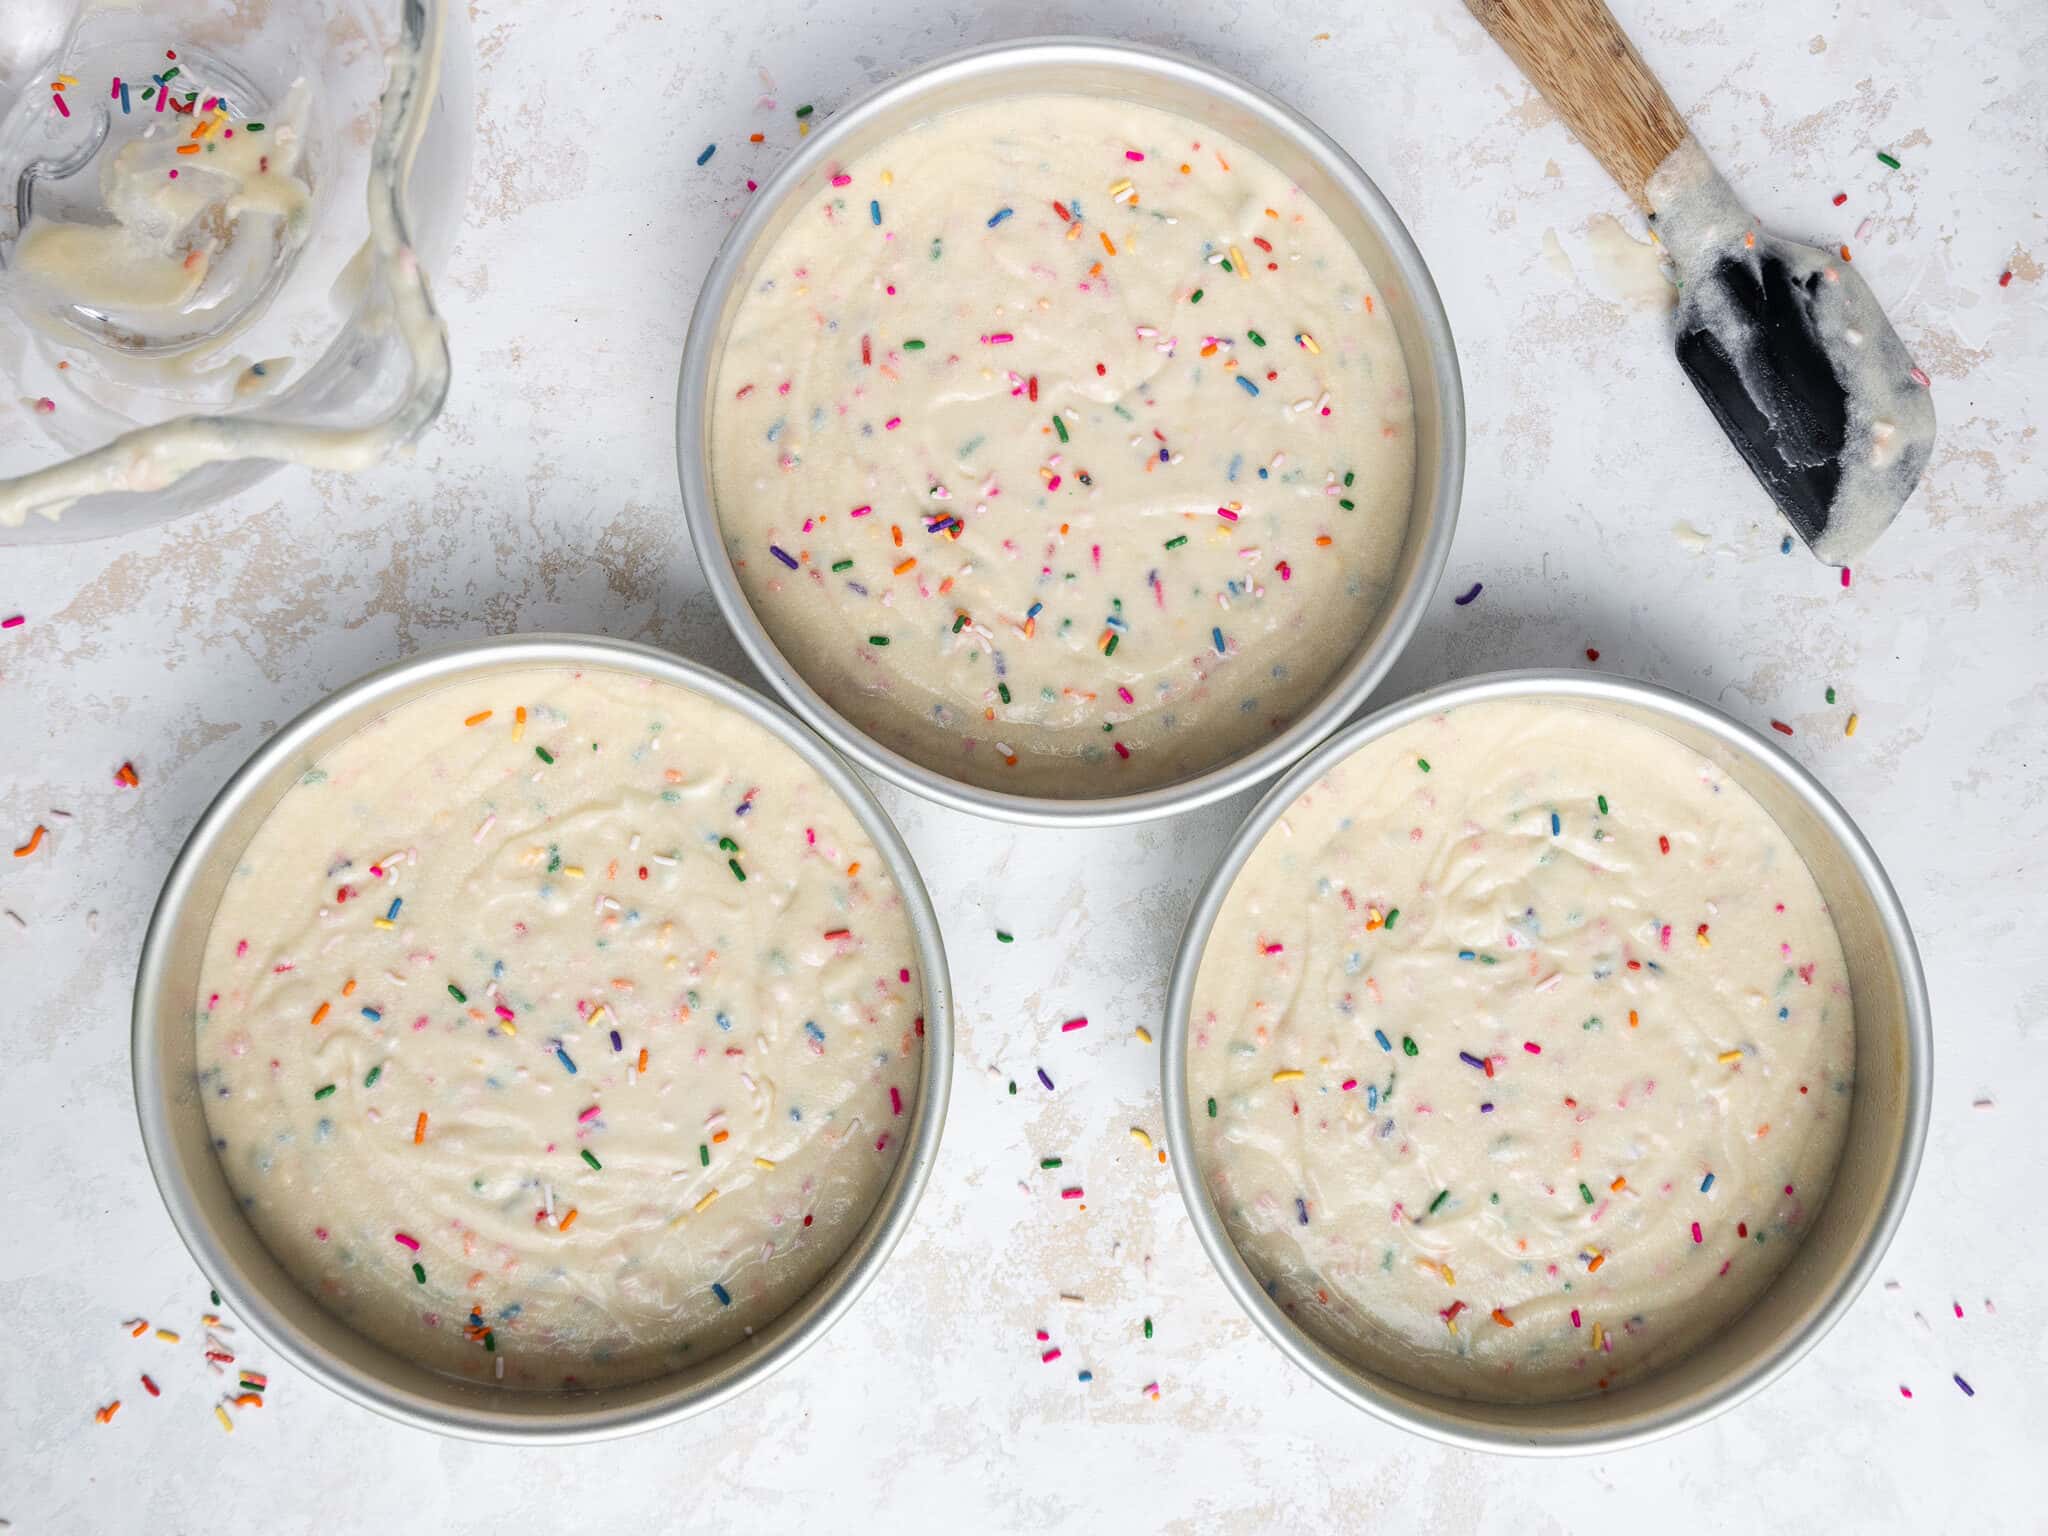
Bake the layers for 34-36 minutes or until a toothpick comes out with a few moist crumbs. Remove the cake layers from the oven and let them cool in the pans for about 15 minutes.
Gently run an offset spatula around the rim of the cake pans to loosen them, then flip the cake layers onto wire racks to finish cooling. If you’re in a rush (or impatient like me), you can pop the cake pans into the freezer for 30 minutes to accelerate the cooling process.
Once cooled, use a serrated knife to level the top of each layer and remove the caramelization around the sides of the layers.
If you make these cake layers in advance and freeze them, let them thaw for about 20 minutes before assembling your cake. The cake layers should still be cold to the touch, which will make it easier to assemble your cake.
Step 2: Make the Vanilla Buttercream Frosting
While the cake layers bake and cool, make the vanilla frosting.
I like to frost this cake with my hybrid buttercream because it’s not too sweet and doesn’t crust! This makes it very forgiving when you need to pipe on all the little sea animals.
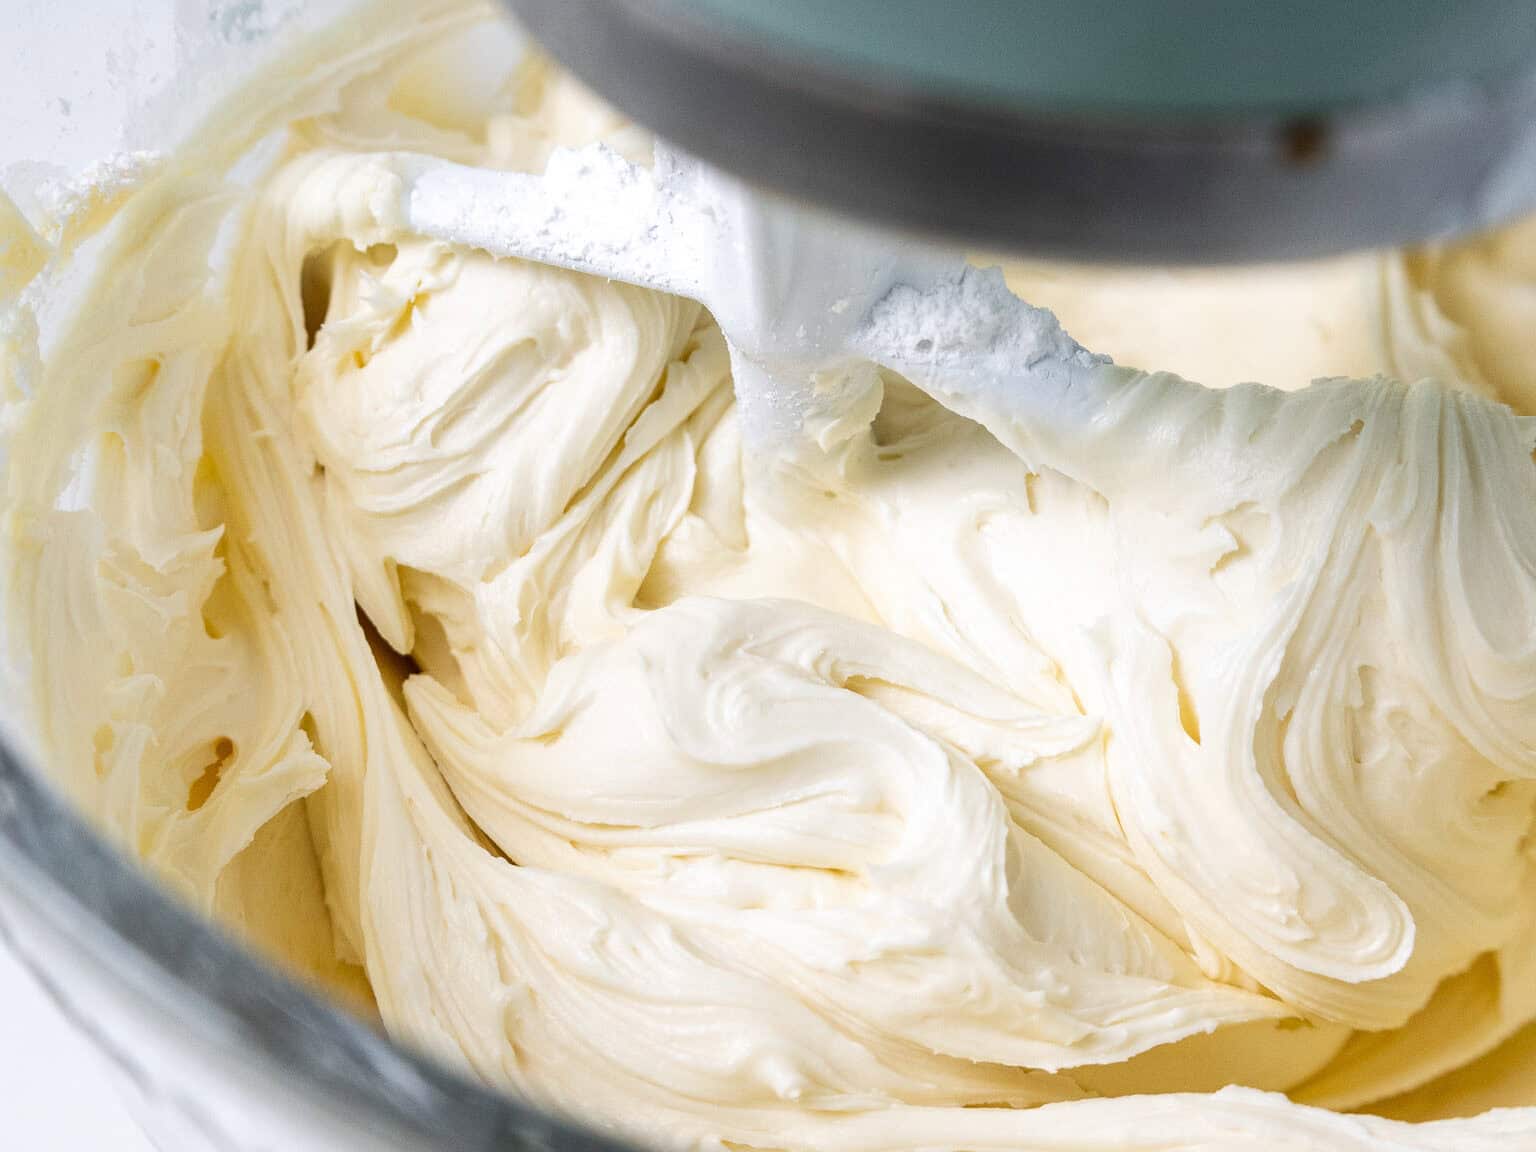
If you aren’t a fan of this type of buttercream, I’d recommend using a batch of my Swiss meringue buttercream (SMBC) or 1.5 batches of my American buttercream.
This frosting can also be made in advance if needed and kept in the fridge for up to a month.
Step 3: Stack and Fill the Cake Layers
Then it’s time to assemble this cake! Stack and frost the cake layers on a greaseproof cake board or flat plate. Use a dab of buttercream to help stick the first cake layer to the board.
Spread an even layer of buttercream on top of each cake layer with a large offset spatula. If desired, add a couple of spoonfuls of sprinkles on top of the frosting. Repeat with the remaining cake layers.

Once all the layers are stacked, gently press down on top of the cake with both of your hands to help them settle and to press out any trapped air between the cake layers.
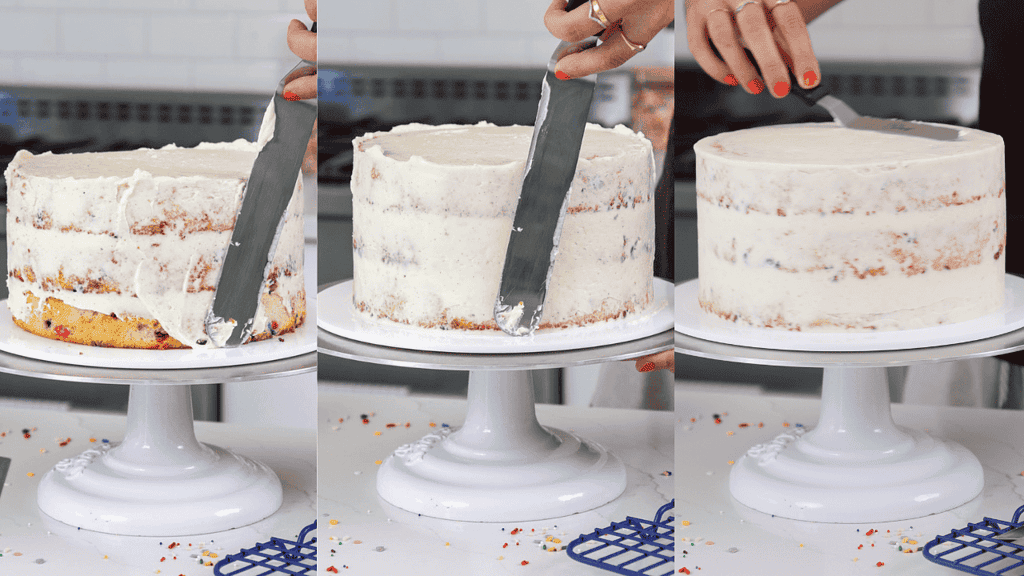
Step 4: Chill and Crumb Coat the Cake
Chill the cake in the freezer for 5-10 minutes to prevent the layers from sliding, then add a thin coat of frosting around the cake that fully covers the cake layers.
Smooth using a large offset spatula and/or bench scraper, then chill the cake again in the fridge (30 minutes) or freezer (10 minutes) until the frosting is firm to the touch.
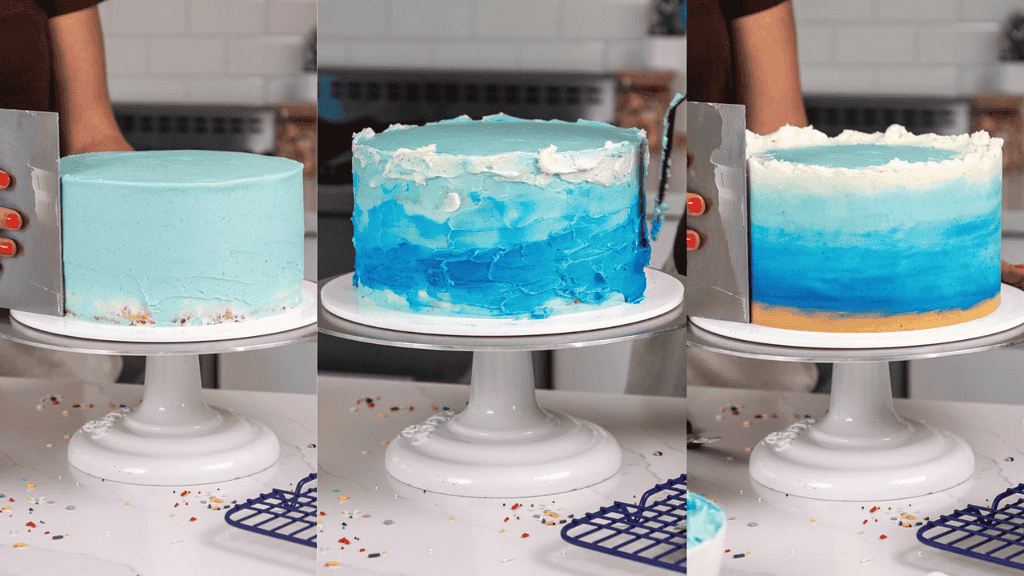
Step 5: Color the Frosting and Add the Second Layer
Scoop 2 cups of frosting into a separate bowl and use gel food coloring to color it light blue. Use this to add a second layer of frosting around the chilled cake to look like the ocean.
I colored a tiny bit of additional frosting a darker blue with more blue gel food coloring and added it around the base of the cake to create a gradient, but this is optional.
Reserve about 2 cups of white frosting by scooping it into a small piping bag fitted with a coupler. This will allow you to swap piping tips. If you don’t have a coupler, cut a small (1/2 cm) hole at the base of the bag. Set aside.
Spread or pipe some white buttercream around the top edge of the cake to look like breaking waves. Smooth the side of the cake with a large offset spatula or bench scraper and leave the top textured, then pop it in the fridge while you color the buttercream.
This next part is kind of a choose-your-own-adventure based on the color scheme you want and the types of sea creatures you want to create.
Use gel food coloring to make 5-10 more colors of frosting. I recommend using the same bowl to make all the colors to cut down on dishes. Start with the lightest color, then work your way to the darkest color.
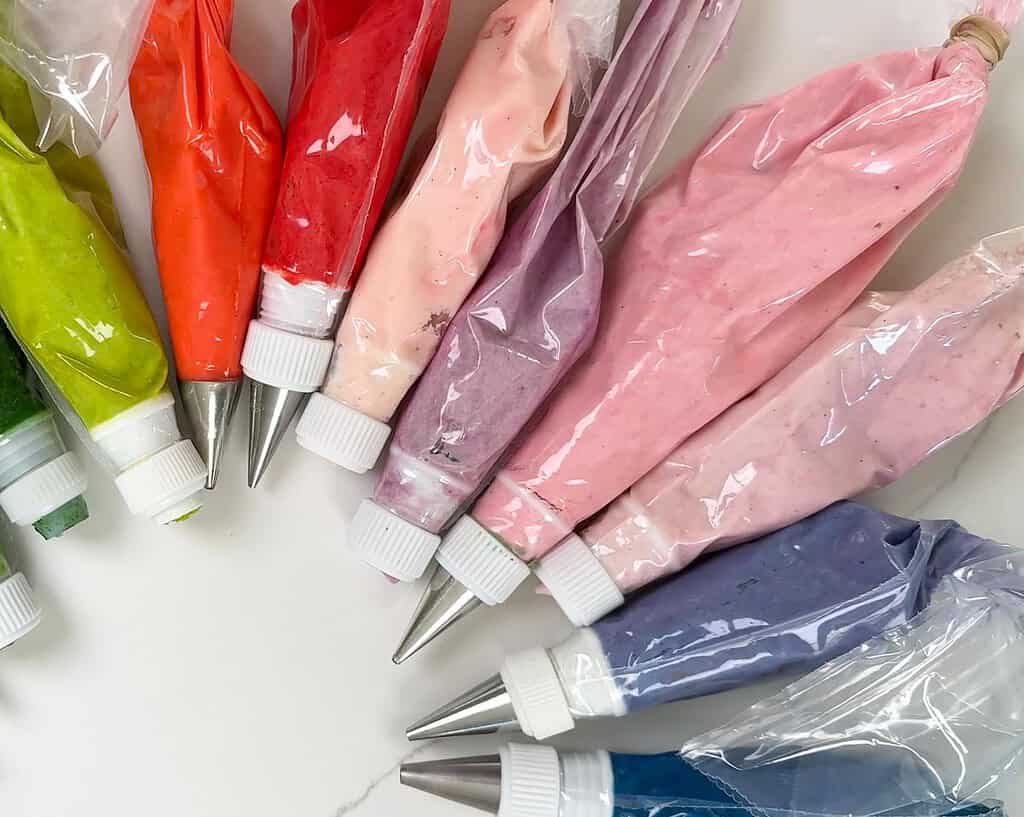
Place each color of frosting in a small piping bag fitted with a coupler (this allows you to easily swap piping tips). If you don’t have couplers, just cut a small (1/2 cm) hole at the base of each bag.
The more colors you make, the more options you’ll have when decorating, but it takes FOREVER, so just make as many as you feel comfortable doing. I made deep blue, purple, red, light brown, light green, dark green, bright orange, light pink, and black.
Step 6: Pipe on the Sea Animals and Coral
Use the different colors of buttercream to pipe seaweed, coral, starfish, and shells around the base of the cake. I used a small petal tip (like a Wilton 103) to make the seaweed, and a small round tip (like a Wilton 5) to add the coral and other details.
Next, work on the sea animals. This part takes some time, so I recommend sitting down in a comfortable chair, anchoring your arm to the counter as you pipe for stability, and giving yourself lots of time! I like to use a toothpick or a small scribe to trace the outline of each sea animal, then pipe on the frosting with a small piping tip (like a Wilton 5).
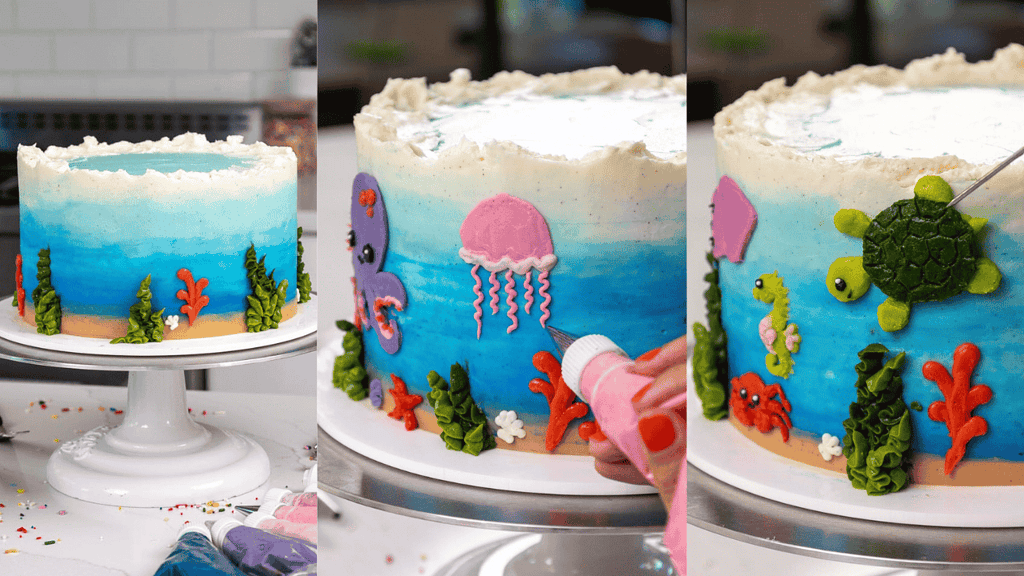
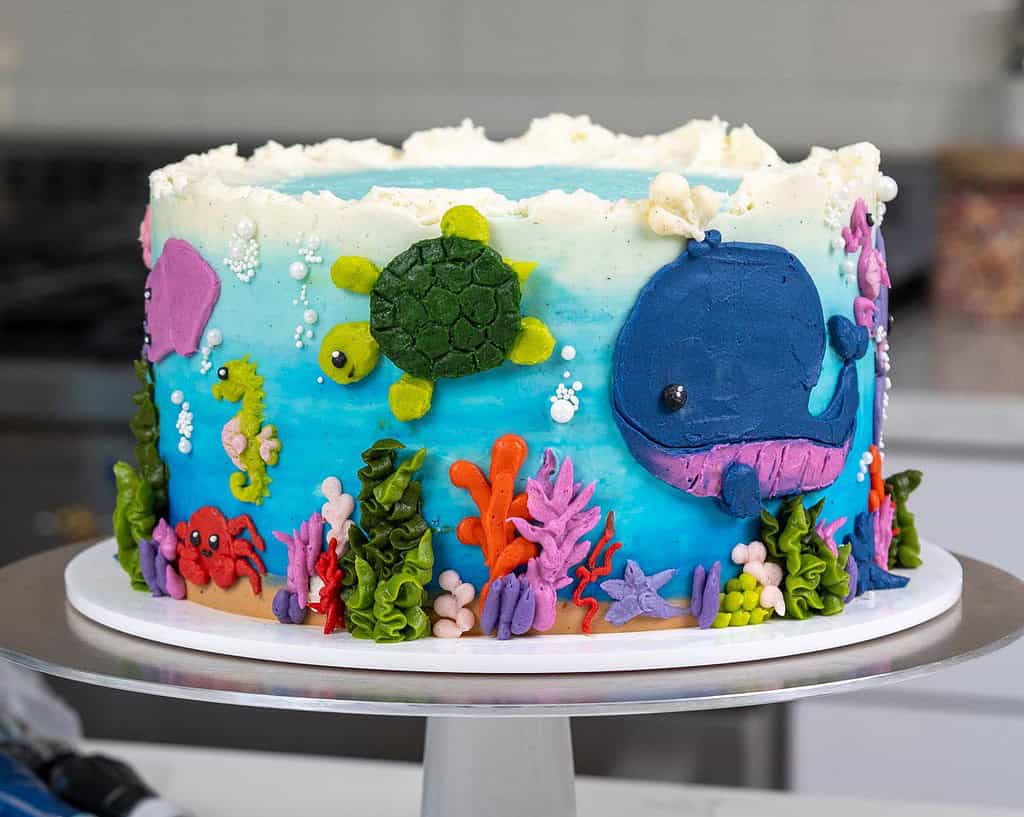
Smooth it using either a small offset spatula or palette knife (tapered ones work great), or a small square of acetate sheet. I added a whale, a few sea horses, a shark, a jellyfish, an octopus, a squid, a turtle, and some small fish, but you can add whatever sea animals you like best!
The last step is to add some bubbles to help fill in any blank spaces! You can do this by piping on little white dots of buttercream, or using small, round, white sprinkles if you have them.
Substitutions and Swaps – Funfetti Cake Layers
Below are some swaps and substitutions that can be made in this cake recipe.
- All-Purpose Flour – This recipe turns out best with AP flour, but you can use a gluten-free flour blend or cake flour if that’s all you have on hand.
- Granulated Sugar – I do not recommend reducing the amount of sugar because it will change the texture of the cake layers.
- Unsalted Butter – If you only have salted butter on hand, you can use it instead of the unsalted butter in this recipe. Just be sure to omit the salt that this cake recipe calls for. You can also use vegan butter in its place (and also skip the salt)!
- Egg Whites – I like to use the pasteurized egg whites that come in a carton, but you can also use 7 fresh egg whites or 4 whole, large eggs. If you have an egg allergy, you can use flaxseed eggs or an egg replacer.
- Buttermilk – You can also use full-fat yogurt, sour cream, or an alternative yogurt or milk (almond, soy, oat) if you’re dairy-free.
- Vegetable Oil – Any flavorless oil can be used in this recipe. Canola or even sunflower oil would work great!
- Almond Extract – I love a hint of almond in this recipe, it really elevates the flavor! However, if you have a tree nut allergy, you can skip the almond extract or replace it with another extract like lemon or coconut.
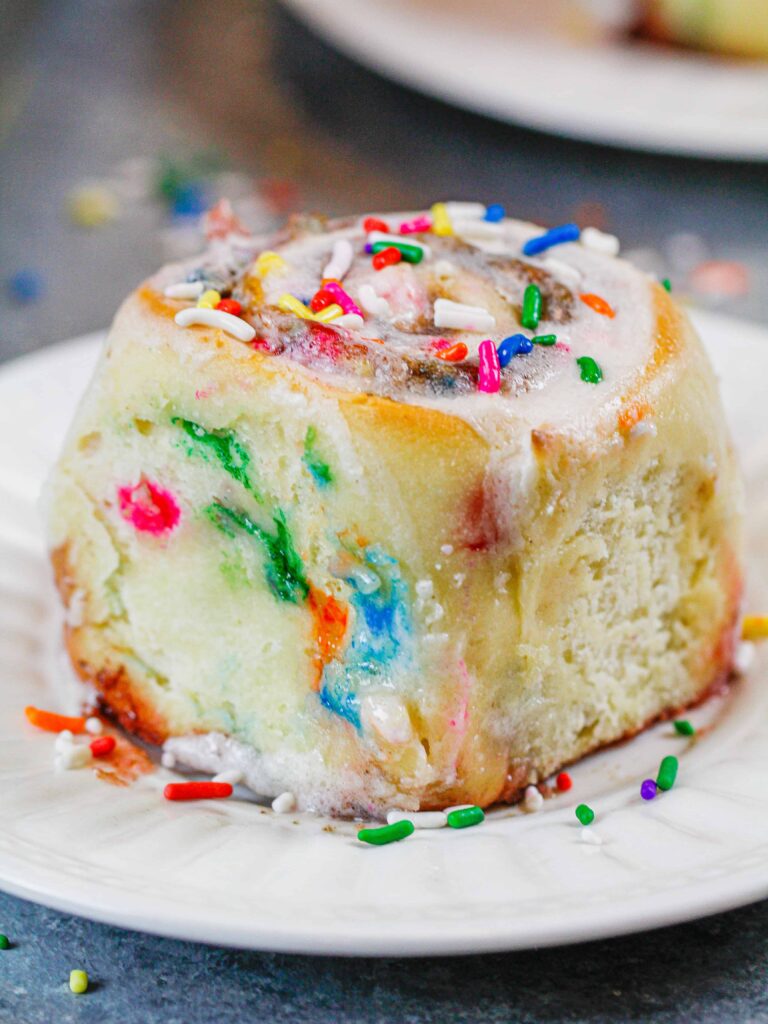
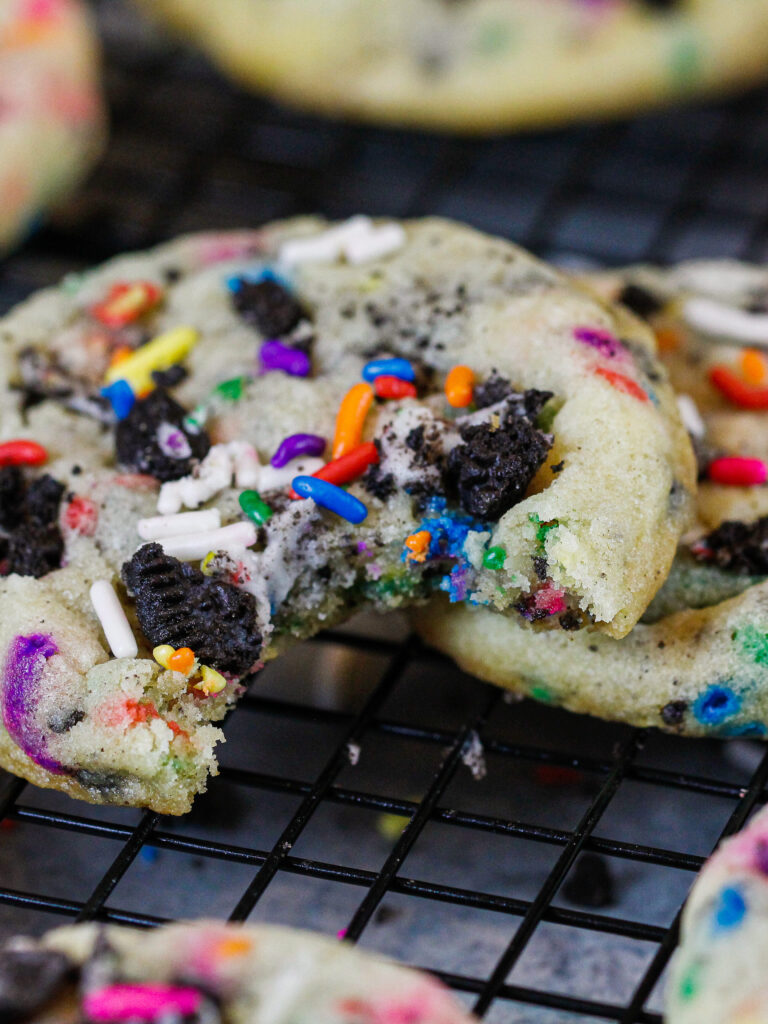
- Sprinkles – The best sprinkles for making a funfetti cake are rainbow jimmies. They hold up best in the batter and bleed less than other types of sprinkles. Avoid nonpareils as they instantly bleed into the batter and turn it grey.
Substitutions and Swaps – Vanilla Buttercream
- Unsalted Butter – If you only have salted butter on hand, you can use it in place of the unsalted butter. Just be sure to omit the salt that this frosting recipe calls for. You can also use vegan butter in its place (and skip the salt)!
Can I Make This Cake in Different Sizes?
One batch of batter is about 1900g or 10.5 cups, so I add about 630g to each of my cake pans when using 3, 8-inch cake pans.
If I’m making 4, 6-inch cake pans, I’ll add 475g to each pan. You can also use one batch of batter to make 2, 9-inch cake layers. Bake time will be a few minutes longer at 350°F/175°C.
This recipe can also be used to make a sheet cake! One batch will make a 1, 9 x 13-inch cake layer that’s about 1.5 inches tall once leveled.
Bake for 45-55 minutes at 350°F / 175 °C, or until a toothpick inserted in the center comes out with a few moist crumbs. Bake time can vary a lot based on the type of pan you use, if you use heating cores, and your oven. I recommend using heating cores if you have them; they help sheet cake layers bake more evenly and quickly.
For more details on how to convert this cake recipe and others into sheet cakes, check out my sheet cake guide.
If you want to make a tiered cake with this recipe, check out my cake batter calculator to see how many batches of batter you’ll need.
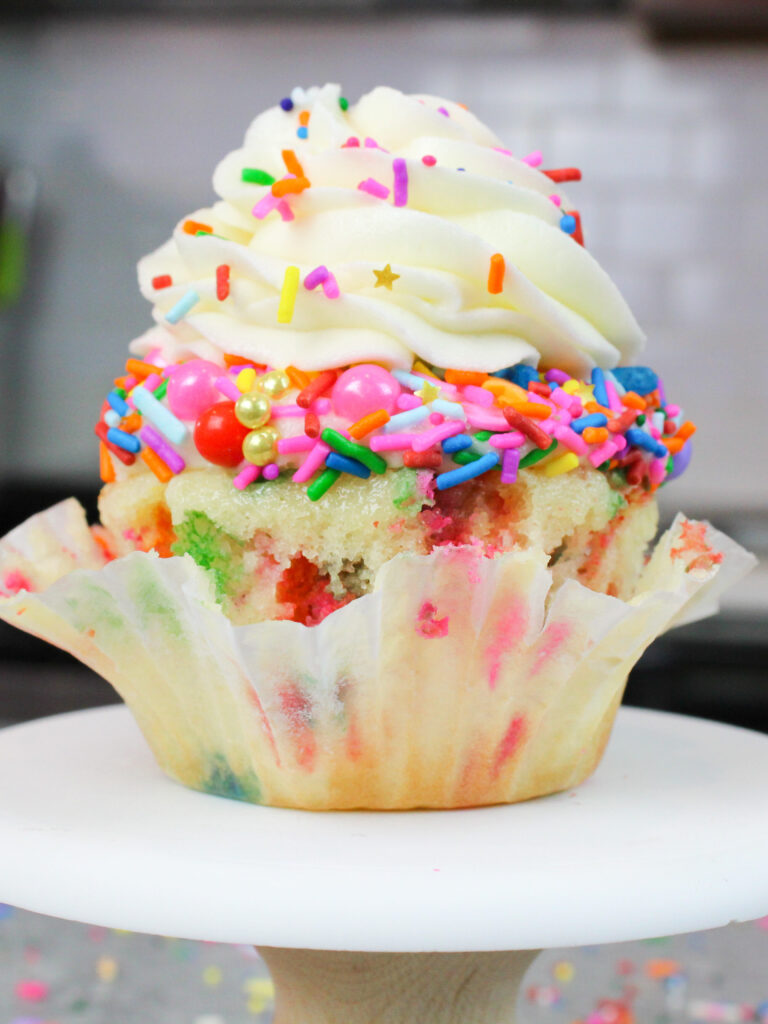
If you want to make funfetti cupcakes, fill the liners 3/4 full and bake them at 350°F/175°C for 18-21 minutes. One batch of batter will make about 3 dozen cupcakes (yield will vary based on the size of your liners).
Or if you just want to make a dozen cupcakes, you can use my funfetti cupcake recipe and make a half batch of this frosting recipe.
Can I Make This Cake in Advance?
I highly recommend making the components of this cake in stages. It breaks the process up and makes it so much more approachable!
The cake layers can also be made in advance and frozen. They taste just as great when they’re frozen as when they’re freshly baked, I promise!
You can make the frosting ahead of time or save any leftover frosting. It can be stored in an airtight container in the fridge for up to a month.
Be sure to give the frosting a good stir once it thaws to get the consistency nice and smooth again.
If you cut into the cake and have leftovers, use any remaining frosting to cover the cut section to keep it moist and store it in the fridge for up to a week.
Tips for Making the Best Under the Sea Cake
- Properly measure your flour. Either spoon it into the cup measure, then level with a knife, or use a kitchen scale to measure your dry ingredients.
- Ingredients at room temperature mix together better. Set out any cold ingredients ahead of time.
- Use a kitchen scale to weigh your cake pans as you fill them. It helps the cake layers bake to the same height and bake more evenly.
- Chill the cake layers in the freezer for about 20 minutes before assembling the cake. This makes them easier to stack and frost.
- Level the room temperature or thawed cake layers with a serrated knife to make them easier to stack and fill.
- Chill the cake before adding the crumb coat. This will help lock all the layers in place and minimize crumbing.
- Give yourself plenty of time to decorate this cake! It took me over 3 hours to color all the frosting and add all the buttercream details and sea animals. I baked the layers and made the frosting a day in advance to break up the process (see details on that in the section above).
Let Me Know What You Think!
If you make this funfetti layer cake recipe, I’d love to hear what you think of it! Let me know by leaving a rating and comment below.
Tag me @chelsweets and use #chelsweets if you share on social media so that I can see your amazing creations.
Under the Sea Cake
Equipment
- Small Acetate Sheet optional
Ingredients
Funfetti Cake
- 3 cups all-purpose flour 360g
- 3 cups granulated sugar 600g
- 2 1/2 tsp baking powder 10g
- 1 tsp fine salt 6g
- 1 cup (2 sticks) unsalted butter, room temperature 226g
- 1 cup carton egg whites or 7 large egg whites, room temperature 240g
- 1 1/2 cups buttermilk, room temperature 360g
- 2 Tbsp vegetable or canola oil 30g
- 2 tsp vanilla extract or vanilla bean paste 8g
- 1 1/2 tsp almond extract – optional 6g
- 2/3 cup rainbow jimmies or long strand sprinkles 115g
- gel food coloring if desired
Vanilla Buttercream Frosting
- 1 cup pasteurized egg whites, room temperature 240g
- 7 cups powdered sugar 904g or a 2 lb. bag
- 3 cups (6 sticks) unsalted butter, room temperature 680g
- 1 Tbsp vanilla extract or vanilla bean paste 12g
- 1 tsp fine salt 6g
Instructions
Funfetti Cake Layers
- Preheat the oven to 350°F / 175°C. Grease then line three 8-inch cake pans with nonstick spray and parchment paper rounds. Set aside. You can also use this recipe to make 4, 6-inch cake layers but the bake time will be a few minutes longer. If you don't have enough cake pans, the batter can sit at room temperature for a few hours. Bake as many layers as you can at a time.
- Mix 3 cups all-purpose flour, 3 cups sugar, 2 1/2 tsp baking powder, and 1 tsp salt together in a stand mixer with a paddle attachment or hand mixer until fully combined.
- Mix in 1 cup of room temperature, unsalted butter slowly into the dry ingredients on a low speed. Continue to mix until no large chunks of butter remain, and the mixture looks like moist sand.
- Pour in 1 cup of egg whites and mix on low until just incorporated. Mix in 1 1/2 cups of buttermilk in two installments on a low speed.
- Add in 2 Tbsp of vegetable oil, 2 tsp of vanilla extract, and 1 1/2 tsp almond extract, and mix at a low speed until fully incorporated. If you want to color these cake layers blue, add the gel food coloring during this step.
- Scrape down the sides of the bowl with a rubber spatula, then beat on a medium speed for about a minute to make sure everything is properly mixed together. This also helps lighten the texture of the cake layers a bit.
- Fold 2/3 cup of sprinkles into the cake batter using a rubber spatula and mix until they're evenly distributed.
- Divide the batter evenly between the prepared cake pans. I like to use a scale to weigh each pan and make sure they have the same amount of batter. This ensures that the layers bake evenly and end up being the same height.
- Bake for 34-36 minutes or until a toothpick comes out with a few moist crumbs. Let the pans cool for 10 minutes, then run an offset spatula around the perimeter of the pan to separate the cake from the pan.
- Place the cake pans into the freezer for 45 minutes to accelerate the cooling process. Once the layers are fully cooled, carefully flip the pans, and remove the layers from the pans.
- These layers bake up pretty flat, so leveling them is optional! If you want to level them, use a serrated knife to level the top of each cake layer. I also like to trim the sides of the cake layers to remove any sprinkles that have caramelized and make them easier to frost. If you make these in advance, wrap and freeze them at this point.
Vanilla Buttercream Frosting
- Add 1 cup of room-temperature pasteurized egg whites and 7 cups of powdered sugar in the bowl of a stand mixer (or a large bowl if you plan to make it with a hand mixer). Mix on a low speed to combine.
- Once all the powdered sugar has been incorporated, mix on high with a whisk attachment for 5-10 minutes until the meringue has increased in volume and has soft peaks.
- Swap the whisk attachment for a paddle attachment. This will help make your buttercream super smooth once it's fully made. Mix in 3 cups or 6 sticks of room temperature butter on a low speed, one at a time. Wait until each stick of butter has been fully mixed in before adding the next stick.
- Once the butter is incorporated, mix on medium speed for an additional 5 minutes until the frosting looks fluffy. If the frosting breaks or becomes soupy once you add in the butter, don't worry! Just keep mixing and it should come back together in 5-10 minutes. When in doubt, keep mixing. If the frosting still hasn't come back together at this point, please refer to my detailed troubleshooting guide in this post.
- Add 1 Tbsp of vanilla extract and 1 tsp of fine salt and mix on a low speed until combined.
- Stir for a couple of additional minutes by hand with a rubber spatula to make the frosting silky smooth. This frosting doesn't crust, so you don't need to cover it unless you're making it in advance!
Assembling This Cake
- Stack and frost cake layers on a greaseproof cake board or flat plate using a dab of frosting to help stick the first cake layer to the board.
- Spread an even layer of buttercream on top of each cake layer with a large offset spatula. If desired, add a couple of spoonfuls of sprinkles on top of the frosting. Repeat with the remaining cake layers.
- Flip the top cake layer upside-down to make it easier to frost.
- Once all the layers are stacked, gently press down on top of the cake with both of your hands to help them settle and to press out any trapped air between the cake layers.
- Spread a thin coat of frosting around the cake to fully cover the cake layers. Smooth using a bench scraper, then chill the cake in the fridge (30 minutes) or freezer (10 minutes) until the frosting is firm to the touch.
Decorating This Under the Sea Cake
- Scoop 2 cups of frosting into a separate bowl and use gel food coloring to color it light blue. Use this to add a second layer of frosting around the chilled cake to look like the ocean. I colored a tiny bit of additional frosting a darker blue with more blue gel food coloring and added it around the base of the cake to create a gradient, but this is optional.
- Reserve about 2 cups of white frosting by scooping it into a small piping bag fitted with a coupler. If you don't have couplers, just cut a small (1/2 cm) hole at the base of each bag. Set aside.
- Spread or pipe some white buttercream around the top edge of the cake to look like breaking waves. Smooth the side of the cake with a large offset spatula or bench scraper and leave the top textured, then pop it in the fridge while you color the buttercream.
- This next part is kind of a choose-your-own-adventure based on the color scheme you want and the types of sea creatures you want to create. Use gel food coloring to make 5-10 more colors of frosting. I recommend using the same bowl to make all the colors to cut down on dishes. Start with the lightest color, then work your way to the darkest color. Place each color of frosting in a small piping bag fitted with a coupler. This will allow you to easily swap piping tips. If you don't have couplers, just cut a small (1/2 cm) hole at the base of each bag. The more colors you make, the more options you'll have when decorating, but it takes FOREVER, so just make as many as you feel comfortable doing. I made deep blue, purple, red, light brown, light green, dark green, bright orange, light pink, and black.
- Use the different colors of buttercream to pipe seaweed, coral, starfish, and shells around the base of the cake. I used a small petal tip (like a Wilton 103) to make the seaweed, and a small round tip (like a Wilton 5) to add the coral and other details.
- Next, work on the sea animals. This part takes some time, so I recommend sitting down in a comfortable chair, anchoring your arm to the counter as you pipe for stability, and giving yourself lots of time! I like to use a toothpick or a small scribe to trace the outline of each sea animal, then pipe on the frosting with a small piping tip (like a Wilton 5). Smooth it using either a small offset spatula or palette knife (tapered ones work great), or a small square of acetate sheet. I added a whale, a few sea horses, a shark, a jellyfish, an octopus, a squid, a turtle, and some small fish, but you can add whatever sea animals you like best!
- The last step is to add some bubbles to help fill in any blank spaces! You can do this by piping on little white dots of buttercream, or using small, round, white sprinkles if you have them.
Video
Notes
Cake Recipe Variations
One batch of batter is about 1900g or 10.5 cups, so I add about 630g to each of my cake pans when using 3, 8-inch cake pans. If I’m making 4, 6-inch cake pans, I’ll add 475g to each pan. You can also use one batch of batter to make 2, 9-inch cake layers. Bake time will be a few minutes longer at 350°F/175°C. This recipe can also be used to make a sheet cake! One batch will make a 1, 9 x 13-inch cake layer that’s about 1.5 inches tall once leveled. Bake for 45-55 minutes at 350°F / 175 °C, or until a toothpick inserted in the center comes out with a few moist crumbs. Bake time can vary a lot based on the type of pan you use, if you use heating cores, and your oven. I recommend using heating cores if you have them; they help sheet cake layers bake more evenly and quickly. For more details on how to convert this cake recipe and others into sheet cakes, check out my sheet cake guide. If you want to make a tiered cake with this recipe, check out my cake batter calculator to see how many batches of batter you’ll need. If you want to make funfetti cupcakes, fill the liners 3/4 full and bake them at 350°F/175°C for 18-21 minutes. One batch of batter will make about 3 dozen cupcakes (yield will vary based on the size of your liners). Or if you just want to make a dozen cupcakes, you can use my funfetti cupcake recipe and make a half batch of this frosting recipe.Tips for Making the Best Under the Sea Cake
- Properly measure your flour. Either spoon it into the cup measure, then level with a knife, or use a kitchen scale.
- Make sure your ingredients are at room temperature to help them mix together better.
- Chill your cake layers in the freezer for about 20 minutes before assembling the cake. This makes them easier to stack and frost.
- Level your room temperature or thawed cake layers with a serrated knife to make them easier to stack.
- Crumb coat and chill your cake, then smooth on a second layer of frosting. This will help ensure your final coat of frosting is crumb-free and beautiful.
- Give yourself plenty of time to decorate this cake! It took me over 3 hours to color all the frosting and add all the buttercream details and sea animals. I baked the layers and made the frosting a day in advance to break up the process (see details on that in the section below).
Make this Cake in Advance and Storage Tips
I highly recommend making the components of this cake in stages. It breaks the process up and makes it so much more approachable! The cake layers can also be made in advance and frozen. They taste just as great when they’re frozen as when they’re freshly baked, I promise! You can make the frosting ahead of time or save any leftover frosting. It can be stored in an airtight container in the fridge for up to a month. Be sure to give the frosting a good stir once it thaws to get the consistency nice and smooth again. If you cut into the cake and have leftovers, use any remaining frosting to cover the cut section to keep it moist and store it in the fridge for up to a week. If you cut into the cake and have leftovers, use any remaining frosting to cover the cut section to keep it moist and store it in the fridge for up to a week.Nutrition
Other Recipes You Might Like: