
Rocky Road Cake
We’re in the midst of the final heat waves of summer and my ice cream consumption is at an all-time high. While this rocky road cake isn’t actually made with ice cream, it’s inspired by all the chocolatey, marshmallow-filled, nutty goodness of rocky road ice cream.
It’s traditionally made with chocolate ice cream, bits of marshmallow and crushed nuts marbled throughout each scoop.
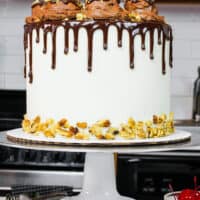
I did my best to do this flavor justice! From the tender chocolate cake layers, marshmallow buttercream, chocolate, and nut filling, to the playful ice cream scoop decorations, I think I did 🙂
Picking the Right Cake Base – Chocolate Cake Layers
Like I mentioned above, rocky road ice cream has a chocolate flavored base. Chocolate is the main flavor, so I decided to follow suit and make this cake with fluffy chocolate cake layers.
I chose to use my go to chocolate layer cake recipe. It’s a wonderful hybrid between a sponge cake and a butter cake.
This means it has a great crumb and you don’t need to soak the layers in simple syrup. It’s already moist enough on its own!
I also like this chocolate cake recipe because it has great structure. It stacks well and keeps its shape.
Filling this Rocky Road Cake
The filling of this cake is really where the rocky road flavor shines. I chose to fill and frost this cake with a marshmallow buttercream.
The base frosting is my American buttercream recipe, plus some marshmallow fluff!
It sounds weird, but it gives the frosting that delicious marshmallow flavor without changing the consistency of the frosting.
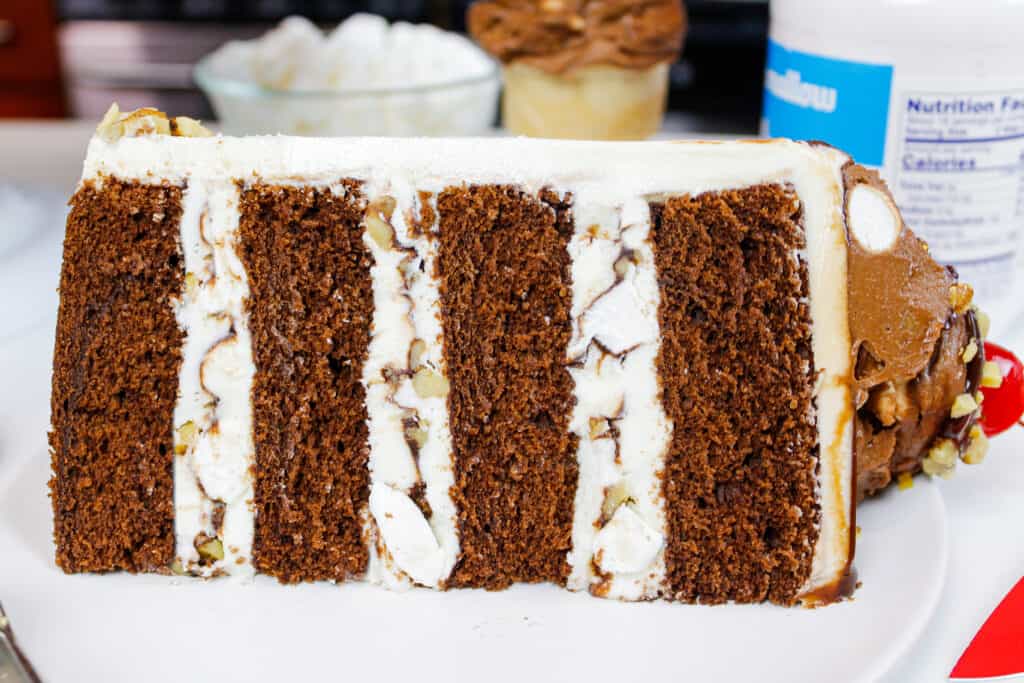
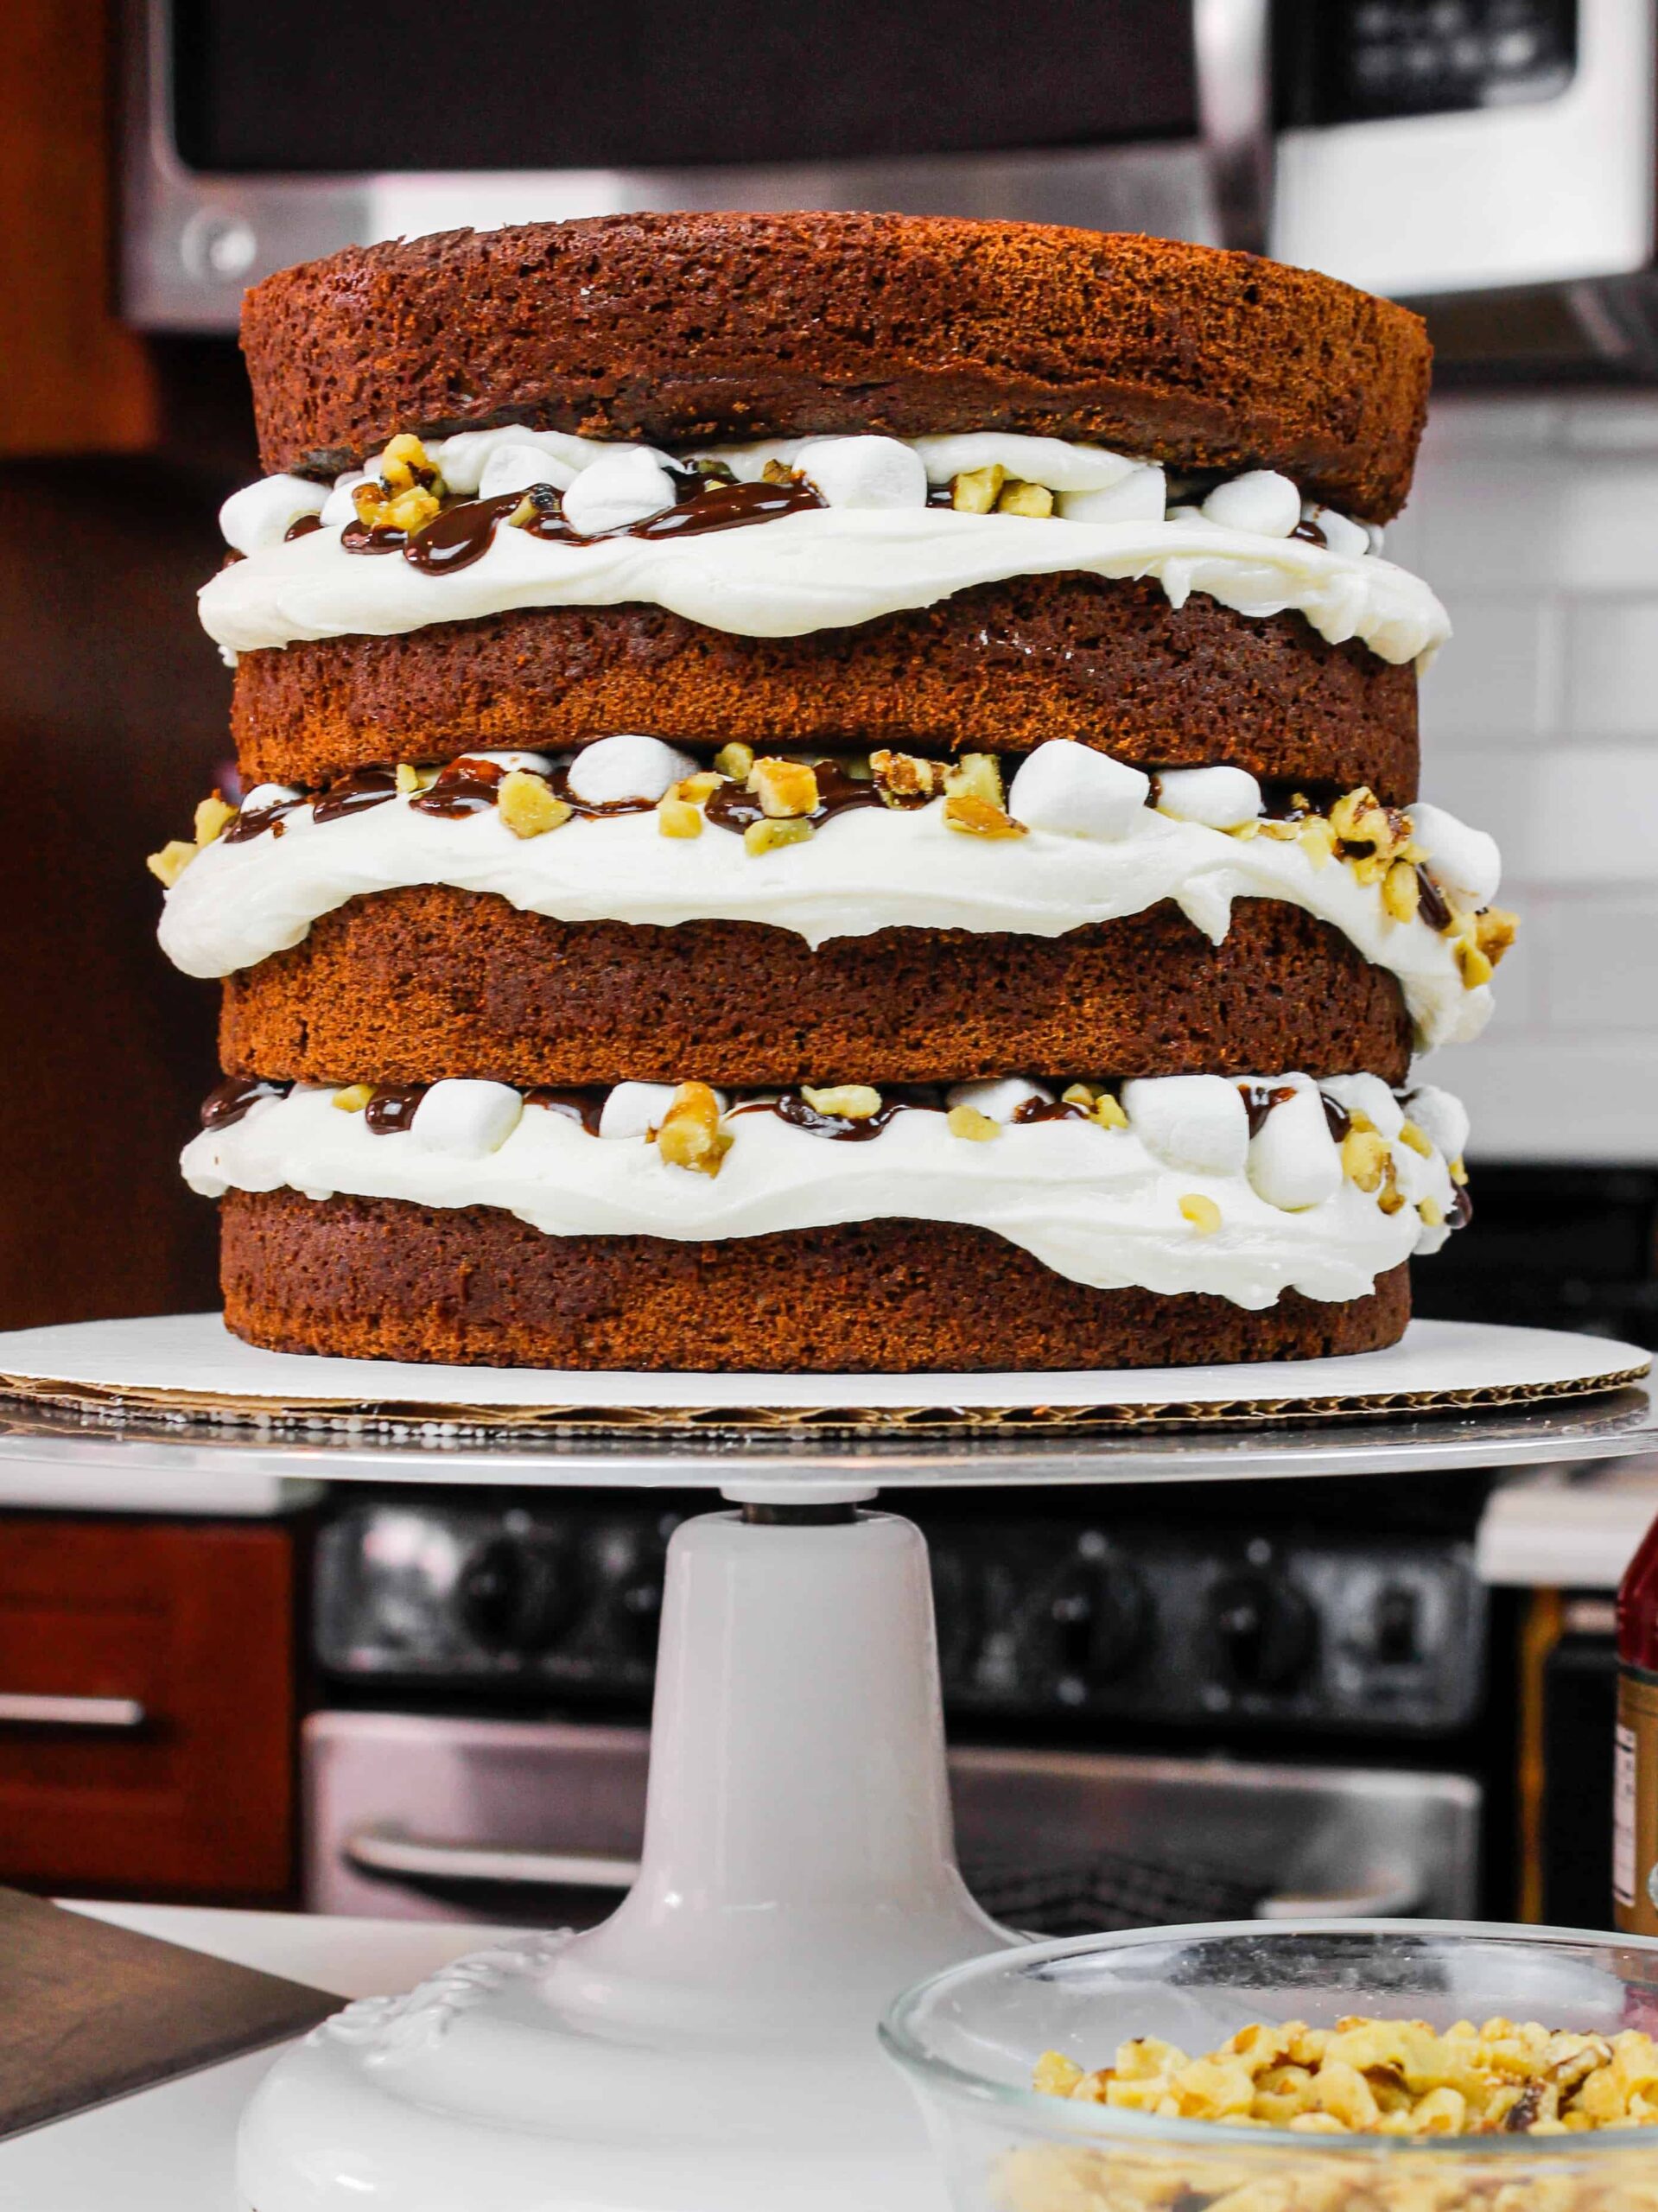
I added a generous drizzle of chocolate ganache on top of each layer of frosting. I topped the ganache with a sprinkle of chopped walnuts and loads of mini marshmallows.
This cake has a lot going on between each layer, so I added a tiny bit of frosting on top of the mini marshmallows.
This helps the next cake layer stick in place once it’s added and gives the cake a bit more stability.
It also ensures there are no big pockets of air stuck between the cake layers, which can hide between the mini marshmallows.
Decorating this Rocky Road Cake
Once I figured out how to incorporate the rocky road flavor through the cake, I went to work dreaming up the decoration of this cake.
I wanted this cake to have serious ice cream vibes and believe the end design gets that point across.
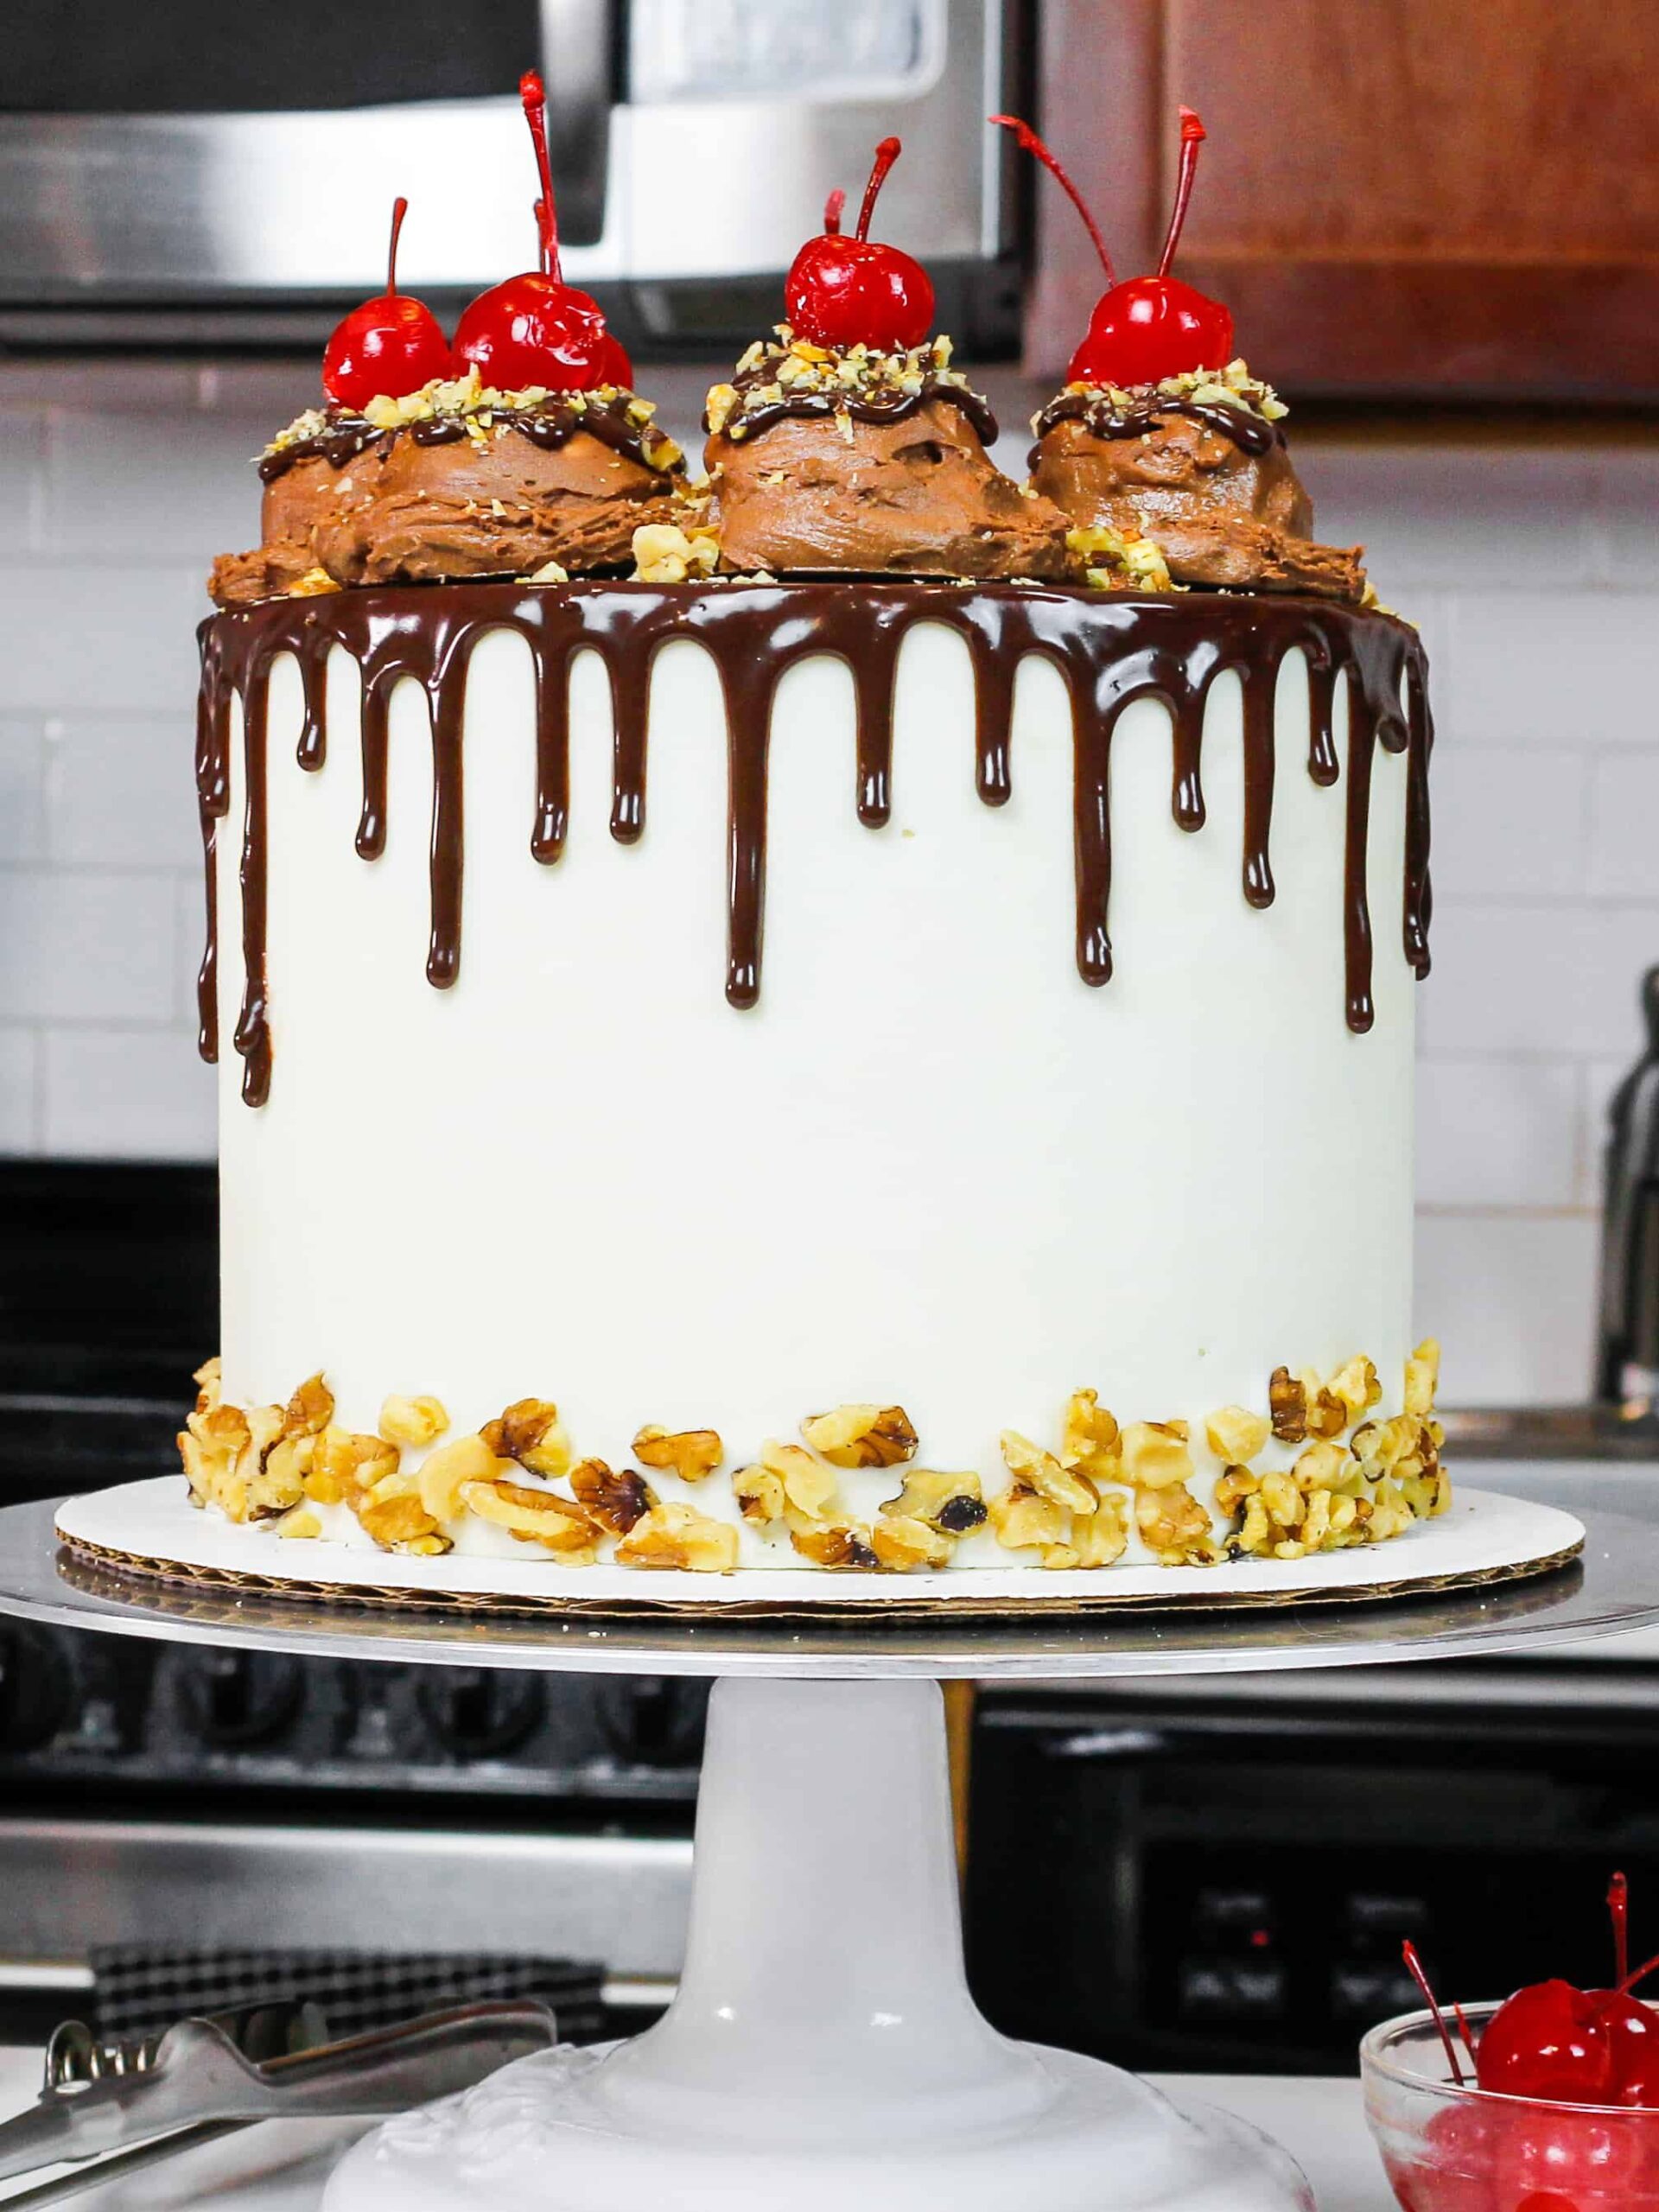
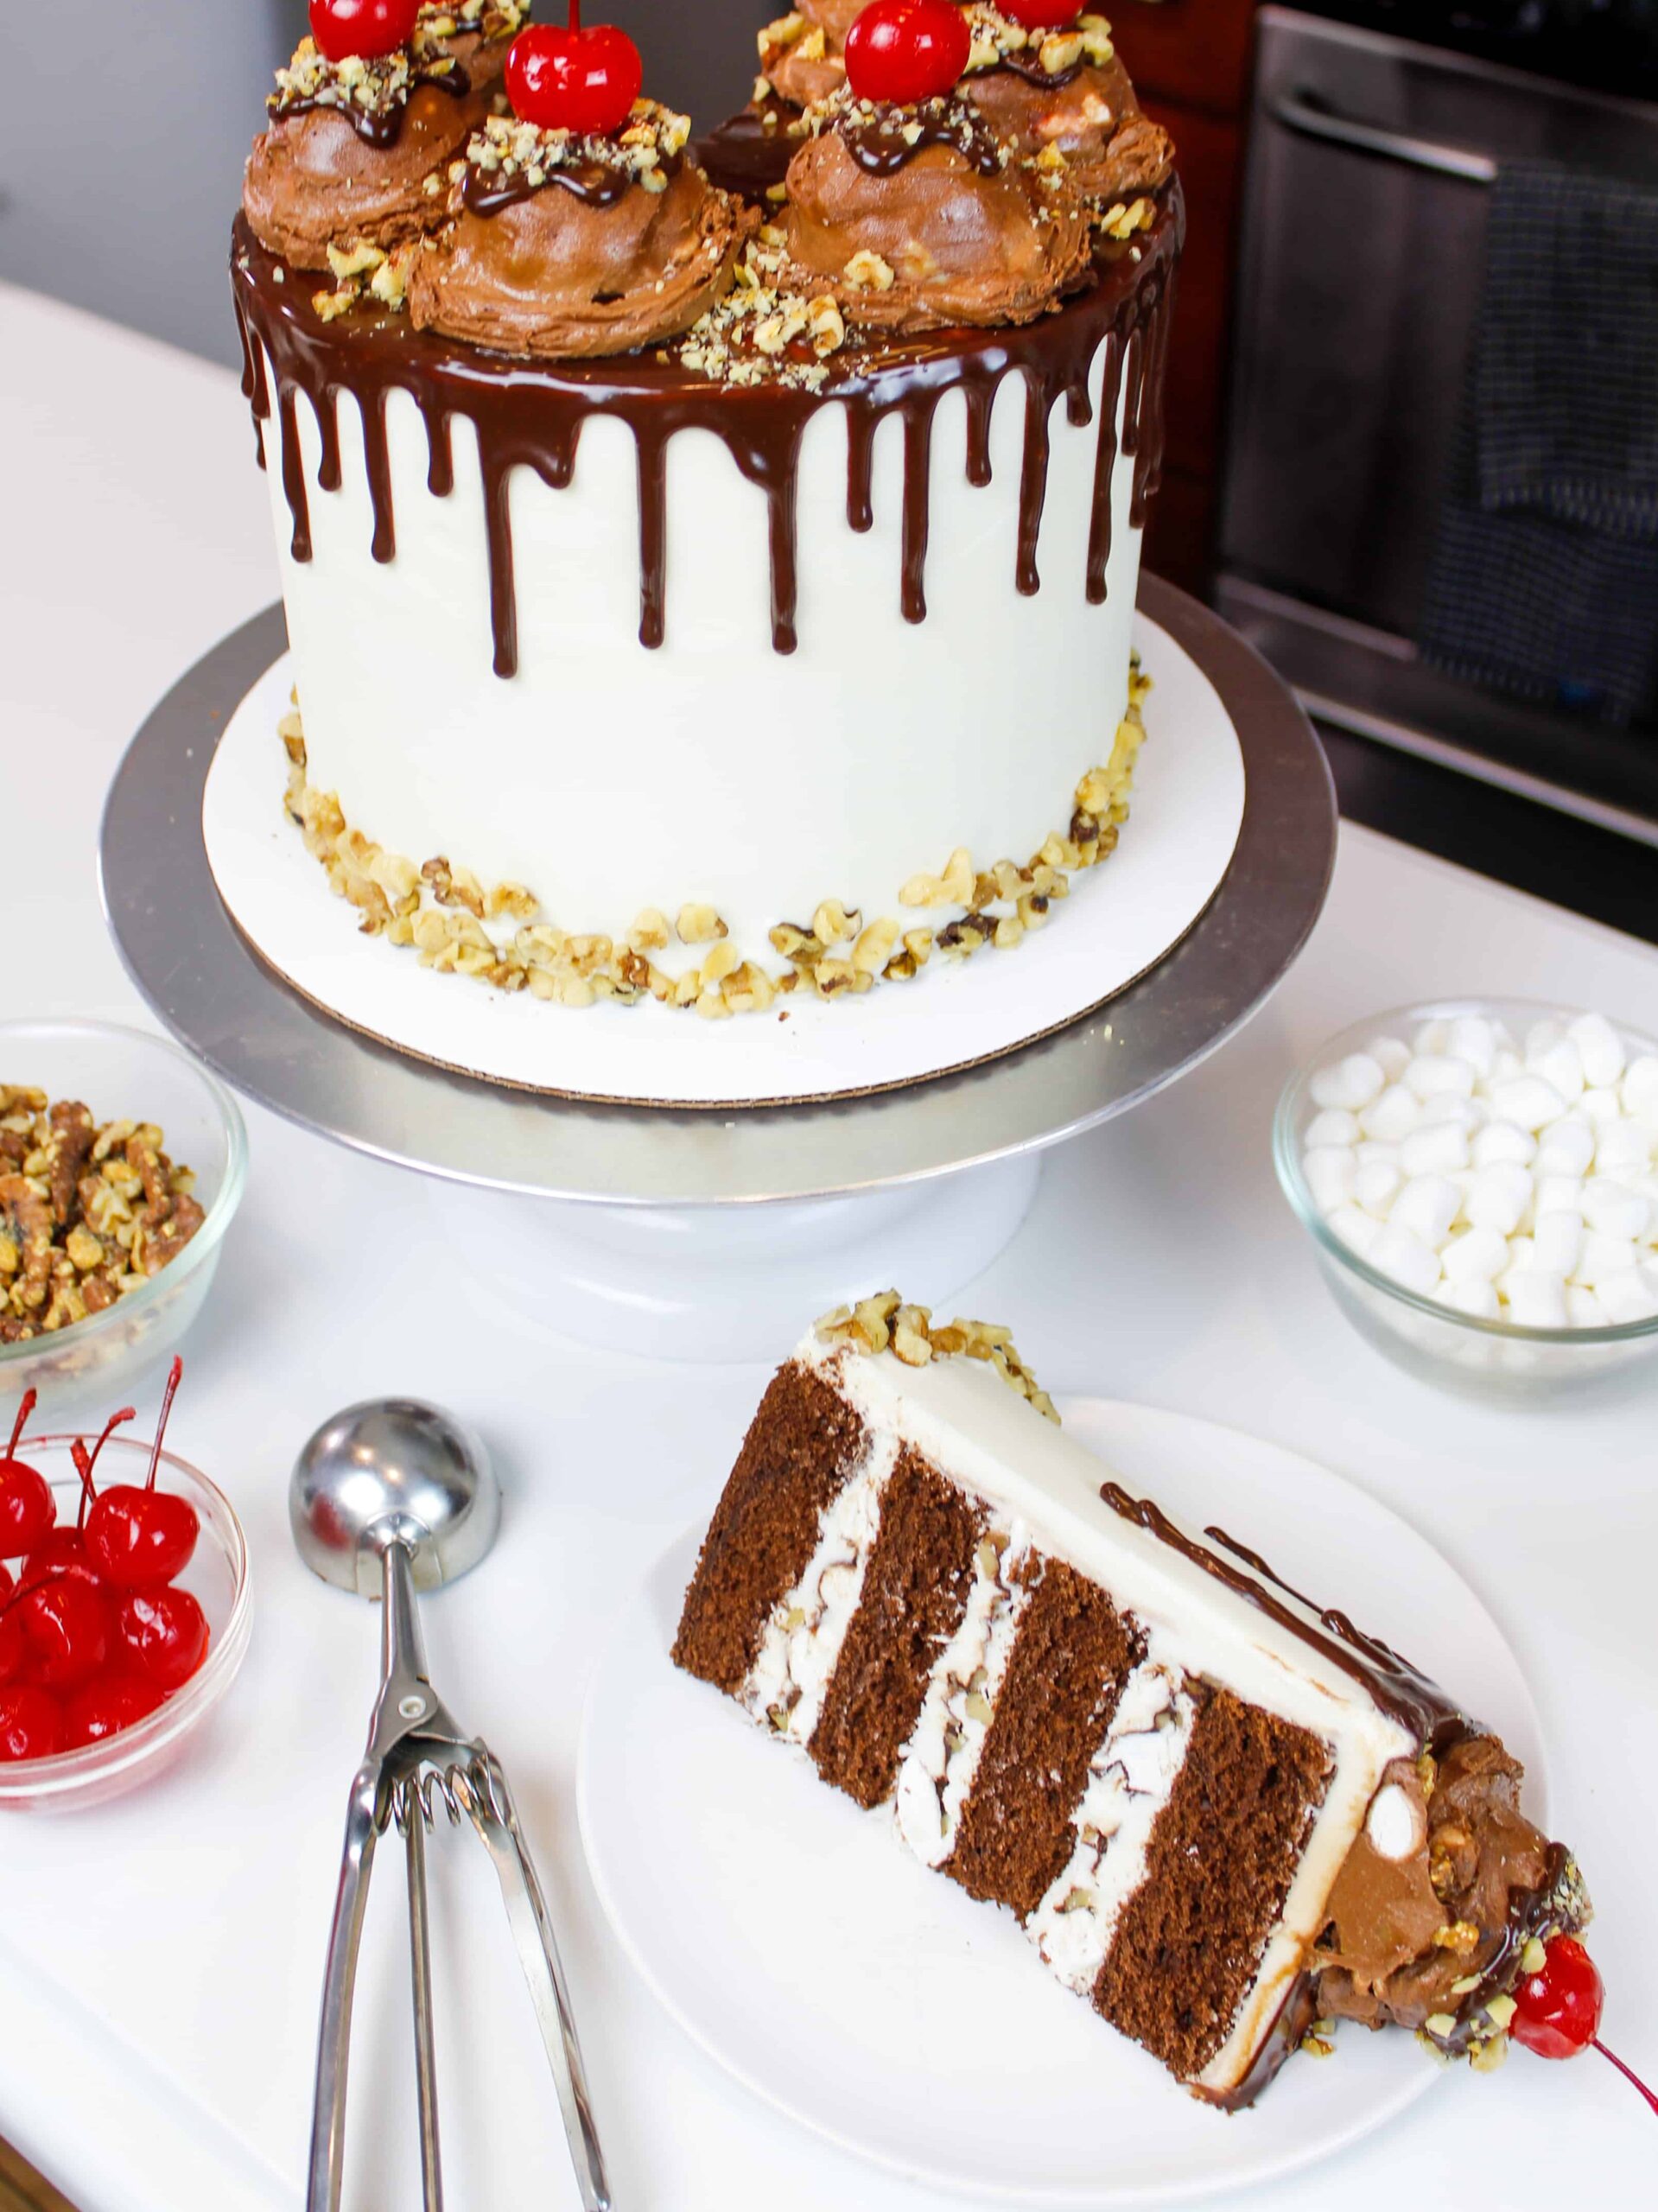
This cake is decorated with a chocolate drip, using the same ganache that’s in the cake filling.
Chocolate drips always add so much flare to a cake. They take a bit of practice, but with a couple tips it’s an easy look to master!
I associate chocolate drizzles with ice cream sundaes, so chocolate drips felt very on theme for this cake.
I topped the cake with scoops of a mock rocky road ice cream, which I made with buttercream!
This is definitely my favorite part of the cake. I placed 2 cups of frosting in a small bowl, and added in some melted chocolate, mini marshmallows, and chopped walnuts.
With a small cookie scoop, I carefully placed scoops of this rocky road buttercream onto a parchment lined baking tray. I froze these for about 20 minutes.
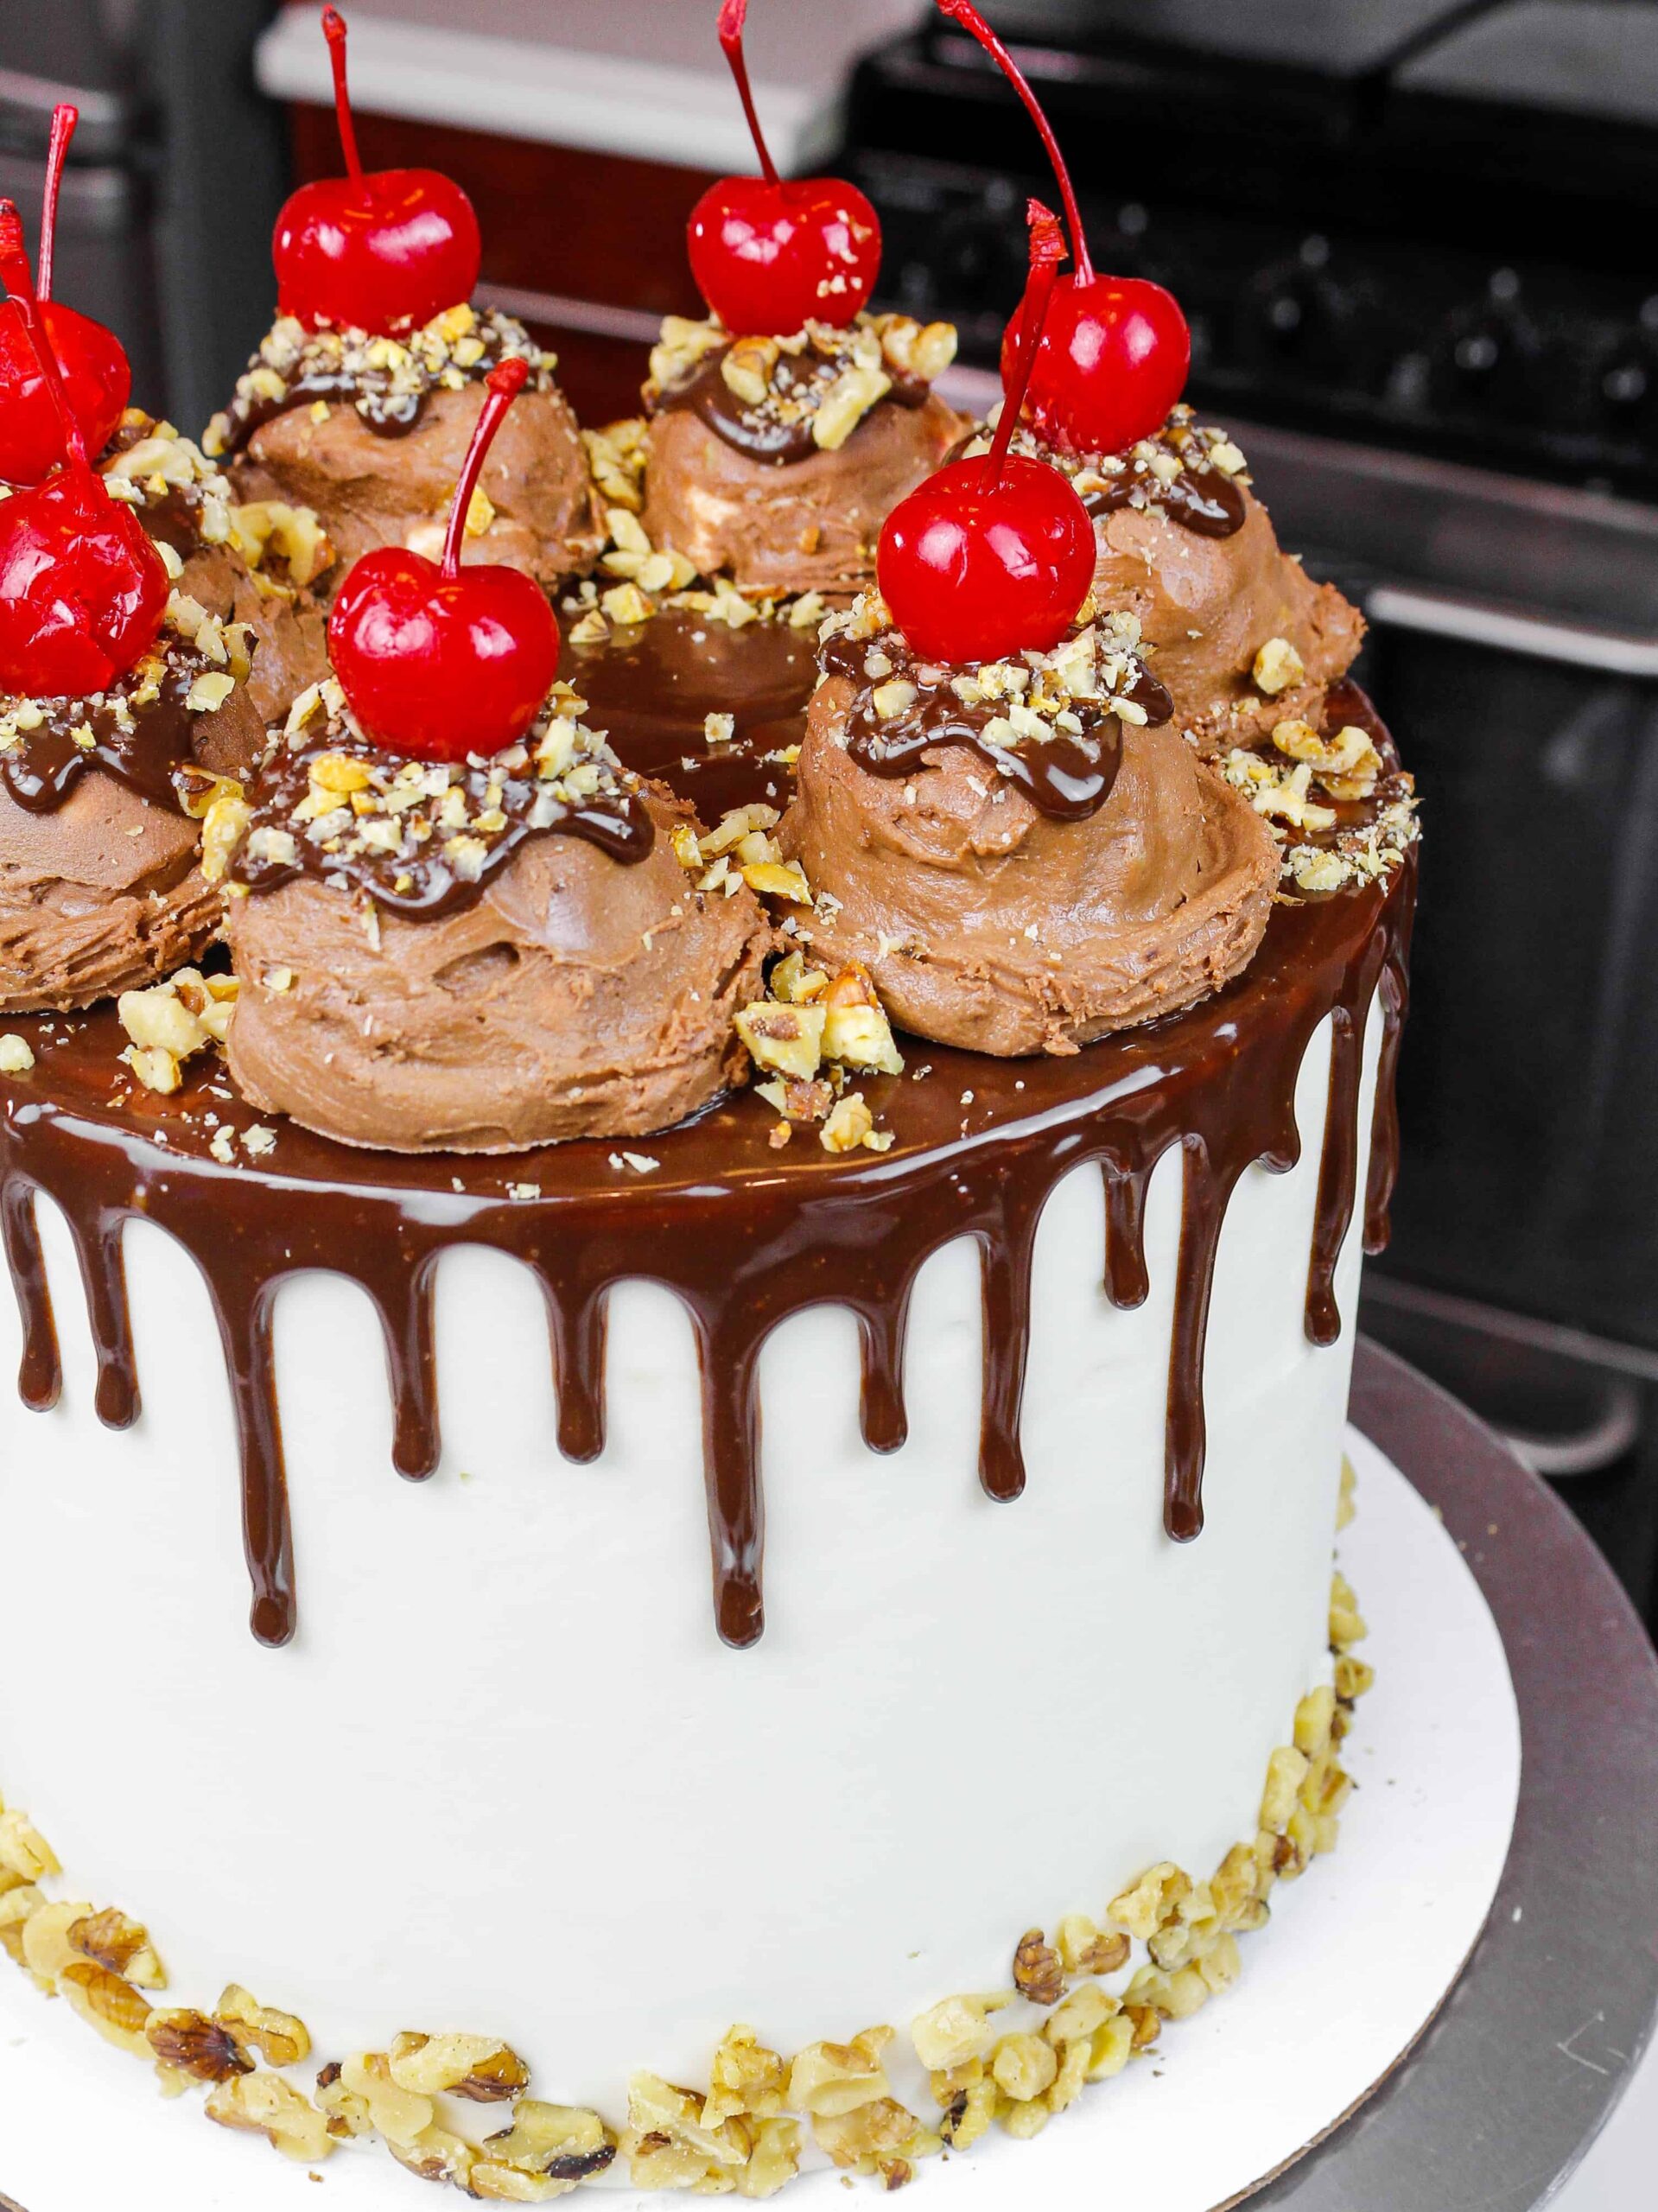
Once the buttercream scoops were firm to the touch, I carefully added them to the top of the cake.
Each little scoop is topped with more chocolate ganache, chopped nuts, and a cherry!
The cherries add a nice pop of color and break up all the white and brown. You could also add some sprinkles if you don’t have maraschino cherries on hand.
Tips for Making the Best Rocky Road Birthday Cake:
- Make your own buttermilk if you don’t have any! Add 1 Tbsp of lemon juice or vinegar to 1 cup of whole milk.
- Properly measure your flour (spoon into the cup measure, then level) or use a kitchen scale to measure your dry ingredients.
- Ingredients at room temp mix together better, so set out any cold ingredients ahead of time.
- Mix your cake batter just until the ingredients are incorporated. This will ensure your cake layers are tender and fluffy.
- Chill your cake layers in the freezer for about 20 minutes before assembling the cake. This makes the cake so much easier to stack and frost.
- One batch of batter can also be used to make one 9×13 inch sheet cake. Bake it at 325F for 35-40 minutes.
- You can also make this rocky road cake vegan or dairy free! Use your favorite type of dairy free milk to replace the buttermilk and heavy cream, use vegan butter sticks in place of the butter, and use flax seed eggs!
Making This Rocky Road Cake in Advance & Storage Tips
Make your cake layers in advance and freeze them. It breaks the process up and makes it more approachable.
Make your frosting ahead of time too or save any leftover frosting. It can be stored in an airtight container in the fridge for up to a month. Or store it in the freezer for up to 3 months! Be sure to give it a good stir once it thaws to get the consistency smooth again.
A frosted cake can last in the fridge for up to a week. In the freezer it can last for up to a month! The buttercream locks in all the moisture, keeping the cake fresh and delicious.
If you cut into the cake and have leftovers, use any remaining frosting to cover the cut section to keep it moist. It can be stored in the fridge like this for up to a week.
Let Me Know What You Think!
If you try this rocky road cake recipe, I’d love to hear what you think of it! Please leave a rating and comment below.
And don’t forget to tag me @chelsweets and use the #chelsweets so that I can see your amazing creations on social media.
Other Recipes You Might Like:
Rocky Road Cake
Ingredients
Chocolate Cake Ingredients
- 2 1/2 cups granulated sugar 500g
- 1 cup unsalted butter, room temperature 226g or 2 sticks
- 4 large eggs, room temperature 224g
- 1 1/2 tsp baking powder 6g
- 1 tsp baking soda 6g
- 1 tsp fine salt 6g
- 1 cup water, warm 240g
- 1 cup buttermilk, room temperature 240g
- 1 cup black cocoa powder 100g
- 3 cups all-purpose flour 375g
Chocolate Drip
- 1/2 cup milk chocolate chips 90g
- 1/3 cup heavy whipping cream, room temperature 80g
Marshmallow Buttercream Frosting
- 2 1/2 cups unsalted butter, room temperature 565g
- 1 Tbsp vanilla extract or vanilla bean paste 12g
- 1/2 tsp fine salt 3g
- 8 cups powdered sugar 1000g
- 1/2 cup heavy whipping cream, room temperature 120g
- 3/4 cup marshmallow fluff 75g
Rocky Road Ice Cream Scoops
- 2 cups marshmallow buttercream recipe above
- 1 cup milk chocolate, melted and cooled 175g
- 1 cup mini marshmallows
- 1/2 cup chopped walnuts
- maraschino cherries garnish
Instructions
Chocolate Cake Layers
- Begin by preheating the oven to 350 F / 175 C. Line four 7- or three 8-inch pans with parchment rounds and spray with non-stick baking spray.
- Add 2 1/2 cups sugar and 1 cup butter into the bowl of a stand mixer. Cream together on a high speed for 2 minutes with a whisk attachment or hand mixer. The mixture should become lighter in color.
- Mix in 4 large eggs on a medium speed, two at a time.
- Add 1 1/2 tsp baking powder, 1 tsp baking soda, and 1 tsp salt. Mix on medium-high for another minute.
- In a separate bowl, whisk together 1 cup of hot water, 1 cup of buttermilk, and 1 cup of black cocoa. Whisk until no clumps remain.
- Next, add 2 cups of flour into the butter/egg mixture. Scrape the sides of the bowl with a spatula, to ensure the flour is fully incorporated.
- Pour the buttermilk/cocoa mixture and gently mix to incorporate the liquid (if you don't, you'll end up splattering the cocoa mixture all over your kitchen!).
- Add in the last cup of flour and mix on low until the flour is incorporated.
- Evenly divide the batter between the prepared pans. I like to use a kitchen scale to ensure each pan has exactly the same amount of batter.
- Bake for 32-35 minutes, or until a toothpick comes out with a few moist crumbs.
- Let the layers cool in the pans for about 10 minutes, then run an offset spatula around the edge of the pans to help separate the layers from the pans.
- Place the pans in the freezer for about 45 minutes to accelerate the cooling process. Once the layers are fully cooled, carefully flip the pans, and remove the layers from the pans.
- Use a serrated knife to level the tops of the layers, then set aside.
Chocolate Ganache Drip
- Place 1/2 cup milk chocolate chips in a heatproof bowl and set aside.
- Heat 1/3 cup of heavy cream in a heatproof bowl in the microwave for 45 seconds to 1 minute, until gently bubbling.
- If you don’t have a microwave or prefer to use the stove top, you can heat the cream over a medium heat in a pan until it begins to simmer. Remove from heat.
- Gently pour the heavy cream over the chocolate chips, making sure they are covered with cream. Let the mixture sit for 1-2 minutes.
- Stir slowly until the cream and chocolate are fully combined, and the ganache is silky smooth. Pour into a plastic squirt bottle to easily add drips to a cake. If you don’t have any plastic bottles on hand, you can also use a spoon to drizzle it over cakes.
- Set aside to cool for about 10 minutes or place in the fridge for about 5 minutes until the mixture is just slightly warm to the touch.
- Before adding around the entire cake, complete a test drip on the cake once it is frosted and chilled to check the consistency. If the test drip seems too thick, try heating up the ganache for 5-10 additional seconds in the microwave. If the mixture seems too thin, allow it to cool a bit longer, then try another test drip.
Marshmallow Buttercream Frosting
- While the cake layers bake and cool, make the marshmallow buttercream frosting.
- Beat 2 1/2 cups of butter on a medium speed for 30 seconds with a paddle attachment until smooth.
- Add in 1 Tbsp vanilla extract and 1/2 tsp salt. Mix on a low speed until combined.
- Gradually mix in 8 cups of powdered sugar and 1/2 cup of heavy cream on a low speed. Scrape the sides and bottom of the bowl with a rubber spatula to make sure everything is properly mixed together.
- Once the powdered sugar is fully incorporated, mix in 3/4 cup of marshmallow fluff.
- Beat on low until the ingredients are fully incorporated and the desired consistency is reached.
- If the frosting seems too thick, add an extra Tbsp of heavy cream. If it's too thin, mix in another 1/4 cup of powdered sugar.
- Stir by hand with a rubber spatula for a couple minutes to get the frosting SUPER smooth. Set aside.
Rocky Road Buttercream Scoops
- Once the marshmallow buttercream is made, place 2 cups of marshmallow frosting into a separate bowl.
- Mix in 1 cup of melted and cooled milk chocolate and stir until combined.
- Fold in 1 cup of mini marshmallows and 1/2 cup chopped nuts.
- Use a cookie scoop to make mock ice cream scoops. Scoop them onto a parchment lined baking sheet and place in the freezer until they're firm to the touch.
Rocky Road Cake Assembly
- Stack and frost cake layers on a greaseproof cake board using a dab of frosting to help stick the first cake layer to the board.
- Add an even layer of marshmallow buttercream between each cake layer.
- Top with a drizzle of chocolate ganache, mini marshmallows, and chopped walnuts.
- Repeat with remaining cake layers.
- Add a thin coat of frosting around the cake to fully cover the cake layers. Smooth using a bench scraper, then chill the cake in the fridge (10 minutes) or freezer (5 minutes) until the frosting is firm to the touch.
- Add a second, thicker layer of frosting to the cake and smooth using a bench scraper.
- Add chopped walnuts around the base of the cake, then chill the cake until the frosting is firm to the touch.
- Then add a chocolate drip to the sides of the cake and top the cake with mock rocky road ice cream scoops. Top the scoops with more ganache, nuts, and maraschino cherries. Then enjoy!
Video
Notes
Tips for Making the Best Rocky Road Cake
- Properly measure your flour (spoon into the cup measure, then level). Or better yet, use a kitchen scale to measure your dry ingredients.
- Mix your cake batter just until the ingredients are incorporated after adding in the flour. This ensures your cake layers are tender and fluffy.
- Use a scale to weigh your cake pans as you fill them. This will make your cake layers bake to the same height and bake more evenly.
- Level your room temperature or thawed cake layers with a serrated knife to make them easier to stack.
- Chill the leveled cake layers in the freezer for about 20 minutes before assembling the cake. It makes it so much easier to frost them!
The Rocky Road Cake looks FABULOUS! You know what I’ll be making for a birthday celebration this weekend! Thank you so much, Chelsey, for this amazing Chelsweets vision!
This looks amazing! How long would I bake for if I use 6inch pans and how many layers should I do?
Hi Kris!
You can use this recipe to make 4, 6 inch cake layers, and they should take 36-40 minutes to bake! they’ll be pretty tall layers!! <3
Your cake looks amazing as always!! I’m always looking at your blog, you have so much talent and your cakes are so beautiful. I’m trying new recipes and i found yours and you did not disappoint. I’m in love!! I’m a blogger myself and you honestly inspire me to create some of my own creations and share what i create with others as well. Once again your awesome!!
You are too sweet Miracle!! Thank you for the kind words. Wishing you all the best with your blog <3
I made this cake for my daughter’s birthday this weekend and it was perfect in every way! Your thorough directions and video made this cake relatively easy to complete! I wish I could attach a picture to show you! Thank you for sharing your recipes/videos and talent! We cannot wait to try another one!
Hi Angelica,
I’m so happy to hear that!! I wish I could see it too 🙂 Happy baking!!!
I am excited to try this recipe.Could I use Hersey special dark cocoa powder instead of black cocoa?
Can you make a cookbook your stuff is amazing ?
Hey, Chels! I’m a fan of working with Swiss meringue buttercream. Do you think it would work just as well with the 3/4C marshmallow fluff?
I just made your Rocky Road Cake for my daughter-in-law’s birthday! She and everyone else absolutely loved it! So good!