
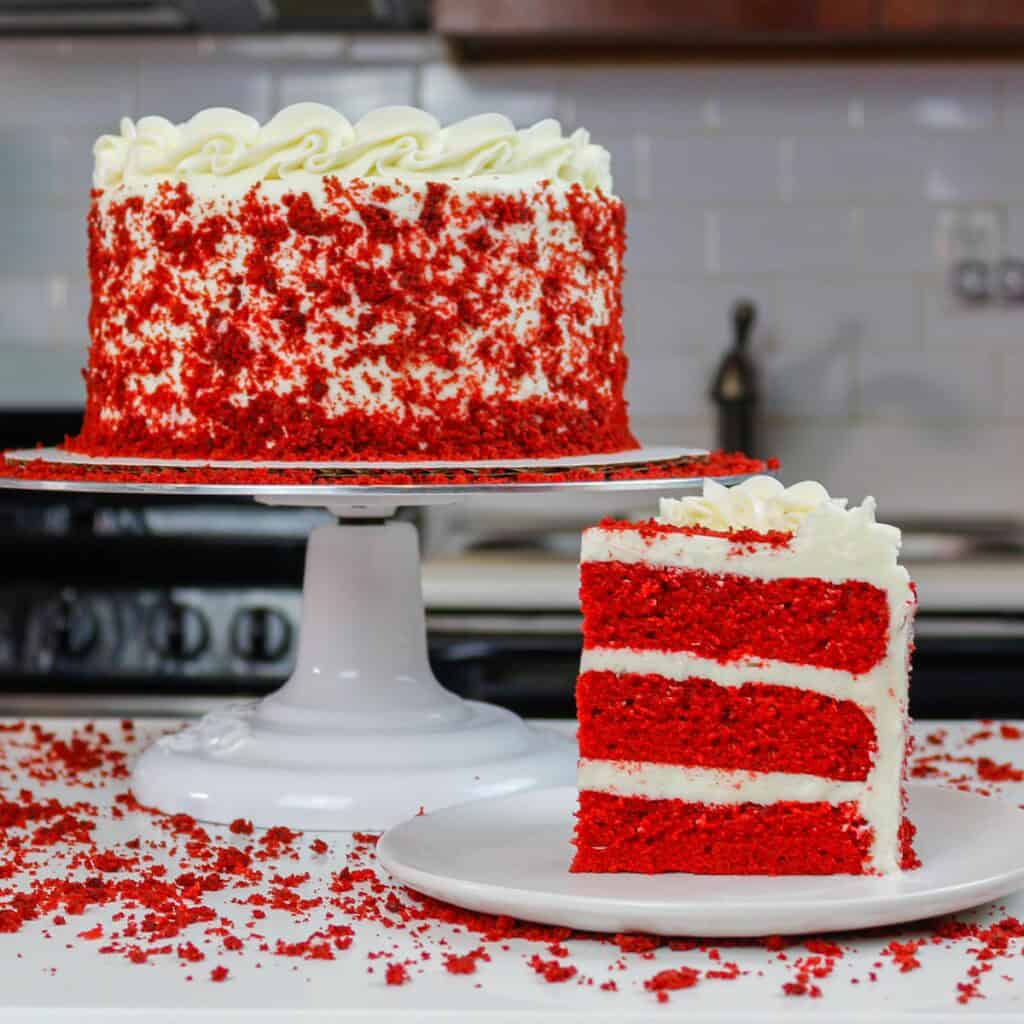
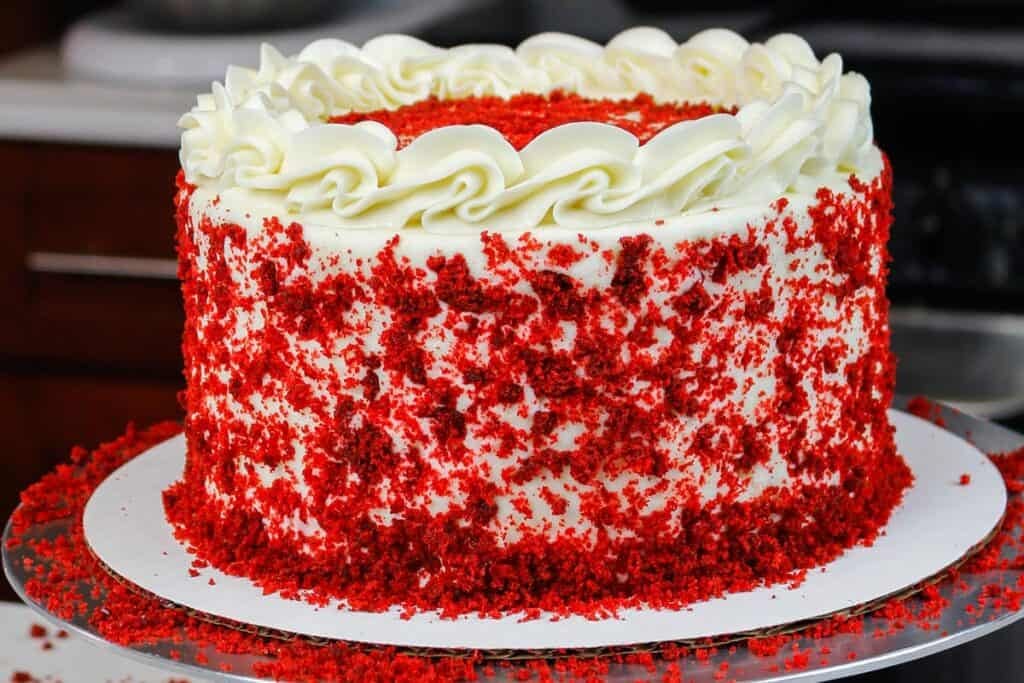
Red Velvet Layer Cake
Red velvet cake…it has eluded me for so long!! You’ve been asking me to share my favorite red velvet layer cake recipe, and I’ve wanted to. I wasn’t procrastinating, I just hadn’t made a red velvet cake I was truly happy with.
I wanted moist, spongy, tender cake layers, sandwiched between generous layers of cream cheese frosting. So, I continued my red velvet experiments.
I tried tons of different recipes to see what ratios I preferred, played around with the amount of leavening agents, and went through 4 iterations of recipe testing.
And here we have it. A delicious, 6-inch red velvet cake recipe that is super moist and has a delicate, tender crumb.
Oil Vs. Butter, or Oil & Butter?
While most of my cake recipes use butter as the fat, this recipe uses oil.
Butter adds a lot of flavor to a cake, but oil adds a lot of moisture. Not to say that a butter cake is dry, but the texture is denser than a cake recipe made with oil.
Oil gives the cake a fluffier texture. While I love a good butter cake, that’s not the texture I associate with a red velvet cake. That’s why this cake recipe uses only oil.
Red Food Coloring
When you make a red velvet cake, you expect it to have that gorgeous, deep red color when you cut it. I’ve found that it’s a lot easier to achieve that result using gel food coloring.
I prefer Americolor or Chefmaster, but any gel food coloring should work! If you don’t have gel food coloring on hand, you can also use liquid food coloring.
I’ve found that you need to use an entire bottle of liquid food coloring to get the deep red color, so be sure you have a full bottle if you go this route.
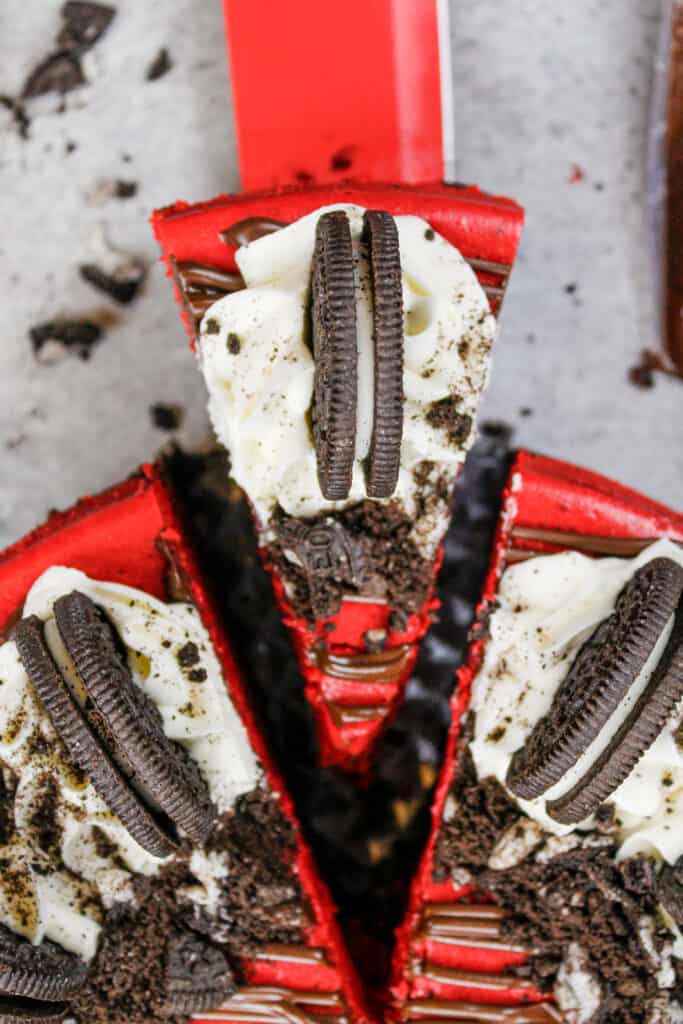
The Cream Cheese Frosting
This red velvet cake recipe would taste great with just about any frosting, but I wanted to stick with the classic combination of cream cheese frosting and red velvet cake.
My cream cheese buttercream is a dream to frost with. It’s thick, has great structure, and pipes like a dream. It’s wonderful on layer cakes because it is stiff enough to support the weight of the cake layers.
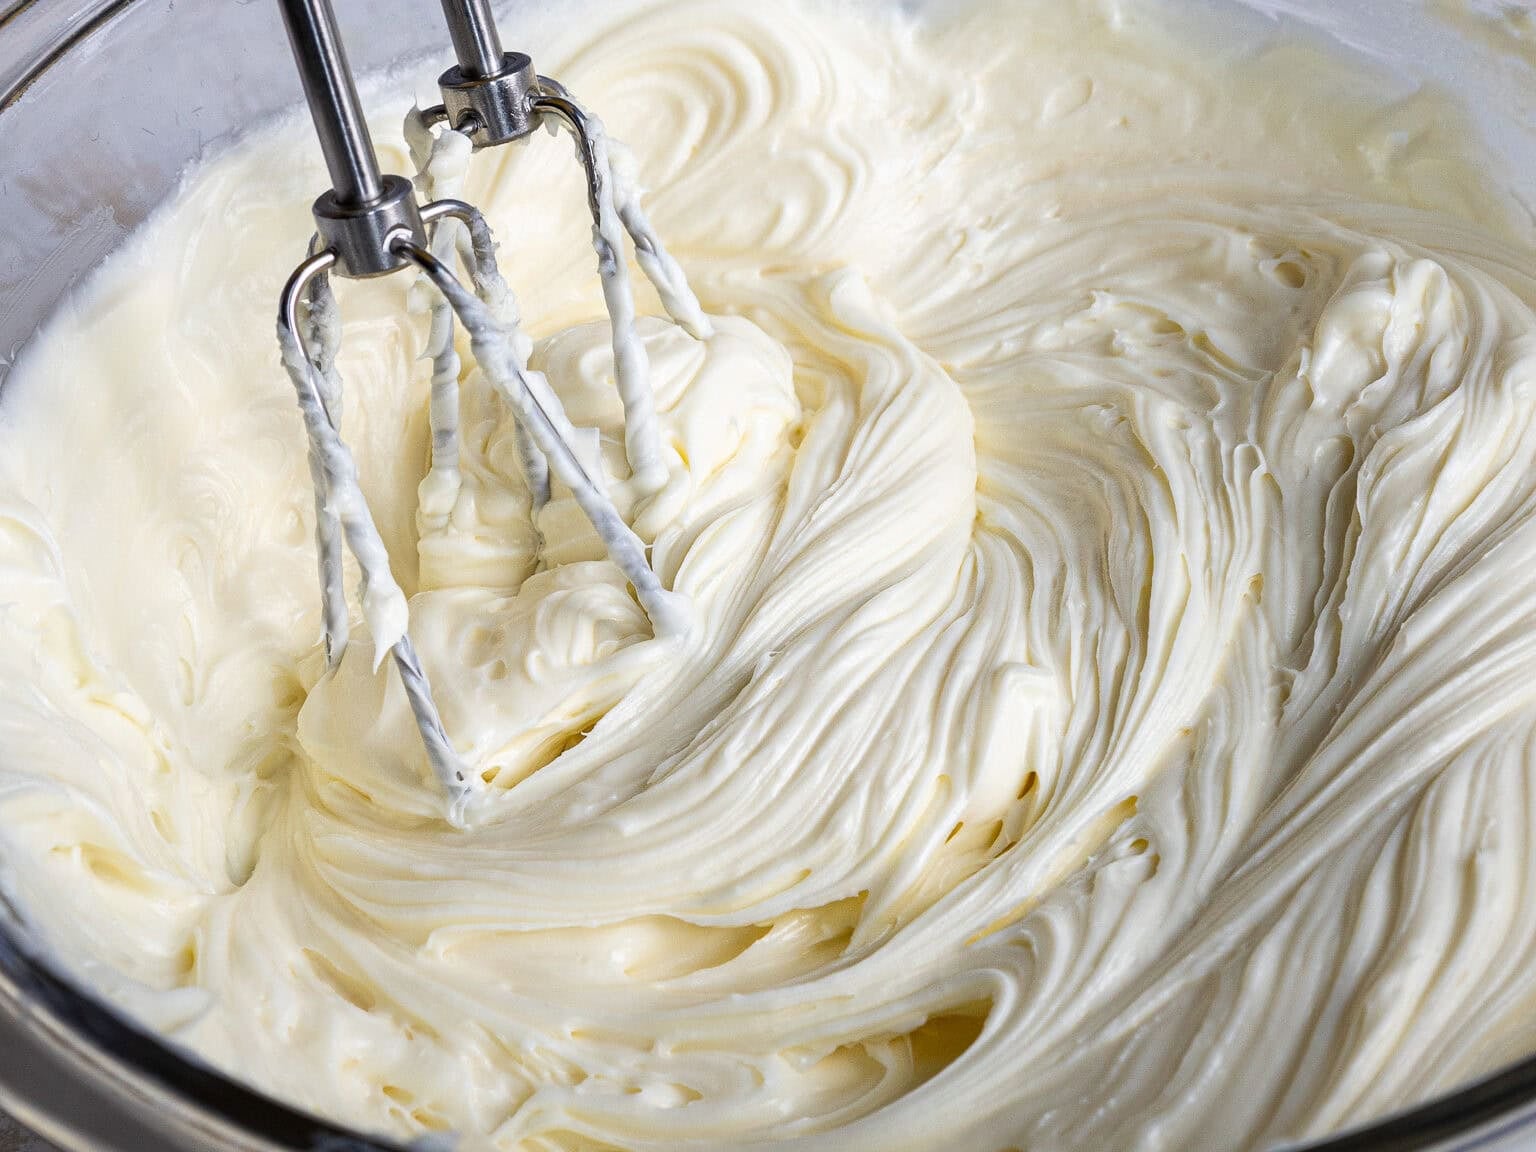
This cream cheese frosting recipe is also stiff enough to pipe a beautiful border around the top of the cake, which is exactly what I did for this cake!
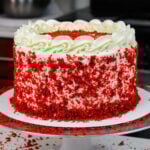
Decorating This Red Velvet Layer Cake
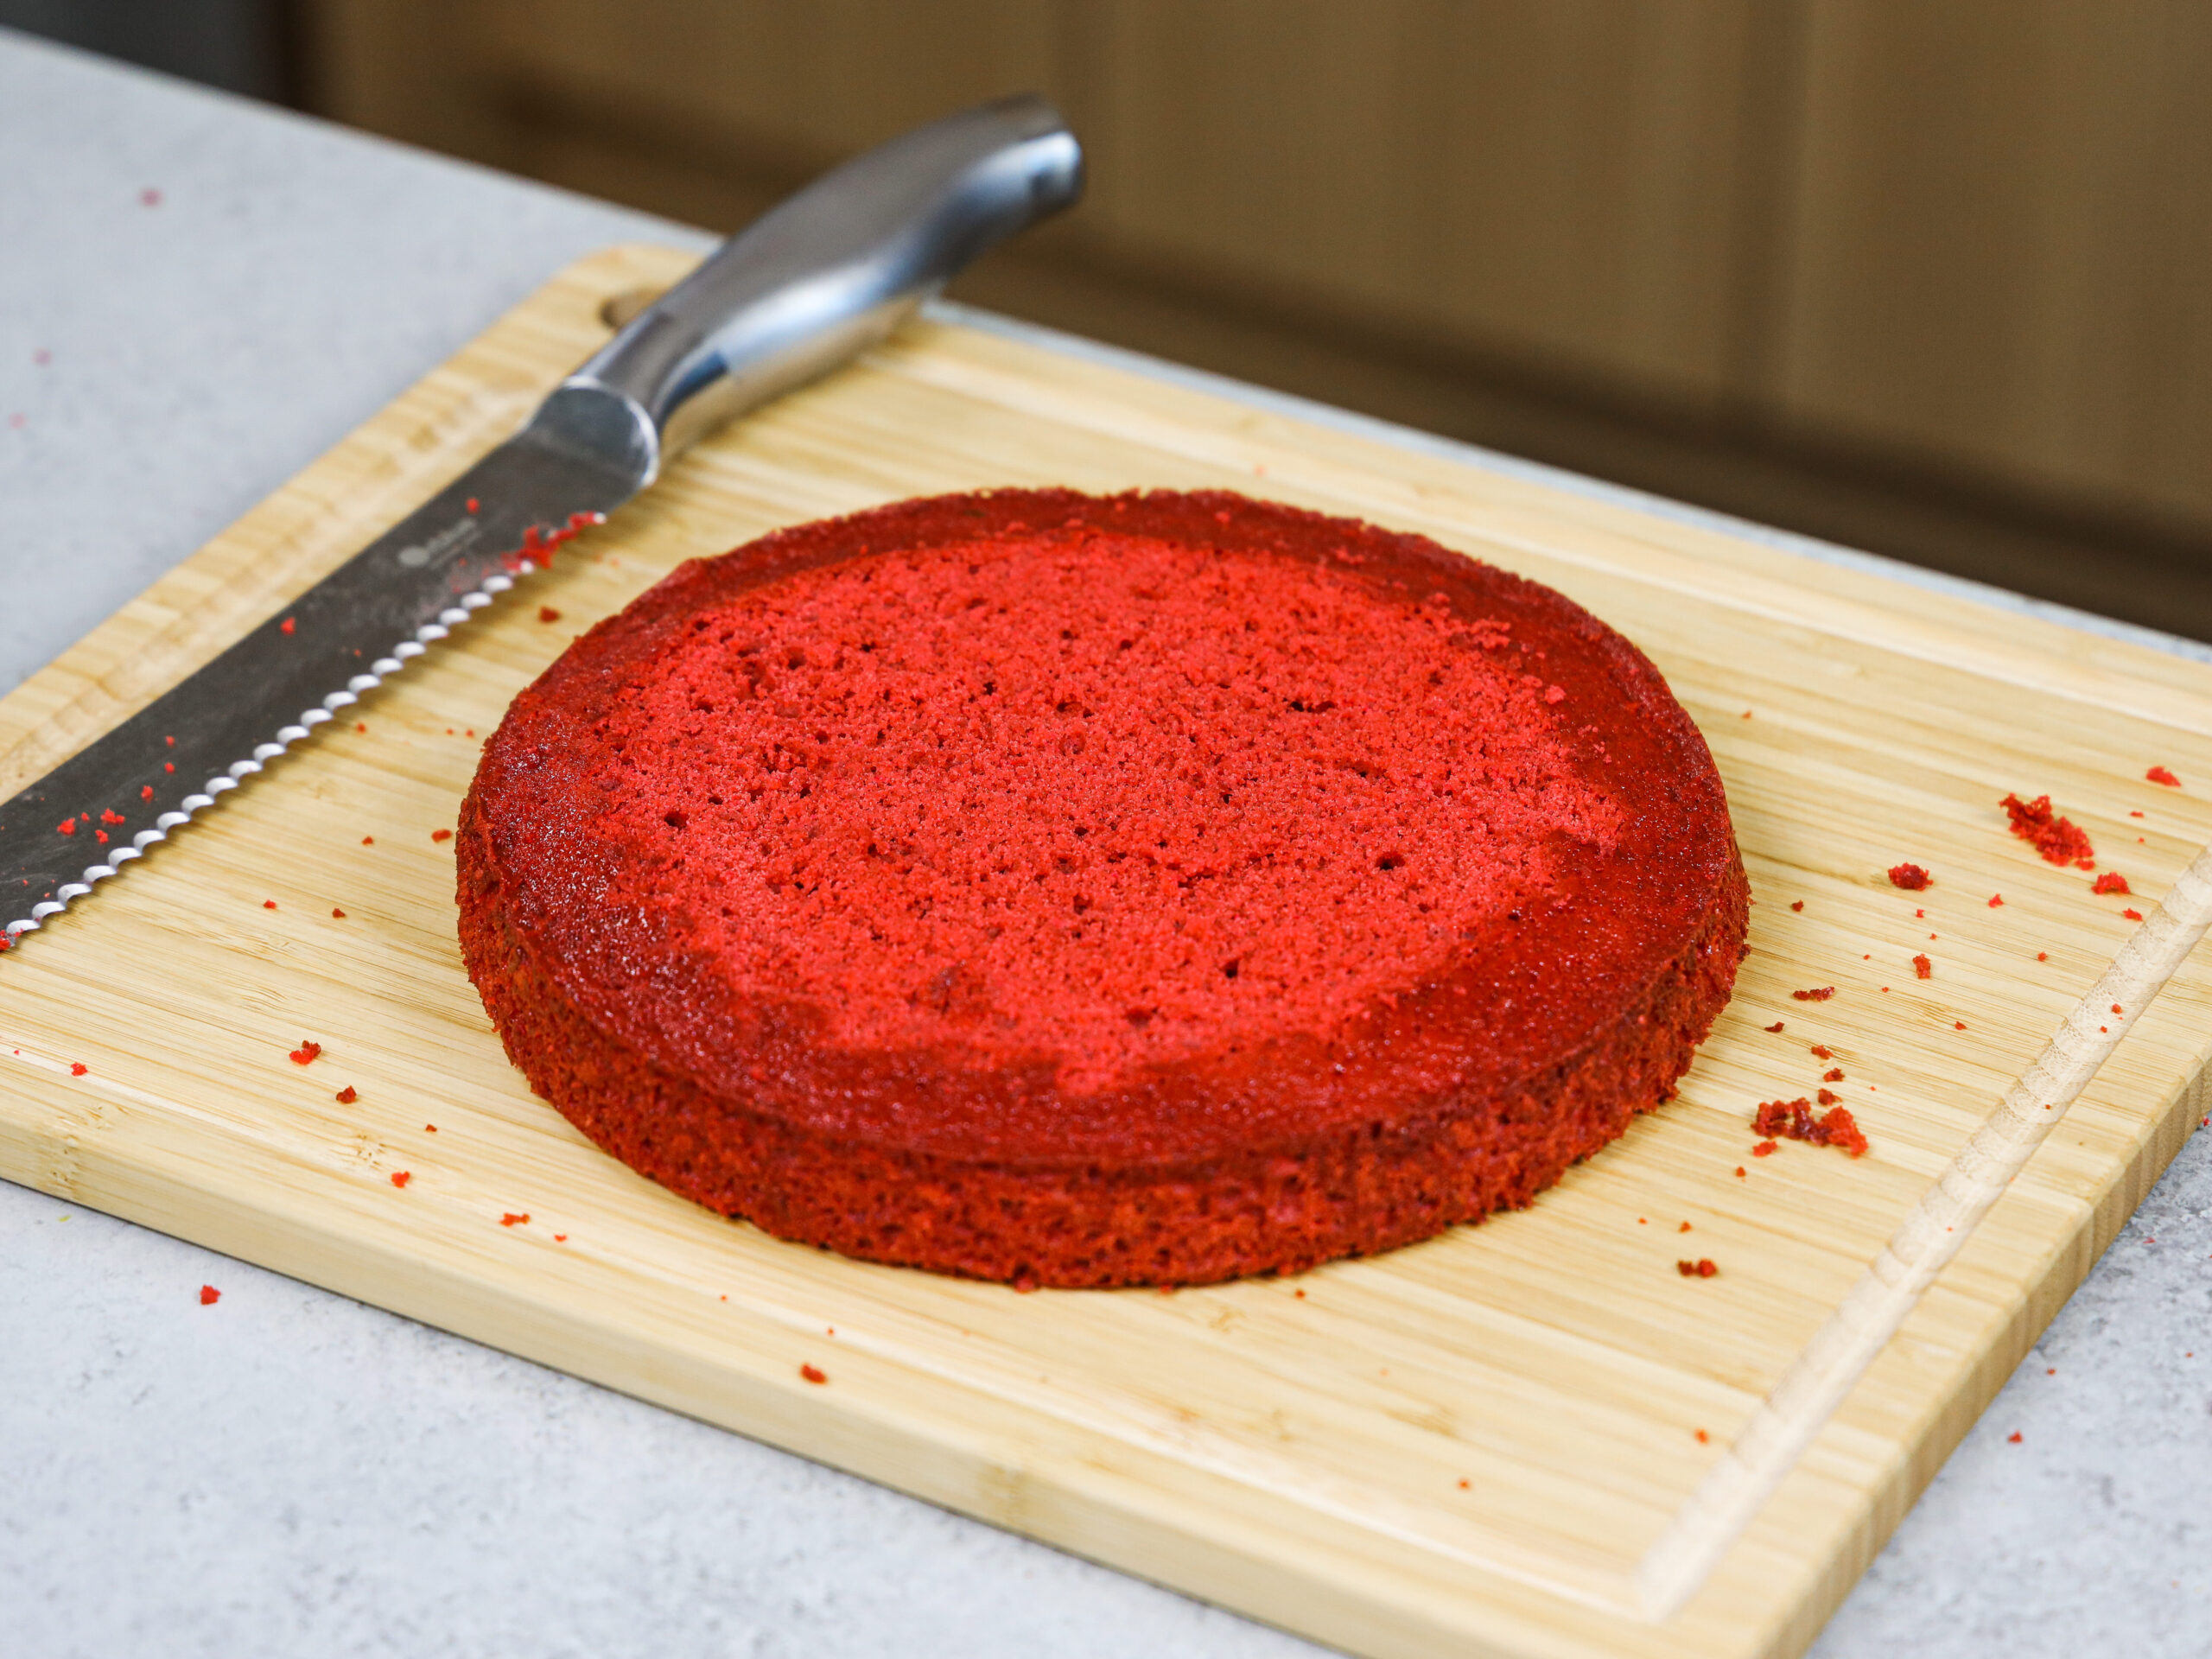
While I love making challenging cake designs, sometimes it’s nice to just make a classic layer cake. I kept things simple with this cake and used crumbled cake tops to decorate the sides of the cake.
This cake decoration screams red velvet! It’s also super easy to make and gives the cake such a classic look.
Substitutions & Swaps in This Red Velvet Cake Recipe
This recipe uses quite a few ingredients, and I know you might not have them all on hand. Or if you have food allergies or restrictions, I’ve got you covered.
Below are some swaps and substitutions that you can make.
- Vegetable Oil – Any flavorless oil can be used in this recipe. Canola, vegetable, or even sunflower oil would all work great. I don’t recommend olive oil, though, as it has a strong flavor and will change the taste of the cake.
- Buttermilk – You can also use full-fat yogurt, sour cream, whole milk, or an alternative yogurt or milk (almond, soy, oat).
- Large Eggs – This recipe uses large eggs. If you have an egg allergy, you can try using a vegan egg replacer, but the texture will be a bit different.
- Granulated Sugar – I do not recommend reducing the amount of sugar or changing the type of sugar, as it will change the texture of the cake layers.
- All-Purpose Flour – This recipe turns out best with all-purpose flour. However, you can swap in a good gluten-free flour blend (like this) if needed. Just be sure to stir the batter longer than normal to help give the cake layers proper structure, and let the batter sit for about 20 minutes before baking it if you opt to make a gluten-free version.
- Unsweetened Baking Cocoa – I like to use the Hershey’s brand of baking cocoa, but any brand of unsweetened baking cocoa powder should work. I don’t recommend using Dutch-processed or dark cocoa powder, as it can impact the rise of the cake.
- Red Food Coloring – Gel food coloring allows you to get a bright shade of red without throwing off the consistency of the batter. You can use 1 Tbsp of liquid food coloring if needed, though!
Making this Red Velvet Layer Cake in Different Sizes
One batch of batter is about 1300g or 6 cups, so I add about 440g to each of my cake pans when using 3, 6-inch cake pans.
You can also use one batch of batter to make 2, 8-inch cake layers. Bake time will be a few minutes longer at 350°F/175°C.
If you want to make a tiered cake with this recipe, check out my cake batter calculator to see how many batches of batter you’ll need.
If you want to make red velvet cupcakes, bake them at 350°F/175°C for 18-21 minutes. One batch of batter will make about 2 dozen cupcakes (yield will vary based on the size of your liners).
You can also use my red velvet cupcake recipe if you want to make a dozen.
Tips for Making the Best Red Velvet Layer Cake:
- Ingredients at room temperature mix together better! Set out any cold ingredients ahead of time.
- Properly measure your flour (spoon into the cup measure, then level). Or better yet, use a kitchen scale to measure your dry ingredients.
- Mix the cake batter just until the ingredients are incorporated, once you add in the flour. This will ensure your cake layers are tender and fluffy.
- Use a scale to weigh your cake pans as you fill them. It will make your cake layers bake to the same height and bake more evenly.
- Use full-fat cream cheese that comes in a brick. It will give the frosting the best consistency.
- Level the room temperature or thawed cake layers with a serrated knife to make them easier to stack.
- Chill the cake layers in the freezer for about 20 minutes before assembling the cake. It makes it so much easier to stack and frost them!
- Use gel food coloring to create brightly colored cake layers. It works best because it doesn’t throw off the consistency of the batter or give it a bitter taste.
Making This Layered Red Velvet Cake in Advance and Storage Tips
I highly recommend making the components of this cake in stages. It breaks the process up and makes it so much more approachable!
The cake layers can be made in advance and frozen. They taste just as great when they’re frozen as when they’re fresh, I promise!
You can make the frosting ahead of time or save any leftover frosting! It can be stored in an airtight container in the fridge for up to 2 weeks or in the freezer for a month.
Be sure to give the frosting a good stir once it thaws to get the consistency nice and smooth again.
A frosted cake can last in the fridge for up to a week or in the freezer for up to a month. The buttercream locks in all the moisture, keeping the cake fresh and delicious!
If you cut into the cake and have leftovers, use any remaining frosting to cover the cut section to keep it moist and store in the fridge for up to a week.
Let Me Know What You Think
If you try my layered red velvet cake recipe, I’d love to hear what you think! Please leave a rating and comment below with your thoughts.
Don’t forget to tag me @chelsweets and use #chelsweets on social media so I can see your amazing creations!
Red Velvet Layer Cake
Equipment
- Greaseproof Cake Board or a Flat Plate
Ingredients
Red Velvet Cake
- 1 cup vegetable or canola oil 225g
- 1 cup buttermilk, room temperature 240g
- 2 large eggs, room temperature 112g
- 2 tsp vanilla extract or vanilla bean paste 8g
- 1 tsp white vinegar 4g
- 1 tsp red gel food coloring or 1 Tbsp liquid food coloring
- 2 cups granulated sugar 400g
- 2 1/2 cups all-purpose flour 310g
- 2 tsp unsweetened cocoa powder, sifted 8g
- 1 tsp fine salt 6g
- 1 tsp baking soda 6g
- 1/2 tsp baking powder 2g
Cream Cheese Buttercream Frosting
- 1 1/2 cups (3 sticks) unsalted butter, room temperature 339g
- 1/2 cup (4 oz) full-fat cream cheese, room temperature 113g
- 1 Tbsp vanilla extract or vanilla bean paste 12ml
- 1 tsp fine salt 6g
- 7 cups powdered sugar 904g or a 2 lb. bag
- 1 Tbsp heavy whipping cream, room temperature 15ml
Instructions
Red Velvet Cake
- Preheat the oven to 350°F / 175°C. Line and grease 3, 6-inch pans. Set aside.
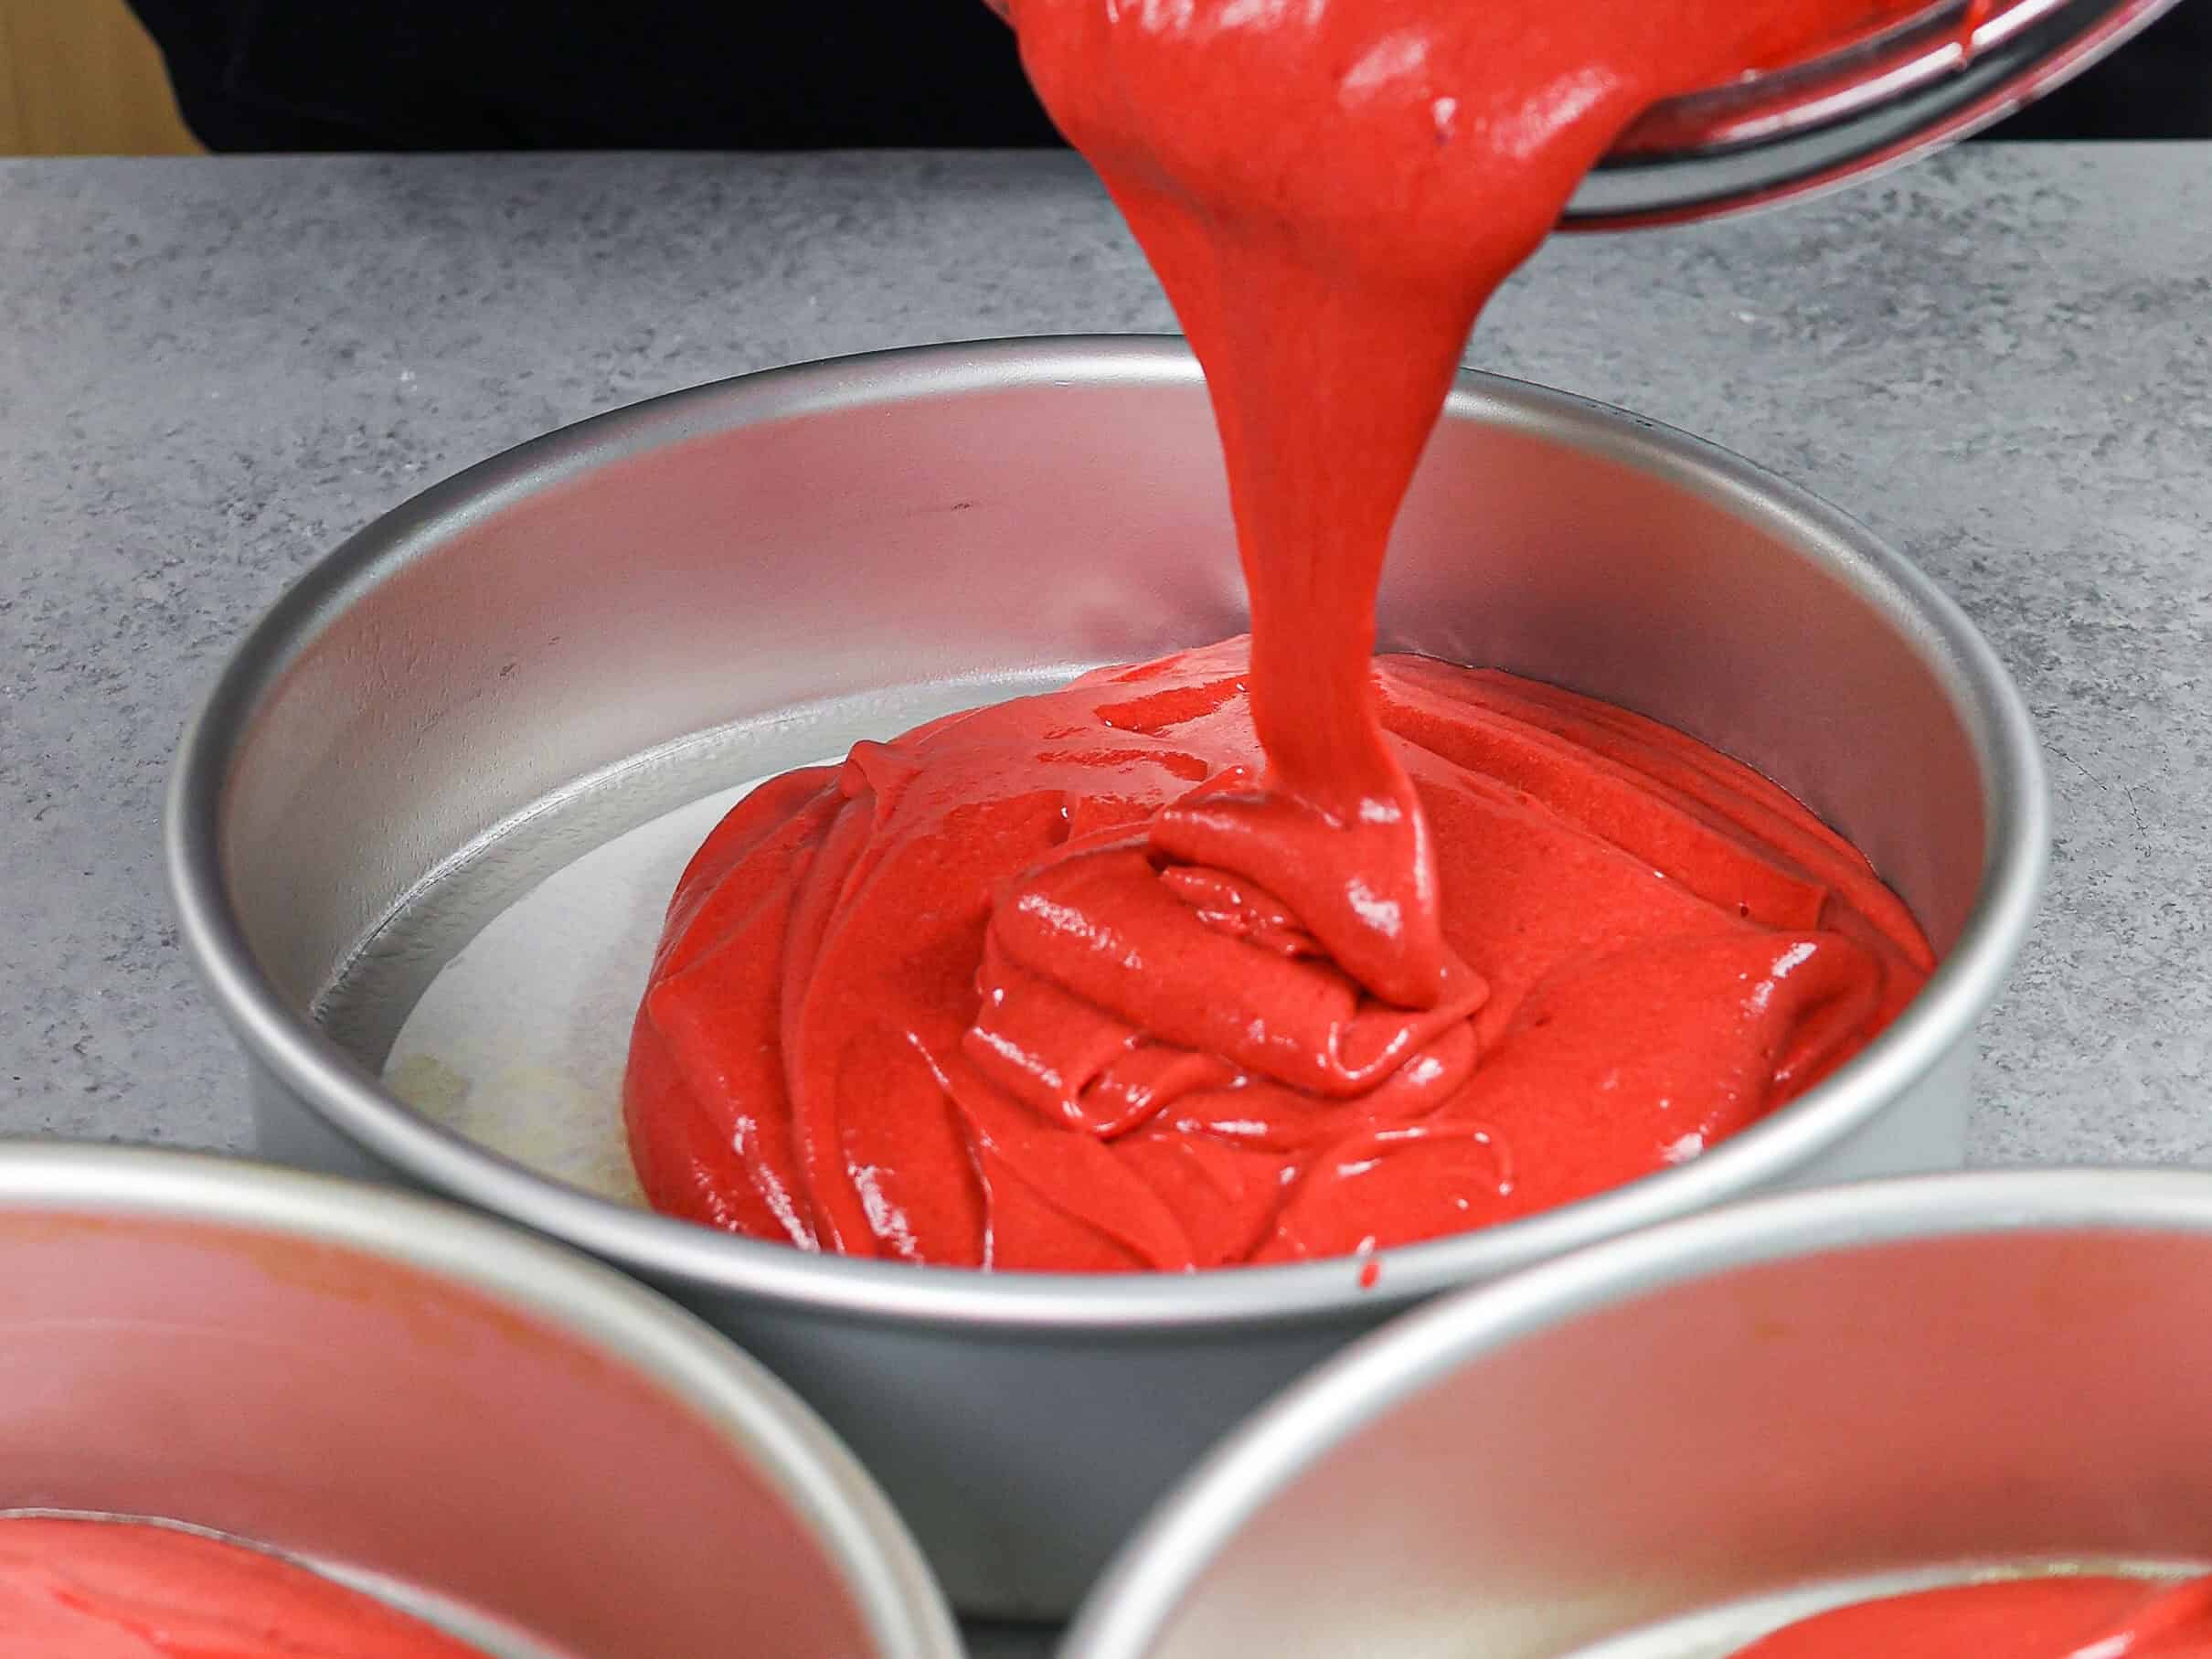
- In a large bowl, whisk together 1 cup vegetable oil, 1 cup buttermilk, 2 large eggs, 2 tsp vanilla extract, 1 tsp white vinegar, and 1 tsp red gel food coloring. Mix until combined and the batter is evenly colored.
- Add 2 cups of granulated sugar and whisk for 30 seconds to help dissolve the sugar.
- Then mix in 2 1/2 cups flour, 2 tsp cocoa powder, 1 tsp salt, 1 tsp baking soda, and 1/2 tsp baking powder. Whisk until combined. The batter should be smooth,
- Divide the batter evenly between the prepared pans and bake for 27-30 minutes. Remove pans from the oven and let them cool in the pans for 15 minutes. Carefully flip the layers out of the pans and place them on a wire rack to finish cooling.
- Level the cake tops with a serrated knife once they're fully cooled. Use a fork to crumble the cake tops, and cover and set aside. If you're making these in advance, wrap and freeze them at this point.
Cream Cheese Buttercream Frosting
- Beat 1 1/2 cups of butter and 1/2 cup of cream cheese on a medium speed for 30 seconds with a paddle attachment until smooth.
- Mix in 1 Tbsp vanilla and 1 tsp salt on a low speed until the ingredients are combined.
- Gradually mix in 7 cups of powdered sugar on a low speed. Add 1 Tbsp of heavy cream halfway through to make the frosting easier to mix. If the frosting is too thick, add in additional cream (1 Tbsp at a time). If the frosting is too thin, add in more powdered sugar (1/4 cup at a time).
- Cover the cream cheese frosting with a piece of plastic wrap to prevent a crust from forming and set aside.
Red Velvet Cake Assembly
- Stack and frost cake layers on a greaseproof cake board using a dab of frosting to help stick the first cake layer to the board.
- Add an even layer of cream cheese buttercream between each cake layer.
- Spread a thin coat of frosting around the cake to fully cover the cake layers. Smooth using a bench scraper, then chill the cake in the fridge (30 minutes) or freezer (10 minutes) until the frosting is firm to the touch.
- Cover the cake in a second, thicker layer of frosting and smooth using a bench scraper. Gently press the reserved red velvet crumbs along the side of the cake with your hand.
- Place the remaining cream cheese buttercream into a frosting bag fitted with a Wilton 1M frosting tip and pipe a border around the top of the cake. Then enjoy!
Video
Notes
Making this Red Velvet Layer Cake in Different Sizes
One batch of batter is about 1300g or 6 cups, so I add about 440g to each of my cake pans when using 3, 6-inch cake pans. You can also use one batch of batter to make 2, 8-inch cake layers. Bake time will be a few minutes longer at 350°F/175°C. If you want to make a tiered cake with this recipe, check out my cake batter calculator to see how many batches of batter you’ll need. If you want to make red velvet cupcakes, bake them at 350°F/175°C for 18-21 minutes. One batch of batter will make about 2 dozen cupcakes (yield will vary based on the size of your liners). You can also use my red velvet cupcake recipe if you want to make a dozen.Tips for Making the Best Red Velvet Layer Cake
- Ingredients at room temperature mix together better! Set out any cold ingredients ahead of time.
- Properly measure your flour (spoon into the cup measure, then level). Or better yet, use a kitchen scale to measure your dry ingredients.
- Mix the cake batter just until the ingredients are incorporated, once you add in the flour. This will ensure your cake layers are tender and fluffy.
- Use a scale to weigh your cake pans as you fill them. It will make your cake layers bake to the same height and bake more evenly.
- Level the room temperature or thawed cake layers with a serrated knife to make them easier to stack.
- Chill the cake layers in the freezer for about 20 minutes before assembling the cake. It makes it so much easier to stack and frost them!
- Use gel food coloring to create brightly colored cake layers. It works best because it doesn’t throw off the consistency of the batter or give it a bitter taste.
Making This Layered Red Velvet Cake in Advance and Storage Tips
I highly recommend making the components of this cake in stages. It breaks the process up and makes it so much more approachable! The cake layers can be made in advance and frozen. They taste just as great when they’re frozen as when they’re fresh, I promise! You can make the frosting ahead of time or save any leftover frosting! It can be stored in an airtight container in the fridge for up to a month. Be sure to give the frosting a good stir once it thaws to get the consistency nice and smooth again. A frosted cake can last in the fridge for up to a week or in the freezer for up to a month. The buttercream locks in all the moisture, keeping the cake fresh and delicious! If you cut into the cake and have leftovers, use any remaining frosting to cover the cut section to keep it moist and store in the fridge for up to a week.Nutrition
Other Recipes You Might Like:

Omg! So glad this is for a 6inch layer cake!!! I am going to try your recipe and let you know how it tastes.
Could this be used for a Red Velvet roll? Thanks for this recipe and your others!
Hi Janet! This recipe is super moist, so I’m not sure it would hold together to make a roll cake!
I actually tried this recipe last weekend for a red velvet roll cake, and it worked great! I’d recommend using it: https://www.foodnetwork.com/recipes/stars-and-stripes-cake-5313264
I’ve been waiting on this for so long. Yippee!!. I wanted to ask tho , what about for 8inch round pans . That won’t come out small .
Haha I finally shared it!!!! 🙂 The 7 inch layers weren’t super tall, so if you make 8 inch layers, I’d recommend only making 2 layers.
Hey Chelsweets! If I am making my own buttermilk for this recipe by adding a TBsp of vinegar to my milk, do I still add the TBsp of vinegar the recipe calls for as well?
Hi Molly! You can omit it, since you’re already adding enough to activate the baking soda 🙂
Hi! Can I make this in 3, 8 inch rounds?!
Hi Humairaa! My 3, 7-inch layers that I made with one batch of batter weren’t super tall, so I’d recommend making 2, 8-inch cake layers if you want to make that size with one batch of batter!
Would this recipe work for cupcakes as well?
I do not know where to start for this recipe! First and foremost THANK YOU! I’ll give my full review:
I saw your reply about using 2, 8 inch and not 3 after I made it, so I made it in 3, 8 inch rounds and it turned out great! I put a little over 600 grams in each pan. I also made another batch with using 2, 8 inch rounds because I needed crumbs to cover the sides of the cake. First thing was I did prefer using the 3, 8 inch pans. The cake was so soft after it baked! The only thing I had was that it got a little brown/ caramelized type around the cake so I ended up trimming the sides( if you have any tips to prevent this please let me know!), BUT one amazing thing was that the layer did not have a dome when I baked them so I didnt even have to level them! I did put them in the refrigerator for a bit before frosting them. The frosting was AMAZING, Pipes like a dream, taste even better. Although the layers were moist, I did make a simple syrup to soak into the layers to ensure it stays moist. Honestly, THE GREATEST red velvet cake recipe I have come across. I am not exaggerating, after this recipe it will be your GO TO! The layers and cream cheese frosting are very forgiving and easy to work with. Your hard work is truly appreciated. Thank you again for sharing!
@Humairaa Vhora,
How did you make your simple syrup?
Thank you.
Hi Purity,
Simple syrup is usually made with equal parts water and sugar (i.e. 1 cup sugar and 1 cup water). Pour the water and sugar into a sauce pan and heat on a medium heat until the water just starts to simmer and the sugar is dissolved. Remove from heat and let it cool to room temp, then brush the cake layers with it.
I have a great vanilla simple syrup recipe here: https://chelsweets.com/vanilla-simple-syrup/
Hope that helps, happy baking!
Hi!! I’m planning on making this cake tonight but just now saw that it’s for 3 6in pans or 2 8in. I was wondering if you could give me ingredient proportions for 3 9in?? Should I just double it? Let me know!
Hi Demi! So sorry for the delayed response <3 I would recommend making 1.5 batches! Or if the the calculation is easier, you can double it too! The layers will just be a bit thicker. You also may want to put a flower nail in the center of the pans to help the cake layers bake faster. Hope that helps, happy baking! <3
Hey Chesley! I had an idea to use your tips on your ferrero rocher cake to make an ornament cake but wanted to try with red velvet. Would you recommend using your other recipe at the beginning of your blog post or this one? Thank you for all you do!
Hi Sarah! So sorry for the delayed response!! I personally prefer this recipe, so I’d recommend this one 🙂 Happy baking!!
Can this recipe be used for cupcakes? Also, can I sub coconut sugar for white sugar? Thanks!
Hi Suzanne,
I haven’t actually tested it out for cupcakes yet, but it should! I’d think baking them for 16-18 minutes should work. I’ve never baked with coconut sugar before, so sadly I’m not sure about that part. Happy baking!
How would you scale this recipe for cupcakes?
Hi Chelly,
I’d made a half batch of batter! I’m not quite sure how many cupcakes that would make, but a full batch of batter would make a ton!! I think that should make about 1 1/2 dozen. Hope that helps, happy baking!
I made your vanilla cake which tasted delicious however it did not bake flat, the sides were slightly lifted, is that normal? I want to try this recipe and I want to make sure that doesn’t happen again, I felt like i had to trim a lot off because of it otherwise it sort of looked domed shaped.
Also, could I refrigerate this cake if baking a day or two beforehand?
Hi Amanda,
I’m so sorry to hear that! Where your ingredients at room temp? What type of cake pan are you using? sometimes those things can affect how the cake bakes. I like use light colored pans, sometimes pans made from dark metal can conduct heat differently. Some ovens also run hot, have you tested yours to see if it bakes true to temp? The last resort would be to use cake strips, which help sometimes if nothing else does! I don’t like using them myself (they’re a bit a of a hassle), but some people swear by them. Hope that helps, fingers crossed your next try in a success! Please let me know how it goes <3
Can you make cupcakes with this recipe? if so, how many will it make?
Thank you!
Hi Macarena,
You should be able to make cupcakes with this recipe, but sadly I haven’t tested it out yet! I would guess it would make 2-3 dozen! If you try it, please let me know how it goes! I’m planning to test it out next weekend 🙂
How would you scale this Recipe for cupcakes?
Would this work for cupcakes?
Hi Tiffany,
I haven’t tested it out yet, but it should!! I’d think they should bake for 16-18 minutes! I’m going to test this recipe out as cupcakes next weekend, so stay tuned!
Or if you try them in the mean time, let me know how they turn out 🙂
Could I use this recipe in a bundt pan?
Hi Tamara,
fun fact, I don’t own a bundt pan so I’ve never tried this recipe in one! I just ordered one on amazon though, and I plan to test it soon 🙂 Stay tuned!!
This sounds amazing! I know you have specific cupcakes recipes for your vanilla and chocolate cupcakes versus just using the cake recipe. Would you you recommend using this recipe as is for cupcakes? Thank you for sharing, your recipes are incredible!
Hi there! If I make this recipe with 2, 8 inch pans does it change the cook time or the temperature I should use?
Hi Sonnie,
2 8-inch cake layers should be about the same thickness as 3, 7-inch cake layers, so the bake time should be the same 🙂 hope that helps, happy baking!
I was able to make two dozen cupcakes using your recipe 1:1 scale – although I think I may have messed up baking soda measurement, the cupcakes didn’t rise well
Hi Jonathan! I finally tested them too!! I found a half batch perfectly makes 12 cupcakes 🙂 Mine rose like normal!
Hi!
How would you store this cake overnight? Can it be left out but covered?
Thanks!
Hi Kiran,
I would store this in the fridge, because it’s frosted with a cream cheese buttercream. Hope that helps, happy baking!
Hello,
I noticed that you have 1 tsp of salt listed for the cake recipe but the directions don’t say when to add it. Is it listed by accident? Thanks!!
Hi Kiesha,
So sorry about that! The salt is added in with the baking powder. I just updated the instructions to reflect this. Thank you for pointing that out!! <3
I loved this recipe! It was my first red velvet cake I’ve made, but both me and the client loved it! I think I doubled the batch for 3 8” layers and it turned out great. I also doubled the icing and had way too much. I’ll be making the recipe into cupcakes for a Christmas baking contest this weekend and will be using the leftover icing. Thanks so much!!!
Hi! Is there a particular brand of unsweetened cocoa powder that you usually use?
Hi i tried your recipe wow i mudt say it super most and nice.. Thank you for sharing
Aw I’m so happy to hear that Andile 🙂 Thanks for sharing!!!
Can’t wait to try! A couple discrepancies I see… Written recipe states 1 cup buttermilk and (3 )6″ cake pans. Your video indicates 1 1/2 cups buttermilk and (3) 7″ pans. Could you clarify please? I will be using 7″ pans . Thank you!!!
Hi Daniel!!
I updated the recipe after a few more tests, but sadly I had already shot the video :/ My recipes are always more up to date than my videos, if there ever is a discrepancy between the two! It’s 1 cup of buttermilk, and you can use 6 inch or 7 inch pans. I’ve updated the recipe to reflect that you can use either pan size! I find that 7 inch pans bake for about 27 minutes in my oven, and 6 inch pans bake for 30 minutes with this recipe. Hope that helps, happy baking 🙂
Hey Chelsy
Thanks so much for this recipe
I wanted to ask
If I wanted to make this recipe with your regular 4 layers with 7″ pans with the normal height your cakes usually have ,do u double the recipe .
Thanks ??
Hey Chelsy
Thanks so much for this recipe
I wanted to ask
If I wanted to make this recipe with your regular 4 layers with 7″ pans with the normal height your cakes usually have ,do u double the recipe .
Thanks ??
Hi! If you want to make 4, 7-inch cake layers with this recipe, I’d recommend making 1 1/2 batches! Doubling it would make some really tall cake layers that would take a lot longer to bake. 1.5 batches should work great 4 layers that size. Happy baking!
Hey Chelsy
Thanks so much for this recipe
I wanted to ask
If I wanted to make this recipe with your regular 4 layers with 7″ pans with the normal height your cakes usually have ,do u double the recipe .
Thanks ??
I wanted to provide some insight into using a bundt pan with this recipe! I tried it out in two different bundt pans, first one of the nice detailed ones and then a very simple rounded shape one. You DEFINITELY need to coat that pan because this recipe is so moist. It did not work well in the detailed pan and totally stuck despite me liberally coating it/flouring it. If you have a tube pan like they use for angel food cake I highly recommend this instead with a ring of parchment. It will make it MUCH easier to remove. I wonder if maybe the recipe that was just posted for the red velvet cupcakes (the grinch ones) would be better suited for the bundt pan as it has half butter instead of all oil. I plan on trying that next as I have so much frosting left over 🙂 I ended up piecing together the top broken off pieces and then just covering it in frosting to mask the issue. No one seemed to mind but they raved on how moist and good the cake was! thank you for the recipe!
Bailey you are the best 🙂 Thank you for following up and sharing this!!
It is a super moist recipe, so that doesn’t surprise me. I’m impressed by your perseverance, and happy to hear it still tasted great!
My cupcake recipe might work better, but I’m not really sure! Clearly I just need to develop a proper red velvet bundt pan recipe for us! haha guess I know what I’ll be doing after Christmas 😛 Happy holidays, and happy baking!! <3
Hello! Would it be possible to substitute the vegetable oil with coconut oil? Thanks!
Hi Kayla,
I haven’t tested it out myself, but I’d think it should still work. If you try it, you can use the same amount of coconut oil as the recipe calls for vegetable oil, just be sure to melt it so it’s a liquid before you add it into the batter. Hope that helps, happy baking!!
Hi, Chelsy! I love your cake recipes and buttercream frosting! I made this recipe for Thanksgiving and it was great! One question, though. Anytime you mention buttermilk in your recipes, are you talking about cultured or uncultured buttermilk? (Sorry if you have answered this before) Thanks!!
Hi Jacie,
I’m so happy to hear that!! I use cultured buttermilk. That’s actually a great question! I’ve never gotten it before, or specified that in my recipes!!
I’ll update the recipe card to reflect that 🙂
Just made this and it came out fantastic. I made it on Monday, served it on Wednesday and it was still excellent. Stored it in the fridge but took it out the night before to serve room temperature. Everyone loved it!!
Hi Rob,
Thank you for sharing, I am so happy to hear that!! 🙂
Comments like this make my day <3 Happy baking!
Hello!
I would love to make this cake for my baby shower, I am having a son. Was wondering if you think replacing the red gel coloring with a blue one will be okay?
Thank you for your help and any tips!
Hi Nathalie,
That’s an awesome idea! I think it would work great to swap the red gel food coloring for blue 🙂 Hope your cake and baby shower turn out wonderfully! <3
So i tried your red velvet cake recipe and the comments from my family and friends has been amazing! Thank you so much. Love from Nigeria.
Aw I am so happy to hear that Nwando!! Thank you for sharing, comments like this make my day 🙂 Happy baking!!
Hello!!! would this recipe work for a 4 tier wedding cake??
Hi Melissa,
This recipe isn’t quite as sturdy as my vanilla or chocolate cake layers, but it should hold up in a wedding cake as long as the tiers are properly supported! Just be sure to also use a sturdy buttercream with it 🙂
Hello!!! Would this recipe work for a 4 tier wedding cake???
Hi Melissa,
This recipe isn’t quite as sturdy as my vanilla or chocolate cake layers, but it should hold up in a wedding cake as long as the tiers are properly supported! Just be sure to also use a sturdy buttercream with it ?
Hi Chelsy, I am looking to bake this for a 10” cake as I am making my best friends wedding cake. Would you suggest doubling the recipe and cooking it for longer? Ive never had to bake a 10” cake before 🙂 love your recipes. Thank you
Lisa
Hi Lisa,
For a 10 inch cake you’ll definitely need to at least double it! How many layers do you plan to make? I have a great post on figuring out how much batter you need for different sized cake layers here: https://chelsweets.com/2019/04/22/how-much-cake-batter-per-pan/
In terms of baking them, I suggest adding a couple heating cores / flower nails (like these: https://amzn.to/2NMFsuP) into the center of each pan with the batter, to help the cake layers bake more evenly and quickly. I hope that helps, please let me know if you have any other questions!!
Yes! I plan to follower your wedding cake videos (already did for 1 wedding cake) and plan on using your buttercream. So that should be good right???
Yah I’d say you’re golden!! 🙂
Thanks!!! One more question…..how many cups does this recipe make???
Hi Melissa,
This recipe makes about 7.5 cups of batter! I add 2.5 cups into each of my 7 layer pans. Hope that helps, happy baking!
Thank you so much!! I totally lied I have another question….. would this cake be fine being a semi naked wedding cake??? I did your other red velvet recipe semi naked and it was fine.
Haha no worries Melissa! I think this would be great as a semi naked cake! It’s a super moist cake, so it shouldn’t dry out! And I think it would look great in that style 🙂
Is the cream cheese buttercream sturdy enough to make a 3 tier wedding cake
Hi Angela,
I used it for a semi-naked cake last February and it worked great! I live in NYC so i didn’t have to deal with any heat or humidity.
I think it would be a bit less stable if you live anywhere warm, or if you try it on a cake in the summer. Hope that helps, happy baking!
I apologize if I missed this question before but is this served cold or room temperature. It is much better room temperature but I was worried about the cream cheese staying warm for too long.
Hi Javier,
I like to take the cake out about an hour before I plan to serve it, to let it coke to room temperature! The frosting won’t spoil in that short of a time, and it should allow the cake to thaw. Hope that helps, happy baking!
Can I add food coloring to the cream cheese buttercream? Will it change the flavor?
Hi Diana,
You can definitely add food coloring to this cream cheese frosting! I like to use gel food coloring (americolor is my favorite and I get it on amazon: https://amzn.to/2vIewWC), which doesn’t change the consistency or flavor of the frosting, and gives the frosting a vibrant color. Liquid food coloring can work if you’re trying to make a light color, but be careful not to add too much, or it can make the frosting too thin. Hope that helps, happy baking!
Would this be stable/strong enough to stack and use fondant?
Hi Mel,
This recipe should work just fine under fondant / as a tiered cake. Just be sure each tier is properly supported with dowels or straws, and you’ll be good to go 🙂 Hope that helps, happy baking!
Cant wait to try this! Is this recipe able to be done as cupcakes?
Hi Rachel,
My cake recipes are designed to bake pretty flat, so it isn’t ideal for cupcakes! It still works, but they’ll make super flat cupcakes! I suggest just using my red velvet cupcake recipe instead! It’s also delicious, and I highly recommend it! 🙂
Here’ the link: https://chelsweets.com/2019/12/16/red-velvet-cupcakes-with-buttermilk/
Hi Chelsea I just noticed the ingredients contained no baking powder.! …. Is it correct, no baking powder used in this recipe ??
Hi Chantelle,
Yup! This recipe uses just baking soda, which is activated by the buttermilk and vinegar in this recipe 🙂 Hope that helps, happy baking!!
@Chelsweets, I’ve noticed the recipe does in fact have baking powder. Has the recipe been updated since?
My cake layers sunk in the middle and I’m trying to figure out what I did wrong!
Hi Zeezee,
I did update the recipe!! There can be a few things that cause cake layers to sink in the middle, the most common are expired leavening agents (baking soda and powder can lose their potency in 6 months), if the layers are slightly underbaked, or if the batter is overmixed once you add in the flour. Do you think it could be any of those things? The other factor that can have an impact is if you’re baking these in a place that’s high altitude. Hopefully we’ll be able to figure it out together!
Can I use two-eight inch pans? I don’t have any six or seven inch pans.
Can I also make cupcakes using this recipe?
Thank a You
Hi Dee,
You can, but I’d bake two layers and save 1/3 of the batter, then bake the third cake layer after! I don’t usually recommend this recipe for cupcakes.
My cake recipes are designed to bake pretty flat, so it isn’t ideal for cupcakes! It still works, but they’ll make super flat cupcakes! I suggest just using my vanilla cupcake recipe instead! It’s also delicious, and I highly recommend it! 🙂 Here’ the link: https://chelsweets.com/2017/07/03/classic-vanilla-cupcake-recipe/
Hope that helps, happy baking!!
Thank Yoi
Is it okay to use cake flour? What size pan would you suggest for a 2 tier cake?
Hi Lisa,
To substitute cake flour for all-purpose flour use 1 cup plus 2 tablespoons cake flour for every cup of all-purpose flour. DO you mean a 2 layer cake? I like to use one batch of batter to make 3 7-inch cake layers that are about 1 inch tall. You could also make 2 cake layers that are 8 inches! Hope that helps, happy baking!
How many cups of batter does this recipe make? Is it the same as your Vanilla/Chocolate Layer Cake or the Small Batch versions? Thank you!
Hi Rebecca,
It’s actually between the two, it’s about 3/4 the amount of my regular vanilla/ chocolate layer cakes! I think ti makes about 7 cups of batter. Hope that helps, happy baking!
Question here! Are there any filings that might pair well in this cake? 🙂
For sure!! I love using my cheesecake filling with this cake recipe! Here’s the link: https://chelsweets.com/2019/09/25/cheesecake-cake-filling/
I also think my raspberry cake filling in addition to the cream cheese frosting this recipe calls for. It’s included in this recipe: https://chelsweets.com/2020/02/24/white-chocolate-raspberry-cake/
Hope that helps, happy baking!
I want to make a smaller version of the cheesecream buttercream I need to make a smaller size for 9 inch cakes
Hi Louis,
Do you mean for 9 inch cakes that are a single layer? Or two layers? You can always half this recipe, or I share the recipe on in a smaller batch/amount here: https://chelsweets.com/2017/11/24/the-best-cream-cheese-frosting/
Hope that helps, happy baking!
My wedding is in August and me and fiancé love red velvet. I plan on making a 4 tier cake but I am nervous about what kind of frosting to use. I don’t want it to melt and I am afraid it will be too hot. What do you think I should do?
My wedding is in August and me and fiancé love red velvet. I plan on making a 4 tier cake but I am nervous about what kind of frosting to use. I don’t want it to melt and I want it to hold up enough to do it’s job. What do you think I should do?
Hi Madison,
I have a great sturdy cream cheese frosting that would work great! here’s the link: https://chelsweets.com/2017/11/24/the-best-cream-cheese-frosting/
With that in mind, I always say that wedding cakes (esp in the summer) should never sit outside. No matter what frosting you use, if a cake sits out on a hot sunny day it will melt and collapse. I recommend chilling the cake at the venue as long as possible, and keeping it indoors. I hope that helps, happy baking!
Hi! This cake looks great! Question: would this cake hold up as a two tier wedding cake? I’m making my sisters wedding cake and she wants a red velvet cake. I know you have experience with wedding cakes and I’m just looking for a trusted recipe!
Thanks!
Hi Catherine,
Thanks! This cake should work great in a wedding cake as long as the each tier is properly supported and you use a central dowel 🙂
Can you make a drip cake using this cream cheese frosting instead of buttercream?
Hi Cathy,
So sorry for the delayed response!! You can definitely make a drip cake using this cream cheese frosting! Happy baking 🙂
I made this recipe Chelsea and it is amazing. However, I find it that my red velvet cake never comes out that bright red color. Any suggestions?
Hi Kymberlee,
So happy to hear that! You can either add slightly less cocoa powder, or use a different type of food coloring that’s more potent! what type are you currently using? I find americolor super red works great! If you’re already using that and still want a stronger color, you can try adding in a bit more food coloring next time <3 hope that helps, happy baking!
Could the frosting be made a day in advance? Or would it get to hard/weird being stored in the fridge?
Hi Kelley,
The frosting can def be make in advance and stored in the fridge in an airtight container! Thaw it to room temp the day of, and give it a really good stir to get it smooth again.
Hey! Can I substitute the vinegar with apple cider vinegar?
Hi Ameerah,
You sure can! Happy baking!
Would this recipe be able to be converted into a gluten-free recipe by subbing the flour for a gluten-free flour with xanthan gum?
Hi Katie,
Yes! Just be sure to mix the batter really well (i.e. overmix!) to help give the cake structure, and let the batter sit for at least 30 minutes before baking to give the GF flour time to absorb some of the moisture from the batter. This will help prevent a gritty texture. Hope that helps, happy baking!
@Chelsweets, yes! that was my question thanks
Hi,
Can I use this Red Velvet cake recipe for a wedding cake , or would it be to soft? I am using fondant to cover the cake.
Thanks
Hi Jeanene,
As long as the cake is properly supported, this works great in a tiered fondant cake! Hope that helps, happy baking!
Just wanna ask and clarify one, do i really need to put 11 cups of powdered sugar? Wouldn’t be too sweet? Thank you
Hi Louriecel,
This is an american based frosting recipe, which is based on a standard ratio of 2 cups of powdered sugar for every stick or 1/2 cup of butter or fat. If you want to add less powdered sugar you can, but it will change the consistency of the frosting and make it more difficult to decorate with. If you want to try a less sweet frosting I’d recommend using my swiss meringue buttercream or my russian buttercream recipe. Hope that helps, happy baking!
Would you recommend this particular red velvet recipe to be used in a wedding cake or would you make alterations to support the weight?
Hi Melissa,
As long as the tiers are properly supported, this recipe should work great in a tiered cake!
I only have two nine inch cake pans. Do I need to lessen the batter I use, or will it work fine?
Hi Sandra,
This recipe would actually work great to make 2, 9″ cake layers! Just keep an eye on them as they bake, as they might take slightly longer to bake through. Hope your cake turns out great 🙂
would this recipe work for three 6 inch cake layers?
Hi Brooke,
It should, but the cake layers will take slightly longer to bake. Hope that helps, happy baking!
Hi! My first attempt was a flop. I used red gel coloring, but when I baked the cake it turned brown. What did I do wrong?
Hi Danielle,
Was the inside of the cake brown? Or just the surface and sides? As long as the cake inside is red, you’re good to go! A bit of browning is ok on the outside. If the inside was brown, you may have added too much cocoa powder. Be sure to carefully measure it, a little cocoa goes a long way and it will have a big impact on the color of the cake! Hope that helps <3
The inside of the cake turned brown, so I must have not measured the coco carefully. Thanks for the tip!!!
Love your recipes and tutorials. I have learned so much from you.
Np! hope it turns out great next time Danielle 🙂 And thank you!!
Hi! Can i substitute the butter milk for any other milk?
Hi Flora,
You can use other milk in place of the buttermilk in this recipe, but it will change the texture a bit! Below are some alternatives:
1 cup buttermilk = 1 Tbsp lemon juice or white vinegar + enough whole milk or alternative milk to make 1 cup
1 cup buttermilk = 1 cup alternative yogurt (soy, oat, almond, coconut, etc.)
1 cup buttermilk = 1 cup plain yogurt
1 cup buttermilk = 3/4 cup plain full-fat greek yogurt + 1/4 cup water
1 cup buttermilk = 1 cup sour cream
If I only have 2 8″ pans can I still use this recipe if so how long should I bake for?
I am confused about the coco powder. It says to use 2 tsp which is 8g. But when using and measuring- 2 tsp only measures to be about half that at 4g. I’m going to go with the gram measurement and hope that’s right :)But Can you clarify this please.
Hey chelsweet ,
Is it okay if I substitute apple cider vinegar for white vinegar ?
Thank you !
Hi Nikhil,
That’s totally fine, ACV will work great. Happy baking!
I’d like to make this as a 3 layer 8” cake. Think that will work out well?
I just want to clarify, would this cake and frosting hold up okay in a tiered wedding cake at an outdoor July wedding in Ohio?
Hey Chels! I was wondering if I would need to change how much batter to make if I wanted to make 3 8 inch cake layers? Thank you!
Hey!
I have tried this recipe recently and it’s amazing, but I am always ending up having a pinkish color rather than a vibrant red color which a red velvet cake should have. Initially the batter looks perfect but after baking the color just changes. I have tried using both gel food color and liquid food color but none of them is helping. Can you please tell me how can I get that vibrant red color?
Thank you
Hi there! I just wanted to know if you recommend this recipe for a sheet cake? I have tried it as a layer cake and it comes out perfect every time. Thank you! I would like a red velvet sheet cake. What are your thoughts?
Hi, if I wanted this to be a 9 by 13 sheet pan would I have to double the recipe?
@Humairaa Vhora, hi – did you do this? Can you share how it worked and if one batch was enough
hi, if i halved the recipe could i turn it into a 4.5 inch three layer cake? if so, would i change the amount of time i cook it for?
Hi! Would I be able to freeze this cake to decorate another day and if so, how would you do it?
Hi, can you plz clarify the amount of cocoa powder in the recipe plz .Thanks in advance .?
Can you plz let me know the time and temperature adjustments for 8 inch cake .
Send big love from the United States Virgin Islands. Made this cake one week ago for my husband’s surprise birthday dinner. He refuse to Share with anyone and said he WILL NEVER buy red velvet cake again!
It was truly awesome and your video on YouTube is perfect.
This recipe looks amazing. I just want to verify that the recipe does call for 11 cups of powdered sugar?
Hi, This was my 1st bake from your recipes. It turned out amazing! I have one question the cake was a bit dry. I like me cakes moist . Why do think that happened?
Thanks
Can I use 9 inch pan for this?
Hi Chelsy your recipe does not specify if you’re using natural or dutched processed cocoa . I’m leaning towards using Dutched cocoa because of the extra acidic ingredients added to the mixture ie vinegar and buttermilk . What are your thoughts on using Dutched cocoa instead of natural cocoa ?
IT IS AWESOME !!!!!!!!!!!!!!!!!!!!!!!!!!!!
Making my gluten free daughter red velvet cake from your recipe?
What should I change other than the flour? Thanks
I tried to bake this cake today and it didn’t come out. There were small speckles of flour when I cut the tops to level my cake and it definitely doesn’t look as fluffy. I baked for about 30-35 minutes and it almost tasted like it could have been under baked. I followed the recipe exactly. What did i do wrong? Maybe sift the flour in small increments?
Hi chelsy! I tried the recipe turned out well. Just that the frosting started to melt wen spreaded on the cake. Is it ok to refrigerate this frosting? Can I use it again? If yes how long can it be kept? FYI I’m a beginner. 1st time trying layered cake actually! Your recipes are quite easy to follow. Fam lives the cake. It was really nice!
Hi Chelsea! How much of the ingredients would I need for 3 layer 5 inch pans? What would be the baking time for the 5 inch pans? Thank you!
I have made the red velvet cake twice now and it keeps sinking, I have no idea what I am doing wrong, any ideas?
Am I able to make this cake in a sheet cake pan? should I just double the recipe?
Can I make the cream cheese frosting black with the black cocoa powder? Or will that throw off the consistency (
Hi ? I’m always on the look out for a classic red velvet cake. Is this a two layer cake for an 8” cake tin? I’d like to make a 3 or 4 layer ideally but sometimes find doubling up does strange things to the batter (another excuse to buy a third cake tin) x
It tests amazing! I am a stay at home baker and I have tried few red velvet recipes but by far yours tested so good! Thank you so much
How would you add an extra layer to the cake? And can you add blue instead of red?
Michelle the same thing happened to me and I made this cake twice . I threw it out both times
I’m not sure what I did wrong here but I made this cake twice yesterday and it just didn’t work. The first time I blamed the buttermilk that I left out overnight. The second time I did everything as stated in the description and YouTube video but the cake still came out undercooked in the center. Total bummer considering I wanted to take it to a Christmas party tonight but oh well. I’ll try a different recipe next time.
Hi. Would this cake hold up well to sculpt into a
Doll dress cake or is it too moist? Any suggestions would be much appreciated. Thanks ??
Hi can I 1 and a half this recipe?
Can you substitute avocado oil for vegetable oil in the recipe?
Would this recipe work for making a tiered cake? Is the cake firm enough to handle becoming a two or three tier cake? I will probably just use regular buttercream frosting or add Oreos to buttercream, I don’t love cream cheese icing.
Is the cream cheese frosting recipe doubled? 11 cups is alot! I am planning on using two 9″ round pans instead of the 3 pans you recommend. Do I need to adjust the frosting recipe?
Hi my name is Merceydys Rasco . Would this recipe be enough to make a normal sized sheet cake.
Hi!
I love your red velvet cake recipe! I just started my home baking business and I just received my first wedding cake order? I was wondering how I should go about making this in 12inch pans. Your feed back is much appreciated ?
Hi, I am planning on making this for my stepdaughters birthday in a few days time, i will divide the batter between my 3 8 inch pans as you have stated, but I am planning on rolling out fondant and covering the whole cake with it, will this cake hold up as long as the fondant is rolled out to the right consistency?
hi chelsea,
should i soak the cake layers in simple syrup before i start stacking them? and if i should, how much simple syrup
should i apply on each layer?
Thank you for sharing your Red Velvet cake recipe, I made it this weekend for my granddaughter’s 7th Birthday. It was a great hit, very light and the icing is delicious and pipes well. The only thing I would say is that I may not have put in enough red gel colouring so it looked quite light in colour but I thought the chocolate colour would have come through. Another recipe I have used for red velvet cupcakes include a small amount of hot coffee, not sure if that’s the difference in colour between the two.
Question, I want to use a 10in pan for this cake but I need three layers. Because I’m doing your Oreo red velvet cake in an 8 in pan..
How should I go about doing this recipe for a 10in? Should I double it?
I also want to make little rosettes with the cream cheese frosting.. would that work?
I made this into a 2 layer 8 inch cake for my nephew’s birthday and it was a hit! The cake came out perfectly and the frosting was so easy to work with! Thank you for this wonderful recipe!
I have made your wedding cake recipe and it turned out wonderfully but for some reason, i have been unsuccessful in my attempts to make a red velvet cake for my daughter – the first few baked up high then collapsed to look like a volcano with cake batter spilling all down the sides – the next batches didnt spill out over the top of the pan but sunk in the middle – this is the 3rd batch – sunk again and looks grainy – i filled the pans up about half way – and followed directions precisely – any suggestions – my confidence is waning fast
Can I use apple cider vinegar instead?
Can I use a grass tip with this icing?
Is it truly 11 cups of powdered sugar. I’ve never used that much for frosting.
Hi Chelsea, can this be made gluten free?
Thankyou for the information.im trying this over the weekend.
Should I double this for 3 8 inch layers? Im planning to use this as a bottom tier in a two tier cake. It looks delicious!
Hi! I’m planning on making a checkerboard cake with this and the chocolate layer cake recipe. Would this be sturdy enough to cut into the circles in order to make a checkerboard cake?
Hi
I would like to make this recipe for a wedding cake.
I need to make 3 x2inch x 12inch layers. Could you please tell me what temperature and how long to bake. I have never made a cake this big before.
Many thanks.
Could I use this icing to make roses? I gotta make a red velvet with roses for a birthday
Hi! If I need to make a double layer tombstone shape cake for a “death to her youth” party lol
Should I double it to make two 9×13 pans?
Hi. I hope you see this question. Can i use cake flour instead?
Your recipe is just amazing woow!!
The bomb Red Velvet Cake!! Just the right amount of cocoa (Red Velvet Cake is NOT a chocolate cake) and using oil instead of butter in this cake is the only way to do it. Delicious!
Hi!
I’ve made this cake three times- it’s soooo delicious however it has sunk every time! My baking side is fresh and I weigh out all the ingredients so the measurements are precise. I am doubling the recipe to make 3 8 inch cakes. Any ideas on what I’m doing wrong?! Thank you xx
Hi was just looking on your site.loved everything on it.just wanted to know where you purchased your cake turntable and was the metal plate that the cake sits on an extra feature.really interested in the Russian buttercream going to try that on my next cake.I live in the uk.
I’d like to use this recipe for a tier in a wedding cake I’m making. I would need it to be in a ten inch pan so do you think I should double the recipe or do 1.5?
Hi! I’m trying to figure out how long and how many degrees I should bake the red velvet layers if I’m going for 10″. Same for your vanilla recipe! Making my first wedding cake this week!!
Hi Chelsweets! In the instructions you mentioned adding the colouring both in step 2 and step 5. Does this means it’s double the colour that it’s listed in the ingredients or do you just add more to achieve the colour you want?? Thank you so much for sharing your recipes with all of us ?
Hi Carla,
So sorry about that, that was a typo! I always add in the gel food coloring with the wet ingredients. Hope that helps, happy baking!
EVERY time I make this recipe the centers cave in…I have no idea what I am doing wrong
Hey Chelsea! When you say “you need to use an entire bottle of liquid food coloring to get the deep red color, so be sure you have a full bottle if you go this route”… what size bottles are you using? A standard 0.75 fl oz?
Hi Jessica,
You are totally right! I am talking about the standard .75 fl oz. 🙂 Hope that helps, happy baking!
hi! I love all your recipes and cakes. If I used the proper support structure (full center dowel and dowels in each layer) would this recipe work for a 10”,8”,6” 3-tier wedding cake? Each tier will be 3 layers – just wonder if it’s too moist? It will be a naked cake frosted with cream cheese and the bride would like artificial succulents …thoughts?
Hi Laura,
You’re too sweet! I used this recipe to make 2 tiers in a 4 tiered cake and it worked great! It is definitely softer than some of my more sturdy cake recipes, but as long as it’s properly supported and chilled it should work!
Hi I’m making a Winnie to Pooh hunny pot do you think this icing would do we’ll decorating with? She wants a red velvet cake and I couldn’t find a good recipe so I’m going to give this a try. Just wondering if I should use this icing for go for a buttercream.
Hi Tori,
Cream cheese icing is always a bit harder to decorate with that regular buttercream. This frosting recipe is more stable than a lot of cream cheese frosting recipes, but it still is slightly more difficult to smooth than my classic American buttercream recipe (https://chelsweets.com/the-best-american-buttercream-recipe/).
A good workaround might be to fill the inside with cream cheese frosting, but using a different type of buttercream on the outside to decorate the outside? Hope that helps, and that your cake turns out great!
Hi! I just started getting into the baking world and love all of your recipes! Is this supposed to have 2 tablespoons of cocoa powder though? I found a similar recipe to yours that uses 2 tbsp, and this says tsp. It was very good and moist, but just seemed like it was lacking in flavor a little bit. Thanks!
Hi Carlie,
Great question! It is supposed to be 2 teaspoons. You can increase the amount to 1 Tbsp if you want, but the amount of cocoa doesn’t change the flavor the cake layers much. This recipe uses a small amount of cocoa powder to allow it to have a vibrant red color. The more cocoa powder you add, the more muted the red gets. Hope that helps, happy baking!
Hi! I absolutely LOVE your red velvet! I’m making this for my wedding cake with 3 tiers, an 8″, 6″ and 4″. Would this 6″ work for the 8″ by doubling the 6″ batch, and then halving the 6″ batch for the 4″? I’m wanting each tier to be 3 layers.
Your recipes are always my go to and got me into baking!
Hi Tiffany,
So happy to hear that!! And that is exactly what I’d do! You will need about 3.5 batches of batter (I’d just make 2 double batches, and bake up an extra layer or make cupcakes with the extra batter). Hope that helps, and that your wedding cake turns out amazing 🙂
I love your Red Velvet Cake recipe .. It is my go to everytime… And I even use it for my cupcake recipe as well.. It will make about 2 dozen cupcakes with one batter.. But My question now is . can you use it in a sheet cake recipe ? I am needing to make a sheet cake red velvet for someone.. and I really want to use this recipe
I’m so happy to hear that Angela!
I haven’t tested this recipe out as a sheet cake, but it should work in that format. This recipe makes about 6 cups of batter, so I would think one batch would make a thin (maybe an inch tall), 9×13-inch sheet cake. I’d probably recommend doubling the recipe and adding a flower nail in the center to help the layer bake more evenly and quickly. Hope that helps, let me know how it goes if you try it!
Hi Sasha,
Sometimes I tweak my recipes once I’ve shared them, and this is one of them! I updated it a few months back, and I think that my YouTube video of this recipe is years old!
The updated version of this recipe has a more tender crumb and bakes up better. In general, my recipe cards are always the most up to date 🙂 Hope that helps, happy baking!
Hi! I just tried this and it tastes AMAZING but the cake came out more brown than red. Any tips on how to fix that next time?
Hi Katie,
So happy to hear your cake tastes delicious!! The type of cocoa powder you use can have a big impact on the color, and I’d recommend avoiding dark baking cocoa powders that are Dutch-processed. The lighter the color of the cocoa powder, the brighter red the batter will be.
You also can add slightly less cocoa powder next time, or add a bit more red gel food coloring. All of those should help brighten the color of the layers.
Hope that helps, happy baking!
This recipe did not bake well in 2 eight inch pans at 350*. I tried twice and neither time was great. The middle was sunken in and the texture was all wrong. If I were to try a third time I would either do 9 in pans or reduce the oven temp to 325*. Not trying to bash on your recipe. Just sharing my experience.
I appreciate your feedback Stephanie! I usually make this recipe with 6-inch cake pans!
I tried this recipe twice and both times it sunk in the middle :(. My ingredients were room temperature, I didn’t open my oven too soon. The taste was delicious, not sure what could be wrong…
Hi Heather,
I’m so sorry to hear that!! Is there any chance it might have needed a few more minutes in the oven? Sometimes that helps with sunken centers!
Hi! I’m using this recipe for a 10 inch cake. Would I double the ingredients and be able to get at least 2 inch height in two 10 in pans?
Hi Alexis,
Because this recipe is pretty heavy on the oil, I don’t know if I’d recommend making 10-inch layer with it! Sometimes the center sinks when I make it in bigger layers using this recipe. So sorry!
Hi there! Thank you so much for your awesome recipes and guidance. You have taught me so much!
I’m making a wedding cake (my first) using this recipe – it’s 3 tiers, 10, 8, 6 inch x 3 layers. I’ve worked out I need 6 batches of batter. Can I make 3 batches in one go or with that not work out? I’ve read somewhere it’s best to make each batch at a time rather than multiple…. It will just take forever that way!!
Thank you
Hi Kat,
It can vary recipe to recipe, but I make double batches of this recipe and haven’t run into any problems with it! I haven’t tried using this recipe to make that large of layers before though, but I’d think they should bake up just fine. Let me know how it goes!!
I’ve made this cake several times and every time I make it, the layers collapse!! What am I doing wrong??!! Lol
I’m so sorry to hear that Jenn! There can be a lot of different reasons why cake layers sink, I walk through them all in this post: https://chelsweets.com/why-do-cakes-sink-in-the-middle/
Hopefully that helps!! If not, we can try to troubleshoot together!
I have one 10 inch cake pan that is 2 inches tall. Will this recipe work for my pan? Thanks
This is my husband’s favorite cake, he loves when i make this recipe, i made it for our wedding reception too and it was a hit! I love that Chelsweets gives the measurements in grams too, it really helps with consistency! Delicious!!
I am so happy to hear that Xy!! Thank you so much for sharing 🙂
Could I make one batch in a 11×15 sheet cake pan?
Hi Samantha,
I’d recommend making a double batch of this recipe to make an 11×15 inch sheet cake. Hope that helps, happy baking!
All three of my cake layers fell in the middle while baking. I know there are a million reasons why this could happen, but any thoughts as to why with this specific recipe?
You are right, it can be a lot of things! Did the centers dip while it was in the oven? Or once it came out? My first questions would be: what type of pans are you using, and are you using a scale to measure the ingredients? Also – are you by chance in a place at altitude?
Mine fell as well. 6 inch baking pans that I always use with your recipes. Cooked 40 minutes because they weren’t done at the 27-30. Used a scale 440 in each. Any thoughts?
So sorry to hear that Suzanne! 40 minutes is wild!! Do you live somewhere with a bit of altitude? In the past readers who have tried this recipe and are baking at higher elevation have had trouble. That would be my first guess! My second is to check the expiration dates on your leavening agents. They can start to lose their potency once they’ve been open for 6 months. My last guess would be that your oven might run a bit cool? Have you tested it with an oven thermometer? If it’s none of those things, let me know and we can keep troubleshooting!
I could not get my cake red. It was brown and I used a lot of the red gel food coloring. I read that non-alkalyzed is best to use. Is hersheys non-alkalyzed? What cocoa powder do you recommend?
I just use Hershey’s, their normal cocoa powder isn’t alkalized. If you want a more vibrant color, I’d recommend using a bit cocoa powder than the recipe calls for, which will brighten up the color and let the red shine through more. Hope that helps! Happy baking!!
Hi, I was looking into using this recipe to make a 4 tier wedding cake. I’m looking at your chart for how much batter I need for each pan. Would you use the measurements for sponge cake or butter cake, I’m not sure what category this cake would fall into.
Thanks
Hi. Can you use this recipe for three 8 inch layers or does it need to be doubled. Thank you
Hi Chelsea,
I am thinking of making this cake for my birthday. What would the measurements be if I used 3 8inch cake tins??
Hi Sapphire,
You totally can use this recipe to make 3, 8-inch cake layers! I’d recommend doubling the recipe to do that. Hope that helps, and that your birthday cake turns out amazing. Happy baking!!
Made this recipe today with high hopes! I’ve loved and had success with so many of your other recipes, even used some for my wedding cake! I must have had back luck or done something wrong because they sunk so much in the middle they look like craters on the moon :/ I totally intend to still level and layer with frosting because as long as it tastes good we won’t let it go to waste, but I’ve never had that happen before!
Oh nooo—I’m so sorry that happened Bailey, especially since you’ve had such great success with my other recipes (and even used some for your wedding cake—what an honor!! <3). Sinking like that is usually caused by a few culprits, even when everything feels spot on. It could be:
Underbaking just slightly—even a couple extra minutes can help the centers set fully.
Using dutch processed cocoa powder or if you’re potentially at a somewhat high elevation? I’m at sea level!
Opening the oven door early, which can cause the centers to collapse before they’re ready.
Or overmixing, which can whip in too much air that then deflates as they bake.
I love your attitude though—frosting covers all, right?! I’m cheering you on for the next round, and I’m always happy to help troubleshoot if you give it another go!
I attempted this recipe three times, first attempt baked at recommended 27-30 at 350 in 3 6” pans, when baking time was done I checked the centers and they were still liquid. Closed door and the centers fell immediately. Second attempt I baked at 350 for 35-40 minute, tested centers and still gummy, baked for 10 more minutes and towards the end the centers fell immediately in 2 rounds. Third attempt I baked at 335 for 45 minutes. Centers fall slightly in 2 and the third round was perfect. I plan to attempt a fourth time reducing the baking soda to 3/4 tsp and bake at 325 for 40 minutes. Aside from the collapsed centers the flavor, moisture and crumb was amazing. I plan to make red velvet cake balls with my collapsed layers so they don’t go to waste.
Hi Jenn,
I’m so sorry to hear this recipe has give you so much trouble!! Are you by chance at elevation?? I know in the past some people have had a hard time with this recipe when baking it at higher elevations that me. I’m in Seattle so I’m pretty much at sea level. Also – have you tested your oven to make sure it’s baking accurately? If it’s even off by like 25 degrees it have a big impact on how long things need to bake! I have a $6 oven thermometer I got on amazon that i keep in my oven at all times, because it varies a bit from time to time.
You probably don’t want to make a cake this big, but I have an amazing 5 layer red velvet cake recipe that also has amazing flavor and texture, but is a lot less finicky. Here’s the link: https://chelsweets.com/five-layered-red-velvet-cake/
Either way, I hope that helps for the future!!
Hi Chels! I have been struggling to do the math on this lol but if I were to make a 2 layer half sheet cake (12x17x1), would I just be doubling this recipe? I’ve used your vanilla cake so many times and always a hit so I wanted to continue down your recipe book 🙂 I’m so excited to make my friends bday cake but having difficulty planning this one – many thanks in advance!
Hi Julie,
Totally! My red velvet cake recipe makes about 6 cups of batter, and a 12x17x1 half sheet pan needs roughly 10 cups of batter for one layer, so for a 2-layer half sheet cake you’ll want about 20 cups total.
Since each batch makes 6 cups, you’ll need to make the recipe about 3.5x to have enough batter. You can round up to 4x for a little wiggle room. It’s always better to have a touch extra than to come up short. Hope that helps, happy baking!!
I’ve made this cake 3 separate times. I used 3 6-inch cake pans with my oven at 350°. Each time, my cake needs more than the recommended 30 minutes. I find that it needs around 40 minutes. The middle of the cake has also fallen in on itself all 3 times. Any tips to make the middles not fall?
That is wild! Have you tested your oven with an oven thermometer? Are all the ingredients fully at room temperature when you make the batter? Are you by chance baking at elevation? Sometimes even a couple thousand feet about sea level can have a huge impact on how recipes like this rise! Hopefully we’ll be able to figure out what’s going on!
Hi
I was just wondering if you can use this recipe in a sheet cake pan if you triple it
Hi Rosette,
I haven’t tested it out, but in theory it should work! I’d recommend using a couple heating cores to help the layer bake up more evenly and quickly if you have them. Hope that helps, happy baking!