
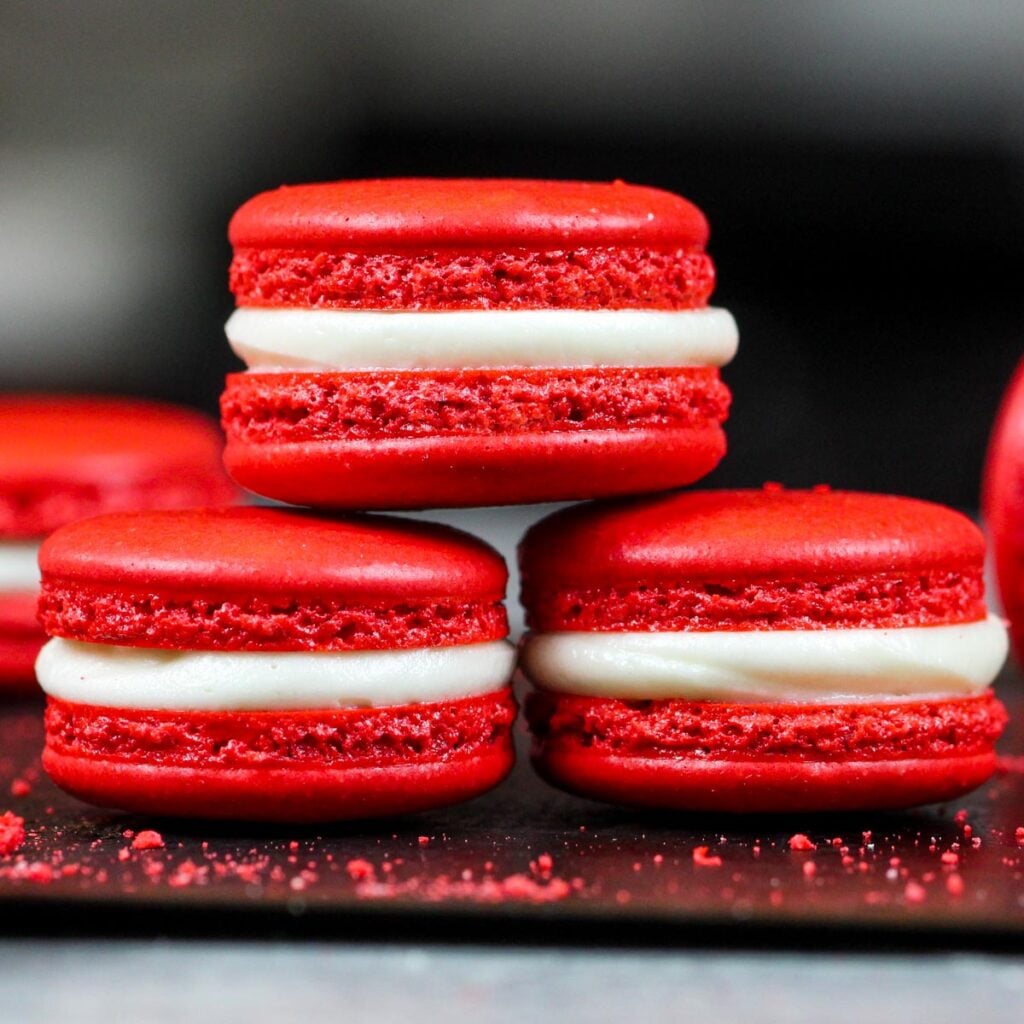
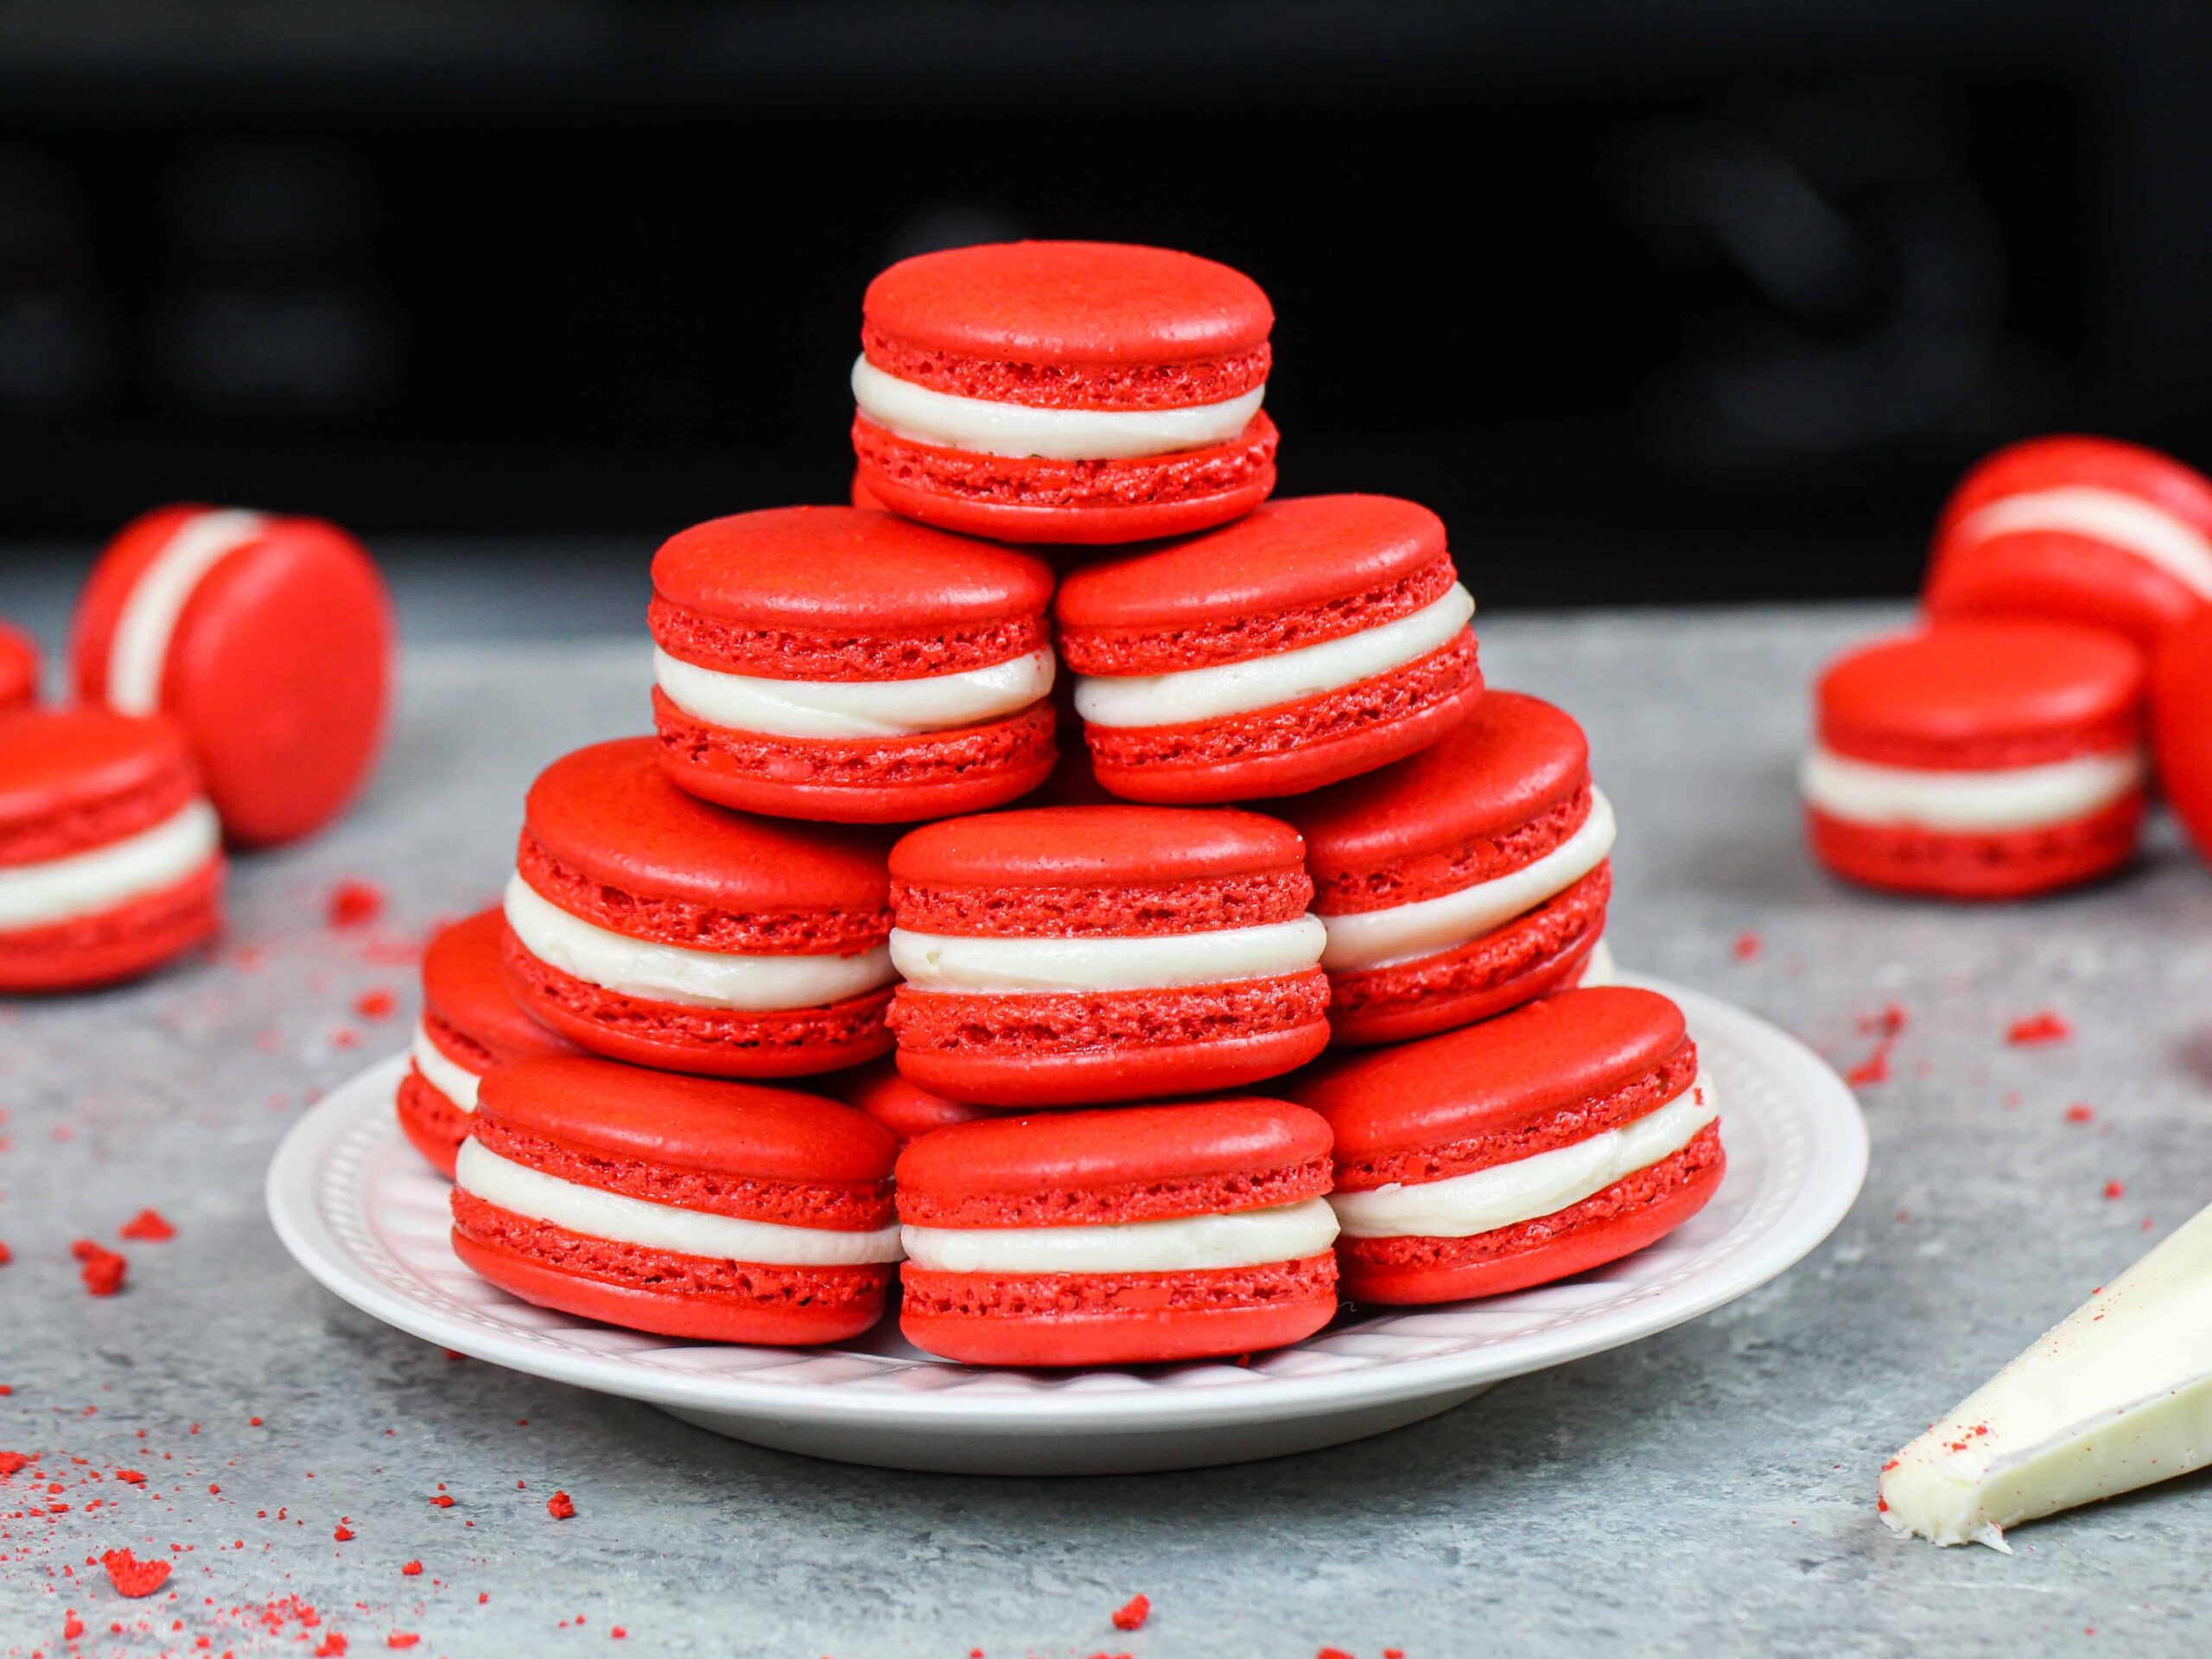
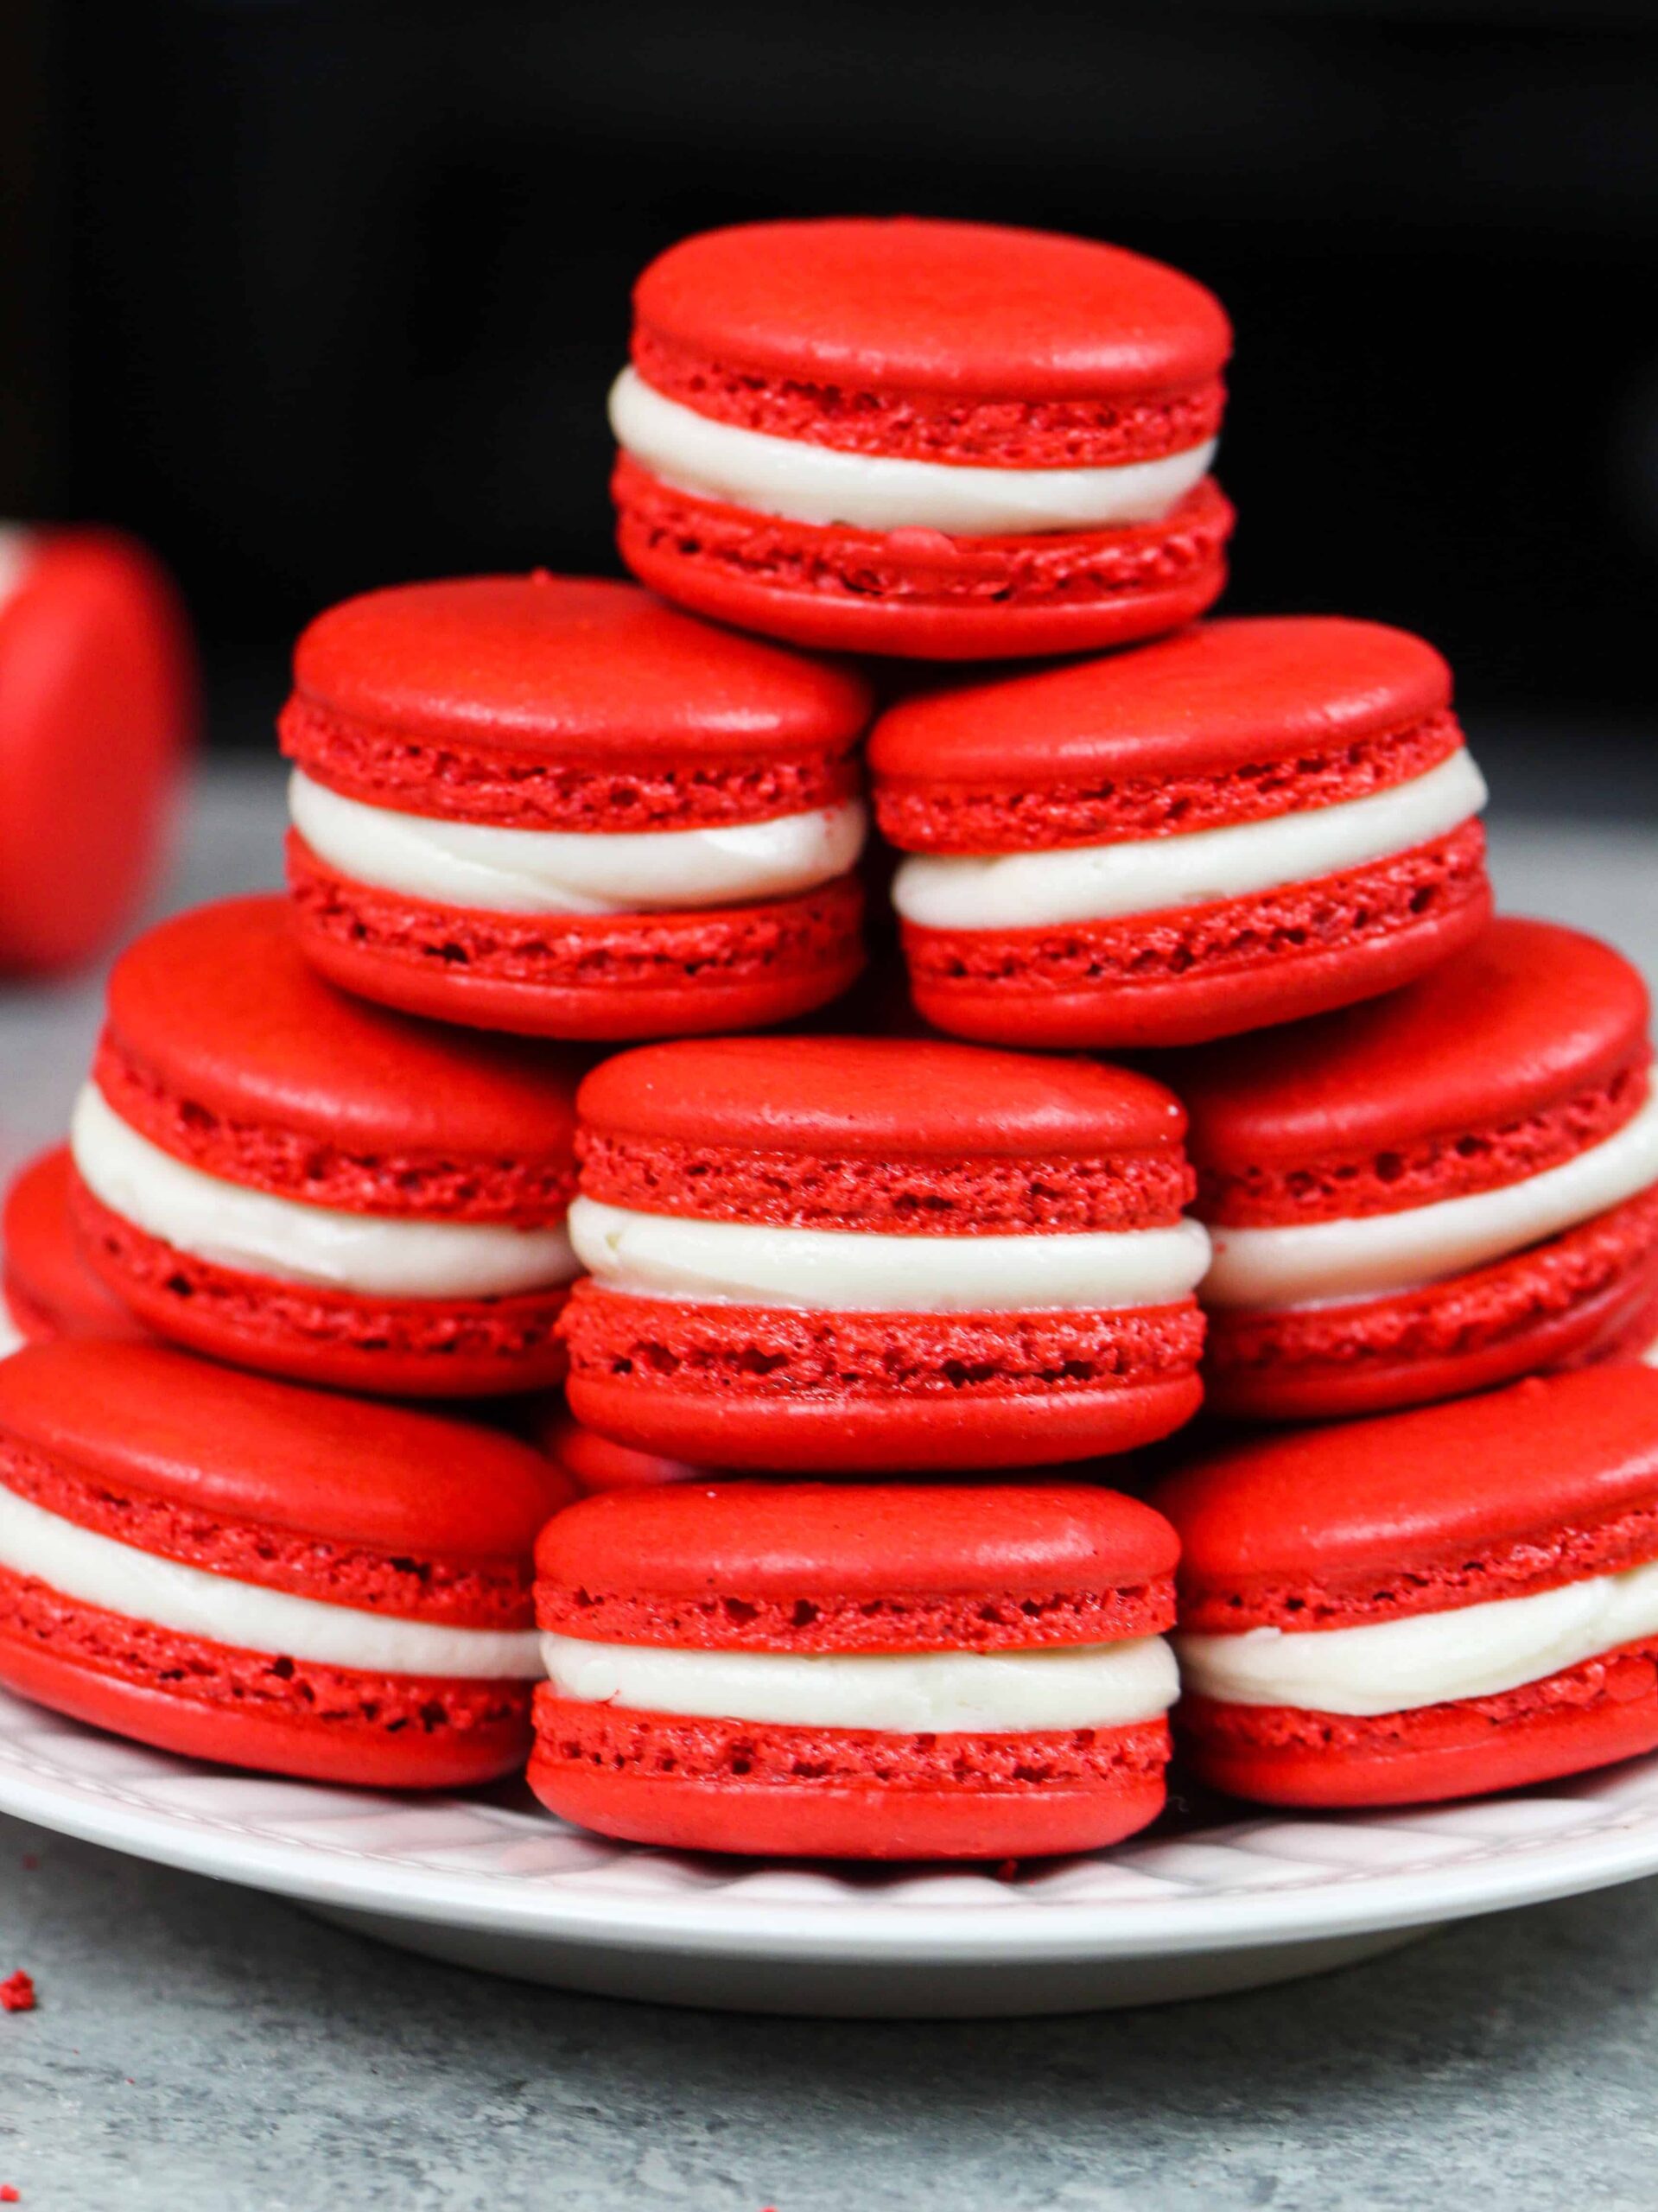
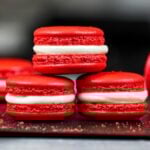
Red Velvet Macarons
These red velvet macarons are equal parts beautiful and delicious!!
Making These Red Velvet Macarons with the French Method
There are a few different ways macarons are made. French macarons are considered easier to make, while the Italian and Swiss methods use a few more steps but are more structurally sound.
French macarons also require less equipment. While I love Italian macarons, I like to keep things simple and use the French method for this recipe.
Equipment You’ll Need to Make These Red Velvet Macarons
I’ve made quite a few batches of macarons, and they definitely turn out best when the ingredients are weighed and the macarons are baked on a Silpat mat.
Let’s walk through each step of this recipe to make sure it turns out great!
Making Red Velvet Macarons – Step by Step Process
While the recipe below is quite detailed, I find visual cues to be super helpful!
Below are some photos and a video tutorial of the process to help guide you through this recipe for French red velvet macarons.
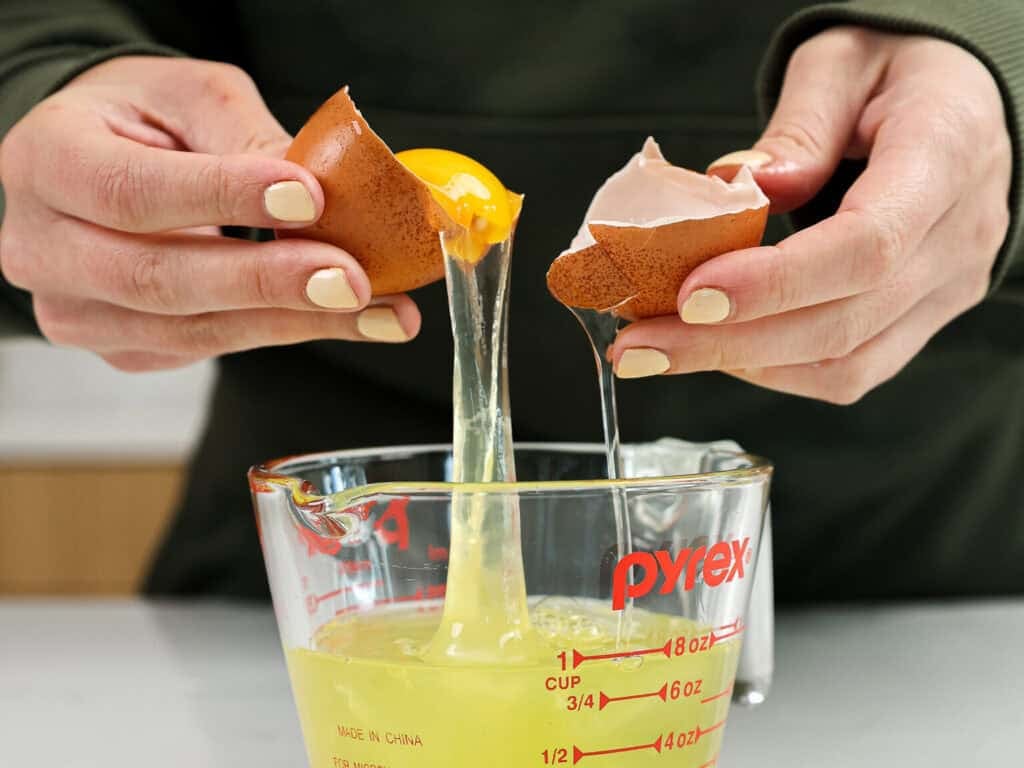
Step #1: Prep the Ingredients and Equipment
After prepping and weighing your ingredients, wipe down your mixing bowl and whisk attachment with a bit of vinegar or lemon juice to remove any residual grease.
This helps the meringue whip up better!
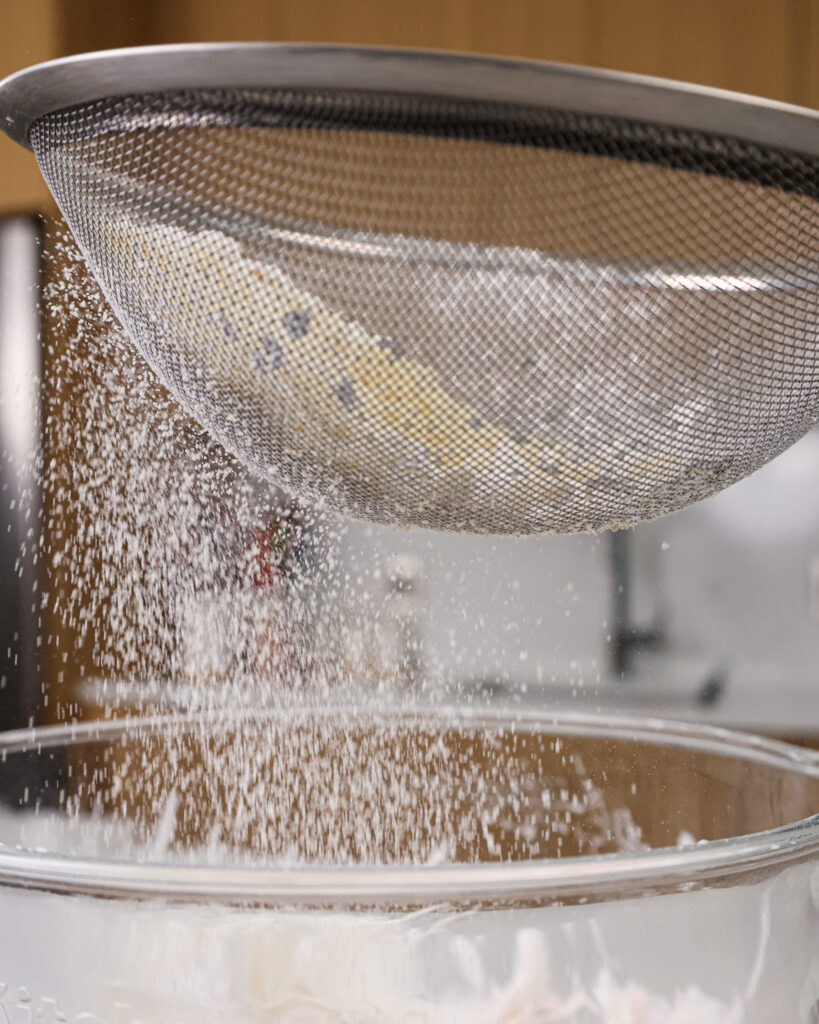
Step #2: Sift the Dry Ingredients
Sift the superfine almond flour, cocoa powder, and powdered sugar into a large bowl and set aside. This makes sure your macaron shells turn out nice and smooth.
Step #3: Make French Meringue
Next, it’s time to make the French meringue!
Whisk the egg whites on a medium speed until soft peaks form, then add in the granulated sugar.
Then mix at a medium-high speed until stiff peaks form, like in the photo below. Keep a close eye on your mixer to avoid over-mixing your meringue.
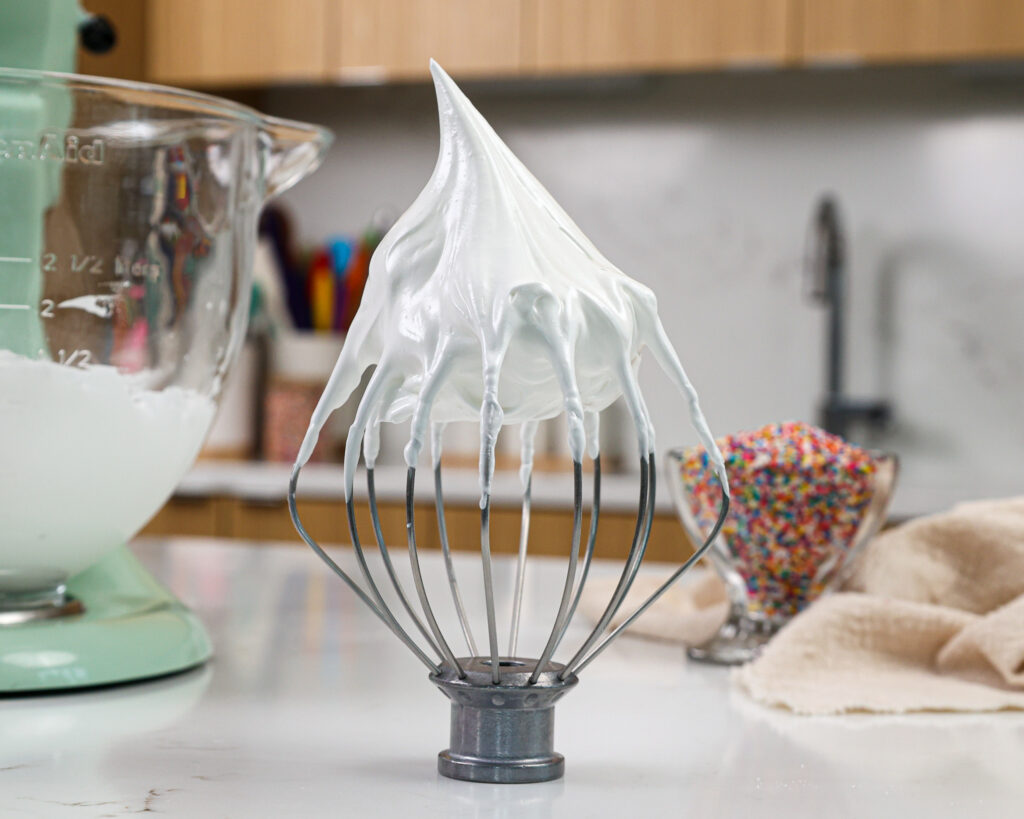
Add in a generous squirt of red gel food coloring at this point. It will get mixed in during the next step.
Step #4: Mix the Dry Ingredients into the Meringue
Fold the dry ingredients into the meringue. The batter might look a bit stiff, but it’s better to be too thick than to over-mix it!
The batter should form a thick ribbon that flows off your spatula when it’s lifted.

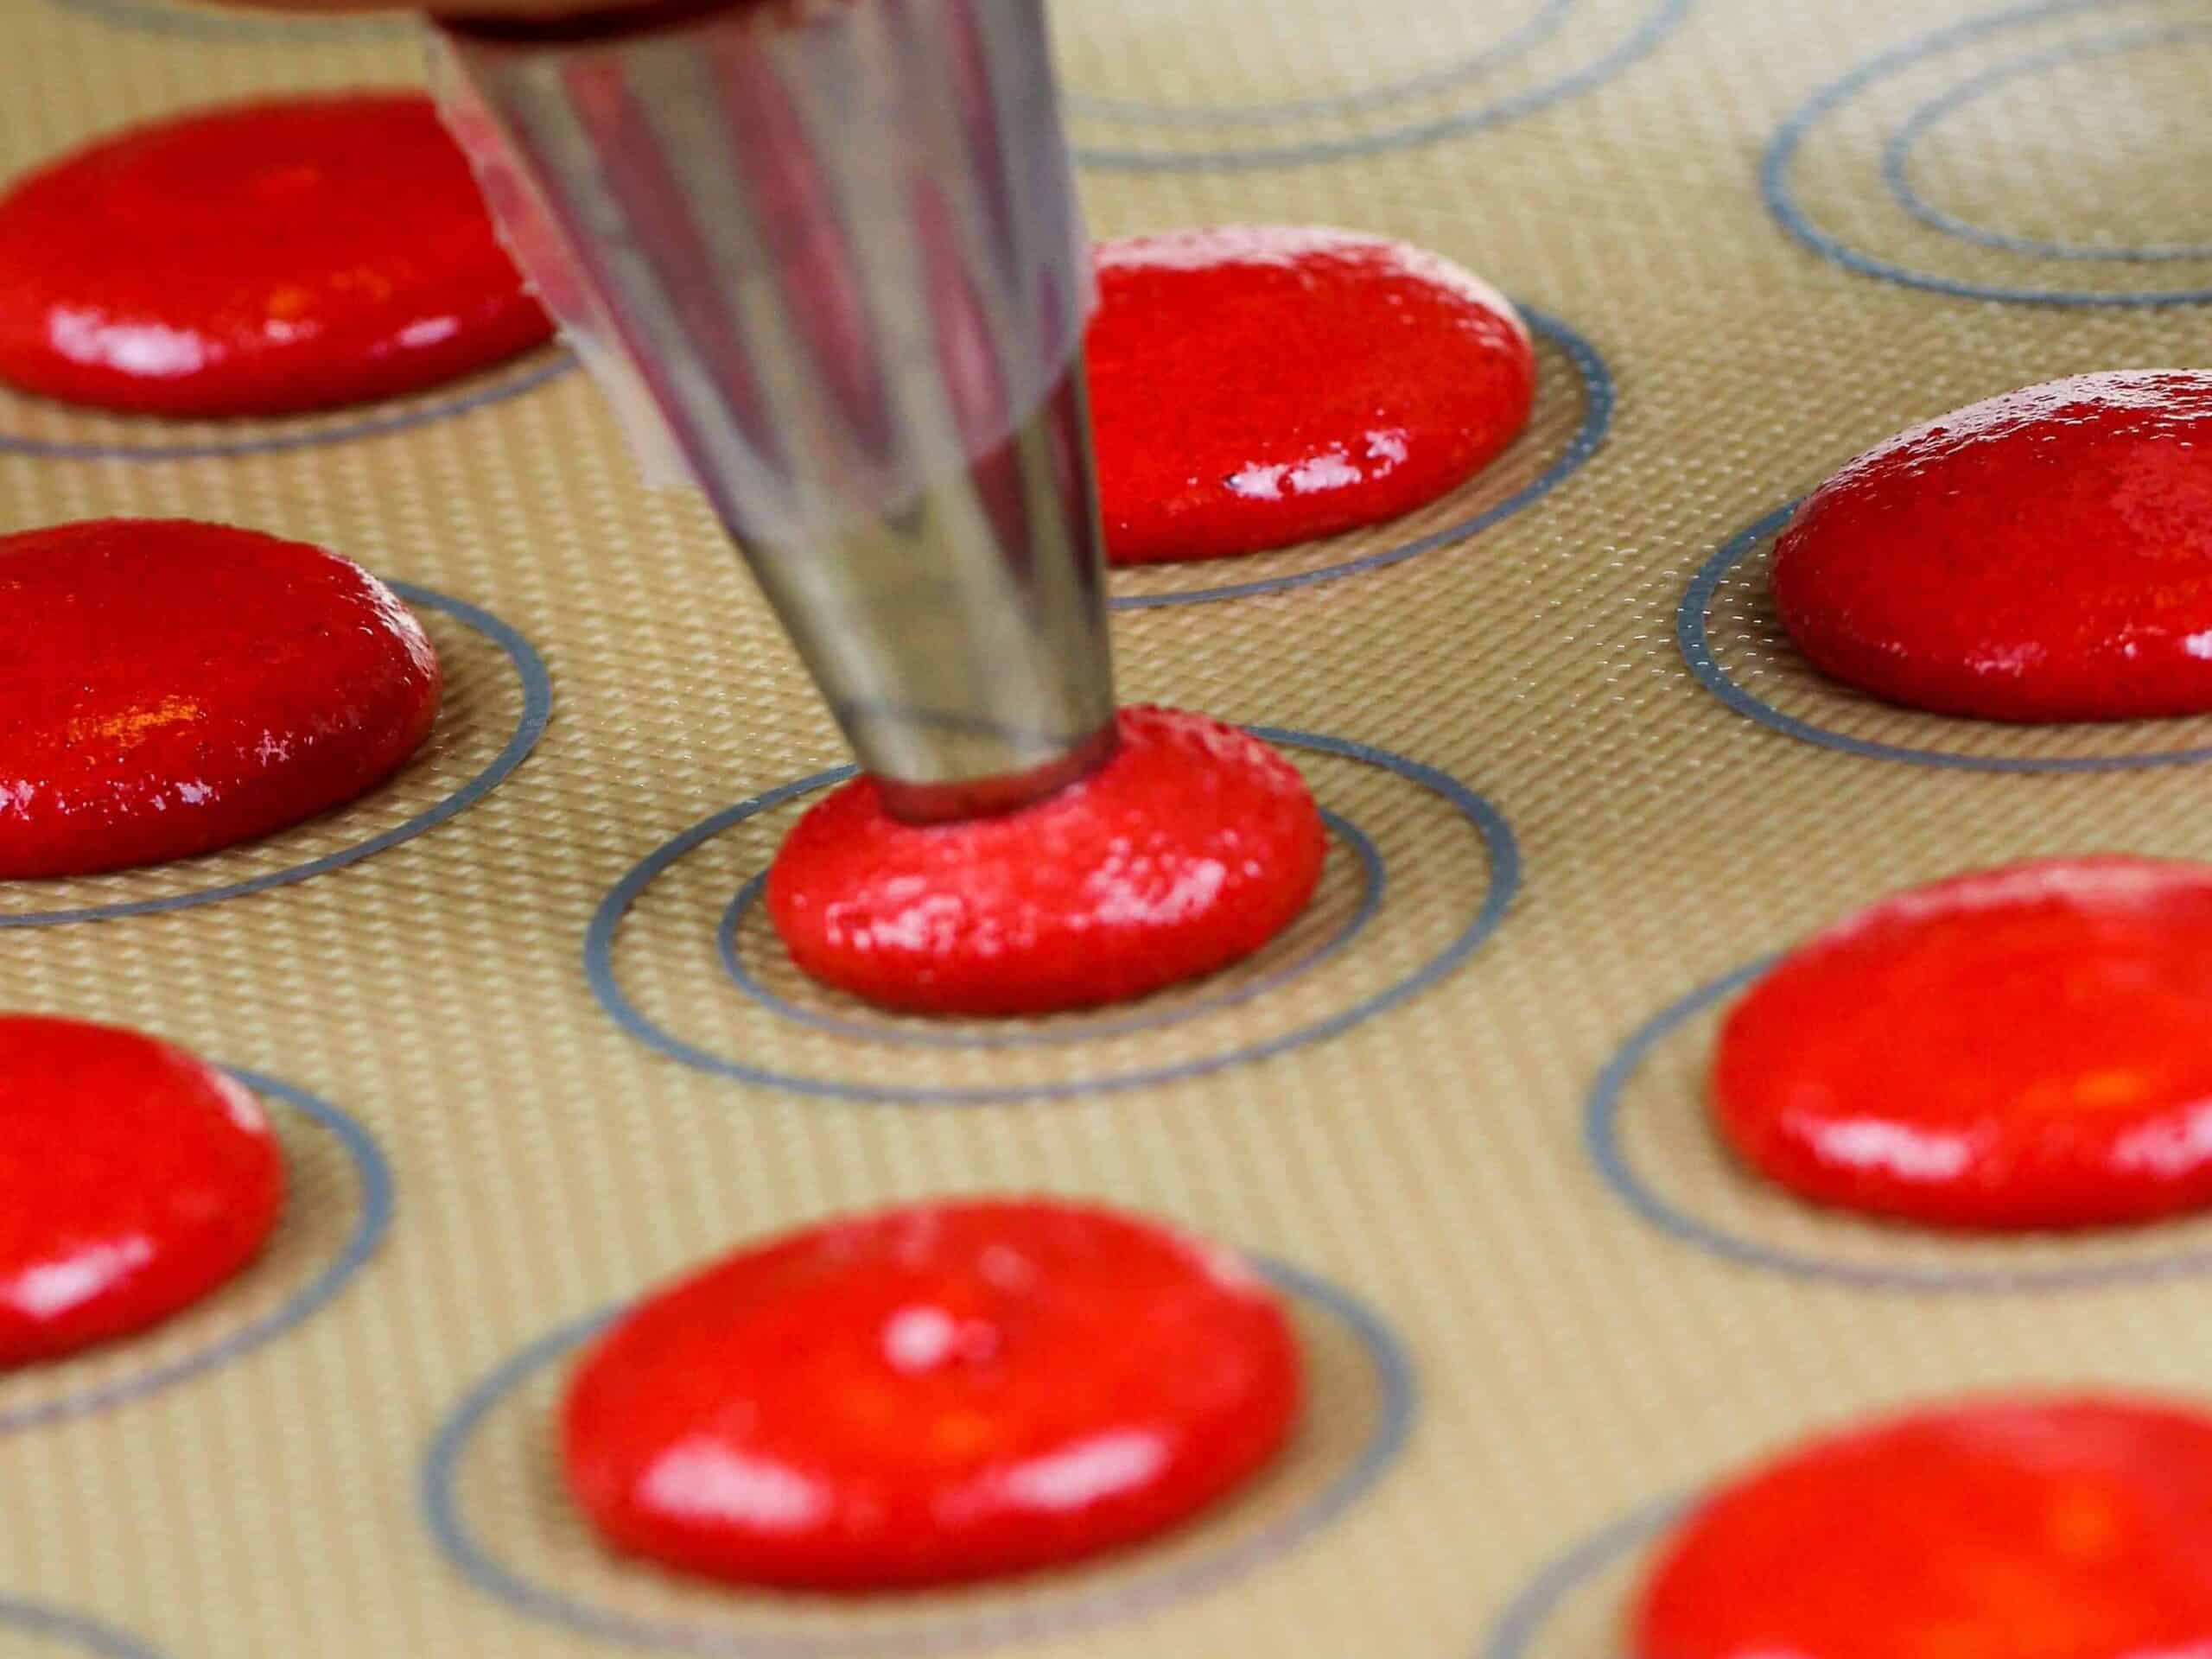
Step #5: Pipe the Macaron Shells
Pour the batter into a large piping bag fitted with a round piping tip. Pipe 1 1/4-inch rounds onto the prepared baking sheets, spacing them about 1 inch apart.
Firmly bang or drop your pans on the counter a few times to bring any trapped air bubbles to the surface and pop them with a toothpick. This can help you avoid hollow or cracked shells.
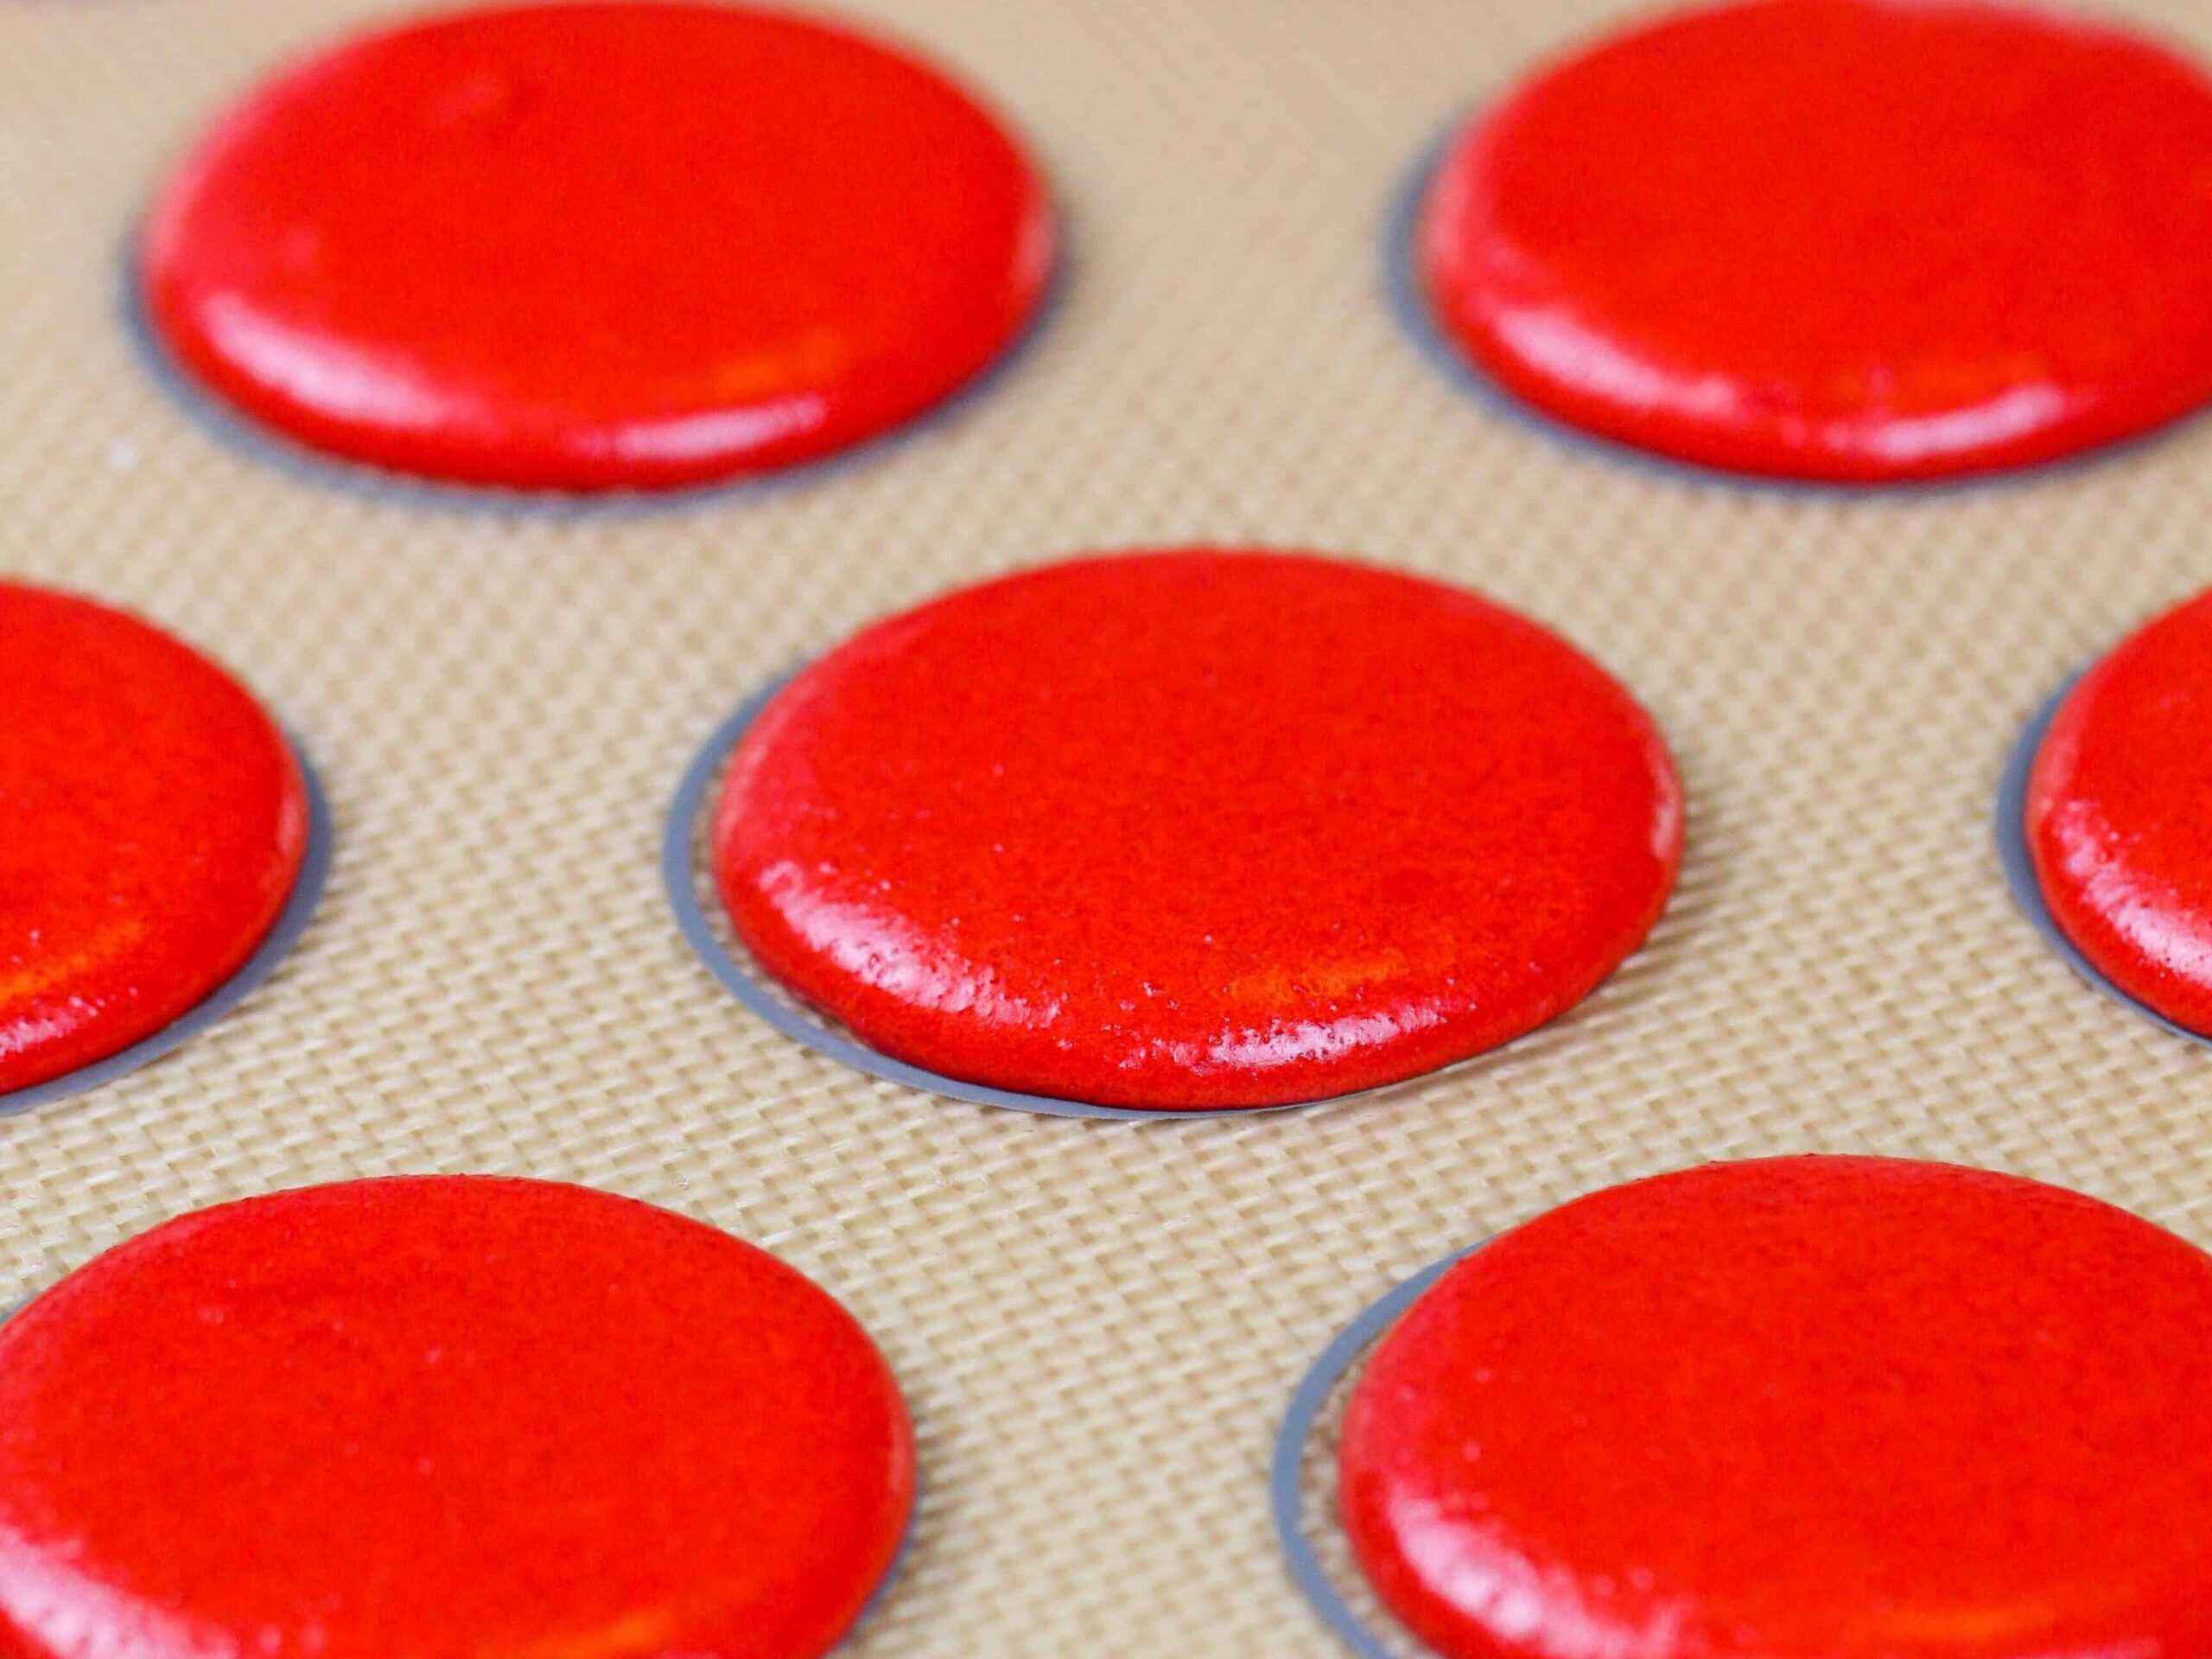
Step #6: Rest the Piped Macarons
Then let the macarons rest until they form a skin. This usually takes about 30 minutes in my kitchen, but it can vary based on humidity.
They should be mostly dry to the touch and look matte once they’re ready to be baked. While the shells rest, preheat your oven.
Step #7: Bake the Macaron Shells
Bake one tray of macarons at a time and place the tray on the middle rack of your oven. Bake time can vary based on the size of macarons you pipe and your oven, so adjust the bake time as needed.
Let the macarons cool fully on the pan, then gently remove them from the Silpat mat. You should be able to cleanly pull them off the mat once they’re cooled.
If they’re sticking or leaving behind residue, you might want to bake your next batch slightly longer.

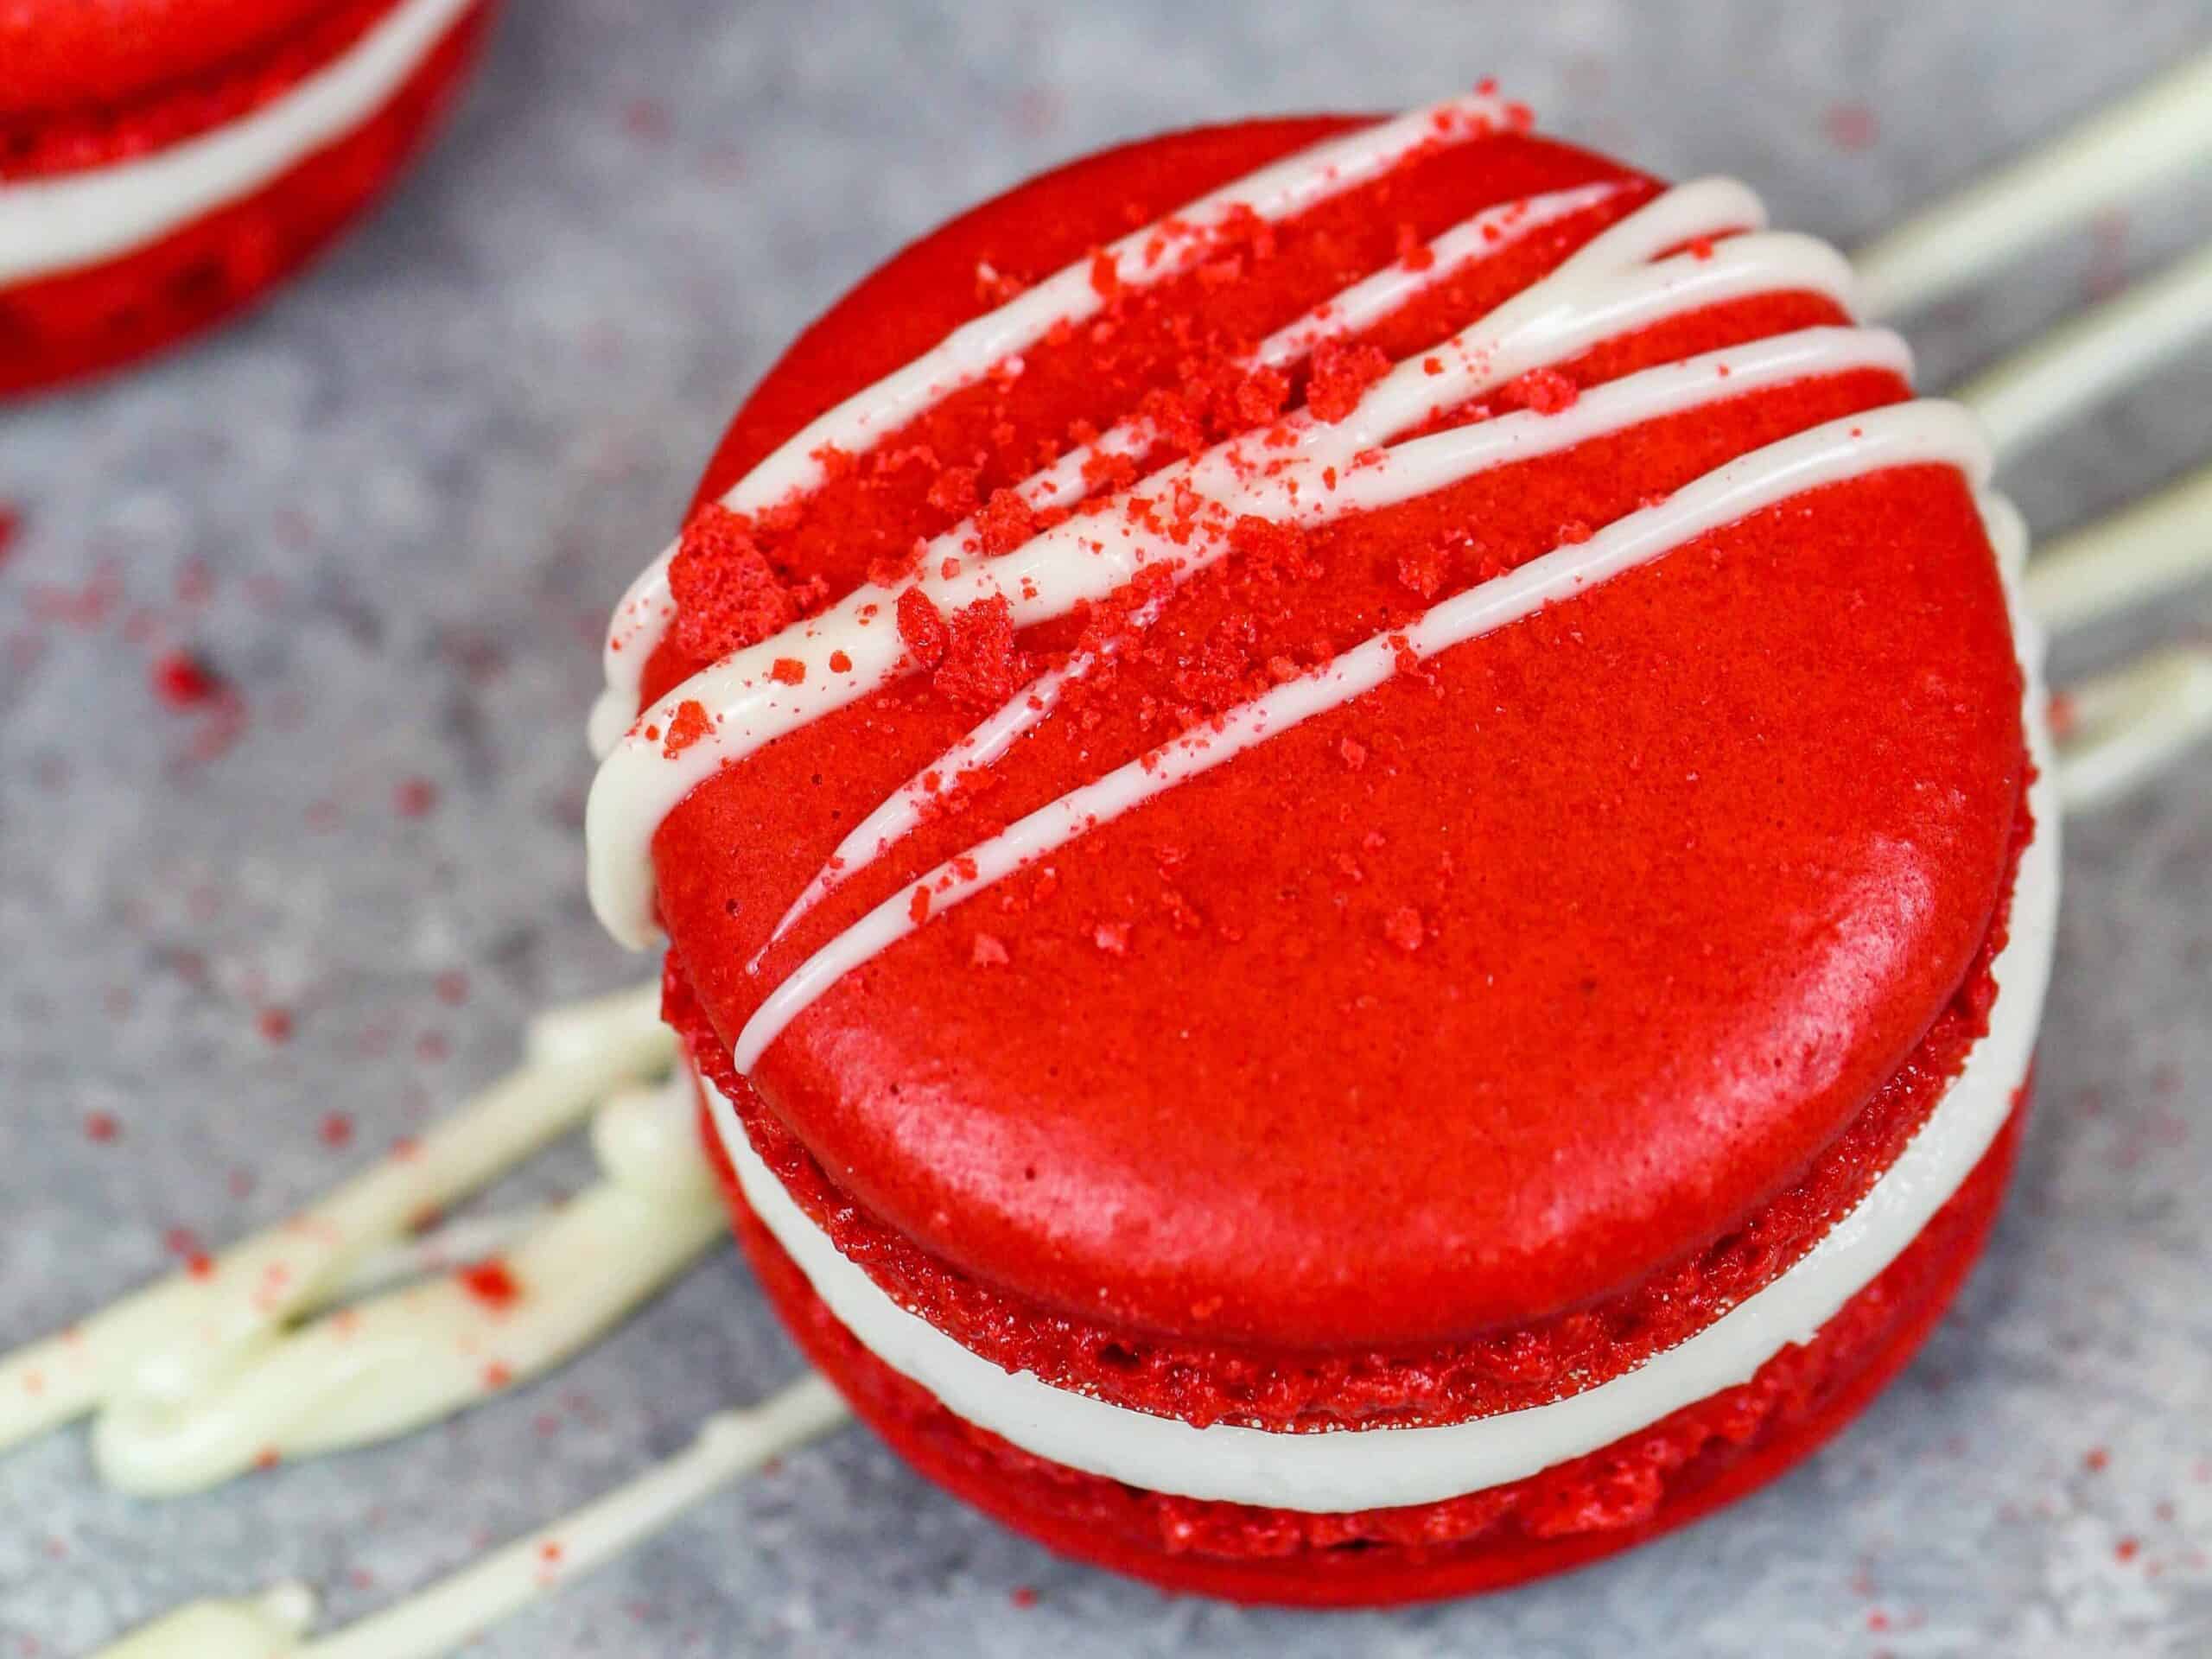
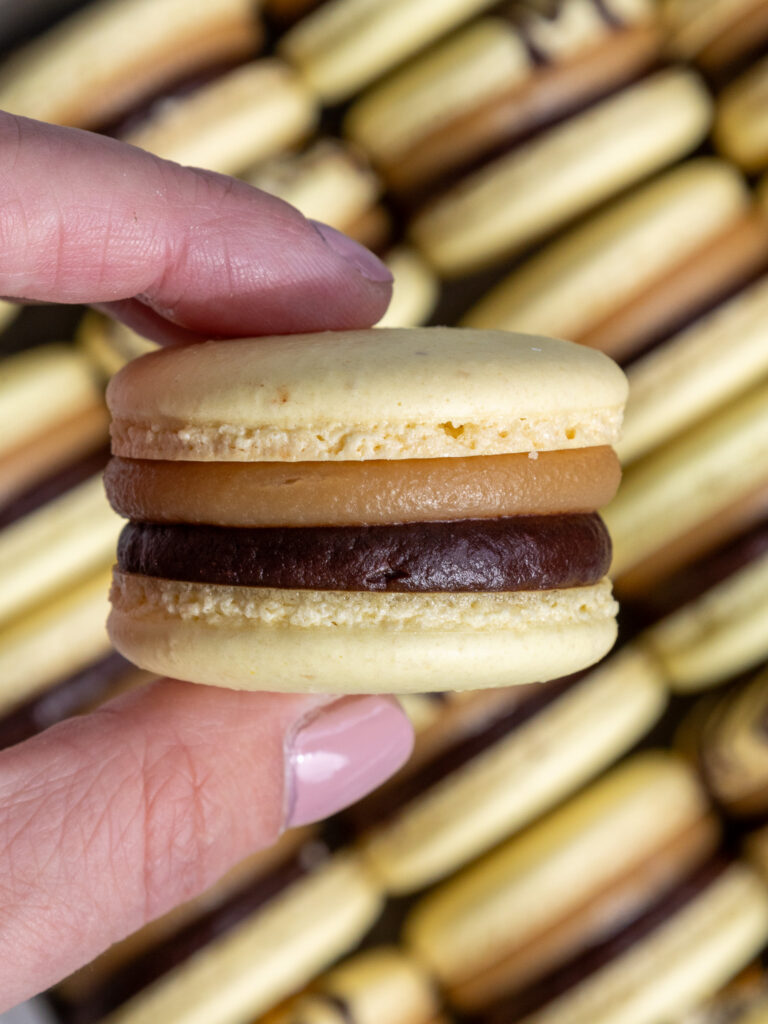
Step #8: Assembling These Red Velvet Macarons
The final step is to pair up the shells and pipe a dollop of cream cheese frosting onto one macaron shell.
Gently press a second shell on top of the frosting to create a sandwich. If desired, drizzle with a bit of white chocolate and crush up two macaron shells to use as a garnish.
Place the finished macarons in the fridge to mature overnight and bring them to room temperature the next day, then enjoy!
Troubleshooting These Red Velvet Macarons
While I’d love to think everyone’s first batch of these red velvet macarons will turn out perfectly, my own experience has taught me that’s not how things usually go.
Macarons are incredibly temperamental, and it might take a few tries to get them just right. If you run into any issues, check out my macaron troubleshooting guide!
Choosing the Right Filling for These Red Velvet Macarons
Almost all the flavor in a macaron comes from its filling. The shell gives the macarons an incredible texture, but the filling is what determines their flavor.
For these macarons, I like to whip up a cream cheese frosting. It gives these macarons an amazing flavor and pairs so well with the slightly chocolatey red velvet macaron shells.
If you don’t want your macarons to be too sweet, you can also use a 1/4 batch of my hybrid buttercream or Swiss meringue frosting as your frosting base.
Recipe Yield
This recipe makes about 36 macaron shells, which can be used to make 18 macarons. You can double or triple this recipe to make more macarons if needed.
The yield and bake time will also vary based on the size of the macarons you pipe. I pipe my shells with a diameter of about 1 1/4 inches.
Tips for Making the Best Red Velvet Macarons
- Wipe your mixing bowl and whisk with lemon juice or vinegar to remove any traces of grease before making your meringue. It will help your egg whites whip up better!
- Separate your own eggs and age them if possible. Do not use egg whites from a carton.
- Measure your ingredients in grams with a kitchen scale! You really need to be precise with this recipe, and your macarons will turn out best if the ingredients are weighed.
- Carefully read through the directions before making these macarons. There are quite a few steps, and it’s good to know your game plan before you start!
- Use a macaron mat or print out a template to help you pipe consistently sized macarons.
- Let your macarons mature! Letting them rest overnight while they are filled softens them (in a good way) and allows the flavors to develop.
- If your first batch of macarons doesn’t turn out, please check out my macaron troubleshooting guide.
Making These Red Velvet Macarons in Advance & Storage Tips
French macarons need to mature for a few hours or overnight in the fridge before eating them. This gives them their best texture and taste.
Store filled macarons at room temperature for up to 2 days in an airtight container.
Refrigerate filled macarons for up to 5 days in an airtight container.
Freeze filled macarons for up to a month in an airtight container.
Unfilled macaron shells can be frozen for up to a month in an airtight container.
You can also make the filling ahead of time or save any leftover filling! It can be stored in an airtight container in the fridge for up to a week or in the freezer for up to a month.
Let Me Know What You Think!
If you try this recipe for red velvet macarons, I’d love to hear what you think! Please leave a rating and comment below.
And don’t forget to tag me @chelsweets and use #chelsweets on social media so that I can see your amazing creations!
Red Velvet Macarons
Equipment
Ingredients
Red Velvet Macarons
- 110 g aged egg whites, room temperature about 4 large egg whites
- 1/4 tsp cream of tartar – optional
- 110 g granulated sugar 1/2 cup + 2 tsp
- 140 g superfine almond flour – blanched 1 1/2 cups
- 125 g powdered sugar 1 cup
- 4 g unsweetened cocoa powder, sifted 2 tsp
- red gel food coloring
Cream Cheese Frosting
- 56 g cream cheese, room temperature 1/4 cup
- 4 g vanilla extract or vanilla bean paste 1 tsp
- 1 g fine salt 1/8 tsp
- 125 g powdered sugar 1 cup
Instructions
Red Velvet Macarons
- Line two large baking sheets with parchment paper or silicon mats. Set aside.
- Pour 110g of aged egg whites into the bowl of a stand mixer with a whisk and mix on medium speed until the surface of the egg whites is covered in small bubbles. Add 1/4 tsp cream of tartar and continue to mix until it reaches the soft peak stage and leaves visible tracks.
- Gradually mix 110g of granulated sugar into the egg whites over a few minutes while mixing on a medium-low speed. Increase the mixing speed to a medium-high speed (6 on a KitchenAid). Keep mixing until stiff, glossy peaks form.
- Sift 140g of superfine almond flour, 125g of powdered sugar, and 4g of cocoa powder into the meringue. Use a rubber spatula to break up any big clumps and press them through the sieve.
- Add in a generous squirt (about 1 tsp) of red gel food coloring. Then fold the ingredients together with a rubber spatula. Use a circular motion that sweeps around the edge of the bowl and then pulls through the bottom of the bowl to make sure everything is getting mixed properly. Don't forget to scrape off the inside of the spatula intermittently. Sometimes, meringue can get stuck there and not get mixed in properly.
- Fold the batter until a thick ribbon of batter runs off the spatula when it's lifted. You should be able to draw a couple of figure 8s with the batter running off your spatula in a continuous stream when it's the right consistency. If the stream of batter breaks before you're able to do this, you may need to stir it a bit more.
- Pour the batter into a large piping bag fit with a medium-sized round piping tip and pipe 1 1/2-inch rounds on the prepared baking sheets. Space them about 1 inch apart.
- Bang the pans firmly on the counter a few times to release air bubbles, then pop any remaining air bubbles that come to the surface with a toothpick.
- Let the macarons rest for 30 minutes, or until they develop a skin. The macarons should look matte once the skin has formed. While the macarons rest, preheat the oven to 320°F/160°C.
- Bake one tray of macarons at a time on the middle rack of your oven for 18-21 minutes and rotate the pan halfway through to help the macarons bake evenly. Bake time can vary based on the size of your shells, so if you pipe them smaller than 1 1/2 inches, they may be done a few minutes earlier.
- Remove the macaron shells from the oven and let them cool fully on the pan (about 30 minutes), then gently peel them off the Silpat mat. If they're properly baked, they should peel off the mat cleanly and have a shiny bottom.
Cream Cheese Frosting
- Beat 56g of room-temperature cream cheese on a medium speed for 1-2 minutes with a whisk attachment until smooth.
- Mix in 4g vanilla extract and 1g salt on a low speed.
- Then slowly mix in 125g of powdered sugar on a low speed.
- Continue to mix on low for a couple of minutes until the ingredients are fully incorporated and the desired consistency is reached. If the frosting is too thick, add in additional heavy cream or milk (1 tsp at a time). If the frosting is too thin, add in more powdered sugar (1 Tbsp at a time).
- Place in a piping bag with a round piping tip or cut a 1 cm opening at the base of the bag and set aside.
Assembling These Red Velvet Macarons
- Pair up the shells, then pipe a dollop of cream cheese frosting on one macaron shell. Gently press a second shell on top of the frosting to create a sandwich.
- If desired, drizzle with a bit of white chocolate and crush up two macaron shells to use as a garnish. You can also use royal icing!
- Place the finished macarons in an airtight container and chill in the fridge overnight, then let them warm to room temperature and enjoy!
Video
Notes
Tips for Making the Best Red Velvet Macarons
- Measure your ingredients in grams with a kitchen scale! You really need to be precise with this recipe. Your macarons will turn out best if the ingredients are weighed.
- Separate your own eggs and age them if possible! Do not use egg whites from a carton.
- Carefully read through the directions before making these macarons. There are quite a few steps, and it’s good to know your game plan before you start!
- Use gel food coloring to color these macarons. If you try to use liquid food coloring, it can throw off the consistency of the batter.
- Use a macaron mat or print out a template to help you pipe consistently sized macarons.
- Let your macarons mature in the fridge overnight! Letting them rest overnight while they are filled softens them (in a good way) and allows the flavors to develop.
- If your first batch of macarons doesn’t turn out, please check out my macaron troubleshooting guide for help!
Making These Red Velvet Macarons in Advance & Storage Tips
French macarons need to mature overnight (or ideally 24 hours) in the fridge before being eaten! They taste best 24 hours after being made. Filled macarons can be stored at room temperature for up to 2 days in an airtight container. Macarons can be refrigerated for up to 5 days in an airtight container. Filled macarons can be frozen for up to a month, but the length can vary based on the filling. Unfilled macaron shells can be frozen for up to a month in an airtight container. Your filling can also be made ahead of time, or you can save any leftover filling! It can be stored in an airtight container in the fridge for up to a week or in the freezer for up to a month.Nutrition
Other Recipes You Might Like:

Should the filling have butter and cream cheese? The recipe shows cream cheese but the instructions only say butter! Looking forward to trying these!
This are amazing. Easy and so delicious. I followed the recipe exactly and they came out perfect. It was my first time making macarons so I don’t think I have the piping technique down yet as they weren’t flat, but that didn’t impact the taste at all. Will definitely be making these again!
Why is the cream of tartar optional?
@Sydney, cream of tarter helps with your meringue, but isn’t necessary!
The red coloring seems to always give me a problem. My shells will not dry. I use Americolor super red and my consistency is perfect but they just won’t dry. Am I putting too much coloring?
@Carmen Velez, I also have AmeriColor super red and I’ve been waiting for over an hour now with a fan on these and they’re still not dry. They’re not wet, but they’re gummy. I’ve never had this happen with any other color except the red.
Made this recipe, thank you btw!! It’s lovely, but I hate how some of them were perfect, and some were cracked!! What’s that all about?
@Lisa, some may have had more air trapped in them than the others, next time you try it make sure to hit the tray on the counter and pop any air bubbles you see
I feel like the ratios are off on this recipe. The shells are wet after 2 hours and I’ve always made macarons with a ratio of more dry to wet. I see I’m not the only one having this issue. I also struggled getting a red color. I would definitely use red power food dye the next time I try this.
Our second time making macarons. Instructions were great. Must have been slightly larger than yours as only yielded 11 and a half. The half won’t make it until tomorrow. Plenty of room in the kitchenaid to double this one. Frosting looks like it will be short, but it there ends up being plenty.
How much red gel food coloring did you use to get that rich color??? I used what I thought was a huge amount but didn’t get anywhere near your color!
Followed this recipe exactly and they came out perfect! Thank you!
Hi Mary,
Yay!! So happy to hear that, thank you for sharing 🙂
honestly pretty good recipe for a a sort of beginner! I wasn’t able to get a rich red and felt like there could have been more cocoa powder. and that icing was DIVINE. I had a few good and cracked ones but i don’t think i tapped the air out properly enough! So excited to surprise my boyfriend with them 😀
Hi Ashlyn,
So happy to hear your macarons tuned out well!!! The cocoa powder is a bit tricky, because the more you add, the more the red color gets dulled. That’s why this recipe has such a small amount of it! It’s a delicate balance between having a hint of chocolate and not ruining the color. To get a really bright red you have to add a LOT of gel food coloring! But also adding too much gel food coloring can make them kind of sticky and make the shells take longer to bake, so you’re probably better off not having a SUPER bright red. Macarons truly are so finicky! haha
I hope your BF loves them!! 🙂
Can I use red velvet emulsion in place of food coloring or will it alter the consistency of the batter?
Hi Alli,
I haven’t tried this recipe with an emulsion, but I would be worried it could throw off the consistency of the batter :/ I’m so sorry!
I’ve used a few other recipes that did not turn out as good as this one! It was perfect!! The fun part is watching for the little feet as they bake. 🙂 Thank you so much for the recipe!
I am so happy to hear that Kerri 🙂 Thank you for sharing!!