
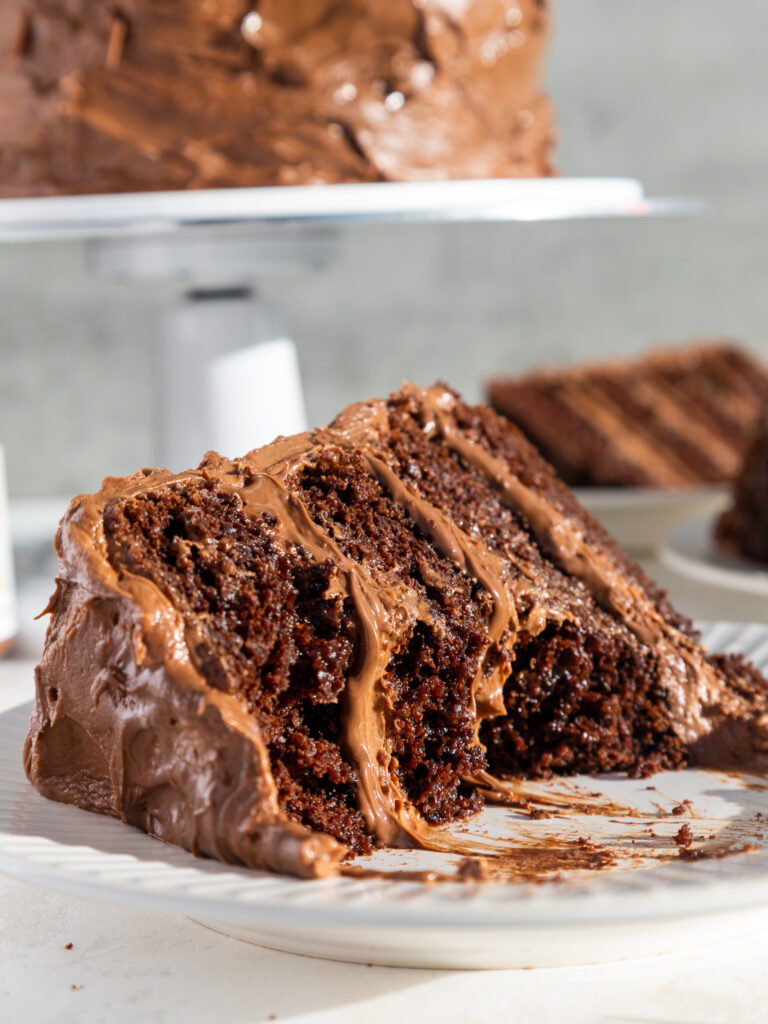
Nutella Cake
Love Nutella?? Then this chocolate Nutella cake recipe is for you!
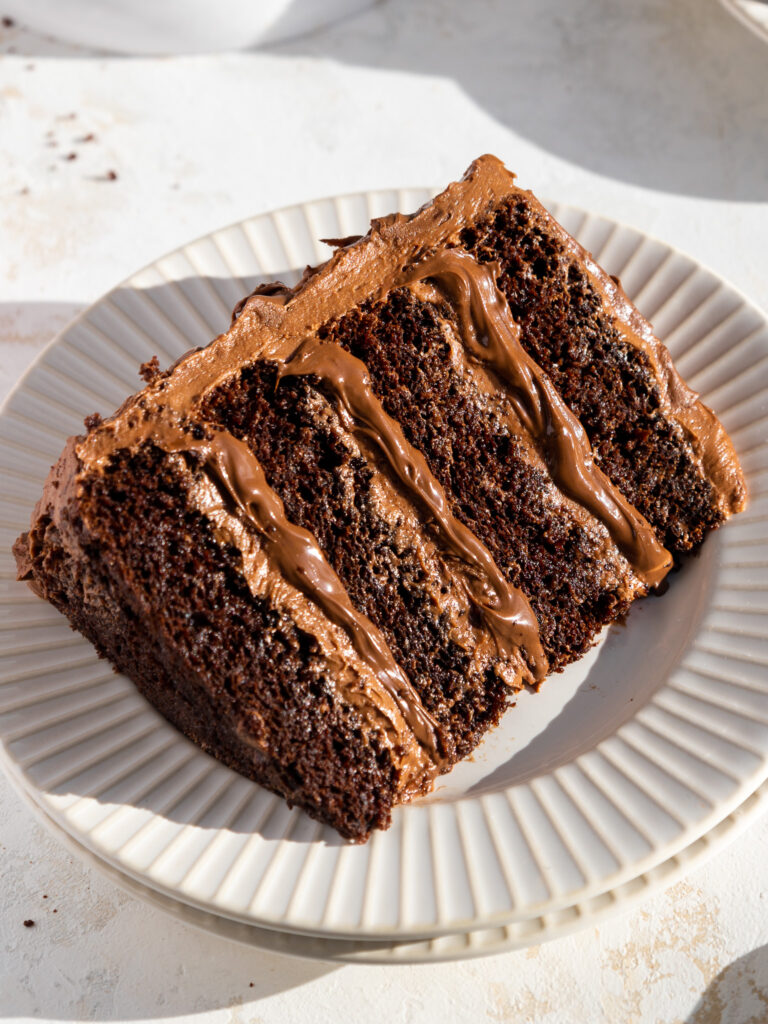
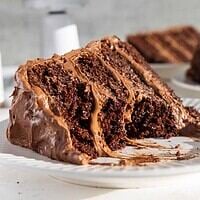
It’s made with moist chocolate cake layers, frosted with decadent Nutella buttercream, and decorated with Nutella swirls.
How to Make This Nutella Cake
To make sure this Nutella cake turns out as amazing as possible, let’s walk through each step together!
I’ve also included a video tutorial in the recipe card below.
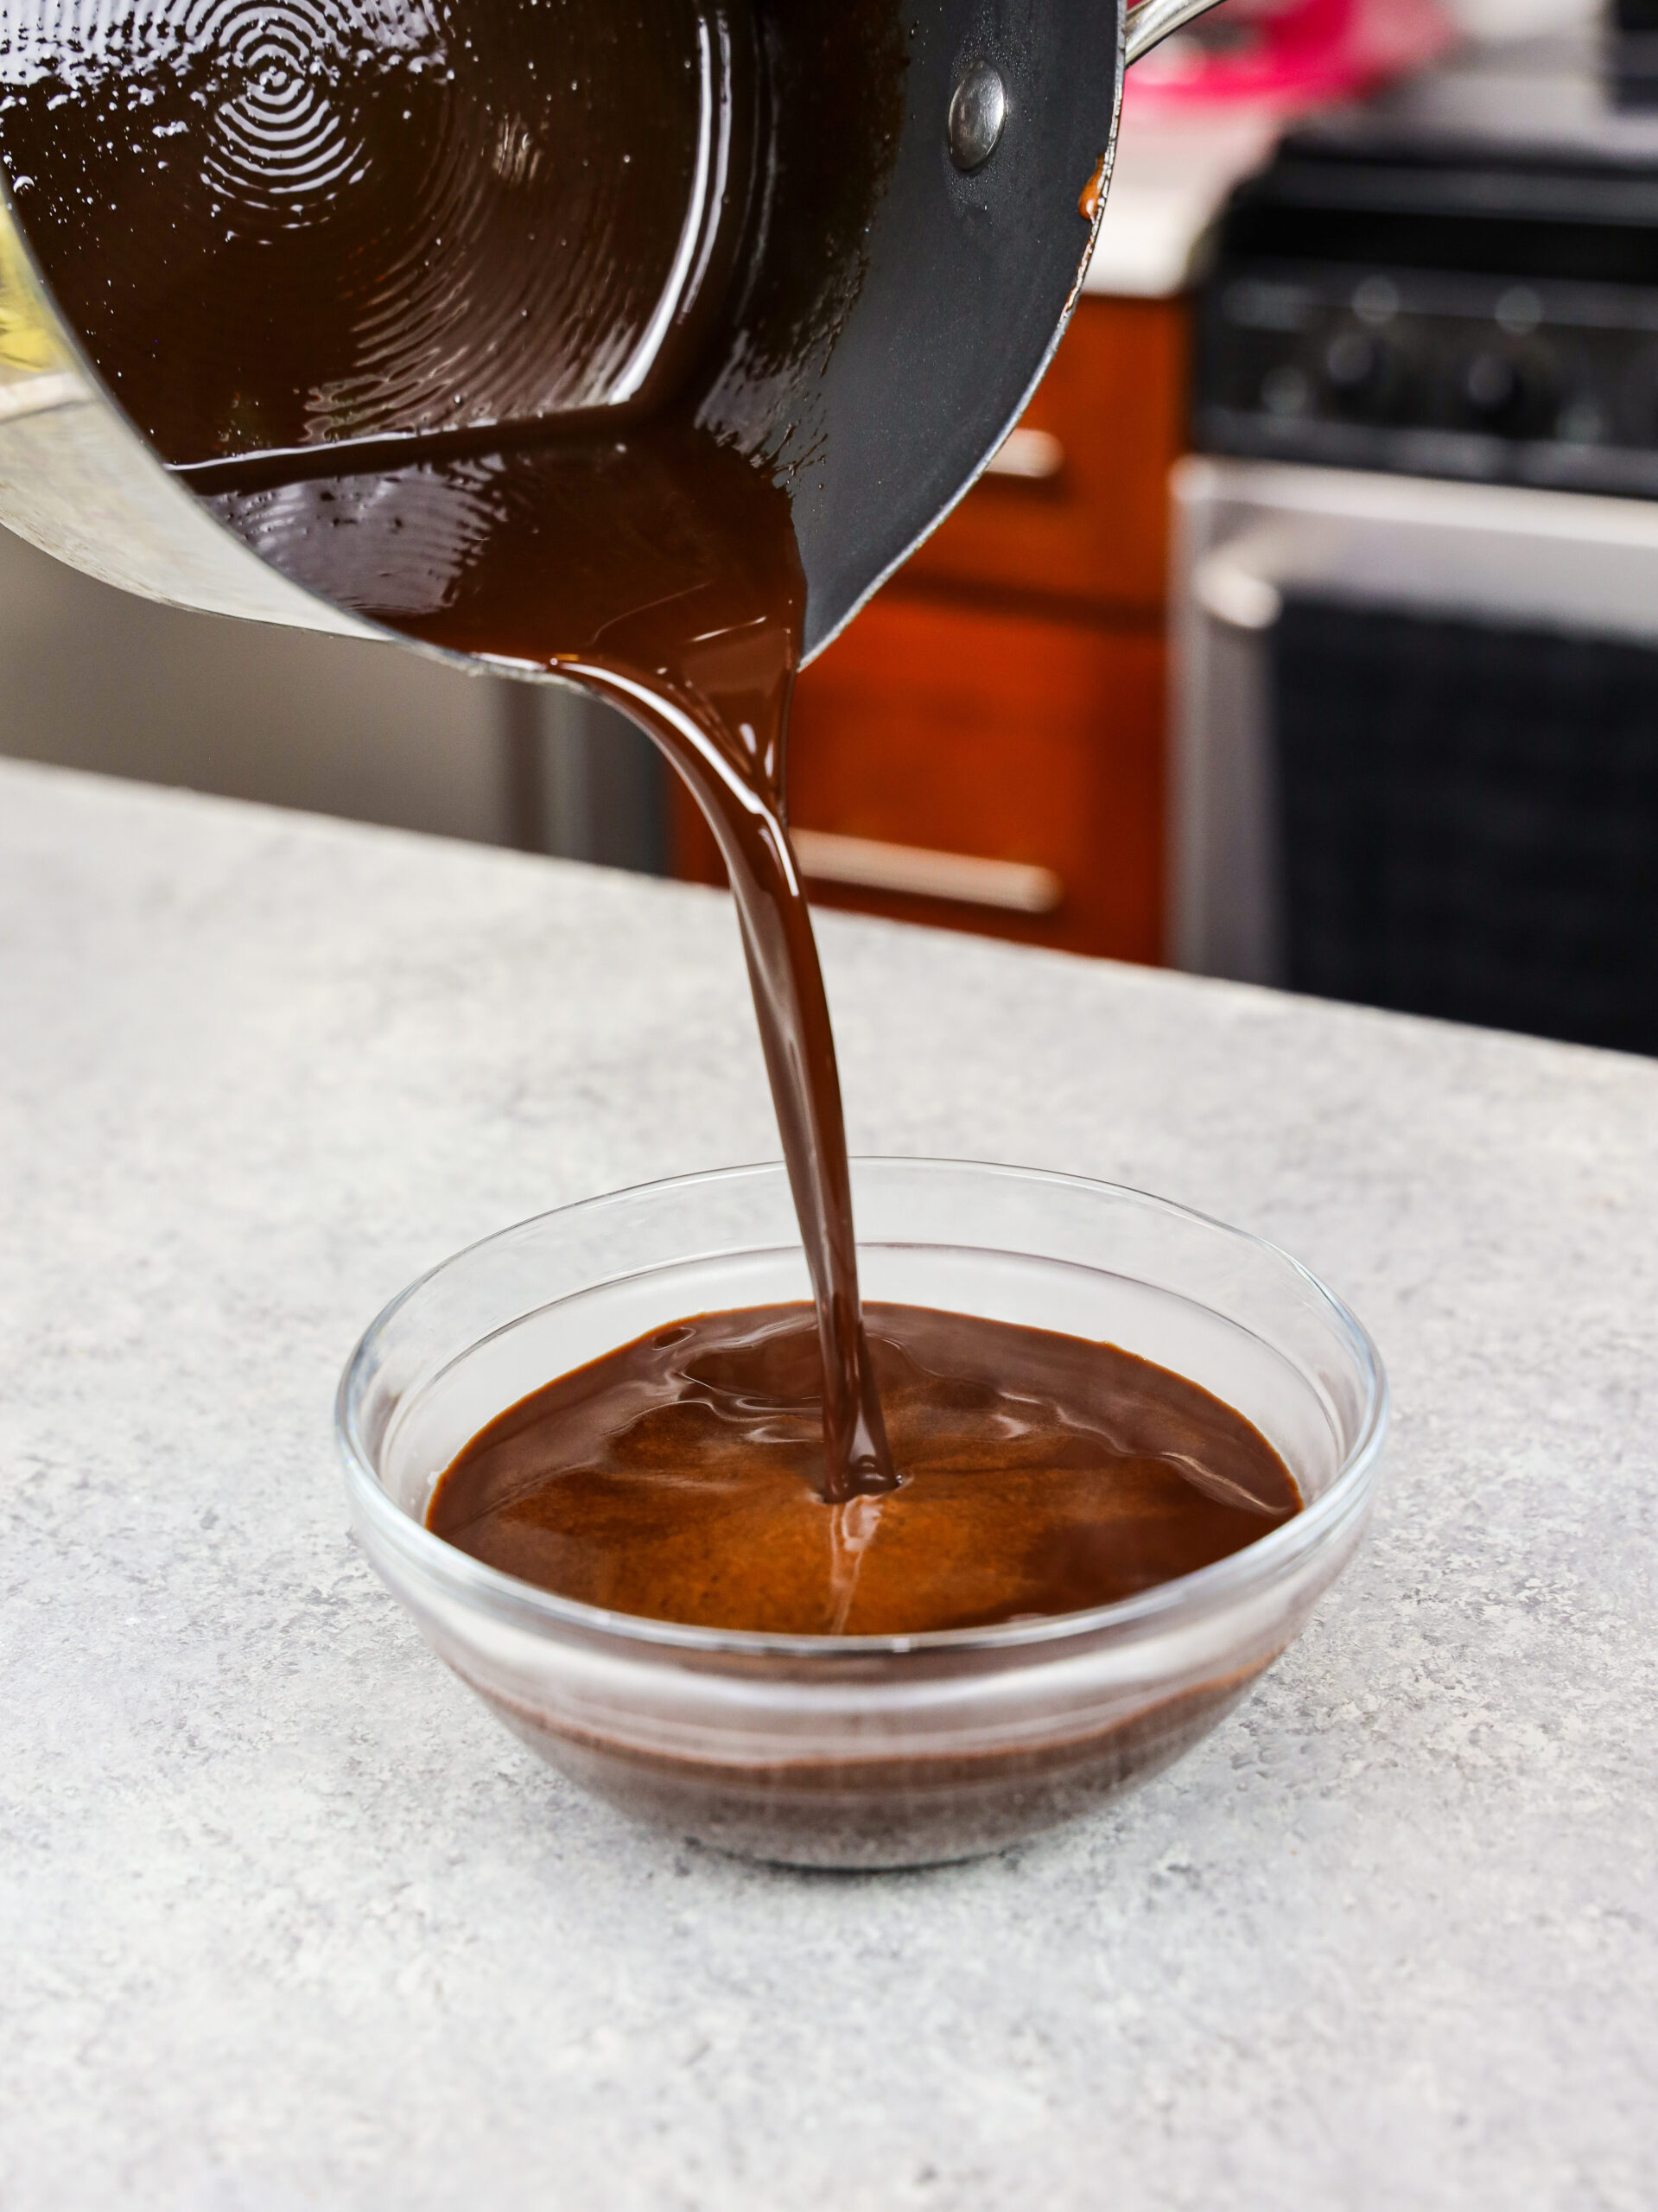
Step 1: Make the Chocolate Simple Syrup
Make the chocolate simple syrup first because it needs time to cool down. Adding simple syrup to the cake layers is optional, but I love the moisture it adds.
Adding chocolate simple syrup is optional, but it makes the cake layers super moist!! I think it really takes this cake to the next level, and don’t recommend skipping it.
Step 2: Bake and Level the Chocolate Cake Layers
Make the chocolate cake batter next. Divide the batter evenly between the prepared cake pans and bake for 23-26 minutes or until a toothpick comes out with a few moist crumbs.
Remove the cake layers from the oven and let them cool in the pans for about 30 minutes.
Gently run an offset spatula around the rim of the cake pans to loosen them, then flip them into wire racks to finish cooling.
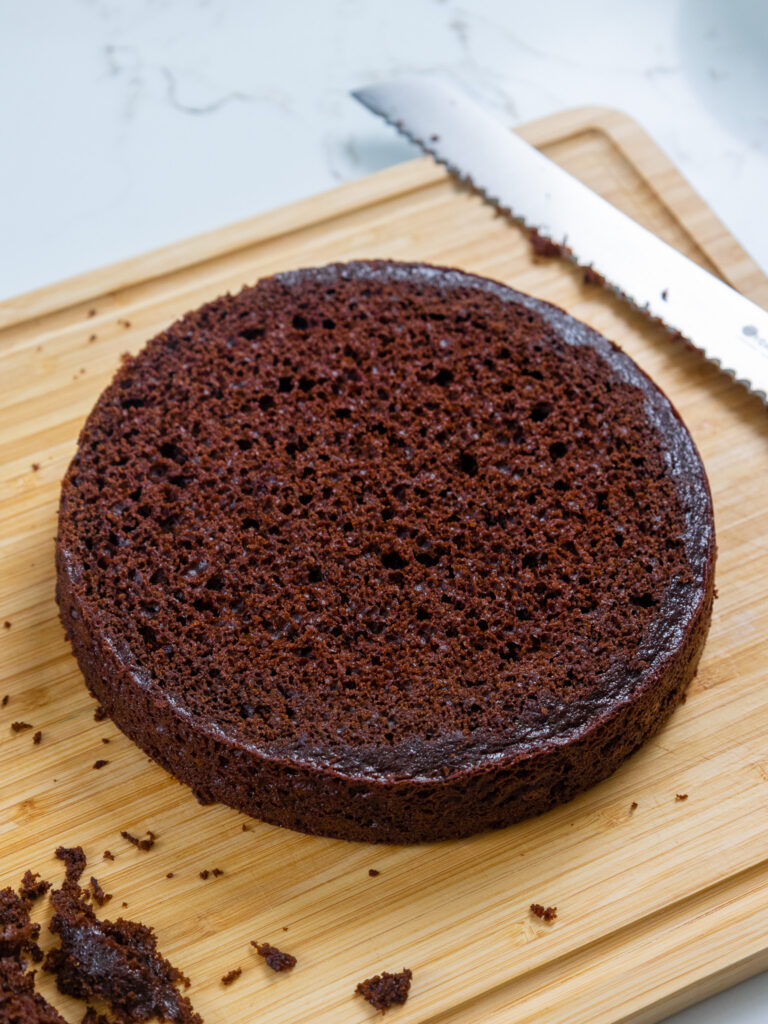
Once the cake layers have cooled to room temperature, use a serrated knife to level the top of each cake layer.

If you’re making these in advance, you can wrap and freeze them at this point.
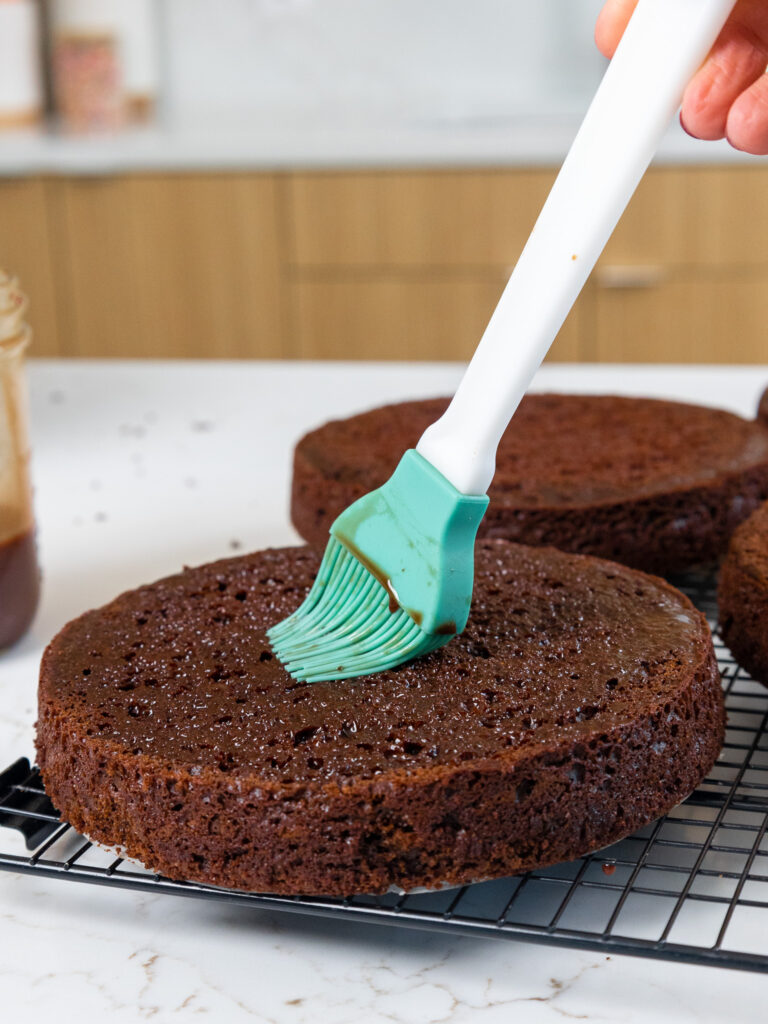
Wait to soak the cake layers with chocolate simple syrup until right before you plan to assemble the cake.
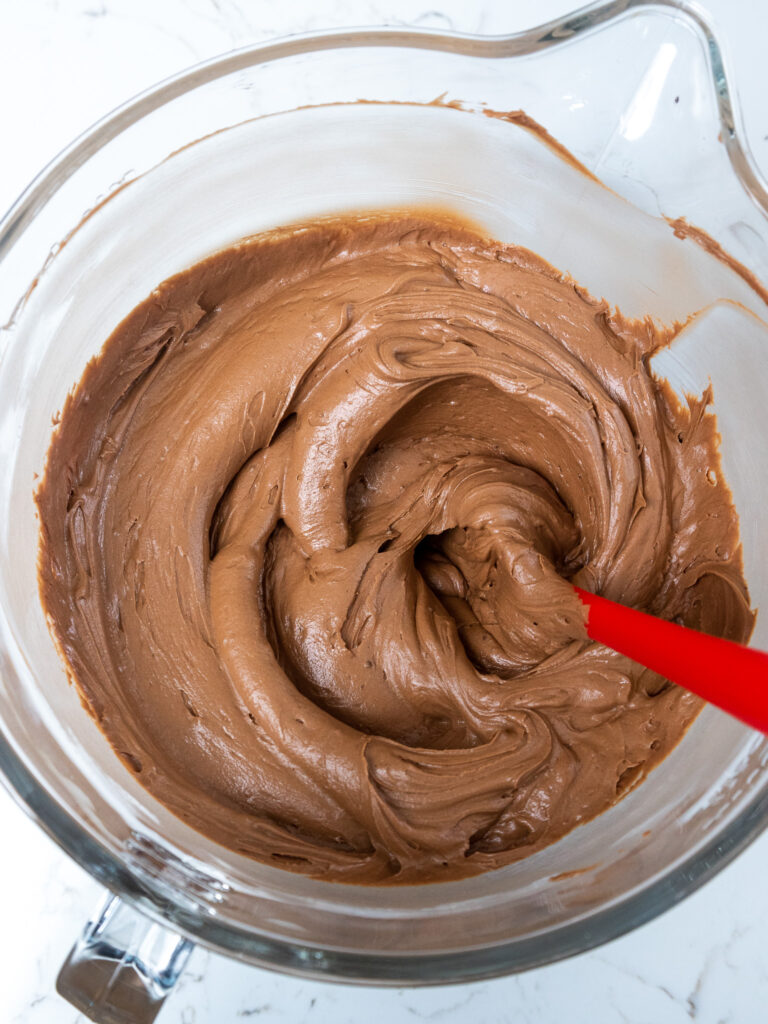
Step 3: Make the Nutella Buttercream
While the cake layers bake and cool, make the Nutella buttercream.
This frosting can also be made in advance if needed and kept in the fridge for up to a month.
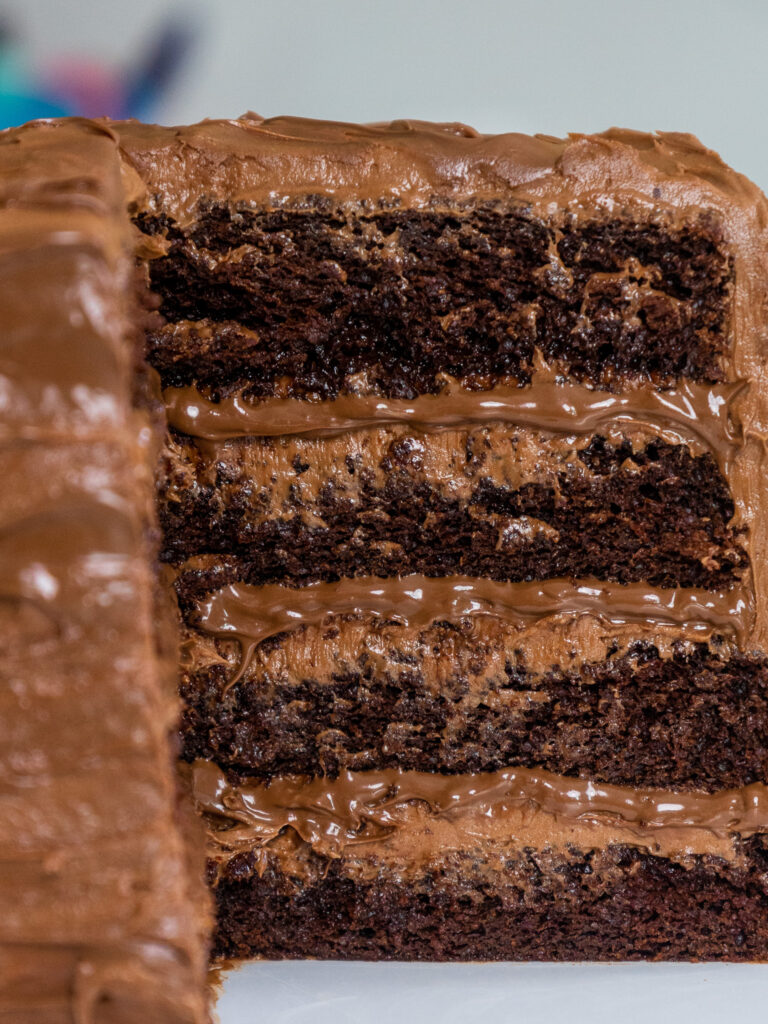
Step 4: Soak and Stack the Cake Layers
Stack and frost cake layers on a greaseproof cake board or flat plate, using a dab of Nutella buttercream to help stick the first cake layer to the board.
Before you add each cake layer, use a silicone brush to soak the top of the cake layer with chocolate simple syrup.
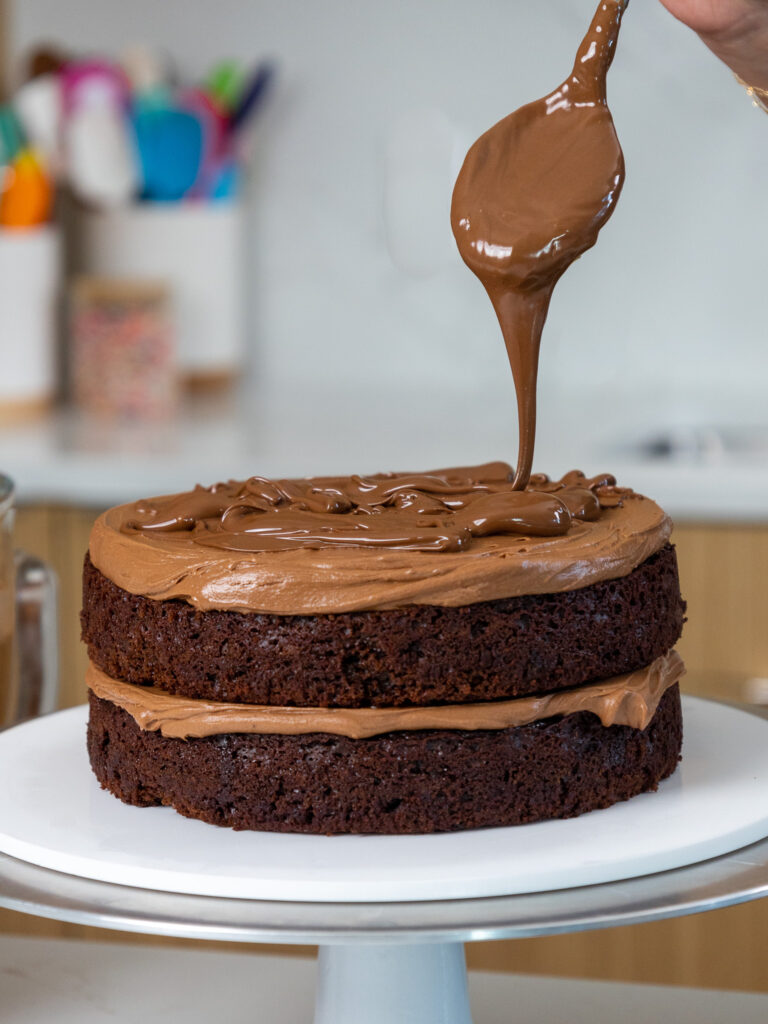
Spread an even layer of Nutella buttercream on top of each cake layer with a large offset spatula.
Drizzle 1/3 cup of warmed Nutella on top of the buttercream.
Repeat with the remaining cake layers. Flip the top cake layer upside down to make it easier to frost.
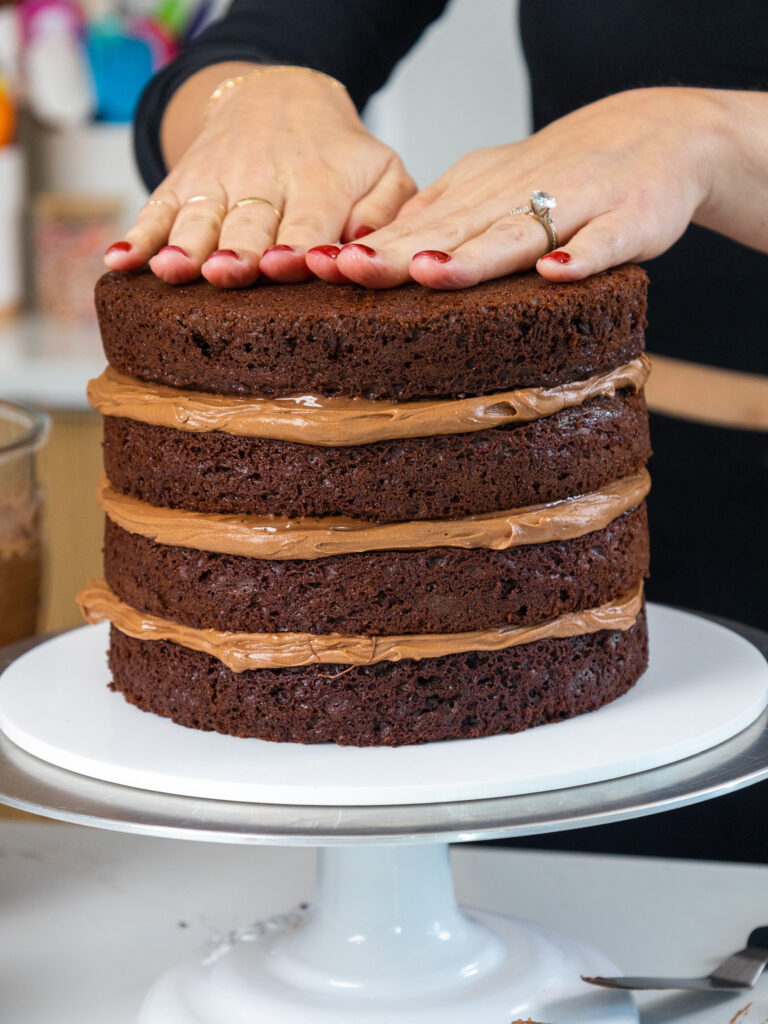
Then freeze the cake for about 10 minutes in the freezer, or until the buttercream between the layers is firm to the touch. This makes the cake way easier to frost!
I usually add a crumb coat to my cakes, but since we’re going for a textured look with this cake, I found the crumb coat wasn’t necessary.
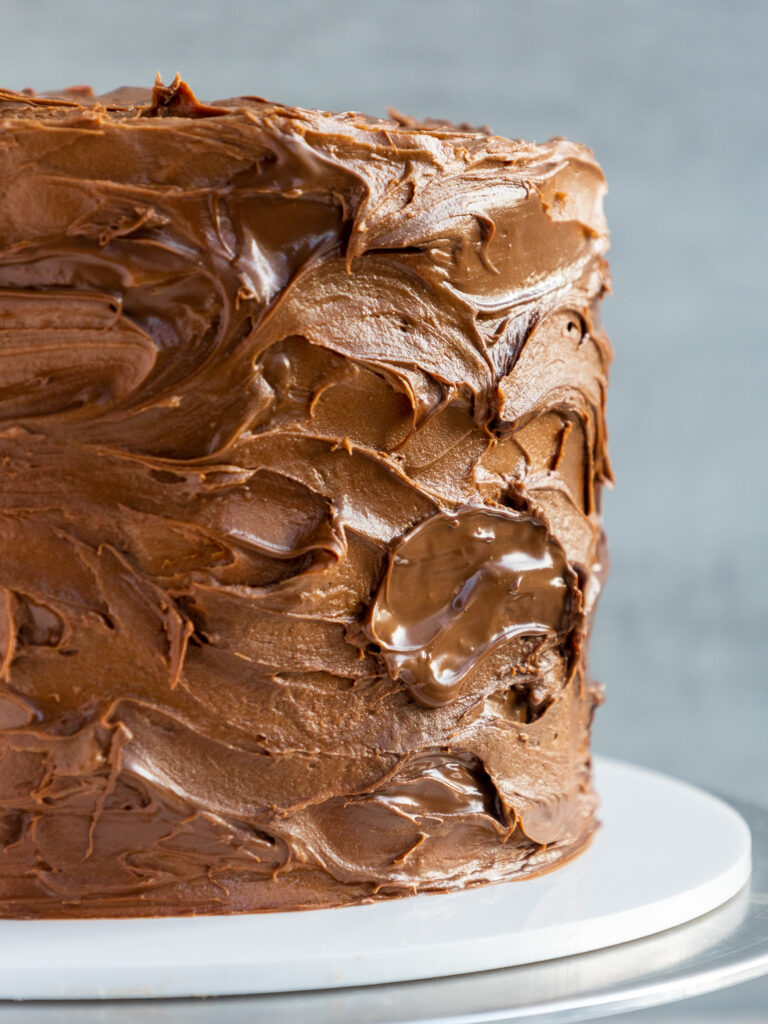
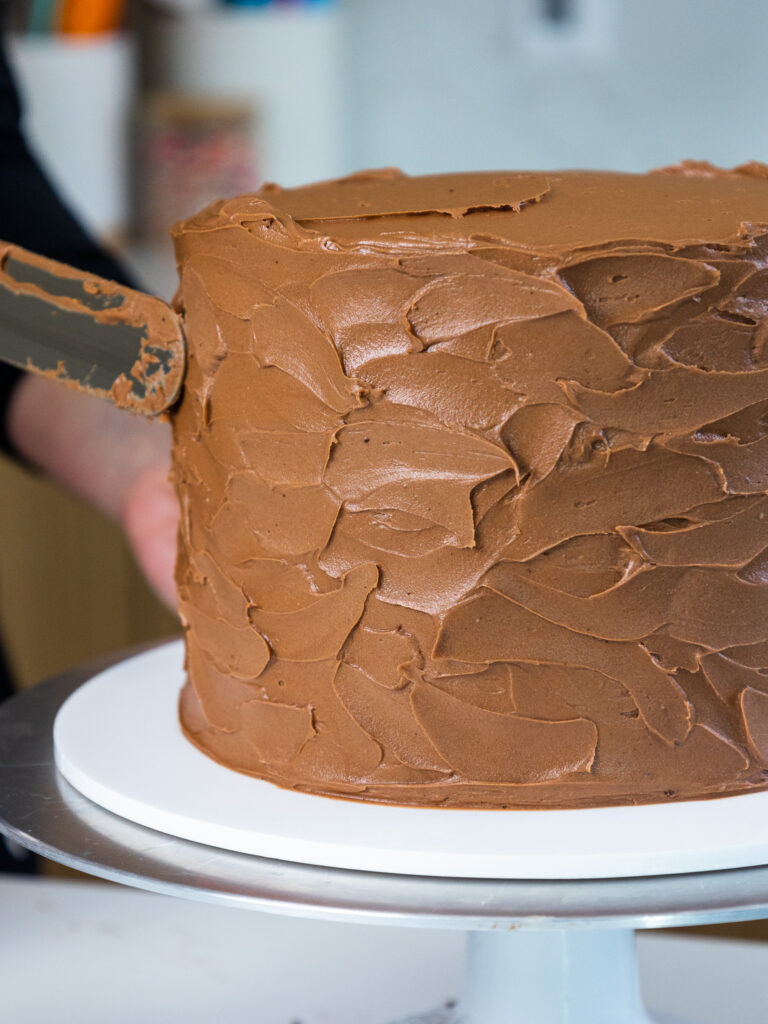
Step 5: Add on the Frosting and Nutella Swirls
Cover the cake with a thick, even layer of buttercream. Use the back of a spoon or a large offset spatula to give the buttercream a textured look like in the photo below.
Then add swipes of warm Nutella around the cake using a spoon or offset spatula.
Substitutions & Swaps: Chocolate Cake Layers
While I love this Nutella cake just the way it is, I know some of you might not have all these ingredients on hand.
Below are some swaps and substitutions that can be made in this recipe:
- All Purpose Flour – This recipe turns out best with all purpose flour. However, you can swap in a good gluten free flour blend (like this) if needed. Just be sure to stir the batter longer than normal to help give the cake proper structure, and let the batter sit for about 20 minutes before baking it if you opt to make a gluten free version.
- Granulated Sugar – I do not recommend reducing the amount of sugar or changing the type of sugar, as it will change the texture of the cake layers.
- Unsweetened Cocoa Powder – If you can’t find unsweetened cocoa powder or don’t have any on hand, you can use Dutch cocoa powder or dark baking cocoa in its place.
- Sour cream – You can also use full fat yogurt, buttermilk, whole milk, or an alternative yogurt or milk (almond, soy, oat).
- Vegetable Oil – Any flavorless oil can be used in this recipe. Canola, vegetable, or even sunflower oil would all work great. I don’t recommend olive oil though, as it has a strong flavor and will change the taste of the cake.
- Eggs – This recipe uses 2 large eggs. If you have an egg allergy you can try using a vegan egg replacer.
Substitutions & Swaps: Nutella Buttercream
Below are some great swaps and substitutions that can be made in this recipe.
- Unsalted Butter – If you only have salted butter on hand, you can use it in place of the unsalted butter. Just be sure to omit the salt that this frosting recipe calls for. You can also use vegan butter in its place!
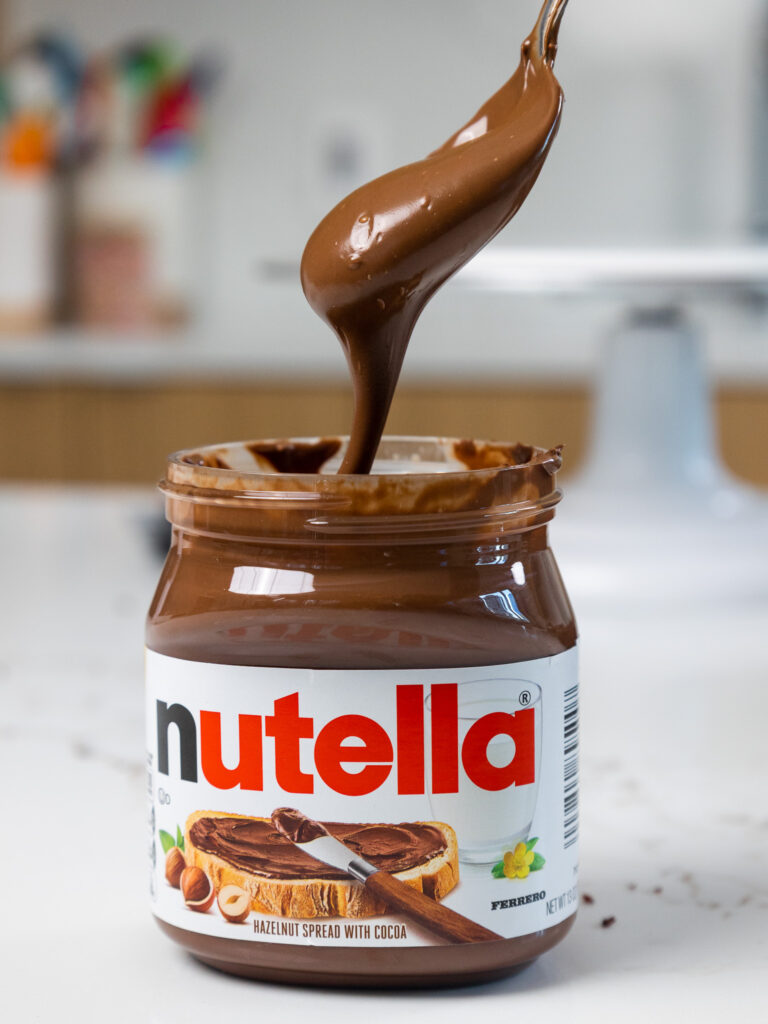
- Nutella – If you can’t find Nutella, any brand of chocolate hazelnut spread will work.
- Heavy Cream – Whole milk or alternative milk (soy, almond, oat) can also be used to make the frosting. However, it will thin out the frosting more than cream, so I recommend using half the amount the recipe calls for.
- Dark Chocolate – You can use dark chocolate chips, baking chocolate, or good-quality chocolate bars to melt and add into the frosting. Alternatively, you can also use milk or semi-sweet chocolate if you have a strong preference.
Making This Nutella Cake in Different Sizes
I used 4, 7-inch cake pans to make this cake, but this recipe can be used to make different sized cake layers.
You can also half or double the ingredients to make a half or double batch!
You can make three, 8-inch cake layers with one batch of batter. Bake 8-inch cake layers at 350 F / 175 C for 23-26 minutes, or until a toothpick comes out with a few moist crumbs.
To make four, 6-inch cake layers with one batch of batter, bake them at 350 F / 175 C for 25-30 minutes, or until a toothpick comes out with a few moist crumbs.
One batch of batter can also be used to make one 9×13-inch sheet cake. Bake it at 350 F / 175 C for 35-40 minutes and use flower nails or heating cores to help the cake bake evenly.
If you want to use a large cake pan and are curious how much batter you’ll need, I recommend using my cake batter calculator. One batch of this recipe makes about 10 cups of batter.
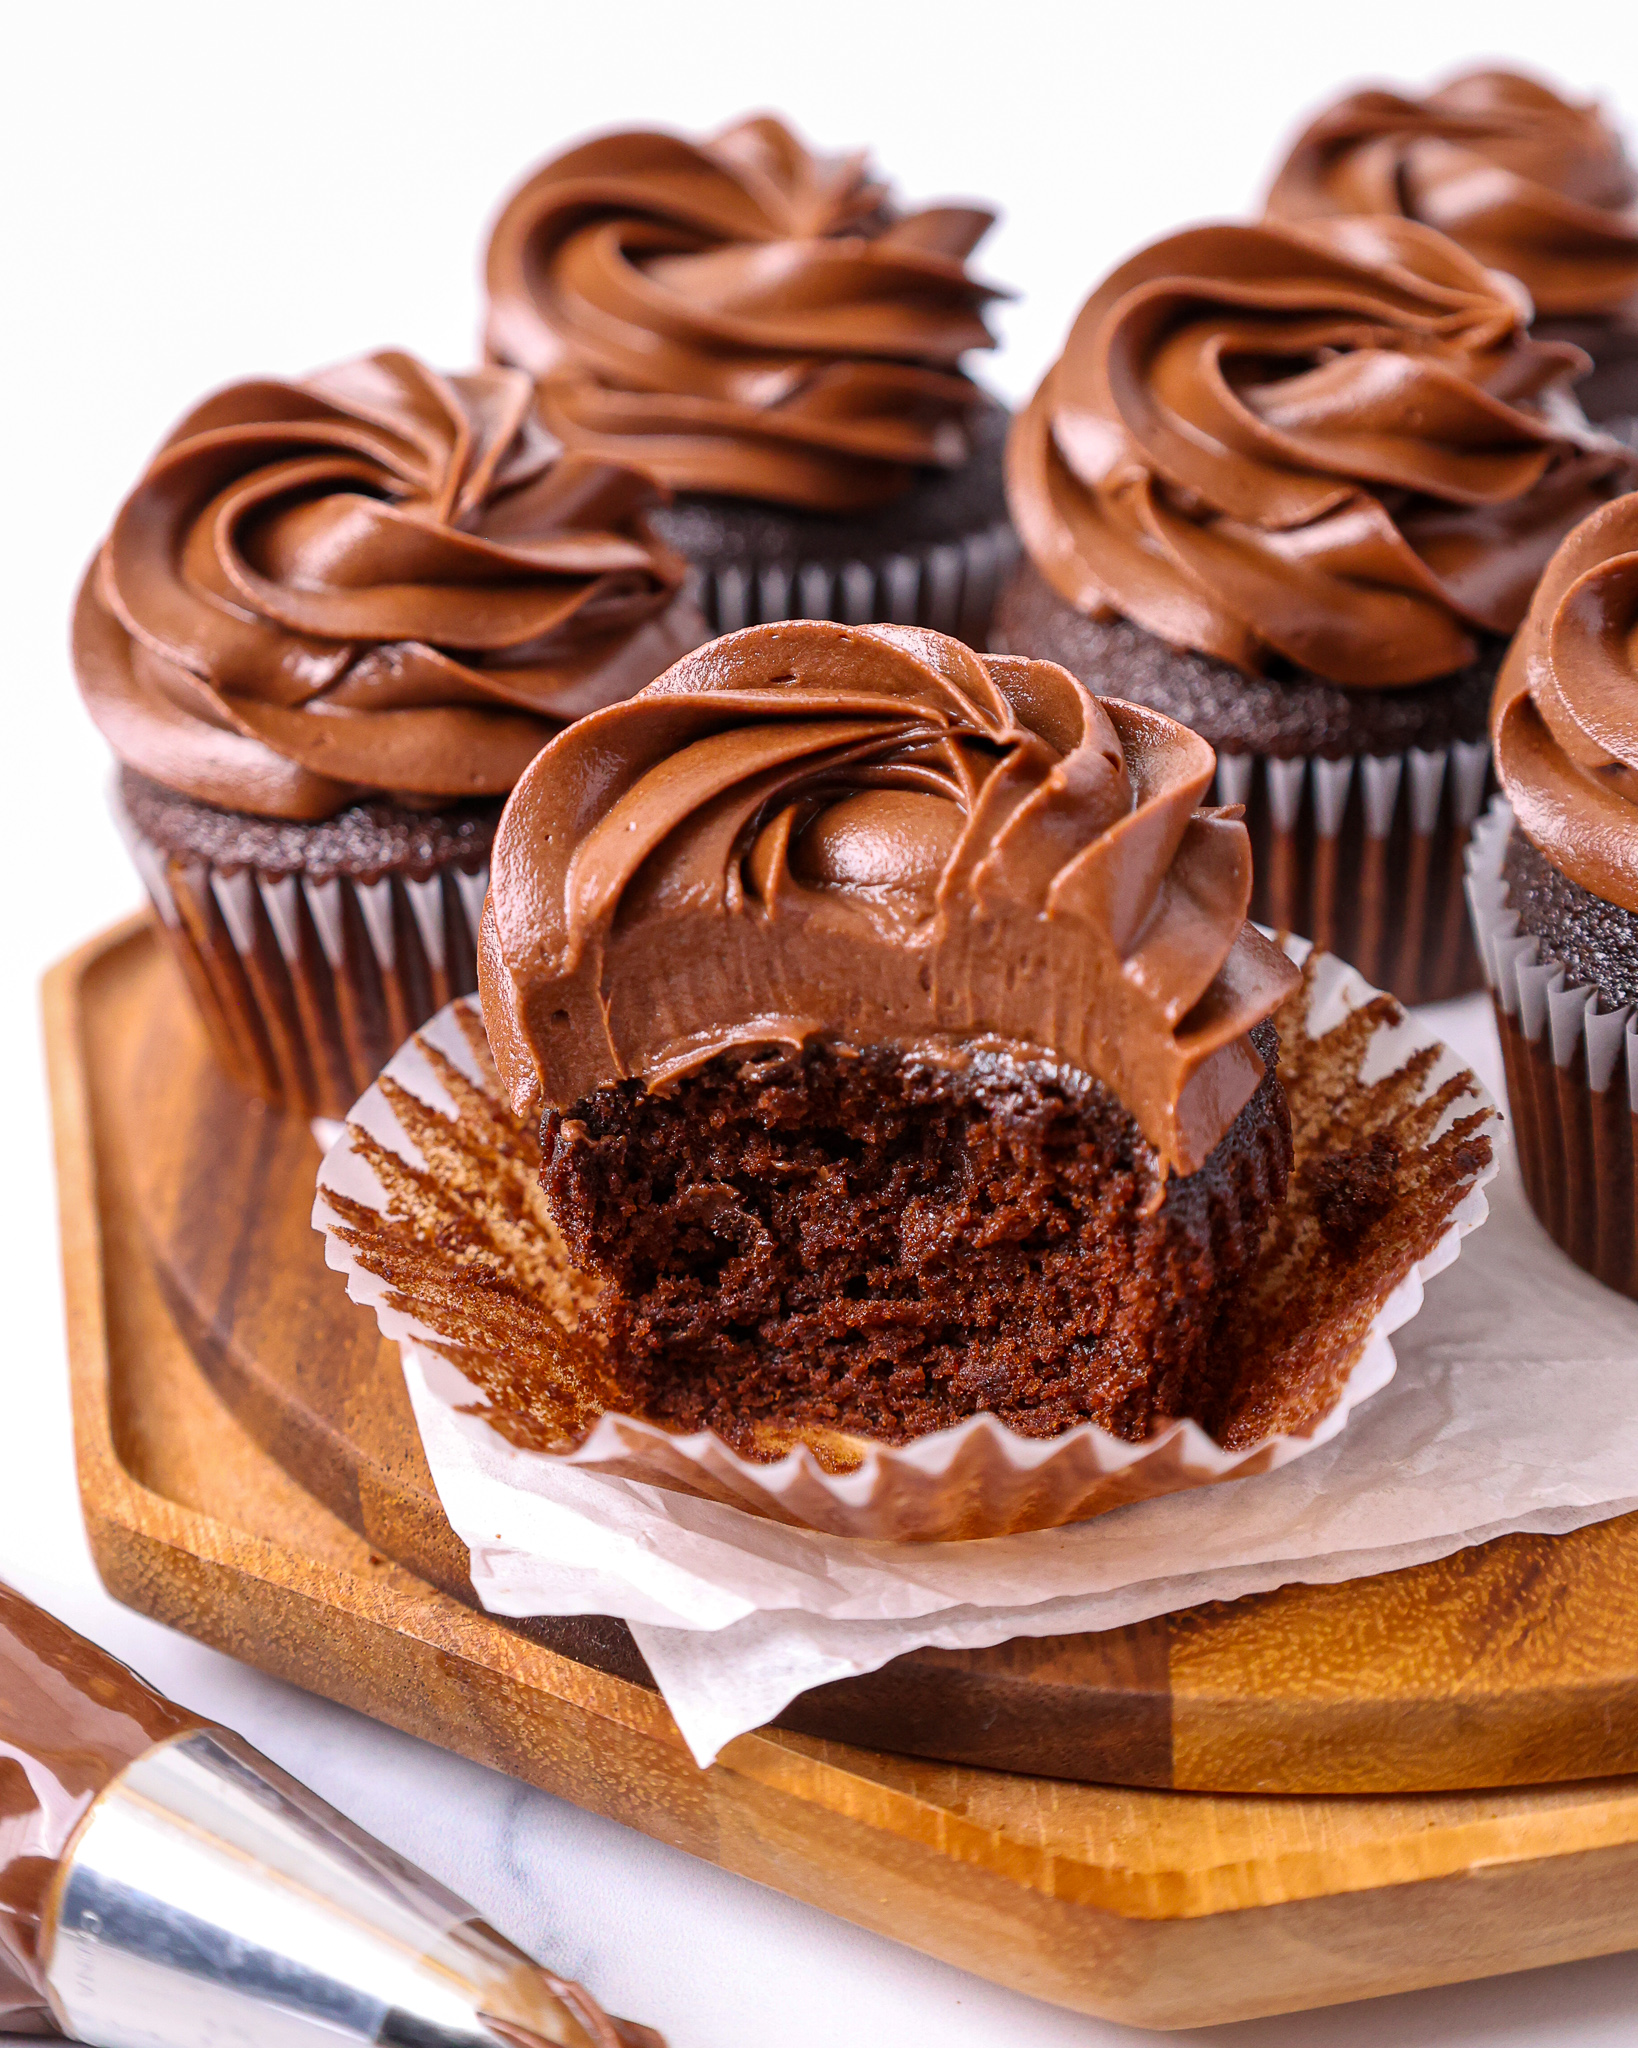
If you want to make Nutella cupcakes, use my Nutella cupcake recipe. It’s just as delicious as this cake recipe and is scaled down to make a dozen cupcakes.
Making this Nutella Cake in Advance and Storage Tips
I highly recommend making the cake layers in advance and freezing them. It breaks the process up and makes it more approachable.
You can also make the Nutella frosting ahead of time or save any leftover frosting. It can be stored in an airtight container in the fridge for up to a month.
This frosting can also be stored in the freezer for up to 3 months! Just be sure to give it a good stir once it thaws to make it nice and smooth again.
A frosted cake can last in the fridge for a week, or in the freezer for a month. The buttercream locks in the moisture and keeps the cake fresh and delicious!
If you cut into the cake and have leftovers, use any remaining frosting to cover the cut section to keep it moist and store it in the fridge for up to a week.
Tips for Making the Best Nutella Cake
- Ingredients at room temp mix together better! Set out any cold ingredients ahead of time.
- Properly measure your flour (spoon into the cup measure, then level). Or better yet, use a kitchen scale to measure your dry ingredients.
- Mix the cake batter just until the ingredients are incorporated. This will ensure your cake layers are tender and fluffy.
- Use a scale to weigh your cake pans as you fill them. If each pan has the same amount of batter, the cake layers will end up being the same height and bake more evenly.
- Level the room temperature or thawed cake layers with a serrated knife to make them easier to stack and fill.
- Chill the cake layers in the freezer for about 20 minutes before assembling the cake and before adding the simple syrup. It makes them so much easier to stack and frost!
Let Me Know What You Think
If you try this Nutella cake recipe, I’d love to hear what you think! Please leave a rating and comment below.
And don’t forget to tag me @chelsweets and #chelsweets so that I can see your delicious creations!
Other Recipes You Might Like:
Nutella Cake
Ingredients
Chocolate Simple Syrup – Optional
- 1/2 cup water 120g
- 1/2 cup granulated sugar 100g
- 2 Tbsp unsweetened cocoa powder, sifted 10g
Moist Chocolate Cake Recipe
- 2 cups all-purpose flour 260g
- 2 cups granulated sugar 400g
- 3/4 cup unsweetened cocoa powder, sifted 75g
- 2 tsp baking powder 8g
- 1 1/2 tsp baking soda 9g
- 1 tsp fine salt 6g
- 1 cup warm water 240g
- 1 cup full-fat sour cream, room temperature 255g
- 1/2 cup vegetable or canola oil 110g
- 2 large eggs, room temperature 112g
- 2 tsp vanilla extract or vanilla bean paste 8g
- 1 tsp instant espresso or coffee 1g – optional
Nutella Buttercream Frosting
- 2 cups (4 sticks) unsalted butter, room temperature 454g
- 1 1/2 cups Nutella 420g
- 1 tsp vanilla extract or vanilla bean paste 4g
- 1/2 tsp fine salt 3g
- 5 cups powdered sugar 625g
- 2/3 cup heavy whipping cream, room temperature 160g
- 1/2 cups dark chocolate chips, melted and cooled 90g
Cake Filling and Decoration
- 1 cup Nutella, warm 280g
Recommended Tools
- 8- inch cake pans
- Spinning cake stand
- 10- inch greaseproof cake board
- Large offset spatula
- Electric hand mixer or stand mixer
Instructions
Chocolate Simple Syrup
- Make the chocolate simple syrup first because it needs time to cool down. Adding simple syrup to the layers is optional, but I love the moisture it gives them.
- Pour 1/2 cup water and 1/2 cup granulated sugar into a small saucepan. Cook over medium heat, whisking continuously until the mixture starts to boil.
- Remove from heat and whisk in 2 Tbsp cocoa powder. Pour into a separate bowl to cool to room temperature, then cover and set aside. If you're making this in advance, it can be stored in an airtight container in the fridge for up to 3 weeks.
Chocolate Cake Layers
- Preheat oven to 350 F / 175 C. Grease and line four, seven-inch or three eight-inch cake pans.
- Sift or whisk together 2 cups flour, 2 cups sugar, 3/4 cup cocoa powder, 2 tsp baking powder, 1 1/2 tsp baking soda, and 1 tsp salt in a large bowl. Set aside.
- In a separate, large bowl, add 1 cup warm water, 1 cup sour cream, 1/2 cup oil, 2 eggs, 2 tsp vanilla, and 1 tsp instant espresso and whisk together until fully incorporated.
- Mix the dry ingredients into the wet ingredients until they're just combined, and the batter is smooth.
- Divide the batter evenly between the prepared cake pans and bake for 23-26 minutes or until a toothpick comes out with a few moist crumbs.
- Remove the cake layers from the oven and let them cool in the pans for about 30 minutes. Gently run an offset spatula around the rim of the cake pans to loosen them, then flip them onto wire racks to finish cooling.
- Once cooled, use a serrated knife to level the top of each cake layer. If you are making these in advance, wrap and freeze them at this point.
Nutella Buttercream Frosting
- Place 2 cups of butter and 1 1/2 cups of Nutella in the bowl of a stand mixer or a large mixing bowl. Beat on a medium-high speed for 2 minutes with a paddle attachment or hand mixer until light and fluffy. Scrape the sides and bottom of the bowl with a rubber spatula as needed.
- Add in 1 tsp vanilla extract and 1/2 tsp salt. Mix on low until the ingredients are combined.
- Gradually mix in 5 cups of powdered sugar and 2/3 cup of heavy cream on a low speed.
- Next, add in 1/2 cup of melted and cooled dark chocolate. Mix until the ingredients are fully incorporated and the desired consistency is reached. Cover with plastic wrap to prevent the frosting from crusting and set aside.
Assembling this Chocolate Nutella Cake
- Stack and frost the cake layers on a greaseproof cake board or flat plate, using a dab of Nutella buttercream to help stick the first cake layer to the board.
- Before you stack each cake layer, use a silicone brush to soak the top of the cake layer with chocolate simple syrup.
- Spread an even layer of Nutella buttercream on top of each cake layer as you stack them with a large offset spatula. Drizzle 1/3 cup of warmed Nutella on top of the buttercream.
- Repeat with the remaining cake layers, flipping the top cake layer upside down to make it easier to frost.
- Freeze the cake for about 10 minutes, or until the buttercream between the layers is firm to the touch. I usually add a crumb coat to my cakes, but since we're going for a textured look with this cake, I found the crumb coat wasn't necessary.
- Cover the cake with a thick, even layer of buttercream. Use the back of a spoon or a large offset spatula to give the buttercream a textured look like in the pictures above. Then add swirls of warm Nutella around the cake with a spoon or a large offset spatula and enjoy!
Video
Notes
Tips for Making the Best Nutella Cake
- Ingredients at room temp mix together better! Set out any cold ingredients ahead of time.
- Properly measure the flour (spoon into the cup measure, then level). Or better yet, use a kitchen scale to measure your dry ingredients.
- Mix the cake batter just until the ingredients are incorporated. This will ensure your cake layers are tender and fluffy.
- Use a scale to weigh your cake pans as you fill them. Make sure each pan has the same amount of batter helps the cake layers bake to the same heigh and bake more evenly.
- Level the room temperature or thawed cake layers with a serrated knife to make them easier to stack.
- Chill the cake layers in the freezer for about 20 minutes before frosting the cake. It makes it so much easier to stack and frost them!
- If you want to add a bit of texture to this cake, I recommend adding some chopped and toasted hazelnuts between the layers.
This looks amazing!
Thanks 😀
Oh. My. Goodness. Seriously. Oh my goodness. Absolutely beautiful. LOVE. 🙂
Aww thanks!! You’re too kind 😀
I’m ready to order my birthday cake for 2015!
we liked it!
Yay!! So glad to hear that 😀
This cake is looking great and chocolate and Nutella… this has to taste great! 🙂
Thanks! I sadly didn’t get to taste it myself, but I heard that it was pretty tasty from the team I gave it to 😀
I don’t doubt it at all. 😀
Sounds amazing! I’m going to have to make this. Thanks for sharing! <3
You definitely should 🙂
Oh whoa. So much Nutella goodness!!! Congratulations on your first cake order!! Great way to start it off with all the Nutella!! I will be sure to make this one!
Thanks! Yah I was really happy with the way it turned out. You definitely should!!
Ooooh nougat! I’ve been searching for a soft/fluffy nougat to use as a filling for like ever it seems lol! You have no idea how awesome this is, you just made my day!!!
I’m always excited for your videos and recipes, thank you for being so generous with your time and knowledge ??????
Adore your style! Super excited to try this recipe, thank you !
So happy to hear that! And you’re too sweet <3
I’m making that’s for my sisters baby shower so I’m very excited! Is it OK to make this a couple days in advanced?
yes! just place the frosted cake in the fridge or freezer once it’s decorated! be sure to take it out several hours in advance so it can thaw 🙂
Definitely trying ASAP!
Yesss! I hope it turns out amazing Jailene!!
Can I substitute something else for eggs ? in the recipe as I am vegetarian? Please advise thank you ?
Hi Mita,
I haven’t tested this out in this particular recipe, but I usually defer to a vegan egg replacer (like this: https://amzn.to/3JDwNqo) or flax seed eggs. If you try either of these, let me know how it turns out!
Do you think this would work well with Black Cocoa instead of what the recipe calls for?
Hi Shannon,
Great question! You can totally use black cocoa in this cake recipe instead of regular cocoa powder. Hope that helps, happy baking!
Hi. Can i substitute vege oil with melted butter?
Hi Suraya,
You can substitute the veg oil with melted butter, but the cake will have a denser texture and the layers will bake up quite a bit shorter. Hope that helps, happy baking!
Hi Chels! planning to bake this for my husb’s bday but there is only a few of us. is there any way to make it a 3 tier 6 inch cake instead?
Hi Syuhaidah,
Great question! I would recommend cutting this recipe in half and making 3, 6-inch cake layers! Hope that helps and happy early birthday to your husband!!
If I’m frosting the cake the night before an event…can it be left out frosted or does it need to be stored in the fridge.
Hi Nicole,
Great question! A cake can sit out overnight, it won’t go bad, but sometimes as the frosting softens the cake can lose its shape or air bubbles can form between the layers as the cake settles. I usually chill a cake overnight and take it out a few hours before I plan to serve it, and that’s what I recommend to ensure that your cake looks just as pretty when you serve it as when you decorated it. Hope that helps, happy baking!
@Chelsweets, thank you! Worked perfectly..now another question. Can I use this recipe to turn these into cupcakes. I saw you had another Nutella cupcakes and the recipe for the cake was different. This cake recipe was a hit and wanted to use this one if possible. How long would I bake and how many would this yield. Also..( sorry) lol….can I scoop out center and add Nutella and still brush with the simple syrup. Sorry so many questions, but you’re a big help and inspiration!
Hi Nicole,
Yay! You can turn this recipe into cupcakes! One batch should make 2 dozen cupcakes, and they should bake for 20-22 mins at 350F. You can totally fill these with Nutella once they’re baked and cooled, and you can also brush them with simple syrup. Hope that helps, and that your cupcakes turn out great 🙂
Hi
Chelsey
you gonna kill me with this amazing
Moist Chocolate Cake
Is this cake and buttercream stable / strong enough to make a 2 tiered stacked 8 inch and 6 inch cake ?
Hi Sally,
This cake recipe has pretty soft layers, but as long as the cake is properly supported and the tiers are chilled, it should be fine as a tiered cake! Hope that helps, happy baking!
Hi Chelsea,
I am baking a Nutella cake, you have 2 recipes. I am looking at both at the moment. I baked the chocolate cake from 1 recipe, now I have to decide whether I make the 3 buttercream flavours from 1 cake or just use this Nutella Buttercream Frosting. The cake is for my super fussy 9 year old nutella lover niece. Are both buttercreams stable? 1 buttercream has melted chocolate and the other does not. Which one would you suggest is better?
Hi Shirley,
Apologies for the delayed response, I hope your Niece’s cake turned out great!! Both buttercreams are stable (the melted chocolate just makes the frosting a bit richer /less sweet), it really just comes down to how much time and energy you want to put into the cake. This Nutella cake recipe is simpler and just as delicious, but not quite as exciting to look at. My Ultimate Nutella cake looks a bit fancier, but you do have to make 3 different frostings!!
Back in the day I used to enjoy going all out on my cakes, but over the years I’ve started to enjoy slightly simpler / more approachable cake recipes. I hope that whatever you ended up going with turned out great, and that your niece loved it 🙂
I love this recipe and I can’t wait to make it for my brother’s birthday. I wanted to ask though, is there any other frosting that can go well with this cake other than the chocolate buttercream? It will still be with the Nutella and everything but an alternative to the chocolate buttercream. I’m thinking something in the lines of heavy whipping cream or cream cheese frosting or vanilla buttercream – something to break the richness of the chocolate? Do you think any of those would work or maybe you have a completely different suggestion? ?
Hi Veronica,
Great question!! And absolutely, I think all of those would be delicious! I’d recommend using my whipped cream frosting (it’s stabilized with cream cheese but you can’t really taste it) or my vanilla buttercream, I think both would work great (linked below)! Cream cheese frosting might be good too, but I’d be worried the cream cheese would compete with the flavor of the Nutella. Hope that helps, and that your brother’s birthday cake turns out great!!
Whipped cream frosting: https://chelsweets.com/whipped-cream-frosting-with-cream-cheese/
Vanilla buttercream: https://chelsweets.com/the-best-american-buttercream-recipe/
Is this cake suitable for a wedding cake? I’m making my daughter’s wedding cake in a few months and want to make sure it is stackable. Thanks. Judy.
Hi Judith,
This cake is stackable, but the layers are quite soft!! Once they’re covered in buttercream they will hold their shape, but they can definitely be more finicky to stack than my other chocolate cake recipes. As long as you properly support the cake with dowels or plastic supports it should work though! I usually default to my chocolate buttermilk cake recipe for stacked, tiered cakes that need to be chocolate because it’s super sturdy, here’s the link: https://chelsweets.com/the-best-chocolate-layer-cake-recipe/
It’s essentially the chocolate version of my popular vanilla layer cake recipe! It would be a lot easier to use this recipe, but it’s up to you! Whatever you chose, I hope your daughter’s wedding cake turns out amazing and I’m sending you all the good cake vibes 🙂
I made this Nutella cake for a friend who was leaving the office, and everyone loved it. The chocolate cake was moist. The frosting was delicious – and not too sweet. I also added a sprinkle of chopped roasted hazelnuts and Ferrero Rocher chocolates on top. 10 out of 10! Thanks, Chelsweets for the great recipe! (And thanks for the post on how to frost a cake smoothly! Definitely helped improve my presentation.)
Thank you for sharing your recepi. Perfectly bake. We really enjoy eating. More power.?
Hello,
Can i make 2 layered 9 inch cake with the same quantity of batter?
Also if its just 2 layers, should i reduce the frosting quantity by half?
Hi Ayesha,
Hi! Yes, you can definitely use the same amount of batter to make a two-layer 9-inch cake—it works great in that size! Just keep an eye on the bake time, as it might take a little longer than smaller pans. Start checking around the 25-30 minute mark.
As for the frosting, if you’re doing a simple fill and frost (no fancy piping or decorations) you can make 3/4 of a batch of frosting. But if you want to pipe on swirls or boarders, you may want a full batch though 🙂 Hope that helps, happy baking!
Ts is amazing my first ever cake and i did mess up the decorating but just taste is 10/10 would say youll be left with a little extra buttercream though
So happy to hear you loved this cake Mar!! Thank you for sharing 🙂
It was so delish!! My cake came out slightly dense, but I think it’s because I overmixed a bit. Frosting was so good, especially with that pinch of salt to round it out. Highly recommend!!
Hi Nila,
So happy to hear you loved this recipe!! Salt really is so clutch in the frosting, it really does bring the whole thing together and balance out the sweetness! Thank you for sharing 🙂
I made this cake for my Nutella loving daughter’s birthday. I am not a huge fan of buttercream. Mainly, as I never get the right consistency, but this came together beautifully. Being so smooth, it was very easy to apply. The addition of the chocolate syrup just complimented it. The taste divine. It is quite a rich cake, so small slices goes a long way. Everyone loved it. It was just like a cake I often buy, only better.
Thanks for making me enjoy making buttercream again!
Hi Mary,
That is so wonderful to hear 🙂 I am so happy it turned out great! Thank you for sharing!!