
Christmas Tree Cookies
These adorable Christmas tree cookies are made with my cream cheese cookie recipe, and don’t require any special cookie cutters! They bake up soft and chewy and are so much fun to shape and bake!!

Tips for Making the Best Christmas Tree Cookies
- Really cream together the butter, cream cheese, and granulated sugar. It helps incorporate air into the dough, which makes tender, soft cookies.
- Properly measure the flour! It has a huge impact on how the cookies turn out! Either use a scale or fluff the flour in the bag, then spoon it into the measuring cup and level it.
- Take the time to chill the cookie dough. It helps prevent the cookies from spreading while they bake and helps them bake up with a soft texture.
- Don’t overbake the cookies. Err on the side of underbaking your cookies, and remember that the cookies continue to bake for a few minutes once they’re out of the oven.
How to Make These Christmas Tree Cookies
Let’s walk through each step of this recipe to make sure it turns out as amazing as possible! I’ve also shared a video in the recipe card attached at the bottom of this post.
Step 1: Make the Cookie Dough
The first step is to make the cookie dough following the recipe card at the bottom of this post.
In a large bowl, beat the butter and cream cheese on medium speed with a hand mixer or whisk attachment until smooth.
Next, add the granulated sugar and mix at a medium-high speed for a couple of minutes until the mixture becomes lighter in color.
Then, mix in the egg yolk and vanilla bean paste or vanilla extract. Mix on a medium speed until incorporated.
Next, add the flour, cornstarch, fine salt, and baking powder, and mix on a low speed until it is JUST incorporated.
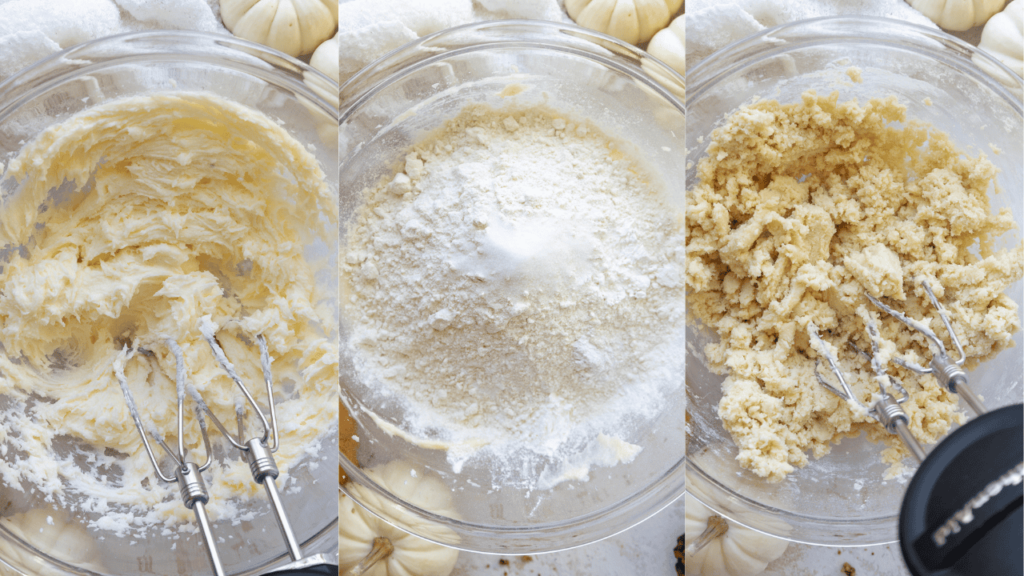
Scrape the sides and bottom of the bowl with a rubber spatula to make sure everything is properly mixed together.
Step 2: Color and Chill the Dough
Scoop about 2 Tbsp of dough into a separate bowl and mix in 1/2 tsp of cocoa powder until combined and evenly colored.
Flatten the dough into a rectangle on a piece of plastic wrap. Wrap the dough tightly and place it in the fridge to chill.
Color the remaining dough green with a generous squirt of neon green. Mix until the dough is just evenly colored. Try not to overmix it!
Flatten the dough into a rectangle that’s about 1/4 inch thick on a piece of plastic wrap. Wrap the dough tightly and place it in the fridge to chill.
Chill both portions of dough in the fridge for about 30 minutes, in the freezer for 10 minutes, or in the fridge overnight.
Preheat the oven to 350°F/175°C right before you start shaping the cookies, and line two large baking sheets with silicone baking mats or parchment paper. It will take a bit of time to shape all the cookies, and that should give your oven enough time to fully preheat. Set aside.
Step 3: Scoop and Shape the Cookie Dough
Unwrap each portion of cookie dough so that it’s sitting on top of the plastic wrap.
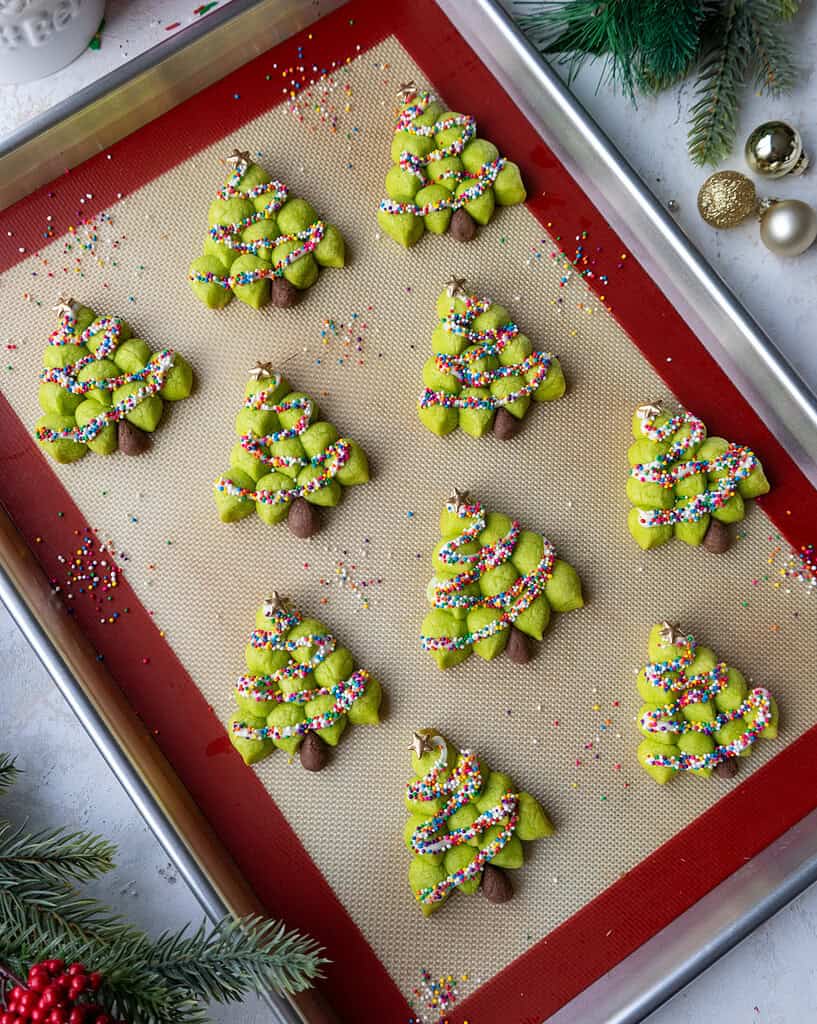
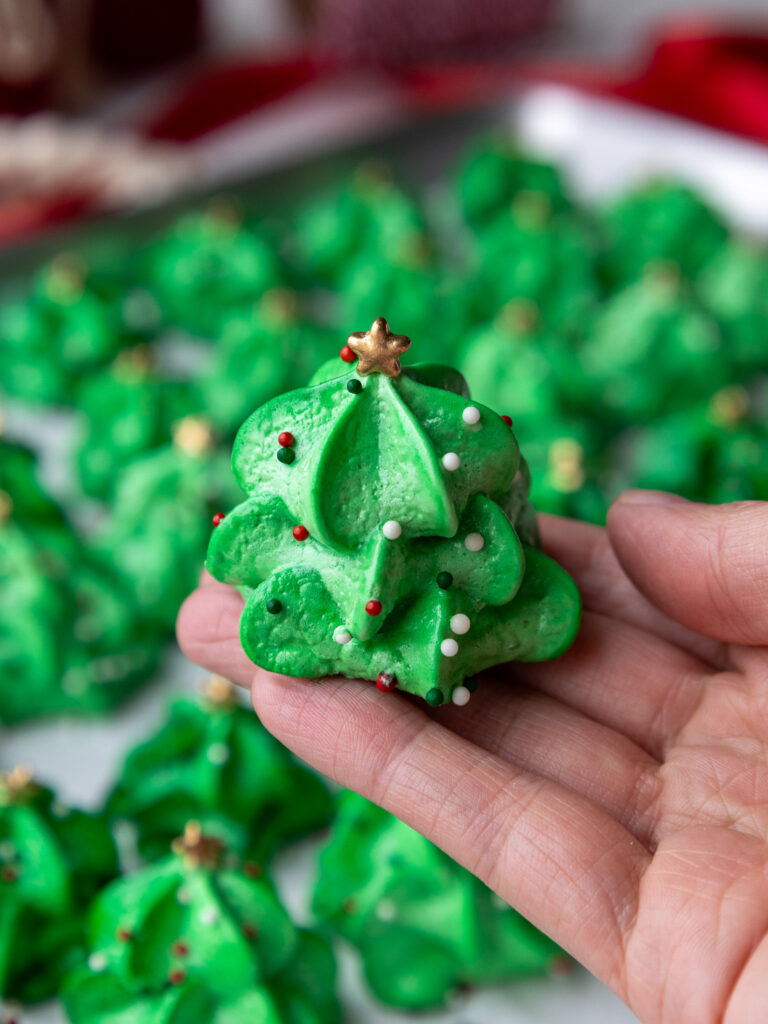
Use a 1/4 teaspoon measure to scoop 10 little bits of green dough. Roll each portion into a ball, then pinch one end to look like a Christmas tree branch (see pictures above).
Start with the bottom row by placing 4 cookie dough balls together, then 3 for the next layer, then 2, then one (see pictures above).
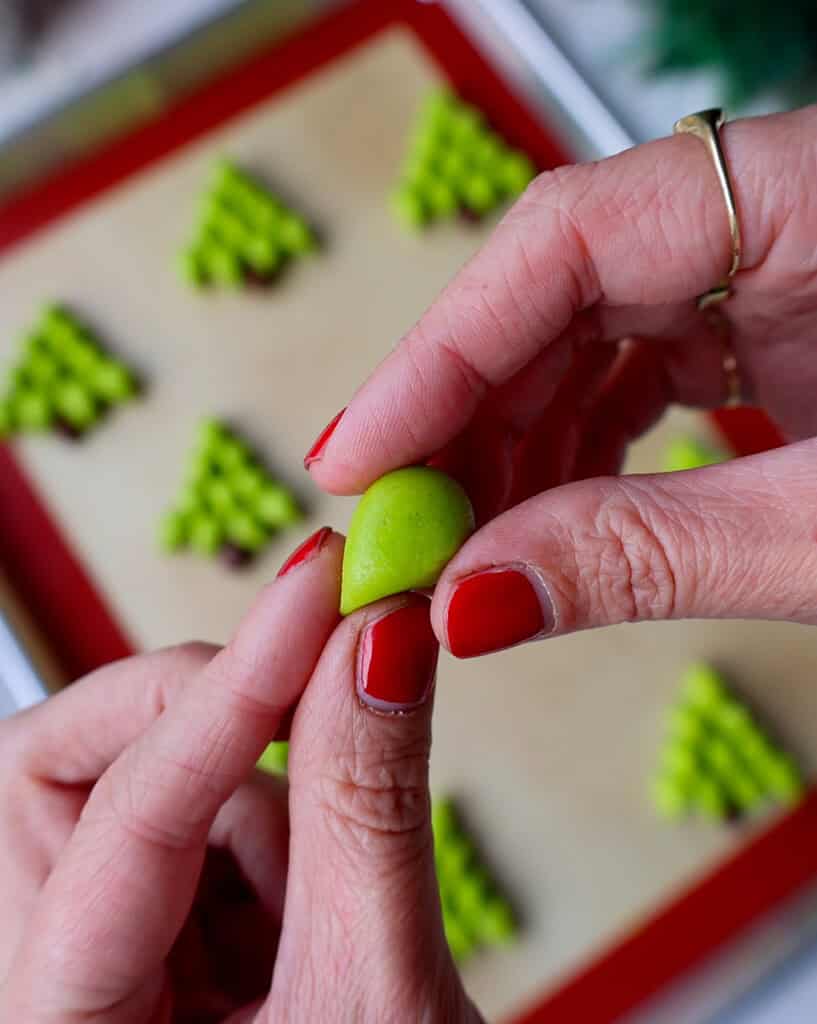
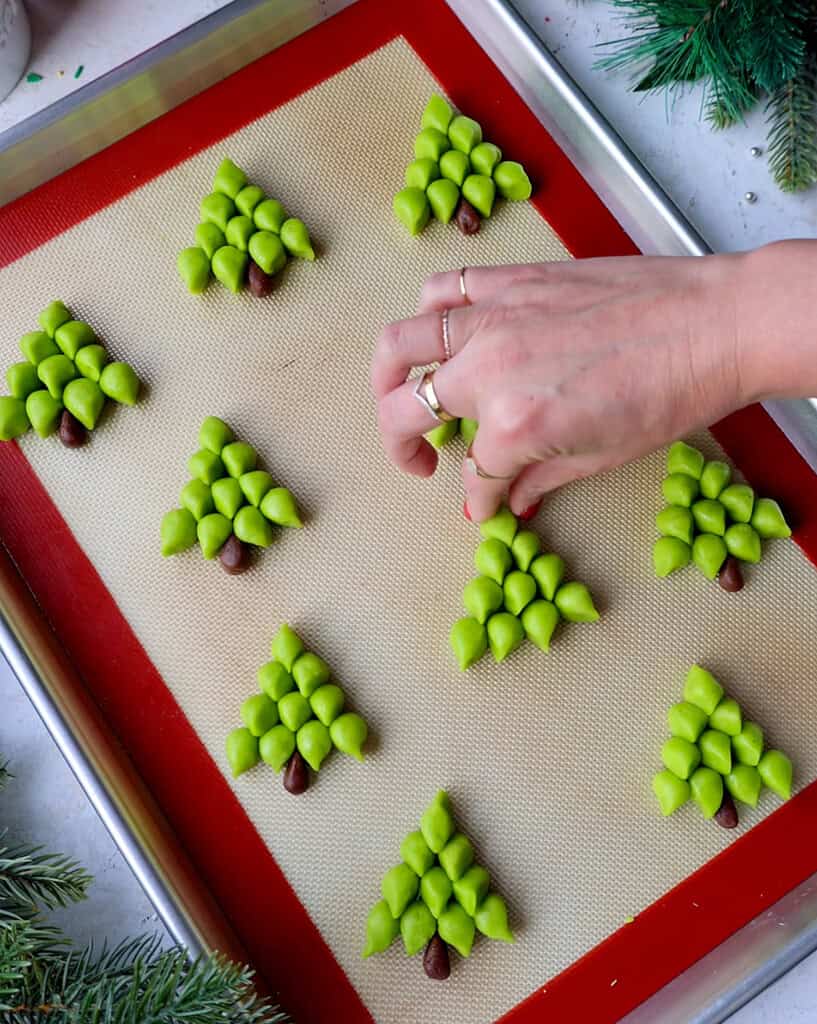
Then, scoop about 1/8 teaspoon (I fill 1/4 tsp measure halfway) of brown dough and use your hands to roll the dough into the shape of an elongated teardrop.
Place this at the bottom of the cookie, in the middle of the four bits of green dough, to look like a tree trunk.
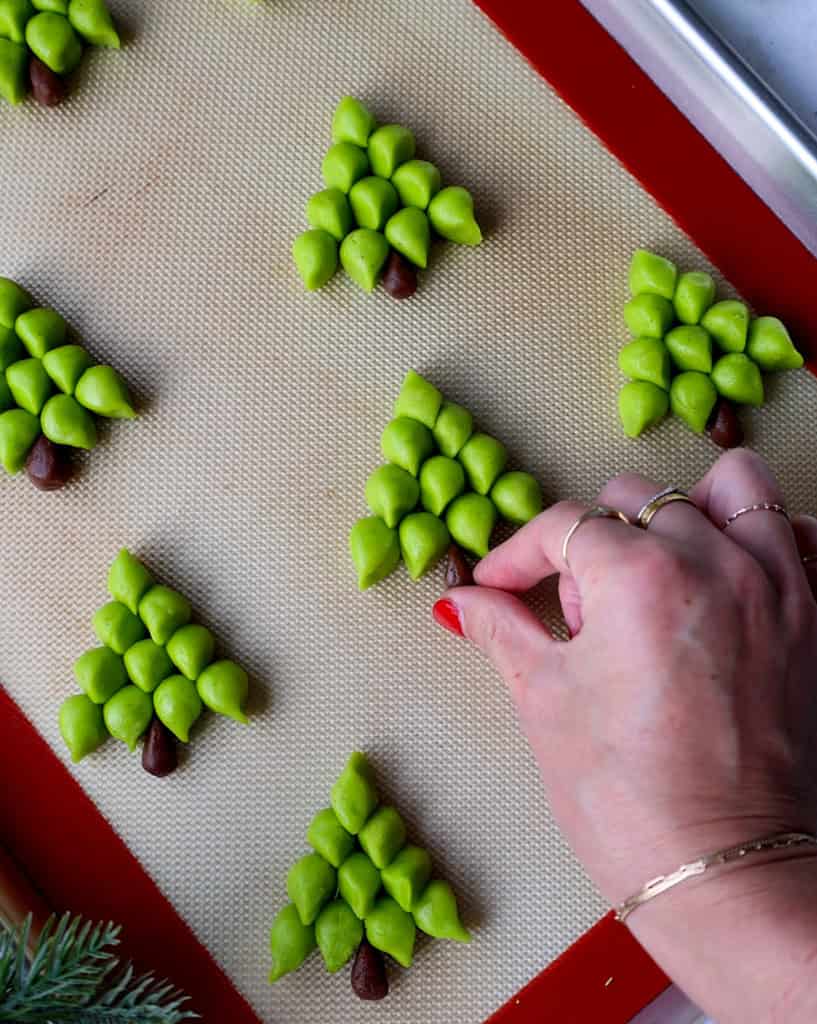
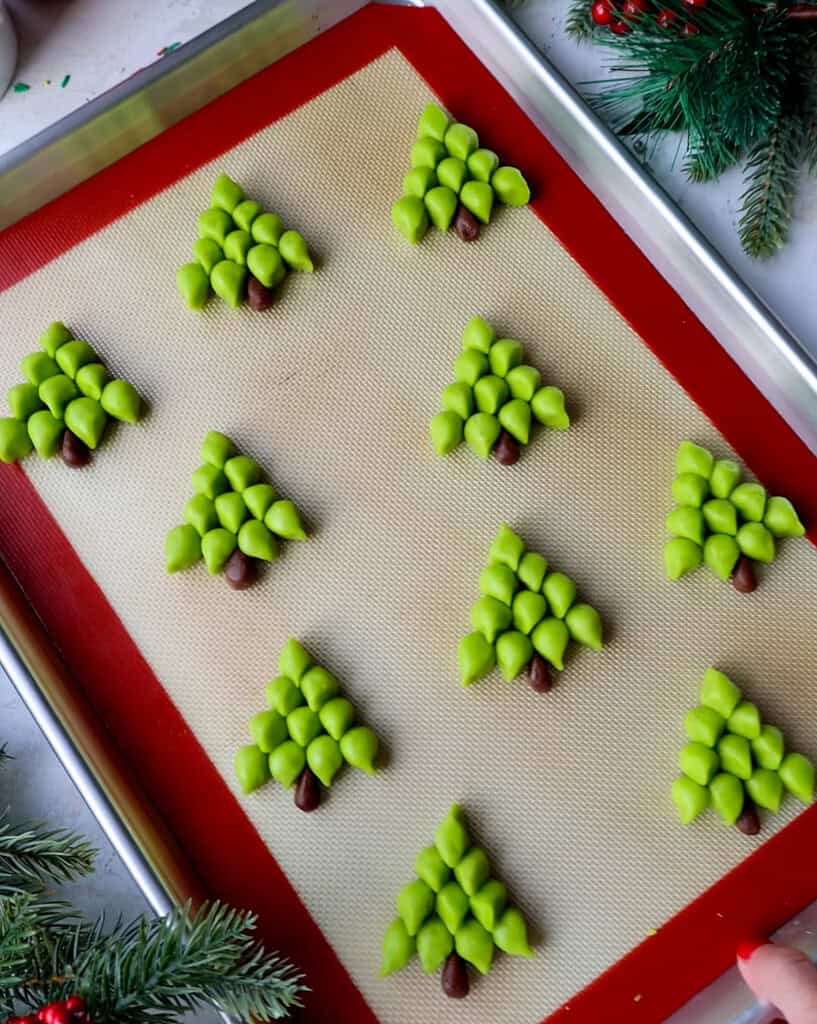
Repeat this process, making one tree at a time to prevent the bits of dough from drying out.
Step 4: Bake the Christmas Tree-Shaped Cookies
Chill the cookies (pan and all) one more time in the fridge for an hour or the freezer for 20 minutes to help them keep their shape as they bake.
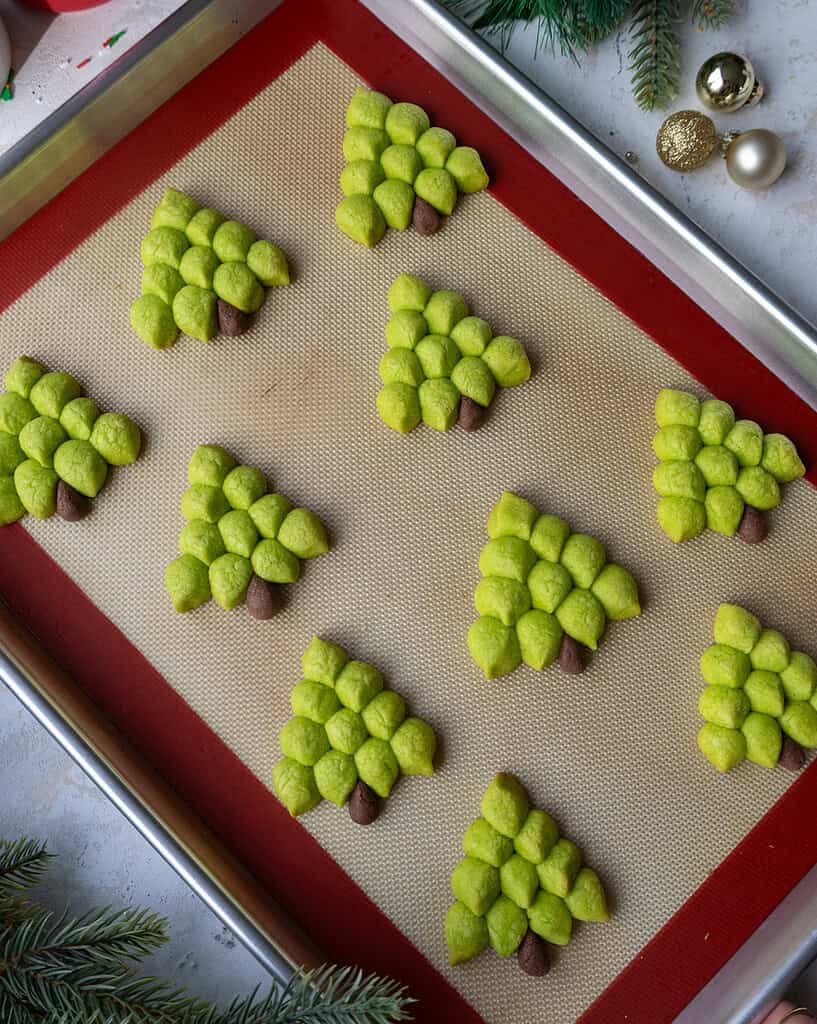
Bake one sheet of cookies at a time. Bake for 14-16 minutes on the middle rack of your oven. Rotate the pan halfway through to help them bake more evenly.
Keep a close eye on the cookies and be sure to pull them out before the edges start to brown.
I like to poke one of the cookies to test for doneness. The outside should be slightly firm, like it has a soft crust. It’s ok if it’s still a little bit soft, but it should not be soft like dough, and you shouldn’t leave a big fingerprint.
When in doubt, err on the side of undercooking! The cookies will continue to firm up on the pan as they cool. Let the baked cookies cool fully on the pan.
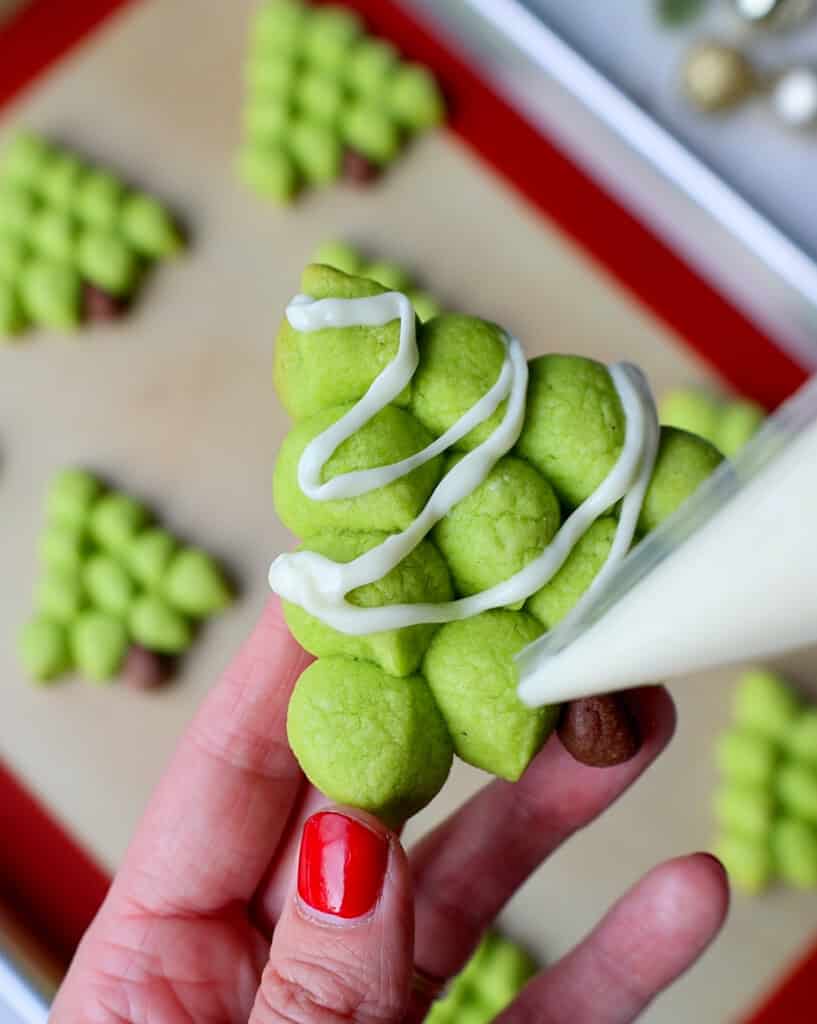
Drizzle melted white chocolate over each cookie to look like a strand of Christmas tree lights. I put the melted white chocolate in a piping bag to make it easier.
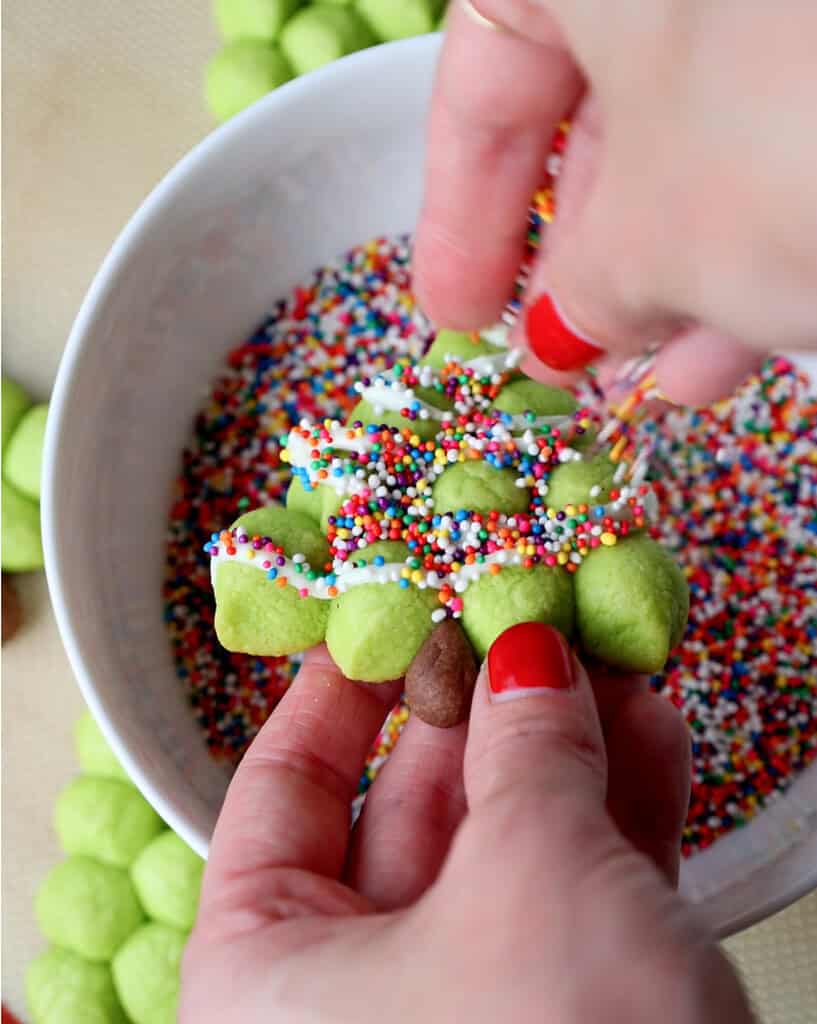
Then add a star sprinkle to the top of the cookie and spoon rainbow nonpareils over the white chocolate. Shake off any excess sprinkles, then enjoy!
Substitutions and Swaps: Christmas Tree Cookies
Now that we’ve covered how to make these cookies, let’s talk about the ingredients!
This recipe uses quite a few ingredients, and I know you might not have them all on hand.
Or if you have food allergies or restrictions, I’ve got you covered. Below are some swaps and substitutions that you can make.
- Unsalted Butter – If you only have salted butter on hand, you can use it in place of the unsalted butter. Just be sure to omit the salt that this recipe calls for. You can also use vegan butter in its place (and omit the salt)!
- Cream Cheese – Full-fat cream cheese that comes in a block works best. You can also use additional butter in place of the cream cheese, but the cookies will spread more.
- Granulated Sugar – I do not recommend reducing the amount of sugar or changing the type of sugar, as it will change the texture of the cookies.
- 1 Large Egg– If you have an egg allergy, try using a flaxseed egg or a vegan egg replacer like this one made by Bob’s Red Mill.
- All-purpose flour – This recipe turns out best with AP flour, but you can use a gluten-free flour blend if needed.
- Cocoa Powder – I like to use the Hershey’s brand of unsweetened baking cocoa powder, but any type will work. You can also use dark or Dutch-processed cocoa powder if you prefer.
- Cornstarch – Cornstarch helps give these cookies a soft texture! If you don’t have any on hand, it can be omitted, but your cookies won’t bake up as soft.
- Gel Food Coloring – I used neon green gel food coloring to make these, but you can use whatever you have on hand.
Making these Christmas Tree Cookies in Advance and Storage Tips
You can store these cookies in an airtight container for up to 5 days at room temperature or for up to a month in the freezer.
This cookie dough can also be frozen for up to 1 month if wrapped tightly in plastic wrap and stored in an airtight container.
I like to move the cookie dough to the fridge the night before I plan to shape and bake it.
How Many Cookies Does This Recipe Make?
This recipe makes about 30 Christmas tree cookies, using a 1/4 tsp measure for each tree branch.
This recipe can be doubled or halved (use an egg yolk) to change the yield if needed.
Let Me Know What You Think!
If you try this recipe for Christmas tree cookies, I’d love to hear what you think! Please leave a rating and let me know your thoughts by sharing a comment.

Christmas Tree Cookies
Ingredients
Cream Cheese Sugar Cookies
- 3/4 cup (1 1/2 sticks) unsalted butter, room temperature 170g
- 1/2 cup (4 oz.) full-fat cream cheese, room temperature 113g
- 1 1/2 cups granulated sugar 300g
- 1 large egg, room temperature 56g
- 2 tsp almond extract, optional 8g
- 2 tsp vanilla extract or vanilla bean paste 8g
- 3 cups all-purpose flour 390g
- 1 Tbsp cornstarch 8g
- 1 tsp fine salt 6g
- 1/2 tsp baking powder 2g
- 1/2 tsp unsweetened baking cocoa – to be added later 3g
- Neon green gel food coloring
- 1/4 cup white chocolate, melted
- 1/4 cup rainbow nonpareil spinkles
- 30 star sprinkles
Instructions
Christmas Tree Cookies
- In a large bowl or the bowl of a stand mixer, beat 3/4 cup butter and 1/2 cup cream cheese on medium speed with a hand mixer or whisk attachment until smooth.
- Next, add 1 1/2 cups granulated sugar and mix on a medium-high speed for a couple of minutes, until the mixture becomes lighter in color.
- Add in 1 egg, 2 tsp almond extract (optional), and 2 tsp vanilla bean paste or vanilla extract. Mix on a medium speed until incorporated.
- In a separate bowl, whisk together 3 cups flour (use a scale or fluff the flour in the bag, then spoon it into the measuring cup and level it), 1 Tbsp cornstarch, 1 tsp fine salt, and 1/2 tsp baking powder.
- Mix the dry ingredients into the butter mixture on a low speed until it is JUST incorporated. Scrape the sides of the bowl with a rubber spatula between additions. At this point, the dough should still be pretty thick and sticky.
- Scoop about 2 Tbsp of dough into a separate bowl and mix in 1/2 tsp of cocoa powder until combined and evenly colored. Flatten the dough into a rectangle on a piece of plastic wrap. Wrap the dough tightly and place it in the fridge to chill.
- Color the remaining dough green with a generous squirt of neon green. Mix until the dough is just evenly colored. Try not to overmix it! Flatten the dough into a rectangle that's about 1/4 inch thick on a piece of plastic wrap. Wrap the dough tightly and place it in the fridge to chill.
- Chill both portions of dough in the fridge for about 30 minutes, in the freezer for 10 minutes, or in the fridge overnight. Preheat the oven to 350°F/175°C right before you start shaping the cookies, and line two large baking sheets with silicone baking mats or parchment paper. It will take a bit of time to shape all the cookies, and that should give your oven enough time to fully preheat. Set aside.
- Unwrap each portion of cookie dough so that it's sitting on top of the plastic wrap. Use a 1/4 teaspoon measure to scoop 10 little bits of green dough. Roll each portion into a ball, then pinch one end to look like a Christmas tree branch (see pictures above). Start with the bottom row by placing 4 cookie dough balls together, then 3 for the next layer, then 2, then one (see pictures above).
- Then, scoop about 1/8 teaspoon (I fill 1/4 tsp measure halfway) of brown dough and use your hands to roll the dough into the shape of an elongated teardrop. Place this at the bottom of the cookie, in the middle of the four bits of green dough, to look like a tree trunk. Repeat this process, making one tree at a time to prevent the bits of dough from drying out.
- The cookies will spread a bit as they bake, so place them at least 2 inches apart. Chill the cut-out cookies (pan and all) one more time in the fridge for an hour or the freezer for 20 minutes to help them keep their shape as they bake.
- Bake one sheet of cookies at a time for 14-16 minutes on the middle rack of your oven (bake time can vary based on the cookies' size and the dough's thickness). Keep a close eye on the cookies and be sure to pull them out before the edges start to brown.
- Let the baked cookies cool on the pan for about 15 minutes, then transfer to a wire rack to finish cooling.
- Drizzle melted white chocolate over each cookie to look like a strand of Christmas tree lights (I put the melted white chocolate in a piping bag to make it easier), then spoon rainbow nonpareils over the white chocolate. Shake off any excess sprinkles, then enjoy!
Video
Notes
Substitutions and Swaps
Please refer to the substitutions and swaps section in the post above for all the ingredient variations that can be used in this recipe.How Many Cookies Does This Recipe Make?
This recipe can be used to make about 30 Christmas tree cookies, using a 1/4 tsp measure for each tree branch and for the tree stem. This recipe can be doubled or halved (use an egg yolk) to change the yield if needed.Making These Christmas Tree Cookies in Advance and Storage Tips
You can store these cookies in an airtight container for up to 5 days at room temperature or for up to a month in the freezer. This cookie dough can also be frozen for up to 1 month if wrapped tightly in plastic wrap and stored in an airtight container. I like to move the cookie dough to the fridge the night before I plan to shape and bake the cookies.Tips for Making the Best Christmas Tree Cookies
- Really cream together the butter, cream cheese, and granulated sugar. It helps incorporate air into the dough, which makes tender, soft cookies.
- Take the time to chill the cookie dough. It helps prevent the cookies from spreading while they bake and helps them bake up with a soft texture.
- Don’t overbake the cookies. Err on the side of underbaking your cookies, and remember that the cookies continue to bake for a few minutes once they’re out of the oven.
Nutrition
Other Recipes You Might Like:

If making ahead of time and freezing, would you still go ahead and decorate them with the white chocolate and sprinkles? Or would you let them thaw/come to room temp and then decorate? Curious if the color on the sprinkles would weep if frozen and then thawed…I plan to bake today but distribute on Dec. 10 or 11.
Hi Ashley,
When I froze mine, I added the white chocolate and sprinkles before freezing and it worked great! Just be sure to place a piece of parchment paper between the layers of cookies if you decide to stack them, and that the white chocolate is fully hardened before stacking them. I had mine frozen for 3 weeks and the sprinkles didn’t bleed! Hope that helps and that your cookies turn out great, happy baking!
I was wondering if I can use this cookie recipe to make cut out cookies, as opposed to the Xmas trees?
You can! I’d recommend just using the recipe linked below, which is pretty much the same but has all my recommendations for how long to chill the dough, how thick to roll it out, etc. Hope that helps, happy baking!
https://chelsweets.com/cream-cheese-sugar-cookie-recipe/
Would it be okay to use Whipped Cream Cheese?
Hi Cynthia,
I haven’t tested it, but I think if you weighed it out it could work? But if you use a cup measure, the amount won’t be the same because the whipped has so much air in it. If you try it, let me know how it turns out <3
Hi, Can I prep the dough 2 days before I make them and store in fridge?
Hi Christina,
You can! Just be sure to cover them tightly with plastic wrap so that the dough doesn’t dry out. Hope that helps, happy baking!