
2025 Christmas Cookie Box
Here are the 12 delicious recipes I used to make my 2025 Christmas cookie boxes.
I’ve also shared all my tips and tricks for making the perfect cookie box, and how to make the cookies in advance and freeze them!
This Year’s Cookie Assortment
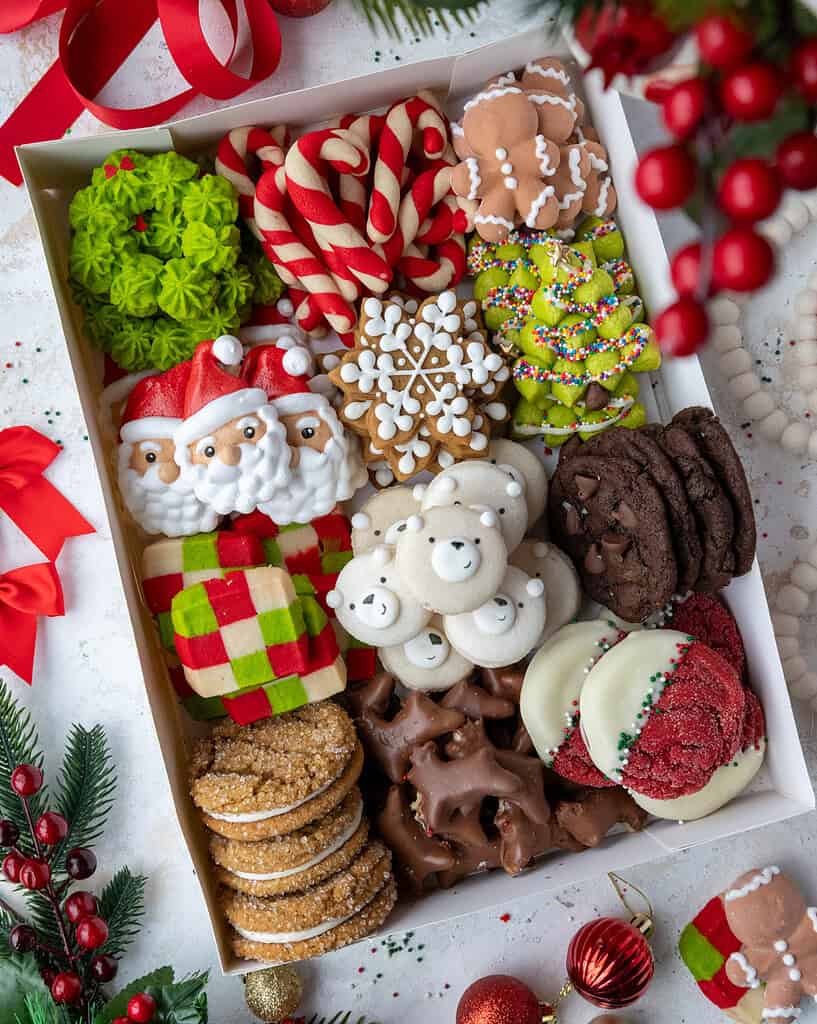
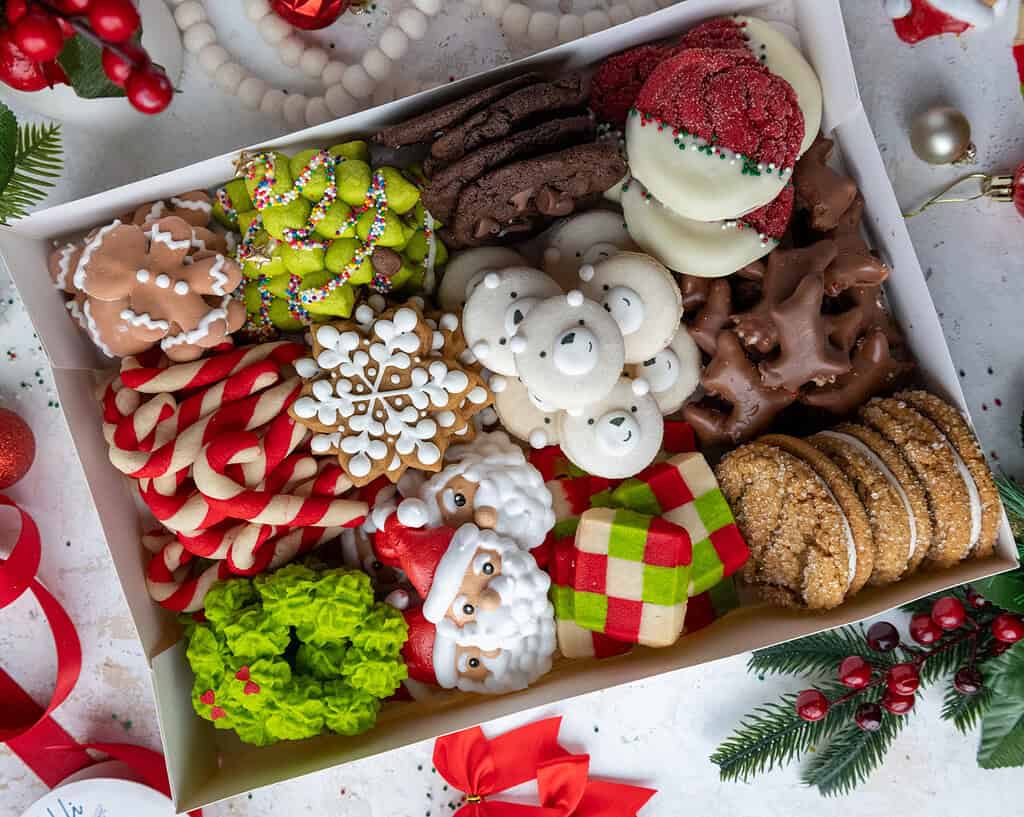
Here are the 12 different cookie recipes I made for this year’s box (from top left to bottom right):
- Christmas Wreath Cookies
- Candy Cane Cookies
- Gingerbread Marshmallows
- Santa Meringues
- Gingerbread Snowflakes
- Christmas Tree Cookies
- Checkerboard Shortbread Cookies
- Polar Bear Macarons (made with my vanilla mac recipe, decorated with a half batch of royal icing)
- Double Chocolate Cookies
- Gingerbread Sandwich Cookies
- Reindeer Shortbread (rolled out my shortbread dough to 1/3-inch thick, baked at 350°F for about 10 minutes (will vary based on size and shape), and dipped in milk chocolate)
- Snow-Capped Red Velvet Cookies
Now let’s walk through the whole process together to make sure your Christmas cookie box turns out as amazing as possible!
Picking Out the Perfect Mix of Cookies
The key to making a stunning Christmas cookie box is all in the assortment of cookies. You want a variety of flavors, shapes, and colors.
Having a variety of flavors and textures is pretty self-explanatory! It keeps the cookie box interesting and makes sure there’s the perfect cookie for everyone.
In terms of shape, having different shapes and sizes is crucial. It not only gives the box an interesting, eye-catching look, but it also allows you to properly fill the box.
If you have a bunch of large cookies, there will be gaps between them that make the box look like it’s not completely filled. Having a mixture of smaller and larger cookies lets you fill in all those little gaps and create a gorgeous-looking box.
It’s also a good idea to consider color. If you have all brown cookies, the box is going to look a bit lackluster. Incorporating some bright pops of color gives the box a festive, cheerful look!
This can be done by coloring the cookie dough or frosting, adding some colorful sprinkles, or picking a cookie with a fun design.
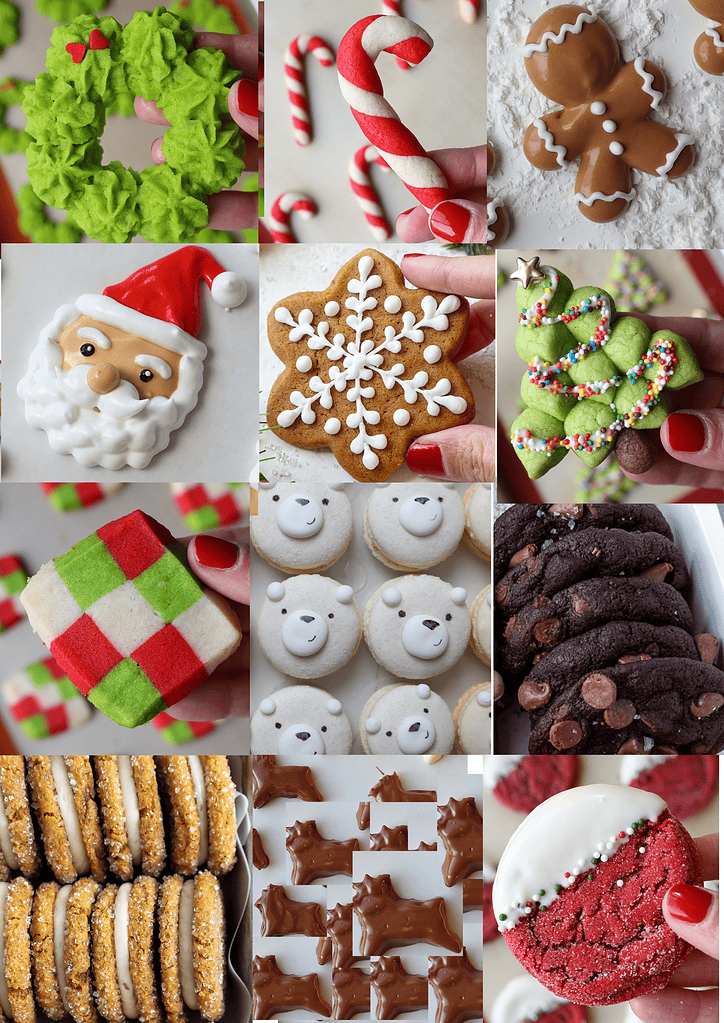
If you’re a Type A person like me, you can make a chart with pictures of the recipes you plan to bake to see what it’ll look like. It won’t look quite the same as your Christmas cookie box will, but it’ll help you take a step back and see how all the cookies look together.
Below is my planning grid for this year’s cookie box. I did this with Canva (which I think you can use for free), but Microsoft PowerPoint, Paint, or any program that lets you play around with pictures should work.
In the past, I’ve only done a few fun shapes, but this year I went all out! I only made 3 traditionally round cookies in this box, which is wild.
The only downside to shaped cookies is that they usually take longer to make. But don’t worry! In the next section, I talk about how to break up the process and make your cookies in advance.
How to Make Cookies in Advance and Freeze Them for Your Christmas Cookie Boxes
Once you figure out which recipes you want to make, it’s time to figure out the timeline. This part can vary based on how many types of cookies you plan to make. However, I recommend breaking it up into phases and spreading the work over a few days.
It makes the process so much more enjoyable and reduces the stress around all that holiday baking! I aimed to make the cookies over 4 days, so I made 3 cookie recipes per day because I was making 12 different types.
And as long as the cookie recipes you plan to make can be frozen, the days do not need to be consecutive. You can split the work up over a few weekends!
Step 1: How Many Batches of Each Cookie Do You Need?
As you plan things out, it’s important to look through each recipe and see what the yield of each recipe is. You also want to consider how many cookie boxes you want to make and how many of each cookie you plan to include in each box before you start baking.
I make a spreadsheet with each cookie name, the yield per batch, and the number of cookies I plan to include in each box, and then calculate the number of batches I need based on the number of boxes I’ll be making.
For example, if I want to make 12 cookie boxes and plan to include 3 red velvet cookies in each box, I’ll need 36 cookies. The recipe makes 21 cookies, so I’ll need to make a double batch when it comes time to make them.
Or if you’re including smaller cookies like my shortbread reindeer, you might need to add 12 cookies per box. It can vary a lot based on the size of the cookies.
Step 2: Group the Cookie Recipes Together to Simplify the Process
Once you figure out how many batches of each cookie you’ll need, I recommend seeing if you can further batch your cookies to simplify the process.
For example, in this year’s cookie box, the checkerboard shortbread cookies and the reindeer shortbread use the same dough! So I decided to make those cookies on the same day.
I also try to pair more time-consuming cookies with easier cookie recipes to make the baking days feel balanced, and recipes I’ve made before with new cookie designs that might take me a while to get right.
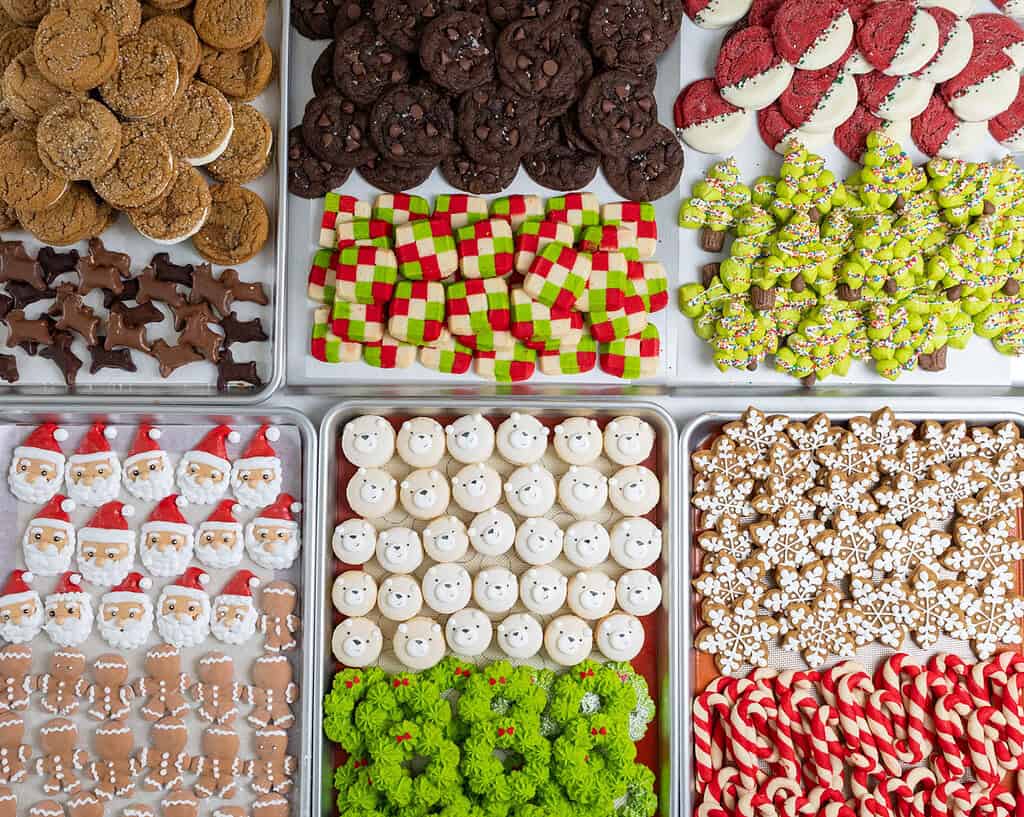
This was my baking schedule this year:
- Day 1: Checkerboard Shortbread, Reindeer Shortbread, and Double Chocolate Cookies. I batched these together because both shortbread cookies use the same base dough, and all three recipes freeze well.
- Day 2: Red Velvet Sugar Cookies, Gingerbread Snowflake Cookies, and Polar Bear Macarons. I picked an easy cookie recipe to pair with the macarons because they always take a while to make, and the snowflakes and the polar bear macarons are decorated with the same royal icing, so I could make a double batch.
- Day 3: Wreath Cookies, Christmas Tree Cookies, and Candy Cane Cookies. I knew the candy cane cookies were going to take a long time to make, but I had made the dough for the Wreath and Christmas tree cookies before, so I knew they’d be manageable!
- Day 4: Gingerbread Marshmallows, Gingerbread Sandwich Cookies, and Santa Meringues. Both the meringue cookies and gingerbread marshmallows cannot be frozen, so I made them the day before I planned to make my cookie boxes. I also made the Santa meringues last because they take a long time to bake in the oven. I paired my gingerbread sandwich cookies with these because I make them all the time and can go into autopilot when making them!
Step 3: How to Store and Freeze Your Christmas Cookies
If you do plan to bake your cookies ahead of time, you need to store the cookies properly. You also want to make sure you have plenty of freezer space available if you want to make the cookies in advance.
An important factor here is that the recipes you choose can be made in advance and frozen. A majority of cookies can, but some can’t. It’s important to check that they can be frozen and to confirm how long they can be frozen for.
All the cookie recipes I used to make these Christmas cookie boxes can be frozen for up to 3 weeks for the best taste and texture, except for the gingerbread marshmallows and the Santa meringues.
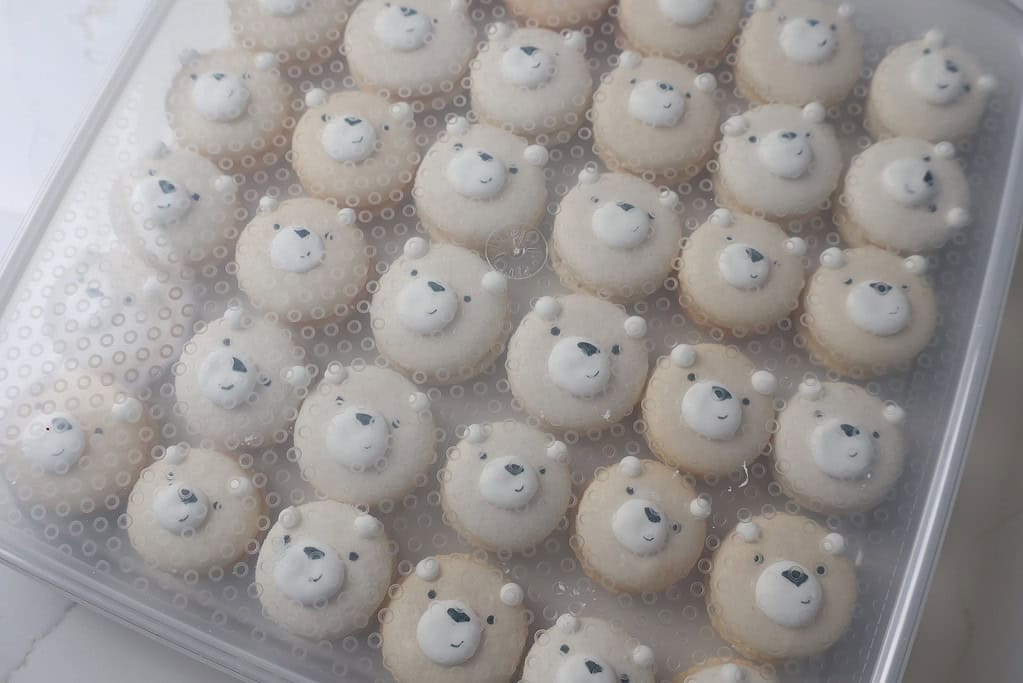
I recommend freezing your cookies once they’ve fully cooled in an airtight container (like this) or freezer ziplock bag with parchment paper between the layers of cookies. If you have any delicate frosting decorations, freeze the cookies on a flat baking sheet before stacking them.
This year I ordered 10 of these large airtight containers, and I was able to fit almost all my cookies in them! They stack really efficiently in the freezer, which I love! The only downside was that it took over a week for them to ship to me.
If you end up storing more than one type of cookie together, make sure any stronger-flavored cookies (like the peppermint) are in their own ziplock bags or containers.
Step 4: Ordering the Right Christmas Cookie Boxes
While the cookies are the star of the show, the box that they go in is important too! The size of the box that you need will vary based on how many cookies you make.
Because I made 12 types of cookies, I used these 10×14-inch cardboard boxes (a quarter sheet cake box). I liked these because they had a cute lid that showed the cookies, shipped quickly, and weren’t too expensive.
My only complaint is that the boxes weren’t super sturdy. I think the reason they aren’t is that they’re designed for sheet cakes. Generally, you’d put a sheet cake on a cardboard cake board, which provides stability.
With this in mind, I highly recommend placing a cardboard cake board underneath the cookies to help support their weight. The cookie boxes can end up being surprisingly heavy!
If you make 9 types of cookies, I’d recommend getting a 10-inch square box. If you make 6 types of cookies, I’d recommend using a cupcake box like this.
Most of these ship in a couple of days with Amazon Prime, but make sure you plan accordingly so that the boxes and any cute ribbons or bows you want to decorate them with arrive before you need them.
Step 5: Assembling the Perfect Christmas Cookie Box
Now that we’ve figured out all the logistics, it’s time for the best part – assembling the boxes!!
If you’re making a larger box like mine, make sure to place a greaseproof cardboard cake board underneath the cookies to give the box support and make it easier to carry.
I also folded a large piece of white parchment paper into the box underneath the cookies to give it a cute, homemade look.
You might already know how you want to lay out the cookies if you made a planning grid, but my advice is to have fun with it!
Play around and shift the cookies until you feel happy with how they look. I like to start with the biggest cookies, followed by the smaller cookies. I also tried to space out the colors and cookies that had cute little faces.
Remember that you can arrange cookies on their sides, tie up a stack of them with cute twine, or layer them at an angle to give your cookie box some added dimension. I flipped my gingerbread sandwich cookies on their sides and loved the way they looked!
The finishing touch is to tie a fun ribbon around the box or add a festive bow and a cute little tag!
How Far in Advance Can You Assemble Christmas Cookie Boxes?
While the cookies themselves can be baked and frozen up to 3 weeks in advance, I recommend assembling your Christmas cookie box as close to when you plan to share them as possible.
Sadly, cardboard boxes aren’t airtight, and that means the cookies are going to go stale over time once they’re in the cookie boxes.
My general rule of thumb is that Christmas cookie boxes like this have a lifespan of about 2 days. Most of the cookies will still be okay after that, but they will start to dry out and lose some of their flavor.
Another important factor that impacts the lifespan of a cookie box is whether you decorated any of the cookies with buttercream. Cookies with buttercream can only sit out at room temperature for 2 days before they spoil.
NOTE: Both the gingerbread sandwich cookies and the macarons are filled with buttercream.
How to Ship Christmas Cookies
While the process and photos above are great for local deliveries, the process is quite a bit different if you want to ship the cookies.
It’s a good idea to stick with sturdy cookie recipes that can survive a few bumps (you might want to nix the macarons). It’s also important that you factor in ship time when making the cookies in advance so that they still taste fresh when they arrive.
To pack the cookies, try to group similar cookies together in freezer ziplock bags. This is my preferred method because I think it keeps the cookies freshest. You should be able to fit 2-4 types of cookies in each bag.
Or if you want a cuter presentation, you can also package each type of cookie in its own cellophane bag. Just be sure to seal the top of the bag really well to keep them fresh.
I highly recommend getting some bubble wrap to line the inside of the box to protect the cookies as they ship. You can also fill in any space between the cookie bags with tissue paper, packing peanuts, or festive box filler.
It’s also a nice touch to include a cute little card on top of the cookies.
In terms of the box you use to ship the cookies, I highly recommend using flat-rate USPS boxes. You can pick these up at the post office or order them online. They come in a variety of sizes, are nice and sturdy, ship quickly (you can pick anywhere from overnight to a couple of days), and have a set price no matter how heavy the box is.
I usually opt for overnight shipping because some of my cookies are usually decorated with buttercream.
It’s best to get the boxes in advance and pack the cookies into them at home. That way, you can carefully fill each box and tape it up really well before heading to the post office. It’s also a good idea to add a fragile label or write fragile on the box too!!
Then, when you get to the post office, you can use the Kiosk to print the labels, drop off the boxes, and be on your way!
You can also overnight the cookies through UPS or FedEx, but I find it’s a lot more expensive.
Let Me Know What You Think!
I hope you found this post helpful and that your Christmas cookie boxes turn out amazing!! If you have any questions I didn’t cover above, please ask them in the comments section below.
Thank you for sharing this information. Do you own a bakery and how can we get on your list to buy your beautiful cookies
Hi Pam,
I do not have a bakery, I am a baking blogger and content creator 🙂 So sadly I don’t sell anything I make, but I do share the recipes and videos on how to make them!
Thank you for these! Just an FYI, many of the links to the individual recipes are not linking to the correct recipes.
Hi Mallory,
I just rechecked all the links, and they’re correct! If you read the text in the parenthesis next to the polar bear macarons and the shortbread reindeer, you can see they link out to different recipes and don’t have their own post! I linked to the base recipes I used, and shared the slight modifications I made to decorate them. Hope that helps, happy baking 🙂
Could you email me your plangrid? The link is not working. I would love to try this for the holidays this year!! Addison.fiedler18@gmail.com
Hi Addie,
The link was just to go to Canva. My plangrid isn’t public because I use it for all my cookie boxes and it’s kind of a constant work in progress! But it’s really just an 8×11 piece of paper divided into 4 rows and 3 columns 🙂 And then I upload pictures of the cookies I want to make a paste them into the boxes. Sorry I can’t be of more help!
So may good cookies here! How do you keep your meringues from going soft when packed in the cookie gift box?
Hi Diana,
That part is hard, and they do get soft over time! I usually pack the boxes right before I give them away, but you can wrap the meringues in an airtight bag to try to prevent this from happening! I’d def recommend this too if you’re making these ahead of time. But it’s sad because the bags kind of ruin the look!
I’m a new big fan!
aw thank you!! So glad you’re here Kathy 🙂
I would actually love to just buy a box from you for my family!
If only!!! Sadly I don’t sell these, so sorry Angie!!
Hi! Do you freeze your macaroons?
@Katie,
I think on her posts or blog I read she doesn’t freeze her Macaroons or Meringue’s.
I do not recommend freezing the meringues, they can get soft as they thaw due to the condensation and lose their crispness! But you can freeze the macarons, they actually freeze quite well 🙂 Happy baking!!
I do! They freeze super well, I put them in an airtight container, then move them from the freezer to the fridge the night before I plan to box them up to prevent condensation. Hope that helps, happy baking!
Can make the doughs, cut out/shape the cookies then freeze them? Or do they have to be fully cooked before freezing?
Hi Amanda,
You can do either! It’s really a matter of preference, as long as the recipe says that the cookies/cookie dough can be frozen either way! The most important thing is just making sure you choose recipes that do freeze well. Hope that helps, and that your Christmas cookies turn out amazing!
Love this. If I want to follow your 4-day schedule and deliver the cookies to everyone on day 5, do I even need to freeze any of the cookies? Can I just make the dough in advance and cook them on the last two days?
Thanks and happy holidays!
Hi Maude,
If you have the time to bake them all in two days, I’d definitely suggest going that route!! Otherwise I probably would freeze the cookies you make on day 1 & 2, because you want them to be as fresh as possible when you assemble the box. Inevitably, the cookies end up sitting out on people’s counters as they eat them (especially if you include a lot of cookies), and I hate the thought of days old, stale cookies!!!! Hope that helps and that your cookie boxes turn out amazing 🙂 Let me know how they go!
Hi! How do you recommend keeping peppermint flavored cookies from leeching into the other cookies in the box? I noticed even through two plastic bags, the peppermint taste leeched into neighboring sugar cookies 🙁
Hi Jessica,
It depends on how strongly the peppermint cookies are flavored, but yes the flavors can seep! If you do include them, I’d suggest putting them in a corner and next to cookies that go with the flavor, like double chocolate or vanilla! It also depends on whether they’re in an airtight container or not! If they are, I feel like the peppermint flavor permeates more. Hope that helps, happy baking!
Do you have a link or list for all your cookie cutter shapes?
Hi Dawn,
Sadly I don’t have a list for all of them, but in every recipe I share I link the cutter you need in the equipment section of the recipe card! I hope that helps, happy baking!
Hi! How do you “reheat” them after frozen? Do you just let them thaw until they are room temperature or do reheat them in the oven so they appear fresh? Thanks!
Hi Paloma,
I actually just take them out of the freezer, and pack them while they’re still frozen! They just gradually thaw and are fine.
If you heat them up, it’d be better right at first, but it dries the cookies out for the long run. I find that cookies are usually in cookie boxes for a couple of days, because it takes time to eat them all even after you deliver them.
Some cookies might be more temperamental, but the cookies I froze for this year’s cookie boxes are pretty hearty. Hope that helps, happy baking!
My cookie box turned out so cute and festive this year thanks to you. Those shortbread were a fun labor of love. The candy canes not so much but so cute and worth it. I look forward to your box post for inspiration every year/season ?
Hi Lynette,
Aw I am so happy to hear that!!! The shortbread are a lot of work, but they’re so pretty! I wish we could share pictures on here. Love that your boxes turned out great, and I’m already looking forward to next year’s box!!
Do you sell your cookies?
Hi Laney,
I don’t, so sorry!
What is the best way to defrost the cookies out the freezer?
It can vary cookie to cookie, but I just take my cookies straight out of the freezer and pack them into my cookies boxes while they’re still frozen. I also don’t live in a super hot or humid place so I don’t have to worry about the cookies sweating, but that’s all I usually do!
Do you sell these boxes? I’d so, how much do they sell for in your area?
Hi Megan,
I don’t sell these boxes, I just make them for my friends and family! So sadly I’m not sure how I’d price them!