
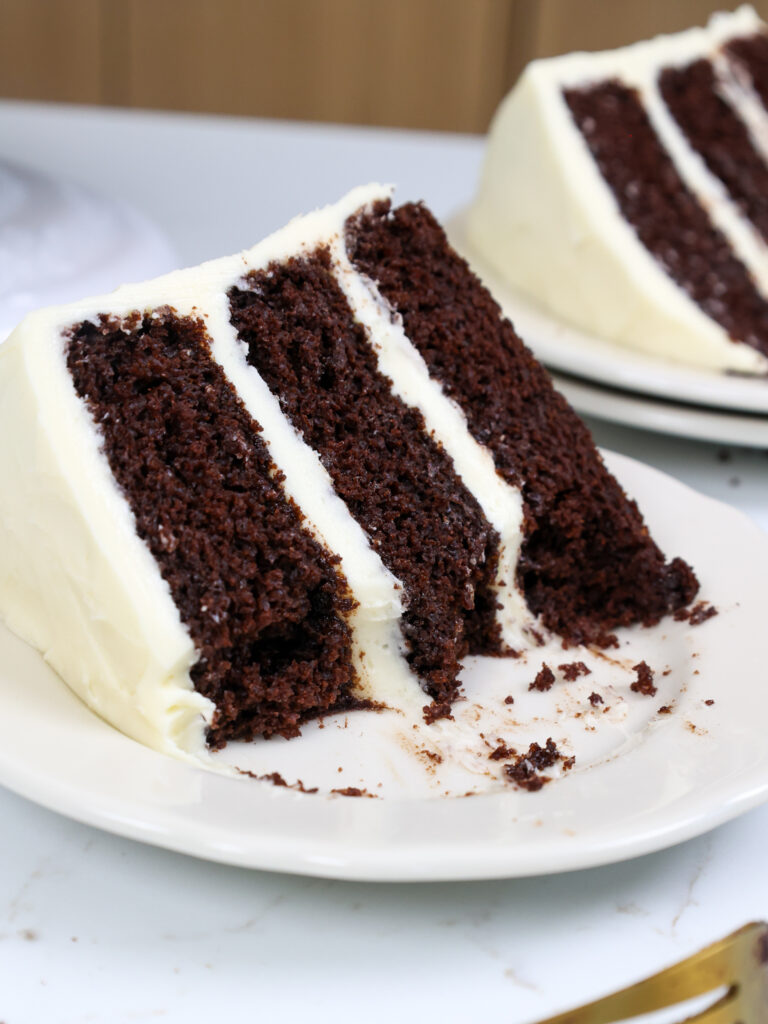
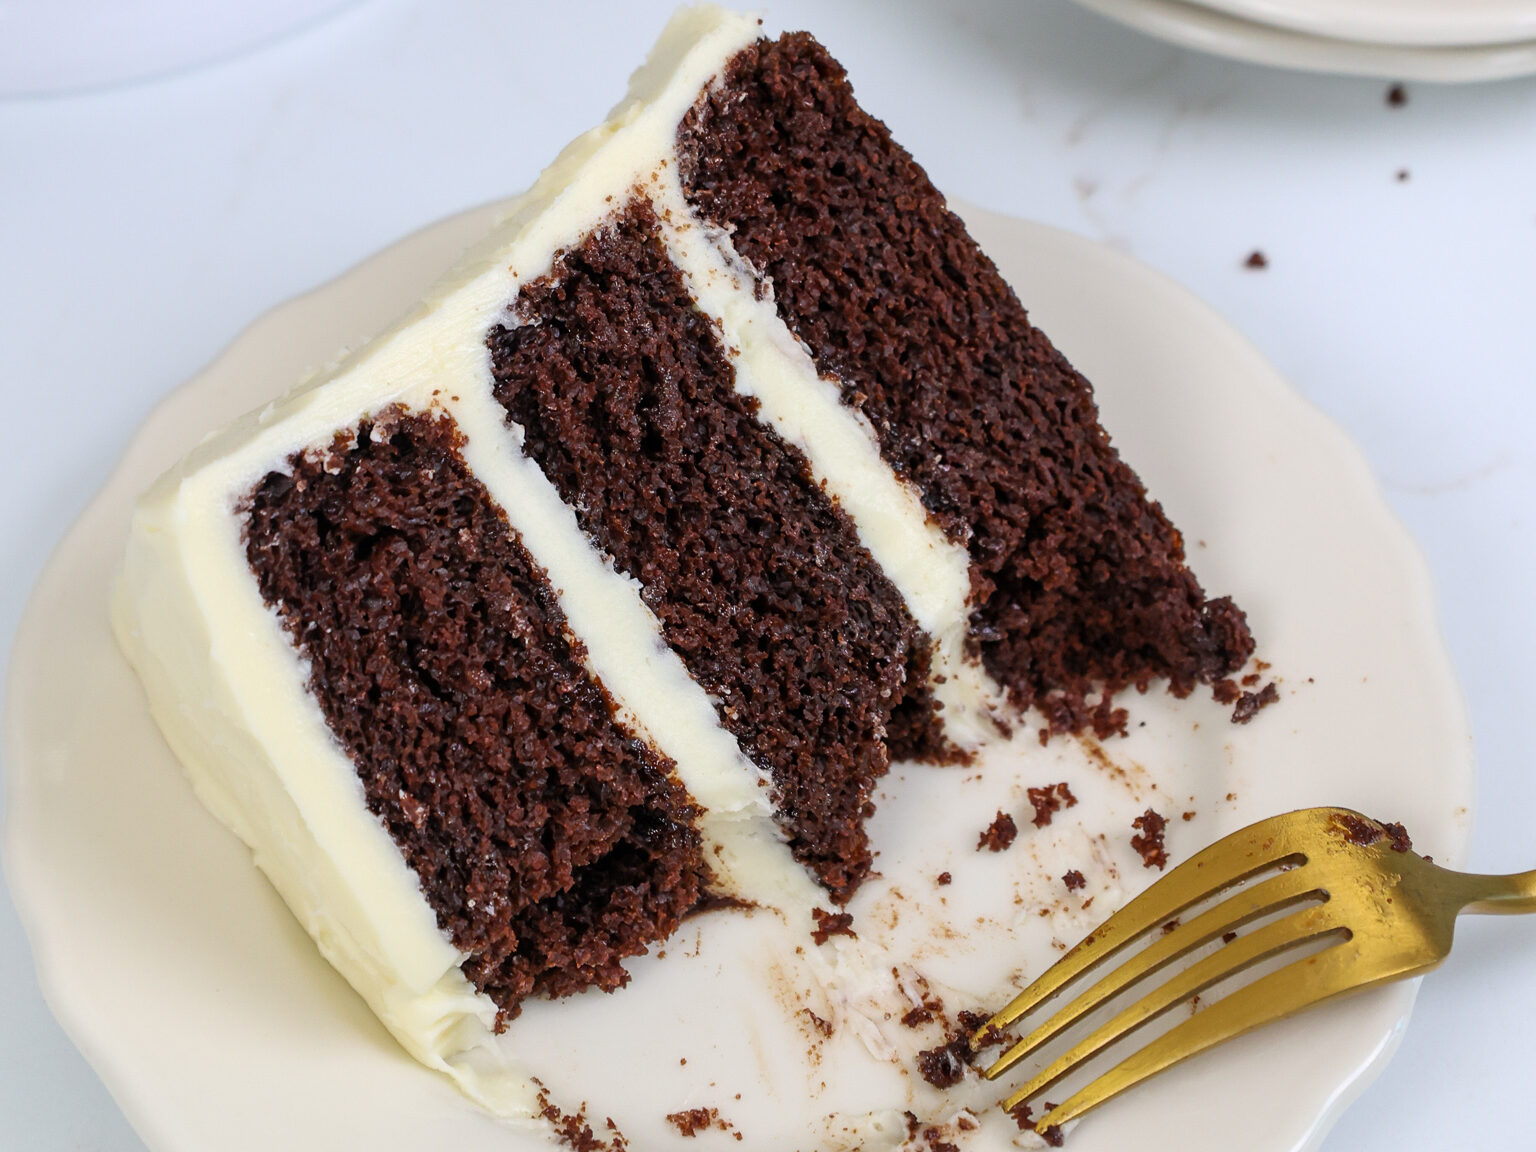
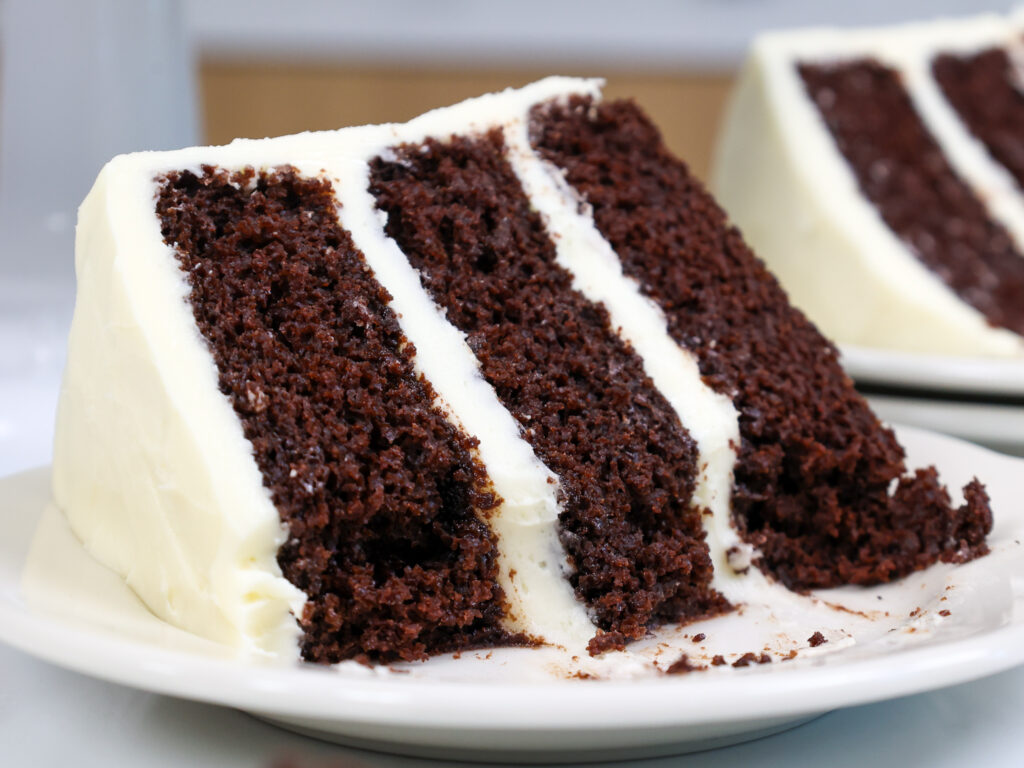
Chocolate Cake with Cream Cheese Frosting
This chocolate cake with cream cheese frosting is made with tender, moist cake layers and the creamiest cream cheese frosting!!
And for anyone asking the question, “Does chocolate cake go with cream cheese frosting??”
It absolutely does!! It’s such a delicious combination.
How to Make This Chocolate Cake with Cream Cheese Frosting
To make sure this chocolate cake recipe turns out as amazing as possible, let’s walk through each step together! I’ve also included a video tutorial of the process below.
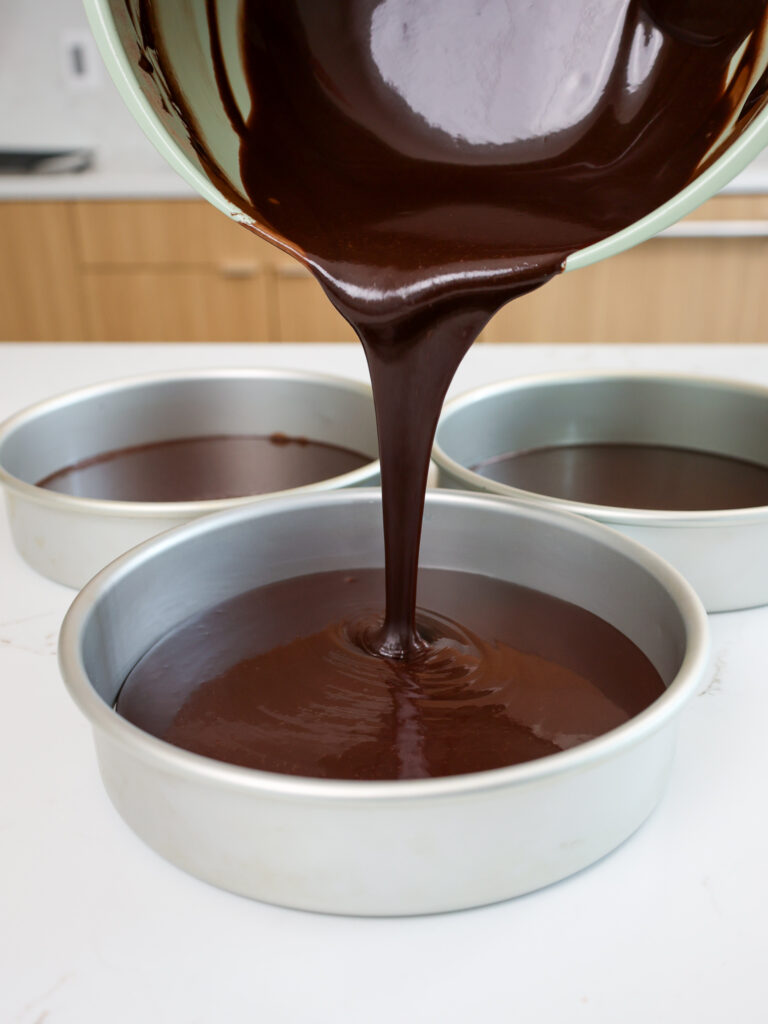
Step 1: Bake the Chocolate Cake Layers
The first step is to make the chocolate cake batter. I love this cake recipe because it can be made by hand and comes together in minutes!
It’s as simple as whisking the dry ingredients together in one bowl, then mixing the wet ingredients into the dry ingredients, and it’s all ready to go.
Divide the batter evenly between the prepared cake pans and bake for 23-25 minutes or until a toothpick comes out with a few moist crumbs.
Remove the cake layers from the oven and let them cool in the pans for about 10 minutes.
Gently run an offset spatula around the rim of the cake pans to loosen them, then flip them onto wire racks to finish cooling.
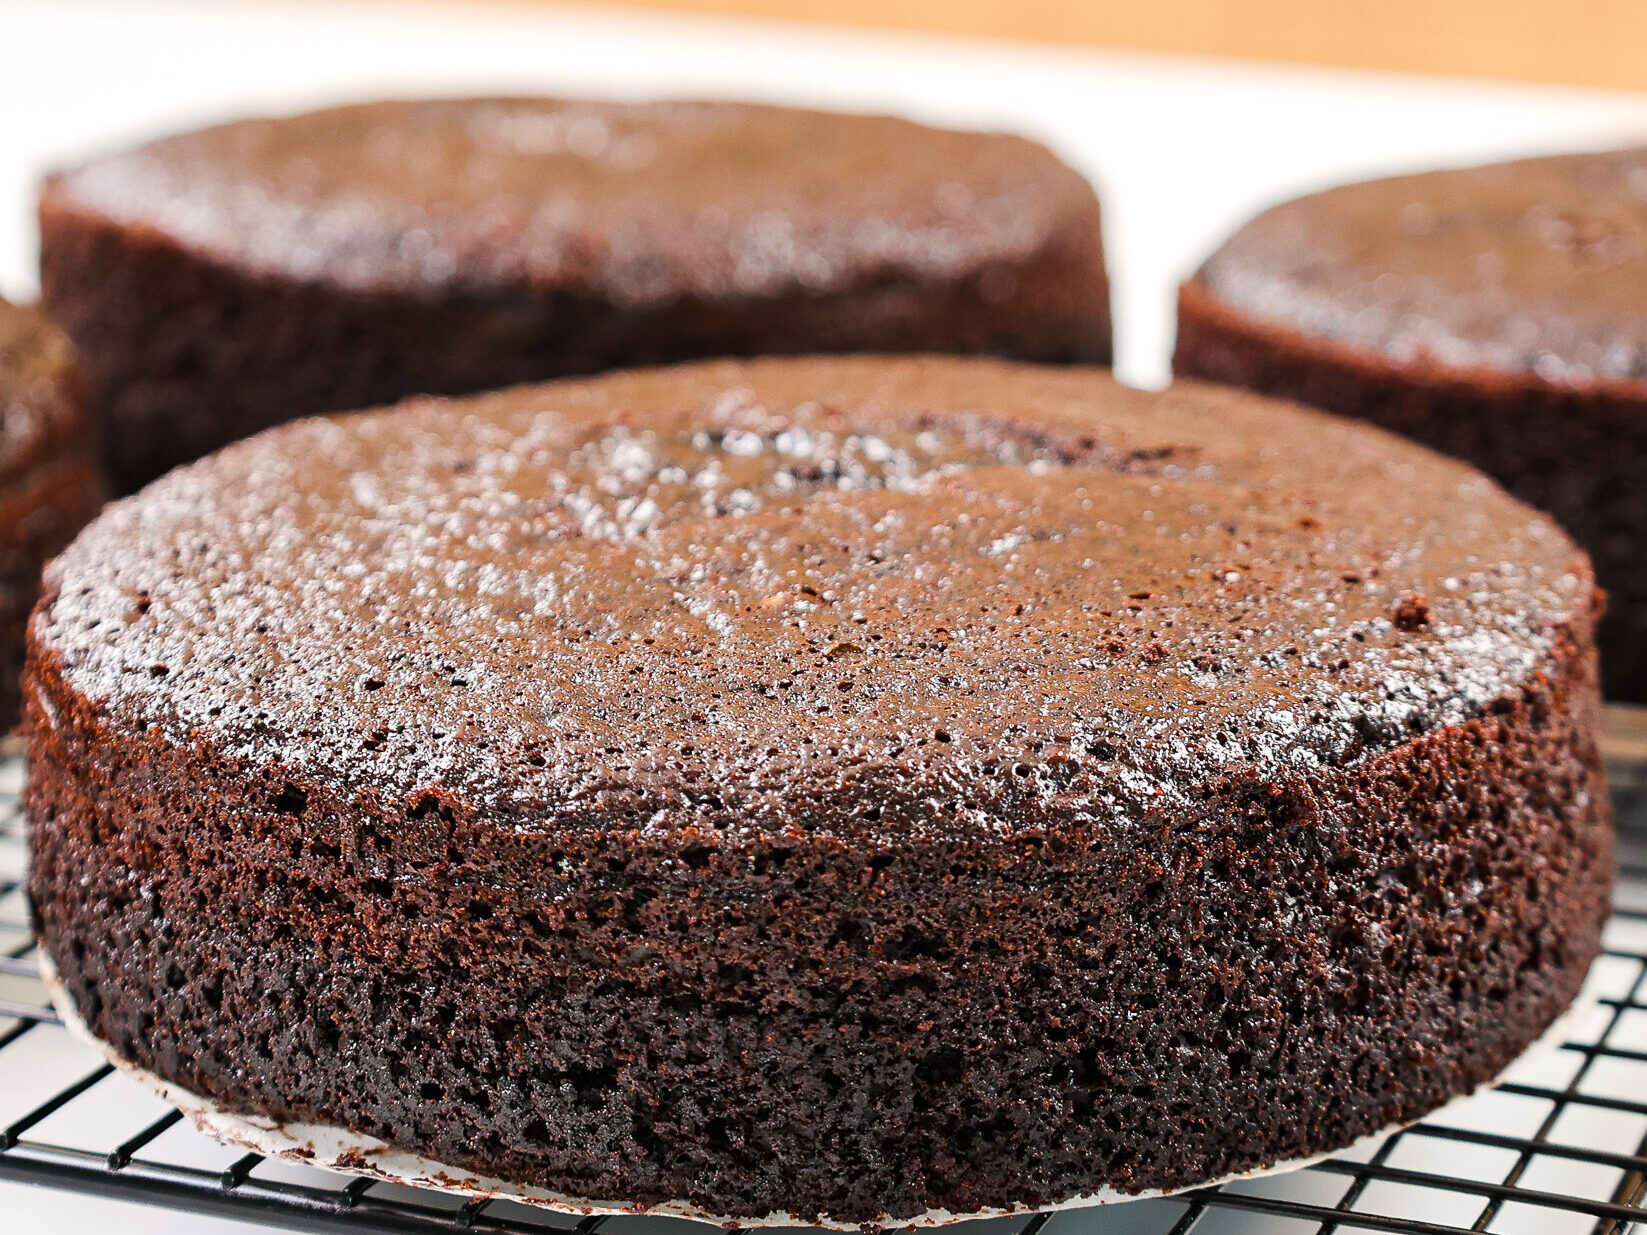
These cake layers bake up pretty flat, so leveling them is optional. If you want to level them with a serrated knife, make sure to wait until the cake layers have fully cooled to room temperature.
If you’re making these in advance, you can wrap and freeze them at this point.
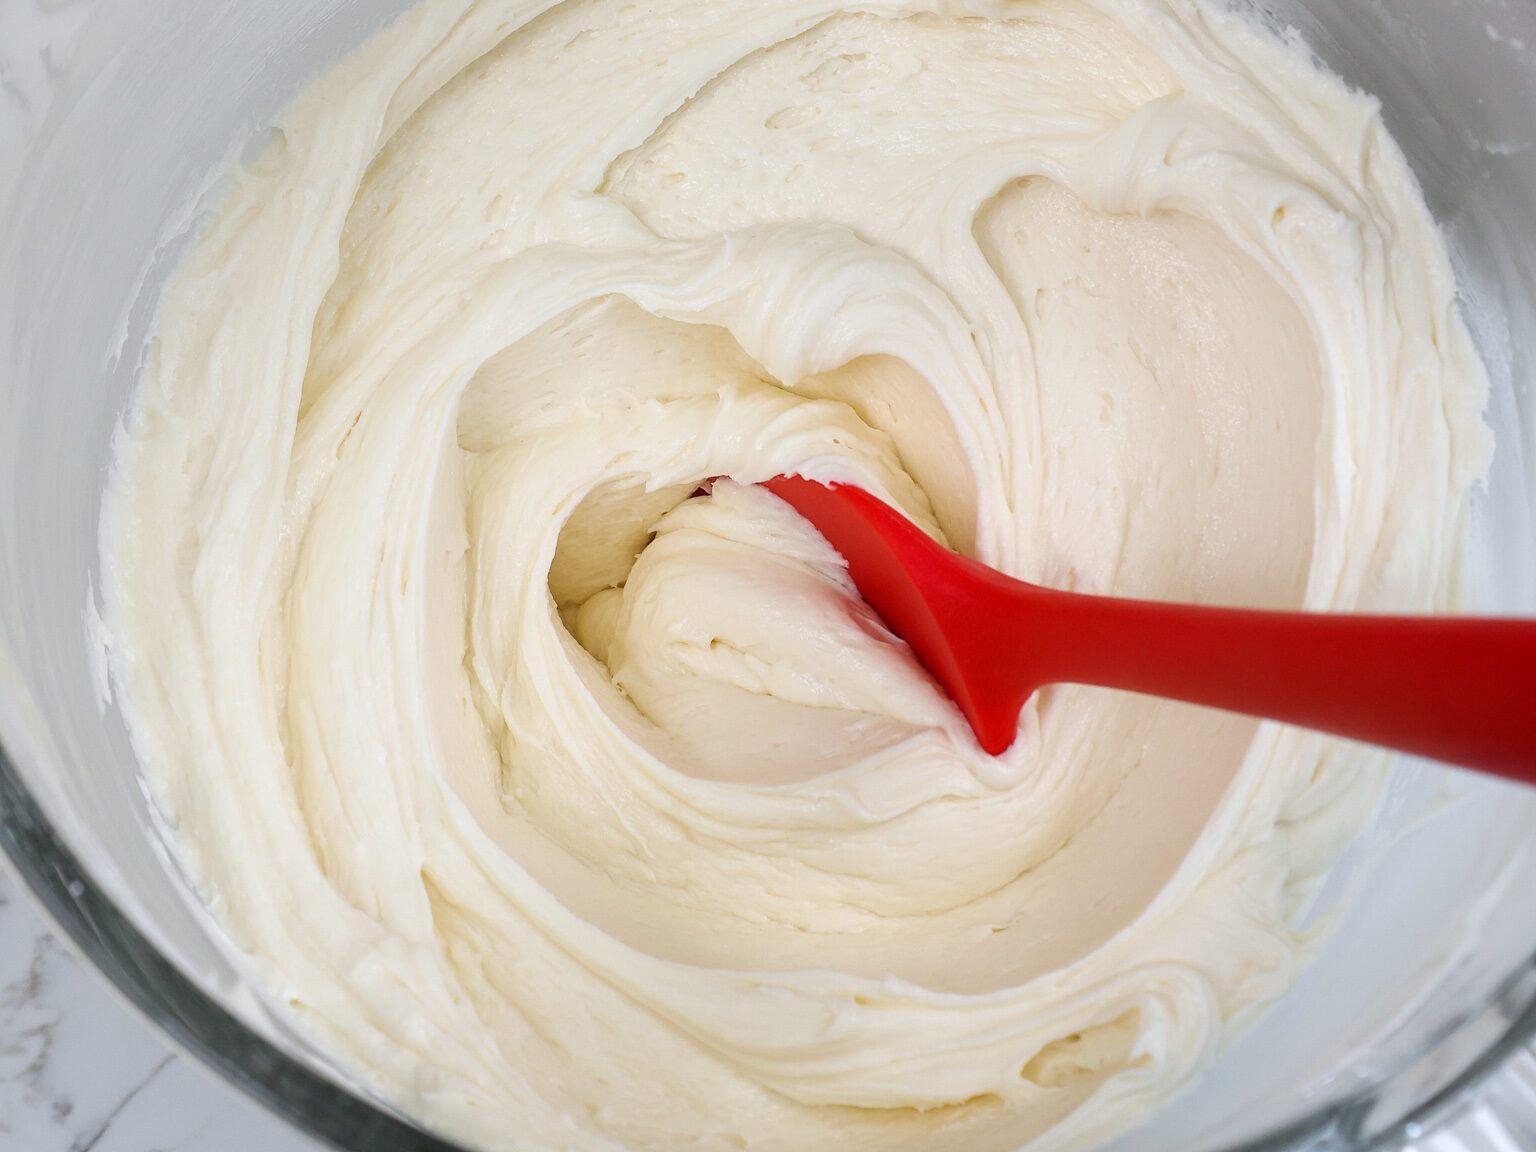
Step 2: Make the Cream Cheese Frosting
While the cake layers bake and cool, make the cream cheese frosting. This frosting can also be made in advance if needed and kept in the fridge for up to a month!
If the frosting seems too thick at this stage, add in additional cream (1 tablespoon at a time). If the frosting seems too thin, add in more powdered sugar (1/4 cup at a time).
Once it’s reached the desired consistency, cover the cream cheese frosting with a piece of plastic wrap to prevent a crust from forming.
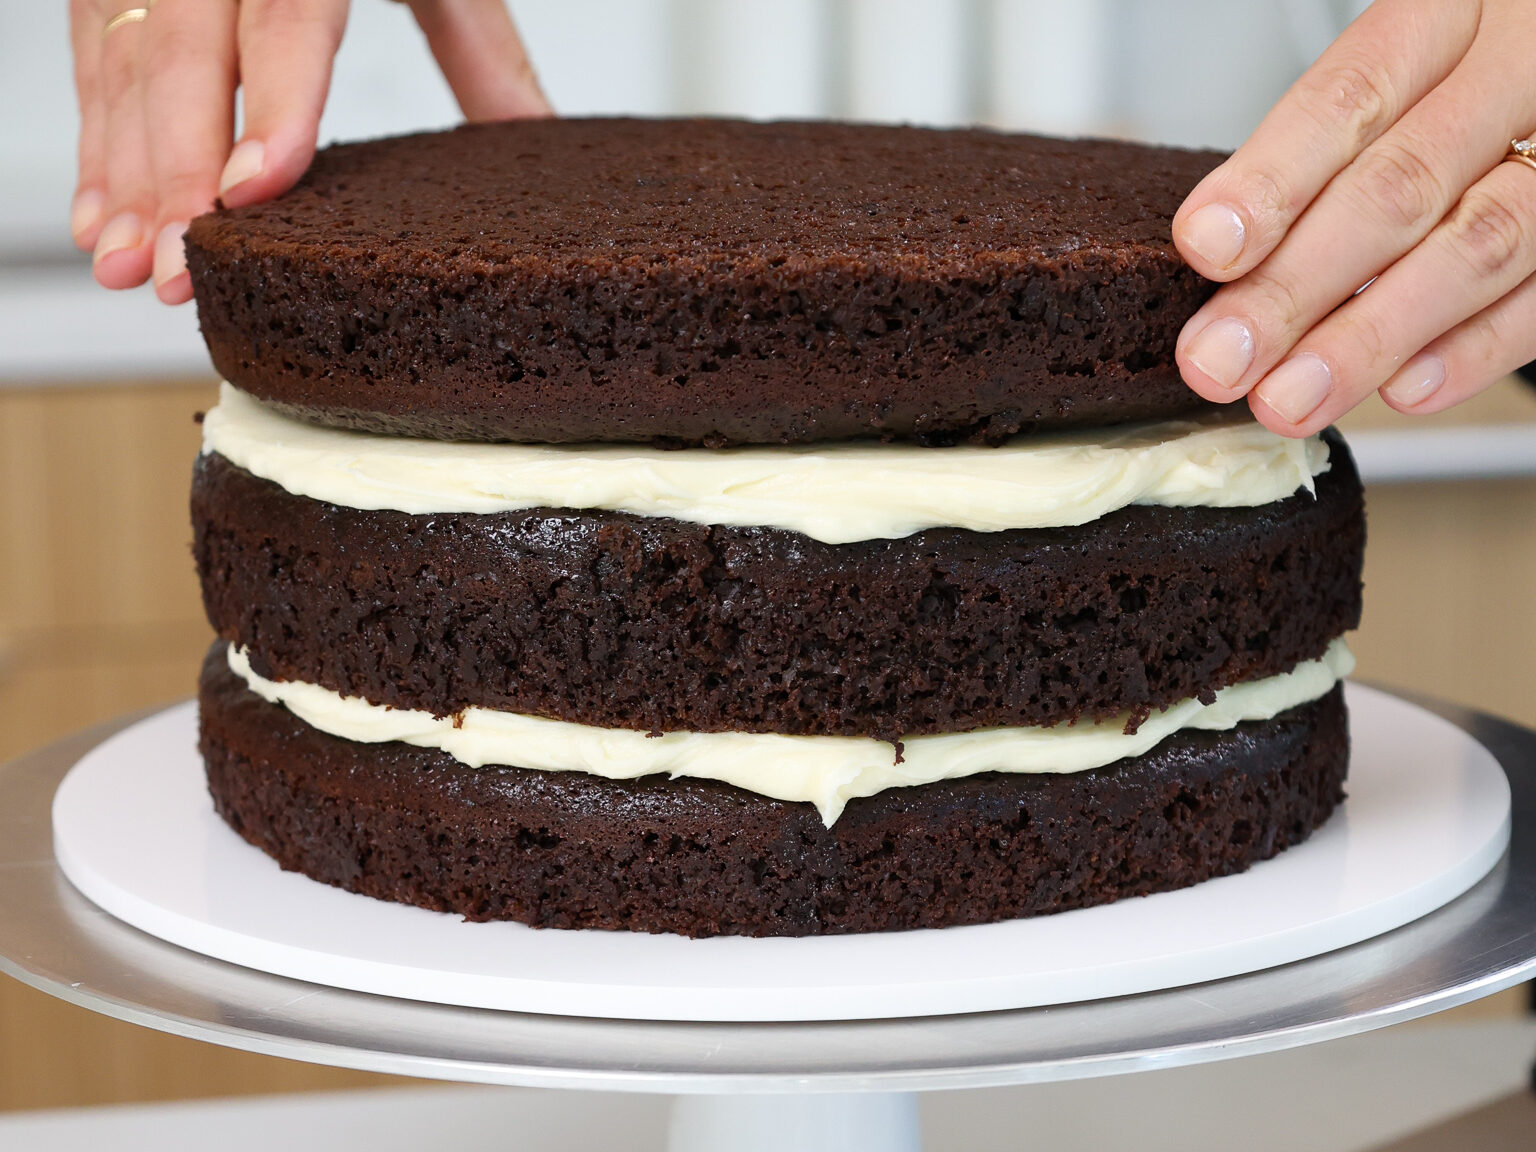
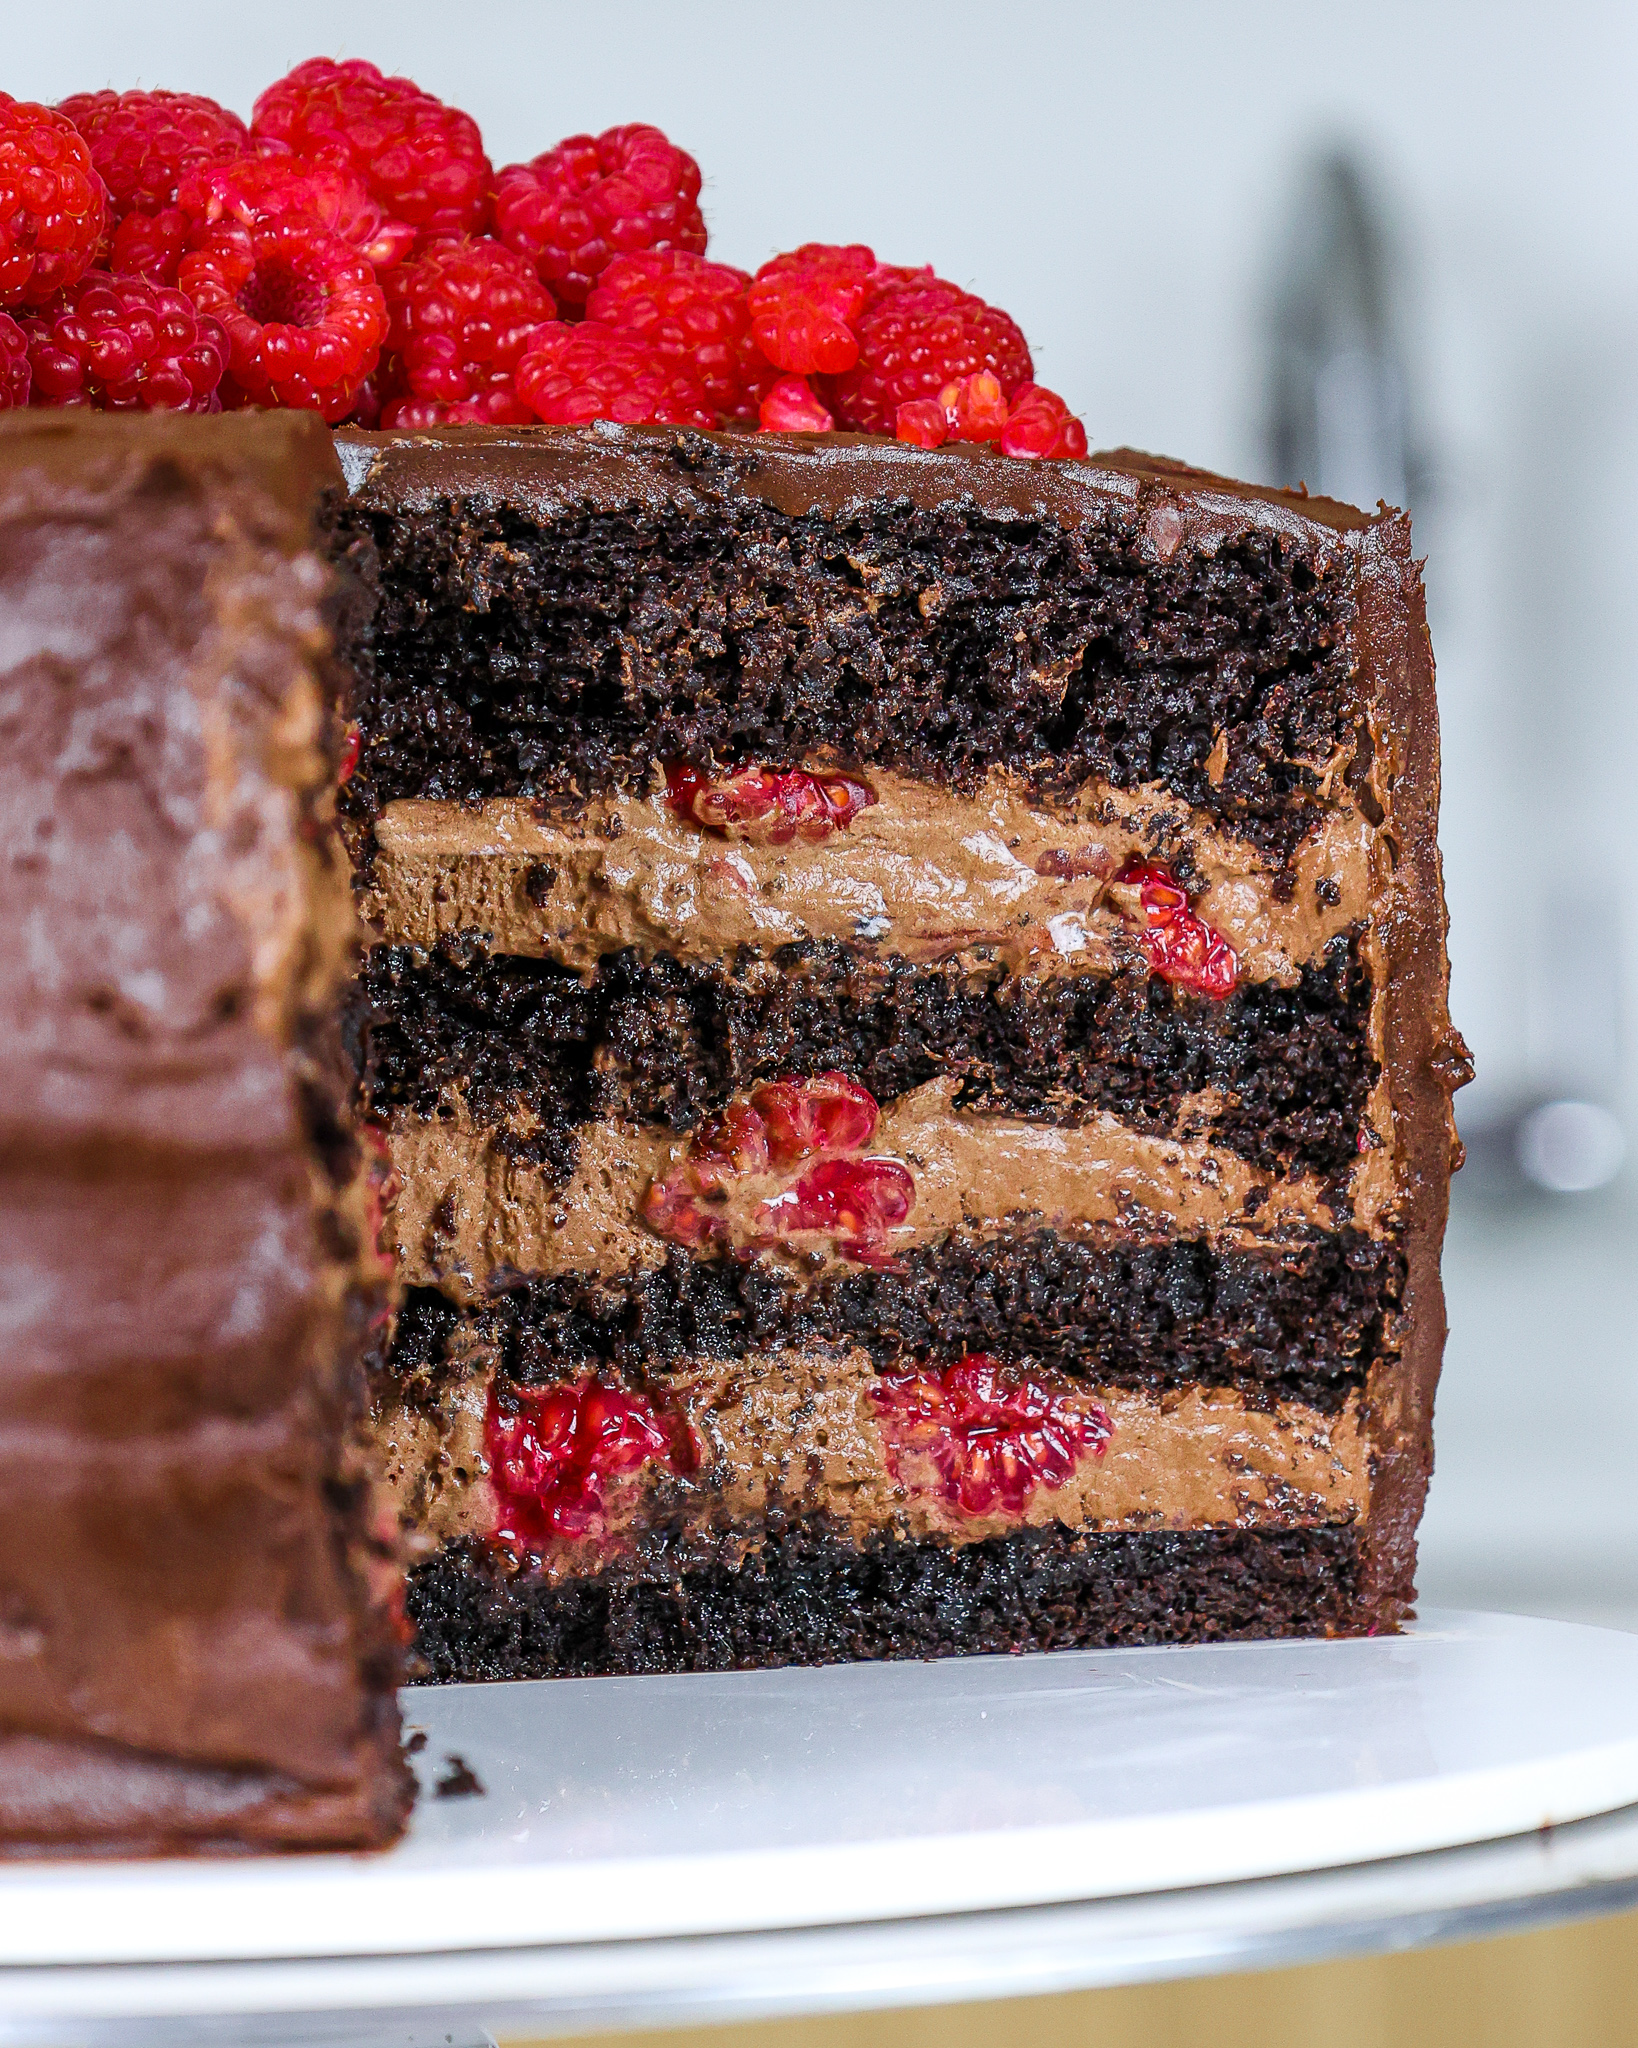
Step 3: Stack and Fill the Cake Layers
If possible, chill the cake layers in the freezer for 20 minutes before stacking them. This will make them so much easier to frost and help minimize crumbing.
Stack and frost cake layers on a greaseproof cake board using a dab of cream cheese frosting to help stick the first cake layer to the board.
Spread a thick, even layer of cream cheese frosting on top of each cake layer.
Place the top cake layer upside down to make it easier to frost. This will help give the cake a better shape and sharper edges.
Step 5: Crumb Coat the Cake
Spread a thin coat of cream cheese frosting around the cake to fully cover the cake layers.
Smooth using a large offset spatula, then chill the cake in the fridge (10 minutes) or freezer (5 minutes) until the frosting is firm to the touch.
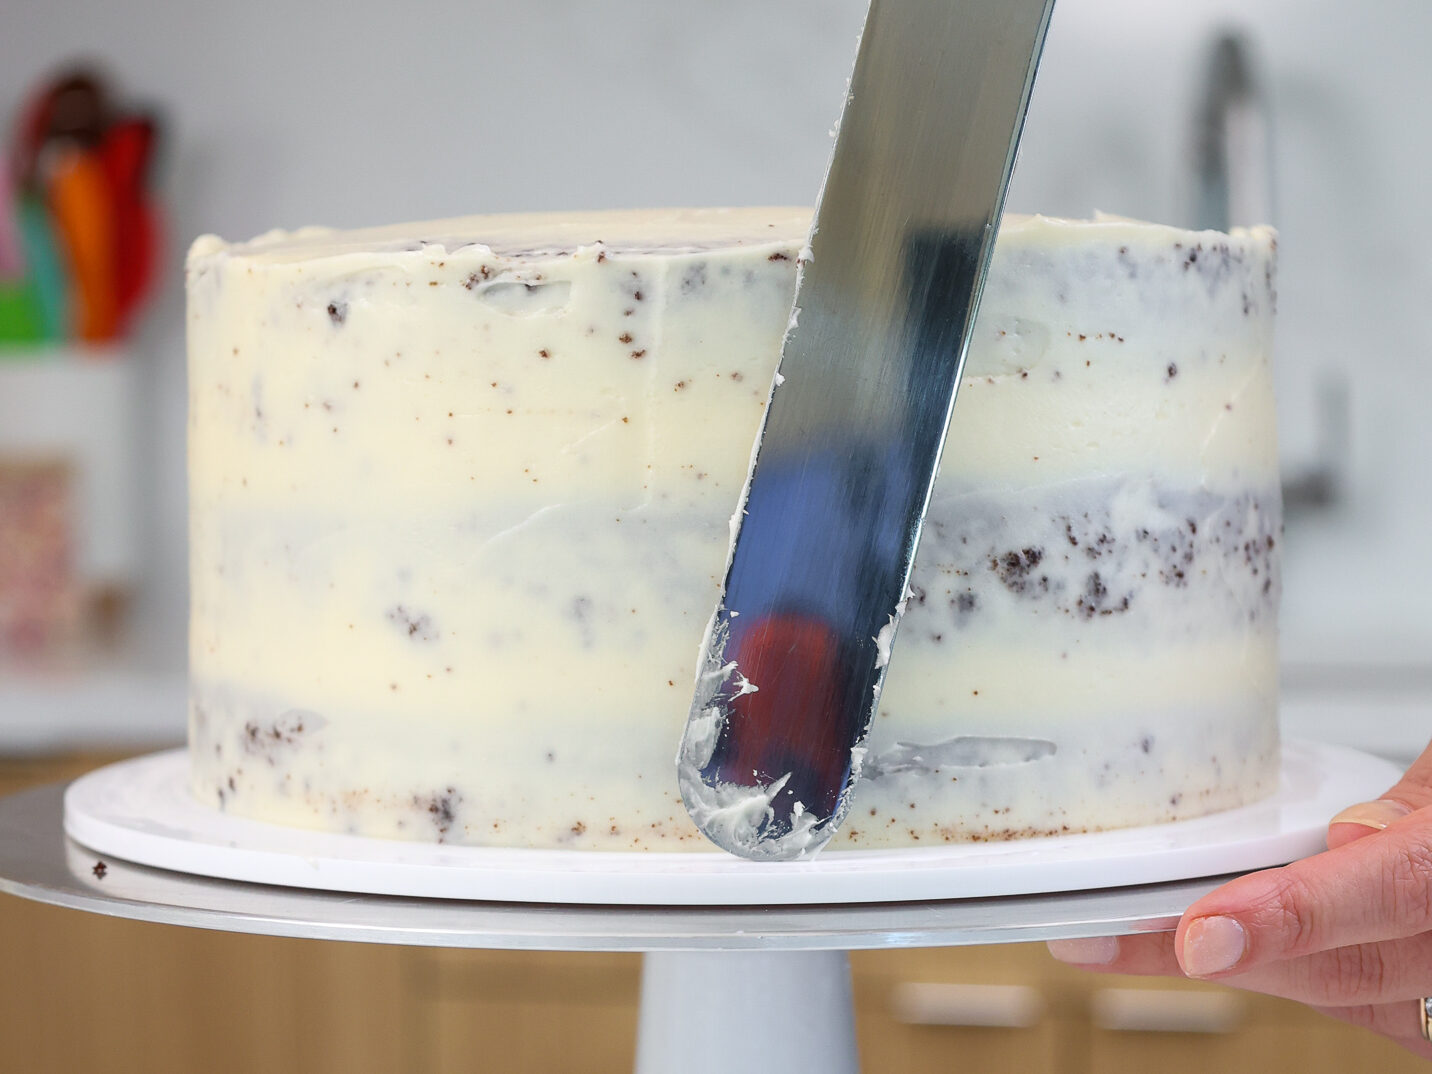
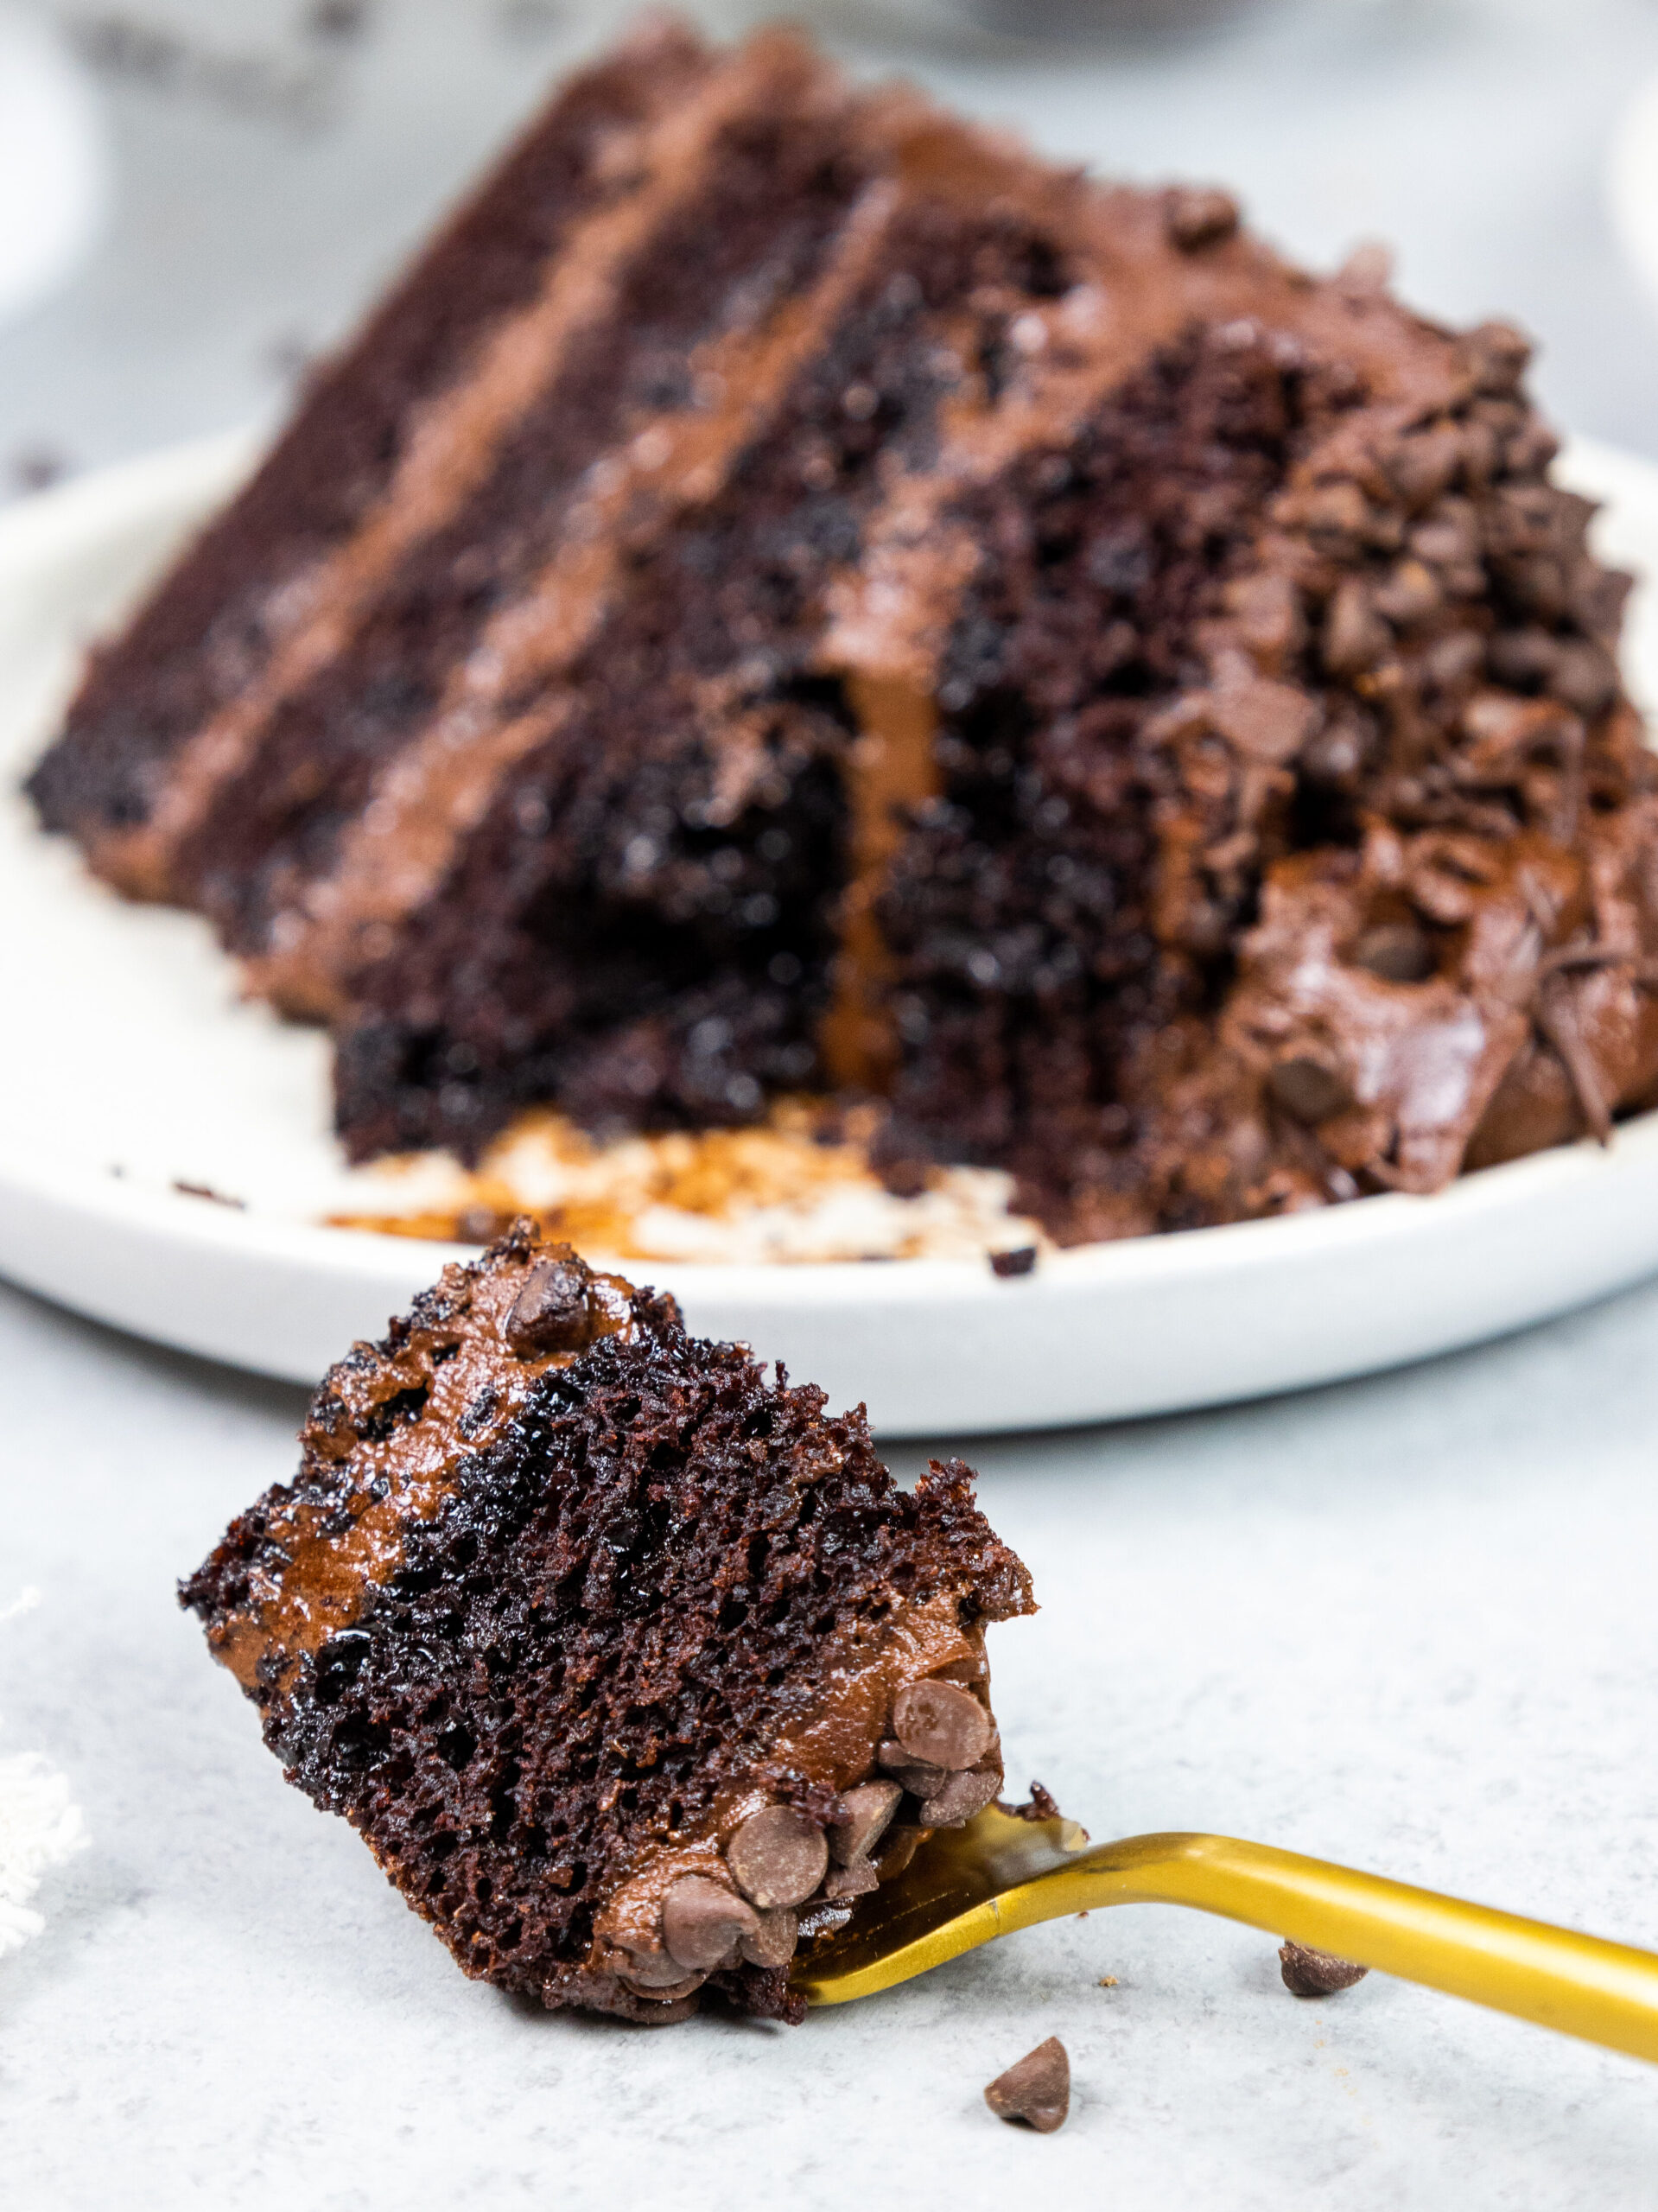
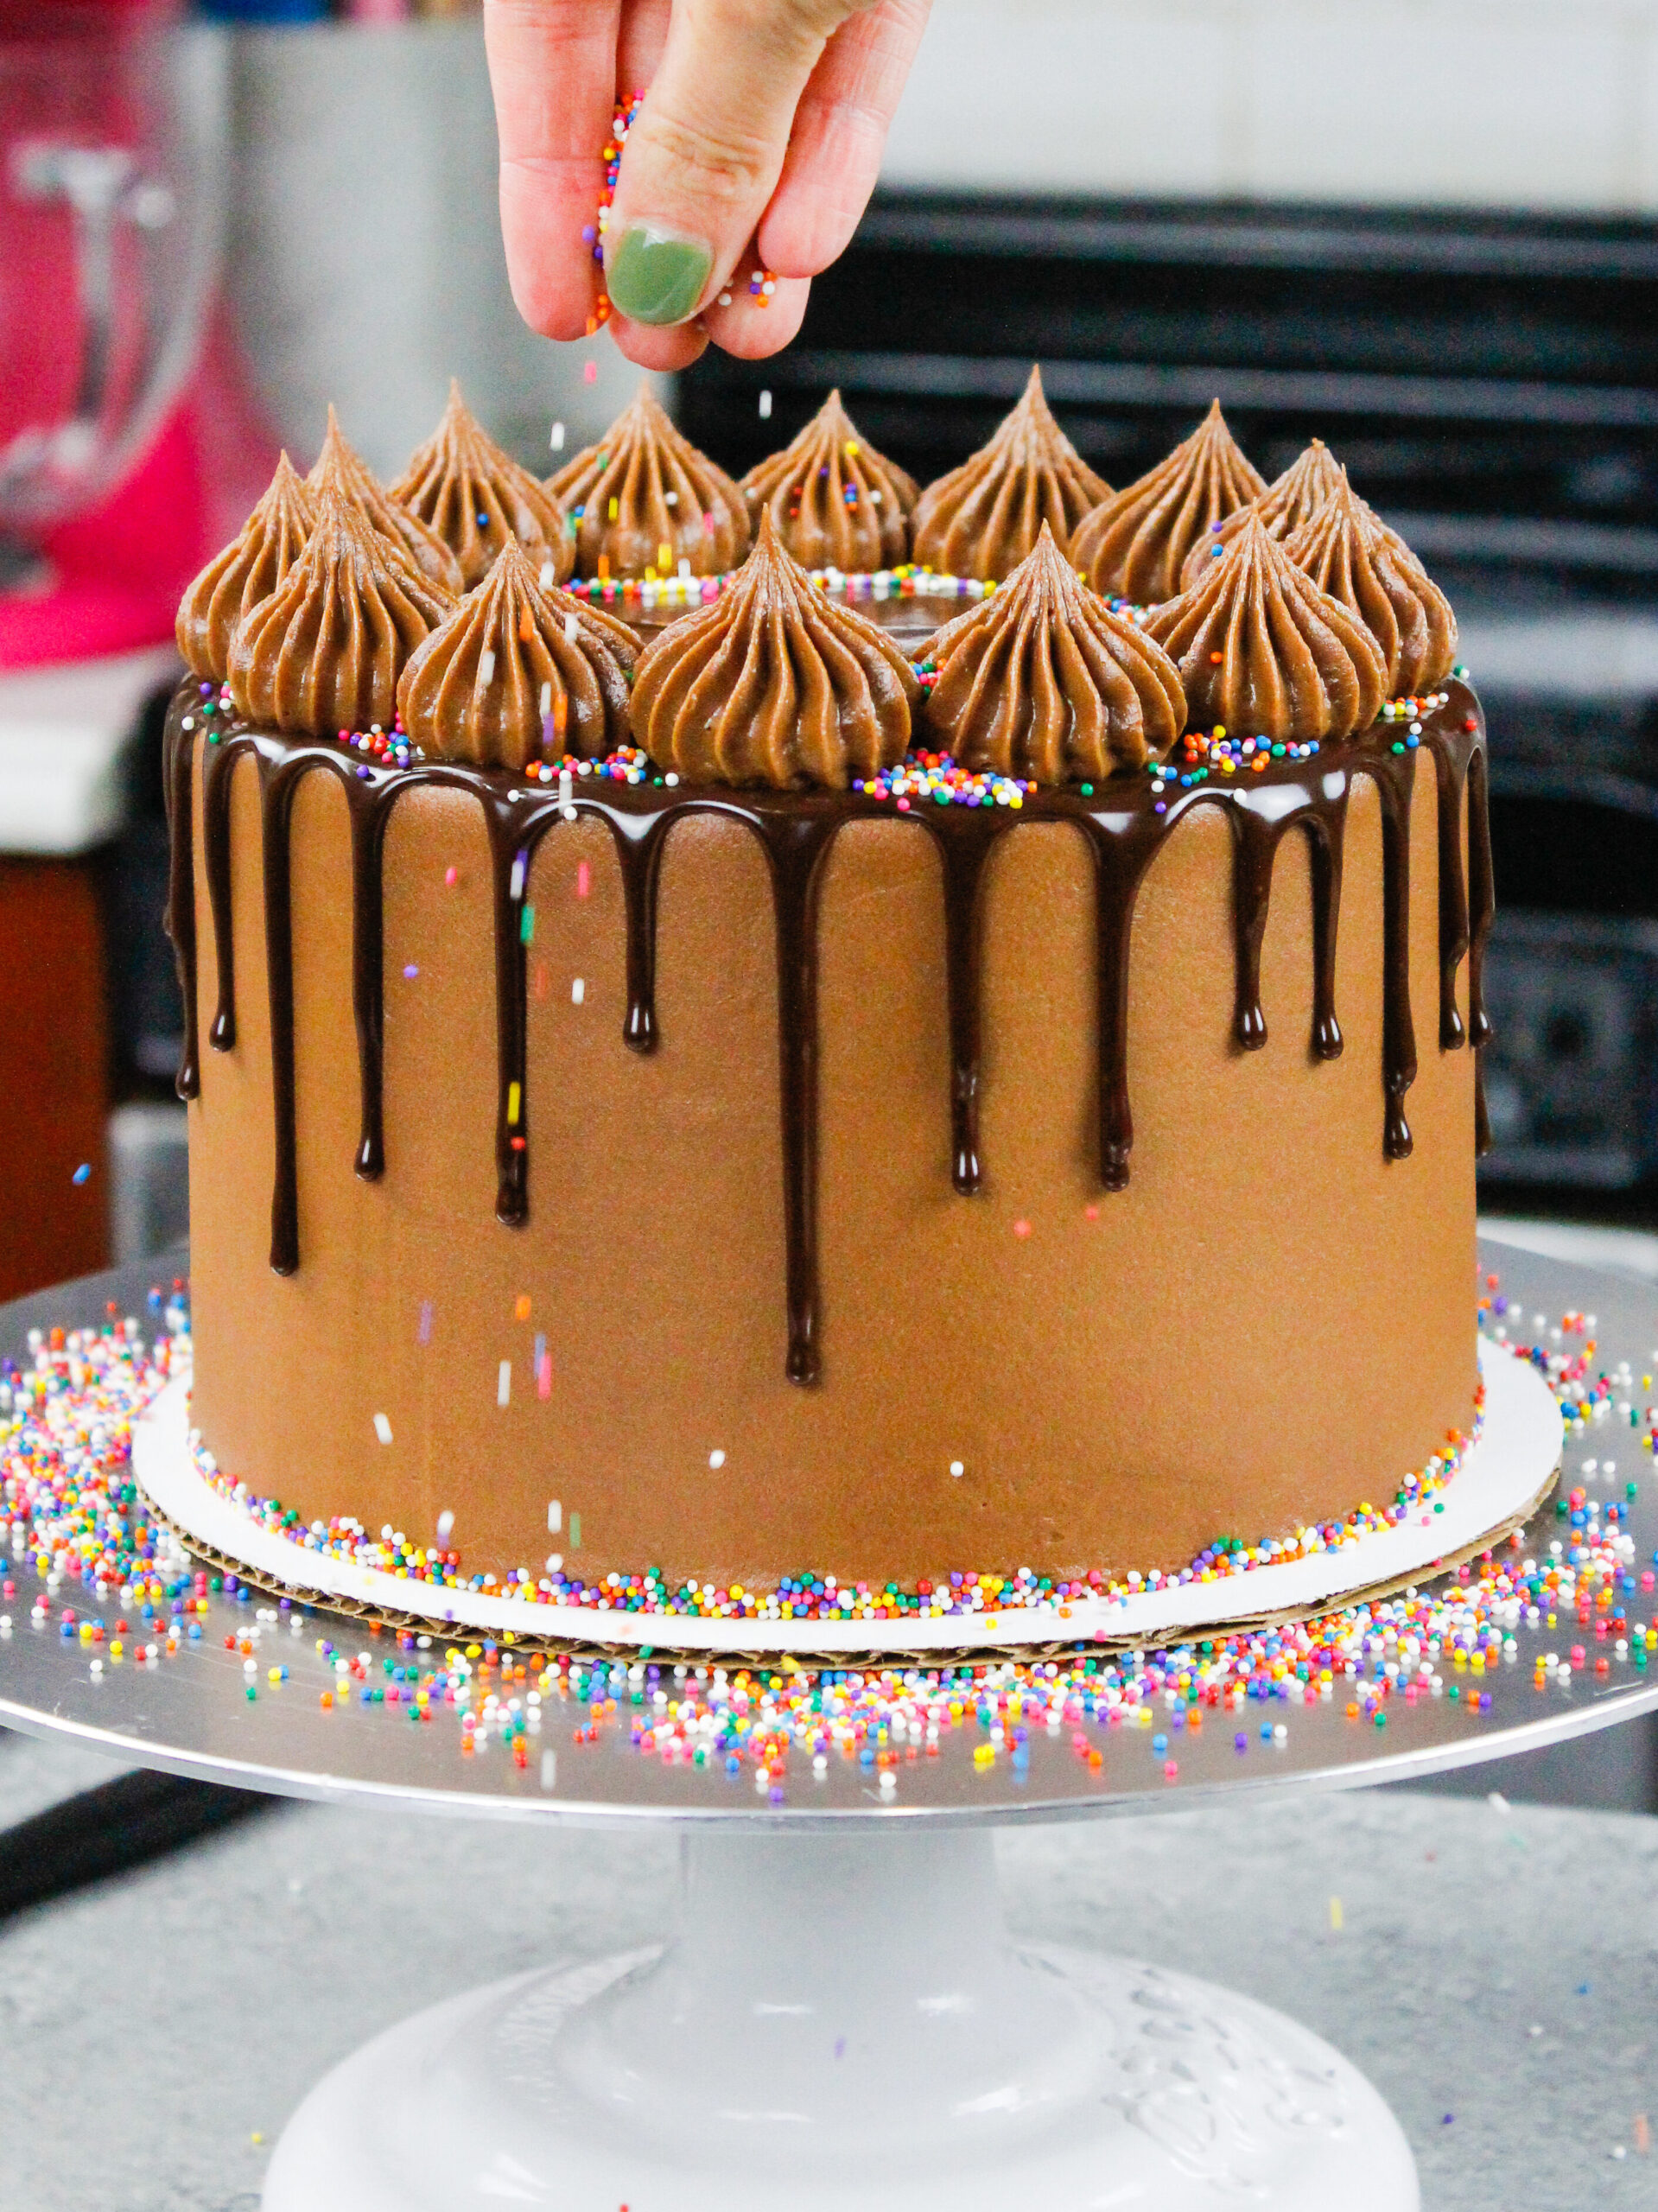
Step 5: Add the Second Layer of Frosting & Decorate
Then add a thicker layer of cream cheese buttercream around the cake and use the back of a spoon or offset spatula to make swoops in the frosting.
Then decorate as desired and enjoy!

Substitutions & Swaps: Chocolate Cake Layers
While I love this chocolate cake recipe just the way it is, I know some of you might not have all of these ingredients on hand.
Below are some swaps and substitutions that can be made in this recipe:
- All-Purpose Flour – This recipe turns out best with all-purpose flour. However, you can swap in a good gluten-free flour blend (like this) if needed. Just be sure to stir the batter longer than normal to help give the cake proper structure, and let the batter sit for about 20 minutes before baking it if you opt to make a gluten-free version.
- Granulated Sugar – I do not recommend reducing the amount of sugar or changing the type of sugar, as it will change the texture of the cake layers.
- Baking Cocoa – I like to use the Ghirardelli or Hershey’s brand of unsweetened baking cocoa, but you can use any brand! You can also use dark or black cocoa powder.
- Buttermilk – You can also use full-fat yogurt, sour cream, whole milk, or an alternative yogurt or milk (almond, soy, oat).
- Vegetable Oil – Any flavorless oil can be used in this recipe. Canola, vegetable, or even sunflower oil would all work great. I don’t recommend olive oil, though, as it has a strong flavor and will change the taste of the cake.
- Eggs – This recipe uses 2 large eggs. If you have an egg allergy, you can try using a vegan egg replacer.
Substitutions & Swaps: Cream Cheese Buttercream
Below are some swaps and substitutions that can be made in this cream cheese buttercream recipe.
- Unsalted Butter – If you only have salted butter on hand, you can use it in place of the unsalted butter. Just be sure to omit the salt that this frosting recipe calls for. You can also use vegan butter in its place!
- Cream Cheese – Use full-fat cream cheese for best results! I like to use the kind that comes in a brick.
Making This Chocolate Cake with Cream Cheese Frosting in Different Sizes
I used 8″ cake pans to make this cake, but this recipe can be used to make different-sized cakes. You can also half or double the ingredients to make a half or double batch!
You can make four 7″ or 6″ cake layers with one batch of batter. Bake the cake layers at
350°F/175°C for 24-28 minutes or until a toothpick comes out with a few moist crumbs.
One batch of batter can also be used to make one 9×13-inch sheet cake. Bake it at
350°F/175°C for 25-35 minutes and use flower nails or heating cores to help the cake bake evenly.
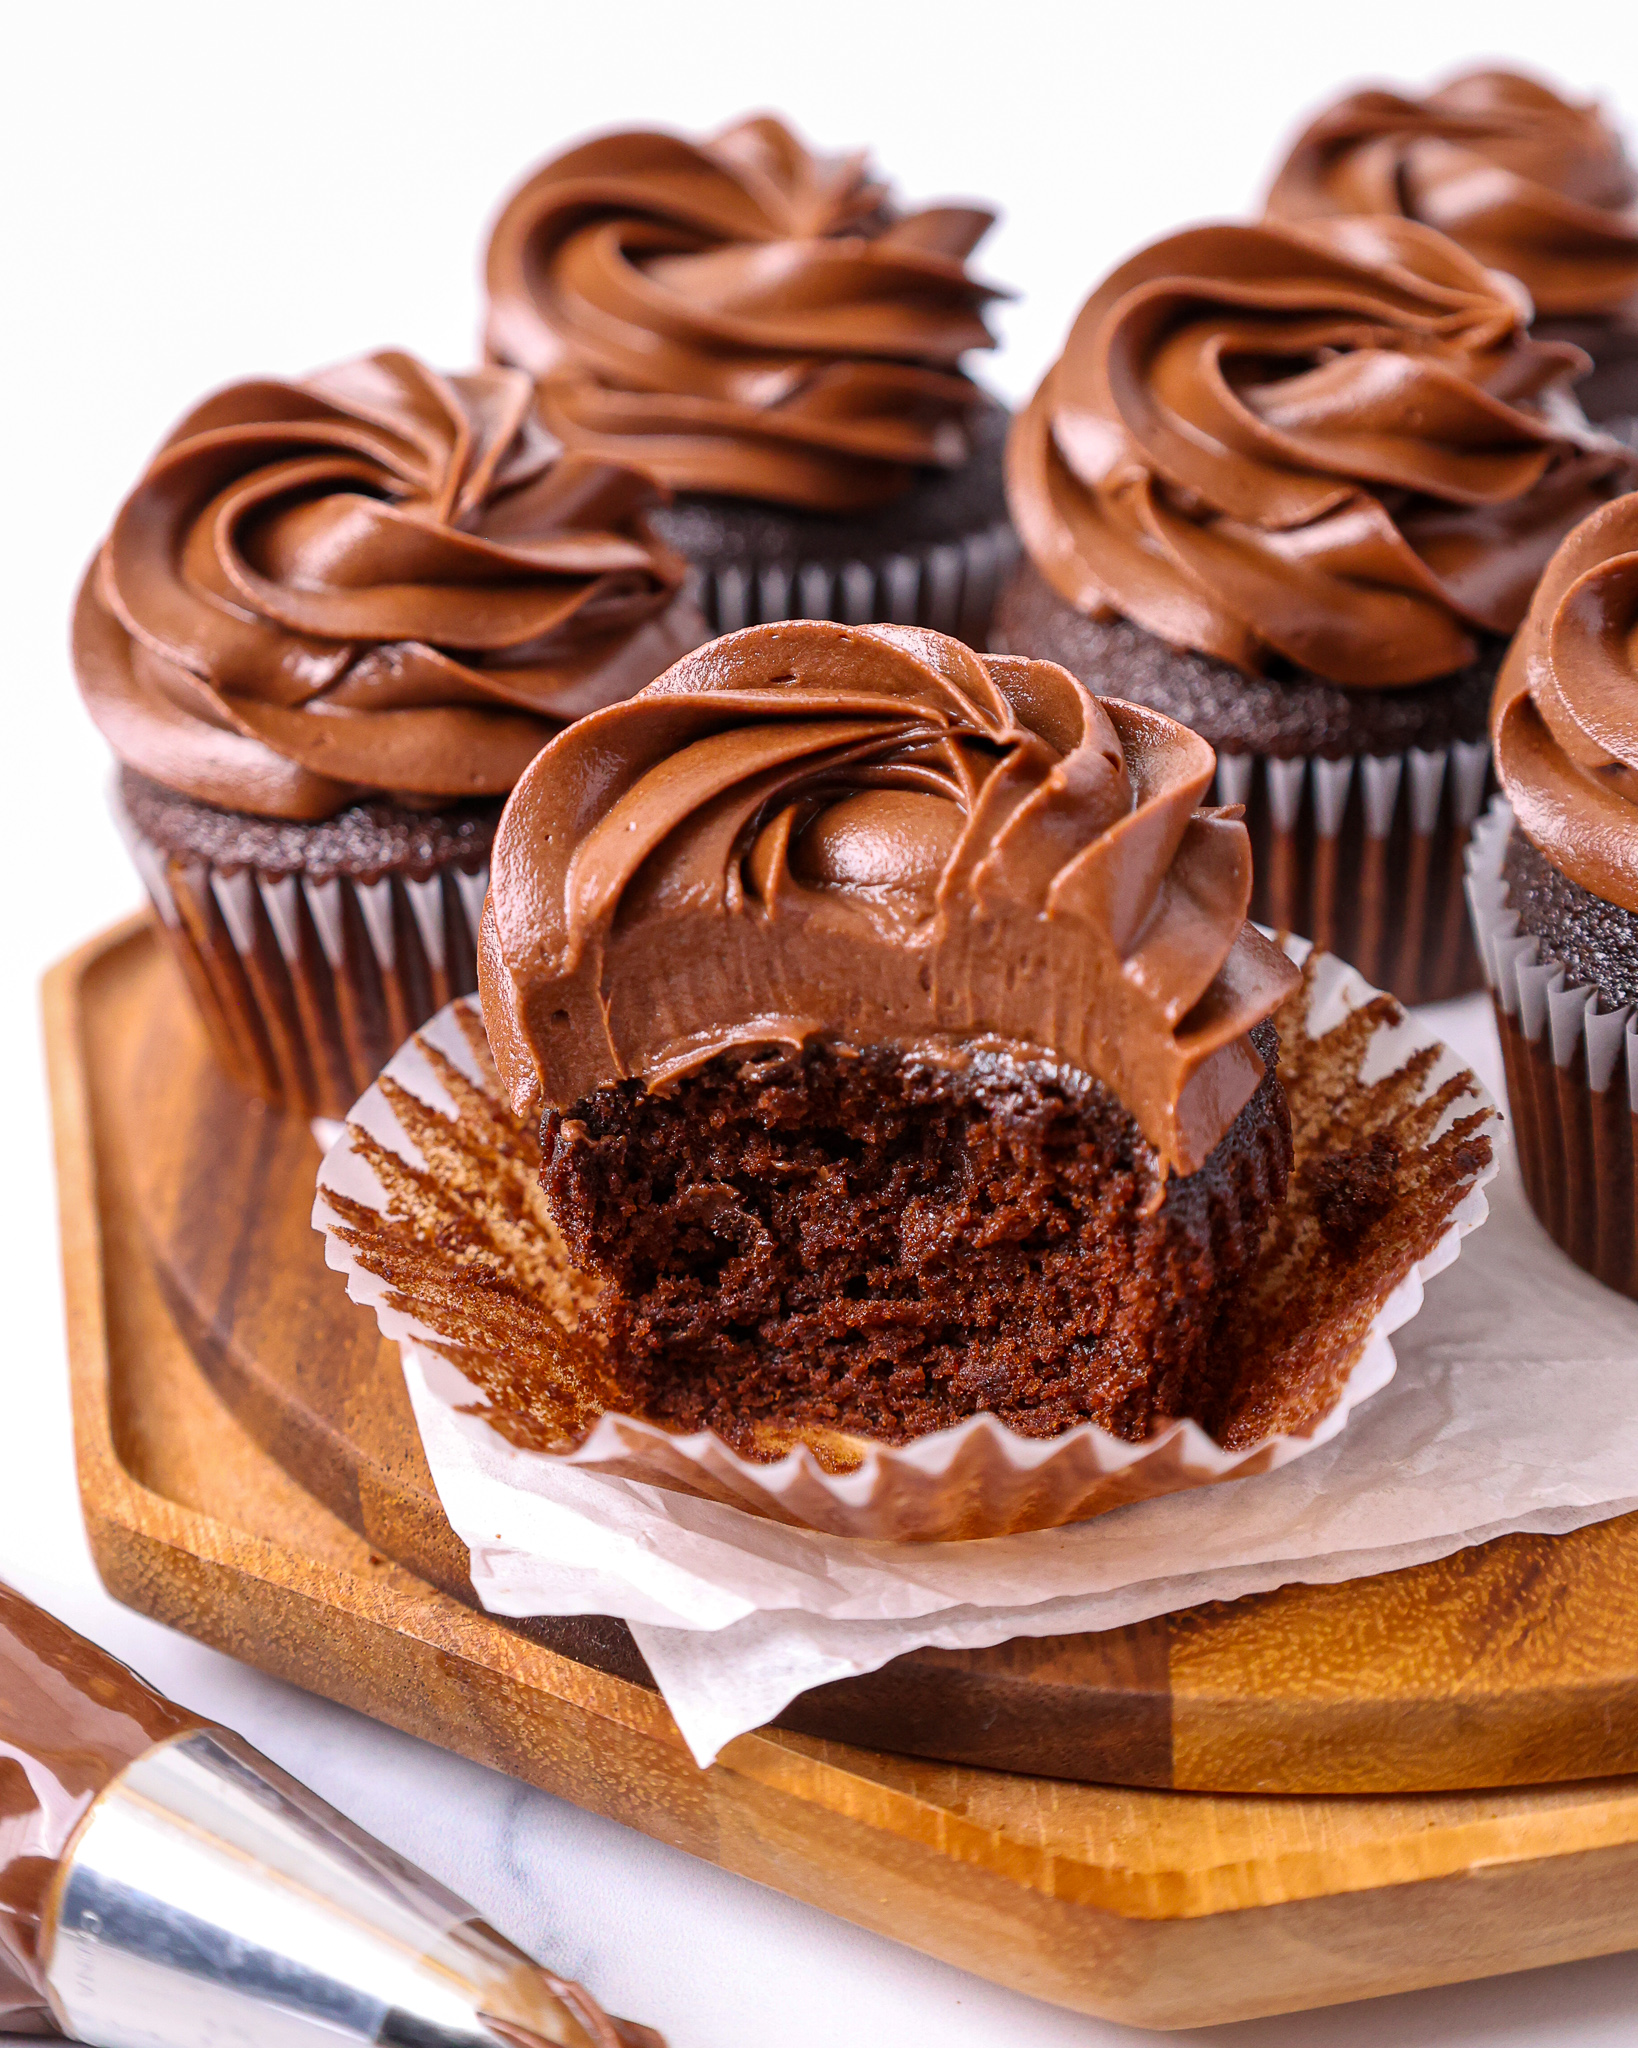
If you want to make chocolate cupcakes with cream cheese, I highly recommend using my chocolate cupcake recipe with 1/2 batch of my cream cheese buttercream recipe! One batch makes 12 chocolate cupcakes.
Making this Chocolate Cake with Cream Cheese Frosting in Advance and Storage Tips
I recommend making your cake layers in advance and freezing them. It breaks the process up and makes it more approachable.
You can also make the frosting ahead of time or save any leftover frosting! It can be stored in an airtight container in the fridge for up to a month.
This frosting can also be stored in the freezer for up to 3 months. Just be sure to give it a good stir once it thaws to make it nice and smooth again.
An uncut, frosted cake can be stored in the fridge for 5 days.
Tips for Making the Best Chocolate Cake with Cream Cheese Frosting
- Ingredients at room temperature mix together better! Bring cold ingredients to room temperature before starting.
- Properly measure your cake flour (spoon into the cup measure, then level). Or better yet, use a kitchen scale to measure your dry ingredients.
- Use a scale to weigh your cake pans as you fill them. Make sure each pan has the same amount of batter will make your cake layers bake to the same height and bake more evenly.
- Chill your cake layers in the freezer for about 20 minutes. It makes it so much easier to stack and frost them!
Let Me Know What You Think
If you make this chocolate cake with cream cheese frosting, I’d love to hear what you think! Please leave a rating and comment below.
And don’t forget to tag me @chelsweets and #chelsweets so that I can see your amazing creations!
Chocolate Cake with Cream Cheese Frosting
Equipment
Ingredients
Chocolate Cake Recipe
- 2 cups all-purpose flour 260g
- 2 cups granulated sugar 400g
- 3/4 cup unsweetened baking cocoa 75g
- 2 tsp baking powder 8g
- 1 1/2 tsp baking soda 9g
- 1 tsp fine salt 6g
- 1 cup warm water 240g
- 1 cup buttermilk, room temperature 240g
- 1/2 cup vegetable or canola oil 110g
- 2 large eggs, room temperature 112g
- 2 tsp vanilla extract or vanilla bean paste 8g
Cream Cheese Buttercream Frosting
- 1 1/2 cups (3 sticks) unsalted butter, room temperature 339g
- 1 cup (8 oz.) full-fat cream cheese, room temperature 226g
- 1 Tbsp vanilla extract or vanilla bean paste 12ml
- 1 tsp fine salt 6g
- 7 cups powdered sugar 904g or a 2 lb. bag
Instructions
Chocolate Cake Layers
- Preheat the oven to 350°F/175°C. Line and grease three 8-inch cake pans with parchment paper and nonstick spray. Set aside.
- Combine 2 cups all-purpose flour, 2 cups sugar, 3/4 cup cocoa powder, 2 tsp baking powder, 1 1/2 tsp baking soda, and 1 tsp of salt in a large bowl. Whisk together until combined.
- Add 1 cup of buttermilk, 1 cup of water, 1/2 cup oil, 2 eggs, and 2 tsp vanilla extract in the dry ingriedents. Mix by hand until fully incorporated. The batter will be on the thin side, but that’s the consistency you're after!
- Divide the batter evenly between the cake pans and bake for about 23-25 minutes. I like to use a kitchen scale to weigh the pans. It makes sure each pan has the same amount of batter and helps the cake layers bake up to be the same height.
- Remove the cake layers from the oven and let them cool in the pans for about 10 minutes. Gently run an offset spatula around the rim of the cake pans to loosen them, then flip them onto wire racks to finish cooling.
- These cake layers bake up pretty flat, so leveling them is optional. If you want to level them with a serrated knife, make sure to wait until the cake layers have fully cooled to room temperature. If you make these in advance, wrap and freeze them at this point.
Cream Cheese Buttercream Frosting
- While the cake layers bake and cool, make the cream cheese buttercream frosting. Beat 1 1/2 cups of butter and 1 cup of cream cheese at medium speed for 30 seconds with a stand mixer and paddle attachment or hand mixer until smooth.
- Add in 1 Tbsp vanilla extract and 1 tsp fine salt and beat on low until the ingredients are combined.
- Gradually mix in 7 cups of powdered sugar on a low speed. Mix on the lowest setting for another minute to make sure the frosting is nice and smooth.
- If the frosting seems too thick at this stage, you can add in some heavy cream (1 tablespoon at a time). If the frosting seems too thin, add in more powdered sugar (1/4 cup at a time).
- Once it's reached the desired consistency, cover the cream cheese frosting with a piece of plastic wrap to prevent a crust from forming.
Assembling this Chocolate Cake with Cream Cheese Frosting
- If possible, chill the cake layers in the freezer for 20 minutes before stacking them. This will make them so much easier to frost and will minimize crumbing.
- Stack and frost cake layers on a greaseproof cake board or flat plate using a dab of frosting to help stick the first cake layer to the board.
- Spread a thick, even layer of cream cheese frosting on top of the cake layer. Repeat this step with the second cake layer, then place the top cake layer upside down to make the cake easier to frost.
- Carefully spread a thin coat of frosting around the cake to fully cover the cake layers with a large offset spatula. Smooth with a large offset spatula, then chill the cake in the fridge (10 minutes) or freezer (5 minutes) until the frosting is firm to the touch.
- Then add a thicker layer of cream cheese buttercream around the cake and use the back of a spoon or offset spatula to add texture to the frosting.
Video
Notes
Recipe Variations
This recipe can also be used to make a sheet cake! One batch will make 1, 9 x 13-inch cake that’s about 1 1/2 inches tall. Bake it at 350°F/175°C for 25-35 minutes and use flower nails or heating cores to help the cake bake evenly.Tips for Making the Best Chocolate Cake with Cream Cheese
- Ingredients at room temperature mix together better! Bring cold ingredients to room temperature before starting.
- Properly measure your flour (spoon into the cup measure, then level). Or better yet, use a kitchen scale to measure your dry ingredients.
- Use a scale to weigh your cake pans as you fill them. It will make your cake layers bake to the same height and bake more evenly.
- Bang your cake pans on the counter before putting them in the oven. This brings any big air bubbles that are trapped in the batter to the surface.
- Chill your cake layers in the freezer for about 20 minutes before assembling the cake. It makes it so much easier to stack and frost them!
- If you want to make cupcakes, I recommend using my moist chocolate cupcake recipe. It has a super similar texture and makes the perfect amount of batter for a dozen cupcakes.
Making This Chocolate Layer Cake in Advance & Storage Tips
I recommend making your cake layers in advance and freezing them. It breaks the process up and makes it more approachable. You can also make the frosting ahead of time, or save any leftover frosting! It can be stored in an airtight container in the fridge for up to a month or in the freezer for up to 3 months. Be sure to give it a good stir once it thaws to get the consistency nice and smooth again. A frosted cake can last in the fridge or freezer for up to a week. If you cut into the cake and have leftovers, use any remaining frosting to cover the cut section to keep it moist and store in the fridge for up to 3 days.Nutrition
Other Recipes You Might Like:
I am so EXCITED to see this recipe!! This combination has been a favorite of mine since I was a little kid. I will be making this ASAP!
YES!!!! I am obsessed with the combination too Ary 🙂 Hope your cake turns our amazing!!!
I have 2) 9” cake pans.
How should I adjust the cooking times?
Hi Cathy,
One batch of batter should be the perfect amount to make 2, 9-inch cake layers. The bake time should be very similar, I’d say bake for 24-27 minutes. Hope that helps, happy baking!
@Chelsweets, I also have 9” cake pans, so I should only use 2 instead of 3?
Hi Vanessa,
Yup!! Happy Baking!
@Chelsweets, if i only have two 8 inch pans can I make this recipe work? Or do I need to purchase a third pan or adjust the amount of ingredients?
You can either let the extra batter sit until the first batch of layers is baked, then bake the last layer, or make 2/3 of the batter to make 2 cake layers. Hope that helps, happy baking!
Can I make the frosting with (much) less butter?
Hi Eve,
You could swap out some of the butter in the frosting recipe for cream cheese, but I wouldn’t recommend just using less butter. The frosting is already on the sweet side, and if you reduce the amount of butter the frosting will be way too dry and sweet.
The ratio of powdered sugar to fat (cream cheese and buttercream) is important to maintain to make sure the frosting has the right consistency and taste. Hope that helps, happy baking!
It’s the first time I’ve actually made a three tier cake (I’m a complete novice at baking) and it was absolutely delicious. It is disappearing very quickly between just the two of us:-). I will definitely be making this again. Thanks for the recipe!
Love that Eve!! 🙂 That’s so wonderful to hear, thank you for sharing! Happy baking!
Made this as a sheet cake. It came out beautifully. Taking it to church tomorrow. I’m sure it will be a hit??
Yay! So happy to hear that Donna, I hope everyone loves it!! Thank you for sharing 🙂
I love this recipe! Best chocolate cake I’ve ever made. How full would you fill cupcake liners to make this into cupcakes? Thanks!
So happy to hear that Rebecca! I’d suggest filling the liners about 3/4 full. Hope that helps, happy baking!
I’m planning to make this for my son’s 2nd bday. If I have 3 9in cake pans should I use measurements as they are, increase by 1/2, or double?
Hi Jaimie,
Great question! I would recommend making 1.5 batches and making 3, 9-inch cake layers. They’ll end up being slightly taller than mine are in the picture, and will need a few minutes longer in the oven baked at the same temperature that the recipe calls for. Hope that helps, happy baking!!
You mention simple syrup in the assembly instructions but I don’t see it anywhere in the recipe. “Chill your cake layers in the freezer for about 20 minutes before assembling the cake and before adding the simple syrup. It makes it so much easier to stack and frost them!”
Is adding simple syrup a necessary step? And if so, how to you make simple syrup and how do you add?
Thanks!
Hi Jenn,
Apologies for any confusion! Sometimes I do add simple syrup to my cakes especially if I’m making them far in advance, but it’s totally optional and you do not need to add it. This cake recipe bakes up super moist and is delicious without it!
I’ve removed that bit of the sentence to make this more clear. Happy baking!
Today was my 4th attempt to make this cake. I’d never tried to bake anything before. I live at 6,400 ft above sea level in an ultra-arid state.
The first attempt turned into brownie bites so I learned about parchment paper cake liners. The second attempt fell so I altered the recipe for altitude. The third attempt fell but I also played around with food coloring until I got a nice lavender colored icing.
Today was my 4th attempt and all the cakes fell in the center again. I know I need to figure out the right chemistry for altitude but I did a nice red white and blue with white stars cake design. I’m kind of proud as I have never tried cake decorating before.
These cakes are delicious. The neighbors will crush it at the party tomorrow. I have two more weeks until my wife’s birthday. Purple is her favorite color. I figure I can get in two more chances.
Your recipe makes a fantastically, moist and rich cake that even a total novice can mix. Once I figure out the altitude, this will be my go to.
Thank you for the recipe.
I’m excited to try again.
I admire your determination Harry!!! Fingers crossed the centers don’t sink in your next attempt! Keep me posted!!!!!!!!
@Chelsweets, My wife’s birthday is tomorrow. Made another attempt tonight and this time, I had heat diffusers.
Those made a huge difference and while the cakes still fell a bit… they are the best I have made so far.
The cakes are in the freezer tonight and I will frost them tomorrow. She likes purple. I’ve got a purple, neon, gel, food coloring to try out.
It’s going to be a bright day!
Glad to hear your latest attempt was the best so far! I’m sure she’s going to love it 🙂 Wishing her a happy belated bday!!!!
I absolutely love your recipes and I try to make as many as possible. This is my first attempt at this chocolate cake tonight with my 21-year-old son and his best friend. Let you know how it goes lol.
Hi Sue,
Aw I love that! I hope it turned out amazing!! Please let me know 🙂
I have made this cake 3 times since I’ve discovered this recipe this past June 2023! I love it! How can I adjust the recipe to make a 3 layer 6 inch cake?
Hi Jennifer,
I love that!!! I would recommend halving the recipe to make 3,6-inch cake layers. The bake time should be similar, maybe a minute or two less. Hope that helps, happy baking!
Hi! I made this today and they did not rise in the middle, any suggestions? Flavor is amazing! Going to try to remake for a birthday tomorrow.
Hi Kristy,
I’m so sorry to hear that! Did they sink in the middle, or did they just not have a rounded top? Did the cake like rise as a whole / was the texture still ok? This recipe doesn’t really dome up a bunch, the layers bake up relatively flat. The don’t dome up the way a sponge cake does.
However, if they didn’t rise much at all of if the texture was dense, it might be you’re leavening agents. If you haven’t used them in a while or they’re older, they lose their potency overtime. That would be my first guess. Hopefully we’ll be able to figure it out together!
I only have3cups powdered sugar can I use 3and 1-2 granulated sugar
Hi Robin,
Sadly I wouldn’t recommend using granulated sugar in the frosting, it’ll give it a grainy texture :/ You could make a half batch of the frosting and make a naked cake though? That might be a good work around!
So I haven’t tasted the cake yet though it smells delicious. I’m still waiting for them to cool but my cakes, like a few others mentioned, sunk in the middle. Or there was rise on the edges but not in the center. Thoughts for next time? I’m really hoping they can still stack and I can just cover with frosting the center or I can fill it.
Hi Jenn,
One of the main reasons people run into slightly sunken centers with this recipe has to do with altitude! Are you above sea level? Even a couple thousand feet can have an impact on how desserts bake up! If so, I’d recommend reducing the baking soda by 1/2 tsp next time and see if that helps.
Luckily even if the centers don’t rise perfectly, the cake should still taste amazing and you should be able to add in a little extra frosting to cover it up 🙂 Hope that helps for next time, happy baking!
@Chelsweets, those little heat diffusers help a ton too.
They really do, I totally swear by them!!
Hi! How tall should each cake layer bake to? I am trying to convert this recipe using your formulae but wasn’t sure the height this recipe makes each layer.
Hi Victoria,
These layers bake up to be slightly less than an inch tall when you use an 8-inch cake pan. Hope that helps, happy baking!
I have made this cake three or four times now and it always sinks in the middle! I’ve used fresh baking powder and soda, made sure my ingredients are room temperature, followed the instructions to a T… Can’t seem to figure it out! I’m not in a high altitude area ( I live in Michigan). I don’t know what to do. I really want to figure this out because this cake is so delicious! I just need it to come out level!
Hi Barbara,
I’m so sorry to hear that! There are quite a few things that can cause the centers of cake layers to sink, but it sounds like you’re doing all the right stuff! It’s so hard to know without being able to see you make the batter / layers. Do you check the centers with a toothpick to make sure they’re fully baked before pulling them out of the oven? Is there any chance they’re slightly underbaked? Every oven bakes differently, and some need slightly longer to bake layers through fully. That’s my best guess!! If you make this again, I’d try the toothpick test (if you aren’t already), and I’d suggest adding 1/2 tsp less baking soda and see if that helps! Hopefully it’s one of those!!
Hi! Do you think avocado or coconut oil could work in place of the vegetable oil in this recipe? We are avoiding seed oils but want to make the cake later this week. Thanks!
Hi Nancy,
Great question, and totally get that! I haven’t tested it out, but I’d think that avocado oil should work great in place of the vegetable oil in this recipe. Hope that helps, happy baking!
@Chelsweets,
We made it with avocado oil and it was amazing! I did two 9 inch cake layers so it took about 30 minutes. Everyone loved it. Thanks so much for the recipe!
So happy to hear that Nancy!! Thank you for sharing 🙂
Loved this recipe! It turned out deliciously moist and received a lot of compliments! I substituted the flour for gluten free flour and only added 500g (2 cups) of icing sugar/powdered sugar to the cream cheese icing. I was worried the icing would then be too buttery without the suggested 7 cups, but it turned out so well! Was perfect for us, as we didn’t want something overly sweet. I will be saving this recipe for future baking attempts 🙂
So happy to hear you loved this recipe Kai, and I love that you were able to adjust it to you preferences 🙂 Thank you for sharing!
Cake tasted really sweet. Is 2 cups of sugar too much? I weighed the ingredients using grams. Can I decrease it abit? The texture was very rich and moist.
Hi Joanna,
The amount of sugar in the recipe has a big impact on the texture of the layers once they’re baked, and I’ve found 2 cups gives it the best texture and taste! You can try reducing the amount of sugar by 1/4 cup or 1/2 cup, but it will make the layers less tender.
You also can try frosting the cake with a less sweet frosting, like a Swiss meringue buttercream (here’s the link to my recipe: https://chelsweets.com/swiss-meringue-buttercream-frosting/)! That might be an easier way to reduce the overall sweetness of the cake.
Hope that helps, happy baking!
My daughter wanted to make this cake for my birthday… so we did. It is AMAZING!! THANK YOU SO MUCH!
Aw I’m so happy to hear that Stephanie!! That is so sweet 🙂 Thank you for sharing, and happy belated birthday!!
Hi! I’ve made this cake twice but this time I’d like to make it in two half sheet pans(18 by 13). Would this recipe work still? And would I have to double it? Thank you!
Hi! I’ve made this cake a few times but this year I’d like to try to make it as a two layer half sheet cake(18 by 13). Would doubling this recipe make it work? Thank you!
I used this recipe to make 12 big cupcakes for my daughter’s birthday and they turned out perfect. Definitely could’ve halved the frosting. Thanks.
I made this and botched it the first time (forgot to flour my pans and they stuck to the pan). The other issue was it didn’t bake for long enough. I think it depends on your oven and how many pans your use, but I had to bake two 9-inch pans for about a full 32 minutes in order for them to come out clean and one of them still almost cracked on me. Even after all of that, I reeeeeeally love this recipe. It was such a hit with my family, and it tasted so damn delicious. Never had a baked good disappear so fast!
Can I substitute the vegetable oil for canola oil or butter?
How much batter should I put in the cake pan if I have 10 in pan?
Hi Cici,
I actually have an entire post to help figure that out, here’s the link for the future: https://chelsweets.com/how-much-cake-batter-per-pan/
Also for reference, this recipe makes 8 cups of batter. Hope that helps, happy baking!
I made this as a sheet cake and then decided to cut the sheet cake in half and stack it for a weirdly shaped 2 layer cake. My crumb coat was awful and it didn’t look pretty but WOW did it taste great. Can’t wait to make this one again!
Hi Shari,
Haha I love this! Honestly, sometimes the “weirdly shaped” cakes end up being the most fun! I’m so glad you loved how it tasted, and I bet your next version will be even more epic. Can’t wait to hear how it goes when you make it again!
Just made this recipe for my mom’s birthday today and it turned out great! I made 2 9inch rounds (added 10 mins to cook them completely) and cut them in half to make a fabulous four layered cake with a chocolate mousse filling. The cream cheese frosting was also yummy, but I found that it would have been a bit too sweet for us if I had used the full 7 cups of powdered sugar- I only ended up using 4. Wish I could attach the pretty pictures of it?
Hi Ashley,
That sounds absolutely wonderful, I bet your mom was thrilled! I love that you turned it into a four-layer cake with chocolate mousse, that must have been such a delicious combo. Great call on adjusting the frosting sweetness too, I always say it’s better to tailor it to your taste. I wish I could see the photos too, but I’m so glad it turned out beautifully for you 🙂
I made this recipe but instead of warm water I added warm coffee! I feel like it made the chocolate flavor even better! Was a hit for my friend’s daughter’s 4th birthday! Thank you!
Going to try to make it into cupcakes for my friend’s wedding this weekend! Hopefully I can get the bake time right.
Ah that would be delicious!! I’d say filling them 3/4 full and baking them 18-21 mins at 350F should work great!! Hope they turn out amazing!
Love that, that sounds delicious!!!! Thank you for sharing Jeremy 🙂
I don’t know how I wasn’t following before. I just stumbled on your site looking for chocolate cakes and wow this recipe came out amazing. I made the batter just as directed and realized I only had one cake pan and two muffins pans so I just poured the batter as is into my muffin pans. These were absolutely delicious soooo moist. The butter cream frosting was so easy to make I only had two sticks a butter and about 8oz of cream cheese it still came out fantastic. Instead of the 900 grams of powdered sugar I used around 600 ish grams ( to taste) so easy to follow. Can’t wait to make more of your recipes!!!
You are too sweet! So happy to hear you loved this recipe, thank you for sharing Martha!
Hi! The recipe sounds amazing. I wanted to make it in a loaf pan instead. How many 9*13″ loaf pans worth cake would this possibly take? Any idea how long i might have to bake it too?
Hi Dona,
When you say 9×13″ loaf pan, do you mean 9×13″sheet pan? If so, a pan that size holds about 14 cups of batter, and one batch of this recipe makes about 8 cups of batter. So you’d probably want to double it! In terms of bake time, it can vary based on whether you use heating cores (like these: https://amzn.to/4ovnR9c which help large cake layers bake more evenly and quickly), but I’d say start checking it between 45 and 55 minutes. Insert a toothpick in the center, and when it comes out with a few moist crumbs, you know it’s ready. Hope that helps, happy baking!