
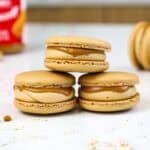
Biscoff Macarons
I am obsessed with Biscoff cookies and cookie butter, so it was only a matter of time until I made Biscoff macarons!
They’re made with French macaron shells, Biscoff buttercream, and a straight-up cookie butter center. They’re a Biscoff lover’s dream!
Making These Biscoff Macarons with the French Method
There are a few different ways macarons are made. French macarons are considered the easiest to make while the Italian and Swiss methods use a few more steps but are more structurally sound.
French macarons also require less equipment. While I love Italian macarons, I like to keep things simple and use the French method for this recipe.
Equipment You’ll Need to Make These Biscoff Macarons
I’ve made quite a few batches of macarons, and they definitely turn out best when the ingredients are weighed, and the macarons are baked on a silpat mat.
These are the tools I like to use when I make these macarons:
- Kitchen scale
- Stand Mixer or Electric Mixer
- Large (18″) piping bag (for the batter)
- Round piping tip (for the batter)
- Small (12″) piping bags (for the filling)
- Large round piping tip (for the buttercream)
- Large, flat baking sheets
- Silpat Mats (or parchment paper)
How to Make These Cookie Butter Macarons: Step-by-Step Process
While the recipe below is quite detailed, I find visual cues to be super helpful!
Below are some photos of the process to help guide you through this recipe.
Step #1: Make the French Meringue
The first step is to make the French meringue!
Whisk the room-temperature egg whites on a medium-low speed until the surface is covered in small bubbles.
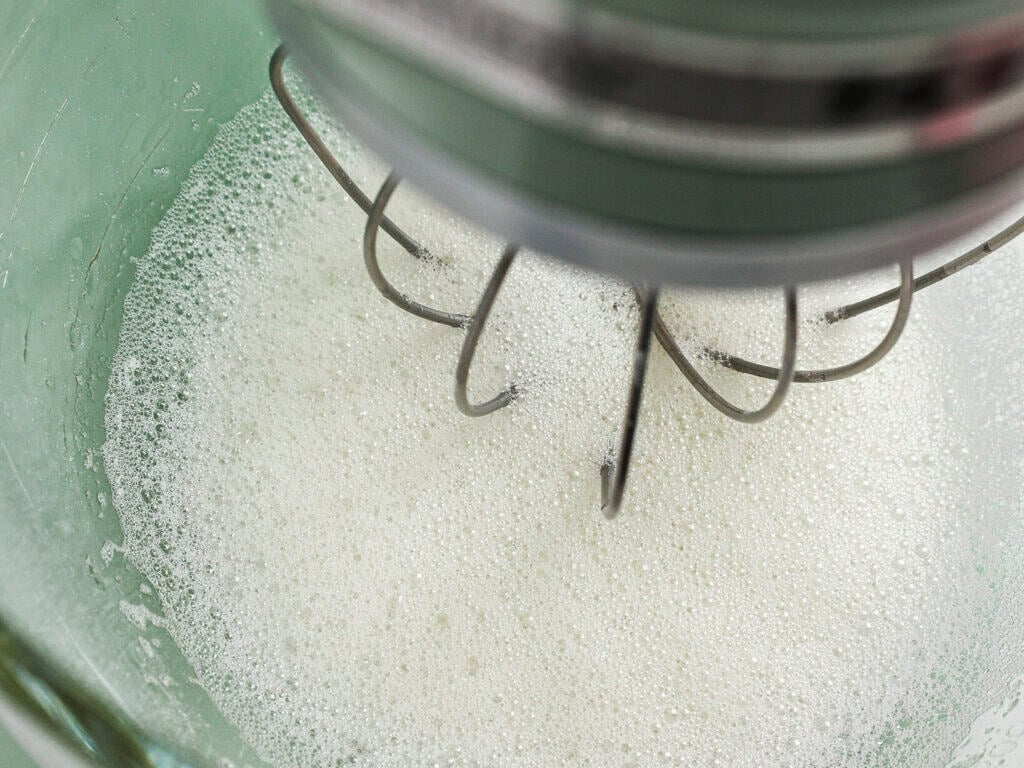
Add in a pinch of cream of tartar and continue to mix until the whisk begins to leave tracks.
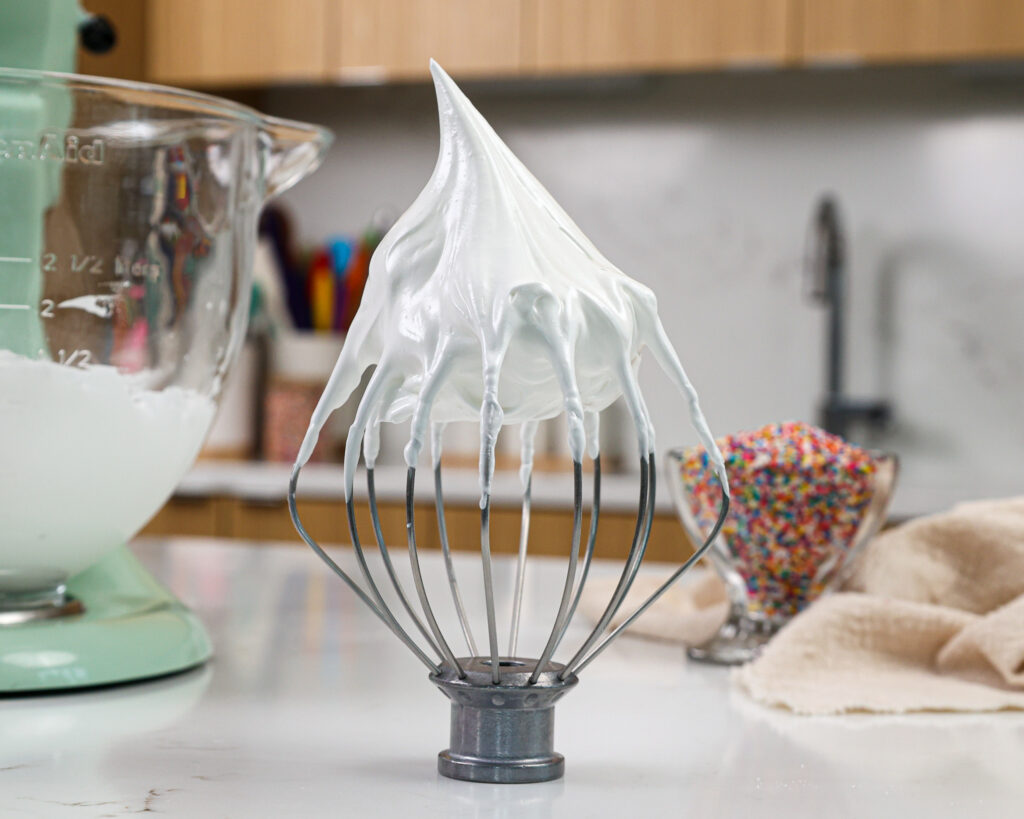
Gradually add the granulated sugar over a few minutes white mixing on a medium-low speed. Then increase the mixing speed to a medium-high speed.
Mix until stiff peaks form, like in the photo below. Keep a close eye on your mixer to avoid over-mixing the meringue.
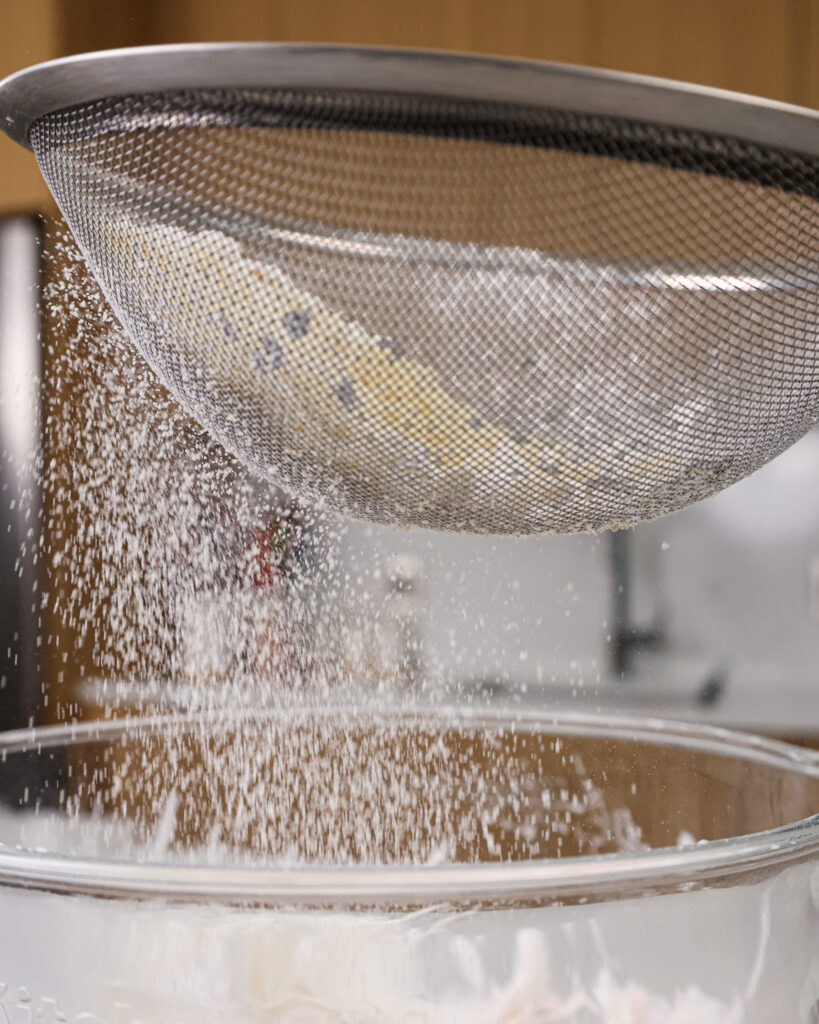
Step #2: Sift and Fold the Dry Ingredients into the Meringue
Sift the superfine almond flour, powdered sugar, and cocoa powder into the meringue. These macarons are made with a chocolate shell.
This might seem like an odd combination with cookie butter, but you can’t really taste the cocoa powder! It’s really there more for the color.
Add a small drop of yellow gel food coloring to give the shells a warm brown color.
Then fold the ingredients together with a rubber spatula.
Use a circular motion that sweeps around the edge of the bowl and then pull through the bottom of the bowl to make sure everything is getting mixed together.

Fold until a thick ribbon of batter runs off the spatula when it is lifted.
You should be able to draw a couple of figure 8’s with the batter running off your spatula in a continuous stream once it is the right consistency.
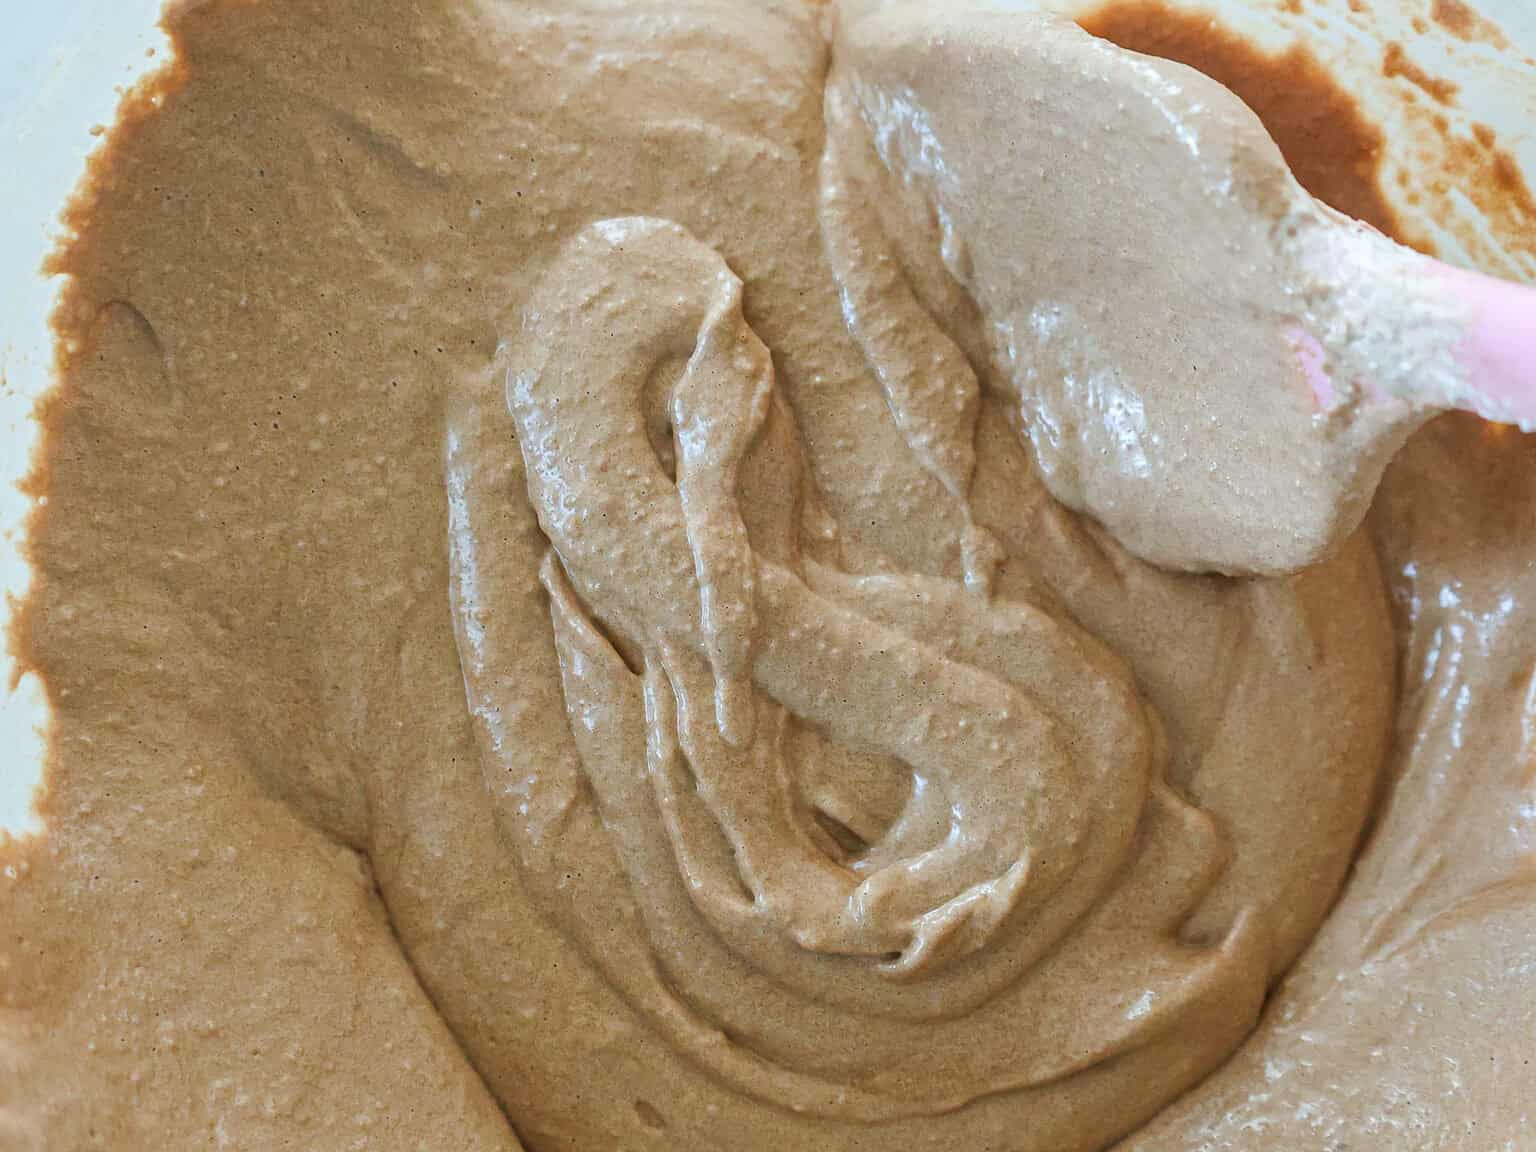
If the stream of batter breaks before you’re able to do this, you may need to fold it a bit more.
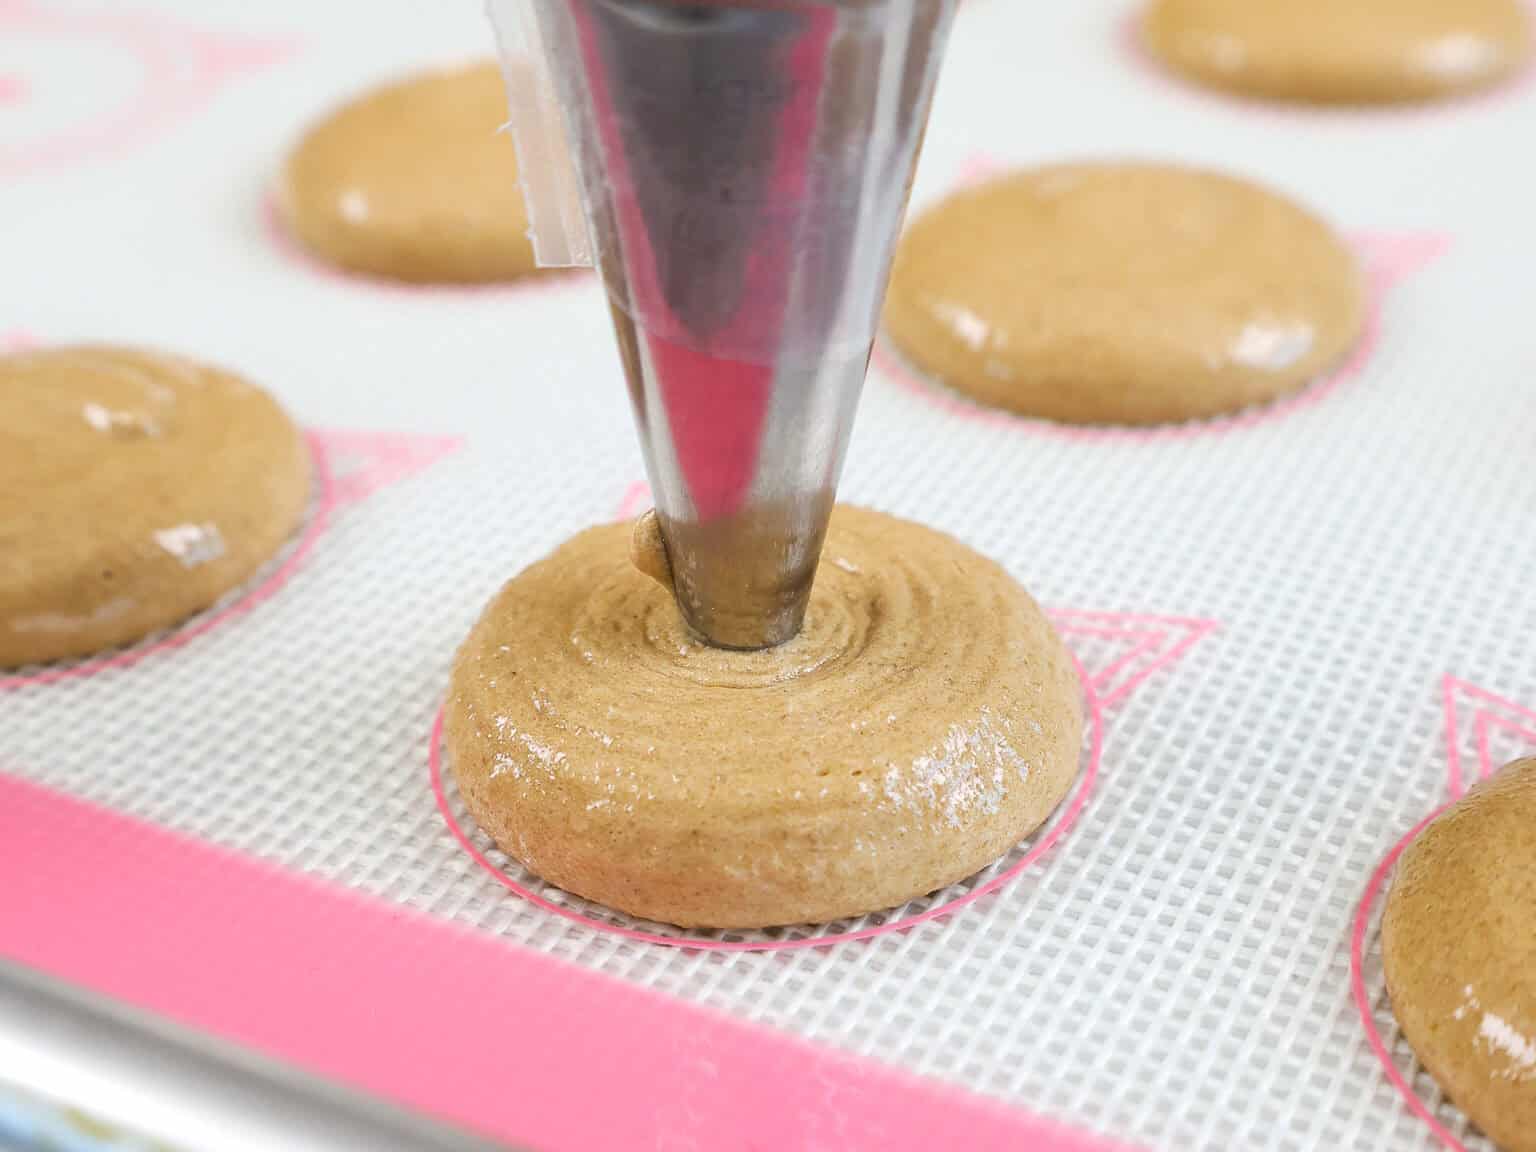
Step #3: Pipe the Macaron Shells
Fill a large piping bag with macaron batter and pipe 1 3/4-inch rounds onto 2 Silpat-lined baking sheets. Space them about 1 inch apart.
Firmly bang or drop your pans on the counter a few times.
This brings any trapped air bubbles to the surface, which can then be popped with a toothpick or a scribe.
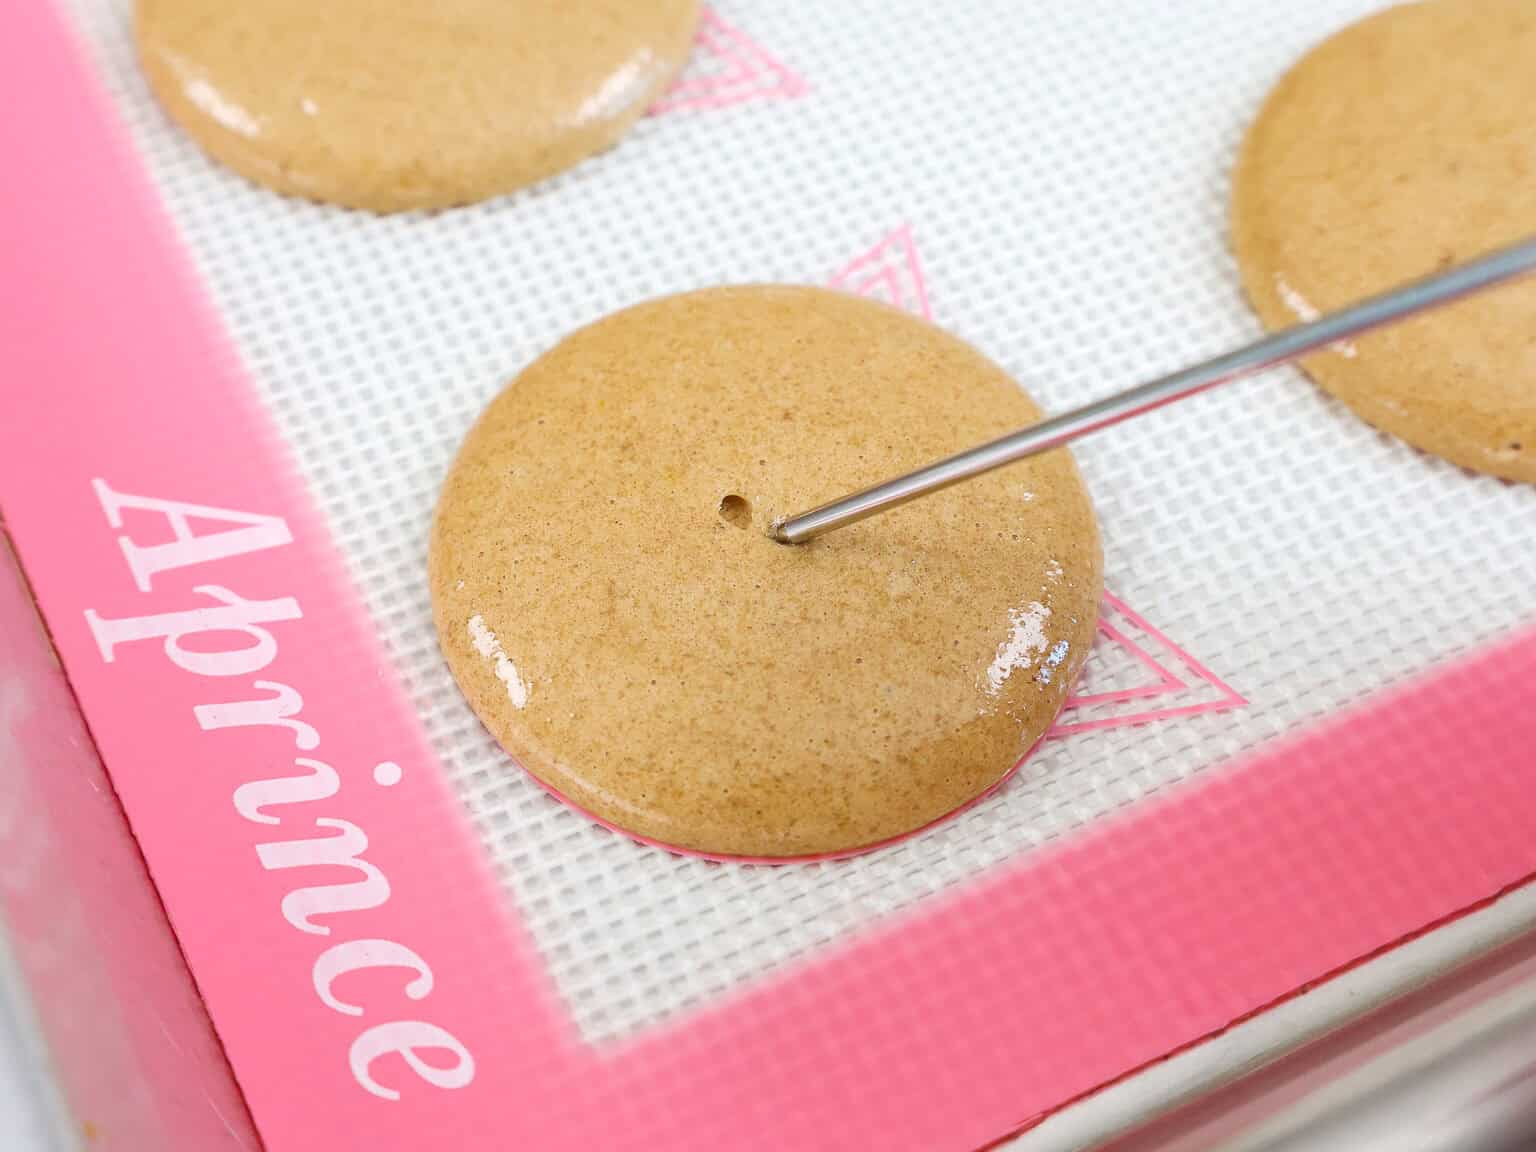
Popping these little bubbles can help you avoid hollow or cracked shells.
Step #4: Rest the Chocolate Macaron Shells
Let the macarons rest for about 30 minutes, or until they form a skin. On rainy days this can take up to an hour where I live!
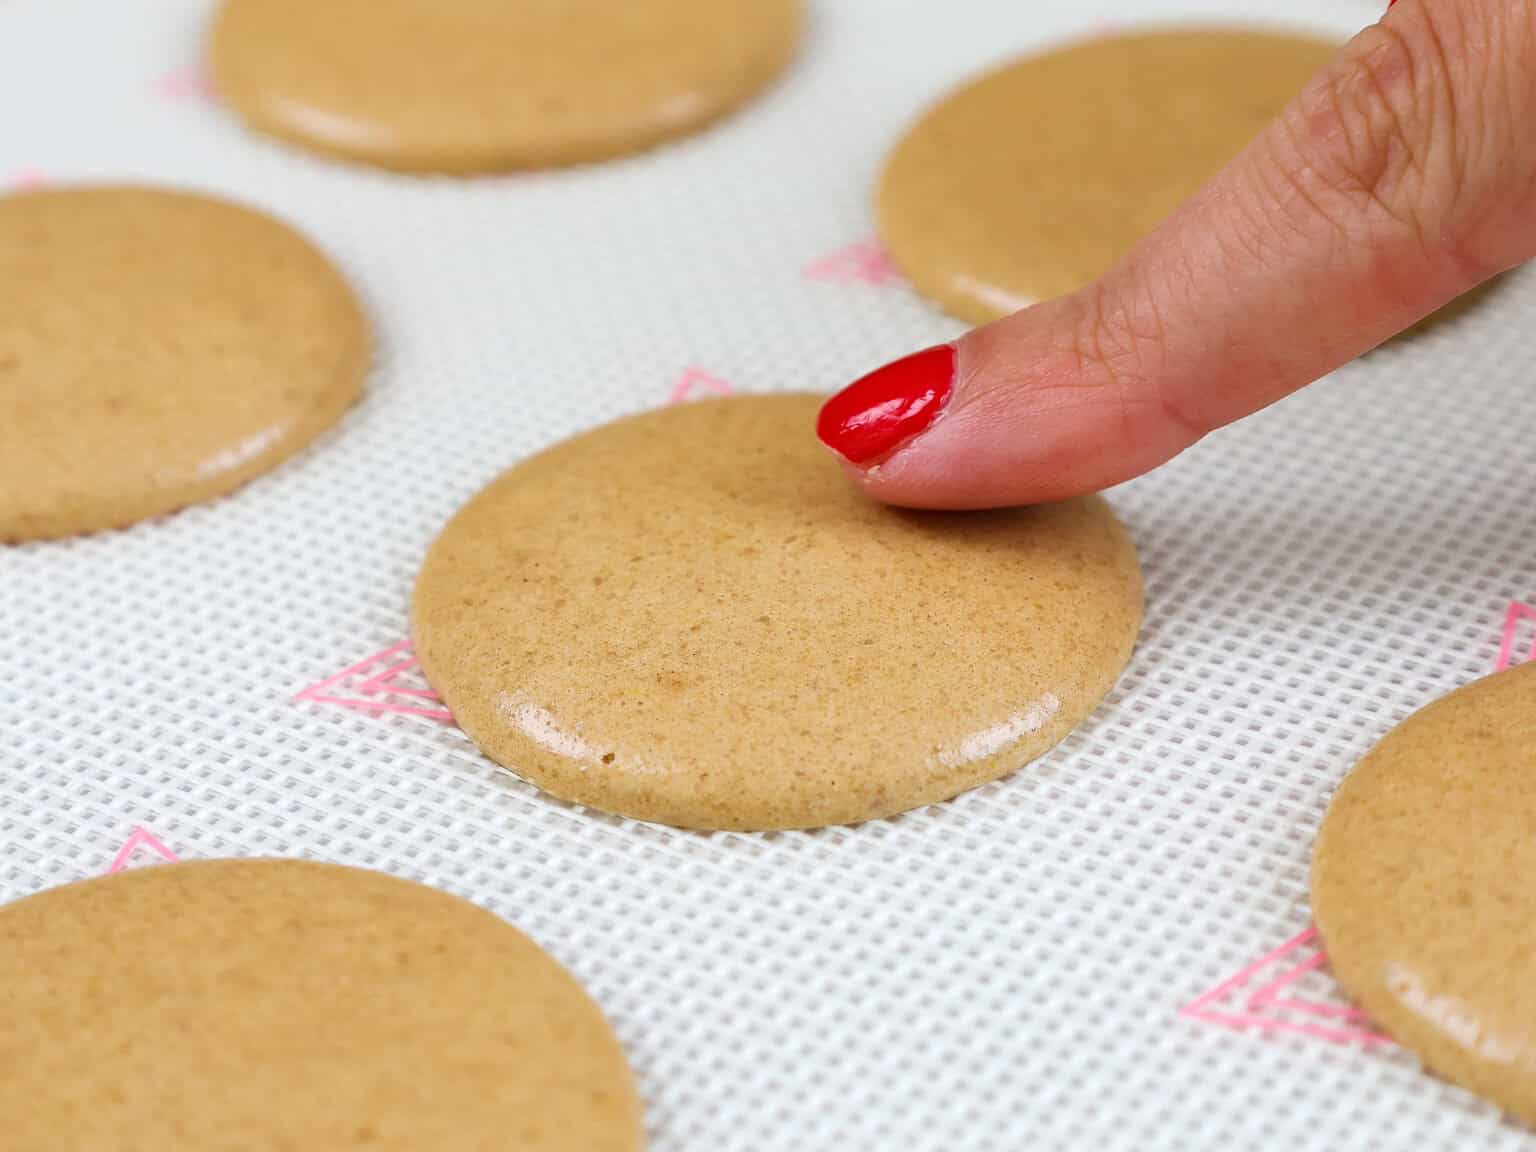
They should be mostly dry to the touch and look matte once they’re ready to be baked.
While the shells rest, preheat your oven.
Step #5: Bake the Macaron Shells
Bake one tray of macarons at a time and place the tray in the middle rack of your oven.
Rotate the pan halfway through to help them bake evenly.
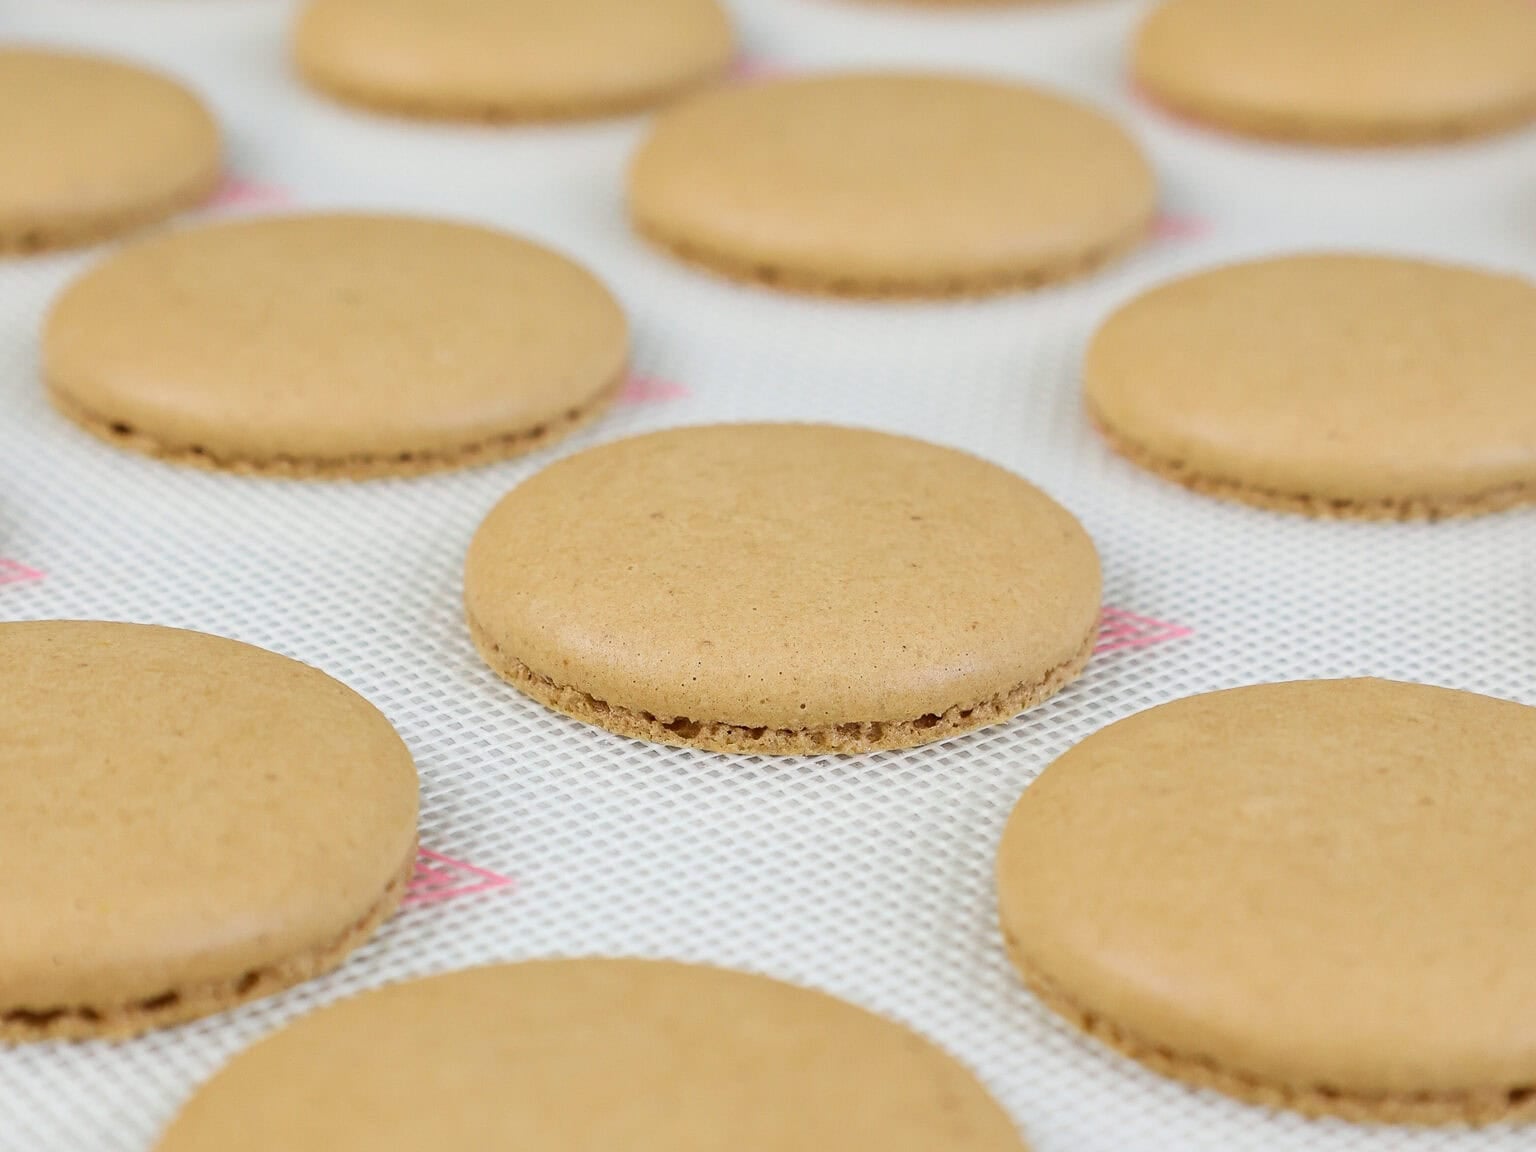
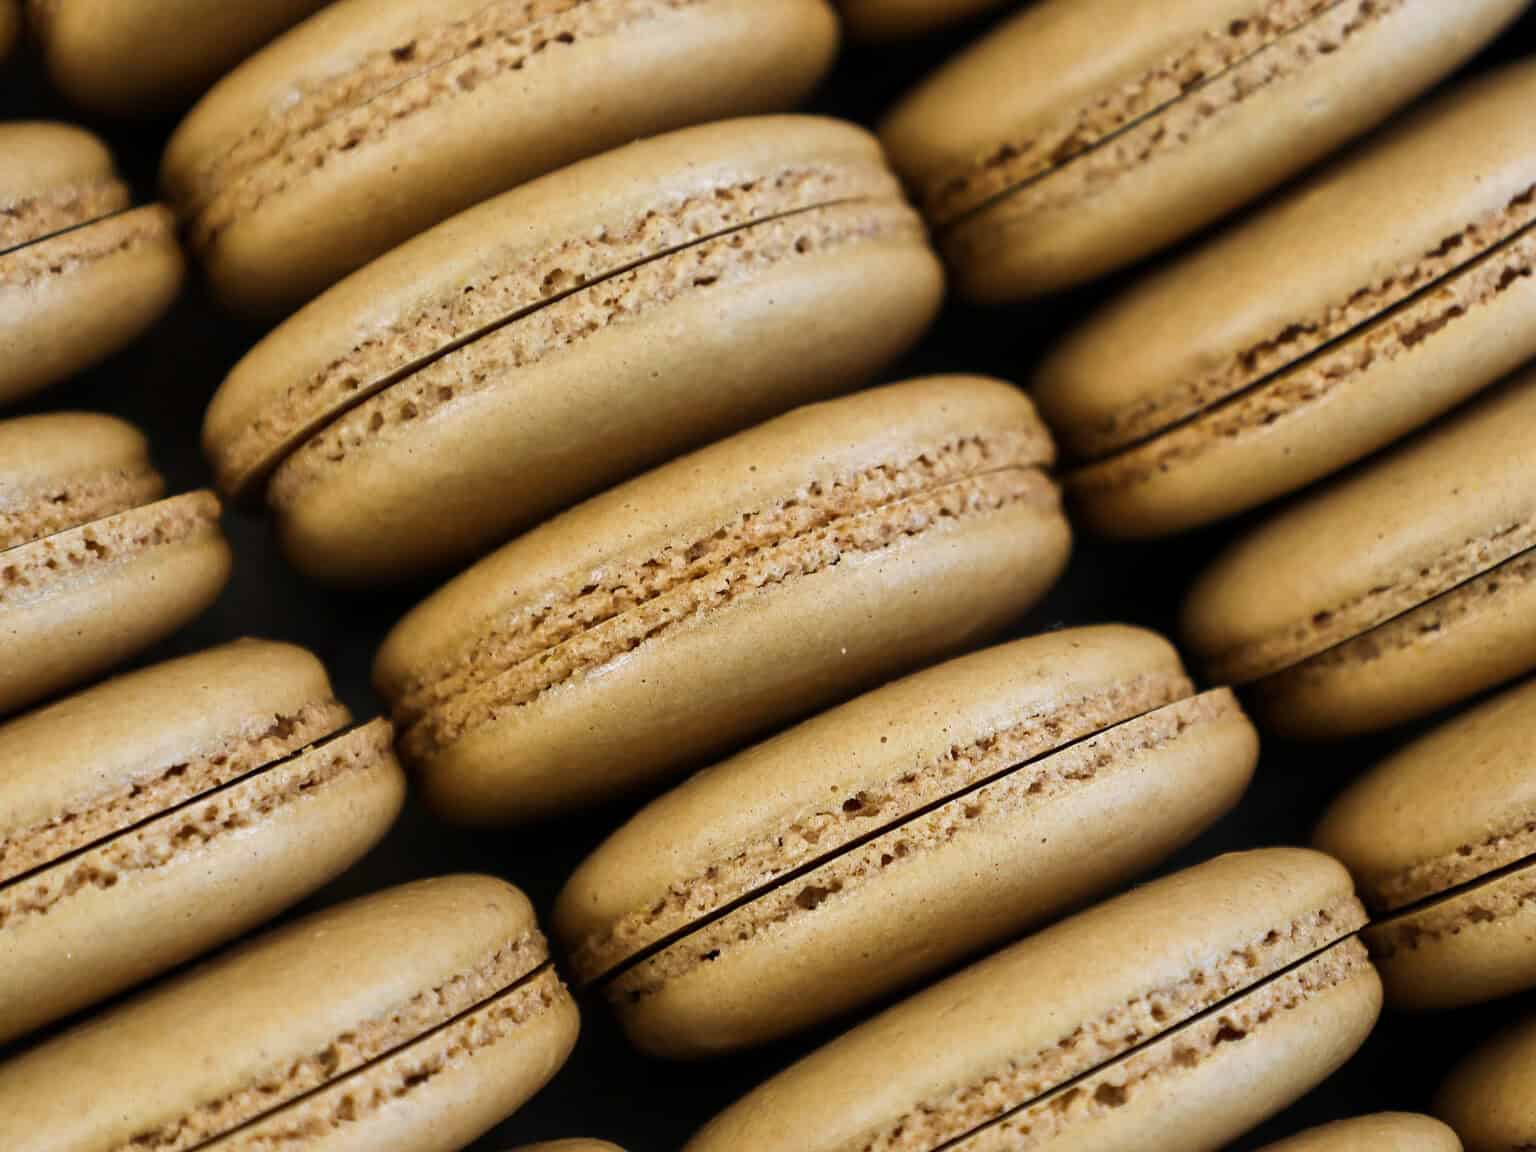
Let the macarons cool fully on the pan, then gently remove them from the silpat mat.
If they’re properly baked, they should peel off the mat cleanly.
Step #6: Assemble these Biscoff Macarons
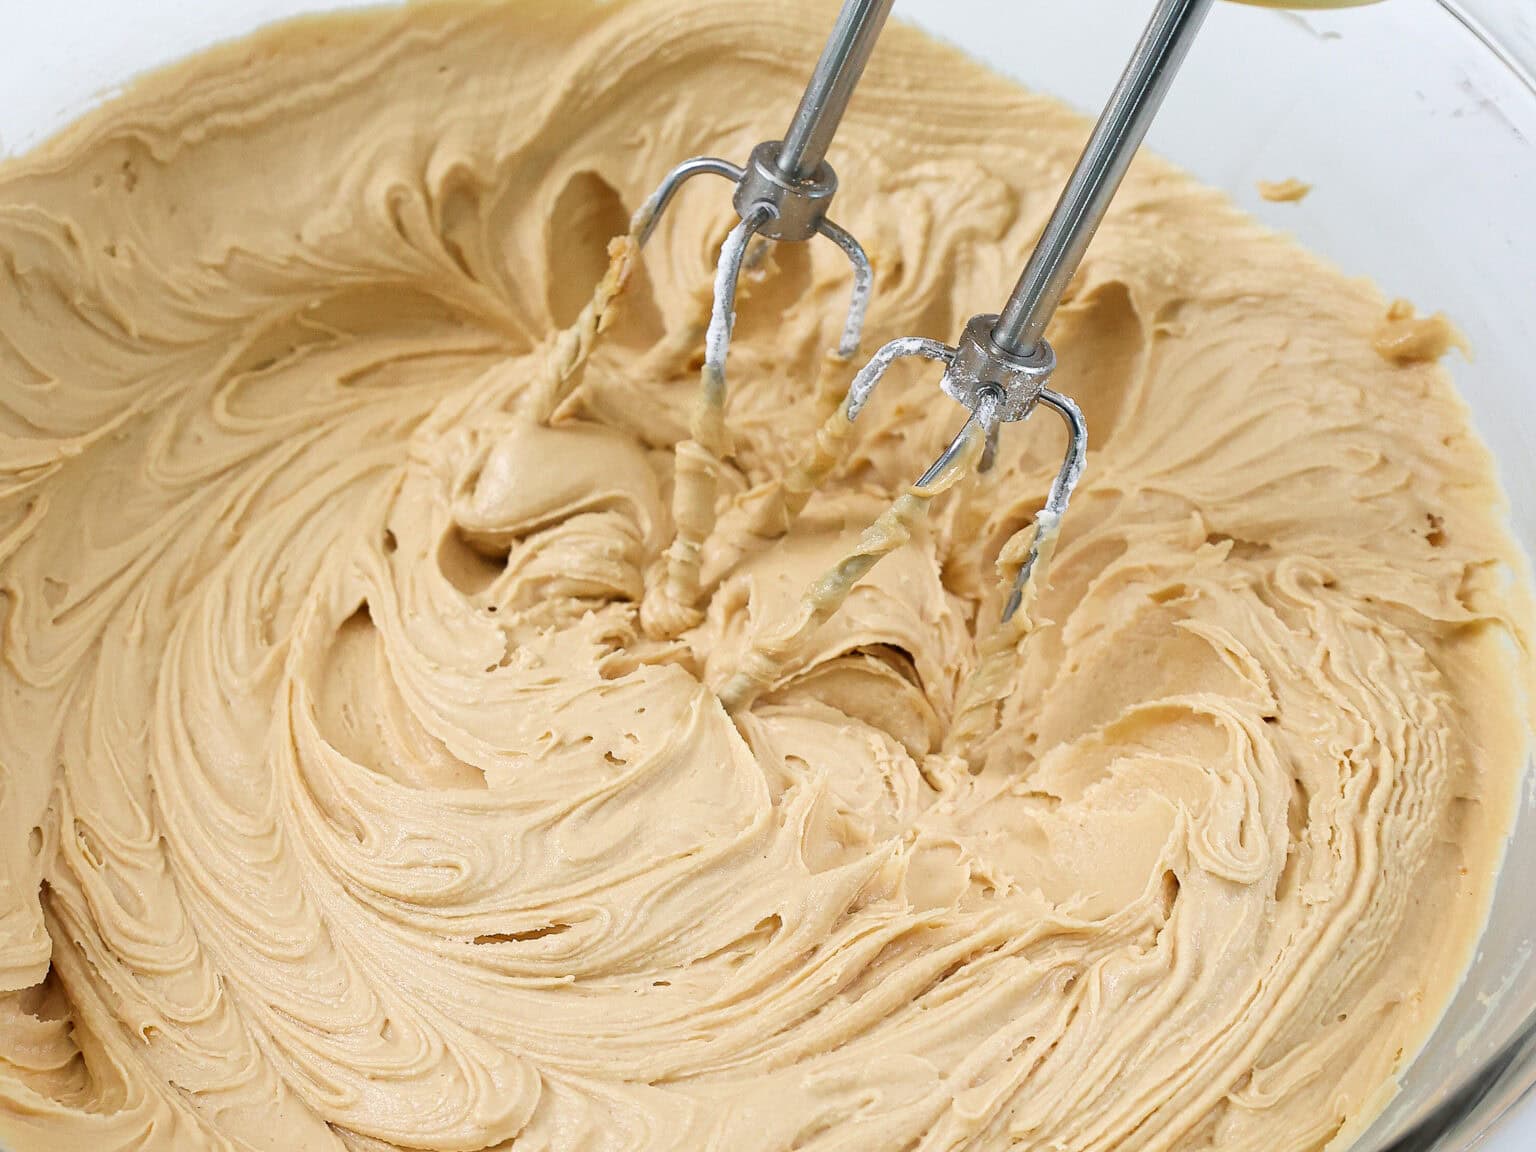
While the macaron shells bake and cool, make the Biscoff buttercream.
Place the frosting in a piping bag fitted with a large round piping tip and set aside.
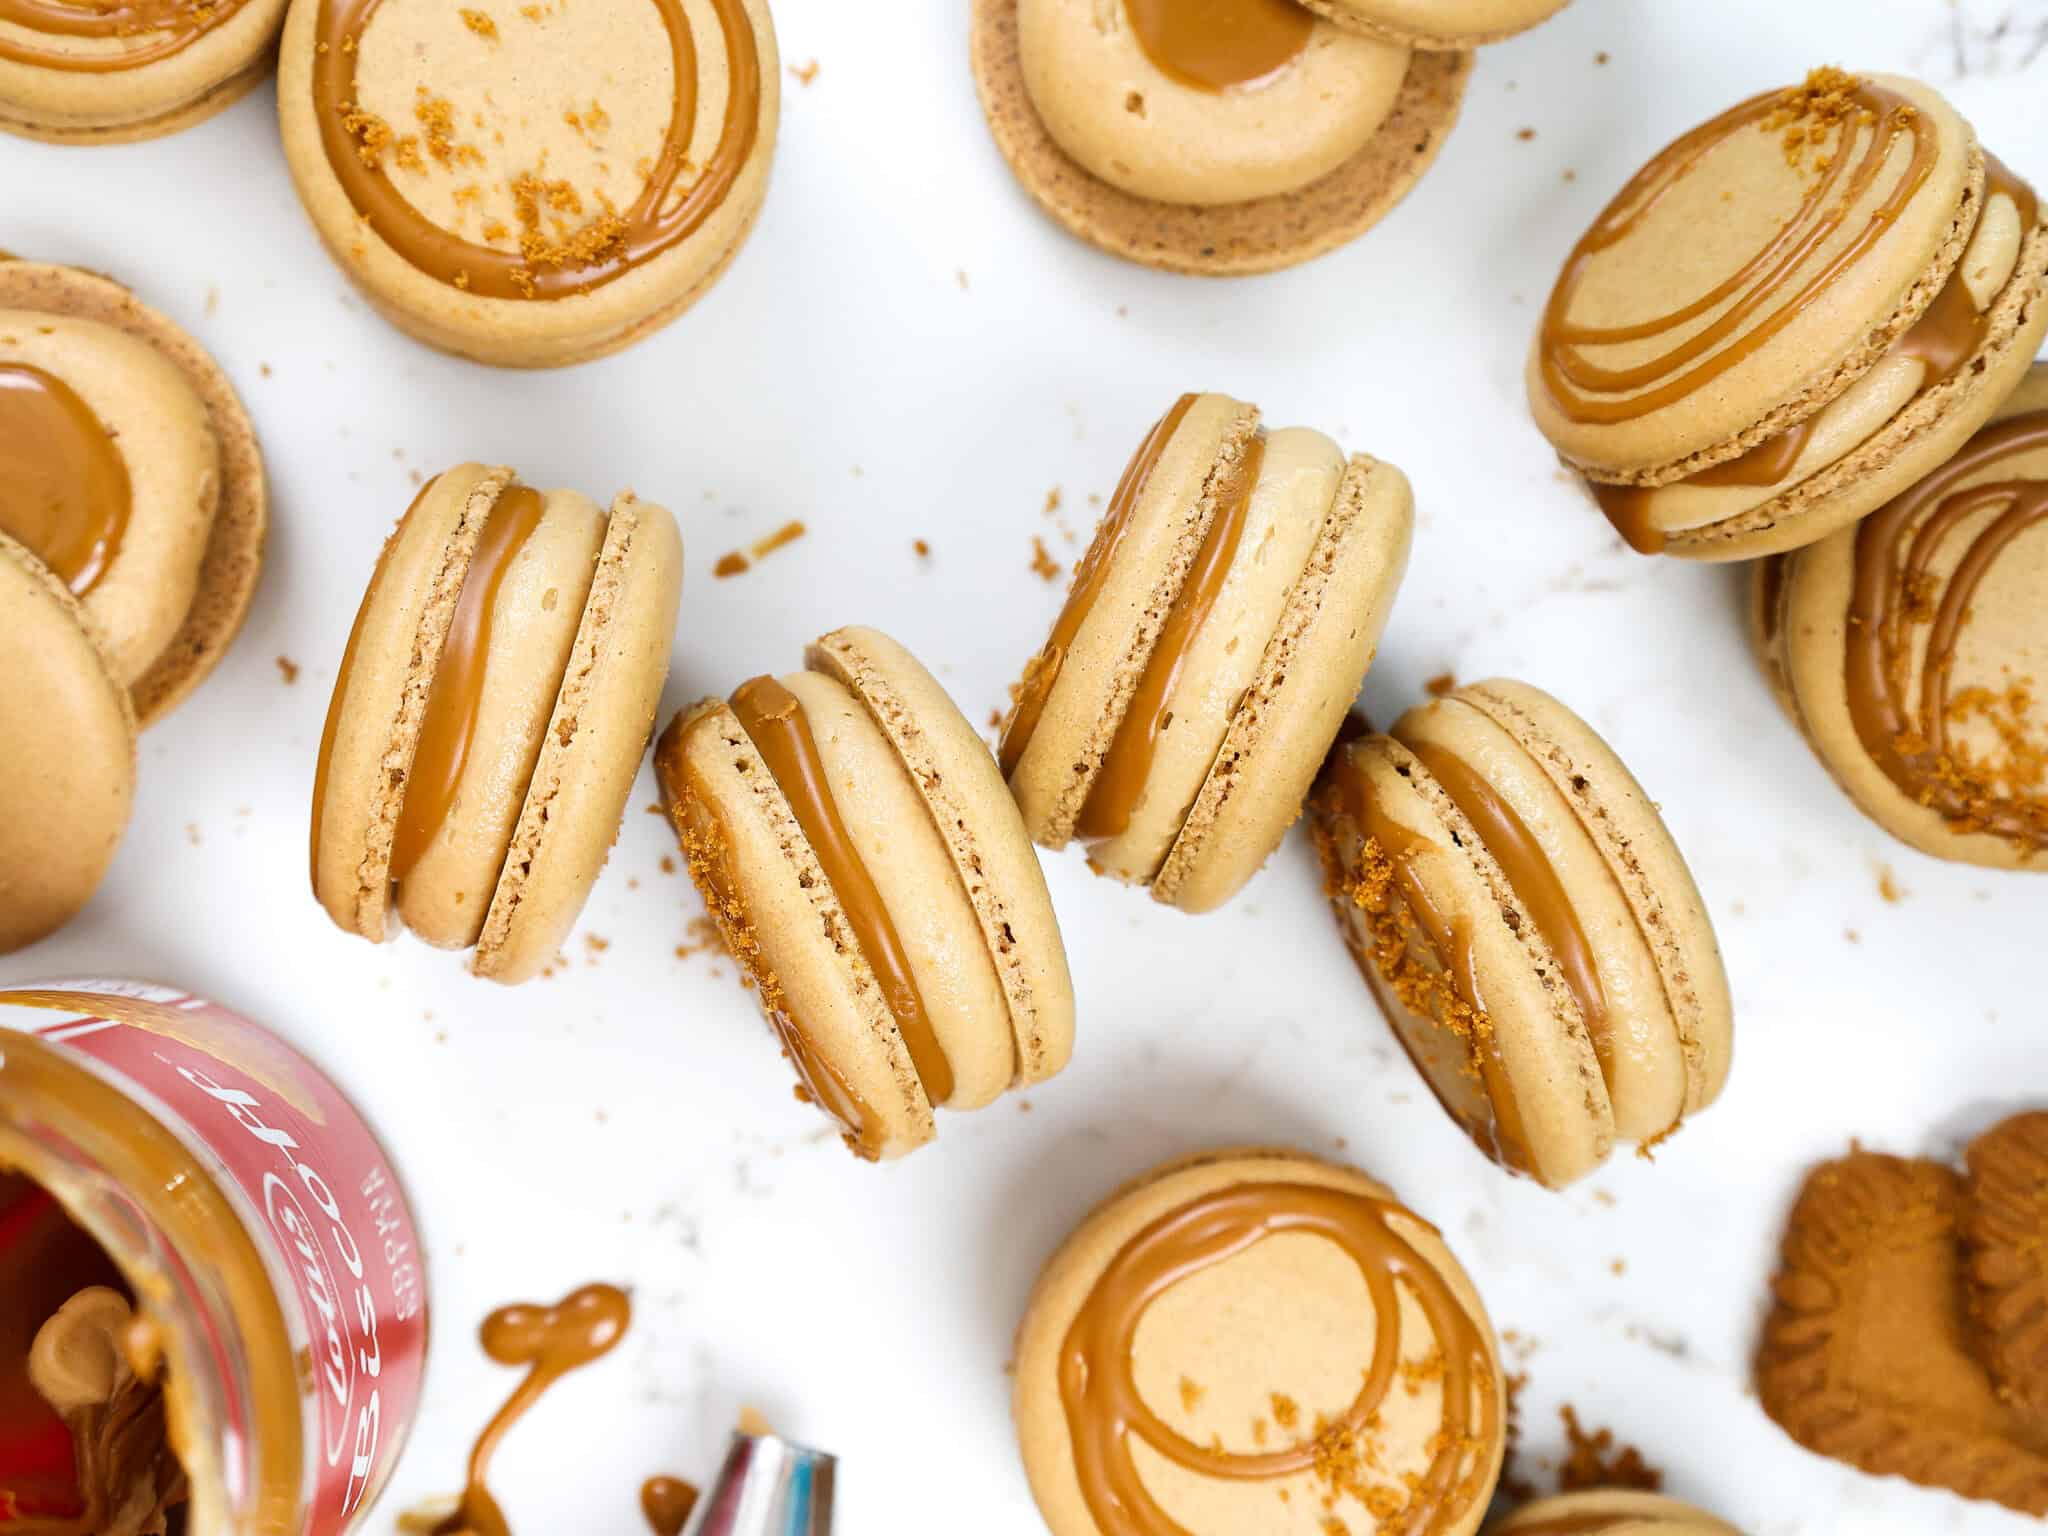
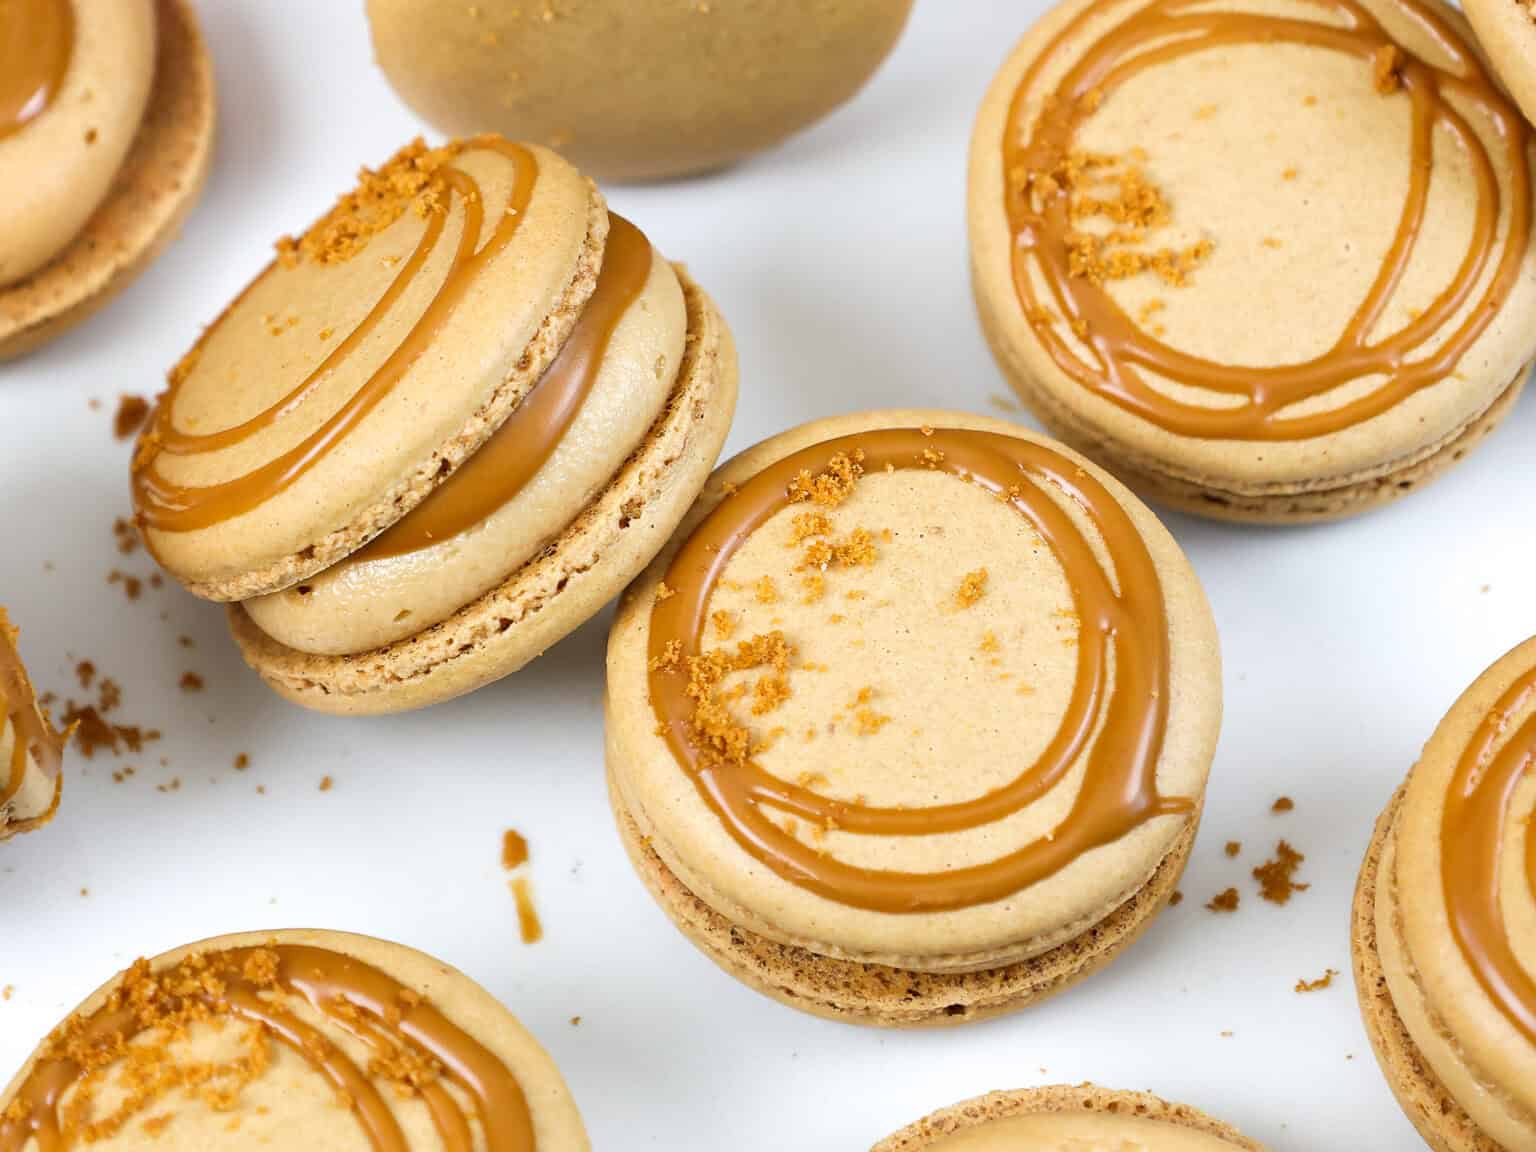
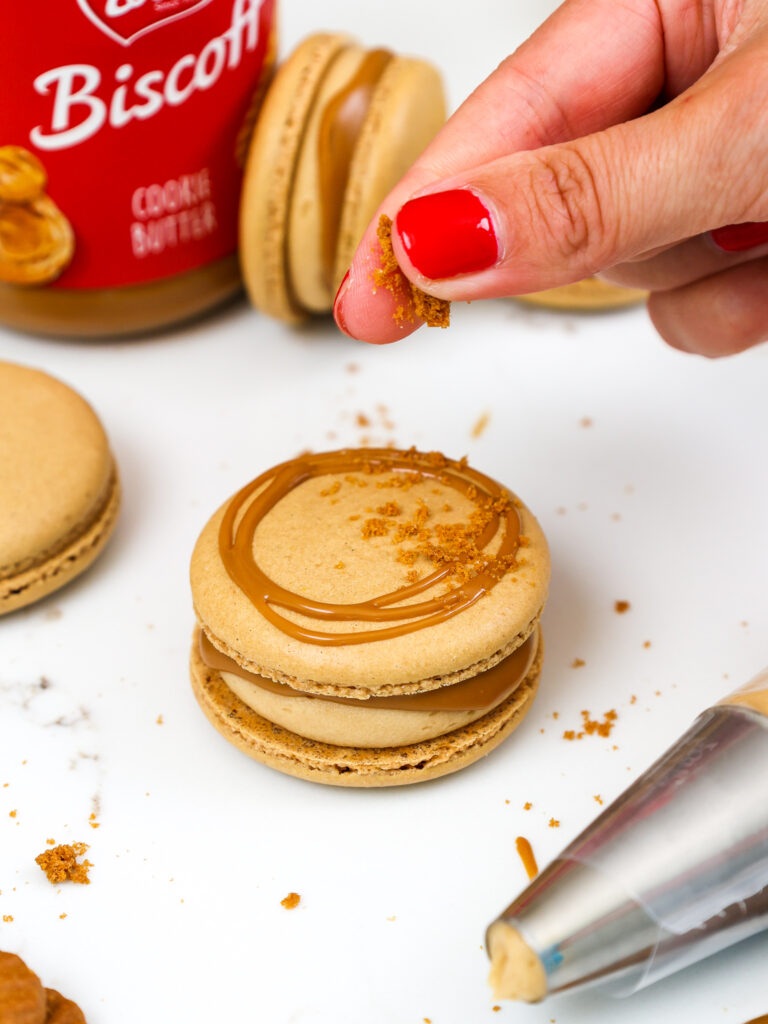
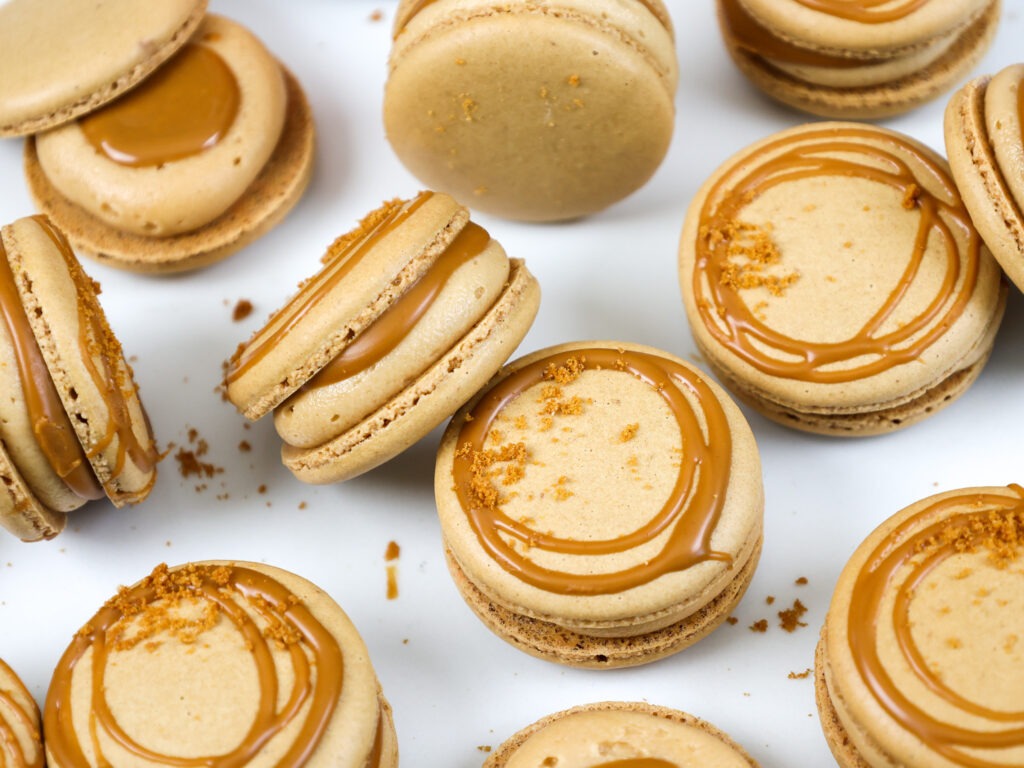
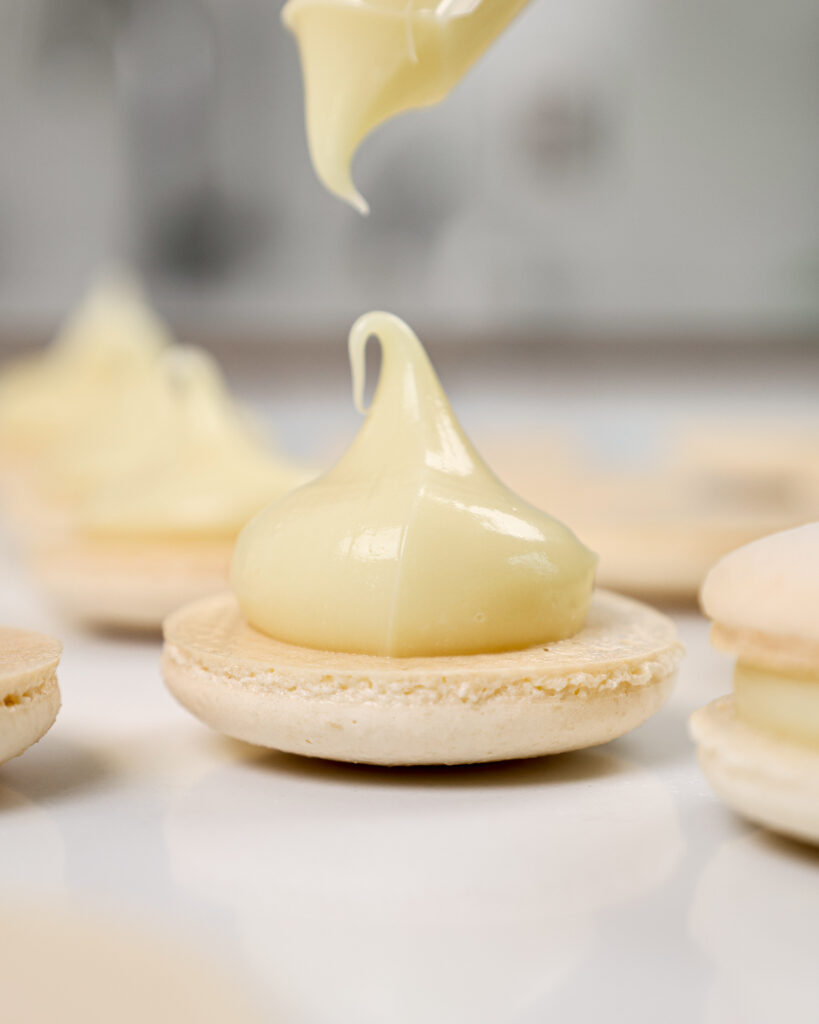
Pair up the macaron shells, then pipe a ring of Biscoff buttercream on one macaron shell. Fill the center with warm cookie butter. I heat mine in the microwave for 10 seconds to make it more fluid.
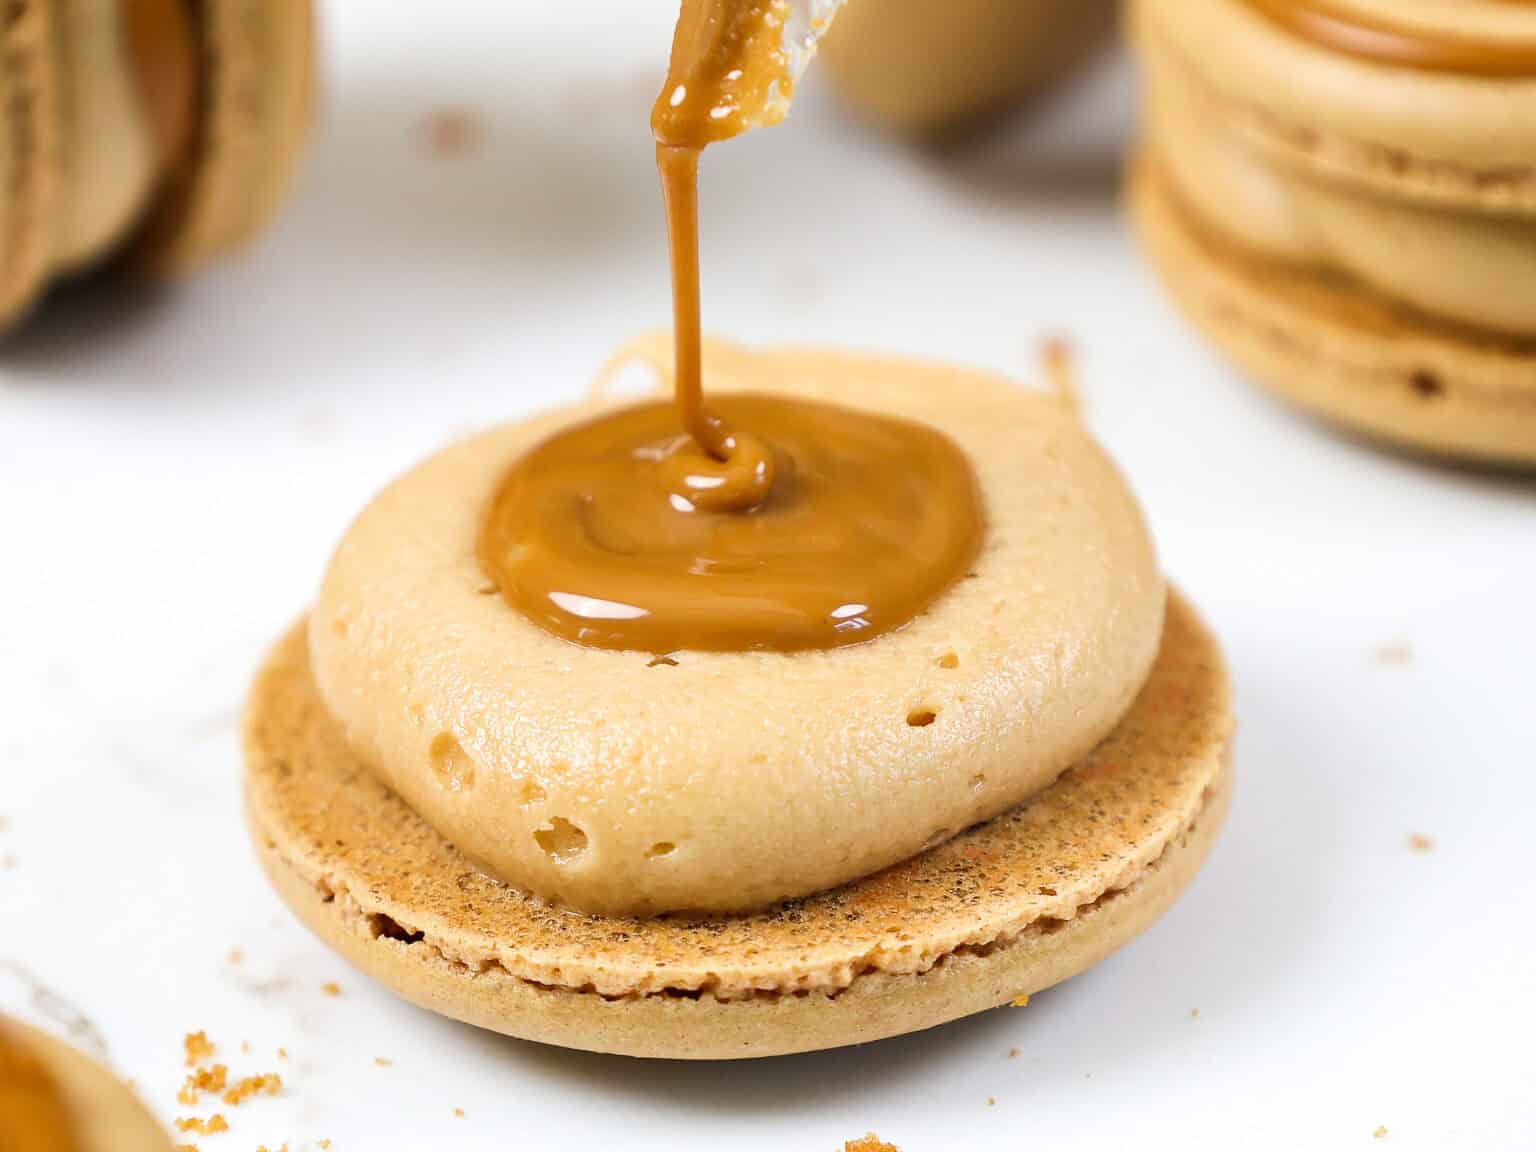
Gently press a second shell on top of the frosting to create a sandwich.
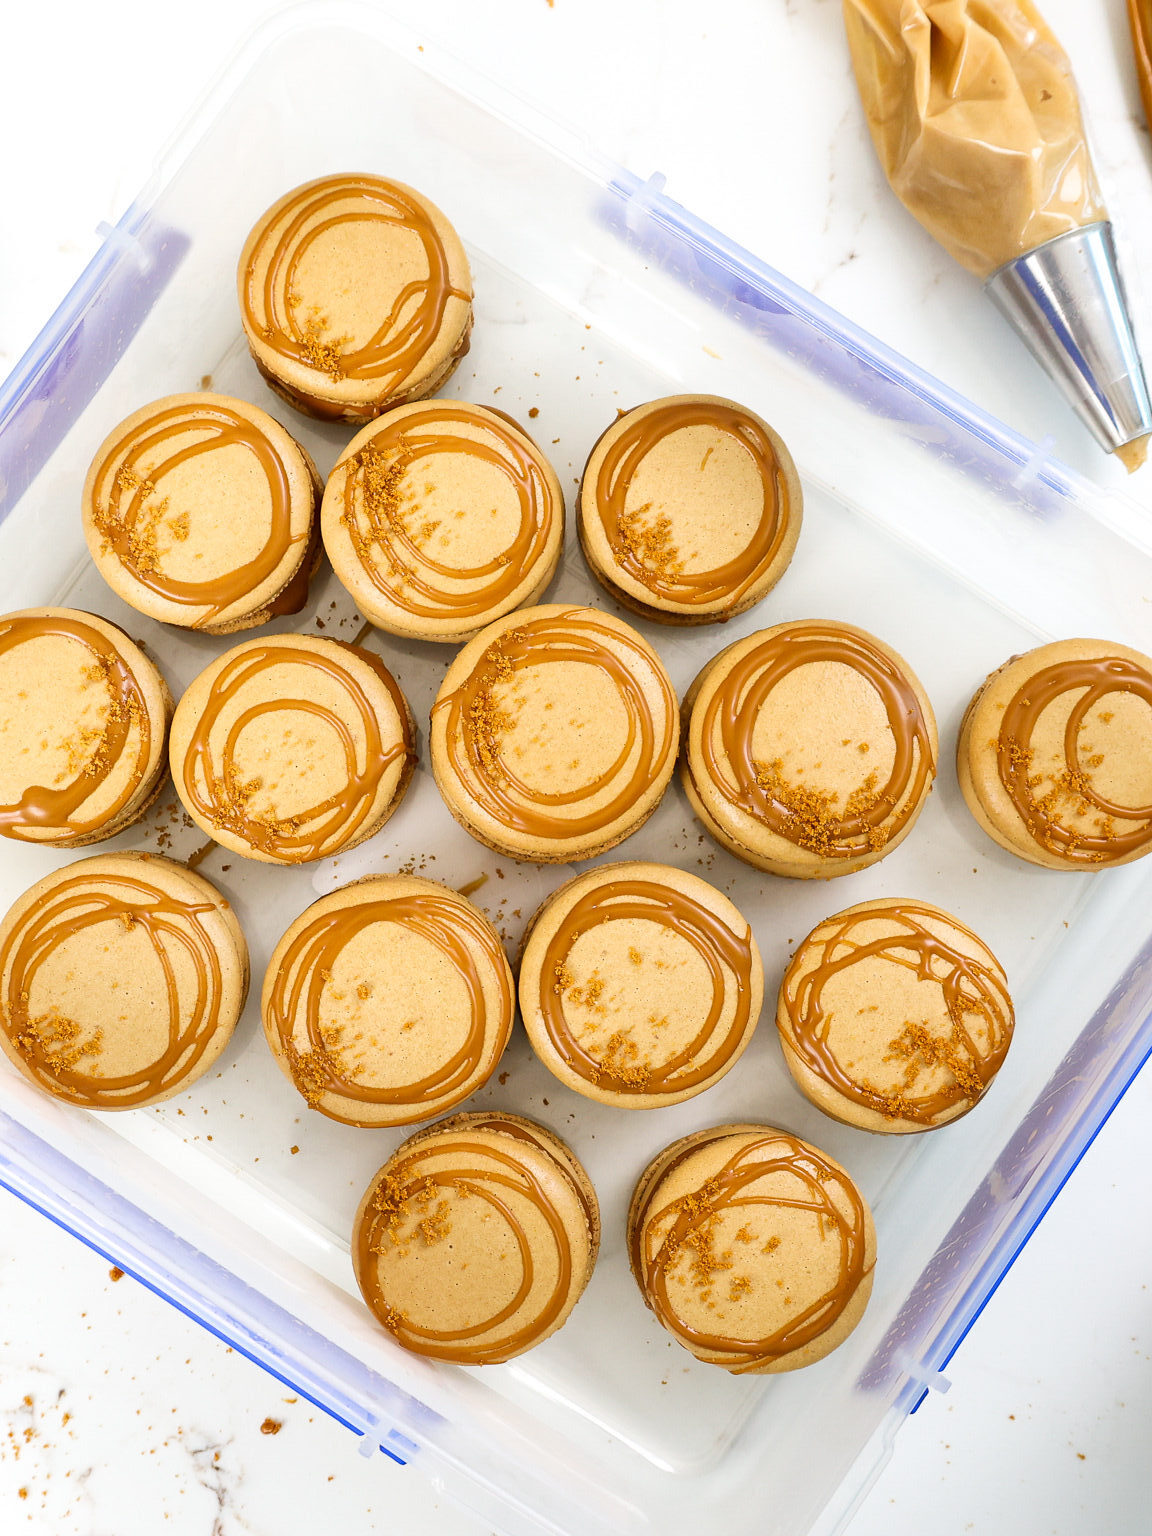
I also chose to drizzle a ring of melted cookie butter over the top of the macarons and sprinkle them with some chopped Biscoff cookies, but this is optional.
The cookie butter on top doesn’t set completely firm, so if you decorate them like this, don’t stack them on top of each other.
Place the finished cookie butter macarons in an airtight container and store in the fridge to let them mature overnight.
Letting the filled macarons rest overnight softens them (in a good way) and allows the flavor to develop.
Troubleshooting These Biscoff Cookie Butter Macarons
While I’d love to think everyone’s first batch of these macarons will turn out perfectly, my own experience has taught me that’s not how things usually go.
Macarons are incredibly temperamental, and it might take a few tries to get them just right. If you run into any issues, check out my macaron troubleshooting guide!
Choosing the Right Filling for These Macarons
While we put tons of energy into the shell of a macaron, almost all the flavor in a macaron comes from its filling.
The shell gives macarons an incredible texture, but the filling is what determines their flavor.
The Biscoff buttercream and cookie butter filling truly make these macarons! It makes them taste just like our favorite cookie.

How Many Macarons Does This Recipe Make?
This recipe makes about 40 large macaron shells, which can be used to make 20 macarons.
You can double or halve this recipe as needed.
The yield and bake time will vary based on the size of the macarons you pipe. I piped these shells with a diameter of 1 3/4-inches.
Tips for Making the Best Cookie Butter Macarons
- If you can’t find Biscoff cookie butter, you can also use a brand of cookie butter or nut butter! Just avoid using chunky cookie butter to make the frosting because it will make it hard to pipe.
- Wipe your mixing bowl, mats, and whisk with lemon juice or vinegar to remove any traces of grease before making the meringue. It will help your egg whites whip up better!
- Separate your own eggs and age them if possible. Do not use egg whites from a carton.
- Measure your ingredients in grams with a kitchen scale. You really need to be precise with this recipe.
- Use a macaron mat or print out a template to help you pipe consistently sized macarons.
- Let your baked and filled macarons mature! This softens them (in a good way) and allows the flavors to develop.
- If your macarons don’t turn out, check out my macaron troubleshooting guide!
Making These Biscoff Macarons in Advance & Storage Tips
These macarons need to mature for a few hours or overnight in the fridge in an airtight container before being eaten. This gives them time to develop the best texture and flavor.
You can refrigerate filled macarons for up to 5 days in an airtight container.
You can also freeze filled macarons for up to a month in an airtight container.
Or if you have unfilled macaron shells, they can be frozen for up to a month in an airtight container.
The frosting can also be made ahead of time, or save any leftovers! It can be stored in an airtight container in the fridge for up to a month or in the freezer for up to 3 months.
Let Me Know What You Think!
If you try this recipe for cookie butter macarons, I’d love to hear what you think! Please leave a rating and comment below.
And don’t forget to tag me @chelsweets and use #chelsweets on social media so that I can see your amazing creations!
Biscoff Macarons
Ingredients
Macarons Shells
- 110 g aged egg whites – about 4 large egg whites
- 1/4 tsp cream of tartar – optional
- 110 g granulated sugar 1/2 cup + 2 tsp
- gel food coloring – optional
- 133 g superfine almond flour – blanched 1 1/4 cups
- 125 g powdered sugar 1 cup
- 7 g unsweetened baking cocoa 1 Tbsp
Biscoff Buttercream Frosting
- 85 g unsalted butter, room temperature 6 Tbsp
- 60 g smooth cookie butter 4 Tbsp
- 4 g vanilla extract or vanilla bean paste
- 2 g fine salt
- 166 g powdered sugar 1 1/3 cups
- 45 g heavy cream or whole milk 3 Tbsp
Instructions
French Macaron Shells
- Line two large baking sheets with silpat mats or parchment paper. Set aside.
- Pour 110g of aged egg whites into the bowl of a stand mixer with a whisk and mix on a medium speed until the surface of the egg whites is covered in small bubbles. Add in a pinch of cream of tartar and continue to mix until it reaches the soft peak stage.
- Gradually mix in 110g of granulated sugar into the eggs over a few minutes while mixing on a medium-low speed. Increase the mixing speed to a medium-high speed. Keep mixing until stiff, glossy peaks form.
- Sift 133g superfine almond flour, 125g powdered sugar, and 7g of cocoa powder into the meringue. Add in a small drop of yellow gel food coloring to give the shells a warm brown color, then fold the ingredients together with a rubber spatula. Use a circular motion that sweeps around the edge of the bowl and then pulls through the bottom of the bowl to make sure everything is getting mixed together. The batter should be a tan color.
- Fold until a thick ribbon of batter runs off the spatula when it is lifted. You should be able to draw a couple of figure 8s with the batter running off your spatula when it is the right consistency. If the stream of batter breaks before you're able to do this, you may need to stir it a bit more.
- Pour the batter into a large piping bag fitted with a medium-sized round piping tip and pipe 1 3/4-inch rounds on the prepared baking sheets, spacing them about 1 inch apart.
- Bang the pans firmly on the counter a few times to release air bubbles, then pop any remaining air bubbles that come to the surface with a toothpick.
- Let the macarons rest for 30 minutes, or until they develop a skin. The macarons should look matte once the skin has formed. While the macarons rest, preheat the oven to 315 F / 157 C.
- Bake one tray of macarons at a time on the middle rack of your oven for 17-20 minutes and rotate the pan halfway through to help them bake evenly.
- Remove from oven and let the macarons cool on the pan (about 15 minutes), then gently remove them from the silpat mat.
Biscoff Buttercream Frosting
- Beat 85g room-temperature butter and 60g cookie butter on a medium speed for 1 minute with a hand mixer until smooth.
- Mix in 4g vanilla extract and 2g salt on a low speed.
- Slowly mix in 166g of powdered sugar. Halfway through, add 45g of heavy cream or milk to make the frosting easier to mix.
- Mix on low for a couple of minutes until the ingredients are fully incorporated and the desired consistency is reached. If the frosting is too thick, add in additional heavy cream or milk (1 tsp at a time). If the frosting is too thin, add in more powdered sugar (1 Tbsp at a time).
- Once the frosting is the right consistency, place it in a piping bag fitted with a large round tip and set aside.
Assembling These Cookie Butter Macarons
- Pair up the macaron shells, then pipe a ring of biscoff buttercream around one macaron shell. Fill the center with warm cookie butter (I heat mine in the microwave for 10 seconds to make it more fluid). Gently press a second shell on top of the frosting to create a sandwich.
- This step is optional, but I like to drizzle a ring of melted cookie butter over the top of the shells and add a garnish of biscoff cookie crumbs. Note that the cookie butter on top doesn't set completely firm, so if you decorate them like this, don't stack them on top of each other.
- Place the finished macarons in an airtight container and chill in the fridge overnight, then enjoy!
Video
Notes
Tips for Making the Best Biscoff Macarons
- Measure your ingredients in grams with a kitchen scale! You really need to be precise with this recipe. Your macarons will turn out best if the ingredients are weighed.
- If you can’t find Biscoff cookie butter, you can also use a brand of cookie butter or nut butter! Just avoid using chunky cookie butter to make the frosting because it will make it hard to pipe.
- Separate your own eggs and age them if possible! Do not use egg whites from a carton.
- Carefully read through the directions before making these macarons. There are quite a few steps, and it’s good to know your game plan before you start!
- Use a macaron mat or print out a template to help you pipe consistently sized macarons.
- FIRMLY bang your pans on your counter after piping your macarons. This helps release any air bubbles that may be trapped and prevents cracked or hollow shells.
- Rest the macarons for 30 minutes before they’re baked to allow them to develop a skin.
- Let your filled macarons mature in the fridge overnight! This softens them (in a good way) and allows the flavors to develop.
- If your macarons don’t turn out, please check out my macaron troubleshooting guide for help!
Making These Biscoff Macarons in Advance & Storage Tips
French macarons need to mature overnight (or ideally 24 hours) in the fridge before being eaten! They taste best 24 hours after being made. Macarons can be refrigerated for up to 5 days in an airtight container. Filled macarons can be frozen for up to a month, but the length can vary based on the filling. Unfilled macaron shells can be frozen for up to a month in an airtight container. The frosting can also be made ahead of time, or save any leftovers! It can be stored in an airtight container in the fridge for up to a month or in the freezer for up to 3 months.Nutrition
Other Recipes You Might Like:

Hi Chelsee, I’m making these biscotti macarons for my daughter’s baby shower and it’s my first attempt at macarons. I am measuring in grams, but I noticed that the 7 grams of cocoa is way more than a tsp. More like a TBS. Shoukd I add the amount measured in grams or measured with my tsp?
Thanks for your help.
Hi Tawnya,
I’m so sorry for the confusion! It should be 1 Tbsp, or 7 grams (I’ve updated this). When I make macarons I always use a scale, so the gram measurements are always the most accurate. However, they should still turn out if you used 1 tsp of cocoa powder, the color would just be a bit lighter. Hope your macarons turned out great, happy baking!
Hi Chelsey!
Long time follower, first time commenter. Big fan. I noticed in the written out recipe portion of this, you’re missing the vanilla, powdered sugar, and heavy cream ingredients in the list of ingredients for the Biscoff buttercream frosting! Not sure if this was intentional, but just wanted to give you a heads up! You include them in the instructions, just not on the initial ingredients list.
Thank you for all you do!
Omg thank you so much for letting me know Jen! I just reformatted my recipe cards (more complicated than you’d think!!) and there definitely were some glitches. Hopefully this is a one off, but please let me know if you come across anything else like this! Appreciate your support and your feedback 🙂
Great recipe! Can’t wait to eat one. A little note: the heavy cream is missing off of the ingredient list for the filling. Luckily, I knew to add a splash. Long after mine were filled & I went back through the description of steps, I saw it.
Thank you so much for letting me know Amber!! I just fixed that 🙂 I hope your macs turned out amazing!!!