
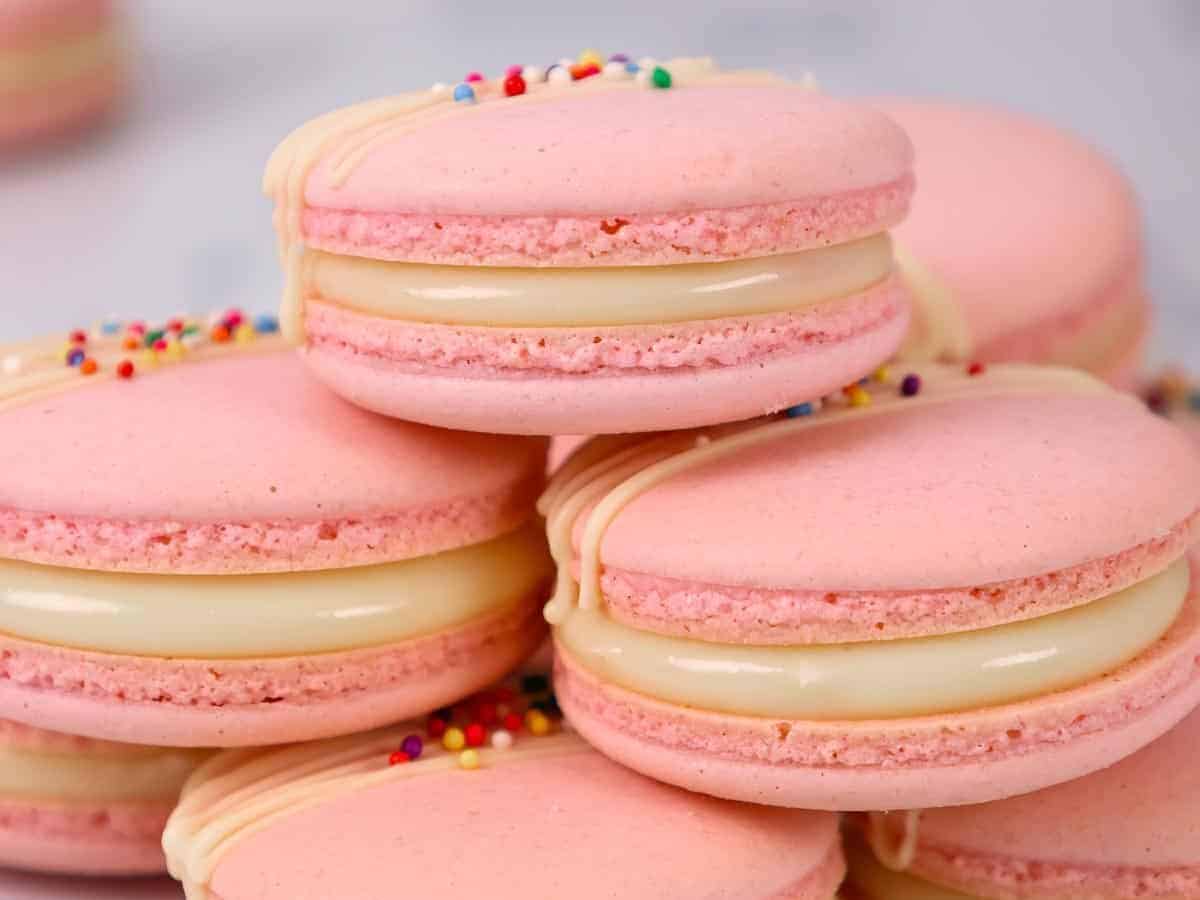
Italian Macarons
When it comes to macarons, there are a few different ways they’re made. While the French method is considered easier, Italian macarons are considered more structurally sound and yield sweeter macarons.
Italian macarons take a few extra steps, but they are totally worth it!
What is the Italian Method of Making Macarons?
No matter what method you use, they all involve making a meringue of some sort and then combining that meringue with almond flour and powdered sugar.
This process of folding the meringue together with the dry ingredients is called macaronage.
The Italian method is unique because, just like its name implies, it uses an Italian meringue. This involves whisks egg whites with a hot sugar syrup to create a stiff, stable meringue.
The second defining feature of Italian macarons is that the almond flour and powdered sugar are mixed with raw egg whites to form a paste before any meringue is folded into them.
Making Italian Macarons – Step by Step Process
While the recipe below is quite detailed, I find visual cues so helpful!
Below are some photos of the process to help guide you through this recipe.
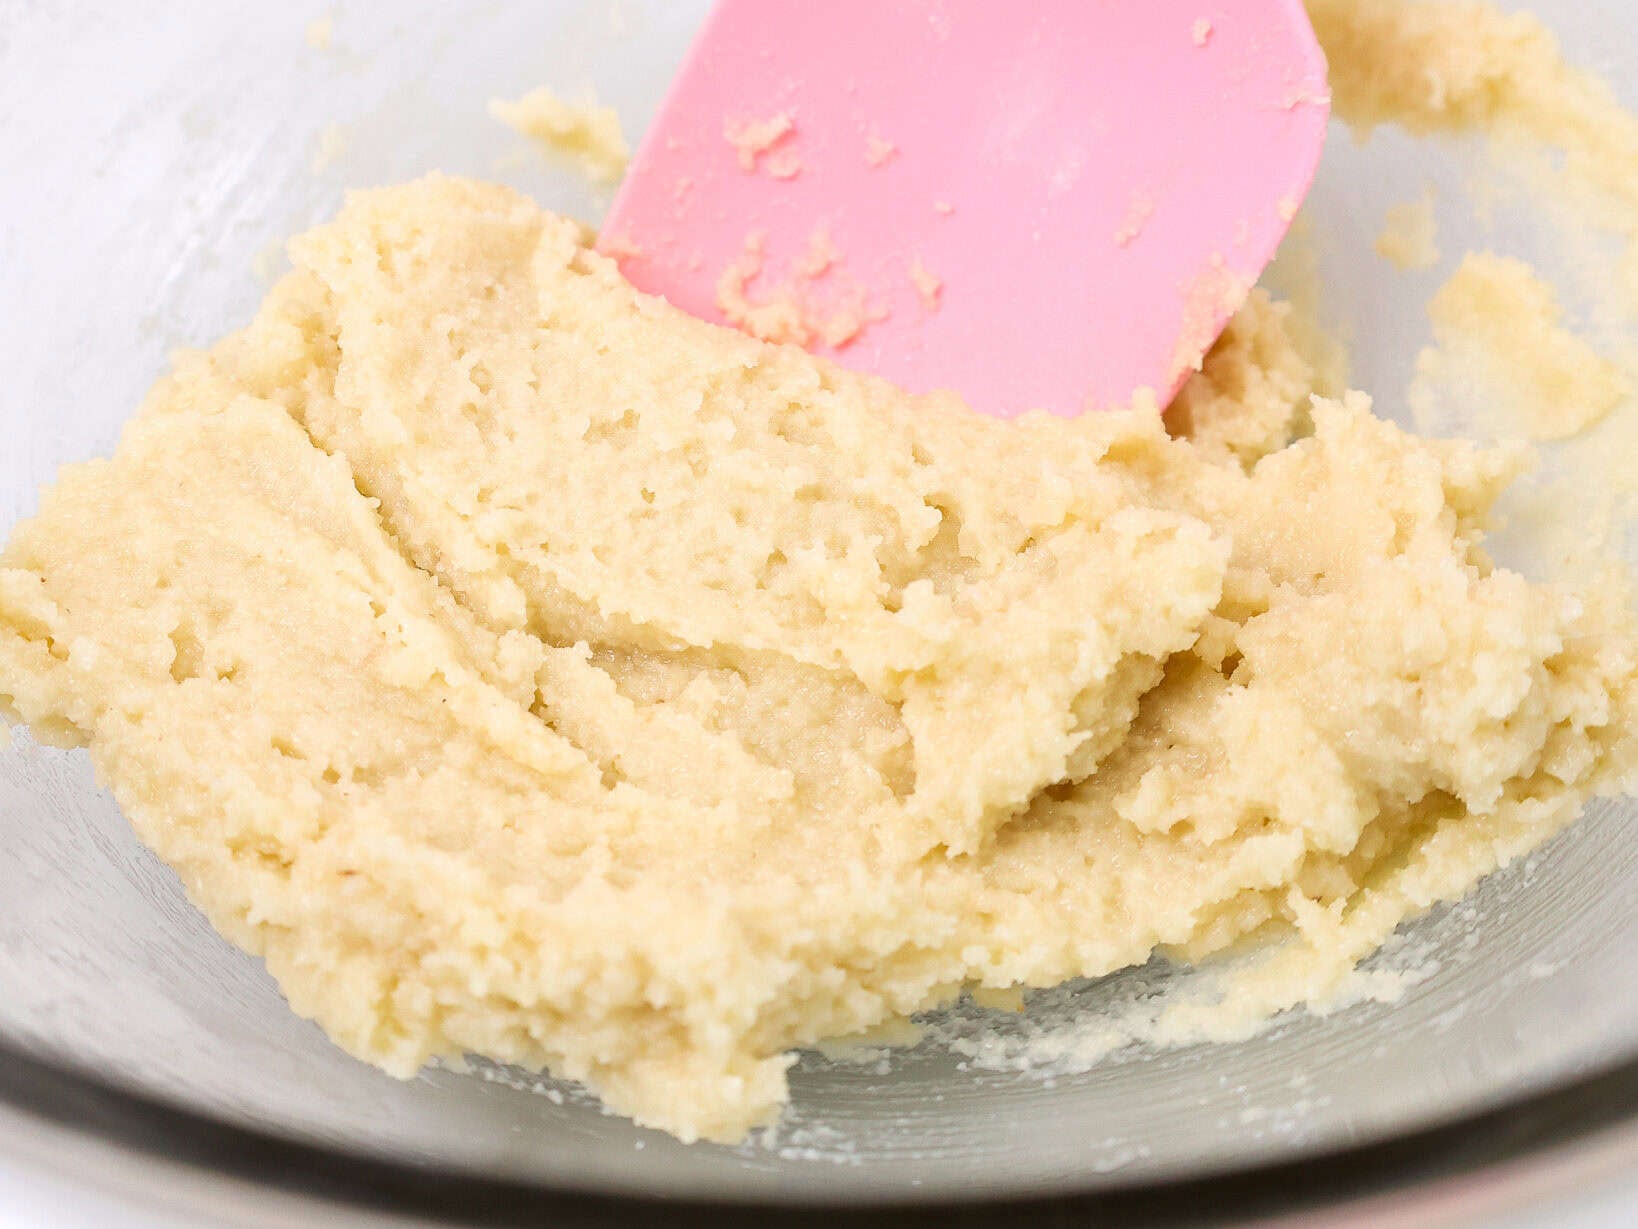
Step #1: Make the Macaron Paste
Stir together the sifted almond flour, powdered sugar, and egg whites.
The mixture should be super thick and almost paste-like. Cover it with plastic wrap to prevent it from drying out.
Step #2: Make the Italian Meringue
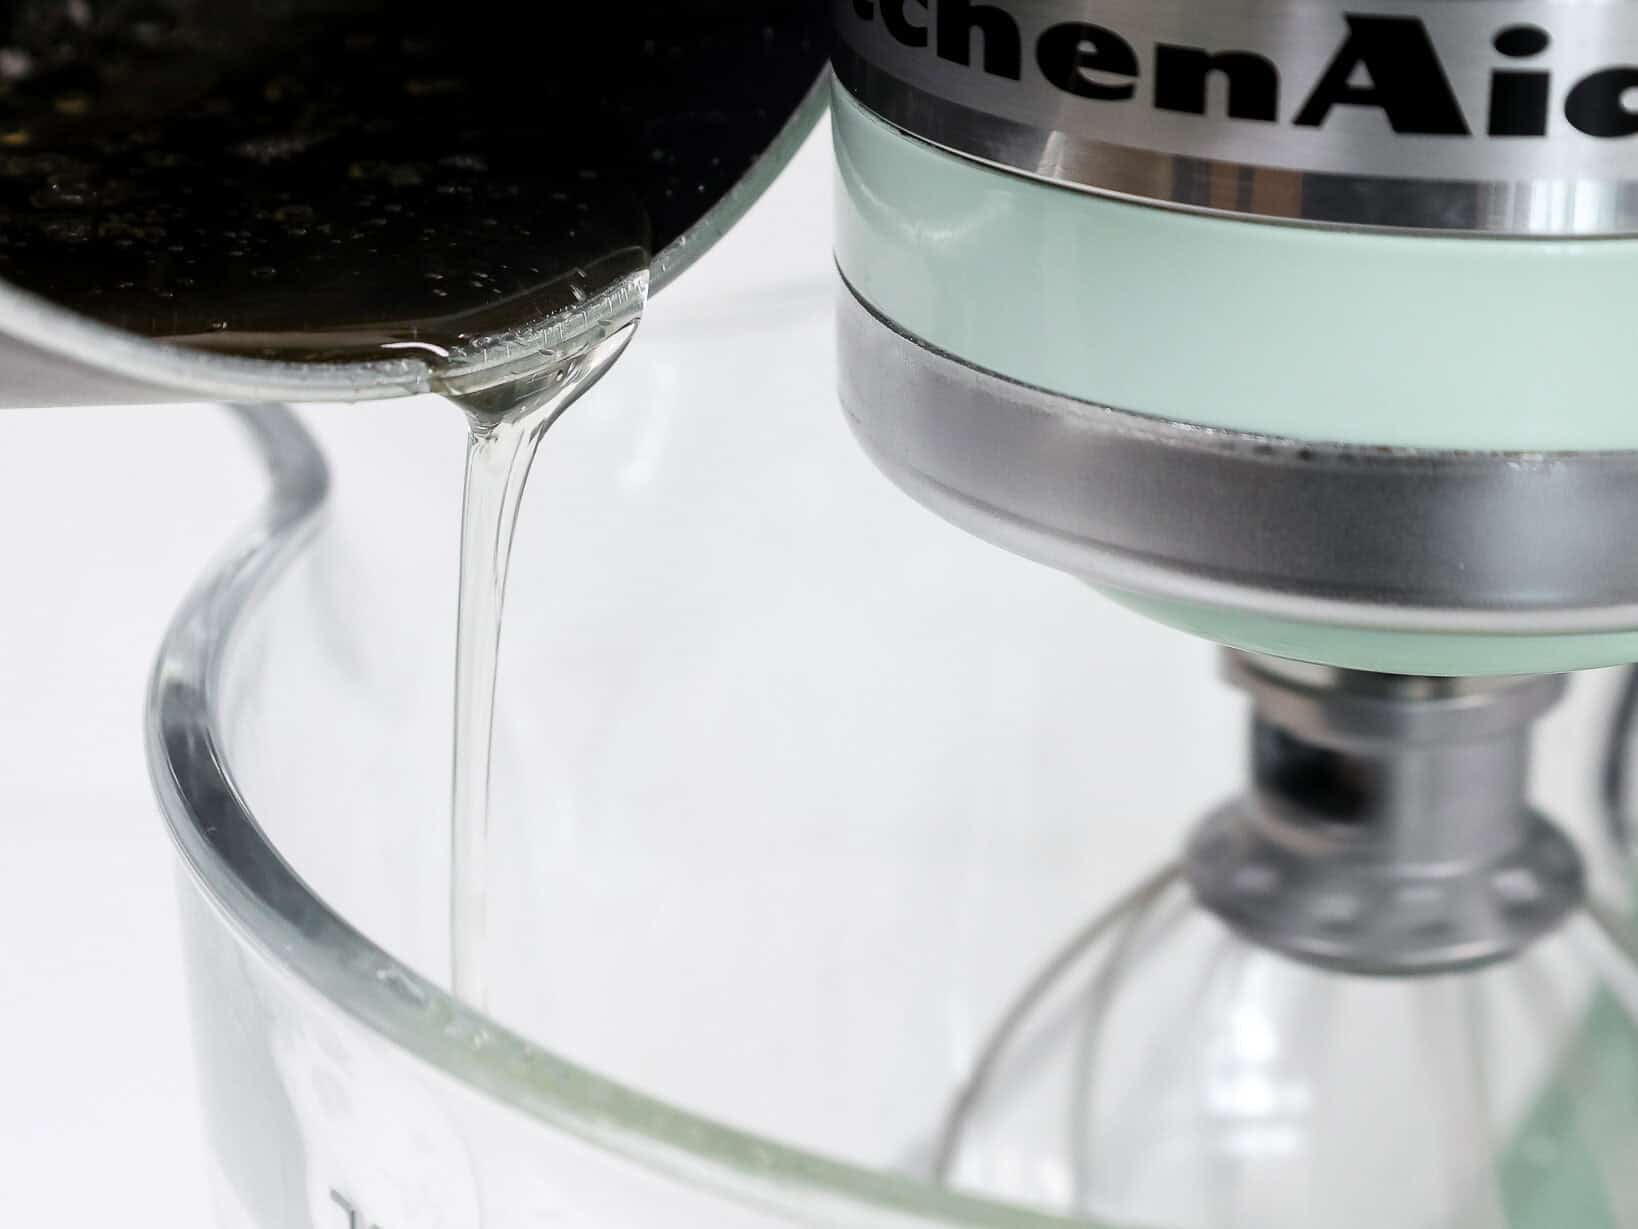
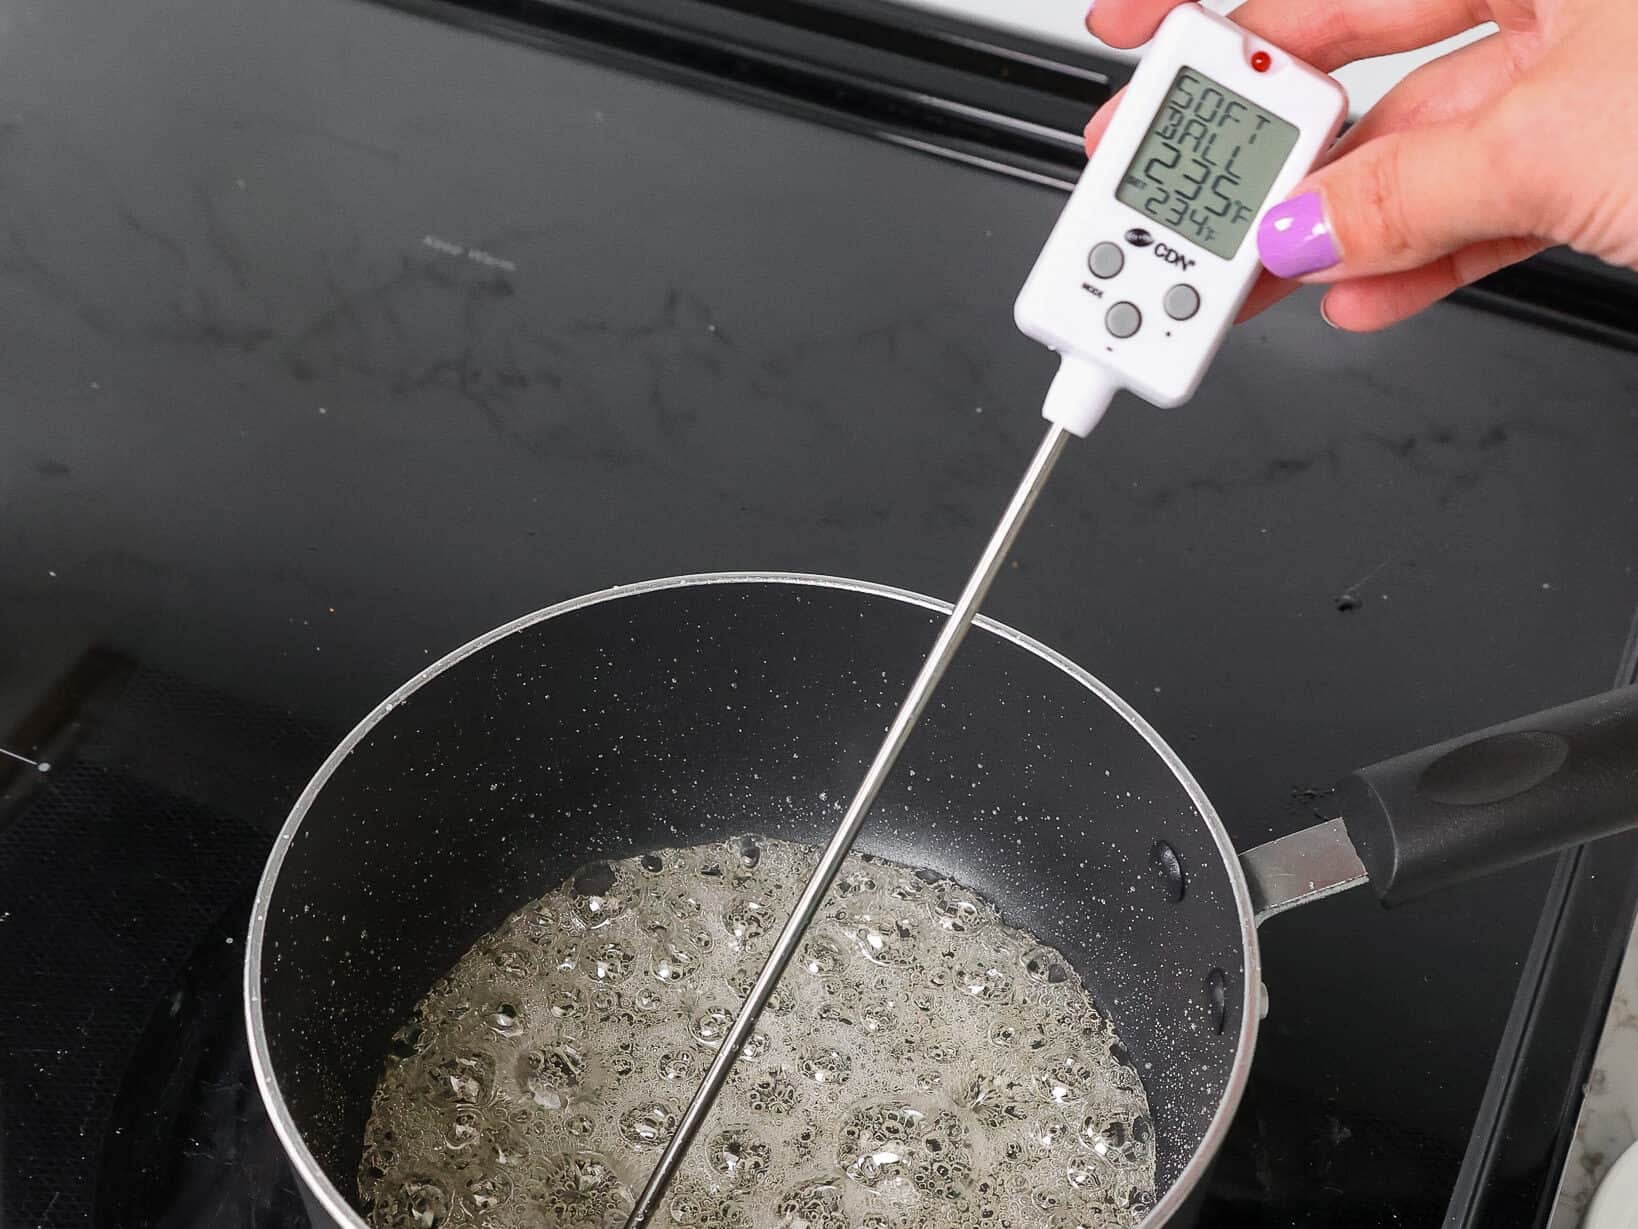
Next, heat the granulated sugar and water in a pot over medium heat with a candy thermometer attached to the side. Heat to medium and bring to a boil.
As soon as the mixture starts to boil, pour the remaining whites into the bowl of a stand mixer and whisk on a medium speed.
Add in 1/4 tsp of cream of tartar to help stabilize the meringue and continue to mix at a medium speed until soft peaks form.
Continue cooking until the mixture reaches 238°F/114°C, then slowly pour the syrup down the side of the mixing bowl into the meringue on a medium speed.
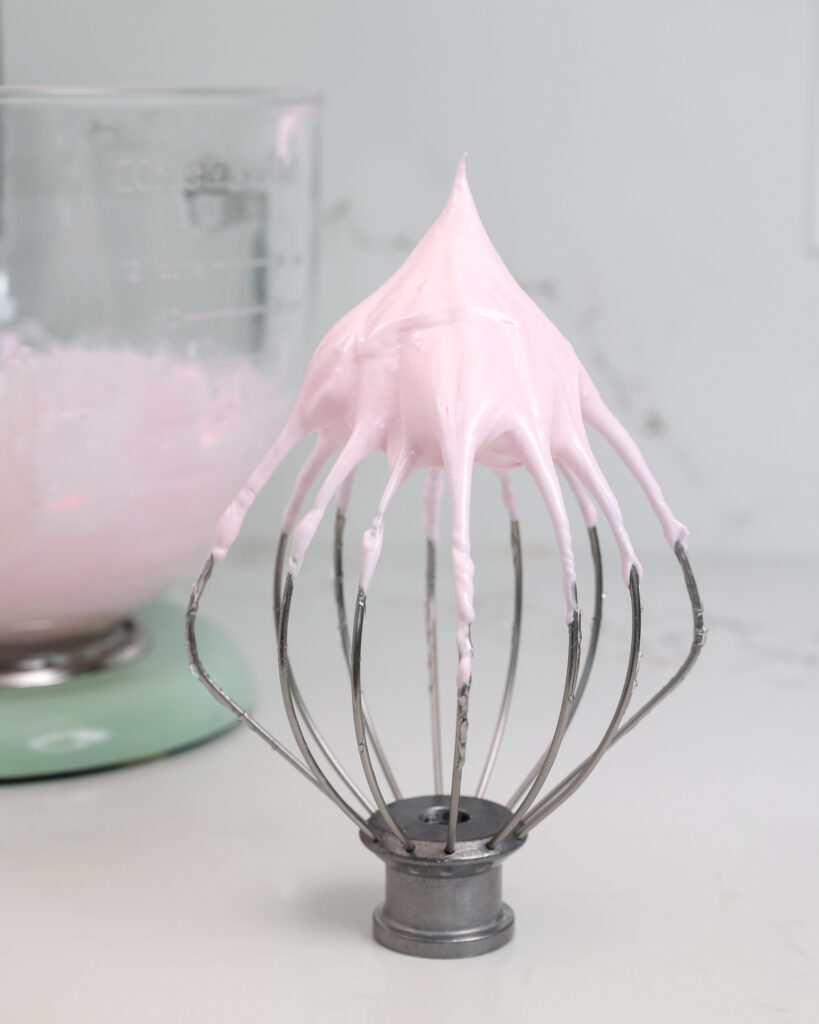
Once the syrup is fully mixed in, increase the mixing speed to a high speed and mix until glossy, stiff peaks form.
If you want to color your macarons, mix in gel food coloring during this step.
There should be a tiny bend in the peak of your meringue when the whisk is lifted.
This usually takes me 6-7 minutes, but it can vary based on your mixer!
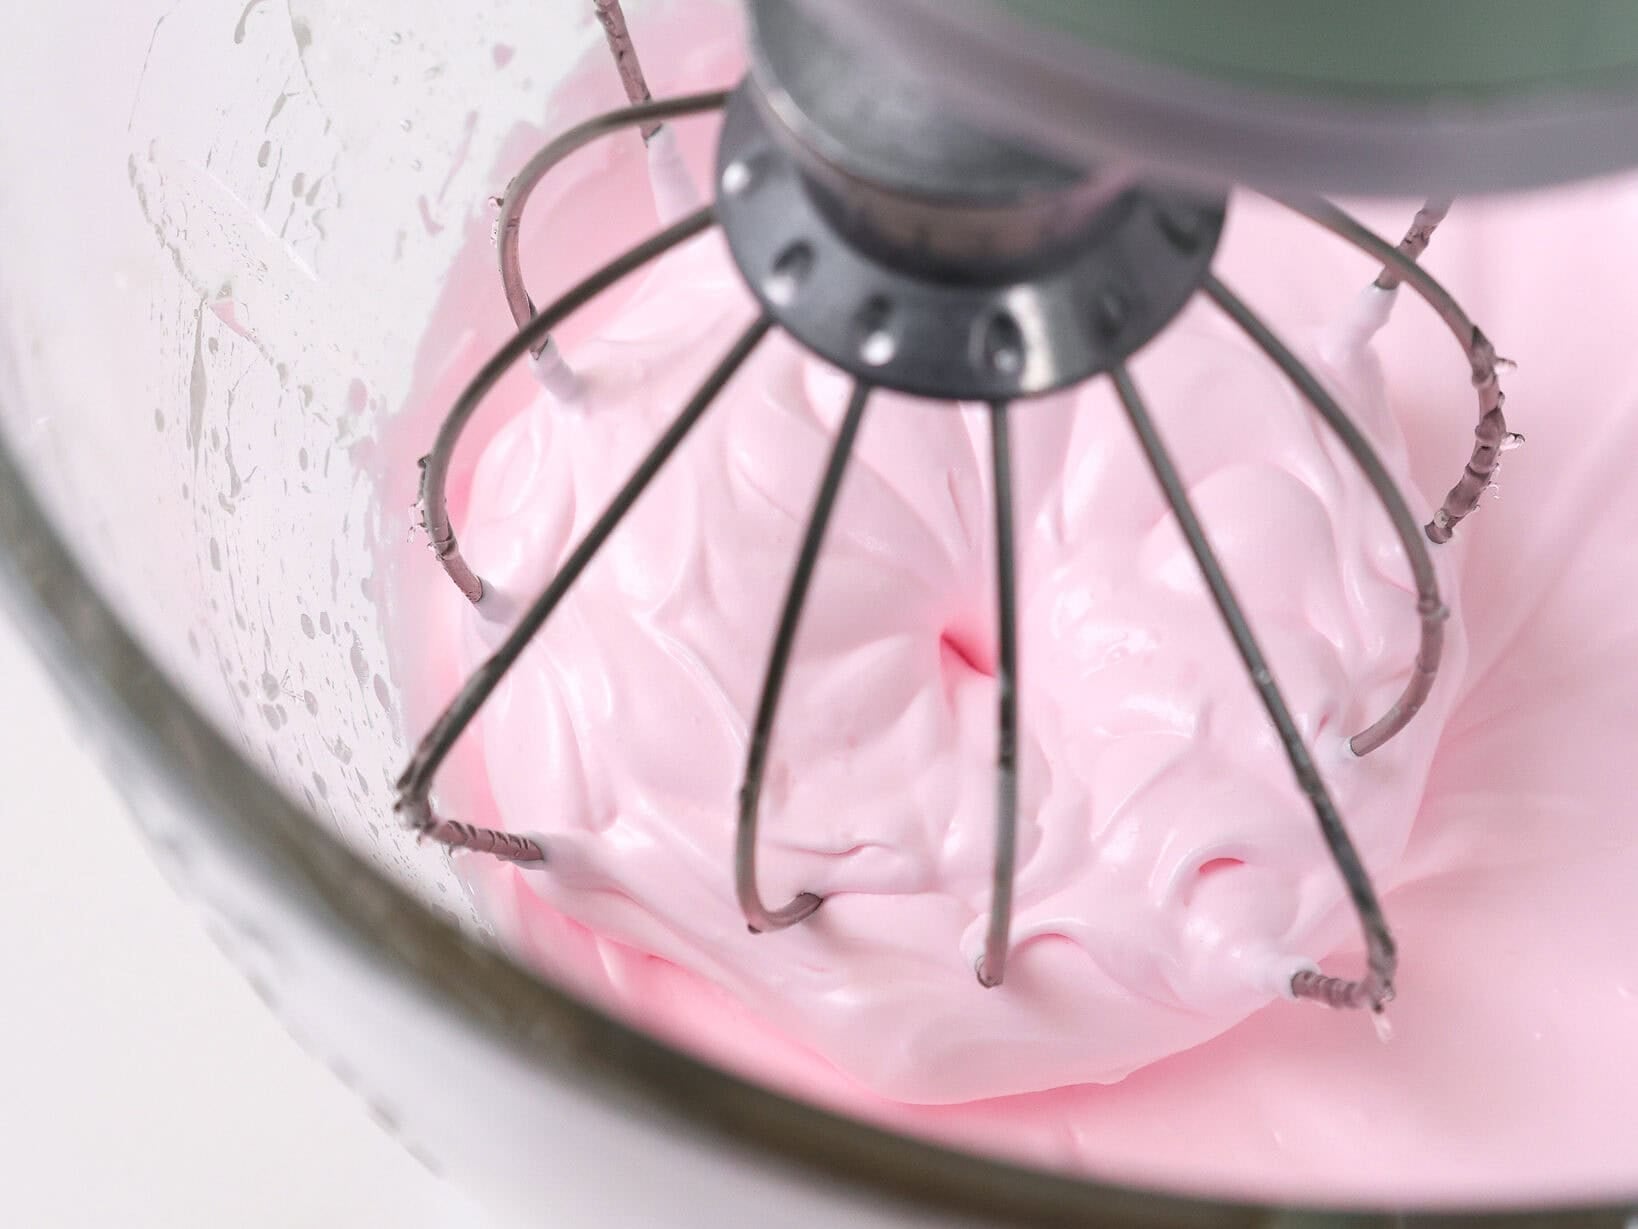
You should notice the meringue gathering inside the whisk towards the end of this process.
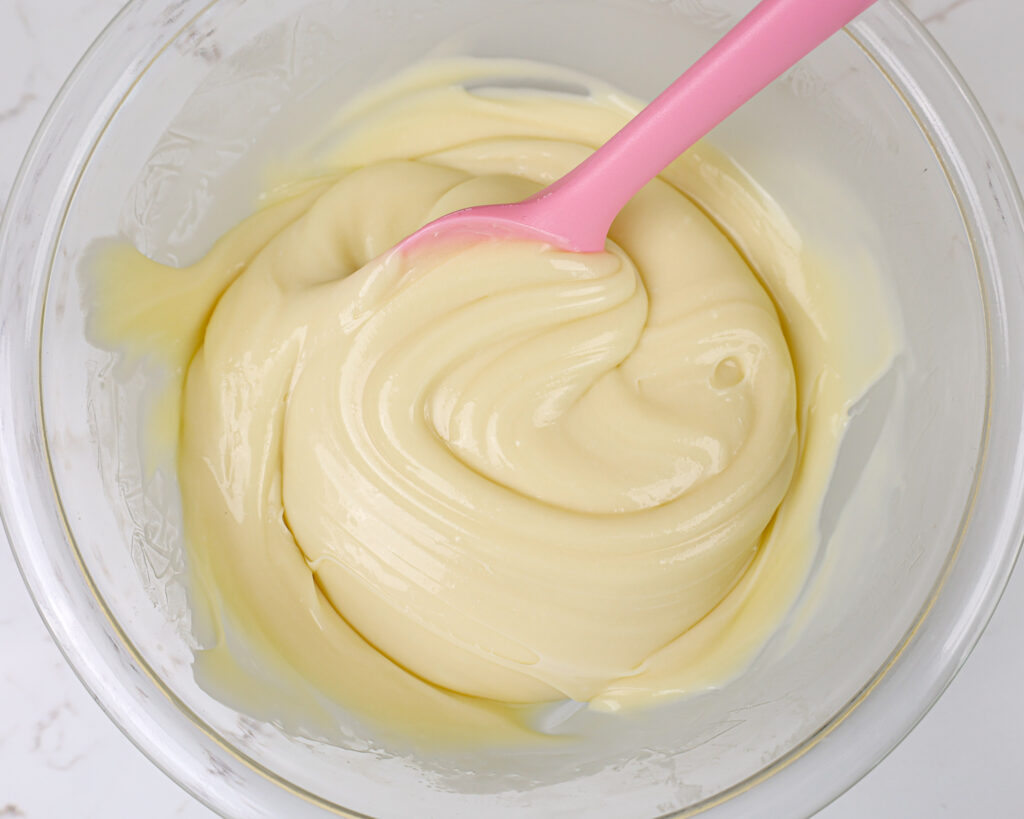
Step #3: Mix the Meringue into the Macaron Paste
Mix the meringue into the almond/powdered sugar paste mixture in two additions.
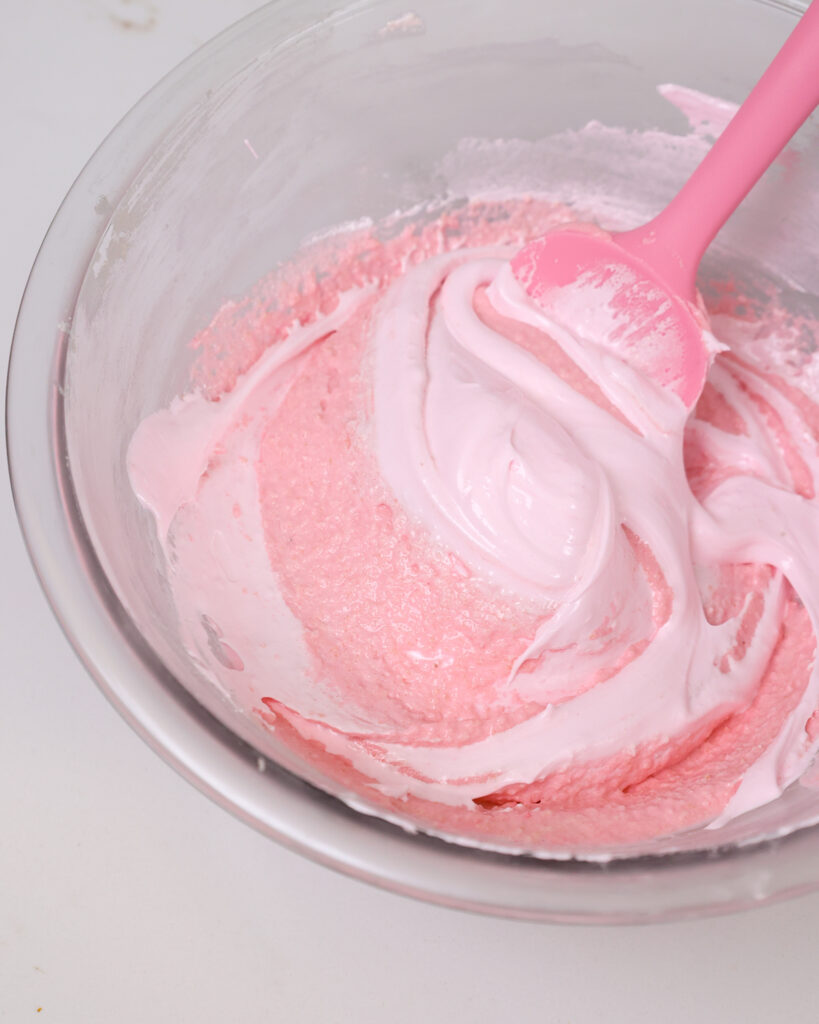
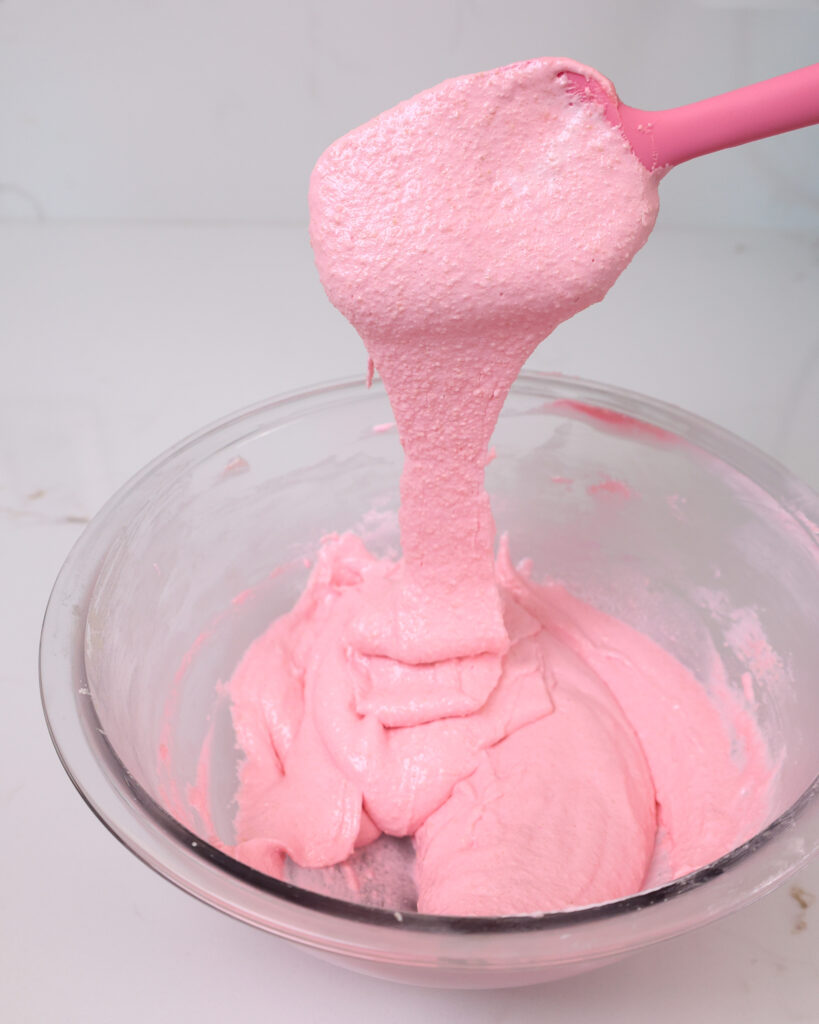
Once the meringue is mixed in, fold the batter in a circular motion until thick ribbons of batter run off the spatula when it is lifted.
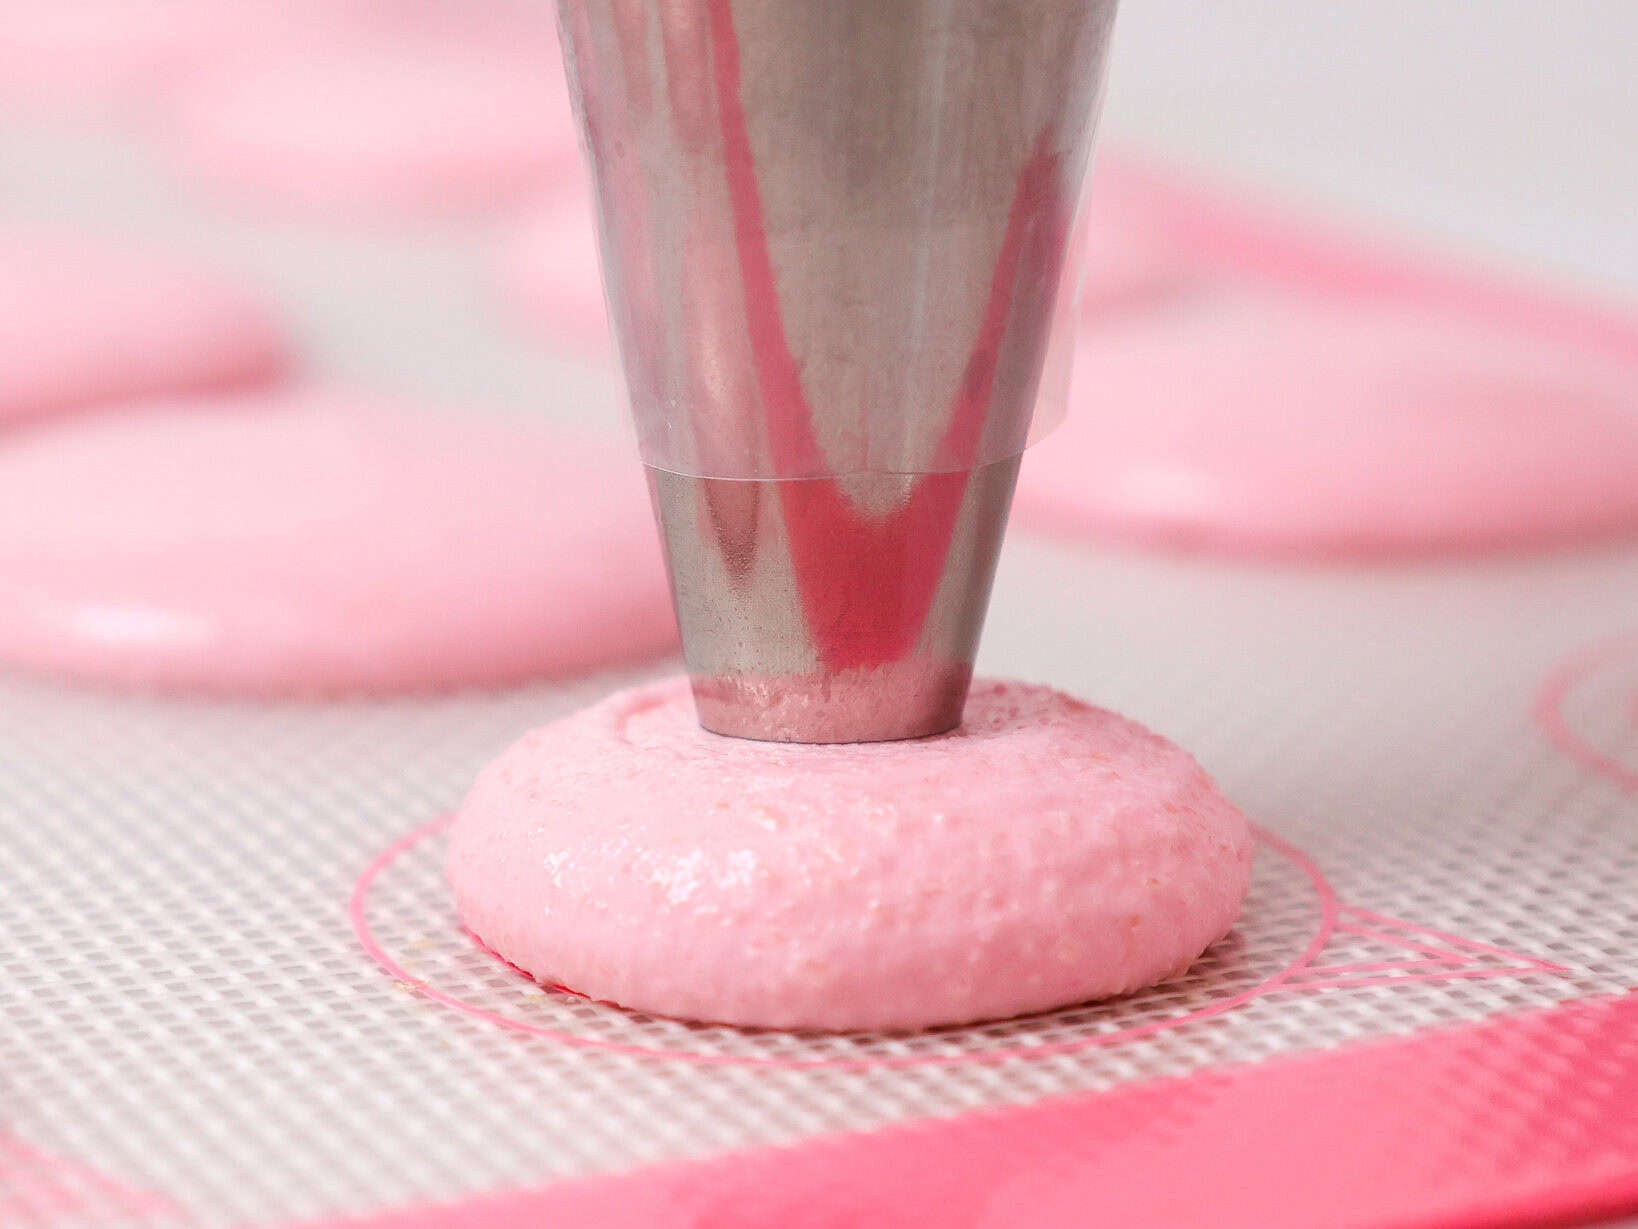
Step #4: Pipe the Macaron Shells
Pour the batter into a large piping bag fitted with a medium-sized round piping tip and pipe 1 1/2-inch rounds on baking sheets lined with Silpat mats, spacing them about 1 inch apart.
Firmly bang or drop the pan on the counter firmly a few times to release air bubbles, then pop any remaining air bubbles that come to the surface with a toothpick.
Step #5: Let the Macaron Shells Rest
Let the macarons rest for 30 minutes until they form a skin. They should look matte and be dry to the touch once they’re ready to be baked.
While the shells rest, preheat the oven to 320°F/160°C.
Step #6: Bake the Macaron Shells
Bake one tray of macarons at a time. Place the tray in the middle rack of your oven and bake for 16-20 minutes.
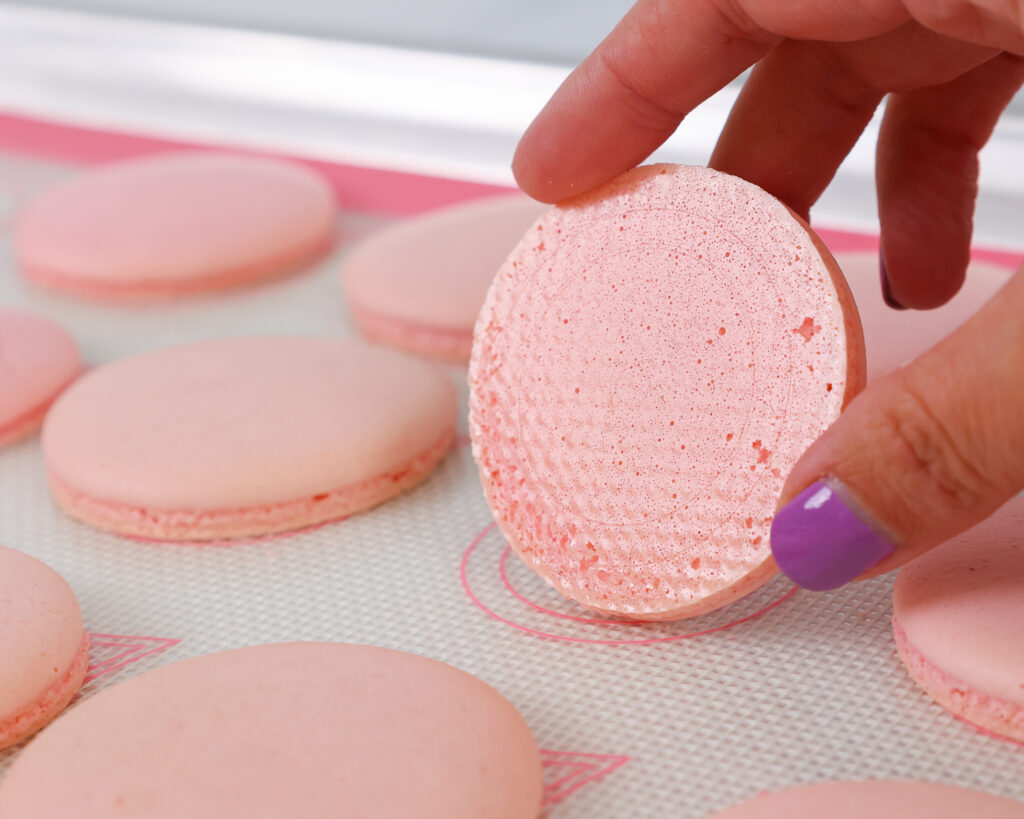
Let the macarons cool fully on the pan, then gently remove them from the Silpat mat.
If they are fully baked, they should peel cleanly off the mat and have a shiny bottom.
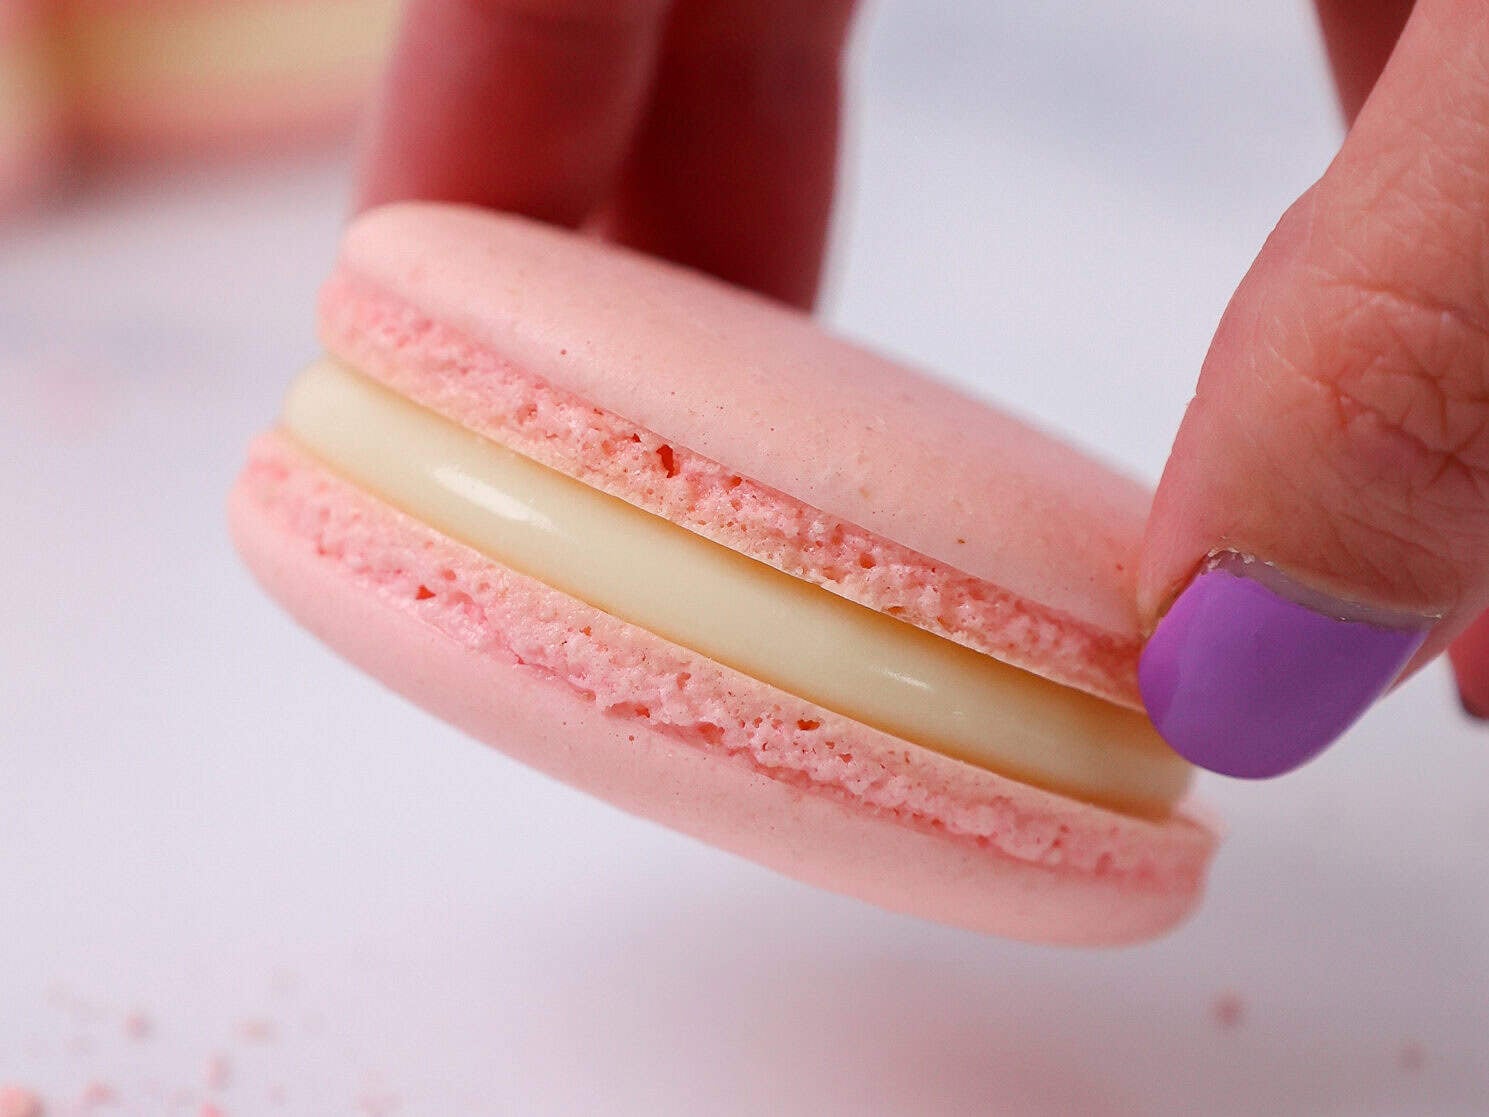
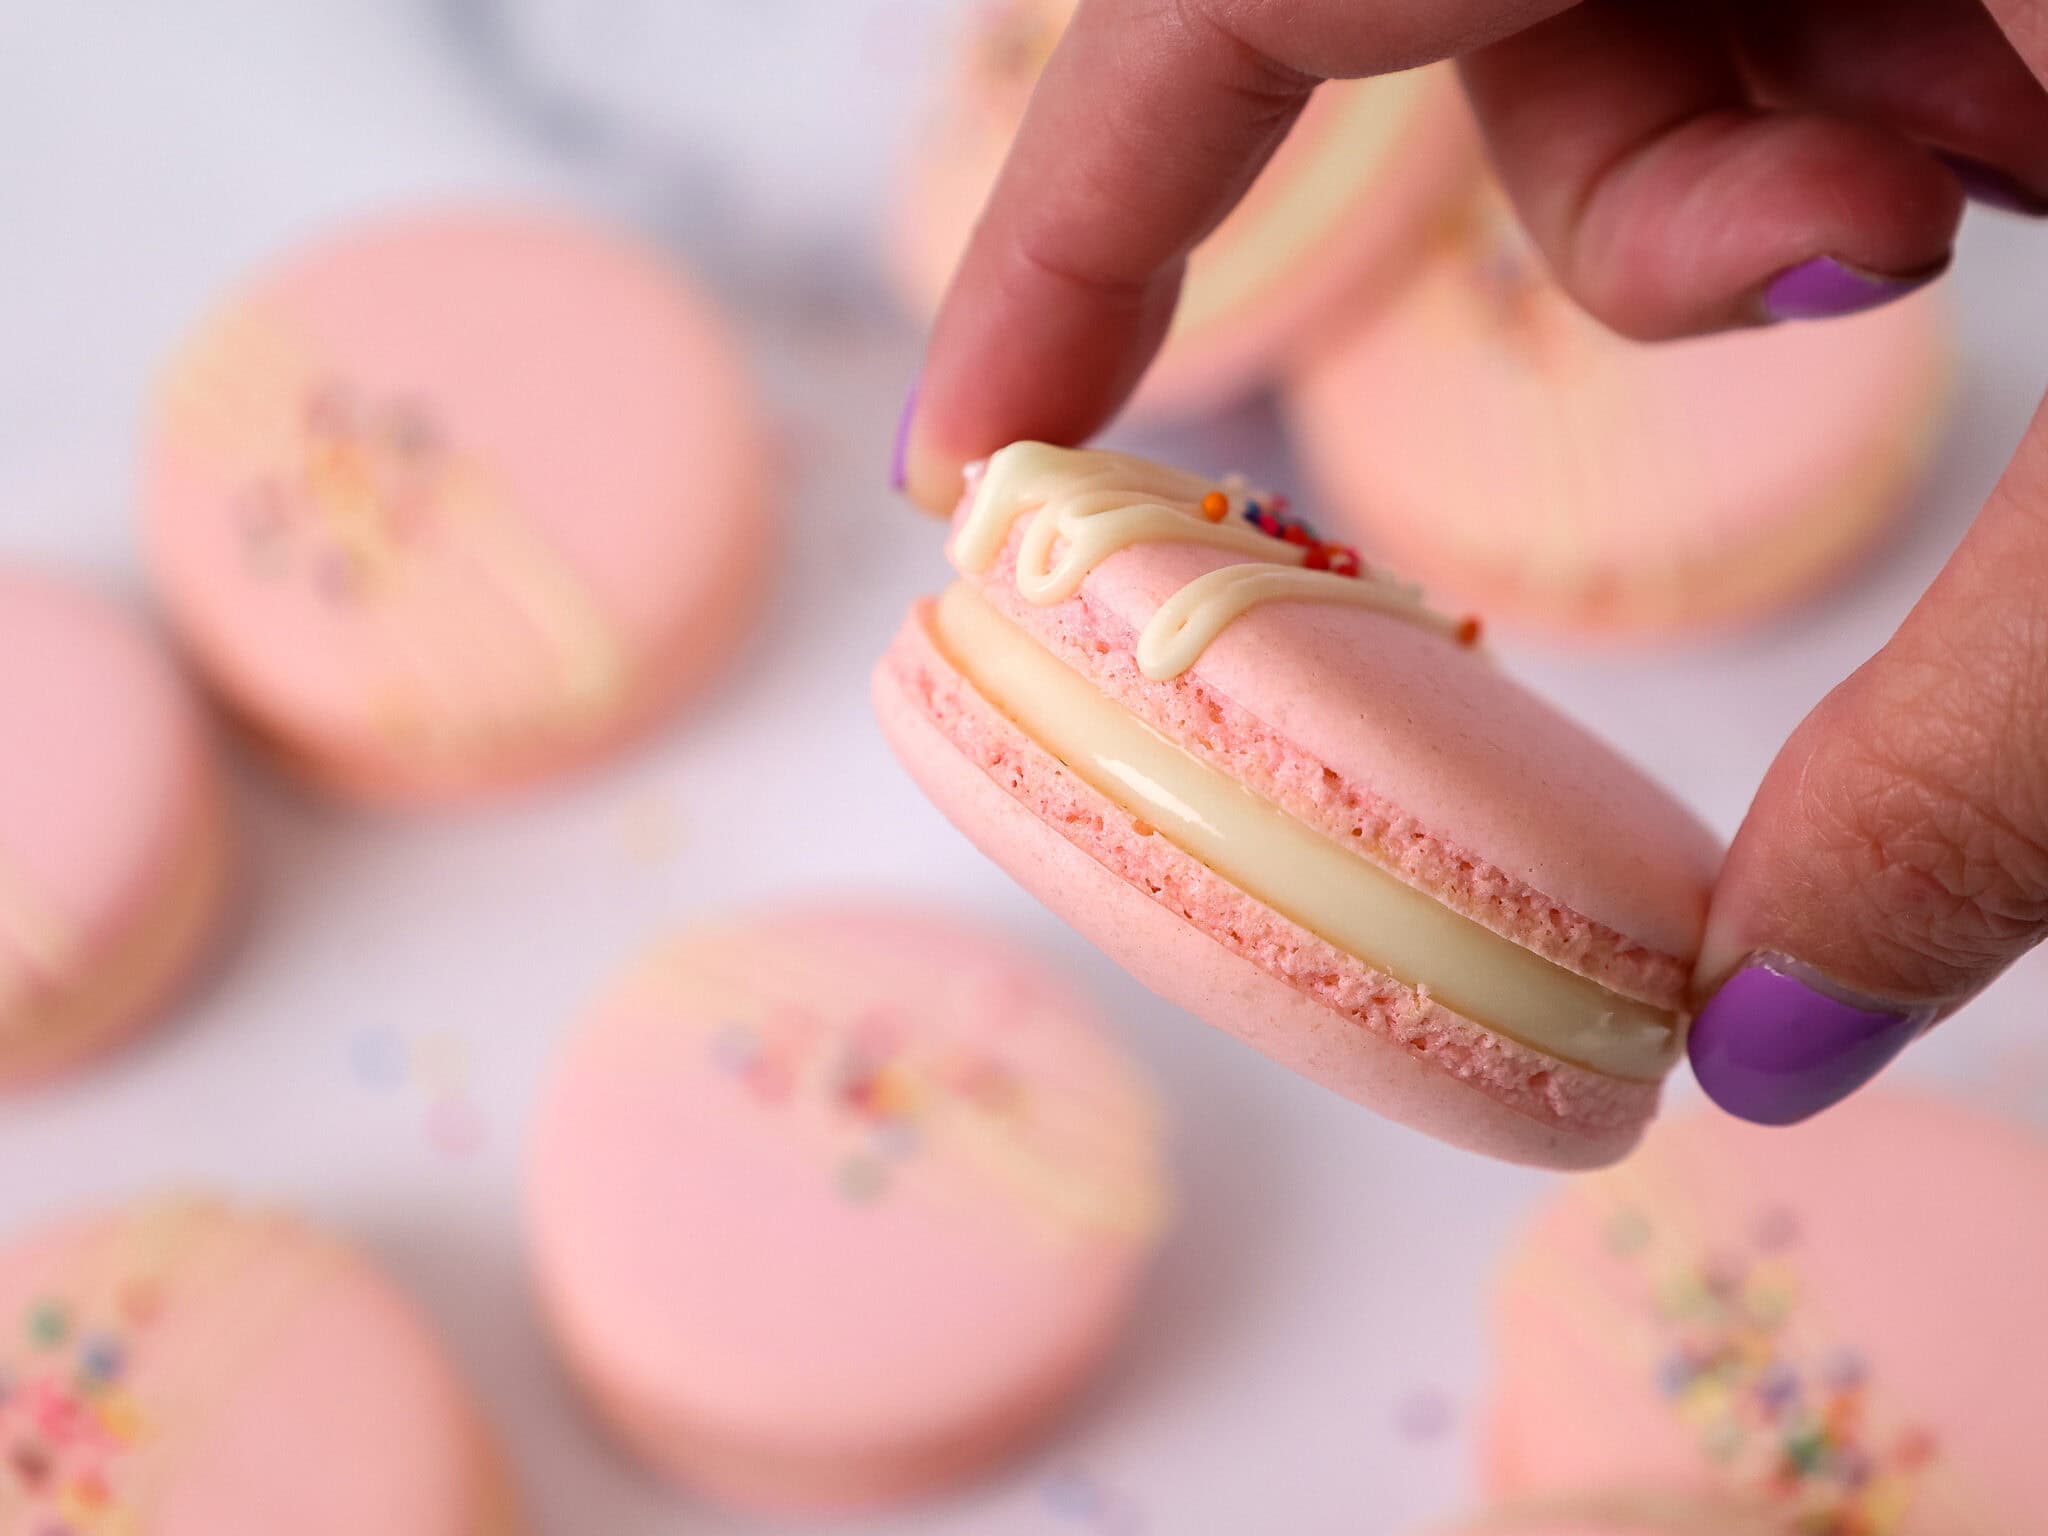
Step #7: Assembling These Italian Macarons
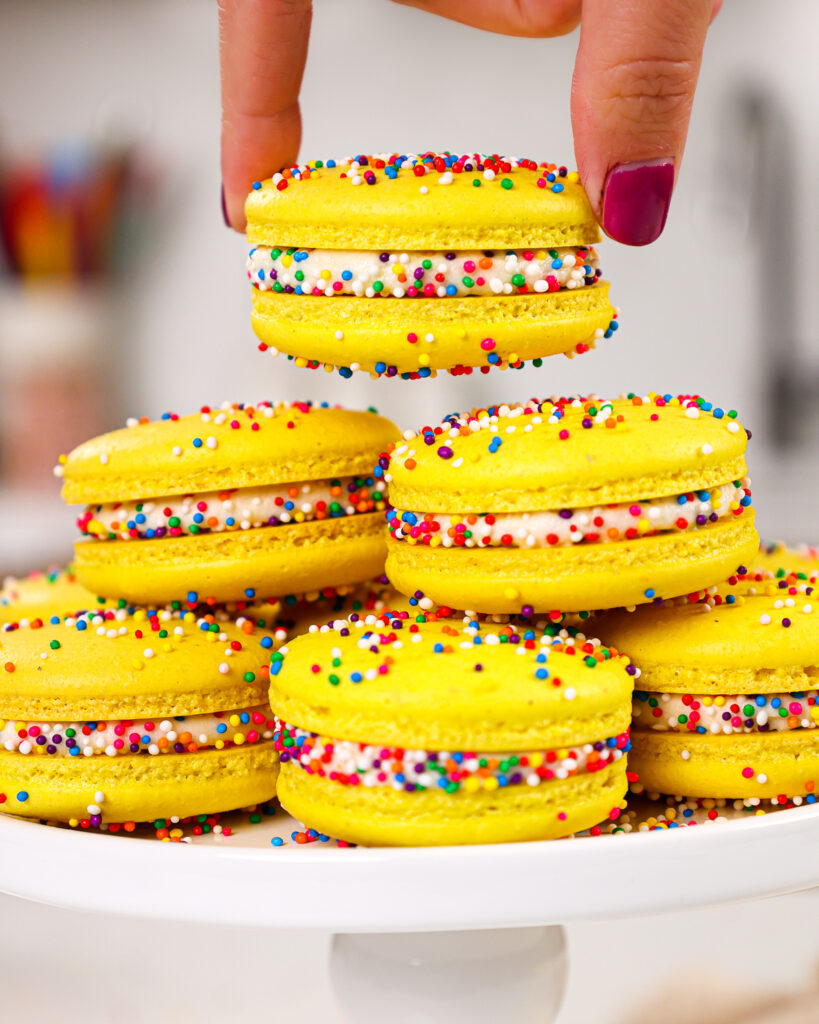
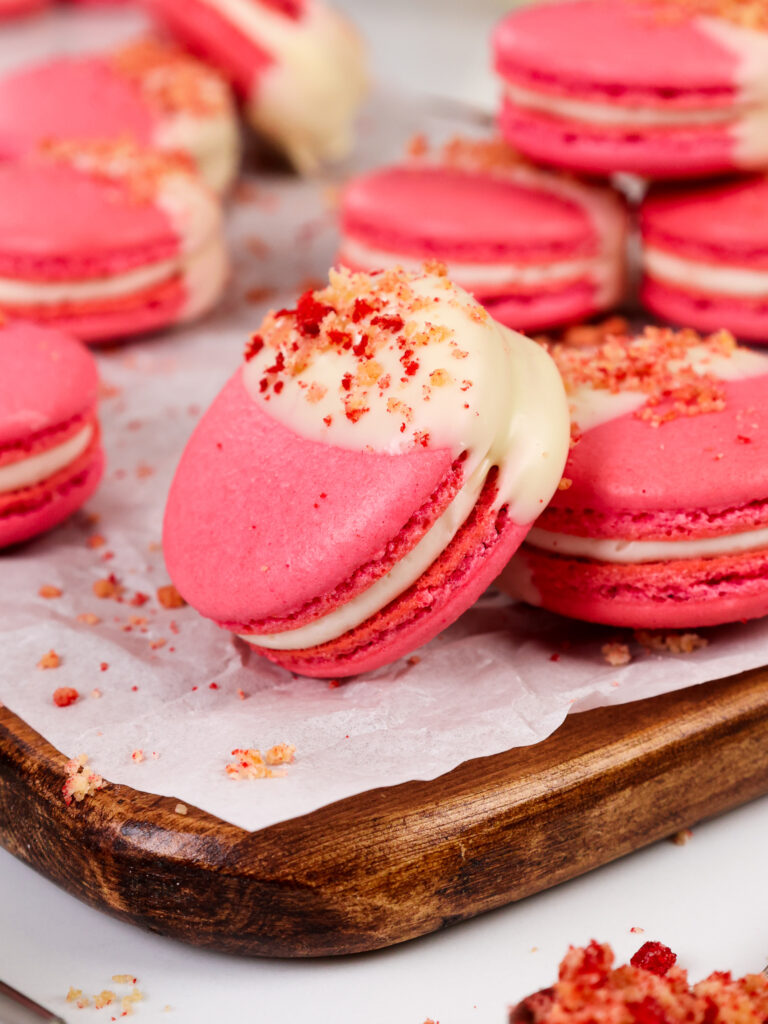
Pipe a dollop of ganache or filling of your choice on one macaron shell and top it with a second shell.
Place the finished macarons in the fridge to chill overnight, then enjoy!
Italian Macaron Troubleshooting
While I’d love to think everyone’s first batch of Italian macarons will turn out perfectly, my own experience has taught me that’s not how things usually go.
Macarons are incredibly temperamental, and it might take a few tries to get them just right.
Below are some of the issues I’ve run into when baking macarons, along with ways to prevent them from happening again.
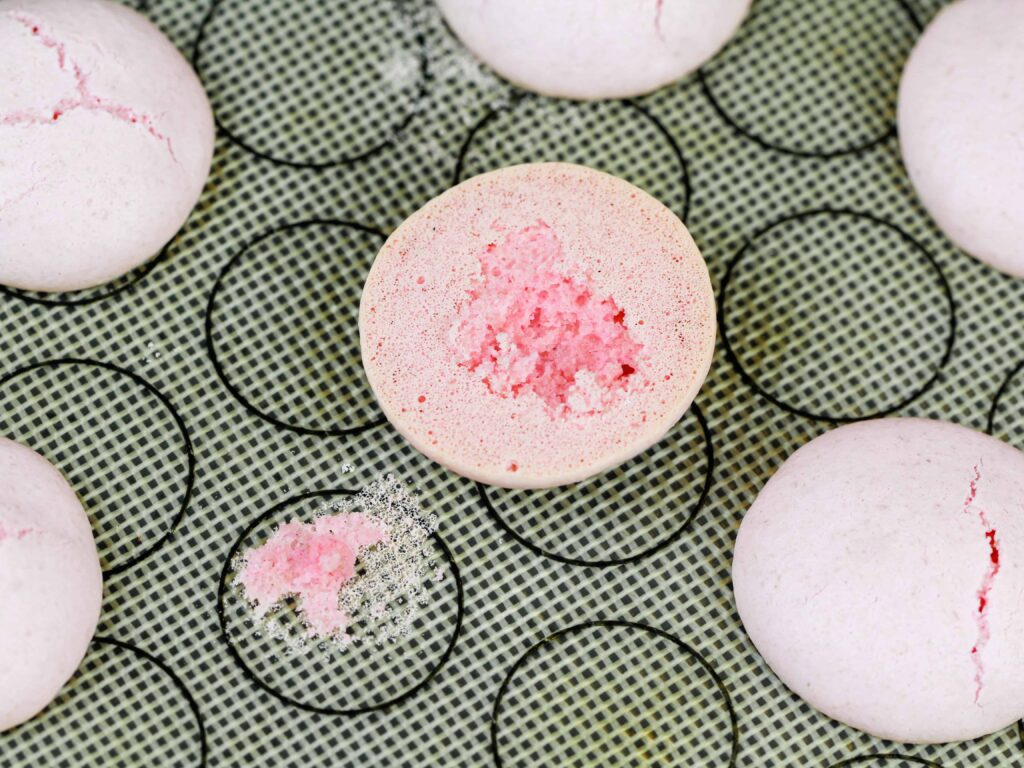
Why Do My Italian Macarons Have Cracked Shells?
Cracked shells were the first issue I ran into when I started baking macarons.
A few different things can cause cracked shells, including too short of a rest, trapped air bubbles, too hot of an oven, or under-mixed batter.
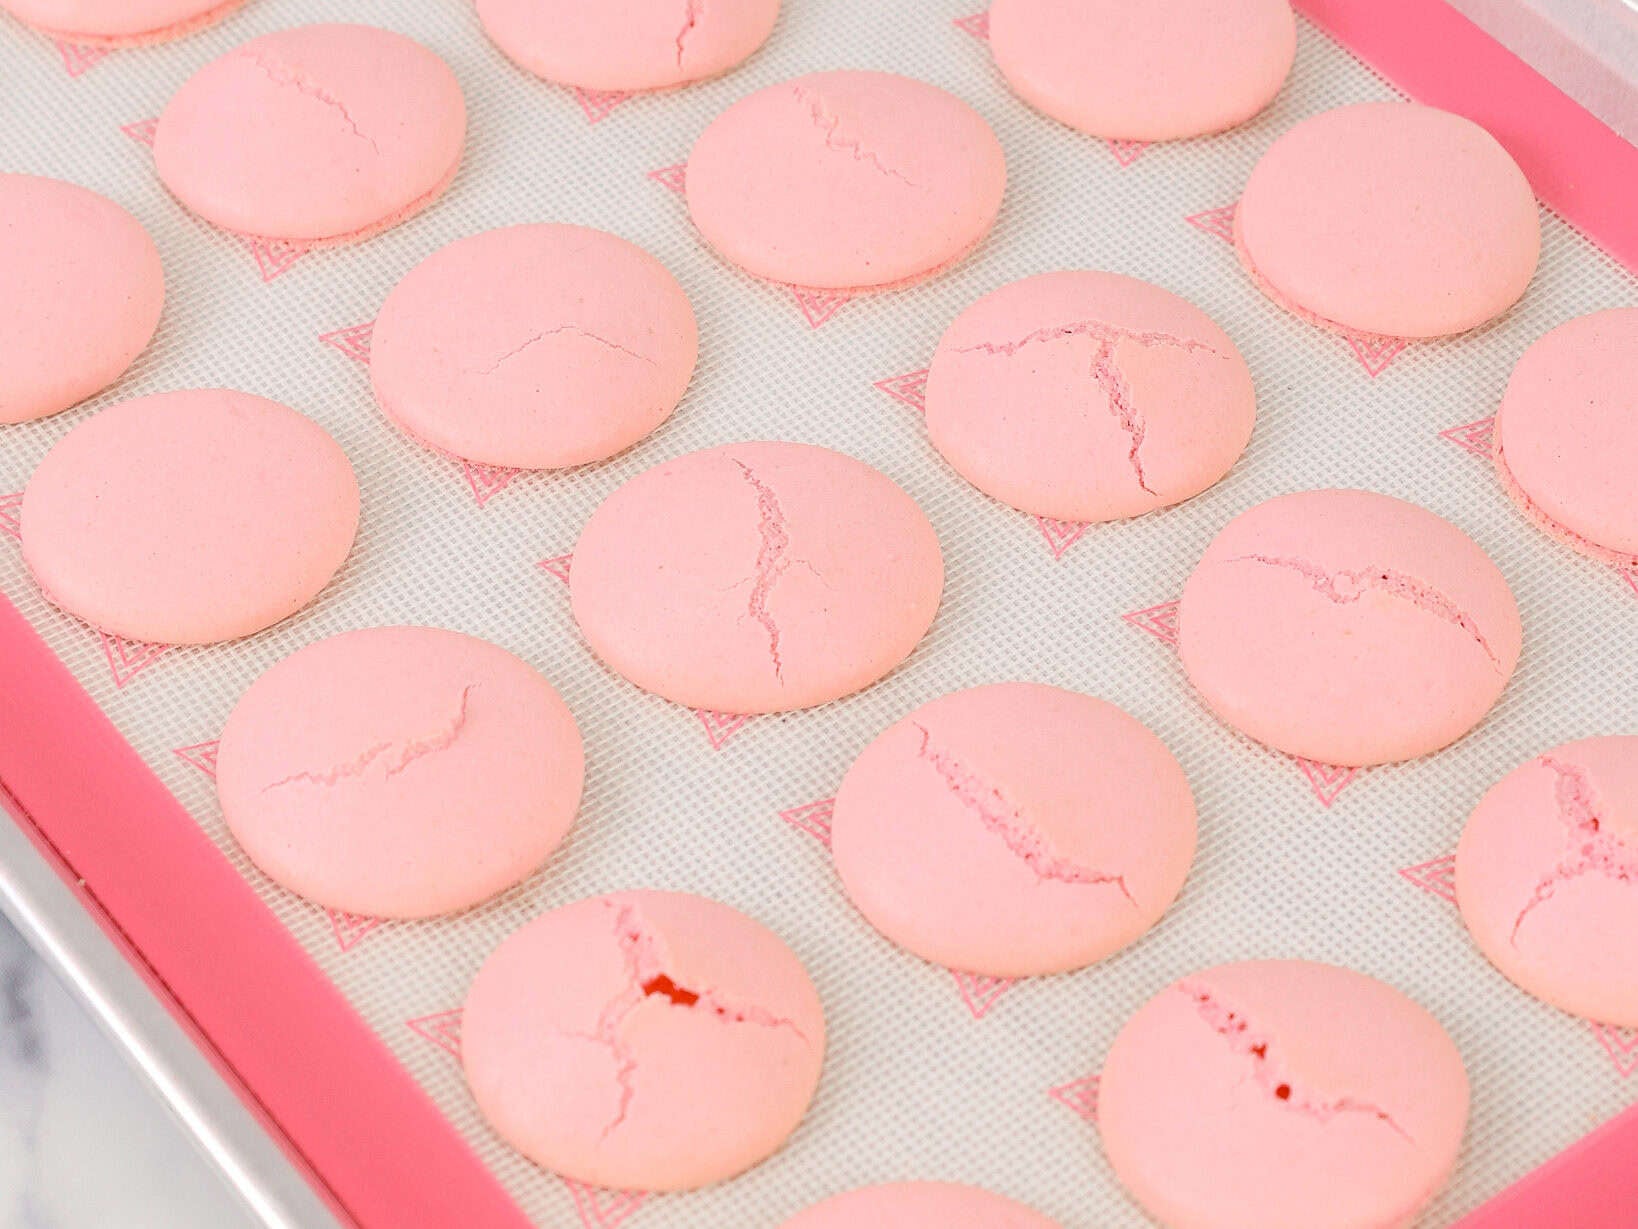
Potential Fixes: Bang your pans firmly before resting your macarons, rest your macarons until they form a skin, check your oven for hot spots, or mix your batter slightly more.
Why Are My Italian Macarons Hollow?
Hollow macarons have big air pockets between the top of the shell and the base.
This can happen when the meringue or batter is over-mixed or if air bubbles get trapped before being baked. It can also happen if your macarons are underbaked.

Potential Fixes: Make sure you’re not over-mixing your meringue/batter, make sure the shells are baking for long enough, or bang your pans firmly against your counter before letting them rest.
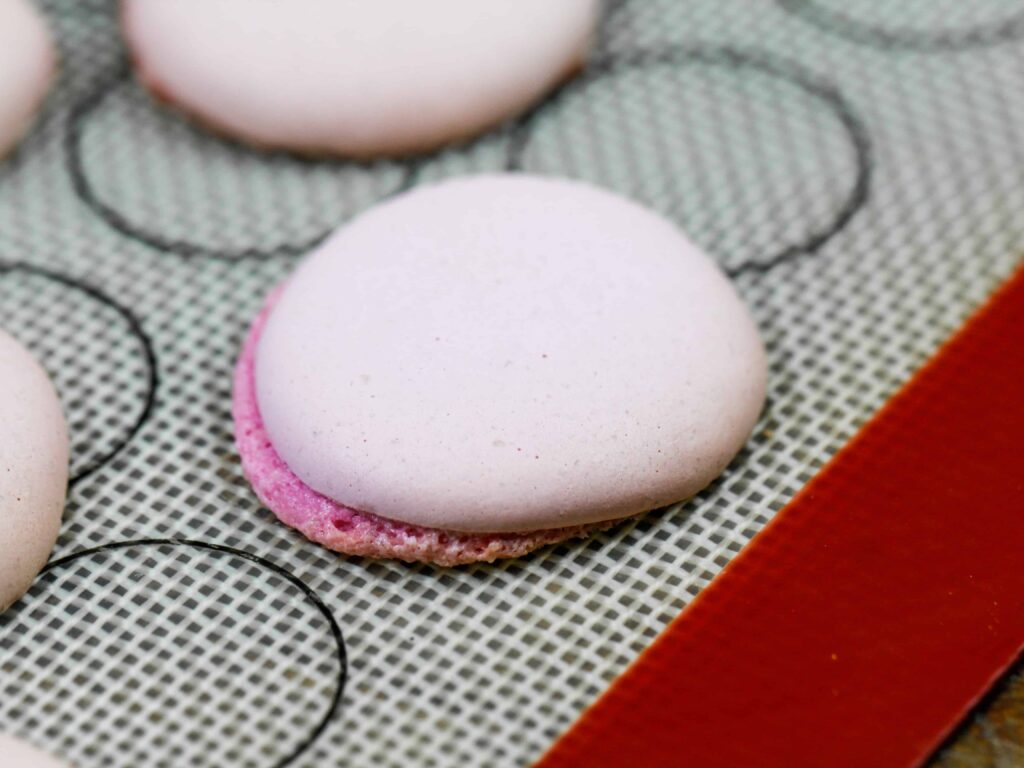
Why Are My Italian Macarons Sticking to My Mat?
Your macarons may stick to your mat/parchment paper if they’re underbaked, or if you didn’t let them cool fully before trying to remove them.
Potential Fixes: Let your macarons fully cool before trying to lift them or bake them slightly longer.
Why Don’t My Italian Macarons Have Feet?
If your macarons don’t develop feet, it could be because your batter is too wet, your batter was over-mixed, or you didn’t let your macarons rest for long enough.
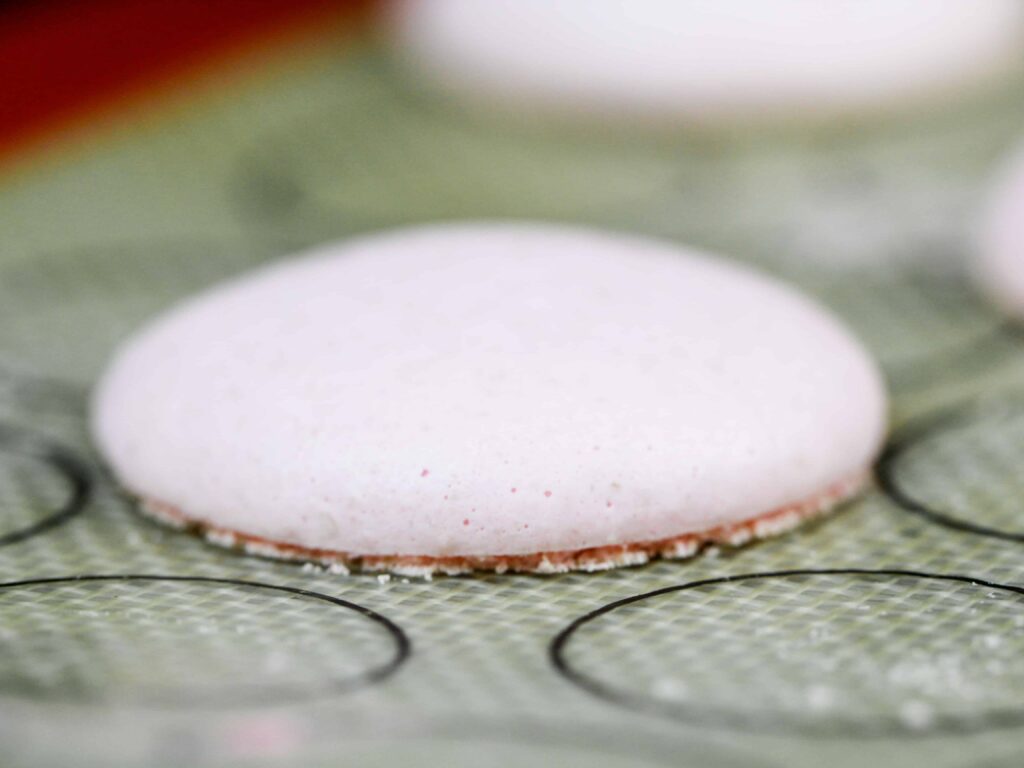
Potential Fixes: Try using aged egg whites, make sure you’re not using any liquid flavoring or food coloring, or let your shells rest until they form a touchable skin (20-40 minutes).
Why Are My Italian Macarons Crispy/Hard?
Sometimes, if the batter is over-mixed, it causes the shells to spread more and bake up crispy. They may also just be over-baked!
Keep in mind that macaron shells soften once they’re filled and have time to mature in the fridge, so don’t be disheartened if they seem a bit firm once they’ve cooled.
Potential Fixes: Mix your batter less, bake your macarons for less time, or fill them and see if the maturation process softens them.
Why Are My Italian Macaron Shells Brown?
There’s nothing worse than baking up a tray of macaron shells only to see they’ve browned! This is caused by overbaking or hot spots in your oven.
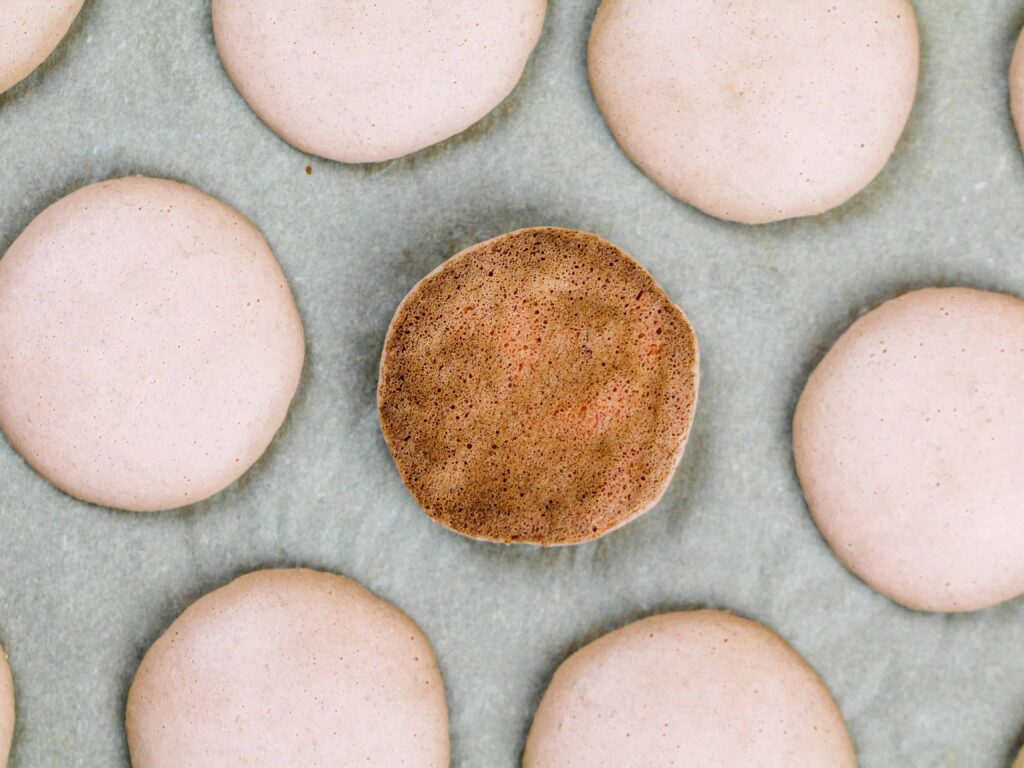
Potential Fixes: Turn down your oven temp by 5-10 degrees F, bake them for slightly less long, bake the macarons with a pan above them to protect them from the heat, or bake the macarons with two pans.
Why Are My Italian Macarons Uneven?
This can be caused by an uneven baking tray or mat, an oven that bakes unevenly, or uneven piping.
Potential Fixes: Make sure you’re using a good quality pan and silpat mat, test your oven for hot spots, or take your time when piping and use a template to ensure your macarons are consistent in size and shape.
Choosing the Right Filling for These Italian Macarons
While we put tons of energy into the shell of a macaron, almost all the flavor in a macaron comes from its filling.
The shell gives the macarons an incredible texture, but the filling is what determines their flavor. You can use just about any type of frosting or ganache to fill macarons.
I have a big sweet tooth, so I usually prefer filling my macarons with white chocolate ganache or American buttercream.
If you don’t want your macarons to be super sweet, I recommend using my chocolate ganache filling, hybrid buttercream, or Swiss meringue frosting.
You can also pipe a frosting or ganache ring on your macarons and fill it with jam or other fillings to create unique flavors.
Tips for Making the Best Italian Macarons
- Carefully read through the directions before making these macarons. There are quite a few steps, and it’s good to know your game plan before you start!
- Wipe your mixing bowl and whisk with lemon juice or vinegar to remove any traces of grease before making your meringue. It will help your egg whites whip up better!
- Separate your own eggs and age them if possible! Do not use egg whites from a carton.
- Measure your ingredients in grams with a kitchen scale! You really need to be precise with this recipe. Your macarons will turn out best if the ingredients are weighed.
- Use a macaron mat or print out a template to help you pipe consistently sized macarons.
- Let your baked and filled macarons mature! Letting them rest overnight while they are filled softens them (in a good way) and allows the flavors to develop.
- If your first batch of macarons doesn’t turn out, please check out the troubleshooting section above for help!
Making These Italian Macarons in Advance & Storage Tips
You need to let Italian macarons mature for a few hours or overnight in the fridge before eating them. This gives them their best texture and taste.
Store macarons at room temperature for up to 2 days in an airtight container.
Refrigerate macarons for up to 5 days in an airtight container.
Freeze-filled macarons for up to a month in an airtight container.
Unfilled macaron shells can be frozen for up to a month in an airtight container.
You can also make your filling ahead of time or save any leftover filling! It can be stored in an airtight container in the fridge for up to a week or in the freezer for up to a month.
Let Me Know What You Think!
If you try this recipe for Italian macarons, I’d love to hear what you think! Please leave a rating and comment below.
Tag me @chelsweets and #chelsweets on social media so that I can see your amazing creations!

Italian Macarons
Equipment
- Immersion Blender optional
Ingredients
Italian Macarons
- 160 g finely ground, blanched almond flour 1 2/3 cup
- 160 g powdered or confectioners sugar 1 1/4 cups
- 120 g egg whites, room temperature – divided 4 large egg whites
- 160 g granulated sugar 3/4 cup + 1 Tbsp
- 40 g water 3 Tbsp
- a pinch cream of tartar – optional 1/4 tsp
- gel food coloring – optional
White Chocolate Ganache Macaron Filling
- 170 g finely chopped white chocolate or white chocolate chips 1 cup
- 95 g heavy whipping cream, room temperature 1/3 cup + 1 Tbsp
Instructions
White Chocolate Ganache
- I like to fill these macarons with white chocolate ganache, but you can use any type of filling you prefer! The white chocolate ganache filling needs about 4 hours to set, so I recommend making it first! It can also be made up to a week in advance. I usually make it the night before.
- Place 170g of white chocolate in a medium-sized bowl and set aside.
- Pour 95g heavy cream into a heat-proof bowl and heat in 15 second intervals in the microwave until it just begins to bubble (this usually takes me about a minute). If you don't have a microwave, heat the cream over a medium-high heat in a saucepan until it starts to bubble and steam.
- Pour the heavy cream over the white chocolate. Make sure all the white chocolate is submerged beneath the cream. Let the mixture sit for a couple minutes.
- Use an immersion blender or a spoon to mix the ganache until the mixture has come together and is smooth. Press a piece of plastic wrap flush against the ganache and place the bowl in the fridge to chill.
Italian Macarons (adapted from my friend Matt Adlard's recipe)
- Next, make the Italian macaron shells. Sift 160g almond meal and 160g powdered sugar into a large bowl.
- Make a well in the center of the dry ingredients and pour in 60g of egg whites. Fold the mixture together until combined. Cover with plastic wrap and set aside.
- Next, heat 160g granulated sugar and 40g water in a pot over medium heat with a candy thermometer attached to the side.
- Heat over a medium heat and bring to a boil. As soon as the mixture starts to boil, pour the remaining 60g of egg whites in the bowl of a stand mixer and whisk on a medium speed.
- Add in 1/4 tsp of cream of tartar to help stabilize the meringue and continue to mix at a medium speed until soft peaks form.
- Continue cooking the sugar syrup until it reaches 238°F/114C°. Then slowly pour the syrup between the edge of the bowl and the whisk attachment while mixing on a medium speed. The syrup might splatter a bit around the bowl as you pour, but that's ok! Just do your best to avoid having the syrup hit the whisk attachment.
- Once the syrup is fully mixed in, increase the mixing speed to a high speed and mix until glossy, stiff peaks form (this usually takes me 6-7 minutes). There should be a tiny bend in the peak of your meringue when the whisk is lifted. If you want to color your macarons, mix in the gel food coloring during this step. Then mix the meringue into the almond/powdered sugar mixture in two additions.
- Once the meringue is mixed in, fold the batter in a circular motion until thick ribbons of batter run off the spatula when it is lifted. Be careful not to over-mix the batter!
- Transfer batter to a large piping bag fit with a medium sized round piping tip and pipe 1 1/2-inch rounds on baking sheets lined with silpat mats, spacing them about 1 inch apart.
- Bang the pans firmly on the counter a few times to release air bubbles, then pop any remaining air bubbles that come to the surface with a toothpick.
- Preheat the oven to 320°F/160°C, then let the macarons rest for 30 minutes to allow a skin to form. They should look matte and be dry to the touch once they're ready to be baked.
- Bake one tray of macarons at a time on the middle rack of your oven for 16-20 minutes.
- Remove from oven and let the macarons cool fully on the pan, then gently remove them from the silpat mat.
Assembling These Italian Macarons
- Place the ganache in a piping bag fit with a large round piping tip. It should be thick enough to scoop into the piping bag and hold its shape.
- Pipe a thick dollop of white chocolate ganache on one macaron shell. Gently press a second shell on top of the ganache to create a sandwich.
- If desired, drizzle a bit of white chocolate over the macarons and top with rainbow sprinkles.
- Place the finished macarons in an airtight container and chill in the fridge overnight, then let them come to room temperature for about 15 minutes and enjoy! Store any leftover macarons in the fridge.
Video
Notes
Tips for Making the Best Italian Macarons
- Measure your ingredients in grams with a kitchen scale! You really need to be precise with this recipe. Your macarons will turn out best if the ingredients are weighed.
- Separate your own eggs and age them if possible! Do not use egg whites from a carton.
- Carefully read through the directions before making these macarons. There are quite a few steps, and it’s good to know your game plan before you start!
- Use gel food coloring to color these macarons. If you try to use liquid food coloring, it can throw off the consistency of the batter.
- Use a macaron mat or print out a template to help you pipe consistently sized macarons.
- FIRMLY bang your pans on your counter after piping your macarons. This helps release any air bubbles that may be trapped and prevents cracked or hollow shells.
- Rest the macarons for 30 minutes before they’re baked to allow them to develop a skin.
- Pipe a small number of macarons on a mat to test your oven for hot spots and see if it bakes accurately. This way, you won’t waste a whole tray of macs if your oven runs hot or cold.
- Let your filled macarons mature in the fridge overnight! This softens them (in a good way) and allows the flavors to develop.
- If your macarons don’t turn out, please check out my macaron troubleshooting guide for help!
Making These Italian Macarons in Advance & Storage Tips
French macarons need to mature overnight (or ideally 24 hours) in the fridge before being eaten! They taste best 24 hours after being made. Macarons can be refrigerated for up to 5 days in an airtight container. Filledmacarons can be frozen for up to a month, but the length can vary based on the filling. Unfilled macaron shells can be frozen for up to a month in an airtight container.Nutrition
Other Recipes You Might Like:

Excited to try your recipe! I’ve tried the french method a few times with varying degrees of success. Do you only sift the almond flour and powdered sugar 1 time?
Love this breakdown of steps and troubleshooting. For aging the eggwhites, how exactly do you do that? Thanks!
@Colleen W, simply separate egg white and put in an air tight container and allow to age in the refrigerator for up to 24 hours before starting your recipe. This step allows the egg whites to relax. Hope this helps!!
Finally, a macaron recipe that gave me great results!! I’ve been making macarons for about two years and usually if I have a beautiful macaron top the inside is hollow, or if I have a full shell the top is cracked. I went into this recipe thinking that this would happen from past experience but it didn’t. They turned out perfect, thank you Chelsea!!
How long do u preheat the oven before baking please
Preheat it until it reaches the right temperature. Your oven will then maintain that temperature until you’re ready to bake. How long it takes to reach that temperature varies depending on your oven. Good luck!
How do you get the purple so nice here? I have difficulty time with the color. Any advice that you could give me please!
@Tram Nguyen, powdered food color does the trick, no liquid
I have tried your recipe. The shells feet rose really high and then they went lower but looked pretty, but inside they were just so dense? What did I do wrong?
In the step by step description of the process at the top, is there part of a step left out? I was confused when reading about the process because Step 3 refers to the whipped egg whites, but there was no whipping of egg whites preceding that. I think it is supposed to be at the end of Step 1 or maybe in between 1 and 2.
The actual recipe further down includes whipping the egg whites, so not a big deal. It was just a little confusing and may be more so for a beginner.
I look forward to trying this method! Thank you.
Jean
This was my first attempt at making these Italian style machine. I do prefer this method versus the French style. I did have to attempt the sugar cooking process twice as it was over cooked and hardened in the meringue but learning from my mistakes, the third time was successful. My delights, have wonderful feet but are not symmetrical in form but a lesson learned.
Thanks for sharing this art form.
In the printable directions it lists almond meal, but in the written #steps you write almond flour. It looks like you are using almond flour in the pictures. I just tried this with almond meal and it didn’t work. Should it have been almond flour?
can the almond paste be
made ahead for the macaron?
I’m not sure what size mixer you use, but the volume of egg whites was not even enough for my KA whisk attachment to grab. I scrambled to try to use a hand mixer (because the sugar was already cooking), but could not get the peaks stiff enough after I added the sugar syrup. Very frustrating and disappointing to have wasted the time and ingredients.
About how long should it take to form stiff peaks following the addition of the hot sugar syrup to the whipped egg whites? Every time I add the syrup my whipped merengue turns to liquid foamy mess and does not stiffen back up.
Tried this. But had very disappointing results. Surface was bumpy and uneven and no feet.
I mixed almond meal and powdered sugar in food processor
For 20 pulses and then sifted mixture twice before making the paste hoping for a smooth result. It did not matter- after letting cure for 30-40 min ended up
With bumpy uneven surface.
Any advice?
@Cheli, try mixing at the macaron age stage for slightly longer to give the almonds time to mix right in. It took me ages to have the confidence to mix a bit longer simply because macaron recipe warns of over mixing. I found the author’s comment about thick ribbons of batter is a good description. 🙂
Thanks Carl!!
@Carl, Be careful over blending the almond flour and powdered sugar in the food processor can cause the almond flour to turn to paste and release oils, you do not want this. I simply use superfine almond flour and sift the mixture instead. This recipe is perfect if you follow simple do’s and don’ts with Italian macarons. Don’t over process your almond flour, don’t over whip the egg whites, you’ll end up with marshmellow, once they start to become shiny it’s probably time to stop. True test, if you can’t invert the bowl with the egg whites and they don’t slip out, they’re good. Also, when adding the sugar mixture, time and patience is key, i add my down the side of the bowl to ensure i don’t cook the eggs and turn the blender on HIGH! Also, DON’T OVER MIX THE BATTER. You’re looking for a thick lava consistency. If you can spoon it on top of itself and it stops spreading after 8 seconds STOP, if it takes longer than 8 seconds give it a couple more turns with the spoon!
Hope this helps. Also if you are using a silt pad, i highly recommend dusting with a little powdered sugar to prevent sticking.
Thank you for sharing this Jacqueline! Totally agree!!
I doubt with the water and sugar ratio that this would get the same result. Water should only be a third of the granulated sugar.
I have made french macrons but I really excited to make macrons, Italian macrons!
Hey! Just made these and found the recipe good-except they stuck to the parchment (i don’t have silicon mats) instead of cleanly releasing like they’re supposed to. I baked for 18 min, and they are fully cooked. Any advice?
Hi Juliette,
Glad that overall it sounds like they turned out well!!
In addition to the mat or parchment paper you use, different pans also have a big impact on how macarons bake! I’d suggest maybe trying a different pan, or if you’re using a rimmed baking sheet, flip it upside down. It sounds crazy and makes it hard to put in and take out of the oven, but it helps the air circulate better and bake the macarons better. I don’t usually use this technique but a lot of macaron bakers swear by it.
You also can increase the temperature a tiny bit (like 5 degrees) or let the shells bake for 30 seconds longer. It sounds trivial but sometimes it makes all the difference. Hope that helps, and that your next batch doesn’t stick!
@Juliette, I dust mine with a little powdered sugar, shaking off any extra. This could also be a sign of over mixing the batter/wet batter, or oils from over blending the almond flour and powdered sugar, her you want to sift, don’t process. When mixing the batter, when you can spoon a bit on top of itself and it stops spreading after 8 seconds you’re done. If it takes longer than 8 seconds, a few more go arounds with the spoon should do it. Also make sure you dry out your Macarons before baking. Hope this helps
I am pure vegetarian. So can you please tell me substitute of egg white or can you please share eggless Italian macrons? Please.
Hi Krishna,
I don’t have a recipe for vegan Italian macarons, but here’s a link to one that should work: https://www.cookingoncaffeine.com/vegan-italian-macarons-aquafaba/
Hope that helps, happy baking!
I’ve tried making macarons with a French meringue, and I was always disappointed with my results. This recipe was so easy to follow and my Italian meringue macarons turned out PERFECTLY! I filled them with your cream cheese macaron filling and a bit of lemon curd, and I am so so delighted with my final results, thank you so much!!
YAY!!!! That’s so great to hear Mara! They sound absolutely delicious 🙂 Thank you for sharing!!
I have been making homemade marshmallow fluff (Italian meringue) for the past three months,
Is there any reasoning behind Not using that meringue recipe to use to create macarons?
Hi Emmi,
This recipe does make a classic Italian meringue, which is then folded into an almond / egg white paste. I’m not sure what marshmallow fluff recipe you’re using, but how is it different than the meringue made in this recipe?
Have you experimented with adding cocoa powder to this to make chocolate ones, or any other slight variations? I’ve seen many with cocoa powder, espresso powder/instant coffee, lemon zest, and other additions and was hoping to do the same with this recipe, was wondering what you’d suggest?
Hi Ari,
Great question! You can swap out some of the almond flour for cocoa powder to make chocolate shells! I’d recommend using about 15g of cocoa powder in place of 15g of almond flour. I haven’t experimented with lemon zest or cocoa powder though, I usually just incorporate those flavors into the filling. Hope that helps, happy baking!
this is THE BEST recipe EVER!!! I’ve tried more than one Italian macaron recipe. I’ve made them maybe fifteen times, only to have them flop again and again. i did A LOT of research about troubleshooting, but nothing ever worked. so I thought I’d try a different recipe, and the first time I tried this one, they came out better than perfect! I can’t believe I’ve finally found a recipe that gives me these results! i’d give it 1000 stars if i could.
Hi Heather,
Oh my goodness, this makes me so happy to read! Macarons can be so tricky, so I totally get how frustrating those flops must have been. I’m thrilled this recipe gave you that perfect result on the very first try, that’s such a win! Thank you for your kind words and for sticking with it until you found your success 🙂