
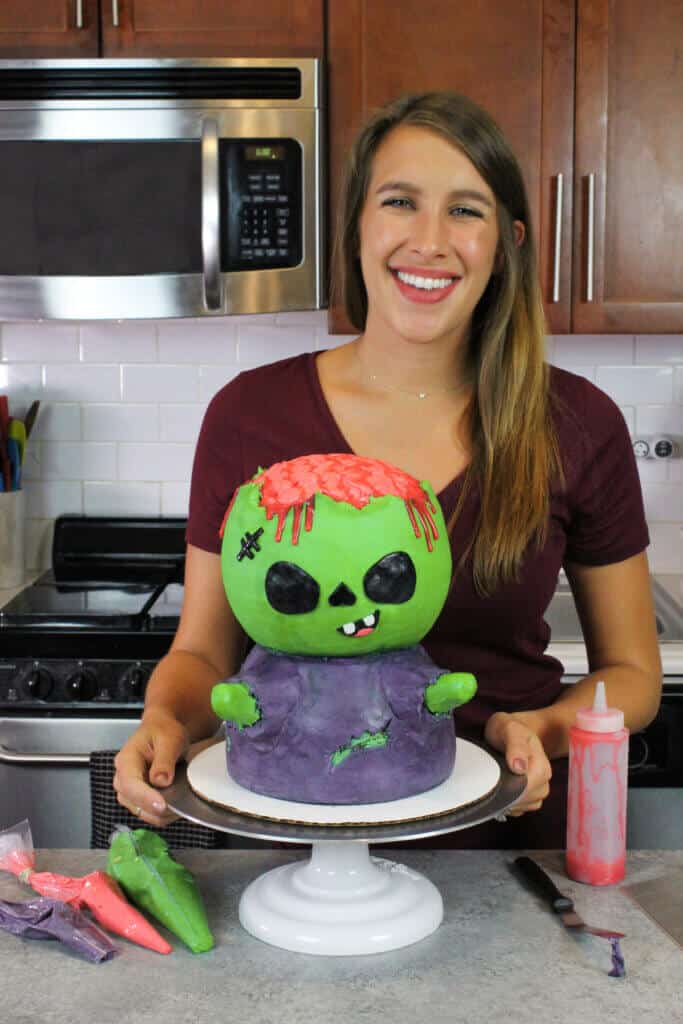
Zombie Cake
I somehow made it through the whole walking dead phenomenon without making a zombie cake. I’m ok with that though, because I’m not really a fan of scary things or cakes.
A cute, cartoonish zombie cake is much more appealing than a terrifying hand coming out of a cake. Not that that isn’t an awesome cake design, it just isn’t really my style 😛
When I was trying to imagine the design of this cake, I got out my sketchbook and drew a little draft.
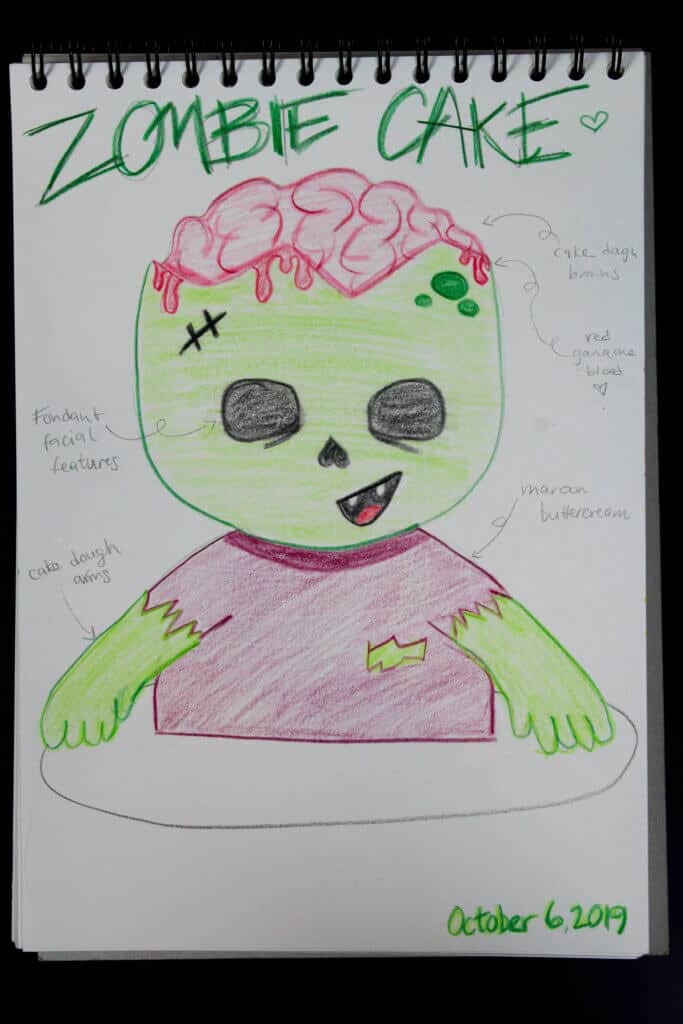
My final cake ended up being a bit different than my sketch, but that’s how things usually end up when I bake!
I love drawing out my cake designs before decorating a cake, because it helps me visualize the concept better. It also forces me to think through how I plan to build the cake.
Zombie Cake Flavor
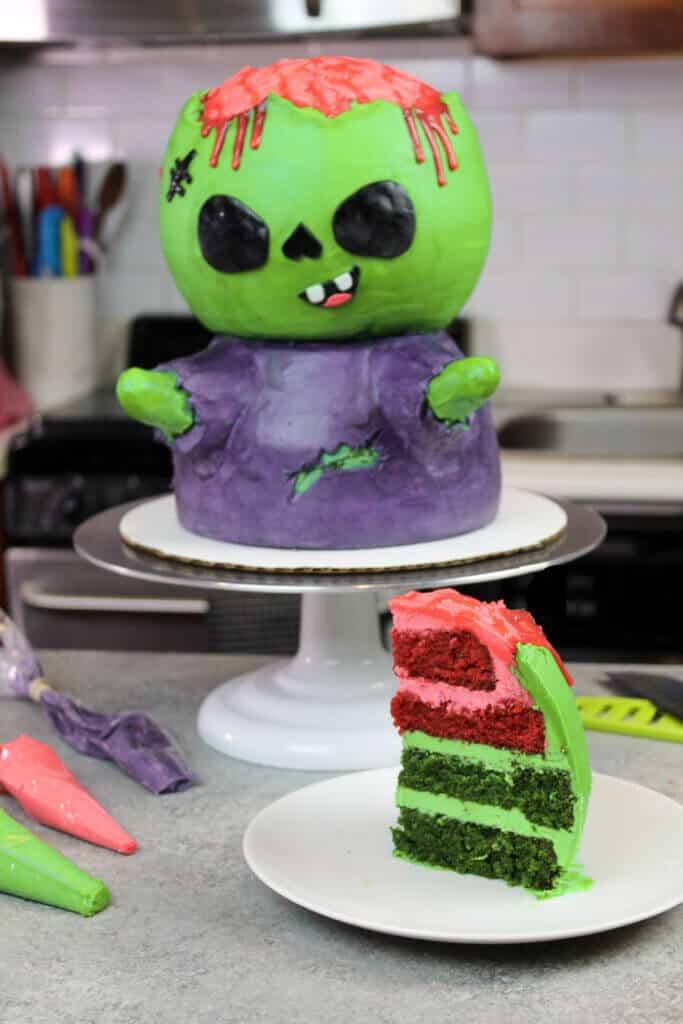
I spent a lot of time the past couple months playing around with my red velvet cake recipe, so I decided to put it to use in this cake!
But instead of red food coloring, these layers are colored green! Green velvet cake layers, for our little green zombie.
I couldn’t resist coloring the top two layers red though, to represent the zombie brains.
This recipe makes a double batch of of my red velvet cake recipe. The ends up being quite large, and feeds about 50 people. So don’t get scared in the ingredients list seems aggressive!
When I made the batter it reminded me of Christmas, but I was convinced it would be make for an awesome cut.
Properly Supporting the Zombie’s Head
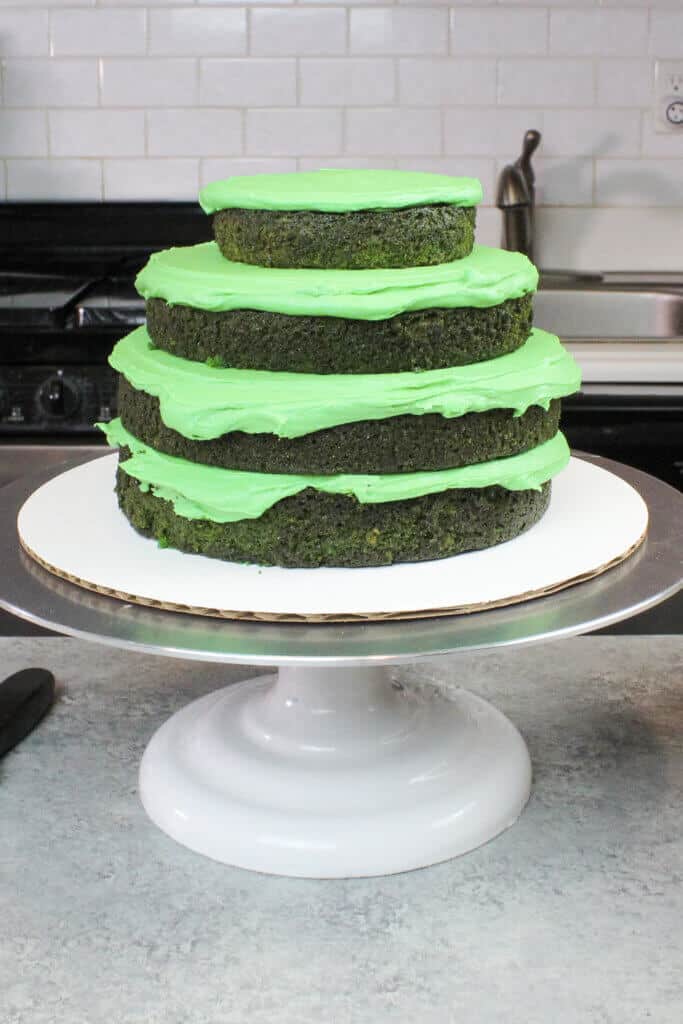
This is technically a tiered cake, because the zombie head really is a second tier! I built the body of the zombie first, by stacking green velvet cake layers in the following order from bottom to top:
- 7 inch green velvet cake layer
- 7-inch green velvet cake layer
- 6-inch green velvet cake layer
- 4-inch green velvet cake layer
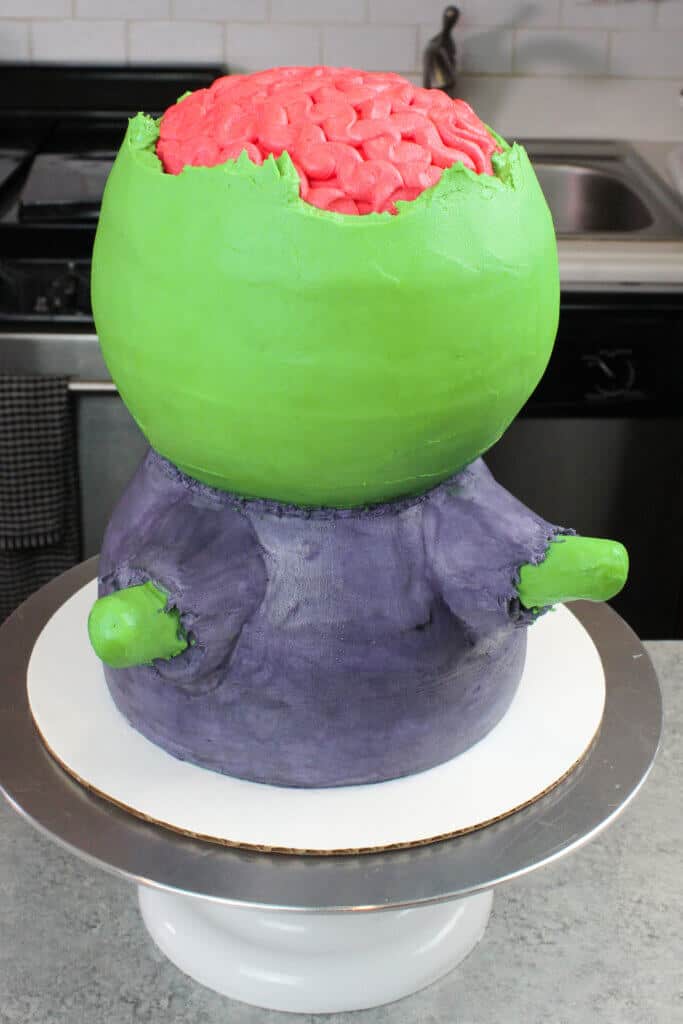
Once I crumb coated and frosted the body of the zombie, I added in a central dowel and three bubble tea straws to help support the weight of the zombie’s head.
If you don’t want to use bubble tea straws, you can also use wooden dowels! I prefer bubble tea straws because they’re much easier to cut, but either will work!
To make the zombie’s head, the cake layers are stacked on a 4 inch-cake board with a hole cut in the center. I stacked the cake layers from bottom to top in this order:
- 6-inch green velvet cake layer
- 7-inch green velvet cake layer
- 6-inch red velvet cake layer (zombie brain)
- 4-inch red velvet cake layer (zombie brain)
Once I crumb coated and frosted the zombie’s head, I chilled it in the freezer for 15 minutes.
This makes it much easier to handle, and slide down the central support onto the bottom tier of the cake.
Shaping This Zombie Cake
Sometimes I have fun carving cake layers, but this green velvet cake recipe make super tender, moist cake layers. That being said, they aren’t the easiest to carve.
Carving cake layers can get pretty messy too, so I chose to take the easy way out and fill between my cake layers with extra buttercream.
I mean, who ever complained about extra buttercream?
To get smooth sides on shaped cakes like this, I love to use an acetate sheet! It’s a thin piece of plastic that is flexible, and allows you to smooth frosting easily on curved surfaces.
I order my acetate sheets on amazon. They come in larger sheets, which I cut into smaller pieces using scissors.
Giving this Zombie its Scare Factor
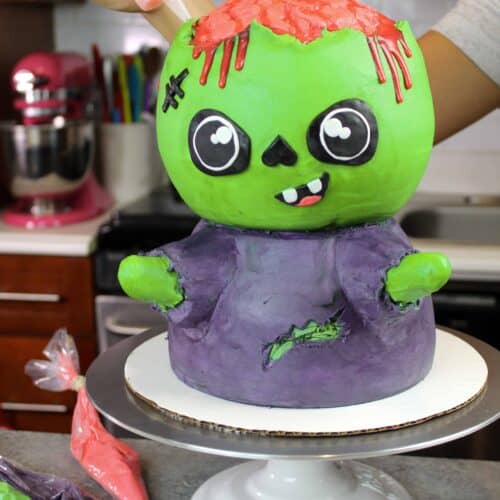
While I do love kawaii-inspired faces and cute cakes, this zombie cake was supposed to be a bit scary.
To give him more of an edge, I gave him an exposed brain with some dripping blood.
I piped some squiggles with pink frosting on top of his head to look like a brain, and added a red white chocolate ganache drip to make it look bloody.
In the process of adding his face, I couldn’t decided whether he should have eyeballs or not.
My sketch looked great, and didn’t include any eyeballs. But when I added his facial features and took a step back, I felt like he was missing something.
In the end, I gave him two cute little eyeballs. I’m still not 100% which look I liked better, so I included pictures of both 😛

The blood drips turned out a bit longer than I planned, but they looked bloody and scary, so I was still happy!
Tips for Making This Green Velvet Zombie Cake:
- Be sure to mix your cake batter just until the ingredients are incorporated; this will ensure your cake layers are tender and fluffy
- Be sure you are properly measuring your flour! Spoon fluffed flour into a measuring cup, and level with knife. Or even better, use a kitchen scale
- Use a serrated knife to level your cake layers once they’re fully cooled, to make it easier to assemble and frost your cake
- You can make these cake layers in advance!
Let Me Know What You Think!
If you try this zombie cake recipe, I’d love to hear what think of it! Please leave a rating, and let me know your thoughts by sharing a comment.
Other Recipes You Might Like:

Green Velvet Zombie Cake
Ingredients
Green Velvet Cake
- 2 1/2 cups vegetable or canola oil 560 grams
- 4 large eggs, room temperature 224 grams
- 2 cups buttermilk, room temperature 456 grams
- 2 Tbsp white vinegar 18 grams
- 4 tsp vanilla extract or vanilla bean paste 12 grams
- 4 cups granulated sugar 800 grams
- 4 tsp. unsweetened cocoa powder, sifted 16 grams
- 2 tsp fine salt 12 grams
- 2 tsp baking soda 12 grams
- 5 cups all-purpose flour 650 grams
- 4 squirts of green gel food coloring or 2 Tbsp liquid food coloring
Vanilla Buttercream Frosting
- 4 cups unsalted butter, room temperature 904 grams – 8 sticks
- 14 cups powdered sugar 1814 grams – two, 2 lb bag
- 2 tsp fine salt 12 grams
- 1/2 cup heavy whipping cream, room temperature or whipping cream (115 grams)
- 2 Tbsp vanilla extract or vanilla bean paste 24 grams
- purple, green, and pink gel food coloring
Brain Ooze/Blood (White Chocolate Ganache Drip Recipe)
- 1/4 cup heavy whipping cream, room temperature 57 grams
- 3/4 cup white chocolate chips 132 grams
- Red gel food coloring
Additional Tools
- 6 thick bubble tea straws 1/2 inch wide
- 10 inch greaseproof cake board
- 4 inch greaseproof cake board
- black and white fondant
- piping bag
Instructions
Red Velvet Cake
- Preheat oven to 350 degrees F (175 degree C).
- Grease and line three 7-inch, three 6-inch, and two 4-inch cake pans.
- In a large bowl, whisk together the vegetable oil, eggs, buttermilk, white vinegar and vanilla extract.
- Add granulated sugar, and whisk for 30 seconds to help the dissolve the sugar.
- Mix in the cocoa powder and baking soda, and whisk until no clumps remain.
- Add green gel food coloring, and mix until the batter is evenly colored a deep shade of green.
- Mix the flour into the batter in two installments.
- Divide the batter between the prepared pans, filling them about 3/4 inch high with batter.
- Bake for 27-29 minutes, or until a toothpick comes out clean.
- Remove pans from oven, and allow them to cool in the pans for 10 minutes.
- Carefully flip the layers out of the pans, and place on a wire rack to finish cooling.
- Level the cake tops with a serrated knife once they’re fully cooled.
Vanilla Buttercream Frosting:
- Beat the butter on a medium speed for 30 seconds with a paddle attachment, until smooth.
- Add in the vanilla and salt, and beat on low until the ingredients are fully incorporated.
- Slowly mix in the powdered sugar on a very low speed, 1 cup at a time. Alternate with small splashes of cream.
- If the frosting is too thick, add in additional cream (1 tablespoon at a time).
- If the frosting is too thin, add in more powdered sugar (1/4 cup at a time).
- Color 3/4 of the frosting green, and divide the remaining frosting between two bowls. Color one a deep shade of purple (zombie t-shirt), and the other a pinkish red color (zombie brains).
- Cover each bowl of frosting with a piece of plastic wrap, to prevent a crust from forming until you’re ready to use it.
Pink White Chocolate Ganache Drips:
- Heat heavy cream in a heatproof bowl in the microwave for 45 seconds, until it’s just beginning to bubble.
- Gently pour white chocolate chips into the heavy cream, making sure they are fully covered with cream.
- Allow mixture to sit for 1 minute.
- Stir slowly until the cream and white chocolate are combined.
- Some bits of chocolate may not be fully melted yet. Heat the mixture again for 20 seconds, and stir. Repeat as necessary until all the chocolate bits are fully melted and incorporated.
- Add in the red gel food coloring, if desired. Allow to cool until desired viscosity is reached (barely warm to the touch).
Zombie Body
- Stack and frost cake layers on a greaseproof cake board, using a dab of frosting to help stick the first cake layer to the board. For the bottom tier, stack the cake layers from bottom to top in this order: 7 inch, 7 inch, 6 inch, 4 inch.
- Add an even layer of buttercream between each cake layer.
- Add a thin coat of frosting around the cake, to fully cover the cake layers. Smooth using an acetate sheet, then add in a central dowel, and three trimmed bubble tea straws to support the weight of the zombie’s head.
- Chill the cake in the fridge (30 minutes) or freezer (10 minutes) until the frosting is firm to the touch.
- Press two bubble tea straws into the sides of the cake, to be the zombie arms. Cover with green frosting, then add purple frosting over the top of the green frosting to create sleeves.
- Add a second, thicker layer of purple frosting to the cake, and smooth using an acetate sheet.
- Chill in the freezer for an additional 10 minutes.
Zombie Head
- While the body chills, assemble the zombie head on the 4 inch, greaseproof cake board. Be sure to cut a hole in the center of the board that is large enough to fit over the central support used in the zombie’s body.
- Stack the cake layers from bottom to top in this order: 6 inch, 7 inch, 6 inch, 4 inch.
- Frost with an even layer of buttercream between each cake layer, and cover with a crumb coat. Chill in the freezer for 10 minutes.
- Add a thin second layer of of pink frosting to the top 1/4 of the cake. Place the remaining pink frosting into a piping bag and cut an opening about 3/4 cm wide.
- Pipe squiggly lines vertically on top of the cake, to look like zombie brains.
- Add a second, thicker layer of frosting to the bottom part of the cake, working the frosting up toward the brain.
- Leave a jagged edge when the green frosting meets the pink frosting.
- Smooth using an acetate sheet.
- Add fondant facial features, and drizzle ganache over the pink frosting and over the edge of the green frosting.
- Chill zombie head for 10 minutes in the freezer.
Zombie Cake Assembly
- Remove zombie head and body from freezer, and carefully lower the zombie head onto the central dowel.
- Slowly lower the head with a large offset spatula, until it’s resting on the body.
- Fill the gap between the two tiers with some additional green frosting.
- Use a knife to cut some holes in the zombie’s shirt, by scraping away some of the purple frosting to expose the green frosting underneath.
- Then cut in and enjoy!
One Comment