
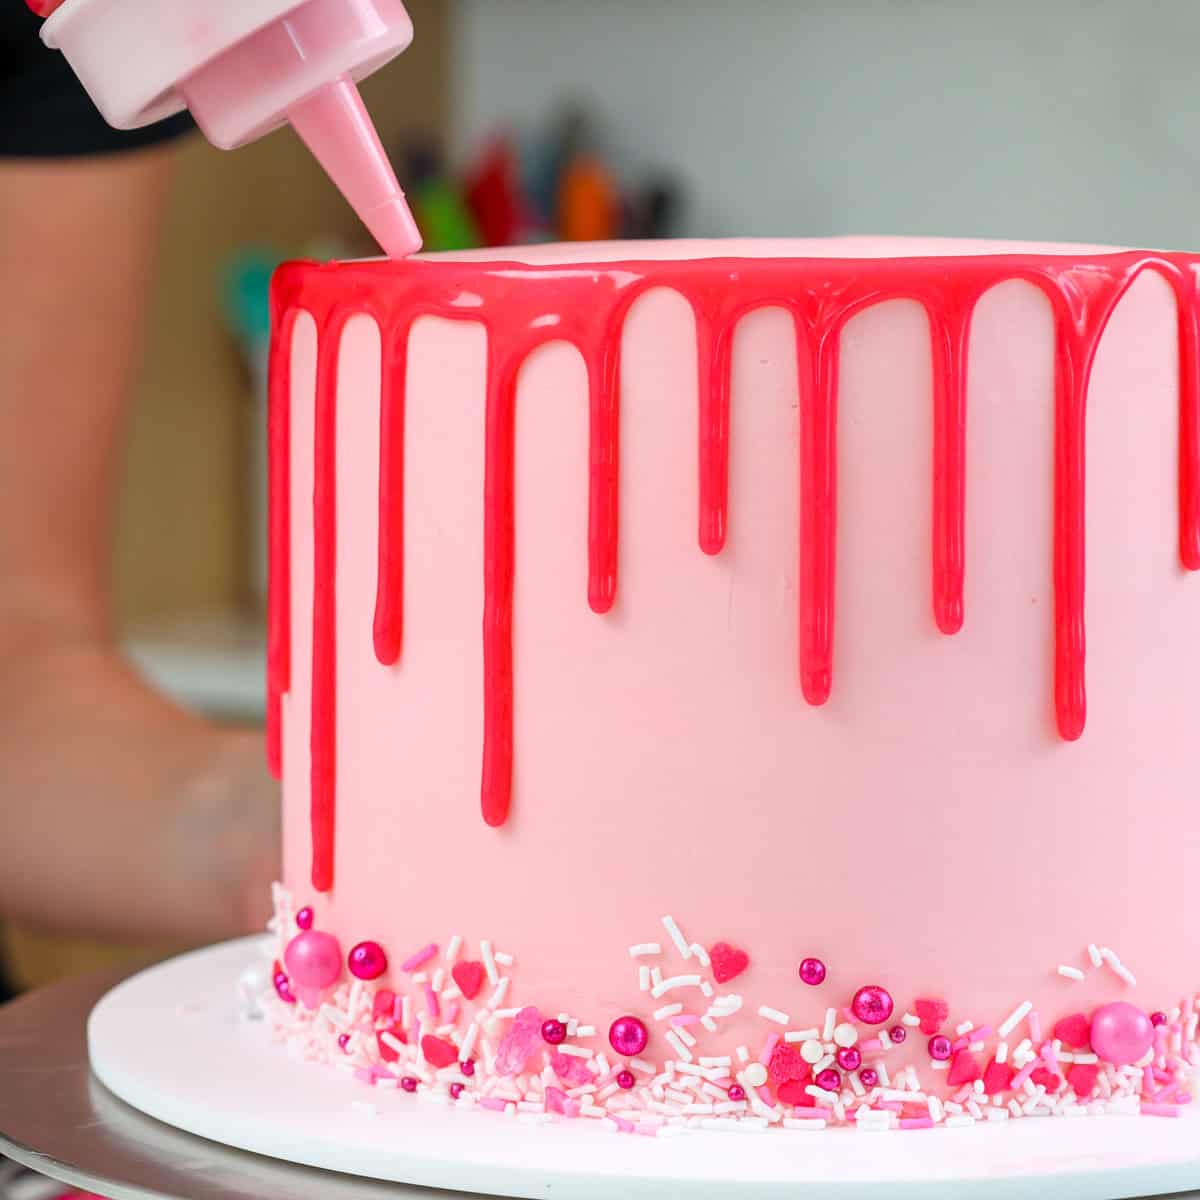
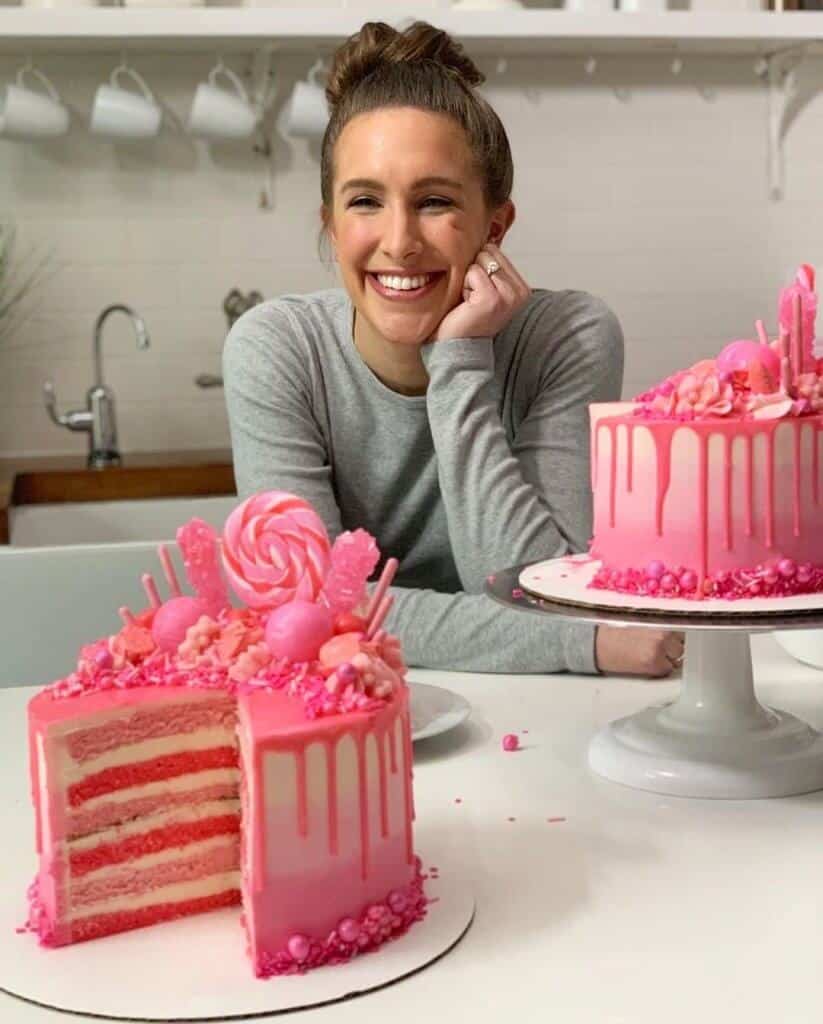
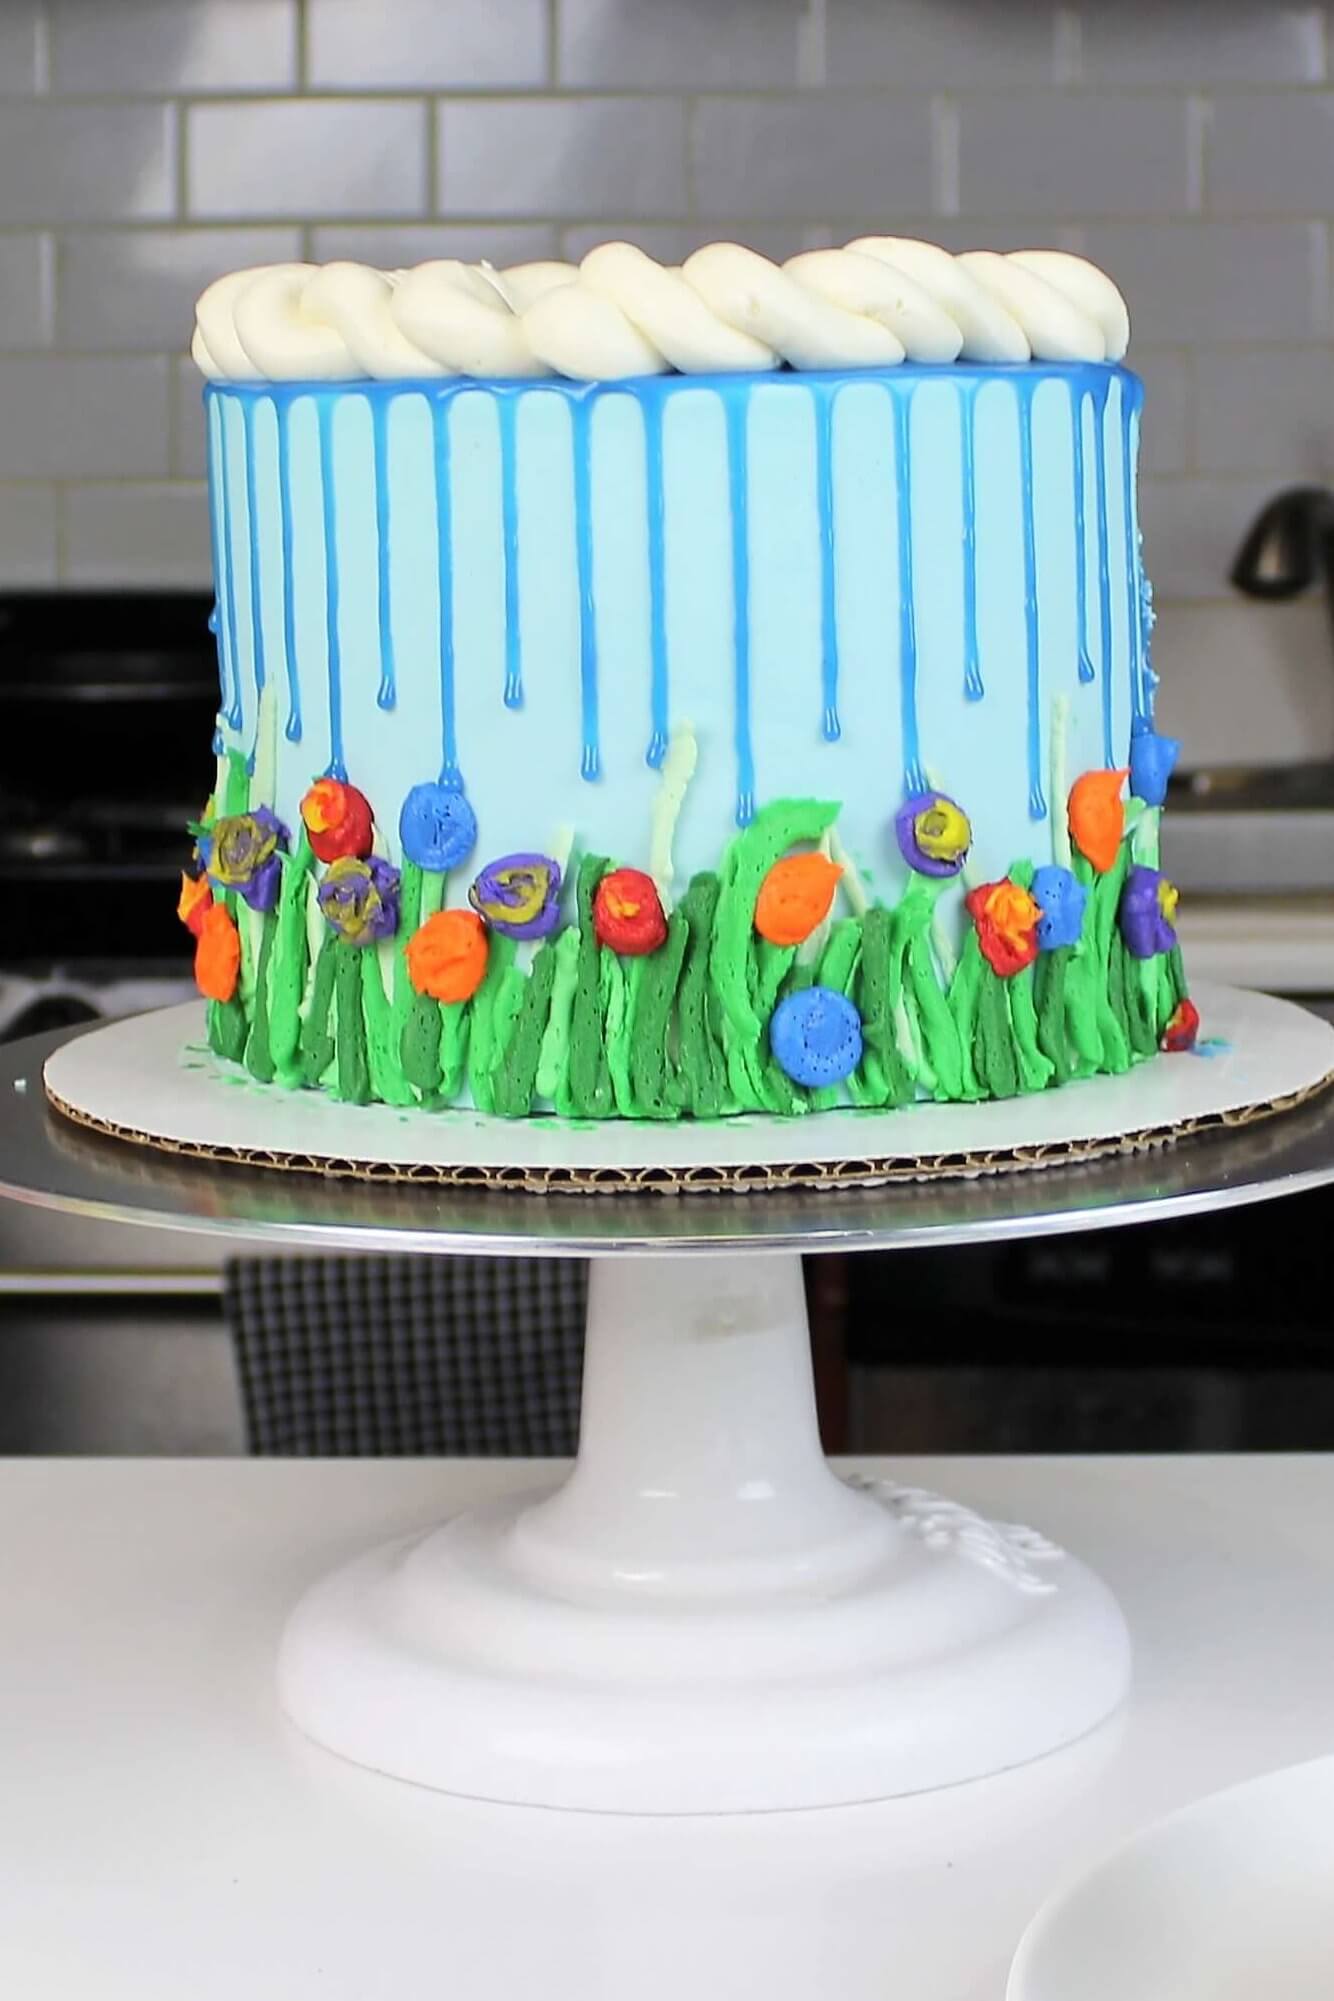
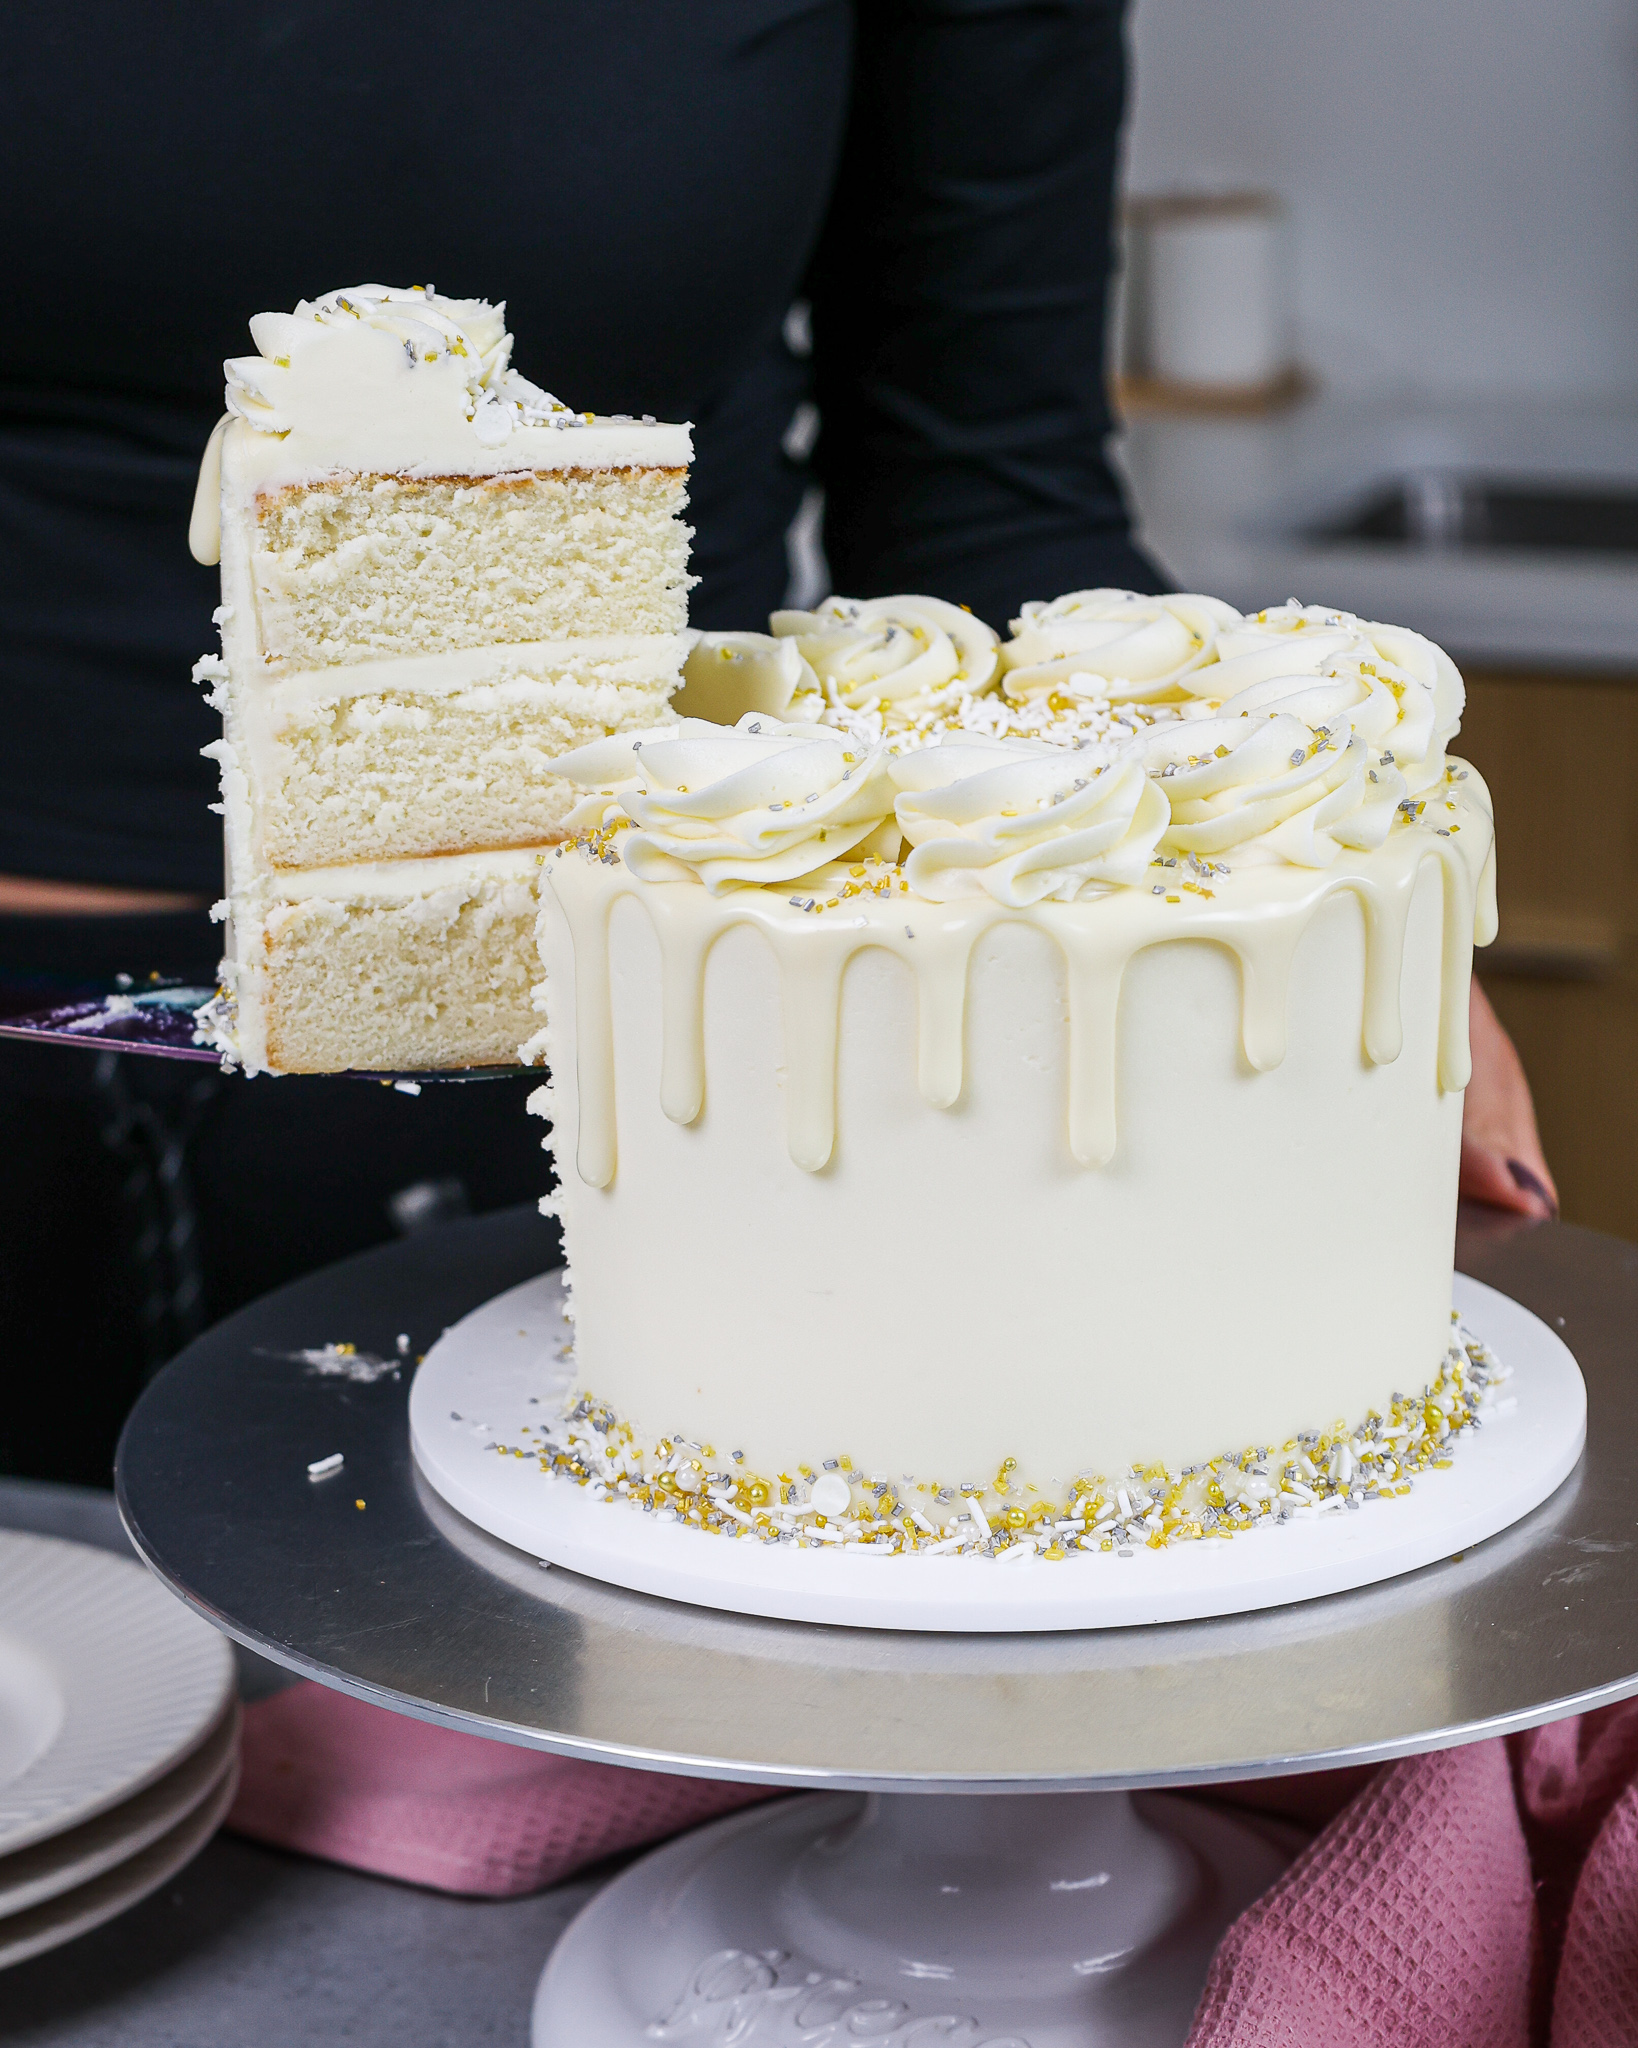
Colored Drips Recipe (White Chocolate Ganache)
Adding colored drips to a cake is the perfect way to take your cake decorating skills to the next level! It’s such an elegant yet playful cake design.
If you’ve never made a drip cake before, fear not! I’m going to share everything you need to know to make a colorful drip cake, and more.
What Do You Call Those Colorful Drips On Your Cake??
A lot of people ask about the colorful stuff on the sides of my cakes! Some people call it drip cake icing, others call it drip cake ganache. I’ve struggled with what to call it, too!
After a lot of back and forth, I’ve finally settled on calling this my colored drip recipe. But you can call it whatever you’d like 🙂
Colored Drip Video Tutorial vs. Recipe
**One thing to note!! The video for this recipe calls for 1/2 cup of heavy cream. I made it several years back, and used to make it with more heavy cream.
After lots of testing, I found that using 1/4 cup + 1 Tbsp of heavy cream is a more foolproof recipe, and I have updated this recipe to reflect that. Sorry for any confusion!!
The Secret To My Colored Drips: 2 Ingredients
Just because colorful drip cakes are beautiful, doesn’t mean they need to be complicated.
We’ll start by discussing the most basic part of colored drips, the ingredients they’re made with! The beauty of my recipe is that it’s made with only two ingredients.
All you need is a cup of white chocolate chips and some heavy cream. If you have a kitchen scale, you can also weigh your white chocolate chips. You will need 175g for this recipe.
I like to use mini white chocolate chips because they melt better. However, because they’re smaller, I’m able to fit more of them in 1 cup than if I were to use regular white chocolate chips (175g vs. 160 g).
With this in mind, if you use regular white chocolate chips, you may want to slightly overfill your cup measure to account for this difference.
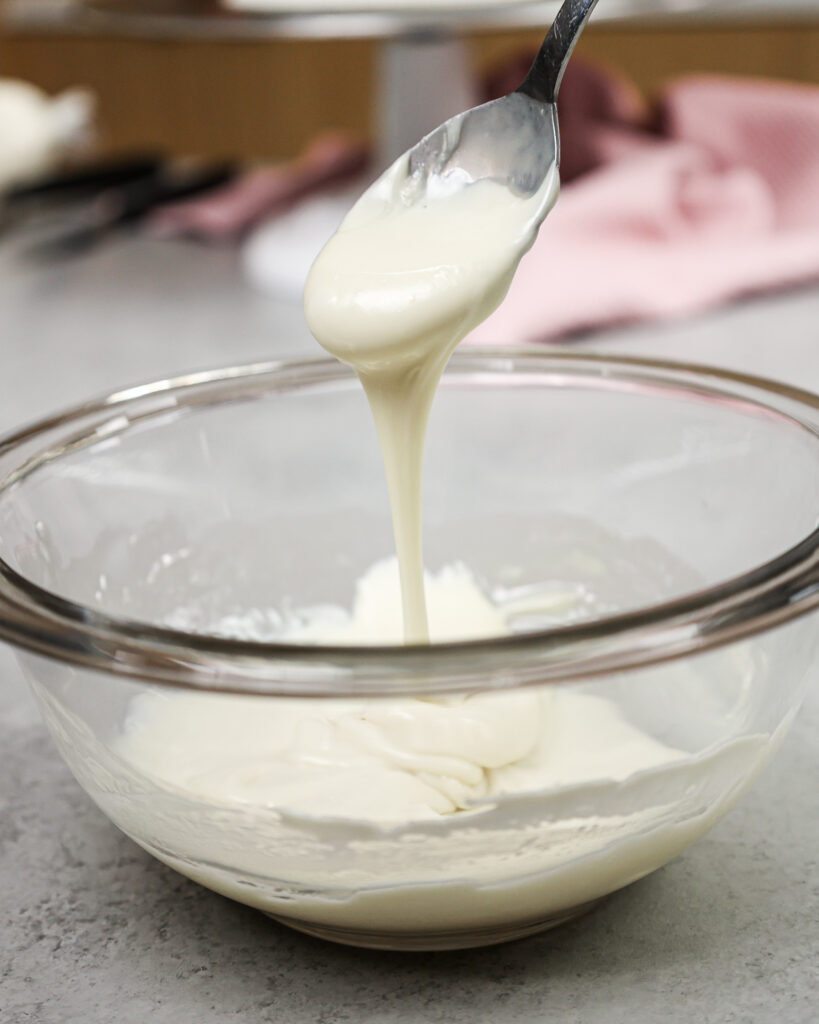
You simply heat the cream and pour in the white chocolate chips. Let them melt, give them a quick stir, and you have silky smooth ganache.
The ratio of white chocolate to heavy cream is super important in this recipe. By using so much white chocolate, the mixture will thicken as it cools.
This allows you to create those beautiful, perfect drips! Since this recipe uses white chocolate and cream, it is technically a white chocolate ganache.
How To Color White Chocolate Ganache
This white chocolate ganache base can be colored any shade, using food coloring. A lot of people worry that adding food coloring will cause the ganache to seize up.
While adding food coloring would cause melted white chocolate to seize (and create the chunkiest mess!!), it won’t cause the white chocolate ganache to seize.
Why, you ask?? It all comes down to the heavy cream that is incorporated into the mixture.
Heavy cream does have a ton of fat in it, but it also has water in it! By melting the chocolate into the heavy cream, you prevent any seizing from the moisture in the food coloring.
The cream will keep the mixture nice and smooth, even with the addition of food coloring.
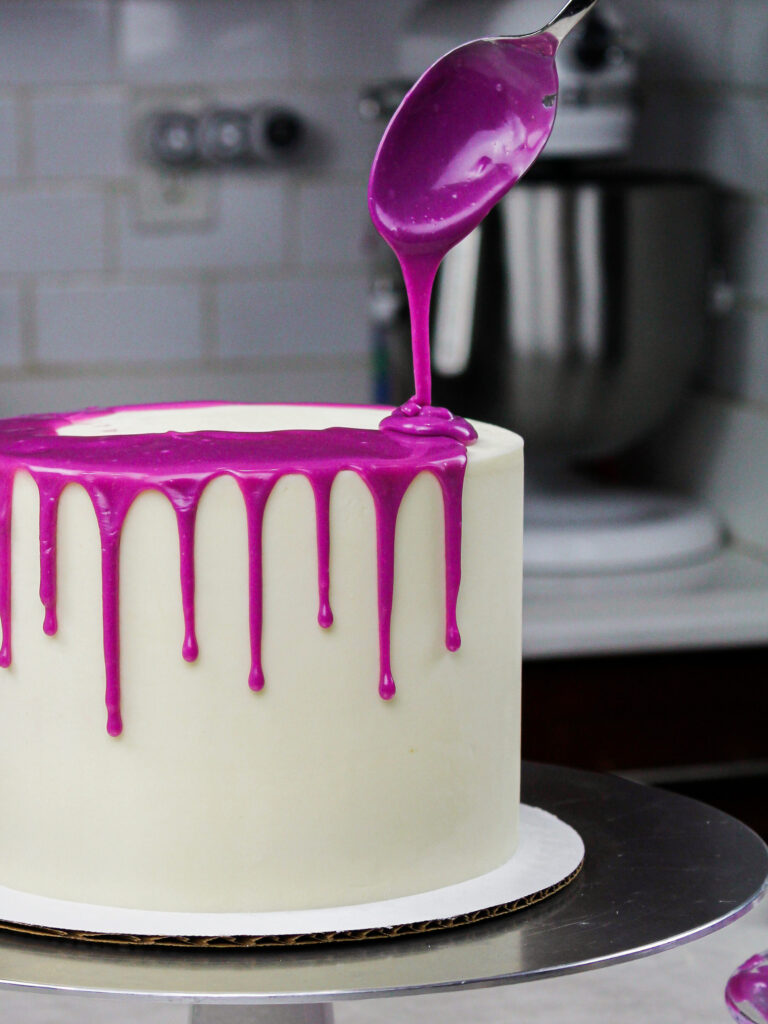
If you want your colorful drips to be a super vibrant color, I highly recommend using gel food coloring.
A small amount of liquid food coloring can work too, but you won’t be able to get as strong a color.
You can also throw off the consistency of the mixture if you add too much liquid food coloring.
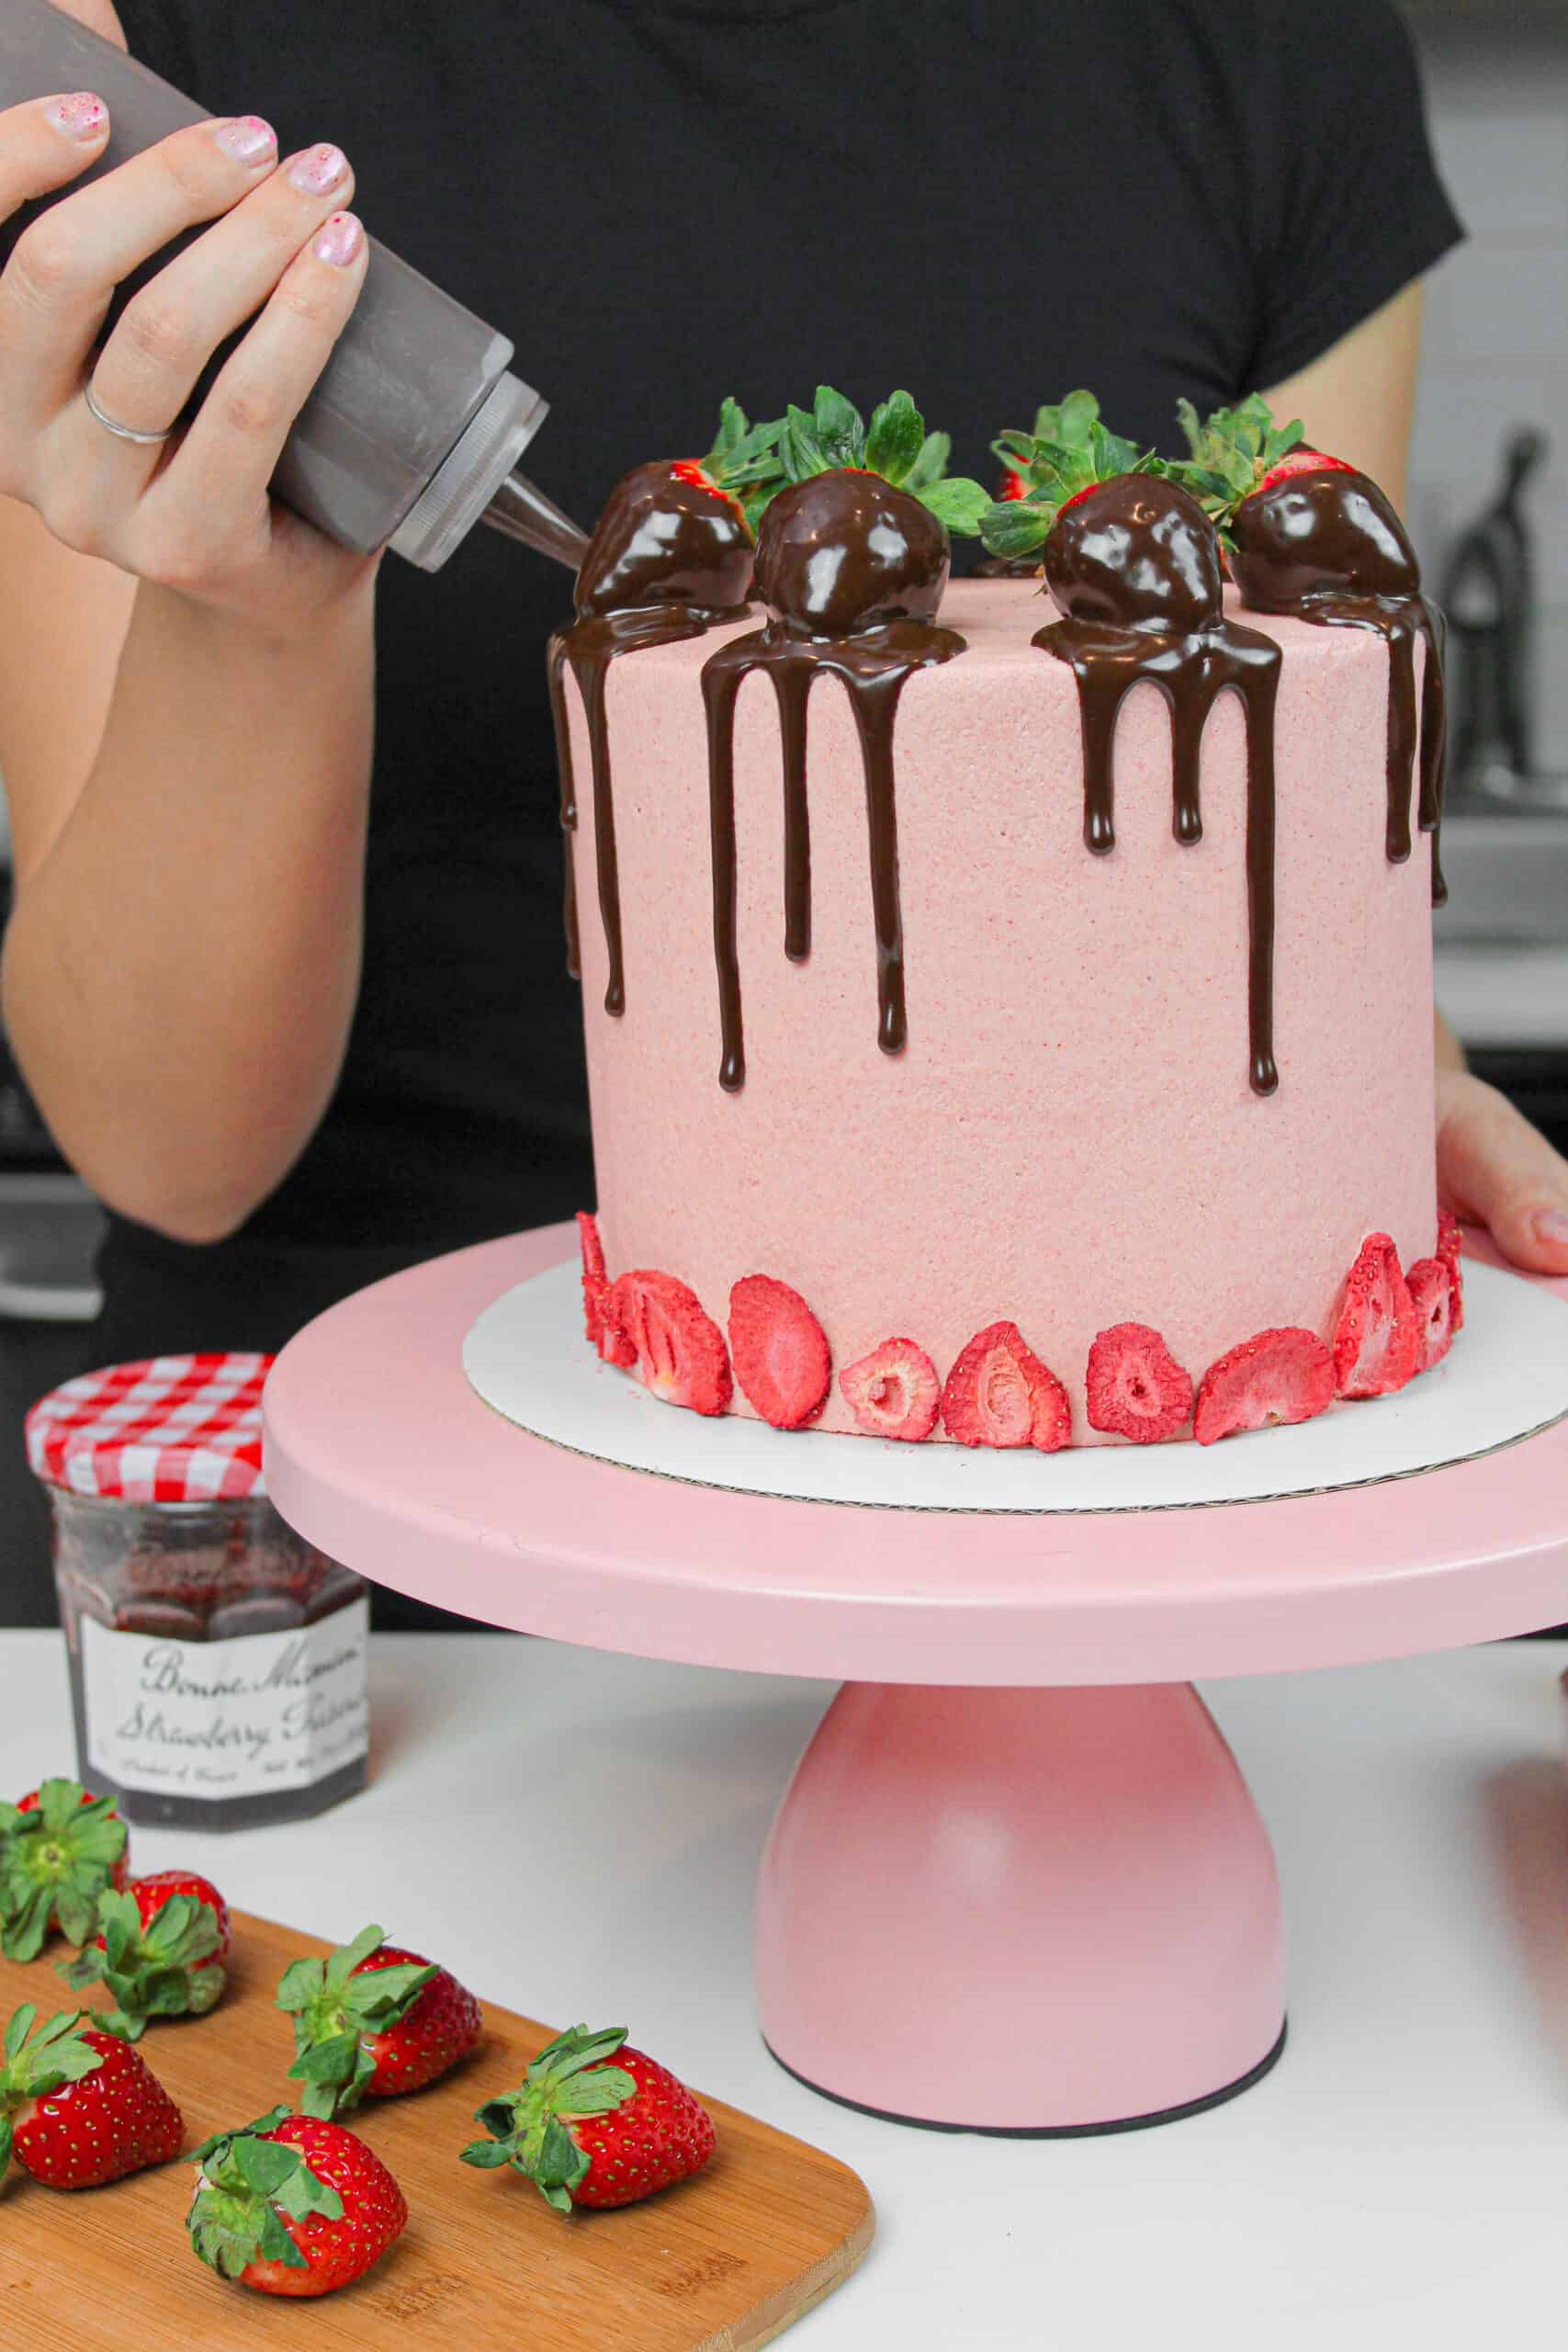
Gel food coloring is incredibly concentrated, so it allows you to use less. A tiny drop will create beautiful, bright colors like my pink drip cake!
It is also thicker and will not change the consistency of the white chocolate ganache. My favorite brand of gel food coloring is Americolor, but any brand will work.
How To Make The Perfect Colored Drip Cake
Drip cakes don’t have to be scary, but there are a few things to keep in mind to make sure you get that perfect drip look! The most common issues people run into when making drip cakes include:
- Runaway drips – drips that run all the way down the cake and right off the cake board
- Watery, thin drips that look more like colorful streaks than drips
- Ganache that seems to melt the buttercream
- Short, stubby drips that resemble candle wax
Most of these problems are caused by adding the ganache to a cake when it isn’t the right temperature.
You can also have issues if the cake hasn’t been properly chilled. If you follow my tips below, I promise you can avoid all of these issues!!
Step #1: Chill Your Cake
My first tip is to make sure your cake is properly chilled. Once frosted, you should allow it to sit in your fridge for at least 20 minutes, or in your freezer for 10 minutes. This makes sure the frosting is cold and firm to the touch.
Chilling the cake helps the buttercream keep its shape and stand up to the slightly warmed ganache.
It will also help slow down the speed at which the drips run down the cake, which will help prevent them from running all the way down the cake.
Step #2: Temperature Of Your Ganache
The second tip is to make sure your ganache is the right temperature!! It should be just slightly warmer than room temperature.
When I say that, I mean it should be barely warm to the touch.
If your ganache is too warm, it will be thinner than you want, and will run straight down the cake and pool at the bottom of your cake board.
On the other hand, if it’s not warm enough, you will end up with short, stubby little drips. Neither of these will create those beautiful, long drips.
Step #3: The Test Drip
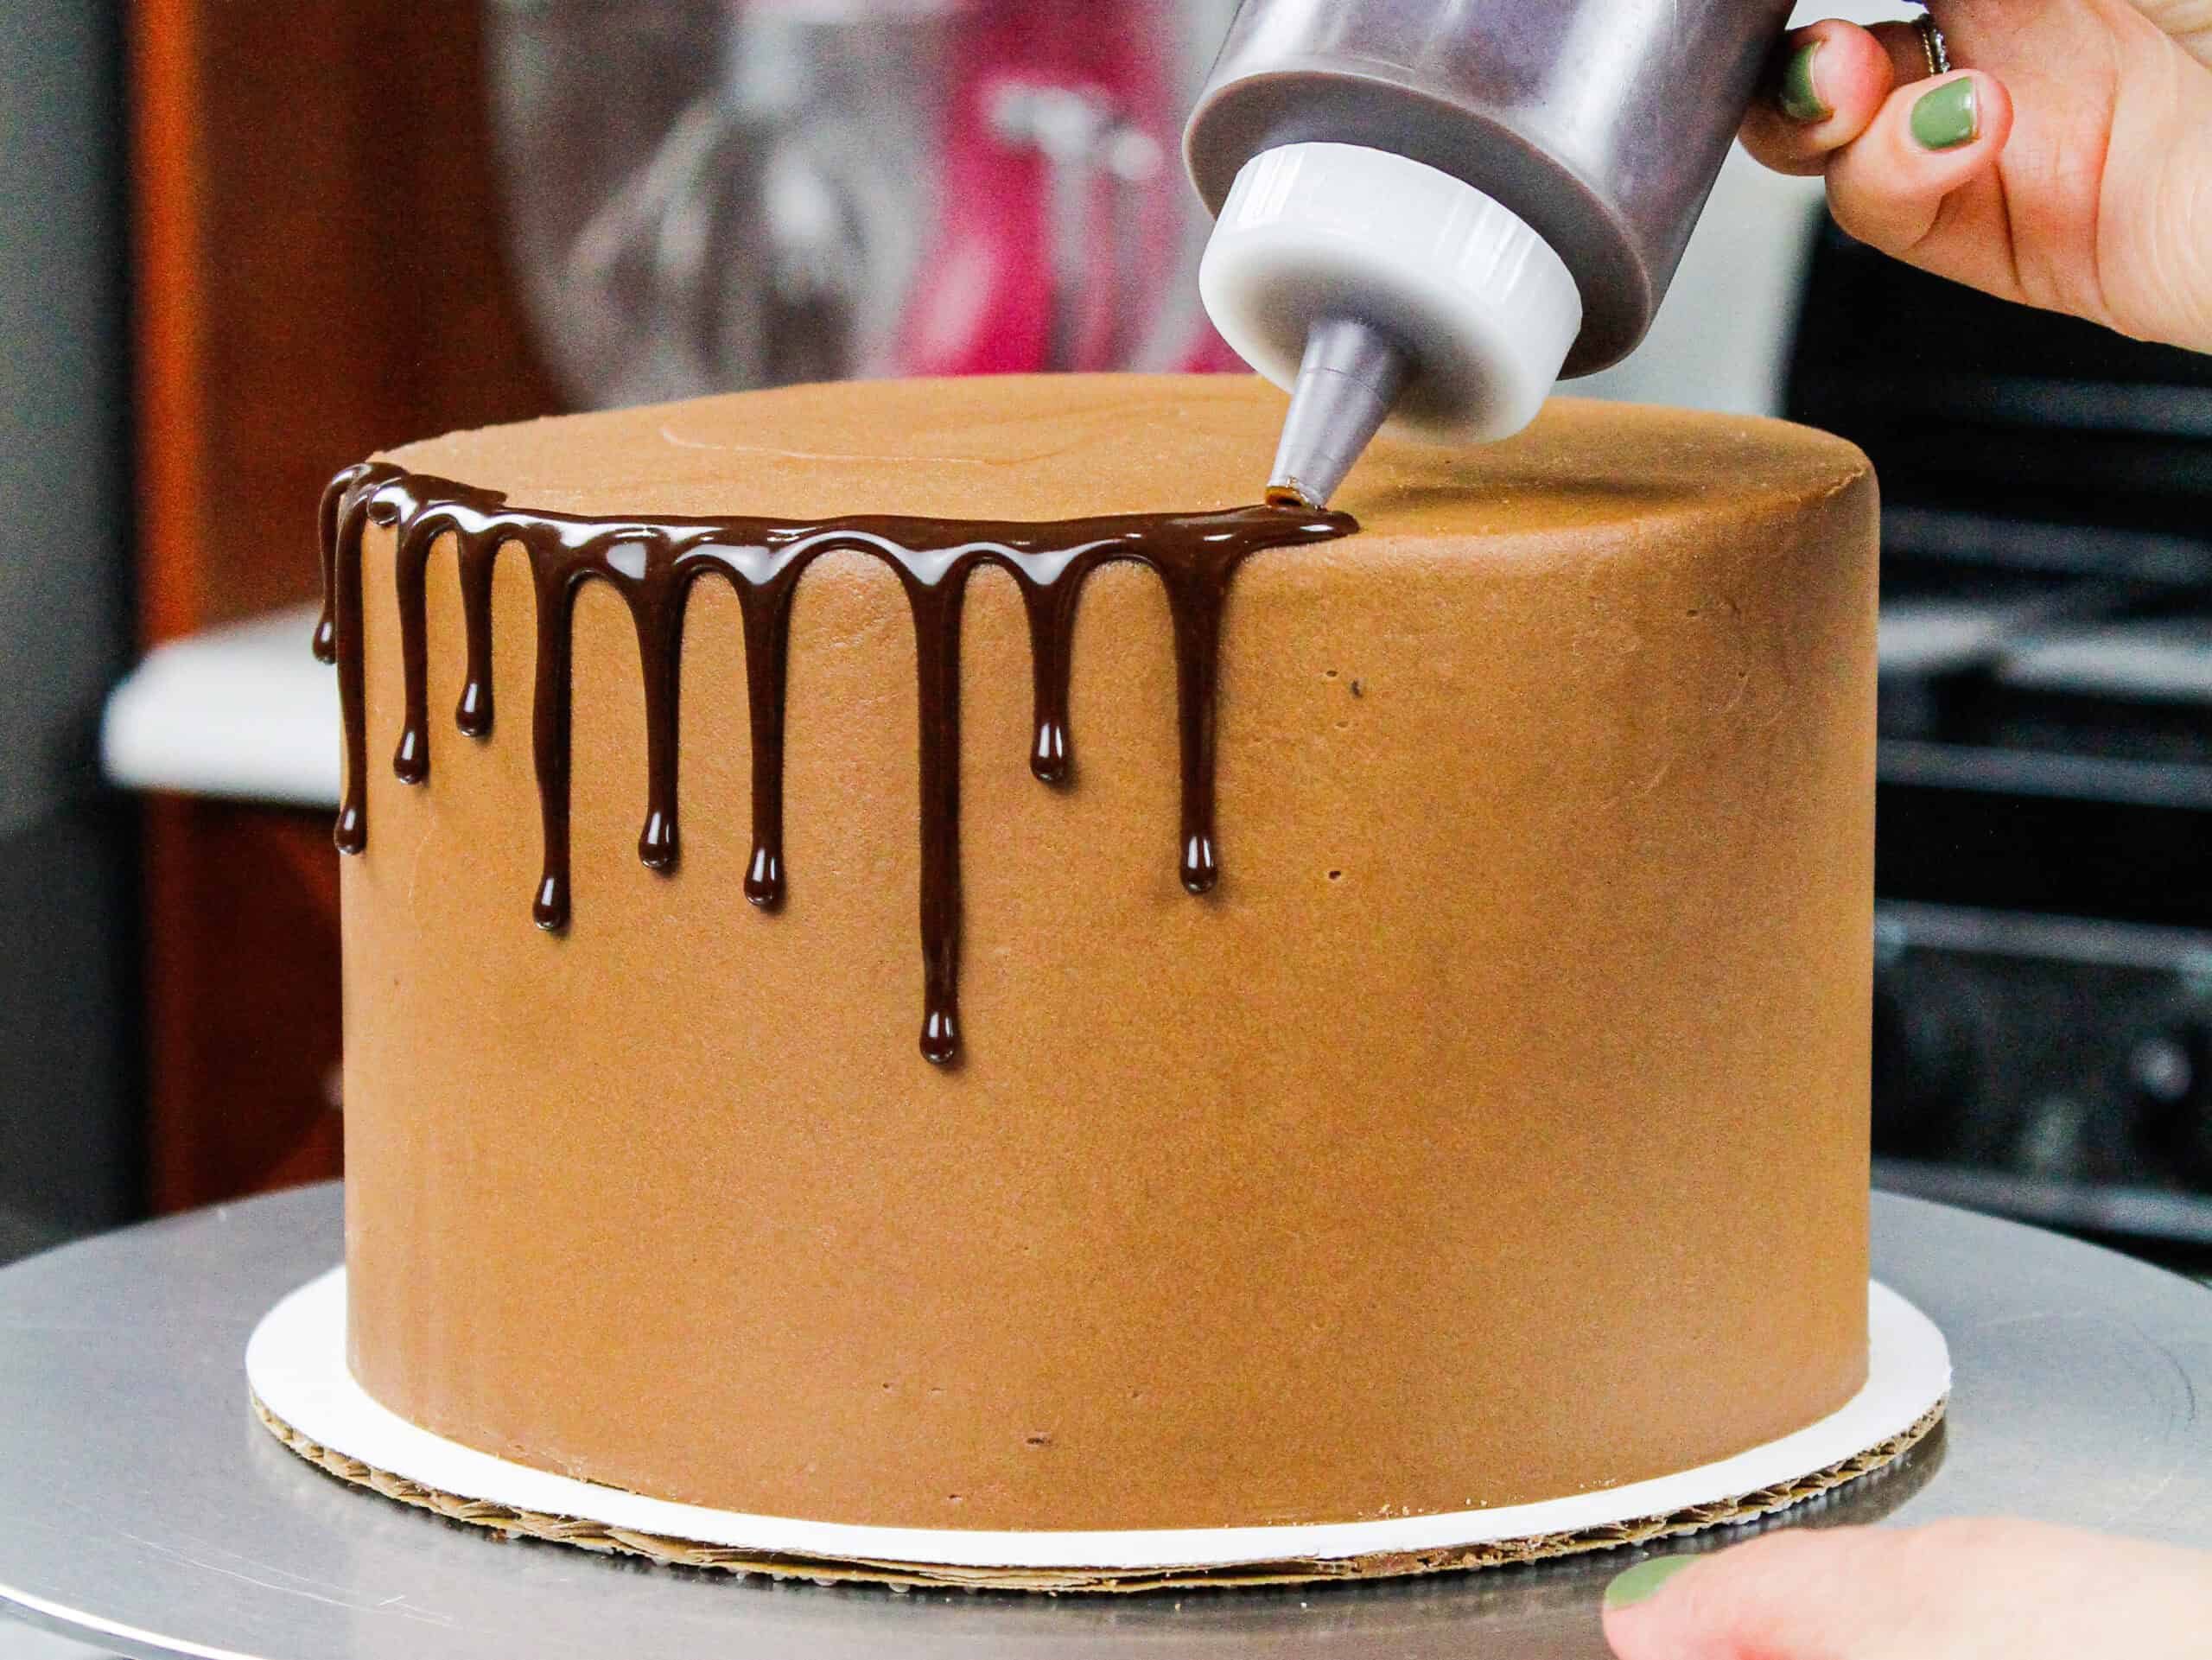
The best way to ensure your ganache is the right temperature is to do a test drip. THIS IS SUCH A CRUCIAL STEP!!! Make one drip on the side of your cake, and let it flow. Allow it to slowly run down the side of the cake for a couple of minutes.
If it’s the length and look you’re after, then go ahead and add drips to the rest of the cake. If not, adjust as needed.
Either pop the ganache into the fridge for a couple of minutes to allow it to cool off a bit more, or pop the bottle (or bowl) in the microwave and heat for 5-10 seconds.
Then test out one more drip, just to be safe! While these extra steps may lengthen the process, it’s worth it to make sure your drips are perfect.
When you spend hours making a cake from scratch, it’s worth taking the extra 10 minutes to ensure your ganache drips will turn out beautifully 🙂
If you’re more of a visual learner, here is a video tutorial showing how to add drips to a cake.
Techniques For Adding Drips To The Cake
There are two ways to easily add colored drips to a cake. One way is to use plastic bottles.
I prefer this method since it makes the process so much easier. The ganache is contained in your hand and can also easily be heated or chilled.
If you don’t have any plastic bottles on hand, you can also use a spoon or an offset spatula to carefully push the ganache over the edge of your cakes, creating each drip.
Whenever I use a spoon, I feel like I’m going to dribble ganache all over my counter or on the cake where I don’t want it.
I actually prefer the way drips look when they’re added to a cake using the spoon method, but I rarely do it because it’s harder to film!
Additional Tips For Colorful Drip Cakes
- Use this drip recipe on any type of buttercream cake, as long as it’s chilled
- Don’t use this colored drip recipe on fondant – it can do weird things to the fondant, and create a goopy mess
- For the white chocolate, I love using the Whole Foods mini white chocolate chips, because they melt so easily!
- You can also use normal white chocolate chips, white chocolate wafers, or even a chopped-up white chocolate bar, but please see the note at the bottom of the recipe if you don’t use mini white chocolate chips
- The ratio of heavy cream is different if you use white candy melts. Candy melts cannot be swapped for the white chocolate in this recipe! They are not interchangeable
- Be sure you use heavy cream or heavy whipping cream! You need the high-fat content to create the right consistency in this recipe. Milk cannot be used in place of the cream.
Making This Colored Drip Recipe in Advance & Storage Tips
- Make this colored drip recipe ahead of time or save leftovers! Once it’s made, wrap the bowl with plastic wrap or cover the top of the plastic bottle and store in the fridge for up to 3 weeks.
- To use chilled ganache, heat the bottle or bowl in the microwave for 10-second intervals until it reaches the right consistency
- Use leftover ganache to top cupcakes, cookies, or even ice cream!
Let Me Know What You Think!
If you try this colored drip recipe, I’d love to hear what you think of it! Please leave a rating, and let me know your thoughts by sharing a comment 🙂
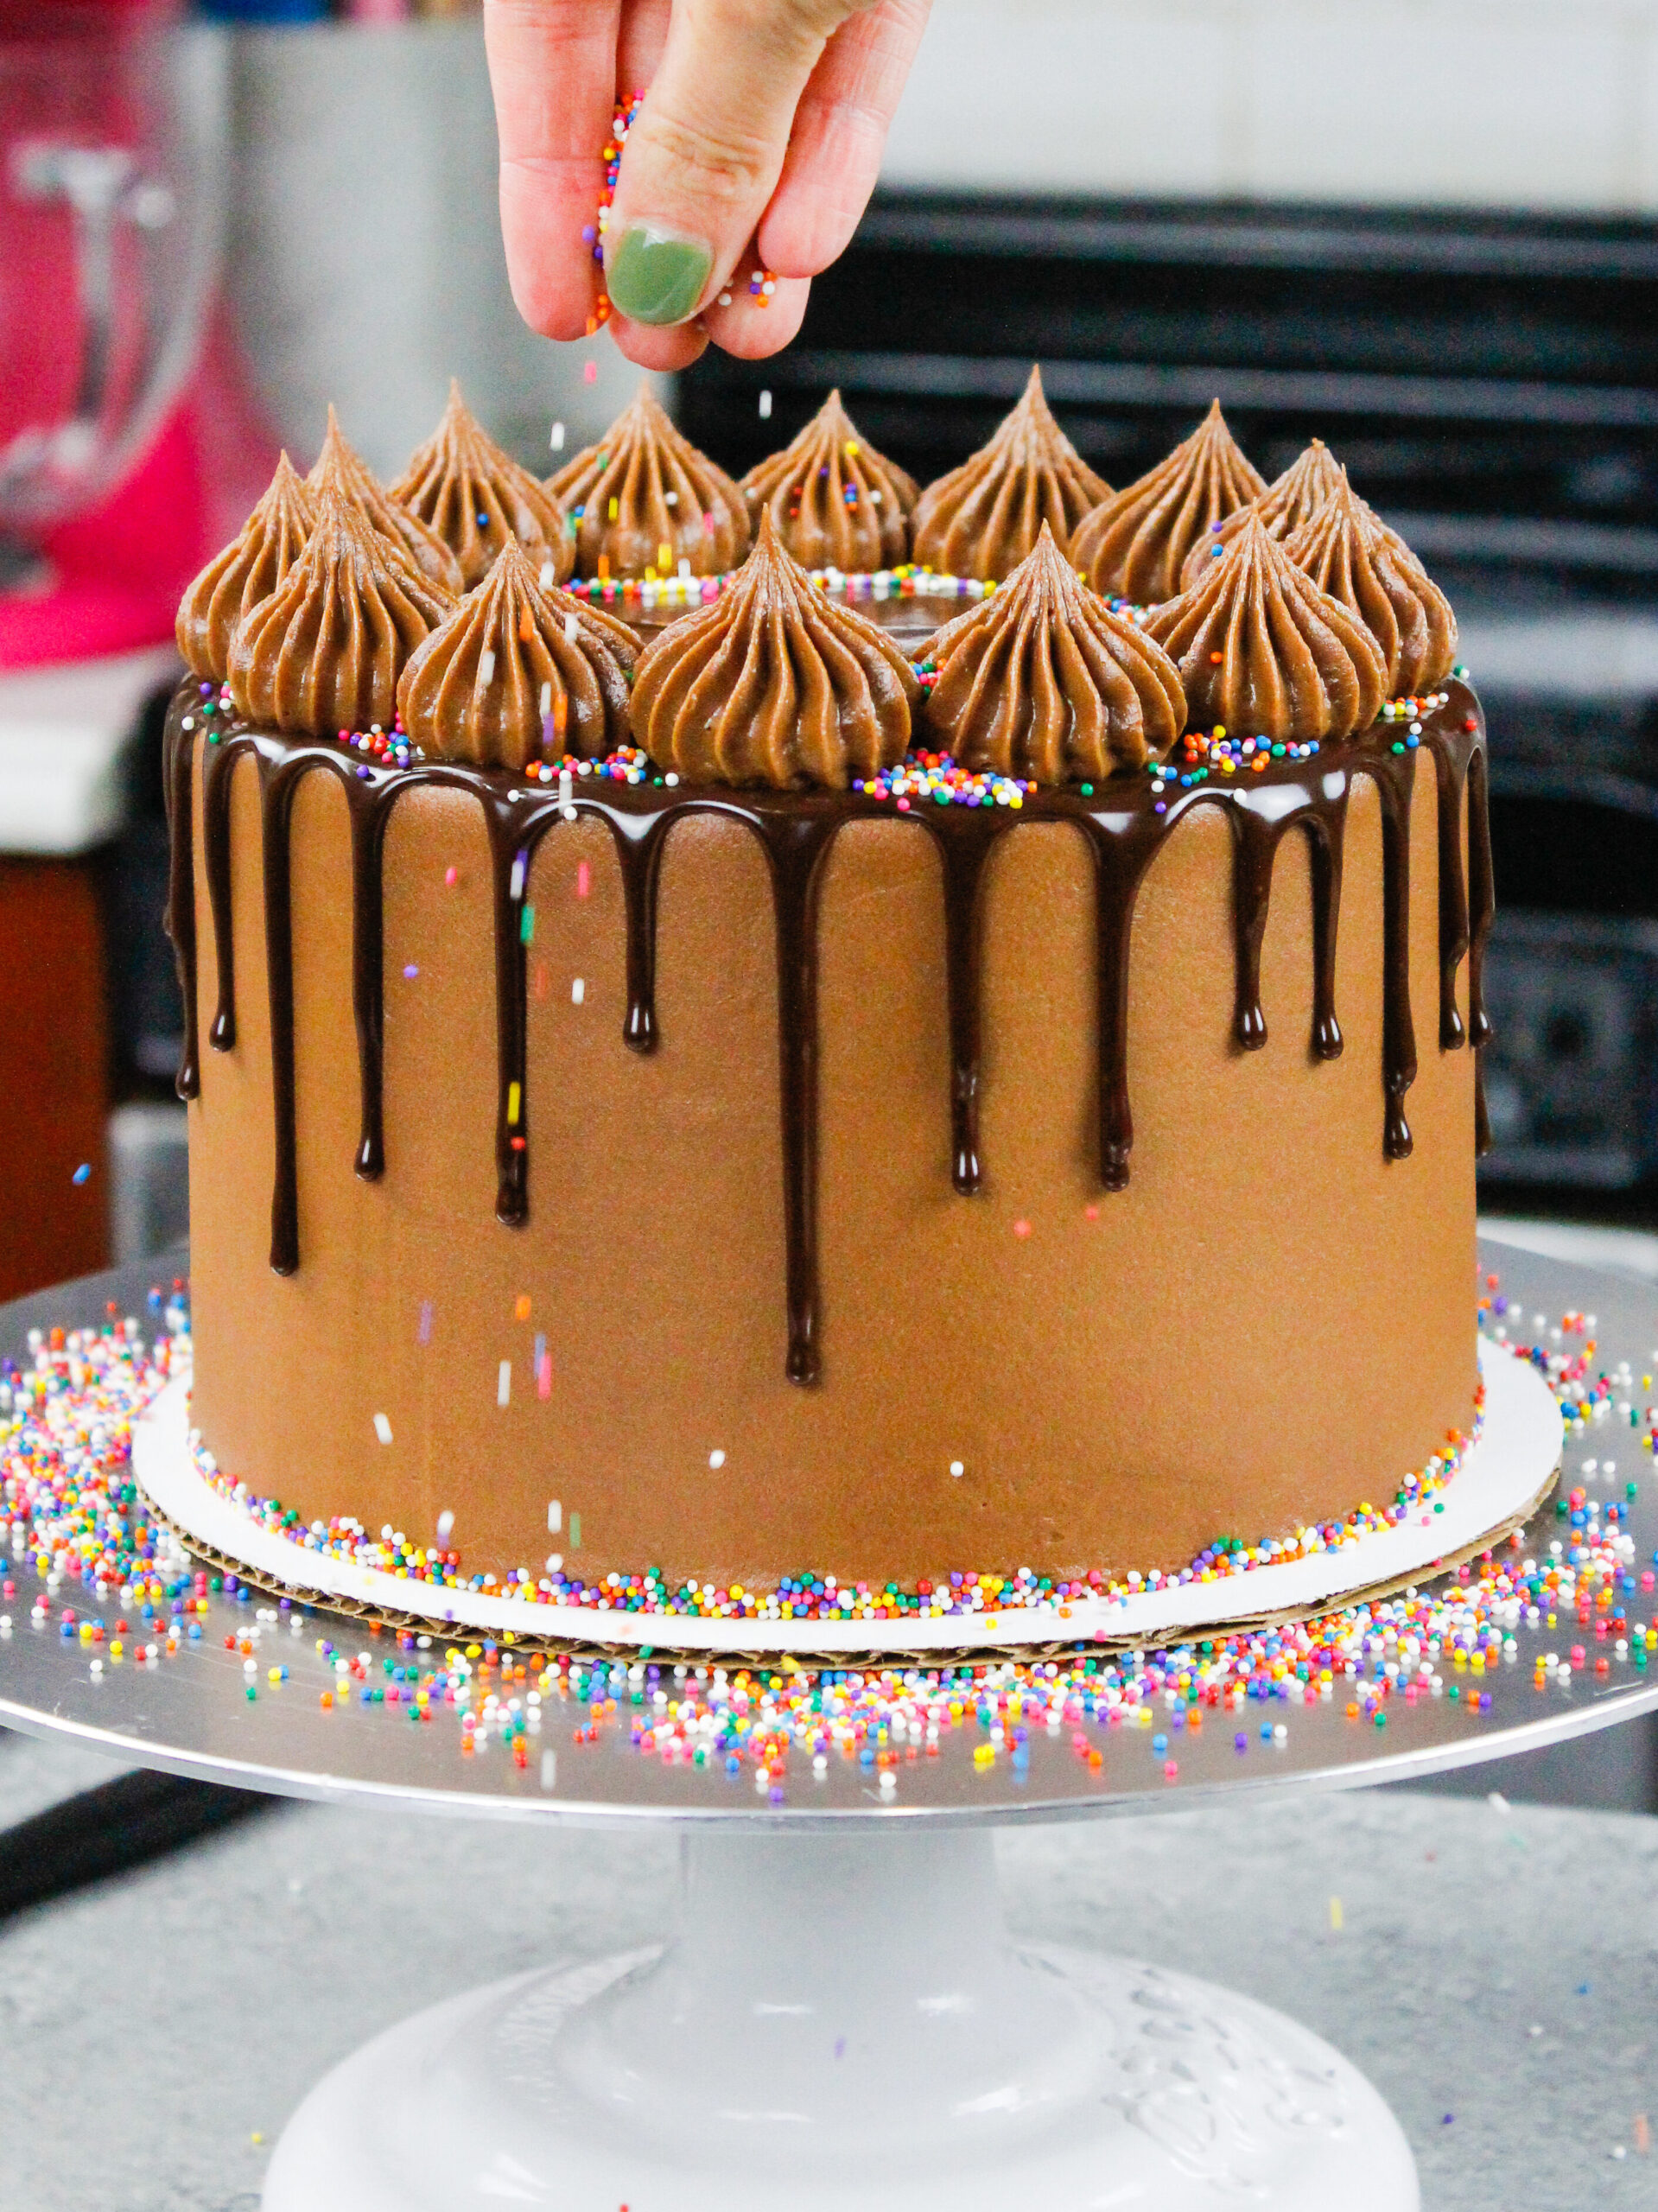
And be sure to tag me @chelsweets and use the hashtag #chelsweets, so I can see your beautiful creations on social media!
Colored Drip Recipe
Equipment
- Microwave or Double Boiler
Ingredients
- 1/4 cup + 1 Tbsp heavy cream 70ml
- 1 cup mini white chocolate chips 175g
- gel food coloring optional
Instructions
- Heat 1/4 cup + 1 Tbsp heavy cream in a heat proof bowl in the microwave for 45 seconds, until it's just beginning to bubble.
- Gently pour 1 cup of white chocolate chips into the heavy cream. Make sure they are fully covered with cream. Allow the mixture to sit for 1 -2 minutes.
- Stir until the cream and white chocolate are combined and the mixture is smooth.
- If some bits of chocolate aren't fully melted, heat the mixture again for 20 seconds, and stir.
- Repeat as necessary until all the chocolate bits are fully melted and incorporated.
- Mix in gel food coloring at this stage, if desired. Let the mixture cool until the desired viscosity is reached (barely warm to the touch).
- If it seems too thin or thick, you can add a touch more chocolate chips or heavy cream! The type of cream and white chocolate that you use can affect the consistency, so feel free to adjust as needed.
Video
Notes
Nutrition
Other Recipes You Might Like:
please recipe of heavy cream
I buy my cream at the grocery store <3
What type of gel coloring can I use? I’ve heard only an oil based otherwise the chocolate will seize. Is this true for drip cakes s well?
I use americolor gel food coloring. You are correct! If you are adding gel food coloring into just melted chocolate, you would need to use flo-coat to make sure it doesn’t seize up! However, if you add it to this ganache recipe, it will not seize up because of the heavy cream! So you don’t have to worry about that with this recipe 🙂
is there a certain way to warm it back up after you store it?
Yes! I heat it in the microwave for 30-45 seconds, depending on how much ganache I need to heat up! You can also place the bottle into warm water.
Here in a Australia, our white chocolate melts with a slightly yellow tinge. Should I add white colouring first to get a white base before adding other colours? Otherwise my “blue” always turns out a green kind of colour. Or do the Americolours over-ride this problem?
Our white chocolate is actually off white too! I usually can get the color I’m after with Americolor gel food coloring though! But maybe your white chocolate is even more intensely yellow? I never add white base, but it is probably a good idea if it helps you get the color you’re after 🙂
Thankyou 🙂
can i use powdered food coloring?
I never have tried, it but i don’t see why it wouldn’t work!
Hi Chelsea…does the ganache harden enough to make the leftovers into bark to decorate the top of the cake with? Thanks!
No it does not! The cream keeps the chocolate from rehardening!
Thanks so much! I will either make different stuff for bark or just do with lollipops! Easier that way! Love all your cakes!
Hey Chelsea! Will it harden enough to paint over with gold lustre dust mixed with alcohol or do you recommend using royal icing if I need to paint. I’ve been having problems getting my chocolate Genache to get hard enough to paint over. I hope this makes sense?
no it will not! if you want to paint it, i think you’d have to use straight melted chocolate! or candy melts!
Can a cake with the ganache be left out over night?
I don’t recommend it! it should be kept in the fridge overnight!
Hi Chelsey!! I loooove your cakes and love to watch your videos… I am learning so much! Thank you! I was going to make a vanilla cake with strawberry filling, I was wondering if I could use a strawberry glaze to make drips like you do? Or do you think it would be better to just color the white chocolate ganache red? I’m not sure if the glaze will harden enough to hold the drips..
So happy to hear that! Yah, I’m not sure of the consistency of your glaze, but I would be concerned about that too! Sometimes red white chocolate ganache can look a bit gory!! I added some to a game of thrones cake, and it looks a lot like blood. So keep that in mind when considering the shade of your drips!! Hope that helps!
Okay great.. thanks!!
Thank you for this recipe! I’m doing a watercolor cake this weekend. Will this “harden” enough for me to paint silver with color dust? If not, what do you think I should use?
Hi.
Can I use this recipe on a fondant covered cake?
I haven’t tried it on fondant myself, but I know other people have been able to!
My ganache always seems so thin and runny, what should I do to thicken it up?
If it’s too thin, try adding in a bit more white chocolate, or a bit less heavy cream!
Why does my ganache look like a wrinkled old person? Never had this issue with regular chocolate
It might be because you added it when it was a bit too warm, or because it’s not thick enough! You can try adding a bit more white chocolate next time, or adding it when it’s slightly cooler.
Does this recipe make a sufficient amount to do a drip on a 11″ cake or would you recommend I double it? Thanks so much!
depends on it you plan on covering the entire top of the cake, or just lining the perimeter with drips! I’d say double it to be safe, but you’ll def have some leftovers!
Having real trouble with my vanilla sponge seems to be getting very dark/ burnt bottom and sides! I use a light coloured tin and have the over fairly low.. any idea how i can stop this? Looks like you trim round the edges?
I plan on making a 4 layer 8 in cake and covering the top of the cake with this. Do you think I will be good with one batch? or do I need two?
Hi Chelsea your cakes are so beautiful. I just have a question please.Can I use this white chocolate ganache to frost a cake? If I can, can I put it in the fridge?For how many days I can put it? Thank you
At this ratio it’s definitely too thin to cover a cake! However, if you increased the ratio of white chocolate to cream to make it thicker you could!
Hi. Every time I try to make this the colour goes funny. I’ve tried different ways, melting chocolate and adding gel colour before cream, microwaving the choc and cream together and then adding the gel colour, adding to the cream and then to the chocolate…… each time it’s fine until the chocolate and cream are combined. Please help. I’ve even tried using coloured candy melts with white choc chips and the same thing happens to that, once I combine with cream the colour completely changes and is unusable. ???
it might be the white chocolate you’re using! I’d recommend trying a different brand, I use mini white chocolate chips from whole foods! What brand of gel food coloring are you using? I use americolor and it works great!
Hi can I use any food colour or does it have to be gel food colouring?
gel works best!
hello
I’m having the same issue as Anna. I am making a gold drip cake for the first time and in researching I have found some using royal icing and others white ganache painted with gold luster and alcohol. The ratio of chocolate is also different. You are 3 to 1 and another was equal parts. please help
this ganache is too soft to paint! it doesn’t fully harden. If you want to paint it, you will need to use less heavy cream!
@Anne, the best way for gold drips is to use a gold drip recipe, I don’t have the measurements on me but it’s powdered sugar, luster dust and vodka. Try looking it up 🙂
Hi Stephany,
That is definitely the easiest way to make gold drips! Some people paint over white chocolate ganache that’s been colored yellow with a mixture of luster dust and vodka, but it takes forever!!!! It’s such a pain.
Hi i dont know if you will get this in time but i will be attempting to make a color drip cake for my niece’s art themed birthday party. The party will be saturday(2/17) but I wanted to get a head start so i was going to make the cake tonight and wanted to know would it be best if put the ganache on tonight and refrigerate or wait until the day of the party to add the ganache.
you can do either! The drips will stay in place if the cake is kept in the fridge, so whatever is easiest! I usually make mine a day in advance, to make life easier!
Just wondering if you use compound white chocolate for this?
I just use mini white chocolate chips that I get at whole foods!
Hi, im looking at making a drip ICE CREAM cake. Would this Ganache work on an ice cream cake and be ok until served? Thanks!!
it should, but it might not drip quite as much as on a regular buttercream cake, since the ice cream with be fully frozen! I’ve never tried it before, and my main concern is that it won’t spread out or drip as well!
Hey chels would you recommend if i just use white chocolate without the heavy cream if i want the chocolate to harden on the cake?
yes! Just make sure the cake is very well chilled so it can handle the heat of the melted white chocolate!
First off thank you! I read through all questions and answers and learned so much. I still have one more question. I’m making a volcano cake and freezing it, as it’s easier to travel with (driving 900 miles). Can I freeze the ganache, or should I wait until I arrive to complete it? Thank you.
first of all, thank you for reading my previous relies!! And second, wowza!! 900 miles is so far! you could make it in advance if you think your car is going to be cool for the entire trip! But to be safe, I’d recommend adding it once you get there! If sun shines into your car and it gets warm, it might cause the ganache to continue to “flow.” Probably best to decorate once you get there!
Hi! I read all the previous answers and -correct me if i’m wrong- should pour the ganache while it is hot unto a cold cake? Also just a quick question what is your opinion if I dyed the ganache purple and poured it on an ombre kinda gradient cake ( dark purple starting from the bottom until it hits white at top ) would this look alright? How about if I add strawberries on top. Because it’s a chocolate cake, but i’m kinda going for half choc. half strawberries and cream ( The frosting is cream cheese ). Anyway thank you so much for this recipe and please say any Thought, comments, or concerns.
yes! The ganache shouldn’t be hot, but it should be warm! I think that color combo would look great, but I think i would skip the strawberries, unless someone specially asked for them. Hope that helps, happy baking!!
What brand of chocolate do you use?
Hi there! Love your skills. I’ve been trying to find a food gel color that would give me a super vibrant deep pink color. Is there a specific brand that you use to get those awesome deep pinks and purple colors?
yes! I love Americolor gel food coloring! It’s the only brand i use! they make a deep pink shade that would be great for what you’re after!
Can I use1 cup half heavy cream & 1/2 cup half and half?
sure, that should work!
can I heat this in a pot instead of a microwave? also can I use regular food coloring?
You can def use a pot, but I really don’t recommend liquid food coloring, it can throw off the consistency if you add a lot, and won’t give you as vibrant of a color!
Thanks. I used a 1/2 ratio and heated on the stove. I did use liquid food color and it turned out ok. Maybe next time i will try a 1/3 cream to chocolate as the drip did run more than i had hoped…
you can add more chocolate, or let it cool more before you add it to the cake! the ratio my recipe recommends 1/3 ratio, so i’d def say try that next time!
Hi there your rainbow drip lollipop cake is amazing. If I make the cake and ice it with buttercream and after refrigerating do the rainbow drips can I refrigerate overnight and add lollipops just before serving, or a couple hours before as I think they’ll go sticky in the fridge. Also, for the kinda ombre blended colors on the cake do you do a white buttercream base then pipe messy lines of color around the cake and then use your smoothing thing to smooth and blend the colors? Thanks so much
Yes, i’d say add the lollipops right before serving, otherwise they can get goopy from condensation! and yes, that is exactly what I do! I pipe bits of colored frosting on top of white buttercream, then smooth them together 🙂
Hi I want to make your rainbow drip cake for my daughters birthday next weekend. If I make one lot of the white chocolate ganache will that be enough to separate into the 6 different colours to drip around the cake in rainbow sections or do I need to make up 6 different lots of ganache to do the whole cake?
I just made one batch and separated into the different colors… had plenty to cover a 6 layered cake with lots left over…
Awesome thanks so much! It’s a busy week so I don’t want to give myself extra work!
No prob… I did my recipe 2:1 chocalte to cream and it was still very liquid and ran down the whole side of the cake. If you are covering the too of the cake i recommend doing that first and then letting it drip down the sides . I did my drip and then decided to do the top. Cake still came out good though
Ok so I will make the cakes, trim then chill and stack with buttercream between layers. Crumb coat and chill then coat with buttercream and refrigerate before putting on he ganache but after the ganache is on does it need to be stored in the fridge or at room temperature overnight (will be icing the cake the day before the party). I won’t add the lollipops until the cake is out at the venue and ready to be displayed so they won’t go all gooey but it’s the overnight storage I’m concerned about as I don’t want the icing to melt into each other and look icky!
I stored mine in the fridge but i am in bermuda where the humidity is 80%… better safe than sorry to store in the fridge. As it probably will get softer over night.
If it seems too thin, I’d recommend letting it cool down a bit more before adding it to the cake!
yes I almost always have leftover! I like to keep them in my fridge for future projects 🙂
One batch of ganache should be enough to cover one cake, even if you are making six different colors! because you won’t need much of each color <3
Hi, if I want the ganache to be black, should I use dark chocolate chips with black gel food color? I am worried that using the white chocolate chips will give me a grey color. Dark chocolate chips seem to make more sense, but I thought I would ask a pro before I mess up and start flinging dishes around the kitchen haha (birthday party this weekend, sigh)
YES! That is exactly what you should do, and what I do for black drips 🙂 I also always try to use as little gel food coloring as possible, and using chocolate as a base makes it so much easier!!
This was super easy to do and it turned out really well for my first time…I did a blue drop and the consistency was great! Thanks for this!
I’m so happy to hear that Mallory!! Thank you for sharing!!! 🙂 I live for these types of comments!
What is the ratio of heavy cream to candy melts, when making a drip?
I have never made a drip with a candy melt myself, so sadly I don’t know! so sorry!!
Can I use your drip on buttercream frosted cupcakes? I want it to look like slime.
You should be able to! but chill the frosted cupcakes before you do, so the buttercream will keep its shaped once you add the warm drip!
What a useful tutorial. I want to try using full fat coconut milk in the place of heavy cream and wonder if you’ve ever tried it.
Thanks Robin!! That’s such an interesting idea, i’ve never tried it but would love to hear if you do! That’d be a great non-dairy version 🙂
Thank you for your amazing tutorial and info. My question is whether the Wilton Color Right bottles or the Wilton Gel Colors would work with this recipe? OR the Wilton Candy Colors for adding into candy melts? I do not have Americolor readily available for a cake this weekend. I am hoping that I can use the Wilton Color Right since this recipe has the heavy cream in it. Thank you!
wilton gel food coloring would work fine too!! or any gel food coloring 🙂 They would also work with candy melts!
Mine didn’t look so pretty. ?
what was the problem? I walk through trouble shooting in this post, which can hopefully help with any issues you may have run into <3
How can I make it silver?
If you let a cake with grey color drips sit in the fridge for a couple days, they will firm up enough where you can paint them with silver luster dust and vodka. Or you can use edible art silver paint 🙂
I see it has worked for many people but I am a bit puzzled by how a 1/3 cup of cream can full cover 1 cup of chips. What size bowl is best? Something shallow?
sadly just a typo!! I just udpated it, and it’s just supposed to be added when it’s first mentioned <3 If you did divide it and add half at the first mention and half at the second, it will still turn out just fine <3
I just tried the drip cake and it was perfect! Thank you so much for your recipe and awesome video tutorial! Could I decorate a cake like this and then put the whole cake in the freezer? I know a cake decorated with buttercream freezes well, but I wasn’t sure if the drip on the cake would do okay! Thanks!
So happy to hear that Stephanie!! you can definitely put a decorated drip cake in the freezer! But be sure to transfer it to the fridge a day before you plan to cut into it, to minimize the temperature shock <3
What size (oz) squirt bottle do you use?
I’m not sure how many oz they are (maybe 10 oz?), but here’s the link to the ones I ordered from amazon:
https://amzn.to/2Jrdras
Hi, thanks for the recipe. I’m really nervous about having to make my daughters cake this year. She has requested a cake that has drips and is covered in all sorts of lollies and treats.
Your recipe seems very well explained and not too daunting. ?
I was just wondering if the ganache, when on the cake needs to be put in the fridge?
It’s winter down here in July so I can leave it in the back room. Away from any heat source.
I’m concerned that some of the treats and lollies may not fare to well overnight in the fridge.
But I think they might “stick” better if added on top before the drip topping sets?
I have a newborn so can’t guarantee I’ll have time to decorate on the morning of the party.
great questions! I usually chill the cake after adding the drips, to really let set and stay in place! I don’t usually leave my cakes out at room temp over night. I usually add the drips and chill the cake overnight, then add the candies and lollipops the morning of! Totally get that doing that might not be possible with a new born though!!
The drip doesn’t really set hard, it’ll still be slightly sticky for at least a day! So the candies will “stick” whenever you add them!
One tip for drips, be sure the ganache is almost at room temp, and is nice and thick when you add it! The number one issue people have with drip cakes is adding the ganache when it’s too warm.
I hope that helps, best of luck with this cake Steph! I’m sure it will turn out great 🙂
I just made this and it was ridiculously EASY!!
I absolutely love the result!!!
THANK YOU 🙂
So happy to hear that Letto! Thank you for sharing 🙂
Thank you! I used 1/4 cup heavy cream and 1 cup regular white chicolate chips. I microwaved for 45 seconds and stirred until smooth. It turned out perfect my very first try! (Except I didn’t tighten the lid well enough and it fell off and I accidentally doused half the cake lol)
haha omg I’ve actually had that exact thing happen during a live stream!!!!
When you use a little less heavy cream, you can add the ganache to the cake when it’s a bit warmer, and you also get thicker drips 🙂 I’m happy your first time went so well (minus the explosion)!! But at least now you have a good story?! 😛
Is it possible to make this diary free for severe allergies?
Sadly I don’t think so! Vegan chips and dairy free milk just won’t create the right consistency, or not in a way I’ve been able to figure out :/
I want to make this for my son’s cake as hot red lava coming down off of a volcano for his dinosaur themed party but I have no heavy cream. I do have white chocolatier chips though and I have whipped cream in a can and I have some cream cheese and 1% milk. Anyway I can make this drippy frosting with those ingredients?
The heavy cream is really needed to get the consistency right! you could try it with those ingredients, but I’m not confident it would work :/ so sorry!
Hi question Im going to attempt the pink ganache will it get hard on the top of the cake to cut it
It will firm up a bit and keep it’s shape, but it won’t be hard! You will easily be able to cut through it. It ends up having the texture of a thick glaze 🙂
Can I color almond bark with candy melts for the color I want and use that to drip on a cake, like I use to do it to drip on my cake pops?
I don’t really use candy melts often because I don’t enjoy the taste, so I’ve never tried making drips with them. I do believe you can melt candy melts with heavy cream to make drips though. I don’t think adding almond bark into that mixture would be a good idea. Hope that helps!
Can you use heavy whipping cream?
You definitely can use heavy whipping cream in place of the heavy cream in this recipe! <3
Hello there,
I tried Colored Drips Recipe (White Chocolate Ganache) today and it came out perfect. Thank you so much for sharing the recipe and instructions.
Yay!! That makes me so happy to hear Vlatka!! Thank you for sharing 🙂
I am trying to make a cake with red wine colored drip on a white cake (with a overturned wine glass on top). It was suggested that I use red chocolate wafers with a smaller amount of purple and black wafers. Your recipe said the recipe would differ if you used wafers. How so? I am new at this, so really appreciate your suggestion and expertise.
I actually have a red wine cake just like that!! I added red gel food coloring, and a tiny bit of black. It worked great! Here was mine:
https://chelsweets.com/2019/05/23/red-wine-chocolate-cake/
You use slightly less heavy cream if you want to use wafers!
Can you do two different color ganache drips? Any tips on how to do that? Let the fist color cool first? Also, can you write with buttercream on top of the ganache covered top of cake?
Thank you!
You can totally do two different colored drips! yes, add one color first, then chill the cake again to let them set, then add the second color! You can also write on top of the ganache with buttercream, once the ganache has cooled and firmed up! 🙂 I usually chill the cake again, then pipe on top.
I have tried the white ganache; colored with Americolor; a few times. I’ve not been happy with the translucent look of it. I have NOT tried your recipe but it appears to be the same as what I’ve used before. Any tips on getting it more opaque? Thank you!
Hi Kim,
White/colorful drips can be hard. I’ve found that a lot of it comes down to the chocolate you use, and the temperature of the ganache. I like using Ghiradelli or Guittard chips, because they are the whitest in color, which makes them easy to color with gel food coloring. If your drip are too translucent, it means that either it’s a bit too warm when it’s added to the cake, or you may need to add a bit more white chocolate. My ganache is quite thick when I add it to my cakes. That helps it keep its color! I’d recommend adding a bit more white chocolate or less heavy cream, to make your mixture thicker. You can also play around with the temperature, and see if that helps. Don’t forget to do a test drip! It will help you figure out right away if your happy with your ganache, and allow you to adjust as needed before you cover the whole cake.
Hope that helps, happy baking!
Does the drip set hard ?
Hi Layla,
It sets pretty firmly if you let the cake sit overnight in the fridge!
Hi,
I think your so talented and I love following your work 🙂
Two questions,
First question is can I paint the white chocolate drip with gold edible paint?
Second questions is should I put the cake in the refrigerator then paint the white chocolate drip gold or leave the cake out at room temperature?
Thanks Jasmine! You can paint this drip if you let the cake sit overnight with the drip. It will firm up over time. Once you paint it, it should be fine to go back into your fridge. Hope that helps, happy baking!
Hi! I have a cake order for a blue mirror glazed cake with white drips, can I do drips on a mirror glaze? Help!
Hi Christine! So sorry for the delayed response!! I’ve never tried adding ganache drips over a mirror glaze, but if you let the drips set, I think it should work. The gelatin sets relatively firmly, so it you let the glazed cake sit overnight, you should be able to add on the drips the next day <3
If I make this green….leaf green is what was in my ameri box. Over the black frosting. Do you think it will show against the black background?
Hi, I was wondering if you put any decorations on top of the drip once it sets? I was thinking about putting meringues but didn’t know if they would fall off or not?
Hi Emily! You can definitely put decorations on top of the ganache once it is fully cooled. I make lots of candy cakes, and have put candy and meringues on top of it 🙂 I usually secure them to the top with a little bit of extra buttercream. Hope that helps, happy baking!
Hi There I urgently need your advice Can I paint gel fold lustre directly onto my drip
If you allow it fully dry and firm up in fridge (at least overnight), you should be able to paint it!
Hello! I want to decorate a drip cake with meringues. Can I keep the cake in the fridge after that? Will meringues be ok if put in fridge?
Hi Anna,
So sorry for the delayed response! You can totally add meringues on top of a colorful drip like this, and refrigerate the cake after! Happy baking <3
Can you tell me what color gel you used for the rainbow cake? They look very vibrant but it’s hard to know exactly what colors you used? Thanks!
Hi Jennifer,
I always use americolor! Those are just the standard shades, yellow, orange, super red, leaf green, sky blue, and royal purple. Hope that helps!!
I order it on amazon, here’s the link: https://amzn.to/36HNr3G
Can’t wait to try this recipe for drip. Just a quick question. How did you make the corrugated look with the buttercream on the above cake (the one with the chocolate coloured drip)? Thanks so much 🙂
Hi Kristy,
I hope you love it!! To make that pattern I just used a frosting comb, which I got on amazon! It was included in this set: https://amzn.to/30agN8l
Happy baking <3
Hi – I am not sure if someone already asked this, but the drip recipe works great but when I leave the cake overnight, the drip gets all wrinkly?
Hi Tonia,
It doesn’t get wrinkly as long as the cake chilled! Sometimes people experience elephant wrinkles in their drips if too much is added to the top of the cake! As it cools some of it can slowly run over the edge, and cause those wrinkles. Hope that helps, happy baking!
Wao it great
Aw thanks Stella!! <3
Hi, can I used Wilton Candy Melts for this recipe? And if not, can you tell me a recipe that uses candy melts please? Thanks
Hi Ivy,
I really don’t like the taste of candy melts, so I don’t use them.
Wilton shares their recipe for a drip with candy melts here: https://www.wilton.com/ganache-glaze/WLRECIP-38.html
Hi, should the recipe change if I use regular white chocolate (e.g. Tobleron)? I’m not sure where to find the mini white choc chips just yet.
Hi Lou,
That should work just fine! Just cut it in up into pretty small pieces, and use the amount the recipe calls for 🙂 hope that helps, happy baking!
Hi there! I tried this recipe-White chocolate chips and heavy cream-yesterday on a cake for a customer. I was really bummed that it was see through when I put it on the cake. I did a “naked cake” and you could see right through the drips. Thoughts? I love this recipe, but would rather the drip not be see through. Thanks! Oh, and I did tint it with Americolor Light Pink.
Hi Holly,
If it was see through, it must have been to warm when it was added to the cake! Was the cake chilled? I’d recommend letting it cool off more next time. Sometimes mine is almost at room temperature when I add it.
I also always do a test drip, to prevent adding the drip to the cake when it isn’t the right temperature. With a test drip, you can see if the drips are too thin or thick, and adjust as needed. That will ensure your drips turn out perfectly. I suggest trying those next time. Hope that helps, happy baking!
Will the colored ganache turn your mouth that color? I’m planning to do half the cake blue and half black.
Hi Daphne,
It doesn’t take much gel food coloring to color the ganache, so it shouldn’t die you mouth! There also isn’t much ganache in each bite if you add it as drips 🙂 Hope that helps, happy baking!
Hi! If I make this on an Italian buttercream will it still set properly or will the protein content in the buttercream make it set differently? Thank you!
Hi Maria,
As long as the cake is chilled and the ganache is the right temperature, the drips should turn out just fine 🙂 Happy baking!
I’m sorry if this posts twice! I didn’t click notifications on ?. Anyway will it still work if I use Italian buttercream and set properly, even with the higher protein content in the buttercream? Thank you!
Will this recipe harden a bit?
Hi Crystal,
It does firm up if you pop the cake back into the fridge overnight! As long as you chill it a bit, it will get firm. Happy baking!
Does this recipe firm up enough that you can paint the drips gold instead of colouring the ganache?
Hi Tasha,
It firms up if you let the cake sit in the fridge for a couple days, but it is still a bit soft the day the drips are added. You can paint the drips if you make the cake far enough in advance. Hope that helps, happy baking!
Can I make this on a cake a day before then put it in the fridge overnight until the party tomorrow? I don’t want to cause any issues to the drip
Hi Nikki,
You definitely can! I make drip cakes in advance all the time, and it works great 🙂 Hope that helps, happy baking!
Thank you for this tutorial and recipe! Do you think it would work on a plain cake without icing? My 6 year old daughter wants to recreate a cake from the movie Coraline. If not, I could do chocolate butter cream. It would still look similar, I think.
Hi Anitra,
You really need chilled buttercream for a successful drip! I’d recommend using some chocolate buttercream <3
Would I be able to use this method on an ice cream cake and if so will it crack if I put the whole thing back in the freezer overnight? I love the recipe but my kiddos don’t like regular cake.
Hi Breann,
I’ve never tried this recipe on an ice cream cake, so I have no idea :/ I’m so sorry!! If you try it, please let me know how it goes!
Would it work on whipped cream frosting ?
Hi Marièlena,
As long as you can freeze the whipped cream frosting so that it’s firm to the touch, you should be able to add a drip to it. Just be sure to do a test drip, to make sure it’s the right temperature and works on your frosting. Hope that helps, happy baking!
It never hardened. It just continually dropped and pooled at the bottom of the cake. So disappointed.
Did you do a test drip?? Was your cake fully chilled? It sounds like your ganache was definitely too warm when you added it to your cake.
Next time I’d recommend letting your ganache chill longer, and doing a test drip so that you don’t get ganache running down to your cake board. Hope that helps Angelene!
@Angelene, I had the same thing happen, but I think it’s because I put too much on top of the cake (I felt like I needed to use it up), and because it never really hardens, it had no where to go but off the edges, so it kept dripping overnight, resulting in pools at the bottom. I tried it again with the same recipe, but barely used just enough to cover the top, and NO MORE. The drips worked perfectly that time! 🙂
Hello! I’m in London and I’ve struggled with the drips – I can’t seem to figure out the right cream to use here. We’ve got single cream, double cream, heavy whipping cream. I’ve had disasters trying to heat up the cream and it starting to separate before I even add the chocolates. Maybe I just need to heat it for less time and not on ‘high’. Have you had anyone else comment in the past from the UK and tell you which cream worked best? Thanks!
I think heavy whipping cream is closest to the heavy cream i use! And yes, I heat it just until it begins to bubble, then I immediately pour it over my chocolate! I haven’t run into issues with the cream separating in the past, but your cream probably is just a bit different. What fat % is it? The heavy cream I use is about 36% fat
I find that the drip is an off yellow colour and the colours I add are not the colours Im after…. How do you get the ganache to be ‘white’.
Hi Karena,
The base color of the ganache can vary a lot based on the type of white chocolate you use! i’ve found that the Ghirardelli and Guittard white chocolate chips or disks work best, and make the least yellow ganache. Also using a good gel food coloring (like americolor) can also help ensure your ganache turns out the color you’re after. I hope that helps, happy baking!
Since using cream, does the cake then need to stay chilled until ready to serve?
Hi Christine,
It can sit out at room temp for a few hours, but if you don’t plan to eat it shortly after you make it, I’d recommend keeping the cake in the fridge! Then take it out an hour or two before you plan to cut into it. Hope that helps, happy baking!
Thank you for your tutorials!! do you have one to make this pink & white frosting swirl? or two-tone frosting… not sure what you call it.
thank you!
I’m so happy you’ve found them helpful JoAnne! For frosting swirls with two or three colors, I like to pipe a thick stripe of one color of buttercream on top of a sheet of saran wrap, then pipe the second or third color next to it, roll up the plastic wrap, then snip one end of the roll and place it in a piping bag. I do something similar in this video: https://www.instagram.com/p/B8Ug9nLJrDa/
Hope that helps, happy baking!!
I’m making this cake 3 days in advance- Does the cake need to be wrapped or in a container to sit in the refrigerator after it’s made? And can it sit for 3 days in the refrigerator? Also how far in advance should I take it out or the fridge on the day of the party?
Hi Stephanie,
A frosted cake can last in the fridge for up to a week, or in the freezer for up to a month. The buttercream locks in all the moisture, keeping the cake fresh and delicious! I don’t usually cover my cakes with anything, just be sure to store it away from anything fragrant. I recommend taking the cake out an hour or two before you plan to cut into it. Hope that helps, happy baking!
Great tips and easy to follow instructions. Thank you for sharing! Made my first drip cake today, can’t wait to make more.
Aw I’m so happy to hear that Tia!! That is so awesome 🙂 And thank you!
Hi, I’m in Aus and I was wondering is thickened cream the same as whipping cream? We only have thickened cream here! I’m going to try this on my one year olds birthday cake for Saturday ??
Hi Karmyn,
The fat % of the heavy cream I use is 36%! So as long as your thickened cream has a high fat percentage similar to that, it should work just fine. Hope that helps, and that your child’s birthday cake turns out great!!
I have also had the issue of the white chocolate wrinkling up, twice now. I’m sure it’s me and not the recipe. Just wondering what you think I did? First time, my thought was that the ganache was too warm…so the next time I made sure to have the ganache pretty thick and room temp and it still did it! I pulled the cake out of the fridge and it was sitting for maybe 5 mins before I put the ganache on the cake. It didn’t wrinkle until a bit after I was finished. I’ve done with when the whole entire time of the cake wrinkles and then also when I’ve just done it around the edges it wrinkled. Any thoughts would be appreciated! Also-I use IMBC so there’s that too!
Hi Courtney,
I’m so sorry to hear that! my first though would also be that the ganache was too warm, but you’ve already thought of that! How long did you let the cake sit in the fridge before adding the ganache? I usually put my cakes in my freezer for 10-15 minutes, so that cakes are reallllly cold when I add my ganache.
I’d suggest trying the freezer to chill the cake before, or recommend adding a bit less ganache to the top of the cake. Sometimes it can very slowly flow over the edge as the cake sites and push down the ganache there, causing the ganache to have wrinkles. Hopefully one of those two suggestions will help. Please let me know if they do! <3
Hi! I’m going to cover my cake in fondant icing but you don’t recommend using your drip cake recipe to put on top. Do you have another way to add drips to fondant? ?
Hi Gemma,
Sadly I don’t! I dont really work with fondant, my cakes are 99% buttercream. I’m so sorry!
Do you store the leftovers in the refrigerator? If you do and you want to use it the next weekend do you just slowly warm it in the microwave? Getting ready to do mine today.
Hi Kate,
I do store the leftovers in the fridge! To use chilled ganache, heat the bottle or bowl in to the microwave for 10 second intervals until it reaches the right consistency. Hope that helps, happy baking!
I need to make several mini drip cakes with buttercream icing. Can I freeze them after they have been frosted and dripped?
Hi Rondee,
You can totally freeze mini buttercream drip cakes after making them! Just let them thaw in the fridge a bit before bringing them to room temp to help minimize condensation / temperature shock. Happy baking! <3
Hi! I tried making this drip cake but when I placed the frosted cake into the freezer to chill before adding the ganache, It came out wet with a lot of moisture. The chocolate just slid right off it. I used your buttercream recipe, was I supposed to let the buttercream crust before refrigerating?
Hi Indira,
Did you let the cake sit in the freezer for a really long time? Was it completely frozen? Do you live in a warm, humid environment? If so, that can cause condensation! If you struggle with that on a regular basis, you can use the fridge to chill your cakes to help minimize the temperature shock and reduce condensation.
You def don’t want condensation on the cake before you the drips or they will slide off. Hopefully that helps, happy baking!
Can I use white cocoa compound button instead of mini white chocolate?
Hi Jessica,
That should work just fine!
Would whipping cream work the same as heavy cream and heavy whipping cream
Yup! That will work just fine 🙂
Hello, when I make this the ganache is see through no matter how much food coloring I put in. (Wilton) additionally, I waited a long time to where it was room temperature and it still ran all the way down my Cake. Can you help?
Thank you!
Hi Lauren,
So sorry to hear that! What type of white chocolate are you using?? Using good quality white chocolate like guittard or ghirardelli work best! I’d recommend trying a different type of white chocolate, or adding more white chocolate to the mixture to thicken it up. Hope that helps, happy baking!
What type of heavy cream did u use?
Hi Oke,
I use a few different brands, really whatever my store has on hand!! As long as it say heavy cream or heavy whipping cream on the label it will work!
Hii.i used to make these drips .but dont know why nowadays when i make them the chocolate siezes imedietly when i add heavy cream.used the same items i used to before (nestle or puck).i tried heating it together,seperate and then mixing,using room temp.chocolate and heavy cream .still happens what do u think might be the problem.
Hi Nihala,
That’s so odd! Are you making it in the microwave or with a stove top? Sometimes that can happen if the chocolate is overheated! That’s my best guess, sorry I can’t be of more help.
Hii.
Have you ever tried using coconut cream instead of heavy whipping cream? Do you think it will work?
Hi Kate,
I haven’t tried it personally, but I’ve received comments from people who have tried it and said it worked great 🙂
Can we use this drips on whipped cream frosting also or only on butter cream frosting it will work pls let me know
Hi,
Can I make this dairy free by using non-dairy whipping cream (thawed and not whipped)?
Have you managed to get a good black colour with this recipe. I need a solid black for a cake and am not sure with the cream if I try this if I’ll get gray thanks
Hi! I love your blog. You’ve really helped me grow as a baker!
do you know around what temperature (degrees Fahrenheit) is a good temperature for the ganache to be before starting the drip? I’ve tried this recipe a couple times and I’ve somehow messed it up. The drips are really runny and the color has white specks in it… I’m trouble shooting now because I want to get it right. I have a digital thermometer know and I’m hoping that will help.
This recipe looks great. I’ve seen around that white chocolate chips don’t melt well, is there a specific type or brand that you recommend? (like melting wafers)
How long does it take for the warm ganache to reach room temperature. How long must I wait more or less?
Hi Chels! Can I use this ganache for cake pops?
-Jen
Hi! Can I use rich’s whip topping base for this ganache??
Hi there! Do we need to put the cake back into the fridge after applying the ganache? I was thinking about surprising my mom with a cake featuring these drops, but I’m curious how it will hold up during transport, seeing as it doesn’t harden. Thank you so much!
Hi! This looks like a really great tutorial. We are going to try this for my daughter’s birthday. Do you have a vanilla cake recipe that is best for decorating and covering in buttercream? Thanks!
Hi, with these ratios, will the color be non-translucent? Last time I tried to do a color ganache, the color was a bit see-thru and I really need the color to be a blue pastel. Last time thought I used the other ratios for regular ganache and not this one so it may have been that.
Hello! I’m so glad I found your page! Quick question, is there a way I can paint the ganache gold? Since I can’t hand paint it because it doesn’t harden.
Hi! I am making a drip cake for my daughters birthday and want to do layers of drip in different colours….how long do I need to let the drip set for before I put the next layer on please and do you have any suggestions on the best way to do this please?
Hi. Im doing a cake covered in sprinkles and a drip on top of that. Will the ganache be ok on top of the sprinkles? I’m using rainbow jimmies.
Can I paint this drip gold? How long does it need to be chilled before I do?
Will this recipe work for a black drip if I use americolor super black???
Hi Chelsea. I’m looking to do a gold drip. Would an edible liquid gold paint added to the ganache work? Or adding gold lustre dust? Or should I just use melted chocolate and paint over it? Thank you!
Hi Chelsea! I put my frosted cake in the freezer then I took it out and did colored drips and they were the perfect length and consistency. Then as I was decorating the drips got even longer and thinner and went to the bottom of the board. Is that because the buttercream is getting warm and the condensation. How do I prevent this or my cake from sweating? Not sure. Thank you 🙂
My store was out of white chocolate chips… I have Ghirardelli white chocolate bars… how much of the chocolate and heavy cream for the ganache for drips?
Hi Chesley! Have you ever added corn syrup to this recipe? I’m looking for a shiny, slime-type look and I’m not sure how to achieve!
Do you think this would work for dipping cake pops? I need to pink cake pops and the ALL stores are out of pink candy melts. Thanks in advance for your help.
Amazing recipie. I’ve tried a few and this is the one!! Thank you
Can you drip on Bettercrme (whipped) icing?
I’ve never put a frosted cake in the freezer but I do know that frosted cakes can “sweat” when taken out after being chilled in the refrigerator. So I’m a little scared of trying this. How do you keep the cake from being ruined with the condensation that forms on it after the drastic temp change?
Can you use this on whipped cream?
I am thinking of using your color drip recipie for a volcano cake. I want to fill the hollowed inside of the cake so it flows out of the cake as it’s cut. Would this recipie work for that or will it harden?
Hi! If I want to make a dusty blue drip would I just mix the Americolor gels like I would in frosting or fondant?
Thanks so much!
Hi!
Suuuuper excited for this recipe! I was wondering, does it at any point require refrigeration?
Thank you!
Kind Regards,
Lisa
Worked like a charm. Thank you for the thorough tips!
too thin…needed 1.5 cups of chocolate chips to 1/3 cup of heavy cream
Hi!
Can I do a drip on cream cheese frosting? My daughter wants cream cheese icing for her birthday with a red velvet cake and I was thinking a red drip would be pretty…
Thanks!
Kara
@Kara Murray, hey Kara! Just saw your comment & im wanting to do this too! Do you remember how yours turned out? Ahah
How do i get a glossy gold drip please, will gold geluk do the trick? Some said i must paint it, want it be a mess?
Regards,
Landa
What color(s) did you use to make the bright purple?
I’ve tried this recipe and it came out good! I’ve found out that Ghirardelli chocolate chips works best and it’s the best go-to for this recipe because it melts better and smoother. I didn’t really need to even heap this brand of chocolate chips. I’ve made two shades of blue and a shade of pink. I really had to practice using only small drops of gel coloring like your instructions said because it will get dark but it wasn’t bad. My nephew loved his birthday cake too!
I’m looking to make this in advance… I’m planning on making the drip 6 different colors for a rainbow drip cake. Can you color it after it’s been stored (and reheated) or should it be colored right when you make it then stored? I just want to avoid 6 different containers in my fridge.
What a beautiful cake! What color americolor did you use to
Achieve the hot pink drip?
Hi Kianna,
Thank you 🙂 I used Americolor deep pink to make the hot pink drip!!
Hi Chelsea!
How much gel food coloring should I use? Do you have the buttercream frosting recipe?
TIA
Jewelz
Hi Jewelz,
It all depends on how bright of a color you want! I usually add a squirt or two, depending on how light or dark I want the color to be. I have a few recipes for different types of buttercream frosting, but my personal favorite and most popular is my American buttercream frosting. Here’s the recipe: https://chelsweets.com/the-best-american-buttercream-recipe/
Hope that helps, happy baking!
Will this drip work with Italian meringue buttercream?
Hi Amanda,
It will as long as the cake is thoroughly chilled and the frosting is firm to the touch 🙂 Happy baking!
What color did you use for the purple-pink colored drip? That’s absolutely perfect for the My Little Pony cake I’m planning on making but I’m not sure which color to search for.
Hi Ashley,
I used Americolor’s neon/electric purple! It creates a really nice, warm purple color when combined with white chocolate. Happy baking!!
Can I use powered raspberry to color this drip recipe?
Hi Linda,
You can use freeze-dried raspberry powder to color this recipe recipe, but you might need to a add a tiny bit more heavy cream because it will make the mixture slightly thicker. It also won’t color the drip totally pink, it will be more of a speckled pink color. Hope that helps, happy baking!
Hi Chelsea, I plan on painting leopard print on a cake. Would the drip smudge the paint or should I do the drip first and then paint on the leopard print? Thanks!
Hi Tabitha,
Great question! As long as the edible paint is fully dried, I think a drip over it should work just fine. Hope that helps, happy baking!
Hi! Love all your recipes and videos! They have helped me so much but I am having a hard time making a vivid pink. I’ve used americolor gel even fusia color and pink but just can’t get that perfect bright pink. Any suggestions? Your pic shows a bright pink. Any advice would be greatly appreciated. Thank you so very much.
Hi Kathy,
You’re too sweet, thank you! I used a very generous squirt of Americolor deep pink to achieve a hot pink color! Sometimes white chocolate can be finicky because the cocoa butter in the white chocolate can give it a base color that’s yellow, and that can cause the final color to be a bit different than you might expect. Sometimes it helps adding in a bit of white gel food coloring to neutralize out the yellow from the cocoa butter. Hope that helps, happy baking!
Can you make a black drip with this recipe?
Hi Sabrina,
You totally can! However, I usually recommend using my chocolate ganache drip recipe and adding a little black gel food coloring to it! That way it naturally has a darker base color, and you don’t have to add as much food coloring.
Here’s the link: https://chelsweets.com/chocolate-ganache-drip-recipe/
Hope that helps, happy baking!
Do I make chocolate ganache the same way using milk or semi-sweet chocolate chips?
Hi Mary,
Great question! The ratios are different when you use milk or semi sweet chocolate instead of white chocolate. I actually have a great chocolate drip recipe here: https://chelsweets.com/chocolate-ganache-drip-recipe/
Hope that helps, happy baking!
Oh my lanta! This is so cute. I love ready recipes! I am making a gender reveal baby shower cake for my sister, and she knows how artistic I am lol. So this will be perfect. I’ll update when I make it at the end of this month.
Hi Brittanie,
So happy to hear that!! I hope your drip cake turns out amazing 🙂
Hi. If I cover the top of the cake with the ganache drip can I place a fondant piece on top of it? Or will I end up with a mess?
Hi Dawn,
As long as the drip has been fully chilled and has firmed up you should be able to place a fondant piece on top of it. Hope that helps, happy baking!
Hi Chelsea!
I know you work mainly with buttercream but would you happen to know if it would be the same thing with a crusting cream cheese icing? (I made the cake tonight + it’s in freezer, will be doing crusting/pipeable cream cheese frosting tomorrow & was thinking of freezing the cake for 15 mins (or until hardened) and do the drip while it’s less than warm.. or does that sound like a bad idea due to the crusting part of the cream cheese (either making it dry or melting it/being too ‘heavy’)?
Thank you:)!
Ps. I’ve done your other recipes & love them!
Great question Allie, and apologies for the delayed response! Yes, this drip recipe would work with a crusting buttercream! I hope your cake turned out great 🙂 Happy baking!!
Hello! Would only an oil-based coloring work for this?
Hi Hannah,
Surprisingly gel food coloring works great in this recipe! The cream prevents the ganache from seizing when gel food coloring is added. Hope that helps, happy baking!
Can you substitute coconut cream for the heavy cream?
You totally can! That should work great. Hope that helps, happy baking!
Hi! I’ve made this recipe a couple of times with success, and wanted to try adding white americolor to it this time, but for some reason now there’s all these white specks in the ganache! Is there a way to salvage it? Thinking maybe I added the gel coloring when it was too hot?
Hi! Can you use drip on a cream cheese frosted cake?
Thanks!
Hi Aruba,
Great question! You absolutely can add drips to a cream cheese frosted cake as long as it is fully chilled and the frosting is firm to the touch. Hope that helps, happy baking!
Hello,
I was wondering if I can freeze the cake after I decorate it, or will that ruin the drip? Also, do you know if I can substitute this recipe with vegan white chocolate and vegan heavy whipping cream? My daughter is allergic to dairy. I would really appreciate your advice. I’ve always made my daughter’s birthday cakes because of her allergies; I have no training or experience. She asked for a spiderman drip cake this year and I’m not sure I can pull it off.
Hi Kristin,
You’re such a rockstar for making all your daughter’s birthday cakes! Yes, you can freeze a decorated cake and this drip should be just fine. If you do freeze it, make sure it’s well-wrapped and freeze it uncovered first until firm, then wrap it to protect the details. When thawing, do it slowly in the fridge to avoid condensation.
As for the drip, you can try using vegan white chocolate and a plant-based heavy cream alternative (like Silk or Country Crock’s dairy-free heavy whipping cream). Just know that some vegan white chocolates melt a little differently, so you may need to play with the ratio slightly — start small and adjust the consistency with extra cream if needed. Hope that helps and that the cake turns out amazing!!
I’ve been afraid of drips, but my nephew wanted a dino/volcano cake for his birthday. I used this and colored it orange, yellow and red for the lava and it was the PERFECT consistency. Adding this to my baking toolkit.
Hi Melissa,
Ahh that makes me so happy to hear!! Your dino/volcano cake sounds absolutely epic—and I love that you went for it with the colored “lava”! So glad the drip worked out perfectly for you. Definitely a great one to keep in the toolkit for fun, dramatic bakes like that!
The detail about mini chips fitting more in a cup (175g vs 160g) really stood out—such a small difference but it shows you’ve actually tested this until it worked.