
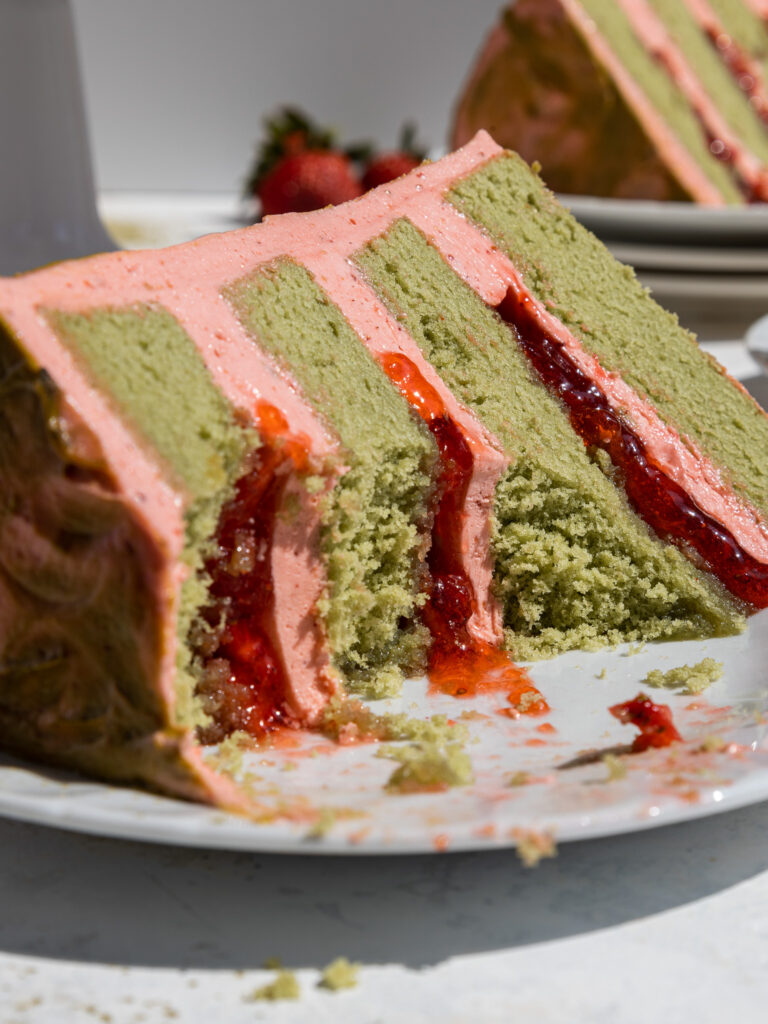
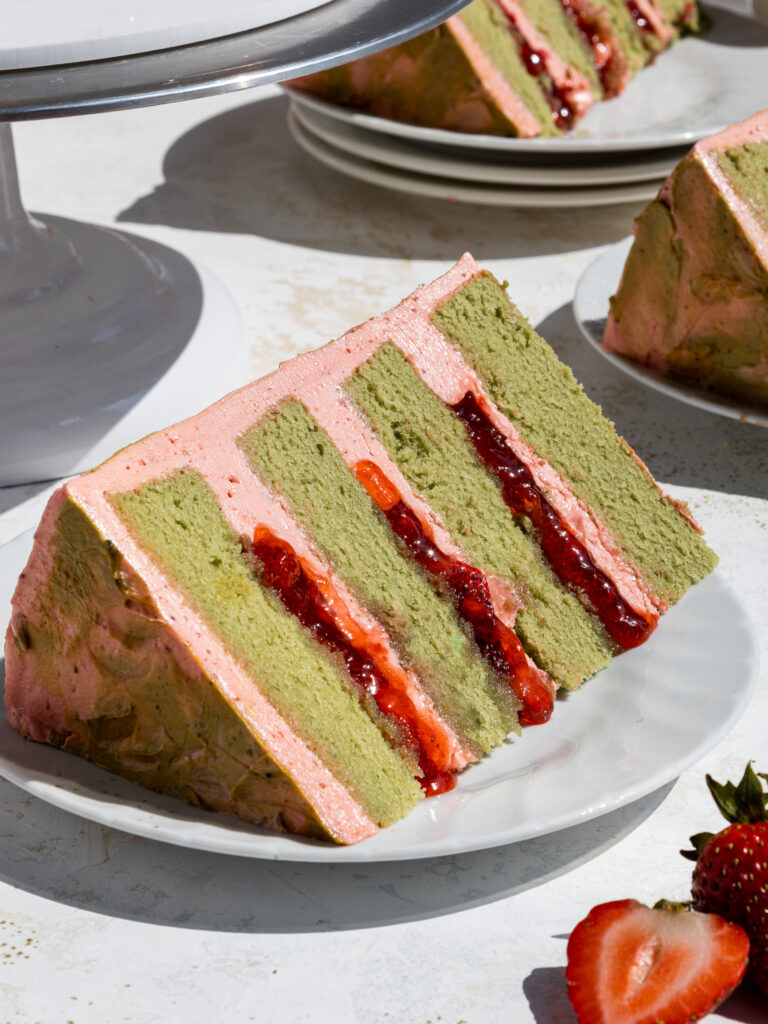
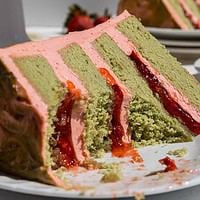
Strawberry Matcha Cake
This strawberry matcha cake is so delicious and has the perfect balance of flavor between the earthy notes of matcha and sweet, bright strawberries!
How to Make This Strawberry Matcha Cake
To make sure this cake turns out as amazing as possible, let’s walk through each step together! I’ve also included a video tutorial of the process below.
I figured it might be helpful to know what tools I use too, so I’ve shared a list below.
Not all of these are mandatory, but they make the process a lot easier. If you don’t have all these things on hand, feel free to improvise and work with what you have.
- Saucepan
- Heat-proof bowl
- 3, 8-inch cake pans or 4, 7-inch cake pans
- Serrated Knife
- Spinning cake stand
- Electric hand mixer or stand mixer
- 10-inch greaseproof cake board or flat plate
- Large offset spatula
- 1 Large piping bag
Step 1: Bake the Matcha Cake Layers
The first step is to make the matcha cake batter following the recipe card at the bottom of this post.
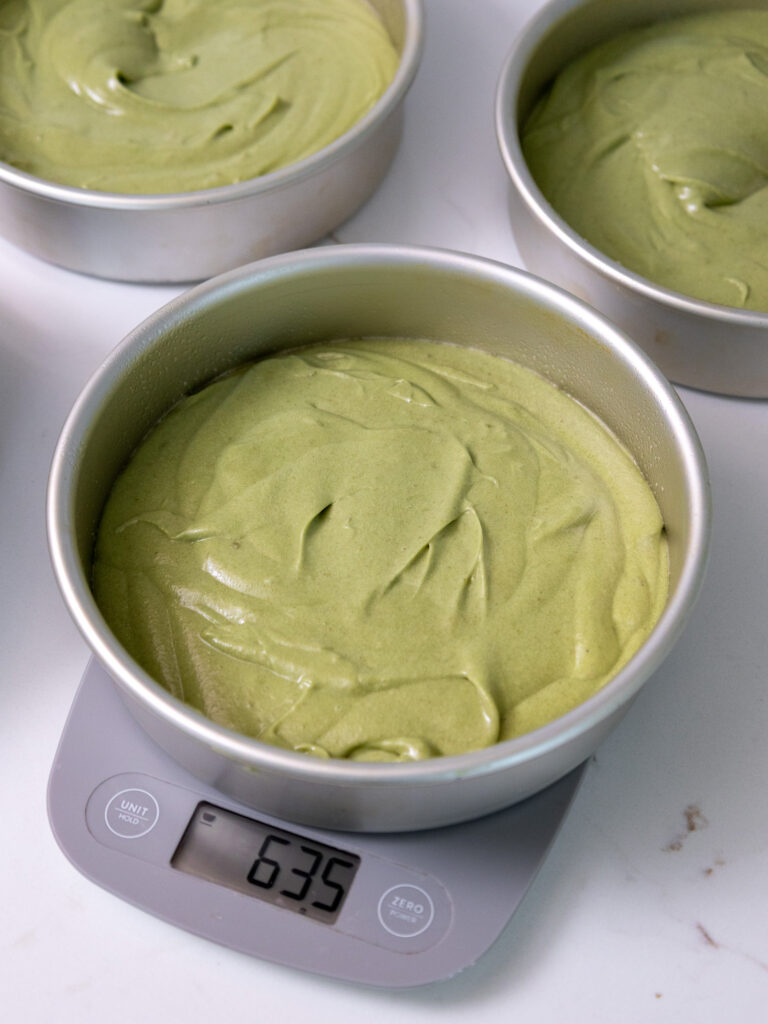
Divide the batter evenly between the prepared cake pans. Bake the layers for 33-36 minutes or until a toothpick comes out with a few moist crumbs.
Remove the cake layers from the oven and let them cool in the pans for about 10 minutes.
Gently run an offset spatula around the rim of the cake pans to loosen them, then flip the cake layers onto wire racks to finish cooling.
Once cooled, use a serrated knife to level the top of each cake layer.
If you’re making these in advance, you can wrap and freeze them at this point.
Step 2: Make the Strawberry Buttercream Frosting
While the cake layers bake and cool, make the strawberry buttercream.
I like to use my Swiss meringue buttercream (SMBC) as a base because it isn’t too sweet and really lets the flavors in this buttercream shine through!
If you aren’t a fan of SMBC, I’d recommend adding the freeze-dried strawberry powder to a batch of my American buttercream or 1.5 batches of my hybrid buttercream.
This frosting can also be made in advance if needed and kept in the fridge for up to a month.
Step 3: Stack and Fill the Cake Layers
Then it’s time to assemble this cake! Stack and frost cake layers on a greaseproof cake board or flat plate. Use a dab of buttercream to help stick the first cake layer to the board.
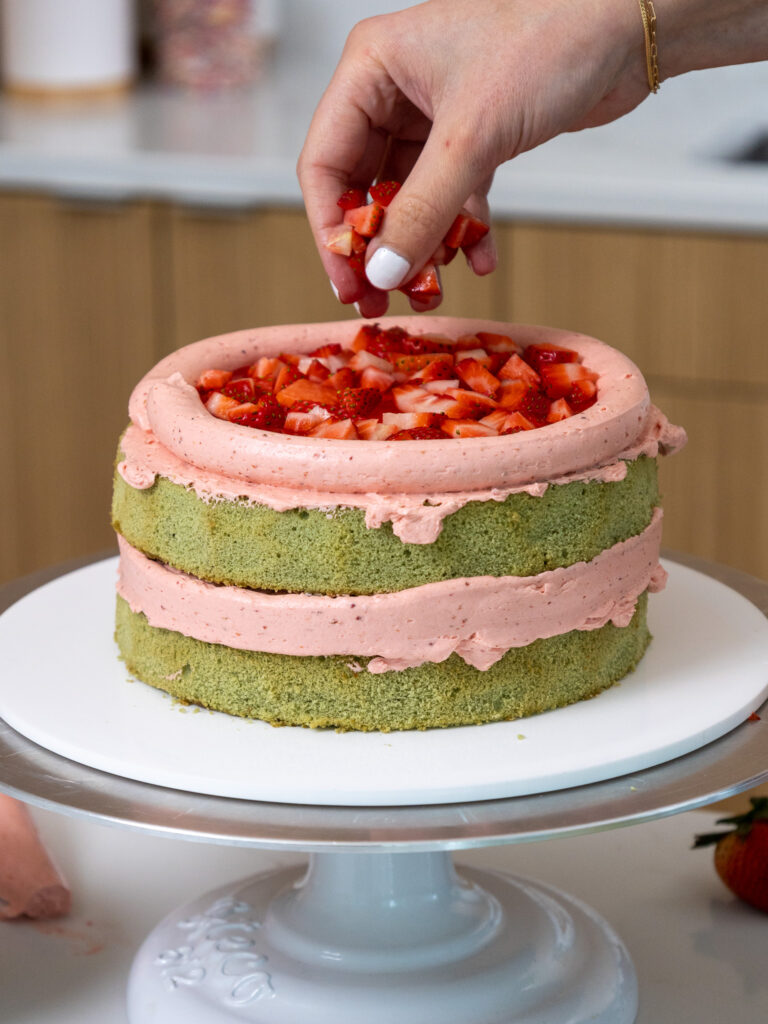
Spread a thin layer of buttercream on top of the cake layer.
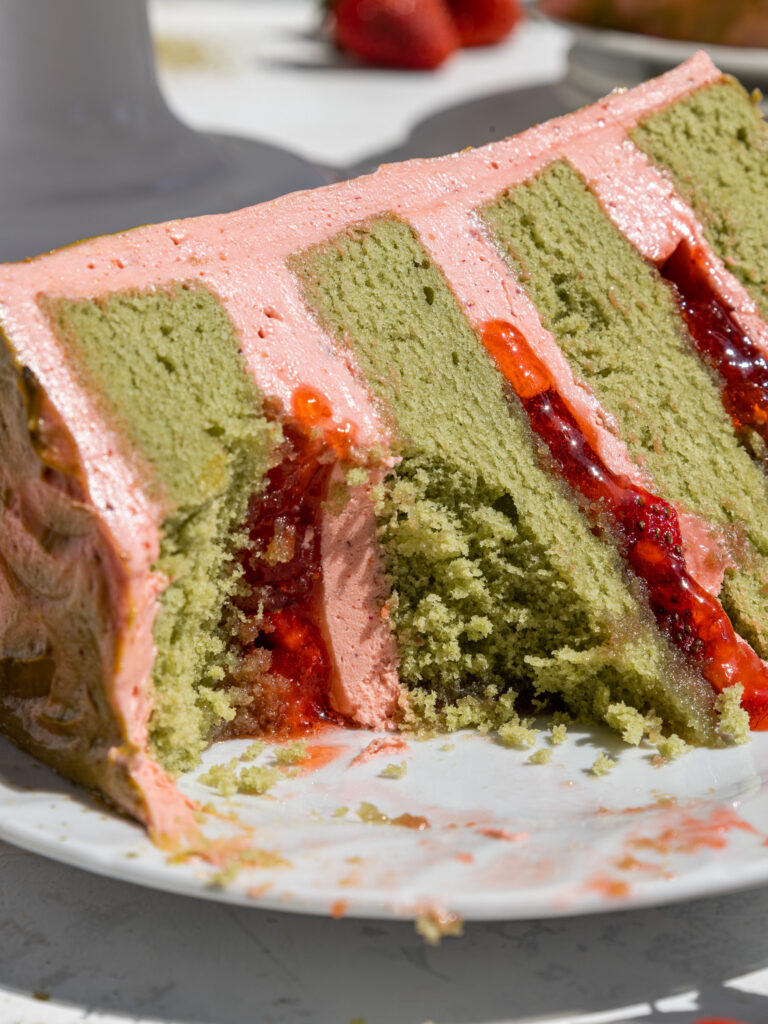
Pipe a thick ring of buttercream around the edge of the cake layer and fill the center with your favorite strawberry jam. I like to add about 1/2 cup of jam between each layer.
If you plan to eat the cake the day you make it, you can also add in some fresh, diced strawberries.
Flip the top cake layer upside down to make the cake easier to frost and get sharp corners.
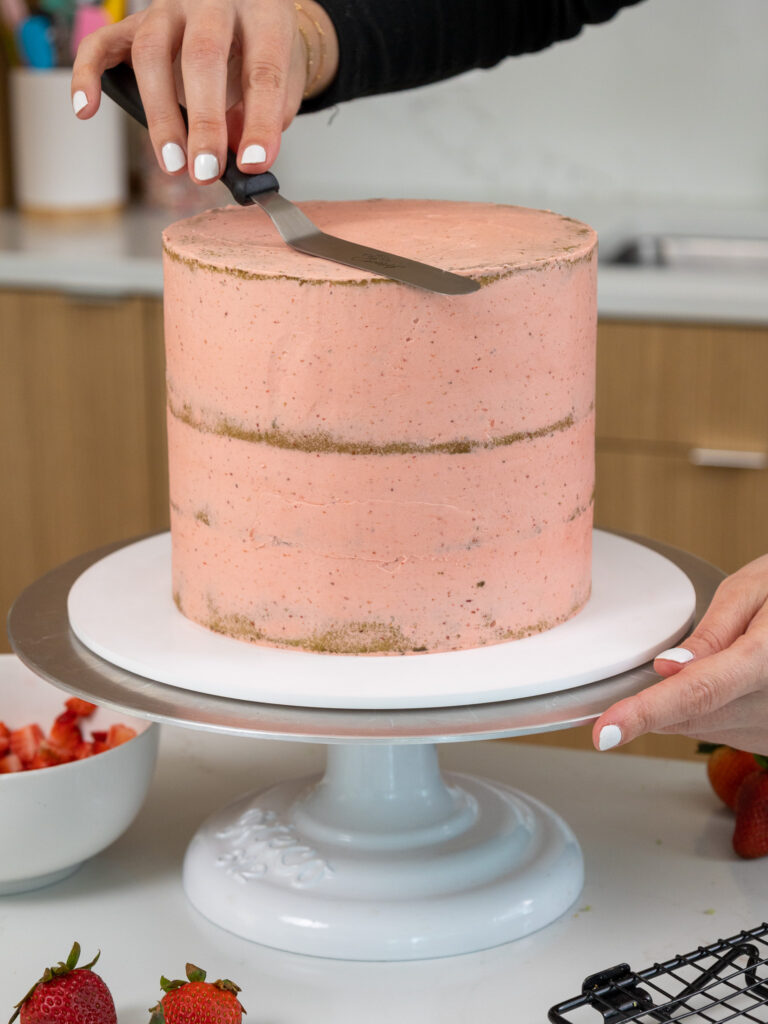
Step 4: Chill and Crumb Coat the Cake
Chill the cake in the freezer for 5-10 minutes to prevent the layers from sliding, then add a thin coat of frosting around the cake that fully covers the cake layers.
Smooth using a bench scraper, then chill the cake again in the fridge (30 minutes) or freezer (10 minutes) until the frosting is firm to the touch.
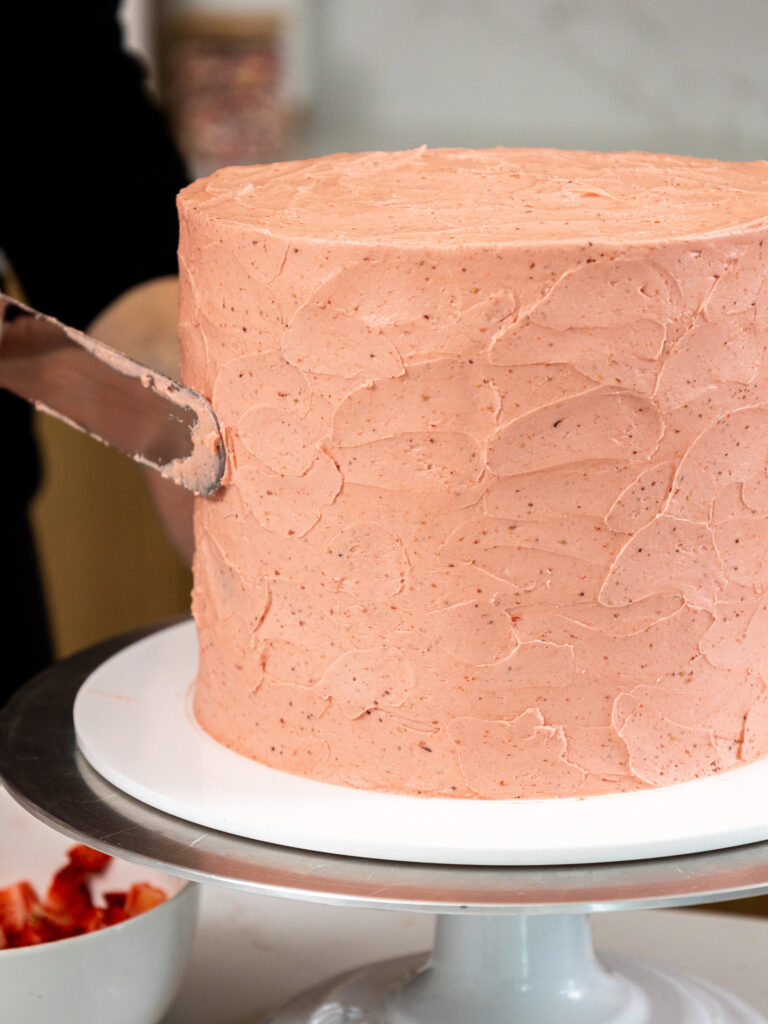
Step 5: Add the Second Layer of Frosting & Decorate
Set aside 1/3 cup of frosting, then add a second layer of frosting to the cake with the remaining buttercream. Use a large offset spatula to give the frosting a textured look.
Color the reserved frosting green with a Tablespoon of matcha powder and a small drop of electric green gel food coloring.
Then use a small offset spatula to add swipes of the green frosting around the cake and blend them into the strawberry frosting.

Substitutions and Swaps – Matcha Cake Layers
This recipe uses quite a few ingredients and I know you might not have them all on hand. Or if you have food allergies or restrictions, I’ve got you covered.
Below are some swaps and substitutions that can be made in this cake recipe.
- Cake Flour – This recipe turns out best with cake flour, but you can use a gluten-free flour blend or all-purpose flour if that’s all you have on hand.
- Granulated Sugar – I do not recommend reducing the amount of sugar because it will change the texture of the cake layers.
- Matcha – You can buy culinary-grade matcha at most grocery stores in either the tea and coffee section or the international section. I get mine from Whole Foods, but you can also order matcha powder on Amazon.
- Unsalted Butter – If you only have salted butter on hand, you can use it in place of the unsalted butter in this recipe. Just be sure to omit the salt that this cake recipe calls for. You can also use vegan butter in its place (and also omit the salt)!
- Egg whites – I like to use the pasteurized egg whites that come in a carton, but you can also use 7 fresh egg whites or 4 whole, large eggs. If you have an egg allergy you can try using flaxseed eggs or an egg replacer.
- Sour Cream – You can also use full-fat yogurt, whole milk, or an alternative yogurt or milk (almond, soy, oat) if you’re dairy free.
- Vegetable Oil – Any flavorless oil can be used in this recipe. Canola or even sunflower oil would work great!
Substitutions and Swaps – Strawberry Buttercream
- Unsalted Butter – If you only have salted butter on hand, you can use it in place of the unsalted butter. Just be sure to omit the salt that this frosting recipe calls for. You can also use vegan butter in its place (and omit the salt)!
- Freeze Dried Strawberry Powder – This ingredient adds both flavor and color to this frosting! I usually order mine on Amazon. If you can’t find strawberry powder at the grocery you can grind up freeze-dried strawberries in a food processor. You can also use an extra 1/4 cup of strawberry jam in place of the strawberry powder if you can’t find any.
Making this Strawberry Matcha Layer Cake in Different Sizes
One batch of batter is about 1800g or 10 cups, so I add about 600g to each of my cake pans when using 3, 8-inch cake pans.
If I’m making 4, 7-inch cake pans, I’ll add 450g to each pan.
You can also use one batch of batter to make 2, 9-inch cake layers or 4, 6-inch cake layers. Bake time will be a few minutes longer at 350 F / 175 C.
If you want to make a tiered cake with this recipe, check out my cake batter calculator to see how many batches of batter you’ll need.
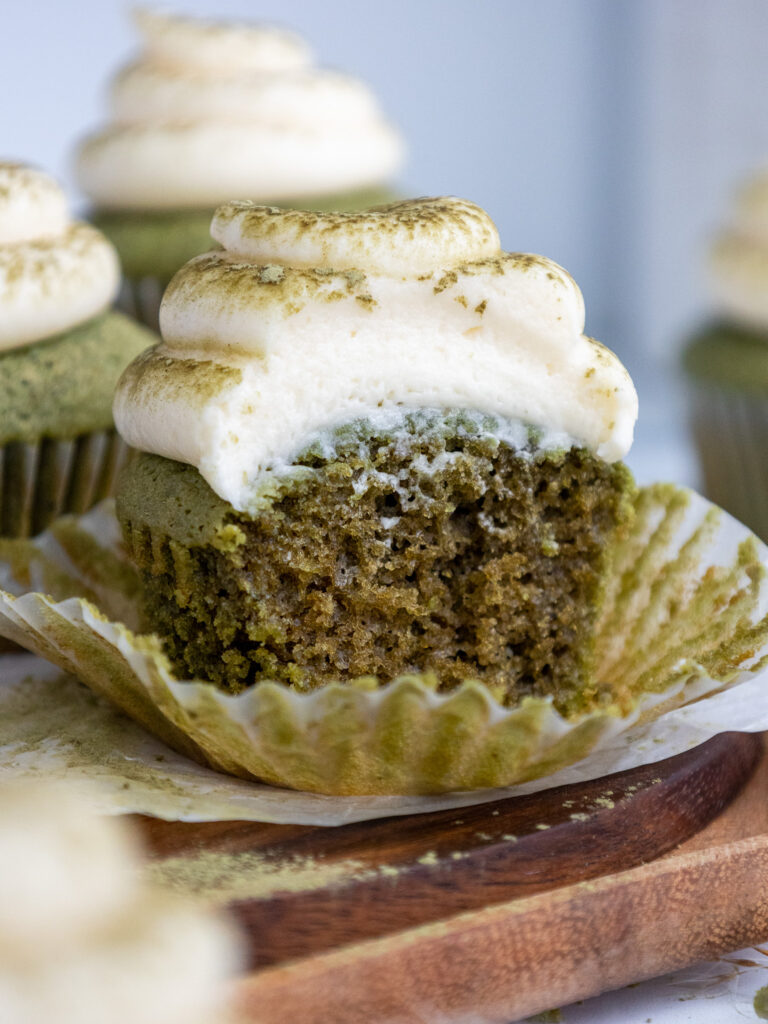
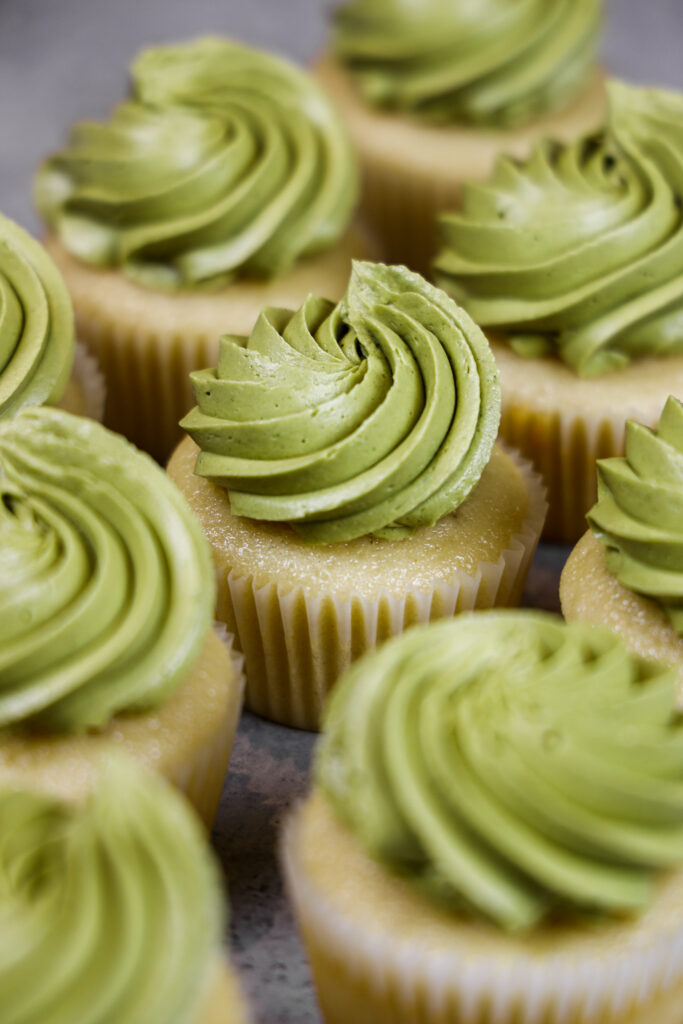
If you want to make strawberry matcha cupcakes, fill the liners 3/4 full and bake them at 350F / 175C for 18-21 minutes. One batch of batter will make about 3 dozen cupcakes (yield will vary based on the size of your liners).
Or if you just want to make a dozen cupcakes, you can use my matcha cupcake recipe and make a half batch of this frosting recipe.
Can This Cake Be Made in Advance?
Short answer – yes! I highly recommend making the components of this cake in stages. It breaks the process up and makes it so much more approachable!
The cake layers can be made in advance and frozen. They taste just as great when they’re frozen as when they’re fresh, I promise!
You can also make the frosting ahead of time or save any leftover frosting! It can be stored in an airtight container in the fridge for up to a month.
Be sure to give it a good stir once it thaws to get the consistency nice and smooth again.
A frosted cake can be stored for up to a week in the fridge as long as there’s no fresh fruit in it. The buttercream will lock all the moisture in and keep it fresh.
If you cut into the cake and have leftovers, use any remaining frosting to cover the cut section to keep it moist and store it in the fridge for up to a week.
Tips for Making the Best Strawberry Matcha Cake
- Properly measure the flour. Either spoon it into the cup measure, then level with a knife or use a kitchen scale to measure your dry ingredients.
- Ingredients at room temp mix together better, so be sure to set out any cold ingredients ahead of time.
- Use a scale to weigh your cake pans as you fill them. It helps the cake layers bake to the same height and bake more evenly.
- Chill the cake layers in the freezer for about 20 minutes before assembling the cake. This makes them easier to stack and frost.
- Level the room temperature or thawed cake layers with a serrated knife to make them easier to stack and fill.
- Chill the cake before adding on the crumb coat. This will help lock all the jam filling in place and prevent the cake layers from sliding.
- If your cake layers do seem to be sliding, insert a wooden dowel or chopstick through the center of the cake to help keep the layers in place.
- If your cake layers turn out less than perfect, check out my cake troubleshooting guide to try to figure out what happened.
Let Me Know What You Think!
If you make this strawberry matcha cake recipe, I’d love to hear what you think of it! Let me know by leaving a rating and comment below.
Tag me @chelsweets and use #chelsweets if you share on social media so that I can see your amazing creations.

Strawberry Matcha Cake
Ingredients
Matcha Cake Recipe
- 2 3/4 cups cake flour 330g
- 2 1/2 cups granulated sugar 500g
- 3 Tbsp matcha powder 18g
- 2 1/2 tsp baking powder 10g
- 1 tsp fine salt 6g
- 1 cup (2 sticks) unsalted butter, room temperature 226g
- 1 cup carton egg whites or 7 large egg whites, room temperature 240g
- 1 1/2 cups full-fat sour cream, room temperature 370g
- 2 Tbsp vegetable or canola oil 28g
- 1 tsp vanilla extract or vanilla bean paste 4g
- electric green gel food coloring – optional
Strawberry Buttercream Frosting
- 8 large egg whites, room temperature 240g
- 2 1/2 cups granulated sugar 500g
- 2 cups (4 sticks) unsalted butter, room temperature 454g
- 1/2 cup strawberry jam 150g
- 1 Tbsp freshly squeezed lemon juice – about 1/2 small lemon 15g
- 1 tsp vanilla extract or vanilla bean paste 4g
- 1/2 tsp fine salt 3g
- 1/2 cup freeze-dried strawberry powder 55g
- Red gel food coloring – optional
Cake Filling
- 1 1/2 cups strawberry jam 450g
Recommend Equipment
- Saucepan
- Heat-proof bowl
- 3, 8- inch cake pans or 4, 7-inch cake pans
- Serrated Knife
- Spinning cake stand
- Electric hand mixer or stand mixer
- 10- inch greaseproof cake board
- Large offset spatula
- 1 Large piping bag
Instructions
Matcha Cake Layers:
- Make the cake layers first so that they have time to bake and cool. Preheat the oven to 350°F/175°C and line and grease three, 8-inch cake pans or four, 7-inch cake pans with parchment rounds and non-stick spray (I used 7-inch cake pans).
- Add 2 3/4 cups cake flour, 2 1/2 cups sugar, 3 Tbsp matcha, 2 1/2 tsp baking powder, and 1 tsp salt into the bowl with the sugar and whisk together until combined.
- Cut 1 cup (2 sticks) of unsalted butter into Tbsp-sized pieces and mix them into the dry ingredients with a paddle attachment or hand mixer on a low speed. Continue to mix until no large chunks of butter remain, and the mixture looks like moist sand.
- Mix in 1 cup of egg whites on a medium speed until incorporated. The batter should be quite thick at this point.
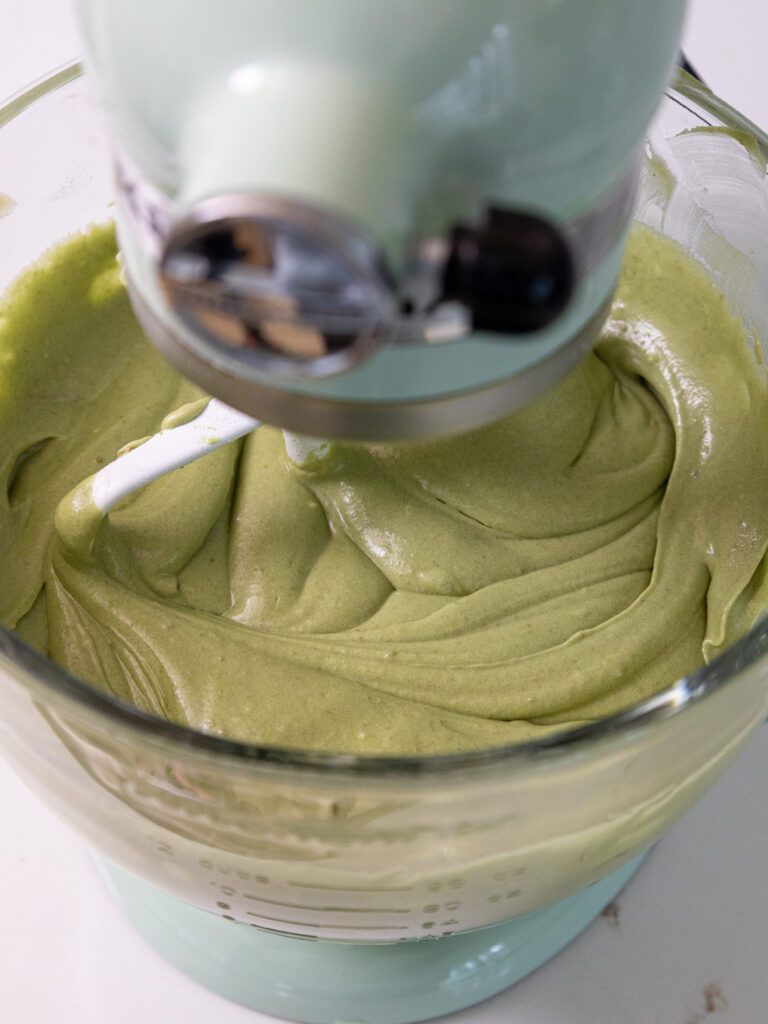
- Then add in 1 1/2 cups sour cream, 2 Tbsp vegetable oil, and 1 tsp vanilla extract. If desired, add in a small drop of electric green gel food coloring to brighten the green color of the layers. Mix on a low speed until incorporated.
- Scrape down the sides and bottom of the bowl with a rubber spatula, then beat on a medium speed for about 30 seconds to make sure everything is properly mixed together. This cake recipe uses the reverse creaming method, so this step is important to help give the cake layers a lighter texture.
- Divide the batter evenly between the prepared cake pans. Bake for 33-36 minutes or until a toothpick comes out with a few moist crumbs. Let the cake layers cool in the pans for 10 minutes, then run a small offset spatula around the perimeter of the pan to separate the cake from the pan.
- Flip the cake layers onto a wire rack to cool. Use a serrated knife to level the top of the layers once they're fully cooled.
- If you make these cake layers in advance and freeze them, let them thaw for about 20 minutes before assembling your cake. The cake layers should still be cold to the touch, which will make it easier to assemble your cake.
Strawberry Swiss Meringue Frosting:
- While the cake layers bake and cool, make the strawberry buttercream frosting. Before making the frosting, be sure to thoroughly clean your mixing bowl. If there’s any grease it can make it difficult to whip up the meringue.
- In a medium sized pot, add about 1 inch of water and bring to a simmer.
- Add 8 egg whites and 2 1/2 cups of granulated sugar into a large metal bowl. Place the bowl on top of the pot filled with simmering water. The bowl should create a seal over the pot. Make sure the water isn’t actually touching the bottom of the bowl, or it can cook the egg whites.
- Whisk the mixture constantly for about 3 minutes, until it reaches 160°F / 71°C. You can test the mixture to see if it’s ready by rubbing a tiny bit between your fingertips. The sugar should be fully dissolved, and it should feel super smooth and hot to the touch.
- Lift the bowl away from the pot and dry the bottom with a towel. Pour the mixture into the bowl of a stand mixer and beat on a medium-high speed with a whisk attachment. Mix for about 10 minutes, or until you have stiff, glossy peaks.
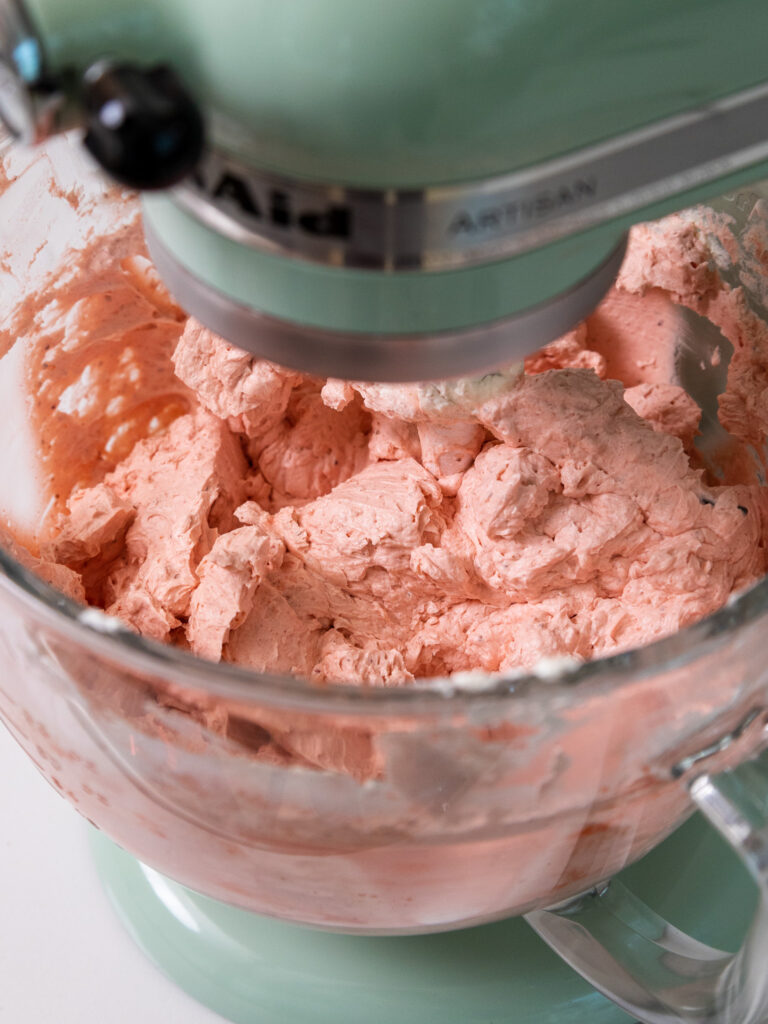
- Mix in 2 cups of unsalted butter at a medium speed, 1 stick at a time. The frosting should have a thick, whipped consistency at this point. If it looks lumpy or broken, keep mixing until it looks smooth and thick. If it doesn't seem to come together after an additional 10 minutes of mixing, check out my Swiss meringue buttercream troubleshooting guide.
- Then add in 1/2 cup strawberry jam, 1 Tbsp fresh lemon juice, 1 tsp vanilla extract, and 1/2 tsp salt and mix on medium until fully incorporated. Once combined, mix in 1/2 cup of freeze-dried strawberry powder. Scrape the sides and bottom of the bowl with a rubber spatula as needed. If you want the frosting to be a brighter pink color, add in a small drop of red gel food coloring.
- To make the frosting extra smooth, swap out the whisk attachment for a paddle attachment and continue mixing on a low speed for a couple minutes.
- Place half of the frosting in a large piping bag and cut a 1-inch opening at the base of the bag. Set aside.
Assembling this Strawberry Matcha Cake:
- Stack and frost cake layers on a greaseproof cake board or flat plate using a dab of frosting to help stick the first cake layer to the board.
- Spread a thin layer of buttercream on top of the cake layer. Pipe a thick ring of buttercream around the edge of the cake layer and fill the center with strawberry jam. I like to add about 1/2 cup between each layer. If you plan to eat the cake the day you make it, you can also add some diced strawberries. Repeat with the remaining cake layers. Flip the top cake layer upside down to make it easier to frost and get sharp corners.
- Chill the cake in the freezer for 5-10 minutes to prevent the layers from sliding, then add a thin coat of frosting around the cake that fully covers the cake layers. Smooth using a bench scraper, then chill the cake again in the fridge (30 minutes) or freezer (10 minutes) until the frosting is firm to the touch.
- Set aside 1/3 cup of frosting, then add a second layer of frosting to the cake with the remaining buttercream. Use a large offset spatula to give the frosting a textured look.
- Color the reserved frosting green with a Tbsp of matcha powder and a small drop of electric green gel food coloring. Use a small offset spatula to add colorful swipes of green frosting around the cake and blend them into the strawberry frosting. Then enjoy!
Video
Notes
Substitutions and Swaps
If you need to make any substitutions or swaps in this recipe, please check out the section on ingredient substitutions in the post above.Making this Strawberry Matcha Layer Cake in Different Sizes
One batch of batter is about 1800g or 10 cups, so I add roughly 600g to each of my cake pans when using 3, 8-inch cake pans, or 450g to my cake pans when using 4, 7-inch cake pans. You can also use one batch of batter to make 2, 9-inch cake layers or 4, 6-inch cake layers. Bake time will be a few minutes longer at 350 F / 175 C. If you want to make a tiered cake with this recipe, check out my cake batter calculator to see how many batches of batter you'll need. If you want to make strawberry matcha cupcakes, fill the liners 3/4 full and bake them at 350F / 175C for 18-21 minutes. One batch of batter will make about 3 dozen cupcakes (yield will vary based on the size of your liners). Or if you just want to make a dozen cupcakes, you can use my matcha cupcake recipe.Tips for Making the Best Strawberry Matcha Layer Cake:
- Properly measure the flour (spoon into the cup measure, then level) or use a kitchen scale to measure your dry ingredients.
- Use a scale to weigh the cake pans as you fill them with batter. This
- Ingredients at room temperature mix together better. Set out any cold ingredients ahead of time.
- Chill the cake layers in the freezer for about 20 minutes before assembling the cake. This makes it a lot easier to stack and frost.
- Chill the entire cake before adding on the crumb coat. This will help lock all the lemon curd filling in place and prevent the cake layers from sliding.
- If your cake layers do seem to be sliding, insert a wooden dowel or chopstick through the center of the cake to help keep the layers in place.
- If your cake layers turn out less than perfect, check out my cake troubleshooting guide to try to figure out what happened.
Making This Cake in Advance and Storage Tips
I highly recommend making the components of this cake in stages. It breaks the process up and makes it so much more approachable! The cake layers can be made in advance and frozen. They taste just as great when they're frozen as when they're fresh, I promise! You can also make the frosting ahead of time or save any leftover frosting! It can be stored in an airtight container in the fridge for up to a month. Be sure to give it a good stir once it thaws to get the consistency nice and smooth again. A frosted cake can be stored for up to a week in the fridge as long as there's no fresh fruit in it. The buttercream will lock all the moisture in and keep it fresh. If you cut into the cake and have leftovers, use any remaining frosting to cover the cut section to keep it moist and store in the fridge for up to a week.Nutrition
Other Recipes You Might Like:
I live your videos and I have a few questions. I am a novice baker and have been asked to make a small wedding cake for family friends. The bride has dietary restrictions of no gluten and no eggs. They Want a Strawberry Lemonade Matcha cake. Any help you can provide would be very appreciated.
Hi Michelle,
What an exciting (and meaningful!) challenge! A gluten-free, egg-free strawberry lemonade matcha cake is totally doable, and I can help!
For the cake layers: For a gluten-free and egg-free base, a lemon cake is a great starting point. Here’s how to make it:
– Lemon Matcha Cake (GF + Egg-Free): Flour: Use a 1-to-1 gluten-free baking flour with xanthan gum (like Bob’s Red Mill blue bag)
– Egg Substitute: Use unsweetened applesauce, dairy-free yogurt, or a commercial egg replacer (like Bob’s or Ener-G). Use 1/4 cup applesauce per egg.
– Leavening: Boost your baking powder just a tiny bit since there’s no egg—this helps with lift.
– Flavor: Add lemon zest + juice and 1–2 teaspoons of matcha powder (culinary grade) to the batter.
– Fat: Use oil for a moist texture (cakes without eggs and gluten can dry out quickly).
For the filling: You can make a strawberry compote or jam! If you’d like a creamy element too, consider a whipped dairy-free cream cheese or coconut whipped frosting layer above the compote.
For the frosting: Lemon Buttercream (Vegan + GF):
– Use dairy-free butter (like Earth Balance or Miyoko’s)
– Beat with powdered sugar, lemon juice, and zest
– Add a pinch of salt to balance the sweetness
You could also flavor half with matcha and use both lemon and matcha frosting!
For assembling the cake: Bake and freeze layers ahead if needed—GF/egg-free cakes freeze well! Chill before stacking or frosting to avoid crumbling. Use bubble tea straws or wooden dowels to support if you’re stacking more than one tier!
Hope that helps and that it turns out AMAZING!!!
I know the reverse creaming method is preferred amongst novice bakers but I just didn’t love how this cake turned out – first of all, it was SUPER sweet, and I used the scale (500g) measurements rather than the English measurements. When I went back to double check how much 2.5C of sugar weighs, it’s actually 550g – I can’t even imagine what an additional 10% sugar would do. I think that the conversions are just not super accurate (also especially true for the matcha). It sort of looked, smelled, and tasted like very sugary playdo (that’s not a dig, I love that smell but I’m not sure that was the goal) and there’s no way I can add frosting or jam on top of all that sweetness. The layers were also too moist and dense to stack – though it looks just like yours in the pictures. This is my 10th or 11th wedding cake (and I’ve been baking for 40 years) and this was the first time I deviated from my standard recipes. I love all the conversions for the sizes of the pans and your descriptions are great…. it’s just not a cake recipe that works I think.
Hi Nazz,
Everyone has different flavor palettes, and it does sound like the reverse crumbing method isn’t for you! And that’s ok 🙂 I definitely have a sweet tooth, and I know that I like things sweeter than some people! I will say 1 cup of granulated sugar is 200g, so 2.5 cups is 500g. I also have a ton of different frosting recipes, including types like my hyrbid buttercream or my Swiss meringue buttercream that are less sweet than the frosting in this recipe. Hope that helps for the future!
The cake turned out nice and moist. My only thing was that I didn’t taste much matcha, it had a very very faint after taste of it. I think adding more of the match powder would be better. I did make the strawberry frosting with it as well. The strawberry frosting was definitely overpowering for the very light match taste of the cake. But other than that, I would recommend this recipe. Just need to more matcha.
Hi Leann,
Thank you so much for the thoughtful feedback! You can absolutely add more matcha if you want a stronger flavor. The brand of matcha you use can also impact the flavor, so that’s something to keep in mind too! I’m glad the cake baked up nice and moist though, and that you still enjoyed it!
Hi, there! I plan to make this in a couple weeks. I noticed you have two different recipes for Strawberry Swiss Buttercream – the one above & another stand alone recipe. There are a couple differences in the number of egg whites & amount of sugar. Does it matter which one is used with the Strawberry Matcha cake? Thanks!
Hi Rachel,
Great question! It really is just a difference in volume/the total amount of buttercream each recipe makes. Both recipes taste very similar. My strawberry Swiss meringue buttercream makes slightly more buttercream than this recipe, but because the decorations on this cake are pretty straight forward, you don’t really need the extra bit of buttercream. Either recipe would work for this cake though! Hope that helps and that your cake turns out amazing 🙂
Hey I was wondering what the measurements would be if i only have 2, 8″ pans?
Hi Aspen,
Great question! I’d recommend making 2/3 of a batch if you want to make 2, 8″ inch cake layers. You can also let some of the batter sit while you bake two layers, then bake the last one once the first two layers are done. Hope that helps, happy baking!