
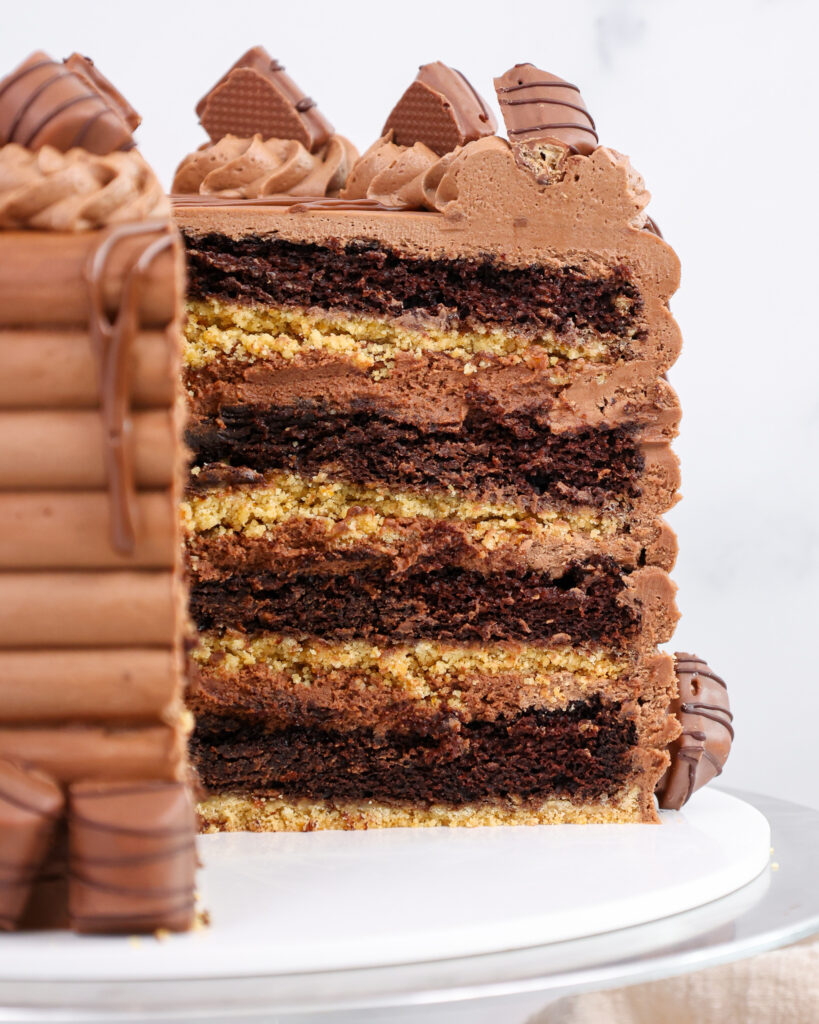
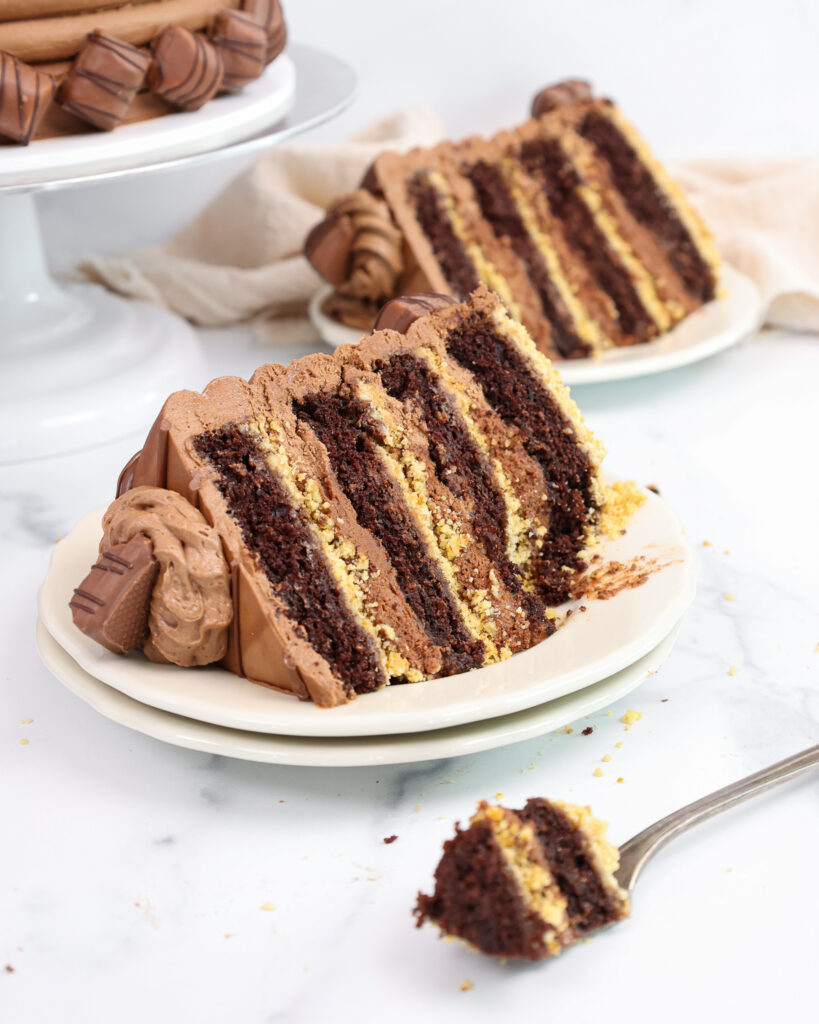
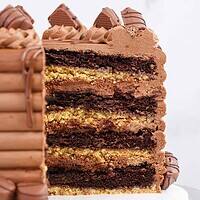
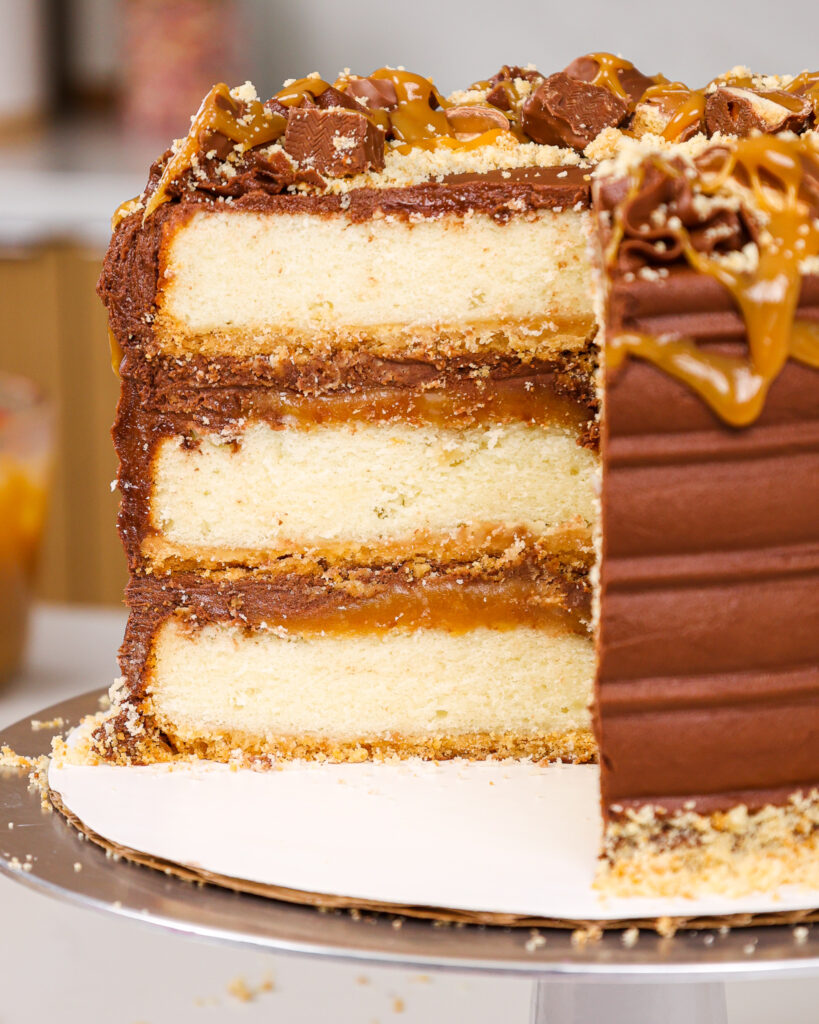
Kinder Bueno Cake
This Kinder Bueno cake tastes just like our favorite candy bar!
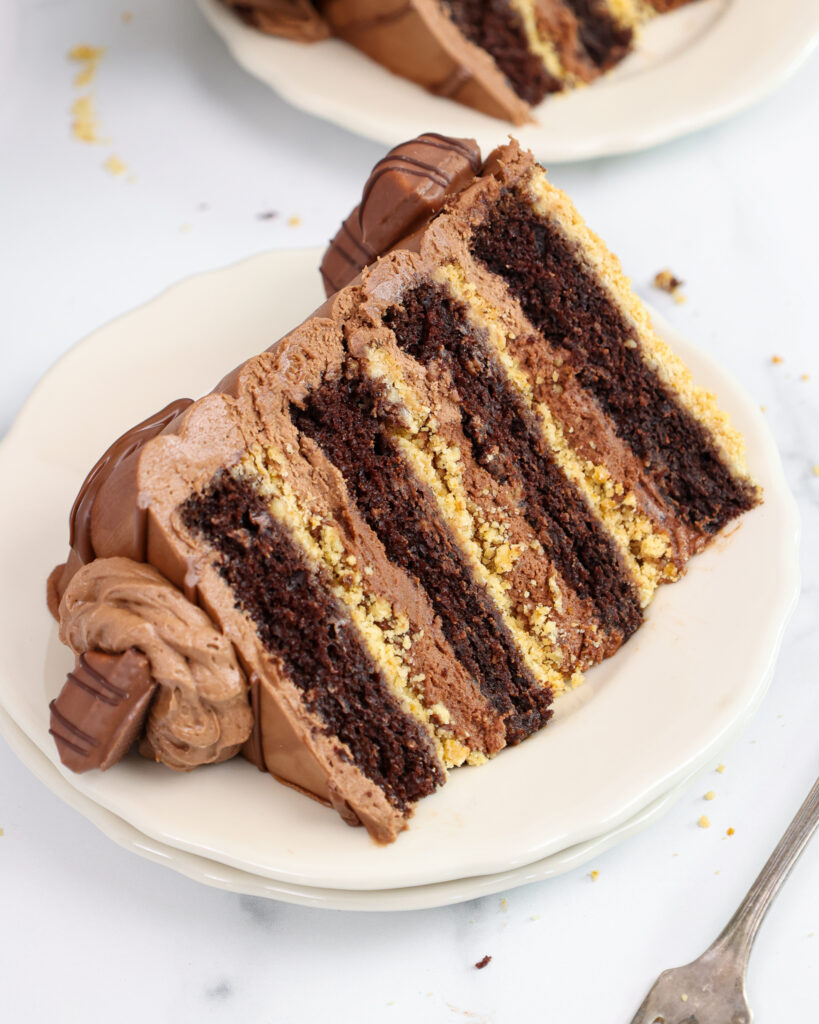
Its shortbread-crusted, moist chocolate cake layers are filled with a fluffy hazelnut mousse and milk chocolate buttercream!!
How to Make This Kinder Bueno Cake
To make sure this cake turns out as amazing as possible, let’s walk through each step together!
Step 1: Make the Hazelnut Mousse Cake Filling
Make the hazelnut mousse filling first so that it has time to set.
This can be made up to 2 days in advance and stored in the fridge.
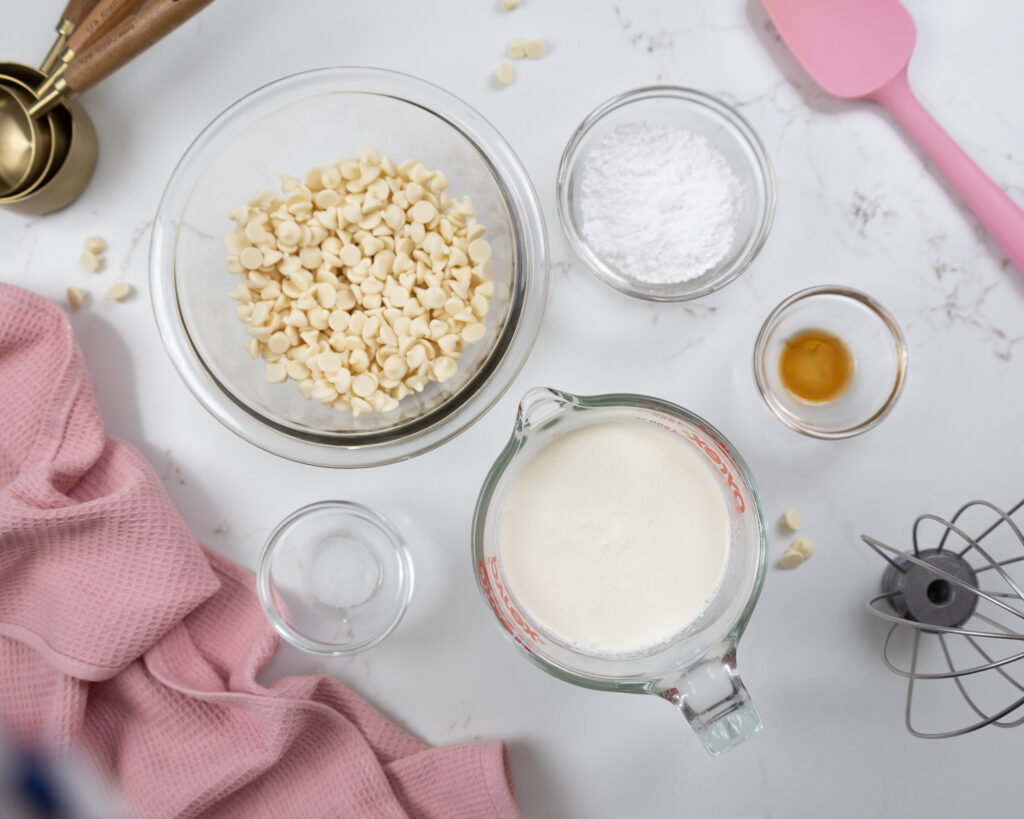
Add the white chocolate chips and 1/2 cup heavy cream to a medium-sized, heat-proof bowl.
Heat for 60-75 seconds in the microwave, then let the mixture sit for a minute. Stir until combined with a rubber spatula. The white chocolate should be completely melted, and the mixture should be smooth.
Mix in the hazelnut paste or Nutella into the white chocolate mixture and stir until combined. Set aside.
Add the remaining heavy cream, powdered sugar, vanilla extract, and a pinch of fine salt to a large bowl or the bowl of a stand mixer fit with a whisk attachment.
Mix on medium-high speed until the whipped cream starts to gather in the whisk attachment and you can see texture around the edges of the bowl.
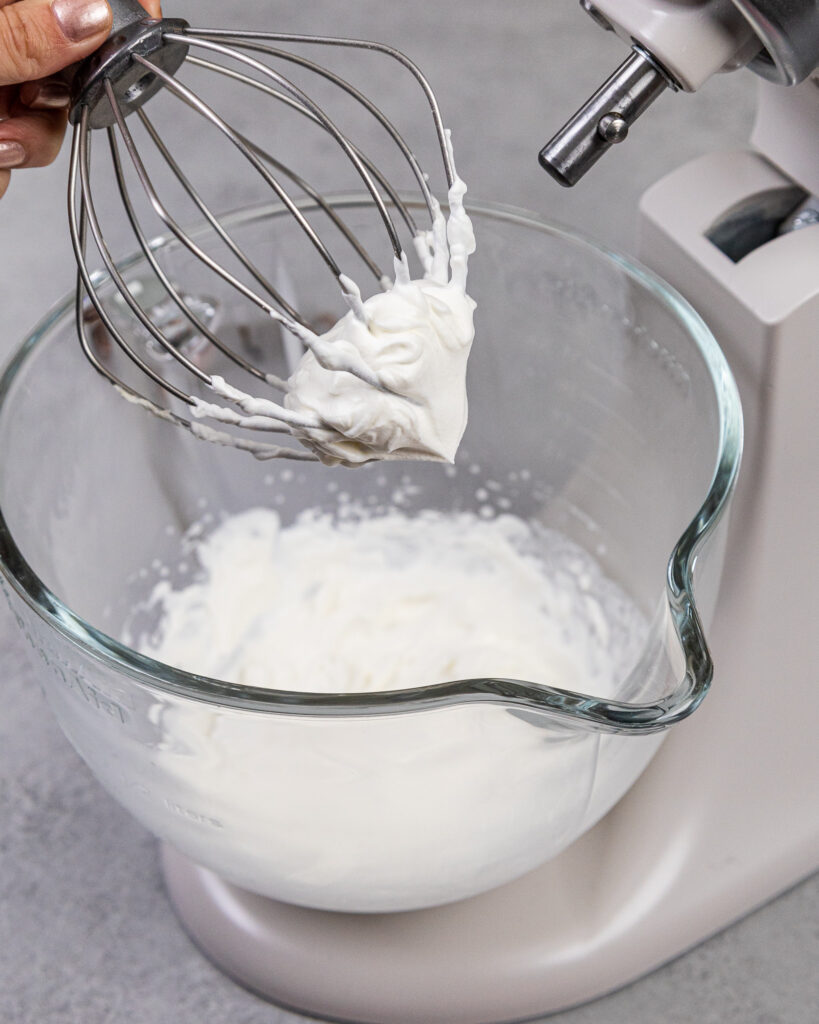
The whipped cream should be thick and able to keep its shape.
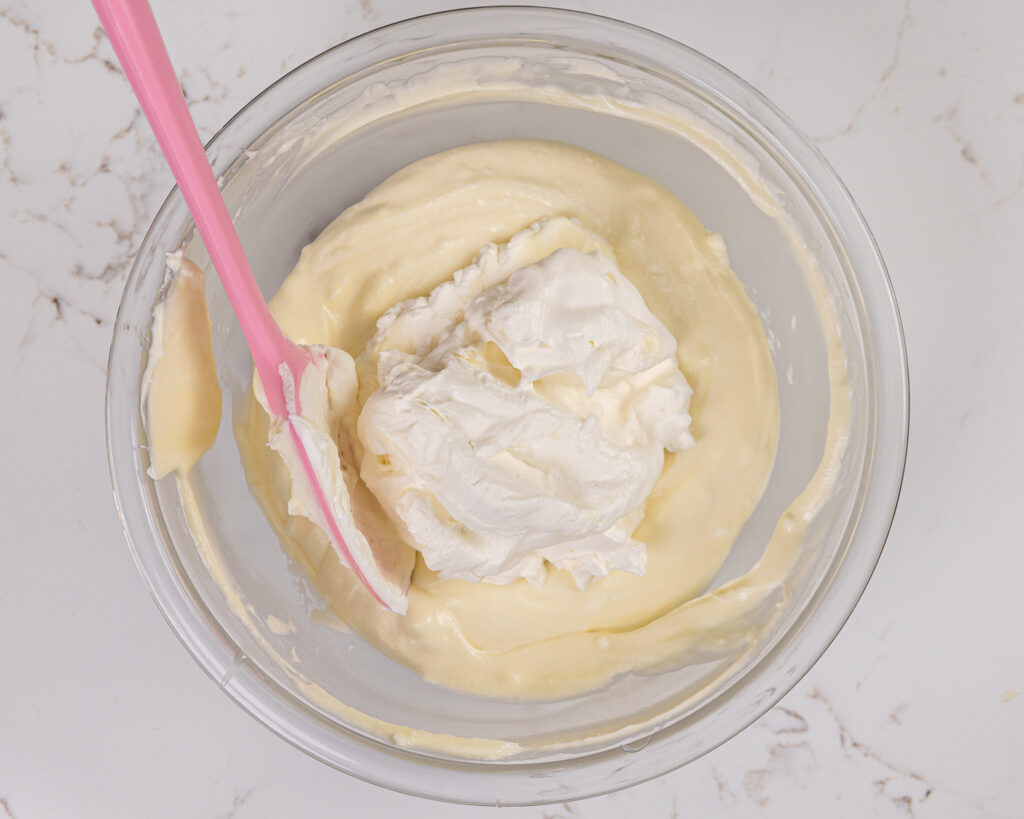
Gently fold half of the whipped cream into the hazelnut white chocolate mixture using a rubber spatula.
Cover the mousse with plastic wrap and chill in the refrigerator for at least 2 hours, or up to 2 days.
If you use Nutella instead of hazelnut paste, the mousse will look darker in color (like in the photo below).
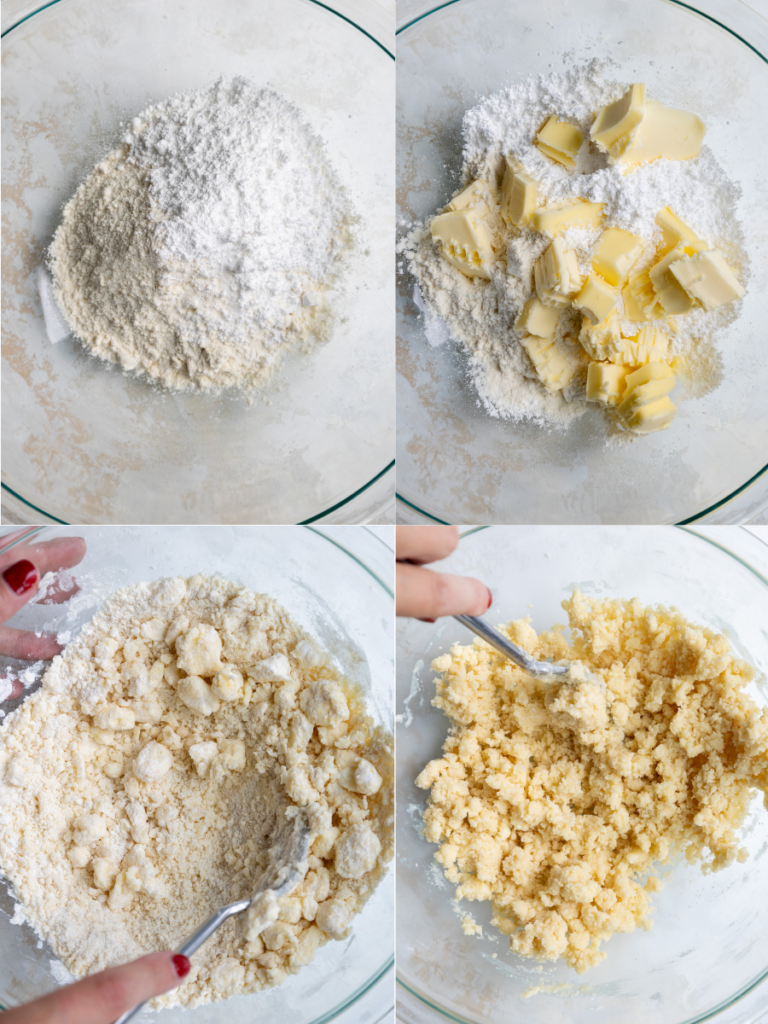
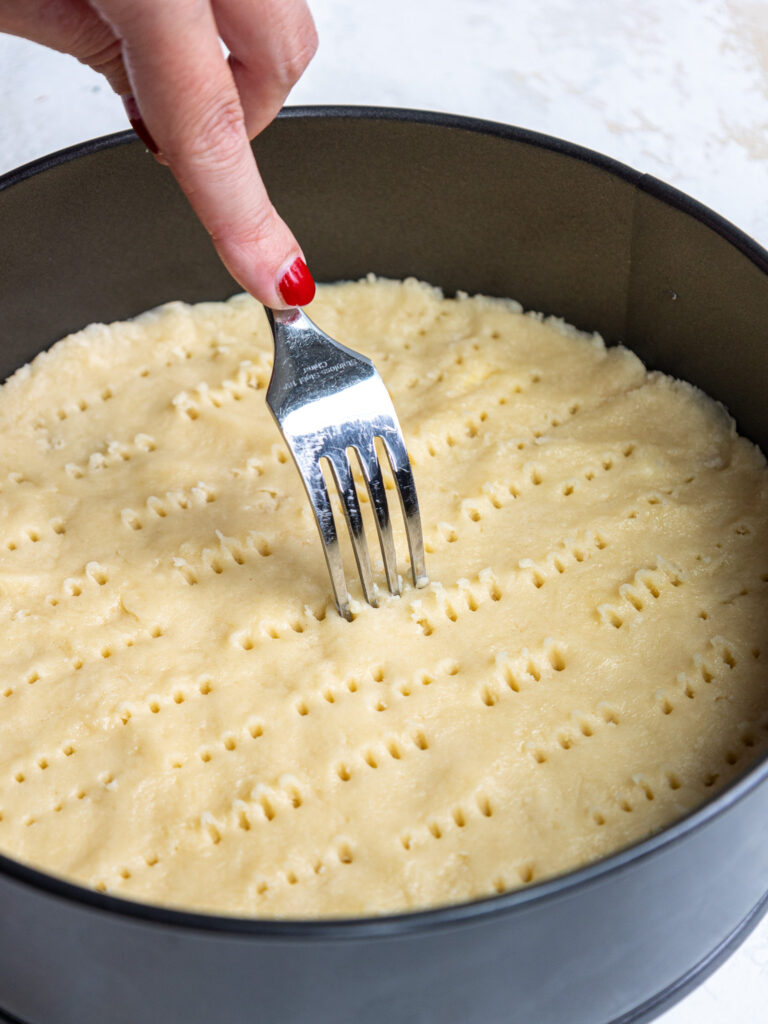
Step 2: Make the Shortbread Crust
Next, make the shortbread-crusted vanilla cake layers!
Divide the dough into three equal portions and press them into the bottom of the prepared pans with your fingers to create an even layer.
Prick the crust thoroughly with a fork, then bake for 22-25 minutes, or until the edges are just starting to brown.
Place the pan on a wire rack to cool and keep the oven.
Step 3: Make the Chocolate Cake Batter
Then we make the chocolate cake batter! Pour the batter on top of the baked shortbread crusts, dividing the batter evenly between the pans.
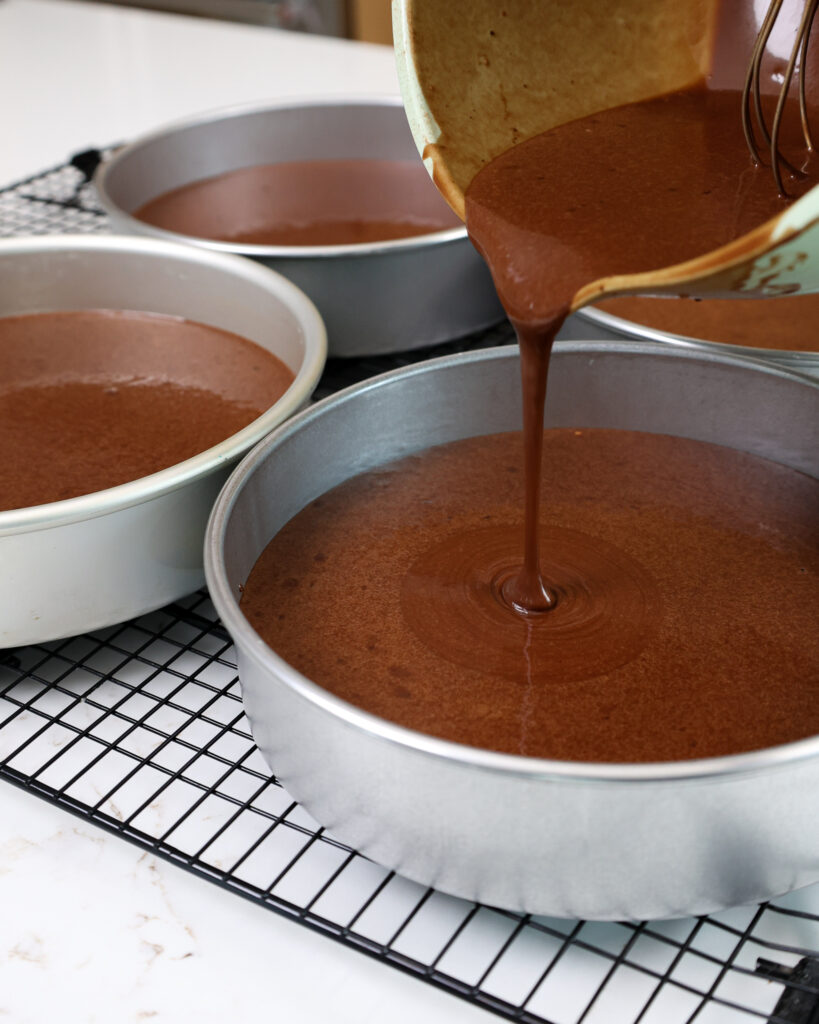
Bake for 28-32 minutes or until a toothpick comes out with a few moist crumbs. Rotate the pans halfway through to help them bake evenly.
Remove the cake layers from the oven and let them cool in the pans for about 10 minutes.
Gently run an offset spatula around the rim of the cake pans to loosen them. Be careful as you do this so that you don’t break up the shortbread crust at the bottom!
Carefully flip them onto wire racks to finish cooling. Once the cake layers have cooled to room temperature, use a serrated knife to level the top of each cake layer.
It makes the cake so much easier to stack and assemble!! If you’re making these in advance, you can wrap and freeze them at this point.
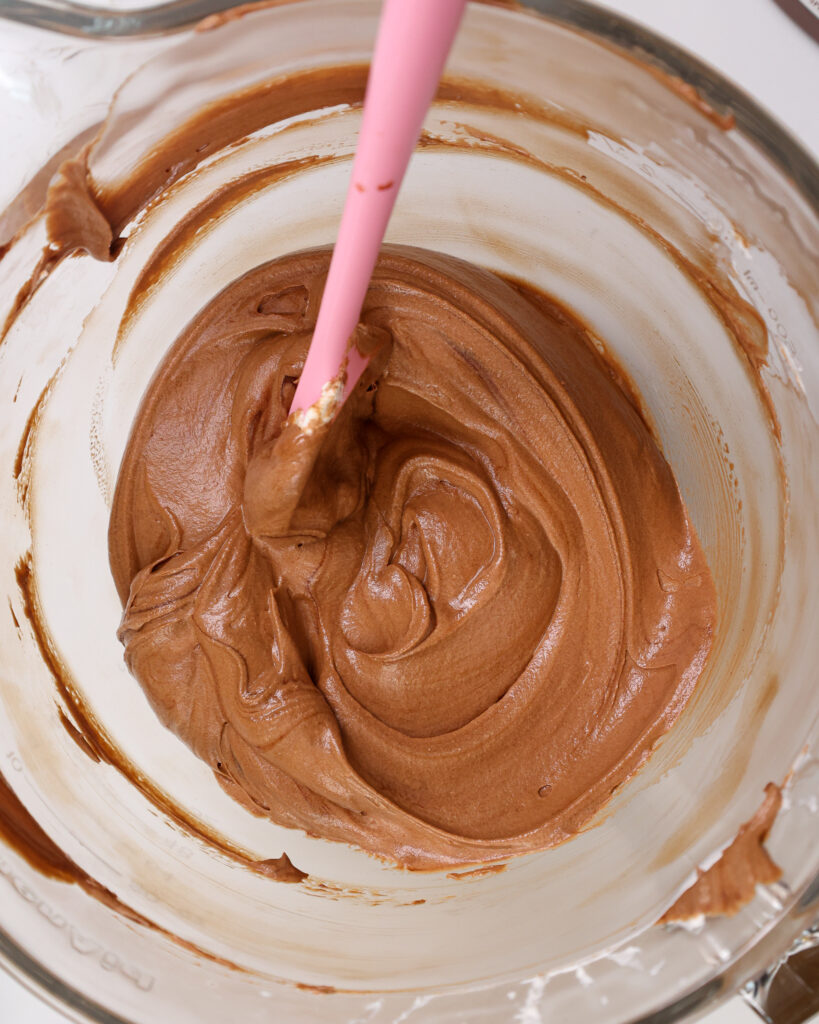
Step 4: Make the Chocolate Hazelnut Buttercream
While the cake layers bake and cool, make the chocolate hazelnut buttercream.
Mix the frosting on the lowest speed with a paddle attachment once it’s made to push out any excess air.
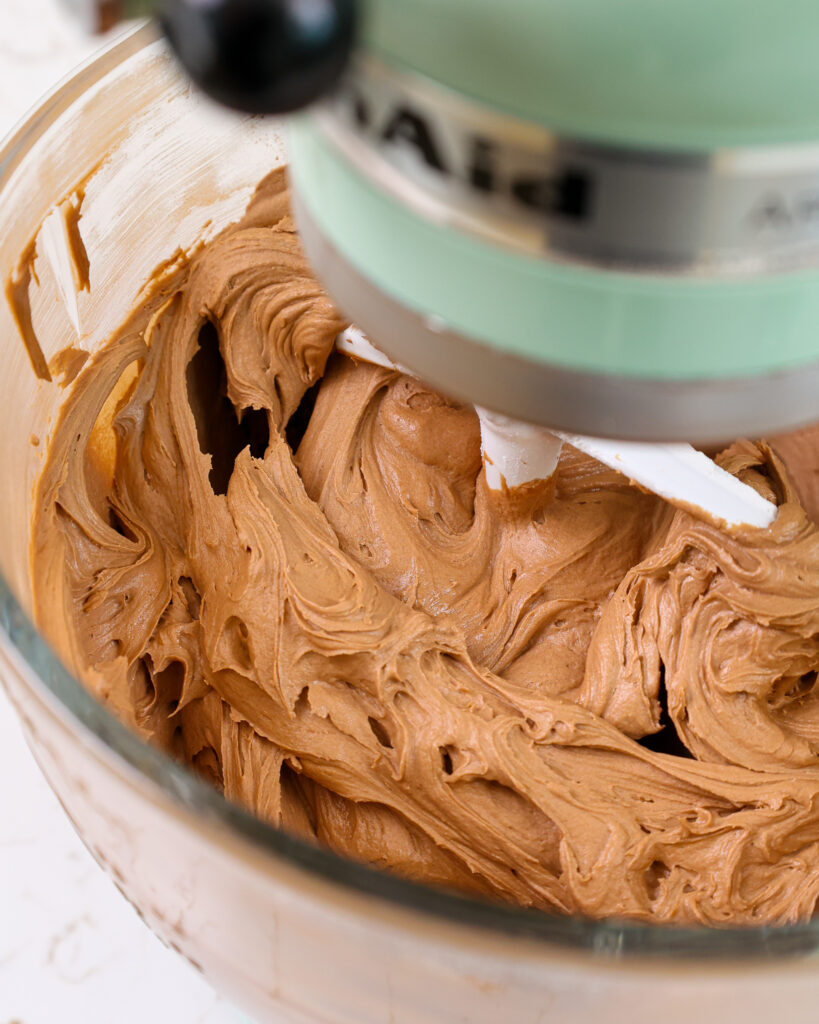
I also like to stir it by hand with a rubber spatula once it’s fully made. This makes the frosting silky smooth and easier to smooth onto your cake.
This frosting can also be made in advance if needed and kept in the fridge for up to a month.
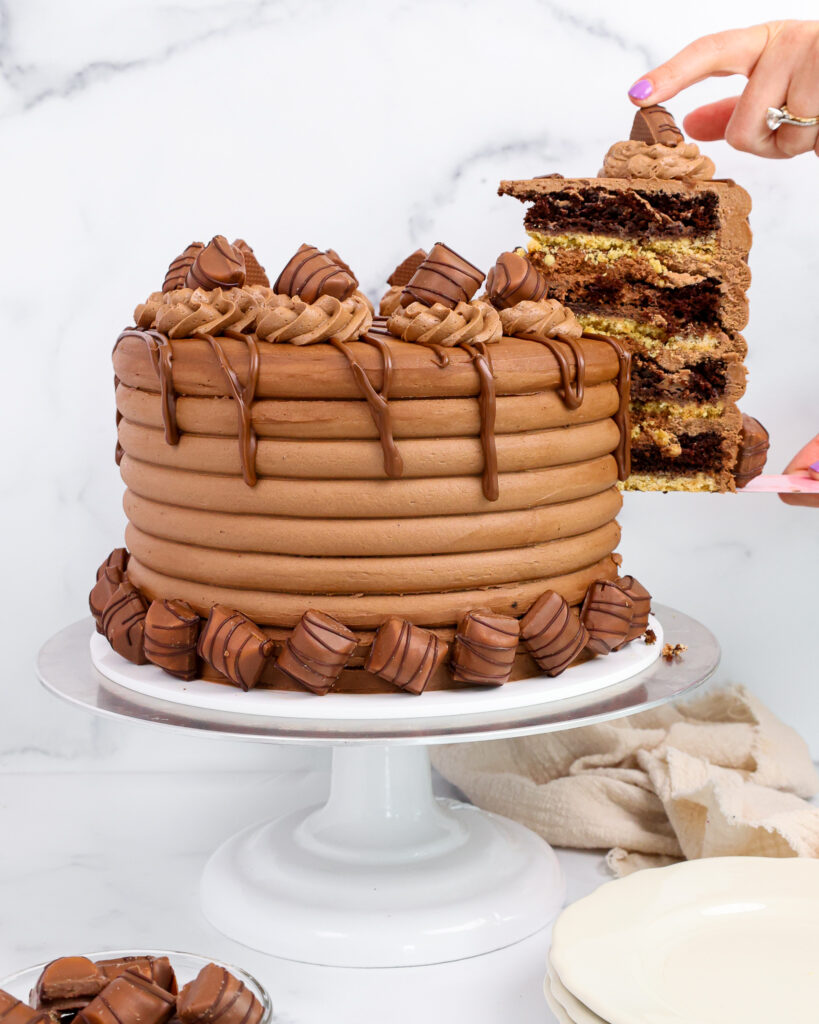
Step 5: Stack and Fill the Cake Layers
Stack and frost the cake layers on a greaseproof cake board. Use a dab of chocolate buttercream to help stick the first cake layer to the board (crust side down).
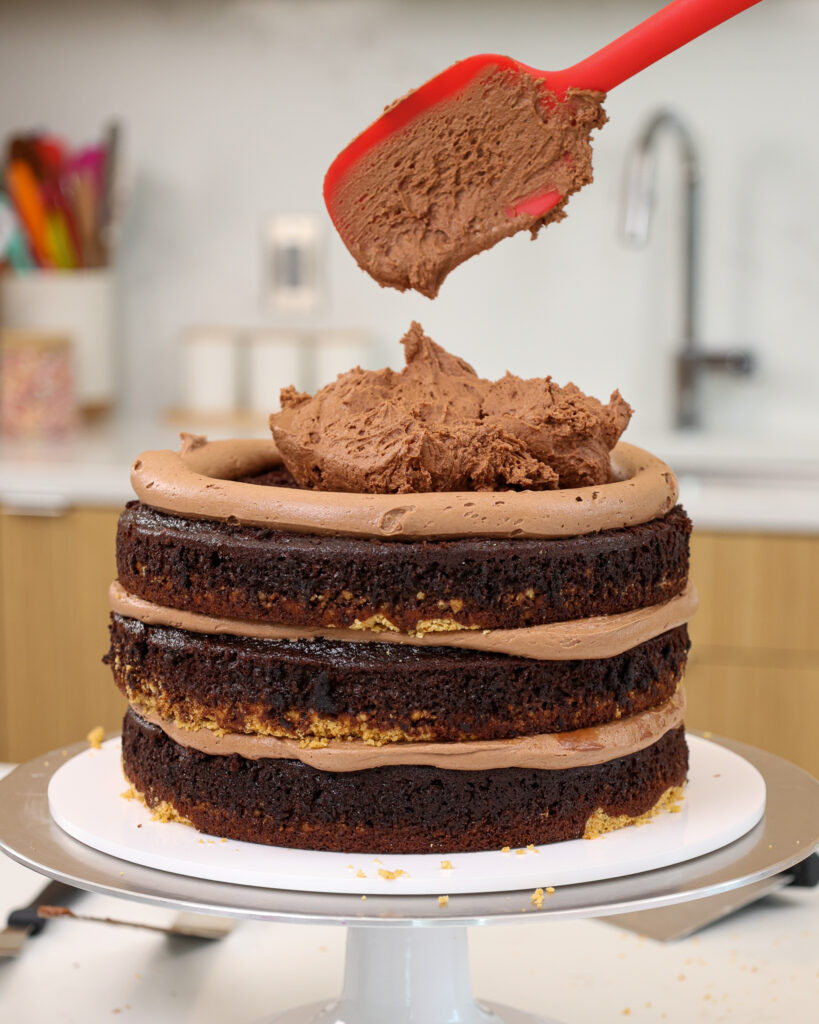
As you assemble the cake, pipe a ring of chocolate buttercream around each cake layer. Spread about 1/3 of the hazelnut mousse inside each buttercream ring.
Sprinkle two, roughly chopped Kinder Bueno bars over the top of the mousse. Repeat with the remaining cake layers.
Step 6: Crumb Coat the Cake
Once you’ve stacked the cake layers, smooth a thin coat of chocolate buttercream around the cake with an offset spatula and bench scraper.
Chill the cake for about 10 minutes in the freezer or 30 minutes in the fridge, until the frosting is firm to the touch.
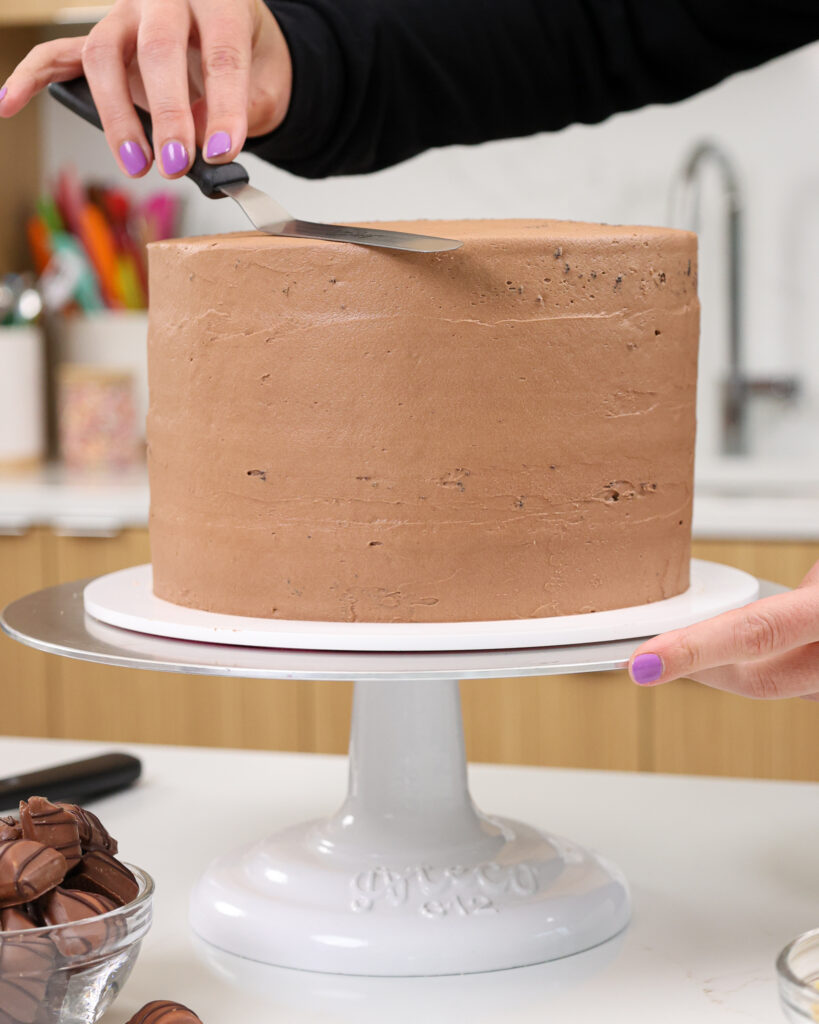
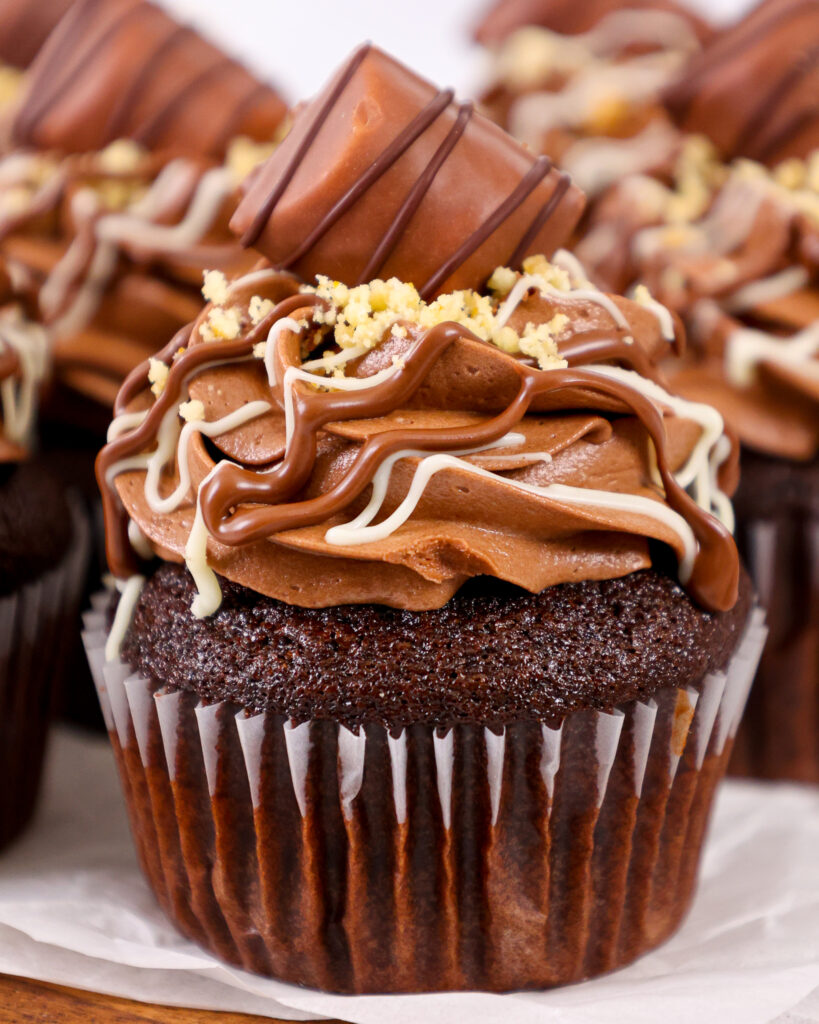
Step 7: Frost and Decorate the Kinder Bueno Cake
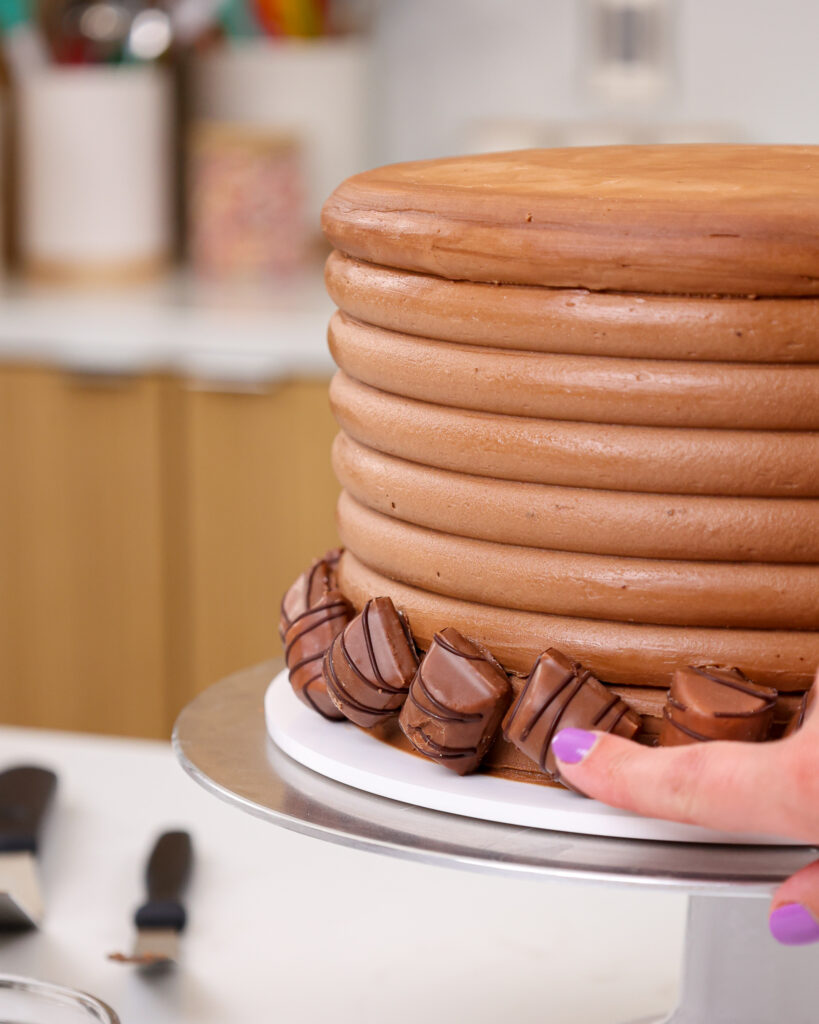
Cover the cake with a second, thicker layer of chocolate hazelnut buttercream and smooth using a bench scraper or icing comb.

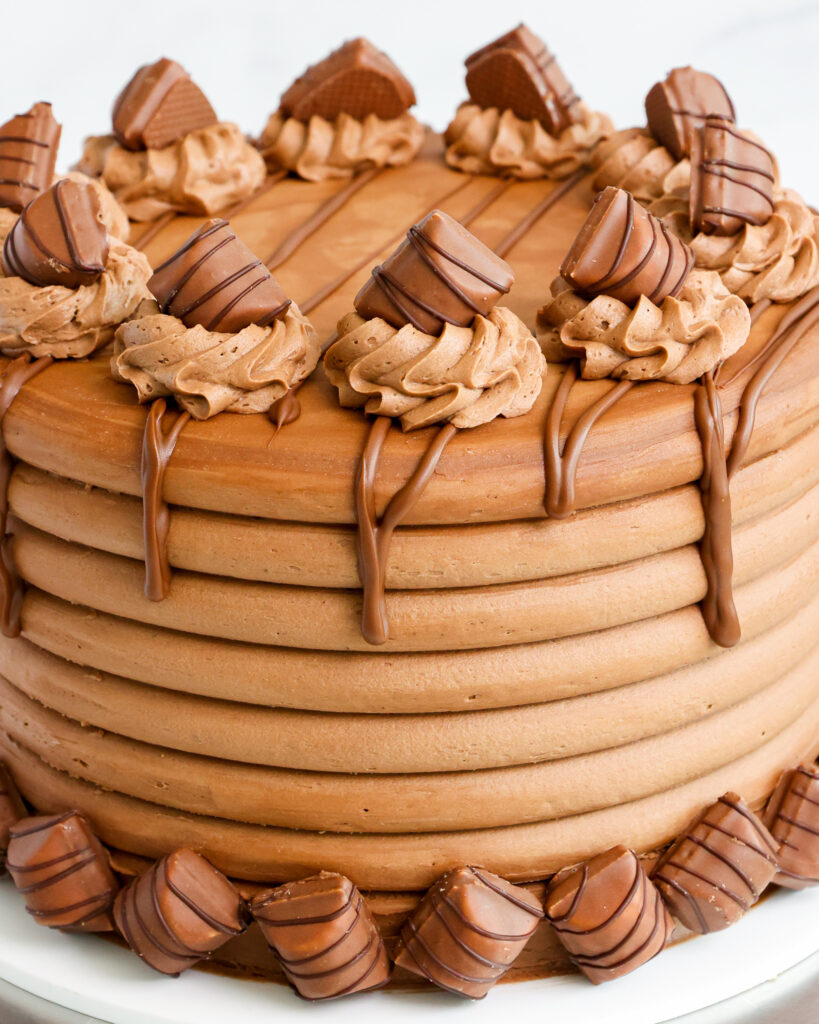
Press a row of mini Kinder Bueno bars around the base of the cake.
Place 1/3 cup of Nutella in a small piping bag and heat in the microwave for 15-20 seconds, or until it’s a thinner consistency.
Drizzle over the top of the cake.
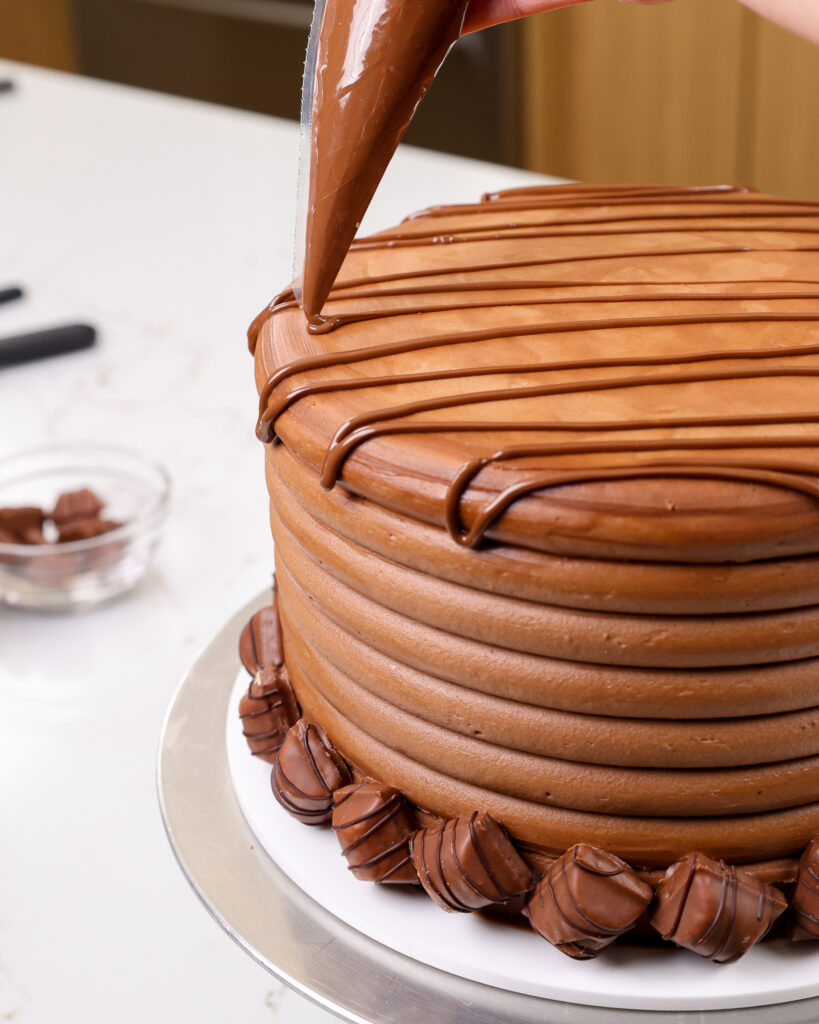
Use the leftover buttercream to pipe swirls on top of the cake (I used an Ateco 828 piping tip, but any open star tip will work great).
Top each swirl with a mini Kinder Bueno bar, then enjoy!
Substitutions & Swaps – Kinder Bueno Cake
Some swaps and substitutions that can be made in this recipe include:
- All-Purpose Flour– This recipe turns out best with all-purpose flour. However, you can swap in a good gluten-free flour blend (like this) if needed. Just be sure to stir the batter longer than normal to help give the cake proper structure, and let the batter sit for about 20 minutes before baking it if you opt to make a gluten-free version.
- Large Eggs – If you have an egg allergy, you can try using a vegan egg replacer or flaxseed eggs.
- Buttermilk – You can also use full-fat yogurt, sour cream, whole milk, or an alternative yogurt or milk (almond, soy, oat) if needed.
- Vegetable Oil – Use any flavorless oil in this recipe.

Substitutions & Swaps: Chocolate Hazelnut Buttercream
- Unsalted Butter – If you only have salted butter on hand, you can use it in place of the unsalted butter. Just be sure to omit the salt that this frosting recipe calls for. You can also use vegan butter in its place!
- Hazelnut Paste – To really make this cake taste like a Kinder Bueno bar, you have to use hazelnut paste in the frosting and mousse filling!! I order mine online. If you can’t get your hands on hazelnut paste, Nutella can be used in its place.
- Heavy Cream – You can use whole milk or alternative milk (soy, almond, oat) instead of heavy cream or whipping cream. This will thin the frosting out more, though, so I recommend using about half the amount the recipe calls for.
- Nutella – I like using Nutella to flavor this buttercream, but you can also use any brand of chocolate hazelnut spread or straight hazelnut paste.
Tips for Making the Best Chocolate Kinder Bueno Cake
- To really make this cake taste like a Kinder Bueno bar, you have to use hazelnut paste in the frosting and mousse filling!! I order mine online.
- Ingredients at room temperature mix together better! Set out any cold ingredients ahead of time.
- Properly measure your flour (spoon into the cup measure, then level). Or better yet, use a kitchen scale to measure your dry ingredients.
- Use a scale to weigh your cake pans as you fill them. It will make your cake layers bake to the same height and bake more evenly.
- Level your room temperature or thawed cake layers with a serrated knife to make them easier to stack.
- Chill your cake layers in the freezer for about 20 minutes before assembling the cake. It makes it so much easier to stack and frost them!
Making This Kinder Bueno Cake in Advance and Storage Tips
You can make the cake layers in advance and freeze them. It breaks the process up and makes it more approachable.
You can also make the chocolate hazelnut frosting ahead of time or save any leftover frosting. Store it in an airtight container in the fridge for up to a month.
Just be sure to give it a good stir once it thaws to make it nice and smooth again. This cake can last in the fridge for up to a week.
A frosted cake can last in the fridge for up to a week, or in the freezer up to a month. If you freeze the cake, transfer it to the fridge the night before you plan to eat it.
This will help it gradually thaw and minimize any temperature shock. Remove the cake from the fridge about 30 minutes before you plan to cut into it.
Let Me Know What You Think
If you try this kinder bueno cake recipe, I’d love to hear what you think! Please leave a rating below and comment below.
Don’t forget to tag me @chelsweets and use #chelsweets on social media so I can see your amazing creations!
Kinder Bueno Cake
Ingredients
Hazelnut Mousse Cake Filling
- 1 1/3 cups good quality white chocolate chips 215g
- 1 1/2 cups heavy cream or heavy whipping cream, cold – divided 360ml
- 1/2 cup Hazelnut Paste or Nutella 140g
- 1/4 cup powdered sugar 30g
- 1 tsp vanilla extract or vanilla bean paste 4ml
- pinch fine salt less than 1/8 tsp
Shortbread Base
- 1 1/2 cups (3 sticks) unsalted butter, room temperature 339g
- 3 cups all-purpose flour 375g
- 3/4 cup powdered sugar 95g
- 1 tsp fine salt 6g
Moist Chocolate Cake Recipe
- 2 1/2 cups all-purpose flour 325g
- 2 1/2 cups granulated sugar 500g
- 1 cup unsweetened cocoa powder, sifted 100g
- 2 1/2 tsp baking powder 10g
- 2 tsp baking soda 12g
- 1 tsp fine salt 6g
- 1 1/4 cup water, warm 300g
- 1 1/4 cup buttermilk, room temperature 300g
- 2/3 cup vegetable or canola oil 145g
- 3 large eggs, room temperature 168g
- 2 tsp vanilla extract or vanilla bean paste 8g
Chocolate Hazelnut Buttercream Frosting
- 2 cups (4 sticks) unsalted butter, room temperature 452g
- 1/2 cup unsweetened natural baking cocoa, sifted 50g
- 1/2 cup Nutella 140g
- 1 tsp vanilla extract or vanilla bean paste 4g
- 1/2 tsp fine salt 3g
- 6 cups powdered sugar 750g
- 1/2 cup heavy whipping cream, room temperature 120g
Cake Filling and Decoration
- 1/3 cup Nutella, warmed 94g
- 6 full sized Kinder Bueno Bars, roughly chopped
- 32 Mini Kinder Bueno bars
Recommended Tools
- 8- inch cake pans
- Spinning cake stand
- 10- inch greaseproof cake board
- Large offset spatula
- Electric hand mixer or stand mixer
- Icing Comb
Instructions
Hazelnut Mousse Cake Filling
- Make the mousse filling first so that it has time to set.
- Add 1 1/3 cups of white chocolate chips and 1/2 cup heavy cream in a medium-sized, heat-proof bowl. Heat for 60-75 seconds in the microwave, then let the mixture sit for a minute. Stir until combined with a rubber spatula. The white chocolate should be completely melted, and the mixture should be smooth. If you don't have a microwave, you can also use a double boiler.
- Mix 1/2 cup of hazelnut paste or Nutella into the white chocolate cream mixture and stir until combined. Set aside.
- Add 1 cup heavy cream, 1/4 cup powdered sugar, 1 tsp vanilla extract, and a pinch of fine salt in a large bowl or the bowl of a stand mixer fit with a whisk attachment.
- Mix on medium-high speed until the whipped cream starts to gather in the whisk attachment and you can see texture around the edges of the bowl. The whipped cream should be thick and able to keep its shape. This usually takes about 2 1/2 to 3 minutes in my stand mixer.
- Gently fold half of the whipped cream into the white chocolate cream mixture using a rubber spatula. Use the spatula to swoop around the sides of the bowl and pull through the center with each pass. Fold in the remaining half of the whipped cream. Be careful not to over-mix the mousse, or it will become deflated and lose its structure.
- Cover the mousse with plastic wrap and chill in the refrigerator for at least 2 hours, or up to 2 days.
Shortbread Crust
- Next, work on the shortbread crust. Preheat the oven to 350°F / 175°C. Spray 3, 8-inch cake pans with nonstick spray, then line with parchment rounds.
- Use a fork or pastry cutter to combine 1 1/2 cups softened butter, 3 cups flour, 3/4 cup powdered sugar, and 1 tsp fine salt. It should form a slightly crumbly dough once combined.
- Divide the dough into three equal portions and press them into the bottom of the prepared pans with your fingers to create an even layer.
- Prick the crust thoroughly with a fork, then bake for 22-25 minutes, or until the edges are just starting to brown. Place the pan on a wire rack to cool and keep the oven.
- Chocolate Cake Layers
- Sift or whisk together 2 1/2 cups flour, 2 1/2 cups sugar, 1 cup cocoa powder, 2 1/2 tsp baking powder, 2 tsp baking soda, and 1 tsp salt into a large bowl.
- Add 1 1/4 cups warm water, 1 1/4 cups buttermilk, 2/3 cup oil, 3 eggs, and 2 tsp vanilla into a separate large bowl and whisk together until combined.
- Mix the dry ingredients into the wet ingredients until they're incorporated, and the batter is smooth.
- Pour the batter evenly between the prepared pans on top of the baked shortbread crusts. Bake for about 28-32 minutes in the preheated 350 F / 175 C or until a toothpick comes out with a few moist crumbs.
- Remove the cake layers from the oven and let them cool in the pans for about 10 minutes. Gently run an offset spatula around the rim of the cake pans to loosen them, then carefully flip them into wire racks to finish cooling. Leave the parchment rounds underneath each crust to help keep it intact.
- Once cooled, use a serrated knife to level the top of each cake layer. If you are making these cake layers in advance, wrap and freeze them at this point. These can be made up to a month in advance.
Chocolate Hazelnut Buttercream Frosting
- Next, make the chocolate hazelnut buttercream. Beat the butter on a medium speed for 30 seconds with a paddle attachment until smooth.
- Add in 1/2 cup Nutella, 1/2 cup sifted cocoa powder, 1 tsp vanilla extract, and 1/2 tsp salt. Mix on low until the ingredients are fully incorporated.
- Slowly mix in 6 cups of powdered sugar. Halfway through, add in 1/2 cup of heavy cream to make the frosting easier to mix.
- Mix on a low speed until the ingredients are fully incorporated and the desired consistency is reached. Cover with plastic wrap to prevent crusting and set aside.
Assembling This Kinder Bueno Cake
- Stack and frost cake layers on a greaseproof cake board or a flat plate, using a dab of chocolate buttercream to help stick the first cake layer to the board.
- As you assemble the cake, pipe a ring of chocolate buttercream around each cake layer. Spread about 1/3 of the hazelnut cake filling inside the buttercream ring. Top with 2 roughly chopped Kinder Bueno bars.
- Repeat with the remaining cake layers. Smooth any overhanging buttercream around the cake with a large offset spatula. Then chill the cake for about 10 minutes in the freezer or 30 minutes in the fridge. This will help the filling between the cake layers firm up and make the cake easier to frost.
- Spread a thick layer of chocolate buttercream around the cake and smooth using a bench scraper or icing comb. Press a row of mini Kinder Bueno bars around the base of the cake.
- Place 1/3 cup of Nutella in a small piping bag and heat in the microwave for 15-20 second, or until it's a thinner consistency. Drizzle over the top of the cake.
- Use the leftover buttercream to pipe swirls on top of the cake (I used an Ateco 828 piping tip, but any open star tip will work great). Top each swirl with a mini Kinder Bueno bar, then enjoy!
Video
Notes
My Tips for Making the Best Kinder Bueno Cake
- Ingredients at room temp mix together better! Set out any cold ingredients ahead of time.
- Properly measure your flour (spoon into the cup measure, then level). Or better yet, use a kitchen scale to measure your dry ingredients.
- Use a scale to weigh your cake pans as you fill them. Make sure each pan has the same amount of batter will make your cake layers bake to the same heigh and bake more evenly.
- Level your room temperature or thawed cake layers with a serrated knife to make them easier to stack.
- Chill your cake layers in the freezer for about 20 minutes before assembling the cake. It makes it so much easier to stack and frost them!
Making This Kinder Bueno Cake in Advance & Storage Tips
- Make your cake layers in advance and freeze them. It breaks the process up and makes it more approachable.
- Make your chocolate frosting ahead of time or save any leftover frosting! It can be stored in an airtight container in the fridge for up to a month. This frosting can also be stored in the freezer for up to 3 months! Just be sure to give it a good stir once it thaws to make it nice and smooth again.
- A frosted cake can last in the fridge for up to a week, or in the freezer up to a month. If you freeze the cake, transfer it to the fridge the night before you plan to eat it. This will help it gradually thaw and minimize any temperature shock. Remove the cake from the fridge about 30 minutes before you plan to cut into it.
Nutrition
Other Recipes You Might Like:
Hey Chelsweets! your blog and recipes are awesome! Do you have any tips on recipe developing? Advice would be much appreciated. Thank you!
Hi Rachel! I have lots of tips!! It mostly comes down to lots of research and experimenting. It also helps to develop a handful of base recipes that can be built up or leveraged when you’re working on different flavor combinations. I really should write a post on it!!
Hello there, amazing cake1 how many cakes layers did you make ? 2 of 8″ nd you torte them or more? I’m thinking of making it into 6″ layers, what do you recommend? I usually make recipes of 1 of 8″ cake into 2 pans 6″ inch and got a thin short layer .
Hi there I love your recipes.I have a question Can I use a fondant on this cake??
hello!
At what temperature should the cake be baked?
Apologies for the confusion!! It bakes at the same temperature as the shortbread crust. I’ve updated the recipe card to make this more clear. Thank you for bringing this to my attention. Happy baking 🙂
If using hazelnut paste, would you use the same amount in the buttercream as Nutella?
Hi Kelly,
Great question! Yes, you can use the same amount of hazelnut paste as Nutella in the buttercream 🙂 Happy baking!
@Chelsweets, thank you so much for replying! The cake turned out amazing!
Yay! I’m so happy to hear that Kelly!! 🙂
My mousse is runny. Hasn’t set yet, can I whip it a little after its cooled?
Hi Jess,
So sorry to hear that! It should firm up a bit as it cools, so I’d recommend letting it chill and then checking the texture. It can’t really be whipped up again, because the more you mix it at that point the more it will deflate the whipped cream that’s already in it:/ Hopefully it gets firmer in the fridge! If it doesn’t, you could try whipping up a bit more heavy cream and gently folding it in to try to fluff it up.
I hope it ended up turning out ok!!
Great recipe and more than enough Buttercream for the layers. And the mousee is awesome as well. Didn’t change anything
This comment put the biggest smile on my face 🙂 Thank you Marie!!
Does the freezer method still work with the shortbread crust in the bottom?
Hi Christina,
You can still freeze these cake layers, even with the shortbread crust! You just have to be a bit gentle when handling them. Hope that helps, happy baking!
The cake looked AND tasted amazing! My family really loved it. However, it certainly took much longer than the stated time to prepare!
So happy to hear that Gigi!!! It definitely is a time consuming cake with all the different components to it, I feel ya! Thank you for sharing 🙂
This cake was delicious and I got rave reviews. My only issue was that when I cut the cake, the shortbread crust broke into big chunks and tore through my cake. Are there any tips to avoid this happening because I definitely plan to make it again. Thanks.
@Kristine,
Hi the same issue happened with me..pls guide us regarding this problem..
I made this for my sister’s 19th birthday and it was an absolute hit! We were all absolutely obsessed, this is such a delicious cake and perfect for kinder bueno lovers! I did however make a few adjustments based off some comments I read and also just personal preference. — I made 2 layers instead of 3 and only did the shortbread on the bottom layer. I wanted to ensure a smooth cut all the way through and think it worked perfectly! I also split the frosting recipe in half and the amount was just what I needed. Spectacular find, thank you so much!!
Hi Mary,
I am so happy to hear you all loved this recipe so much! And I totally get making the adjustments you did, it’s great that you were able to make it to match your preferences 🙂 Thank you for sharing!!
Hi Mary
Did you also make the adjustment to the quantities when doing in 2 pans only instead of 3?
Hi Chelsea! Can I make my own hazelnut paste? If so, would you recommend a simple hazelnut paste or praline paste?
Hi Hannah,
Yes, you can definitely make homemade hazelnut paste. Just roast your hazelnuts at 350°F for about 10–12 minutes until fragrant, rub off as much of the skins as possible in a clean kitchen towel, then blend them in a high-powered food processor until they turn into a smooth, drippy paste. It takes a few minutes, and you’ll need to stop and scrape the bowl a couple times, but they’ll release their natural oils and smooth out.
As for whether to make a simple hazelnut paste or a praline paste, it depends on the recipe. A simple hazelnut paste is just ground hazelnuts and gives you pure, nutty flavor without added sweetness. A praline paste is made by blending hazelnuts with caramelized sugar, so it’s sweeter and has a deeper, slightly toasty caramel flavor.
This recipe already has a decent amount of sugar, so I’d probably stick with plain hazelnut paste so you don’t throw off the sweetness level. But you could use praline paste if you prefer! Hope that helps, happy baking!!
Hi! I’m excited to make this. Is the unsweetened natural baking powder for the frosting the same as the unsweetened cocoa powder in the cake?
Hi Yvonne,
It is!! Hope that helps, happy baking!
Hi, I have a question about the number of layers. instructions says 3 layers but videos and photos show 4 layers. I’m making this for my daughter’s 18th Birthday this week.
Hi Carrie,
In the past I’ve made this recipe in 7 inch pans and made 4 layers, but since most people don’t have that size of cake pan, I’ve updated the recipe to make 3, 8-inch layers. Hope that helps, happy baking!
Yes, thank you!