
Grinch Cake
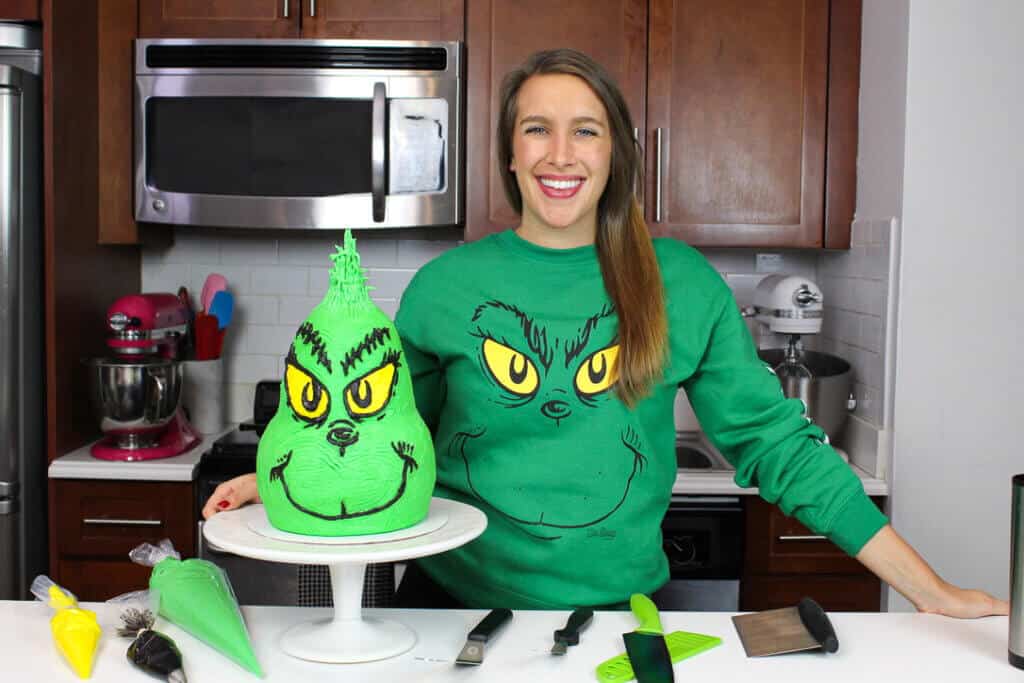
The creation of this Grinch cake started with the purchase of a very silly grinch sweatshirt. It was $10 and the sleeve said “naughty.”
I chuckled the second I saw the sweatshirt and was able to move past the writing on the sleeve. It was an impulse purchase but one I don’t regret.
I love the Grinch, and watch it almost every holiday season. I actually watched all three versions of the Grinch while making this cake and my Grinch cupcakes, and it really warmed my heart.
The sweatshirt was exactly the push I needed to finally make a Grinch Cake. But once I’d made up my mind, I had a few things I needed to figure out.
Which Version of The Grinch?
The Grinch has had many looks over the years. He’s been a classic cartoon (1966), a person (2000), and an animated grump (2018). However, in my mind he’ll always be the classic, whimsical, Dr. Seuss version.
Lucky for me, that’s the Grinch that was on my sweatshirt! While that version is a bit scarier looking (and more evil in the movie), it also is more iconic. More importantly, it’s easier to pipe with buttercream!
What Flavor is The Grinch Cake?
Once I had a game plan for decorating the cake, I needed to figure out the cake flavor. I took a poll on my Instagram, and the votes came down to pistachio and banana.
Pistachio because it’s naturally green, and banana because of that memorable song line from the movie (You’re a bad banana with a greasy black peel!).
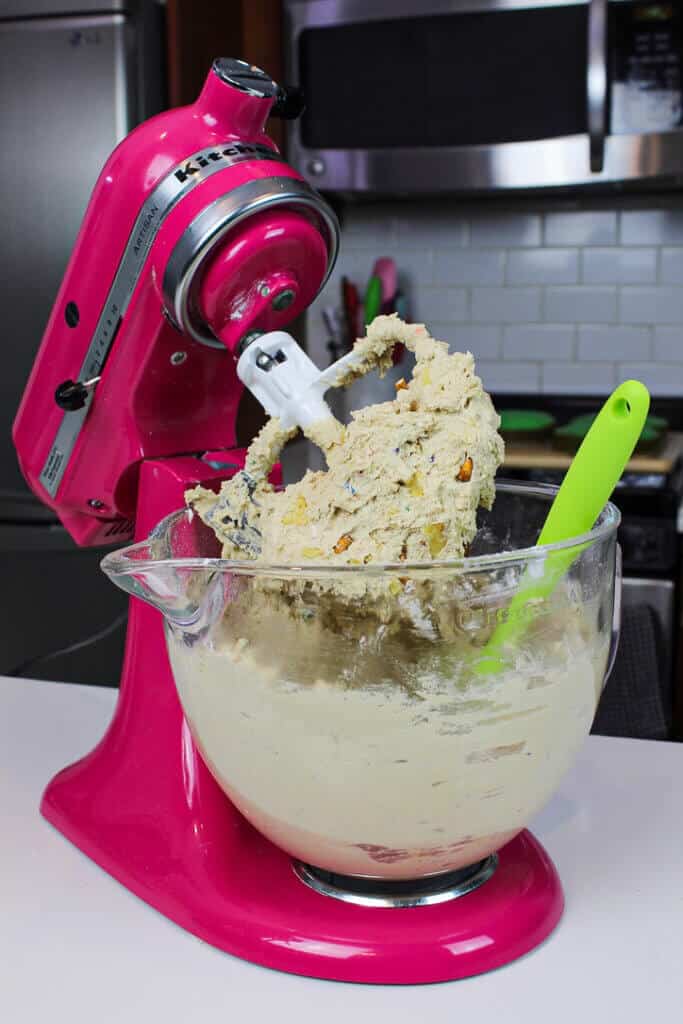
But then my good friend Robert suggested a genius flavor. A cake flavor inspired by Christina Tosi‘s compost cookie!!
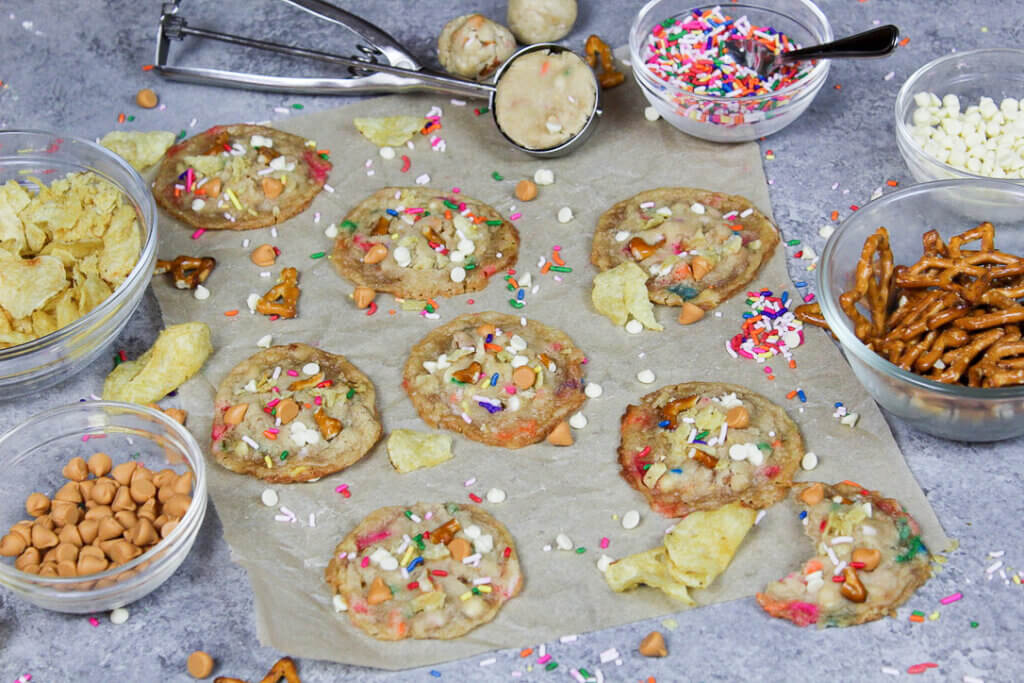
For those of you who haven’t tried compost cookies before, they are incredible. These cookies have just about everything in them but the kitchen sink!
They have all the makings of a normal cookie, plus butterscotch chips, potato chips, graham cracker crumbs, oats, and even pretzels. It’s a wonderful combination of salty and sweet, just like the Grinch.
Not only is it delicious, I also loved the name! I associate the word compost with garbage, and the Grinch eats garbage. It all just seemed so fitting for this cake.
The Edible Compost Cookie Dough Filling
While the normal compost cookie recipe calls for oats, I decided to omit them from my cookie dough filling.
Since this edible cookie dough wasn’t going to be baked, I was worried the texture of raw oats in the cake filling might be a bit off putting.
I also decided to add in some rainbow sprinkles for a pop of color, and swapped the chocolate chips for mini white chocolate chips.
Surprisingly, the butterscotch chips and potato chips are really what make this cookie so irresistible. They’re the first and last flavors to hit you, and they leave a lasting impression 🙂
This cake filling is based off of my tried and true edible cookie dough recipe. I incorporated all of the salty and sweet mix-ins into the dough, and also included a bit of baking powder and some pasteurized egg whites.
Why, you might ask?? I wanted you to be able to bake cookies with any leftover cookie dough filling! To make cookies, shape cookie dough balls with 1 Tbsp of batter. Chill for about 1 hour in the fridge.
Bake on parchment paper or a silicone baking sheet at 350 degree Fahrenheit for about 7 minutes, or until the edges are golden brown.
Leftover cookie dough can also be kept in the freezer for up to two months in an airtight container.
Edible Cookie Dough: Safe to Eat Raw
If you have any concerns about eating raw cookie dough, fear not!
Using heat treated flour and pasteurized egg whites (egg whites from a carton) make this cookie dough is safe to eat raw.
If you can’t find heat-treated flour, you can simply heat your flour in the microwave for about 1 minute, or until it reaches and internal temperature of 160 degrees F.
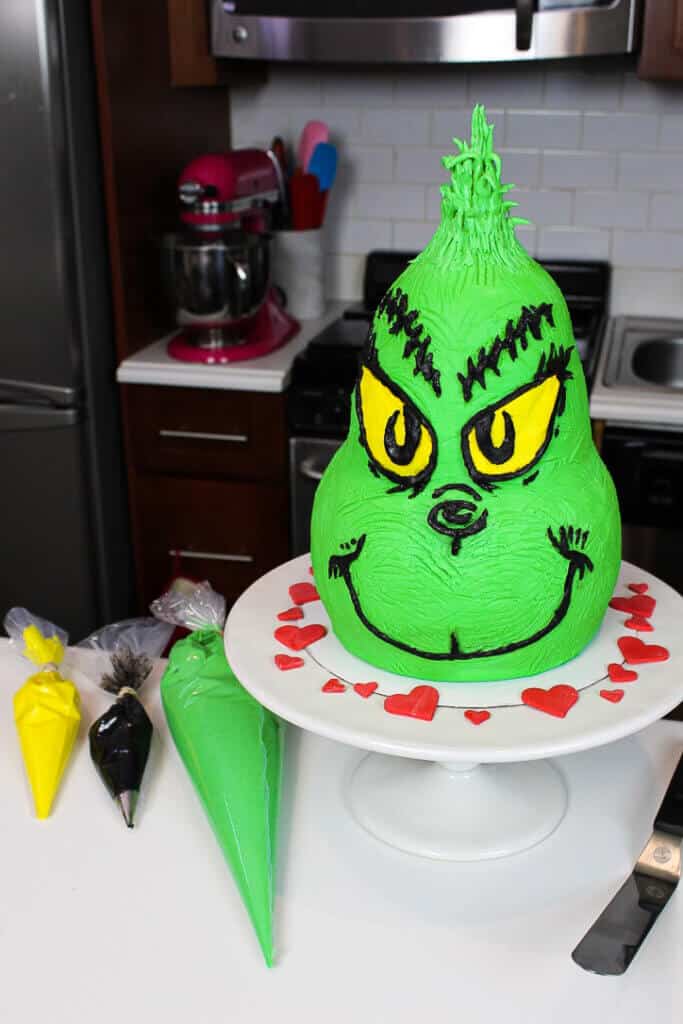
Giving this Grinch Cake Some Fur
The final challenge of this cake was the Grinch’s fur. I was happy with how smooth I was able to get my second layer of green frosting, but it didn’t feel right.
In all three version of the Grinch, his fur is part of his identity. I wanted to create some texture, but I didn’t think that piping on fur would be quite right. That would make him too hairy.
He needed just a bit of fuzz. A touch of fur. I decided to use a small fork to add a bit of texture.
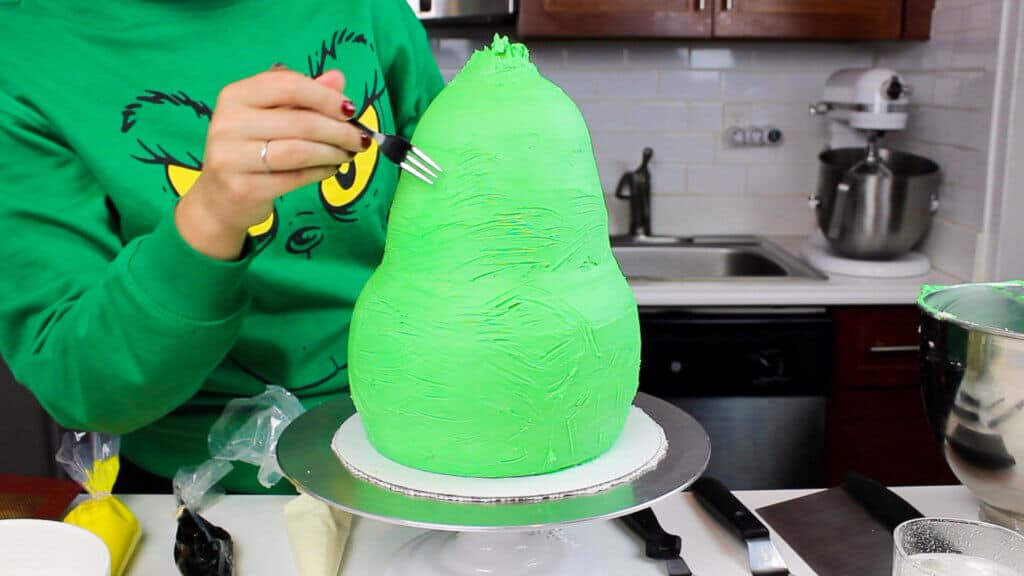
I dipped it into a cup of hot water, dried it off, then lightly ran it over the frosting. It gave the cake the exact look I was hoping for.
Tips to Make The Best Grinch Cake
- Smooth curved sides of this Grinch cake with a piece of acetate sheet
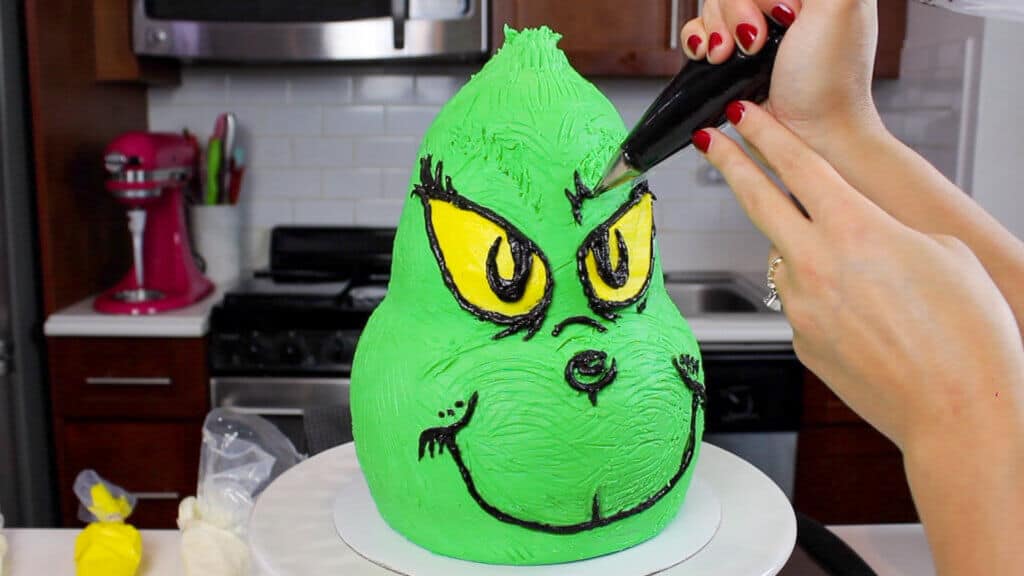
- Use a toothpick or thin wooden skewer to trace the outline of the Grinch’s face before piping
- Anchor your arm on the counter or against your cake stand while you pipe, to keep your hand steady
- Use toothpicks at the top of the Grinch’s head to create his tall strands of hair
- Color your frosting with gel food coloring, to make sure you get vibrant, deep shades
- Make your frosting in advance, to also allow the shades to deepen
Let Me Know What You Think
If you try this Grinch cake recipe, I’d love to hear what think of it!
Please leave a rating, and let me know your thoughts by sharing a comment.
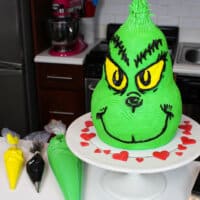
Grinch Cake
Ingredients
Green Vanilla Cake
- 3 cups all-purpose flour 390 grams
- 3 cups granulated sugar 600 grams
- 2 1/2 tsp baking powder 10 grams
- 1 tsp fine salt 6 grams
- 1 cup unsalted butter, room temperature 226 grams - 2 sticks
- 2 tsp. vanilla extract or vanilla bean paste 8 grams
- 1 cup carton egg whites, room temperature or about 7 egg whites (235 grams)
- 1 1/2 cups buttermilk, room temperature 345 grams
- 1/8 cup vegetable or canola oil 28 grams
- green gel food coloring if desired
Vanilla Buttercream Frosting
- 3 cups unsalted butter, room temperature 678 grams
- 11 cups powdered sugar 1375 grams - or about 1.5 lbs
- 1 tsp fine salt 6 grams
- 1/3 cup heavy whipping cream, room temperature or whipping cream (75 grams)
- 1 1/2 Tbsp vanilla extract or vanilla bean paste 18 grams
- Green, yellow, and black gel food coloring
Edible Compost Cookie Dough Filling
- 1 1/2 cups unsalted butter, room temperature 339 grams
- 2 1/4 cups packed light brown sugar 495 grams
- 1 tsp fine salt 6 grams
- 2/3 tsp baking powder 3 grams
- 1/2 tsp instant espresso or instant coffee dissolved in 2 tsp hot water (2 grams)
- 1 tsp vanilla extract or vanilla bean paste 3 grams
- 1/4 cup graham cracker crumbs 30 grams
- 1/4 cup mini white chocolate chips 43 grams
- 1/3 cup crushed potato chips 30 grams
- 1/3 cup chopped pretzels 30 grams
- 1/4 cup rainbow sprinkles 44 grams
- 1/4 cup butterscotch chips 43 grams
- 2 3/4 cup all-purpose flour, heat-treated or heated in the microwave for about 1 minute to reach 160 degrees F (356 grams)
- 2 Tbsp pasteurized egg whites, room temperature 30 grams
Instructions
Vanilla Cake Layers:
- Preheat oven to 350°F. Line two 7-inch pans, one 6-inch pan, and two 4-inch pans with parchment rounds, and grease with non-stick cooking spray.
- Mix together all dry ingredients (flour, baking powder, sugar, and salt) in a stand mixer with a paddle attachment until fully combined.
- Mix chunks of room-temperature butter slowly into the dry mix, on a low speed. Continue to mix until no large chunks of butter remain, and the mixture becomes crumbly.
- Pour in egg whites, and mix on low until just incorporated. Mix in the buttermilk in two installments, on a low speed.
- Add in vanilla and oil, and mix at a low speed until fully incorporated. Scrape down the sides of the bowl with a spatula, then beat on low speed for about 15 seconds (the key is to mix until the ingredients are JUST incorporated, so that the batter isn't over mixed).
- If desired, add in green gel food coloring. Mix the color in by hand using a rubber spatula, scraping the sides and bottom of the bowl part way through. Mix until the batter is evenly colored.
- Divide batter between the prepared cake pans, filling each pan with the same height of batter.
- Bake for 32-35 minutes, or until a toothpick comes out with a few moist crumbs. Allow the pans to cool for 10 minutes, then run an offset spatula around perimeter of the pan to separate the cake from the pan.
- Place cake layers into the freezer for 45 minutes, to accelerate the cooling process. Once the layers are fully cooled, carefully flip the pans and remove the layers from the pans.
- Use a serrated knife to level the tops of the layers, and then frost as desired.
Vanilla Buttercream Frosting:
- While the cake layers bake and cool, make the vanilla buttercream frosting.
- Beat the butter on a medium speed for 30 seconds with a paddle attachment, until smooth. Slowly add in the powdered sugar, 1 cup at a time. Alternate with small splashes of cream.
- Once fully mixed, add in the vanilla and salt, and beat on low until the ingredients are fully incorporated, and the desired consistency is reached.
- If the frosting is too thick, add in additional cream (1 TBSP at a time). If the frosting is too thin, add in more powdered sugar (quarter of a cup at a time).
- Wait to color the buttercream until the cake is filled and crumb coated.
Edible Compost Cookie Dough:
- Next, make the edible compost cookie dough. Cream together the unsalted butter and light brown sugar in a large bowl.
- Add in the salt, baking powder, instant espresso mixture, and vanilla extract. Mix on a low speed until incorporated.
- Pour in the graham cracker crumbs, mini white chocolate chips, crushed potato chips, chopped pretzels, rainbow sprinkles, and butterscotch chips. Gently pulse your stand mixer or hand mixer to slowly mix in these ingredients.
- Mix in the heat treated flour on a low speed. Scrape the sides of the bowl with a rubber spatula as needed.
- Add in the pasteurized egg whites, and mix on a low speed.
To Assemble The Grinch Cake:
- Stack and frost cake layers on a greaseproof cake board, using a dab of frosting to help stick the first cake layer to the board. Stack the cake layers in the following order: 7-inch, 7-inch, 6-inch, 4-inch, 4-inch.
- Add a thin layer of buttercream on top of each cake layer, followed by a generous layer of edible compost cookie dough.
- Add a thin coat of frosting around the cake, to fully cover the cake layers. Smooth using an acetate sheet, then chill the cake in the fridge (20 minutes) or freezer (5 minutes) until the frosting is firm to the touch.
- Color 1/2 cup of frosting bright yellow, and 2/3 cup black with gel food coloring. Place each frosting into a small piping bag.
- Color the remaining frosting a bright shade of green with gel food coloring.
- Add a second, thicker layer of green frosting to the cake, and smooth using an acetate sheet.
- Use a fork to add texture to the frosting and create the Grinch's fur.
- Trace the outline of the Grinch's face with a toothpick, then use the yellow and black frosting to pipe his facial features.
How can you transport a cake this tall?
Hi Marvel,
Great question! Transporting a tall cake like this could be challenging. I’d recommend anchoring the center dowel to the cake drum. I’d also suggest transporting the cake while it’s thoroughly chilled. Both of those should make it a bit easier to transport. Hopefully you don’t have to take it too far!
Can I make this without the cookie dough in the middle?
Hi Joemi,
Totally! That should work just fine 🙂 Happy baking!
I’ve tried to searched everywhere on here before commenting. But I can’t see where you let people know you off set those cake layers some. And I feel it would be very important to know which ones you offset to create the best results. Looking on the video alone is to hard to tell if you offset the 6 inch layer or just the two 4inch layers.
Search **
Hi there, this looks amazing! Which tips did you use for the frosting btw?