
Marble Cake Recipe
You’ve been asking for my marble cake recipe for a while, and I’m finally getting around to it!
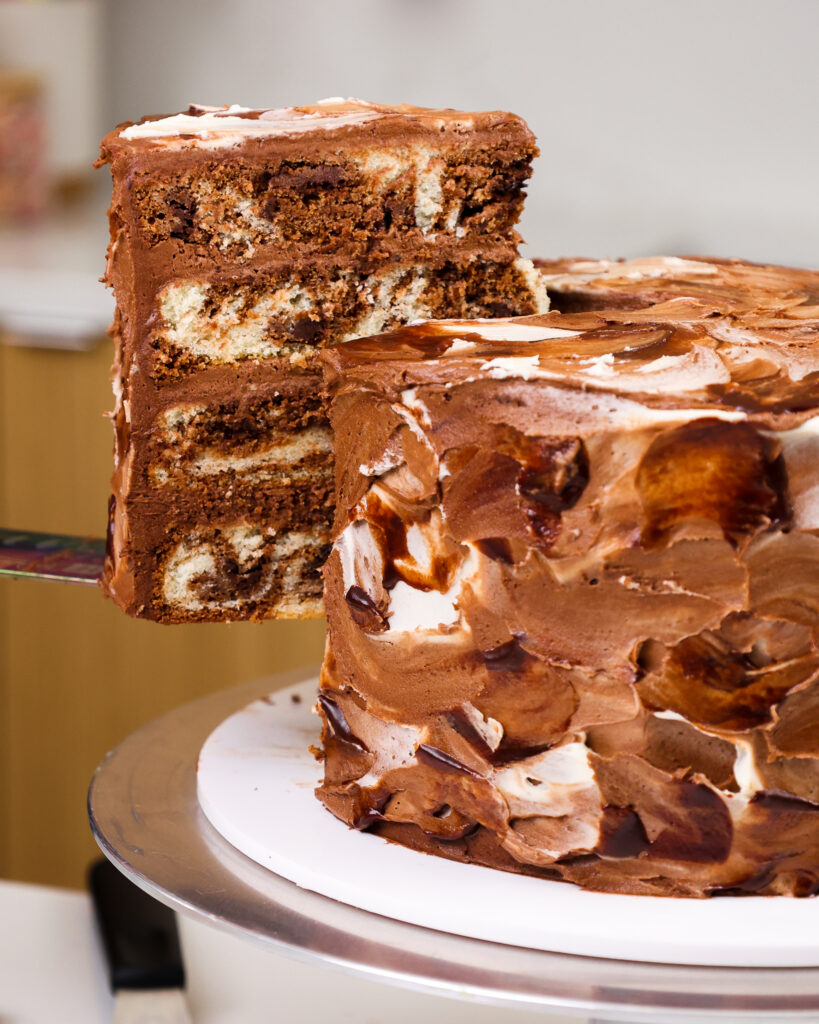
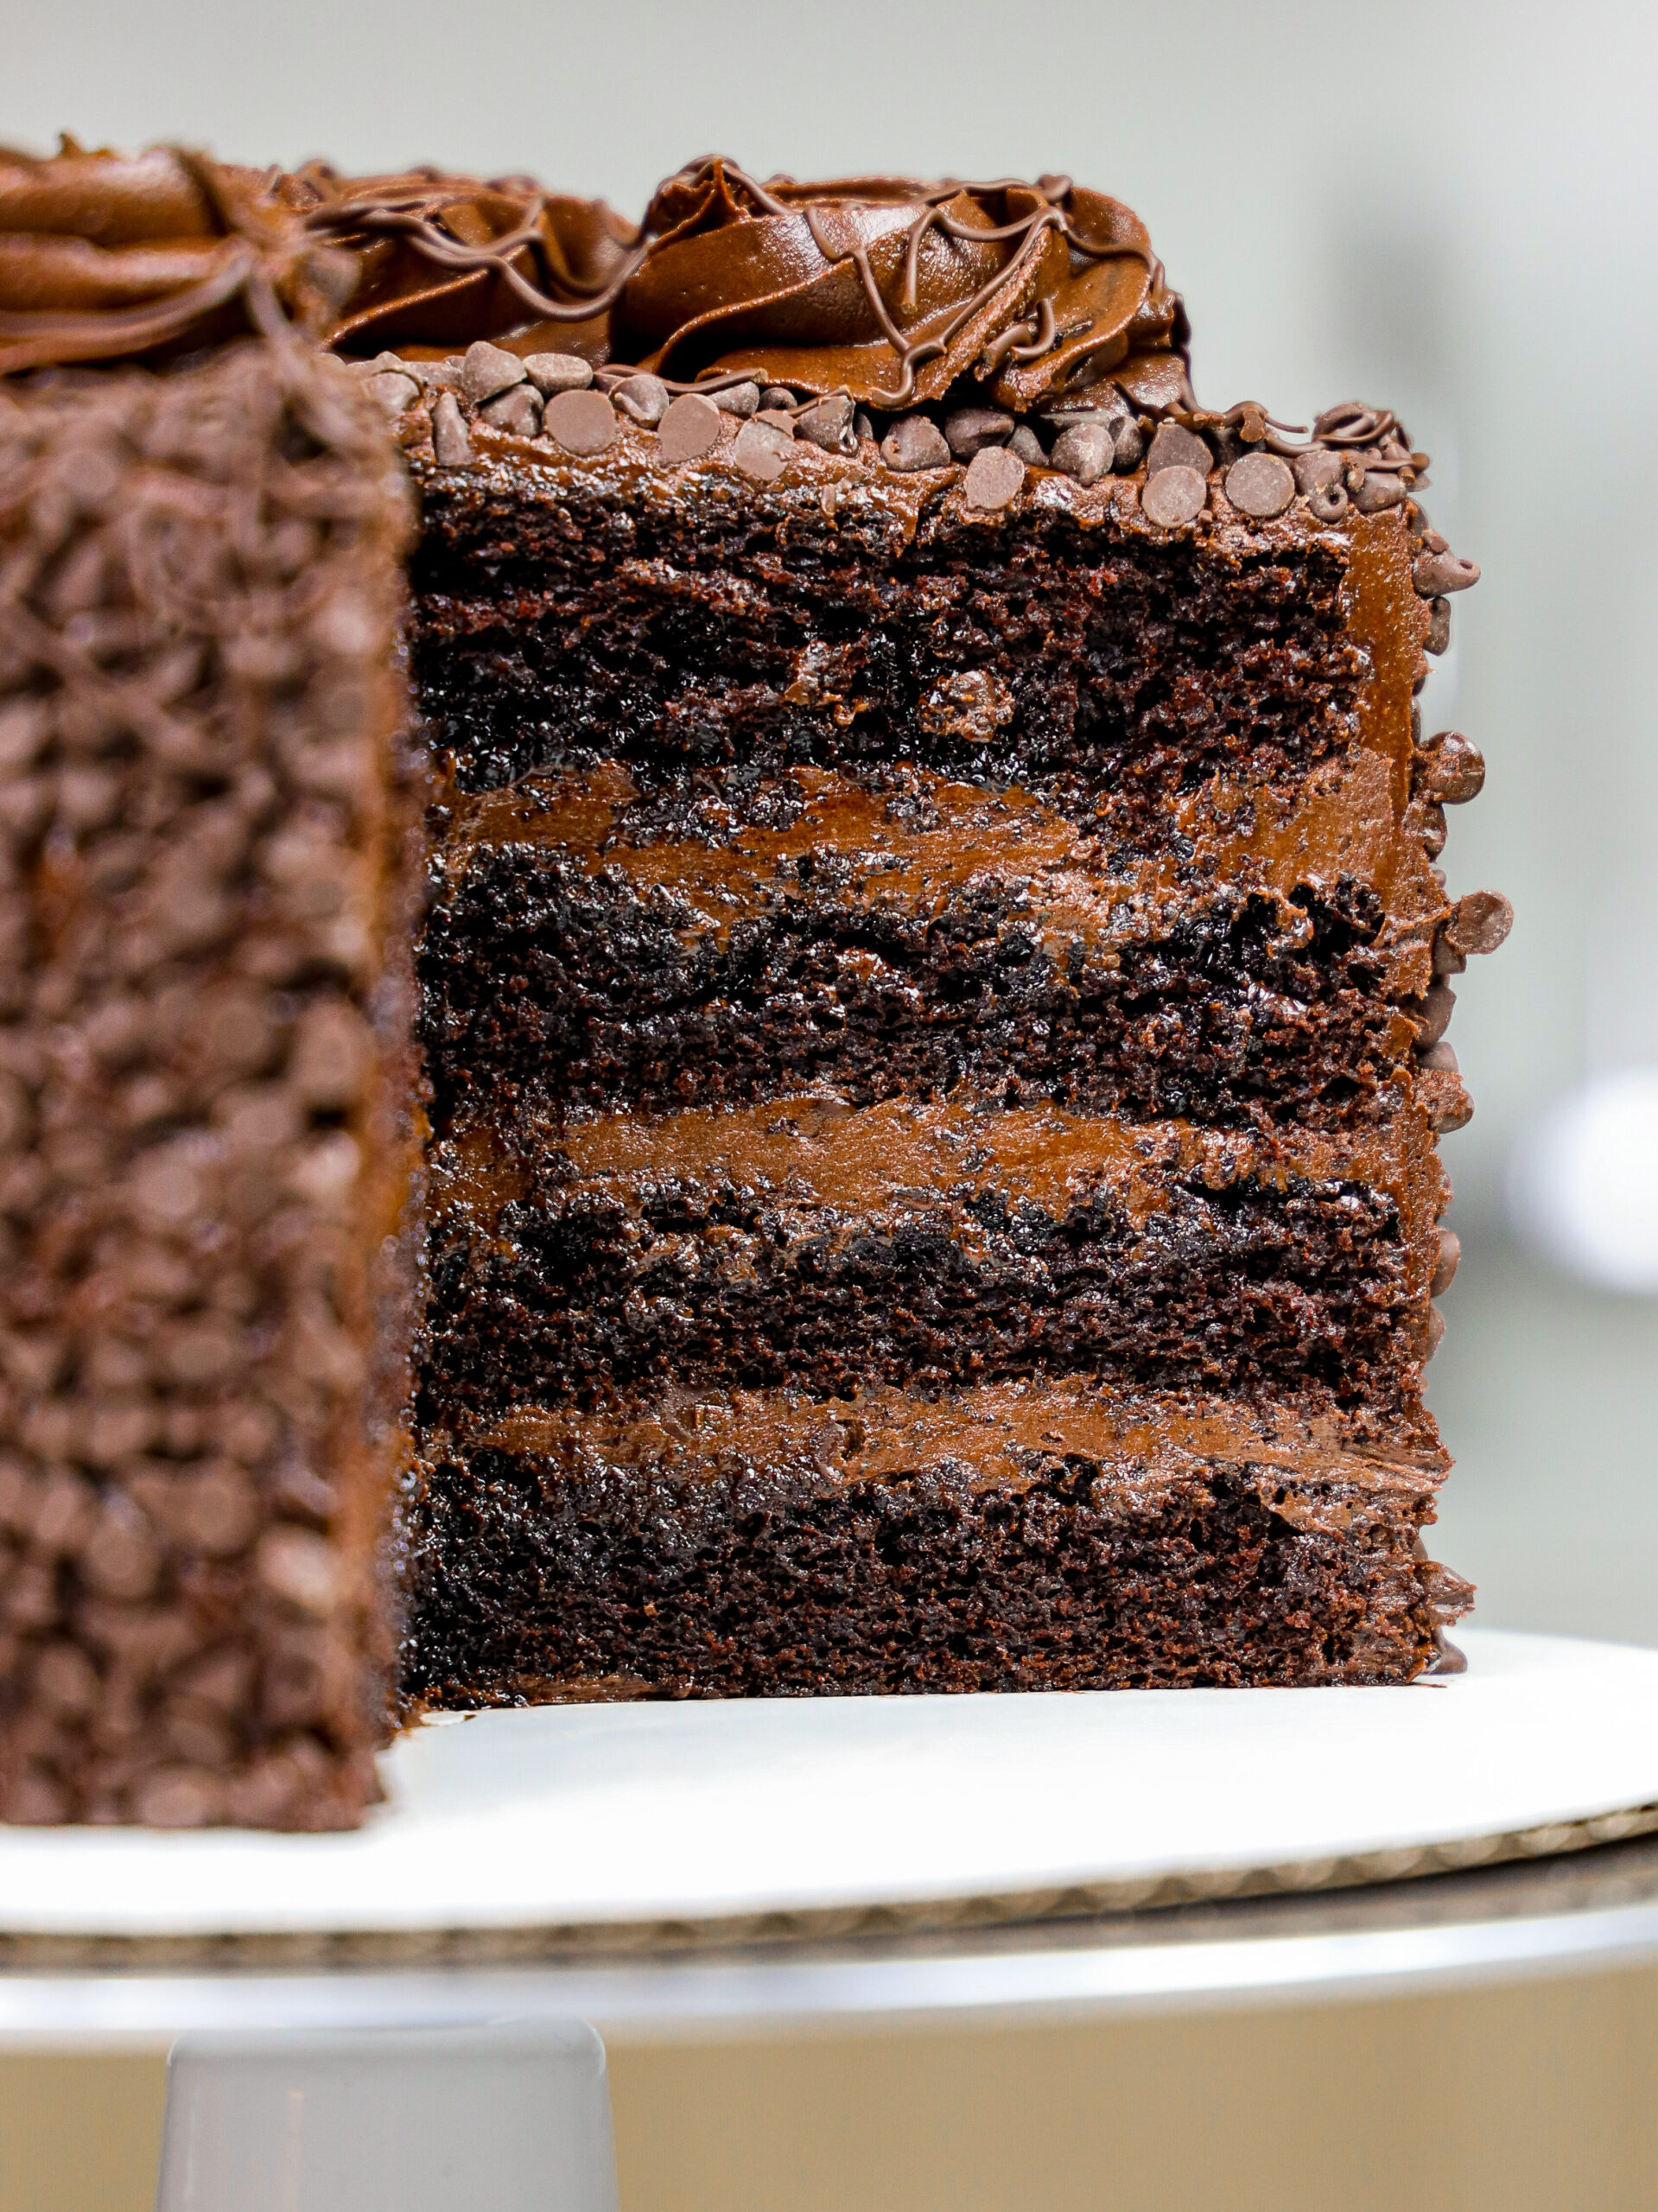
One Batter, Two Flavors!!
While I love a lot of things about this cake recipe, I am obsessed with the fact that we make the vanilla and chocolate cake batter using the same base cake batter!
After making the vanilla cake batter, you can set aside two-thirds of it (about 1200g) and transform the remaining batter into chocolate cake batter.
All you have to do is mix in a few additional ingredients. It’s so easy and is so much faster than making two separate cake batters!
The Added Bonus: A Fudge Swirl
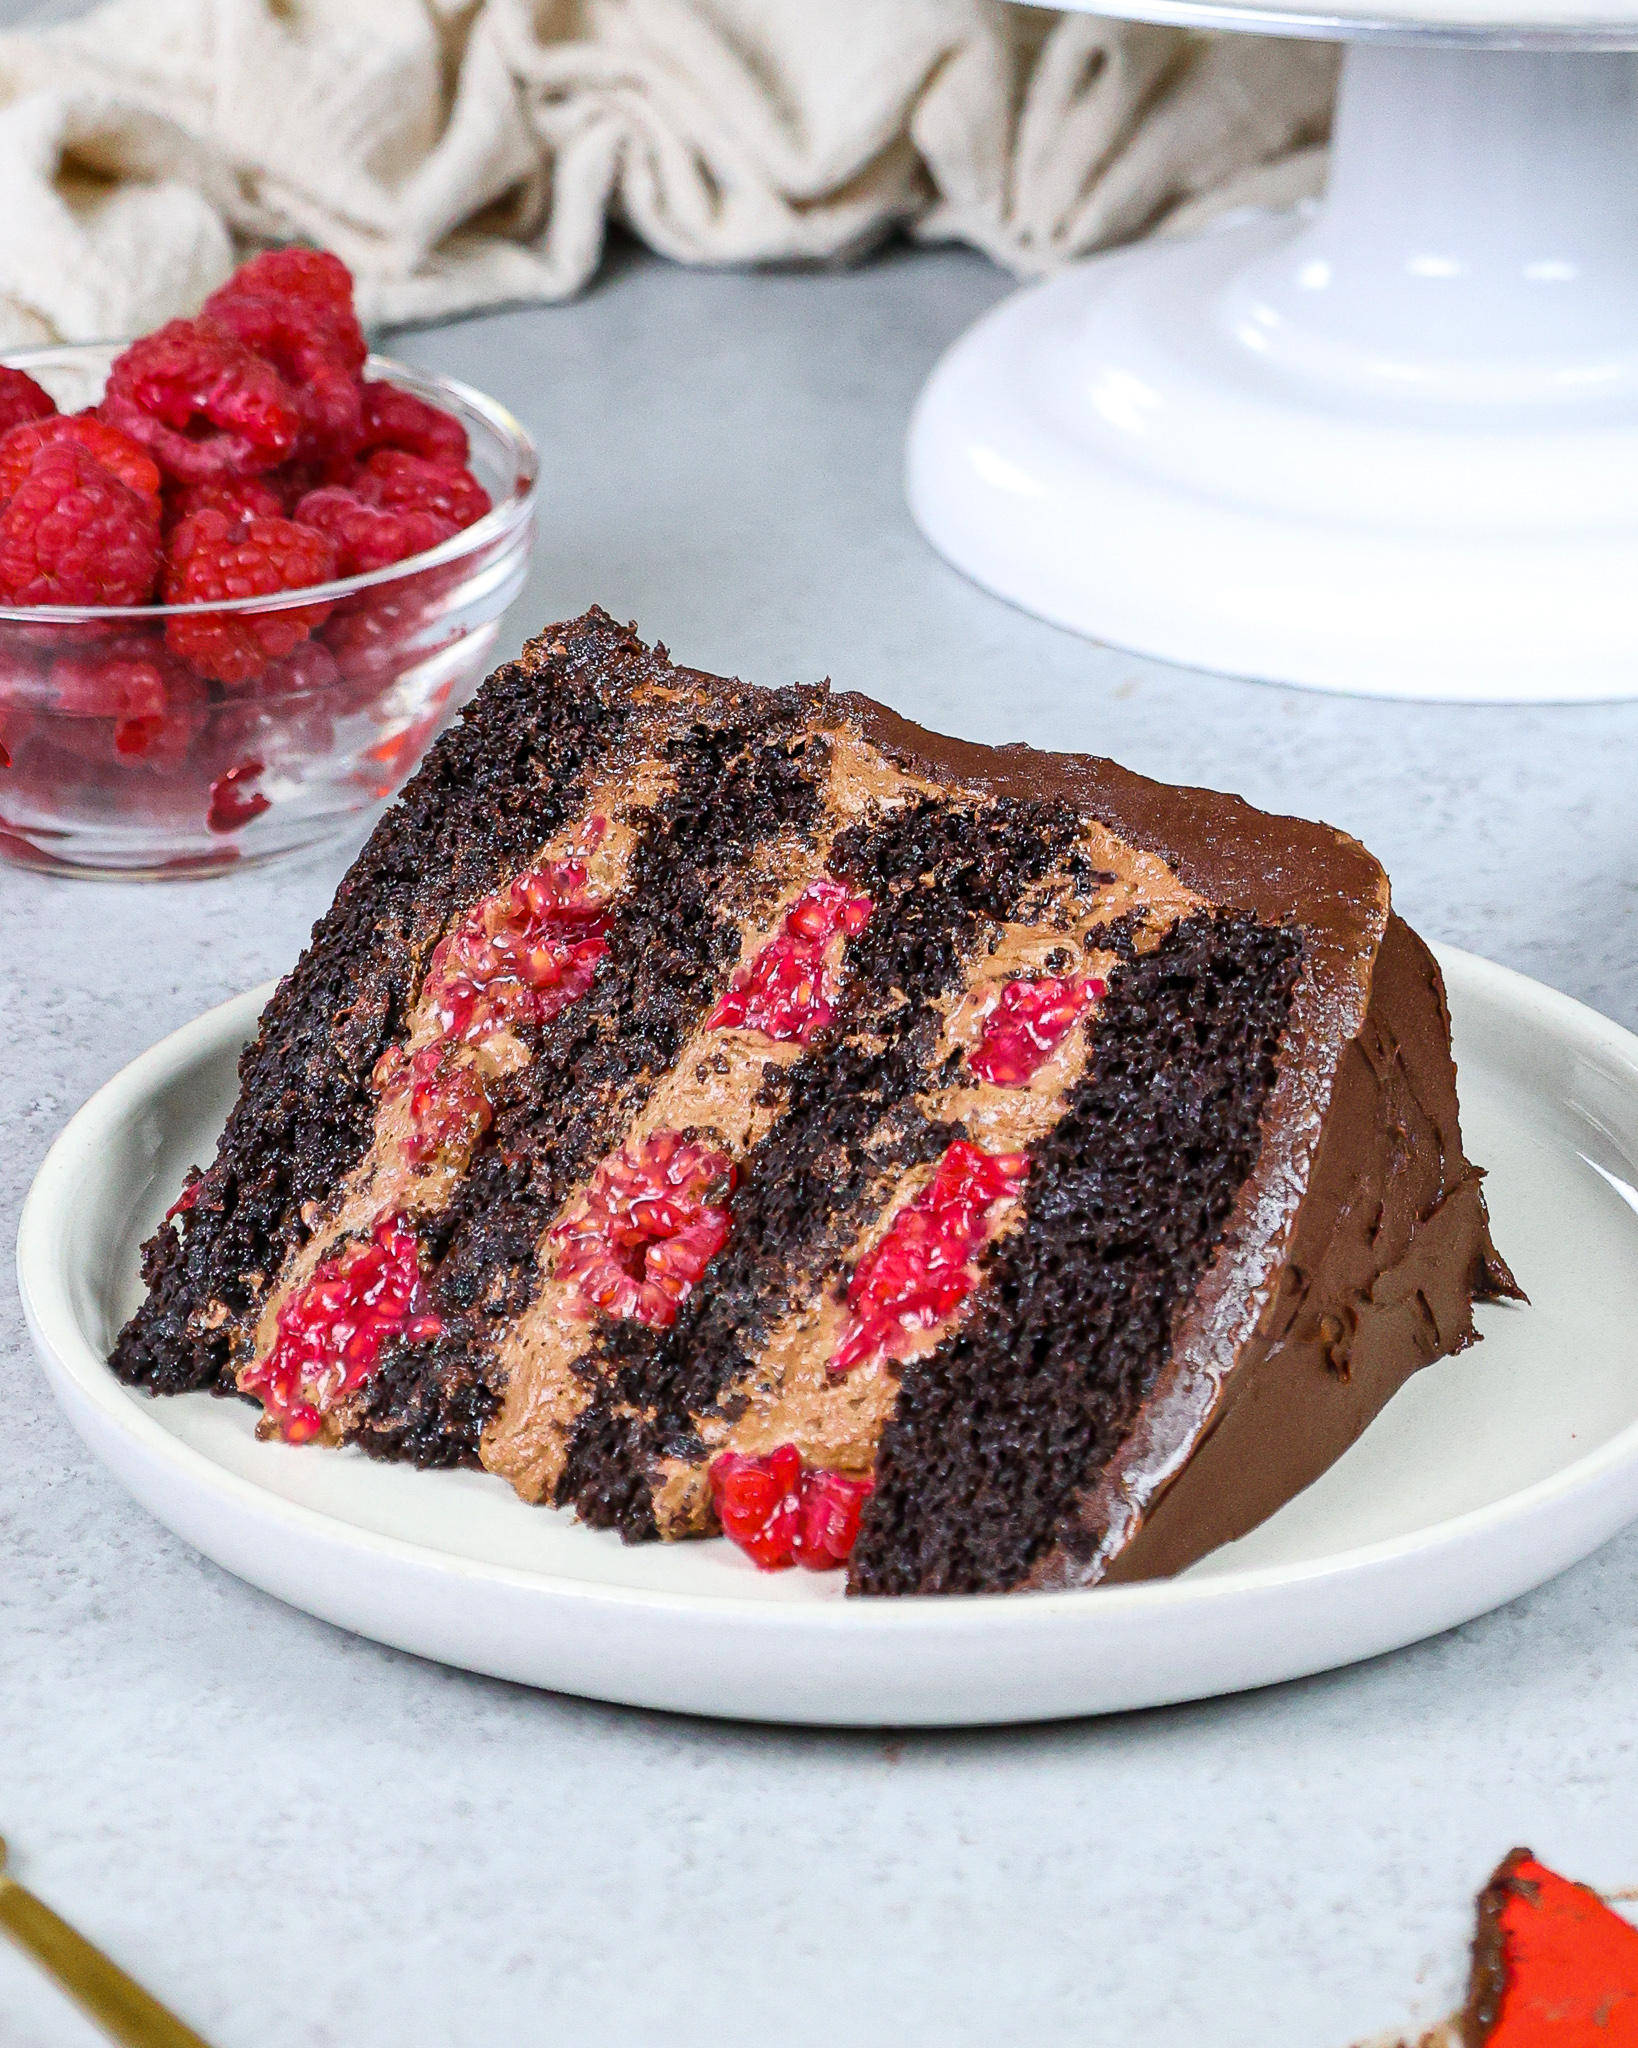
If you want to up the ante, add the chocolaty fudge swirl! This is totally optional, but it’s such a pleasant surprise when you bite into this cake.
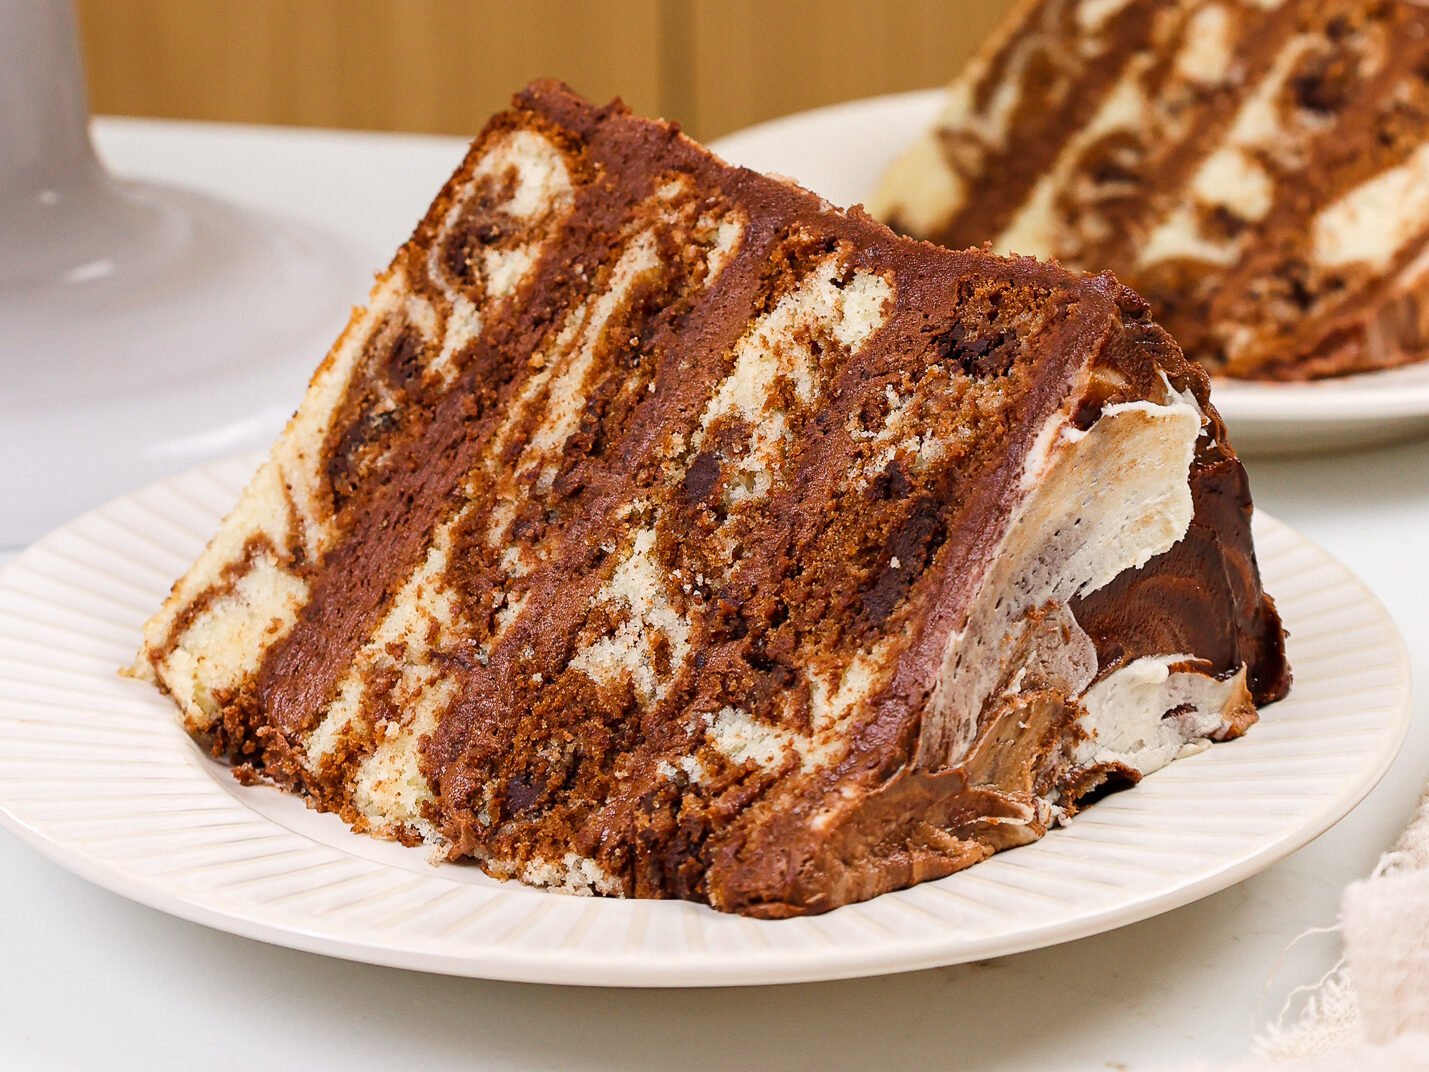
It bakes up beautifully into the cake layers. The chocolate kind of dissolves into the cake layers as they bake.
This creates a fudge ripple throughout each cake layer and adds a rich, chocolatey flavor into each bite.
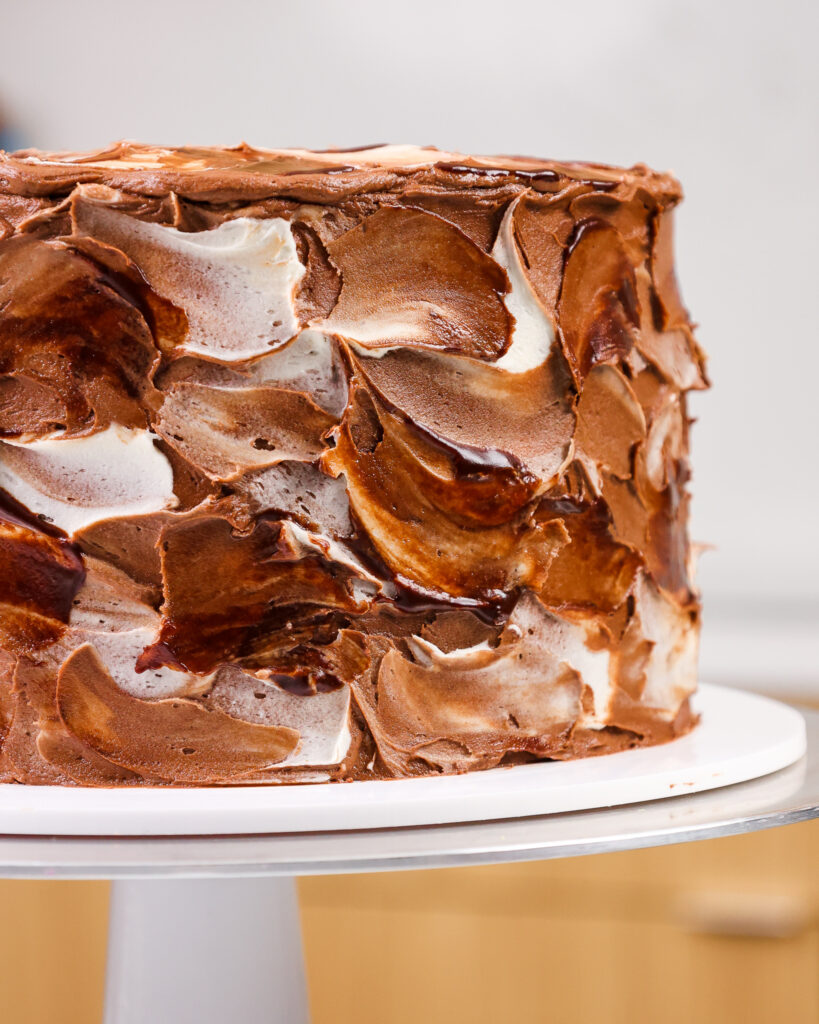
I’m also big on aesthetics. The melted chocolate swirled into the batter looks GORGEOUS! Not only is it worth adding for the taste, it also gives the cake layers such a stunning look.
How To Make Marble Cake Layers
Once both cake batters (and the optional chocolate fudge ripple) are made, the real fun starts.
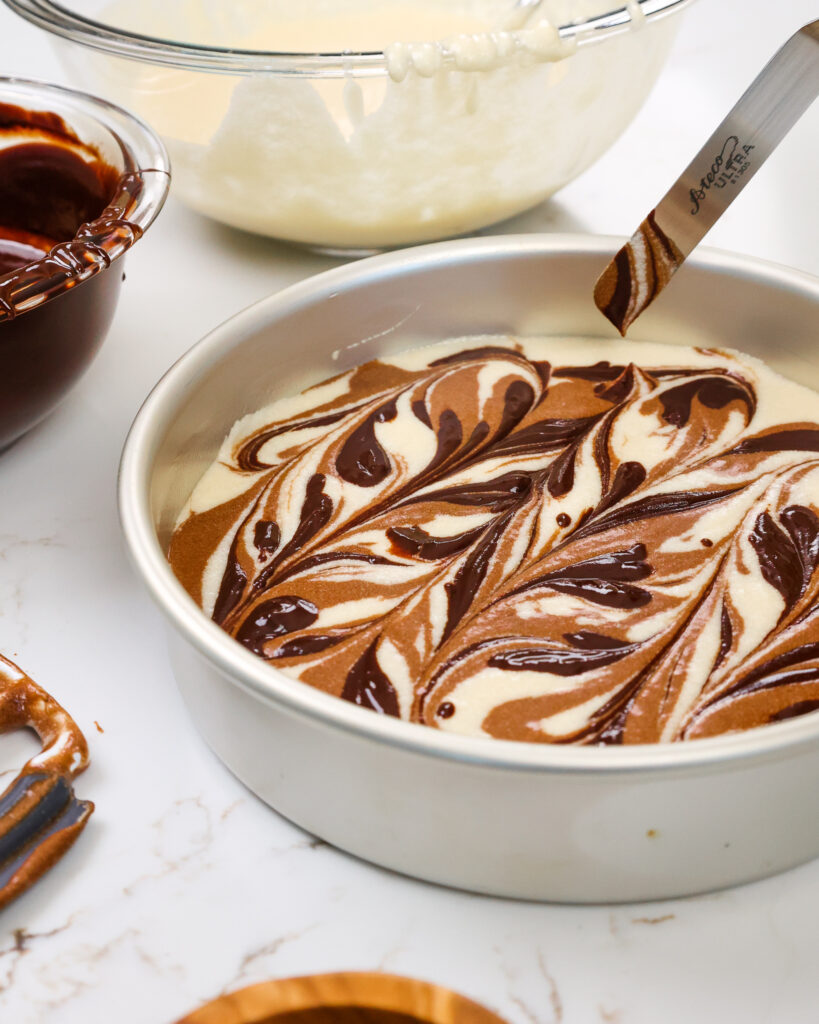
Alternate spoonfuls of vanilla and chocolate cake batter into your pans. Continue until you’ve evenly distributed the batter between the pans.
TIP: It’s much easier to make sure your pans have the same amounts of cake batter if you add the spoonfuls of batter in rounds. Add a spoonful of vanilla to each pan, then a spoonful of chocolate to each pan, and repeat until you’ve used all your batter.
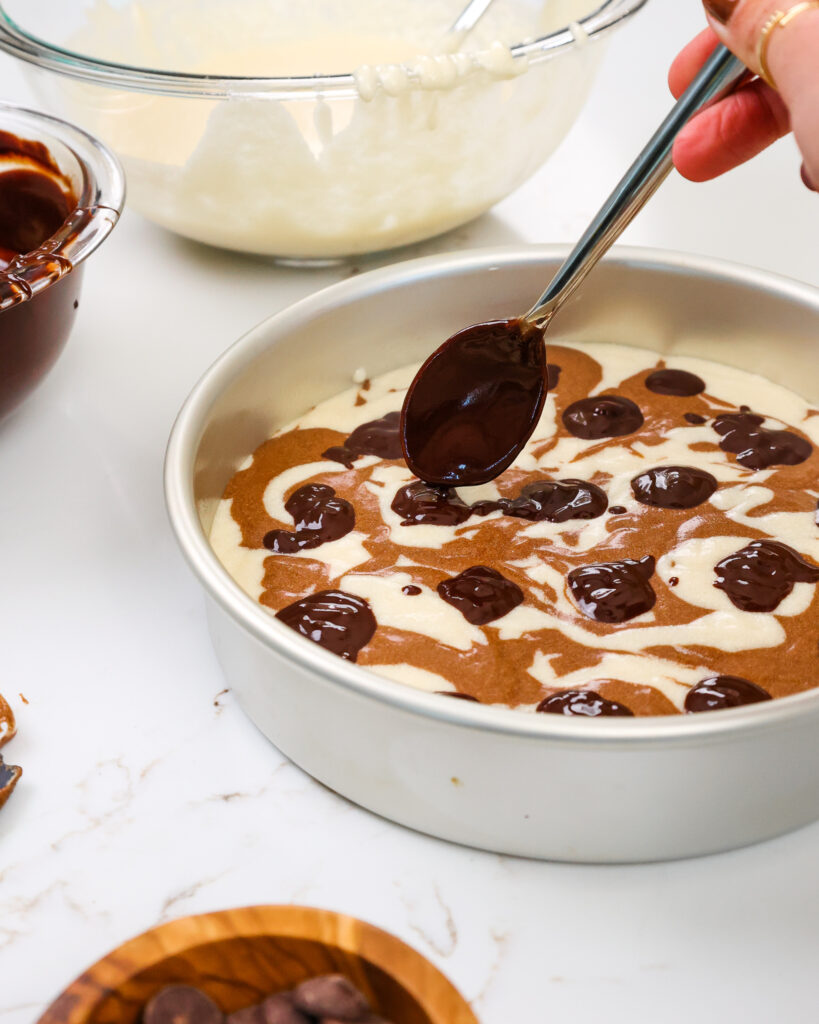
Once you’ve used all your batter, use a spoon to add small drops of the chocolate fudge mixture on top of the cake batter.
Make sure the chocolate drops are relatively spread out. This will prevent them from completely covering the cake batter when swirled.
You want to be able to see each different component in these cake layers once they’re baked!!
Then drag a small offset spatula or butter knife through the batter to create lines that are both horizontal and vertical.
Make sure your offset spatula is lightly touching the bottom of the pan.
This helps make sure you’re swirling the batter throughout the layer, and not just on the top.

Try to create the lines using one continuous motion, going up and down, and then side to side.
Repeat with the remaining cake layers. Then bake the layers in a preheated 350°F/175°C oven for 32-35 minutes, or until a toothpick comes out with a few moist crumbs.
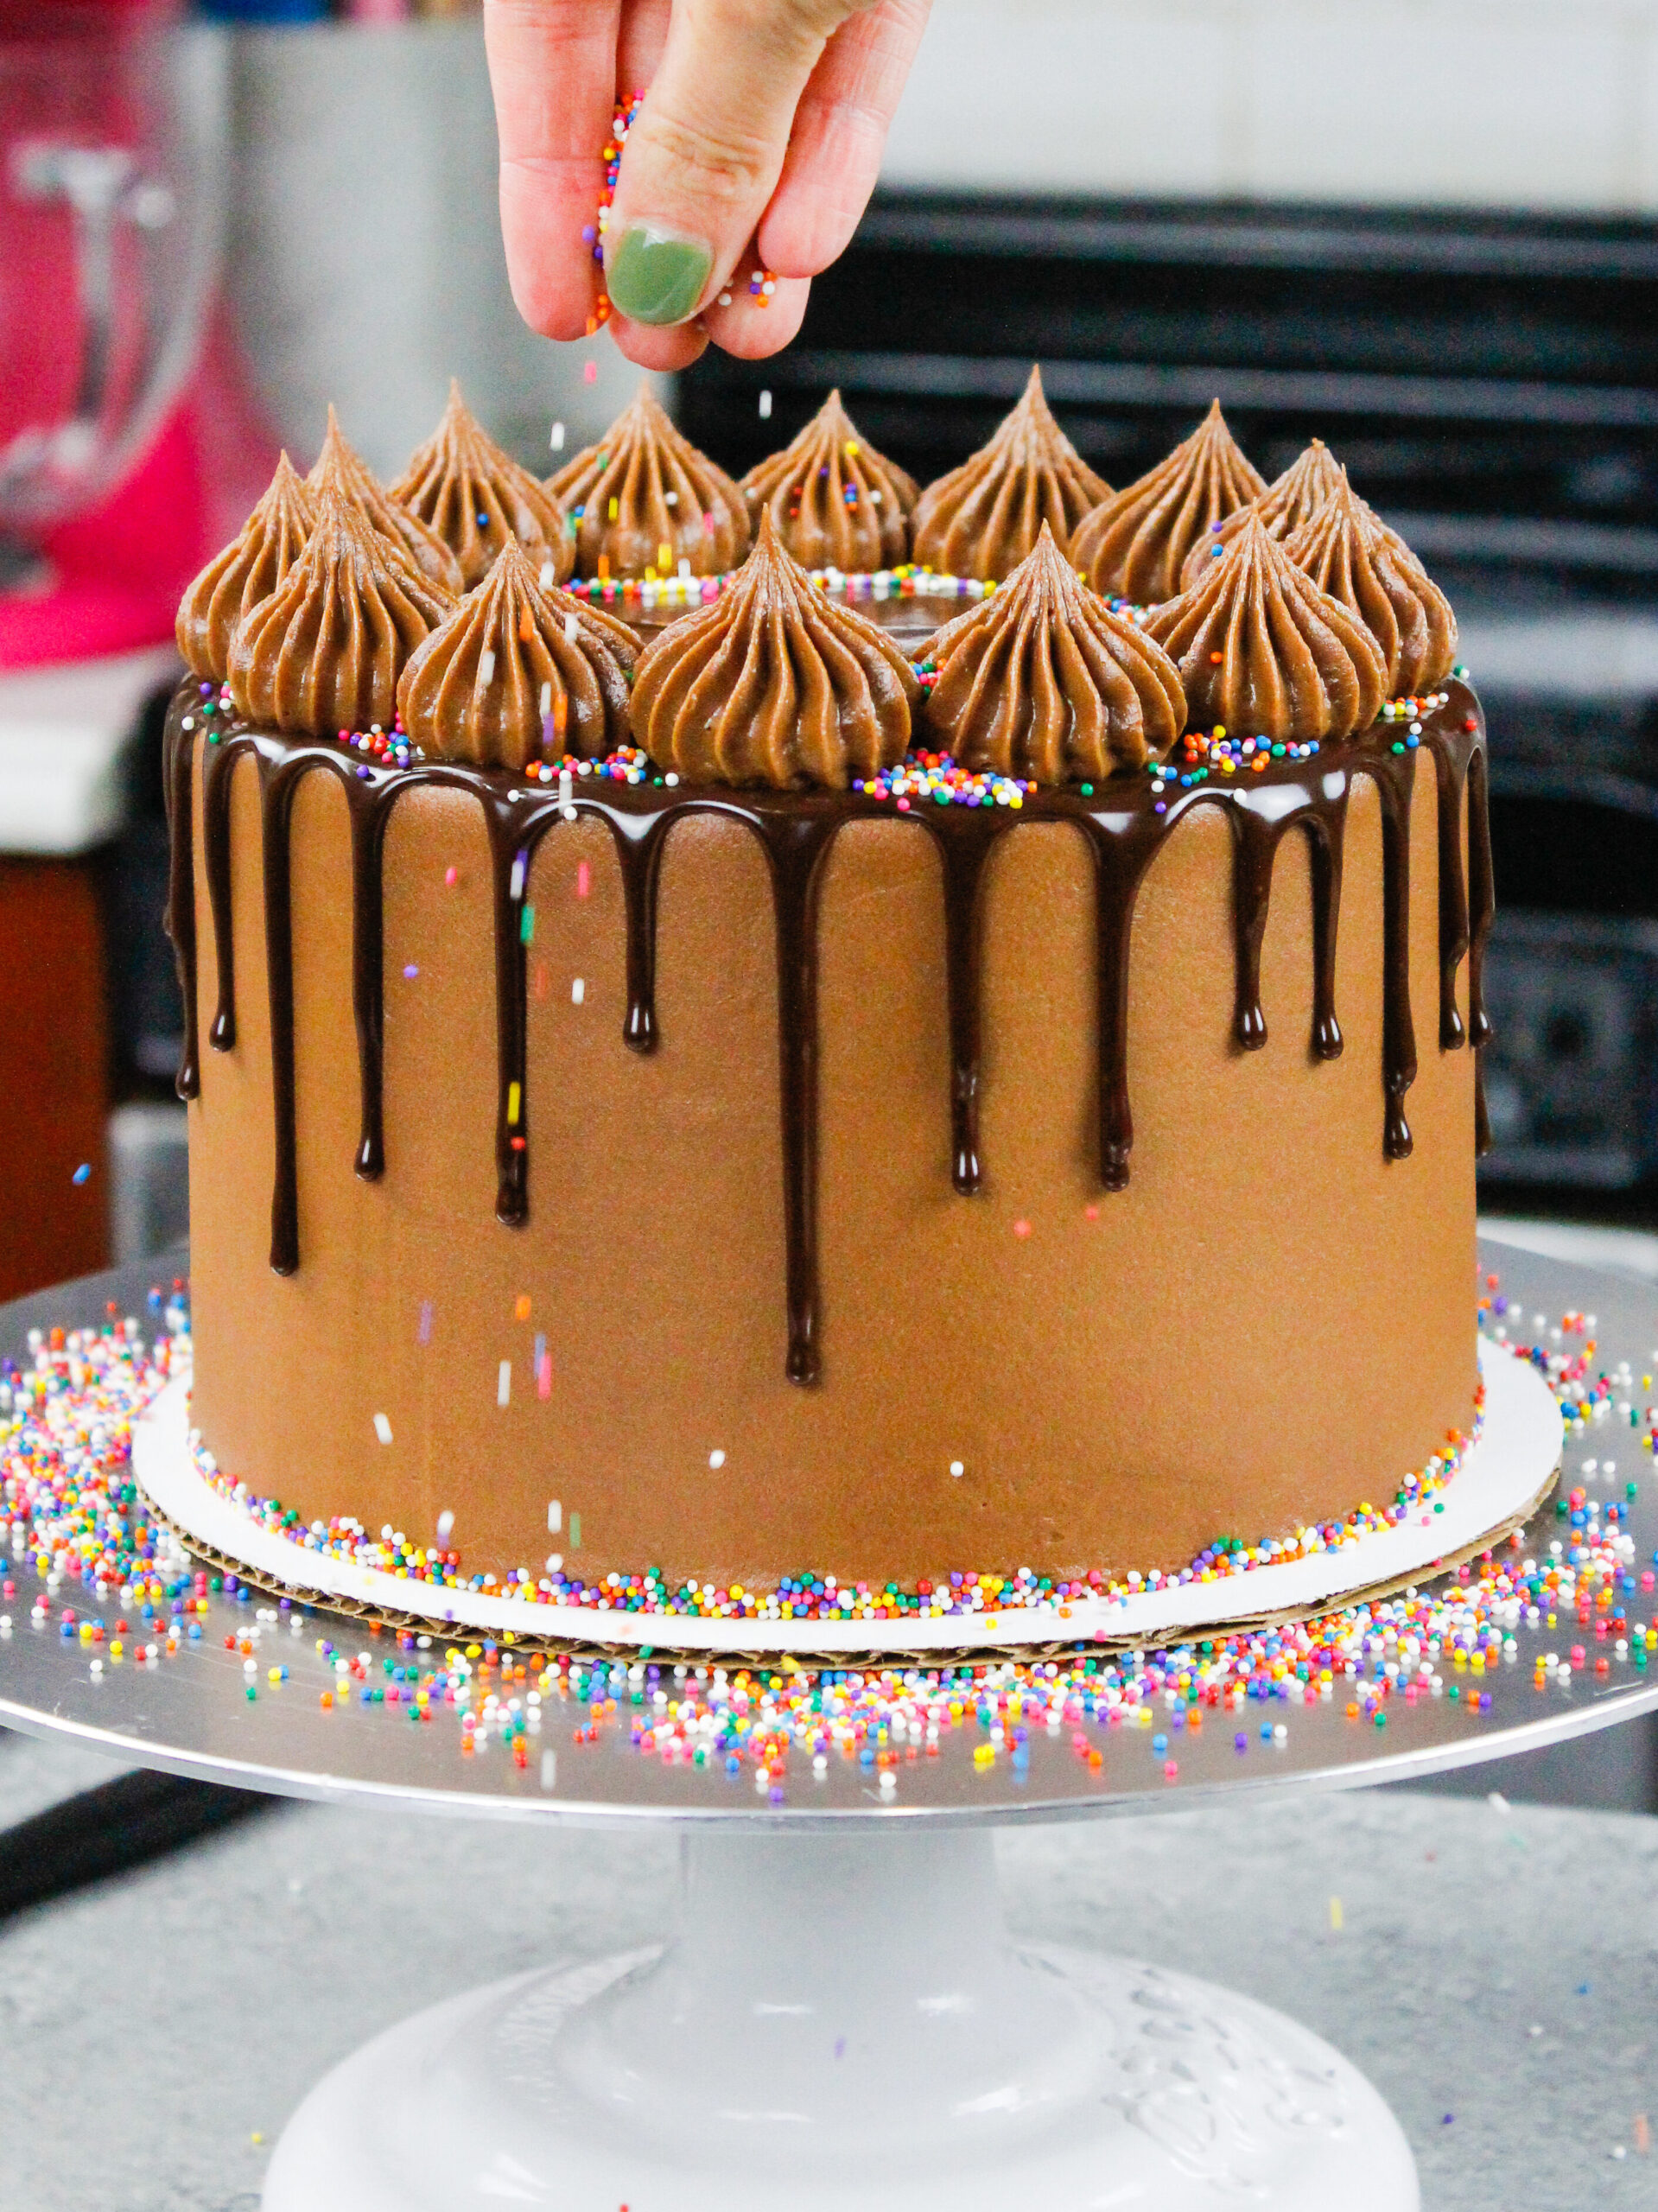
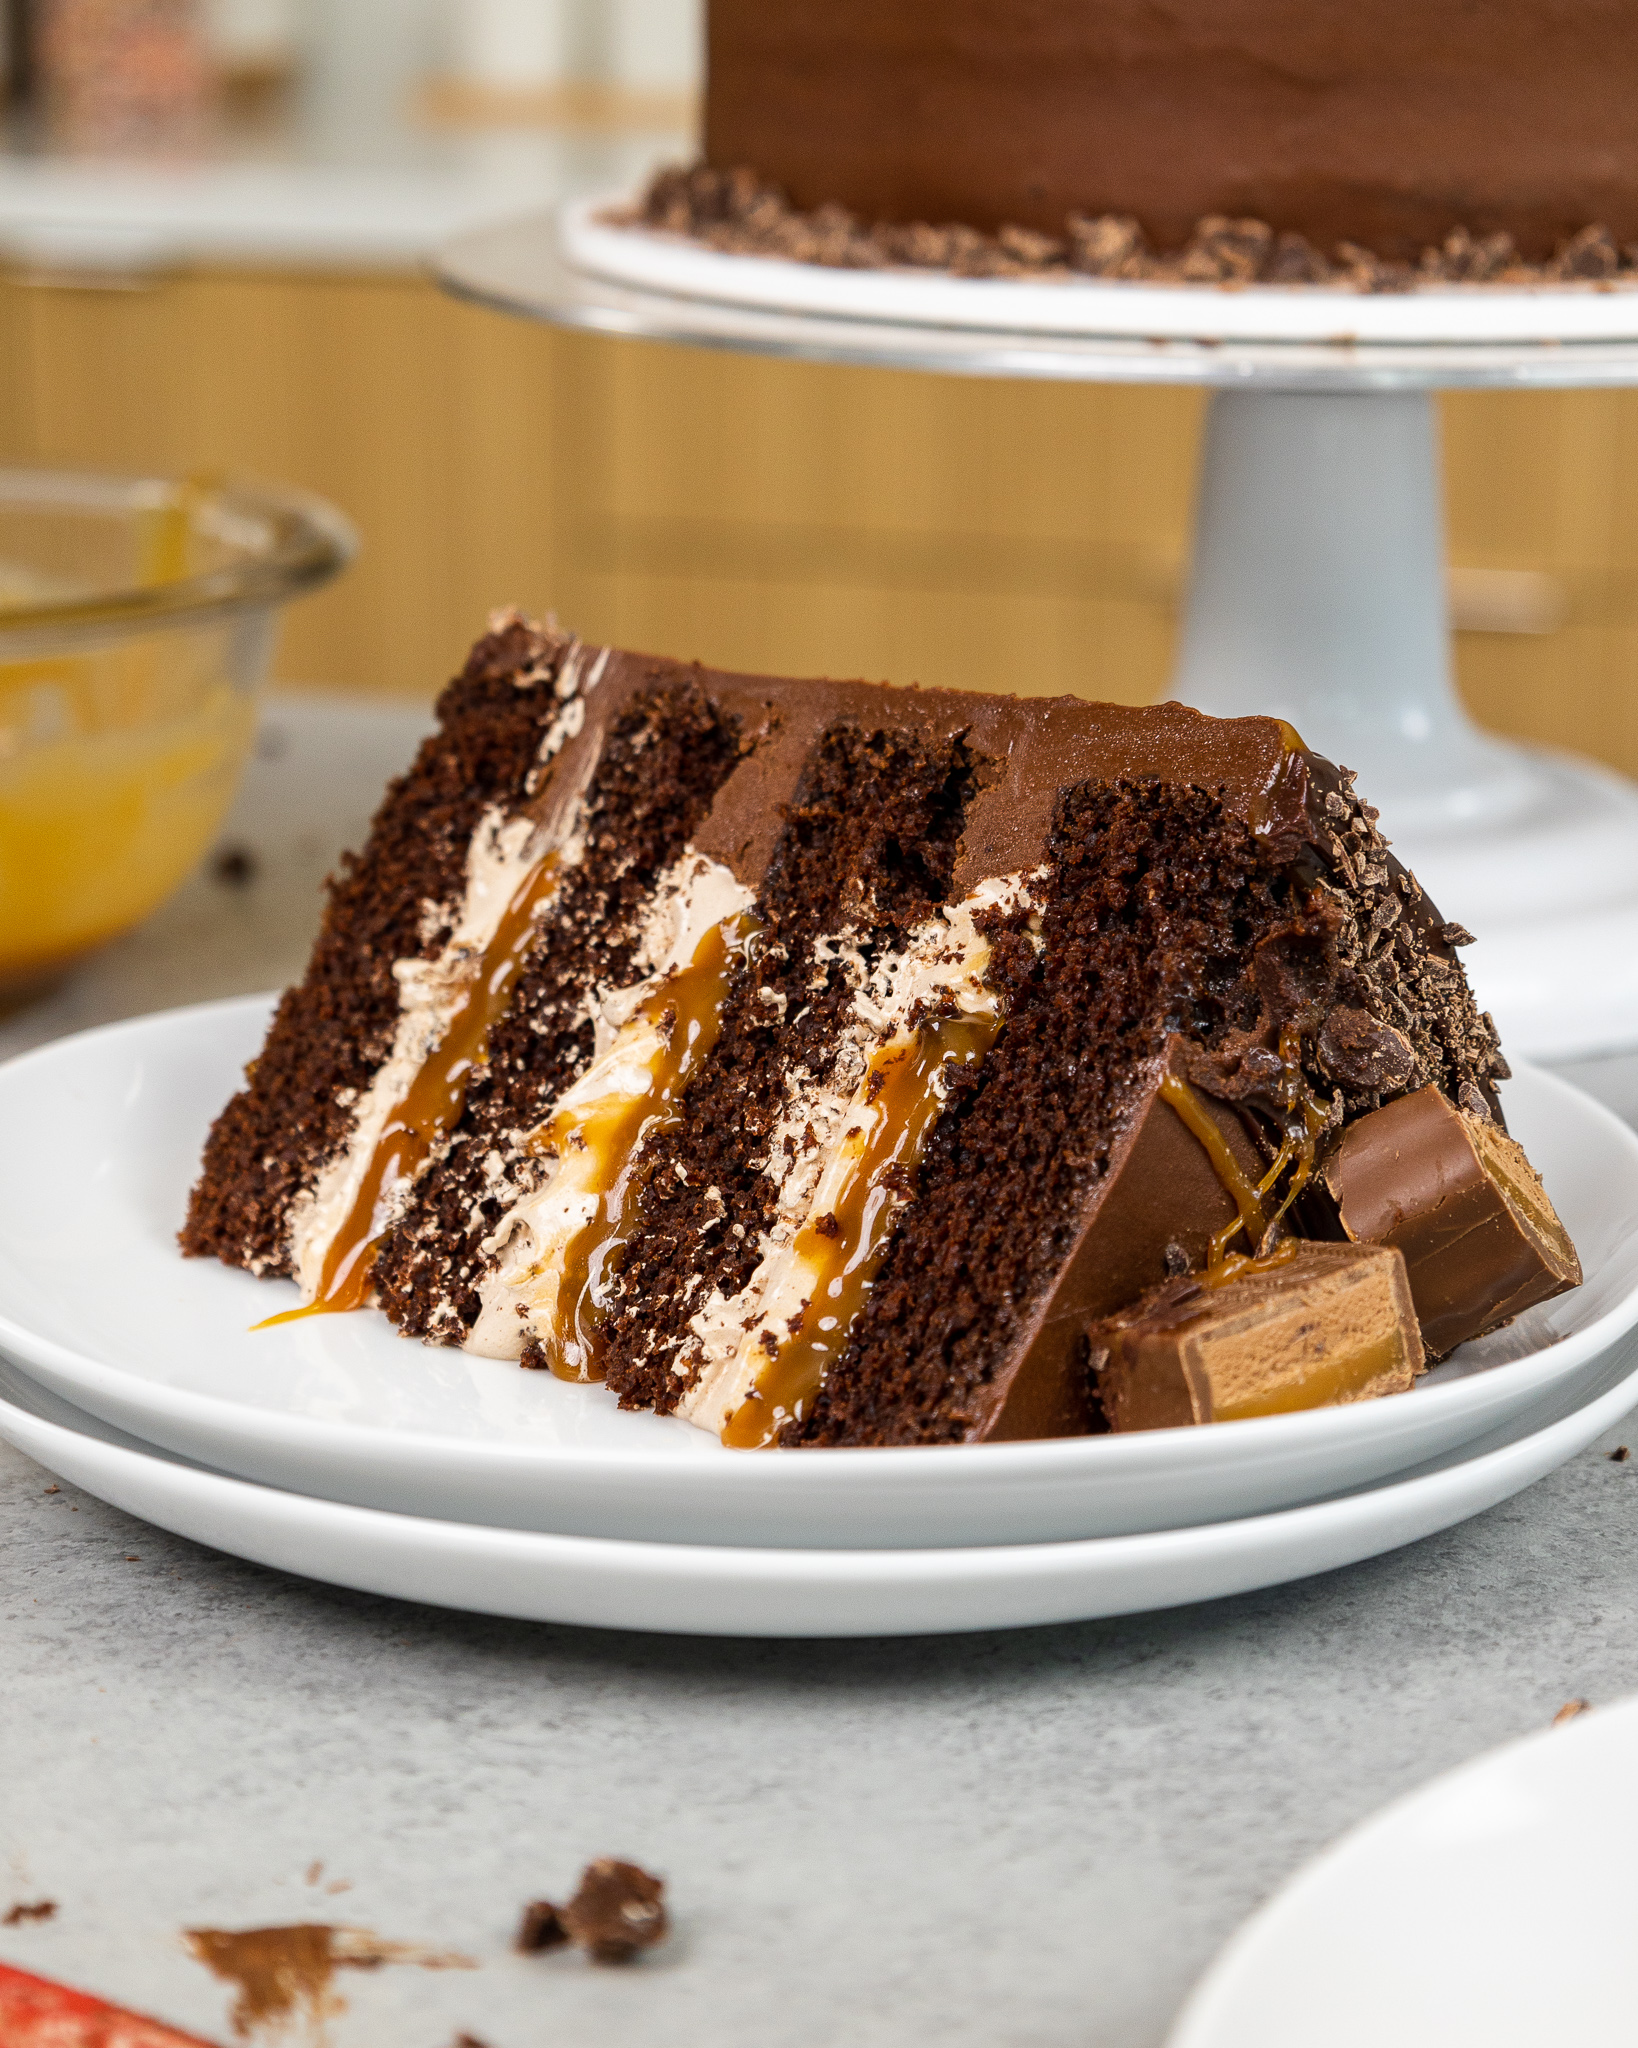
Cake Assembly and Decoration
This marble cake recipe is honestly so delicious, it almost doesn’t need frosting. ALMOST.
I like to take this cake to the next level with my fudgy chocolate buttercream recipe.
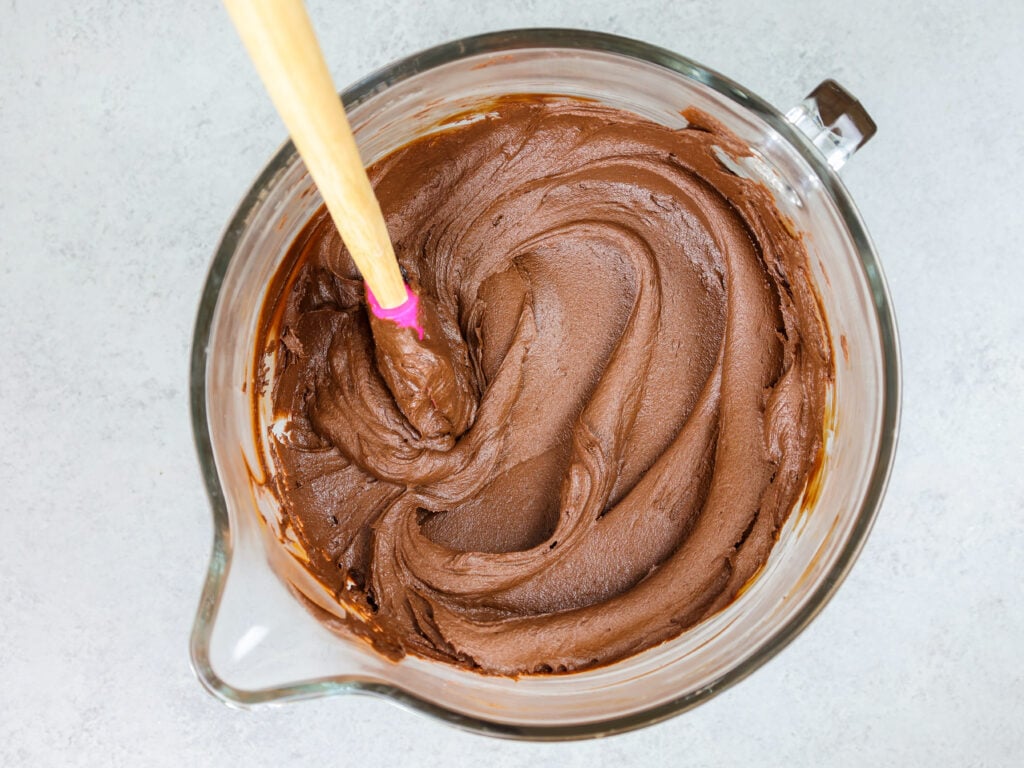
My chocolate buttercream recipe uses both cocoa and melted chocolate, and boy is it tasty.
I wanted the outside of this cake to match the beautiful marbled cake layers inside, so I swirled together my frosting with a large offset spatula. I was obsessed with the way it turned out!!
The best part is that this technique is such an easy and forgiving way to frost a cake.
Tips for Making The Best Marble Layer Cake
- Properly measure your flour. Either spoon it into the cup measure, then level with a knife, or use a kitchen scale to measure your dry ingredients.
- Ingredients at room temperature mix together better, so be sure you set out any cold ingredients ahead of time.
- This recipe bakes up pretty flat, but if you notice a little dome, I recommend pressing a smaller cake pan on top of the cake layers right when they come out of the oven. This will give them a perfectly flat top and make them easy to stack and frost.
- Chill your cake layers in the freezer for about 20 minutes before assembling the cake. This makes them easier to stack and frost.
- Make sure your buttercream is the right consistency. It makes the cake so much easier to fill and frost.
- Crumb coat and chill your cake, then smooth on a second layer of frosting. This will help make sure your final coat of frosting is crumb-free and beautiful.
- To make a 6-inch cake, halve this recipe and bake 3 layers.
Making This Marble Cake in Advance & Storage Tips
I recommend making your cake layers in advance and freezing them. It breaks the process up and makes it more approachable.
You can also make the frosting ahead of time or save any leftover frosting! It can be stored in an airtight container in the fridge for up to a week or in the freezer for up to a month. Be sure to give it a good stir once it thaws to get the consistency nice and smooth again.
A frosted cake can last in the fridge for up to a week or in the freezer for up to a month. The buttercream locks in all the moisture, keeping the cake fresh and delicious!
If you cut into the cake and have leftovers, use any remaining frosting to cover the cut section to keep it moist and store in the fridge for up to a week.
Let Me Know What You Think!
If you try this easy marble cake recipe, I’d love to hear what you think of it! Please leave a rating and comment below.
Also tag me @chelsweets and use #chelsweets so I can see your beautiful creations on social media!
Marble Cake Recipe
Equipment
Ingredients
Vanilla Cake Recipe*
- 3 cup all-purpose flour 360g
- 3 cups granulated sugar 600g
- 2 1/2 tsp baking powder 10g
- 1 tsp fine salt 6g
- 1 cup (2 sticks) unsalted butter, room temperature 226g
- 1 cup carton egg whites or 7 large egg whites, room temperature 240ml
- 1 1/2 cups buttermilk, room temperature 360ml
- 2 Tbsp vegetable or canola oil 30ml
- 2 tsp vanilla extract or vanilla bean paste 8ml
- *additional ingredients for the chocolate cake are listed below
Additional Ingredients (to be added after the vanilla cake batter is made, to change it into chocolate batter):
- 1/3 cup unsweetened baking cocoa 28g
- 1/4 cup granulated sugar 50g
- 1/4 cup large egg whites, room temperature 60ml or 2 egg whites
- 1/4 cup buttermilk, room temperature 60ml
- 1/2 tsp baking powder 2g
- 1/4 tsp fine salt 1g
Chocolate Fudge Swirl:
- 1 cup chocolate chips 160g
- 1/4 cup unsalted butter, room temperature 56g
- 1/4 cup heavy whipping cream, room temperature 60ml
Buttercream Frosting
- 2 cups unsalted butter, room temperature 452g
- 1 Tbsp vanilla extract or vanilla bean paste 12ml
- 1/2 tsp fine salt 3g
- 7 cups powdered sugar 875g
- 1/4 cup heavy whipping cream, room temperature 60ml
- 1/2 cup unsweetened cocoa powder, sifted 40g
- 1 cup dark chocolate chips, melted and cooled 175g
- additional 1/4 cup heavy cream or whipping cream 60ml
Instructions
Marble Cake Layers:
- Preheat oven to 350°F/175°C. Grease and line four 8" cake pans and set aside.
- Begin by making the vanilla cake batter. Mix together the dry ingredients (3 cups flour, 3 cups sugar, 2 1/2 tsp baking powder, and 1 tsp salt) in a stand mixer with a paddle until fully combined.
- Mix 1 cup of room-temperature butter into the dry ingredients on a low speed. Continue to mix until no large chunks of butter remain, and the mixture looks like moist sand.
- Pour in 1 cup of egg whites and mix on low until just incorporated, then mix in 1 1/2 cups of buttermilk, 2 Tbsp vegetable oil, and 2 tsp vanilla extract on a low speed.
- Scrape down the sides of the bowl with a spatula, then beat on medium speed for about 1 minute. This helps give the layers a lighter texture.
- Pour 2/3 of the batter into a separate bowl (roughly 1200 grams) and set aside.
- Next, we transform the remaining vanilla cake batter into chocolate cake batter. Mix in the additional 1/3 cup baking cocoa, 1/4 sugar, 1/4 cup egg whites, 1/4 cup buttermilk, 1/2 tsp baking powder, and 1/4 tsp salt on a low speed until combined and set aside.
- If desired, make the chocolate fudge swirl. Combine 1 cup of chocolate chips, 1/4 cup of room-temperature butter, and 1/4 cup of heavy cream in a heatproof bowl. Heat in two 30-second intervals, stirring between each interval. Allow the mixture to sit for 1 minute, then stir until smooth.
- Alternate spoonfuls of chocolate and vanilla cake batter into the prepared cake pans. Fill them roughly 1 inch high with batter. I like to use a digital kitchen scale to make sure each pan has the same amount of batter.
- Add small drops (about 1 inch in diameter) of the chocolate swirl on top of the cake batter, then drag a small offset spatula or butter knife through the batter in horizontal and vertical lines to create a marbled pattern. Save the leftover chocolate mixture to decorate the cake layer. It can sit out at room temperature for up to 8 hours.
- Bake for 32-35 minutes or until a toothpick comes out with a few moist crumbs.
- Once the cake layers are out of the oven, run a small offset spatula around the edge of the pans to help separate the cake layers from the pans.
- Allow the layers to cool in the pan for about 15 minutes, then flip them onto a wire rack to finish cooling.
- Once the cake layers have finished cooling use a serrated knife to level the tops and set the cake layers aside.
- If you're making these cake layers in advance, wrap and freeze them like this. When you're ready to assemble the cake, unwrap the frozen layers and allow them to thaw for about 30 minutes before you plan to frost the cake.
Buttercream Frosting:
- While the cake layers bake and cool, make the vanilla buttercream frosting. Beat 2 cups of unsalted butter on a medium speed for 30 seconds with a paddle attachment until smooth.
- Mix in 1 Tbsp of vanilla extract and 1/2 tsp salt on a low speed.
- Slowly add in 7 cups of powdered sugar on a low speed. Add 1/4 cup of heavy cream halfway through to make the frosting easier to mix.
- Continue to mix on low speed for a few minutes, until the desired consistency is reached. If the frosting is too thick, add in additional cream (1 Tbsp at a time). If the frosting is too thin, add in more powdered sugar (a quarter of a cup at a time).
- Place 1 cup of vanilla buttercream into a separate bowl and set aside.
- Mix in 1/2 cup of baking cocoa, 1 cup of melted chocolate chips, and an additional 1/4 cup of heavy cream into the remaining frosting.
- Cover both the vanilla and the chocolate buttercream with plastic wrap to prevent crusting and set aside.
Assembling this Layered Marble Cake
- Stack the cake layers on a greaseproof cakeboard or flat plate. Spread a tablespoon of buttercream on the center of the board to help your cake layer stay in place.
- Center the first cake layer on the cake board. Spread an even layer of the dark chocolate buttercream onto the cake layer with a large offset spatula. Repeat with the remaining cake layers. Place the top cake layer upside down.
- Cover the cake in a thin layer of frosting and smooth using a bench scraper or a large offset spatula. Chill the cake in the freezer for 10 minutes or fridge for 30 minutes until the frosting is firm to the touch.
- Swirl together the vanilla and chocolate buttercream around the cake using the back of a spoon or an offset spatula. Heat up the remaining chocolate fudge swirl mixture for 15-30 seconds, or until it's thin enough to easily spread into the frosting on the cake. Swirl the chocolate mixture into the frosting to create a marbled look, then enjoy!
Video
Notes
How Many People Does This Cake Feed?
If you make this cake with 4 8-inch cake layers, it will feed about 32 people. For more information on cake sizes and servings, check out my cake portion guide.Recipe Variations – Making This Cake in Different Sizes
One batch of this recipe makes about 11 cups of batter or about 2000 grams. If you plan to use four circular cake pans, add 500 grams of batter into each pan. If you want to make a tiered cake or different-sized cake with this recipe, check out my cake batter calculator to see how many batches of batter you’ll need. This recipe can also be used to make a sheet cake! One batch will make a 1, 9 x 13-inch cake layer that’s about 1.5 inches tall once leveled. Bake for 45-55 mins at 350°F/175°C, or until a toothpick inserted in the center comes out with a few moist crumbs. Bake time can vary a lot based on the type of pan you use, if you use heating cores, and your oven. I recommend using heating cores if you have them, they help sheet cake layers bake more evenly and quickly. For more details on how to convert this cake recipe and others into sheet cakes, check out my sheet cake guide. Last but not least, you can also make cupcakes using this recipe. Fill the liners 3/4 full and bake them at 350°F/175°C for 19-21 minutes, or until a toothpick inserted in the center comes out with a few moist crumbs.Tips for Making the Best Marble Layer Cake
- Ingredients at room temperature mix together better! Set out any cold ingredients ahead of time.
- Properly measure the flour (spoon into the cup measure, then level). Or better yet, use a kitchen scale to measure your dry ingredients.
- Use a scale to weigh your cake pans as you fill them. It will make your cake layers bake to the same height and bake more evenly.
- Make sure the buttercream is the right consistency. This will help give the cake proper structure and make it easier to decorate.
- Level the room temperature or thawed cake layers with a serrated knife to make them easier to stack.
- Chill your cake layers in the freezer for about 20 minutes before assembling the cake. It makes it so much easier to stack and frost them!
- If your cake layers turn out less than perfect, read my cake troubleshooting guide to see where things might’ve gone awry.
Making This Marble Layer Cake in Advance & Storage Tips
I highly recommend making the cake layers in advance and freezing them. It breaks the process up and makes it more approachable and enjoyable, and I promise they taste just as delicious! You can also make the frosting ahead of time or save any leftover frosting! It can be stored in an airtight container in the fridge for up to a month or in the freezer for up to 3 months. Be sure to give it a good stir once it thaws to get the consistency nice and smooth again. A frosted cake can last in the fridge for up to a week (as long as it doesn’t have a perishable fruit filling) or in the freezer for up to a month. The buttercream locks in all the moisture, keeping the cake fresh and delicious! If you cut into the cake and have leftovers, use any remaining frosting to cover the cut section to keep it moist and store it in the fridge for up to a week.Nutrition
Other Recipes You Might Like:
Thanks sharing the tweaked Marble Layer Cake and making it easier to recreate your marbleized design.You usually show how to assemble the layers and decorate it. I like how the finished cake look in the last photo and wonder if you have a video of how.
I do!! I decided to split it up into two separate videos, just because it was too long! I’ll be sharing the video of the assembly on the cake on youtube, and I can definitely add some more photos to this post 🙂
Hi! If I half the recipe for 6 inch layers about how tall will they rise?
They should be just under 1 inch! 🙂
Lately my marble has been dry am excited to try this. wondering it’s not too chocolaty with the added chocolate chips ? thanks
This is going to be a perfect recipe for you then!! I loved the chocolate swirl, but I’m also a huge chocolate fan! You can definitely skip the chocolate fudge swirl if you think it’ll be too much for your taste ??
Hi Chels! I need to make Character cake and I know I’m going to need to use a 9×13 pan but I dont want super thin layers because I’m going to need to carve. Should I double this recipe and do it in one 9×13 pan or double it and bake in two 9×13 pans and then sandwich then together?
I usually use one batch to make two 9×13 inch cake layers, and sandwich them together! Each layer ends up being about 1 inch tall. If you want them thicker than that you can definitely make 1.5 or 2 batches! Just be sure to use flower nail (placed upside-down in the center of the pan) to help them bake evenly!
Really wanting to make this!! On your ingredients you list an additional 1/2 tsp baking powder but in the directions you say baking soda. Which is it supposed to be.
so sorry about that, it’s a typo! It should be baking powder <3
Can you use carton egg whites?
Yup, that’s actually what I use!!
Can I use semi sweet chocolate bars instead of mini chips?
You definitely can Rosemary!! That would work too!
Thank you for sharing, love baking and will follow you always thanks again
Aw thanks Angie! I’m so happy to hear that!! <3
Hello ? I would love to try this recipe for my daughters birthday. I would be doing a 4 layer cake using 8″ round pans. If I doubled the recipe would this be adequate? Thank you!
If you double it you’re going to have a lot of extra batter! I would recommend making 1.5 batches to make 4, 8-inch cakes layers <3
@Chelsweets, isn’t the receipt written for 4 8″ layers? it says to prepare 4 8″ cake pans
Hi
I want to make this cake but really unsure of the measurements I always understood flour to weigh 120g and butter 113g. So 3 1/4 cups flour 390 g but your measurements sugest 3 1/2 cups and a half a stick of butter weighs 113g but your measure sugests 1/4 cup im probably wrong no great math wiz here but if you could help would love to make this cake
Heyyyy…just tried the cake without the fudge swirl. It came out great except for the cracked top. Can you tell me what causes cracked cake tops?
sometimes that can happen if your layers are placed too high in your oven! maybe try placing them on a lower baking rack in the future <3
Hi Chelsea, you mention room temp for butter and buttermilk. Should egg whites be room temp as well? Look forward to making this cake!!
Yes!! so sorry about that! the batter just mixes together more easily when everything is at room temp <3
Hi! i tried this recipe for an Easter cake and everyone loved it! I made half of the recipe for 3- 6 in layer cakes.
Now I want to make it for my sons birthday. I need to fill 2- 10″ round pans. Do you know how much of the batter I should make? Thanks so much!
So happy to hear that Carolyn! I actually just shared a cake batter guide that calculates how much batter you need for different sized cake pans 🙂 Here’s the link: https://chelsweets.com/2019/04/22/how-much-cake-batter-per-pan/
How many times would I make this recipe for a wedding cake of 14, 10, 8, 6″ (5 inch each tier)? Thanks!
It makes pretty much the same amount of batter as my vanilla cake recipe! I share a really great batter calculator here, which helps you figure out exactly how much batter you need for different sized tiers. Hope it helps!
https://chelsweets.com/2019/04/22/how-much-cake-batter-per-pan/
Hello. Was looking for a good marble cake recipe and i think that i have found it. Instead of baking them in layers i want to bake a deep cake. Could you suggest what size cake tin would i should use for this amount of batter. Also would i need to alter the oven temp and baking time? Sorry for the problem..Thanks.
I never bake in deep baking pans, so sadly i’m not sure! this is a butter cake, not a sponge cake, so it doesn’t bake and tort the same way a sponge cake would! If possible, I’d recommend baking multiple layers in shallower pans <3
Hi could I add peanut butter to the vanilla cake to make it a chocolate and peanut butter marble cake?
It will change the texture of the vanilla cake a bit, and cause it to bake a bit differently! It should still turn out though, I’d recommend adding maybe 1/3 cup of cream peanut butter to the batter if you plan to try it 🙂 Add the peanut butter when you add the butter!
Hi Chels! I also need to make a 9 x 13 but would prefer not to have two thin layers. Could this be baked in a single 9 x 13 pan and if so, for about how long?
This recipe would make two 9×13 inch layers, that would be about 1 inch tall! I’ve done it before, and stacked them, and it’s been great! if you were to put all the batter in one pan, I’m worried it would overflow in the oven, and would take forever to bake! regardless of which method you do, be sure to use flower nails to help the sheet cakes bake more quickly and evenly <3 It’s a life saver!!!
Hi Chelsey! I would like to use this recipe for a two tier (6″ and 8″) cake that is three layers for each tier, would I do a recipe and a half in order to make this? Thank you!
If you plan to do 3 layers in each tier, I’d say 1 1/2 batches should be about right 🙂 happy baking Sam!
Thank you for your advise..You have been very kind.
Hi Chels! I am interested in making this cake with 2 9-inch pans instead of 4 8-inch pans. Do you think cutting the recipe in half would yield enough batter? Or should I maybe use 75% of the original recipe?
I’d def say make 3/4 of the original amount of batter for 2, 9-inch pans! Happy baking Cat!
Ace! I wanted to know this too. Can’t wait to try it. If I can’t get buttermilk, should I just add vinegar to whole milk?
Hello! I’ve made this recipe before, and my family and I absolutely love it! I want to make marble cupcakes, would this recipe work for cupcakes? Thanks!
Hi Erica!! so happy to hear you and your family love this recipe! I haven’t tried making cupcakes with it, so I’m not quite sure! my cake recipes sometimes stick to the liners when people try to make them into cupcakes, so that would be my only concern!
The recipe calls for greasing 4 8” pans. Is this correct?
yup! This recipe makes more batter than my normal cake recipes, since you end up adding more ingredients to make the chocolate batter 🙂
@Chelsweets, This cake has become my son’s annual birthday tradition :-)) It’s definitely a staple in our home!! I only have three 9 inch cake pans that are 1.5 inches tall though and my cakes are not as thick as I’d like so I’m wondering how much I should increase the recipe to make them closer to an inch and a half thick. Also… Would it work the same if I sipped my egg whites and folded them into the batter, alternating with the buttermilk? Would that ruin the texture?
Thanks!
This is a great recipe, thank you. I am making a bear cake for my nephew and was wondering if this would be a good recipe for carving?
I’m so happy to hear that! If the cake layers are chilled (I pop mine in the freezer for about 20 minutes), you can carve them with a serrated knife! Just be super gentle 🙂
How long will the cake keep once it is made ?
Hi Susan! A cake can last up to a week in the fridge once it’s frosted! or several weeks if you keep it in the freeze <3
Well I finished making the cakes and noticed the oil still on the counter. I don’t know if you know but in the video you didn’t add the oil. I was following along so I didn’t check the directions. The only thing I looked at was for the chocolate ingredients because you didn’t mention how much of a few things. I guess I learned my lesson. You might want to mention it in your video. I pulled them out of the oven and tried a bite. Definitely doesn’t taste right and it’s for my nephews bday tomorrow. I guess I’ll have to go buy a cake.
Sadly I can’t change that video since it’s already been uploaded and shared! But to be honest, it doesn’t really change the taste at all! I think it makes the texture a tiny bit fluffier, which is why it’s in the recipe. But not including 1/8 of a cup of vegetable oil in that much batter isn’t going to ruin your cake. I don’t include it sometimes when I run out of it, and it still tastes great. if your cake didn’t turn out, something else must have gone wrong. I’m sorry this didn’t work for you!
Hi Chelsey! I will be trying out this recipe tonight and wanted to know if I could use the chocolate fudge mixture to make drips around the top of the decorated cake? Thanks!!
I don’t recommend it! I have a wonderful chocolate ganache recipe that makes amazing drips, which I’d recommend instead. Here’s the link: https://chelsweets.com/2017/03/28/chocolate-ganache-drip-recipe/
I don’t recommend it! I have a wonderful chocolate ganache recipe that makes amazing drips, which I’d recommend instead. Here’s the link:
https://chelsweets.com/2017/03/28/chocolate-ganache-drip-recipe/
I am in LOVE with this recipe! I tried it for the first time last week and it was a huge hit at the party I brought it to. When I took the last leftover pieces home for my family to taste, they were begging me to make it again for our family cottage weekend. Just baked it again last night (but this time in two 9″ pans) and it came out incredible once again. Thank you so much Chelsey – this is by far the best recipe I have ever tried and will be my new go-to when I want to impress!!
So happy to hear that Jen!! You are too sweet, I love hearing that you’re putting my recipes to good use!!
hi im making this cake for may daughters brithday. i only have 2 cake tins.. can i bake 2 and then the second 2 after the first are cooked?
You definitely can Shayla! Leave the batter out at room temp, and bake them as soon as the other layers are done <3
Hi! can the fudge swirl be made with Nutella or some sort of hazelnut chocolate spread? Am Making a cake for a Nutella lover and think would look so cute!
For sure! just heat it up a tiny bit in the microwave to make it more swirlable <3
Have you ever made this into cupcakes? If so, how many does it make, temperature and time to bake.
Thank you!
Sadly I haven’t with this specific recipe, but based on the volume of the batter I think it would make at least 3 dozen!! You should bake them at 350 degrees, and I’d guess they’ll take 18-20 minutes to bake.
Far too sweet! Your conversion of 3 cups sugar being 600g is surely wrong if 3.25 cups flour is 426g? Anyways! Too sweet, but great otherwise.
A US cup of granulated sugar is 200 grams, so three cups weigh 600 grams. You can try adding less granulated sugar next time if it seemed too sweet for your palette.
@Chelsweets, how much less sugar can I use before it affects the cake texture? I also found it to be too sweet but loved the way it turned out otherwise.
Hi Emily,
Great question! You can decrease the amount of sugar by 1/2 cup and the texture should still be great! The layers will still turn out if you reduce it by a whole cup, but they will be a lot less tender, so I’d recommend not reducing it more than 1/2 cup. Hope that helps, happy baking!
Absolutely love your recipes! I’ve made a few before and its always a hit! Question, for the buttercream for the marbled cake, would it still taste well if milk chocolate chips were used rather than dark? I’m planning to make a Spider-man cake for my brothers birthday tomorrow and have to try this recipe! But he’s not a huge dark chocolate fan. Or does it not have that dark chocolatey taste?
Thank you!
Thanks Marissa! The frosting will taste great with milk or dark chocolate in it!! I’ve made it both ways, and both are great! It really just comes down to your preferences, so if you’re a milk chocolate gal (or your brother loves milk chocolate!)), def use milk chocolate!!! 🙂
This looks beautiful but I am concerned with how sweet it will be. What kind of frosting do you recommend to keep the sweetness down?
It def is on the sweet side Elizabeth! You can try frosting it with a swiss merignue or italian buttercream <3
@Chelsweets, It’s SO GOOD with SMBC!! ??
GM Chelsweets, I have reviewed your information of how to fill cake pans. My question is my cake pans are 3 inches deep so I end up measuring my batter most times. So should I use 1.5 the batter for each 8 inch pan and the whole batter for my 6 inch pan? Also can I substitute the oil for butter?
Good morning! This recipe is formulated to use butter, so I’d recommend using that! i’ve never tried using oil, so I’m not sure if that would work. If you try it, please let me know!
One batch of batter makes about 7 cups, so if you want to make 3, 8-inch cake layers like the recipe recommends, you should add about 2 1/3 cups of batter to each one. Hope that helps!
I have a question regarding baking powder measurements. I usually weigh my ingredients but then check my measuring spoons just to see how accurate they are. I used measuring spoons for the 2.5 t of baking powder but that ended up being 13 grams instead of 10. I just want to make sure that the 10 grams is what you used and if so will back off on my measuring spoons. Three grams off can make a difference.
Thank you.
Hi Chelsweets!
I have a client that is requesting a sugar free marbled cake and your recipe was the first one I thought of. Would this recipe work with a sugar free substitute? How would I go about using it? It will be a 2 tiered cake. Thank you!
Hi Jocelyn! I honestly have never tried making a cake with sugar substitute, so sadly I have no clue!! I am so sorry :/
But I’m sending you all the good cake juju as you navigate that cake order!! <3
Forgive me but I’m confused as to the yield of the batter. The recipe says 4 8 inch pans, however in the response above you say the recipe recommends 3 8 inch pans… I am making this cake in two days and need to make 3 9 inch layers. Will this recipe be enough or should I make 1.5 times batter?
Sorry, that is a typo (i’m updating it as we speak)! I used this recipe to make 4, 8-inch cake layers! If you want to make 3, relatively thick 9-inch cake layers, I’d still recommend increasing the amount of batter to 1.5 batches <3
Hi Chelsweets,
Absolutely divine recipe!! Youe comment above is good to know. I wanted to know if i wanted to make just one 8″ or 9″ cake how would i change the measurements? Would i just make 1/3rd of everything or is there an easier way? Thank you!
Hi Gunjan,
Yup! If you just one to make one cake layer, I’d follow the recipe the same way, but use 1/3 of each ingredient 🙂 Hope that helps, happy baking!!
How much should I double or triple for 4 layer 14″ and 10″ wedding cake?
I use my batter calculator to figure that out! here’s the link to it: https://chelsweets.com/2019/04/22/how-much-cake-batter-per-pan/ <3 Hope that helps!
Hi I am looking to make 2 x 6inch cakes each cake must have 3 layers can you advise on the amount of batter required. Do I make 2 lots?
I’d actually recommend making 1.5 batches! That should be just the right amount for 2 cakes that made with 3, 6-inch cake layers.
Hope that helps, happy baking Dyan!
This marble cake recipe baked up perfectly and was delicious! One question, though. Is there any reason why the cake would get sweeter? We frosted it with your cream cheese frosting recipe (using half the powdered sugar) then kept the frosted cake refrigerated for 3 days before eating. Does that somehow make the sweetness intensify? Haha. It was still delicious, but much sweeter than the day it was baked.
Hi Britt,
So happy to hear that you loved this recipe!! I don’t think letting the cake sit affects the sweetness, but this recipe does use a lot of sugar!! haha I think it’s just on the sweet end of the spectrum 😛
Hi! I was just wondering if I want thick layers can I just use 2 8” pans instead of 4 and approximately how long should I cook it for? Thank you!
If you use all this batter in only two pans, it’ll take quite a long time! I highly recommend using a heating core if you plan to do this, otherwise the sides will caramelize a TON! This recipe has a lot of sugar in it, and it really bakes up best in 4 pans <3
Sorry I can’t be of more help Haide, I’ve never tried baking it in two pans!
This recipe looks so delicious… Can this marbled cake recipe be made into marbled cupcakes?
Hi Ericka,
You should be able to just fine! I haven’t tested it out yet, but this recipe should work just fine for cupcakes. If you try it, I’d love to know how they turn out 🙂
Hi
By egg whites do you mean whipped egg whites?
Hi Hanna,
I just mean regular egg whites! I get mine in a carton, so they’re easy to measure and pour for baking <3
Hi, could you please let me know how many times i should do the recipe for a half sheet single layer cake?
Hi Rama! One batch of batter should actually be great for a single half sheet layer cake! Just be sure to use flower nails or heating cores to help the cake layer bake more evenly and quickly <3
Hello…well, instead of making the marble cake, I totally deviated and converted your vanilla cake (I made 1/2 recipe) into a lemon cake. It was fantastic!!! The color, texture and flavor were perfect!!!! I eliminated the vanilla and added 1 tsp lemon extract, zest of one lemon, and a tsp of lemon juice. Very good and my husband, who doesn’t like lemon cake, was looking for the leftover tonight! Btw, 1/2 recipe made 2 thick 6″ layers, each layer was approx. 1 1/2″ tall. 🙂
I don’t know what i did wrong. I followed everything but when my cakes bakes the chocolate swirl sunk to the bottom of the pan making it harder to get the cake out.
I’m so sorry to hear that Brittany!
What size of cake pans did you use? Maybe when you swirled the batter it pushed the chocolate swirl a bit too deep into the batter?? Hopefully we can figure out what happened!
Hi. Your recipe says it makes 4 8” layers cakes. Then why should she make 1.5 times the batter?
Hi Shweta! is this in response to another comment? Sorry, they don’t show up linked in the platform I use to respond to them. What size of pans are you trying to use?
Hey I was wondering if I can replace all-purpose flour for cake flour? And I can then you much cake flour I need?
Hi Linda,
You can use cake flour in place of all purpose flour. For every cup of AP flour the recipe calls for, use 1 cup + 2 TBSP of cake flour. Hope that that helps, happy baking!
This cake turned out very dense for me, like a sponge cake. Is this usual? I used cake flour but didn’t add the extra 2 tbsp?
Hi Christine! Usually sponge cakes are springy quite fluffy. Do you mean more like a pound cake?
This is a butter cake, so it is a denser style of cake! It’s a unique texture, but it works incredibly well for stacking and making layer cakes, and tastes great. It’s not everyone’s cup of tea, but I really enjoy it 🙂
Does the buttermilk for the chocolate part of the marble need to be room temperature as well? It states it for the vanilla but not for the chocolate.
What size tip do you use for the icing? Thanks 🙂
Hi Elyza,
Surprisingly I didn’t use a frosting tip at all! I just cut openings in my piping bag that were a little less than 1 inch. Hope that helps, happy baking!?
Hello,
Your recipe sounds great. I need a double layer cake recipe to make my kids Mickey Mouse cake. I’ll be using a Mickey cake pan. I’d say the pan is roughly 9 by 13. Can I use this recipe as is for this cake pan?
Thanks,
Michele
Hi Michele,
You sure can! One batch of this cake recipe will make 2 cake layers that are 9×13, and that are about 1 inch tall (once leveled). Hope that helps, happy baking!
My boyfriend loves marble cake and i intend to use this recipe for him for Valentine’s day! Hopefully he’ll love it.
But i plan on baking it in bread pans to make cake loafs. Any advice on adjustments to make for this? I’m not very creative when it comes to baking adjustments, haha!
Hi Leighann,
I’ve actually never tried baking any of my cake recipes in a bread pan before, so sadly I don’t have much advice either! It should work though, because this cake recipe is pretty similar to a pound cake recipe. The batter doesn’t rise a ton, so be sure to keep that in mind when you fill the pans.
I’d love to hear how this turns, please let me know!!! 🙂
Hi there! I am hoping to use this recipe for a 9×13 cake. What adjustments would I need to make (if any) for the recipe?
Hi Olivia,
This cake recipe makes two sheet cakes that are 9×13 inches. However, they’ll be slightly less than 1 inch tall once you level them. So it depends on how tall you want the layers to be! When I bake layer cakes, I place two flower nails spaced evenly apart in the center of each pan (and spray them), to help the layers bake more evenly and quickly. With flower nails/ heating cores (like these:https://amzn.to/2GIFU97), the cake layers bake in 37-40 minutes in my oven. I hope that helps, happy baking!!
Have you a gram weight for the cocoa please? I’ve only Dutch process. That ok?
Hi Caroline,
I just updated to recipe card to include the gram measurements for that! And dutch processed should work just fine in in this recipe 🙂 Happy baking!
Hi dear, just wanted to ask if it’s okay to add in egg yolk since I noticed you only use egg whites? Thank you and love your cake recipes!
I cut this recipe in half and used it as a cupcake recipe. They turned out so cute and really moist and tasty! I filled the liners halfway and baked at 350 degrees for 18 minutes. Some of them didn’t quite rise as much as I liked so I will fill a bit more next time around! But I think it’s a great start to making the perfect marble cupcakes! Thanks for the recipe ?
That’s so great to know Jamie!! I have been meaning to test this recipe as cupcakes for the longest time but haven’t gotten around to it, so I’m so happy you shared how your turned out 🙂 Thank you!!
Hi Chelsey! I plan on making this as a wedding cake and had a couple of questions:
1. How long do I bake 6″ and 12″ cakes for?
2. If I want the chocolate buttercream on the inside and vanilla buttercream to frost the outside, should I use half of the recipe for each?
Thanks in advance for your help!
Hi Lubna,
I usually use about a cup of frosting between each of my cake layers, so I’d make about 3 cups of the frosting chocolate and leave the rest vanilla.
The time different sized cake layers bake for can vary a lot based on how full the pans are filled, and if you use flower nails with the larger pans. I bake my 6 inch cake layers for about 32 minutes, and 12 inch cake layers with flower nails / heating cores for about 50 minutes.
Hope that helps, happy baking!
Hello dear
Can I use while eggs instead of just egg whites?? If yes what is the measurements fir the whole eggs to be added in the marble cake recipe??
Hi Arifa,
You can! You can use 4 whole eggs in place of the egg whites this recipe calls for. Hope that helps, happy baking!
Is that 3 eggs in vanilla batter and 1 in chocolate or 4 in the main batter and none in the chocolate?
Hi Erica,
You can add four whole eggs to the main batter and then not add any extra to the chocolate portion. Happy baking!
Sounds and looks heaven! Is there any substitute for buttermilk to make it dairy free?
Hi Lisa,
I like to use almond milk in place of the buttermilk! It will change the taste and texture a little bit, but it should work in its place 🙂 Hope that helps, happy baking!
Hi! I tried out this lovely cake today and it was just beautiful! Tasted amazing, so soft and moist, yet packed with flavour. My picky toddler ate about 4 slices in one sitting! Definitely will make again. Thank you for the recipe!
So happy to hear that Srilakshmi! That is awesome 🙂 happy baking!!
Hi. Wondering if you could help me. I am planning on making this tomorrow for my son’s birthday cake. I have 1 6 inch by 2 inch pan. If I wanted to make one 6 inch and one 9 inch to layer it would half the recipe? And how long would the 6 inch take versus the 9 inch. (also would a 6 inch on a 9 inch look nice).
If I wanted to just do one 6 inch by 2inch high cake would I 1/3 the recipe? Baking it April 11 so any help would be great
So sorry for the delayed response Kyla! If you wanted to make one 6 inch cake layer you should 1/4 this recipe! To make one 6″ and one 9″ I”d actually recommend using a full batch of batter, and just making slightly taller cake layers.
I’m not sure how single 6″ and 9″ cake layers would look stacked on top of each other, I would recommend making either 2 9″ or 4 6″ layers. If you only have one pan, that’s ok! You can bake the layers one at a time.
The bake time should actually be pretty similar for the two cake layers, but can vary based on how full you fill them. The 6 inch should take about 35 mins, and the 9 inch should take about 40.
Hope that helps, happy baking!
Does substituting egg whites for eggs change the taste or consistency in any way?
Hi Hanaan,
It does make the cake a tiny bit denser, but it still tastes amazing!
This was so worth the time to make. Awesome cake and fosting. Made a large layer cake and a small “smash cake” for our grandsons first birthday.
Hi Paul,
So happy to hear that!! Thank you for sharing 🙂
Hi, how would you covert this recipe into a one layer cake? I’m looking to do this cake but in just one cake pan for my sister’s birthday since I’m a beginner. Thanks!!
Hi Mimi,
It depends what size of cake pan you have! If it’s an 8 inch cake pan, I’d recommend making 1/3 of a batch of cake and 1/4 batch of frosting!
Can the cake be baked for 180c for 40 m
inutes
Hi Janice,
I believe 350 F equals about C, so the bake time should be similar (34-36 minutes) and shouldn’t take that long! Be sure to bake just until the cakes are done and a toothpick comes out with moist crumbs, or else it can turn out dry! Also remember the cake will continue to bake a bit once it’s out of the oven. Hope that helps, happy baking!
Hi! Does the recipe make 3 or 4 8-inch cakes? Noticing some contradicting info in the comments vs recipe and just want to clarify! Thanks a million for all the lovely info!
So sorry for any confusion Nadine! I just updated the recipe card to clarify. This recipe works best when used to make 4, 8-inch cake layers 🙂 Hope that helps, happy baking!!
My cake cracked at the top where the chocolate swirls were. How do you prevent that?
Hi Jean,
A little bit of cracking is normal, and happened to mine too! If you want to fully avoid any cracks, you can omit the additional chocolate fudge swirl and just swirl together the vanilla and chocolate cake batters.
Hello, I know this would be a lazy way of making a marble cake but can you mix boxed cake mixes for a marble cake? I’m needing to make a half sheet cake size for a graduation cake.
Hi Talisha,
I’ve never tried that but it seems like it should work!
If I make the cake the night before I plan to frost and serve it, how can I store it so the cake remains soft?
Hi Annalisa,
I’d recommend assembling and frosting the cake, then storing it in the fridge overnight. The frosting will lock in all the moisture and keep it soft and delicious <3 I do that with most of my cakes! Just take it out a couple hours before you plan to cut it so that it can thaw to room temperature.
I have not done it yet but can I use salted butter?
Hi Samirah,
You can, just be sure to omit the salt in the recipe! <3
Thank you! I think I’ll still incorporate the choc fudge swirls for my future bakes. Too pretty not to! ?
haha I agree Jean!! 🙂 I am a big fan of it!!
Started making the cake and noticed that the butter grams weight for the fudge swirl does not match to the 1/4 cup. Which amount do you recommend using, grams or 1/4 cup? Are there any other corrections for the recipe?
So sorry about that Jane! I usually bake with a cup measure, then convert the grams in recipes after. Just updated the recipe card to reflect this, thanks for bringing it to my attention <3
Thank you. I guessed that it was the 1/4 cup & made the cake for my husband’s happy quarantine birthday. Kids & grandkids came for an outdoor social distance celebration. Everyone LOVED the cake! I baked the full recipe in 2-9″ pans and it came out perfectly. Split them into 4 layers and added a cream cheese chocolate buttercream filling & 1 layer of white chocolate cream cheese butter cream filling. My husband is a marble cake aficionado & said this is the best one he’s had, bar none! ~ Thank you!
Hi Jane,
Phew! So happy to hear that it was a big hit 🙂 That sounds incredible!! Thank you so much for sharing!
Hi 🙂 Can i use nonstick 8 inch cake pans? Planning on making this soon for a big birthday. Ty
Hi Mia,
You sure can! Just be sure to line your pan with parchment paper and use lots of non-stick spray or butter flour 🙂 Hope that helps, happy baking!
Hi! I’m going to be making this for my son’s birthday. We live at a higher elevation. Do you have any recommendations for that?
Hi Trina,
It depends on how high up you, but here are my general recommendations for 5,000 feet:
Reduce baking powder:for each teaspoon, decrease 1/8 to 1/4 teaspoon.
Reduce sugar: for each cup, decrease 0 to 2 tablespoons.
Increase liquid: for each cup, add 2 to 4 tablespoons.
Increase oven temperature by 25 degrees F.
Hope that helps, happy baking!!
How would I make this cake dairy free? What substitutes would you recommend? I loved the original recipe but a friend asked me to make it for her daughter who can’t have any dairy
Hi Brittany,
That’d be a lot of substitutions! You can use vegan butter, flaxseed eggs, and alternative yogurt (soy, almond or oat should work just fine) in place of the buttermilk. Hope that helps, happy baking!
Hi Chelsweet,
I have 2 6” pan and was wondering if you could help me with showing the correct measurements for this. Thank you in advance and hope you are doing well.
I’m really excited to try this recipe for a cake I will be baking soon!! I would like to know if you have a marble cake recipe for 3 6’ inch cakes?
Yay! Hope it turns out great Jannixa.I haven’t shared that yet but I will be in about 3 weeks <3 stay tuned, it’s coming!!
Can I make this without the chocolate fudge swirl?
Hi Madalyn,
For sure! It can be left out. Happy baking!
i am making a cake for a friend’s birthday, and i was wondering if i could make it in a 9×13 pan instead. would that be possible for this recipe?
Hi Katie,
I would halve this recipe to make one 9×13 inch cake! If you use a full batch, your sheet cake will turn out super thick!! You also probably only need about 1/3 of the frosting. Hope that helps and that your friends bday cake turns out great!
Will this recipe work in 2 9” cake pans?
Hi Brandy,
This recipe would work great to make 2, 9″ cake layers 🙂 Happy baking!
Hi there! My friend absolutely loves marbled cakes and this recipe sounds and looks delicious! I’m hoping to use this recipe and baker her a cake for her birthday that is coming up, but I would like to use only two 8” round pans. What adjustments would I need to make for the recipe?
Hi Megan,
I’d recommend making a half batch of this recipe to make 2, 8″ cake layers. Hope your friend’s cake recipe turns out great!
Hi there, I’m looking to make this cake in 8×8 square inch pans. Would you know about how many layers that would be with this recipe? Thank you!
Hi Kait,
You can make either 3 8″ x 8″ cake layers with this recipe. Hope that helps, happy baking!
Could this be made without eggs to allow for allergies?
Hi! I’m planning on making this for my mom’s birthday. I only have 2 9” pans, though. Would I need to make half a batch? I see that you recommend that on other comments.
Hi Vanessa,
As long as you don’t mind the layers being a tiny bit thicker than mine, you can use one batch to make 2 9″ cake layers! They will just take a bit longer to bake. You can also add a heating core to the center to help them bake more evenly and quickly 🙂 Happy baking!
Hi ??
I just tried making the cake but it came it out with a weird texture like it was as if I made it in a pressure cooker
Is it how it’s meant to be
The taste was good tho
Hello!
I just tried your recipe. The cake was awesome… Thank you for sharing
I did the marble cake last night seems like the baking time required takes more than 60 mins for my oven. Not sure what’s the reason. Am using 8 inch pan
I didn’t do the multiple layer of the cake. Only one marble cake
Hello? im looking forward to make this cake for my sons birthday and i have got one 10 inch round tray..will the cake receipe fit in to my tray? Or kindly instruct how to adjust.thanks a lot
Hi chels! I absolutely love your cakes! 🙂 I was wondering if it was okay to use this Exact recipe for two 3 layer 6in cakes? Or do I need to make any adjustments?
Thank you so much for this fantastic recipe. Every recipe I try on your site works out for me and tastes great.
This marble cake has great flavour and is not dry. Its super easy to make and was a huge hit.
Wanted to try this recipe but not make 4 8″ layers, so I halved the recipe. I didn’t add in the fudge swirl, as I was just trying to see how the cake would turn out (texture, flavor, rise, etc). Result: very light and fluffy, not too sweet, and NO bitterness like some other marble cake recipes I’ve tried recently.
My notes:
I am in AZ at around 1200′ ft above sea level, and I reduced the oven temp to 340F (I usually bake at 325F) and my 2 8″ rounds were done at 24 min. When mixing the chocolate batter, note that it will be VERY runny (as is the vanilla batter). (Some recipes turn out a lot thicker when you make the chocolate batter.) I didn’t make the frosting, because I already had a batch of Chocolate Ermine Frosting, which isn’t super sweet like American Buttercream frosting, and the ermine frosting pairs VERY NICELY with this cake recipe! Next time, I will try adding in the fudge swirl for a little sweet addition!
Definitely a keeper!!
Hello can this recipe be used for cupcakes also
Hi, thank you so much for such detailed instructions. Won’t the chocolate drops prevent the cake from baking as it should be normally? Will it take more time? Can I use Hershey’s chocolate syrup?
This is the one of the best, most moist, delicious cakes I’ve made. I’ve always been a choc cake maker and gave this a try for my daughters birthday. It’s super delicious and the big 3 layer (8inch) cake finished so quickly. Everyone at the party asked for the recipe. Thank you for the detailed recipe. Btw I mixed melted white chocolate in frosting instead of dark bcos I made a pink icing cake ?
This came out really really dense. The taste is great but no one could even finish their piece! What would I do to lighten it next time? Less sugar?
My vanilla batter is EXTREMELY runny and thin. I measured everything on my scale. Thoughts?
@Carrie L Thompson,
I made this a couple of days ago and I had the same problem. I am wondering if it’s the weather or if my butter was too warm?! But I’m not sure. I will be making it again and maybe chill in the freezer for 10-20 minutes.
Certainly isnt as pretty as yours. Flavor batters smooshed together with no real marbling. Also took 7 minutes longer to cook.
This cake came out just like your picture and was extremely delicious and pretty! I also made the buttercream frosting and it was beautiful. We made this for my Great-Grandson’s 4th Birthday. Half of the family like yellow cake and the other half chocolate, so this was a great compromise. I was worried that it was going to be to sweet, but it was perfect and everyone loved it. I will definitely be making many more times. Thank you for the recipes!
Hi, chelsweets
Can I reduce the sugar in this receipe
@shaddy, I had the same question! It was on the sweet side and with the added fudge, it was even sweeter. I’ll be making this recipe again and reduce the sugar by 1/2 cup.
Thanks for the recipe. I halved it and it made 2 very short 8″ cakes, but they were tasty. Can you explain why it’s necessary to add egg to the chocolate batter when it’s already in there from the original batch?
Hi, chelsweets I wanted to make a marble number cake would this recipe work for a pan that is a 12 x 18 x 2?
Hi Chelsea, planning to make as 6″cake with three layer, how many cups of frosting will I need to cover the cake if I use your buttercream recipe excluding filling.
hi There, but same recipe can be baked into, 6″cake pan, right ?
Can this be done gluten free?
I never write reviews for anything I bake or cook, but this cake is amazing! I made it for my daughter’s b BBC day because she loves marble cake. I think the recipe was easy and the cake and icing were delicious. My sister (who is a very serious and skilled baker) said it was one of the best cakes she has ever had. Her whole family agreed it was better than any local bakery. And everyone who tried it loved it. Definitely saving this recipe!
I can’t wait to make this cake! I have a question about the amount of flour. I typically weigh my ingredients and use the King Arthur weight chart which says that 1 cup of flour is 120 grams. Your recipe calls for 3 cups of flour (which would be 360 grams) yet you have 390 grams (which would be 3 1/4 cups of flour). Which should I use-your measurement in cups or grams? 3 or 3 1/4 cups?Thank you.
Hi Chelsey, I just baked this cake and it looks so dreamy. However I ended up with cracks (some are even craters) where the fudge was swirled in. Did I do something wrong? Did I not swirl the fudge enough or were my dollops too thick?
hi chelsea if i wanted to use whole eggs, like your small batch marble, what would the conversion be for using whole eggs? thanks!
Hi Chelsea,
Been asked for a 6″ mable cake and have come across your recipe. Can i ask…would this sponge hold up under buttercream and fondant covering?
Many thanks
Hi. If I want to make 2, 6 inch layer cakes, should I double the recipe? Thanks!
Interestingly enough I wondered about the same thing but sugar is more dense, right? And so that is the difference? This cake turns out beautiful!
Hi! Just trying to understand serving size. On this recipe, it says “30”. If I compare that number of servings to your cake cutting chart, I don’t see 30 in the 8″ row. How do you get this #? Thank you.
I just made your marble cake and am concerned because the layers are so thin – .75”. Reading the comment to make 1.5 batches of batter for four 8” layers, but the recipe as-is calls for four 8” cake pans. Is there an error?
The same thing happened to me. I generously filled the cake with icing to get more height and it ended up being fine but next time I will bake 3 layers instead of 4. I personally like thicker layers.
Hi chels!! I was wondering if doubling this would work for 3 12inch pans? TYIA 🙂
Isn’t this recipe for 4 – 8 inch cake pans to begin with?
Have you ever made this with whole eggs? Would I just do 3 whole eggs +1 white for the base?
@Jennifer Penson, I have! You can either do that, or use 4 large, whole eggs. The texture will be a tiny bit more tense but it’ll still be delicious 🙂
I have the same question. Can whole eggs be substitutes and how many?
Hi chelsweets I would like to know if I can use this recipe for a10 inch cake? I need to do 2tier cake 10”and 8 “ I’m going crazy thinking about it hope you can help please help it would be my first 2 tier cake
Hi Chel
Thank you so much for the delicious recipe. I have earlier tried marble cakes, but this was the best, especially the texture!
Dear Chelsea
Thank you for sharing this beautiful recipe.
If I just want to make one 7 or 8 inch cake, what are the measurements?
Holy S*#t Balls!!! Let me first start by saying I do not like white cake in any form or fashion but my daughter really wanted a marble cake for her birthday. Because I don’t eat it, I have stayed clear on giving my effort to learning how to make a white cake. But I decided to give it a try. I followed the receipe exactly but without the chocolate fudge swirl and used my own favorite chocolate icing and I have to say I was amazed at how great it tasted. I watched the tutorial for the cake and it was really helpful. I changed the process at the end and instead of letting it cool at room temperature, I let it cool for about 10 minutes and then wrapped each layer in plastic wrap and put in the freezer for 2 hours, took it out and frosted the cake. AMAZING!! Thank you so much
I let my niece test taste the cake for her wedding (My husband and I thought it was GREAT)and she prefers a milk chocolate taste. How do i adjust the recipe? Her wedding is in a week please answer soon
I tried this recipe…Cake turned out very well. Tqvm for sharing.
look like this
https://marmeladlimetbex.blogspot.com/2012/10/marble-patterned-cake-recipe.html
Hi there! I am currently needing a successful vanilla recipe. I’ve attempted your melted butter vanilla recipe, but it didn’t work out for me the three times I’ve tried. But this marble recipe is great! Can I just use the vanilla battery I make a simple vanilla cake?
This is BY FAR the best homemade cakes I’ve come across 🙂 I’m a baker at heart and had given up making homemade cakes because they just didn’t have the moist, tender taste that I look for in a cake. This marble cake checks all the boxes!
Thank you Chelsea!!
Oh my word, I’m so happy I found this recipe! I’m having a baby sprinkle next month & the theme is Twinkle Twinkle Little Star so I want to make a galaxy cake…. but I want to do a marble/d cake so that the chocolate batter &/or fudge swirls can be black & dark indigo, therefore using less food coloring for better flavor. Being in my third trimester, I really don’t want to make two kinds of batter though lol. I’m sooooo excited to try this!
can I use almond milk instead
@Audrey, Hi Audrey! You can use almond milk in place of the buttermilk.
I filled two 8” pans and one 6” pan using the full recipe (approx. 1” per pan). After baking, each cake was only about 1 1/4” high. Not sure why the recipe calls for 4-8” pans. Must be very thin layers. I baked the cakes on a Tues. After cooling, I cut off the top dome to level, The cake pieces removed tasted very moist. I wrapped each cake in plastic wrap and then with foil. The cakes were placed in the fridge until Thurs, when I decorated the cake. Only used the two 8” cakes. When serving the cake, after removing from the fridge two hours prior, I found the cake very dense. Somewhat disappointed.
@Laura Schultz, Hi Laura! It is a butter cake, so it does have a denser crumb than a sponge cake. however, it sounds like the layers might now have risen as high as normal. The main culprits for that are usually old/expired baking powder, using cold ingredients that haven’t fully come to room temperature, or the flour was over-measured. Is there a chance that one of those things impacted the rise of your layers?
Hi do I use Normal sugar and not caster sugar?
Thanks
@Laura, Yup! Granulated sugar works best in this recipe, not caster sugar.
I just made this and it turned out amazing! The only change I made was to add a packet of instant vanilla pudding mix and then cut the sugar in half. If you put the chocolate fudge swirl in it’s so good you don’t even need icing on it! Wonderful cake, I would highly recommend!
Hi!! Can I use while eggs instead of egg whites in the recipe?
Hello
This cake uses the reverse method which usually requires a couple of minutes medium to fast beating for height & fluffiness.
I’m a bit hesitant because you say to mix on low for less time.
The feedback is a bit mixed.
Any thoughts?
@Esther, you are absolutely right! I’ve updated the recipe card to reflect this. I originally wrote it a few years ago and it definitely needed an facelift. That bit of mixing at the end is crucial for the texture of the layers to turn out right. Thank you for this comment!!
Hi! Made this for my brothers birthday and wow it was amazing! Such a great cake recipe. I thought it was perfect on its own (without frosting). Everyone loved it!
Do you think this could bake well in a bundt pan?
Thank you!
@Charity, so happy to hear that Charity! I do think this would bake well in a bundt pan! It has a similar texture to the find crumb of a pound cake. Just be sure to grease the pan super well and watch it after 45 minutes in the oven. I’m not quite sure what the bake time would be!
You mention an extra 1/4 cup of egg whites in the ingredients, but not in the directions for the chocolate batter. I’m adding it anyway. Hope that’s what you meant.
@Annie, good call! That was a typo, and the instructions have been updated to include the eggs whites. Thank you!
Hey Chelsea! If you don’t have cocoa powder can you use dark chocolate chips instead? And how much do we use?
How do I make the cake with just 2 pans ?
@Marley Paschal, this recipe can be used to make 2, 9-inch or 10-inch cake layers or you can cut the recipe in half and make 2, 8-inch cake layers.
The ingredients say additional egg whites for the chocolate version but it is not included in the instructions. Do i need to add them?
Hello. Do you think this recipe would be enough for 2 9×13 pans instead of 4 8in rounds?
Just read comments below.
In the directions for converting the vanilla to chocolate you do not mention the additional egg whites that are in the ingredient portion. I didn’t add them. I hope it doesn’t make much difference
I’m so bummed because my cake turned out super flat! I looks like the butter all melted out of it when it cooked, and the sides are a bit chewy. Any idea where I went wrong? I looked back through the recipe and feel like I followed the steps. ?
@Elizabeth, Hi Elizabeth! This recipe is specially formulated to bake up flat 🙂 That way you don’t have to level the layers, or if you do, you don’t have to cut off half the cake. In terms of the butter, what did you use to grease your pans? and are you using good quality butter in the batter?
I wanted to make this for a 3-layer, 6 inch cake and saw you said to cut the recipe in half. How would you adjust the bake time for that? Thank you!
Hi, how much batter would I need to make if I wanted to make 4 layers of a 6inch cake around 2inches tall.
I am going to make your cake tonight or tomorrow, my daughter wants chocolate and vanilla. Could I separate the flavors or that ruin the cake?
This cake tasted delicious but the cake did not rise very much and came out very flat. The direction was also a bit confusing when it comes to making the chocolate cake. In the directions, it calls for more egg white, but the directions never say to add them.
this is my go to if i want a marble cake. but can i use this recipe on a cupcake?
I love your vanilla recipe and your WASC from scratch. They are my favorites. If it’s no trouble to ask, should I double the recipe for a 12×18 pan? Thank you. Can’t wait to try this one. It’s for a 60th wedding anniversary.
Hello there! I love a lot of your recipes and I can’t wait to try this one. However I do have a question about this one. In the ingredients list, its shows to add 1/4 cup or 2 egg whites to make the chocolate batter but I do not see that listed in the instructions anywhere. It states when to add the other ingredients to make the chocolate batter but not the egg whites. Please let me know when you are adding this, if you are. Thanks!
Hi there!
I am wanting to use this recipe for a 12×18″ sheet cake for a graduation cake I’m making. What suggestions do you have for me in terms of doubling the recipe, cooking time, etc? Thanks so much!
Hi I was wondering if it’s possible to reduce the amount of granulated sugar in your cakes? Or would it ruin the rise/crumb?
Ok, never mind, I just watched the video and you explain it beautifully there. Thanks
I’ve decided to make my own baby shower cake, haven’t been baking for a good while I was going to pay someone to make it but I have a vision for my cake ? so dumb question how different would baking times be for a half sheet cake pan?
Hi, Chelsweets!!
I would love to make this recipe with cupcakes! Do you have any suggestions on how to alter it to do that? Thank you!!
Hey there! I’m wanting to make this cake for someone’s birthday and was wondering if I just used 2 8inch cake pans instead of 4 if it would be okay? They are very tall pans and I’m wondering if maybe you have an estimate of how tall each layer would be once baked if I did only 2 layers. Also I’m assuming this would affect the baking time as well?
I want to bake this in an 11×15 pan. What are your thoughts? Thank you
Hi! Just had a question- for the ingredients listed it says to create the chocolate batter to add additional egg whites, but that isn’t listed in the directions? Just wondering if I’m missing something, thank you!
how about if youn dont have a stand mixer
Hi! Can you tell me how many 8 in round pans this recipe would fill? I’m not trying to make a very big cake. Just one 8 in layer if anything. Should I half this recipe?
Hello. Thank you for sharing your recipes. Would I need to diyble this recipe for a 12x18x3 pan? Thank you for your time.
I need to make a full sheet cake (2 layer 18×26”). How much batter per layer?
Can you use brownie mix for the chocolate batter?
Any tips for making this recipe with yellow cake instead (whole eggs)?
Hi I wanted so to love this recipe after seeing all the ratings. However!! I followed your instructions and even though I am a pro baker I wanted to try a different technique. I also make marble cakes with one base batter and add chocolate in the second half (using the traditional sponge creaming method). I found yours too brownie like, not a light and fluffy sponge. Sadly it was just off – a waste of my time, and ingredients!! Why do you add more liquid to the second half of the batter? The two batters cook at different speeds then. Not sure the logic or science behind it. My instincts told me not to, but like I said I followed your recipe. Sorry I don’t normally write reviews but felt I had to. People wanting an easy marble cake, find a basic sponge recipe you love (equal ratio of the main ingredients) and half the batter in two bowls, add your preference for chocolate in one half, simpler you cannot get.
I found this to be an extremely expensive and wasteful recipe So I put only 5 egg whites in the vanilla cake, added some dried cranberries and walnuts and called it a day. There are so many excellent marble cake recipes that don’t call for the waste of 9 egg yolks.
Hi! I’m a big fan of Chelsweets! Do you think it would work to bake these in mini loaf pans (5x3x2 in.)? Want to make something smaller to sell at the Farmer’s Market that isn’t a cupcake. Thanks!
I’m a fairly experienced baker but new to cakes and am excited to try this one. Do I need to line only the bottoms of the cake pans with parchment or do I do the sides too? Should I grease and flour the pans? Do I grease the pan, add the paper and then grease the paper too? Thank you!
This sounds amazing! Can I use this recipe in a springform pan? A friend of mine wants me to make her a marbled frog cake for her birthday and I only have springforms. Do you have any recommendations on how to adapt to that?
Hello is it 3 1/4 cup of flour or 3 cups? The text has 3 cups but you say 3 1/4 in the video
@Crystal, The video is pretty old, and I’ve slightly tweaked the recipe since then. In general, my recipe cards always have the most up to date version 🙂 So sorry for any confusion!!
Can you substitute shortening for some or half the butter in the frosting recipe? Would it still turn out?
My batter was thinner than yours in your video. Your Dollops stayed in place mine all ran together. So my cakes are mostly chocolate. I also wanted to ask why you were using for pans with very little better instead of three. I wanted to know if it had to be that way or you just need to get that way.
Meant to read (4) pans
Sorry I forgot one thing. I’m your instructions for the chocolate cake it doesn’t say anything about the egg whites and I accidentally left them out but when I seen them left after being completely done I was able to add them in.
Absolutely the worst cake I’ve ever made, it went straight into the trash before it was even frosted. I’m a professional pastry chef and I would not recommend this recipe to anyone!
Hi! I can’t open the read more thing that you have do you have any other way of viewing this recipe?? Thanks in advance 🙂
Hi!! I’m trying to get to the full recipe but when I click on the read more, it brings me back to this page. I tried it on other recipes and it’s the same thing.
I plan on using this recipe in 2 or 3 8” pans. Will that be a problem? I don’t want the cake to be dry or raw in the middle by not using 4 pans
If I use a 18 x 12in bake pan should I double the recipe?
Can this cake be carved (into a number, nothing intricate ) and covered in fondant. I want tocuat a 5 out of it and cover it.
My family and I absolutely loved this cake!!! Was beautiful and worked so well! Used melted Nutella instead of dark chocolate fudge icing, and quartered the amount of icing asked for because we don’t like too much, worked perfectly! Icing the cake itself in zigzag shapes was a little tricky and messy though, I couldn’t find a video on how to do it!! Any tips that you could give for the next time?
Hi! I made it today and I can taste buttermilk in it. The cake has a little sour taste to me. Is it supposed to be like that? I’m concerned people won’t like it ?
Thanks sharing the tweaked Marble Layer Cake and making it easier to recreate your marbleized design.You usually show how to assemble the layers and decorate it. I like how the finished cake look in the last photo and wonder if you have a video of how.
Hi! If I need to make 4 – 8inch cakes and 4 -6inch cakes, would doubling the batter be enough or would you say 2.5 of the recipe? Thank you!
Hi! I need to make 4- 6inch cakes and 4- 8 inch cakes. Would doubling the recipe be enough or do I need to do 2.5 of the recipe? Thanks!
making this cake and it smells so yummy already! however, i noticed in the ingredient list to add to the vanilla batter to make into chocolate batter, you mentioned egg whites but not in the instructions. i didn’t add them because i went off the instructions! do you think this will be an issue?
I am making a smash cake and cupcakes for my grandsons first birthday. I am doing a three layer 6 inch cake and chocolate and vanilla cupcakes. Do you know about how many cupcakes I would get from half a batch?
I used part of your recipe but tne base was a boxed cake mix. I added your fudge swirl and used your butter cream frosting recipe too. I tried to do something similar to your wavy frosting design but ended up just using the wavy lines at either end and in the middle and flat frosting in between. I’m terrible at cake decoration. It was wildy successful for my husband’s 75th birthday celebration! The cake was so pretty unfrosted it was almost a crime to cover it with frosting.
This cake is beautiful! I wanted to make it this weekend. If I want to use 3 x 9″ round cake pans, would these amounts work? I don’t want to make very thick layers because I don’t like really high cakes. Thanks!
Was one of the best cake recipes I’ve ever made. It was super light and delicious and the added chocolate fudge ribbon created that extra special something!! I’m using the layers in a trifle with homemade whipped cream and Oreo’s for Thanksgiving. Will photograph and tag on Thanksgiving. Thank you
Can this recipe be used for cupcakes or will they be flat?
Would this recipient be sufficient for 2 9” rounds or should I reduce it?
How would I use this recipe if I wanted to make a Bundt cake?
Is this for a 3 layer cake?
Egg whites are not included in the instructions for choc batter. 1/4 cup is added to choc cake recipe,
correct?
Using this! But you have “1/4 cup egg whites” for addition in chocolate cake but your directions do not say to add them. Do you?
Hi! I just baked this cake and as I was cleaning up after putting the pans in the oven, I realized that I still had my egg whites that belonged in the chocolate cake batter sitting on my counter! I remembered putting them along with my other ingredients when prepararing everything but when I followed the recipe, I didn’t see them listed in the chocolate cake instructions. I thought I missed it but I don’t think they’re in there. Did I miss something?
How many cups of batter does this recipe yield?
I need to make a 12×18 cake. I wasn’t going to do layers, just one sheet, and the pan is 2” deep. I obviously don’t want a really thin cake….how should I adjust the recipe to make enough for such a big cake?
I haven’t tried your recipe because 1) There is soooo much content to go through before you even find the recipe and 2) the amount of ads and pop up is covering most of the screen and one can hardly read the recipe!
Made the cake this weekend. Made it with 3 layers and saved the fourth one for home. Tasted so great. Thanks for sharing.
So I decided to give your 6-inch marveled cake recipe a whirl before committing to this larger one. I noticed that this recipe calls for egg whites instead of whole eggs. Is this cake lighter in texture than the 6-inch marble one?
hi dear..i have a qeury..if i used whole eggs instead of egg whites …can i add..if yes how many whole eggs can be added..tia?
Hi!
Thank you ao much for this recipe. I want to make it for my son’s birthday but wanted to know if this is a super moist and fluffy cake or more dense for those who want to carve and decorate?
I’ve tried some recipes in the past and found them to be quite dense out of the fridge and hard as well (not your recipes btw ) so was wondering how this would be.
I’m going for a box cake moisture and softness level, if that’s possible.
Thank you for your amazing recipes.
Naz
Can you use this to make two 9in layers?
Hi Donna,
You can, but they’ll be pretty thick layers and would need to bake for a few minutes longer. You can also use this recipe to make 3, 9-inch cake layers and the bake time should be the same. Hope that helps, happy baking!
Hi, Chelsey! I LOVE your marble cake recipe, and I would like to use it for a sheet cake I’m doing! Do you happen to have this converted for amounts for a quarter sheet cake? If not, do you have a suggestion of where I could go to do so? Thank you!
Hi Mary,
So happy to hear that! And for sure 🙂 One batch of this recipe can also be used to make 2, 9 x 13-inch cake layers that are about 1-inch tall.
I’d recommend placing a couple flower nails / heating cores (like these:https://amzn.to/3nzXfqe) in the middle if you have them to help the cake layers bake more evenly / quickly. They should take about 35-40 mins in a 350F oven.
You can also make 1, thicker quarter sheet cake, but it’ll take 50-60 mins to bake. Hope that helps, happy baking!
Can you confirm this will recipe will also make 3 8-inch layers? Love all your recipes!
Hi Mary,
You can definitely make 3, 8-inch cake layers with this recipe but the bake time will be slightly longer. Hope that helps, happy baking!
If you were to convert this recipe to make cupcakes, would you recommend any changes to the recipe?
Hi Jennifer,
This recipe makes an amazing cake but doesn’t make the best cupcakes! I’m actually planning to work on a marble cupcake this coming week and hope to have it live in a week or two!! Stay tuned 🙂
I made this cake for my sisters birthday and it was amazing! Everyone loved it! The flavour and texture was perfect. I baked mine in a 9×13 baking dish and I halved the buttercream recipe, I also only used 2 cups of icing sugar in the buttercream. Thank you Chelsea for the recipe! I can’t wait to try another of your cakes ?
So happy to hear that Seanna!! Love that 🙂 Thank you for sharing!!
Hey!! How many batches of this recipe would I need to make to bake up a half sheet cake?
Hi Cassie,
One batch of this recipe can be used to make one half sheet cake! It will bake up pretty short (about 1 inch tall). You can double it to make it taller if you want though! Hope that helps, happy baking!
So I misread the instructions and accidentally made 2/3 of the batter into the chocolate batter ? but it was still DELICIOUS!! That chocolate swirl definitely levels up a marble cake. Amazing – I’m adding this to my regular recipes!!
Hi McKenna,
Glad it still turned out great!! You just had a chocolate forward marble cake, which honestly sounds delicious! Thank you so much for sharing 🙂
I would like to use this recipe for a red velvet marble cake, what would you recommend for turning the chocolate part into red velvet? Thank you!
Hi Patty,
I’d recommend swapping out most of the cocoa powder for additional flour, and adding in some red gel food coloring. That should do the trick! Hope that helps, happy baking!
Hello, I need a 10″ 3-layer cake using this recipe. Is there enough cake batter to fill 3 10″ cake pans if this recipe is doubled?
Hi Tammi,
Great question! This recipe makes enough batter for 2, 10-inch cake layers, so I’d recommend making 1.5 batches to make 3, 10-inch cake layers.
You can double the recipe to make 3, 10-inch cake layers but they will be taller and take longer to bake. Hope that helps, happy baking!
Hi Chelsea. I need to make a 1/2 sheet cake 12×18) single layer. Should I double or triple
Hi Melissa,
It depends on how tall you want the cake layer to be, but I’d recommend doubling it! That should make a half sheet cake that is about 2-inches tall. hope that helps, happy baking!
Hello, Could I substitute cake flour in place of the all-purpose flour in this recipe? Also, how much would I have to increase recipe to make this in a 6″, 8″ and 10″ tier cake?
Hi Nicole,
Great question! Cake flour can be used in place of the AP flour in this recipe. If you want to make that size of tiered cake (with 3 layers per tier) you’d need to make 3 batches of batter. 1.5 batches for the 10 inch tier, 1 batch for the 8 inch tier, and 1/2 batch for the 6 inch tier. Hope that helps, happy baking!
Could I use this to make three layers? I only have three 8-inch pans and am just wondering if I could make thicker layers.
Hi Brittany,
You can totally use this recipe to make 3, 8-inch layers! they’ll end up taller and will need a few more minutes to bake through. Hope that helps, happy baking!
I made this cake today. Looks like it’ll be delicious! But note, when I made the batter as described, it made only 3 x 8” cakes that are 1” tall. Luckily I wanted to do a three layer cake and didn’t reduce the recipe. If you want 4 layers, I think you will need to increase the ingredients.
Hello. Can this recipe be used in a bundt pan?
Hi Crystal,
This recipe can be made in a bundt pan! Bake time will vary, but can take anywhere from 55-75 mins! I’d recommend testing the cake with a toothpick every 5 minutes once it’s been baking for 55 minutes, and remove it once the toothpick comes out with a few moist crumbs. Hope that helps, happy baking!
I made this cake tonight. I have also used several of your other recipes. For the last few cakes I have made I’ve been getting these little hard black bitter bits in them. I researched and looks like it could be the baking powder causing the issue. What are your Thoughts?
Hi Jessica,
So sorry to hear that!! I would guess that it’s caused by the dry ingredients clumping. I’d recommend sifting the dry ingredients (if you aren’t already) to see if that helps! If it doesn’t, you can also try getting new baking powder or trying a different cocoa powder.
It’s hard to know without seeing a picture (I wish we could upload them here!!), but those would be my best guesses! Hope that helps, happy baking!
What if I only want to make 3 8 inch cakes?
Hi Crystal,
You can use this recipe to make 3, 8-inch cake layers but they’ll be a bit taller and will take a few more minutes to bake through (check the center of the layers with a toothpick, and you’ll know they’re done when the toothpick comes out with a few moist crumbs). Hope that helps, happy baking!
This looks amazing and I want to make it for my son’s birthday but I’m a little confused on the amount of white vs. chocolate batter. It says to pour 2/3rds into a separate bowl. Is the 2/3rds the white or used to make the chocolate batter? How does that work if the cake pans should have equal amounts of the white vs chocolate?
Hi Sheri,
Once we’ve made the base vanilla batter, we pour 2/3 of it into a separate bowl and set it aside. Then we add additional ingredients into the remaining 1/3 of the batter to transform it into chocolate cake batter. Because we are adding in cocoa powder and other ingredients, you end up having just as much chocolate cake batter as vanilla cake batter. Hope that helps, happy baking!
Can this be baked in a 9×13 rectangular sheet pan?
Hi Kayla,
It totally can! One batch will make 2, 9 x 13-inch cake layers that are about 1 inch tall. Bake for 35-40 mins at 350 F / 175 C. I recommend using heating cores (like these: https://amzn.to/47C37V5) if you have them to help large cake layers like this bake more evenly and quickly.
You can also make one 9 x 13-inch cake layer that’s about 2 inches tall, but the bake time will be 45-55 minutes at 350 F/ 175 C. Hope that helps, happy baking!
I want to start with saying, I love your recipes and congratulations on your pregnancy! I love watching your stories online. I’m just curious, I notice when I make your recipes I end up with crunchy edges usually. I wasn’t sure if this was from the buttermilk? Maybe the egg whites? This recipe in particular. I don’t necessarily mind but I have to do a lot of extra trimming. Any thoughts on this or tips for trimming? My layers are in the freezer now.
Hi Megan,
Thank you, you are too sweet! The crusting/crunchy edges that happens on these layers has to do with the amount of sugar in the recipe and the fact that it uses the reverse crumbing method to make the batter. I usually do just trim off the edges / caramelization so that my layers are consistent, but if you use wet cake strips around the pans or use cake goop to grease the pans instead of nonstick spray, it should get rid of the crunchy bits. Hope that helps for the future, happy baking!
Can this be converted into 6” cake with 3 layers?
Hi Bev,
Great question! I actually have a small batch marble cake recipe that makes 3, 6-inch cake layers. Here’s the link: https://chelsweets.com/small-batch-marble-cake/
Hope that helps, happy baking!
Once made should this cake be stored in the fridge or can it sit on worktop if covered?
Hi Sarah,
This cake can sit at room temperature for up to 2 days, but if you plan to make it further in advance a frosted cake can last in the fridge for up to a week, or in the freezer for up to a month. I usually store my cakes in the fridge if I make them more than a few hours in advance to help them keep their shape! The buttercream locks in all the moisture, keeping the cake fresh and delicious. Hope that helps, happy baking!
Any suggestons for making this in a 9×13 pan?
Hi, could this recipe be used for a half sized sheet cake? What adjustments should be made/
Also could I use a vanilla buttercream recipe?
Hi Gracen,
It depends on how thick you want the layer to be, and if you want to make one or two cake layer! If you’re making a single cake layer, I would recommend making 1.5 batches of batter! You can totally top the cake with my vanilla buttercream, that would be delicious 🙂 Hope that helps, happy baking!
Can this recipe be used for a bundt cake? If not do you have a recipe?
Hi Crystal,
This recipe can be used to make a bundt cake in a 10-cup capacity bundt pan! Bake it at 350 F/ 175 C for 55-70 minutes, or until a toothpick inserted into the middle comes out with a few moist crumbs. Hope that helps, happy baking!
Hello, how many cups of batter does this recipe yield? Thank you
Hi Lisa,
Great question! This recipe makes about 11 cups of batter. Hope that helps, happy baking!
As my cake is cooling the chocolate fudge swirl is sinking. Why is this happening?
Hi Tina,
That happens naturally because the fudge swirl is denser than the cake batter. But don’t worry, that actually helps the fudge marble into the cake layers which gives every bite a bit of texture! Hope that helps, happy baking!
I love this recipe!! My kids are obsessed with planets & outer space so I’ve used this recipe, coloring the chocolate batter dark blackish blue & purple, and the vanilla lighter colors, like pink for my daughter or green for my son. The swirl is perfect for a galaxy pattern!
Thank you so much for putting the amounts in the body ( directions ) and not just at the beginning ingredients list. When you are on a phone it’s terrible to have to keep scrolling up to find the amounts for each step. I hope others will follow your example.
I actually made this cake twice yesterday, first time I accidentally used the 1-1/2 cup measuring cup for egg whites then I realized what I did so I opted to leave out the extra whites in the chocolate batter. Thinking the cake would be ruined I proceeded to make another batter the correct way. Both times I noticed that 1 minute mixing the vanilla portion was not enough time to incorporate all that sugar. Both cakes stuck on the bottom, first time I used JOY flour with non stick spray and the 2nd time I greased with solid shortening and floured.
Here’s my take, the 1st cake actually turned out better than the 2nd batter as far as the height of the layers and consistency. I’m going to change the way to put this together, I’m going to cream and butter and sugar and add the dry and wet ingredients alternately. Both times I do not believe the sugar is getting mixed into the cake. I use a Kitchenaid mixer so maybe that may be the difference. I like the addition of the fudge swirl. I will also line my cake pans with either parchment or wax paper and grease and flour, then nothing will stick to the bottom of the pan, never had this issue with any other cake I have baked. The flavor is good and it really does come down to using the best cocoa and chips for the dallops. I did make my own frosting so I did not use that recipe.
Thanks for letting me share.
Hi Kathy,
Thank you for sharing your thoughts, I appreciate it! This recipe uses the reverse creaming method, which incorporates butter into the dry ingredients to reduce the amount of gluten that can form. This creates denser, but super tender cake layers! I really love this texture, but you can absolutely use the traditional method of creaming together the butter and sugar.
In terms of the cake sticking to the pans, what types of pans are you using? The reverse crumbing method does use a lot of sugar, and that can cause the layers to stick a bit to the pans. Light colored aluminum pans work best, but if they stick at all in the future you can run an offset spatula around the edges to gently release it. Hope that helps, happy baking!
Hello, I’ve baked this cake several times and it’s fantastic! I was wondering though, can you not marble it and use the batter as vanilla and chocolate cake? Or do you have to marble it?
Can you make marble cupcakes with this recipe? If so how many cupcakes would this make
Would this recipe be sturdy enough to use to create a tiered cake?
It absolutely is! It has a tender yet somewhat dense crumb and is great for tiered cakes!
Thank you for sharing this recipe! Would you say it’s possible to turn an entire bowl of vanilla cake batter into chocolate using this method? I’m curious how much melted chocolate one recipe can accept when mixing it in after the vanilla batter is already made. Thank you in advance for any thought you may have!
You totally could! As long as you keep the same ratio I have in this recipe, you can turn all the vanilla cake batter into chocolate batter. Hope that helps, happy baking!
Please please make sure you stress to people to use parchment paper in the cake pans I used Crisco to grease my pans. I have very good pans and this is what I got. I’d like to leave if I can figure out a way everything stuck this cake was so much work and I’m a baker home baker I’ve never had this happen to me, but I am going to piece this cake back together. If it kills me tomorrow is my son‘s birthday and he asked me for a marble cake and I saw your recipe and thought oh wow sounds good. Hopefully it tastes better than it looks.
Hi Lynda,
I’m so sorry to hear that your layers stuck! Did you use parchment paper on the base of the cake pans? The parchment paper does definitely help prevent sticking, but sometimes there is a bit of caramelization on the side of the cake layers. Usually once the layers cool though you can run an offset spatula around the edge of the pan and they separate super easily so it shouldn’t be a problem getting the cake layers out of the pan. I hope that you were able to get yours out and that your son’s cake turned out great.
Can I substitute the flour for Bob’s Red Mill 1-to-1 Gluten-free flour (blue package)?
Hi Pelumi,
Yes, absolutely! Bob’s Red Mill 1-to-1 Gluten-Free Flour is a great substitute for all-purpose flour in most baking recipes—including cookies, cakes, and muffins. You can use it as a direct 1:1 swap by weight or volume.
Just a couple quick tips:
– If the original recipe is super soft or delicate, the texture might be a touch more tender or crumbly.
– Letting the batter or dough rest for 20–30 minutes before baking can help the GF flour hydrate and improve the final texture.
Let me know if you try it, I’d love to hear how it turns out!
Several questions. Have you ever used gluten free flour? If so, did you have to make any other changes? Do you need to use store bought buttermilk, or will the cheat version of milk with vinegar work?And one more, what is the reasoning behind only using egg whites versus whole eggs?
Hi Adrea,
All great questions! Yes, this recipe turns out great with a baking gluten free flour that’s cup for cup. I’d recommend stirring the batter a bit extra (you don’t have to worry about gluten forming by overmixing), this helps the flour incorporate better into the batter, and then letting the batter sit in the pans for about 30 minutes before you bake it to help the flour absorb some moisture (this can help minimize any gritty texture you get sometimes with GF flour).
You can use a mixture of milk and vinegar in place of the buttermilk, that should work just fine.
The egg whites just help lighten the texture a bit, this cake has a very tender but slightly dense crumb, and the egg whites lighten it up a bit. I use ones from a carton, but you can also use 4 whole eggs in place of the egg whites.
Hope that helps, and that your cake turns out great! Happy baking!