
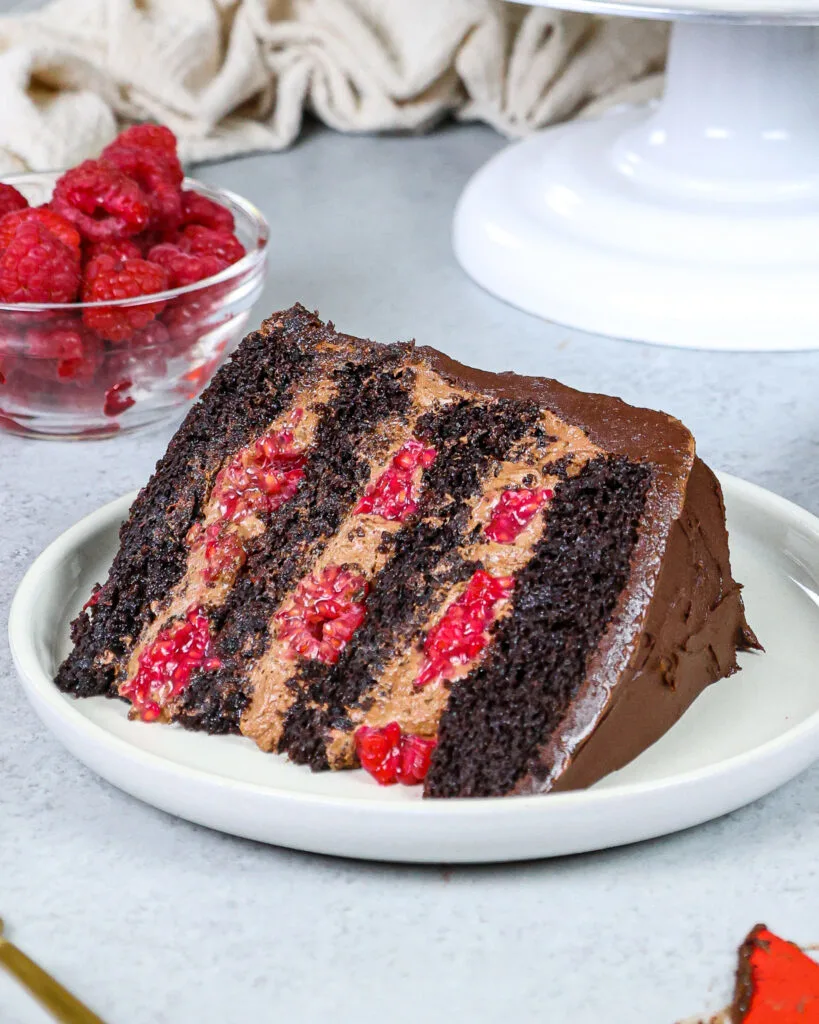
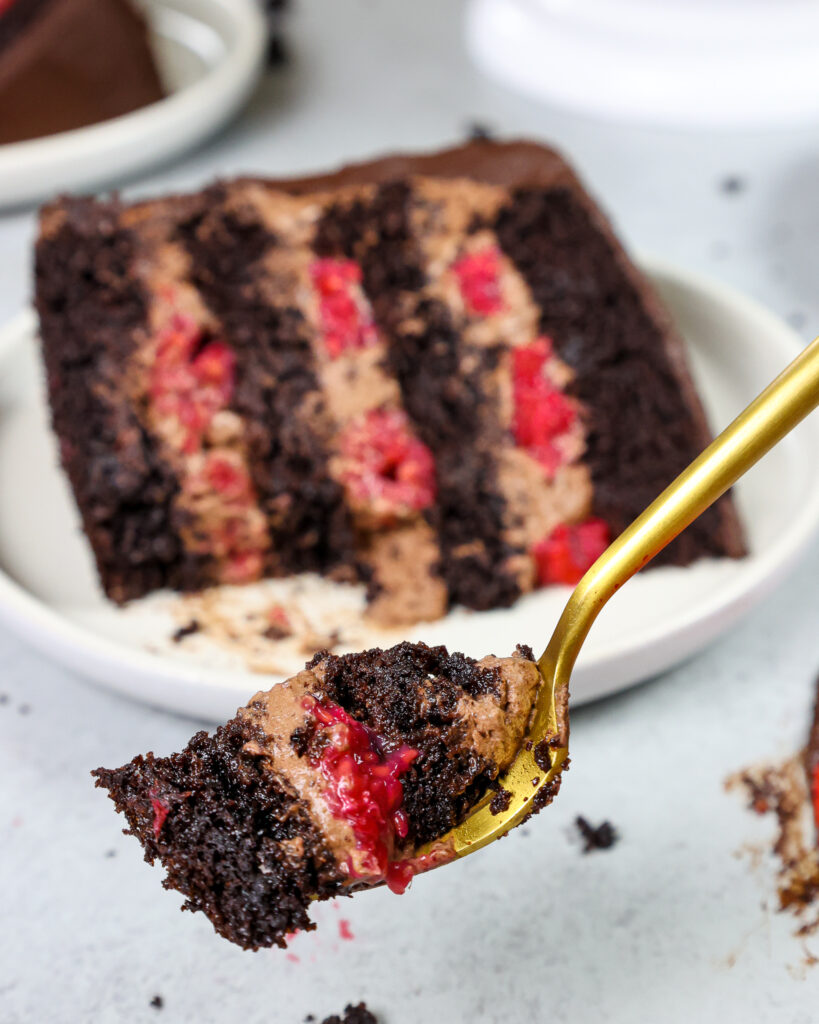
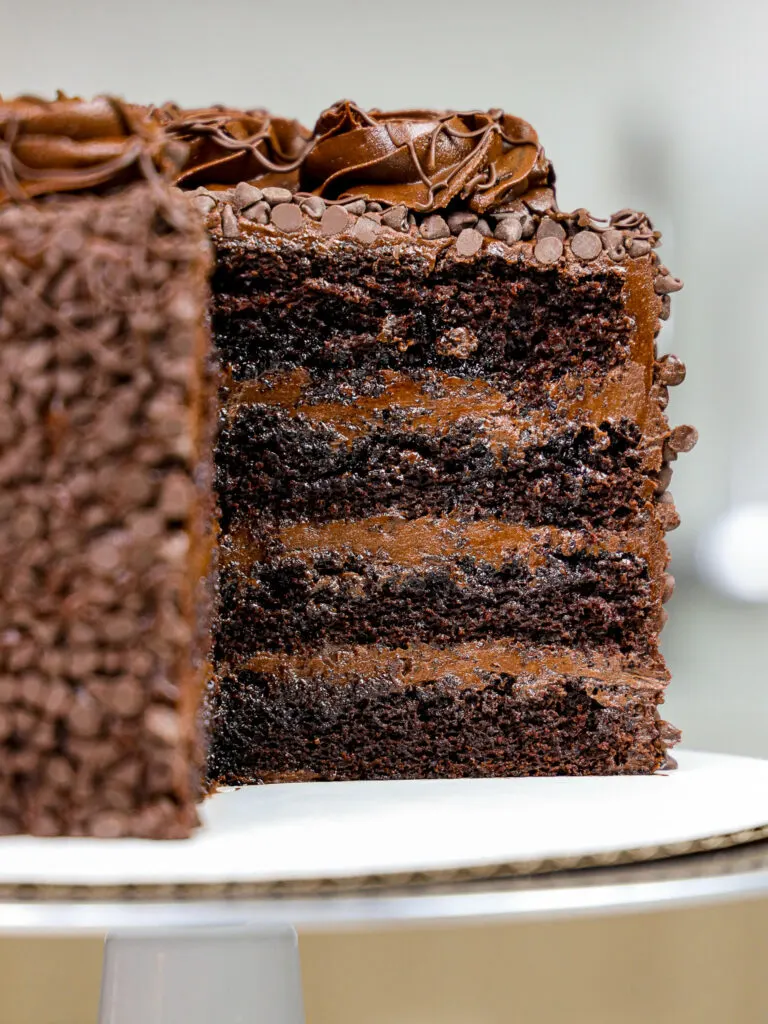
This chocolate raspberry mousse cake has the perfect balance of tart and sweet! Its moist chocolate cake layers are filled with fluffy chocolate mousse, tart raspberry jam, and are studded with fresh raspberries.

How to Make This Chocolate Raspberry Mousse Cake
To make sure your chocolate raspberry mousse cake turns out as amazing as possible, let’s walk through each step together! I’ve also included a video tutorial of the process below.
Step 1: Make the Chocolate Mousse
Make the chocolate mousse first, so it has time to chill.
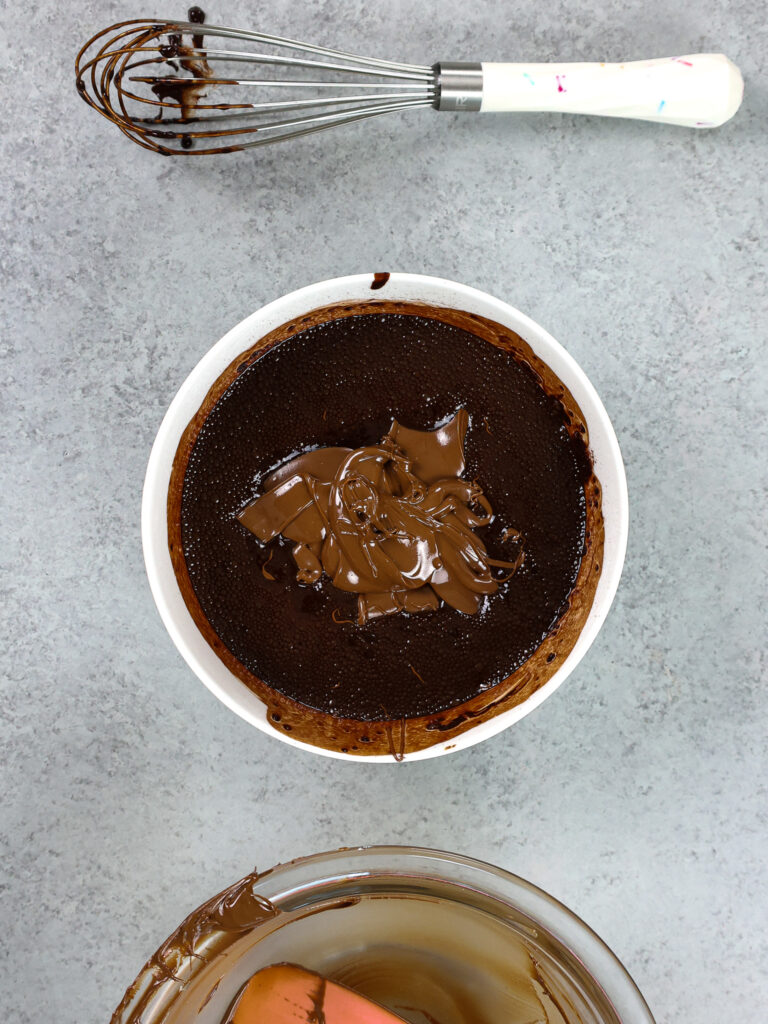
Melt the chocolate chips by placing them in a medium-sized, heat-proof bowl. Heat in 20-30 second increments in the microwave, stirring after each increment until the chocolate is completely melted and smooth. If you don’t have a microwave, you can also use a double boiler.
In a small bowl, whisk together the hot water and cocoa powder. Pour into the melted chocolate and whisk together until smooth. The mixture should be somewhat thick. Set aside.

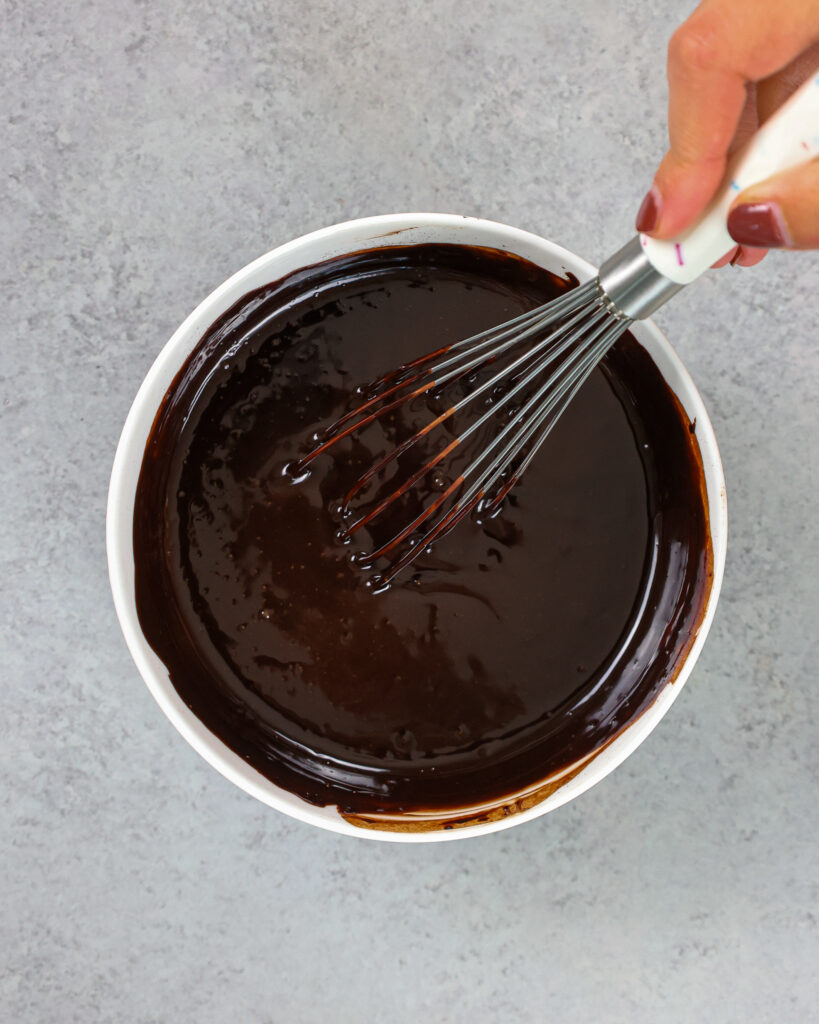

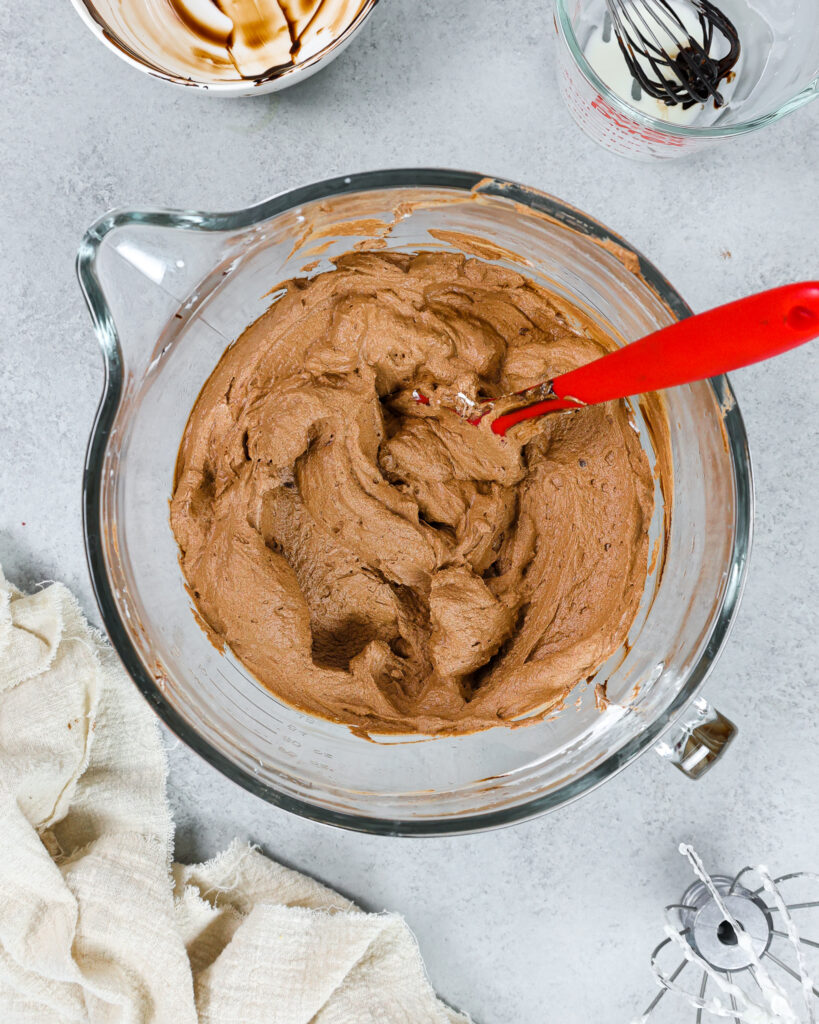
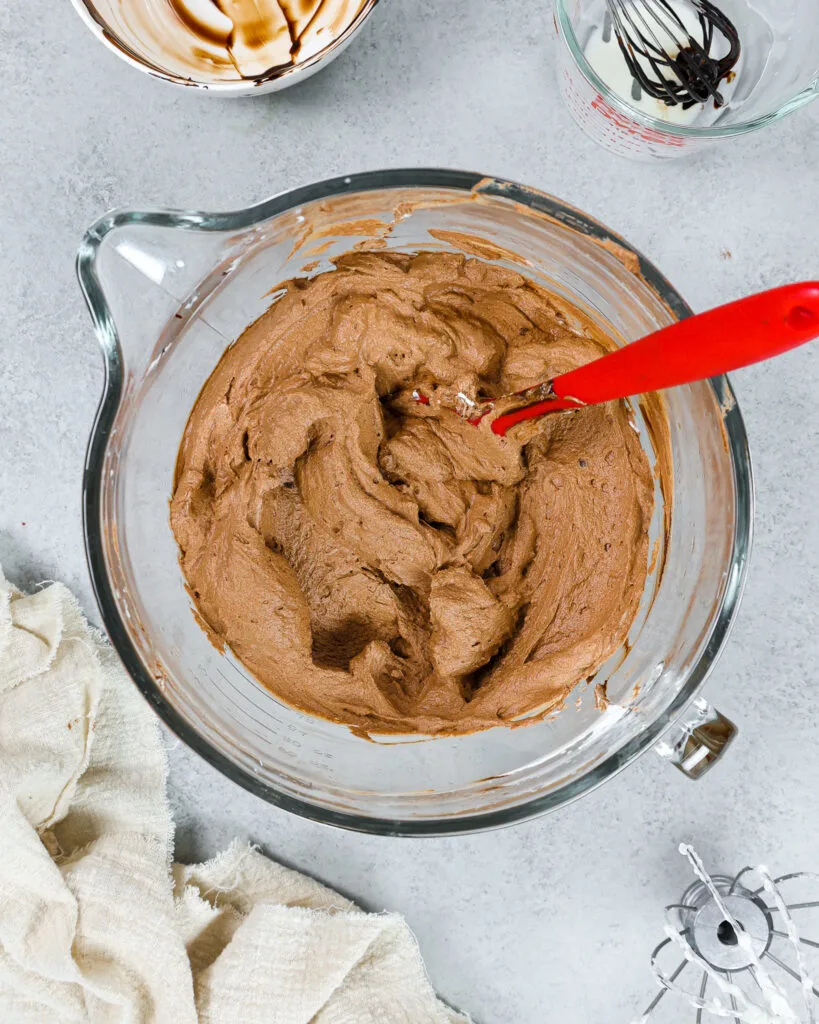
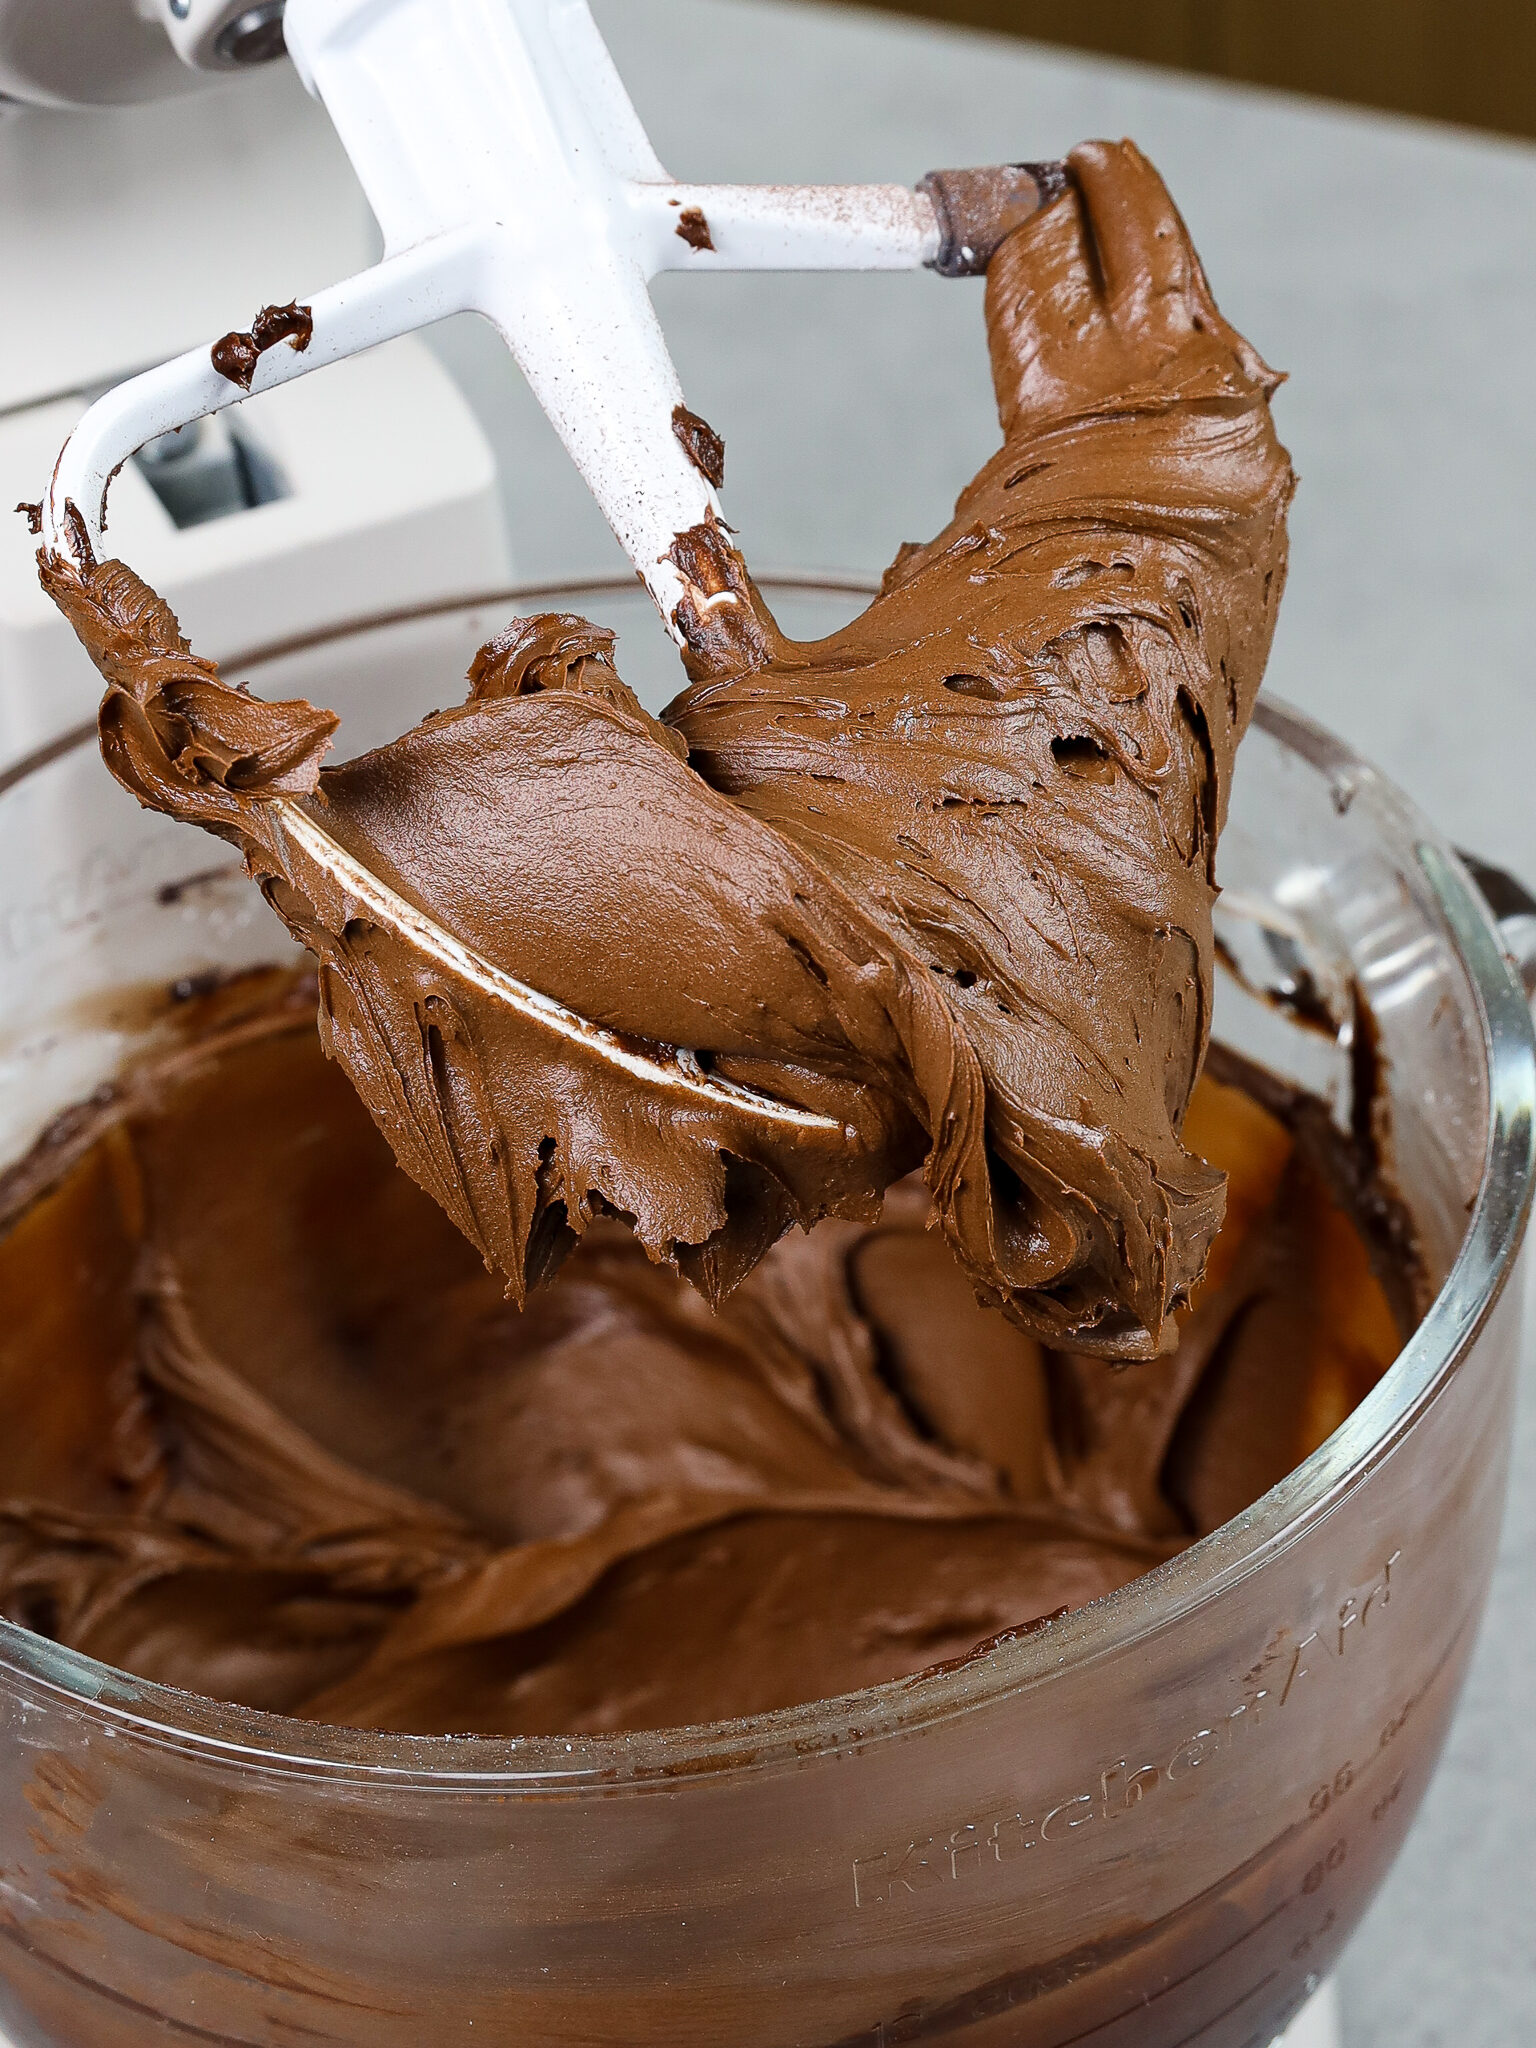
Add the heavy cream, powdered sugar, vanilla extract, and a pinch of fine salt in a large bowl or the bowl of a stand mixer fit with a whisk attachment.
Mix on medium-high speed until the whipped cream starts to gather in the whisk attachment and you can see texture around the edges of the bowl (see photo below). At this stage, the whipped cream should be thick and able to keep its shape. This usually takes about 2 1/2 to 3 minutes in my stand mixer.
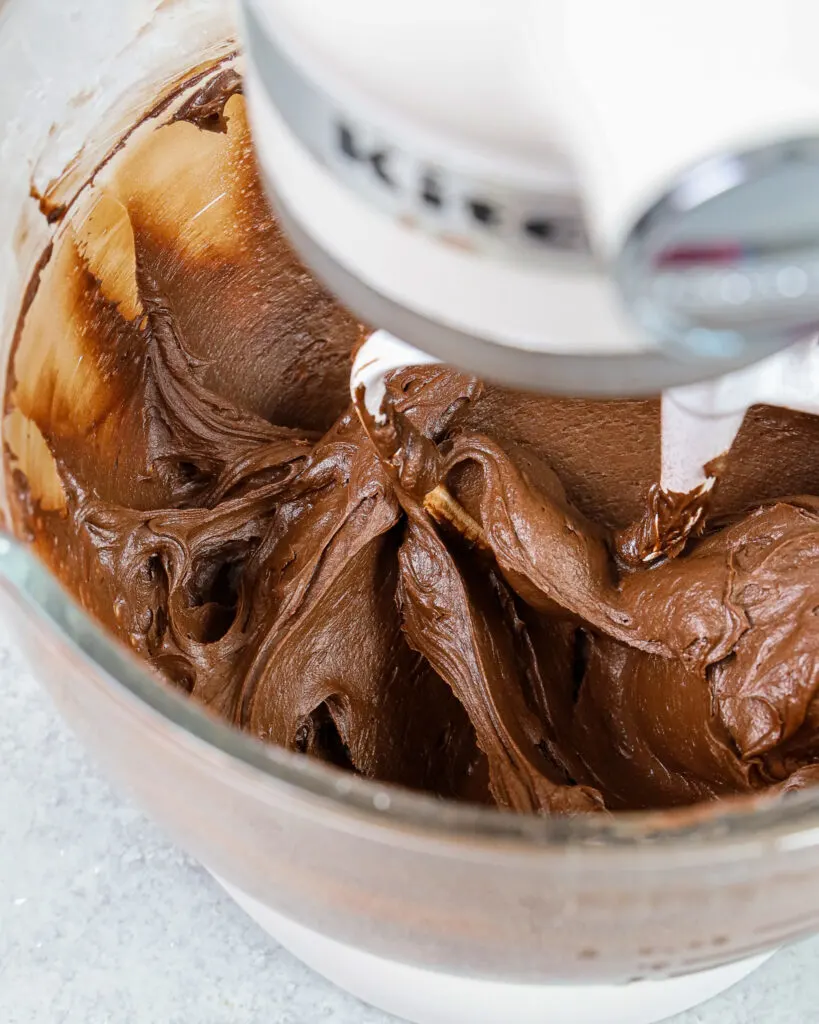
Gently fold the chocolate mixture into the whipped cream using a rubber spatula.


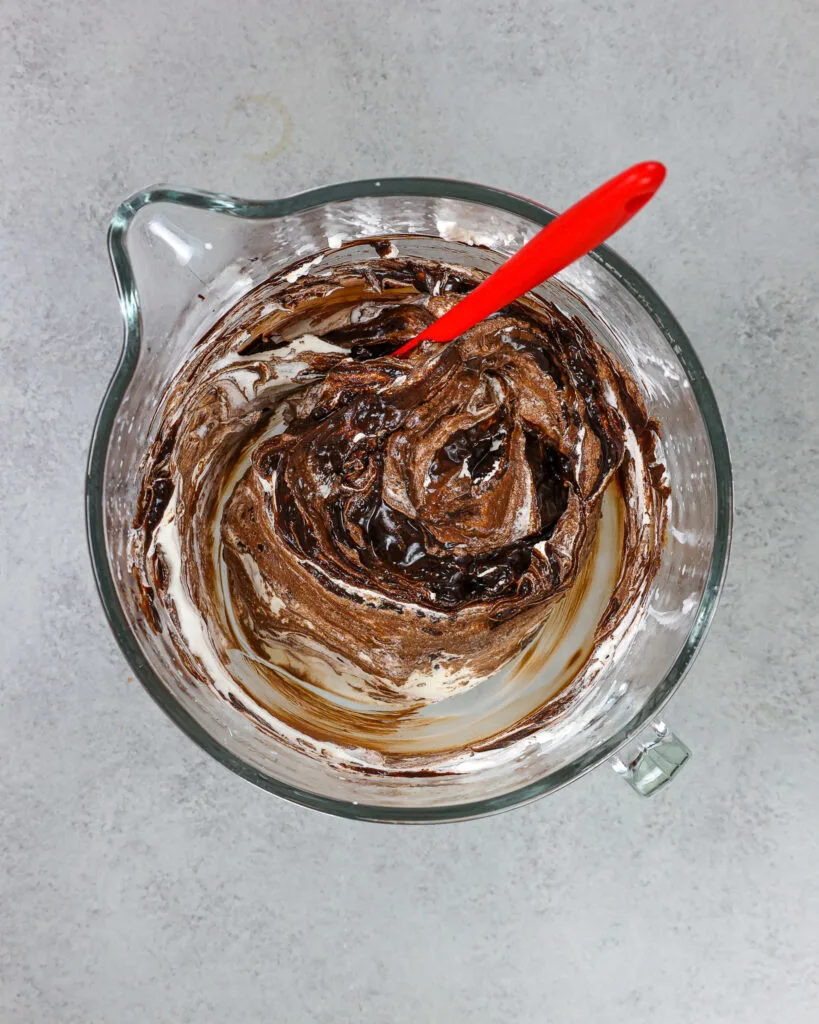
Use the spatula to swoop around the sides of the bowl and pull through the center like I show in the video of this recipe. Be careful not to over-mix the mousse, or it will become deflated and lose its structure.
Be careful not to over-mix the mousse, or it will become deflated and lose its structure. Cover the mousse with plastic wrap and chill in the refrigerator for at least 2 hours.
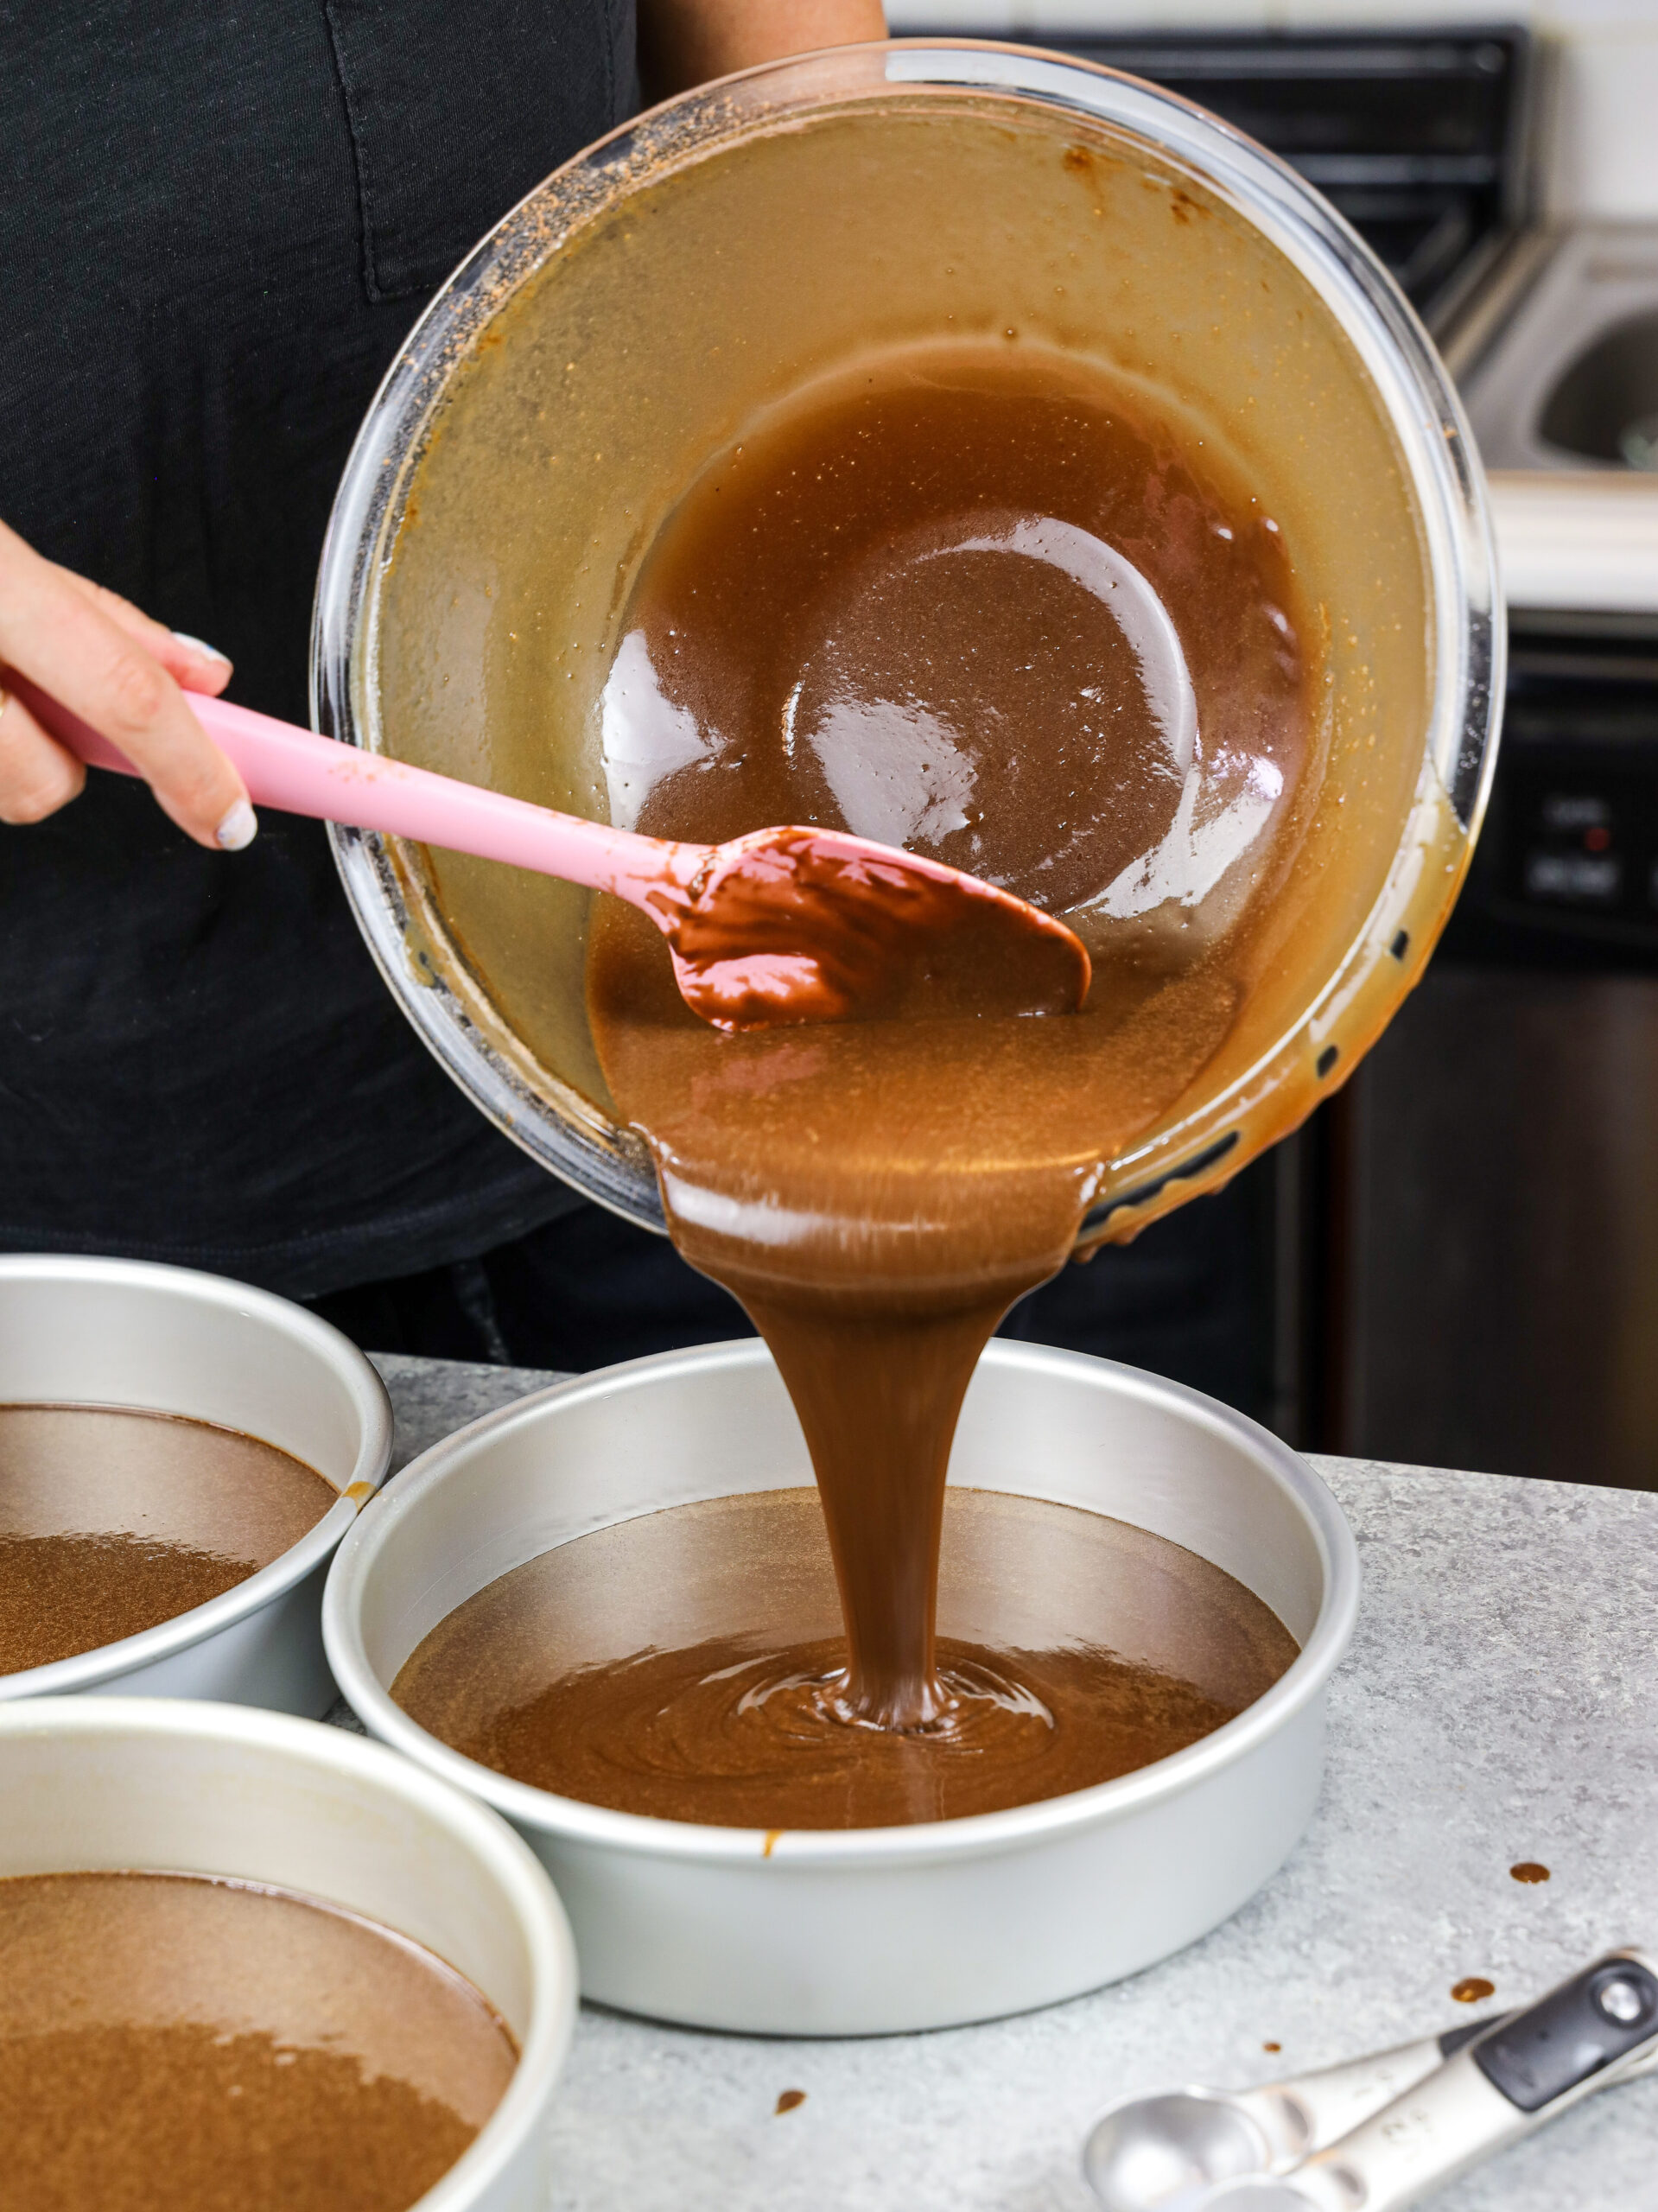
Step 2: Bake and Level the Chocolate Cake Layers
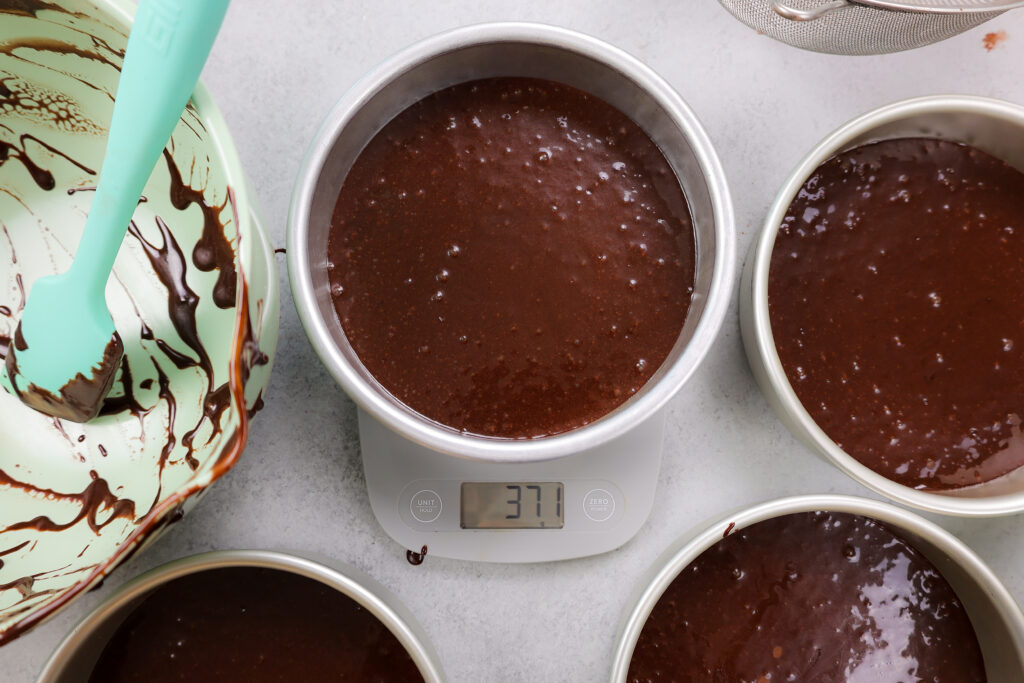
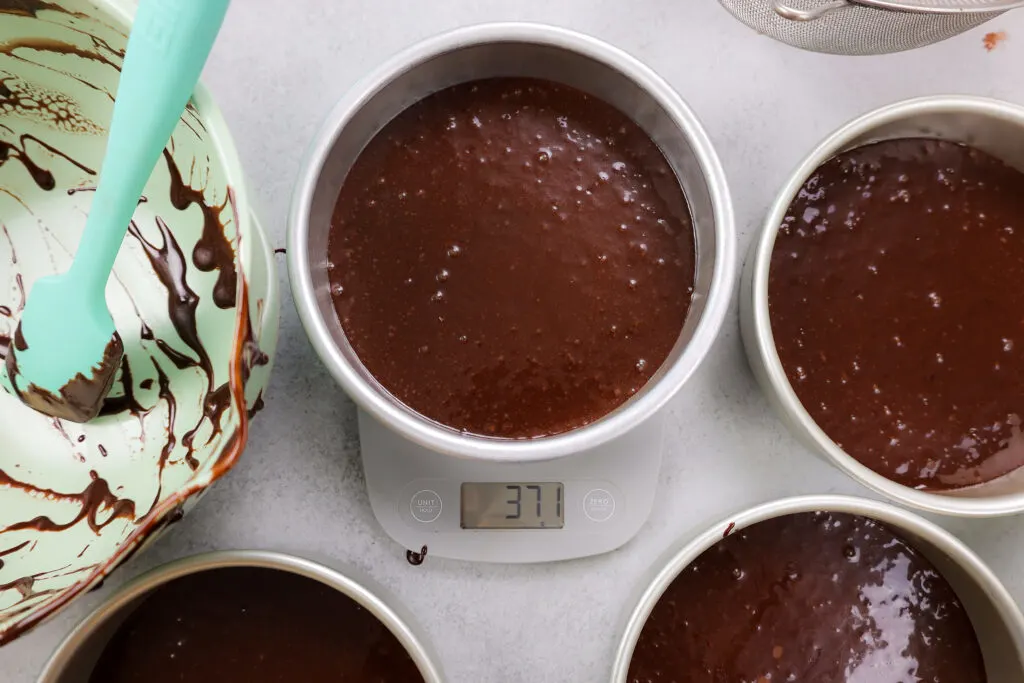
Next, make the chocolate cake batter. Divide the batter evenly between the prepared 8-inch cake pans. Bake for 23-26 minutes or until a toothpick comes out with a few moist crumbs.

Remove the cake layers from the oven and let them cool in the pans for about 10 minutes. Gently run an offset spatula around the rim of the cake pans to loosen them, then flip them into wire racks to finish cooling.
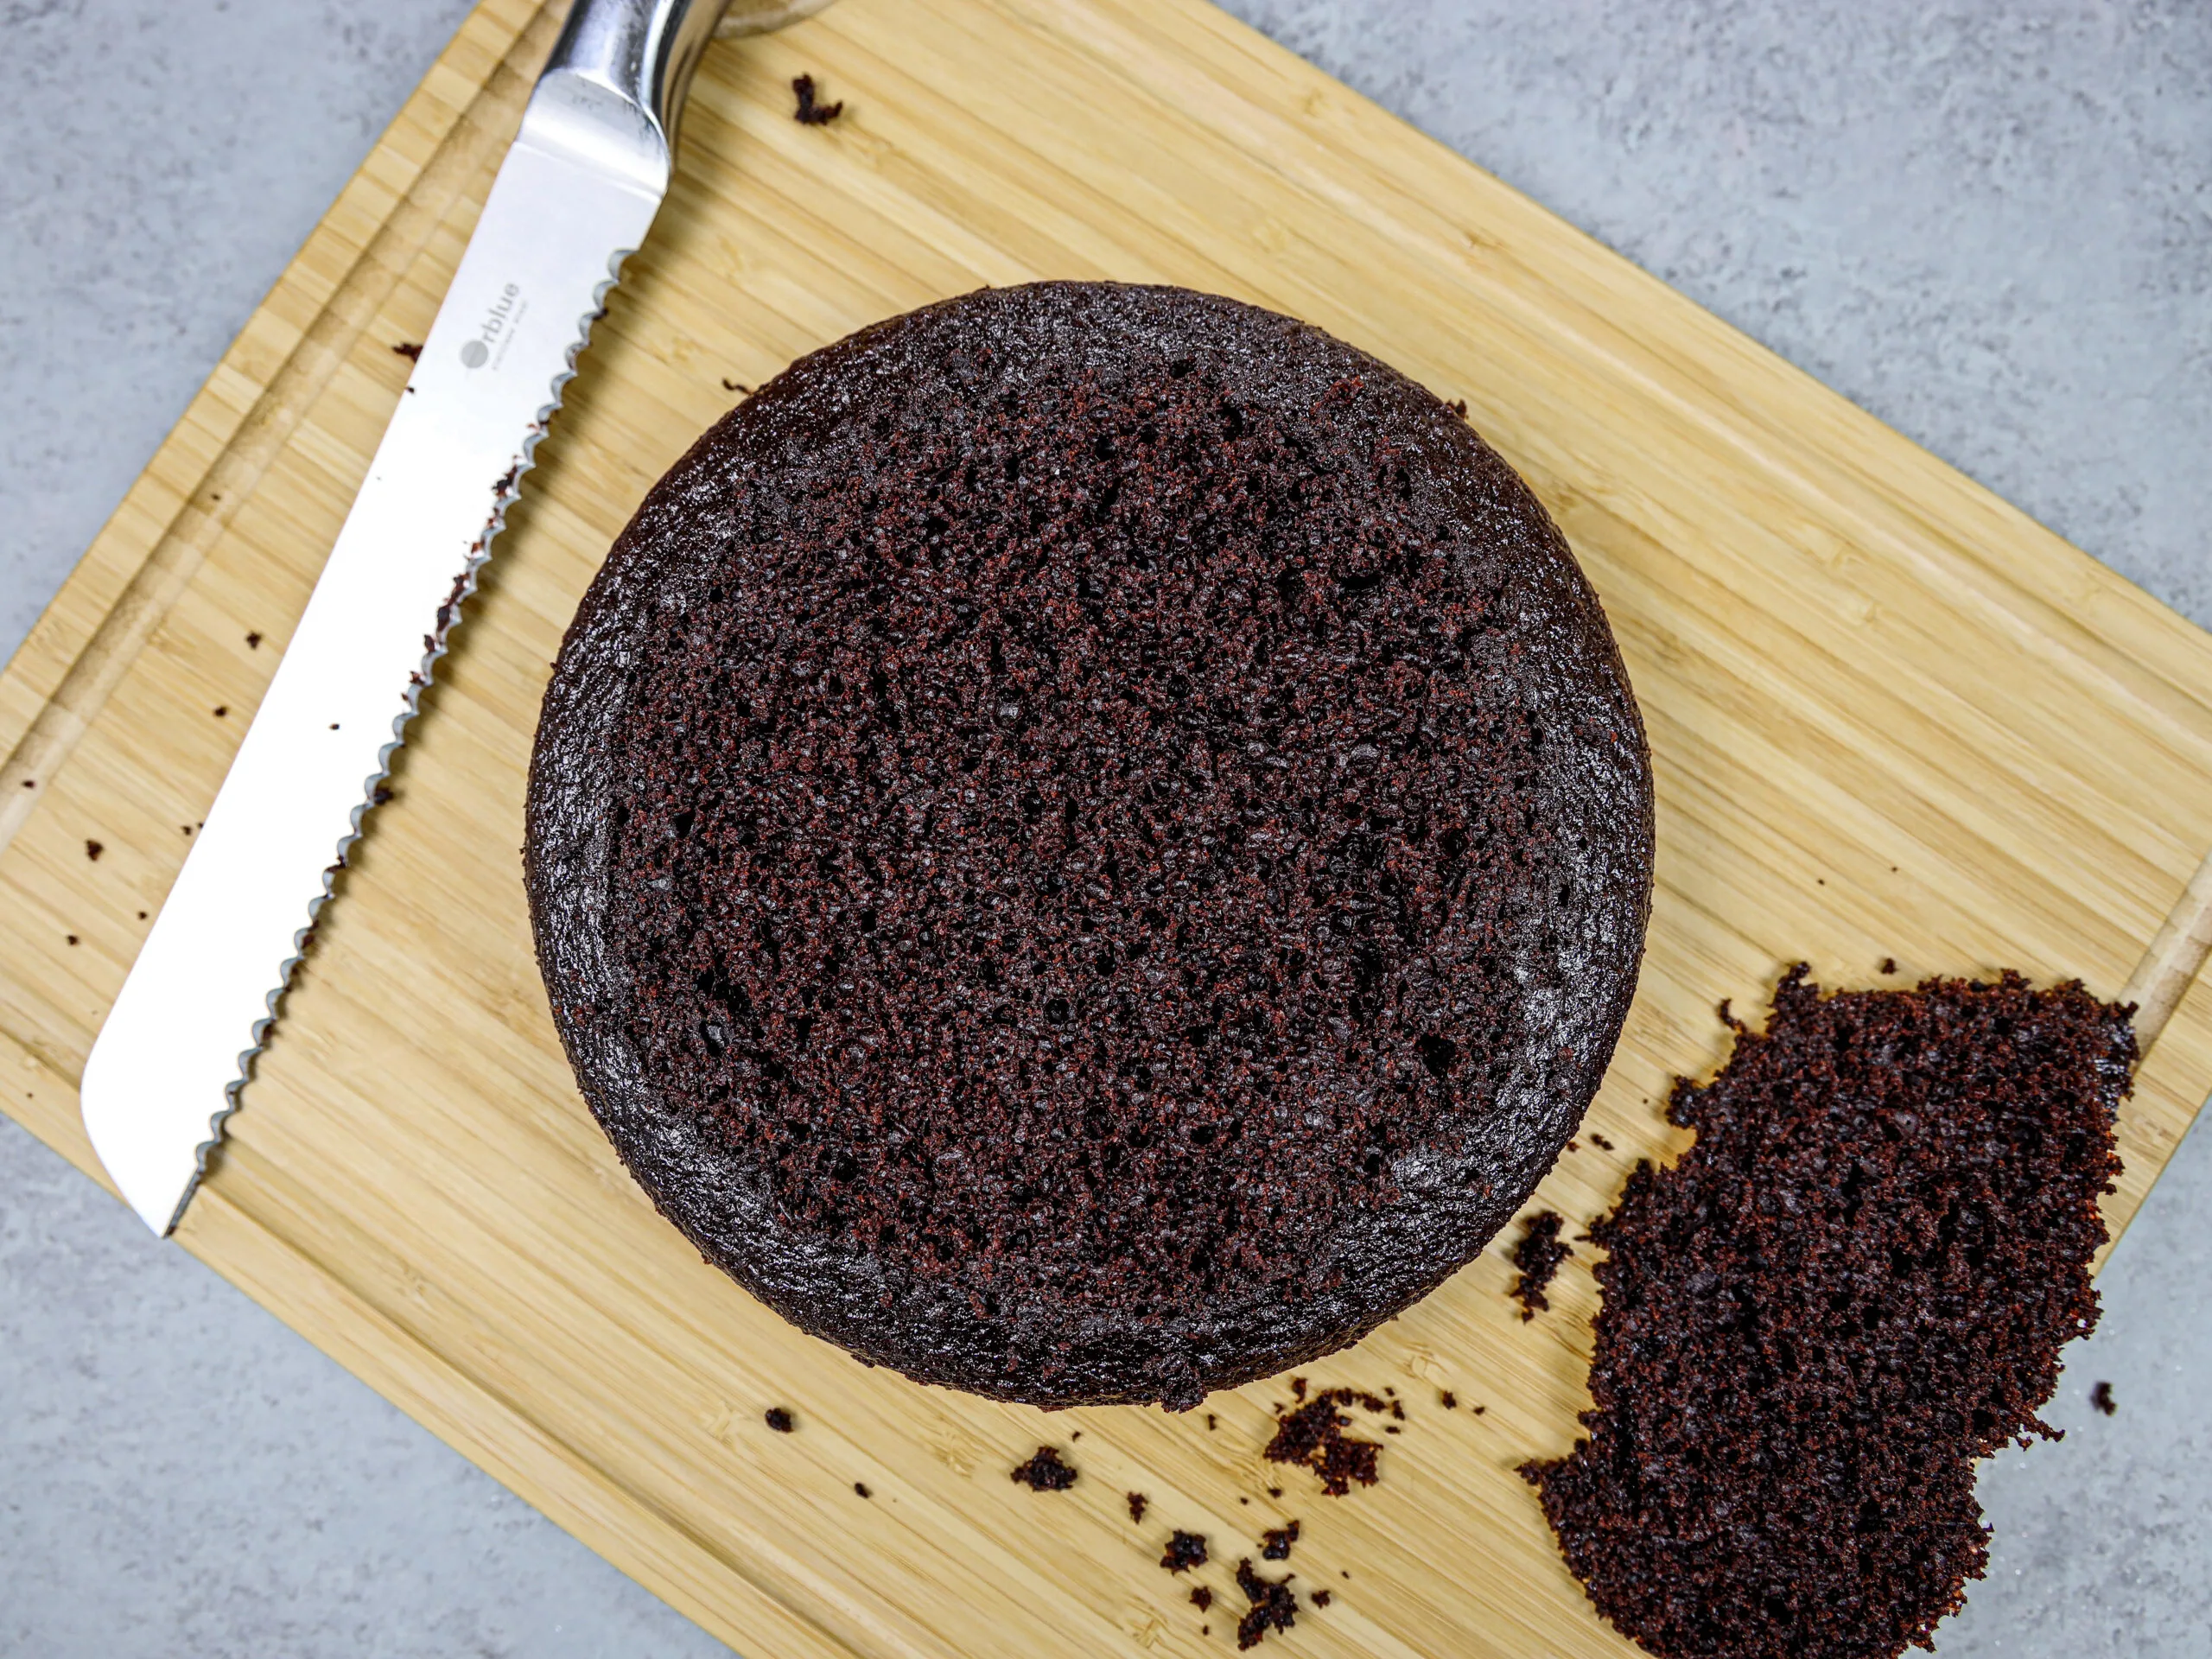
Once the cake layers have cooled to room temperature, use a serrated knife to level the top of each cake layer. It makes the cake so much easier to stack and assemble!!
If you’re making these in advance, you can wrap and freeze them at this point.

Step 3: Make the Chocolate Buttercream
While the cake layers bake and cool, make the chocolate buttercream. This frosting can also be made in advance if needed and kept in the fridge for up to a month!
If your frosting seems too thick after mixing your ingredients, add in additional cream (1 tablespoon at a time). Or if the frosting is too thin, add in more powdered sugar (a quarter of a cup at a time).
If you’re unsure how thick your frosting should be, you can learn what consistency you’re looking for in my frosting consistency post.

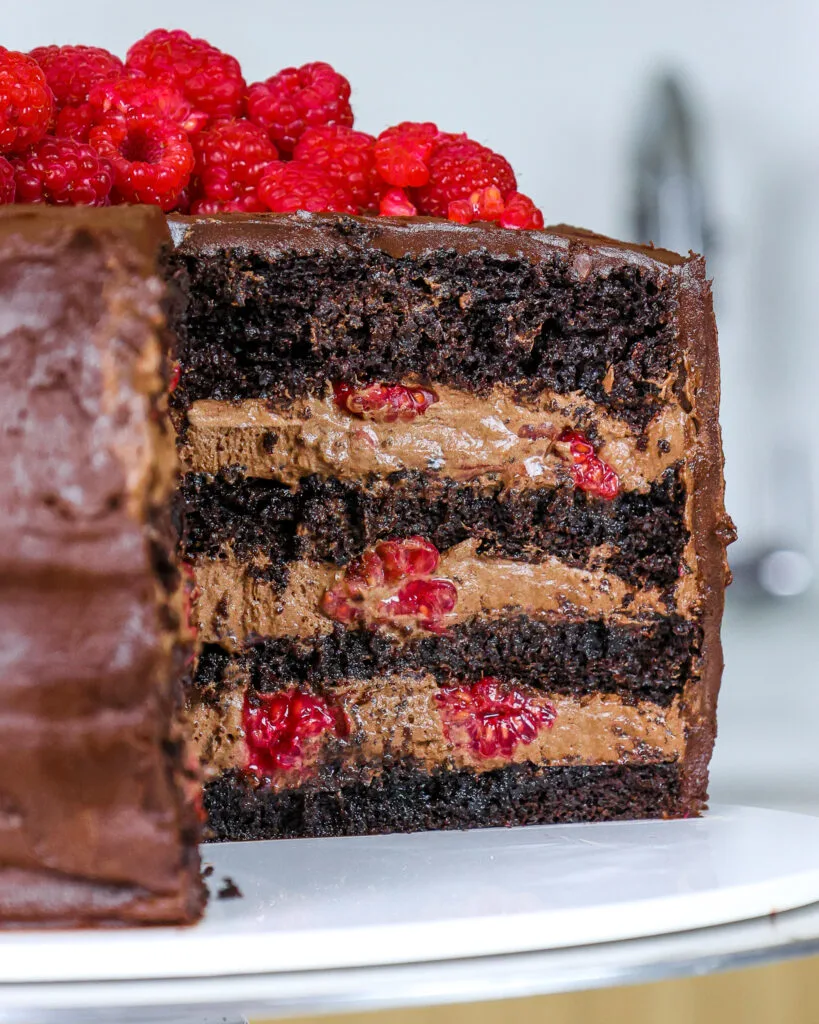
Step 4: Stack and Fill the Cake Layers
Stack and frost cake layers on a greaseproof cake board, using a dab of chocolate buttercream to help stick the first cake layer to the board.
As you assemble the cake, spread about 1/4 cup of raspberry jam on each cake layer. Spread about 1/3 of the chocolate mousse in an even layer on top of the jam.
If desired, gently press about 2/3 cup of fresh raspberries into the mousse.
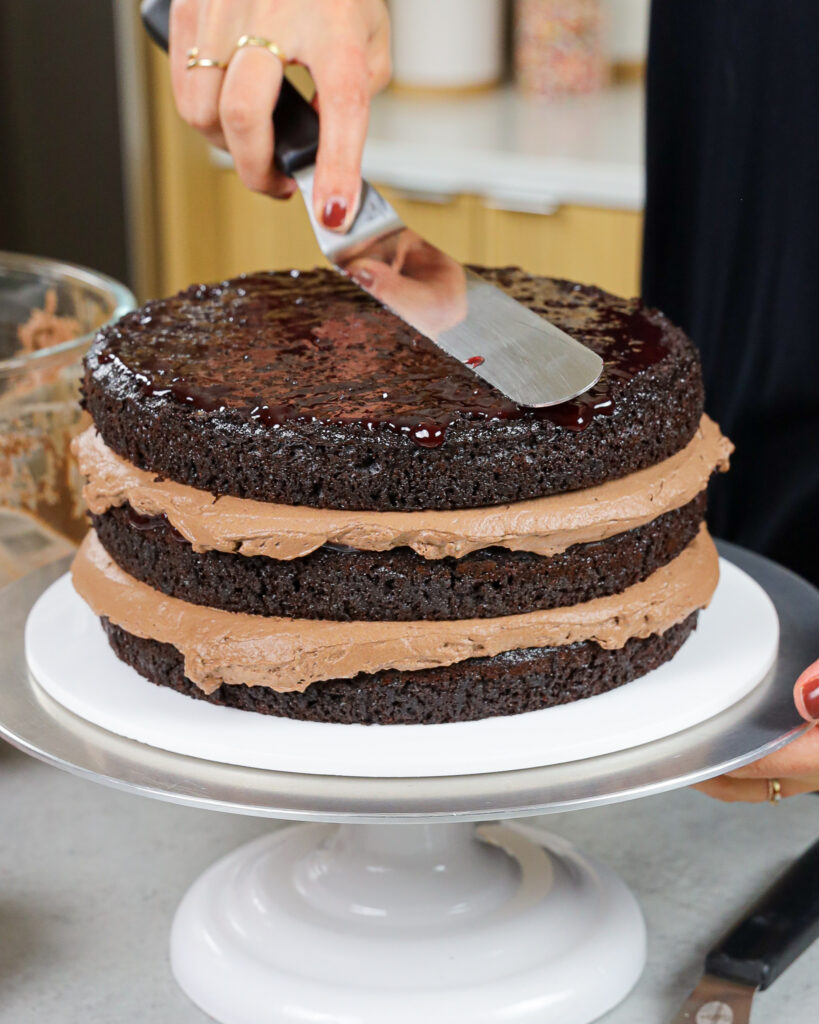
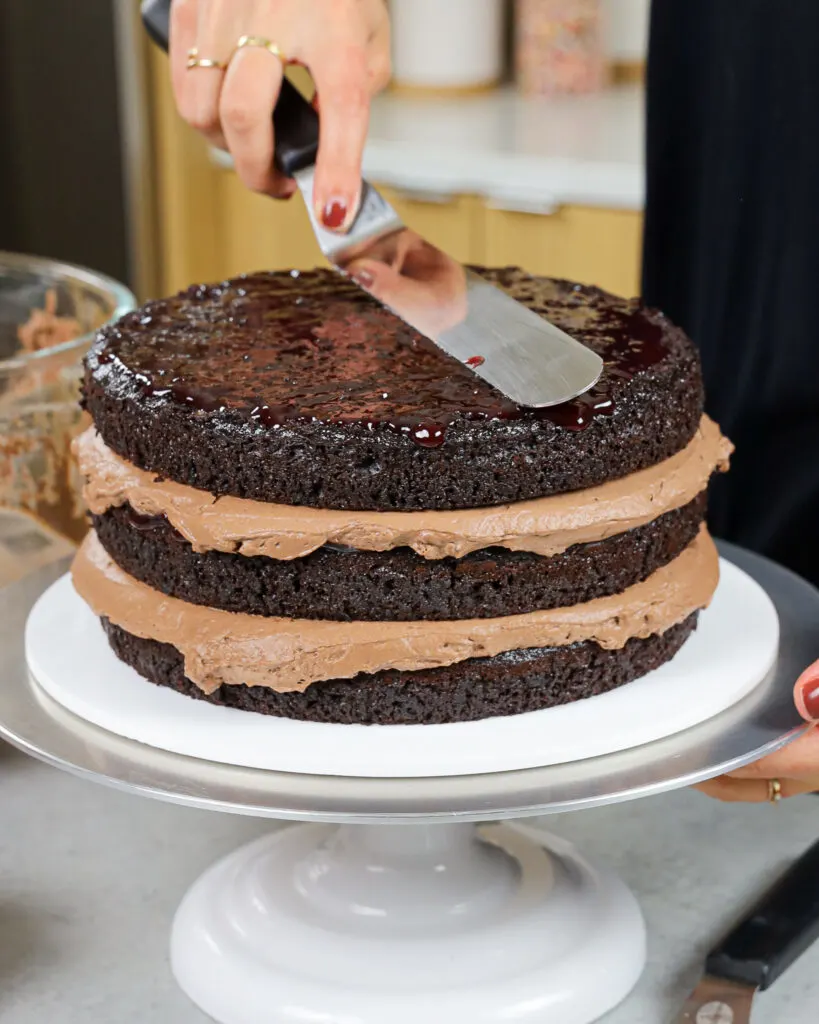
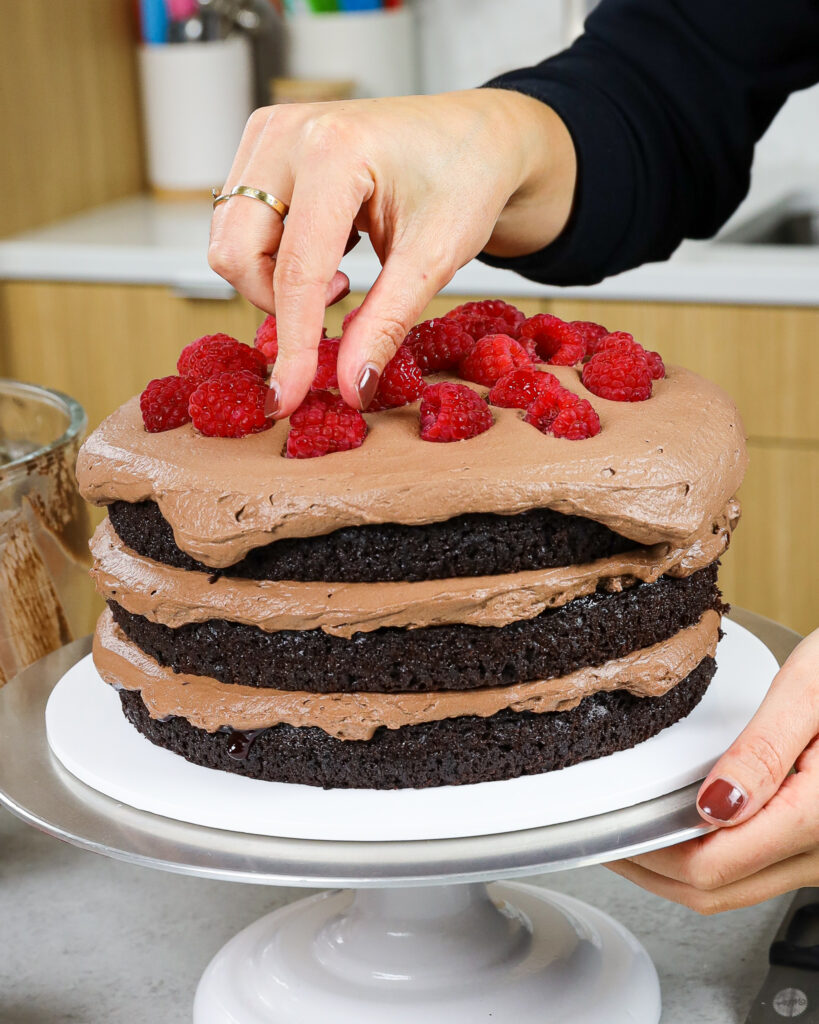

Repeat with the remaining cake layers. Smooth any overhanging mousse around the cake with a large offset spatula, then freeze the cake for about 10 minutes in the freezer.
This will help the buttercream between the cake layers firm up and make the cake way easier to frost.
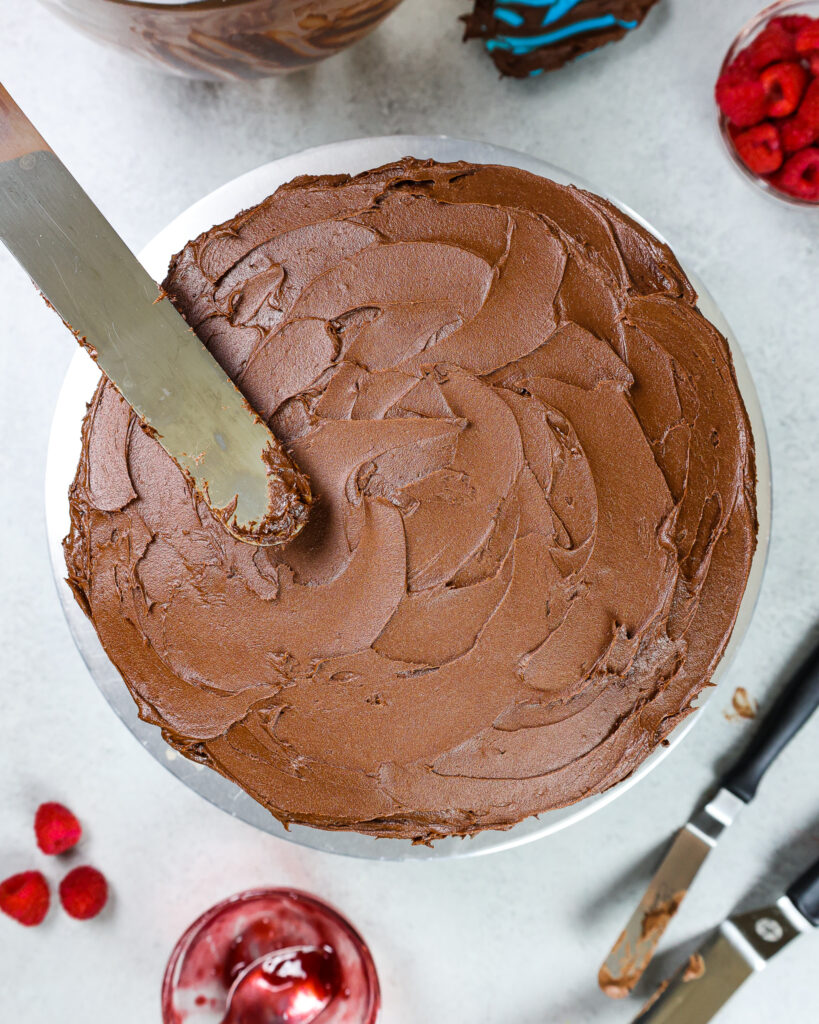
Step 5: Spread on a Thick Layer of Frosting
Cover the cake with a thick, even layer of chocolate buttercream and use an offset spatula or the back of a spoon to make some cute swoops around the cake.
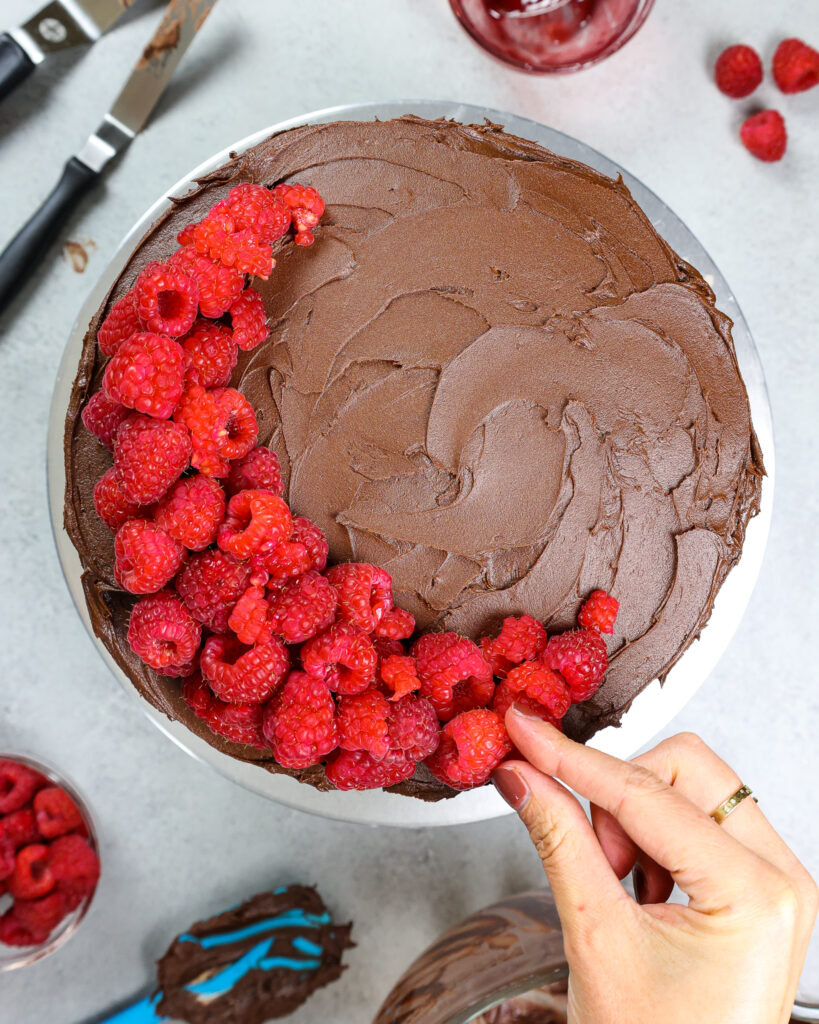
This is an easy and stress-free way to decorate a cake that gives it a beautiful finished look. Top with a semicircle of fresh raspberries and enjoy!


Substitutions & Swaps: Chocolate Cake Layers
While I love this chocolate raspberry mousse cake just the way it is, I know some of you might not have all these ingredients on hand.
Below are some swaps and substitutions that can be made in this recipe:
- All-Purpose Flour – This recipe turns out best with all-purpose flour. However, you can swap in a good gluten-free flour blend (like this) if needed. Just be sure to stir the batter longer than normal to help give the cake proper structure, and let the batter sit for about 20 minutes before baking it if you opt to make a gluten-free version.
- Granulated Sugar – I do not recommend reducing the amount of sugar or changing the type of sugar, as it will change the texture of the cake layers.
- Dark Baking Cocoa – I like to use the Hershey’s brand of dark baking cocoa, but you can also use black cocoa. If you can’t find dark cocoa powder or don’t have any on hand, you can use regular unsweetened baking cocoa in its place.
- Buttermilk – You can also use full-fat yogurt, sour cream, whole milk, or an alternative yogurt or milk (almond, soy, oat).
- Vegetable Oil – Use any flavorless oil in this recipe. Canola, vegetable, or even sunflower oil would all work great. I don’t recommend olive oil though, as it has a strong flavor and will change the taste of the cake.
- Eggs – This recipe uses large eggs. If you have an egg allergy you can try using a vegan egg replacer.
- Raspberry Jam – Spread a jar of jam on top of each cake layer to pack it with fruity flavor! I like using seedless raspberry jam, but any jam will work! You can also use strawberry or blackberry jam instead of raspberry if needed. Just be sure to match the fruit you fill the cake with to the jam you use.
- Fresh Raspberries – I like to add fresh raspberries between the cake layers. This is optional, but I really think it adds to the texture and flavor of this cake. Alternatively, you can use strawberry slices or fresh blackberries if you can find fresh raspberries.

Substitutions & Swaps: Chocolate Buttercream
Some swaps and substitutions that can be made in this frosting recipe include:
- Unsalted Butter – If you only have salted butter, you can use it in place of unsalted butter. Just be sure to omit the salt that this frosting recipe calls for. You can also use vegan butter in its place!
- Dark Cocoa Powder – If you can’t find dark cocoa powder or don’t have any on hand, you can use regular unsweetened baking cocoa or add additional powdered sugar in its place.
- Heavy Cream – Whole milk or alternative milk (soy, almond, oat) can also be used to make the frosting.
- Dark Chocolate – You can use dark chocolate chips, baking chocolate, or good-quality chocolate bars to melt and add to the frosting. Alternatively, you can also use milk or semi-sweet chocolate if you have a strong preference.

Tips for Making the Best Chocolate Raspberry Mousse Cake
- When making the chocolate mousse, chill your mixing bowl and whisk attachment in the freezer. It makes it easier and quicker to whip up the whipped cream for the mousse.
- Ingredients at room temp mix together better! Set out any cold ingredients ahead of time.
- Be sure to properly measure your flour (spoon into the cup measure, then level). Or better yet, use a kitchen scale to measure your dry ingredients.
- Mix the cake batter just until the ingredients are incorporated. This will ensure your cake layers are tender and fluffy.
- Use a scale to weigh your cake pans as you fill them. Make sure each pan has the same amount of batter will make your cake layers bake to the same height and bake more evenly.
- Level your room temperature or thawed cake layers with a serrated knife to make them easier to stack.
- Chill your cake layers in the freezer for about 20 minutes before assembling the cake. It makes it so much easier to stack and frost them!
Making this Chocolate Raspberry Mousse Cake in Advance and Storage Tips
- You can make these cake layers in advance and freeze them. It breaks the process up and makes it more approachable.
- The chocolate mousse can also be made in advance! Make it up to 2 days in advance and store it in the fridge.
- Make your chocolate frosting ahead of time or save any leftover frosting! Store in an airtight container in the fridge for up to a month.
- This frosting can also be stored in the freezer for up to 3 months! Just be sure to give it a good stir once it thaws to make it nice and smooth again.
- This cake can last in the fridge for up to 2 days. I don’t recommend storing it longer than that as the raspberries can start to spoil.

Let Me Know What You Think
If you try this chocolate raspberry mousse cake recipe, I’d love to hear what you think! Please leave a rating below and a comment to let me know your thoughts.
Other Recipes You Might Like:


Chocolate Raspberry Mousse Cake


This chocolate raspberry mousse cake has the perfect balance of tart and sweet! Its moist chocolate cake layers are filled with fluffy chocolate mousse, tart raspberry jam, and is studded with fresh raspberries.
Ingredients
Chocolate Mousse
- 1 cup or 8 oz. good quality dark chocolate chips (180g)
- 1/2 cup warm water (120ml)
- 1/2 cup unsweetened cocoa powder (40g)
- 2 cups heavy cream or heavy whipping cream, cold (465ml)
- 1/4 cup powdered sugar (30g)
- 2 tsp vanilla extract (8mL)
- pinch of fine salt (less than 1/8 tsp)
Moist Chocolate Cake Recipe
- 2 1/2 cups all-purpose flour (325g)
- 2 1/2 cups granulated sugar (500g)
- 1 cup sifted dark cocoa powder (80g)
- 2 1/2 tsp baking powder (10g)
- 2 tsp baking soda (12g)
- 1 tsp salt (6g)
- 1 1/4 cup warm water (300ml)
- 1 1/4 cup buttermilk, room temperature (300ml)
- 2/3 cup vegetable oil (145ml)
- 2 large eggs + 1 egg white, room temperature (142g)
- 2 tsp vanilla extract (8ml)
Chocolate Buttercream Frosting
- 1 cup (or 2 sticks) unsalted butter, room temperature (226g)
- 1/2 cup dark baking cocoa, sifted (40g)
- 1 tsp vanilla extract (4ml)
- 1/4 tsp fine table salt (1g)
- 2 1/2 cups powdered sugar (312g)
- 1/3 cup heavy cream or heavy whipping cream, room temperature (90ml)
- 1 cup dark chocolate chips, melted and cooled (190g)
Cake Filling
- 3/4 cup raspberry jam (255g)
- 3 cups fresh raspberries - optional (375g)
Recommended Tools
- 8-inch cake pans
- Spinning cake stand
- 10-inch greaseproof cake board
- Large offset spatula
- Electric hand mixer or stand mixer
Instructions
Chocolate Mousse Filling
- Make the chocolate mousse first, so it has time to chill. Or better yet, make this mousse in advance! It can be made 1-2 days ahead of time.
- Melt the chocolate chips by placing them in a medium-sized, heat-proof bowl. Heat in 20-30 second increments in the microwave, stirring after each increment until the chocolate completely melted and smooth. If you don't have a microwave, you can also use a double boiler.
- In a small bowl, whisk together the warm water and cocoa powder. Pour into the melted chocolate and whisk together until smooth. The mixture should be somewhat thick. Set aside.
- Add the heavy cream, powdered sugar, vanilla extract, and a pinch of fine salt in a large bowl or the bowl of a stand mixer fit with a whisk attachment.
- Mix on medium-high speed until the whipped cream starts to gather in the whisk attachment and you can see texture around the edges of the bowl. The whipped cream should be thick and able to keep its shape. This usually takes about 2 1/2 to 3 minutes in my stand mixer.
- Gently fold the chocolate mixture into the whipped cream using a rubber spatula. Use the spatula to swoop around the sides of the bowl and pull through the center like I show in the video of this recipe. Be careful not to over-mix the mousse, or it will become deflated and lose its structure.
- Cover the mousse with plastic wrap and chill in the refrigerator for at least 2 hours.
Chocolate Cake Layers
- Preheat oven to 350 F / 175 C. Grease and line four, eight-inch cake pans.
- Sift or whisk together the dry ingredients (flour, sugar, dark cocoa powder, baking powder, baking soda and salt) into a large bowl.
- Pour in the warm water, buttermilk, oil, eggs, and vanilla into a separate bowl and whisk together until fully incorporated.
- Mix the wet ingredients into the dry ingredients just until they're incorporated into the batter.
- Divide the batter evenly between the prepared cake pans, and bake for about 23-26 minutes or until a toothpick comes out with a few moist crumbs.
- Remove the cake layers from the oven and let them cool in the pans for about 10 minutes. Gently run an offset spatula around the rim of the cake pans to loosen them, then flip them into wire racks to finish cooling.
- Once cooled, use a serrated knife to level the top of each cake layer. If you are making these in advance, wrap and freeze them at this point.
Chocolate Buttercream Frosting
- Beat the butter on a medium speed for 30 seconds with a paddle attachment until smooth.
- Add in the sifted dark cocoa, vanilla extract and salt. Mix on low until the ingredients are fully incorporated.
- Slowly mix in the powdered sugar. Halfway through, add in the heavy cream to make the frosting easier to mix.
- Mix in the cooled, melted dark chocolate on a low speed until the ingredients are fully incorporated and the desired consistency is reached. Cover with plastic wrap to prevent crusting and set aside.
Assembling This Chocolate Raspberry Mousse Cake
- Stack and frost cake layers on a greaseproof cake board, using a dab of chocolate buttercream to help stick the first cake layer to the board.
- As you assemble the cake, spread about 1/4 cup of raspberry jam on top of each cake layer. Spread about 1/3 of the chocolate mousse in an even layer on top of the jam. If desired, gently press about 2/3 cup of fresh raspberries into the mousse.
- Repeat with the remaining cake layers. Smooth any overhanging mousse around the cake with a large offset spatula, then freeze the cake for about 10 minutes in the freezer. This will help the buttercream between the cake layers firm up and make the cake way easier to frost.
- Carefully cover the cake with a thick, even layer of chocolate buttercream and use an offset spatula or the back of a spoon to make some cute swoops around the cake. This is an easy and stress-free way to decorate a cake that gives it a beautiful finished look.
- Top with a semicircle of fresh raspberries and enjoy!
Notes
My Tips for Making the Best Chocolate Raspberry Mousse Cake
- When making the chocolate mousse, chill your mixing bowl and whisk attachment in the freezer. It makes it easier and quicker to whip up the whipped cream for the mousse.
- Ingredients at room temp mix together better! Set out any cold ingredients ahead of time.
- Be sure to properly measure your flour (spoon into the cup measure, then level). Or better yet, use a kitchen scale to measure your dry ingredients.
- Mix your cake batter just until the ingredients are incorporated. This will ensure your cake layers are tender and fluffy.
- Use a scale to weigh your cake pans as you fill them. Make sure each pan has the same amount of batter will make your cake layers bake to the same height and bake more evenly.
- Bang your cake pans on the counter before putting it in the oven. This brings any air bubbles that are trapped in the batter to the surface.
- Level your room temperature or thawed cake layers with a serrated knife to make them easier to stack.
- Chill your cake layers in the freezer for about 20 minutes before assembling the cake. It makes it so much easier to stack and frost them!
Making This Chocolate Raspberry Mousse Cake in Advance & Storage Tips
- Make your cake layers in advance and freeze them. It breaks the process up and makes it more approachable.
- The chocolate mousse can also be made in advance! It can be made up to 2 days in advance and stored in the fridge.
- Make your chocolate frosting ahead of time or save any leftover frosting! It can be stored in an airtight container in the fridge for up to a month.
- This frosting can also be stored in the freezer for up to 3 months! Just be sure to give it a good stir once it thaws to make it nice and smooth again.
- A frosted cake can last in the fridge for up to 2 days. I don't recommend storing it longer than that as the raspberries can start to spoil.
Nutrition Information
Yield
24Serving Size
1Amount Per Serving Calories 438Total Fat 18gSaturated Fat 8gTrans Fat 0gUnsaturated Fat 9gCholesterol 31mgSodium 287mgCarbohydrates 70gFiber 2gSugar 57gProtein 4g
Alison
Saturday 25th of May 2024
I made this cake for my brothers birthday, it was a huge hit. My mom generally doesn’t request cake, but requested it for her birthday. It’s delicious and making it in multiple days makes it so much easier.
Chelsweets
Sunday 26th of May 2024
I am so happy to hear that Alison :) Thank you for sharing!!
Kristi
Friday 5th of April 2024
This was amazing! I didn't have buttermilk so I used sour cream. The cake was so delicious. The mousse was incredible and the frosting is the best I've ever made (or tasted)! I made a mixed berry compote in stead of using jam. This was for a birthday and everyone raved. BEST CHOCOLATE CAKE EVER!!
Chelsweets
Sunday 7th of April 2024
Hi Kristi,
I'm so happy to hear that!! That sounds incredible :) Thank you for sharing!!!
Angie
Tuesday 13th of February 2024
Hi! Am I able to opt out the cocoa and the water and still get a similar result?
Stephanie
Tuesday 5th of December 2023
Hi Chelsea! Love your recipes!
Would I be able to use this same recipe and after frosting with buttercream, can I wrap it in fondant and keep in the fridge for two days in the fridge? Or do you only cover in fondant one day before? Im doing a cake for a birthday party and I was hoping to get it filled, frosted, and covered in fondant two days ahead.
Appreciate you! Steph
Chelsweets
Saturday 9th of December 2023
Hi Steph,
I am definitely not a fondant expert / I haven't covered a cake in fondant in years! But I believe that you can cover a cake in fondant a few days in advance. My only word of caution is the fresh raspberries! Fruit can get weird inside cakes if they're made too far in advance. I'd suggest either omitting the fresh raspberries or using a bit of raspberry jam instead (spread it directly on the cake layer and then top if with the chocolate mousse). Hope that helps and that the cake turns out great, happy baking!
Nutella Cake: Easy, Delicious Recipe from Scratch
Monday 9th of January 2023
[…] Moist Chocolate Cupcakes Chocolate Drip Cake Raspberry Chocolate Cake […]