
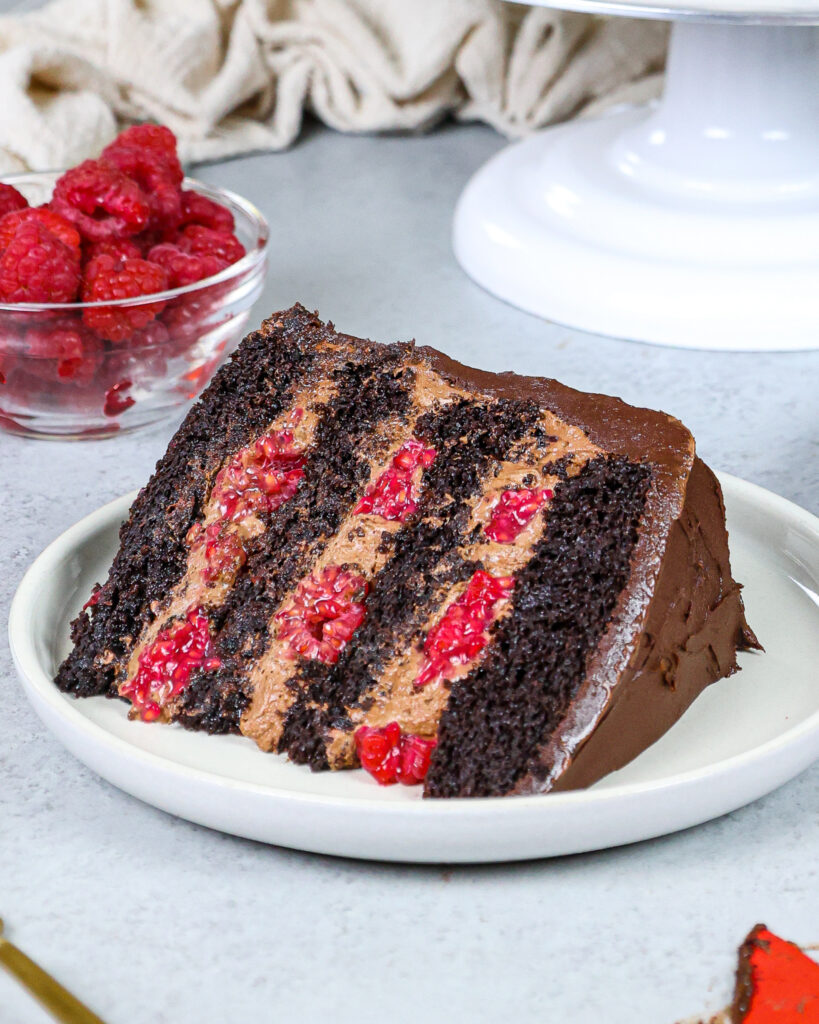
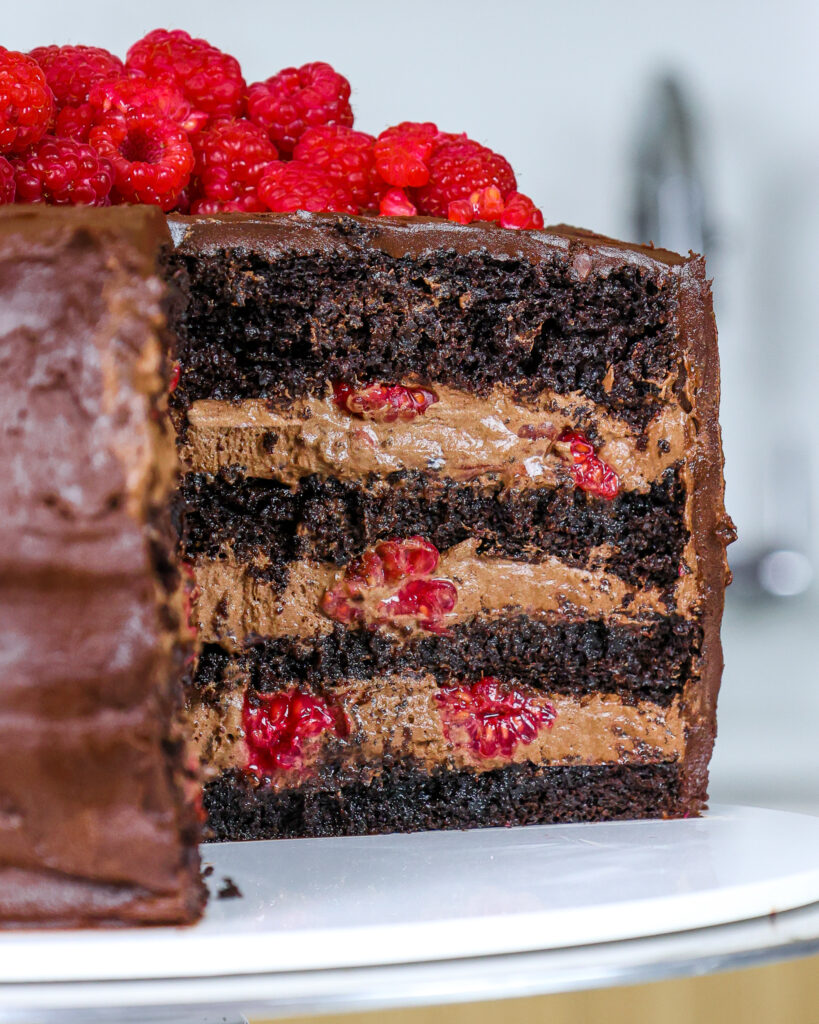
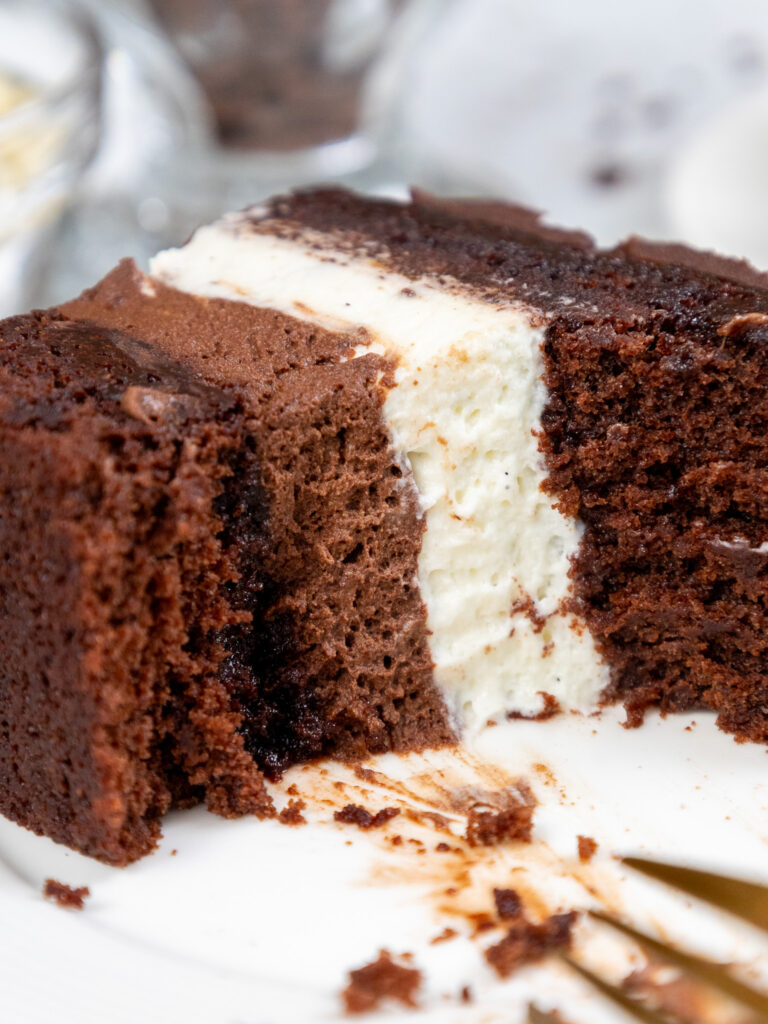
Chocolate Mousse Cake Filling
This chocolate mousse cake filling is fluffy, delicious, and perfectly sweet. It’s the ultimate filling for any dessert, from cakes to cupcakes!
At its core it’s chocolate whipped cream that’s stabilized with melted and cooled dark chocolate. This gives it a light as air texture that’s full of chocolate flavor.
How to Make This Chocolate Mousse Cake Filling
To make sure your chocolate mousse filling turns out as amazing as possible, let’s walk through each step together! I’ve also included a video tutorial of the process below.
Step 1: Melt the Chocolate & Make Chocolate Mixture
Melt the chocolate chips by placing them in a medium-sized, heat-proof bowl.
Heat in 20-30 second increments in the microwave, stirring after each increment until the chocolate completely melted and smooth.
If you don’t have a microwave, you can also use a double boiler.
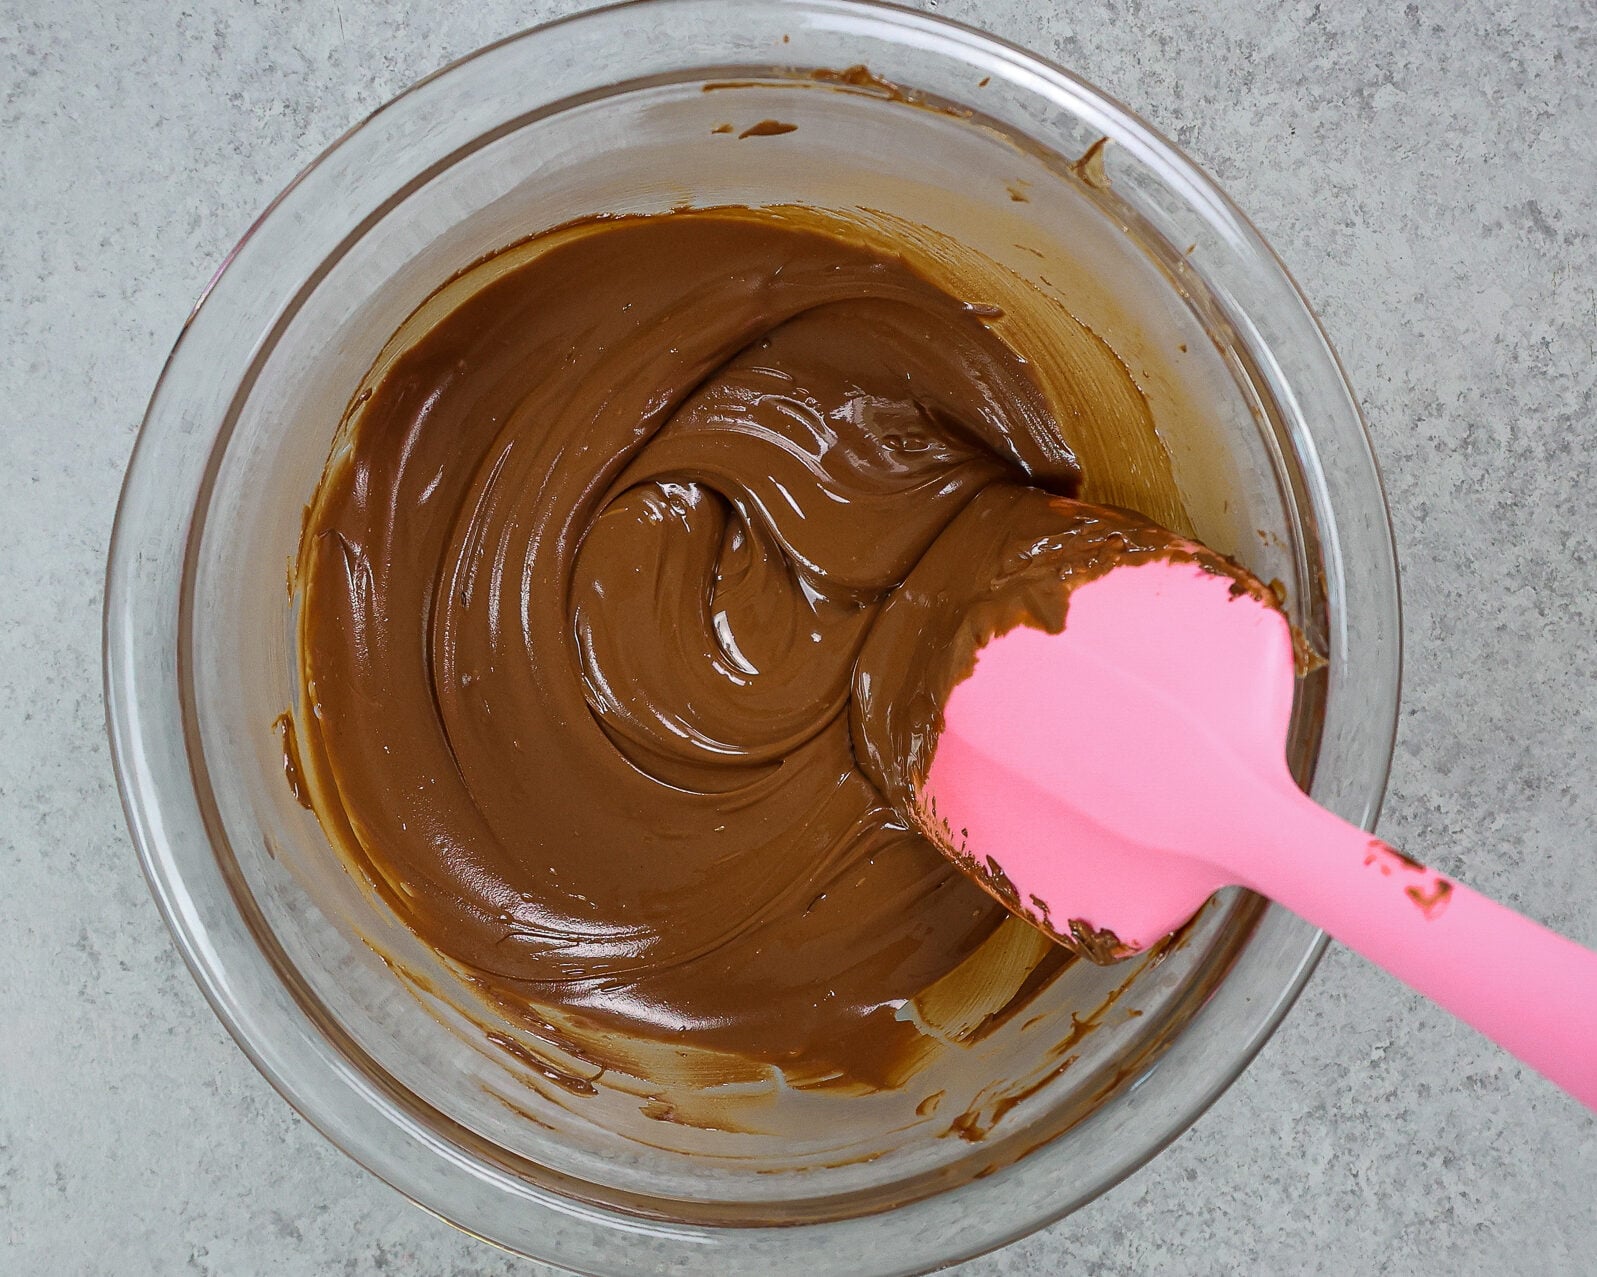
In a small bowl, whisk together the hot water and cocoa powder.
Pour into the melted chocolate and whisk together until smooth. The mixture should be somewhat thick. Set aside.
Step 2: Whip Up the Whipped Cream
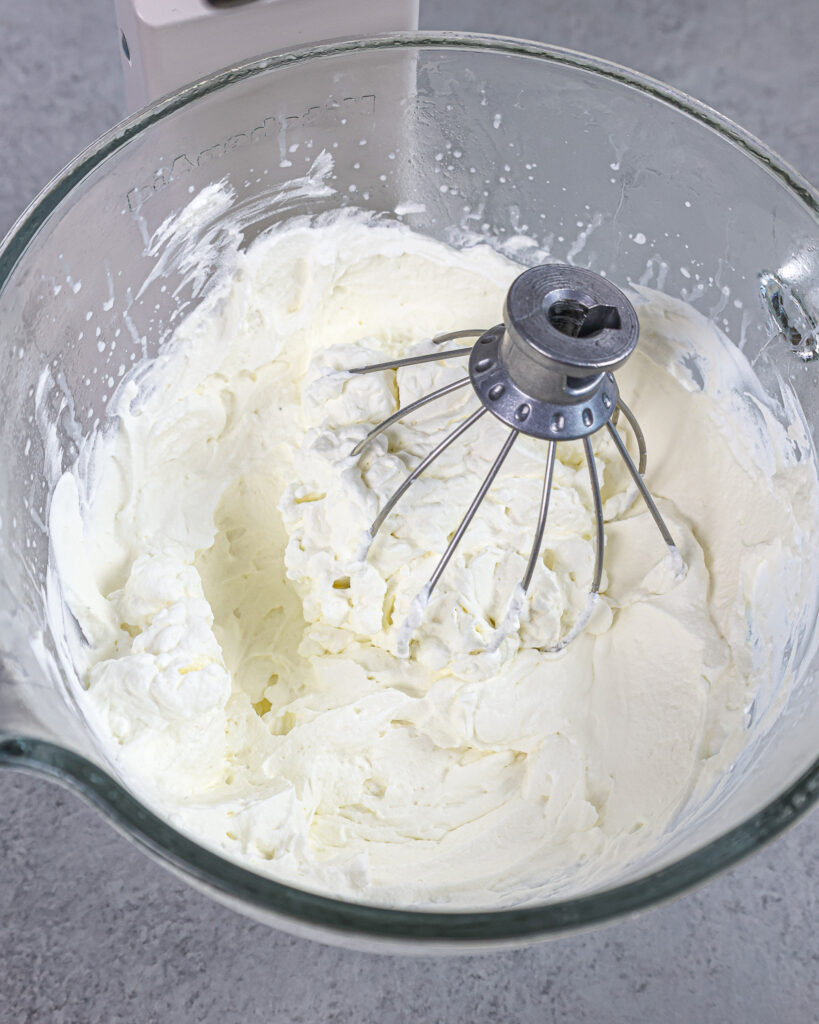
Add the heavy cream, powdered sugar, vanilla extract, and a pinch of fine salt to a large bowl or the bowl of a stand mixer fitted with a whisk attachment.
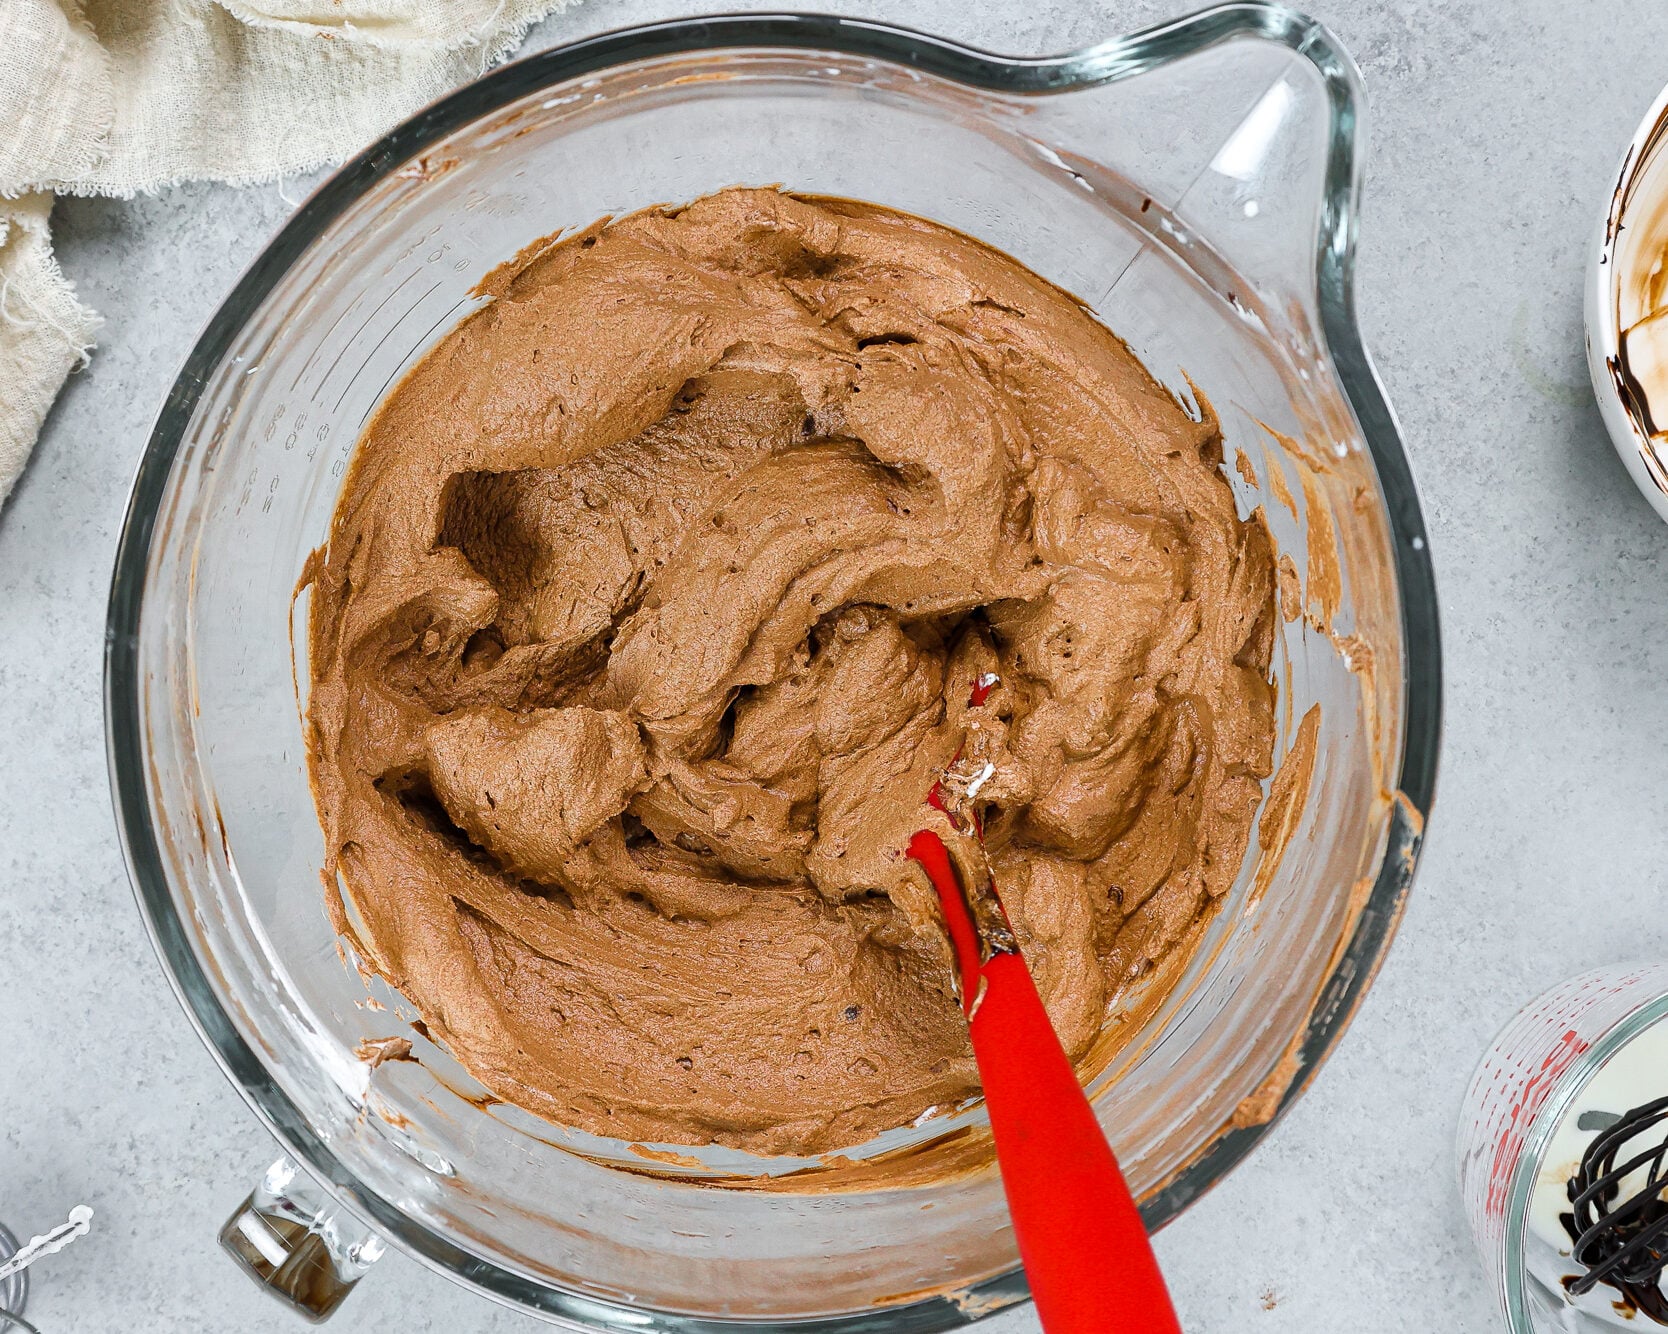
Mix on medium-high speed until the whipped cream starts to gather in the whisk attachment and you can see texture around the edges of the bowl (see photo below).
At this stage, the whipped cream should be thick and able to keep its shape. This usually takes about 2 1/2 to 3 minutes in my stand mixer.
Step 3: Fold in the Chocolate Mixture
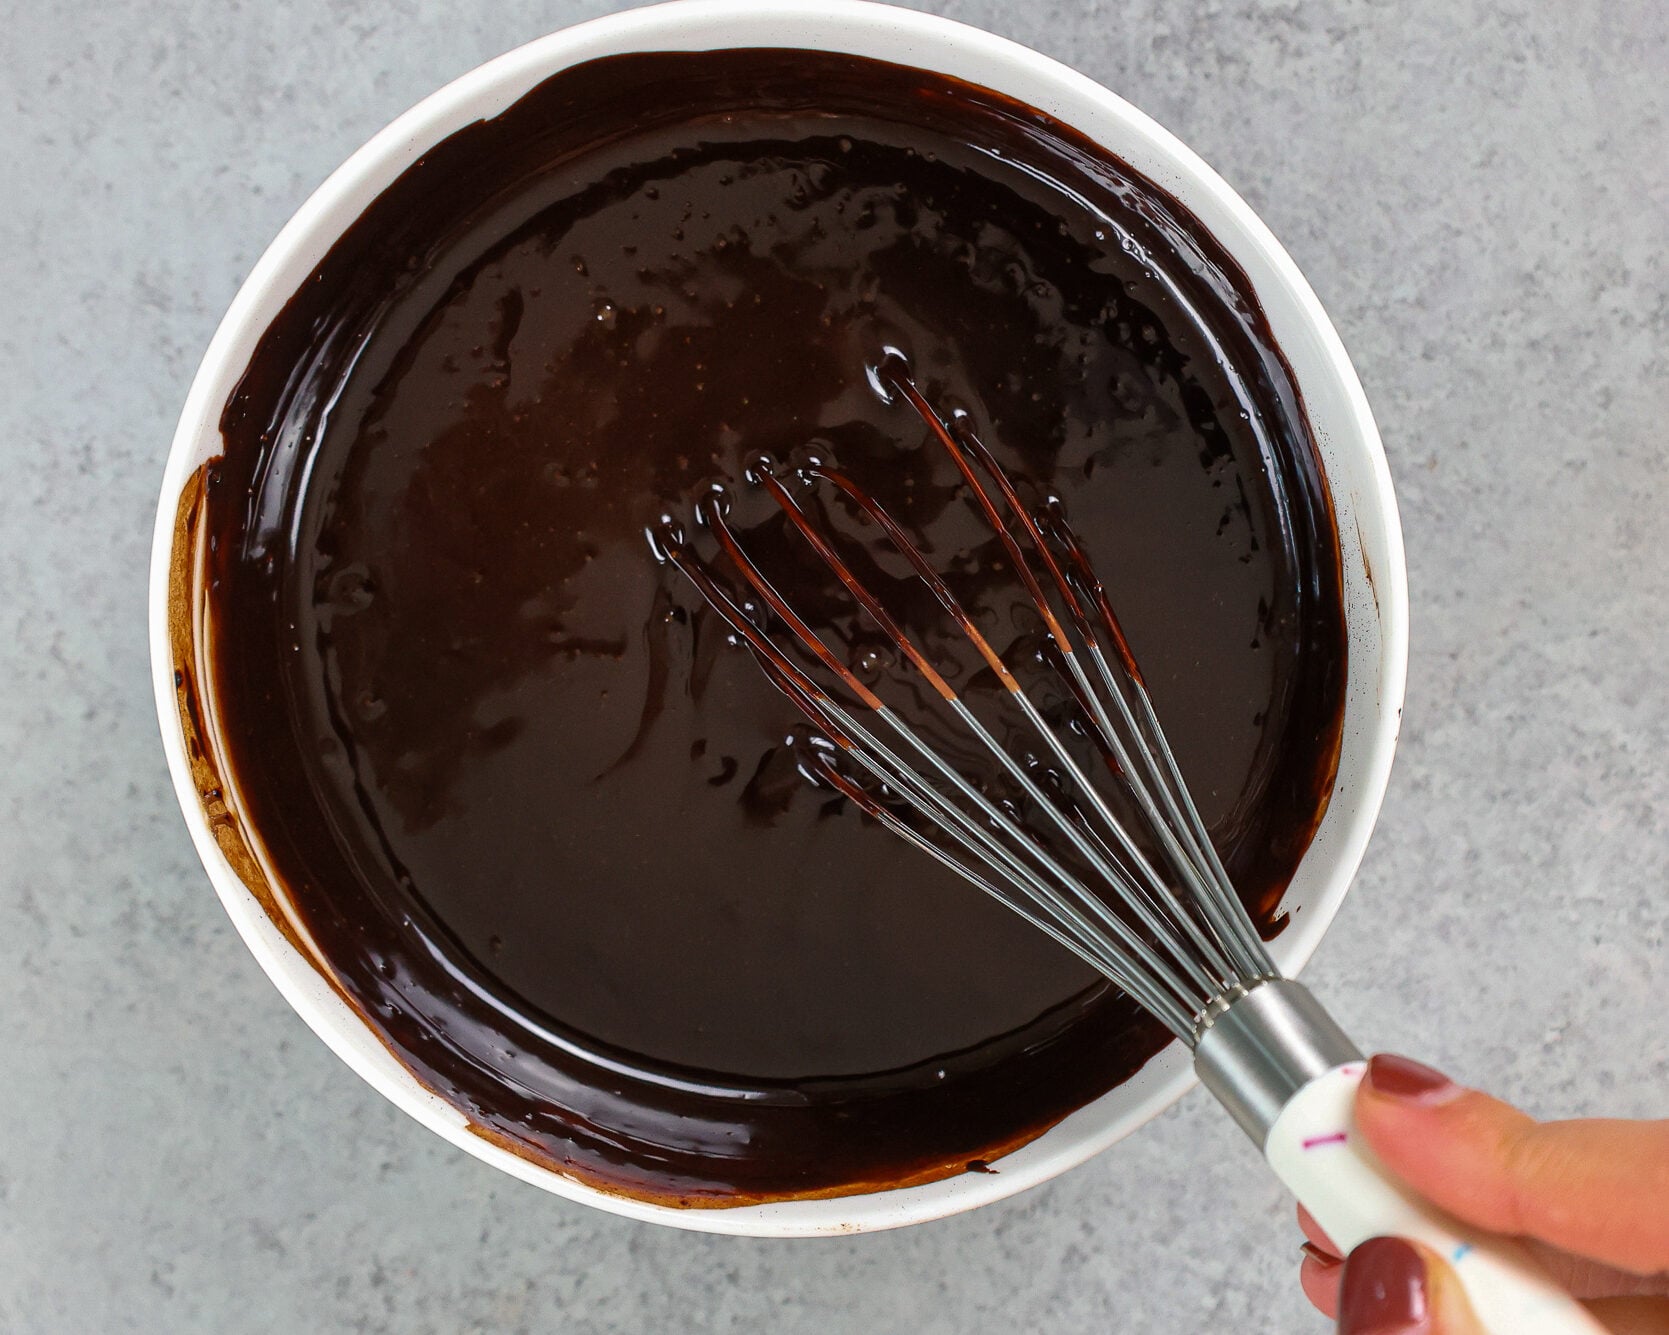
Gently fold the chocolate mixture into the whipped cream using a rubber spatula.
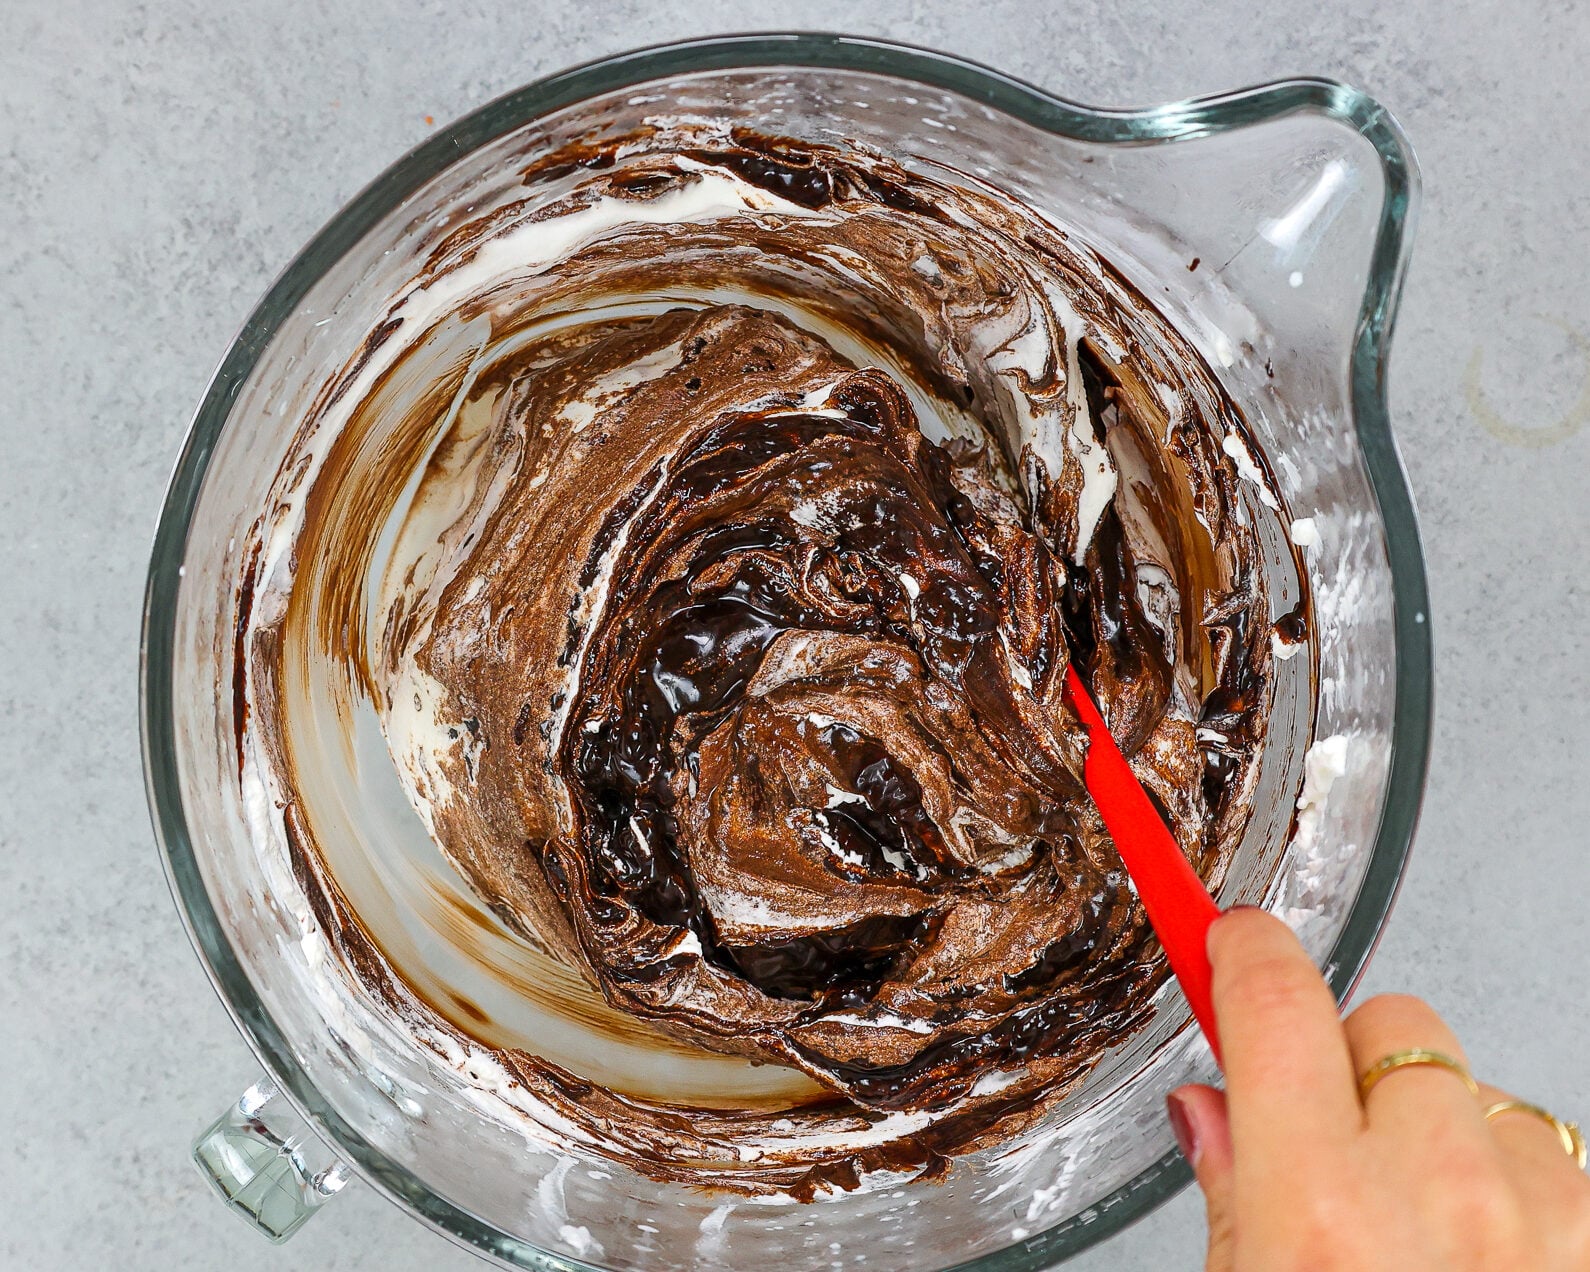
Use the spatula to swoop around the sides of the bowl and pull through the center like I show in the video of this recipe.
Be careful not to over-mix the mousse, or it will become deflated and lose its structure.
Be careful not to over-mix the mousse, or it will become deflated and lose its structure. Cover the mousse with plastic wrap and chill in the refrigerator for at least 2 hours.
Substitutions & Swaps in This Chocolate Mousse Recipe
Some swaps and substitutions that can be made in this recipe include:
- Dark Chocolate – You can use dark chocolate chips, baking chocolate, or good-quality chocolate bars to melt. Alternatively, you can also use milk or semi-sweet chocolate if you have a strong preference.
- Dark Cocoa Powder – If you can’t find dark cocoa powder or don’t have any on hand, you can use regular unsweetened baking cocoa.
- Heavy Cream – Heaving cream or heavy whipping cream can be used. To make dairy free and vegan chocolate mousse cake filling use coconut cream.
- Powdered Sugar – You need a fine sugar like powdered sugar to help sweeten the whipped cream and give it a smooth consistency. I don’t recommend using granulated sugar or other types of sugar.
What Can I Make with This Chocolate Mousse Filling?
This delicious dark chocolate mousse can be enjoyed with all kinds of desserts!
I love to use it to fill layer cakes, but it would also be a delicious filling with cupcakes or even ice cream cakes.
It can also be enjoyed by itself. Top with a dollop of whipped cream and some chocolate shavings, and you have a dessert in and of itself!
Tips for Making the Best Chocolate Mousse Cake Filling
- When making the chocolate mousse, chill your mixing bowl and whisk attachment in the freezer. It makes it easier and quicker to whip up the whipped cream for the mousse.
- Heat the chocolate in short intervals, stirring between. This will prevent it from overheating and seizing up.
- Keep an eye on your mixer as you whip up the whipped cream! If you over-mix it, it will turn into butter.
- Use good-quality chocolate! It has a huge impact on the flavor of this filling.
- Keep this chocolate mousse cake filling cold. It can lose its shape and structure if it gets too warm.
Making This Chocolate Mousse Cake Filling in Advance & Storage Tips
Make this chocolate mousse up to 2 days in advance! Store it in the fridge in an airtight container or covered with plastic wrap.
Once a cake or cupcakes have been filled with this filling, keep them refrigerated.
Let Me Know What You Think
If you try this chocolate mousse cake filling recipe, I’d love to hear what you think! Please leave a rating below and a comment to let me know your thoughts.

Chocolate Mousse Cake Filling
Equipment
Ingredients
Chocolate Mousse
- 1 cup or 8 oz. good quality dark chocolate chips 180g
- 1/2 cup warm water 120ml
- 1/2 cup unsweetened cocoa powder, sifted 40g
- 2 cups heavy whipping cream, cold 465ml
- 1/4 cup powdered sugar 30g
- 2 tsp vanilla extract or vanilla bean paste 8ml
- pinch fine salt less than 1/8 tsp
Instructions
Chocolate Mousse Cake Filling
- Melt the chocolate chips by placing them in a medium-sized, heat-proof bowl. Heat in 20-30 second increments in the microwave, stirring after each increment until the chocolate completely melted and smooth. If you don't have a microwave you can also use a double boiler.
- In a small bowl, whisk together the warm water and cocoa powder. Pour into the melted chocolate and whisk together until smooth. The mixture should be somewhat thick. Set aside.
- Add the heavy cream, powdered sugar, vanilla extract, and a pinch of fine salt in a large bowl or the bowl of a stand mixer fitted with a whisk attachment.
- Mix on medium-high speed until the whipped cream starts to gather in the whisk attachment and you can see texture around the edges of the bowl. The whipped cream should be thick and able to keep its shape. This usually takes about 2 1/2 to 3 minutes in my stand mixer.
- Gently fold the chocolate mixture into the whipped cream using a rubber spatula. Use the spatula to swoop around the sides of the bowl and pull through the center like I show in the video of this recipe. Be careful not to over-mix the mousse, or it will become deflated and lose its structure.
- Cover the mousse with plastic wrap and chill in the refrigerator for at least 2 hours or up to 2 days.
Video
Notes
Yield
This recipe makes about 5 cups of chocolate mousse. This recipe can be halved or doubled if needed!My Tips for Making the Best Chocolate Mousse Cake Filling
- When making the chocolate mousse, chill your mixing bowl and whisk attachment in the freezer. It makes it easier and quicker to whip up the whipped cream for the mousse.
- Heat the chocolate in short intervals, stirring between. This will prevent it from overheating and seizing up.
- Keep an eye on your mixer as you whip up the whipped cream! If you over-mix it, it will turn into butter.
- Use good-quality chocolate! It has a huge impact on the flavor of this filling.
- Keep this chocolate mousse cake filling cold. It can lose its shape and structure if it gets too warm.
Making This Chocolate Mousse Cake Filling in Advance & Storage Tips
The chocolate mousse can be made in advance! It can be made up to 2 days ahead of time and stored in the fridge in an airtight container or covered with plastic wrap. Once a cake or cupcakes have been filled with this filling, keep them refrigerated.Nutrition
Other Recipes You Might Like:
would strawberries work instead of rasberriees
I’ve made this a few times, and each time I’ve made it the mousse has not come out correctly. When I mix the melted chocolate with the unsweetened cocoa and water mixture it becomes so thick it’s almost like brownie batter. Then when I go to mix it into the whipped cream and I fear I have to overmix it to get it to be smooth. So I don’t, and I end up with soft dark chocolate chunks running through my mousse, which isn’t a bad thing but I’d love to know how to make it smooth like you do. Any ideas?
Thanks
@RLS, it’s probably because you haven’t fully melted the chocolate.
@RLS, I had the same outcome. I might just use cocoa powder next time and unflavored gelatin as others suggested. Happy baking!
It was an absolutely wonderful mousse and lived up to all its promises as you say!! The only difficulty is that I used it for a layered cake and in the summer heat it was difficult to keep the layers from sliding to and fro even through I had put it in the fridge – so care needs to be taken there but it is divine when you eat it with a good dark chocolate cake!! Thanks a million for sharing!!
I am so happy to hear that Mary!! And that is a very fair point, cakes with softer fillings like this can definitely be a challenge in the summertime. So glad you loved this recipe 🙂
@Mary A, try adding unflavored gelatin to hold it in place.
@Mae,
I have made the mousse and it came out perfectly. I also had the issue with the cake sliding off while it was in the fridge. I’m planning on making it again, but this time trying the non-flavored gelatin. How much gelatin should I use? I had planned on cutting the recipe in 1/2. I made the full batch before and had too much left over. Also, can you freeze leftovers in a freezer Ziploc?
Thanks
@Mary A, freeze the cake layers for a few hours. It’s hot here, too.
I made this mousse yesterday and it is AWESOME! Thank you so much!
Yay! I’m so happy to hear that Heather!! 🙂 Thank you for sharing!!
Made it and was a delicious hit! Thank youu 🙂
Yay!! So happy to hear that, thank you for sharing Deleon 🙂
Hi . I’ve made a layered cake with this mousse . Do you know If I can freeze the whole decorated cake?
Hi Eleni,
I always get nervous freezing mousse cakes that are made without gelatin like this one! Ice crystals can form in the mousse, and the mousse can thaw faster than the cake layers. I haven’t tested this recipe in the freezer (I usually stick the freezer), but if you do I’d love to know how it goes!
Can I add a fudge flavoured essence ?
Hi Jeanette,
I haven’t tried doing that before, but if it’s similar to an extract that should work just fine in this recipe. Hope that helps, happy baking!
Hi! Would it be better to add gelatine to this recipe if I plan on using it for a birthday cake that will sit out of the fridge for a while? If so, how would u add it? Thank you
This was delicious and easy to put together. Win win situation. Definitely saving this recipe as a staple for the future.
Hi Rosie,
So happy to hear that!!! Yay 🙂 Thank you so much for sharing!!
Wedding is outdoors,
Will the mousse keepform in the cake.
Hi Alison,
Great question! This filling is less stable than buttercream so I wouldn’t recommend it for a wedding cake filling if the cake is going to be outdoors. So sorry!
Can I freeze this? I saw you said to use gelatin?
Hi Eleni,
I always get nervous freezing mousse cakes that are made without gelatin like this one! Ice crystals can form in the mousse, and the mousse can thaw faster than the cake layers. I haven’t tested this recipe in the freezer (I usually stick to the fridge), but if you do I’d love to know how it goes!
With that in mind, the chocolate mousse can be made up to 2 days ahead of time and stored in the fridge in an airtight container or covered with plastic wrap. Hope that helps, happy baking!
In the recipe you call for warm water, but in the body of your post, you say hot water. I tried this following the recipe using warm water, and I got small chocolate chunks when I mixed with the whipped cream. Could that be because I should have used hot water?
Hi Michelle,
What may have happened is that the chocolate mixture was too warm when it was folded into the whipped cream, and that caused the chocolate to seize up a bit as it was mixed in. To avoid that in the future I’d recommend letting the chocolate mixture sit for a little bit longer to cool off before adding it in next time. Hope that helps, happy baking!
@Chelsey I also get choc chunks every time I incorporate the chocolate into the whipped cream, but then I describe it as a textured choc mousse. Next time, I’ll use your suggestion and leave it to cool on the counter quite a bit longer. Thank you for the opportunity for bakers to comment on your recipes and your responses.
Omg i actually love that description though, you are so clever!! 🙂 I might have to try making it that way next time!
Is it supposed to be this bitter !?
Hi Taylor,
It isn’t very sweet and is a lot less sweet than frosting, but it shouldn’t be bitter! What % of dark chocolate did you use? Some brands taste a bit more bitter than others, so it might be the type of chocolate you used. You also can add a bit more powdered sugar if you want it to taste a bit sweeter. Hope that helps, happy baking!
Am I able to opt out the water and cocoa powder and still remain with a similar end result?
Hi Angie,
Great question! I haven’t tested this recipe out that way, so sadly I’m not sure. I would think it should work, but I’m worried the melted chocolate might seize as it’s added into the cold whipped cream without the water.
Such an easy mouse to make! My friends absolutely loved it!!
Yay!! I am so happy to hear that Linda, thank you for sharing 🙂
Can I freeze the cake with filling?
Hi Catherine,
I always get nervous freezing mousse cakes that are made without gelatin like this one! Ice crystals can form in the mousse, and the mousse can thaw faster than the cake layers. I haven’t tested this recipe in the freezer (I usually stick the fridge), but if you do I’d love to know how it goes!
I doubled the mousse recipe from this to fill a 4 layer white cake (my nephew wanted a white bday cake) and OMGosh it is the BEST!!! My family was taking spoonfuls out of the bowl (which we could have finished off). I will make this mousse again and again, even as a stand alone dessert. THANK YOU!
Aw I am so happy to hear that RJ!!! Thank you for sharing 🙂
I made 1/2 of the recipe for a filling for my daughter’s birthday cake. Chocolate cake, chocolate mousse, and chocolate icing! The mousse was soooo delicious!
That sounds delicious Camille 🙂 So happy to hear that, thank you for sharing!!
Can this mousse be used as a frosting instead of a filling for a cake? Would it hold its shape?
Hi Allison,
While the mousse is relatively stiff when it’s cold, it loosens up pretty quickly as it comes to room temperature. You could try using it as a frosting if you kept the cake cold and served it cold though? If you try it I’d love to hear how it turns out!
Can the chocolate mousse be used as a frosting instead of a filling? Will it be stiff enough to hold its shape?
When I’m Whisking it doesn’t get any thicker.
Hi Mia,
Are you mixing by hand, or with a hand or stand mixer? Was the heacy cream nice and cold when you started mixing? Hopefully we’ll be able to figure out what happened!
I was looking to use this chocolate mousse filling in a grooms cake at my Daughter’s wedding. Bad idea? The cake will be sitting out for hours
this is a delicious recipe but i wouldn’t recommend it as is for filling a cake. It is too soft and my layers were sliding around. I’m seeing that people are suggesting adding gelatin to firm it up. I should have read the comments beforehand.
Hi! Thank you for always posting the most amazing recipes. I am making this for a crowd in a few days – I intend to use it as a cake filling but I’m a little concerned since I see a lot of comments about the cakes slipping. If I use stable vanilla icing as a dam and as the outside icing layer, would that solve the problem? Thank you!!
Thank you for an excellent chocolate mousse filling recipe! Worked wonderfully!
Hi Kaylee,
I am so happy to hear that!!! Thank you so much for sharing 🙂
I ended up with textured chocolate mousse. The melted chocolate hardened as I was folding it into the heavy cream. Nevertheless, it tastes great and will work well with the cake I’m making. Will have to keep practicing to figure out how to perfect this recipe.
Hi Amy,
Thanks so much for sharing your experience! It sounds like you’re super close to nailing it—textured mousse can definitely happen if the chocolate cools a bit too much before folding it in. Next time, try making sure the chocolate is still slightly warm (but not hot!) and work fairly quickly to fold it into the cream. I’m so glad it still tasted great and will work with your cake—that’s a win in my book! Hope that helps for your next batch 🙂
can i use semi sweet chocolate chips in this mousse instead of dark?
Absolutely! That would work just fine. Hope that helps, happy baking JJ!
This sounds amazing. Bookmarked for out next birthday cake! Question: Can a cake made with this filling be frozen and thawed?
Hi Alicia,
So glad you bookmarked it for a birthday cake, that makes me so happy! Most cakes with this filling can be frozen, just keep these tips in mind:
Assemble and chill first so the filling firms up, then wrap the whole cake (or layers) tightly in plastic wrap and foil.
Freeze for up to 2–3 months. When you’re ready to serve, move it to the fridge to thaw overnight, then let it come to room temp before enjoying.
The texture should hold up nicely, though sometimes fillings like this can soften a bit after thawing or have their texture change a bit. If it’s for a special event and you’re worried, you can always do a test run with a small portion first.
Hope that helps, happy baking!!
The texture came out perfectly, HOWEVER it’s too bitter! I used the called for 1/4 cup powder sugar. I used semi sweet tollhouse chocolate chips. My husband said the same, yuk too bitter. ?
Hi Chris,
I hear you, this is not a sweet cake filling, especially when you use dark chocolate! Usually when paired with a sweet cake, it all balances out. But if the texture was spot on and the flavor leaned bitter, it’s likely from the type of chocolate. What type of chocolate did you use? Some types (especially Tollhouse) can taste more bitter in mousse since there isn’t as much sugar or cream to balance them out.
Here are a couple tips to make it sweeter next time:
– Use milk chocolate or a higher-quality semi-sweet that’s a bit smoother.
– Add more powdered sugar (start with an extra 2–3 Tbsp and taste as you go).
That should mellow the bitterness while keeping the fluffy mousse texture you loved. Hope that helps for next time, happy baking!!
I will say, I have made this recipe many times, and here is what I’ve learned,
the higher percentage of cocoa may lead to the paste being to think,
I typically use Hershey dark Choc chips and they work out fine, recently used a 72% bar because I had it and as a previous commenter mentioned, was brownie batter thick. I almost double the water and emulsified it until it looks like the photo above. I also added gelatine incase the extra water wouldn’t hold as well.
also, I temper the whip cream and chocolate first, but folding in scoops of whipped cream into the chocolate, until I have used about a third of the cream and the chocolate mixture is now more light and airy, so it tends to mix in the rest of the whip cream without seizing.
overall, a great recipe, and super easy compared to mousses that use eggs .
Hi Becky,
I so appreciate your feedback, that is super helpful!! Thank you so much for sharing 🙂