
Blue Mirror Glaze Cake
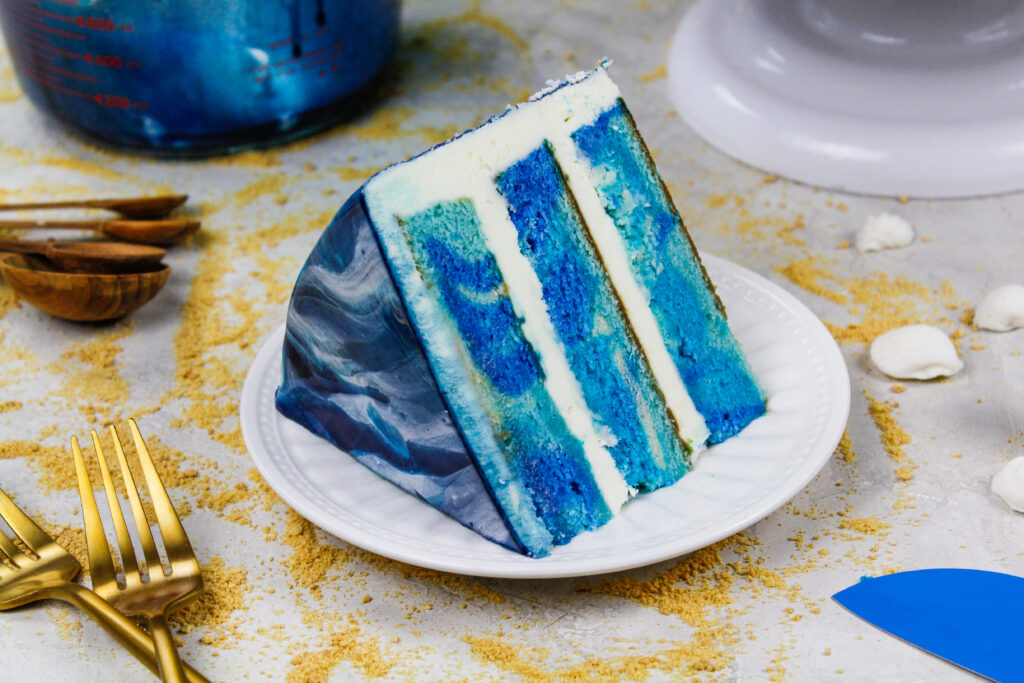
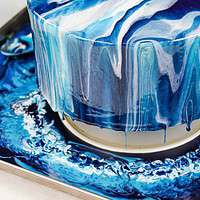
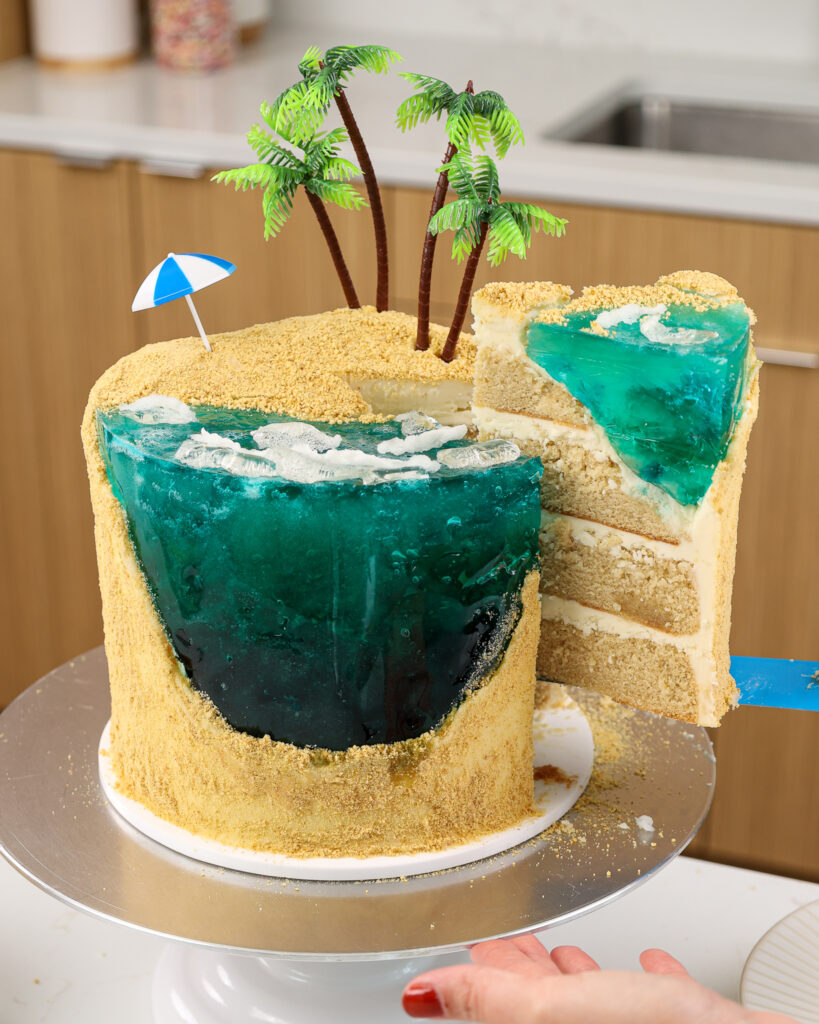
Few things are more satisfying than covering a cake in mirror glaze. Watching it slowly run down the sides of the cake, covering every inch of buttercream, is so captivating. I’ve made a few mirror glaze cakes in the past, but this summer I wanted to make an ocean-inspired blue mirror glaze cake.
With the help of a few different shades of blue and a bright mirror glaze, this cake gives off total beach vibes!!
What Is Mirror Glaze?
At the base of every mirror glaze recipe, sugar and gelatin are the key ingredients.
Most recipes heat the mixture to allow the gelatin to dissolve and combine with the other ingredients. The glaze is then allowed to cool a bit before being poured over a chilled cake.
By pouring it at just the right temperature, it sets with that signature shine. I find that pouring my mirror glaze recipe at about 95 degrees F is the sweet spot.
At this temperature, the glaze is thin enough to be easily poured over the cake, but thick enough to set on the cake and keep its vibrant color.
What Does this Blue Mirror Glaze Taste Like?
My mirror glaze recipe includes a couple of different ingredients that make it unique and (in my opinion) make it taste better than some classic mirror glaze recipes.
The biggest difference? White chocolate. I don’t know if you’ve ever tasted plain gelatin (or even smelled it), but it is simply disgusting.
Every time I mix plain gelatin with water to allow it to bloom, my gag reflex kicks in.
With that being said, I wanted to add something to this recipe to cover that flavor. That’s where the white chocolate and sweetened condensed milk come in.
These are the primary flavors of this mirror glaze, and they give the glaze a sweet, subtle taste that pairs well with vanilla buttercream.
By adding both of these ingredients, you’re also giving the glaze a whitish base, which makes it easier to color.
These ingredients also make the mirror glaze a tiny bit thicker and more forgiving. It covers the cake in a thicker layer of glaze than a traditional mirror glaze.
How Much Mirror Glaze Does One Batch Make?
This recipe makes enough glaze to cover one eight-inch layer cake.
While this technique is beautiful to make, it involves pouring tons of glaze over the cake. This is necessary to make sure the cake is fully covered in glaze.
You can try to salvage the glaze that runs off, but it can be more difficult to reuse once the colors combine.
I rarely reuse mirror glaze once it’s been poured, but you can refrigerate leftover glaze in an airtight container and reheat it to use it again.
How to Color this Blue Mirror Glaze
While this blue mirror glaze cake is ocean-themed, you can create so many different looks with different colors.
When creating different colors of glaze, it’s super important that you use gel food coloring to color this glaze. I used navy, royal blue, and sky blue gel food coloring to make the different colored glazes poured over this cake.

Gel food coloring creates vibrant shades because it is a lot more concentrated than liquid food coloring. This also means you don’t have to use much to get the color you’re after.
If you try to use liquid food coloring, you will have to use a ton to get bright colors, and this can throw off the consistency of the glaze.
To make the bright white mirror glaze, I used a tiny bit of titanium dioxide!! Its name makes it sound a bit intimidating, but it’s really just a vegan whitening agent.
You can also use white gel food coloring, but it won’t give you quite as bright of white color.
The Best Way to Pour Mirror Glaze Over a Chilled Cake
Now that we’ve covered everything you need to know about mirror glaze, let’s talk about actually pouring the mirror glaze onto a cake!
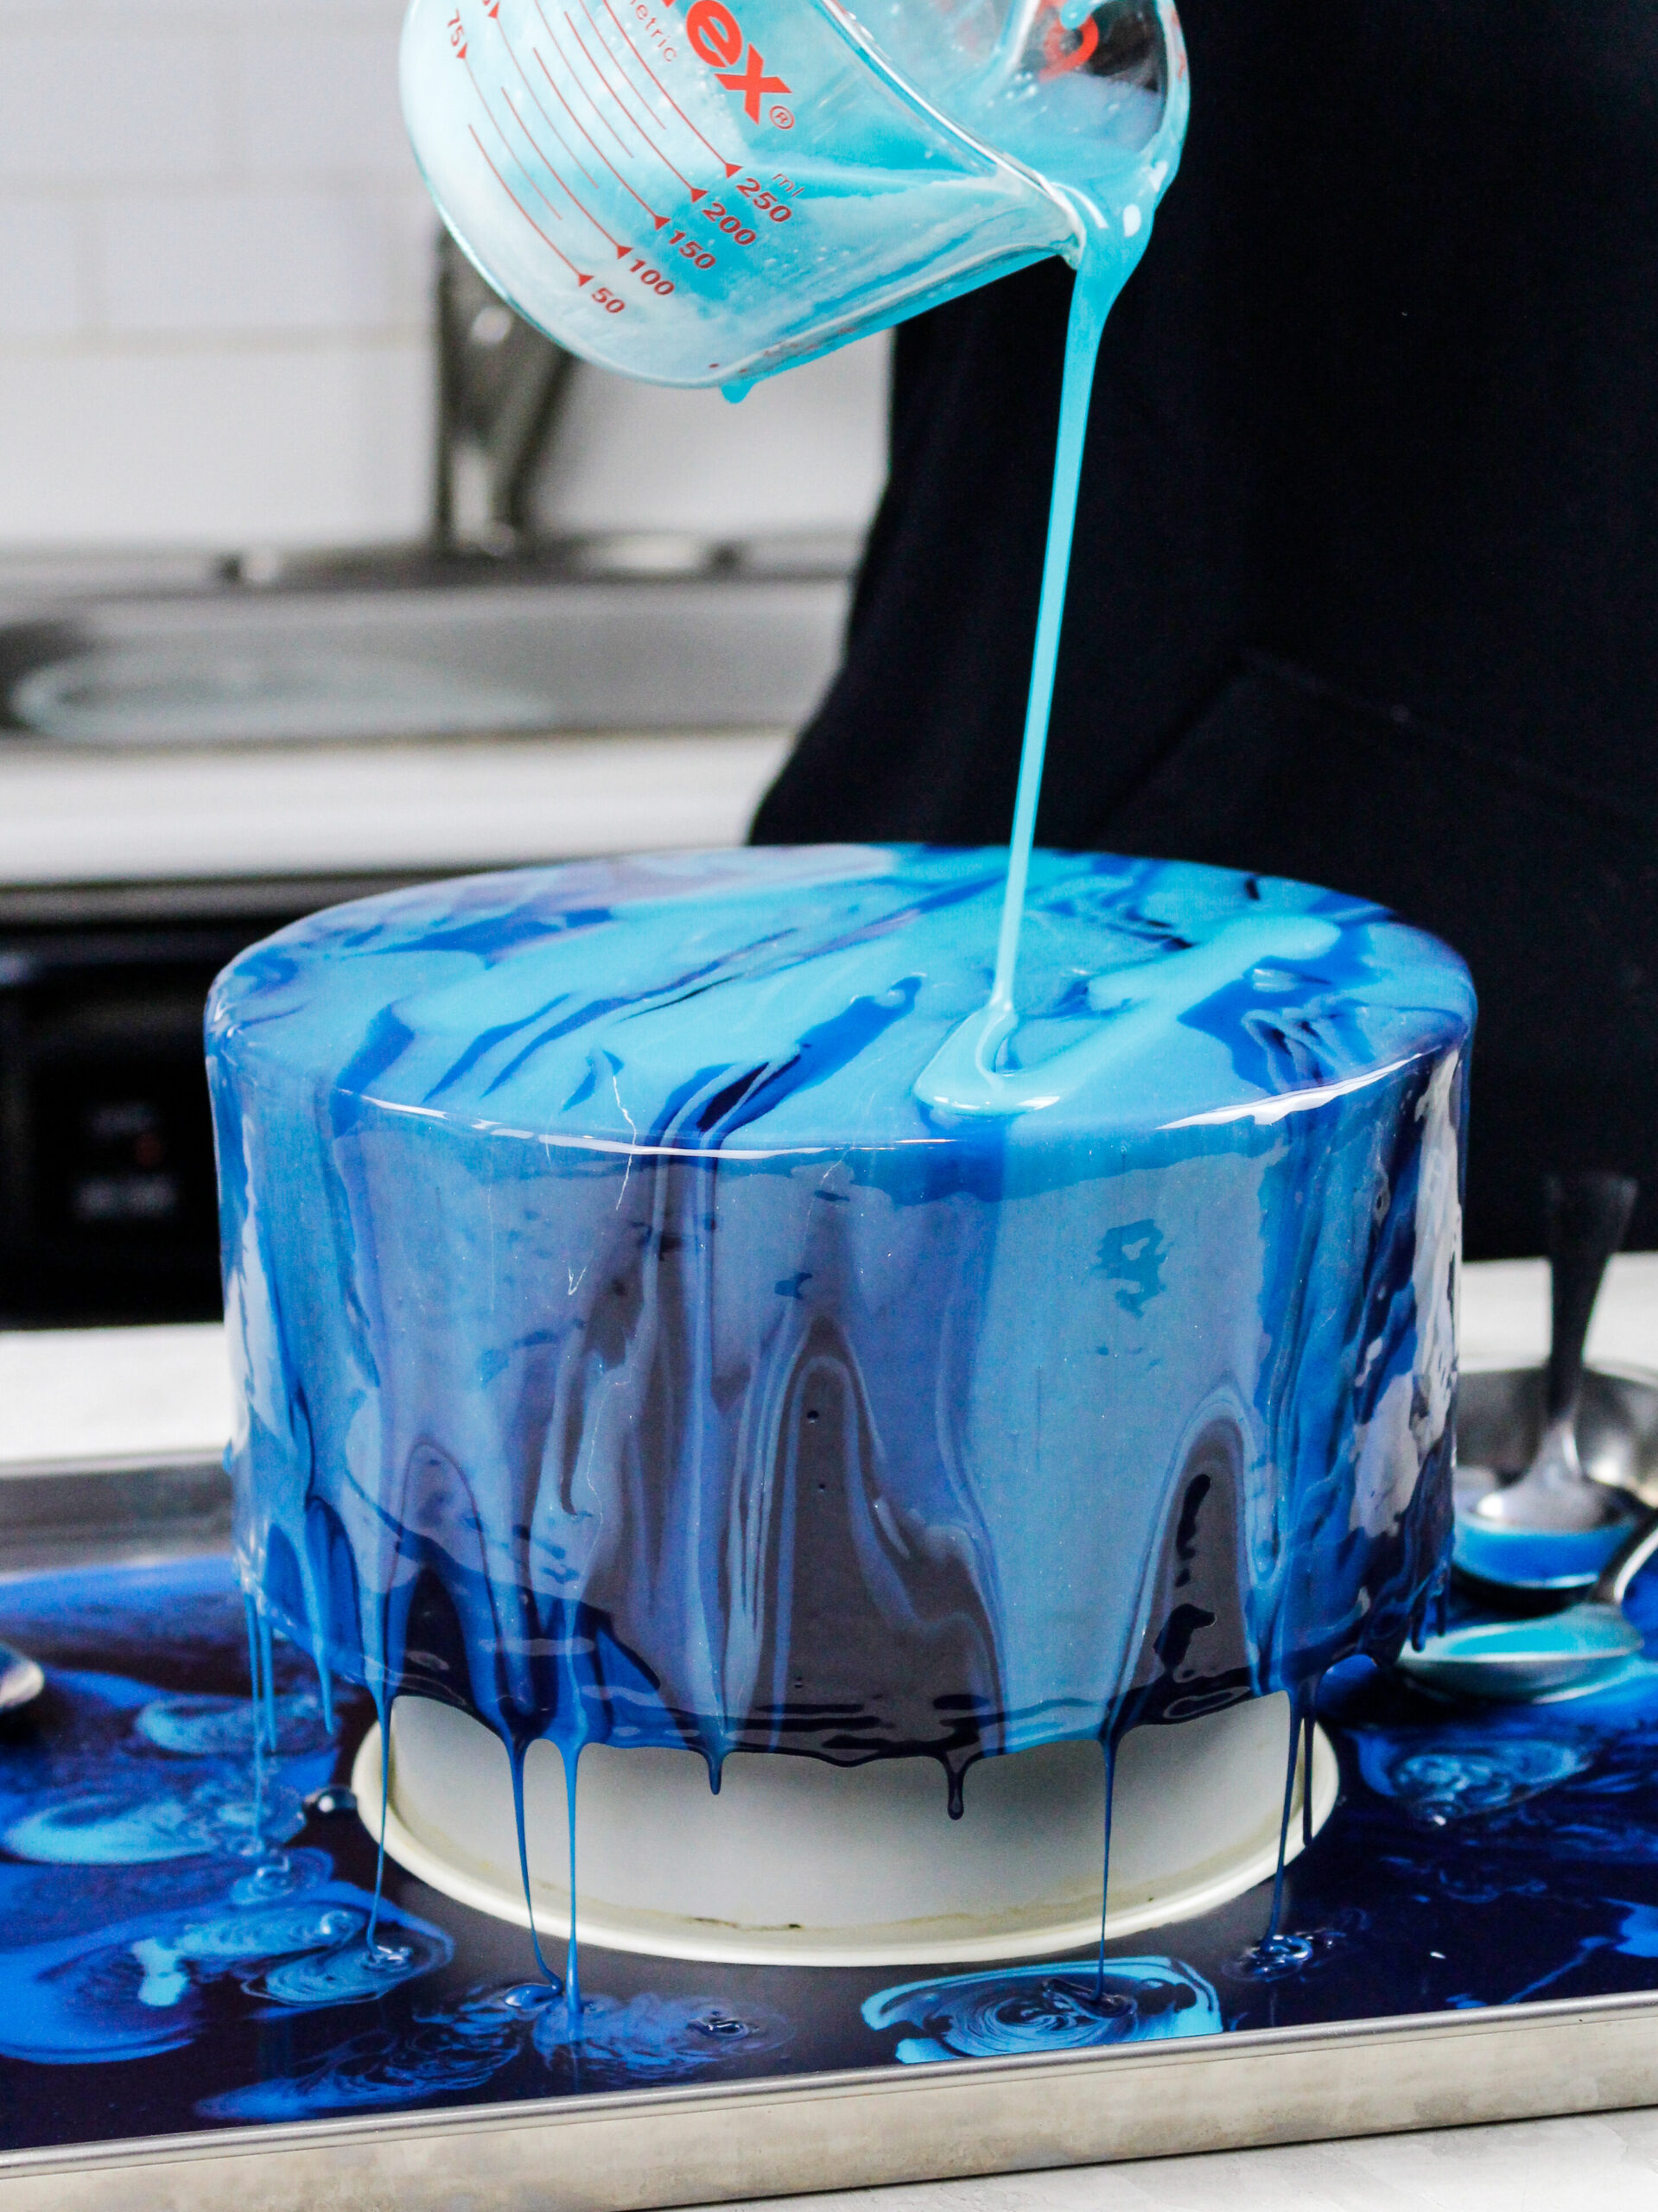
Once you’ve frosted and chilled your buttercream cake, remove it from the fridge or freezer and place the cake on a circular object on top of a large, rimmed baking sheet to catch the run-off glaze.
I like to rest the cake on a small cake pan or a wide, short glass.
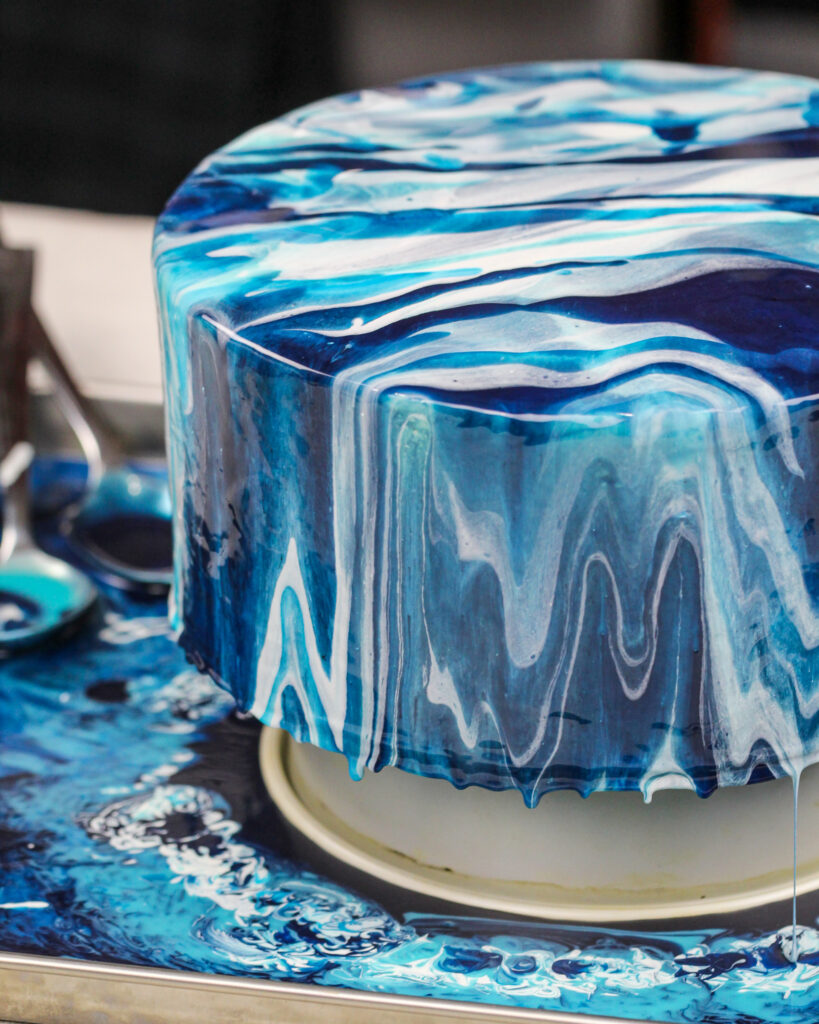
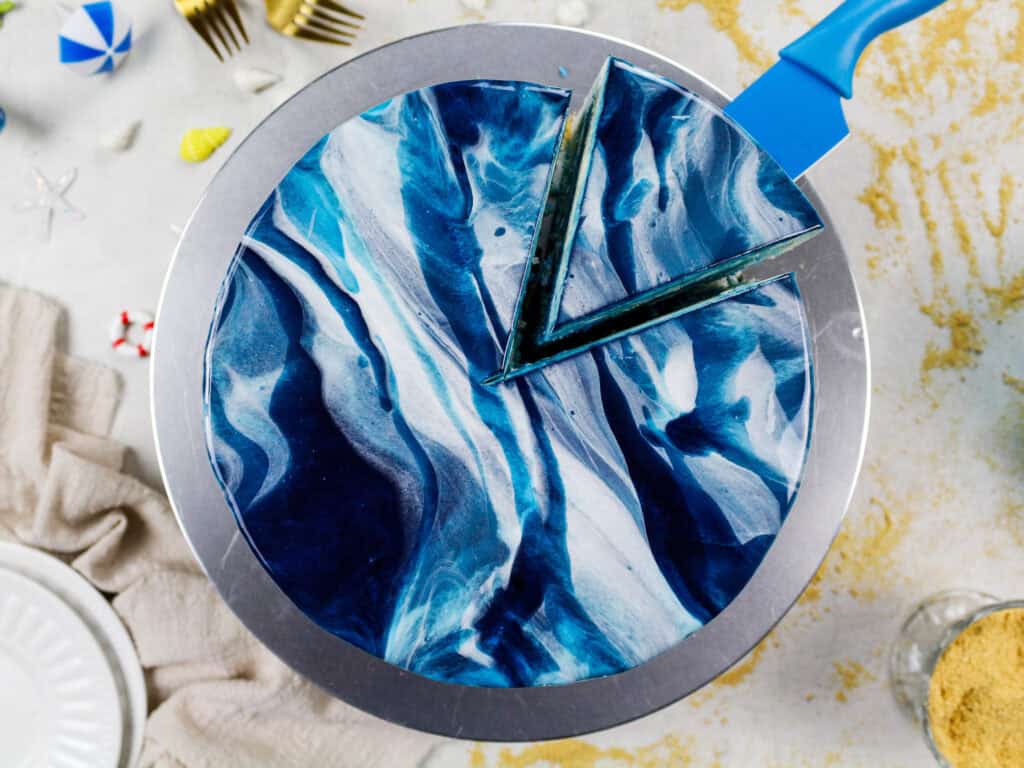
Begin pouring the darkest glaze onto the center of the cake, then slowly work your way out to the edges. Once the cake is fully covered, drizzle the lighter colors over the cake to create a beautiful marbled look.
Let the glaze continue to drip for about 10 minutes, then use an offset spatula to scrape away any drips from the cake board.
The glaze should be mostly set. Place the cake in the fridge if you don’t plan to eat it within a few hours.
Additional Tips for Making the Best Mirror Glaze Cake:
- This recipe can be used on any type of buttercream cake as long as it’s properly chilled.
- If possible, make the cake on a cake board the same size as the cake layers to allow the glaze to drip directly off the bottom of the cake.
- Don’t use this mirror glaze recipe on fondant! It can do weird things to the fondant and create a goopy mess.
- I prefer using mini white chocolate chips, but any white chocolate chip (or finely chopped white chocolate bar) will work.
- The glaze should be thin enough to pour over your cake, but thick enough that it is opaque and has a vibrant color. If you start to pour and it seems too thick or too thin, adjust the temperature to get it to the desired consistency.
- Do not use flavored Jello in place of the unflavored gelatin in this recipe.
Making This Cake in Advance & Storage Tips:
- If you plan to eat the cake within a few hours after pouring the glaze, leave it out at room temperature.
- If you pour the glaze in advance, store the cake in the fridge. Remove the cake from the fridge a couple of hours before you plan to cut into it.
- Make this mirror glaze ahead of time or save leftovers! Once it’s made, wrap the bowl with plastic wrap and store it in the fridge for up to a week.
- To use chilled glaze, heat the bowl in the microwave for 15-20 second intervals until it reaches the right consistency
- Use leftover glaze to top cupcakes, cookies, or even ice cream!
Let Me Know What You Think!
If you try this blue mirror glaze recipe, I’d love to hear what you think! Please leave a rating on the recipe card below.
And don’t forget to tag me @chelsweets and #chelsweets, so I can see your beautiful creations on social media!
Blue Mirror Glaze Recipe
Ingredients
Vanilla Cake Recipe
- 3 cups all-purpose flour 390 grams
- 3 cups granulated sugar 600 grams
- 2 1/2 tsp baking powder 10 grams
- 1 tsp fine salt 6 grams
- 1 cup unsalted butter, room temperature 226 grams – 2 sticks
- 1 cup carton egg whites, room temperature or about 7 egg whites (235 grams)
- 1 1/2 cups full-fat sour cream, room temperature 345 grams
- 2 Tbsp vegetable or canola oil 28 grams
- 2 tsp vanilla extract or vanilla bean paste 8 grams
- Blue gel food coloring if desired
Vanilla Buttercream Frosting
- 2 cups unsalted butter, room temperature 454 grams
- 1 Tbsp vanilla extract or vanilla bean paste 12 grams
- 1 tsp fine salt 6 grams
- 7 cups powdered sugar 875 grams
- 1/4 cup heavy whipping cream, room temperature or whipping cream (60 grams)
Mirror Glaze Recipe
- 2 1/2 tsp (1 envelope) powdered unflavored gelatin 7 grams, bloomed in 1/4 cup of additional water
- 1 1/2 cups granulated sugar 300 grams
- 3/4 cup water, room temp 180 grams
- 2/3 cup sweetened condensed milk 200 grams
- 1 2/3 cup white chocolate chips, melted 300 grams
- 1/2 tsp titanium dioxide or white gel food coloring
- Blue gel food coloring
Additional Decorations – Optional
- Graham cracker crumbs
- White fondant
- Small silicone seashell mold
Equipment Needed
- 8- inch cake pans
- Spinning cake stand
- 8- inch cake board
- Large offset spatula
- Bench Scraper
- Electric hand mixer
- Microwave
- Mesh Strainer
- Digital thermometer
- Rimmed baking tray
Instructions
Vanilla Cake Layers:
- Preheat oven to 350°F. Line three 8" cake pans with parchment rounds and grease with non-stick baking spray.
- Mix together 3 cups all-purpose flour, 3 cups sugar, 2 1/2 tsp baking powder and 1 tsp salt in a stand mixer with a paddle attachment or hand mixer until fully combined.
- Mix in 1 cup of unsalted butter slowly into the dry ingredients on a low speed. Continue to mix until no large chunks of butter remain and the mixture looks crumbly.
- Pour in 1 cup of egg whites and mix on low until just incorporated. Mix in 1 1/2 cups buttermilk in two installments, on a low speed.
- Add in 2 Tbsp of vegetable oil and 2 tsp of vanilla extract and mix at a low speed until fully incorporated.
- If you plan to color your cake layers, add in the gel food coloring with the vanilla and oil.
- Scrape down the sides of the bowl with a rubber spatula, then beat on a low speed for about 30 seconds to make sure everything is properly mixed together.
- Divide the batter evenly between your prepared pans. Bake for 33-35 minutes or until a toothpick comes out with a few moist crumbs.
- Allow the pans to cool for 10 minutes, then run a small offset spatula around perimeter of the pan to separate the cake from the pan.
- Place cake layers into the freezer for 30 minutes to accelerate the cooling process. Once the layers are fully cooled, carefully flip the pans and remove the layers.
- Use a serrated knife to level the tops of the layers right before you plan to assemble your cake, or you can wrap and freeze them in you're making them in advance.
- If you make these cake layers in advance and freeze them, let them thaw for about 20 minutes before making your cake. The cake layers should still be slightly cold to the touch, which will make it easier to assemble your cake.
Vanilla Buttercream Frosting:
- While the cake layers bake and cool, make the vanilla buttercream frosting.
- Beat 2 cups of unsalted butter on a medium speed for 30 seconds with a paddle attachment, until smooth.
- Mix in 1 Tbsp of vanilla extract or vanilla bean paste and 1 tsp salt on a low speed.
- Slowly add in 7 cups of powdered sugar, 1 cup at a time. Alternate with small splashes of 1/4 cup of heavy cream.
- Continue to mix on low speed for a few minutes, until the desired consistency is reached.
- If the frosting is too thick, add in additional cream (1 TBSP at a time). If the frosting is too thin, add in more powdered sugar (quarter of a cup at a time).
- Cover the buttercream with plastic wrap once it’s ready to
prevent crusting.
Assembling the Cake:
- Stack and frost cake layers on a greaseproof cake board the same size as the cake layers.
- Add an even layer of buttercream between each cake layer with a large offset spatula.
- Add a thin coat of frosting around the cake, fully cover the cake layers.
- Smooth using a bench scraper, then chill the cake in the fridge
(20 minutes) or freezer (5 minutes) until the frosting is firm to the touch. - Add a second, thicker layer of frosting to the cake, and smooth using a bench scraper. Place the cake in the fridge (1 hour) or freezer (15 minutes) until the frosting is totally chilled.
Mirror Glaze:
- While the cake chills, make the mirror glaze. Pour 1 1/2 cups of granulated sugar, 3/4 cup of water, and 2/3 cup sweetened condensed milk in a heatproof bowl.
- Heat for 2 minutes on high power in the microwave. Remove the mixture and stir.
- Mix 1 envelope of about 2 1/2 tsp gelatin in a small bowl with 1/4 cup of water. Let this sit for a couple minutes until the gelatin is hydrated.
- Pour the bloomed gelatin into the sugar water and whisk until the gelatin is fully dissolved.
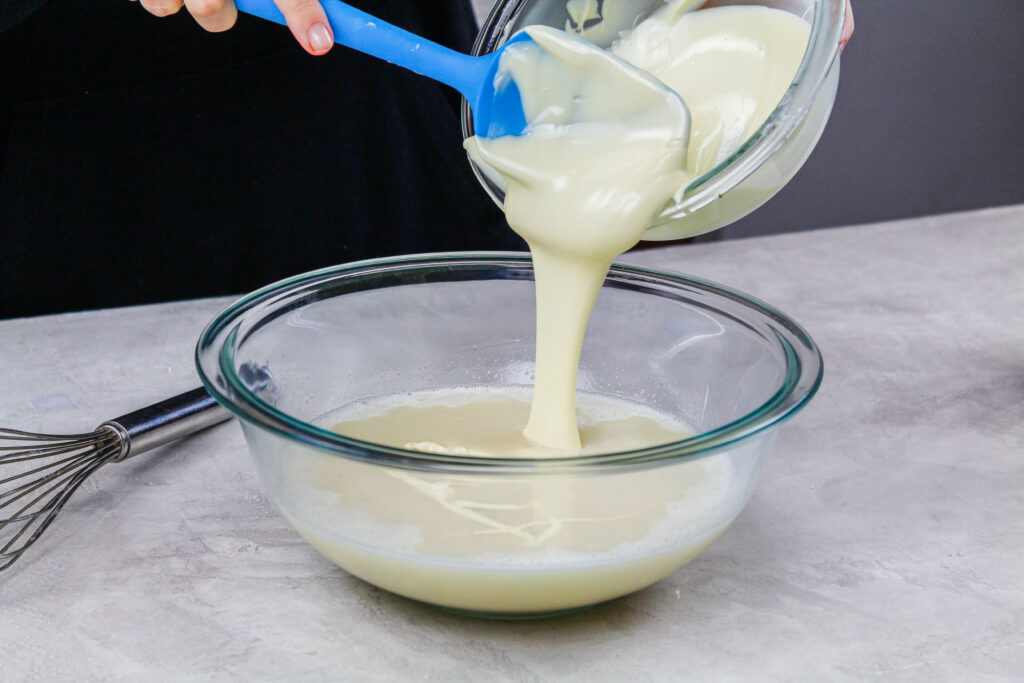
- Melt 1 2/3 cup white chocolate in the microwave by heating in 30 second intervals, stirring between each interval. Once the white chocolate is fully melted, pour the chocolate into the warm gelatin mixture.
- Carefully whisk mixture until fully combined. Pour through a sieve to remove any chunks of un-melted chocolate or stubborn bits of gelatin, or blend with an immersion blender.
- Pour 50 grams of mirror glaze into a small bowl and mix in 1/2 tsp of titanium dioxide. Set aside.
- Divide the remaining glaze between three bowls – there should be about 350 grams per bowl. Color them different shades of blue using gel food coloring.
- Place a chilled buttercream cake on top of a circular object smaller than the cake board, and set this on top of large, rimmed baking sheet to catch the run-off glaze.
- Once the glaze has cooled to about 95 F /47 C it’s ready to be poured.
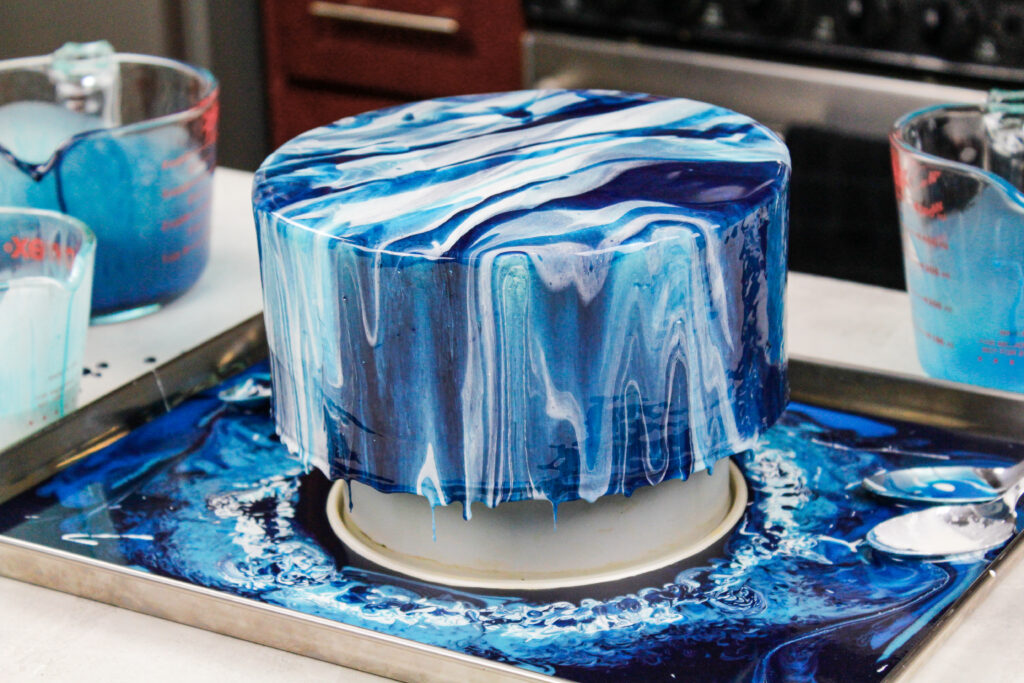
- Pour the darkest blue glaze onto the center of the cake, then slowly work out to the edges of the cake in a circular motion until the cake is covered. Alternate the shades of blue as you pour them to create an ocean-inspired look. Be sure to save a little bit of each color for the next step.
- Once the cake is fully covered, swipe a large offset spatula covered with the white mirror glaze across the top of the cake to create a marbled look, then drizzle with a bit of additional blue glaze.
- Let the glaze continue to drip for about 10 minutes then scrape away excess glaze from the bottom of the cake board using a small offset spatula.
- Add crushed graham crackers around the base of the cake and garnish with small fondant seashells if desired.
Video
Notes
Nutrition
Other Recipes You Might Like:

Looks awesome!
Is there anyway to make this dairy free?
@CH, I was able to use coconut sweet and condensed milk and that worked for me!
This is awesome as well as all of your posts I have viewed so far. I was wondering if you have any posts for image transfers to a cake n then decorating them?
Can this glaze be used on a cheesecake?
So amazing. I made this yesterday and my co-workers were amazed. It stayed sticky to the touch even after being stored in the refrigerator over night which caused some visual issues. I am making one this weekend and would love some pointers on what I may have done wrong (stayed sticky).
****Hi Chelsweets, l will be making this cake tomorrow am, put the cake in the freezer can l leave it in the freezer 10 hrs or more, then take it out a put the glaze on, put back into the refrigerator and serve it the next day sat( tomorrow) for a party? Please answer me Asap. I need the info for tomorrow. Also l am making a rectangle cake for 20 people, swimming this recipe will make enough
mirror glaze for this? Please answer me, even thou, these questions might sound silly to you. I do need your input to me. Looking forward to your replay. Thank you in advance.
Hi Rose,
Apologies for the delayed response! I usually respond to my blog comments on Sundays so I’m just seeing this now :/
That plan for your mirror glaze cake should have worked well! I’d recommend storing it in the fridge for 10 hours, then briefly chill it in the freezer before pouring the glaze to avoid the risk of condensation, but as long as your kitchen was cool and you don’t live in a humid place storing it the freezer should have worked too.
It depends on the dimensions of your rectangle cake, but I would think that this recipe makes enough to pour over a cake with 20 servings! I usually have some leftover when I pour it over my round cakes. Hope that helps for the future, and that your cake turned out great <3
Hi,
Is it possible to replace the gelatin with vegan gelatin? Thanks
Hi Suzanna,
I haven’t tested this recipe out with it, but you could try using agar agar in place of the powder gelatin and see if it works? Sorry I can’t be of more help!
This buttercream and glaze were a great combination and tasted amazing. I’ve tried some glazes that looked nice but that I preferred to scrape off, this actually tasted good! Thanks for the titanium dioxide tip, it worked so well!! The only disappointment was that I had to cover a good portion of the cake with a big shark head and no one could really appreciate how beautifully the glaze turned out on top!
Yay!! So happy to hear that KC! The titanium dioxide really is a total game changer!!
Sad that the shark head covered up part of it, but at least you know how beautiful it was before 😉 happy baking!!
I used the mirror glaze on a 9” 3 layer choc cake with choc buttercream frosting, following the directions carefully. It turned out absolutely beautiful! I have plenty of leftover glaze and I was not at all stingy with it. Everyone raved about both appearance and taste. I used my immersion blender to ensure there were no lumps and I imagine also helped to cool down the glaze. I used white chocolate bars I’ve had on hand for a long time that were pretty yellow and it took extra titanium oxide to get the small amount of white glaze to become close to white, and my blue shades were a bit on the teal side of blue but that was fine with me. I ended up putting the white in a squeeze bottle so I could pour very narrow ribbons. I will admit the design didn’t turn out how I’d envisioned it but I was smart enough to stop when I liked the look and it ended up beyond spectacular, so my advice is literally to go with the flow! I was conflicted about how to finish the bottom and ended up flooding extra glaze around the base (I was using a lipped cake plate) and it looked great.
I am so happy to hear that Mary!! The immersion blender really does make such a big difference! It sounds amazing, thank you so much for sharing 🙂
will kosher gelatin work for this technique?
Hi Saadyah,
I haven’t tested this recipe with kosher gelatin, but I think it should work just fine as long as it’s a powdered gelatin. Hope that helps, happy baking!
Could I put some fondant decorations on the outside? You advise to not use over fondant but then mention that you can add some fondant seashells, so fondant is okay to add after the glaze cools? Should the fondant be dry/hard first? Would the decorations slide off if placed on the sides near the top? Sorry for so many questions!
Hi Jackie,
Great question! I don’t recommend pouring the glaze over a fondant covered cake, but I do find that it’s totally fine to add on some fondant garnishes once the glaze has set. I do recommend letting the fondant decorations firm up before adding them to the cake. Hope that helps, happy baking 🙂
Can you freeze the mirror glazed cake. I want to make my son a birthday cake with mirror glaze that he can defrost for his birthday in a month since i won’t be there.
Hi Anna,
Great question! I haven’t tried freezing a mirror glaze cake, but it should freeze just fine! It might not be quite as shiny when you defrost it, but other than that it should keep well. If you try it, please let me know how it goes! Happy baking!!
Hi Chelsweets! Fan here!
I’m wondering if this glaze recipe will still work well on top of italian buttercream, ermine, or swiss meringue. My household is not really a fan of the traditional American buttercream T.T
Planning to make a lemon-flavored and yellow-marbled version of this recipe. Any tips?
Thank you! Amazing recipes, as always!
Hi Marian,
You’re too sweet! And great question, this recipe should work just fine on other types of frosting (SMBC, IMBC, Ermine, etc.) as long as the frosting is fully chilled and firm to the touch. To make this cake lemon flavored, I’d recommend adding the zest of 2 large lemons in the batter along with 2 tsp of lemon extract, and adding the zest and juice of one large lemon to the frosting and omitting the heavy cream. That should give it a bright, delicious lemon flavor.
Hope that helps and that your cake turns out great!
Hello!! I was wondering if this butter cream and mirror glaze can survive a hot and humidity weather? I’m talking about 32°c average temperature with a humidity of 80%. The event will be outdoor in the evening and I won’t be able to keep it in the fridge for a good 6 hour? May I know any sugguestions for this? ??
Hi Shermine,
Those are such difficult conditions for a cake :/ I don’t really think any buttercream cake would be able to withstand 6 hours in that heat and humidity!!! I would be super worried the frosting would get soft and melt. I’m so sorry!! If you could store it in a styrofoam cake cooler or a large cooler, that could help keep it cool though?
Hello . What type of chocolate you used for the glaze? Is it coverture or just chocolate chips ( the cheap kind?
Hi Noor,
Great question! Honestly it’s kind of a middle ground, I use the mini white chocolate chips from Whole Foods that are the 365 brand. They’re higher quality than Nestle, but not on the level of coverture. You can use coverture if you have it on hand, but a good quality white chocolate chip (like Guittard or Ghirardelli) should work great. Hope that helps, happy baking!
I just made this, first time trying to make a mirror glazed cake. My glaze turned out thin. Any suggestions on what went wrong?
Hi Sam,
So sorry to hear that! It can be a few different things, but usually that’s caused by the type of white chocolate you use! What type did you use? Sometimes lower quality white chocolate has a lot of stabilizers in it that can impact how the glaze turns out. The other big factor is the gelatin! Did you use powdered gelatin? The final thing is the temperature. Did you let it cool off enough before pouring it? Hopefully we’ll be able to figure out what happened together!
Can I use a white chocolate ganache over my cake instead of buttercream frosting and still have this method work?
Will this remain tacky once set? I am thinking of doing a tiered galaxy mirror cake for my sons birthday party, with the center tier being acrylic one, filled with items that fit the theme. I’m worried that the center tier will slide or that it will smudge the cake design. Can you provide insight?
Thanks!
Hi Bethany,
The mirror glaze does get kind of sticky and tacky if it sits in the fridge overnight or longer. If you make the cake layers in advance I feel like they should be able to keep their design but the cake would have to stay chilled or else I would be nervous that it would mess up the design. Hope that helps, happy baking!
Could I use this over stabilized whipped frosting?
Hi Tiffany,
Great question! You totally can, just make sure the frosting is fully chilled and firm to the touch before you pour it. Hope that helps, happy baking!