
Easy Microwave Mirror Glaze Recipe
I’ve already shared my Easy Mirror Glaze Recipe (made with only 5 ingredients!!), which helped make the mirror glaze technique much more approachable.
However, I wanted to simplify the process even further, and am now sharing a modified mirror glaze recipe that can be prepared using just a microwave!!!
Microwave Mirror Glaze needs to be a thing! I’m not kidding, this take roughly 5 minutes in the microwave to whip up. I’m 99% sure this is the simplest mirror glaze recipe out there!
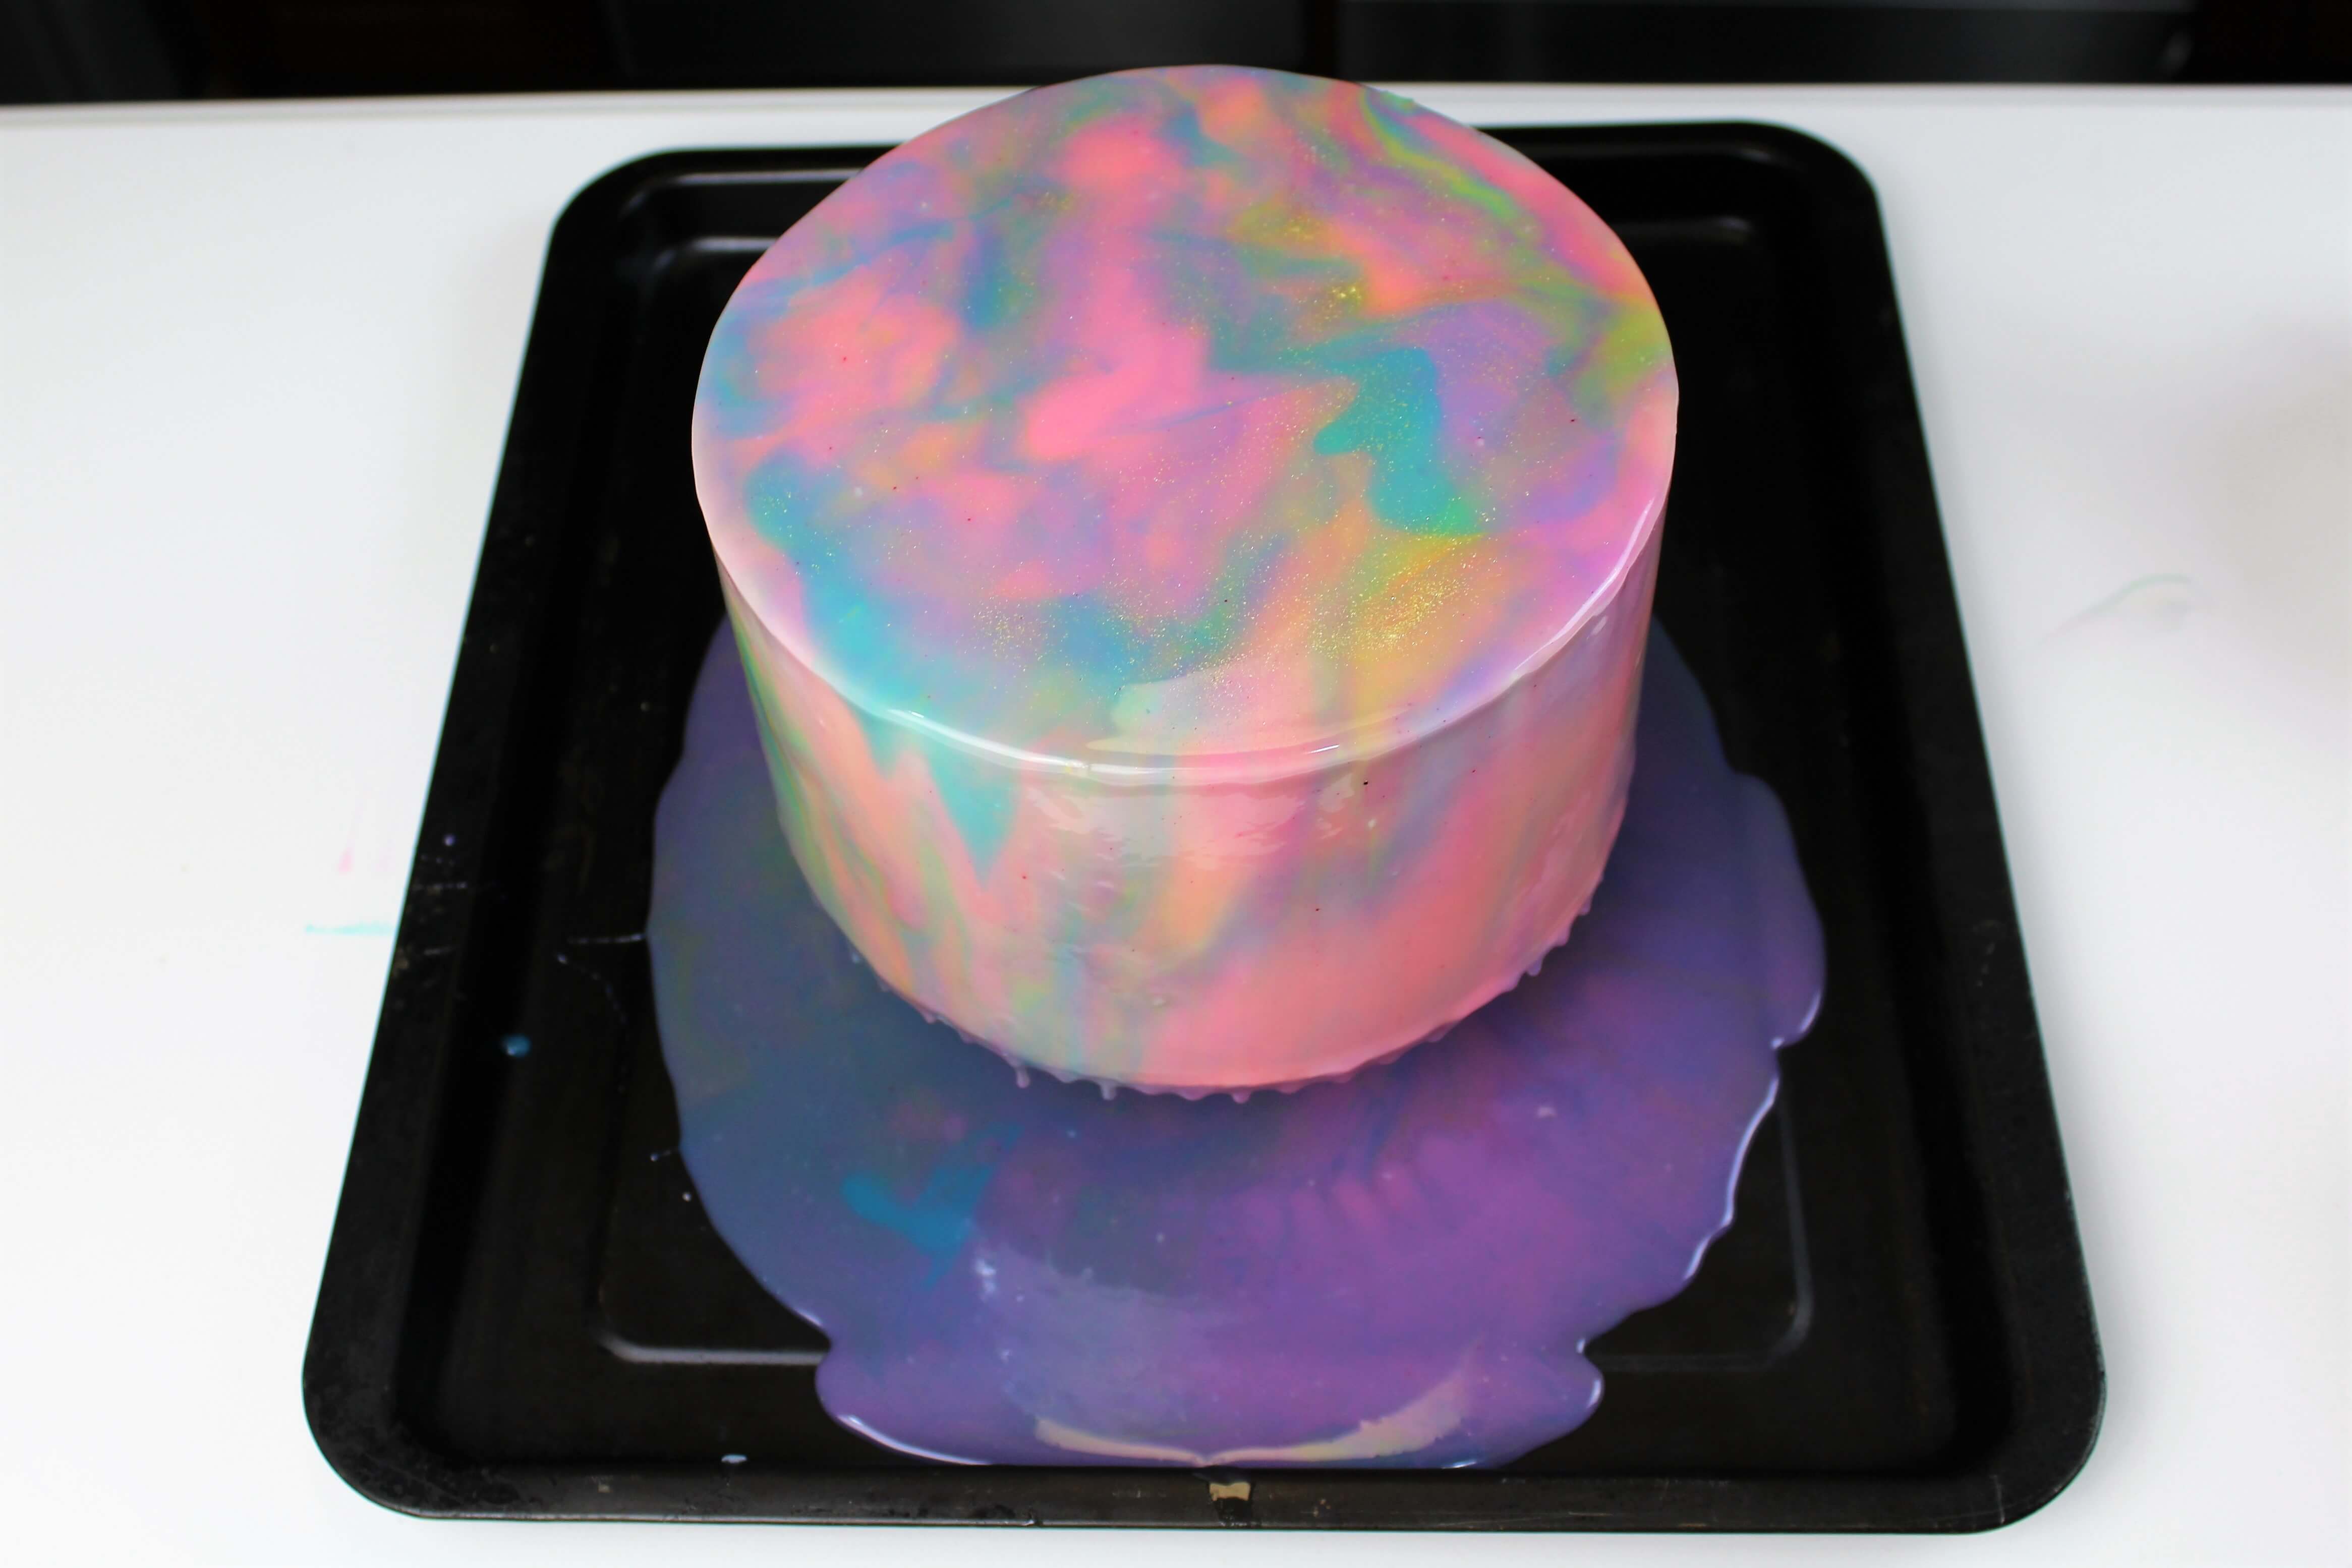
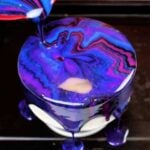
I wanted to make a mermaid-inspired mirror glaze. To do this, I used some light shades of pink, purple, blue, and green.
In addition to making microwave mirror glaze a thing, I also want to make mermaid glaze a thing! So many goals, so little time.
There are a few things you need to know before you begin making your mirror glaze:
- You must use unflavored gelatin; the sugar in regular jello throws off the recipe
- I recommend using miniature white chocolate chips if possible, they melt the fastest
- If you want to color the mirror glaze, be sure to use gel food coloring. It won’t throw off the consistency of the glaze like liquid food coloring
- Be sure to pour the glaze over a fully frozen, very smooth cake. I prefer to pour this over cakes frosted with buttercream, but you an also pour it over frozen mousse.
Make The Mirror Glaze
Mix the gelatin in a bowl with 1/4 cup of water, and set aside to let it bloom while you begin the glaze.
Combine together the 1 1/2 cups of sugar, 1 cup of water, and 2/3 cup sweetened condensed milk in a heatproof bowl.
Heat for 1 minute at full power, and remove from microwave. Stir, and heat for another minute.
Next, add in the gelatin (it will be very firm), breaking it up into smaller pieces.
Heat for an additional minute, then add in the melted white chocolate.
Slowly stir, until the white chocolate is fully incorporated.
The glaze should be perfectly smooth, and roughly 130 degrees F at this point.
If there are still bits of white chocolate, heat for additional 30 second intervals (stirring between), until all the chocolate is fully incorporated.
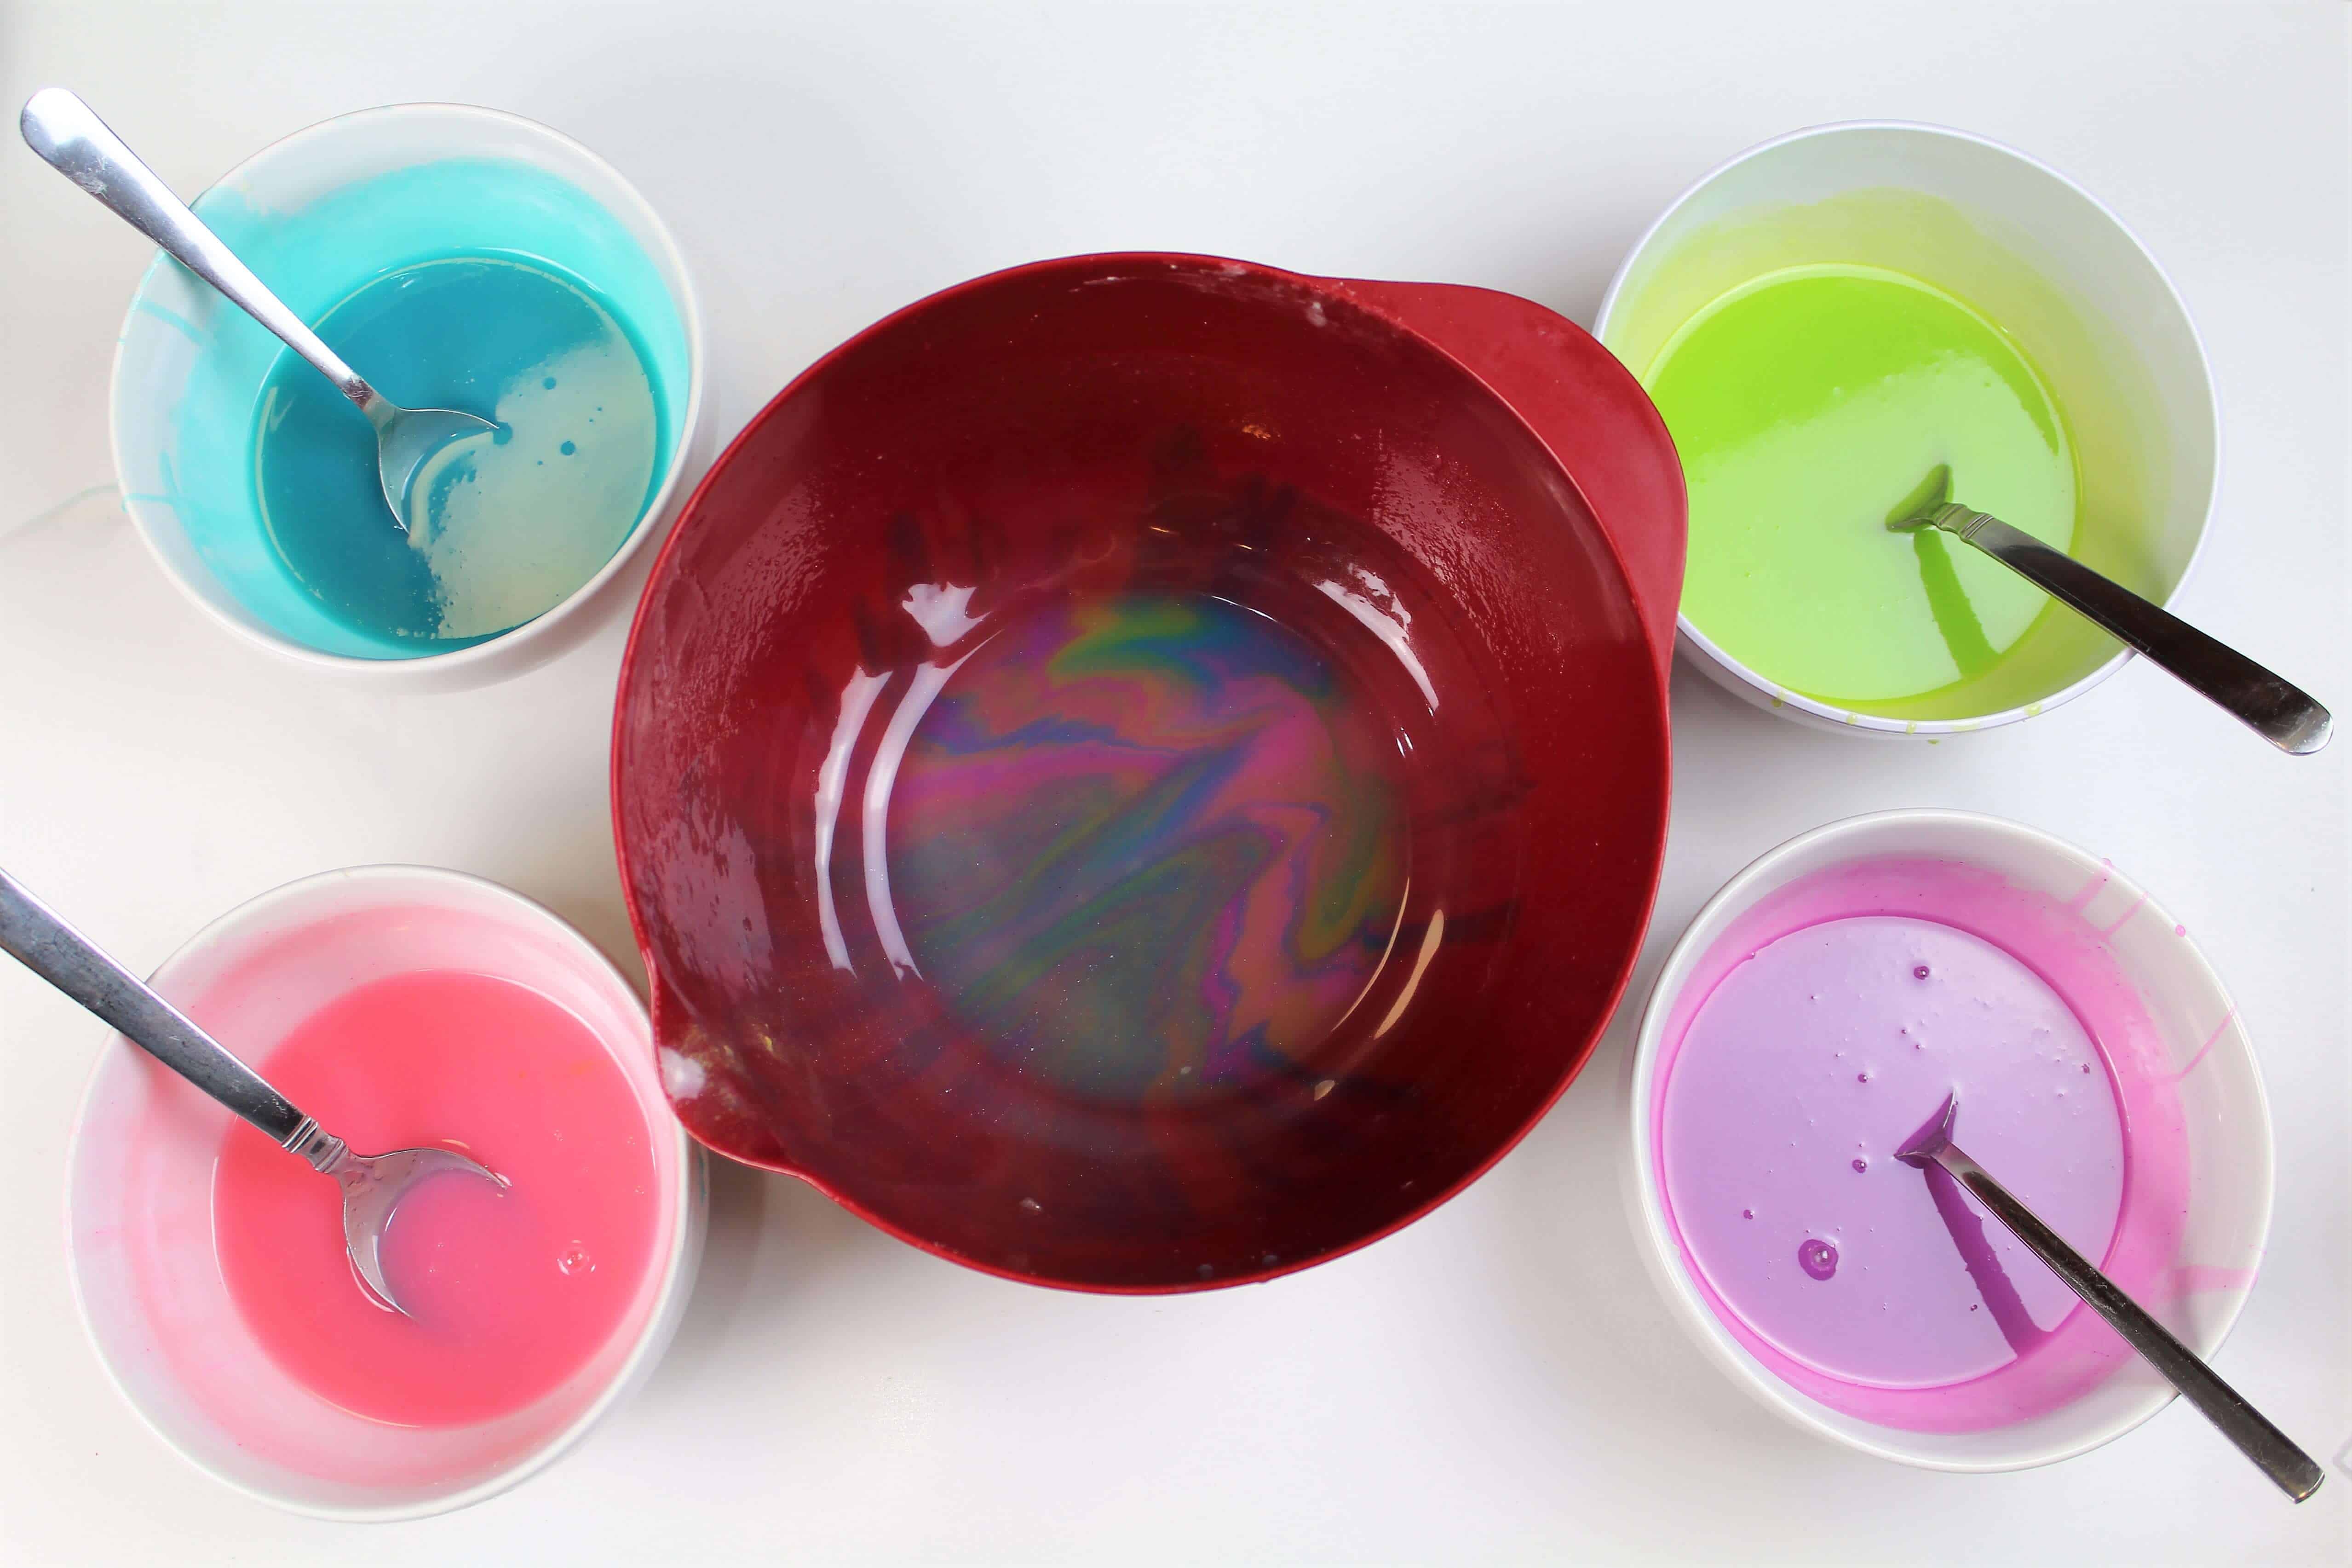
Divide the glaze evenly between four bowls. Color the bowls pink, purple, blue, and green.
Continue to stir occasionally to stop a skin from forming, until the glaze has reached 90 degrees, or is slightly above room temperature.
My glaze took about 20 minutes to cool to the right temperature.
Then pour drizzle in 2/3 of the purple, blue, and green glazes on top of the pink.
Once the glazes have cooled slightly, pour all of the pink into a large bowl with a pouring spout.
Although the traditional mirror glaze recipe involves more ingredients and additional equipment, this easy, 5 ingredient recipe makes the technique way more approachable.
I was shocked by how quickly I was able to make this, and how easy it was to do.
Traditionally mirror glaze cakes involve pouring the glaze over a perfectly smooth, mousse-covered cake.
I experimented, and found that you can easily pour it over a classic buttercream cake, as long as the frosting is extremely smooth.
I elevated my cake with a a small cake pan, then slowly poured the glaze on the cake.
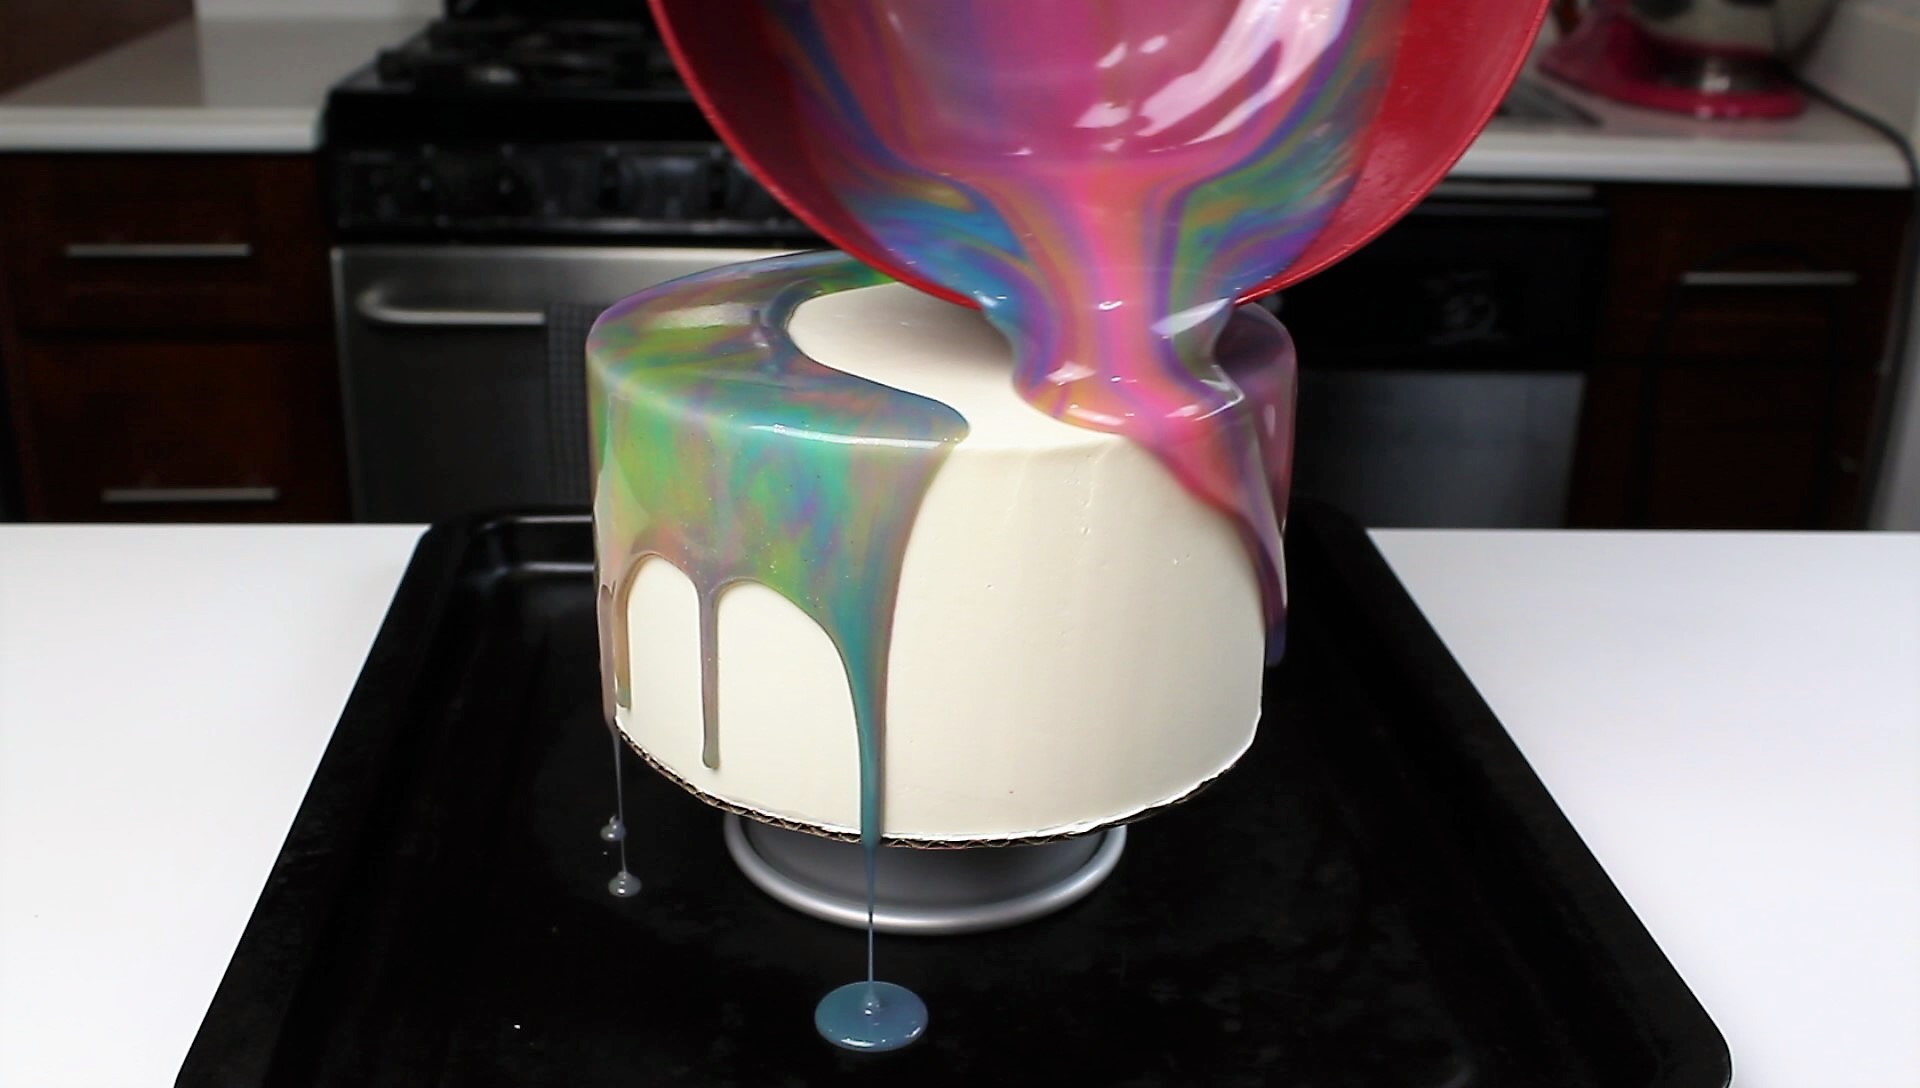
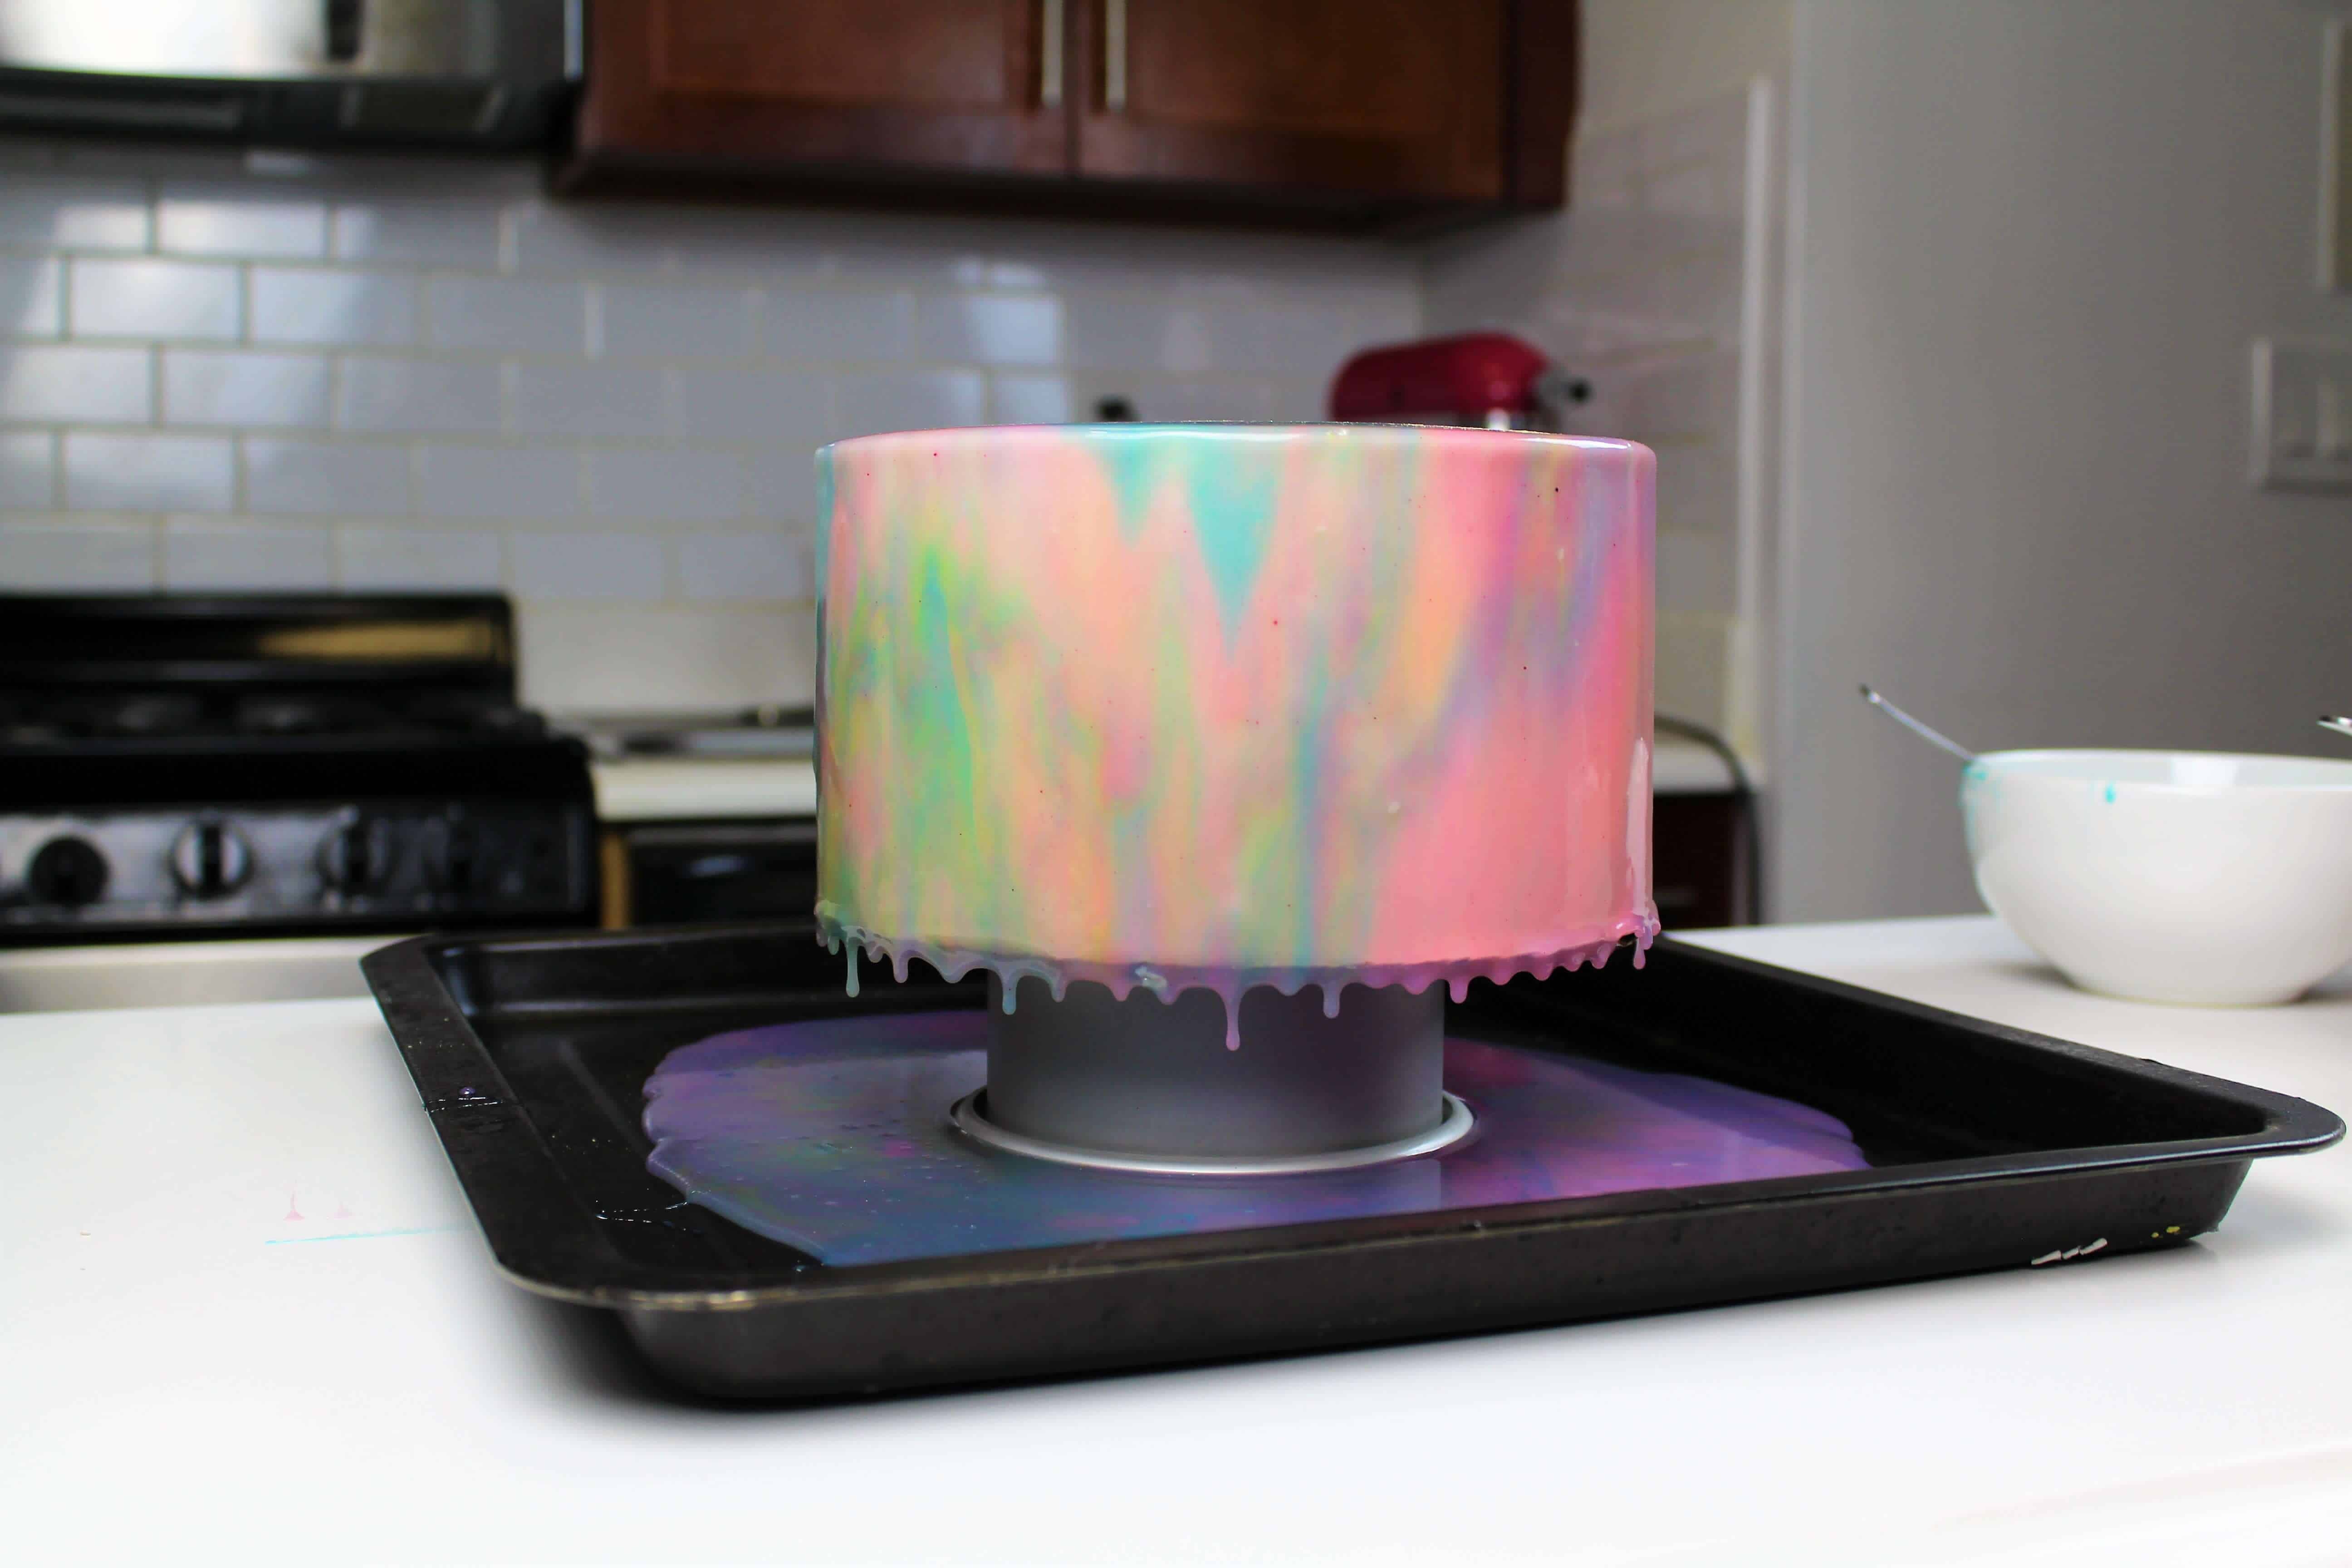
Begin pouring the onto the center of the cake, then slowly work your way out to the edges. Once the cake is fully covered, sprinkle a line of edible glitter over the top.
Swipe a bit more blue onto the top of the cake with a large offset spatula, and sprinkle some edible glitter over the top.
Let the glaze continue to drip for about 10 minutes, then placed the cake in the fridge.
See? So easy!!! My cake was a three layer cake made with seven inch cake rounds.
This glaze recipe easily covered a cake this size, and I had plenty of leftover glaze.
It can be stored in the fridge in an airtight container, and reheated to be used in the future.
However, the glaze can develop a skin, so be careful!
Easy Mirror Glaze Recipe
Equipment
- Microwave or Double Boiler
Ingredients
Mirror Glaze Recipe
- 2 1/2 tsp (1 envelope) powdered unflavored gelatin, bloomed in 1/4 cup of additional water 7g
- 1 1/2 cups granulated sugar 300g
- 3/4 cup water, room temperature 180ml
- 2/3 cup sweetened condensed milk 170g
- 2 cups mini white chocolate chips 350g
- gel food coloring
Instructions
- Mix 1 envelope of about 2 1/2 tsp of gelatin in a bowl with 1/4 cup of water. Set aside to let the gelatin bloom while you begin the glaze. NOTE: The amount of gelatin in this recipe differs from the video shared on YouTube in 2016. I have revamped the recipe to reduce the volume, and the scaled-down version uses 1 envelope or 2 1/2 tsp of gelatin. It makes enough to glaze 2, 8-inch layer cakes.
- Pour 1 1/2 cups of granulated sugar, 3/4 cup of water, and 2/3 cup of sweetened condensed milk into a heatproof bowl.
- Heat for 90 seconds on high power in the microwave. Remove the mixture from the microwave and give it a good stir. The sugar should be mostly, if not fully, dissolved at this point. If it isn't, heat the mixture in additional 10-second intervals until it is.
- Add in the bloomed gelatin and whisk until the gelatin is fully dissolved.
- Melt 2 cups of mini white chocolate chips in the microwave by heating them in 15-second intervals, stirring between intervals. Once the white chocolate is fully melted, pour the white chocolate into the warm gelatin mixture.
- Carefully whisk the mixture until fully combined. Pour through a sieve to remove any bits of unmelted chocolate or stubborn bits of gelatin.
- Divide the glaze evenly between four bowls. Color them in different shades using gel food coloring. To create this galaxy mirror glaze, color them blue, purple, black, and pink.
- Continue to stir occasionally (to prevent a skin from forming) until the glaze has reached 90°F/32°C, or is just slightly warm to the touch.
- Pour each color of glaze back into one large bowl, alternating colors and drizzling the colors together as you pour them.
- Place a chilled buttercream cake (in the freezer for at least 10 minutes or the fridge for 1 hour) on top of a circular object smaller than the cake board, and set this on top of the large rimmed baking sheet to catch the run-off glaze.
- Begin pouring the glaze over the center of the cake, then slowly work your way out to the edge of the cake in a circular motion until the cake is fully covered.
- Let the glaze drip for about 10 minutes, then scrape away any excess glaze from the bottom of the cake board using a small offset spatula or butter knife.
Video
Notes
Tips for Making the Best Mirror Glaze Cake
- This recipe can be used on any type of buttercream cake that is properly chilled. I do not recommend pouring it over a cake covered in whipped cream.
- Make the cake on a cake board that is the same size as the cake layers. It allows the glaze to drip directly off the bottom of the cake and makes it easier to get a clean, finished look.
- Don't use this mirror glaze recipe on fondant. It can do weird things to the fondant and create a goopy mess.
- I prefer using mini white chocolate chips in this recipe, but any good-quality white chocolate chip or finely chopped white chocolate bar will work.
- The glaze should be thin enough to pour over the cake, but thick enough that it is opaque and has a vibrant color. If you start to pour and it seems too thick or thin, adjust the temperature as needed to get it to the desired consistency.
- Do not use flavored Jello in place of the unflavored gelatin in this recipe.
you state that the glaze develops a film. So do you recommend glazing day of party or can you store it in the refrigerator over night and it be okay? Thanks!
it’s best to do it day of if possible, it loses some of it’s shine if the fully glazed cake sits overnight!
Hallo in this recipe can we use agar instead of gelatin
I’m not sure, I’ve never tried that before!
i used a swiss merinque buttercream and when i glazed it the glaze didn’t seem to want to stick to spots on the edges…any idea why? cheers!
sometimes that can happen if the glaze is too warm! I’d recommend letting it cool slightly longer, and that should fix that 🙂
Lol…guess I was too impatient!
How long does the glaze keep, and how would you recommend reheating the glaze? I did a trial run today for a birthday cake next weekend, and I have a TON of glaze that I would love to just save and use later this week.
It keeps for up to 3 weeks, and you can reheat it to reuse it! However, it can form a skin, so be sure to put some saran wrap on top of it when storing it in the fridge! 🙂
Is it possible to use this glaze on a fondant covered cake ?
I don’t receive many requests for butter cream cakes.
I’m not sure, I’ve never tried it!
@Chelsweets, pouring glaze on fondant makes it wierd and changes the structure of it…I found out the hard way
We actually just did a cake with fondant instead of icing, and did the mirror glaze over it. It did pretty good, although was a little dark since we did chocolate flavored fondant, but otherwise, worked just fine and was a really smooth cover due to the fondant! 🙂
ah that’s awesome! happy to hear that worked so well!! 🙂
Can you use colored candy melts instead of white chocolate chips? I would like to use white candy melts so was hoping that would work, any thoughts?
You can! I’ve never really used them, but I’ve heard you can sub white chocolate for candy melts! I prefer the taste of white chocolate though!
Just made my third mirror glaze cake using your recipes. The first two were spectacular. I used the stovetop method for the glaze. This one I used the microwave, and wasn’t as happy with it. The temp never got up to the 130 that you mention initially, only about 90. At least it got to room temp much quicker! Then when I poured it, it was thin and had tiny bubbles, even though I had sieved it to get out any lumps. I think it will be okay, since I was making it for a friend’s kid and he wanted some white in it (the frosting is showing in places). Not sure if it was because I didn’t get it hot enough initially, do you think that the gelatin needs to be hotter to activate it? Anyway, I will probably stick to the stovetop method in the future. I’m sure it was operator error, just wondered if you had any ideas about what went wrong. I used your vanilla cake recipe and it tasted great (of course I had to taste the trimmings!!). Thanks for all of the ideas. I almost went into a sugar coma just looking at the S’Mores cake pics!
I’m so sorry to hear that! Yah, i think it needs to be heated up a bit to ensure it sets properly! Happy that my vanilla cake recipe was a hit though 🙂
Hello there! this is the first time I see a recipe that does not call for glucose and I wonder if, comparing a traditional recipe, you detect some loss of gloss in the final glaze? I would love to say goodbye to the glucose, not only because it’s a pain to measure, very messy to work with, but most recipes use a lot of it, and I keep having to order more and more 😉
I am tempted to try it, but if you have input on the difference I’d love to know!
also, have you tried to do a “spider web” effect with your method? that is also on my list to try soon
it does lose it’s shine overtime, which is the downside to omitting the glucose! however, it makes this type of recipe so much more accessible to all the home bakers out there, which is why I’ve chosen not to use it. I have yet to try the spider web method, but I’ve been wanting to for a while!!
Thank you so much! you are right, it simplifies it a lot and depending on what you are doing, why not, right?
Thank you so much for your videos @Chelsweets.. It will be my first time making a mirror glaze, any advice? ?
I’d recommend just following the measurements to a T, and making sure your cake is fully chilled before you pour the glaze over it 🙂 best of luck!
could we have the ingrediants in grams and ounces please as im from across the pond thanks
So sorry, I still need to update this post! But I actually share my mirror glaze recipe with grams here: https://chelsweets.com/2016/08/28/easy-5-ingredient-mirror-glaze-recipe/
Hope that helps Wayne!
WooHoo! Worked on the very first time!
However, it seems too opaque when finished even though it was VERY dark when mixed.
Can I color the frosting to further darken to overall appearance?
Hi Carla,
So happy to hear that this worked on the first try for you! Usually I recommend using a light colored frosting under the glaze to help the colors pop, but it depends on what look you’re after and what color or colors you’re using! If you’re doing a single color and want to use the same color of frosting underneath, you can totally do that. Hope that helps, happy baking!
I got a 10” round cake from Sam’s and had them cover it with buttercream. Then I will do the glaze. You said to freeze the cake but if I’m going to decorate and eat it in the same day the cake will not have time to thaw completely. Can I do the cake right out of the fridge and serve it that afternoon? Thanks.
Hi Deidre,
I’d try popping it in to the freezer for at least 20 minutes before pouring the glaze! The glaze will be a bit warm, and if the cake isn’t pretty well chilled the frosting can melt! I’m not sure what Sam’s clubs frosting is like and if it’s butter or shortening based, but I think a little bit of time in the freezer should do the trick! Please let me know how it turns out, I’m super curious!!
Cake thaws rather quickly, so I would suggest you half freeze it at least !
Hi Bev,
Do you mean before pouring the glaze?? Yes, I definitely think cakes need to be thoroughly chilled before pouring the glaze!! 🙂
Definately! I cover cake in buttercream first, then freeze. Next day I do the mirror glaze, but if you want cake shortly afterwards, at least semi freeze it for a few hours. As I said, cake will thaw rather quickly.
Hi, I froze the cake for a few hours that morning. Your recipe was easy and the glaze went on just fine. The shine of the mirror glaze only lasted maybe an hour then it went dull. I was sad. Next time I will use the karo syrup so it will stay shiny. Thank you for an easy recipe.
This is my first time trying a mirror glaze and it ended up looking pretty cool (except the bald spot in the back). But it doesn’t have any shine to it, is that due to something with the temperature of the glaze? Thanks
Hi Brandi,
The shine usually has to do with the white chocolate you use! If you want a shinier look, you can try adding a bit less white chocolate next time. You also can make the glaze a bit warmer! It loses its shine as it cools. Hope that helps, happy baking! <3
Please how many days can the mirror glazed cake last in a clients hand without refrigerate it, so as to know how to recommend it for a client, bcoz some customers don’t like eating all the cakes at ago….. Thanks
I have been intimidated by mirror glaze cakes for 2 years but have always wanted to try it. After I watched your video, I thought you made it look easy so I gave it a shot and am I glad I did! You nailed this recipe and it turns out as good as all the YouTube videos I have watched previously on this. Thank you so much!
I’m super excited to try this but I can’t find gelatin any where! Can I use something else?
I tried your technique tonight. I followed step by step, however, most of the glaze ran off and I could see my white frosting. I even poured the drops back on and that didn’t help. I’m so confused as to why it didn’t work. Thankfully, it was just a practice cake.
My mirror glaze looses its shine almost immediately after it is poured. How to I keep it shiny?
Hi the video says 2 tablespoons of gelatine, but the recipe says 2 1/2 teaspoons. Which one is it please.
The recipe says 2.5 teaspoons. Your video says 2 tablespoons or 2 packets of gelatin. 2 packets is less than 2 tablespoons. Can you please let me know which measurement is correct?
There is an error in your easy mirror glaze recipe. In one place it calls for 3/4 cup water and another place 1 cup of water. 1cup is too much. Glaze is too thin and colors mix too much and look muddy.
Your videos
And your written recipes are different . I’m afraid to try this till we know which one is correct. The water ratios and the gelatin ratios are very different
Hi, can i eliminate sugar for this recipe? What will be happened of i dont use sugar? Thanks.
Hi Alicia,
Would you still be adding the sweetened condensed milk? I haven’t tested this recipe with no sugar so sadly I’m not sure! Sorry I can’t be of more help.
I love all your videos and helpful tips/recipes. Thank you for sharing your ideas and advice ?
This mirror glaze is something I’d really like to do for my sister’s birthday (this May) and was wondering if decorating on top of the glaze was possible with either buttercream or stabilized whipped cream piping?? And you’ve mentioned that once the cake is glazed it’s best to use right away. Will it not stay glossy if made ahead of time and kept in fridge or freezer? And once it’s glazed and will be used same day, it can be kept at room temp? For how long? I’m trying to plan this out, sorry for all the questions ? Thanks!!
Hi Melissa,
Great question! You can totally decorate on top of the glaze once it has set. As long as you chill the cake and let the glaze firm up, buttercream or stabilized whipped cream should work great on top of it.
Some people in the past have complained about the glaze losing its shine overtime, but my cakes are usually still shiny a day or two after the cake is glazed. I store them in the fridge.
If you do glaze the cake the day of, I’d recommend chilling it a little bit to help the glaze set, and then it can sit at room temperature until you’re ready to eat it. Hope that helps and that your sister’s cake turns out great!
I’m doing a bowling ball. Any ideas how to transfer the “ball” from the elevated platform to the flat piece it will be transported on?
Hi Jennifer,
That can definitely be challenging! I’d recommend inserting a dowel or chopstick in the top of the cake to give you some stability, and using a large offset spatula underneath to try to move the cake. It’ll be challenging, but I think that’s probably the best way to do it. You can smooth over the top with a little extra glaze once it’s moved. Hope that helps, happy baking!