
Bat Cookies
These bat cookies bake up soft and chewy and are decorated with royal icing to look just like a cute little bat.

Why You’ll Love These Bat Cookies
These bat cookies are made with a soft cream cheese sugar cookie dough that holds its shape well and stays tender after baking.
The royal icing design looks detailed, but it’s beginner-friendly because you only need two icing colors, and the design is pretty simple. They’re perfect for Halloween parties, spooky cookie boxes, or baking with kids.
How to Make These Bat Cookies
Let’s walk through each step of this recipe to make sure it turns out as amazing as possible!
I’ve also shared a video on how to make them in the recipe card at the bottom of this post.
Step 1: Make the Cookie Dough
In a large bowl or the bowl of a stand mixer, beat 3/4 cup butter and 1/2 cup cream cheese on medium speed with a hand mixer or paddle attachment until smooth.
Next, add 1 1/2 cups of granulated sugar and mix on a medium-high speed for about a minute, until the mixture becomes lighter in color.
Add in 1 egg and 2 tsp vanilla bean paste or vanilla extract. Mix on a medium speed until incorporated.
In a separate bowl, whisk together 3 cups flour (use a scale or fluff the flour in the bag, then spoon it into the measuring cup and level it), 1 Tbsp cornstarch, 1 tsp fine salt, and 1/2 tsp baking powder.
Mix the dry ingredients into the butter mixture on a low speed until they are JUST incorporated. Scrape the sides of the bowl with a rubber spatula between additions.
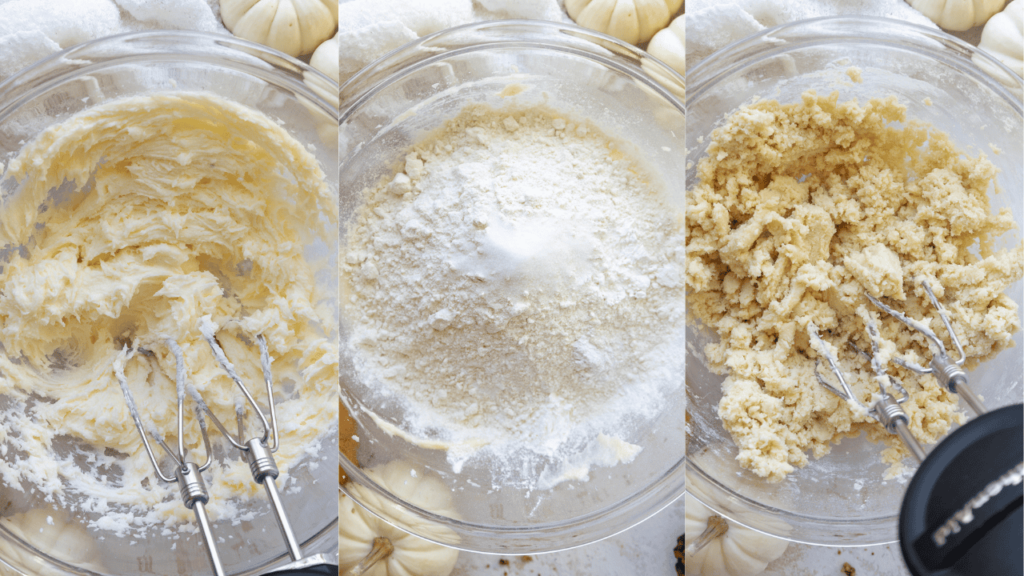
At this point, the dough should still be pretty thick and sticky. Divide the dough in half and wrap each portion of dough in a piece of plastic wrap. I like to flatten the dough out into a rectangle that’s about 1/2 inch thick to make it easier to roll out once it’s chilled.
Chill the dough in the fridge for about 2 hours or in the freezer for 30 minutes. It can also be chilled overnight.
Step 2: Cut Out the Bat Cookies
Preheat the oven to 350°F / 175°C for about 30 minutes before you plan to roll out the dough, and line two large baking sheets with parchment paper. Set aside.
Take one piece of dough out of the fridge, leaving the other in there to continue to chill. If you put the cookie dough in the freezer, let it sit at room temperature for 5-10 minutes to soften up a bit before trying to roll it out.
Unwrap the cookie dough and lay the plastic wrap out flat on your counter. We will be rolling out the cookie dough on the plastic wrap to make cleanup a breeze and make cutting out the cookies easier. Dust the cookie dough and your rolling pin with flour.
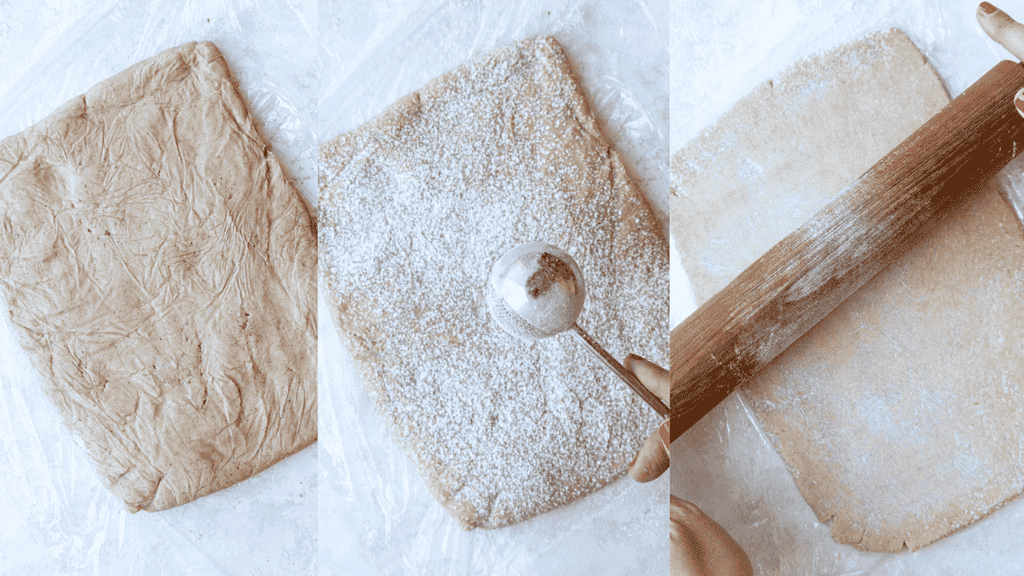
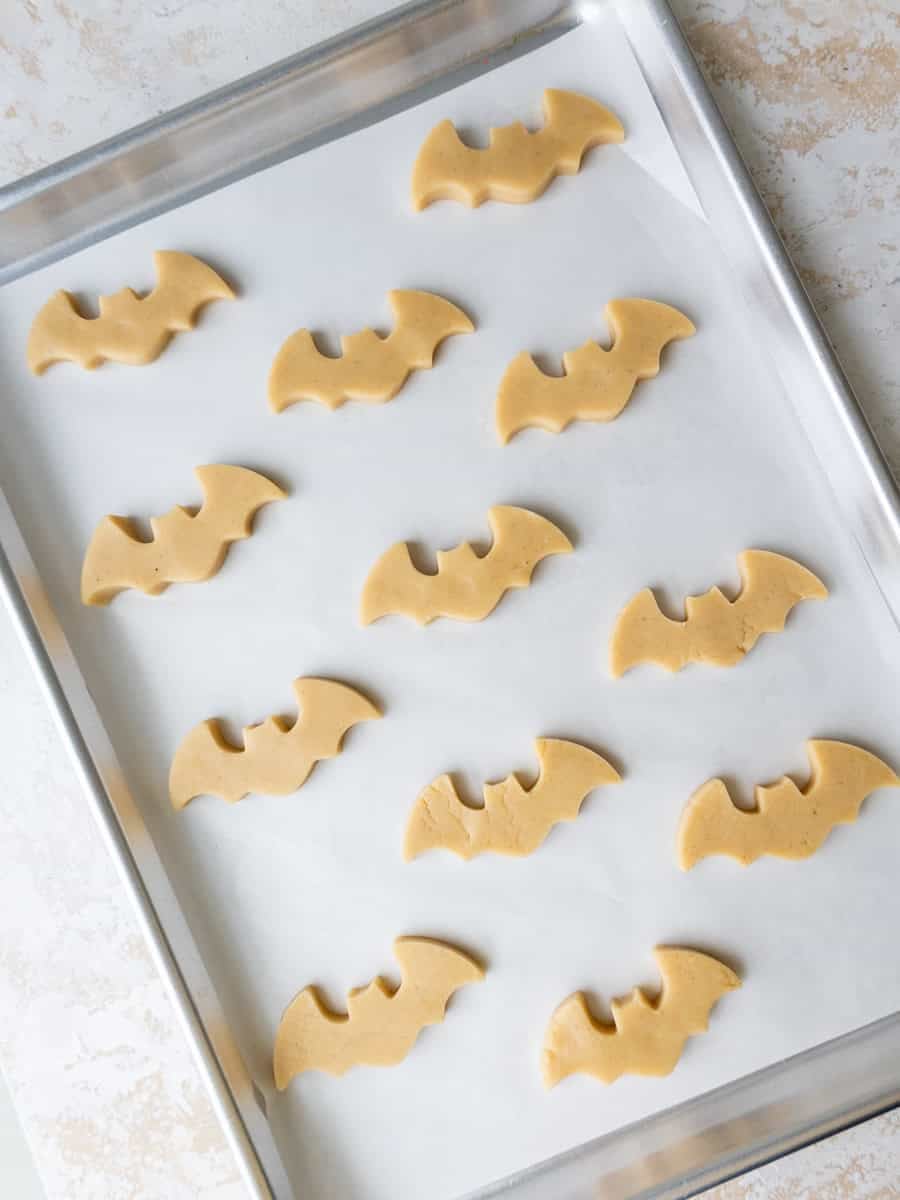
Roll the chilled dough to be 1/3 inch thick (these rolling pin rings help a ton with getting a consistent thickness) and use a bat cookie cutter to cut out as many cookies as you can. Place them about 1 inch apart on the baking sheet.
Chill the cut-out cookies one more time in the fridge for 15 minutes or the freezer for 5 minutes to help them keep their shape as they bake.
Step 3: Bake the Bat-Shaped Cookies
Bake one sheet of cookies at a time for 13-15 minutes on the middle rack of your oven (bake time can vary based on the size and thickness of the dough).
Keep a close eye on the cookies and be sure to pull them out before the edges start to brown.
Let the baked cookies cool on the pan for about 15 minutes, then transfer to a wire rack to finish cooling.
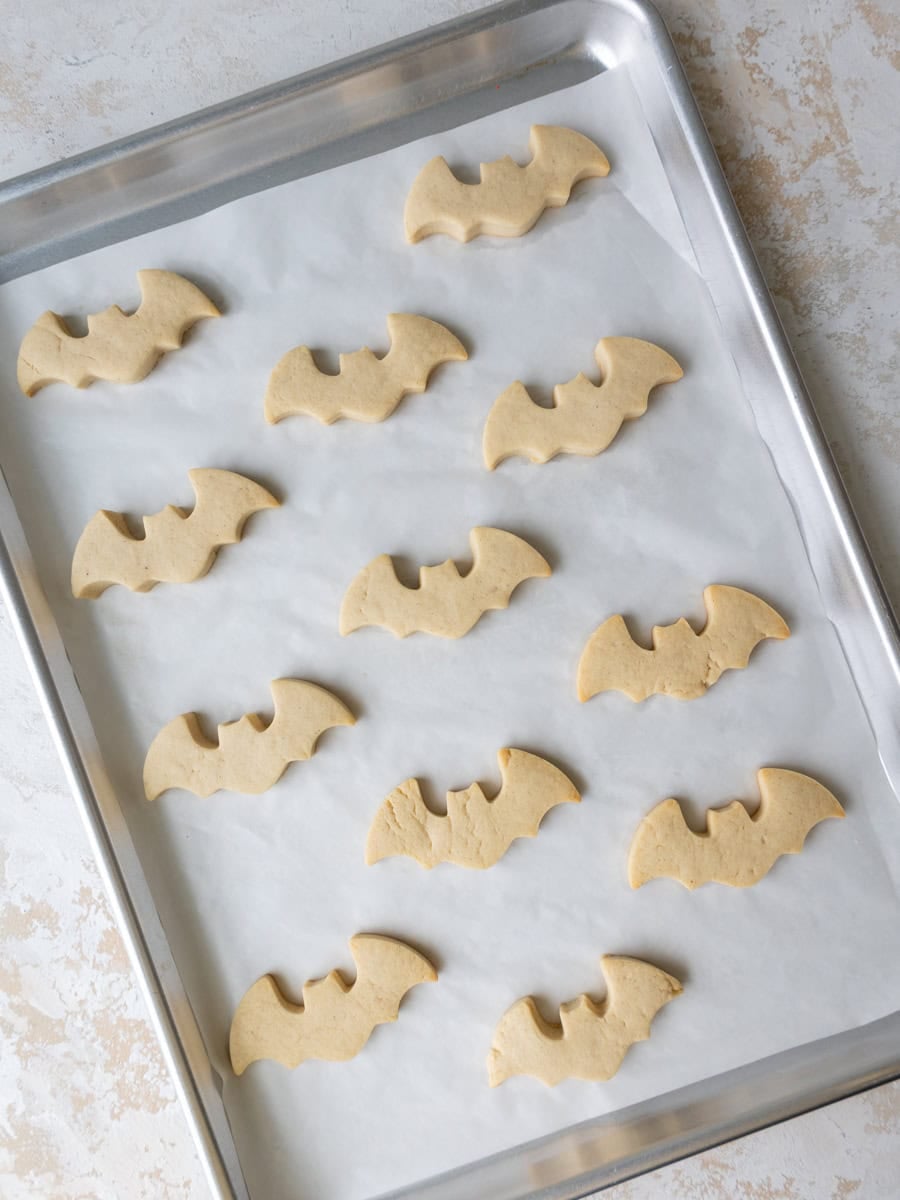
While the first batch bakes and cools, knead together the cookie dough scraps and rewrap them in plastic wrap. Pop them back in the fridge to chill.
Pull out the second chilled portion of dough and repeat the steps above. Then repeat with the chilled dough scraps.
Step 4: Make the Royal Icing
While the cookies cool, make the royal icing. This can be made a few hours in advance or potentially the night before, but the icing can separate as it sits, so I don’t recommend making it any further ahead of time.
Whisk together 3 3/4 cups of powdered sugar and 3 Tbsp of meringue powder in a large bowl or the bowl of a stand mixer.
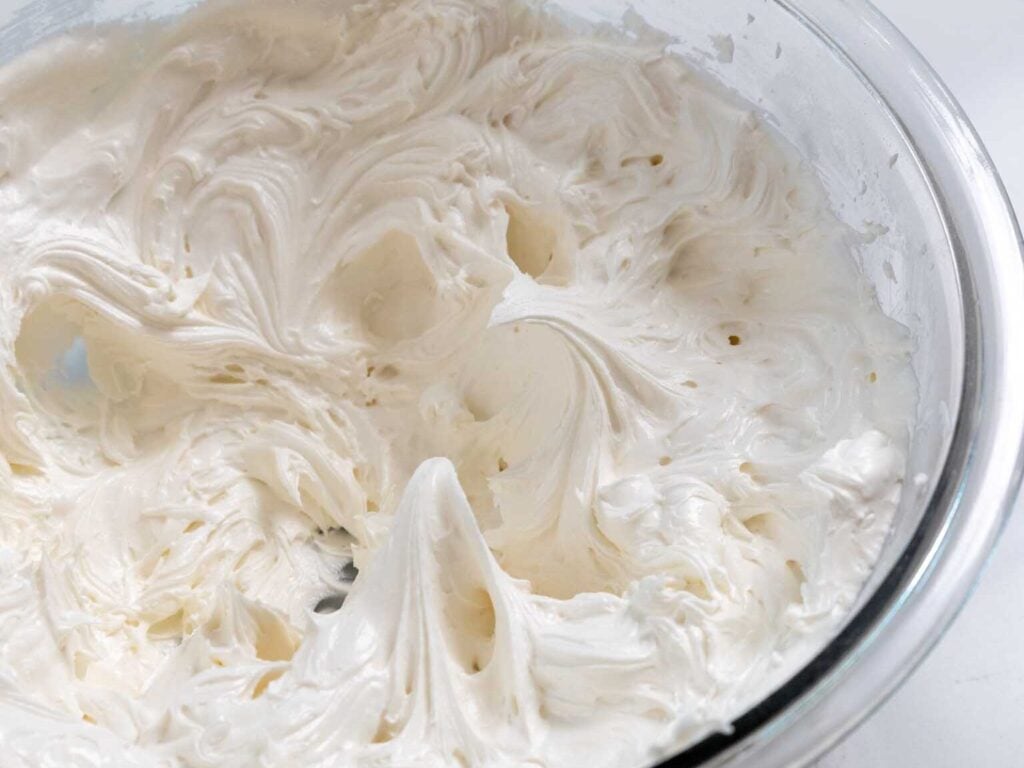
Add 1/4 cup + 1 Tbsp water, 1 Tbsp vanilla extract, and 1 tsp almond extract (optional). Mix on a low speed with a stand mixer and paddle attachment or hand mixer to incorporate the liquid, then increase to a medium speed and mix until stiff peaks form (see picture below).
It’s ok to stop the mixer and check the stiffness! I usually check a few times before it’s ready. This usually takes me about 3 minutes with a hand mixer or 2 minutes with a stand mixer. Scrape around the sides and bottom of the bowl with a rubber spatula to ensure everything is properly mixed together.
Step 5: Color the Royal Icing
Next, mix in additional water 1 tsp at a time into the remaining icing until a thick flood consistency is reached. It sounds silly to add it by the teaspoon, but it really helps you get the consistency just right, and you’ll thank yourself for that when it’s time to ice the cookies. I usually use 2-5 tsp of water, but it can vary from batch to batch.
To test the consistency, count how many seconds it takes for a drizzle of icing to settle and become smooth. A good thick flood consistency usually takes between 10 and 15 seconds to settle. If the icing settles too quickly (under 10 seconds), it’s too thin. If it takes longer than 15 seconds or falls off the spatula in a clump, it’s too thick.
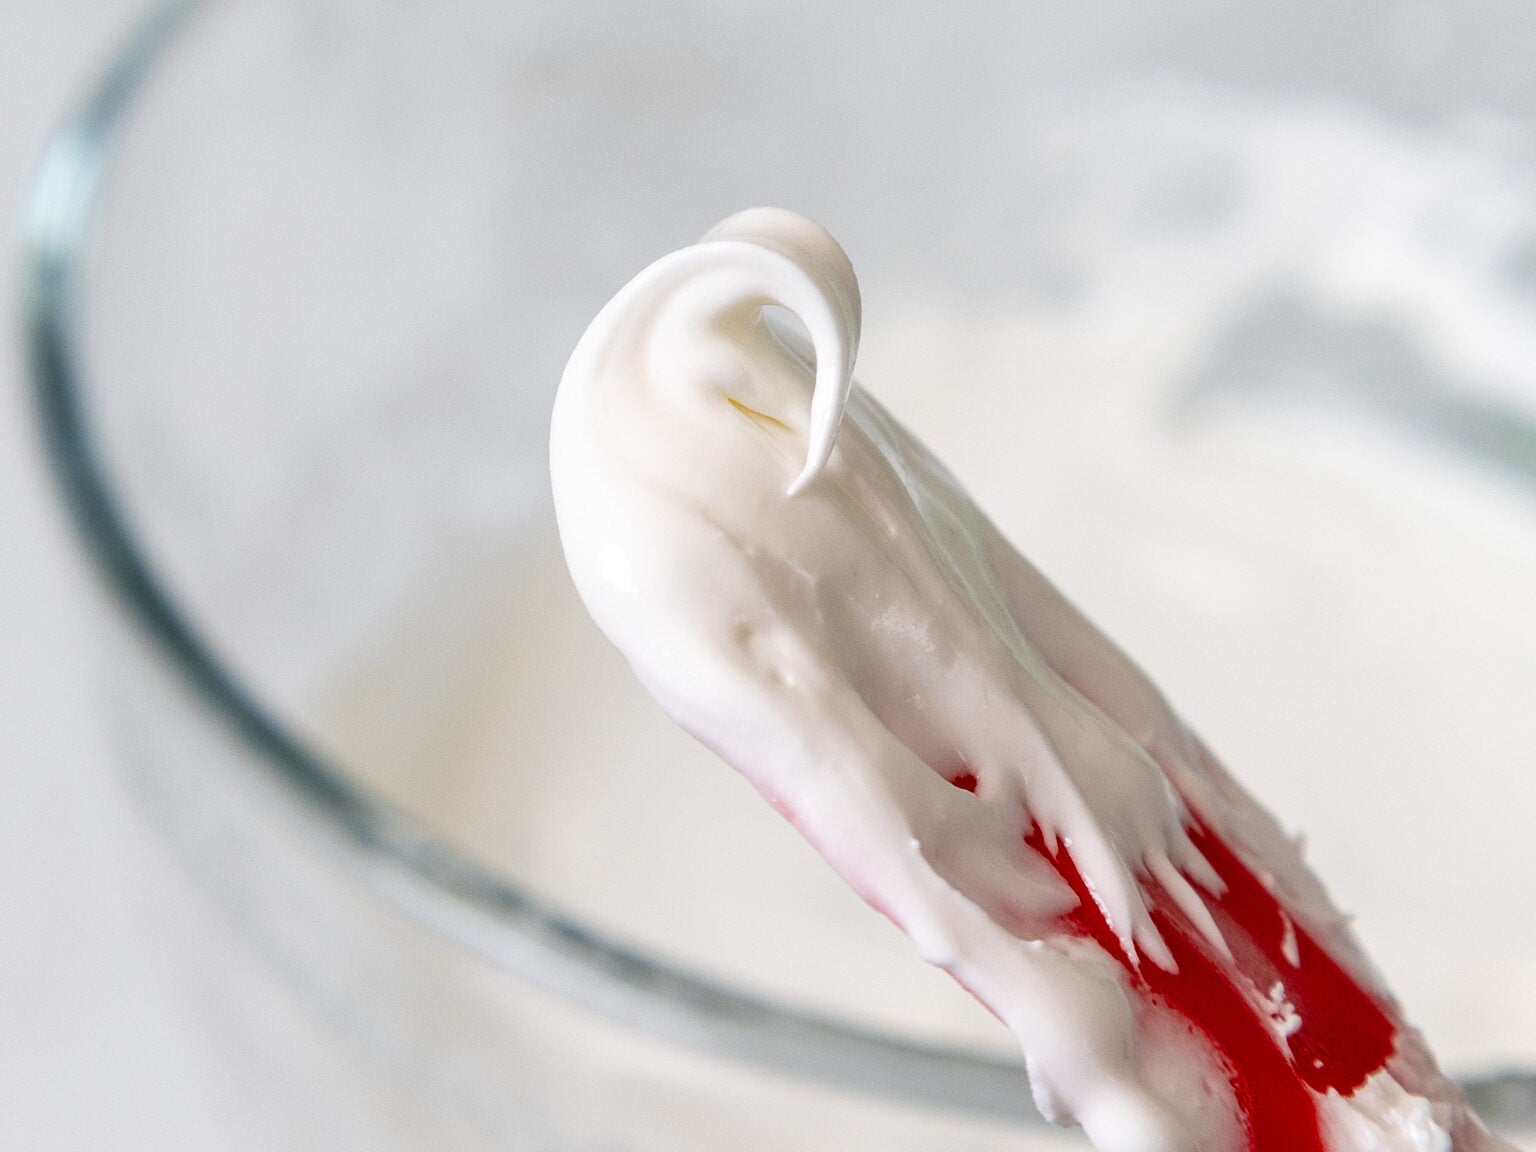
Once the icing is thinned to this consistency, scoop about 3 Tbsp of icing into a small bowl and color it black with gel food coloring. Scoop this into a small piping bag and seal the top with a rubber band or clip. Set aside.
Color the remaining icing purple with neon or electric purple gel food coloring. Scoop about 1 cup of icing into a small piping bag and seal the top with a rubber band or clip. Set aside.
Thin the remaining purple icing with water to a regular flood consistency (the icing should settle in less than 8 seconds). Pour this into a large piping bag and seal the top with a rubber band or clip. Set aside.
Step 6: Decorating These Bat Cookies
When you’re ready to decorate the cookies, cut a small opening (about 1/8 of an inch) at the base of each of the piping bags. You can always cut the opening wider, but you can’t make it smaller once you cut it. I find it’s a lot easier to control the icing as you decorate the cookies if you have a small opening.
Pipe an outline along the edges of the cookie and around the body of the bat with purple icing (see pictures above). I also like to pipe a squiggle of icing inside each section to prevent the icing from caving in as it dries, but this is optional.


Repeat this on all the cookies. By the time you’ve finished, the icing on the first cookie should have hardened.
Next, fill the inside of each section with the thinner, purple icing. I like to start piping around the outside edge, then slowly work my way in. Fill in the center section first on all the cookies, then move on to the wings.


Let the purple icing sit for about 30 minutes to firm up, then use the thicker purple icing to pipe two lines on each wing from point to point (see pictures).
The last step is to use the black icing to pipe on the eyes and mouth. If desired, add a white nonpareil sprinkle to give the eyes more dimension.


Let the cookies dry for a few hours or overnight until the icing is firm to the touch. These cookies can be stored in an airtight container for up to two weeks at room temperature or up to 3 months in the freezer.
Substitutions and Swaps
Below are some swaps and variations that can be made to this recipe.
- Gel Food Coloring – I highly recommend using gel or powdered food coloring to color the icing. Liquid food coloring can throw off the consistency of the icing.
- Unsalted Butter – If you only have salted butter, you can use it and omit the salt. You can also use vegan butter.
- Cream Cheese – I recommend using the full-fat cream cheese that comes in a block.
- Granulated Sugar – I do not recommend reducing the amount of sugar or changing the type of sugar. It will change the spread of these cookies.
- All-purpose flour – You can use a gluten-free flour blend in place of the AP flour in this recipe.
- Cornstarch – Cornstarch helps give these cookies a soft texture! If you don’t have any on hand, it can be omitted, but your cookies won’t bake up as soft.
- Meringue Powder – This ingredient is a must for the royal icing. It has stabilizers (usually cornstarch and sugar), which help the icing whip up. For this reason, I don’t recommend using dried egg white powder as a substitute.
- Almond Extract – I like to use this to flavor the icing, but it’s optional! It can either be omitted, or you can use additional vanilla in its place.
How Many Cookies Does This Recipe Make?
This recipe can be used to make about 36 2.5-inch cookies. The yield and bake time will vary based on the size of the cookie cutter(s) you use and the thickness of the dough.
This recipe can be halved to make fewer cookies (use half a scrambled egg in the dough), but I don’t recommend doubling it unless you have a commercial (8 qt.) stand mixer.

Frequently Asked Questions
Can I make these bat cookies without a bat cookie cutter?
Yes! A bat cookie cutter is the easiest option, but you can also print or draw a small bat template, place it over the chilled, rolled-out dough, and cut around it with a sharp paring knife. If the dough gets too soft while cutting, pop it back in the fridge for 10–15 minutes before baking.
Why did my bat cookies spread?
The most common reason cut-out cookies spread is that the dough got too warm before baking. Silicone mats can also sometimes cause cookies to spread a little more than parchment paper.
Be sure to chill the dough before rolling it out and again after cutting out the cookies. Rolling the dough to an even 1/3-inch thickness also helps the cookies bake evenly and keep their shape.
How long does royal icing need to dry?
Royal icing usually needs a few hours to dry until it’s firm to the touch, but I recommend letting these cookies dry overnight if you plan to stack, package, or transport them. This gives the icing time to fully set and helps prevent any dents.
How far in advance can I make bat cookies?
These decorated bat cookies can be made up to 2 weeks in advance and stored in an airtight container at room temperature. You can also make the cookie dough ahead of time and freeze it for up to 1 month, then thaw it in the fridge overnight before rolling and baking.
Can I freeze decorated bat cookies?
Yes, decorated bat cookies can be frozen for up to 3 months in an airtight container. Let them thaw completely at room temperature inside the sealed container before opening it. This helps prevent condensation from forming on the royal icing and causing the colors to bleed.
Tips for Making the Best Bat Cookies
- Really cream together the butter, cream cheese, and granulated sugar in the first step of this recipe. It helps incorporate air into the dough, which makes tender and soft cookies.
- Don’t overwork the cookie dough! It can overwork the gluten and result in tough, dense cookies.
- Roll the cookie dough out to a consistent thickness of 1/3 inch. If some are thicker or thinner than others, they may over or underbake in the oven.
- Take the time to chill the cookie dough. It helps prevent your cookies from spreading while they bake and helps them bake up with a soft texture.
- Don’t overbake your cookies. Err on the side of underbaking your cookies, and remember that the cookies continue to bake for a few minutes once they’re out of the oven.
- Avoid leaving the icing uncovered for long periods of time, or it will crust! Either immediately place it in piping bags or cover it with plastic wrap.
- Make and color the icing right before you plan to decorate the cookies. Otherwise, the icing can separate.
Let Me Know What You Think!
If you make these bat cookies, I’d love to hear how they turn out! Please leave a rating and comment below.
And if you share on social media, tag me @chelsweets and use #chelsweets so I can see your delicious creations.

Bat Cookies
Equipment
- 1 large piping bag
- Rubber Bands or Clips
Ingredients
Cream Cheese Cookie Dough
- 3/4 cup (1 1/2 sticks) unsalted butter, room temperature 170g
- 1/2 cup full-fat cream cheese, room temp 113g
- 1 1/2 cups granulated sugar 300g
- 1 large egg, room temperature 56g
- 2 tsp vanilla extract or vanilla bean paste 8g
- 3 cups all-purpose flour 375g
- 1 Tbsp cornstarch 8g
- 1 tsp fine salt
- 1/2 tsp baking powder
Royal Icing
- 3 3/4 cups powdered sugar 454g or a 1 lb. box
- 3 Tbsp meringue powder 28g
- 1/4 cup + 1 Tbsp water, room temp 75g
- 1 Tbsp vanilla extract 15g
- 1 tsp almond extract (optional) 5g
- additional water to bring to a thick flood consistency
- electric or neon purple and black gel food coloring
- white nonpareil sprinkles – for the eyes (optional)
Instructions
Cream Cheese Cookie Dough
- In a large bowl or the bowl of a stand mixer, beat 3/4 cup butter and 1/2 cup cream cheese on medium speed with a hand mixer or paddle attachment until smooth.
- Next, add 1 1/2 cups granulated sugar and mix on a medium-high speed for about a minute, until the mixture becomes lighter in color.
- Add in 1 egg and 2 tsp vanilla bean paste or vanilla extract. Mix on a medium speed until incorporated.
- In a separate bowl, whisk together 3 cups flour (use a scale or fluff the flour in the bag, then spoon it into the measuring cup and level it), 1 Tbsp cornstarch, 1 tsp fine salt, and 1/2 tsp baking powder.
- Mix the dry ingredients into the butter mixture on a low speed until it is JUST incorporated. Scrape the sides of the bowl with a rubber spatula between additions.
- At this point, the dough should still be pretty thick and sticky. Divide the dough in half and wrap each portion of dough in a piece of plastic wrap. I like to flatten the dough out into a rectangle that's about 1/2 inch thick to make it easier to roll out once it's chilled.
- Chill the dough in the fridge for about 2 hours or in the freezer for 30 minutes. It can also be chilled overnight. Preheat the oven to 350°F / 175°C for about 30 minutes before you plan to roll out the dough, and line two large baking sheets with parchment paper. Set aside.
- Take one piece of dough out of the fridge, leaving the other in there to continue to chill. If you put the cookie dough in the freezer, let it sit at room temperature for 5-10 minutes to soften up a bit before trying to roll it out. Unwrap the cookie dough and lay the plastic wrap out flat on your counter. We will be rolling out the cookie dough on the plastic wrap to make cleanup a breeze and make cutting out the cookies easier. Dust the cookie dough and your rolling pin with flour.
- Roll the chilled dough to be 1/3 inch thick (these rolling pin rings help a ton with getting a consistent thickness) and use a bat cookie cutter to cut out as many cookies as you can. Place them about 1 inch apart on the baking sheet.
- Chill the cut-out cookies one more time in the fridge for 15 minutes or the freezer for 5 minutes to help them keep their shape as they bake.
- Bake one sheet of cookies at a time for about 13-15 minutes on the middle rack of your oven (bake time can vary based on the size and thickness of the dough). Keep a close eye on the cookies and be sure to pull them out before the edges start to brown.
- Let the baked cookies cool on the pan for about 15 minutes, then transfer to a wire rack to finish cooling.
- While the first batch bakes and cools, knead together the cookie dough scraps and rewrap them in plastic wrap. Pop them back in the fridge to chill.
- Pull out the second chilled portion of dough and repeat the steps above. Then repeat with the chilled dough scraps.
Royal Icing
- While the cookies cool, make the royal icing. This can be made a few hours in advance or potentially the night before, but the icing can separate as it sits, so I don't recommend making it any further ahead of time.
- Whisk together 3 1/2 cups of powdered sugar and 3 Tbsp of meringue powder in a large bowl or the bowl of a stand mixer.
- Add 1/4 cup + 1 Tbsp water, 1 Tbsp vanilla extract, and 1 tsp almond extract (optional). Mix on a low speed with a stand mixer and paddle attachment or hand mixer to incorporate the liquid, then increase to a medium speed and mix until stiff peaks form (see picture above). It's ok to stop the mixer and check the stiffness! I usually check a few times before it's ready. This usually takes me about 3 minutes with a hand mixer or 2 minutes with a stand mixer. Scrape around the sides and bottom of the bowl with a rubber spatula to ensure everything is properly mixed together.
- Next, mix in additional water 1 tsp at a time into the remaining icing until a thick flood consistency is reached. It sounds silly to add it by the teaspoon, but it really helps you get the consistency just right, and you'll thank yourself for that when it's time to ice the cookies. I usually use 2-5 tsp of water, but it can vary from batch to batch. To test the consistency, count how many seconds it takes for a drizzle of icing to settle and become smooth. A good thick flood consistency usually takes between 10 and 15 seconds to settle. If the icing settles too quickly (under 10 seconds), it's too thin. If it takes longer than 15 seconds or falls off the spatula in a clump, it's too thick.
- Once the icing is thinned to this consistency, scoop about 3 Tbsp of icing into a small bowl and color it black with gel food coloring. Scoop this into a small piping bag and seal the top with a rubber band or clip. Set aside.
- Color the remaining icing purple with neon or electric purple gel food coloring. Scoop about 1 cup of icing into a small piping bag and seal the top with a rubber band or clip. Set aside.
- Thin the remaining purple icing with water to a regular flood consistency (the icing should settle in less than 8 seconds). Pour this into a large piping bag and seal the top with a rubber band or clip. Set aside.
Decorating These Bat Cookies
- When you're ready to decorate the cookies, cut a small opening (about 1/8 of an inch) at the base of small piping bags with the black and purple icing. You can always cut the opening wider, but you can't make it smaller once you cut it. I find it's a lot easier to control the icing as you decorate the cookies if you have a small opening.
- Pipe an outline along the edges of the cookie and around the body of the bat with purple icing (see pictures above). I also like to pipe a squiggle of icing inside each section to prevent the icing from caving in as it dries, but this is optional. Repeat this on all the cookies. By the time you've finished, the icing on the first cookie should have hardened.
- Next, fill the inside of each section with the thinner, purple icing. I like to start piping around the outside edge, then slowly work my way in. Fill in the center section first on all the cookies, then move on to the wings.
- Let the purple icing sit for about 30 minutes to firm up, then use the thicker purple icing to pipe two lines on each wing from point to point (see pictures). The last step is to use the black icing to pipe on the eyes and mouth. If desired, add a white nonpareil sprinkle to give the eyes more dimension.
- Let the cookies dry for a few hours or overnight until the icing is firm to the touch. These cookies can be stored in an airtight container for up to two weeks at room temperature or up to 3 months in the freezer.
Video
Notes
Substitutions and Swaps
Please refer to the substitutions and swaps section in the post above for all the ingredient variations that can be used in this recipe.How Many Cookies Does This Recipe Make?
This recipe can be used to make about 36 2.5-inch cookies. The yield and bake time will vary based on the size of the cookie cutter(s) you use and the thickness of the dough. This recipe can be halved to make fewer cookies (use half a scrambled egg in the dough), but I don’t recommend doubling it unless you have a commercial (8 qt.) stand mixer.Making These Bat Cookies in Advance and Storage Tips
You can store decorated cookies in an airtight container for up to 2 weeks at room temperature or for up to 3 months in the freezer. If you freeze the iced cookies, store them in an airtight container and let them thaw to room temperature completely in the airtight container before opening the container. This will prevent the icing from bleeding due to condensation. If you want to stack the cookies on top of one another, I recommend adding a layer of parchment paper between them. This cookie dough can also be frozen for up to 1 month if wrapped tightly in plastic wrap and stored in an airtight container. I like to move the cookie dough to the fridge the night before I plan to roll it out and bake the cookies. Baked, un-iced cookies can also be frozen! These cookies last for up to a month if frozen in an airtight container. I recommend waiting to decorate them until they’ve thawed to room temperature. Move them to the fridge the day before you plan to eat them, then let them sit out at room temperature for a few hours before icing them.Tips for Making the Best Bat Cookies
- Really cream together the butter, cream cheese, and granulated sugar in the first step of this recipe. It helps incorporate air into the dough, which makes tender and soft cookies.
- Don’t overwork the cookie dough! It can overwork the gluten and result in tough, dense cookies.
- Roll the cookie dough out to a consistent thickness of 1/3 inch. If some are thicker or thinner than others, they may over- or under-bake in the oven.
- Take the time to chill the cookie dough. It helps prevent your cookies from spreading while they bake and helps them bake up with a soft texture.
- Don’t overbake your cookies. Err on the side of underbaking your cookies, and remember that the cookies continue to bake for a few minutes once they’re out of the oven.
- Avoid leaving the icing uncovered for long periods of time, or it will crust! Either immediately place it in piping bags or cover it with plastic wrap.
- Make and color the icing right before you plan to decorate the cookies. Otherwise, the icing can separate.
Nutrition
Other Posts You Might Like:




Hello! Where can I buy the exact bat cookie cutter? Also, how do you properly freeze your decorated cookies in the freezer? I want to make this in advance for a party and want to ensure all my hard work doesn’t get wasted. I’ve seen other posts, not from your website, with ruined cookies from the condensation. Should I wrap them individually? Can they be stacked with parchment paper? Any tips would be appreciated!
And, thank you for sharing all your work. I made your ghost cookies for a Halloween party last year and my son’s friends loved it.
Hi Tracy,
I used a bat cookie cutter that’s about 2 1/2 inches long! I ordered it on Amazon and it came in a set with some other Halloween cookie cutters. Here’s the link: https://amzn.to/4rWqnZn.
The decorated cookies can also be frozen for up to 3 months. I’d let the icing dry completely, stack them in an airtight container with parchment paper between the layers, and keep the container closed while the cookies come back to room temperature so condensation forms on the container rather than the cookies. Hope that helps, and I’m so happy the ghost cookies were a hit last year!!