
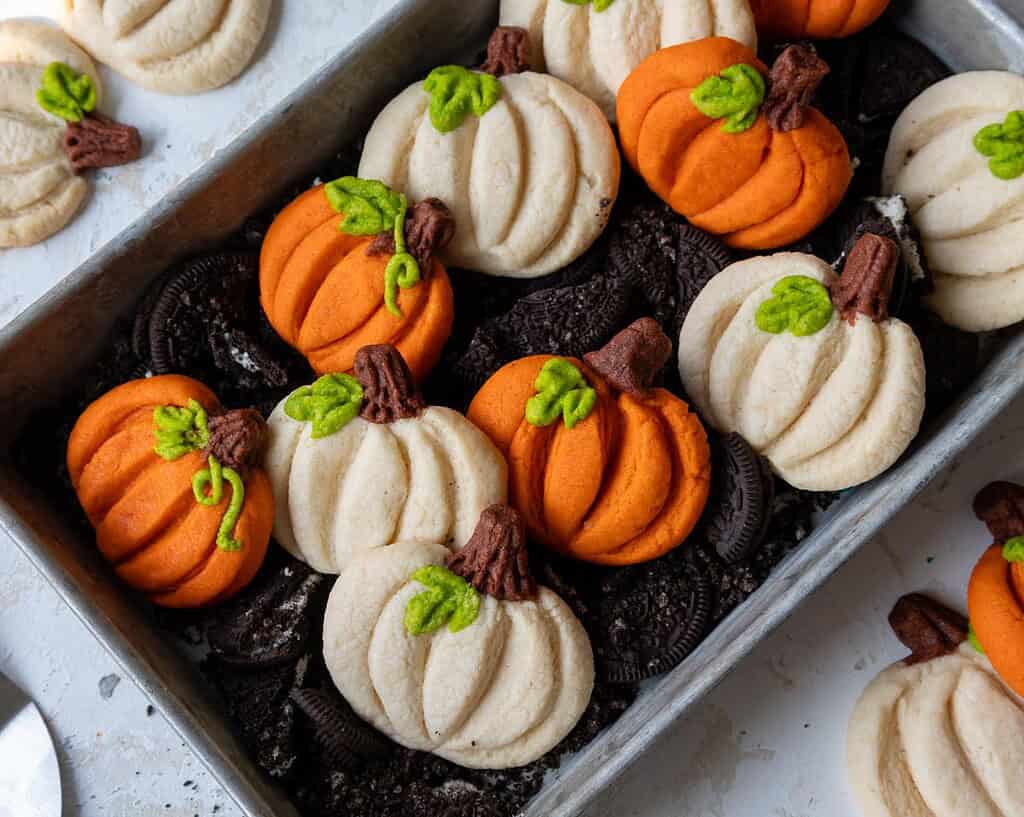
Pumpkin Shaped Cookies
These pumpkin-shaped cookies look just like little pumpkins and don’t require any fancy cookie cutters!! They bake up soft and chewy with the perfect hint of pumpkin spice.
How to Make These Pumpkin Cookies
Let’s walk through each step of this recipe to make sure it turns out as amazing as possible!
Step 1: Make the Cookie Dough
The first step is to make the cookie dough following the recipe card at the bottom of this post.
In a large bowl, beat the butter and cream cheese on medium speed with a hand mixer or whisk attachment until smooth.
Next, add the granulated sugar and mix at a medium-high speed for a couple of minutes until the mixture becomes lighter in color.
Then, mix in the egg yolk and vanilla bean paste or vanilla extract. Mix on a medium speed until incorporated.
Next, add the flour, cornstarch, pumpkin spice, fine salt, and baking powder, and mix on a low speed until it is JUST incorporated.
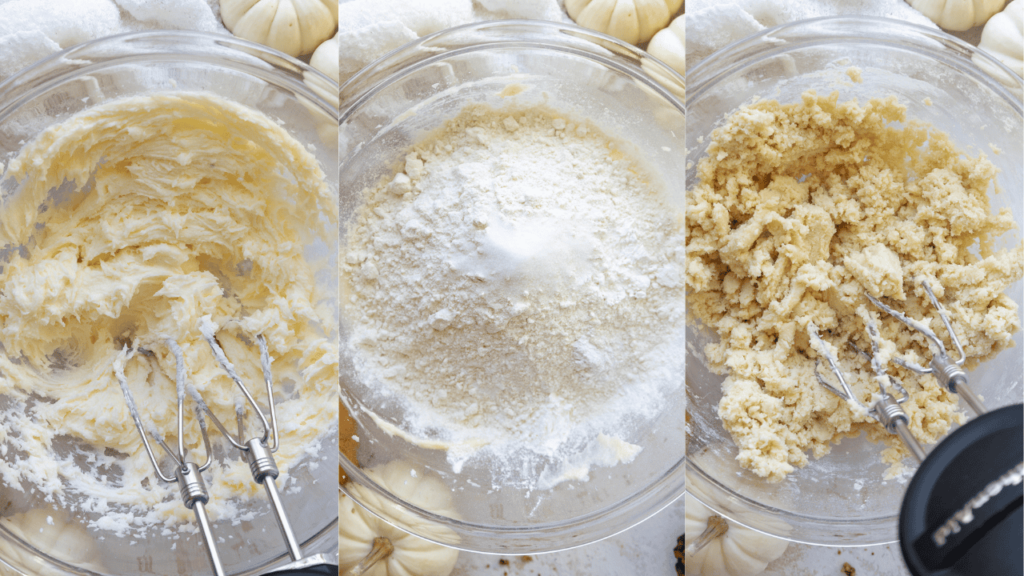
Scrape the sides and bottom of the bowl with a rubber spatula to make sure everything is properly mixed together.
Step 2: Color and Chill the Dough
At this point, the dough should still be pretty sticky. Scoop about 3 Tbsp of the dough into a separate bowl and use green gel food coloring to color it green.
Scoop 2 Tbsp of dough into another bowl and color it brown with brown gel food coloring. Color the remaining dough orange with gel food coloring.
You can also leave the remaining dough uncolored if you want to make white pumpkins. I ended up coloring half of the dough orange and leaving the other half uncolored.
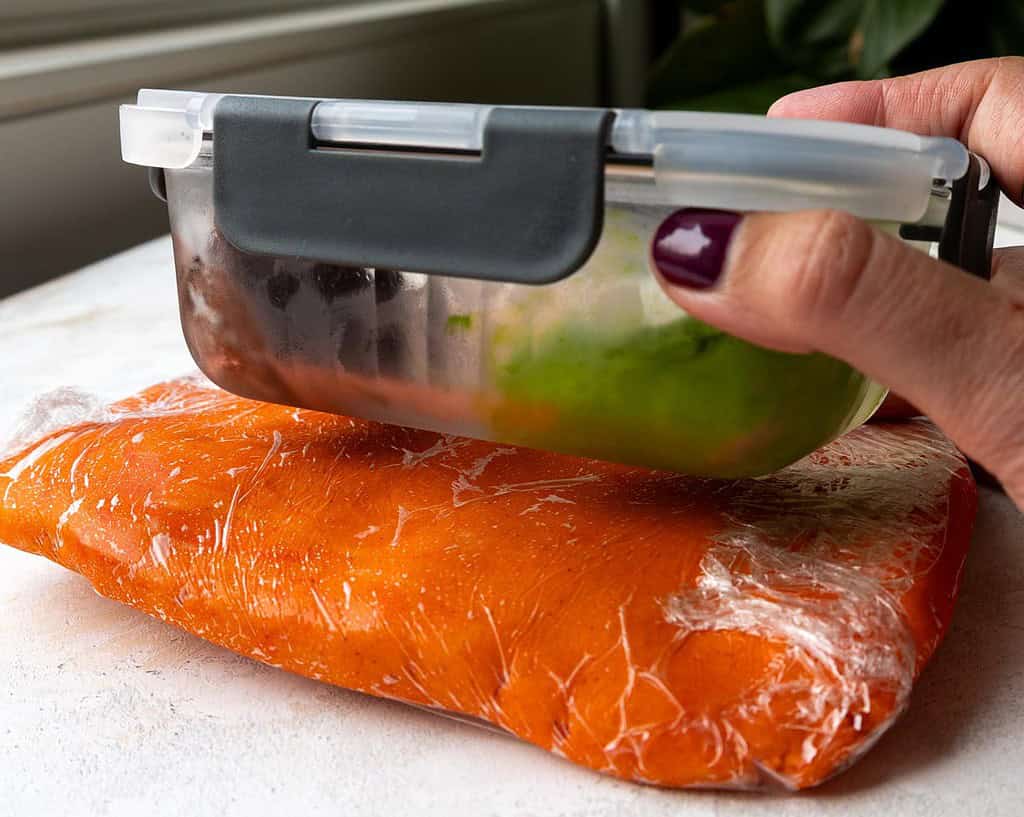
Wrap each color of dough in a piece of plastic wrap or store it in an airtight container. I like to flatten the dough out into a rectangle that’s about 1/3 inch thick to make it easier to scoop from later.
Chill the dough in the fridge for about 30 minutes, in the freezer for 10 minutes, or in the fridge overnight.
Step 3: Scoop and Shape the Cookie Dough
Preheat the oven to 350°F/175°C for about 30 minutes before you plan to start shaping the cookies, and line two large baking sheets with silicone baking mats or parchment paper. Set aside.
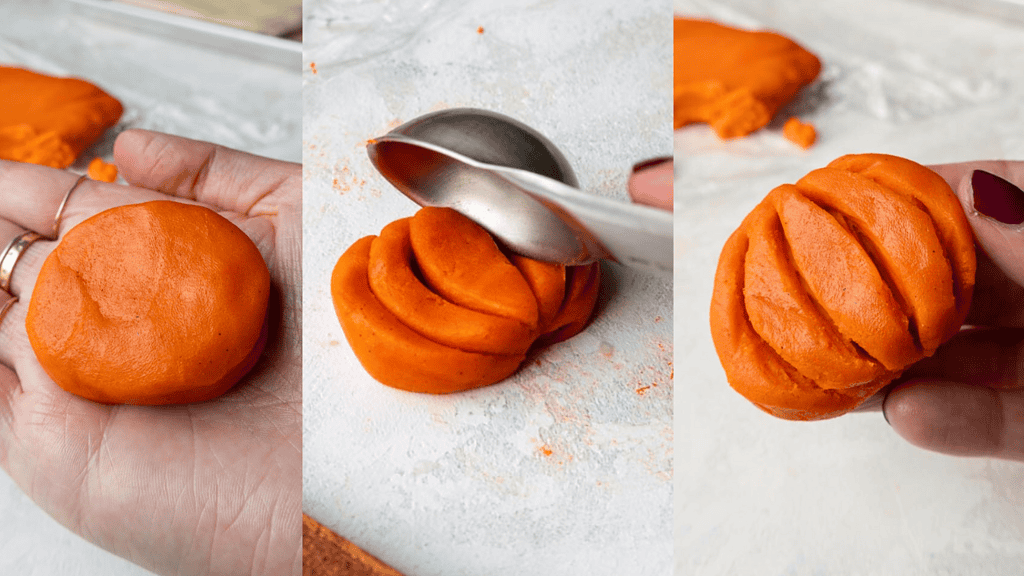
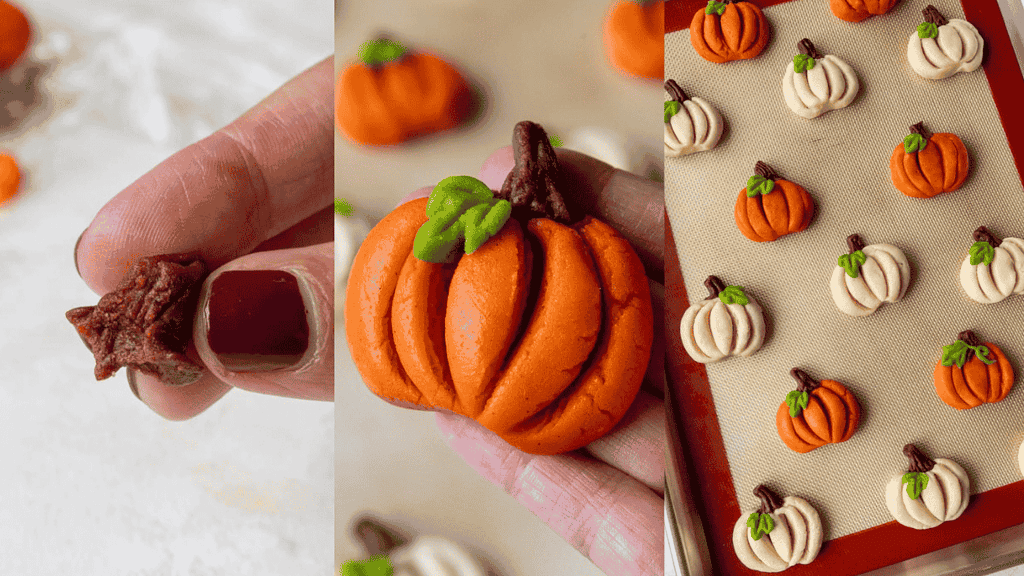
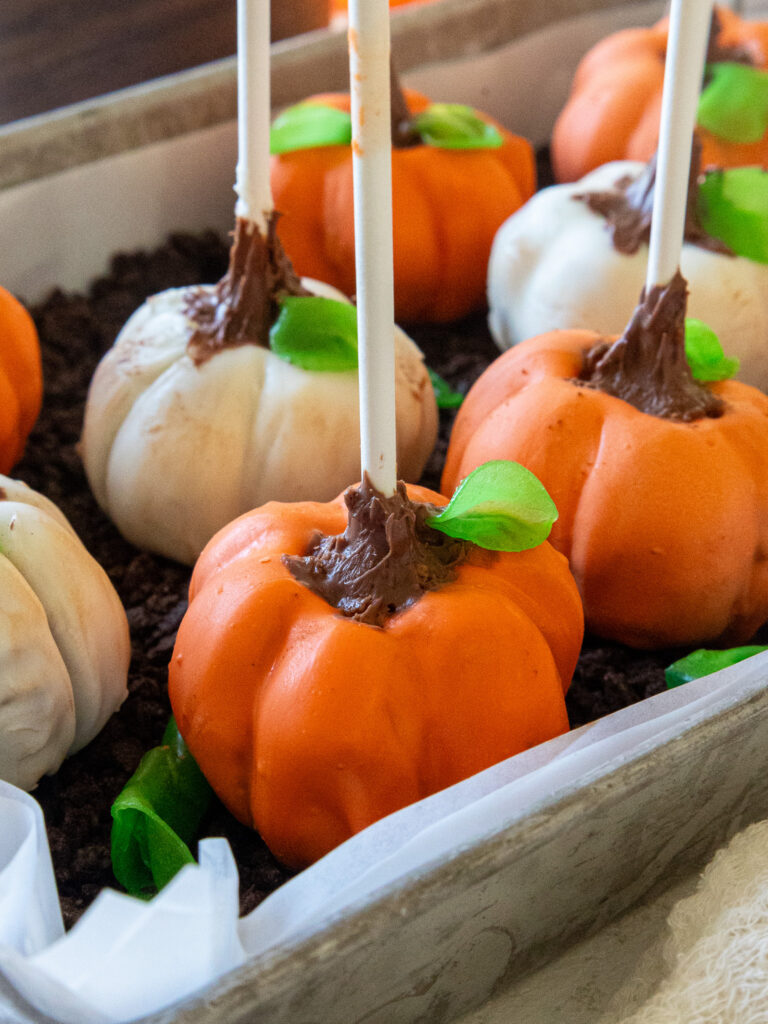
Unwrap each portion of cookie dough so that it’s sitting on top of the plastic wrap. Use a 1 Tbsp measure to scoop the orange dough, then use your hands to shape the dough into a flattened oval.
Add some lines with a small spoon, a metal scribe, or a toothpick to create the pumpkin’s panels.
Then use a 1/4 tsp measure to scoop the brown dough and make it look like a pumpkin stem.
Use a 1/4 tsp measure to scoop the green dough, and shape it into a leaf. Carefully press both onto the pumpkin cookie until they stick together.
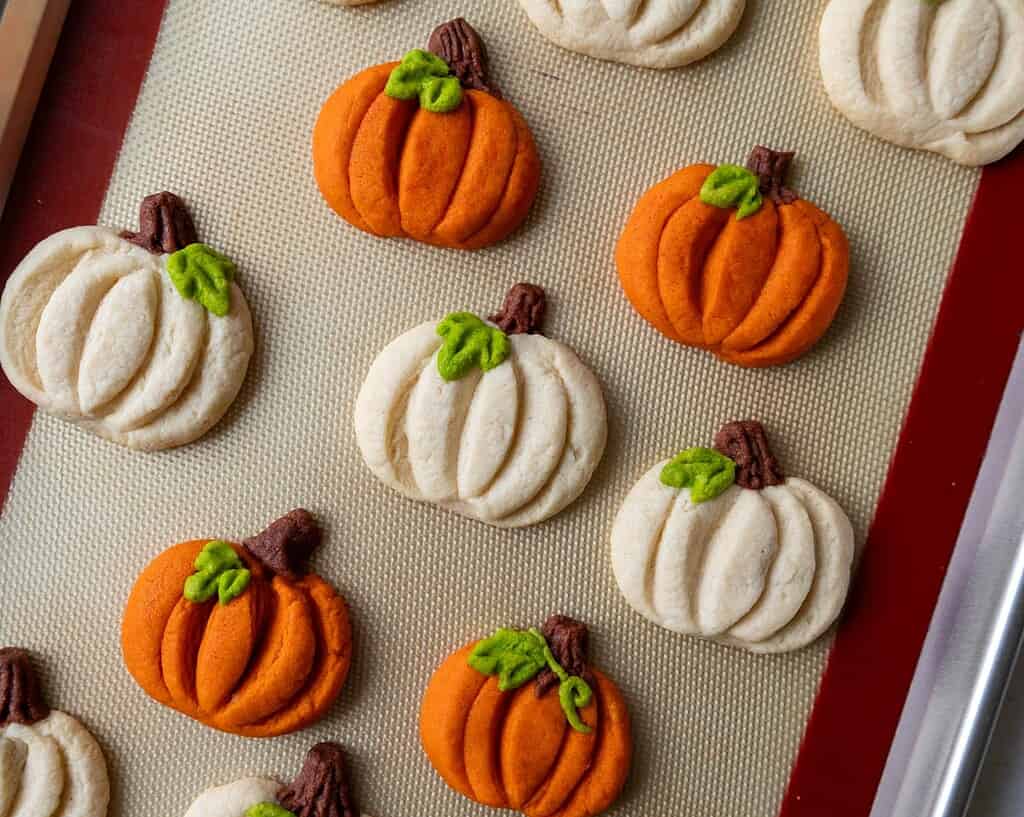
Place the cookies about 2 inches apart on the prepared baking sheets and repeat with the remaining dough.
Chill the cookies (pan and all) one more time in the fridge for 15 minutes or the freezer for 5 minutes to help them keep their shape as they bake.
Step 4: Bake the Pumpkin-Shaped Cookies
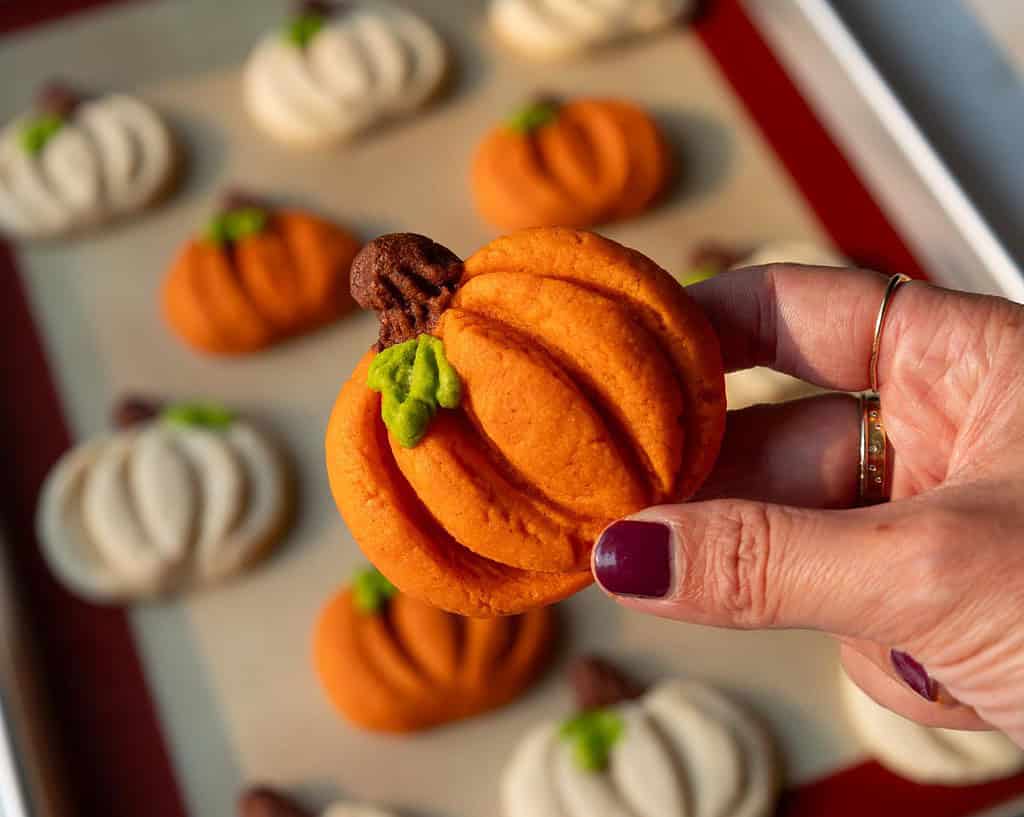
Bake one sheet of cookies at a time, for 12-14 minutes on the middle rack of your oven.
Keep a close eye on the cookies and be sure to pull them out before the edges start to brown.
I like to gently poke one of the cookies to test for doneness. The outside should be slightly firm, like it has a soft crust. It’s ok if it’s still a little bit soft, but it should not be soft like dough, and you shouldn’t leave a big fingerprint.
When in doubt, err on the side of undercooking! The cookies will continue to firm up on the pan as they cool.
Let the baked cookies cool fully on the pan, then enjoy!
Substitutions and Swaps: Pumpkin-Shaped Cookies
Now that we’ve covered how to make these cookies, let’s talk about the ingredients!
This recipe uses quite a few ingredients, and I know you might not have them all on hand.
Or if you have food allergies or restrictions, I’ve got you covered. Below are some swaps and substitutions that you can make.
- Unsalted Butter – If you only have salted butter on hand, you can use it in place of the unsalted butter. Just be sure to omit the salt that this frosting recipe calls for. You can also use vegan butter in its place (and omit the salt)!
- Cream Cheese – Full-fat cream cheese that comes in a block works best.
- Granulated Sugar – I do not recommend reducing the amount of sugar or changing the type of sugar, as it will change the texture of the cookies.
- Egg Yolk– If you have an egg allergy, try using half of a flaxseed egg or a vegan egg replacer like this one made by Bob’s Red Mill.
- All-purpose flour – This recipe turns out best with AP flour, but you can use a gluten-free flour blend if needed.
- Cornstarch – Cornstarch helps give these cookies a soft texture! If you don’t have any one hand, it can be omitted, but your cookies won’t bake up as soft.
- Pumpkin Spice – This is essentially what gives these cookies all their flavor! I love the way it makes them taste, but you can also use ground cinnamon in its place.
Making These Pumpkin-Shaped Cookies in Advance and Storage Tips
You can store these cookies in an airtight container for up to 5 days at room temperature or for up to a month in the freezer.
This cookie dough can also be frozen for up to 1 month if wrapped tightly in plastic wrap and stored in an airtight container. I like to move the cookie dough to the fridge the night before I plan to shape and bake it.
How Many Cookies Does This Recipe Make?
This recipe can be used to make about 36 pumpkin cookies, using a 1 Tbsp measure for the pumpkin.
This recipe can be doubled to increase the yield if needed. You can use 1 whole egg in place of the egg yolk if you double the recipe.
Tips for Making the Best Pumpkin-Shaped Cookies
- Really cream together the butter, cream cheese, and granulated sugar. It helps incorporate air into the dough, which makes tender, soft cookies.
- Use gel food coloring to color the cookie dough! Liquid can throw off the consistency of the dough and won’t create quite as bright a color.
- Take the time to chill the cookie dough. It helps prevent the cookies from spreading while they bake and helps them bake up with a soft texture.
- Don’t overbake the cookies. Err on the side of underbaking your cookies, and remember that the cookies continue to bake for a few minutes once they’re out of the oven.
Let Me Know What You Think!
If you try this recipe for pumpkin-shaped cookies, I’d love to hear what you think! Please leave a rating and let me know your thoughts by sharing a comment.

Pumpkin Shaped Cookies
Equipment
- Tablespoon Measuring Spoon
Ingredients
Pumpkin-Shaped Cookies
- 1/2 cup (1 stick) unsalted butter, room temperature 113g
- 1/4 cup (2 oz) full-fat cream cheese, room temperature 56g
- 1 cup granulated sugar 200g
- 1 large egg yolk 20g
- 1 tsp vanilla extract or vanilla bean paste 5g
- 2 cups all-purpose flour 260g
- 2 tsp cornstarch 5g
- 1 tsp pumpkin spice
- 1/2 tsp fine salt
- 1/4 tsp baking powder
- orange, brown, and neon green gel food coloring
Instructions
Pumpkin-Shaped Cookies
- In a large bowl or the bowl of a stand mixer, beat 1/2 cup (1 stick) unsalted butter and 1/4 cup cream cheese on medium speed with a hand mixer until smooth.
- Next, add 1 cup granulated sugar and mix on a medium-high speed for a couple of minutes, until the mixture becomes lighter in color.
- Add in 1 egg yolk and 1 tsp vanilla bean paste or vanilla extract. Mix on a medium speed until incorporated. Scrape the sides and bottom of the bowl with a rubber spatula as needed.
- Then, add 2 cups flour, 2 tsp cornstarch, 1 tsp pumpkin spice, 1/2 tsp fine salt, and 1/4 tsp baking powder to the butter mixture and mix at a low speed until it is JUST incorporated. Scrape the sides and bottom of the bowl with a rubber spatula to make sure everything is properly mixed together.
- At this point, the dough should still be pretty sticky. Scoop about 3 Tbsp of the dough into a separate bowl and use green gel food coloring to color it green. Scoop 3 Tbsp of dough into another bowl and color it brown with brown gel food coloring. Color the remaining dough orange with gel food coloring. You can also leave the remaining dough uncolored if you want to make white pumpkins. I ended up coloring half of the dough orange and leaving the other half uncolored.
- Wrap each color of dough in a piece of plastic wrap. I like to flatten the dough out into a rectangle that's about 1/3 inch thick to make it easier to scoop from later. Chill the dough in the fridge for about 30 minutes, in the freezer for 10 minutes, or in the fridge overnight.
- Preheat the oven to 350°F/175°C for about 30 minutes before you plan to start shaping the cookies, and line two large baking sheets with silicone baking mats or parchment paper. Set aside.
- Unwrap each portion of cookie dough so that it's sitting on top of the plastic wrap. Use a 1 Tbsp measure to scoop the orange dough, then use your hands to shape the dough into a flattened oval (see pics above). Add some lines with a small spoon, a metal scribe, or a toothpick to create the pumpkin's panels.
- Then use a 1/4 tsp measure to scoop the brown dough and make the pumpkin stem. Use a 1/4 tsp measure to scoop the green dough, and shape it into a leaf. Use a scribe or toothpick to add texture to the pumpkin stem and to make lines on the leaves that look like veins. Carefully press both onto the pumpkin cookie until they stick together. Place the cookies about 2 inches apart on the prepared baking sheets and repeat with the remaining dough.
- Chill the cookies (pan and all) one more time in the fridge for 15 minutes or the freezer for 5 minutes to help them keep their shape as they bake.
- Bake one sheet of cookies at a time for 12-14 minutes on the middle rack of your oven. Rotate the pan halfway through to help them bake more evenly. Keep a close eye on the cookies and be sure to pull them out before the edges start to brown. I like to poke one of the cookies to test for doneness. The outside should be slightly firm, like it has a soft crust. It's ok if it's still a little bit soft, but it should not be soft like dough, and you shouldn't leave a big fingerprint. When in doubt, err on the side of undercooking! The cookies will continue to firm up on the pan as they cool. Let the baked cookies cool fully on the pan, then enjoy!
Video
Notes
How Many Cookies Does This Recipe Make?
This recipe can be used to make about 36 pumpkin cookies, using a 1 Tbsp measure for the pumpkin. This recipe can be doubled to increase the yield if needed. You can use 1 whole egg in place of the egg yolk if you double the recipe.Making These Pumpkin-Shaped Cookies in Advance and Storage Tips
You can store these cookies in an airtight container for up to 5 days at room temperature or for up to a month in the freezer. This cookie dough can also be frozen for up to 1 month if wrapped tightly in plastic wrap and stored in an airtight container. I like to move the cookie dough to the fridge the night before I plan to shape and bake the cookies.Tips for Making the Best Pumpkin Cookies
- Really cream together the butter, cream cheese, and granulated sugar. It helps incorporate air into the dough, which makes tender, soft cookies.
- Use gel food coloring to color the cookie dough! Liquid can throw off the consistency of the dough and won’t create quite as bright a color.
- Take the time to chill the cookie dough. It helps prevent the cookies from spreading while they bake and helps them bake up with a soft texture.
- Don’t overbake the cookies. Err on the side of underbaking your cookies, and remember that the cookies continue to bake for a few minutes once they’re out of the oven.
Nutrition
Other Recipes You Might Like:
So good! Really yummy, with the vanilla and cream cheese and spices. It’s fun to make the pumpkins. I want to say I mostly was good at paying attention to the specific directions and tips, but I did have to rinse my hands after touching the brown and green, because I made each pumpkin entirely, instead of shaping all the punkins first, like the instructions indicated, and then the stems, then the leaves. Def making again! ?
Hi Wendy,
So happy to hear that!! Handling the different colored dough can def make your hands messy, but I’m glad they turned out so well 🙂 Thank you for sharing!!
So easy, cute, and delicious!! Love these.
YAY!!! So happy to hear you loved this recipe Corrin 🙂
So cute can’t wait to try them! is there a way to make these cookies without cream cheese? not a fan of cream cheese.. hoping there’s a way to sub for it or omit it!
Hi Natalie,
Great question! You can use additional butter in place of the cream cheese, but it will cause the cookies to spread a bit more and slightly change the flavor of the cookies. But also, I swear they don’t actually taste like cream cheese! The cream cheese just kind of helps balance the sweetness of the cookies. But if you don’t want to use it, I totally get it. Hope that helps, happy baking!
These came together quickly and turned out adorable! Will make again this season and next!
This comment put the biggest smile on my face 🙂 I am so happy to hear that Mac!!!! Thank you for sharing 🙂
Where do I get a cookie cutter for the leaves/stem? Would you have a link by chance?
Hi Sarah,
I shaped both the leaves and stems by hand!! I just used my fingers to make the little leaves and then a metal scribe to make the veins in the leaves. Hope that helps, happy baking!
Hi,
I was so excited for this recipe, I followed it exactly but had massive spread on the pumpkins, I tried chilling the 2nd batch for even longer (I had chilled the first batch for 30 minutes as I spreading issues with the ghost cookies as well) and still had completely flattened cookies. Any thoughts onto why? I didn’t substitute any ingredients
Hi Hannah,
So sorry to hear that!! That is such a bummer. If you followed the recipe to a T, I’d guess it’s the type of sheet pan you used or your oven being slightly off temp! Also, parchment paper makes cookies spread a bit more than silicone mats if you used that.
What type of sheet pan did you use? Sometimes dark or colored pans can get hot faster and cause more spreading. I recommend using light colored aluminum pans!
An inaccurate oven temperature can also cause this though!
If your oven runs too cool, the butter in your dough melts before the structure (flour, eggs, leavening) has a chance to set. That means the cookies pool outward before they can hold their shape, leaving you with thin, flat, crispy cookies instead of soft, chewy ones.
If your oven runs too hot, the opposite can happen! The edges set too fast while the centers stay underbaked — but you can still get overspreading if the dough was too soft going in.
It’s always worth checking your oven with an inexpensive oven thermometer. Most home ovens are off by 15–25°F. Mine is off by 25F. If you find yours runs cool, try increasing the temperature slightly or preheating longer before baking.
Hopefully one of those fixes it, but if not let me know and we can keep troubleshooting!