
Pumpkin Cake
This past month I challenged myself to make a pumpkin cake. First I had to settle on a pumpkin cake recipe I really loved. While the decoration of a cake is always fun, taste is always my first priority!
This pumpkin cake recipe makes moist, fluffy pumpkin cake layers, which I’ve frosted with my vanilla buttercream recipe. I couldn’t resist the cake tops when I was leveling these cake layers, which is always a sign that I have a winner 🙂
Once I was happy with the flavor of the cake, it was time to figure out how to decorate it. I love matching the outside of cakes to the flavor hidden inside, and that’s exactly what I did with this cake.
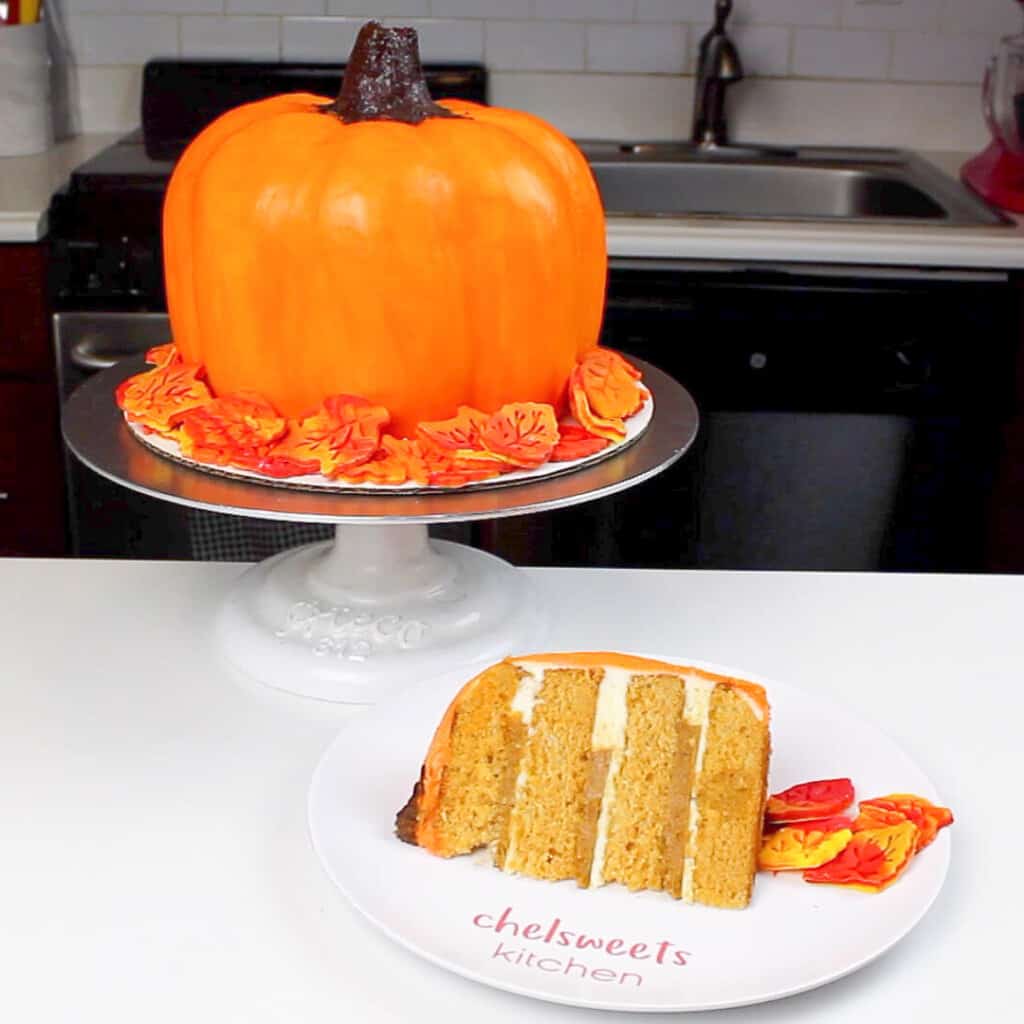
Not only is it pumpkin flavored, it’s shaped just like a pumpkin too.
Sculpting This Pumpkin Layer Cake
We’ve all seen the pumpkin cakes that are easily made with bundt pans. You simply bake two bundt cakes, level the bottoms, and stack one on top of one another.
Believe it or not, I don’t own a bundt pan. I also wanted to try something new, and challenge myself a bit. I might also be a little bit crazy!!
Instead of taking the easy route, I decided to carve and frost a layer cake to create that iconic pumpkin shape.
This method is way more time-consuming and difficult, but that also means it’s super rewarding once you finish the cake! Or at least that’s how I look at it.
I trimmed the top and bottom cake layers with a serrated knife to start creating a round shape. I like to chill my cake layers in the freezer for about 20 minutes, so that they’re cold to the touch but not fully frozen.

This is done before assembling my cakes, to make them easier to stack and frost. It minimizes crumbing, and makes them easier to carve.
Crumb Coat and Shape
Once I was happy with the shape of the cake, I added a thin crumb coat around the cake. This traps any loose crumbs, and makes it easier to add the second layer of frosting.
Because this cake has some curved sides, I smoothed the frosting using an acetate sheet (as seen below). This is a flexible, thin piece of plastic that works wonders when it comes to sculpted cakes.

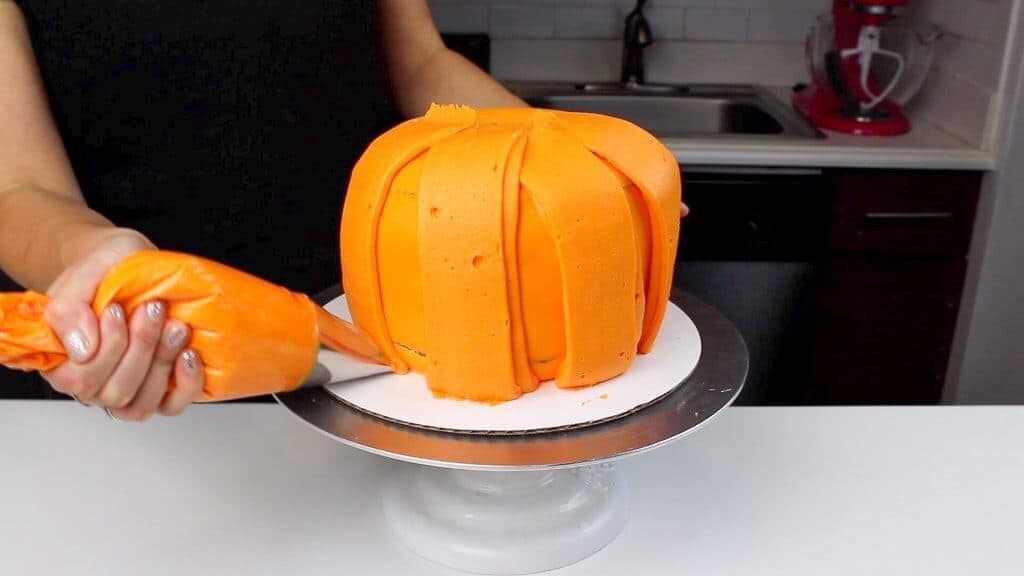
In this case, the second layer of frosting was going to be INTENSE! You know those symmetrical little panels that line the sides of a pumpkin? We’re going to make them completely out of frosting!
This means you’re going to need a LOT of frosting. You will use 1.5 batches of frosting, to be more precise! I made my orange buttercream a few days in advance to allow the shade to deepen.
It’s colored with Americolor orange gel food coloring, which is my favorite food coloring brand.
To create the shape of the panels, I used a wide, flat frosting tip. This is a Wilton 789, which I used to pipe two thick lines up the sides of the cake.
Heating Things Up
I started to smooth these out with a small offset spatula and my acetate sheet, then tried out a new technique.
I did my best job smoothing the frosting with those tools, then chilled the cake to let the buttercream firm up a bit.
It’s a bit wild, but this next technique sure is fun! I used a small kitchen torch to heat up the back of a small offset spatula.
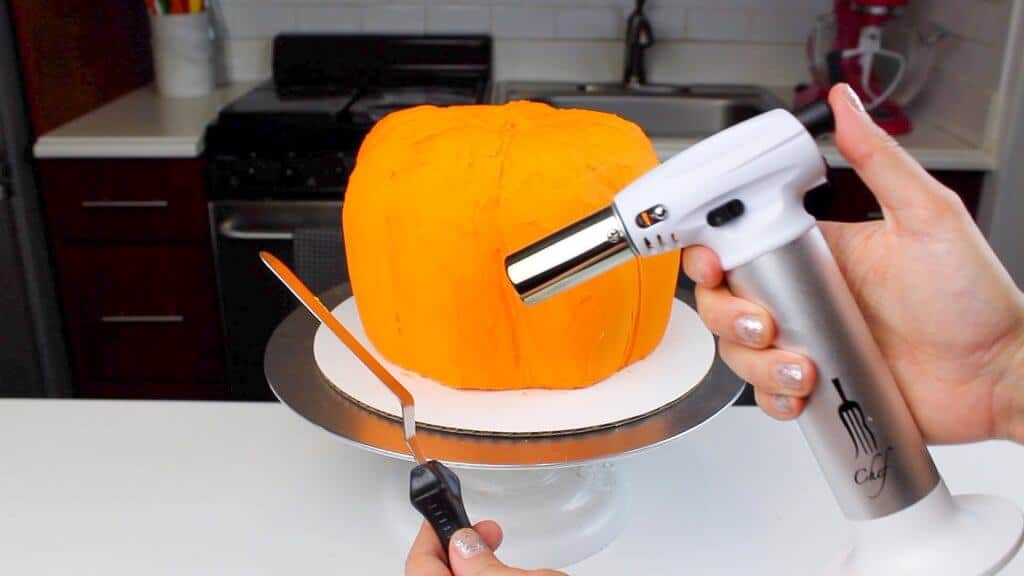
This allows you to use heat to smooth out any lines, and it also actually deepens the color of the frosting.
Because the heat changes the color of the frosting, it’s important to go over the entire cake with the heated spatula if you decide to try this technique.
Throughout this process, the spatula will get covered in melted buttercream. I wiped off the spatula and reheated it several times while I smoothed the frosting.
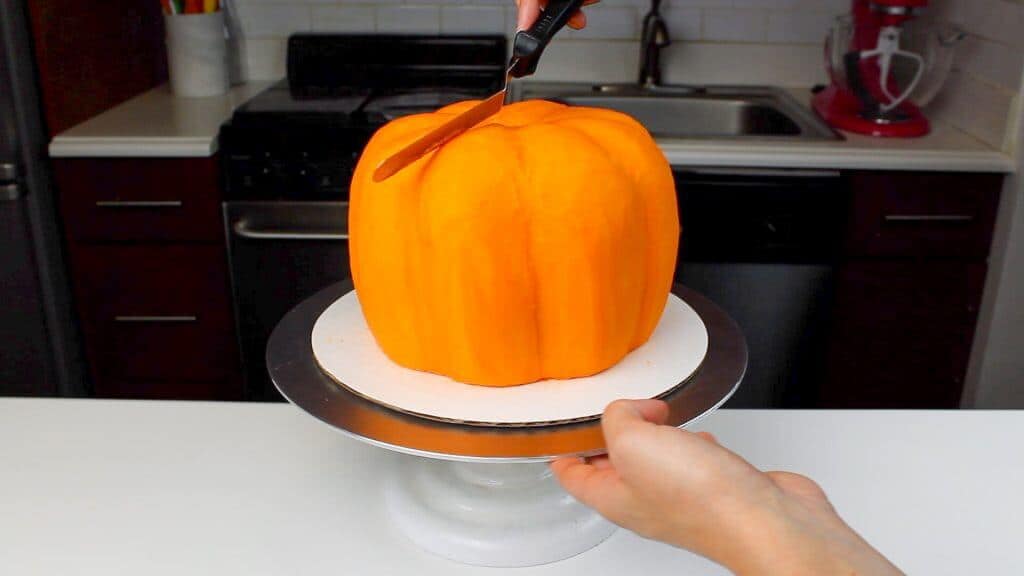
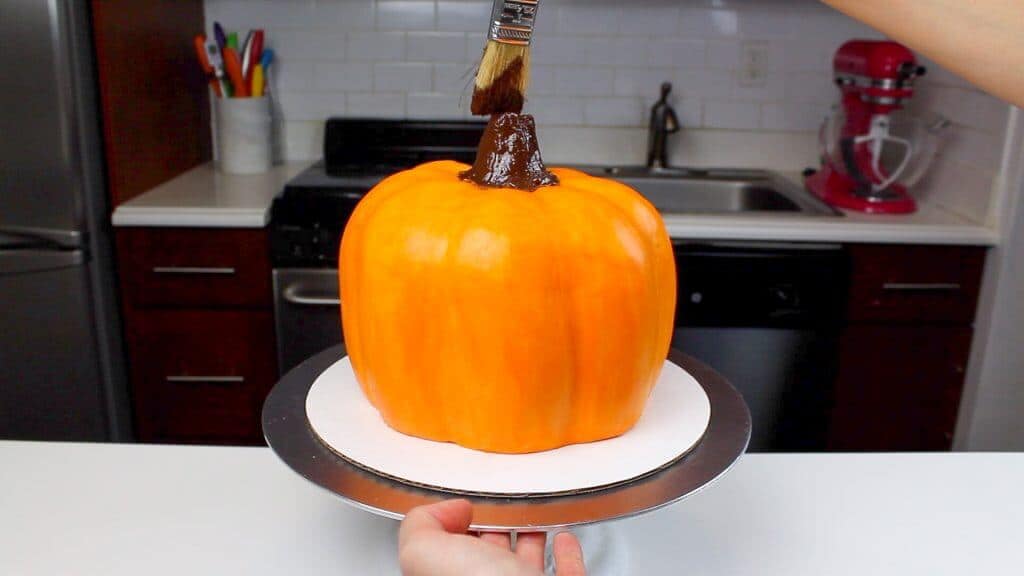
The Stump
Once the frosting was FINALLY smoothed, it was time to add the stump. I saved the cake tops, and mixed them with some frosting and melted chocolate.
I formed a little cylinder and placed it on top of the pumpkin.
To add some texture and to help keep the stump in place, I brushed the stump with some melted chocolate. It helped set its shape, and looked so cool!
The Finishing Touch
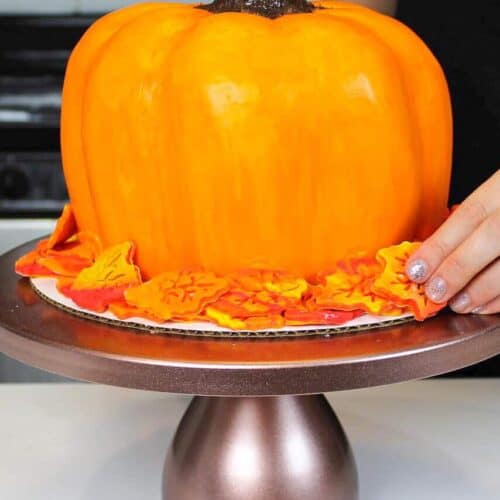
When I took a step back at this point, the cake board seemed a little bare. It needed something else.
I ended up marbling together some yellow, orange, and red fondant, and cut out little leaves using some leaf punch cutters.
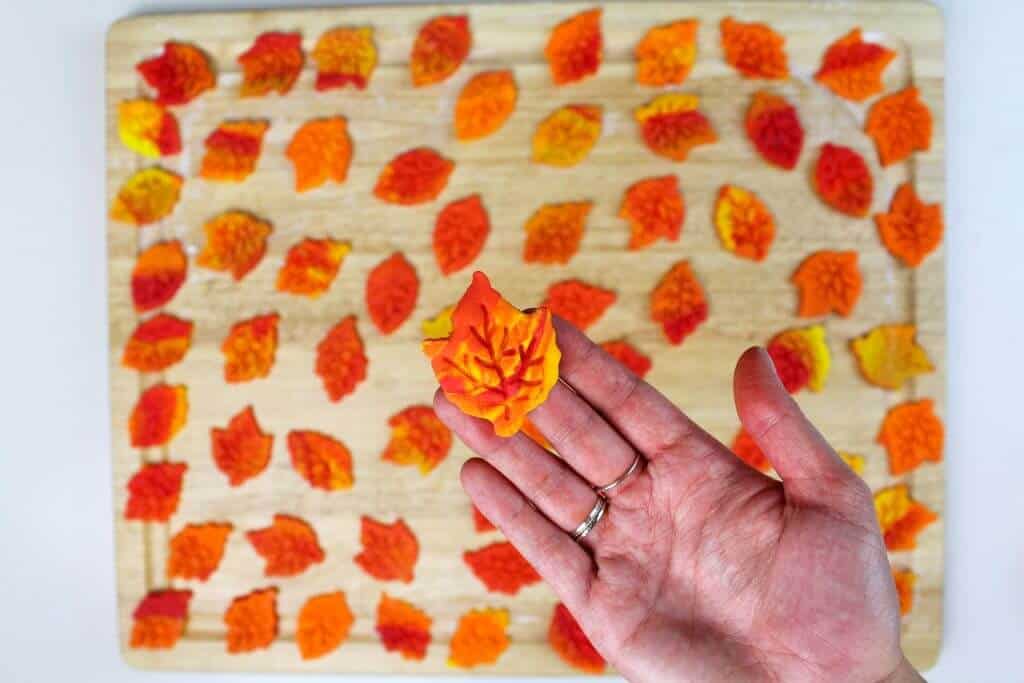
I surrounded the base of the cake with these leaves, and then I was finally content with how the cake looked.
Let Me Know What You Think!
If you make this pumpkin cake recipe, I’d love to hear how it goes! Please leave a rating, and let me know your thoughts by sharing a comment.
Or if you share your creations on social media, be sure to tag me @chelsweets!
Pumpkin Cake
Ingredients
Pumpkin Cake Layers
- 3 cups all-purpose flour 375g
- 3 cups granulated sugar 600g
- 2 1/2 tsp baking powder 10g
- 1 tsp fine salt 6g
- 2 tsp ground cinnamon 6g
- 1 tsp ground ginger 3g
- 1/2 tsp ground nutmeg 2g
- 1 cup unsalted butter, room temperature 226g
- 1/2 cup carton egg whites or 4 large egg whites, room temperature 120g
- 2/3 cup pumpkin puree 112g
- 1 1/2 cups full-fat sour cream, room temperature 360g
- 2 Tbsp vegetable or canola oil 28g
- 2 tsp vanilla extract or vanilla bean paste 8g
Vanilla Buttercream Frosting
- 3 cups unsalted butter, room temperature 678 grams
- 11 cups powdered sugar 1375 grams – or about 3 lbs
- 1 tsp fine salt 6 grams
- 1/2 cup heavy whipping cream, room temperature or whipping cream (115 grams)
- 1 Tbsp vanilla extract or vanilla bean paste 12 grams
- orange gel food coloring
Additional Decorations
- 1/2 cup dark chocolate chips, melted and cooled
- Kitchen paint brush
- Large piping bag
- Ateco 789 frosting tip
- Red, orange, and yellow fondant
- Leaf cookie cutters
Instructions
Pumpkin Cake Layers:
- Preheat the oven to 350°F/175°C. Line four 7-inch or three 8-inch round pans with parchment rounds and grease with non-stick cooking spray. You can also use this recipe to make 3, 8-inch cake layers. If you don't have that many cake pans, the batter can sit at room temperature for a few hours. Bake as many layers at a time as you can at a time.
- Mix 3 cups all purpose flour, 3 cups sugar, 2 1/2 tsp baking powder, 1 tsp salt, 2 tsp cinnamon, 1 tsp ginger, and 1/2 tsp nutmeg together in a stand mixer with a paddle attachment or hand mixer until fully combined.
- Mix 1 cup of room temperature, unsalted butter slowly into the dry ingredients on a low speed. Continue to mix until no large chunks of butter remain and the mixture looks like moist sand.
- Pour in 1/2 cup of egg whites and 1/2 cup of pumpkin puree. Mix on low until just incorporated. Then mix in 1 1/2 cups of sour cream on a low speed.
- Add in 2 Tbsp of vegetable oil and 2 tsp of vanilla extract. Mix at a low speed until fully incorporated. If you want to color these cake layers, add in the gel food coloring during this step.
- Scrape down the sides of the bowl with a rubber spatula, then beat on a medium speed for about a minute to make sure everything is properly mixed together. This also helps lighten the texture of the cake layers a bit.
- Divide batter evenly between the prepared cake pans. Bake for 33-36 minutes or until a toothpick comes out with a few moist crumbs. Let the pans cool for 10 minutes, then run an offset spatula around the perimeter of the pan to separate the cake from the pan.
- Place the cake pans into the freezer for 45 minutes to accelerate the cooling process. Once the layers are fully cooled, carefully flip the pans and remove the layers from the pans.
- Once the layers have cooled, level then using a serrated knife to trim the top of each cake layer. Save the cake tops in a bowl to make the pumpkin stump later.
Vanilla Buttercream Frosting:
- While the cake layers bake and cool, make the vanilla buttercream frosting.
- Beat the butter on a medium speed for 30 seconds with a paddle attachment, until smooth. Slowly add in the powdered sugar, 1 cup at a time. Alternate with small splashes of cream.
- Once fully mixed, add in the vanilla and salt, and beat on low until the ingredients are fully incorporated, and the desired consistency is reached.
- If the frosting is too thick, add in additional cream (1 TBSP at a time). If the frosting is too thin, add in more powdered sugar (quarter of a cup at a time).
To Assemble This Pumpkin Shaped Cake:
- Stack and frost the pumpkin cake layers on a greaseproof cake board, using a dab of frosting to help stick the first cake layer to the board.
- Add an even layer of buttercream between each cake layer.
- carve the top and bottom edge of the cake to begin to make a sphere shape.
- Apply a thin coat of frosting around the cake, to fully cover the cake layers. Smooth using a bench scraper, then chill the cake in the fridge (20 minutes) or freezer (5 minutes) until the frosting is firm to the touch.
- Color the remaining frosting orange with gel food coloring, and place in a frosting bag fit with a wide, flat frosting tip (Wilton 789).
- Pipe lines of buttercream vertically up the sides of the cake to make the panels of the pumpkin.
- Smooth using an offset spatula and an acetate sheet.
- In a separate bowl, crumble the cake tops using a fork. Mix with 1/2 cup of frosting, and some a 1 inch tall stump.
- Place this on top of the cake, then brush with melted dark chocolate.
- If desired, place fondant leaves around the base of the cake.
- Then cut in and enjoy!
Video
Notes
Recipe Variations
This recipe can also be used to make a sheet cake! One batch will make 2, 9 x 13-inch cake layers that are about 1-inch tall or 1, 9×13-inch cake layer that is about 2 inches tall. One batch of cake batter makes about 1800 grams. If you plan to use four circular cake pans, add 450 grams of batter into each pan.Tips for Making the Best Pumpkin Cake
- Ingredients at room temp mix together better! Set out any cold ingredients ahead of time.
- Properly measure your flour (spoon into the cup measure, then level). Or better yet, use a kitchen scale to measure your dry ingredients.
- Use a scale to weigh your cake pans as you fill them. It will make your cake layers bake to the same height and bake more evenly.
- Level your room temperature or thawed cake layers with a serrated knife to make them easier to stack.
- Chill your cake layers in the freezer for about 20 minutes before assembling the cake. It makes it so much easier to stack and frost them!
- While this recipe makes delicious cake layers, it doesn't make the best cupcakes! I don't recommend using this recipe to make cupcakes. I recommend using my pumpkin cupcake recipe instead (and omit the chocolate chips)!
Could you try making a 4 layer vanilla cake with stone henge on the top! It would be so cool!
Hi Amber! I’m in the midst of creating holiday content right now, but maybe after that I can your idea! 🙂
Hello! Thanks for the recipe.? If I cover this with fondant instead, can I keep it out for couple of days? Im thinking to make this ahead before the party.
This looks amazing! Can you share the recipe for the pumpkin pie filling?
This looks great! Approx how many people does this serve?
Hi Noora! It depends on the size of slices you cut, but because this cake uses so much buttercream, I think it feeds about 36 people!
I made this cake last year and pie filling was on the recipe. Not sure where it went.
Hi Rachel! I updated the post to focus on the shape of the cake! But the pumpkin pie filling can still be found in this post: https://chelsweets.com/2017/11/24/pumpkin-pie-cupcakes/
so sorry for any confusion!
This cake is amazing! You might have a post on it somewhere that I haven’t seen, but do you make all your own fondant or where to you purchase it?
Thanks Heidi!!
I don’t use fondant very often, so I usually just buy it! I find the Satin Ice brand tastes best, but wilton is easiest to work with. I order them in small quantities from amazon, like this: https://amzn.to/2RbAp7I
First Day of Fall Begins 2021
Back To School Cake – September
Halloween Pumpkin Cake – October
Thanksgiving Cake – November
How To Cake It YouTube Video
How would you edit the batter for a nine inch cake pans?? I don’t plan to do a pumpkin shape, just a regular cake?.
Tried using this recipe for cupcakes and definitely a more dense cupcake with a flat, caramelized top. Also baked up pretty small vs. a normal-sized cupcake. Your recipes are sooo delicious and reliable! Just wanted to let fans know this recipe is ideal for cake layers and not so much for cupcakes.
Hi Susie,
Thank you for sharing, I totally agree with you! My cake recipes are formulated to bake pretty flat to make leveling optional, but this makes them not ideal for cupcakes. I’ve just added a note to the recipe card to make this more clear <3