
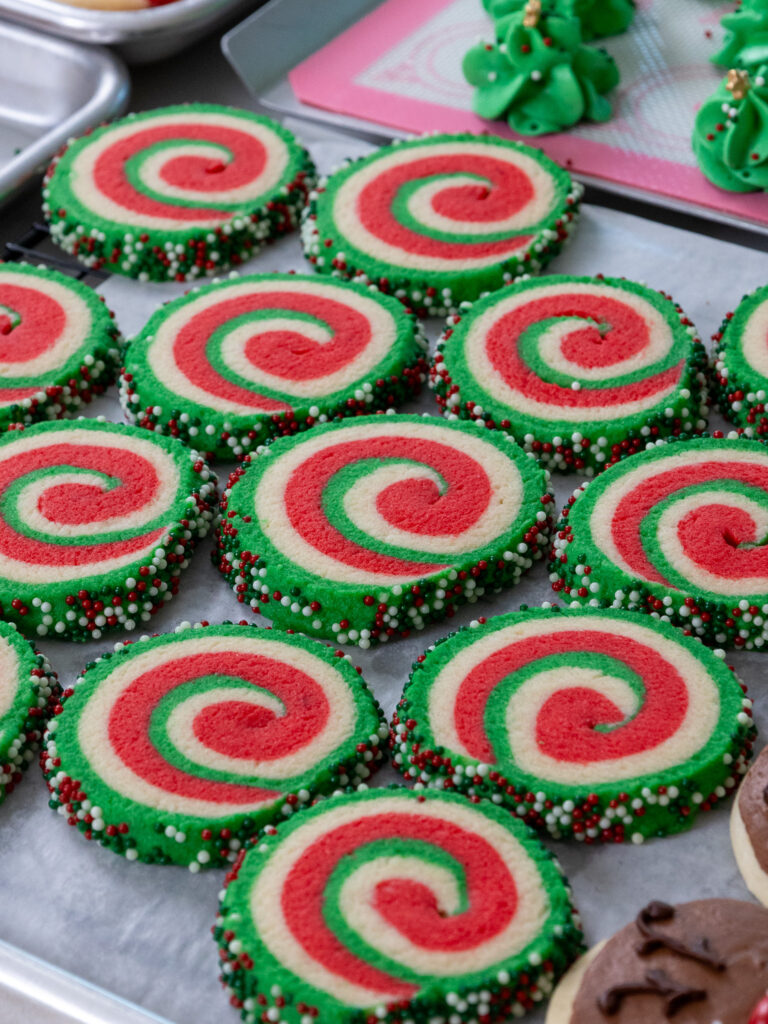
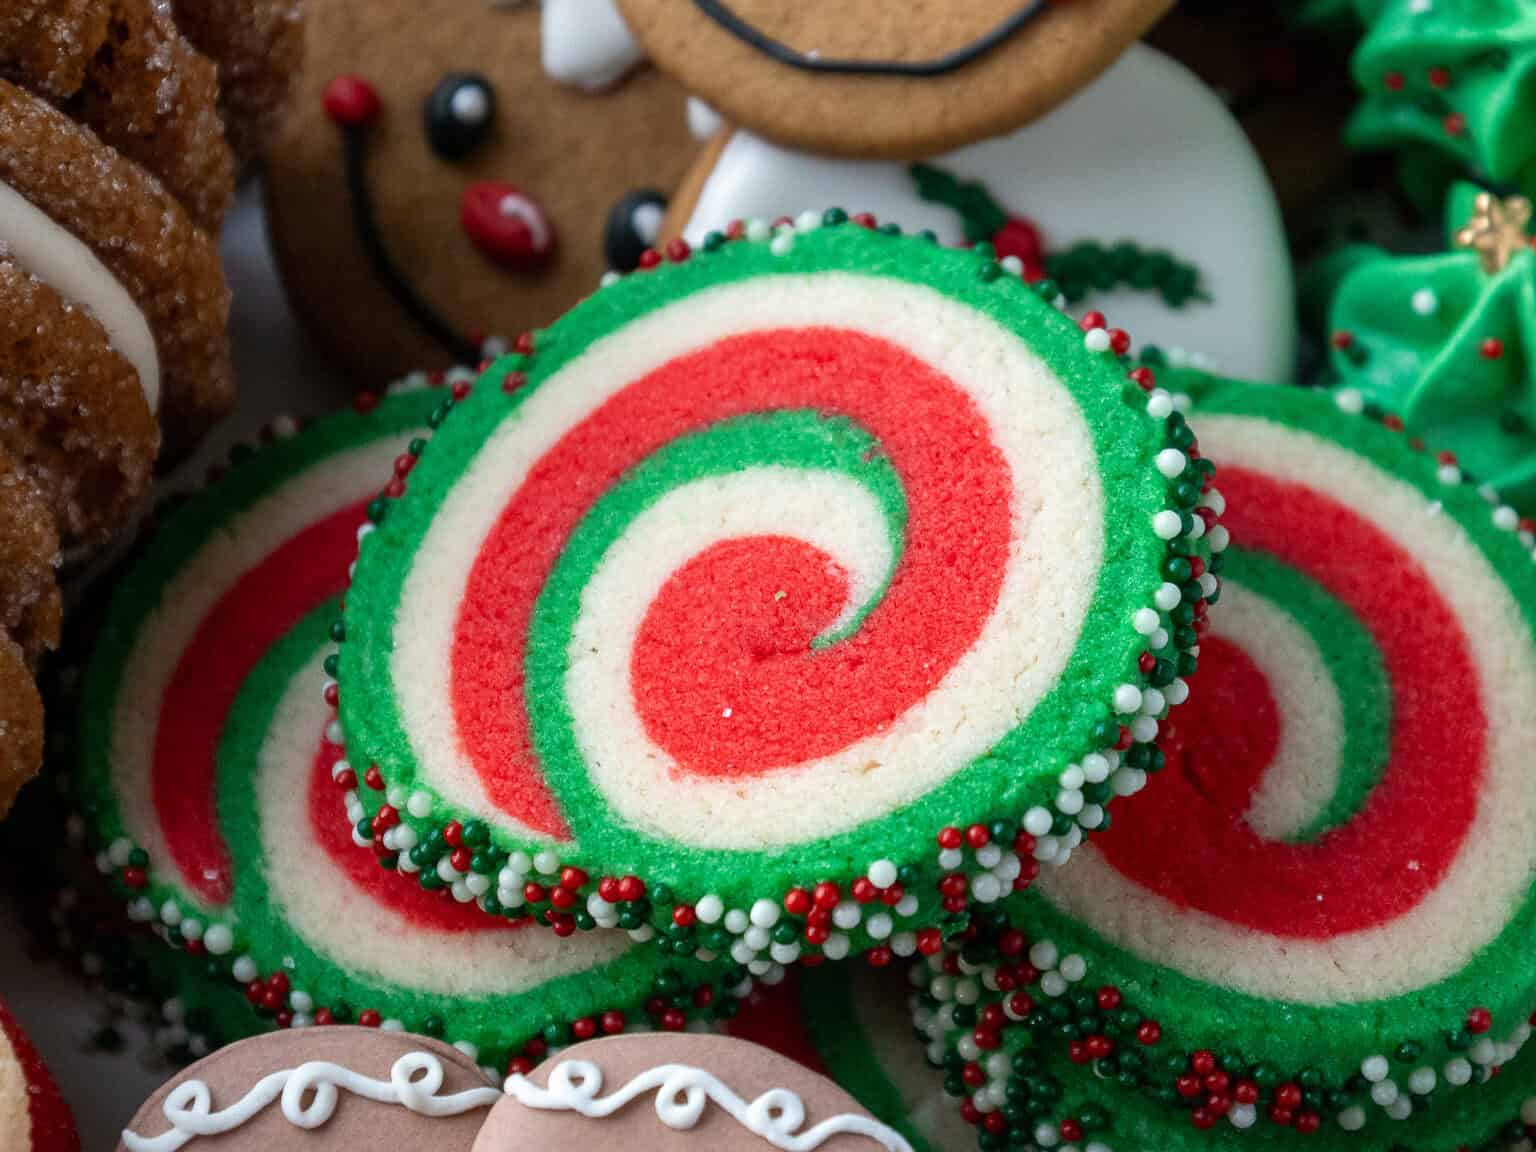
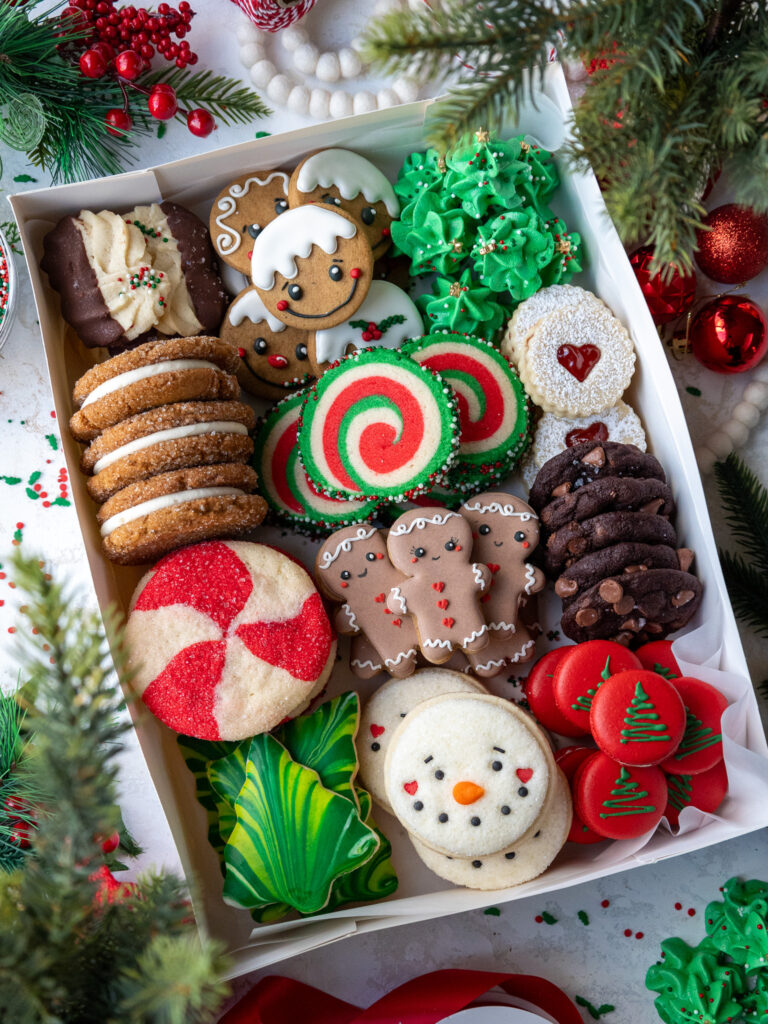
Swirled Christmas Cookies
These swirled Christmas cookies are a total show-stopper for the Holidays! They have crunchy sprinkle edges, soft centers, and that perfect red/white/green spiral.
They are a little temperature-sensitive (cold dough = clean swirl), but I’ll walk you through exactly how to roll, chill, slice, and bake them without cracking or smushing.

This Recipe At a Glance
- Flavor: buttery sugar cookie with vanilla + optional almond
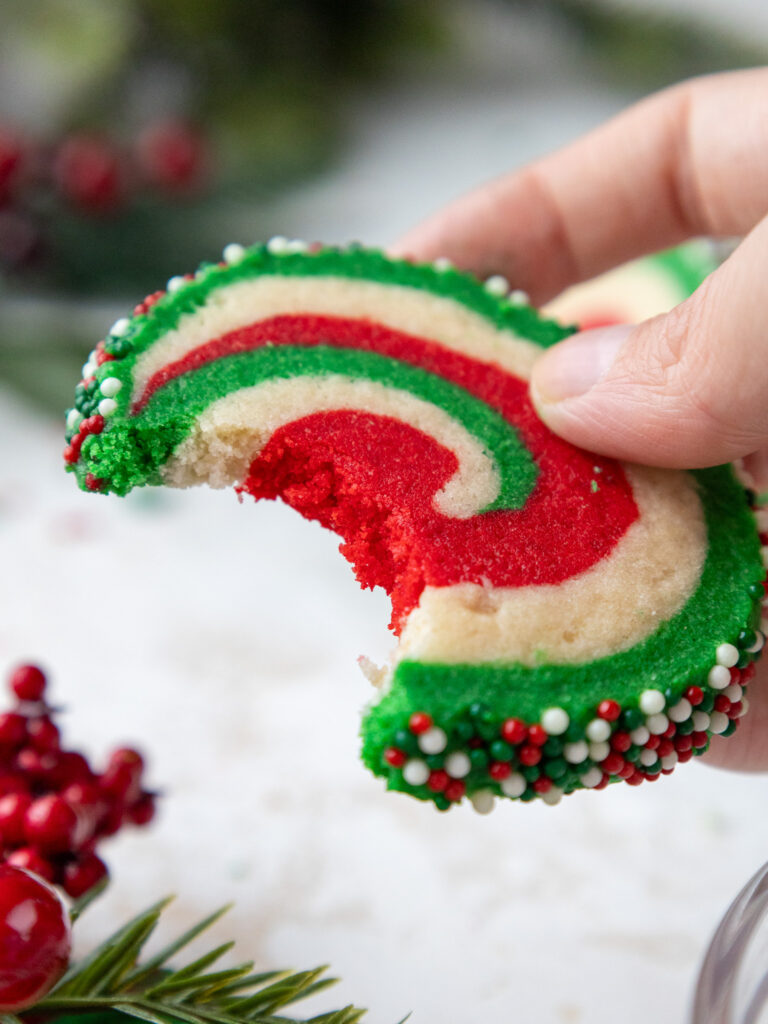
- Texture: soft centers + crunchy sprinkle edges
- Skill level: intermediate (more technique than difficulty)
- Time: ~20 min prep + chill + 12–14 min bake
- Yield: ~20 cookies at 1/3″ thick (more if sliced thinner)
- Key to success: keep dough cold + chill log before slicing
Let’s Make These Swirled Christmas Cookies Together!
To make sure these cookies turn out as amazing as possible, let’s walk through each step together.
Step 1: Make the Dough
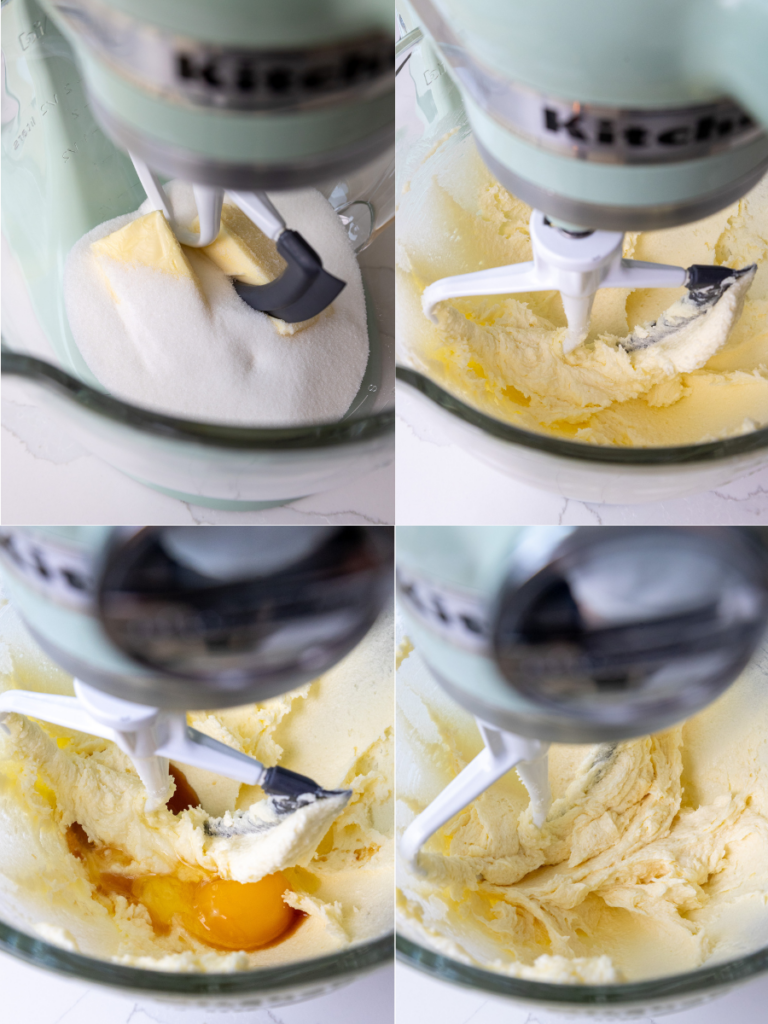
In a large bowl or the bowl of a stand mixer, beat the unsalted butter and granulated sugar and mix on a medium-high speed for a couple of minutes, until the mixture becomes lighter in color.
Add the egg, almond extract, and vanilla bean paste or vanilla extract. Mix on a medium speed until incorporated. Scrape the sides and bottom of the bowl with a rubber spatula as needed.
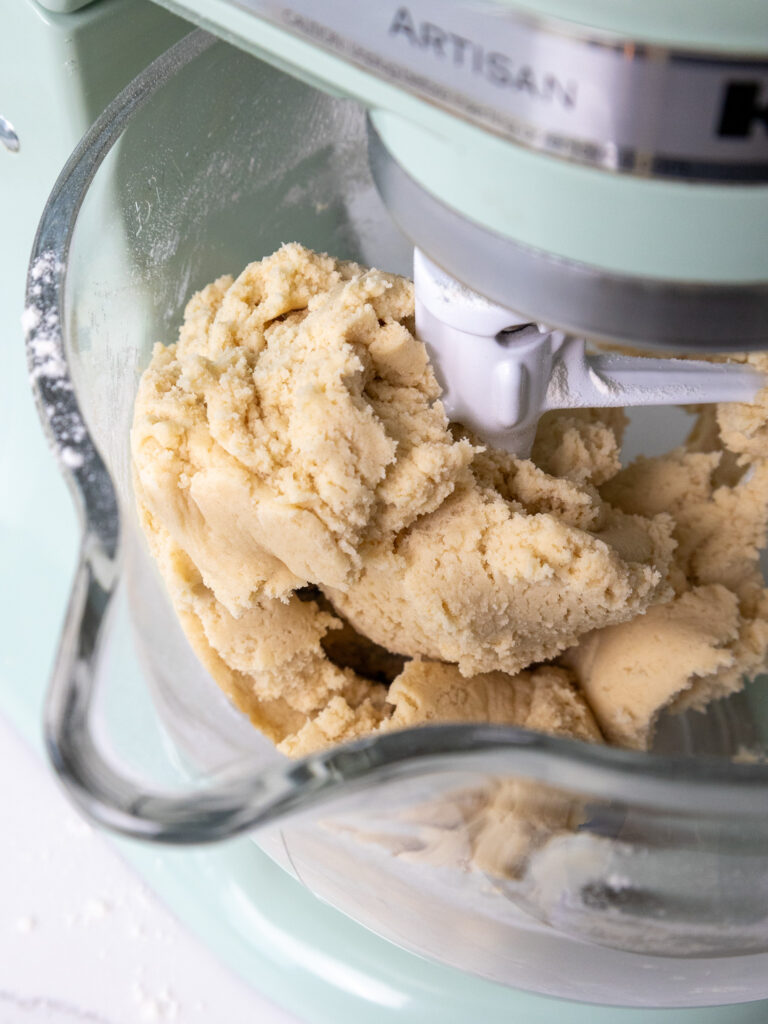
Then, add the flour, cornstarch, baking powder, and fine salt to the butter mixture and mix at a low speed until it is JUST incorporated.
Scrape the sides and bottom of the bowl with a rubber spatula to make sure everything is properly mixed together.
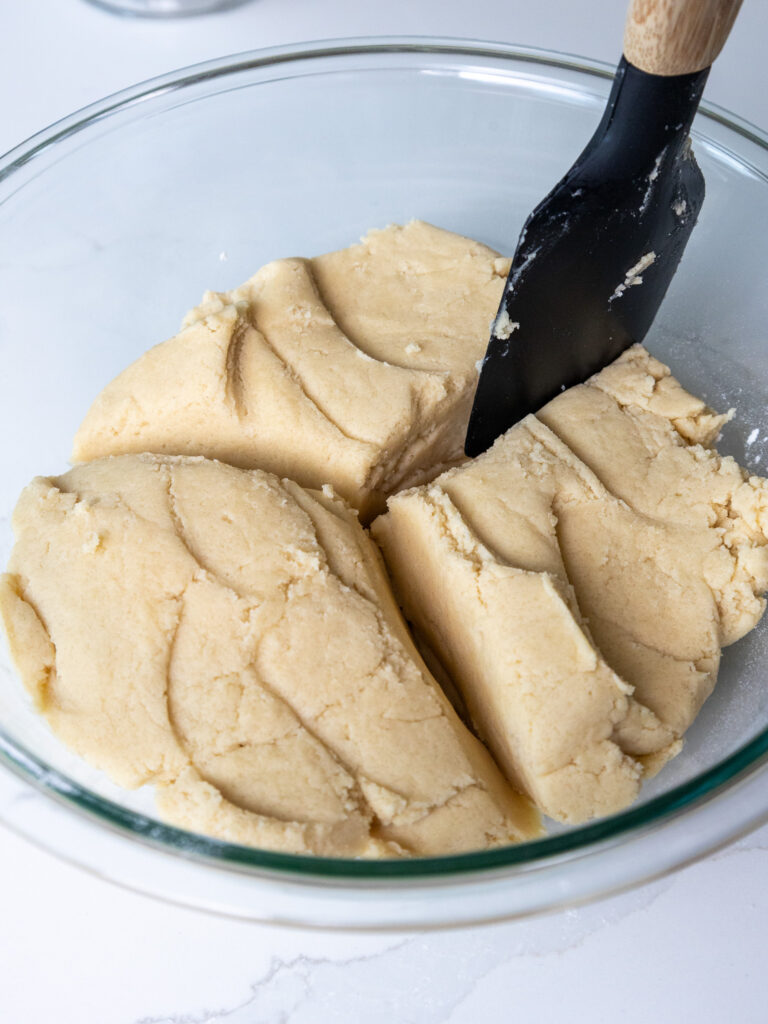
At this point, the dough should still be pretty thick. Divide the dough into three equal-sized portions (about 10 oz. or 305g each).
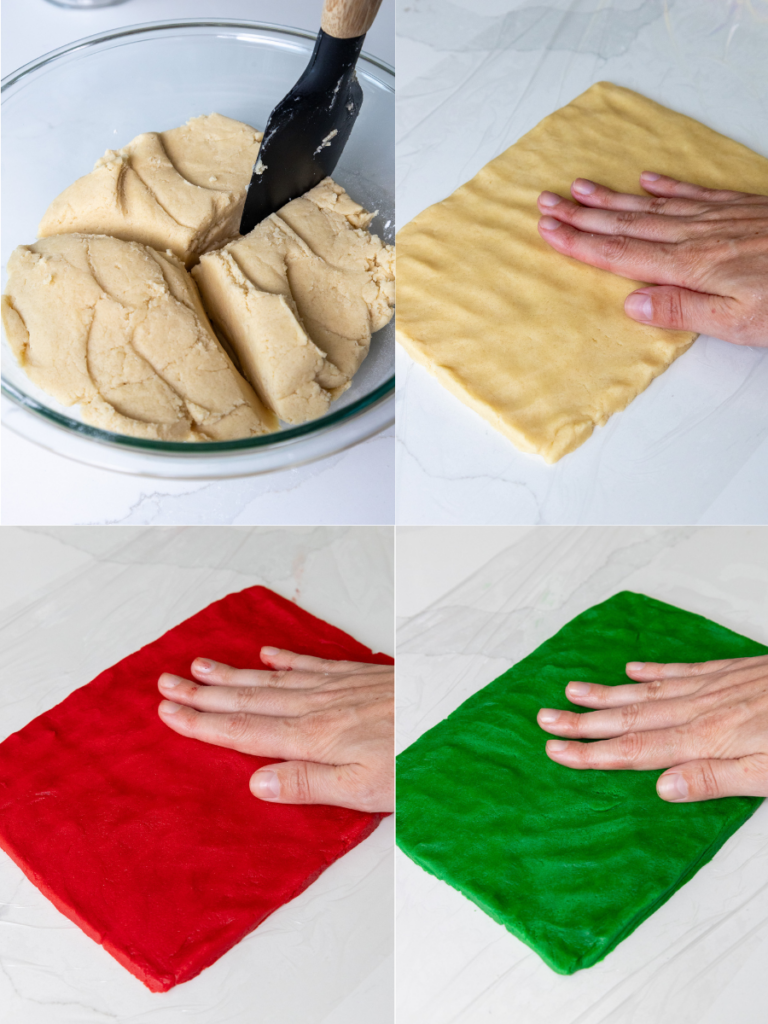
Step 2: Color the Dough
Leave one uncolored, and use gel food coloring to color one portion green and the other red. Wrap each portion of dough in a piece of plastic wrap.
I like to flatten the dough out into a rectangle that’s about 1/3 inch tall to make it easier to roll out once it’s chilled.
Try to make sure the cookie dough portions are similar in size to make it easier to stack them together later.
Step 3: Chill the Dough & Preheat the Oven
Chill the dough in the fridge for about 30 minutes, in the freezer for 10 minutes, or in the fridge overnight.
If you chill the dough overnight, let it sit out at room temperature for about 5 minutes before trying to roll it out. This will make it easier to roll out.
Preheat the oven to 350 F / 175 C 30 minutes before you plan to cut the cookies, and line two large baking sheets with silicone baking mats or parchment paper. Set aside.
Step 4: Layer and Roll the Cookie Dough
Unwrap each portion of cookie dough and lay the plastic wrap flat on your counter. We will be rolling out the cookie dough on the plastic wrap to make cleanup a breeze and to make it easier to cut the cookies.
Roll out each portion of chilled dough to be about 7×12 inches. Lay out a piece of parchment paper, then stack the dough on the parchment paper in the following order: green on the bottom, white in the middle, and red on top. Use a rolling pin to gently roll over the stacked cookie dough and stick it together.
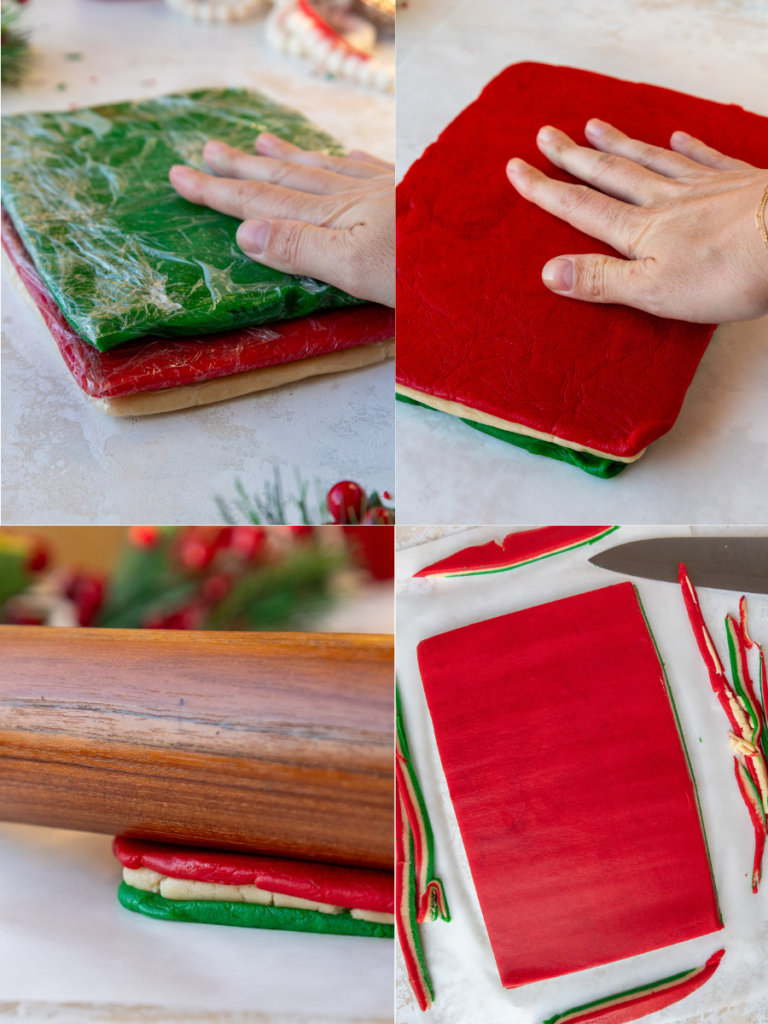
Trim the edges with a sharp knife to get rid of any uneven parts. Cut one of the long sides at an angle, so that you have slightly less red than green on that edge. This will give the cookies a more defined spiral. Start rolling the cookie dough from this edge.
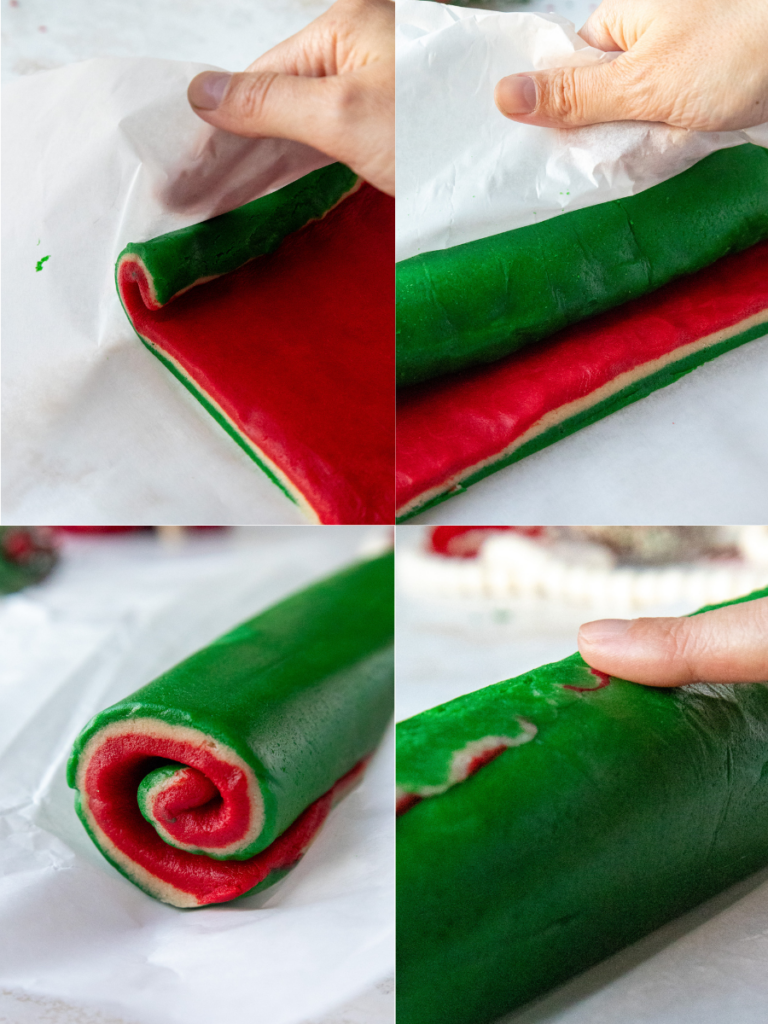
Carefully roll the cookie dough into a long log with a tight spiral. I find that pulling up the parchment paper and using it to help roll the cookie dough onto itself makes the process easier. Once the cookie dough is rolled, use your finger to gently spread the green cookie dough over the seam and seal the log.
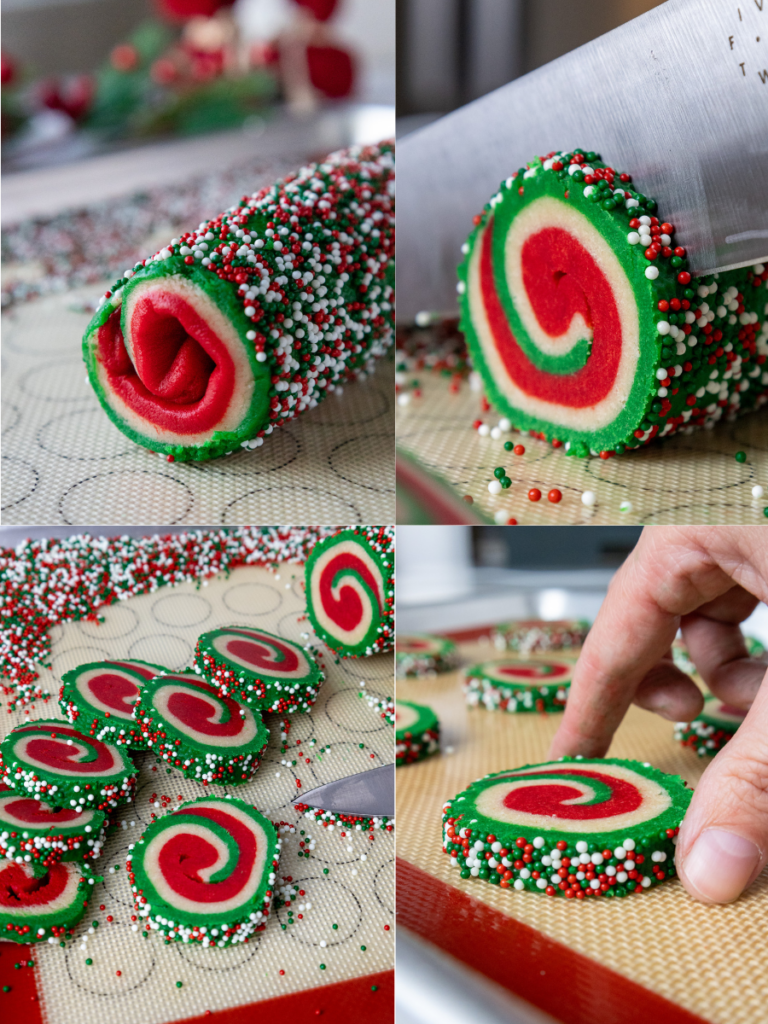
Pour 1 cup of Christmas sprinkles into a rimmed baking sheet and roll/press the cookie dough in the sprinkles until it’s fully coated.
Step 5: Slice the Cookies
Use a sharp knife to slice cookies that are about 1/3 inch thick. The cookie dough should still be cold enough to keep its shape as you cut.
If the log isn’t keeping its shape or looks like it’s getting smushed as you cut it, pop the log into the fridge to firm it up for 15-30 minutes. Place the cookies on the prepared baking sheets, spacing them about 1 inch apart.
The cookies will spread a bit as they bake, so they need a little room. Bake one sheet of cookies at a time.
Step 6: Bake the Cookies
Bake for 12-14 minutes on the middle rack of your oven (bake time can vary a lot based on the size and thickness of the cookies).
Rotate the pan halfway through to help them bake more evenly. Keep a close eye on the cookies and be sure to pull them out before the edges start to brown. When in doubt, err on the side of undercooking! The cookies will continue to firm up on the pan as they cool.
The end pieces always end up looking a bit wonky once they’re baked, so I consider those my taste-test cookies!
Let the cookies cool on the pan for 15 minutes, then move them to a wire rack to finish cooling.
Let the baked cookies cool fully on the pan, then enjoy! These can be stored in an airtight container at room temperature for up to 5 days.
Swirled Christmas Cookie Ingredients & Substitutions
Below are some swaps and variations that can be made in this recipe.
- Unsalted Butter – If you only have salted butter, you can use it and omit the salt that this recipe calls for. You can also use vegan butter.
- Granulated Sugar – This recipe turns out best with granulated sugar. I wouldn’t recommend changing the amount or type of sugar, as it will impact the spread of the cookies.
- All-Purpose Flour – You can use a gluten-free flour blend if needed in place of the AP flour in this recipe.
- Cornstarch – Cornstarch gives these cookies a tender, soft center and helps control the spread of the cookies. However, it can be omitted if needed.
- Almond Extract – I love this recipe with almond extract, but you can use vanilla or another extract in its place if needed.
How Many Cookies Does This Recipe Make?
This recipe can be used to make about 20 swirled cookies. The yield and bake time will vary based on how thick you choose to cut them.
This recipe can be doubled to increase the yield if needed.
Can I Make These Swirled Christmas Cookies In Advance?
You absolutely can! These cookies can be stored in an airtight container for up to 5 days at room temperature or for up to a month in the freezer.
The cookie dough can be stored in the refrigerator for up to 2 days before being baked. You can also cut the unbaked cookies and store them in an airtight container for up to 2 days.
This cookie dough can also be frozen for up to 1 month if wrapped tightly in plastic wrap and stored in an airtight container. I like to move the cookie dough to the fridge the night before I plan to cut it and bake the cookies.
Troubleshooting
Why is my dough crumbly or not coming together?
Usually, this is caused by adding too much flour (scooped/packed into the measuring cup) or butter that wasn’t soft enough. If it’s crumbly, try working it together with your hands for 30-60 seconds. If that doesn’t help, you can add 1 tsp milk at a time until it holds.
Why does my dough crack when I roll the spiral?
It’s too cold. Let the stacked dough sit at room temperature for 3-5 minutes, then roll again using parchment to help guide a tight spiral.
Why won’t the sprinkles stick?
The outside of the log needs to be slightly tacky. Roll the log right after assembling while it’s still a touch sticky, or very lightly dampen your finger and run it over the surface before rolling in sprinkles (just enough to help them adhere, don’t soak it).
Why are my cookies coming out oblong instead of round?
The log likely flattened while chilling or while slicing. After you roll the log, gently roll it on the counter to round it, then chill it before slicing. A wire/dental floss can also prevent squishing if you don’t have a really sharp knife.
Are these cookies supposed to be soft or crunchy?
Soft center, crisp edge. If they’re crunchy all the way through, they were sliced too thin and/or baked too long.
Why did my cookies turn out super hard?
This is almost always from overbaking. Because the dough is colored, browning is hard to see. Pull them from the oven when the tops look set, and they’re still slightly soft. They will firm up on the tray as they cool.
Frequently Asked Questions
Can I skip the almond extract?
Yup! You can swap it for more vanilla or another extract (peppermint, orange, lemon, etc.). Just note that some extracts can tint the dough!
Can I make the dough log 1–2 days ahead?
Yes. Wrap it tightly and refrigerate. Make sure you add the sprinkles before chilling, or else it’ll be difficult to get them to stick.
Can I make these gluten-free?
Yes, a 1:1 gluten-free blend works well. The texture of the dough will be a little bit different (slightly softer and stickier), and you may need to adjust the bake time as well.
Can I freeze baked cookies?
Yes. Freeze airtight and thaw fully before handling so condensation doesn’t soften the sprinkles.
Tips for Making the Best Swirled Christmas Cookies
- Really cream together the butter and sugar at the start of the recipe. It should become lighter in color and look kind of fluffy once it’s properly creamed together. This will give the cookies a nice, chewy texture.
- Space your cookies about 2 inches apart before baking them. They will spread as they bake.
- Don’t over-bake your cookies! The color of the dough makes it hard to tell when they start to brown, so keep an eye on the texture of the top of the cookie. Even if they seem a bit soft coming out of the oven, they will continue to bake and set on the tray once they’re out of the oven.
- Use gel food coloring to color the dough. Liquid food coloring can throw off the consistency of the dough and make it harder to portion and roll out.
Let Me Know What You Think!
If you make these swirled Christmas cookies, I’d love to hear your thoughts! Please leave a rating and comment below.
Or if you share on social media, tag me @chelsweets and use #chelsweets so I can see your delicious creations!

Swirled Christmas Cookies
Ingredients
Swirled Christmas Cookies
- 1 cup (2 sticks) unsalted butter, room temperature 226g
- 1 1/4 cups granulated sugar 250g
- 1 large egg, room temperature 56g
- 2 tsp almond extract 10g
- 1 tsp vanilla extract or vanilla bean paste 5g
- 3 cups all-purpose flour 390g
- 1 tsp cornstarch 3g
- 1 tsp baking powder 4g
- 1 tsp fine salt 6g
- 1 cup Christmas sprinkles I used nonpareils but jimmies work too
- red and green gel food coloring
Instructions
Swirled Christmas Cookies
- In a large bowl or the bowl of a stand mixer, beat 1 cup (2 sticks) unsalted butter and 1 1/4 cups granulated sugar and mix on a medium-high speed for a couple of minutes, until the mixture becomes lighter in color.
- Add in 1 large egg, 2 tsp almond extract, and 1 tsp vanilla bean paste or vanilla extract. Mix on a medium speed until incorporated. Scrape the sides and bottom of the bowl with a rubber spatula as needed.
- Then, add 3 cups of flour, 1 tsp cornstarch, 1 tsp baking powder, and 1 tsp fine salt to the butter mixture and mix at a low speed until it is JUST incorporated. Scrape the sides and bottom of the bowl with a rubber spatula to make sure everything is properly mixed together.
- At this point, the dough should still be pretty thick. Divide the dough into three equal-sized portions (about 10.75 oz. or 305g each). Leave one uncolored, and use gel food coloring to color one portion green and the other red. Wrap each portion of dough in a piece of plastic wrap. I like to flatten the dough out into a rectangle that's about 1/3 inch tall to make it easier to roll out once it's chilled. Try to make sure the cookie dough portions are similar in size to make it easier to stack them together later.
- Chill the dough in the fridge for about 30 minutes, in the freezer for 10 minutes, or in the fridge overnight. If you chill the dough overnight, let it sit out at room temperature for about 5 minutes before trying to roll it out. This will make it easier to roll out.
- Preheat the oven to 350 F / 175 C 30 minutes before you plan to cut the cookies, and line two large baking sheets with silicone baking mats or parchment paper. Set aside.
- Unwrap each portion of cookie dough and lay the plastic wrap flat on your counter. We will be rolling out the cookie dough on the plastic wrap to make cleanup a breeze and to make it easier to cut the cookies.
- Roll out each portion of chilled dough to be about 7×12 inches. Lay out a piece of parchment paper, then stack the dough on the parchment paper in the following order: green on bottom, white in the middle, and red on top. Use a rolling pin to gently roll over the stacked cookie dough and stick together.
- Trim the edges with a sharp knife to get rid of any uneven parts. Cut one of the long sides at an angle, so that you have slightly less red than green on that edge. This will give the cookies a more defined spiral. Start rolling the cookie dough from this edge.
- Carefully roll the cookie dough into a long log with a tight spiral. I find that pulling up the parchment paper and using it to help roll the cookie dough onto itself makes the process easier. Once the cookie dough is rolled, use your finger to gently spread the green cookie dough over the seam and seal the log.
- Pour 1 cup of Christmas sprinkles into a rimmed baking sheet and roll/press the cookie dough firmly in the sprinkles until it's fully coated. Nonpareil sprinkles or jimmies both work.
- Use a sharp knife to slice cookies that are about 1/3 inch thick. The cookie dough should still be cold enough to keep its shape as you cut. If the log isn't keeping its shape or looks like it's getting smushed as you cut it, pop the log into the fridge to firm it up for 15-30 minutes. Place the cookies on the prepared baking sheets, spacing them about 2 inches apart. The cookies will spread a bit as they bake, so they need a little room.
- Bake one sheet of cookies at a time. Bake for 12-14 minutes on the middle rack of your oven (bake time can vary a lot based on the size and thickness of the cookies). Rotate the pan halfway through to help them bake more evenly. Keep a close eye on the cookies and be sure to pull them out before the edges start to brown. When in doubt, err on the side of undercooking! The cookies will continue to firm up on the pan as they cool. The end pieces always end up looking a bit wonky once they're baked, so I consider those my taste-test cookies! Let the cookies cool on the pan for 15 minutes, then move them to a wire rack to finish cooling.
- Let the baked cookies cool fully on the pan, then enjoy! These can be stored in an airtight container at room temperature for up to 5 days.
Video
Notes
Making These Swirled Christmas Cookies in Advance and Storage Tips
You can store these cookies in an airtight container for up to 5 days at room temperature or for up to a month in the freezer. The cookie dough can be stored in the refrigerator for up to 2 days before being baked. You can also cut the unbaked cookies and store them in an airtight container for up to 2 days. This cookie dough can also be frozen for up to 1 month if wrapped tightly in plastic wrap and stored in an airtight container. I like to move the cookie dough to the fridge the night before I plan to cut it and bake the cookies.Tips for Making the Best Swirled Christmas Cookies
- Really cream together the butter and granulated sugar. It helps incorporate air into the dough, which makes tender, soft cookies.
- Use gel food coloring to color the cookie dough! Liquid can throw off the consistency of the dough and won’t create quite as bright a color.
- Cut the cookies with a consistent thickness of 1/3 inch. This will help the cookies bake more evenly.
- Take the time to chill the cookie dough. It helps prevent the cookies from spreading while they bake and helps them bake up with a soft texture.
- Don’t overbake the cookies. Err on the side of underbaking your cookies and remember that the cookies continue to bake for a few minutes once they’re out of the oven.
Nutrition
Other Recipes You Might Like:
I am so excited to try out this recipe, how much food colouring do you use when colouring the dough or is it personal preference? So sorry if you mentioned this in the recipe and I missed it!
Hi Emma,
It is a preference thing! I use a very generous squirt of gel food coloring when I make them to get vibrant colors. Hope that helps, happy baking!
The dough for this came together really easily and the cookies tasted great. My only issues were with the suggested thickness of the cookies. I think half an inch thickness would make these come out better. I did the suggested quarter inch, marking the roll with a ruler, and got 40 cookies that were too thin in my opinion. I also struggled with the cookies coming out oblong instead of circular, so thats something to work on for next time.
Totally hear you Amanda! I think mine ended up being closer to 1/3 of an inch, and I’ve updated the recipe to reflect this. The oblong part can happen if the dough starts to warm up once it’s rolled, I’ve had that happen too! It might help if you chill the log before cutting it next time. Hope that helps, happy baking!
@Chelsweets, I’ve used a wire to cut these, like you would use for cheese. Makes it a lot easier to cut without smushing the dough.
That is so smart!! I need to get one and try that!!
I love this design and will try again with a slightly different (moister) cookie dough. This turned out quite dense, I suspect because the gel dye I had did not blend in easily and I probably overworked it to get it blended. I also could not get the sprinkles to actually stick to the log very well and didn’t want to push hard and ruin the spiral, so it was skimpy on that important part. I will try again as these are one of a kind and with some practice and slight amendments, it could be stunning. You are clearly a wizard in cookie-making!
Hi Linda,
So sorry to hear that!! You can try putting a little bit of water on your finger and running it over the dough to moisten it/to help the sprinkles stick if needed! you don’t want enough water to make the sprinkles bleed, just enough to help them stick adhere to the dough. Hope that helps for next time, happy baking!
Dough seemed thin when rolling out to specifications, tore when rolling into the spiral. Didn’t seem to stick together well nor did the sprinkles want to stick to the outside. I used gel food coloring but the dough seemed overly soft once it came to temperature.
Hi Jo,
The dough should be fully chilled when you stack, roll, and cut the dough! It shouldn’t ever really be at room temperature except for when you color it and flatten it out before putting it in the fridge to chill. If it was at room temp, it would be extremely hard to roll and cut! Hope that helps for next time <3
Is it possible to use your buttercream cookie dough recipe for the base in these cookies?
If i only want to back use half of the dough now, should I keep it in a log and freeze? or? thank you so much!
So I made them at 350 for 12 min and they became colorful rocks. I lowered temp to 325 for 10min and they came out pretty great. My suggestion is to bake a couple and check your oven to adjust as needed.
Saw these on instagram and they were so pretty I had to make them! My first spiral cookie – easy to follow recipe and they came out looking just perfect. I either cut them too thin , over baked them or it’s my new silicone mats because they’re very “crisp”. and I guess I expected them to be softer. Bakers error I’m sure but I will definitely make them again! Thanks for the fun recipe!
could you make ther resipe easier to print . i like to print it out then to use my phone and dirty it, we just need the direction not what you use we will see it in the vlog not the recipe
@sarah, if you are on iPhone and using safari there is button with a rectangle and two lines right next to the link, if you click it and select “show reader” it changes it to the perfect mode for printing. If you’re not looking to print but just want the instructions to look clearer this mode will keep your screen from turning off while baking. Hope this helps!
Made these today , they tasted delicious and were very pretty…. Although more square like… I rolled the log and pressed into the sprinkles and it got like square
So I had to round them after I cut.. over all this was a pretty easy recipe to follow and the cookies take amazing! I need to practice my rolling skills!
Thank you again for a great cookie!
Why did I think I could do this? Dough came out delicious, perfect amount of sweetness however, the process…oh my lol. I had to reenact as a kid playing with play doh to find the sense of why I chose to make these this year, LOL! I will not be making these again. I haven’t baked them but I’m sure they will turn out delightful. ps…I used green gel coloring and have washed my hands consistently and somehow the green wants to stay…hopefully I am not turning into an ogre lol.
Hi! Could I make the layers, roll out & assemble the log a day or 2 ahead of baking time, and leave the log wrapped in the fridge until baking time? If I do this, should I put the sprinkles on right after I wrap it or wait until I’m about to bake it? Thanks!!
How did everyone blend the food coloring? I’m having a hard time!
@Kylie, I made three half batches, and after making the first non colored batch, I’m glad I did. The dough is so firm! I added the food coloring with the wet before I added the flour mixture. Did that three times so I made a total of 1.5x the recipe
@Nicole, this is so smart and I plan on doing this!
My dough keeps breaking? I followed all the direction
I followed all the directions and chilled the dough for a substantial amount of time and the dough just falls apart when I try to roll it. It’s rock hard and not bendable.
@Madison, this happened to me. So I placed parchment paper on top and rolled over the parchment paper. Worked a treat.
I made your recipe with Cup4Cup gluten free flour and they turned out so delicious! Baking time was just a smidge longer, but that could just be my oven. They were flavorful and moist. Thanks for the recipe!
Worked perfectly for us. Thank you for this amazing receipt
I just made these for our work Christmas party, and these cookies look amazing. The almond flavor is spot on. I think I’m going to make some ladies jealous and this guy is ok with that!!! Thanks for the recipe!
In the process of making these. In central Queensland, Australia the heat is ridiculous and made the dough get to room temp very quickly. I used parchment paper on top of the doughs to roll out and help roll into a log. Sprinkles had trouble sticking and the dough became impossible to work with without it breaking lol so back in the fridge for a bit before I cut and bake. Fingers crossed they turn out nicely.
Hola, quiero hacer la receta pero tengo una duda ¿podría usar margarina en lugar de la mantequilla? Gracias desde ya ??
Just made them and I love them so much! They are so good and so pretty! I was a little hesitant when using the sprinkles so I use a little less and I will definitely be adding more next time.
Has anyone tried these with peppermint extract? I’m not a fan of almond, but would like a variation of flavors on my cookie plates!
These are so good and my daughter loves them. But the dough kept cracking no matter what I tried. And I chilled it a lot too.
Would your cream cheese sugar cookie recipe work for this?
These turned out so good — they were beautiful and delicious!! I let the dough soften a bit before pressing the sprinkles into the dough and then popped the log back into the refrigerator for 30 min before cutting into 1/3 inch slices. Thank you for sharing, will be saving recipe to make for next year 🙂
Hi Chelsey! Would I be able to use almond paste in the place of almond extract? Really want to give these a try tonight!
Is this supposed to be a crunchy or soft cookie?
These turned out very well! I was shocked, because I’m usually a klutz when it comes to rolling up dough, cake, or decorating! What’s more, it’s a delicious sugar cookie! I rolled out my three colors just after mixing between two pieces of parchment paper, then refrigerated before I combined them, rolled into a log or cut. If the dough cracked while rolling, it’s very forgiving to push back in place, and the sprinkles on the outside hid a multitude of sins so the end result still looked pretty. The only tricky thing was sometimes a sprinkle would dislodge when slicing and cause a tiny groove in the cookie otherwise perfect swirl.
Adorable and Delicious! I too had a little trouble with the dough coming together. I just added a splash of milk and I was good to go. Because of a nut allergy in the house I used Cardamom extract instead of almond and they were delicious. I did take a tip from making checkerboard cookies and brushed the color doughs with a little egg white and water to make the colors stacks stick well before rolling. Definitely a new holiday favorite.
Hello!
I have made all almost of your Christmas cookies this year and I am a HUGE fan- my only question is for 3 cups of flour (in grams) it’s listed as 390 in this recipe but for the polar bear cookies it’s listed as 365! Just wanted to check if it is supposed to be 3 and a half cups or if it’s meant to be 3- Thank you 🙂
Hi Maggie!!
Love your attention to detail!! The amount of flour that’s in a cup can vary based on how you measure it and who you ask, but most people think it’s anywhere from 120g-130g! I like the polar bear cookies to bake up nice and fluffy, and think 365g is the best amount for them, but these need a tiny bit more flour for them to be able to sliced and keep their shape, so I lean towards a bit more flour with these.
I usually use 125g/cup of flour as my benchmark, but tweak it a bit when needed! Hope that makes sense/helps, happy baking!!
These were a hit! And even worked with the Becky Excell Gluten Free Flour mixture.
I added a 1/4 tsp of Xanthum gum to the recipe as well.
I added them to my own 2024 Christmas Cookie Box – Instagram @kiwi.bird.kitchen
I love that SB, thank you for sharing!! Happy holidays!!
Making your valentine’s day edition and can’t wait!!! My only problem is, I don’t have an electric mixture? Will hand mixing suffice? Thanks for any help and sharing your gifts with us <3
So sorry for the delayed response Rose!
You can definitely make this by hand you just would have to really vigorously whisk together softened butter rather than room temperature butter and sugar at the start of the recipe until it gets creamed together properly. Hope that helps for the future, happy baking!
Chelsea! Tried these cookies for my Valentine’s Day cookie box and they were so much fun. I would LOVE if you could post a tutorial on how to roll out cookie dough in a rectangle. I COULD NOT figure it out and mine was more of an oval, which made doing the roll and a swirl really hard. Thank you for all of your incredible recipes.
Hi Mollie,
Yes, that part can be hard!! This might sound weird but you’re going to start in the center of the dough and roll out to where you want the corners of the dough to be! It also helps if you flatten the dough initially into a rectangular shape before you wrap it in plastic wrap or even once it is in the plastic wrap that will give you a starting point that will make it much easier. Hope that helps with the future, happy baking!
These look great! Wondering what you would recommend swap for almond extract for a nut allergy?
Any extract will work! Extra vanilla, lemon, orange, even coconut!
Absolutely delicious cookie! Keeping the dough nice and cold is the trick to keeping them neat – my first few were sorry looking, but the rest of the batch turned out out beautifully.
Hi Ashley,
YAY!! So happy to hear you loved this recipe 🙂 And you are so right, keeping the dough chilled is a must!! The first ones do look a little wonky sometimes, but usually towards the center the swirl is great!! Thank you for sharing!
Hi! I am obsessed with your work and truly aspire to be able to bae and create like you, so thank you for sharing your work! Is there a specific brand of food coloring your use, I can never achieve bright vibrant colors like yours.
Hi Danni,
You’re too sweet, thank you!! I made these with Americolor super red and Americolor leaf green 🙂 Hope that helps, happy baking!
This looks so pretty. Can you please tell me which American color gel colors you used?
Hi Marian,
Absolutely! This is Americolor super red (chef master super red looks exactly the same too!), and Americolor leaf green! Hope that helps, happy baking!
These cookies are beautiful and I loved making them. The wonderful scent while they were baking rivaled the delicious taste. My grandchildren call them Grinch cookies since the colors are reminiscent of that character.
Tagged you on Instagram. These will be on our holiday cookie tray this year and each year after.
Hi Julie,
Ah I love that!!! I tried looking for your post on IG but I don’t see it in my tagged posts! Is your account private? That might be why I can’t see it. So happy to hear you loved this recipe, thank you for sharing 🙂
We are a dye free household so I used non-artificial food coloring for the dough and sprinkles.
Slightly less “vibrant” but equally as tasty!!!
So so so so good!!
Totally respect that, and that’s great to know for others who also avoid food coloring 🙂 Would you mind sharing what brand of natural food coloring you like to use? I get asked that a lot, and would love to hear your thoughts! Thanks for sharing Madi!!
Hey Karli! Is there a benefit to using vanilla bean paste over vanilla extract?
Hi JoAnn,
I find that vanilla bean paste gives the cookies a bit stronger of a vanilla flavor, which is why I like using it! Hope that helps, happy baking!
Similar to other reviews, the suggested thickness resulted in a super thin swirl, the mini non-pareils didn’t stick, and the dough was so sticky when it came out of the fridge it was hard to work with. The flavor was good, but this recipe didn’t work for me. They DO look beautiful in your photos!
So sorry to hear that Katie! If the dough is super sticky coming out of the fridge, it’s strange that the sprinkles aren’t sticking! How are you measuring your flour to make the dough? I wish we could upload photos on here so you could show me how yours turned out, it would help so much with trouble shooting!
When you say the swirl was super thin, did you use rolling pin guides to make sure the dough was the exact right thickness? And did you roll the dough into the dimensions I shared in the recipe card? Both of those things have a big impact on how the swirl looks. If the swirl was thin, it sounds like the dimensions of the rectangle might have been different! Let me know, hopefully we’ll be able to figure it out together!
Can’t wait to make this with my daughter this year! 2 questions (kind of dumb, sorry)
1. What’s the best way to get the color in? Kneed the dough?
2. If we are going to freeze should we freeze with the sprinkles on or right when we are ready to bake?
Hi Liz,
Great questions!! You can either knead it with your hands (but they might get dyed from the food coloring) or mix it in with a rubber spatula! Kneading is easier, but I usually just use a spatula to avoid dying my hands).
If you want to freeze the cookie dough, I’d suggest adding the sprinkles before freezing them, just so that they’re ready to bake with you thaw them! It’d be hard to get the sprinkles to stick after they were frozen. Hope that helps, happy baking!
Do you have a recommended extract swap for prime with nut allergies?
Hi Kristen,
You can either add additional vanilla, or any extract you like really! Lemon, peppermint, even maple (but maple will darken the color of the dough a bit)! Hope that helps, happy baking!
Hello ?? can I i use powdered sugar instead of granulated sugar?
Hi Tanya,
You can, but the cookies won’t bake up the same way!
Powdered sugar is super fine and contains cornstarch, so it gives cookies a much more tender, melt-in-your-mouth texture. Granulated sugar, on the other hand, creates more structure and spread. If you swap in powdered sugar here, the dough will be softer and the cookies will spread less, which can make the swirl design look a bit puffier and less defined.
They’ll still taste great, but the texture won’t match the original recipe, and the look will change a bit. If you’re going for the classic chewy sugar-cookie bite with a clean swirl, stick with granulated sugar.
Hope that helps, happy baking!!
How do you color the dough once it is made?
Hi Marykay,
I just work it into the dough with a rubber spatula. You can also use your hands to massage it into the dough, but the gel food coloring can dye your hands. Hope that helps, happy baking!
I have an egg allergy so I swapped out the one egg for 1/4c of plain unsweetened apple sauce and the cookies turned out absolutely perfect!!
That is so wonderful to hear Michelle! I love applesauce as a substitute for eggs, it works so well 🙂 Thank you for sharing!
I consider myself an intermediate home baker and found these really challenging. The tips were helpful but rolling and assembling was really intricate. If you’re a beginner baker, don’t start with this recipe. Just some advice!
Hi Shelly,
I totally agree! Getting the dough to just the right measurements and rolling it up super tight can be challenging, this is definitely not my easiest cookie recipe. But they sure are fun to make and especially once they’re baked! Appreciate your feedback <3
Hi Chelsea,
Can the cookies be frozen after they are baked? Does it affect the sprinkles as they defrost? Can’t wait to bake them for my cookie boxes. They are so pretty. Thanks
Hi Karen,
They totally can be frozen after they’re baked! The sprinkles haven’t bled on me in the past, but I also let them thaw full to room temperature before handling them. I also don’t live in a super humid place, which helps too! As long as they’re stored in an airtight container and thawed fully, you should be good to go! You can also add a sheet of parchment paper between the cookies if you layer them to give yourself peace of mind 🙂 Hope that helps, happy baking!
Hi! Is there any way I can skip the almond extract?
Hi Lia,
Absolutely! You can either completely omit it or use additional vanilla extract or another extract you prefer in it’s place. Hope that helps, happy baking!
Hi, this was so easy to come together except the rolling part. I put the dough to chill for 30 mins but after when I tried to roll it, it kept breaking so my shape wasn’t round but they were still delicious!
Hi Aarti,
So happy they were delicious!
And that part can be a bit tricky!! In the future if you run into that, you can let the dough sit for a few minutes at room temp, then try rolling it out again! It’s hard because everyone’s fridge/kitchen are different temperature, and it’s better to have the dough be a little bit too chilled than to have it be too warm and sticky/hard to handle. Hope that helps for next time, happy baking!
I tried to mix the dough with correct measurements but it never fully incorporated, very crumbly and dry. I was able to like mold into a dough shape.. and im hoping for the best, this recipe looks so cute!
Maybe 3 cups of flour is too much? (Still rating high because this was user error!)
Hi Kat,
How are you measuring your flour? If you’re scooping straight from the bag with a measuring cup, it can pack the flour down and accidentally add a lot more than the recipe calls for. The best way is to fluff the flour first, spoon it into your measuring cup, and level it off with a flat edge. Or, if you have a kitchen scale, that’s even better for accuracy and consistency. It makes such a big difference in how the dough turns out! Hope that helps, happy baking!!
These were awesome! I omitted the almond flavoring and just used extra vanilla. The biscuits tasted like shortbread, and the colours and sprinkles were a massive hit with everyone. I also used the regular liquid food coloring we have here in Australia at the supermarket (1 tsp per colour) and my results were as vibrant as the picture.
So happy to hear that Kay!! Thank you so much for sharing, sounds like they turned out perfect!!! 🙂
Just got done rolling my dough up. I am very excited to see the end product. I do recommend refrigerating between rolling each color into its 12×7 sheets to keep them cool. And to slowly roll/mold the stacked layers together using the parchment paper as a guide to avoid cracking. I didn’t do the extra refrigerating and impatiently rolled my stacked dough and it cracked a lot.
Hi Sarah,
Agreed! The extra chilling really does make a big difference! Thank you for sharing, hope your cookies turn out amazing!!
I have issues! First, the dough was easy to make and color. Yay. That’s where easy ended. I am an experienced baker. The dough was hard to roll out when cold. If it got too warm, it was sticky. Lifting it to layer was tough. You say, “The dough should be fully chilled when you stack, roll, and cut the dough!” there is no way the dough can be rolled without cracking if cold. Yikes! I let the rolls rest to warm up a little and again, no way the sprinkles will stick without some adhesive and I thought the dough was sticky when warm! I used a little corn syrup. I refrigerated before cutting. They held their shape and they taste good. They look pretty, but I spent way more than 2 hours making these. Oh, brother! You make it look easy…NOT!
Hi Ellen,
These cookies are very temperature sensitive, and they can be a bit temperamental, I hear you! It sounds like you figured out some good work arounds though, and I’m proud of you for that!
My job is to make it make it look easy, but rest assured these are not easy to make! However, I do think they’re worth the effort. Appreciate you sharing your experience!
I made these last year and they tasted great but I struggled to get the swirl looking good, can I make this recipe and use the checkerboard method in your checkerboard shortbread cookie recipe?
Hi Cecilia,
I haven’t tested it, so sadly I’m not sure! If you try it, let me know how it goes!
Aight i clearly did something wrong. It never came together as a dough. I creamed the butter and sugar a lot. Is it possible to do too much?
Hi Hillary,
So sorry to hear that :/ How long did you cream them together for? Were you using a hand mixer or stand mixer?
How did you measure the flour when you added it? Hopefully we’ll be able to figure out what happened!
Thank you, they came out fantastic. I usually store my cookies in tins but your directions says “air tight” container, can I use a plastic container?
Hi Paula,
So happy to hear that! I just think they stay freshest in airtight containers, and a plastic container would work just fine! Hope that helps, happy baking!
Hello!
Would this recipe be okay to use and make checkerboard tyle cookies instead of pinwheels?
Thanks!
Hi Alicia,
I haven’t tested it, but in theory you could try!! I’ve only made checkerboard cookies with my shortbread cookie recipe, which worked great. But I’m not totally sure with this one, they don’t spread a ton, but they do spread as they bake. Sorry I can’t be of more help!
Made using scale, nice fluffy texture when cooked. Tastes very basic, a bit doughy. Lemon extract would prob give it a better punch. It’s a beautiful cookie.
Hi Sara,
Thank you! You can totally use lemon extract in place of the almond extract in the future. I usually avoid lemon because it doesn’t really go with the other flavors in my cookie boxes, but you’re more than welcome to use a different flavor of extract. Hope that helps, happy baking!
They are such a pain (I hate baking) but 10/10 considering I’m an awful baker and my 10 year old and I nailed it! The key is keeping everything chilled and great recommendation from someone about using a wire cheese slicer!
Yessss!! haha I hear you on all of this and totally agree! A lot of work, but worth it!!
These Christmas cookies are so much fun and eye-catching. We made the layers thinner and got more spiral. Totally recommend.
Love that! So happy to hear they turned out great, thanks for sharing Sara! 🙂 Happy holidays!
Worst cookie recipe I’ve ever made. The dough kept crumbling and falling apart the entire way through. Wasted my time, money, and ingredients.
@Hannah, gang you gotta hand mix ? it’s crumbly if you use a machine
Hi Hannah,
How did you measure the flour? Did you use a scale or fluff the flour and spoon it into your cup measure? If you scoop directly from the bag you end up using a lot more flour than the recipe calls for.
Was your butter full at room temp? Sometimes during winter even if you set the butter out far in advance, it’s a lot firmer just because it’s colder outside/in our homes in winter. Both of those things can cause the dough to be crumbly. It should be quite smooth once it’s all mixed together. If it’s not either of those things let me know and we can keep troubleshooting.
These cookies are impressive and taste great. I won a best decorated in a cookie competition with this as my entry!
The only reason they aren’t five stars is they are so fiddly. I made three batches to finally get the technique right. My biggest problem was keeping the circular shape and the roll tight. I tried multiple ways of rolling and no matter the temperature of the dough or how I did it they ended up oblong and not a pretty spiral. I ended up stacking the dough as directed but then measured and cut strips and rolled up each cookie individually the dipped the edges in the sprinkles. Doing it this way also helped keep the sprinkles adhered to the edge. When I tried to dip the whole log they would fall of as I tried to cut.
Hi Kelley,
I hear you, this recipe can be a bit finicky! But I’m glad you found a way that works best for you and I appreciate you sharing it. And congrats on winning the cookie competition, that is amazing!!! Happy holidays!
Loved these cookies! I wish I’d have made the swirl a little tighter – you really have to push it in at the beginning – but they still came out wonderful, soft and so delicious.
Hi Michelle,
So happy to hear that! It can be hard to get the swirl tight, you really have to pull on the parchment paper tightly!! Glad they turned out great, thank you for sharing!!
These turned out so cute and the taste is delicious Perfect cookie for the holidays!
Yay!! That’s great to hear Kaitlyn, so happy they turned out so well 🙂 Thank you for sharing, and happy holidays!!!
These turned out so great! The colors are so much fun and I love the punchy almond flavor. And these were a snap to make!
I am so happy to hear that Melissa! I do love a generous amount of almond extract in my cookies!! 🙂 Thank you so much for sharing!
What did I do wrong?? My dough kept cracking and was not manipulative. I ended up just throwing the dough away out of frustration. I’ve never had that problem before.
Hi Britni,
So sorry to hear that, that’s such a bummer!
How did you measure the flour? Did you use a scale or fluff the flour and spoon it into your cup measure? If you scoop directly from the bag you end up using a lot more flour than the recipe calls for.
And what type of butter did you use? Those would be first two guess as to what may have gone wrong with the dough! If it’s not either of those, let me know and we can keep troubleshooting!
Made this recipe today, and it was a hit! I kept the dough cold at all times after I rolled it out and used a cake wire cutter to cut the pieces. I only left them for about 10 minutes since I was able to get about 30 cookies from them, and they were nice and chewy!
That’s so great to hear Sabina!! Keeping the dough cold definitely makes a huge difference, thank you for sharing 🙂
This is the second year I’ve made these cookies and they are always a hit! This year I froze the dough for a week before rolling it out and they came out just as good!
Yesss!! It’s so great making the dough ahead of time, it really breaks up the procoess and makes the rolling and cutting a lot more fun 🙂
Absolutely delicious cookies and they look fantastic. I baked 5 batches to give away at our theatre’s holiday shows, and they were a huge hit! These will definitely become part of my regular holiday rotation.
Hi Ashley,
Omg I am impressed, 5 batches!!! That is a lot of work! So happy to hear they were such a hit, thank you for sharing 🙂
Made these today and they turned out great. They do take some time and effort but are worth it. I used wax paper on the top and bottom of each layer as I rolled it out with the help from my husband holding the paper as I rolled. I chilled it as a log for approximately 20 minutes and then cut with dental floss. The cookies looked a little wonky so I shaped them back into circles with my fingers. The parts I cut off to even up I stuffed in the ends. No waste. I made 23 cookies. They are pretty big. I’ll shoot for 24 next time.
Love that! Thank you for sharing Karen, and that’s so smart to fill the ends the bits you trim off! I need to try that next time I make these 🙂 Happy baking!
These are my go to cookies for every gathering! They come out perfect every time. I just swap out the colors depending on what season/holiday it is!
Yessss!!! It is such a versatile recipe, love that you’re putting it to use year round 🙂 Thanks for sharing Jillian!!