
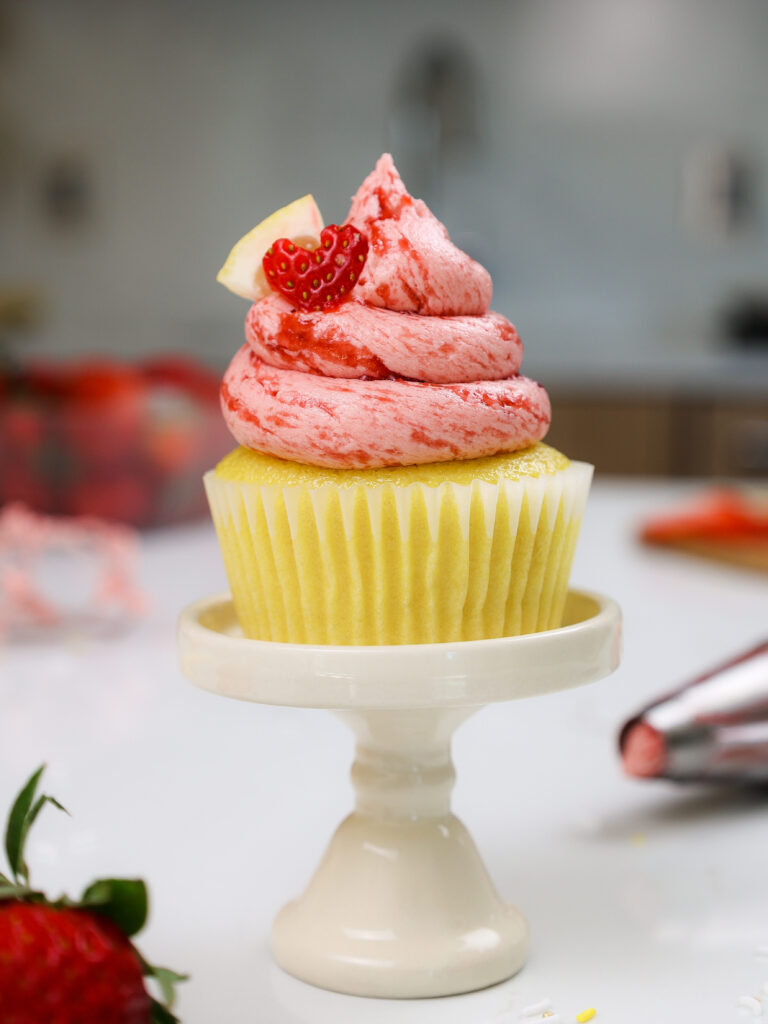
Strawberry Cheesecake Bars
These strawberry cheesecake bars taste just like summer! They’re decadently rich and creamy, with swirls of bright, jammy strawberries.
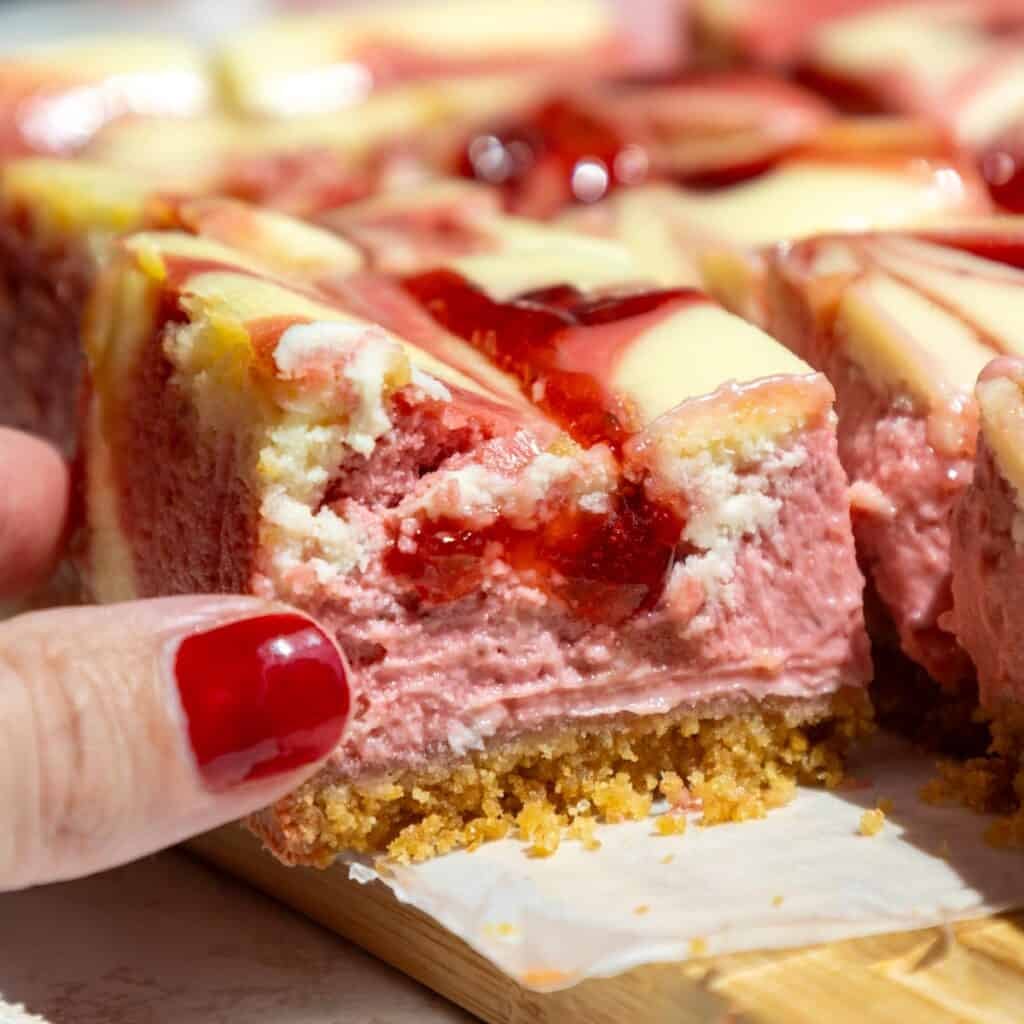
I love to make these in the summer, but they taste amazing all year round. As an added bonus, these bars are the perfect make-ahead dessert. I swear they somehow taste better over time!
How to Make Strawberry Cheesecake Bars
Let’s walk through each step of this recipe to make sure it turns out as amazing as possible.
I’ve also included a video tutorial in the recipe card below.
Step 1: Make the Strawberry Reduction
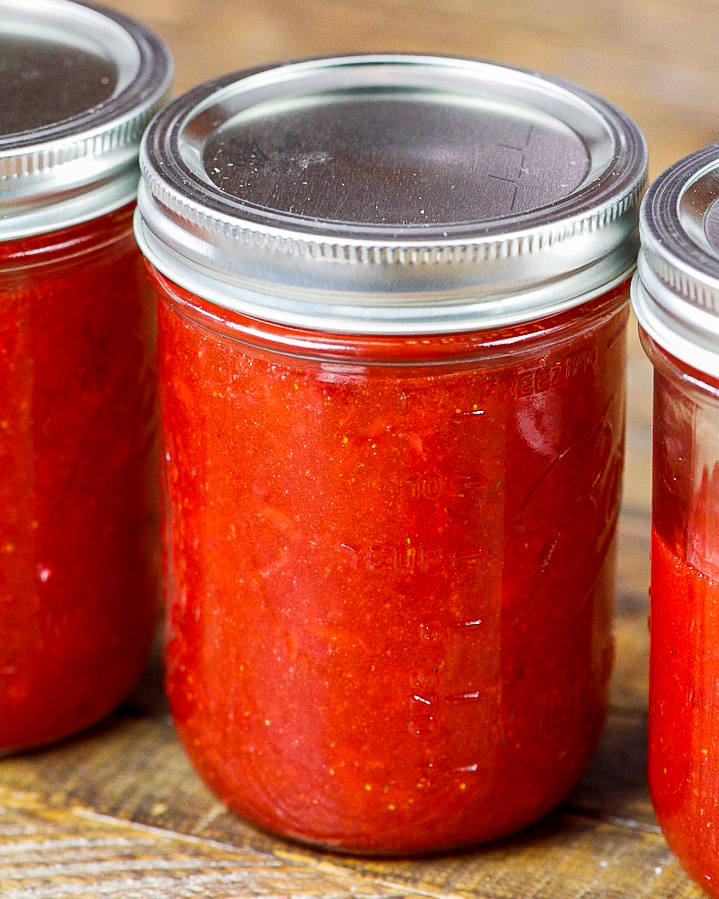
I like to make the strawberry reduction first because it needs time to cool before it can be added to the cheesecake batter.
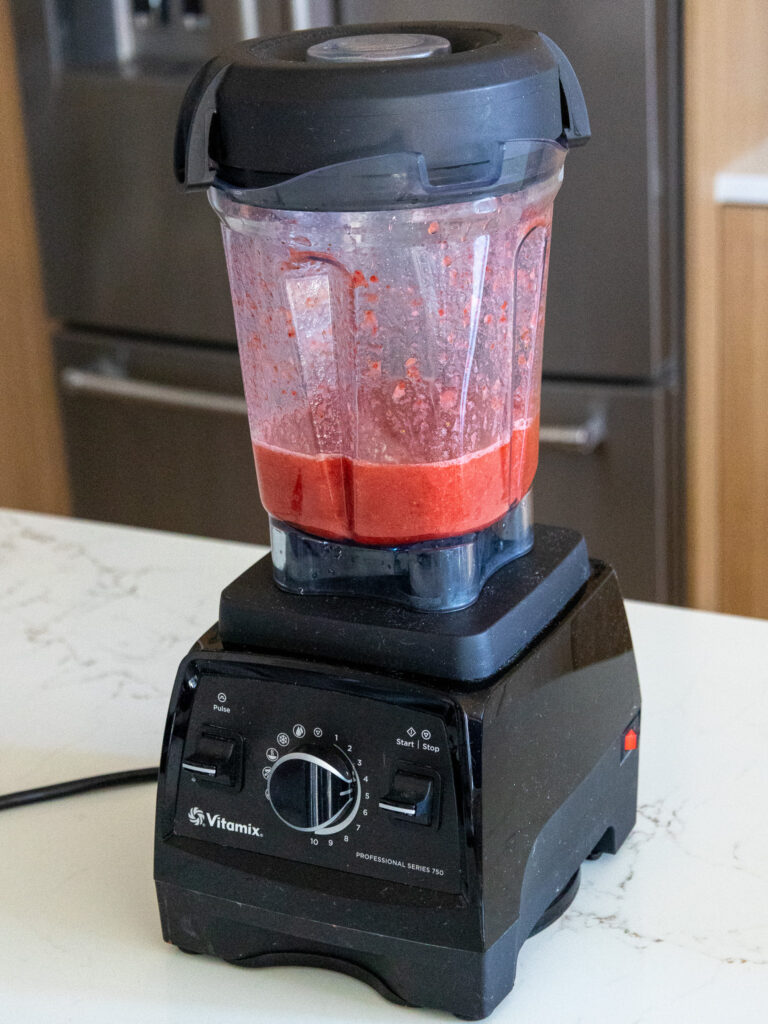
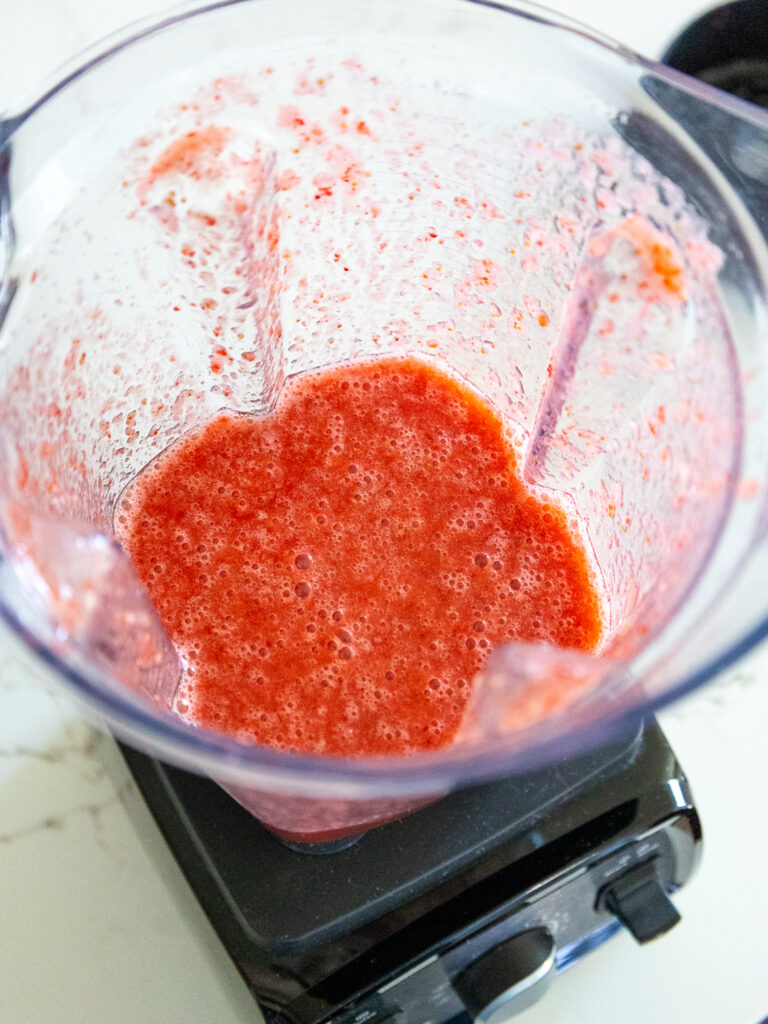
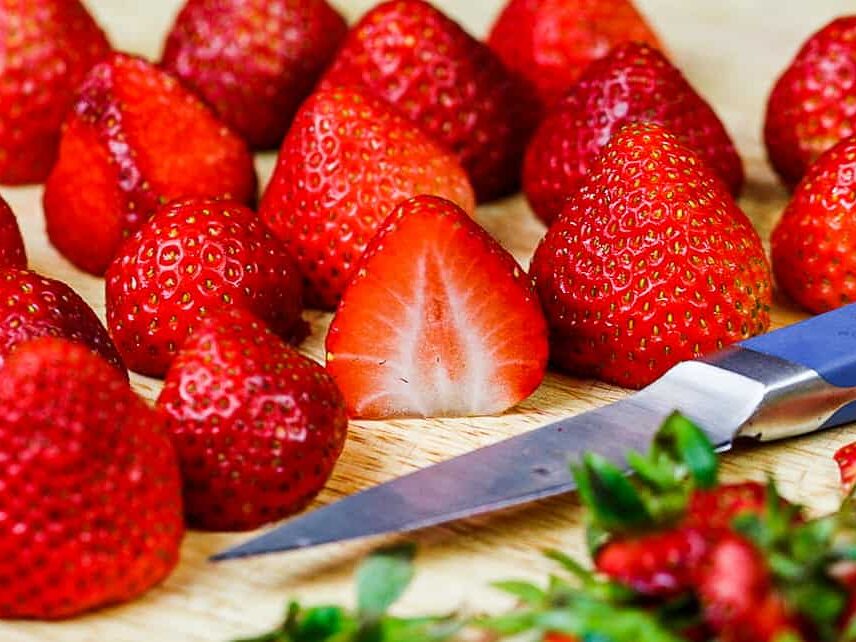
In a food processor or blender, combine the fresh or frozen (and thawed) strawberries and granulated sugar. I usually use frozen because they’re already hulled! Blend until the mixture becomes a smooth puree.
Pour the mixture into a medium-sized saucepan. Heat over medium heat and stir occasionally until the mixture bubbles and foams up (this takes me about 8 minutes).
Then turn the heat down to medium-low and cook for 30 more minutes, stirring occasionally. Be sure to scrape the sides and bottom of the pan as you stir to prevent it from browning.
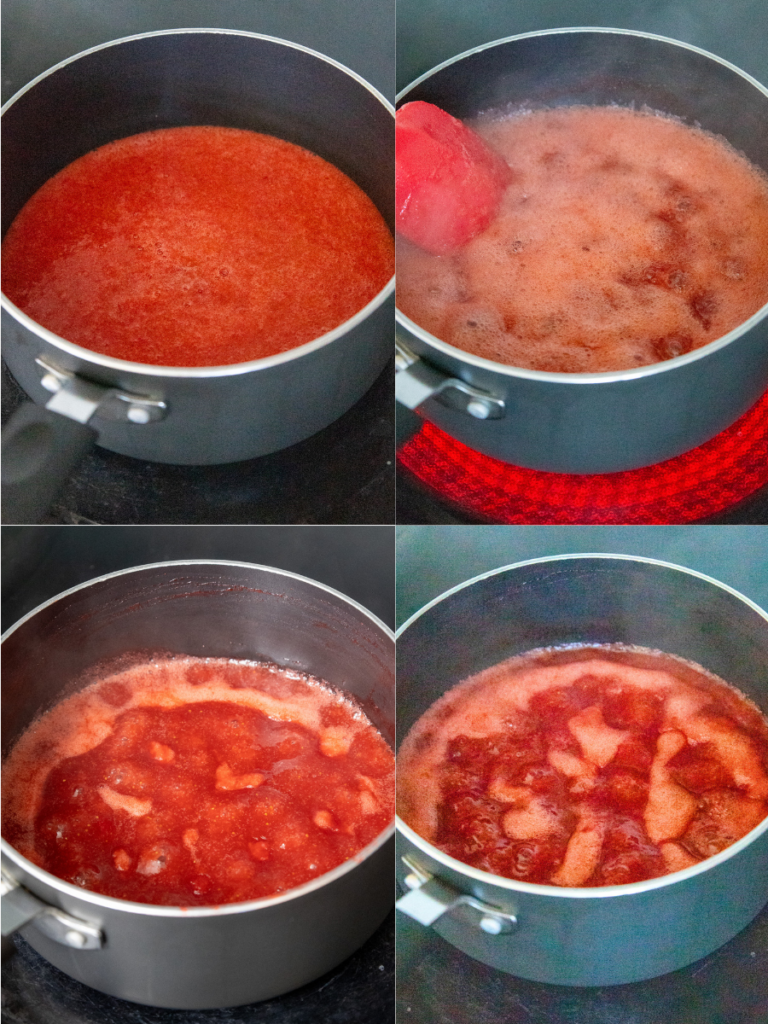
At this point, the mixture should have thickened and become a darker shade of red. Pour the mixture into a separate bowl to help it cool down more quickly.
You should have about 1 1/4 cups of strawberry reduction. Set aside to cool to room temperature, then cover with plastic wrap and store in the fridge until you’re ready to use it.
This can be made up to 3 days in advance and stored in the fridge.
Step 2: Bake the Graham Cracker Crust
Next, we tackle the Graham cracker crust. Preheat the oven to 325°F or 165°C and line an 8×8-inch square baking pan with parchment paper.
Pour the graham cracker crumbs, melted butter, sugar, and fine salt into a small bowl. Mix until the ingredients are fully combined, and the graham cracker crumbs look moist.
Pour the graham cracker mixture into the prepared pan. Press the mixture down using the bottom of a measuring cup or flat-bottomed glass to create a compact, even crust.
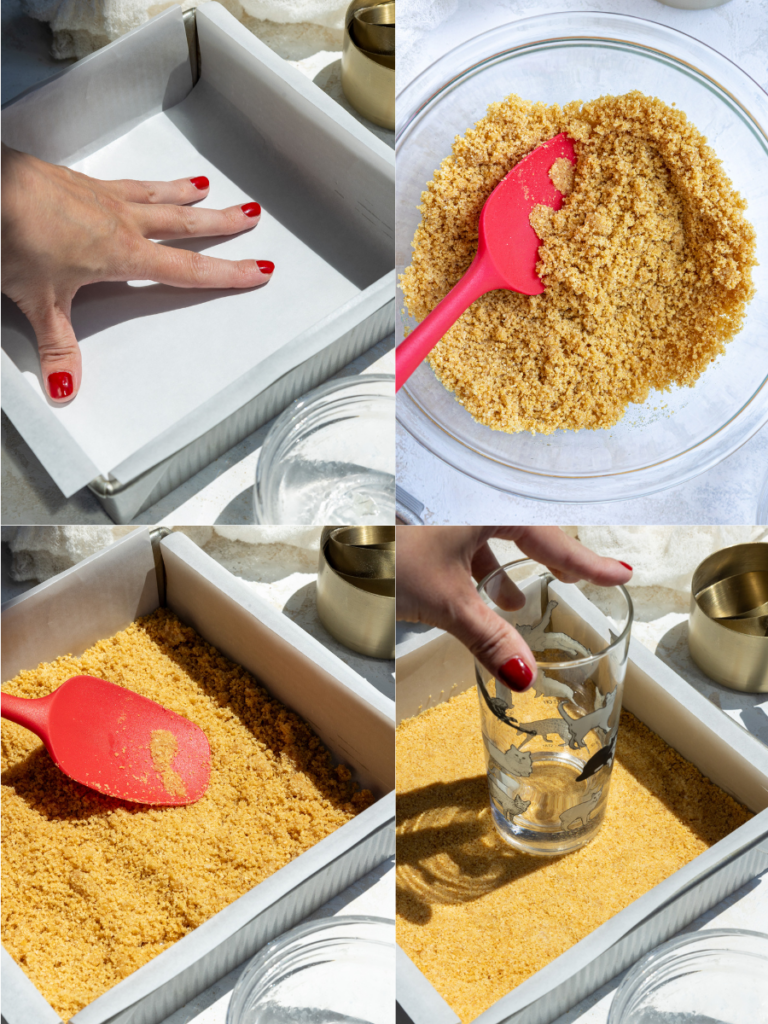
Bake for 8 minutes, then remove from the oven and place the pan on a wire rack to cool. Be sure to keep your oven on!!
Then fill a rimmed baking dish with about 1 inch of water and place it on the bottom rack of the oven (this will act as a pseudo water bath and help the bars bake up more evenly).
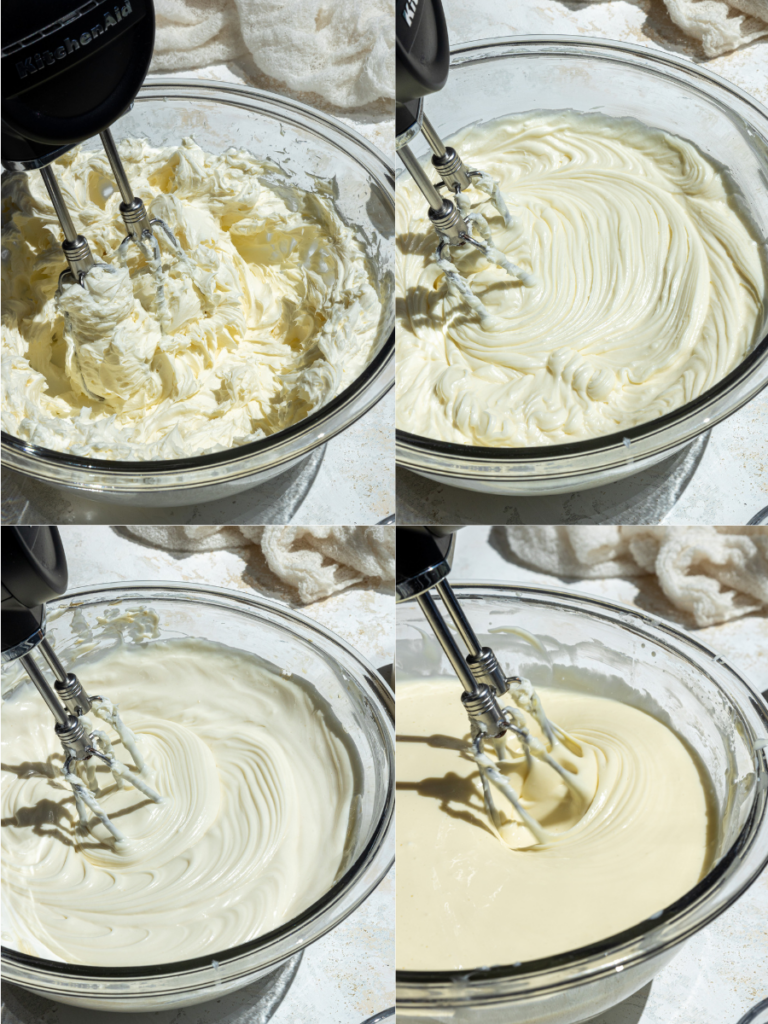
Step 3: Make the Strawberry Cheesecake Batter
While the graham cracker crust bakes and cools, make the strawberry cheesecake filling.
Place the room-temperature cream cheese in a medium-sized bowl. Beat with a hand mixer or stand mixer with a whisk attachment at medium to medium-high speed. Mix until the cream cheese is smooth and creamy, and no lumps remain.
Then mix in the sugar on a medium speed until combined, scraping the sides of the bowl with a rubber spatula as needed. Next, mix in the sour cream, vanilla extract, and lemon zest on a medium speed.
Then mix in the eggs, one at a time. Mix on a low speed until the eggs are fully incorporated. The mixture should be perfectly smooth at this stage.
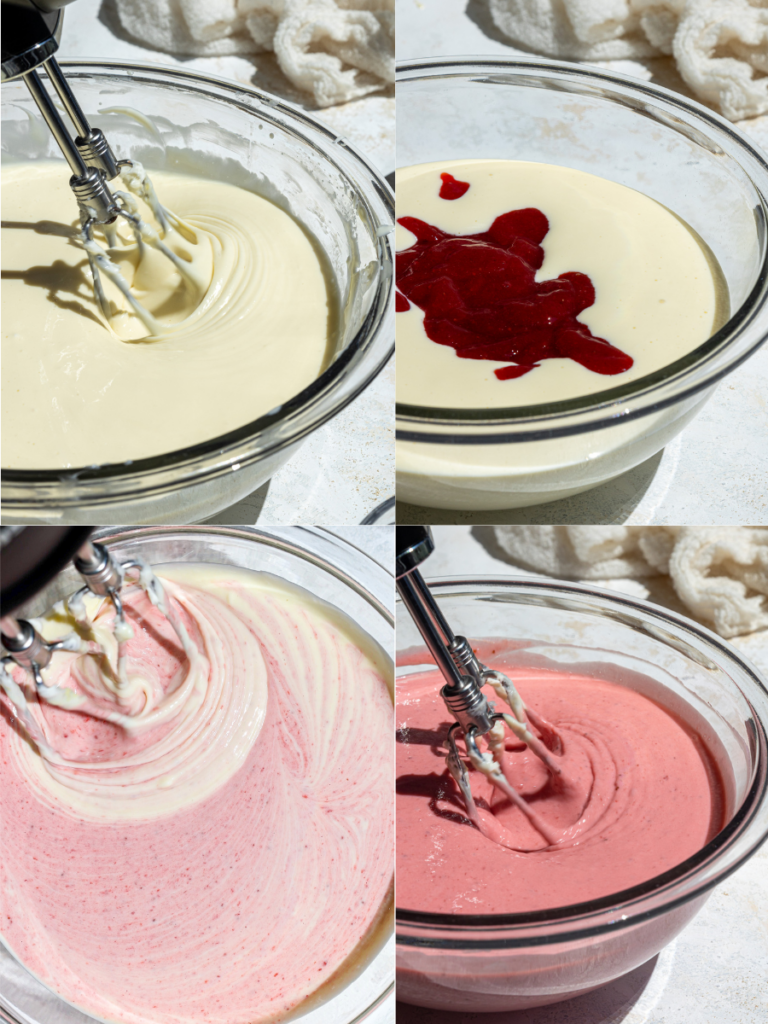
Pour about half of the cheesecake batter into a separate bowl and mix some of the strawberry reduction (made above) into the batter on a low speed until combined.
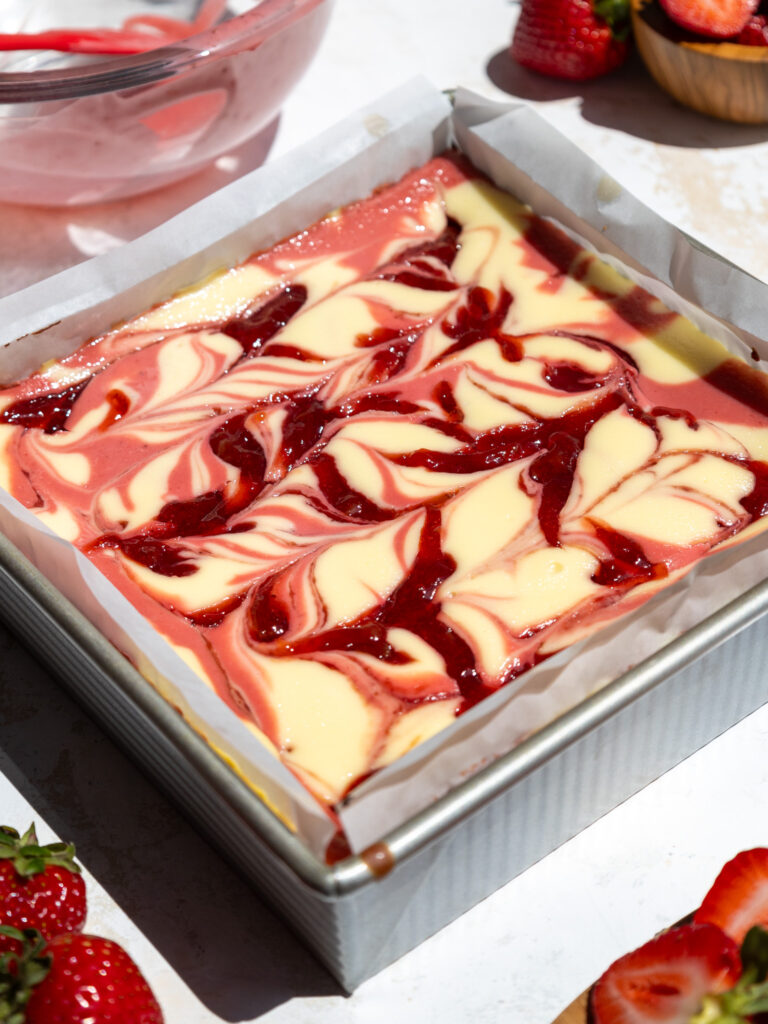
Alternate pouring the regular and strawberry cheesecake batter on top of the cooled graham cracker crust.
Then add spoonfuls of the strawberry reduction on top of the cheesecake batter. Drag a knife or offset spatula through the cheesecake to create strawberry swirls.
If you want the strawberry cheesecake to have a brighter color, you can also mix in a drop of pink or red gel food coloring. I added a tiny bit of red gel food coloring to my batter!
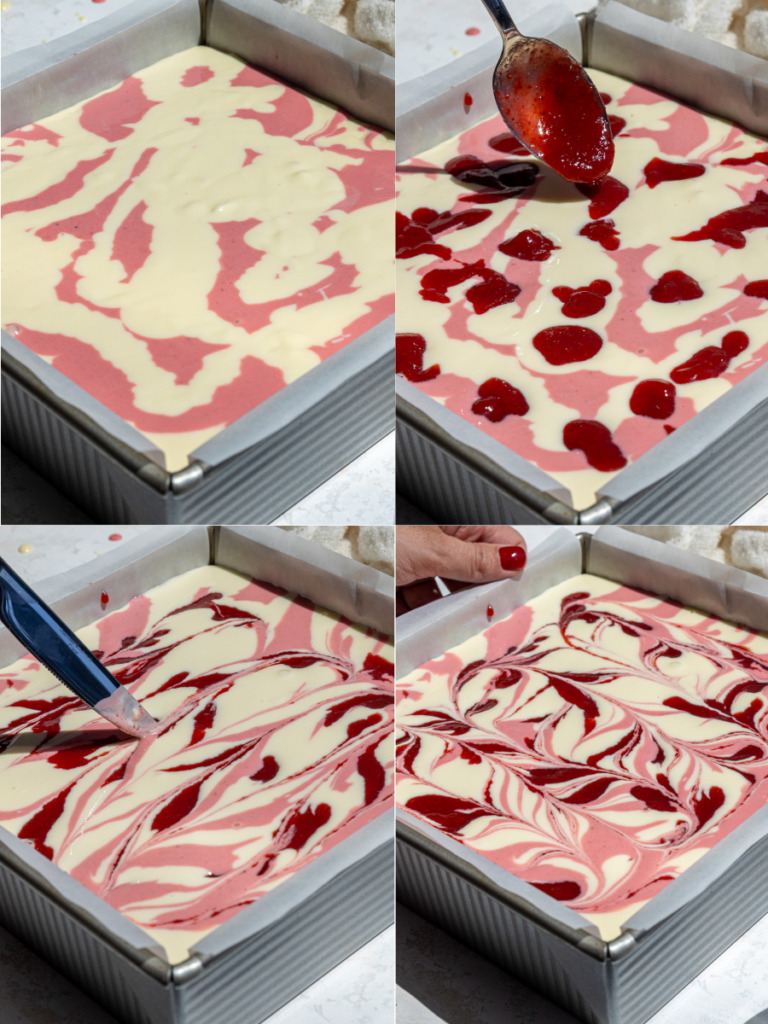
You should have about 1/2 cup of the strawberry reduction left over after topping the cheesecake bars. Save this to spoon on top of the bars once they’re baked and cooled.
Step 4: Bake the Strawberry Cheesecake Bars
Bake the cheesecake bars for 50-60 minutes. Do a wiggle test to check if they’re done (watch the center, and look for a small wiggle), rather than a toothpick!
Let the bars cool completely in the pan on a metal rack. Once they reach room temperature, refrigerate them for an additional 2 hours or overnight.
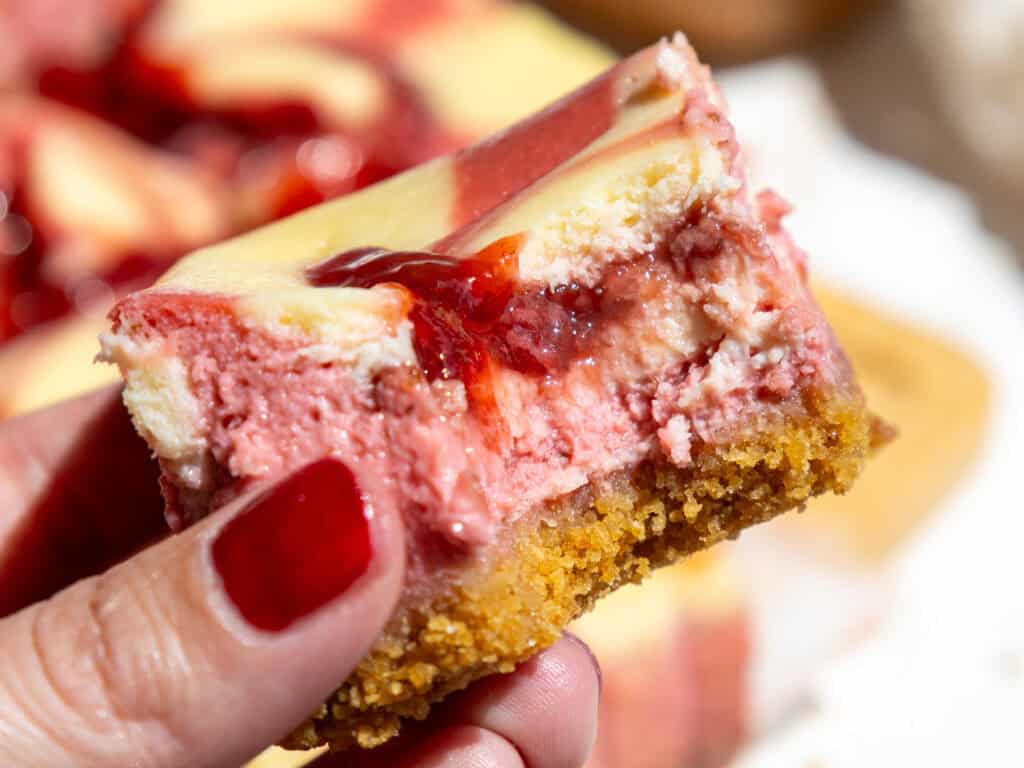
The strawberry swirls will sink a little bit once the cheesecake is baked and cooled, and I like to spoon the leftover strawberry reduction into any cracks or little crevices to give it a beautiful finished look!
Cut the bars with a sharp, warm knife once they’re fully chilled. I recommend cleaning the knife after each cut to get perfect slices.
Leftover bars can be kept in the fridge for up to 5 days in an airtight container.
Substitutions & Swaps in this Strawberry Cheesecake Bar Recipe
I love this recipe just the way it is, but I know some people might not have all these ingredients on hand! Or you might have food restrictions or allergies.
- Graham Cracker Crumbs – I like using graham cracker crumbs to make life easier. If you can’t find these, you can crush sheets of graham crackers in a food processor to get the right consistency.
- Unsalted Butter – If you only have salted butter, omit the 1/4 tsp of salt from the crust mixture.
- Granulated Sugar – I think these cheesecake bars have just the right amount of sweetness, but you can either increase or decrease the amount of sugar by a couple of tablespoons based on your preferences.
- Lemon Zest – A little bit of lemon zest helps brighten the flavor of the strawberries. You can use a lime in place of the lemon, or omit it if you don’t have any lemons on hand.
- Cream Cheese – This recipe turns out best with full-fat cream cheese (the type that comes in a block). I don’t recommend using low-fat cream cheese or the type that comes in a tub.
- Eggs – Sadly, this recipe does not turn out with egg alternatives like applesauce or flaxseed eggs. I highly recommend using regular large eggs.
- Strawberries – You can use frozen or fresh hulled strawberries to make this recipe. I prefer using frozen strawberries because they’re frozen at peak ripeness and are already hulled! You can also use pretty much any berry in this recipe- blackberries, raspberries, or even marionberries would all taste amazing.
Can These Cheesecake Bars Be Made in Advance?
Absolutely! I love making this recipe a day or two before a big event because the bars keep so well. These strawberry cheesecake bars can be kept in the fridge for up to 5 days. Store them in an airtight container to keep them fresh.
You can also freeze these bars for up to two months! Freeze the bars on a sheet pan until they’re firm to the touch, then wrap them in a layer of plastic wrap and foil.
When you want to enjoy the bars, place them in the fridge overnight, then unwrap and enjoy them the following day.
Making this Recipe in Different Sizes
If you want to make this recipe in a 9 x 13-inch pan, double the recipe and bake at 325°F/162°C for 55-65 minutes, or until the edges look set but the center is still a bit soft.
Or if you want to make this recipe in a 9×9-inch pan, go for it! The bars will be slightly shorter but will still taste great. Bake the bars at 325°F/162°C for 45-55 minutes, or until the edges look set but the center is still a bit soft.
How To Make the Best Strawberry Cheesecake Bars
- Make sure the cream cheese is at room temperature. If you forget to set it out ahead of time, cut the blocks into smaller squares and heat them in the microwave in 10-second intervals until they reach room temperature.
- Use your favorite berries! This recipe would also work great with blackberries, raspberries, or even marionberries.
- Beat the cream cheese until it’s smooth and creamy before adding the other ingredients! This helps to prevent any lumps from forming in the cheesecake batter.
- Don’t use a toothpick to check if your bars are done. Instead, gently shake the pan while it’s still in the oven. If only a small circle in the center jiggles a little, it’s ready! The center will set as the bars cool.
- Use a warm, sharp knife to get clean slices. Fill a tall cup with hot water and drip a sharp knife into it. Dry the knife fully, then make a slice. Repeat with each cut, being sure to wipe the blade completely clean after each cut.
Let Me Know What You Think!
If you try this recipe for strawberry cheesecake bars, I’d love to hear what you think of it!
Please leave a rating and let me know your thoughts by sharing a comment below.

Strawberry Cheesecake Bars
Equipment
Ingredients
Strawberry Reduction
- 1 lb. hulled strawberries – fresh or frozen 452g
- 1/2 cup granulated sugar 100g
Graham Cracker Crust
- 1 cup graham cracker crumbs or about 9 sheets 115g
- 1/4 cup unsalted butter, melted 56g
- 3 Tbsp granulated sugar 38g
- 1/4 tsp fine salt 2g
Strawberry Cheesecake Batter
- 3 cups (24 oz) cream cheese, softened 678g
- 1 cup granulated sugar 200g
- 1/2 cup full-fat sour cream, room temperature 125g
- 2 tsp vanilla extract or vanilla bean paste 8g
- 1 tsp fresh lemon zest – optional
- 3 large eggs, room temperature 168g
- 1/3 cup strawberry reduction – made above 85g
- red or pink gel food coloring – optional
Instructions
Strawberry Reduction
- In a food processor or blender, combine 1 lb. of fresh or frozen (and thawed) strawberries and 1/2 cup of sugar. I usually use frozen because they're already hulled! Blend until the mixture becomes a smooth puree.
- Pour the mixture into a medium-sized saucepan. Heat over medium heat and stir occasionally until the mixture bubbles and foams up (this takes me about 8 minutes). Then turn the heat down to medium-low and cook for 30 more minutes, stirring occasionally. Be sure to scrape the sides and bottom of the pan as you stir to prevent it from browning.
- At this point, the mixture should have thickened and become a darker shade of red. Pour the mixture into a separate bowl to help it cool down more quickly. It will continue to thicken as it cools. You should have about 1 1/4 cups of strawberry reduction. Set aside to cool to room temperature, then cover with plastic wrap and store in the fridge until you're ready to use it. This can be made up to 3 days in advance and stored in the fridge.
Graham Cracker Crust
- Preheat the oven to 325°F/165°C and line an 8×8-inch metal pan with parchment paper.
- Pour 1 cup of graham cracker crumbs, 1/4 cup of melted butter, 3 Tbsp of sugar, and 1/4 tsp fine salt into a small bowl. Mix until the ingredients are fully combined and the graham cracker crumbs look moist.
- Pour the graham cracker mixture into the prepared pan. Press the mixture down using the bottom of a measuring cup or flat-bottomed glass to create a compact, even crust.
- Bake for 8 minutes then remove from the oven and place the pan on a wire rack to cool. Be sure to keep your oven on!! Then fill a rimmed baking dish with about 1 inch of water and place it on the bottom rack of the oven (this will act as a pseudo water bath and help the bars bake up more evenly).
Strawberry Cheesecake Bars
- While the graham cracker crust bakes and cools, make the strawberry cheesecake filling.
- Place 3 cups of room-temperature cream cheese in a medium-sized bowl. Beat with a hand mixer or stand mixer with a whisk attachment at medium to medium-high speed. Mix until the cream cheese is smooth and creamy, and no lumps remain.
- Add 1 cup of sugar and mix on medium speed until combined, scraping the sides of the bowl with a rubber spatula as needed. Then add 1/2 cup of sour cream, 2 tsp vanilla extract, and 1 tsp lemon zest (optional) and mix at a medium speed until combined.
- Next, mix in 3 eggs, one at a time. Mix on a low speed until the eggs are fully incorporated. The mixture should be perfectly smooth at this stage.
- Pour about half of the cheesecake batter (550g if you have a scale) into a separate bowl and mix in 1/3 cup of strawberry reduction (made above) on a low speed until combined. If you want the strawberry cheesecake to have a brighter color, you can also mix in a drop of pink or red gel food coloring. I added a tiny bit of red gel food coloring to my batter!
- Alternate pouring the regular and strawberry cheesecake batter on the cooled graham cracker crust. Then add spoonfuls of the strawberry reduction on top of the cheesecake batter like in the photos above. Gently drag a knife or offset spatula through the batter to create strawberry swirls. After this, you should have about 1/2 cup of the strawberry reduction left over after topping the cheesecake bars. Save this to spoon on top of the bars once they're baked and cooled.
- Bake the cheesecake bars for 50-60 minutes. Do a wiggle test to check if they're done (watch the center, and look for a small wiggle), rather than a toothpick!
- Let the bars cool completely in the pan on a metal rack. Once they reach room temperature, refrigerate them for an additional 2 hours or overnight. The strawberry swirls will sink a little bit once the cheesecake is baked and cooled, and I like to spoon the leftover strawberry reduction into any cracks or little crevices to give it a beautiful finished look!
- Cut the bars with a sharp, warm knife once they're fully chilled. Clean the knife after each cut to get perfect slices. Leftover bars can be kept in the fridge for up to 5 days in an airtight container.
Video
Notes
Can These Cheesecake Bars Be Made in Advance?
Absolutely! These strawberry cheesecake bars can be kept in the fridge for up to 5 days. Store them in an airtight container to keep them fresh. You can also freeze these bars for up to two months! Freeze the bars on a sheet pan until they’re firm to the touch, then wrap them in a layer of plastic wrap and foil. When you want to enjoy the bars, place the bars in the fridge overnight, then unwrap and enjoy the following day.Making this Recipe in Different Sizes
If you want to make this recipe in a 9 x 13-inch pan, double the recipe and bake at 325°F/162°C for 55-65 minutes, or until the edges look set but the center is still a bit soft. Or if you want to make this recipe in a 9×9-inch pan, go for it! The bars will be slightly shorter but will still taste great. Bake the bars at 325°F/162°C for 45-55 minutes, or until the edges look set but the center is still a bit soft.How To Make the Best Strawberry Cheesecake Bars
- Make sure the cream cheese is at room temperature and soft to the touch. If you forget to set it out ahead of time, cut the blocks into smaller squares and heat them in the microwave in 10-second intervals until they reach room temperature.
- Use your favorite berries! This recipe would also work great with blackberries, raspberries, or even marionberries.
- Don’t use a toothpick to check if your bars are done. Instead, gently shake the pan while it’s still in the oven. If only a small circle in the center jiggles a little, it’s ready! The center will set as the bars cool.
- Use a warm, sharp knife to get clean slices! Fill a tall cup with hot water and dip a sharp knife into it. Dry the knife fully, then make a slice. Repeat with each cut, being sure to wipe the blade completely clean each time.
Nutrition
Other Posts You Might Like:

Can you make them with another fruit? No berry. Maybe mango? Passion fruit? If so, do I need to make a reduction like you did with the strawberries?
Hi Maria,
I have only tested this recipe with berries, but omg mango or passionfruit sounds amazing!! I would think you should be able to use 1 lb of mango chunks in place of the lb of strawberries (and follow the recipe making the puree reduction) and it should work! I’m not totally sure about the passionfruit though. Hope that helps, happy baking!
Do you put the pan with the cheesecake in the pan with the water or do you put the cheesecake on the top shelf?
Hi Juana,
Great question! I put the pan with the water on the bottom rack, and the cheesecake bars on the middle rack. Hope that helps, happy baking!
I love to bake but this was my first time baking a cheesecake. Your recipe was great because you had the visual part on Tik Tok, and then it was quite easy to find the written recipe. Was delicious and I found to be relatively easy! Thank you for this recipe 🙂
Hi Ellen,
I am so happy to hear that!!! That’s wonderful, I’m so glad they turned out great 🙂
Hi! These turned out delicious, however I found that the strawberry layer turned too liquidy and then the cheesecake was very soft and falling in those areas. Do you think maybe my strawberry reduction wasn’t thick enough?
Hello, I followed the recipe but after taking it out of the oven it kind of sunk and became very dense. It did rise at the beginning but once out it was all gone. Can you please tell me what to do for next time?
Hi Maria,
So sorry to hear that! Did you do the pseudo water bath, where you put 1 inch of water in a pan and place it on the bottom rack of the oven while it preheats? Usually the steam from that helps prevent the cheesecake bars from collapsing. The only other things I can think of is that the ingredients might not have all been at room temperature, or that they may have needed a couple more minutes in the oven (some ovens run slightly cool – have you tested yours with an oven thermometer?). Hopefully we’ll be able to figure it out together!
Can you substitute diet sugar for sugar?
I tried this recipe and absolutely loved it and im planning to make it again this week!! However, i am wanting to put it in a circular pan.. would the bake time and temperature still be the same??
I am so happy to hear that Kaylynn!! And that’s a great question. The volume of a circular 8 inch pan is a bit smaller than a square 8 inch pan so your bake time will be a bit longer. I keep the temperature the same but I would add five to 10 minutes of bake time.
I’d also recommend doing the jiggle test to make sure that the edges are set before you pull the pan out of the oven. Hope that helps and that these bars turn out wonderful again. Happy baking!
Is the recipe missing from this post? I can’t see it.
Thank you
Hi Christine,
So sorry about that, yes!!!! I’m in the process of changing the format of my recipe cards and for some reason on a few posts they just VANISHED!!!!! It is terrible and I’m currently working my way through all 700 of my posts checking to make sure it didn’t happen on any others. Thank you for letting me know!!
Where is the list of ingredients that you need to make them?
@Kayla, I bought the majority of what I think I am going to need already but the list of ingredients is gone. I was making these for a bridal shower on Saturday, when will the list return. My strawberries are already thawed!
UGH I AM SO SORRY KAYLA!!!!!!!!!!!!!! I changed the format of my recipe cards to make them more accessible and easier to use, but in the process of migrating them for all 700+ of my posts, some of them glitched and just didn’t get inserted at all!!! :/ I’ve fixed this post so it should be good to go now, and am currently working my way through checking all my other posts. Again, I am so sorry about this!
Hi, I’m going to try this recipe tomorrow but was wondering if you think it would work if I used raspberry jelly that didn’t set up all the way. There is no pectin in the jelly, just raspberry and sugar.
Hi Sara,
I do think that could work! It might turn out a tiny bit different but I think it should still be delicious. Let me know how it turns out!!
This didn’t work out for me 🙁 I wish the instructions for how to tell when it’s done were more clear, as I kept “jiggling it” and it didn’t seem fully set so I kept baking it longer and longer (30 min extra), only to find the centre still raw after cooling and refrigerating. Really disappointed as I spent all day making this! I watched the Tiktok and read the instructions countless times, and everything was great up until the baking part.
Hi Jay,
I’m so sorry to hear that happened, I know how frustrating it is to spend all that time baking and not have it turn out. That’s definitely unusual though, especially with such a long bake time added on. Have you ever tested your oven with an oven thermometer to make sure it’s running at the right temperature? Sometimes ovens can be off by quite a bit without us realizing. Also, did you happen to make any adjustments to the recipe? Was everything at room temperature? Any extra info will help me troubleshoot with you, because the center still being raw after all that extra time is so wild! Hopefully we’ll be able to figure out what happened together!
Incredible I even switch the strawberries for chocolate or caramel to get a diffrent flavour cheesecake
So happy to hear you loved this recipe!!! And yes, it’d be delicious with different flavors too 🙂 Thanks for sharing!
I just made these this weekend and I was absolutely thrilled how they came out! I have never made cheesecake before and consider myself a novice baker at best, but the recipe was super easy to follow. I also referenced the accompanying TikTok for visual aid. Next time I will definitely add the food coloring to enhance the color but they still looked pretty cute. The bars are super rich so I ended up cutting each bar into fourths, making more of a cheesecake bite and that is truly the perfect amount. Will absolutely make again 🙂
Hi Bridget,
Thank you so much for sharing this!! I’m so happy to hear they turned out so well, especially since this was your first time making cheesecake! I’m also glad the TikTok was helpful too. And yes, cutting them into smaller cheesecake bites is such a smart move because they really are rich! 🙂 Can’t wait for you make them again!!